Agenda Objectives Handouts/Notes - 6 · Objectives Navigate to the tabs ... Student...
22
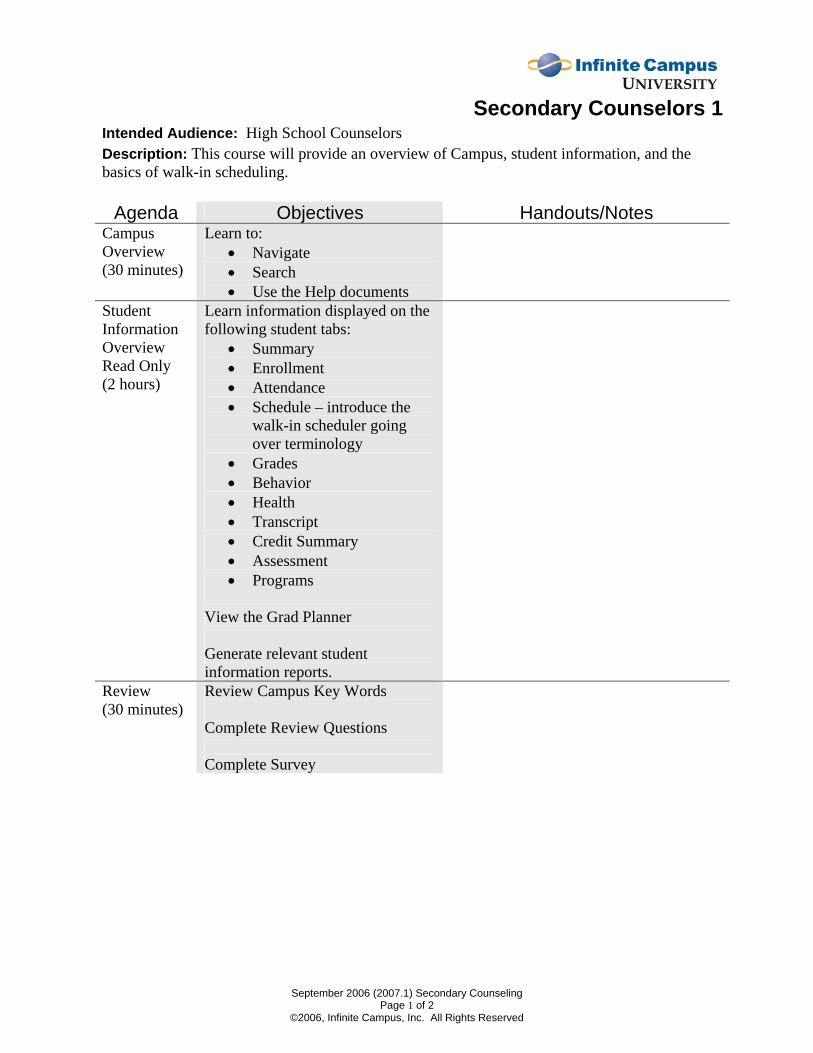
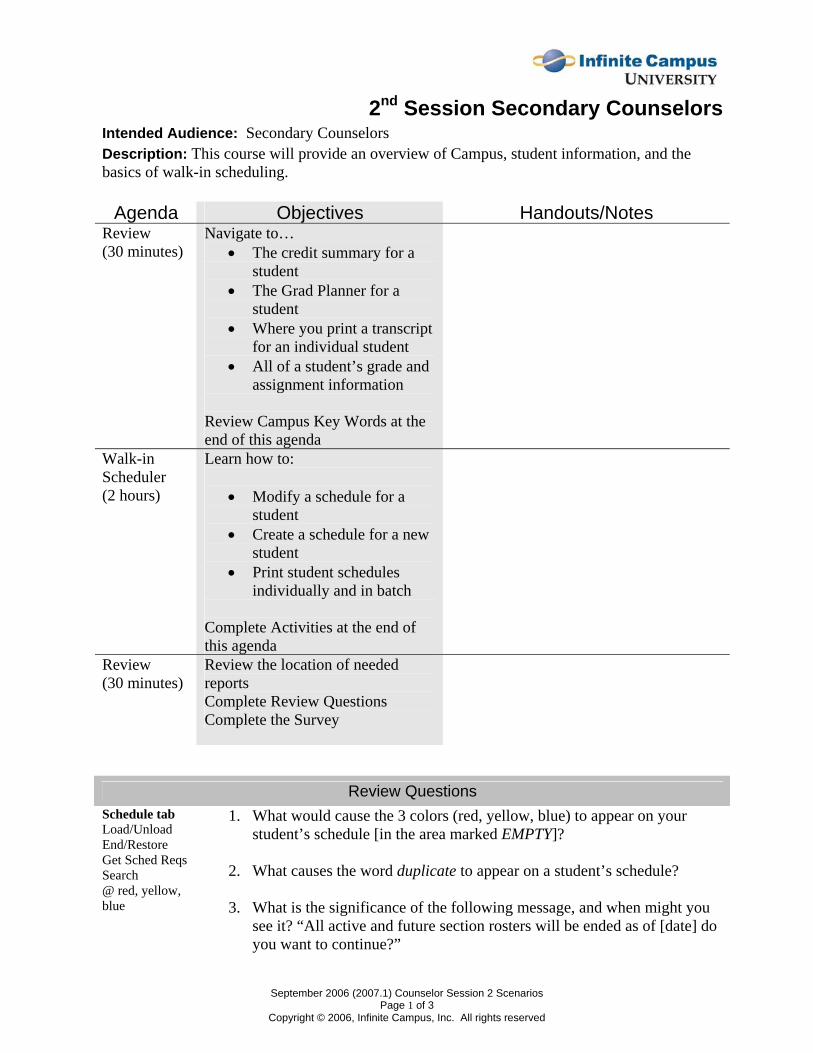
September 2006 (2007.1) Secondary Counseling Page 1 of 2 ©2006, Infinite Campus, Inc. All Rights Reserved Secondary Counselors 1 Intended Audience: High School Counselors Description: This course will provide an overview of Campus, student information, and the basics of walk-in scheduling. Agenda Objectives Handouts/Notes Campus Overview (30 minutes) Learn to: • Navigate • Search • Use the Help documents Student Information Overview Read Only (2 hours) Learn information displayed on the following student tabs: • Summary • Enrollment • Attendance • Schedule – introduce the walk-in scheduler going over terminology • Grades • Behavior • Health • Transcript • Credit Summary • Assessment • Programs View the Grad Planner Generate relevant student information reports. Review (30 minutes) Review Campus Key Words Complete Review Questions Complete Survey
Transcript of Agenda Objectives Handouts/Notes - 6 · Objectives Navigate to the tabs ... Student...
September 2006 (2007.1) Secondary Counseling Page 1 of 2
©2006, Infinite Campus, Inc. All Rights Reserved
Secondary Counselors 1Intended Audience: High School Counselors Description: This course will provide an overview of Campus, student information, and the basics of walk-in scheduling.
Agenda Objectives Handouts/Notes Campus Overview (30 minutes)
Learn to: • Navigate • Search • Use the Help documents
Student Information Overview Read Only (2 hours)
Learn information displayed on the following student tabs:
• Summary • Enrollment • Attendance • Schedule – introduce the
walk-in scheduler going over terminology
• Grades • Behavior • Health • Transcript • Credit Summary • Assessment • Programs
View the Grad Planner Generate relevant student information reports.
Review (30 minutes)
Review Campus Key Words Complete Review Questions Complete Survey
September 2006 (2007.1) Secondary Counseling Page 2 of 2
©2006, Infinite Campus, Inc. All Rights Reserved
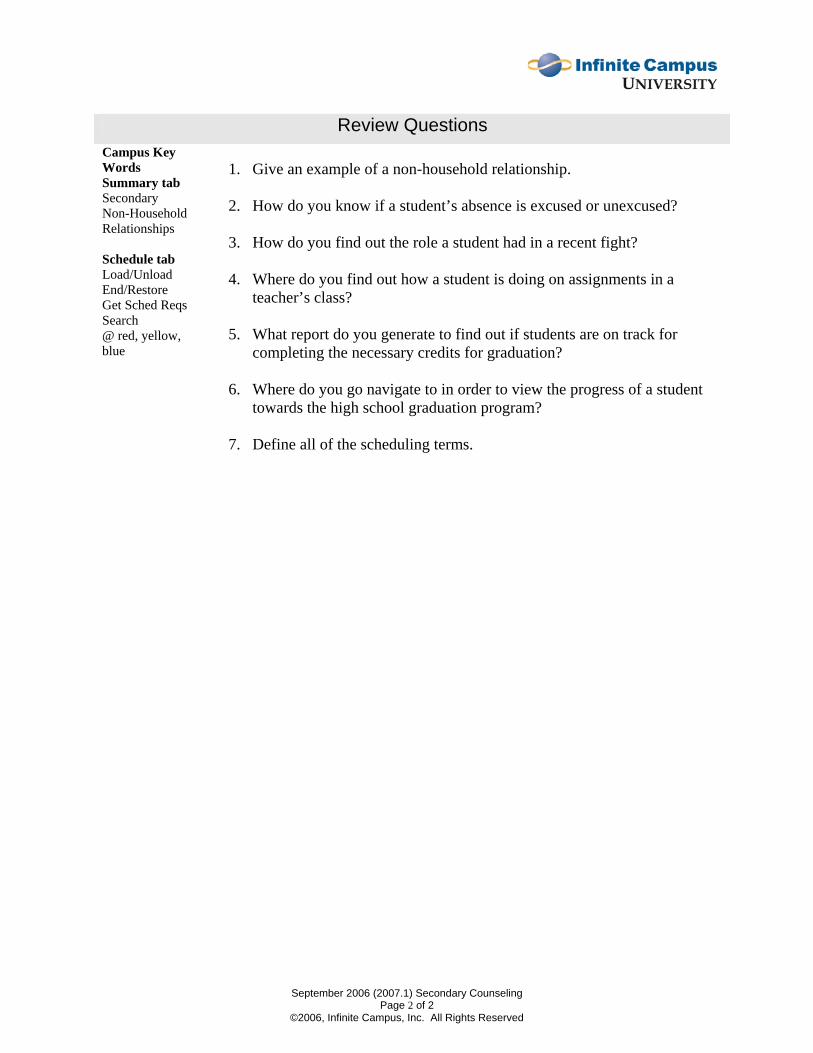
Review Questions
Campus Key Words Summary tab Secondary Non-Household Relationships Schedule tab Load/Unload End/Restore Get Sched Reqs Search @ red, yellow, blue
1. Give an example of a non-household relationship. 2. How do you know if a student’s absence is excused or unexcused? 3. How do you find out the role a student had in a recent fight?
4. Where do you find out how a student is doing on assignments in a
teacher’s class?
5. What report do you generate to find out if students are on track for completing the necessary credits for graduation?
6. Where do you go navigate to in order to view the progress of a student
towards the high school graduation program?
7. Define all of the scheduling terms.
Student Information>General
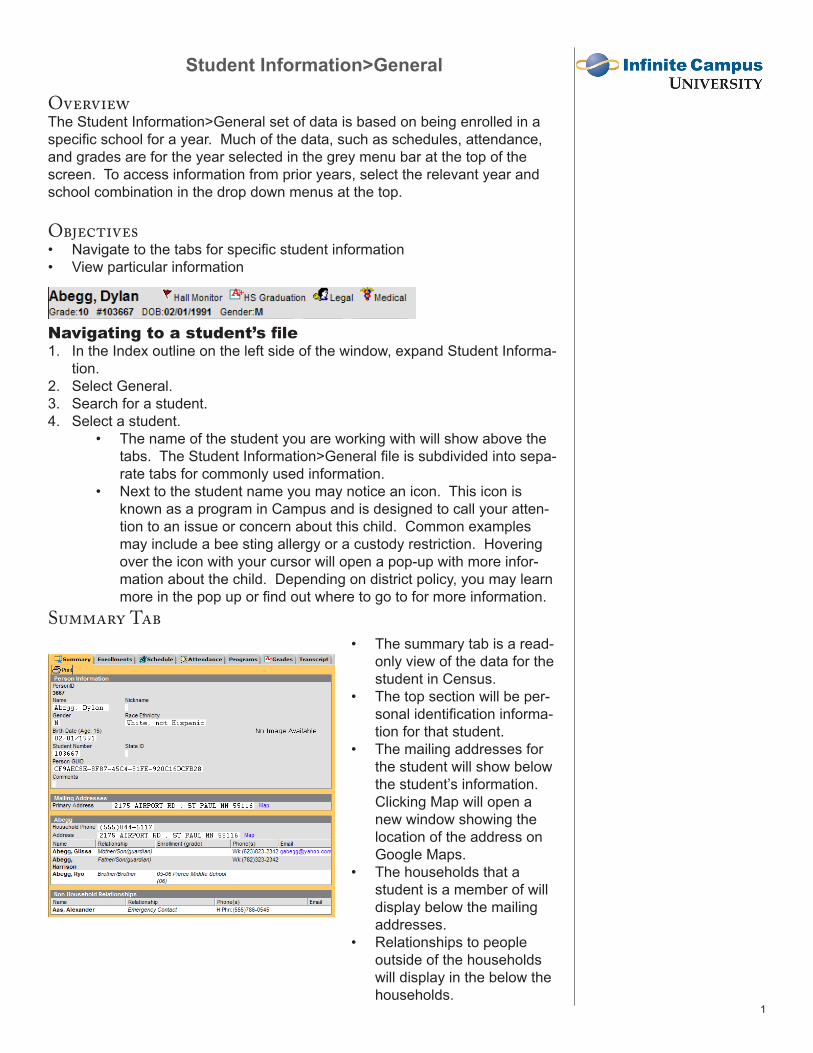
OverviewThe Student Information>General set of data is based on being enrolled in a specific school for a year. Much of the data, such as schedules, attendance, and grades are for the year selected in the grey menu bar at the top of the screen. To access information from prior years, select the relevant year and school combination in the drop down menus at the top.
ObjectivesNavigate to the tabs for specific student informationView particular information
••
�
Navigating to a student’s fileIn the Index outline on the left side of the window, expand Student Informa-tion.Select General.Search for a student.Select a student.
The name of the student you are working with will show above the tabs. The Student Information>General file is subdivided into sepa-rate tabs for commonly used information.Next to the student name you may notice an icon. This icon is known as a program in Campus and is designed to call your atten-tion to an issue or concern about this child. Common examples may include a bee sting allergy or a custody restriction. Hovering over the icon with your cursor will open a pop-up with more infor-mation about the child. Depending on district policy, you may learn more in the pop up or find out where to go to for more information.
Summary Tab
1.
2.3.4.
•
•
The summary tab is a read-only view of the data for the student in Census. The top section will be per-sonal identification informa-tion for that student. The mailing addresses for the student will show below the student’s information. Clicking Map will open a new window showing the location of the address on Google Maps.The households that a student is a member of will display below the mailing addresses.Relationships to people outside of the households will display in the below the households.
•
•
•
•
•
Student Information>General
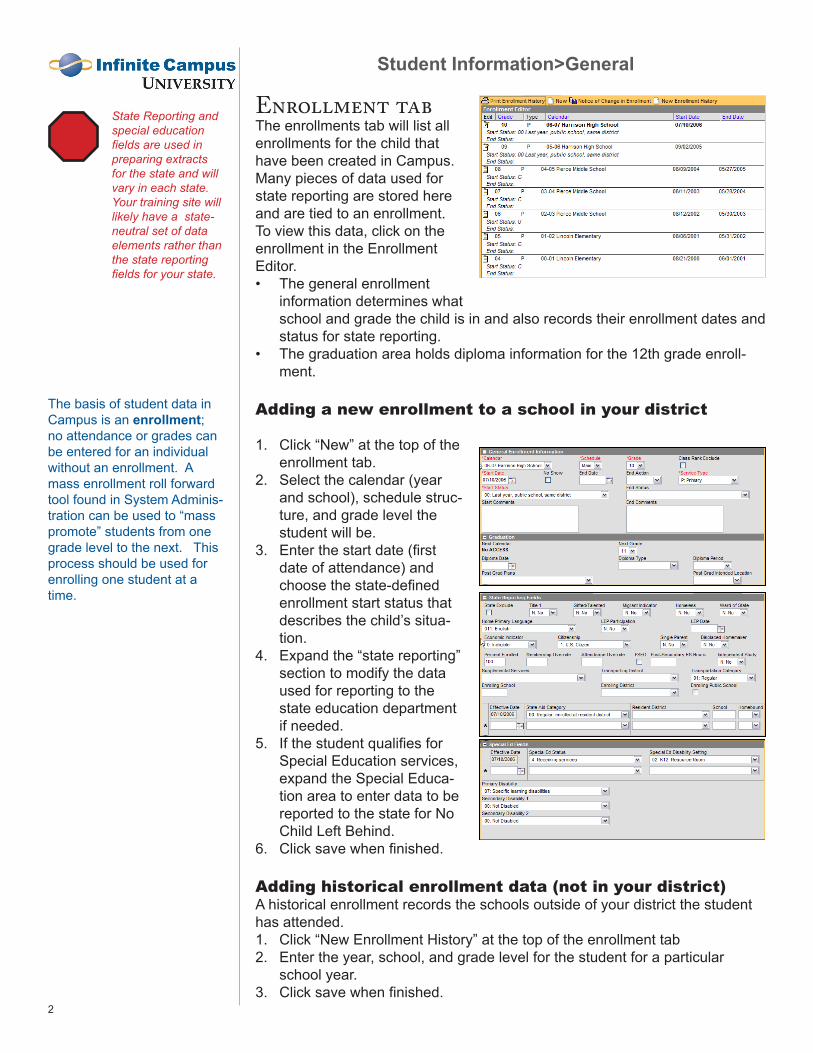
Enrollment tabThe enrollments tab will list all enrollments for the child that have been created in Campus. Many pieces of data used for state reporting are stored here and are tied to an enrollment. To view this data, click on the enrollment in the Enrollment Editor.
The general enrollment information determines what school and grade the child is in and also records their enrollment dates and status for state reporting.The graduation area holds diploma information for the �2th grade enroll-ment.
Adding a new enrollment to a school in your district
Click “New” at the top of the enrollment tab.Select the calendar (year and school), schedule struc-ture, and grade level the student will be.Enter the start date (first date of attendance) and choose the state-defined enrollment start status that describes the child’s situa-tion.Expand the “state reporting” section to modify the data used for reporting to the state education department if needed. If the student qualifies for Special Education services, expand the Special Educa-tion area to enter data to be reported to the state for No Child Left Behind.Click save when finished.
Adding historical enrollment data (not in your district)A historical enrollment records the schools outside of your district the student has attended.
Click “New Enrollment History” at the top of the enrollment tabEnter the year, school, and grade level for the student for a particular school year.Click save when finished.
•
•
1.
2.
3.
4.
5.
6.
1.2.
3.2
State Reporting and special education fields are used in preparing extracts for the state and will vary in each state. Your training site will likely have a state-neutral set of data elements rather than the state reporting fields for your state.
The basis of student data in Campus is an enrollment; no attendance or grades can be entered for an individual without an enrollment. A mass enrollment roll forward tool found in System Adminis-tration can be used to “mass promote” students from one grade level to the next. This process should be used for enrolling one student at a time.
Student Information>General
�
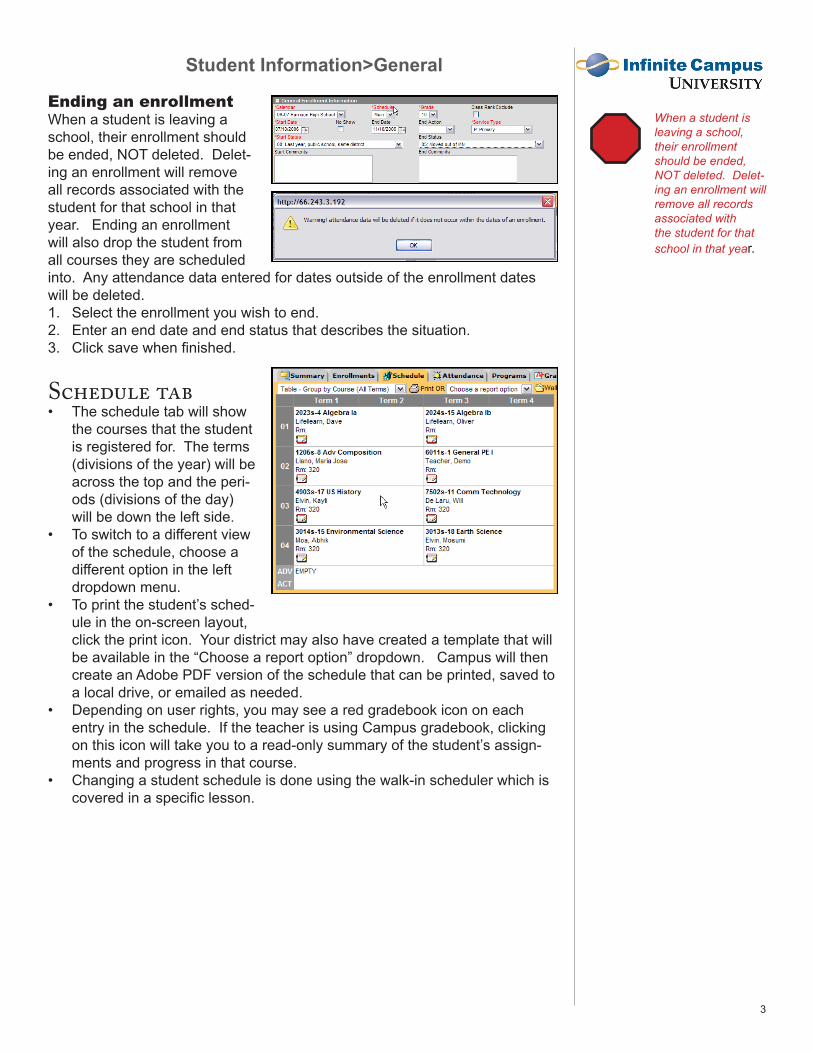
Ending an enrollmentWhen a student is leaving a school, their enrollment should be ended, NOT deleted. Delet-ing an enrollment will remove all records associated with the student for that school in that year. Ending an enrollment will also drop the student from all courses they are scheduled into. Any attendance data entered for dates outside of the enrollment dates will be deleted.
Select the enrollment you wish to end.Enter an end date and end status that describes the situation.Click save when finished.
Schedule tabThe schedule tab will show the courses that the student is registered for. The terms (divisions of the year) will be across the top and the peri-ods (divisions of the day) will be down the left side. To switch to a different view of the schedule, choose a different option in the left dropdown menu.To print the student’s sched-ule in the on-screen layout, click the print icon. Your district may also have created a template that will be available in the “Choose a report option” dropdown. Campus will then create an Adobe PDF version of the schedule that can be printed, saved to a local drive, or emailed as needed.Depending on user rights, you may see a red gradebook icon on each entry in the schedule. If the teacher is using Campus gradebook, clicking on this icon will take you to a read-only summary of the student’s assign-ments and progress in that course.Changing a student schedule is done using the walk-in scheduler which is covered in a specific lesson.
1.2.3.
•
•
•
•
•
When a student is leaving a school, their enrollment should be ended, NOT deleted. Delet-ing an enrollment will remove all records associated with the student for that school in that year.
Student Information>General
�
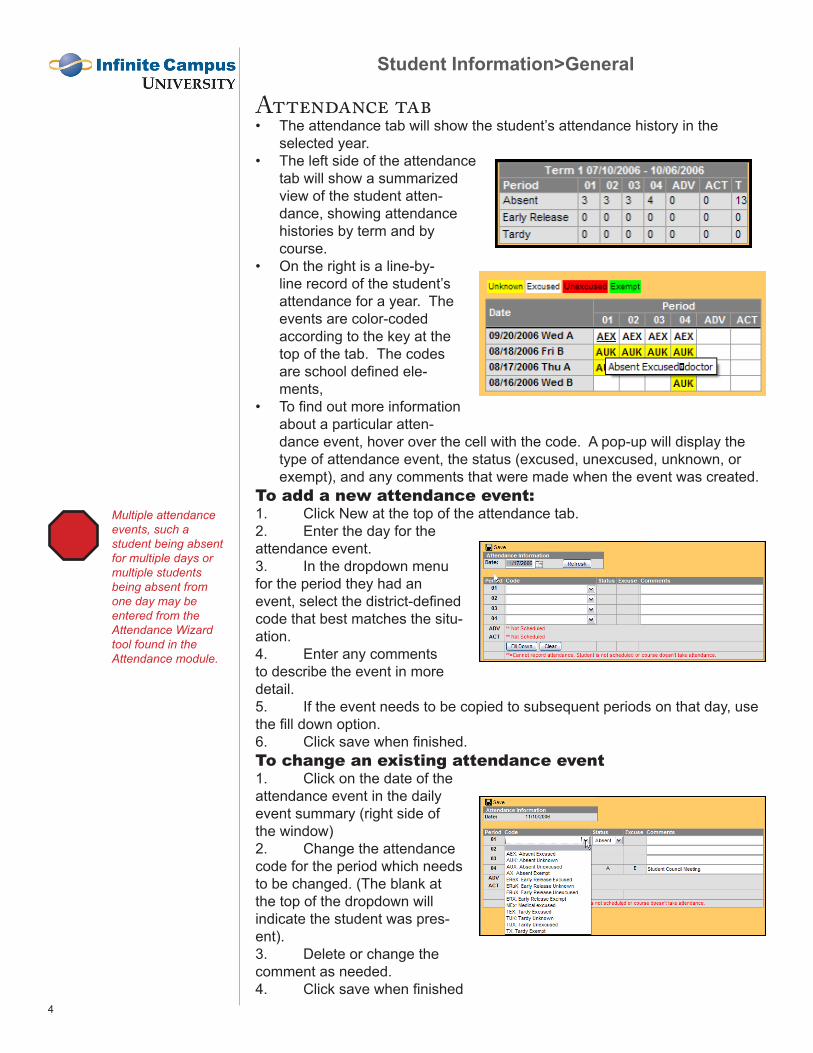
Attendance tabThe attendance tab will show the student’s attendance history in the selected year.The left side of the attendance tab will show a summarized view of the student atten-dance, showing attendance histories by term and by course.On the right is a line-by-line record of the student’s attendance for a year. The events are color-coded according to the key at the top of the tab. The codes are school defined ele-ments,To find out more information about a particular atten-dance event, hover over the cell with the code. A pop-up will display the type of attendance event, the status (excused, unexcused, unknown, or exempt), and any comments that were made when the event was created.
To add a new attendance event:1. Click New at the top of the attendance tab.2. Enter the day for the attendance event.3. In the dropdown menu for the period they had an event, select the district-defined code that best matches the situ-ation.4. Enter any comments to describe the event in more detail.5. If the event needs to be copied to subsequent periods on that day, use the fill down option.6. Click save when finished.To change an existing attendance event1. Click on the date of the attendance event in the daily event summary (right side of the window)2. Change the attendance code for the period which needs to be changed. (The blank at the top of the dropdown will indicate the student was pres-ent).3. Delete or change the comment as needed.4. Click save when finished
•
•
•
•
Multiple attendance events, such a student being absent for multiple days or multiple students being absent from one day may be entered from the Attendance Wizard tool found in the Attendance module.

Student Information>General
�
Programs TabThe programs tab is where more information can be found out about the “warn-ing flag” that is seen next to the student’s name above the tabs. Many users will not have access to this tab, but you may have access depending on district policy and procedure.To find out more information about a particular warn-ing program, select the program in the editor list. The details will open on screen and provide more information about the concern.
To create a new program/flag:Click new at the top of the programs tab.Choose the type of program in the dropdown menu.Enter the start date for the programEnter the text you wish all users of campus to see in the user warning field.Enter any additional information that should be accessible only on this tab in the comments area.Click save when finished.
Grades TabThe Grades tab will display all grades that have been submitted for a student for the year. This will include report card grades and/or standards and may also include mid-term progress marks and weekly eligibility grades.The report card format drop-down allows the user to select a defined template and generate a report card for one student if needed.Down the left side will be the courses a student is in and the grading tasks the teacher was expected to turn in. Across the top will be the terms. A white cell in the table indicates that this particular grade was expected to be submitted at that point in time. To view a student’s overall progress in a course, click the red gradebook icon below the course name. If the teacher is using the Campus grade-book, the student’s individual scores on assignments in that class can be seen.At the bottom of the grades tab will be the students term GPA for that term. Below the Term GPA is the Rolling Cumulative GPA, which is a rough esti-mate of the child’s Cumulative GPA. The Rolling Cumulative GPA is calcu-lated by taking the GPA from the end of the previous year and averaging it with the Term GPA the student has earned. Again, this is a rough estimate only.
•
•
1.2.3.4.5.
6.
•
•
•
•
••
Changing grades for a student in a particular course is done on the section in the scheduling area of Campus.
Student Information>General
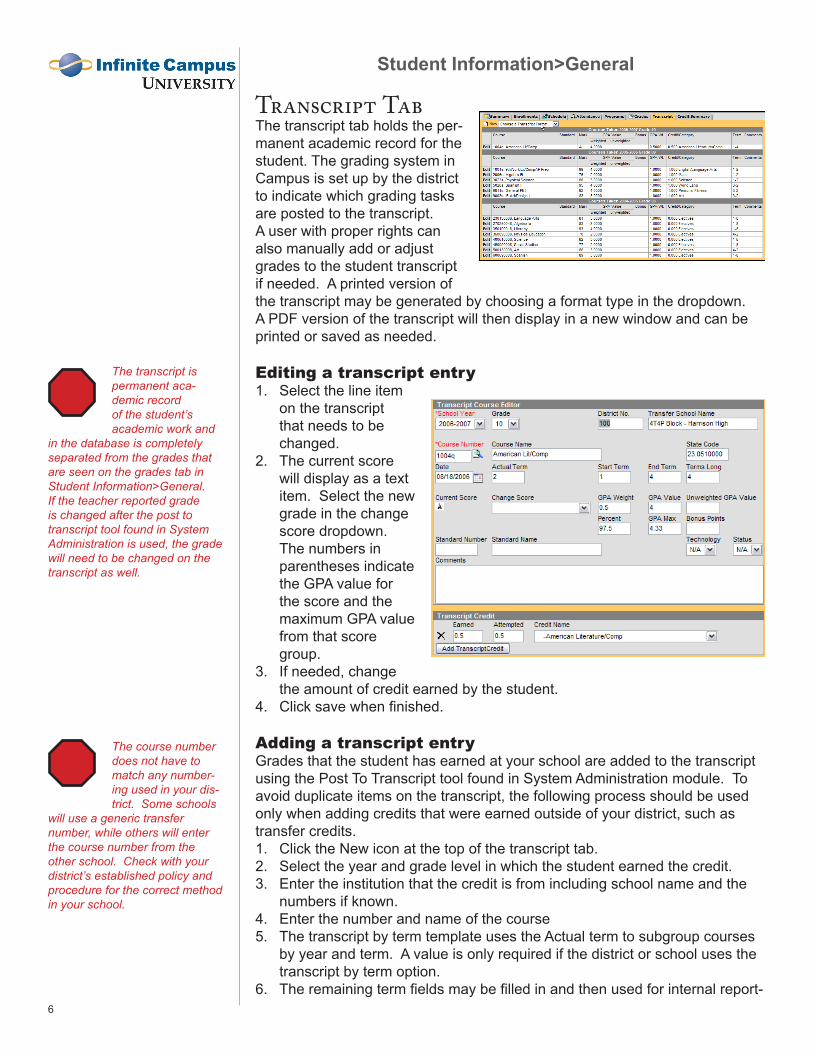
Transcript TabThe transcript tab holds the per-manent academic record for the student. The grading system in Campus is set up by the district to indicate which grading tasks are posted to the transcript. A user with proper rights can also manually add or adjust grades to the student transcript if needed. A printed version of the transcript may be generated by choosing a format type in the dropdown. A PDF version of the transcript will then display in a new window and can be printed or saved as needed.
Editing a transcript entrySelect the line item on the transcript that needs to be changed.The current score will display as a text item. Select the new grade in the change score dropdown. The numbers in parentheses indicate the GPA value for the score and the maximum GPA value from that score group.If needed, change the amount of credit earned by the student.Click save when finished.
Adding a transcript entryGrades that the student has earned at your school are added to the transcript using the Post To Transcript tool found in System Administration module. To avoid duplicate items on the transcript, the following process should be used only when adding credits that were earned outside of your district, such as transfer credits.
Click the New icon at the top of the transcript tab. Select the year and grade level in which the student earned the credit.Enter the institution that the credit is from including school name and the numbers if known.Enter the number and name of the courseThe transcript by term template uses the Actual term to subgroup courses by year and term. A value is only required if the district or school uses the transcript by term option.The remaining term fields may be filled in and then used for internal report-
1.
2.
3.
4.
1.2.3.
4.5.
6.�
The course number does not have to match any number-ing used in your dis-trict. Some schools
will use a generic transfer number, while others will enter the course number from the other school. Check with your district’s established policy and procedure for the correct method in your school.
The transcript is permanent aca-demic record of the student’s academic work and
in the database is completely separated from the grades that are seen on the grades tab in Student Information>General. If the teacher reported grade is changed after the post to transcript tool found in System Administration is used, the grade will need to be changed on the transcript as well.
Student Information>Generaling if desired.Select the score the student earned in the course in the dropdown. All scores used in the district will display. The numbers in parentheses will indicate the GPA value for that score and the maximum on that score group.Enter a GPA weight. This is a multiplier used to determine how the score the student earned is calculated into the cumulative GPA. If required, enter a standard number and name.In the transcript credit area, enter the amount of credit the student earned in the course, an amount attempted, and choose a credit type in the credit name. If multiple types of credit will be awarded (example: a physics class in some schools offers 2 credits—1 math and 1 science), click Add Tran-script Credit to add the second credit amount and type.When finished, click save. If there are multiple items that need to be added, Save & Add Another will save the year, grade and school informa-tion for the next item.
Credit SummaryThe Credit Summary tab will show the total amount of credits that are listed on the student’s transcripts based upon the credit groups or categories that are defined in the school. Clicking the student total for a credit group will show the courses that a student has taken in that area, while clicking on the credit group name will show where credit could be earned in the selected school and calendar.
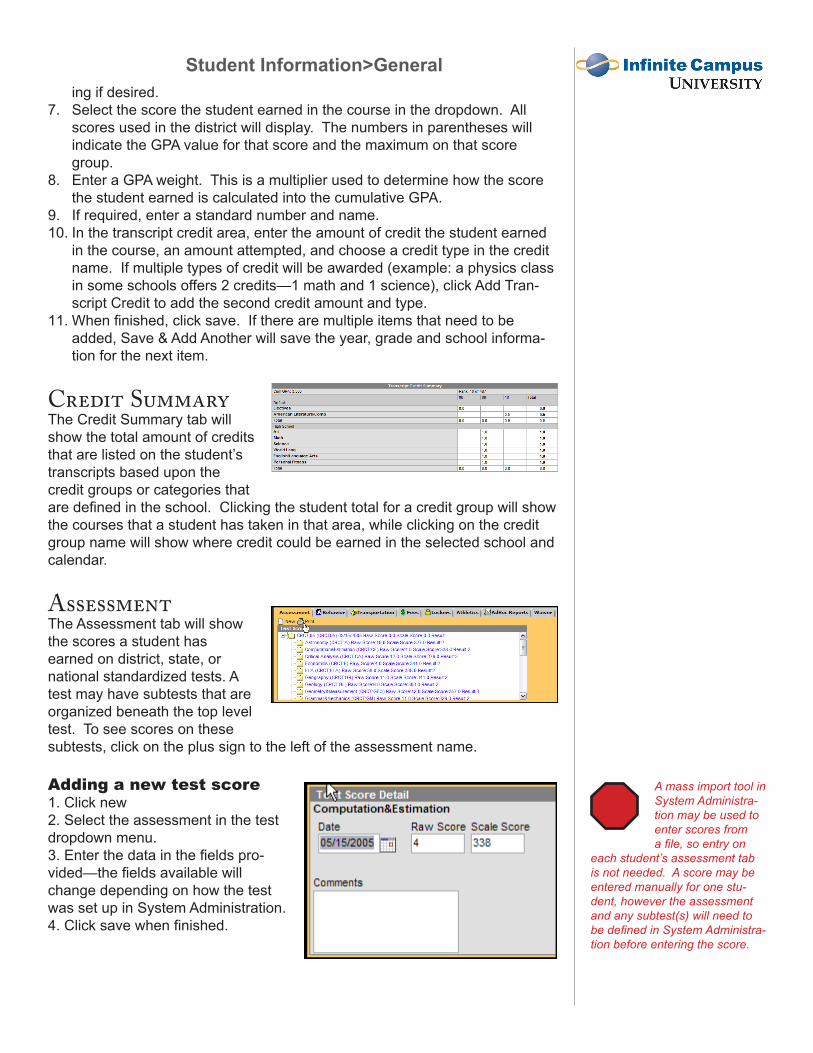
AssessmentThe Assessment tab will show the scores a student has earned on district, state, or national standardized tests. A test may have subtests that are organized beneath the top level test. To see scores on these subtests, click on the plus sign to the left of the assessment name.
Adding a new test score1. Click new2. Select the assessment in the test dropdown menu.3. Enter the data in the fields pro-vided—the fields available will change depending on how the test was set up in System Administration.4. Click save when finished.
7.
8.
9.10.
11.
A mass import tool in System Administra-tion may be used to enter scores from a file, so entry on
each student’s assessment tab is not needed. A score may be entered manually for one stu-dent, however the assessment and any subtest(s) will need to be defined in System Administra-tion before entering the score.
Student Information>General
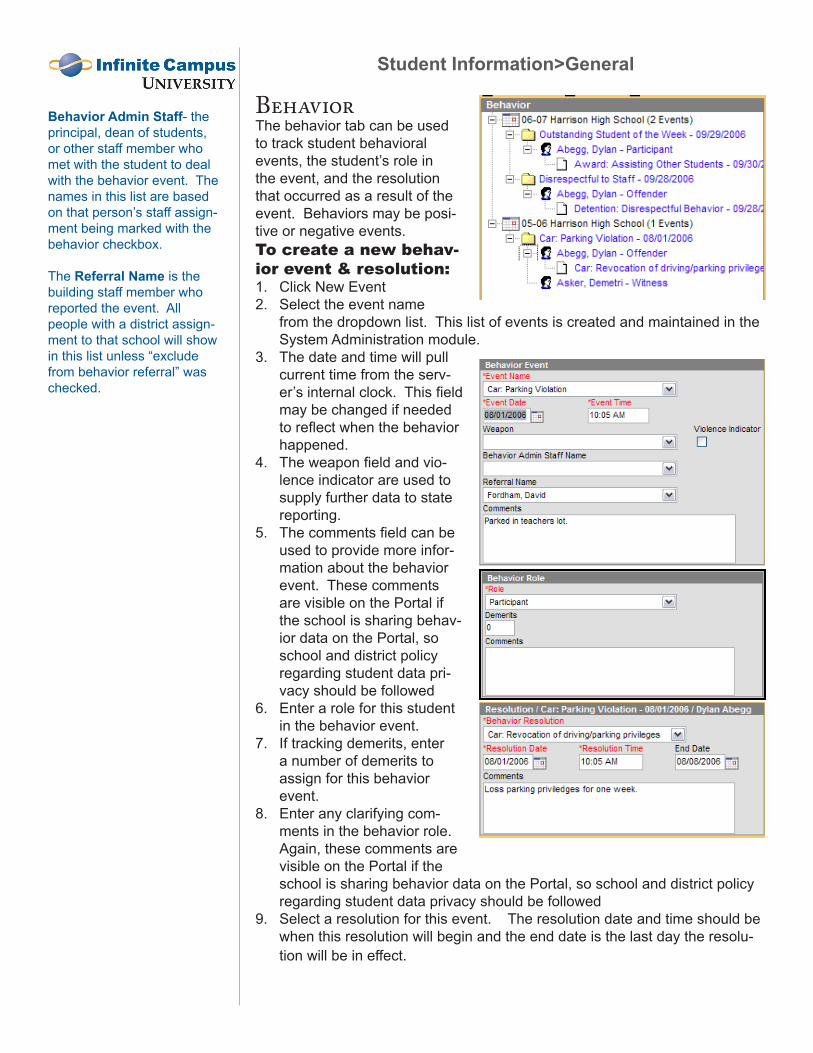
BehaviorThe behavior tab can be used to track student behavioral events, the student’s role in the event, and the resolution that occurred as a result of the event. Behaviors may be posi-tive or negative events. To create a new behav-ior event & resolution:
Click New EventSelect the event name from the dropdown list. This list of events is created and maintained in the System Administration module.The date and time will pull current time from the serv-er’s internal clock. This field may be changed if needed to reflect when the behavior happened.The weapon field and vio-lence indicator are used to supply further data to state reporting. The comments field can be used to provide more infor-mation about the behavior event. These comments are visible on the Portal if the school is sharing behav-ior data on the Portal, so school and district policy regarding student data pri-vacy should be followedEnter a role for this student in the behavior event. If tracking demerits, enter a number of demerits to assign for this behavior event.Enter any clarifying com-ments in the behavior role. Again, these comments are visible on the Portal if the school is sharing behavior data on the Portal, so school and district policy regarding student data privacy should be followedSelect a resolution for this event. The resolution date and time should be when this resolution will begin and the end date is the last day the resolu-tion will be in effect.
1.2.
3.
4.
5.
6.
7.
8.
9.
Behavior Admin Staff- the principal, dean of students, or other staff member who met with the student to deal with the behavior event. The names in this list are based on that person’s staff assign-ment being marked with the behavior checkbox.
The Referral Name is the building staff member who reported the event. All people with a district assign-ment to that school will show in this list unless “exclude from behavior referral” was checked.
Student Information>General
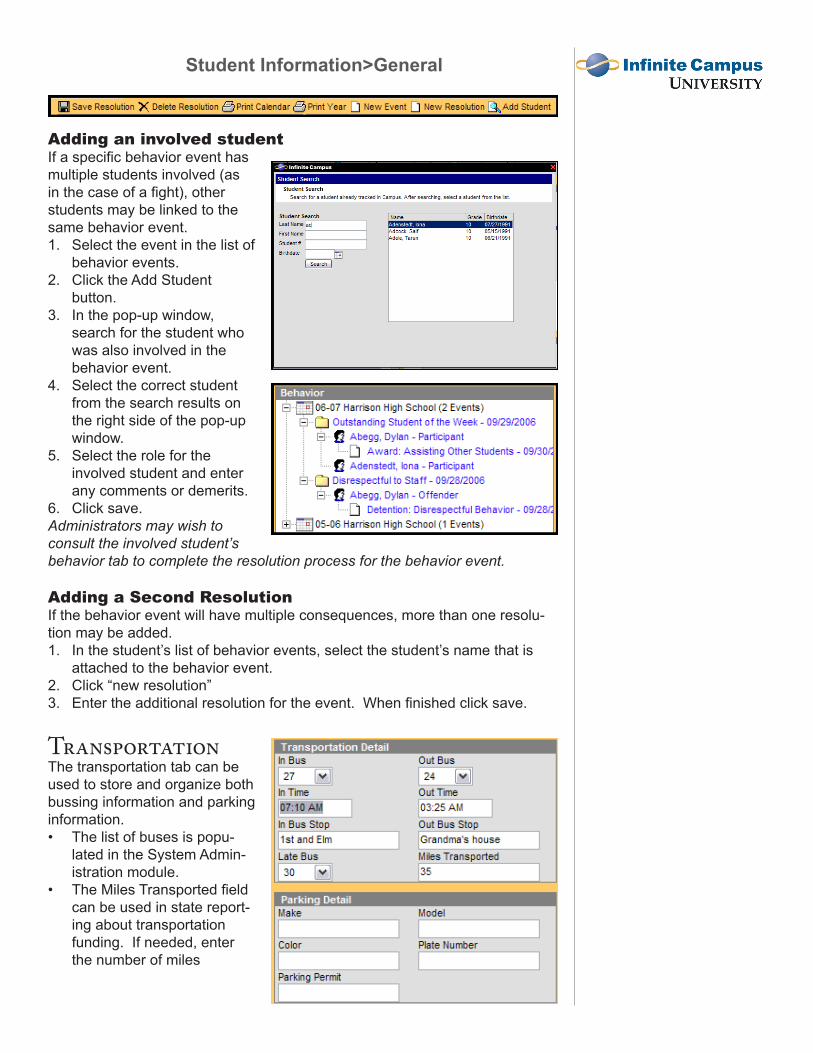
Adding an involved studentIf a specific behavior event has multiple students involved (as in the case of a fight), other students may be linked to the same behavior event.
Select the event in the list of behavior events.Click the Add Student button.In the pop-up window, search for the student who was also involved in the behavior event. Select the correct student from the search results on the right side of the pop-up window.Select the role for the involved student and enter any comments or demerits.Click save.
Administrators may wish to consult the involved student’s behavior tab to complete the resolution process for the behavior event.
Adding a Second ResolutionIf the behavior event will have multiple consequences, more than one resolu-tion may be added.
In the student’s list of behavior events, select the student’s name that is attached to the behavior event.Click “new resolution”Enter the additional resolution for the event. When finished click save.
TransportationThe transportation tab can be used to store and organize both bussing information and parking information.
The list of buses is popu-lated in the System Admin-istration module. The Miles Transported field can be used in state report-ing about transportation funding. If needed, enter the number of miles
1.
2.
3.
4.
5.
6.
1.
2.3.
•
•
Student Information>General
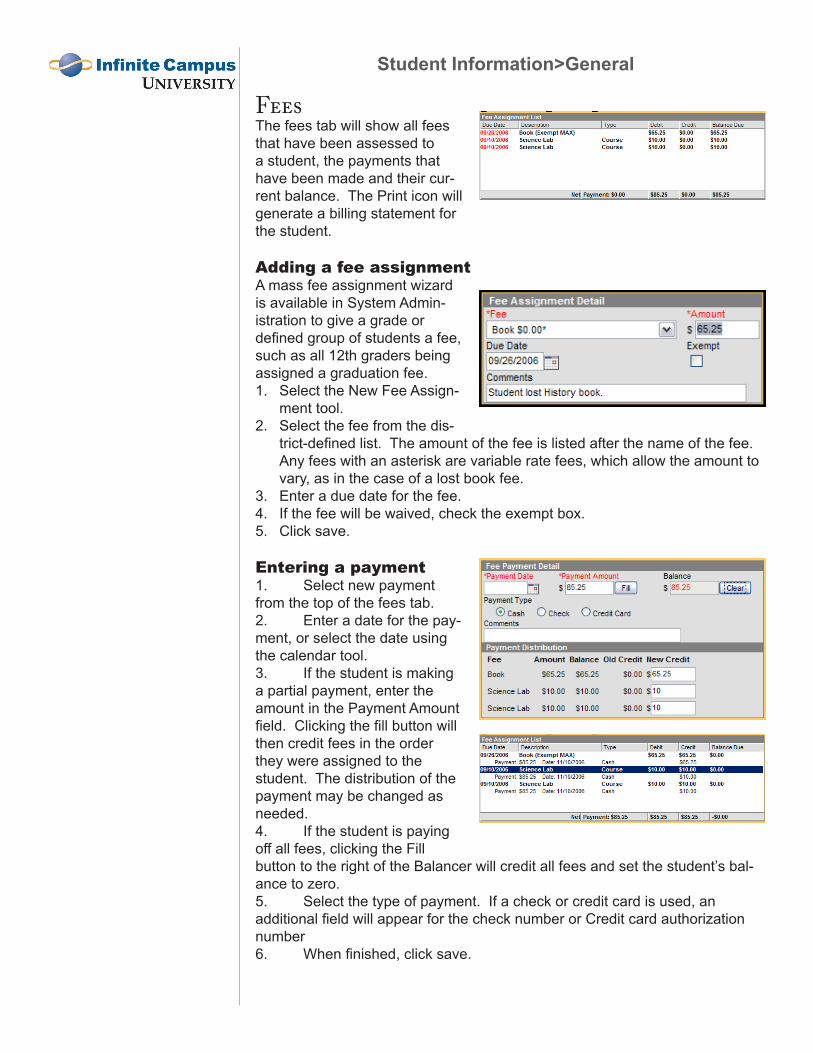
FeesThe fees tab will show all fees that have been assessed to a student, the payments that have been made and their cur-rent balance. The Print icon will generate a billing statement for the student.
Adding a fee assignmentA mass fee assignment wizard is available in System Admin-istration to give a grade or defined group of students a fee, such as all �2th graders being assigned a graduation fee.
Select the New Fee Assign-ment tool.Select the fee from the dis-trict-defined list. The amount of the fee is listed after the name of the fee. Any fees with an asterisk are variable rate fees, which allow the amount to vary, as in the case of a lost book fee.Enter a due date for the fee.If the fee will be waived, check the exempt box.Click save.
Entering a payment1. Select new payment from the top of the fees tab.2. Enter a date for the pay-ment, or select the date using the calendar tool. 3. If the student is making a partial payment, enter the amount in the Payment Amount field. Clicking the fill button will then credit fees in the order they were assigned to the student. The distribution of the payment may be changed as needed.4. If the student is paying off all fees, clicking the Fill button to the right of the Balancer will credit all fees and set the student’s bal-ance to zero.5. Select the type of payment. If a check or credit card is used, an additional field will appear for the check number or Credit card authorization number6. When finished, click save.
1.
2.
3.4.5.
Student Information>General
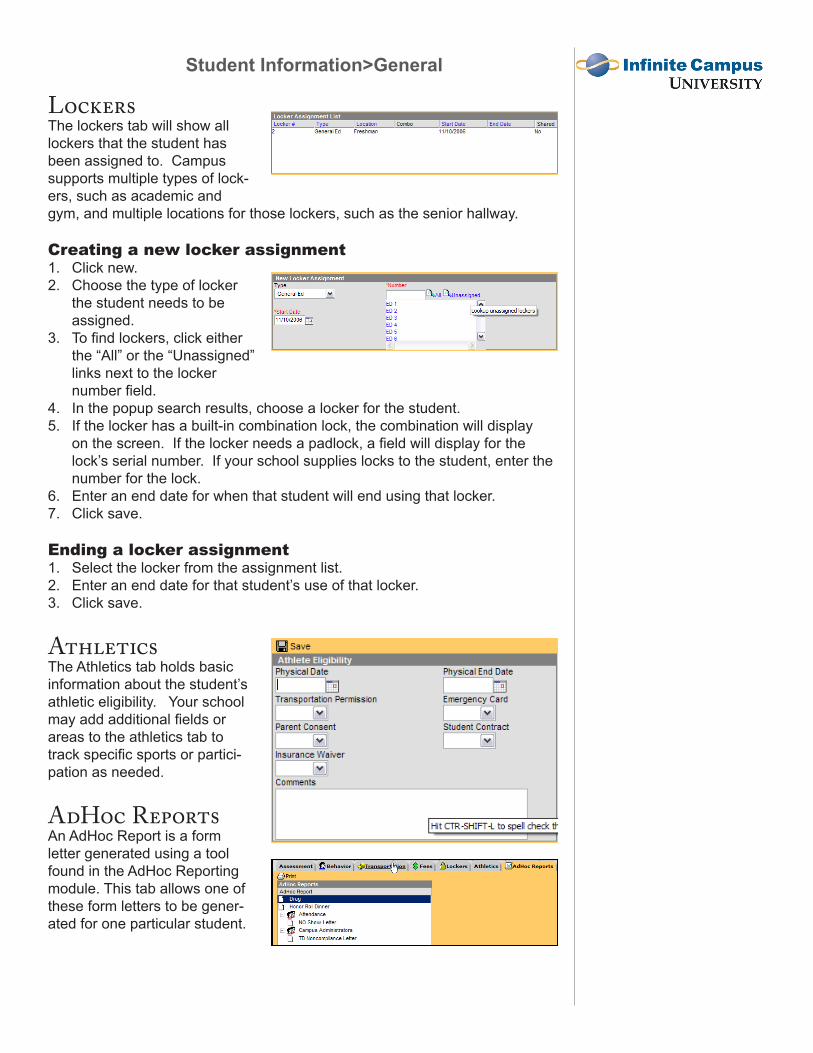
LockersThe lockers tab will show all lockers that the student has been assigned to. Campus supports multiple types of lock-ers, such as academic and gym, and multiple locations for those lockers, such as the senior hallway.
Creating a new locker assignmentClick new.Choose the type of locker the student needs to be assigned.To find lockers, click either the “All” or the “Unassigned” links next to the locker number field.In the popup search results, choose a locker for the student. If the locker has a built-in combination lock, the combination will display on the screen. If the locker needs a padlock, a field will display for the lock’s serial number. If your school supplies locks to the student, enter the number for the lock.Enter an end date for when that student will end using that locker.Click save.
Ending a locker assignmentSelect the locker from the assignment list.Enter an end date for that student’s use of that locker.Click save.
AthleticsThe Athletics tab holds basic information about the student’s athletic eligibility. Your school may add additional fields or areas to the athletics tab to track specific sports or partici-pation as needed.
AdHoc ReportsAn AdHoc Report is a form letter generated using a tool found in the AdHoc Reporting module. This tab allows one of these form letters to be gener-ated for one particular student.
1.2.
3.
4.5.
6.7.
1.2.3.
Student Information>General
Walk-In Scheduler
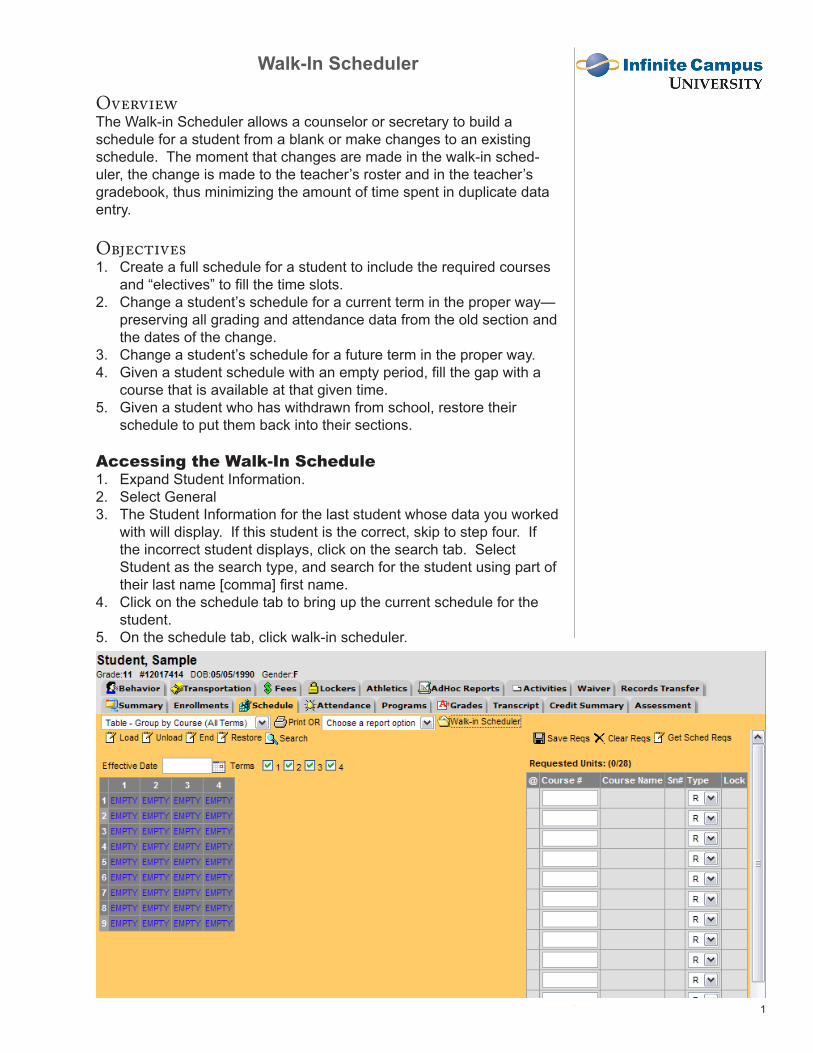
OverviewThe Walk-in Scheduler allows a counselor or secretary to build a schedule for a student from a blank or make changes to an existing schedule. The moment that changes are made in the walk-in sched-uler, the change is made to the teacher’s roster and in the teacher’s gradebook, thus minimizing the amount of time spent in duplicate data entry.
ObjectivesCreate a full schedule for a student to include the required courses and “electives” to fill the time slots.Change a student’s schedule for a current term in the proper way—preserving all grading and attendance data from the old section and the dates of the change.Change a student’s schedule for a future term in the proper way.Given a student schedule with an empty period, fill the gap with a course that is available at that given time.Given a student who has withdrawn from school, restore their schedule to put them back into their sections.
Accessing the Walk-In ScheduleExpand Student Information.Select GeneralThe Student Information for the last student whose data you worked with will display. If this student is the correct, skip to step four. If the incorrect student displays, click on the search tab. Select Student as the search type, and search for the student using part of their last name [comma] first name.Click on the schedule tab to bring up the current schedule for the student.On the schedule tab, click walk-in scheduler.
�.
�.
3.4.
�.
�.�.3.
4.
�.
�
Walk-In Scheduler
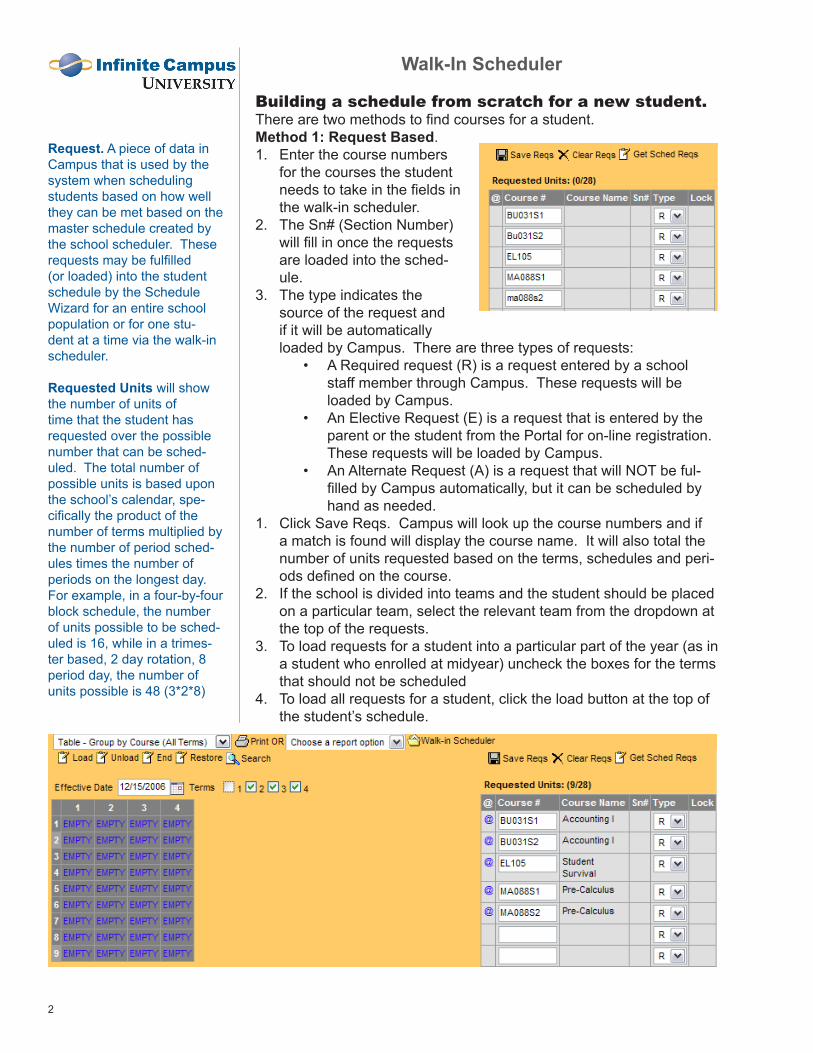
Building a schedule from scratch for a new student.There are two methods to find courses for a student.Method 1: Request Based.
Enter the course numbers for the courses the student needs to take in the fields in the walk-in scheduler.The Sn# (Section Number) will fill in once the requests are loaded into the sched-ule.The type indicates the source of the request and if it will be automatically loaded by Campus. There are three types of requests:
A Required request (R) is a request entered by a school staff member through Campus. These requests will be loaded by Campus.An Elective Request (E) is a request that is entered by the parent or the student from the Portal for on-line registration. These requests will be loaded by Campus.An Alternate Request (A) is a request that will NOT be ful-filled by Campus automatically, but it can be scheduled by hand as needed.
Click Save Reqs. Campus will look up the course numbers and if a match is found will display the course name. It will also total the number of units requested based on the terms, schedules and peri-ods defined on the course.If the school is divided into teams and the student should be placed on a particular team, select the relevant team from the dropdown at the top of the requests.To load requests for a student into a particular part of the year (as in a student who enrolled at midyear) uncheck the boxes for the terms that should not be scheduled To load all requests for a student, click the load button at the top of the student’s schedule.
�.
�.
3.
•
•
•
�.
�.
3.
4.
�
Request. A piece of data in Campus that is used by the system when scheduling students based on how well they can be met based on the master schedule created by the school scheduler. These requests may be fulfilled (or loaded) into the student schedule by the Schedule Wizard for an entire school population or for one stu-dent at a time via the walk-in scheduler.
Requested Units will show the number of units of time that the student has requested over the possible number that can be sched-uled. The total number of possible units is based upon the school’s calendar, spe-cifically the product of the number of terms multiplied by the number of period sched-ules times the number of periods on the longest day. For example, in a four-by-four block schedule, the number of units possible to be sched-uled is �6, while in a trimes-ter based, � day rotation, 8 period day, the number of units possible is 48 (3*�*8)
Walk-In Scheduler
3
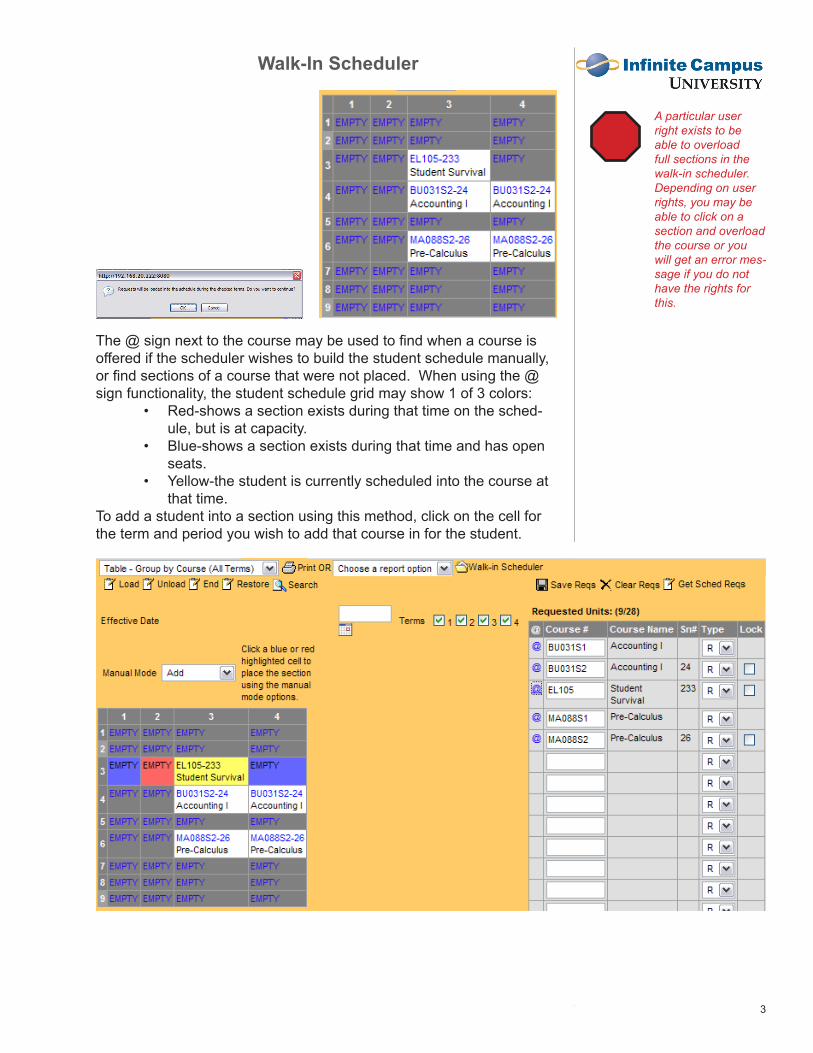
The @ sign next to the course may be used to find when a course is offered if the scheduler wishes to build the student schedule manually, or find sections of a course that were not placed. When using the @ sign functionality, the student schedule grid may show � of 3 colors:
Red-shows a section exists during that time on the sched-ule, but is at capacity.Blue-shows a section exists during that time and has open seats.Yellow-the student is currently scheduled into the course at that time.
To add a student into a section using this method, click on the cell for the term and period you wish to add that course in for the student.
•
•
•
A particular user right exists to be able to overload full sections in the walk-in scheduler. Depending on user rights, you may be able to click on a section and overload the course or you will get an error mes-sage if you do not have the rights for this.
Walk-In Scheduler
4
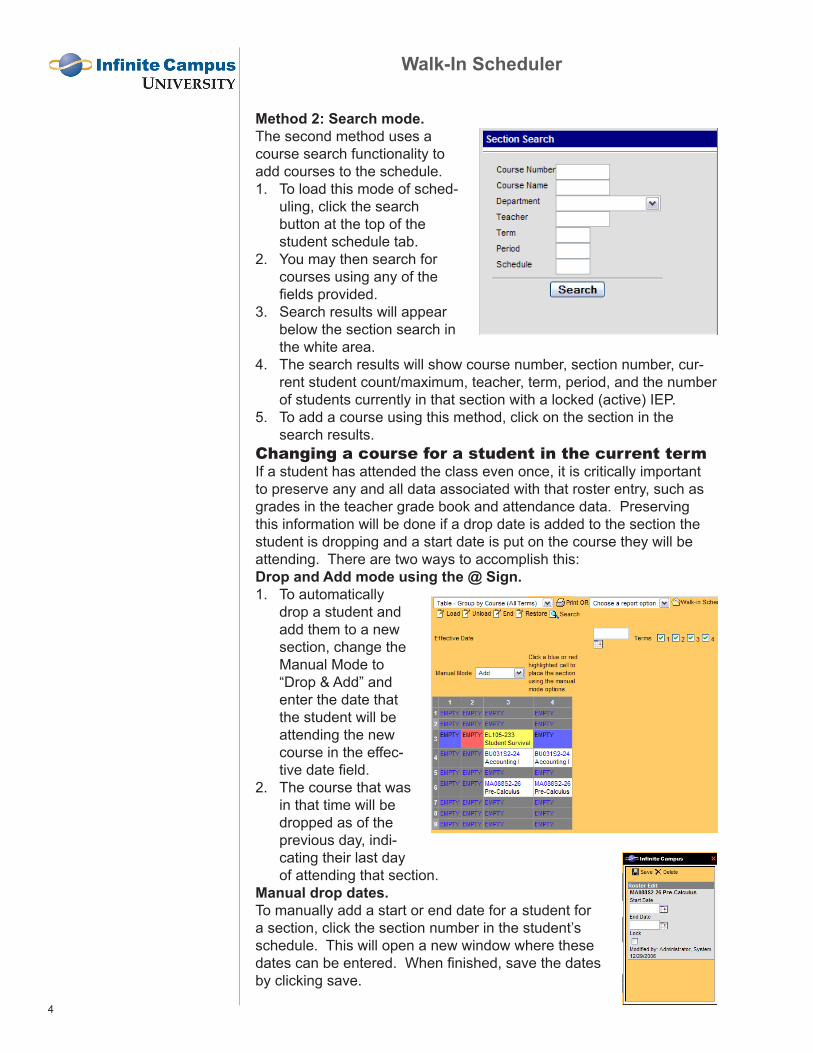
Method 2: Search mode. The second method uses a course search functionality to add courses to the schedule.
To load this mode of sched-uling, click the search button at the top of the student schedule tab. You may then search for courses using any of the fields provided.Search results will appear below the section search in the white area. The search results will show course number, section number, cur-rent student count/maximum, teacher, term, period, and the number of students currently in that section with a locked (active) IEP. To add a course using this method, click on the section in the search results.
Changing a course for a student in the current termIf a student has attended the class even once, it is critically important to preserve any and all data associated with that roster entry, such as grades in the teacher grade book and attendance data. Preserving this information will be done if a drop date is added to the section the student is dropping and a start date is put on the course they will be attending. There are two ways to accomplish this:Drop and Add mode using the @ Sign.
To automatically drop a student and add them to a new section, change the Manual Mode to “Drop & Add” and enter the date that the student will be attending the new course in the effec-tive date field.The course that was in that time will be dropped as of the previous day, indi-cating their last day of attending that section.
Manual drop dates.To manually add a start or end date for a student for a section, click the section number in the student’s schedule. This will open a new window where these dates can be entered. When finished, save the dates by clicking save.
�.
�.
3.
4.
�.
�.
�.
Walk-In Scheduler
�
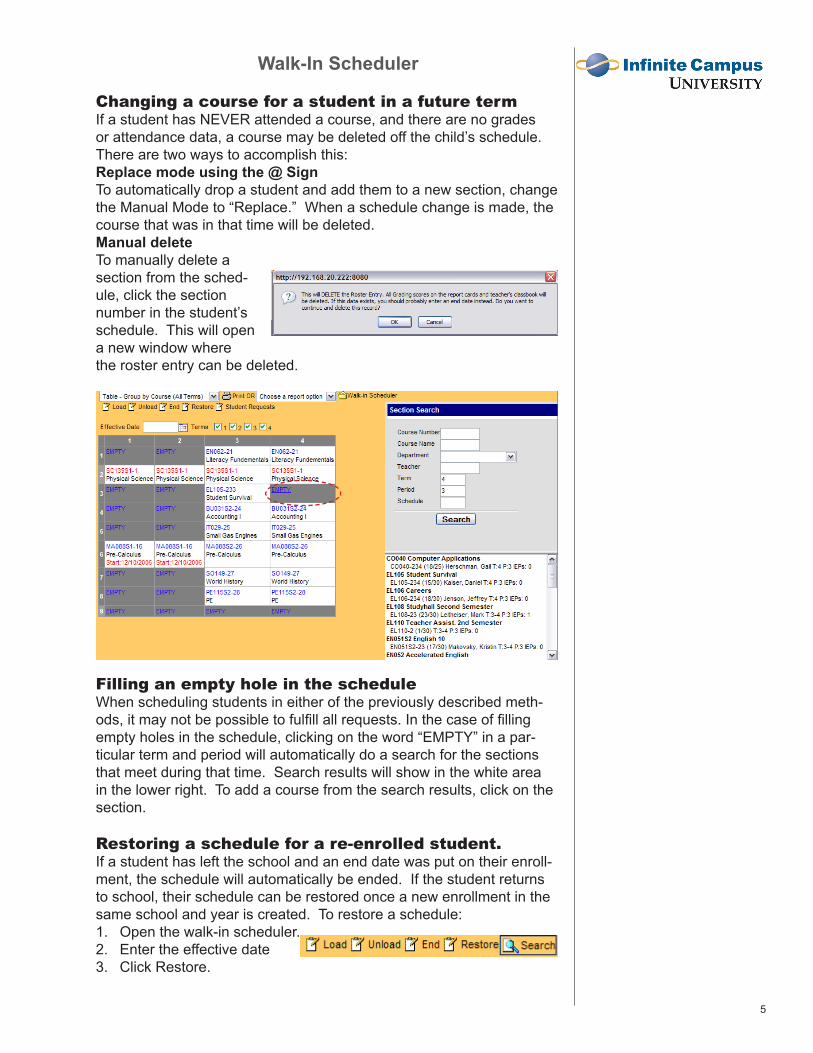
Changing a course for a student in a future termIf a student has NEVER attended a course, and there are no grades or attendance data, a course may be deleted off the child’s schedule. There are two ways to accomplish this:Replace mode using the @ SignTo automatically drop a student and add them to a new section, change the Manual Mode to “Replace.” When a schedule change is made, the course that was in that time will be deleted.Manual deleteTo manually delete a section from the sched-ule, click the section number in the student’s schedule. This will open a new window where the roster entry can be deleted.
Filling an empty hole in the scheduleWhen scheduling students in either of the previously described meth-ods, it may not be possible to fulfill all requests. In the case of filling empty holes in the schedule, clicking on the word “EMPTY” in a par-ticular term and period will automatically do a search for the sections that meet during that time. Search results will show in the white area in the lower right. To add a course from the search results, click on the section.
Restoring a schedule for a re-enrolled student.If a student has left the school and an end date was put on their enroll-ment, the schedule will automatically be ended. If the student returns to school, their schedule can be restored once a new enrollment in the same school and year is created. To restore a schedule:
Open the walk-in scheduler.Enter the effective dateClick Restore.
�.�.3.

Walk-In Scheduler
6
September 2006 (2007.1) Counselor Session 2 Scenarios Page 1 of 3
Copyright © 2006, Infinite Campus, Inc. All rights reserved
2nd Session Secondary CounselorsIntended Audience: Secondary Counselors Description: This course will provide an overview of Campus, student information, and the basics of walk-in scheduling.
Agenda Objectives Handouts/Notes Review (30 minutes)
Navigate to… • The credit summary for a
student • The Grad Planner for a
student • Where you print a transcript
for an individual student • All of a student’s grade and
assignment information
Review Campus Key Words at the end of this agenda
Walk-in Scheduler (2 hours)
Learn how to:
• Modify a schedule for a student
• Create a schedule for a new student
• Print student schedules individually and in batch
Complete Activities at the end of this agenda
Review (30 minutes)
Review the location of needed reports Complete Review Questions Complete the Survey
Review Questions Schedule tab Load/Unload End/Restore Get Sched Reqs Search @ red, yellow, blue
1. What would cause the 3 colors (red, yellow, blue) to appear on your student’s schedule [in the area marked EMPTY]?
2. What causes the word duplicate to appear on a student’s schedule?
3. What is the significance of the following message, and when might you
see it? “All active and future section rosters will be ended as of [date] do you want to continue?”
September 2006 (2007.1) Counselor Session 2 Scenarios Page 2 of 3
Copyright © 2006, Infinite Campus, Inc. All rights reserved
4. Requested Units: (_/_). What can you learn from this? How can this
number be altered?
5. What is the difference between Required, Elective, and Alternate in Campus?
6. What is the effect of leaving Terms unchecked prior loading schedule
requests?
7. Explain 2 ways of locking/unlocking a course
Hands-On Activities Activity 1 Search for a course to place it in the student’s schedule:
That spans T1 through T4 That is offered period 2 and spans T3 – T4 In the science department that is offered during period 3
Activity 2 Before loading schedule requests into a student’s schedule,
Lock two courses into the student’s schedule. Load and unload, then proceed to create a full schedule for student. State 2 changes you noticed after unloading the courses.
Activity 3 Select a student that has an empty schedule then:
Give the student manual course requests of all types (elective, required, and alternative)
Load a course that has reached it’s maximum number of students allowed into the student’s schedule
Load an Elective, Required, and Alternate request into a student’s schedule
Give the student a full schedule using multiple methods Explain the implications of ending a student’s schedule. End the
student’s schedule. Activity 4 Search for the following course: [course information will be provided by the
trainer].
Show 3 ways to find this course, then load it into a student’s schedule Load another course into the same period as this one – Skinny Describe and demonstrate how the 2 search buttons on Walk-in
Scheduler are used.