AFOPro Spatial At this point the spatial data should be ready for use with the AFOPro Spatial Tool....
53
AFOPro Spatial At this point the spatial data should be ready for use with the AFOPro Spatial Tool. This tutorial shows the user how to use AFOPro Spatial to… •Properly attribute the Planned Land Unit Theme •Create regulatory setbacks shapefiles •Export the Spatial Database Part 2: Creating the Spatial Database
-
date post
21-Dec-2015 -
Category
Documents
-
view
228 -
download
0
Transcript of AFOPro Spatial At this point the spatial data should be ready for use with the AFOPro Spatial Tool....

AFOPro Spatial
At this point the spatial data should be ready for use with the AFOPro Spatial Tool. This tutorial shows the user how to use AFOPro Spatial to…
•Properly attribute the Planned Land Unit Theme •Create regulatory setbacks shapefiles •Export the Spatial Database
Part 2:Creating the Spatial Database

Getting Started
2. Add appropriate themes Images, Planned Land Units (fields), SSURGO Soils, streams, ditches/waterways, wetlands, wells, homes, etc.
3. Zoom to the farm
4. From View Menu select Properties. Set Map and Distance Units.
1. Open ArcView with a new View

Turning on the AFOPro Spatial Extension
From the File menu select Extensions

Click the check boxnext to AFOPro Spatial
Turning on the AFOPro Spatial Extension

Turning on the AFOPro Spatial Extension
Four new buttons appear in the ArcView toolbar

AFOPro Spatial Tools
Runs the AFOPro Spatial wizard which createsan .mdb file that easily imports into AFOPro

AFOPro Spatial Tools
Attributes existing fields shapefile with Tract Number,Field Number, Acres, and Land Use to become aCST Planned Land Units Theme

AFOPro Spatial Tools
Creates setback shapefile at a specified distance from selected features in existing shapefiles.

AFOPro Spatial Tools
Launches the AFOPro Spatial Help Files

Spatial Data Prep: Step 4
Attribute Planned Land Units
Make sure that the Planned Land Unit theme is active. This is indicated by a slightly raised grey box around the theme. Single click on the theme to make it active.

Spatial Data Prep: Step 4
Attribute Planned Land Units
Choose the Select Feature Tool and click inside one of the fields.

Spatial Data Prep: Step 4
Attribute Planned Land Units
The selected field becomes highlighted Click on the AFOPro Spatial Attribute Tool

Spatial Data Prep: Step 4
Attribute Planned Land Units
From the drop down list selectthe Planned Land Units themeand click OK
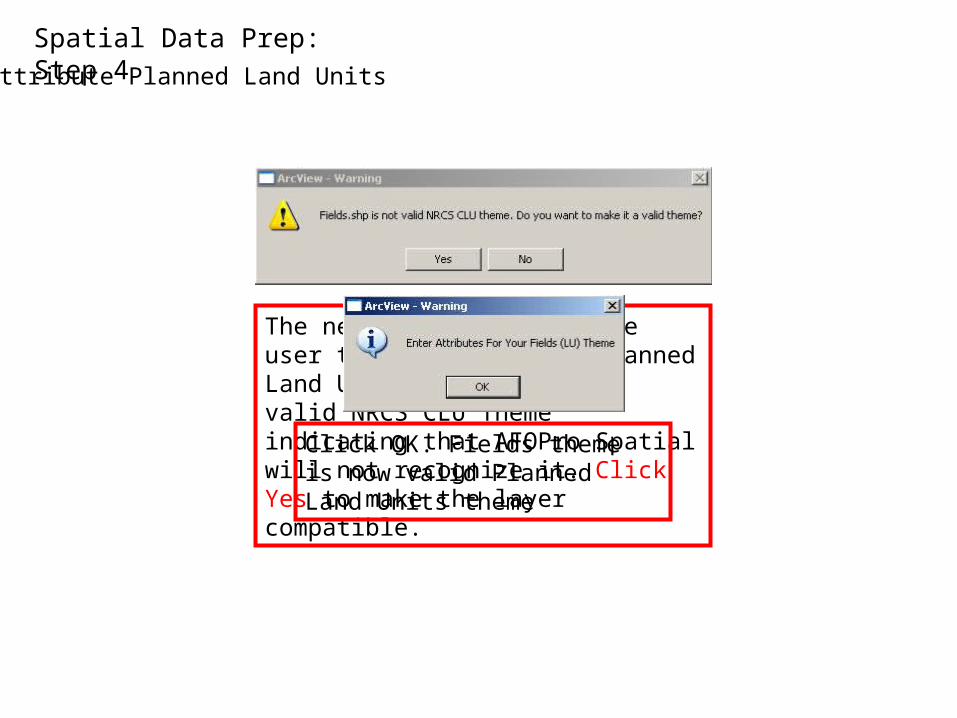
The next window alerts the user that the selected Planned Land Units theme is not a valid NRCS CLU Theme indicating that AFOPro Spatial will not recognize it. Click Yes to make the layer compatible.
Spatial Data Prep: Step 4
Attribute Planned Land Units
Click OK. Fields theme is now valid Planned Land Units theme

Spatial Data Prep: Step 4
Attribute Planned Land Units
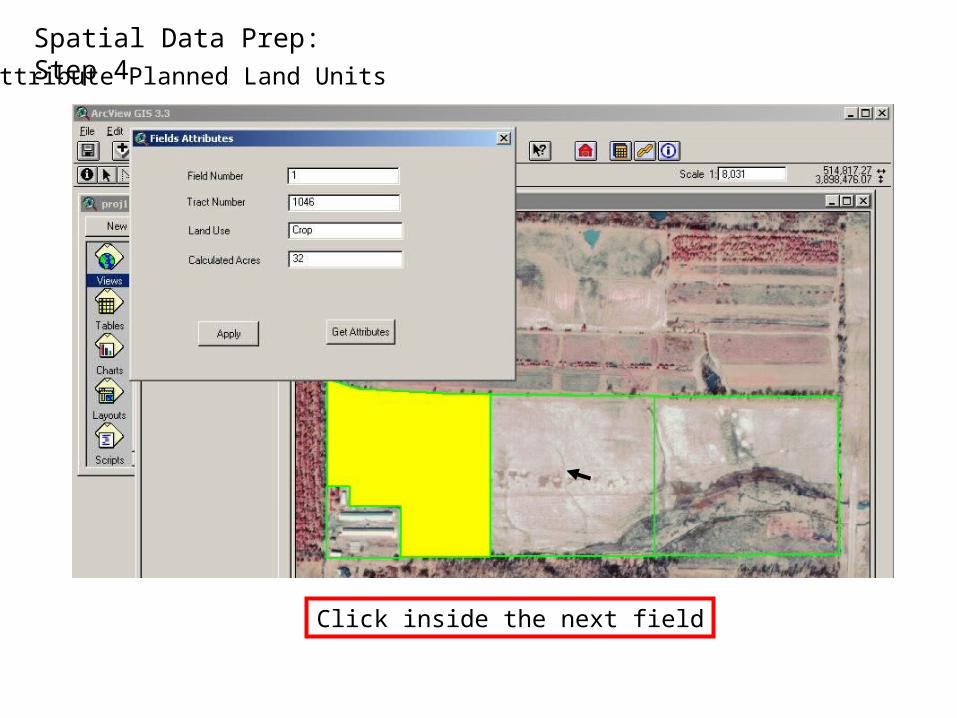
Populate cells in the Fields Attributes Form

Spatial Data Prep: Step 4
Attribute Planned Land Units
Click Apply to save attributes of selected field
Spatial Data Prep: Step 4
Attribute Planned Land Units
Click inside the next field

Spatial Data Prep: Step 4
Attribute Planned Land Units
Click Get Attributes Button to see attributes of the selected field

Spatial Data Prep: Step 4
Attribute Planned Land Units
Repeat this process until all fields required for the CNMP have been attributed
Close the window when this process is complete

Spatial Data Prep: Step 4
Attribute Planned Land Units
To unselect fields click the Clear Selected Features button while the Planned Land Units theme is still active.

Spatial Data Prep: Step 4
Attribute Planned Land Units
To unselect fields click the Clear Selected Features button while the Planned Land Units theme is still active.

Spatial Data Prep: Step 5
Create Setbacks Shapefiles using AFOPro Spatial Buffer Tool

Spatial Data Prep: Step 5
Create Setbacks Shapefiles using AFOPro Spatial Buffer Tool
Make the appropriate resource theme active by single clicking on the theme symbol. The active theme is indicated by a slightly raised grey box around the theme symbol

Spatial Data Prep: Step 5
Create Setbacks Shapefiles using AFOPro Spatial Buffer Tool
Using the Select Feature Tool…

Spatial Data Prep: Step 5
Create Setbacks Shapefiles using AFOPro Spatial Buffer Tool
Single click on one of the features in the active theme

Spatial Data Prep: Step 5
Create Setbacks Shapefiles using AFOPro Spatial Buffer Tool
Now hold the shift key and single click on the other features of the ponds theme that require a setback.

Spatial Data Prep: Step 5
Create Setbacks Shapefiles using AFOPro Spatial Buffer Tool
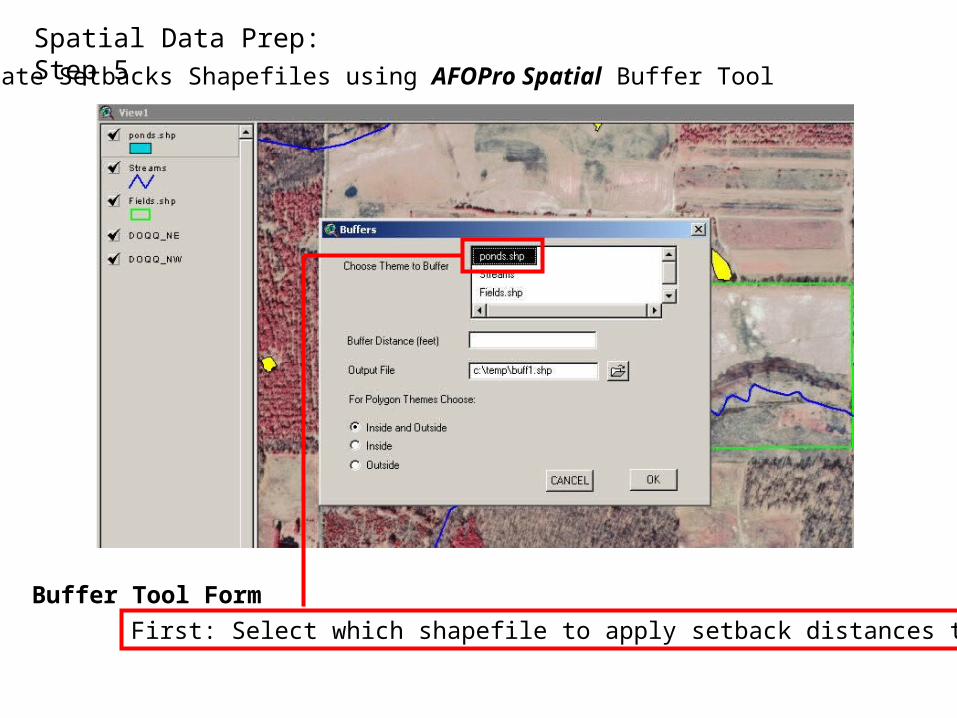
Once all ponds that require a setback are selected, click on the AFOPro Spatial Buffer Tool.
Spatial Data Prep: Step 5
Create Setbacks Shapefiles using AFOPro Spatial Buffer Tool
Buffer Tool Form
First: Select which shapefile to apply setback distances to

Spatial Data Prep: Step 5
Create Setbacks Shapefiles using AFOPro Spatial Buffer Tool
Buffer Tool Form
Second: Type in setback distance

Spatial Data Prep: Step 5
Create Setbacks Shapefiles using AFOPro Spatial Buffer Tool
Buffer Tool Form
Third: Click the Browse button. Browse to the folder where the setback shapefile will be saved and name it.

Spatial Data Prep: Step 5
Create Setbacks Shapefiles using AFOPro Spatial Buffer Tool
Buffer Tool Form
Fourth: Select where the setback should lie in relation to the polygon features selected. This decision is only required for polygon resource themes

Spatial Data Prep: Step 5
Create Setbacks Shapefiles using AFOPro Spatial Buffer Tool
1. Inside and Outside
Examples
2. Inside Only (Property Line)
3. Outside Only (Pond, Wetland)

Click Cancel to close Buffers Window
Spatial Data Prep: Step 5
Create Setbacks Shapefiles using AFOPro Spatial Buffer Tool
Buffer Tool Form
Click OK to create Setback shapefile.

Spatial Data Prep: Step 5
Create Setbacks Shapefiles using AFOPro Spatial Buffer Tool
The new setback theme now appears at the top of the theme list and all selected features of the ponds theme have a 100 foot setback.

Spatial Data Prep: Step 5
Create Setbacks Shapefiles using AFOPro Spatial Buffer Tool
Now repeat the process for the streams theme.

Spatial Data Prep: Step 5
Create Setbacks Shapefiles using AFOPro Spatial Buffer Tool

Spatial Data Prep: Step 7
Run the AFOPro Spatial Wizard
Once all regulatory setback themes have been completed the AFOPro Spatial wizard may be run.

Spatial Data Prep: Step 7
Run the AFOPro Spatial Wizard
Before running the wizard make the Planned Land Units theme active by single clicking on the theme symbol.

Spatial Data Prep: Step 7
Run the AFOPro Spatial Wizard
Using the select feature tool and the shift key select allfields required for the CNMP

Spatial Data Prep: Step 7
Run the AFOPro Spatial Wizard
Using the select feature tool and the shift key select allfields required for the CNMP

Spatial Data Prep: Step 7
Run the AFOPro Spatial Wizard
1. Fields selected from the Planned Land Units theme
Final check before running the AFOPro Spatial wizard

Spatial Data Prep: Step 7
Run the AFOPro Spatial Wizard
2. Setback themes complete
Final check before running the AFOPro Spatial wizard

Spatial Data Prep: Step 7
Run the AFOPro Spatial Wizard
3. SSURGO Soils theme present
Final check before running the AFOPro Spatial wizard

Spatial Data Prep: Step 7
Run the AFOPro Spatial Wizard
Click the AFOPro Spatial wizard tool

Spatial Data Prep: Step 7
Run the AFOPro Spatial Wizard
Displays Copyright information and givesa short description of the tool’s purpose
Introduction Screen
Click Next

Spatial Data Prep: Step 7
Run the AFOPro Spatial Wizard
Fields Screen
Select the Planned Land Units theme or themes that have fields selected for use in the CNMP by single clicking on the name.
Click Next

Spatial Data Prep: Step 7
Run the AFOPro Spatial Wizard
Fields Screen
An info window appears that displays the number of fields selected in each Planned Land Units theme. Click OK.

Spatial Data Prep: Step 7
Run the AFOPro Spatial Wizard
Buffer Themes Screen
Select the setback (buffer) themes from the list by single clicking on the theme name. Any areas where manure cannot be applied

Spatial Data Prep: Step 7
Run the AFOPro Spatial Wizard
Buffer Themes Screen
Select a location for the exported spatial database to be saved and name it.Click Next

Spatial Data Prep: Step 7
Run the AFOPro Spatial Wizard
Soils Screen
Select the SSURGO Soils theme from the list by single clicking on the theme name. If one does not exist click Next.
Click the browse button and browse to the appropriate NASIS Database.Click Next

Spatial Data Prep: Step 7
Run the AFOPro Spatial Wizard
Finish Screen
Provides a summary report that describes the steps for importing the spatial data into AFOProClick Finish

For Additional Information, Interest in AFOPro for your State, or Technical Assistance
•Contact Mark Evans
•803-777-7600•[email protected]
• Wes Standish •803-777-7600•[email protected]
•Visit (To Download AFOPro)
•http://www.esri.sc.edu/Projects/usda/application_development/afopro.asp

AFOPro Spatial
Part 3:Using the Spatial Database
Part 3 is the final tutorial for AFOPro Spatial that walks the user throughthe process of…
• Importing the spatial data into AFOPro Core
• Analyzing that data by simply opening the .mdb file created by AFOPro Spatial.
Go to Part 3