AeroTech oven - Fisher & Paykel OB30DD...590700A 09.14 USING THE TIMER FOR MORE INFORMATION...
2
Keep this document handy for easy reference. ● ● For detailed information on the features of your oven, see your ‘User guide’. ● ● Before using your oven, make sure you read the full ‘User guide’, with special attention to the ‘Safety and warnings’ section. ● ● For contact information or if you require service, assistance or replacement parts, see the end of this document or your ‘Service & warranty’ booklet. AeroTech TM oven US CA QUICK START GUIDE continued > YOUR MODEL THE CONTROL PANEL SETTING THE CLOCK CONDITION BOTH OVENS OB30DTEPX3 OB30DDEPX 1 Control panel 2 Oven vent louvres 3 Oven light 4 Telescopic sliding shelf (x5) 5 Side rack 6 Oven door and handle 7 Oven seal Accessories: 8 Meat probe 9 Rack !0 Grid !1 Pan 8 9 !0 !1 2 3 4 5 7 6 1 Locking the control panel ● ● To lock, press and hold the select button until the control lock indicator comes on. ● ● To unlock, press and hold the cancel button until the indicator flashes and then goes out. OB30DDEPX3 Top oven illustrated Control lock indicator (see ‘Locking the control panel’) if lit: Control panel is locked Timer indicator (see ‘Using the timer’) if lit: Timer is counting down Close door indicator if lit: Door is open when oven is on (some functions only). See ‘Troubleshooting’ in your User guide. Display Scroll Select Cancel You set the clock within the user preference menu. To learn more about the user preference menu, refer to your User guide. Note: If you do not wish to set the time initially when the oven is first switched on at the wall, press the cancel button to exit the clock setting. If you want to set the clock later, follow the steps under ‘To change the time’. To change the time (within the user preference menu) When the oven is first switched on at the wall 1 Press and hold the left and right scroll buttons together for 3 seconds to enter the user preference menu. ● ● The display will either show 12 Hr or 24 Hr 2 Press the select button to confirm. The display will flash. 3 Follow steps 2-5 left to set the time. ● ● At step 2a, you also now have the ability to scroll between 24 Hr, 12 Hr and OFF (turns the display off). ● ● Refer to the User guide to learn more about this feature. 3 Press the left and right scroll buttons to set the time. 1 The display will flash 24 Hr. 4 Press the select button to confirm. 2aPress the right scroll button to scroll between 24 Hrand 12 Hr 2bPress the select button to confirm. UPPER LOWER Aero Bake True Aero Broil Classic Bake Aero Broil Aero Pastry Maxi Broil Aero Bake True Aero Broil Classic Bake Aero Broil Aero Pastry Maxi Broil Upper Oven Function indicators (see ‘Oven functions’) Lower Oven Function indicators (see ‘Oven functions’) Function dial Upper Oven selector button Lower Oven selector button Upper oven Temperature indicator Lower oven Temperature indicator Temperature dial Function halo Temperature halo Cooking time indicator (see ‘Automatic cooking’ in User guide) if lit: Automatic cooking time is set Meat probe indicator (see ‘Using the meat probe’ in User guide) if lit: Meat probe is in use (display will alternate between probe set temperature and internal temperature of the meat) Stop time indicator (see ‘Automatic cooking’ in User guide) if lit: Automatic stop time is set Upper oven Lower oven Upper Oven indicator if lit: Oven is on Lower Oven indicator if lit: Oven is on It is important that you condition the oven before using it for cooking and baking. Conditioning will burn off any manufacturing residue and ensure you get the best results from the start. You can condition both ovens at the same time. Follow the steps below.There will be a distinctive smell and a small amount of smoke during conditioning. This is normal, but make sure the kitchen is well ventilated. 1 Make sure you have removed any packaging and any cable ties used to secure the shelving during transit. 2 Make sure you have set the clock. 3 Make sure all the shelves are fitted. UPPER LOWER N O I T C N U F N O I T C N U F E R U T A R E P M E T E R U T A R E P M E T E R U T A R E P M E T E R U T A R E P M E T 5 Select the Bake function. ● ● The halo will glow white. ● ● Each function has a preset temperature and so the oven will start heating at the Bake preset temperature of 360 o F. 8 Select the Bake function. ● ● The halo will glow white. ● ● Each function has a preset temperature and so the oven will start heating at the Bake preset temperature of 360 o F. 4 Press the UPPER oven selector button ● ● The upper row of function indicators will glow. ● ● The halo around the selector button will glow red. 6 Set the temperature to 400 o F for 30 minutes. ● ● While the oven is heating up, the temperature halo will glow red and the temperature indicator will alternately show the actual and set temperatures. ● ● When the oven has reached set temperature, a tone will sound and the halo will turn white. 9 Set the temperature to 400 o F for 30 minutes. ● ● While the oven is heating up, the temperature halo will glow red and the temperature indicator will alternately show the actual and set temperatures. ● ● When the oven has reached set temperature, a tone will sound and the halo will turn white. UPPER LOWER 7 Press the LOWER oven function button ● ● The lower row of function indicators will glow ● ● The Bake indicator on the top row will continue to glow red, but the rest of the indicators will go out.
Transcript of AeroTech oven - Fisher & Paykel OB30DD...590700A 09.14 USING THE TIMER FOR MORE INFORMATION...

Keep this document handy for easy reference.
●● For detailed information on the features of your oven, see your ‘User guide’.●● Before using your oven, make sure you read the full ‘User guide’, with special attention to the ‘Safety and warnings’ section.●● For contact information or if you require service, assistance or replacement parts, see the end of this document or your ‘Service &
warranty’ booklet.
AeroTechTM oven
US CA
QUICK START GUIDE
continued >
YOUR MODEL
THE CONTROL PANEL
SETTING THE CLOCK
CONDITION BOTH OVENS
OB30DTEPX3
OB30DDEPX
1 Control panel2 Oven vent louvres3 Oven light4 Telescopic sliding shelf (x5)5 Side rack6 Oven door and handle7 Oven seal
Accessories:8 Meat probe9 Rack!0 Grid!1 Pan
8
9
!0
!1
2
3
4
5
7
6
1
Locking the control panel●● To lock, press and hold the
select
ERUTAREPMETNOITCNUF
button until the control lock indicator
ERUTAREPMETNOITCNUF
comes on.
●● To unlock, press and hold the cancel
ERUTAREPMETNOITCNUF
button until the indicator
ERUTAREPMETNOITCNUF
flashes and then goes out.
OB30DDEPX3 Top oven illustrated
Control lock indicator (see ‘Locking the control panel’)
if lit: Control panel is locked
Timer indicator (see ‘Using the timer’)
if lit: Timer is counting down
Close door indicator
if lit: Door is open when oven is on (some functions only). See ‘Troubleshooting’ in your User guide.
Display
Scroll Select Cancel
You set the clock within the user preference menu. To learn more about the user preference menu, refer to your User guide. Note: If you do not wish to set the time initially when the oven is first switched on at the wall, press the cancel
- +
- + - +
button to exit the clock setting. If you want to set the clock later, follow the steps under ‘To change the time’.
To change the time(within the user preference menu)
When the oven is first switched on at the wall
1 Press and hold the left and right scroll
- +
- + - +
- +
- + - +
buttons together for 3 seconds to enter the user preference menu.●● The display will either show 12 Hr
or 24 Hr2 Press the select
ERUTAREPMETNOITCNUF
button to confirm. The display will flash.
3 Follow steps 2-5 left to set the time.
●● At step 2a, you also now have the ability to scroll between 24 Hr, 12 Hr and OFF (turns the display off).
●● Refer to the User guide to learn more about this feature.
3 Press the left and right scroll
- +
- + - +
- +
- + - +
buttons to set the time.
1 The display will flash 24 Hr.
4 Press the select
ERUTAREPMETNOITCNUF
button to confirm.
2aPress the right scroll
- +
- + - +
button to scroll between 24 Hrand 12 Hr
2bPress the select
ERUTAREPMETNOITCNUF
button to confirm.
UPPER
LOWER
FanBake
FanForced
ClassicBake
FanGrill
MaxiGrill
FanBake
FanForced
ClassicBake
FanGrill
MaxiGrill
UPPER
LOWER
FanBake
FanForced
ClassicBake
FanGrill
MaxiGrill
FanBake
FanForced
ClassicBake
FanGrill
MaxiGrill
UPPER
LOWER
FanBake
FanForced
ClassicBake
FanGrill
MaxiGrill
FanBake
FanForced
ClassicBake
FanGrill
MaxiGrill
UPPER
LOWER
FanBake
FanForced
ClassicBake
FanGrill
MaxiGrill
FanBake
FanForced
ClassicBake
FanGrill
MaxiGrill UPPER
LOWER
FanBake
FanForced
ClassicBake
FanGrill
MaxiGrill
FanBake
FanForced
ClassicBake
FanGrill
MaxiGrill
UPPER
LOWER
AeroBake
TrueAero
Broil ClassicBake
AeroBroil
AeroPastry
MaxiBroil
AeroBake
TrueAero
Broil ClassicBake
AeroBroil
AeroPastry
MaxiBroil
Upper Oven Function indicators
(see ‘Oven functions’)
Lower Oven Function indicators
(see ‘Oven functions’)
Function dialUpper Ovenselector button
Lower Ovenselector button
Upper ovenTemperature
indicator
Lower ovenTemperature
indicator
Temperature dial
Function halo Temperature halo
Cooking time indicator (see ‘Automatic cooking’ in User guide)
if lit: Automatic cooking time is set
Meat probe indicator (see ‘Using the meat probe’ in User guide)
if lit: Meat probe is in use (display will alternate between probe set temperature and internal temperature of the meat)
Stop time indicator (see ‘Automatic cooking’ in User guide)
if lit: Automatic stop time is set
Upper oven
Lower oven
Upper Oven indicator if lit: Oven is on
Lower Oven indicator if lit: Oven is on
It is important that you condition the oven before using it for cooking and baking. Conditioning will burn off any manufacturing residue and ensure you get the best results from the start. You can condition both ovens at the same time. Follow the steps below.There will be a distinctive smell and a small amount of smoke during conditioning. This is normal, but make sure the kitchen is well ventilated.
1 Make sure you have removed any packaging and any cable ties used to secure the shelving during transit.2 Make sure you have set the clock.3 Make sure all the shelves are fitted.
NOITCNUF
NOITCNUFNOITCNUF
ERUTAREPMET ERUTAREPMET
AeroGrill
NOITCNUF
AeroGrill
UPPER
LOWER
UPPER
LOWER
UPPER
LOWER
UPPER
LOWER
NOITCNUF
NOITCNUFNOITCNUF
ERUTAREPMET ERUTAREPMET
AeroGrill
NOITCNUF
AeroGrill
UPPER
LOWER
UPPER
LOWER
UPPER
LOWER
UPPER
LOWERNOITCNUF
NOITCNUFNOITCNUF
ERUTAREPMET ERUTAREPMET
AeroGrill
NOITCNUF
AeroGrill
UPPER
LOWER
UPPER
LOWER
UPPER
LOWER
UPPER
LOWER
NOITCNUF
NOITCNUFNOITCNUF
ERUTAREPMET ERUTAREPMET
AeroBroil
NOITCNUF
AeroBroil
UPPER
LOWER
UPPER
LOWER
UPPER
LOWER
UPPER
LOWERNOITCNUF
NOITCNUFNOITCNUF
ERUTAREPMET ERUTAREPMET
AeroBroil
NOITCNUF
AeroBroil
UPPER
LOWER
UPPER
LOWER
UPPER
LOWER
UPPER
LOWER
5 Select the Bake
NOITCNUF NOITCNUF NOITCNUFERUTAREPMET ERUTAREPMET
AeroGrill
function. ●● The halo will glow white.●● Each function has a preset
temperature and so the oven will start heating at the Bake preset temperature of 360oF.
8 Select the Bake
NOITCNUF NOITCNUF NOITCNUFERUTAREPMET ERUTAREPMET
AeroGrill
function. ●● The halo will glow white.●● Each function has a
preset temperature and so the oven will start heating at the Bake preset temperature of 360oF.
4 Press the UPPER oven selector button●● The upper row of function
indicators will glow.●● The halo around the
selector button will glow red.
6 Set the temperature to 400oF for 30 minutes. ●● While the oven is heating up, the
temperature halo will glow red and the temperature indicator will alternately show the actual and set temperatures.
●● When the oven has reached set temperature, a tone will sound and the halo will turn white.
9 Set the temperature to 400oF for 30 minutes. ●● While the oven is heating up, the
temperature halo will glow red and the temperature indicator will alternately show the actual and set temperatures.
●● When the oven has reached set temperature, a tone will sound and the halo will turn white.
NOITCNUF
NOITCNUFNOITCNUF
ERUTAREPMET ERUTAREPMET
AeroGrill
NOITCNUF
AeroGrill
UPPER
LOWER
UPPER
LOWER
UPPER
LOWER
UPPER
LOWER
7 Press the LOWER oven function button●● The lower row of function indicators
will glow●● The Bake indicator on the top row will
continue to glow red, but the rest of the indicators will go out.
590700A 09.14
USING THE TIMER
FOR MORE INFORMATION
CONDITION BOTH OVENS
REPOSITIONING THE SHELVES
For detailed information on thefeatures of your oven
For warranty information
If you…●● have any questions or comments●● need a Fisher & Paykel authorized
technician to service your product●● need replacement parts or accessories●● want to register your product
see your ‘User guide’
see your ‘Service and warranty’ booklet
see your ‘Service and warranty’ booklet or contact us
USA toll-free, 24/7 1 888 936 7872 CA toll-free, 24/7 1 888 936 7872
www.fisherpaykel.com
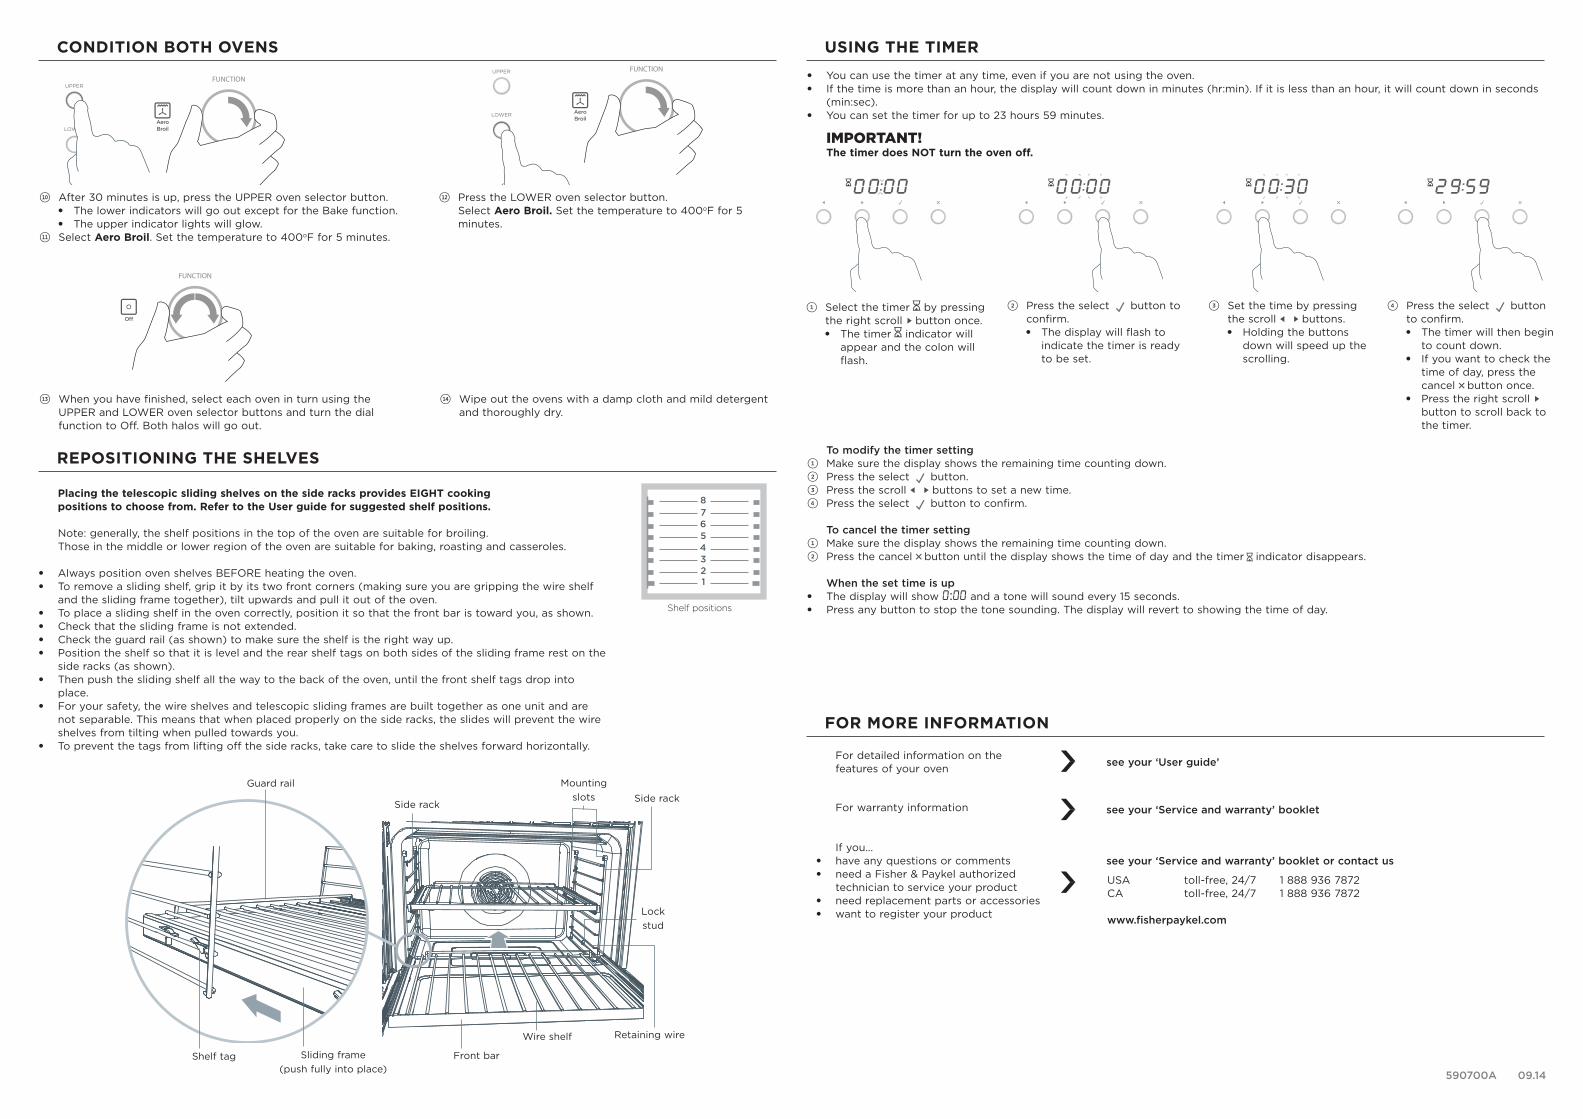
Placing the telescopic sliding shelves on the side racks provides EIGHT cooking positions to choose from. Refer to the User guide for suggested shelf positions.
Note: generally, the shelf positions in the top of the oven are suitable for broiling. Those in the middle or lower region of the oven are suitable for baking, roasting and casseroles.
●● Always position oven shelves BEFORE heating the oven.●● To remove a sliding shelf, grip it by its two front corners (making sure you are gripping the wire shelf
and the sliding frame together), tilt upwards and pull it out of the oven.●● To place a sliding shelf in the oven correctly, position it so that the front bar is toward you, as shown.●● Check that the sliding frame is not extended.●● Check the guard rail (as shown) to make sure the shelf is the right way up. ●● Position the shelf so that it is level and the rear shelf tags on both sides of the sliding frame rest on the
side racks (as shown).●● Then push the sliding shelf all the way to the back of the oven, until the front shelf tags drop into
place.●● For your safety, the wire shelves and telescopic sliding frames are built together as one unit and are
not separable. This means that when placed properly on the side racks, the slides will prevent the wire shelves from tilting when pulled towards you.
●● To prevent the tags from lifting off the side racks, take care to slide the shelves forward horizontally.
Shelf positions
12345678
1 Select the timer
- +
- + - +
by pressing the right scroll
- +
- + - +
button once.●● The timer
- +
- + - +
indicator will appear and the colon will flash.
2 Press the select
ERUTAREPMETNOITCNUF
button to confirm. ●● The display will flash to
indicate the timer is ready to be set.
3 Set the time by pressing the scroll
- +
- + - +
- +
- + - +
buttons. ●● Holding the buttons
down will speed up the scrolling.
4 Press the select
ERUTAREPMETNOITCNUF
button to confirm. ●● The timer will then begin
to count down.●● If you want to check the
time of day, press the cancel
- +
- + - +
button once. ●● Press the right scroll
- +
- + - +
button to scroll back to the timer.
●● You can use the timer at any time, even if you are not using the oven.●● If the time is more than an hour, the display will count down in minutes (hr:min). If it is less than an hour, it will count down in seconds
(min:sec).●● You can set the timer for up to 23 hours 59 minutes.
IMPORTANT!The timer does NOT turn the oven off.
To modify the timer setting1 Make sure the display shows the remaining time counting down.2 Press the select
ERUTAREPMETNOITCNUF
button.3 Press the scroll
- +
- + - +
- +
- + - +
buttons to set a new time.4 Press the select
ERUTAREPMETNOITCNUF
button to confirm.
To cancel the timer setting1 Make sure the display shows the remaining time counting down.2 Press the cancel
- +
- + - +
button until the display shows the time of day and the timer
- +
- + - +
indicator disappears.
When the set time is up●● The display will show 0:00 and a tone will sound every 15 seconds.●● Press any button to stop the tone sounding. The display will revert to showing the time of day.
NOITCNUF
NOITCNUFNOITCNUF
ERUTAREPMET ERUTAREPMET
AeroBroil
NOITCNUF
AeroBroil
UPPER
LOWER
UPPER
LOWER
UPPER
LOWER
UPPER
LOWER
NOITCNUF
NOITCNUFNOITCNUF
ERUTAREPMET ERUTAREPMET
AeroGrill
NOITCNUF
AeroGrill
UPPER
LOWER
UPPER
LOWER
UPPER
LOWER
UPPER
LOWER
NOITCNUF
NOITCNUFNOITCNUF
ERUTAREPMET ERUTAREPMET
AeroBroil
NOITCNUF
AeroBroil
UPPER
LOWER
UPPER
LOWER
UPPER
LOWER
UPPER
LOWER
!0 After 30 minutes is up, press the UPPER oven selector button.●● The lower indicators will go out except for the Bake function.●● The upper indicator lights will glow.
!1 Select Aero Broil. Set the temperature to 400oF for 5 minutes.
!3 When you have finished, select each oven in turn using the UPPER and LOWER oven selector buttons and turn the dial function to Off. Both halos will go out.
!4 Wipe out the ovens with a damp cloth and mild detergent and thoroughly dry.
!2 Press the LOWER oven selector button. Select Aero Broil. Set the temperature to 400oF for 5 minutes.
Side rackSide rack
Mounting slots
Retaining wire
Lock stud
Wire shelf
Front barSliding frame(push fully into place)
Shelf tag
Guard rail