Advantys Configuration - Software 8.0 - Manual del usuario ...

3100
2962
00
Advantys Configuration Software Quick Start Guide
890USE18000 Version 1.0
3100
2962
00

2 890USE18000 September 2003

Table of Contents
Safety Information . . . . . . . . . . . . . . . . . . . . . . . . . . . . . . . . . . . . 5
About the Book . . . . . . . . . . . . . . . . . . . . . . . . . . . . . . . . . . . . . . .7
Chapter 1 Hardware and Software Requirements. . . . . . . . . . . . . . . . . . . . 9Introduction . . . . . . . . . . . . . . . . . . . . . . . . . . . . . . . . . . . . . . . . . . . . . . . . . . . . . . 9System Requirements. . . . . . . . . . . . . . . . . . . . . . . . . . . . . . . . . . . . . . . . . . . . . 10Installing and Uninstalling the Software . . . . . . . . . . . . . . . . . . . . . . . . . . . . . . . 11
Chapter 2 Screen Elements. . . . . . . . . . . . . . . . . . . . . . . . . . . . . . . . . . . . .13Introduction . . . . . . . . . . . . . . . . . . . . . . . . . . . . . . . . . . . . . . . . . . . . . . . . . . . . . 13What Is an Island?. . . . . . . . . . . . . . . . . . . . . . . . . . . . . . . . . . . . . . . . . . . . . . . . 14Creating a Project with the Advantys Configuration Software. . . . . . . . . . . . . . . 16The Workspace . . . . . . . . . . . . . . . . . . . . . . . . . . . . . . . . . . . . . . . . . . . . . . . . . . 18Workspace Toolbars . . . . . . . . . . . . . . . . . . . . . . . . . . . . . . . . . . . . . . . . . . . . . . 20Workspace Browser . . . . . . . . . . . . . . . . . . . . . . . . . . . . . . . . . . . . . . . . . . . . . . 24Island Editor . . . . . . . . . . . . . . . . . . . . . . . . . . . . . . . . . . . . . . . . . . . . . . . . . . . . 26The Catalog Browser. . . . . . . . . . . . . . . . . . . . . . . . . . . . . . . . . . . . . . . . . . . . . . 31The Log Window . . . . . . . . . . . . . . . . . . . . . . . . . . . . . . . . . . . . . . . . . . . . . . . . . 34
Chapter 3 Creating an Island Bus Configuration . . . . . . . . . . . . . . . . . . .35Introduction . . . . . . . . . . . . . . . . . . . . . . . . . . . . . . . . . . . . . . . . . . . . . . . . . . . . . 35Creating a Workspace. . . . . . . . . . . . . . . . . . . . . . . . . . . . . . . . . . . . . . . . . . . . . 36The Rails . . . . . . . . . . . . . . . . . . . . . . . . . . . . . . . . . . . . . . . . . . . . . . . . . . . . . . . 37Adding Modules to an Island Segment . . . . . . . . . . . . . . . . . . . . . . . . . . . . . . . . 38Adding Extension Rails to the Island Configuration . . . . . . . . . . . . . . . . . . . . . . 40Extending the Configuration to a Preferred Module . . . . . . . . . . . . . . . . . . . . . . 41Extending the Configuration to Standard CANopen Devices . . . . . . . . . . . . . . . 42Adding and Deleting Annotation to an Island . . . . . . . . . . . . . . . . . . . . . . . . . . . 44Offline Protection. . . . . . . . . . . . . . . . . . . . . . . . . . . . . . . . . . . . . . . . . . . . . . . . . 46Online Protection. . . . . . . . . . . . . . . . . . . . . . . . . . . . . . . . . . . . . . . . . . . . . . . . . 48
890USE18000 September 2003 3

Chapter 4 Accessing the Software Editors . . . . . . . . . . . . . . . . . . . . . . . . 49Introduction . . . . . . . . . . . . . . . . . . . . . . . . . . . . . . . . . . . . . . . . . . . . . . . . . . . . . 49The Module Editor . . . . . . . . . . . . . . . . . . . . . . . . . . . . . . . . . . . . . . . . . . . . . . . . 50Modifying Module Parameters in the Properties Tab. . . . . . . . . . . . . . . . . . . . . . 52Accessing the Reflex Editor . . . . . . . . . . . . . . . . . . . . . . . . . . . . . . . . . . . . . . . . . 55Accessing the Resource Analysis Display. . . . . . . . . . . . . . . . . . . . . . . . . . . . . . 57I/O Image Overview . . . . . . . . . . . . . . . . . . . . . . . . . . . . . . . . . . . . . . . . . . . . . . . 60
Chapter 5 Verifying an Island Configuration . . . . . . . . . . . . . . . . . . . . . . 63Introduction . . . . . . . . . . . . . . . . . . . . . . . . . . . . . . . . . . . . . . . . . . . . . . . . . . . . . 63Verifying Your Island Configuration . . . . . . . . . . . . . . . . . . . . . . . . . . . . . . . . . . . 64Printing a Report . . . . . . . . . . . . . . . . . . . . . . . . . . . . . . . . . . . . . . . . . . . . . . . . . 66
Chapter 6 Downloading/Uploading Configuration Data . . . . . . . . . . . . . 69Introduction . . . . . . . . . . . . . . . . . . . . . . . . . . . . . . . . . . . . . . . . . . . . . . . . . . . . . 69Downloading Configuration Data to the Physical Island . . . . . . . . . . . . . . . . . . . 70Uploading Configuration Data to the Advantys Configuration Software . . . . . . . 71
Chapter 7 Using Other Standard CANopen Devices . . . . . . . . . . . . . . . . 75Importing and Exporting EDS Files . . . . . . . . . . . . . . . . . . . . . . . . . . . . . . . . . . . 75
Glossary . . . . . . . . . . . . . . . . . . . . . . . . . . . . . . . . . . . . . . . . . . . . . . .77
Index . . . . . . . . . . . . . . . . . . . . . . . . . . . . . . . . . . . . . . . . . . . . . . .93
4 890USE18000 September 2003

§
Safety InformationImportant Information
NOTICE Read these instructions carefully, and look at the equipment to become familiar with the device before trying to install, operate, or maintain it. The following special messages may appear throughout this documentation or on the equipment to warn of potential hazards or to call attention to information that clarifies or simplifies a procedure.
The addition of this symbol to a Danger or Warning safety label indicatesthat an electrical hazard exists, which will result in personal injury if theinstructions are not followed.
This is the safety alert symbol. It is used to alert you to potential personalinjury hazards. Obey all safety messages that follow this symbol to avoidpossible injury or death.
DANGER indicates an imminently hazardous situation, which, if not avoided, will result in death, serious injury, or equipment damage.
DANGER
WARNINGWARNING indicates a potentially hazardous situation, which, if not avoided, can result in death, serious injury, or equipment damage.
CAUTIONCAUTION indicates a potentially hazardous situation, which, if not avoided, can result in injury or equipment damage.
890USE18000 September 2003 5

Safety Information
PLEASE NOTE All pertinent state, regional, and local safety regulations must be observed when installing and using this product. For reasons of safety and to ensure compliance with documented system data, only the manufacturer should perform repairs to components.When controllers are used for applications with technical safety requirements, please follow the relevant instructions.No responsibility is assumed by Schneider Electric for any consequences arising out of the use of this material. This document is not intended as an instruction manual for untrained persons.© Schneider Electric 2003 All rights reserved.
6 890USE18000 September 2003

About the Book
At a Glance
Document Scope This document provides basic information and instructions for getting the Advantys Configuration Software set up and operating.
Validity Note The data and illustrations found in this book are not binding. We reserve the right to modify our products in line with our policy of continuous product development. The information in this document is subject to change without notice and should not be construed as a commitment by Schneider Electric.
Related Documents
Title of Documentation Reference Number
The Advantys STB System Planning and Installation Guide 890USE17100
The Advantys STB System Hardware Components Reference Guide 890USE17200
The Advantys STB Profibus DP Network Interface Applications Guide 890USE17300
The Advantys STB INTERBUS Network Interface Applications Guide 890USE17400
The Advantys STB DeviceNet Network Interface Applications Guide 890USE17500
The Advantys STB CANopen Network Interface Applications Guide 890USE17600
The Advantys STB Ethernet TCP/IP Modbus Network Interface Applications Guide
890USE17700
The Advantys STB Modbus Plus Network Interface Applications Guide 890USE17800
The Advantys STB Fipio Network Interface Applications Guide 890USE17900
The Advantys Reflex Actions Reference Guide 890USE18300
890USE18000 September 2003 7

About the Book
Product Related Warnings
Schneider Electric assumes no responsibility for any errors that may appear in this document. If you have any suggestions for improvements or amendments or have found errors in this publication, please notify us.No part of this document may be reproduced in any form or by any means, electronic or mechanical, including photocopying, without express written permission of Schneider Electric. All rights reserved. Copyright 2003.All pertinent state, regional, and local safety regulations must be observed when installing and using this product. For reasons of safety and to ensure compliance with documented system data, only the manufacturer should perform repairs to components.When controllers are used for applications with technical safety requirements, please follow the relevant instructions.Failure to use Schneider Electric software or approved software with our hardware products may result in injury, harm, or improper operating results.Failure to observe this product related warning can result in injury or equipment damage.
User Comments We welcome your comments about this document. You can reach us by e-mail at [email protected]
8 890USE18000 September 2003
890USE18000 September 2003
1
Hardware and Software RequirementsIntroduction
Overview The Advantys configuration software is designed to run on various Windows-based operating systems. This chapter describes your computer system requirements. It also provides instructions for installing and uninstalling the software.
What’s in this Chapter?
This chapter contains the following topics:
Topic Page
System Requirements 10
Installing and Uninstalling the Software 11
9
Requirements
System Requirements
Hardware Requirements
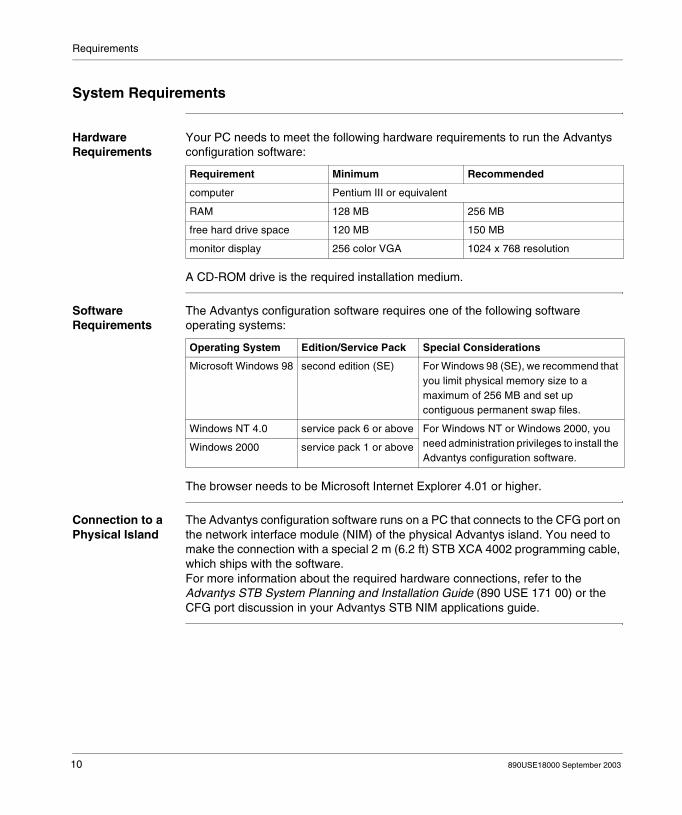
Your PC needs to meet the following hardware requirements to run the Advantys configuration software:
A CD-ROM drive is the required installation medium.
Software Requirements
The Advantys configuration software requires one of the following software operating systems:
The browser needs to be Microsoft Internet Explorer 4.01 or higher.
Connection to a Physical Island
The Advantys configuration software runs on a PC that connects to the CFG port on the network interface module (NIM) of the physical Advantys island. You need to make the connection with a special 2 m (6.2 ft) STB XCA 4002 programming cable, which ships with the software.For more information about the required hardware connections, refer to the Advantys STB System Planning and Installation Guide (890 USE 171 00) or the CFG port discussion in your Advantys STB NIM applications guide.
Requirement Minimum Recommended
computer Pentium III or equivalent
RAM 128 MB 256 MB
free hard drive space 120 MB 150 MB
monitor display 256 color VGA 1024 x 768 resolution
Operating System Edition/Service Pack Special Considerations
Microsoft Windows 98 second edition (SE) For Windows 98 (SE), we recommend that you limit physical memory size to a maximum of 256 MB and set up contiguous permanent swap files.
Windows NT 4.0 service pack 6 or above For Windows NT or Windows 2000, you need administration privileges to install the Advantys configuration software.
Windows 2000 service pack 1 or above
10 890USE18000 September 2003

Requirements
Installing and Uninstalling the Software
Before You Start Before you install the Advantys configuration software: uninstall any previous version of the Advantys configuration software close all Windows applications and virus-protection software
Uninstalling the Software
To uninstall the Advantys configuration software from your computer, chose the following path:
Installing the Software
To install the Advantys configuration software:
Start → Settings → Control Panel → Add/Remove Programs
Step Action Result
1 Insert the Advantys CD in your PC’s CD-ROM drive.
If the AUTORUN function is activated, the installation will start automatically.
2 If the installation does not start automatically, click Start → Run.
The Run dialog box will appear.
3 Enter [Drive:]\setup.exe, then click OK.
The language selection screen appears.
4 Choose a language and click OK. A message appears asking you if you want to register the your copy of the software.
5 To register the software, click Yes. To run the software without registering it, click No.
An unregistered software package will run for 21 days, then stop running. You will need to uninstall the expired software before installing a new version. The new installation must be registered before it will work.
6 Follow the remaining on-screen installation instructions.
Once the software has been installed, an icon appears on your desktop, which you can double-click to start the software:
890USE18000 September 2003 11

Requirements
12 890USE18000 September 2003
890USE18000 September 2003
2
Screen ElementsIntroduction
Overview The concepts of an island and a workspace are explained, and the elements that appear on the screen when the software is running are described. These elements include: the workspace browser the catalog browser the island editor the log window the toolbarsThe chapter also provides a work flow for creating an Advantys STB project.
What’s in this Chapter?
This chapter contains the following topics:
Topic Page
What Is an Island? 14
Creating a Project with the Advantys Configuration Software 16
The Workspace 18
Workspace Toolbars 20
Workspace Browser 24
Island Editor 26
The Catalog Browser 31
The Log Window 34
13

Elements
What Is an Island?
Overview Before we describe the different capabilities available in the Advantys configuration software, let’s distinguish between a physical island in the real world of your application and a logical island in the context of the software.
A Physical Island An island is an assembly of distributed I/O, power distribution and island bus communication/extension modules that function together as one node on a fieldbus. An island contains up to 32 I/O modules plus a NIM, one or more power distribution modules PDMs, and optionally some modules that let you extend the bus to multiple segments (or rails) of Advantys STB I/O, to Advantys STB preferred modules, and to standard CANopen devices.The following illustration shows an example of a segment on a physical island:
Module (1) is the NIM, followed by a PDM (2) and a voltage group of I/O modules (3). A second PDM follows this I/O group. The second PDM (4) supports another group of I/O modules (5) that require a different field power voltage. The last device on the segment is an EOS module (6), which allows you to extend the physical island to another segment of Advantys I/O modules or to a preferred module.
1
23
45
6
14 890USE18000 September 2003
Elements
A Logical Island The Advantys configuration software lets you model a physical island so that it can be tested against our design rules (See Overview, p. 64) and customized to meet your application requirements. We call the software model the logical island.The logical island is a file in the software program with a .isl extension. It contains a description of the physical island—all the modules on the island and all the operating parameters associated with each module that may be defined in software.As you develop a logical island, the software will provide warnings about any mistakes you have made in the model, and usually it will prevent you from creating an invalid configuration. For example, it prevents you from placing a DC module in a location where it would receive AC field power (and vice versa).
890USE18000 September 2003 15

Elements
Creating a Project with the Advantys Configuration Software
Overview The Advantys configuration software provides a set of Windows-based tools that enable you to plan, model, customize, and test island bus designs and to download custom configurations to physical islands.
Advantages of Using the Software
All the Advantys STB I/O modules have factory-default parameter settings that allow them to be operational directly out of the box. If you want to customize your island’s operational capabilities, however, you need to use the Advantys configuration software.The software lets you: customize the operating parameters of the I/O modules create and implement reflex actions optimize island performance by assigning priority to certain modules designate certain application-critical modules as mandatory add preferred modules and/or standard CANopen devices to the island
configuration validate that your island configuration adheres to Advantys STB design
guidelines (See Design Rules that Are Checked by the Software, p. 64)
16 890USE18000 September 2003
Elements
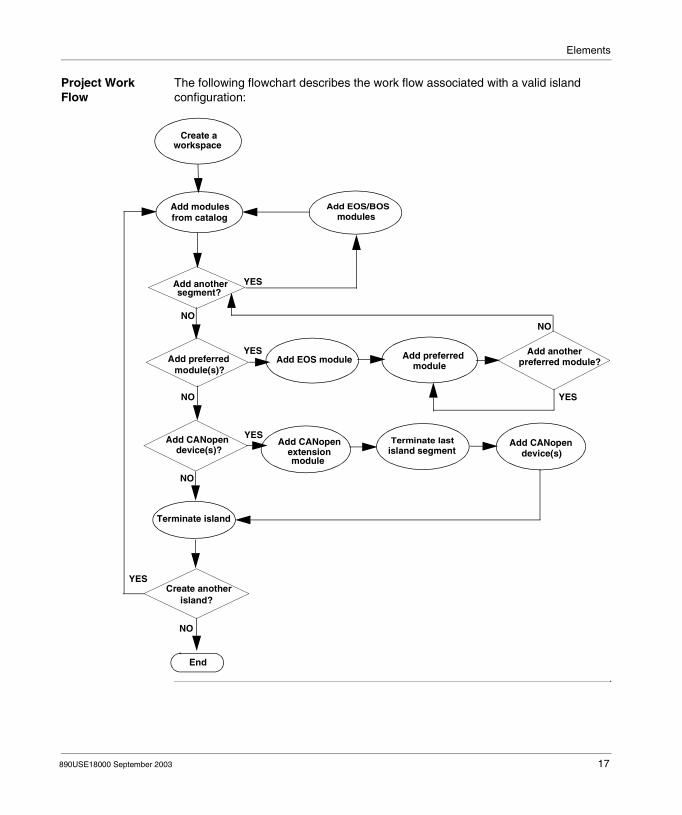
Project Work Flow
The following flowchart describes the work flow associated with a valid island configuration:
from catalogAdd modules
Add another segment?
Add EOS/BOS modules
Add preferred module(s)?
Add EOS module Add another
preferred module?Add preferred
module
Add CANopen device(s)?
Add CANopen
module
Terminate island
Create another island?
End
Create a workspace
extension Terminate last
island segmentAdd CANopen
device(s)
YES
NO
YES
NO YES
NO
YES
NO
NO
YES
890USE18000 September 2003 17
Elements
The Workspace
Overview The workspace is a project environment in the Advantys configuration software. The workspace is where you design a logical island configuration. Within the workspace, you can create a new configuration and download it to the physical island (See Downloading Configuration Data to the Physical Island, p. 70). You can also upload configuration data from a physical island to a logical island in the workspace (See Uploading Configuration Data to the Advantys Configuration Software, p. 71).A workspace is saved as a file with an .aiw extension.
Relationship of the Workspace to an Island
One or more logical islands can be created and managed in a workspace, up to a maximum of 10 islands. The configuration data associated with each island is stored in its own .isl file in the workspace.
Customizing Your Workspace
You can customize your workspace settings by selecting Settings from the Options pull-down menu. These settings include: the interface language (English, French, German, Spanish or Italian) foreground and background colors the default directory pathIf you have more than one workspace on your computer, you can define different settings for different workspaces.
18 890USE18000 September 2003
Elements
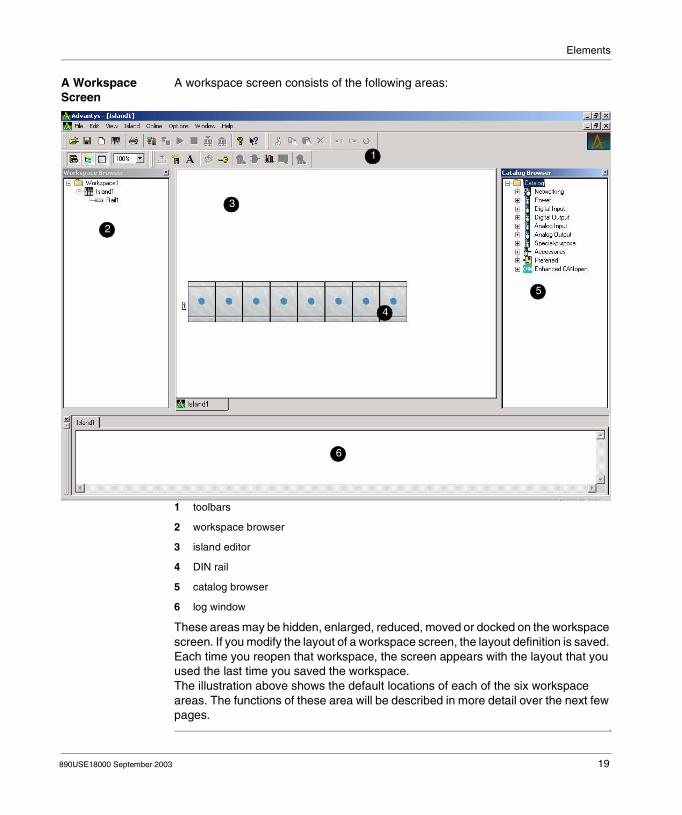
A Workspace Screen
A workspace screen consists of the following areas:
1 toolbars
2 workspace browser
3 island editor
4 DIN rail
5 catalog browser
6 log window
These areas may be hidden, enlarged, reduced, moved or docked on the workspace screen. If you modify the layout of a workspace screen, the layout definition is saved. Each time you reopen that workspace, the screen appears with the layout that you used the last time you saved the workspace.The illustration above shows the default locations of each of the six workspace areas. The functions of these area will be described in more detail over the next few pages.
1
2
3
4
5
6
890USE18000 September 2003 19

Elements
Workspace Toolbars
Overview The Advantys configuration software has four groups of toolbars available on the workspace screen: view standard edit islandThe buttons on the toolbars let you execute frequently performed actions. Each of these four toolbar groups may be hidden or shown in the workspace screen. Each group may also be moved to different locations on the screen.
The View Toolbar The view toolbar has four buttons. The commands associated with these buttons let you modify the look of the workspace screen:
Button Command Function
Catalog Browser A toggle button that either shows or hides the catalog browser (See The Catalog Browser, p. 31) in the workspace screen.
Workspace Browser A toggle button that either shows or hides the workspace browser (See Workspace Browser, p. 24) in the workspace screen.
Log Window A toggle button that either shows or hides the log window (See The Log Window, p. 34) in the workspace screen.
Zoom Island Editor Increases/reduces the size of the island editor display (See Island Editor, p. 26) in the workspace screen. Choices are 100%, 75%, 50% or 25%. The island editor can be reduced, but it cannot be hidden.
20 890USE18000 September 2003
Elements
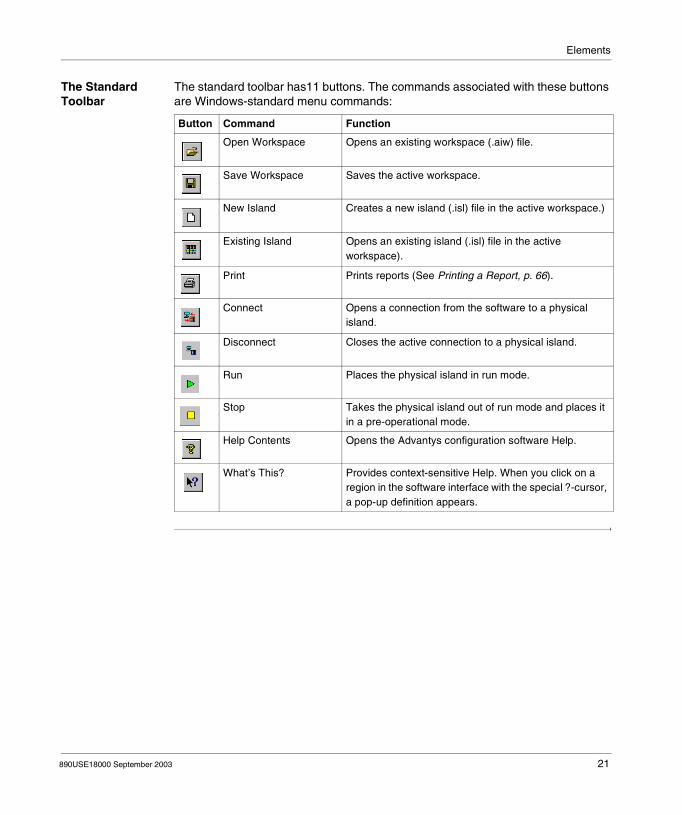
The Standard Toolbar
The standard toolbar has11 buttons. The commands associated with these buttons are Windows-standard menu commands:
Button Command Function
Open Workspace Opens an existing workspace (.aiw) file.
Save Workspace Saves the active workspace.
New Island Creates a new island (.isl) file in the active workspace.)
Existing Island Opens an existing island (.isl) file in the active workspace).
Print Prints reports (See Printing a Report, p. 66).
Connect Opens a connection from the software to a physical island.
Disconnect Closes the active connection to a physical island.
Run Places the physical island in run mode.
Stop Takes the physical island out of run mode and places it in a pre-operational mode.
Help Contents Opens the Advantys configuration software Help.
What’s This? Provides context-sensitive Help. When you click on a region in the software interface with the special ?-cursor, a pop-up definition appears.
890USE18000 September 2003 21

Elements
The Edit Toolbar The edit toolbar has seven buttons. The commands associated with these buttons let you edit objects in the island editor:
Button Command Function
Cut Cuts an object from the island editor.
Copy Copies an object from the island editor.
Paste Pastes an object into the island editor.
Delete Deletes an object from the island editor.
Undo Undoes the previous action. This command can be issued an unlimited number of times to undo previous edits. It will not undo actions performed before a Revert command was issued.
Redo Redoes the previous action. This command can be issued an unlimited number of times to redo previous edits. It will not redo actions performed before a Revert command was issued.
Revert Reverts the active .isl configuration to its last saved state.
22 890USE18000 September 2003
Elements
The Island Toolbar
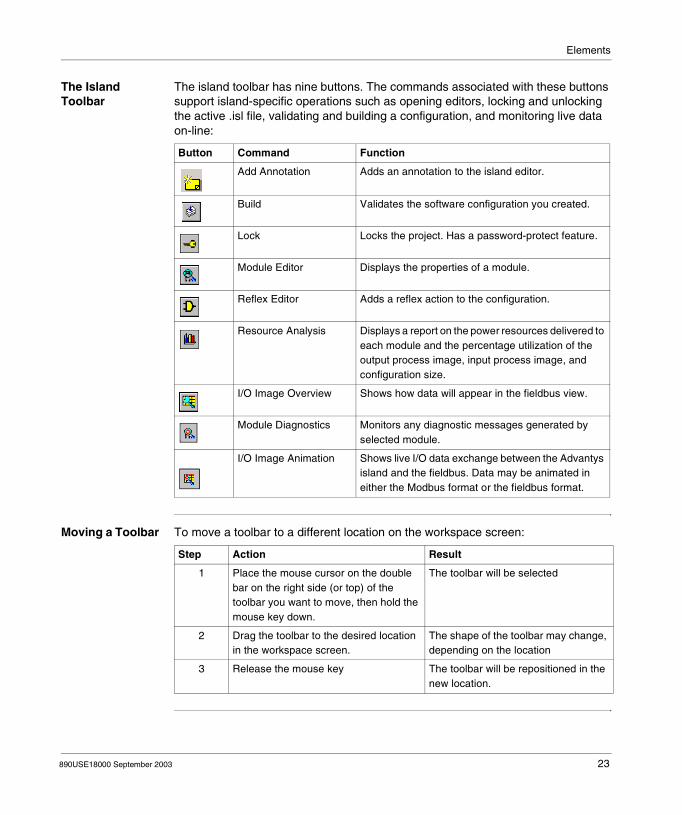
The island toolbar has nine buttons. The commands associated with these buttons support island-specific operations such as opening editors, locking and unlocking the active .isl file, validating and building a configuration, and monitoring live data on-line:
Moving a Toolbar To move a toolbar to a different location on the workspace screen:
Button Command Function
Add Annotation Adds an annotation to the island editor.
Build Validates the software configuration you created.
Lock Locks the project. Has a password-protect feature.
Module Editor Displays the properties of a module.
Reflex Editor Adds a reflex action to the configuration.
Resource Analysis Displays a report on the power resources delivered to each module and the percentage utilization of the output process image, input process image, and configuration size.
I/O Image Overview Shows how data will appear in the fieldbus view.
Module Diagnostics Monitors any diagnostic messages generated by selected module.
I/O Image Animation Shows live I/O data exchange between the Advantys island and the fieldbus. Data may be animated in either the Modbus format or the fieldbus format.
Step Action Result
1 Place the mouse cursor on the double bar on the right side (or top) of the toolbar you want to move, then hold the mouse key down.
The toolbar will be selected
2 Drag the toolbar to the desired location in the workspace screen.
The shape of the toolbar may change, depending on the location
3 Release the mouse key The toolbar will be repositioned in the new location.
890USE18000 September 2003 23

Elements
Workspace Browser
Overview The workspace browser is an hierarchical view of all of the island (.isl) files in the active workspace. By default, the workspace browser is located in a pane on the left side of the workspace screen.
Expanding and Collapsing the Browser Views
The workspace browser lets you expand each island into its segments (which it calls rails). Each rail can be expanded into the modules that populate it. When an island or a rail is collapsed, it has a (+) sign to the left of its name. To expand an island or a rail, click the (+) sign.When an island or a rail is expanded, it has a (-) sign next to its name. To collapse it, click the (-) sign.The following illustration is an example of a workspace browser. The active workspace has two islands. Each island contains one rail. The rails are expanded to list the modules that reside on them:
Online/Offline Indications
The workspace browser displays one of two icons next to the name of each island:
indicates that an island is online (connected to a physical island)
indicates that an island is offline (disconnected from a physical island)
24 890USE18000 September 2003

Elements
Shortcut Menus When you right-click on a node in the workspace browser, a shortcut menu with a list of commands appears:
Properties If you right click on the workspace folder, then left click on Properties, the Workspace Properties dialog box appears. The dialog has six field. Two fields contain read-only information: Filename Last modified date and timeYou can enter information in the remaining four fields: Logical name Author Comments Version number and revisionThere is an Auto-increment check box in the dialog. If you check this box, the software will automatically keep track of version/revision numbering for you.
If you right click on a ... ... the following list of commands appears:
workspace folder Add Island to the workspace Properties of the workspace
island name Add Rail to the active island Remove the active island Build the configuration for the selected island Connect to a physical island Disconnect from a physical island Properties of the active island
rail name Cut the rail Copy the rail Paste the rail Delete the rail Add Module to the rail
module name Cut the module Copy the module Paste the module Delete the module Module Editor
Note: If the command appears dimmed, it is unavailable.
890USE18000 September 2003 25

Elements
Island Editor
Overview The island editor provides a graphical display of the logical islands (the .isl files) in the current workspace. It allows you to visualize and the physical island you are modelling.
Screen Position By default, the island editor is located in the center pane of the workspace. It can be displayed at 100%, 75%, 50% or 25%. You can increase or reduce the view of an island image island editor’s components using the Zoom Island Editor box (See Workspace Toolbars, p. 20).
26 890USE18000 September 2003

Elements
Components of the Island Editor
The island editor consists of a graphical image of an island and a set of tabs below the display. The names of each .isl file in the active workspace are displayed on the tabs. A workspace can contain as many as 10 islands.You may tile or cascade the island images in the island editor, or you may maximize them so that only one image appears in the image screen at any time.Only one island can be active at a time in the island editor. To select the island graphic you want active, click once on the associated tab. The tab of the island that is being displayed will appear in front of the other tabs and will be a little larger than the other tabs. The border around the selected island image will be a highlighted color.In the example below, we see a workspace that contains three logical islands—station_1, station_2 and station_3. The active graphic displayed in the island editor is an image of station_2. Notice how the middle tab is enunciated:
1 the island tabs
2 an island image
1 2
890USE18000 September 2003 27

Elements
Adding Modules to a Rail
You can add modules to a rail by in the active island by several different methods (See Adding Modules to an Island Segment, p. 38). Usually, the simplest way is to select a module name in the catalog browser (See The Catalog Browser, p. 31), drag it from the catalog browser and drop it in the desired location on a rail in the island editor.The island editor applies design rules to the island model you are creating. It will not let you insert modules in invalid locations. For example, it prevents you from placing a 24 VDC I/O module in a location on the island segment that is being serviced by a 115/230 VAC power distribution module (PDM).The modules need to be placed on a rail in a particular sequence: The first module on the island must be a NIM. Only one NIM is used on an island.
It can be picked from the Networking group in the catalog browser. Directly to the right of the NIM, place a PDM. PDMs can be picked from the
Power group in the catalog browser. Choose either a 24 VDC PDM or a 115/230 VAC PDM, depending on the power requirements of the I/O modules that follow.
Install the desired I/O modules to the right of the PDM. Make sure that all the I/O modules that follow a PDM use the same AC or DC voltage. If you are planning to use both AC and DC I/O modules on a rail, we suggest that you install the AC PDM(s) and AC modules first.
If you are using more than one voltage group on a rail, install another PDM after the first voltage group of I/O modules. The second PDM will isolate field power between the two voltage groups as well as distribute the appropriate field power to the modules that follow it.
Install the desired I/O modules to the right of the second PDM. The sum of the logic bus current consumed by all the I/O modules on the rail
cannot exceed 1.2 A. If the modules use more than 1.2 A of logic bus current, you will need to add more rails to the island configuration.
If you are not extending the island beyond the primary segment (the first rail), insert a terminator plate at the end of the rail. The terminator plate can be picked from the Accessories group in the catalog browser.
If you plan to extend the island with more Advantys STB I/O modules or with one or more preferred modules, insert an EOS module at the end of the rail. Do not terminate the rail. The EOS module can be picked from the Accessories group in the catalog browser.
If you plan to extend the island with one ore more standard CANopen devices, insert a CANopen extension module to the end of the rail, and insert a termination plate after the CANopen extension module. The CANopen extension module can be picked from the Accessories group in the catalog browser.
28 890USE18000 September 2003
Elements
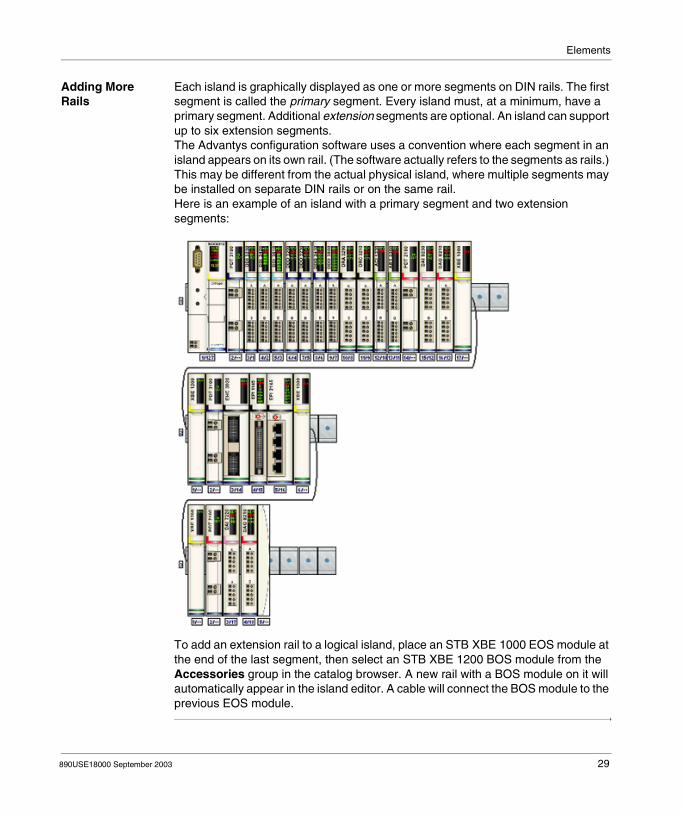
Adding More Rails
Each island is graphically displayed as one or more segments on DIN rails. The first segment is called the primary segment. Every island must, at a minimum, have a primary segment. Additional extension segments are optional. An island can support up to six extension segments.The Advantys configuration software uses a convention where each segment in an island appears on its own rail. (The software actually refers to the segments as rails.) This may be different from the actual physical island, where multiple segments may be installed on separate DIN rails or on the same rail.Here is an example of an island with a primary segment and two extension segments:
To add an extension rail to a logical island, place an STB XBE 1000 EOS module at the end of the last segment, then select an STB XBE 1200 BOS module from the Accessories group in the catalog browser. A new rail with a BOS module on it will automatically appear in the island editor. A cable will connect the BOS module to the previous EOS module.
890USE18000 September 2003 29

Elements
Shortcut Menus When you right-click on an item in the island editor, a short menu with a list of commands displays. The following table lists the short menu commands available:
If the command appears dimmed, it is disabled.
If you right-click on ... ... the following commands appear
an open area Add Annotation to the island and Paste
a rail Cut the rail Copy the rail Paste the rail Delete the rail
a module Cut the module Copy the module Paste the module Delete the module Module Editor
30 890USE18000 September 2003
Elements
The Catalog Browser
Overview The catalog browser is a list of all the modules in the Advantys STB product catalog. By default, the catalog browser is located in the right pane of the workspace. Use the catalog browser to populate a logical island by dragging modules from it into the island editor (See Island Editor, p. 26).
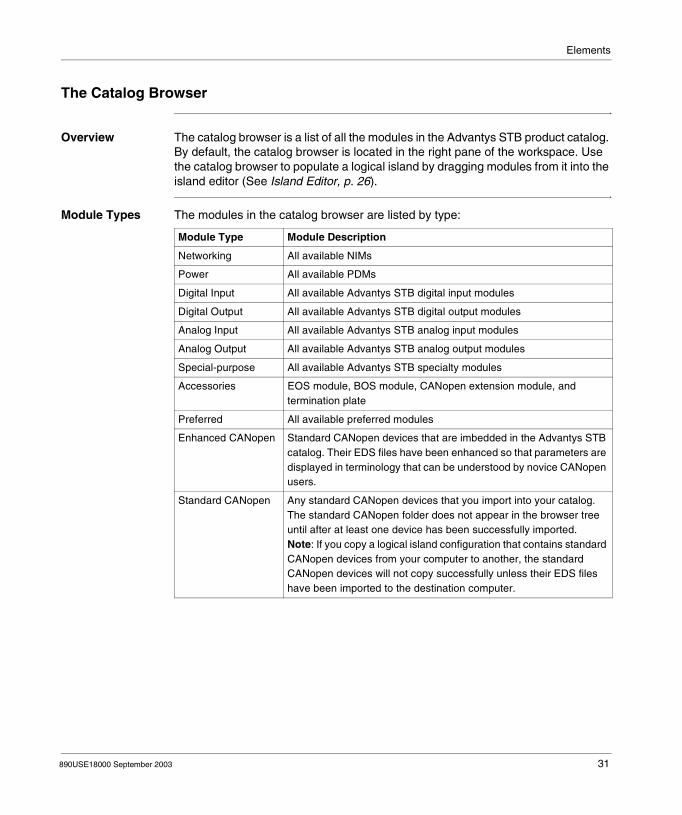
Module Types The modules in the catalog browser are listed by type:
Module Type Module Description
Networking All available NIMs
Power All available PDMs
Digital Input All available Advantys STB digital input modules
Digital Output All available Advantys STB digital output modules
Analog Input All available Advantys STB analog input modules
Analog Output All available Advantys STB analog output modules
Special-purpose All available Advantys STB specialty modules
Accessories EOS module, BOS module, CANopen extension module, and termination plate
Preferred All available preferred modules
Enhanced CANopen Standard CANopen devices that are imbedded in the Advantys STB catalog. Their EDS files have been enhanced so that parameters are displayed in terminology that can be understood by novice CANopen users.
Standard CANopen Any standard CANopen devices that you import into your catalog. The standard CANopen folder does not appear in the browser tree until after at least one device has been successfully imported.Note: If you copy a logical island configuration that contains standard CANopen devices from your computer to another, the standard CANopen devices will not copy successfully unless their EDS files have been imported to the destination computer.
890USE18000 September 2003 31
Elements
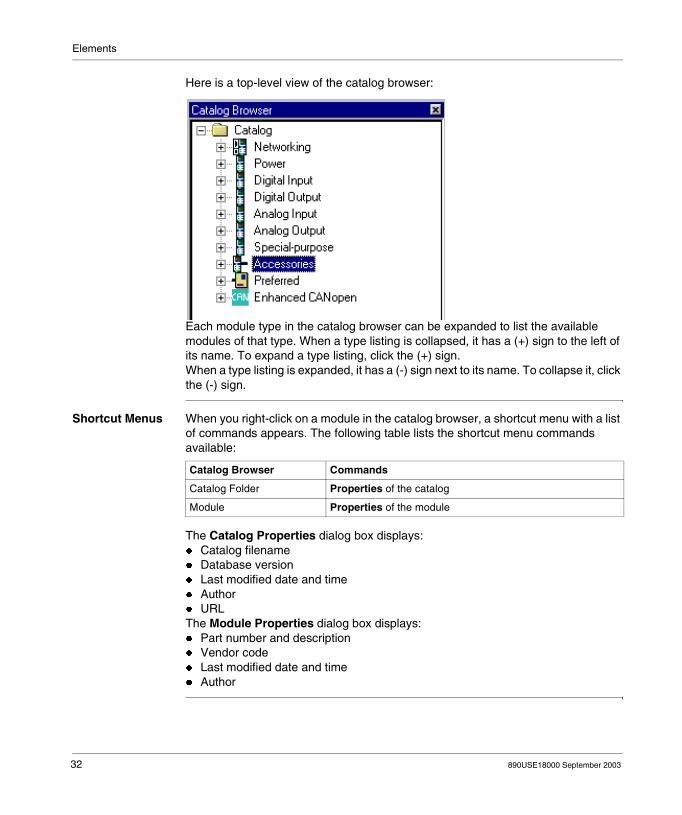
Here is a top-level view of the catalog browser:
Each module type in the catalog browser can be expanded to list the available modules of that type. When a type listing is collapsed, it has a (+) sign to the left of its name. To expand a type listing, click the (+) sign.When a type listing is expanded, it has a (-) sign next to its name. To collapse it, click the (-) sign.
Shortcut Menus When you right-click on a module in the catalog browser, a shortcut menu with a list of commands appears. The following table lists the shortcut menu commands available:
The Catalog Properties dialog box displays: Catalog filename Database version Last modified date and time Author URLThe Module Properties dialog box displays: Part number and description Vendor code Last modified date and time Author
Catalog Browser Commands
Catalog Folder Properties of the catalog
Module Properties of the module
32 890USE18000 September 2003

Elements
Adding New Modules to the Catalog Browser
You will need to add new modules to the catalog browser: when a new release of Advantys STB modules (along with any new preferred
modules and/or enhanced CANopen devices) becomes available if you want to use standard CANopen devices in your island configurationsWhen new modules become available, a new database will be offered on our website.If you want to add a standard CANopen device to the catalog browser, use the import capability (See Importing and Exporting EDS Files, p. 75) in the software to load the EDS file(s) to your workspace.
890USE18000 September 2003 33

Elements
The Log Window
Overview The log window displays the results of the operations performed by the Advantys configuration software during a work session. Each island has its own log window. By default, the log window is located in the bottom pane on the workspace screen.
Message Types Messages that appear in the log window might be: warnings error messages and error codes command confirmations status for processes that require time to execute—for example, downloading
configuration data to the physical NIM (See Downloading Configuration Data to the Physical Island, p. 70)
resource analysis results (See Accessing the Resource Analysis Display, p. 57) island build results (See Verifying Your Island Configuration, p. 64)
Shortcut Menu When you right-click in the log window, a shortcut menu appears with the following commands: Save Logfile Clear
Saving a Log File The log window is temporary. It posts messages during the current work session, until you close the active workspace. When you reopen a workspace, the new log window will come up empty.For troubleshooting purposes, you may want to save the contents of a log window before you close the work session. To do this, right-click in the log window and left-click on Save Logfile. A Save Log File screen appears that lets you save the log contents to a text file.
34 890USE18000 September 2003

890USE18000 September 2003
3
Creating an Island Bus ConfigurationIntroduction
Overview This chapter describes how a logical island configuration can be created in an active workspace.
What’s in this Chapter?
This chapter contains the following topics:
Topic Page
Creating a Workspace 36
The Rails 37
Adding Modules to an Island Segment 38
Adding Extension Rails to the Island Configuration 40
Extending the Configuration to a Preferred Module 41
Extending the Configuration to Standard CANopen Devices 42
Adding and Deleting Annotation to an Island 44
Offline Protection 46
Online Protection 48
35
Creating an Island Configuration
Creating a Workspace
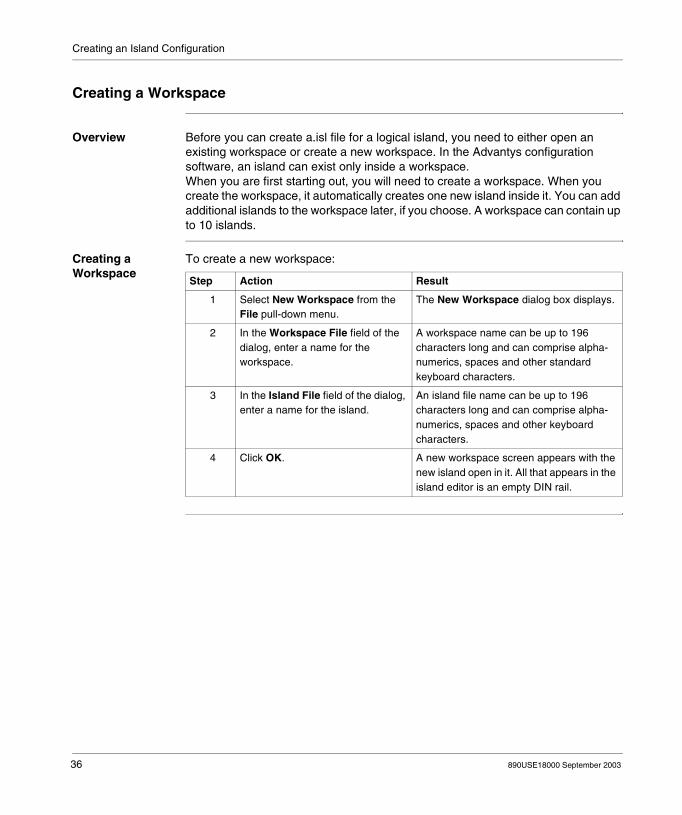
Overview Before you can create a.isl file for a logical island, you need to either open an existing workspace or create a new workspace. In the Advantys configuration software, an island can exist only inside a workspace.When you are first starting out, you will need to create a workspace. When you create the workspace, it automatically creates one new island inside it. You can add additional islands to the workspace later, if you choose. A workspace can contain up to 10 islands.
Creating a Workspace
To create a new workspace:
Step Action Result
1 Select New Workspace from the File pull-down menu.
The New Workspace dialog box displays.
2 In the Workspace File field of the dialog, enter a name for the workspace.
A workspace name can be up to 196 characters long and can comprise alpha-numerics, spaces and other standard keyboard characters.
3 In the Island File field of the dialog, enter a name for the island.
An island file name can be up to 196 characters long and can comprise alpha-numerics, spaces and other keyboard characters.
4 Click OK. A new workspace screen appears with the new island open in it. All that appears in the island editor is an empty DIN rail.
36 890USE18000 September 2003
Creating an Island Configuration
The Rails
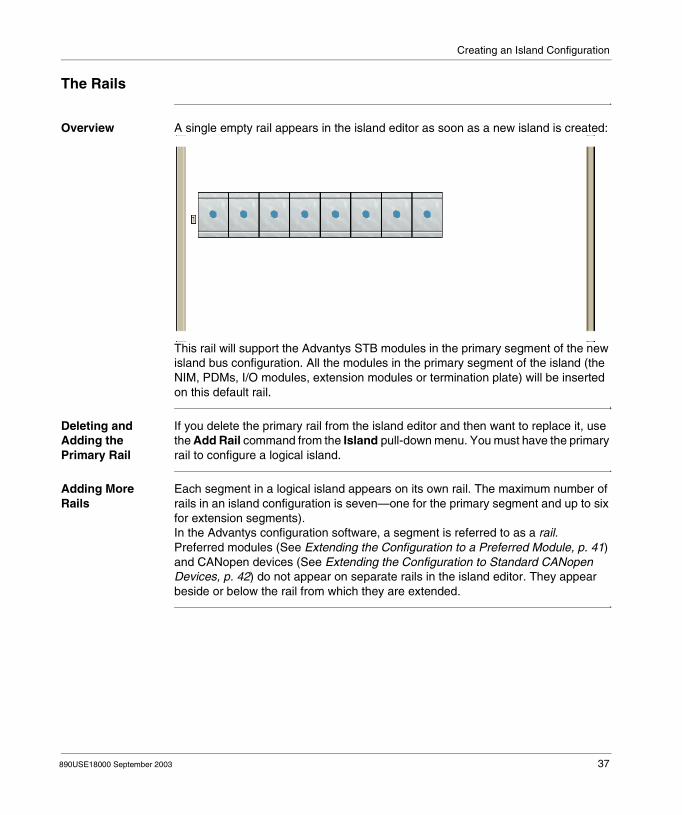
Overview A single empty rail appears in the island editor as soon as a new island is created:
This rail will support the Advantys STB modules in the primary segment of the new island bus configuration. All the modules in the primary segment of the island (the NIM, PDMs, I/O modules, extension modules or termination plate) will be inserted on this default rail.
Deleting and Adding the Primary Rail
If you delete the primary rail from the island editor and then want to replace it, use the Add Rail command from the Island pull-down menu. You must have the primary rail to configure a logical island.
Adding More Rails
Each segment in a logical island appears on its own rail. The maximum number of rails in an island configuration is seven—one for the primary segment and up to six for extension segments).In the Advantys configuration software, a segment is referred to as a rail.Preferred modules (See Extending the Configuration to a Preferred Module, p. 41) and CANopen devices (See Extending the Configuration to Standard CANopen Devices, p. 42) do not appear on separate rails in the island editor. They appear beside or below the rail from which they are extended.
890USE18000 September 2003 37

Creating an Island Configuration
Adding Modules to an Island Segment
Overview There are three ways to add the modules to a rail: drag-and-drop double-click on the module select the module and press EnterIf you try to add a module on the rail in an invalid location, a warning message appears and the software does not allow the module to be dropped in that location.
Drag-and-Drop Method
To add a module to a rail using the drag-and-drop method:
Double-Click Method
The double-click method is usually the quickest way to add a module to the configuration: If you want to add a module to the end of the last rail, simply double-click on the
module name in the catalog browser (See The Catalog Browser, p. 31). A graphical version of the module appears at the end of the rail.
If you want to place a module between two modules that are already on the island, single-click on the leftmost of the two existing modules in the island editor, then double-click on the new module name in the catalog browser. A graphical version of the new module appears between the two existing modules on the rail.
Step Action Result
1 Single-click on a module name in the catalog browser (See The Catalog Browser, p. 31).
The module name is highlighted.
2 Hold down the cursor and drag it to the desired location on the rail in the island editor.
As the module is dragged across the
workspace, the icon displays.
When the module crosses over the rail, one of the following icons appears:
indicating a valid position
indicating an invalid position
3 Release the mouse button on a valid location.
A graphical version of the module drops in the location on the rail.
38 890USE18000 September 2003
Creating an Island Configuration
Enter Key Method
The Enter key method is similar to the double-click method: If you want to add a module to the end of the last rail, single-click on the module
name in the catalog browser (See The Catalog Browser, p. 31), then push Enter. A graphical version of the module appears at the end of the rail.
If you want to place a module between two modules that are already on the island, single-click on the leftmost of the two existing modules in the island editor, then single-click on the new module name in the catalog browser and push Enter. A graphical version of the new module appears between the two existing modules on the rail.
890USE18000 September 2003 39

Creating an Island Configuration
Adding Extension Rails to the Island Configuration
Procedure You can extend the island configuration over longer distances by adding extension rails:
Step Action
1 If there is a terminator plate at the end of the last existing rail, remove it.
2 Pick an EOS module from the catalog browser and drop it in the island editor at the end of the last rail.
3 Double-click on a BOS module in the catalog browser.A new rail will appear in the island editor below the existing one. The BOS module (3) is the first module on the new rail. An extension cable (2) connects the EOS module (1) and the BOS module.:
4 Pick a PDM from the catalog browser and drop it in the island editor next to the BOS module.
5 Pick the appropriate I/O modules from the catalog browser and drop them in voltage group(s) after the PDM(s).
6 Pick either a terminator plate or another extension module (either an EOS or a CANopen extension module) and drop it at the end of the new rail.
Note: An island can support up to seven rails. The primary is required, and up to six extension rails are optional.
1
3
2
40 890USE18000 September 2003

Creating an Island Configuration
Extending the Configuration to a Preferred Module
Procedure To extend an island configuration from a rail to a preferred module:
Step Action
1 If there is a terminator plate at the end of the last existing rail in the island editor, remove it.
2 Pick an EOS module from the catalog browser and drop it in the island editor at the end of the rail.
3 Double-click on a preferred module in the catalog browser.The preferred module (3) appears in the island editor beside the rail. An extension cable (2) connects the EOS module (1) and the preferred module.
4 If you want to add another preferred module, repeat step 3. Each additional module is placed to the right of the previous module, with a cable connection between them. If you want to extend to a new Advantys I/O rail, go to step 5.If you want the preferred module to be the last module on the island, go to step 6.
5 Double-click on a BOS module in the catalog browser.A new rail will appear below the existing one. The BOS module is the first module on the new rail. An extension cable connects the preferred module and BOS module (See Adding Extension Rails to the Island Configuration, p. 40).
6 Apply 120 Ω termination to the physical preferred module.
Note: There is no graphical element in the software to indicate termination on a preferred module. You must provide this termination on the physical module.
1 3
2
890USE18000 September 2003 41
Creating an Island Configuration
Extending the Configuration to Standard CANopen Devices
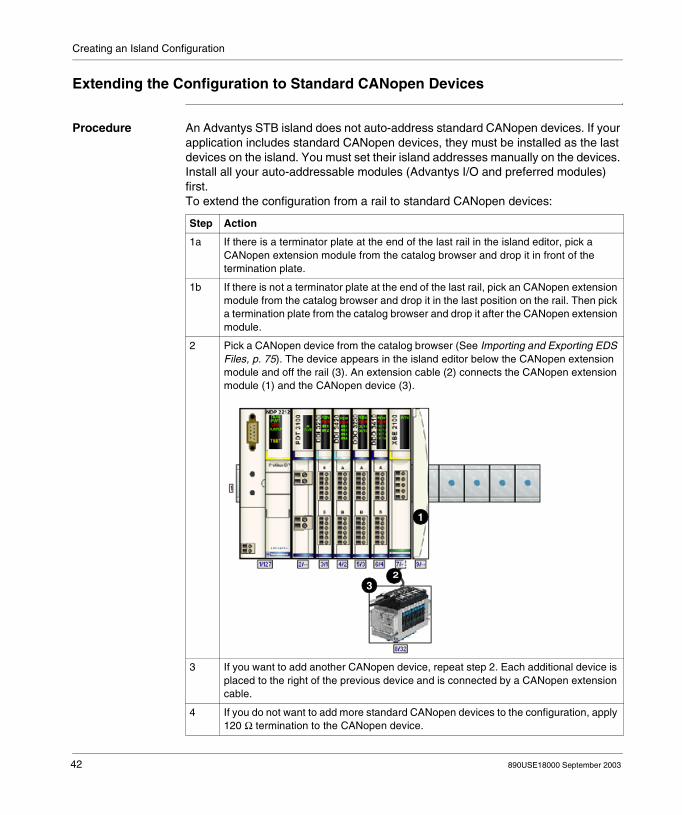
Procedure An Advantys STB island does not auto-address standard CANopen devices. If your application includes standard CANopen devices, they must be installed as the last devices on the island. You must set their island addresses manually on the devices. Install all your auto-addressable modules (Advantys I/O and preferred modules) first.To extend the configuration from a rail to standard CANopen devices:
Step Action
1a If there is a terminator plate at the end of the last rail in the island editor, pick a CANopen extension module from the catalog browser and drop it in front of the termination plate.
1b If there is not a terminator plate at the end of the last rail, pick an CANopen extension module from the catalog browser and drop it in the last position on the rail. Then pick a termination plate from the catalog browser and drop it after the CANopen extension module.
2 Pick a CANopen device from the catalog browser (See Importing and Exporting EDS Files, p. 75). The device appears in the island editor below the CANopen extension module and off the rail (3). An extension cable (2) connects the CANopen extension module (1) and the CANopen device (3).
3 If you want to add another CANopen device, repeat step 2. Each additional device is placed to the right of the previous device and is connected by a CANopen extension cable.
4 If you do not want to add more standard CANopen devices to the configuration, apply 120 Ω termination to the CANopen device.
1
2
32
42 890USE18000 September 2003

Creating an Island Configuration
Note: There is no graphical element in the software to indicate termination on a standard CANopen device. You must provide this termination on the physical device.
890USE18000 September 2003 43
Creating an Island Configuration
Adding and Deleting Annotation to an Island
Adding Annotation
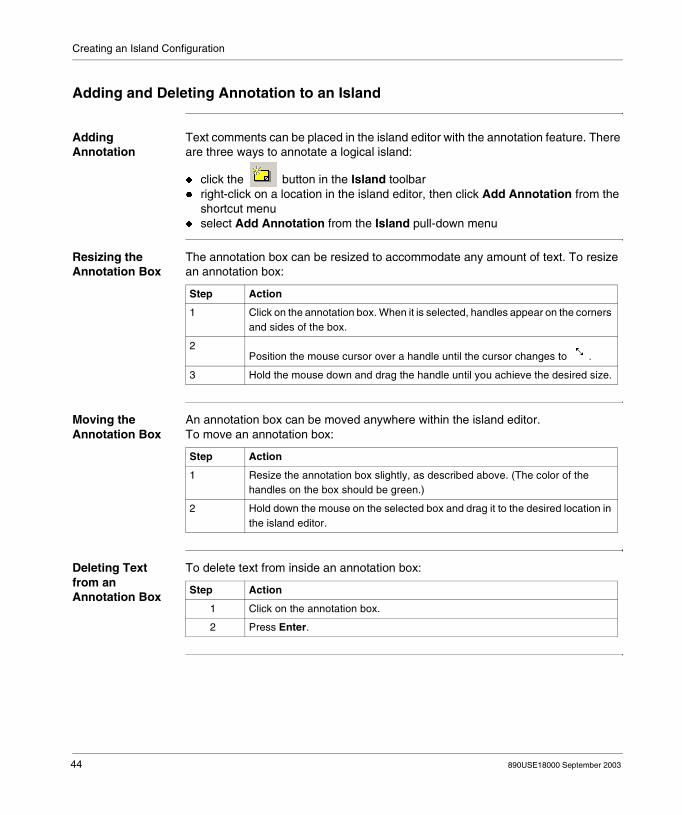
Text comments can be placed in the island editor with the annotation feature. There are three ways to annotate a logical island:
click the button in the Island toolbar right-click on a location in the island editor, then click Add Annotation from the
shortcut menu select Add Annotation from the Island pull-down menu
Resizing the Annotation Box
The annotation box can be resized to accommodate any amount of text. To resize an annotation box:
Moving the Annotation Box
An annotation box can be moved anywhere within the island editor.To move an annotation box:
Deleting Text from an Annotation Box
To delete text from inside an annotation box:
Step Action
1 Click on the annotation box. When it is selected, handles appear on the corners and sides of the box.
2Position the mouse cursor over a handle until the cursor changes to .
3 Hold the mouse down and drag the handle until you achieve the desired size.
Step Action
1 Resize the annotation box slightly, as described above. (The color of the handles on the box should be green.)
2 Hold down the mouse on the selected box and drag it to the desired location in the island editor.
Step Action
1 Click on the annotation box.
2 Press Enter.
44 890USE18000 September 2003

Creating an Island Configuration
Retrieving Text for an Annotation Box
To retrieve text that has just been deleted from an annotation box:
Deleting an Annotation Box
To delete an annotation box along and its contents:
Step Action
1 Click on the empty annotation box.
2Click the button.
Step Action
1 Click on the annotation box.
2 From the Island menu, click Delete Annotation.
890USE18000 September 2003 45

Creating an Island Configuration
Offline Protection
Overview Whenever you open an existing island (.isl) file, it comes up locked. When a file is locked, you can monitor it in the workspace screen, but you cannot edit it. Editing is possible only when the file is unlocked. Optionally, you can apply password protection to the offline lock. If you apply a password, you will not be able to unlock the file without first entering the password.
Applying a Password to the Lock
To apply a password to the lock on a new .isl file:
The password must be an alphanumeric string between 1 and 36 characters long. An empty password is not valid.
Changing the Lock Password
To change the password on the lock:
Step Action
1
While the new .isl file is active in the workspace, click . A message appears asking you if you want to set a password.
2 Click Yes.
3 Type a password, then retype it to confirm.
4 Click OK.
5 A message appears prompting you to save the file with the new password. Click OK.
Step Action
1
While the .isl file is active in the workspace, click . A message appears asking you if you want to change the password.
2 Click Yes.
3 Enter the old password, then the new one, and then confirm the new password.
4 Click OK.
5 A message appears prompting you to save the file with the new password. Click OK.
46 890USE18000 September 2003

Creating an Island Configuration
Unlocking After a password has been applied to a .isl file, you need to know the password to unlock and edit the file when you reopen it. To unlock a password-protected .isl file:
Step Action
1
While the .isl file is active in the workspace, click .
2 Enter the password.
4 Click OK.
890USE18000 September 2003 47

Creating an Island Configuration
Online Protection
Overview An online protection capability is available to prevent unauthorized changes or overwrites to the configuration data in the physical island. When online protection is enabled, the RST button on the NIM is disabled and data on the removable memory card is ignored. You will be asked to apply a password to the online protection. When a password is applied, a user needs to know the password in order to remove the protection feature or get into (or out of) test mode.
The Online Protection Feature
The protection feature is available only in online mode (when the active .isl file in the Advantys configuration software is connected to a physical island).To enable online protection for the physical island:
The Protect command toggles the feature on and off. When protection is applied, a check mark appears in the box next to the command in the pull-down menu.
The Password The password must be an alphanumeric string between 0 and 6 characters long. An empty password is valid.When protection is activated, you will be queried for a password if you try to execute a command online. If you are not using a password, simply click OK when the password dialog appears.
Unprotecting To disable online protection, click Online → Protect again to toggle the feature off. When online protection is not applied, there is no check mark next to the command in the pull-down menu.
Note: Be sure to record the password. If you forget the password, you cannot use the RST button to reset the default configuration parameters or the removable memory card to load a new configuration. Also, you cannot change modes on the physical island (test mode/run mode) without the password while online protection is enabled.
Step Action
1 From the Online menu, click Protect.
2 Enter a password.
3 Click OK.
48 890USE18000 September 2003

890USE18000 September 2003
4
Accessing the Software EditorsIntroduction
Overview The Advantys configuration software features a set of online and offline editors that let you customize, monitor and evaluate your configuration data. This chapter provides an overview of these editors and instructions on accessing them.
What’s in this Chapter?
This chapter contains the following topics:
Topic Page
The Module Editor 50
Modifying Module Parameters in the Properties Tab 52
Accessing the Reflex Editor 55
Accessing the Resource Analysis Display 57
I/O Image Overview 60
49
Accessing Editors
The Module Editor
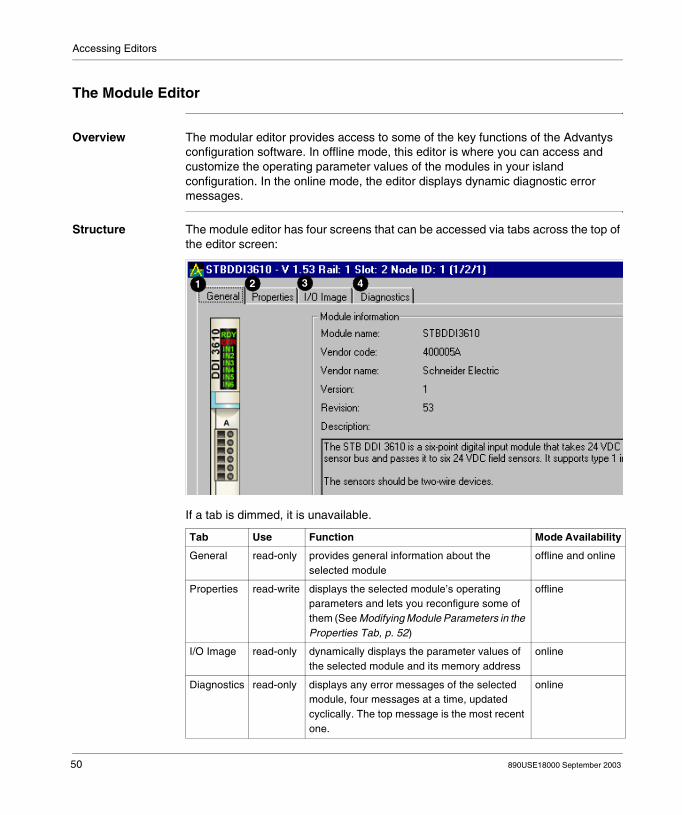
Overview The modular editor provides access to some of the key functions of the Advantys configuration software. In offline mode, this editor is where you can access and customize the operating parameter values of the modules in your island configuration. In the online mode, the editor displays dynamic diagnostic error messages.
Structure The module editor has four screens that can be accessed via tabs across the top of the editor screen:
If a tab is dimmed, it is unavailable.
Tab Use Function Mode Availability
General read-only provides general information about the selected module
offline and online
Properties read-write displays the selected module’s operating parameters and lets you reconfigure some of them (See Modifying Module Parameters in the Properties Tab, p. 52)
offline
I/O Image read-only dynamically displays the parameter values of the selected module and its memory address
online
Diagnostics read-only displays any error messages of the selected module, four messages at a time, updated cyclically. The top message is the most recent one.
online
1 2 3 4
50 890USE18000 September 2003

Accessing Editors
Accessing the Module Editor
There are several ways to open the module editor. In all cases, you must first select one module in your configuration, then open the editor for that module. Choose any one of the following: double-click on a module graphic in the island editor screen single-click on either a module graphic in the island editor or a module name in
the workspace browser, then click the button single-click on either a module graphic in the island editor or a module name in
the workspace browser, then select the Module Editor command from the Island pull-down menu
If the active .isl file is in offline mode when you open a module editor, the Properties screen opens. If the active .isl file is in online mode when you open a module editor, the Diagnostics screen opens.
890USE18000 September 2003 51

Accessing Editors
Modifying Module Parameters in the Properties Tab
Overview The Properties tab on the module editor contains the user-configurable parameters for the selected module. These parameters appear as: checkboxes at the top of the screen and items in a table of parametersThe following illustration shows an example of the module editor’s Properties tab:
1 Properties tab
2 Hexadecimal checkbox
3 Mandatory checkbox
4 Prioritize checkbox
5 Parameters table
6 Module Help button
1 2
3 4
5
6
52 890USE18000 September 2003

Accessing Editors
Numeric Display Format
Many of the parameter values are displayed and can be entered in either decimal or hexadecimal format. Choose the format you prefer by selecting checking or unchecking the Hexadecimal checkbox at the top right side of the modular editor (item 2 above). The default display format is decimal (the box is unchecked).
Mandatory Designation
When a module is designated as mandatory, its presence and health are considered critical for the island’s operations. If a mandatory module on a physical island fails, is powered down or is removed from its base, the entire island will stop operating.To designate mandatory status to a module, put a check in the Mandatory module checkbox on the top left side of the Properties tab (item 3 above). By default, this box is unchecked.
Module Priority Some digital input modules are considered fast modules. As a result, they have a user-configurable status called priority, which enables you to scan them more frequently than analog modules.Priority is available only for digital input modules. It cannot be applied to analog I/O or to any output modules.To assign priority to a digital input module, put a check in the Prioritize checkbox at the top left side of the Properties tab (item 4 above). By default, this box is unchecked.
890USE18000 September 2003 53

Accessing Editors
Parameters Table and Configuration Guidelines
The contents of the parameters table (item 5 above) are different for various module types. All of the user-configurable operating parameters are listed, and the table is the place where you customize your island configuration. Here are some important considerations that can help you navigate through this table: The leftmost column, Parameter name, lists key operating parameters for the
selected module. Some of these parameter entries can be expanded and collapsed (when there is
a +/- sign in front of them). In the example above, the Input Polarity parameter can be expanded to let you set a value for each of its four channels.
In the Value column, some of the entries are in grayed cells and others are in white background cells. The values displayed on gray backgrounds are read-only values, describing things such as module status and module data. The values displayed on white backgrounds are user-configurable. You can change these values using pull-down menus or sometimes direct keyboard entry.
The .isl file must be unlocked and offline (See Offline Protection, p. 46) in order for you to change editable parameters in this table.
Many of the values need to be picked as integers in a specific range. The high and low range limits of the selected parameter are displayed at the bottom of the module editor. Refer to the Advantys STB Hardware Reference Guide or click the Module Help button (item 6 above) for details about the specific parameters of the module you have selected.
Integer values may be entered in decimal or hexadecimal format, depending on the Hexadecimal checkbox setting.
It is possible to configure two parameters so that they conflict with one another. For example, you may have an analog module that can be configured to operate over a range of either 0 to 10 V or -10 to +10 V. It is possible to set the parameter to 0 to 10 and set the fallback states to negative numbers. If something like this happens, the module resolves the conflict by resetting the contradictory parameters to their factory default settings.
You may assign a tag name to any or all parameters in the table by entering a string in the appropriate cell in the User defined label column. The string can be a set of up to 50 standard keyboard characters, including spaces.
54 890USE18000 September 2003

Accessing Editors
Accessing the Reflex Editor
Overview The reflex editor allows you to configure reflex actions in your island configuration. Reflex actions are small routines that execute dedicated functions directly on the island bus. These actions allow output modules on the island bus to act on data and drive field actuators directly, without requiring the intervention of the fieldbus master.A typical reflex action might be: a Boolean AND or exclusive OR operation a comparison of an analog input value to a user-specified threshold value an up- or down-counter operation A timer operation the triggering of a latch to hold a digital value high or low the triggering of a latch to hold an analog value at a specific valueAn island configuration can support up to ten reflex actions.
Procedure The reflex editor can be accessed by either:
clicking the button selecting the Reflex Editor command from the Island pull-down menu.
890USE18000 September 2003 55

Accessing Editors
The Reflex Editor The look of the reflex editor begins to take shape when you select an Action group and a Action type within that group. A sample reflex editor is shown below:
Once you have identified the Action group and Action type, fields become available in the editor that let you define: the action module (item 1 above)—the output module that contains the channel
where the result of the action will be sent the inputs to the reflex block (item 2 above) any preset values (like threshold or delta values) that the block function will need
(item 3 above) the physical output channel (item 4 above) where the result of the action will be
sent a logical output tag name (item 5 above)For detailed information about the available reflex action blocks and their parameters, refer to the Advantys Reflex Actions Reference Guide (890 USE 183) or click the Action Help button (item 6 above).
1
2
3
4
5
6
56 890USE18000 September 2003

Accessing Editors
Accessing the Resource Analysis Display
Overview Each island in the active workspace has a Resource Analysis display. A Resource Analysis display is a read-only bar graph that illustrates resource utilization on the active .isl file. The dialog has two tabs: Power ConfigurationWhen changes are made to the island configuration, the information in the Resource Analysis display does not dynamically update if it is left opened.
Accessing the Resource Analysis
The resource analysis display can be accessed in either of the following ways:
click the button select the Module Editor command from the Island pull-down menu
890USE18000 September 2003 57

Accessing Editors
The Power Tab The Power tab displays the percentage of logic power and field power consumed by the I/O modules on each rail:
The Power tab displays the consumption of: logic power drawn from the NIM on the primary rail and from the BOS module(s)
on any extension rail(s) sensor power drawn by the input modules from a PDM actuator power drawn by the output modules from a PDM
58 890USE18000 September 2003

Accessing Editors
The Configuration Tab
The Configuration tab displays the percentage of: configuration memory consumed in the NIM input and output process image area consumed by the configuration fieldbus frame size usedA sample display is shown below:
Color Codes The bars are color-coded as follows:
Color Meaning
green amount of resource consumed
blue amount of resource still available
yellow resource is approaching maximum utilization
red resource is over-utilized
890USE18000 September 2003 59
Accessing Editors
I/O Image Overview
Overview The I/O Image Overview display provides a summary view of data and status values for all the I/O modules on the island. It also gives a view of any HMI data that may be written to the island bus or read by the fieldbus master.]The I/O Image Overview consists of two tabs: Fieldbus Image Modbus Image
Procedure To open the I/O Image Overview dialog box, do one of the following:
Click the button. Click I/O Image Overview from the Island menu.The I/O Image Overview dialog box appears.
60 890USE18000 September 2003
Accessing Editors
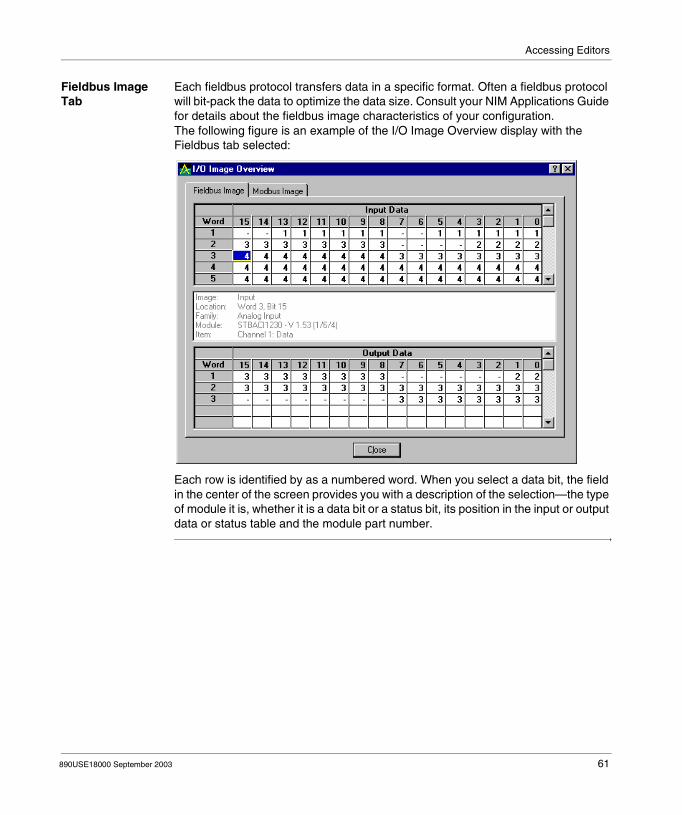
Fieldbus Image Tab
Each fieldbus protocol transfers data in a specific format. Often a fieldbus protocol will bit-pack the data to optimize the data size. Consult your NIM Applications Guide for details about the fieldbus image characteristics of your configuration.The following figure is an example of the I/O Image Overview display with the Fieldbus tab selected:
Each row is identified by as a numbered word. When you select a data bit, the field in the center of the screen provides you with a description of the selection—the type of module it is, whether it is a data bit or a status bit, its position in the input or output data or status table and the module part number.
890USE18000 September 2003 61

Accessing Editors
Modbus Image Tab
The Modbus protocol is the format in which data are transferred across the island bus. It does not employ any bit packing. Regardless of the NIM type you are using, the Modbus image always appears the same.Here is the same example with the Modbus tab selected:
Each row is identified with a Modbus register number.
62 890USE18000 September 2003
890USE18000 September 2003
5
Verifying an Island ConfigurationIntroduction
Overview This chapter describes how to verify that your configuration is valid by building the island file. It also describes the statistical reports that you may generate via the Advantys configuration software.
What’s in this Chapter?
This chapter contains the following topics:
Topic Page
Verifying Your Island Configuration 64
Printing a Report 66
63
Verifying an Island Configuration
Verifying Your Island Configuration
Overview Before you download your island configuration to a physical island, you must verify that your configuration is valid. You do this by performing a build.
Launching a Build To verify your configuration, click on the button. A Build in progress dialog
box appears. As the software builds your .isl file, it checks the data to make sure it conforms to Advantys STB design rules.
Design Rules that Are Checked by the Software
One and only one NIM shall be present on the island, and it shall be the first module on the primary rail.
A PDM shall be directly to the right of the NIM. The voltage distributed by all PDMs on the island shall be appropriate for the I/O
modules they support. The I/O modules on each rail shall consume no more than a total of 1.2 A of logic
power. There shall be no more than seven rails (one primary and six extensions) on the
island. A BOS module shall be the first module on every extension rail. A PDM shall be directly to the right of each BOS module on the extension rail(s). The input modules in a voltage group should not draw a total of more than 4 A of
sensor power from the PDM that supports them. The software will produce a soft warning if this condition is detected, and the build will continue.
The output modules in a voltage group should not draw a total of more than 8 A of actuator power from the PDM that supports them. The software will produce a soft warning if this condition is detected, and the build will continue.
There shall be no more than 32 I/O modules across all the rails on the island. There shall be no more than 10 prioritized (See Module Priority, p. 53) input
modules on the island. There shall be no more than 10 reflex action blocks in the island configuration. No more than two reflex blocks shall be configured for any one output module on
the island. If an output module has reflex blocks mapped to it, it shall be able to support
those reflex type(s). If an HMI panel is used on the island, the maximum size of the HMI input/output
table shall not exceed the size that you have configured. The HMI table size is a user-configurable parameter for the NIM, which you set in the module editor (See The Module Editor, p. 50).
The size of the HMI input/output table plus the block required for standard I/O data exchange shall not exceed the maximum data exchange size imposed by your fieldbus. Refer to your NIM documentation for this limit.
64 890USE18000 September 2003

Verifying an Island Configuration
If one or more standard CANopen devices are used on an island, the last module on the last rail of the island shall be a CANopen extension module. A termination plate shall be installed on the rail after the CANopen extension module.
The address of any standard CANopen device shall not duplicate the address of an Advantys STB module or a preferred module on the island.
There shall be at least one CANopen device and no more than twelve CANopen devices after the CANopen extension module
The last module on the island shall be terminated with a 120 Ω resistor.
Design Rules that May Not Be Checked by the Software
Two important design rules are not checked in the build process by the software. You need to be aware of these rules and incorporate them in the design of your physical island: If the last module on the island is a preferred module or a standard CANopen
device, you shall provide120 Ω termination on that module/device. The maximum length of the physical island shall be no more than 15 m if standard
CANopen devices are not used and no more than 6.5 m if standard CANopen devices are used. Standard CANopen devices and cables shall be calculated as part of the total island length.
Validating the Build
If the configuration is not valid, the build will fail. The Log Window will display the associated error messages.If the configuration is valid, the build will succeed. The Log Window will display the following message: "Build completed successfully".
890USE18000 September 2003 65
Verifying an Island Configuration
Printing a Report
Overview Ten different types of reports can be printed from the software: workspace information island information the fieldbus I/O image the Modbus I/O image a reflex action listing resource utilization statistics power resource details configuration resource details module details annotations
Procedure To print a report:
Step Action
1 Do one of the following:
Click on the button. Select Print from the File pull-down menu.
The Print dialog appears.
2 In the Print field in the dialog (item 1 below), select the islands about which you want information. Click either All, Active Island, or Select Islands.
3 In the Print Items field in the dialog (item 2 below), check the boxes next to the reports you want to print. If you want all the reports, check Select All (item 3 below).
4 Check or uncheck the Collate and/or Export to File check boxes (item 4 below).
5 Click Preview (item 5 below) if you want to see the reports before you print them.
6 Click Setup (item 6 below) if you want to change the printer settings.
7 Click OK to print or Cancel (item 7 below) to cancel the print job.
66 890USE18000 September 2003
Verifying an Island Configuration
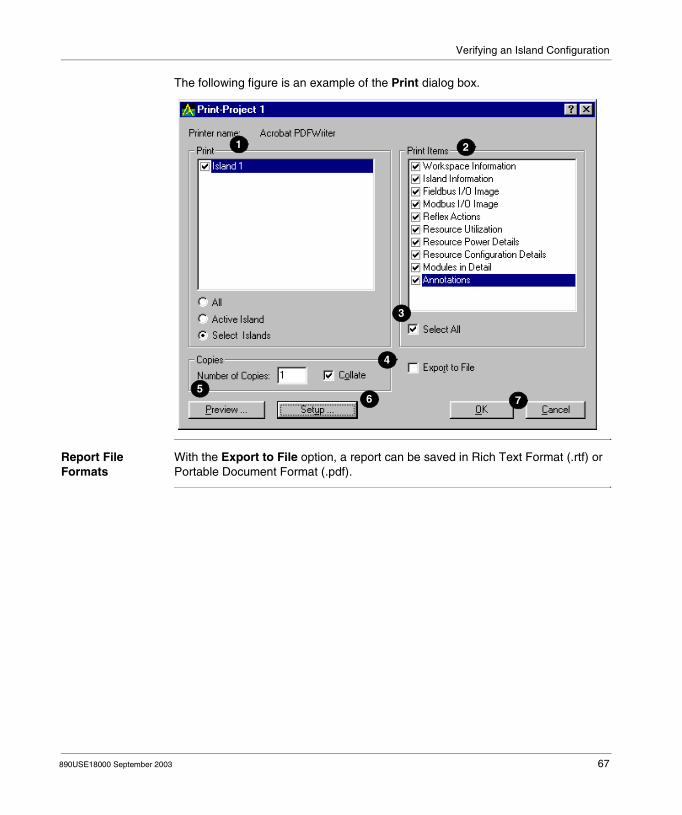
The following figure is an example of the Print dialog box.
Report File Formats
With the Export to File option, a report can be saved in Rich Text Format (.rtf) or Portable Document Format (.pdf).
1 2
3
4
56 7
890USE18000 September 2003 67

Verifying an Island Configuration
68 890USE18000 September 2003

890USE18000 September 2003
6
Downloading/Uploading Configuration DataIntroduction
Overview When the Advantys configuration software is online, you can download the data in a .isl file to a physical island. You can also upload configuration data from a physical island to a file in the software.This chapter provides downloading and uploading instructions.
What’s in this Chapter?
This chapter contains the following topics:
Topic Page
Downloading Configuration Data to the Physical Island 70
Uploading Configuration Data to the Advantys Configuration Software 71
69

Download/Upload Configurations
Downloading Configuration Data to the Physical Island
Overview When you download a new island configuration to a physical island, the physical island will start running the new configuration as soon as the download is complete. If the physical island is running a protected configuration when you attempt to download, you will not be able to complete the download until you have unprotected the old configuration. If the protected configuration has a password, you will need to enter it in order to unprotect the configuration.
Procedure To download the configuration to the physical island, select Download from the Online pull-down menu.The download process automatically wipes out the old configuration in the NIM’s Flash memory and writes the new configuration to Flash.
When the download is complete, you can store the configuration to a removable memory card if you choose.
Storing the Configuration to a Removable Memory Card
After you download a new configuration to a physical island, you may optionally save that new configuration to a removable memory card. The card serves as a backup to the configuration in RAM and Flash.There are several benefits to storing the configuration on a removable memory card: If the NIM malfunctions and needs to be replaced, configuration data in the RAM
and Flash are lost. Configuration data on the card survives and can be used to redownload data to the replacement NIM.
If you have multiple islands that need to run the same configuration, you simply insert the card in the NIM of every island and cycle power. The configuration is written to Flash from the card. This technique eliminates the need to carry a PC with you to download to each physical island.
Procedure To save a configuration to a removable memory card, place a card in the card drawer in your NIM and select Store to Removable Memory Card from the Online pull-down menu. A detailed description of the card usage is provided in your NIM documentation and in the on-line Help.
Note: If the physical island to which you are connected experiences a loss of power or loss of communications during the download task, the software ends the task and displays an error message. When you reestablish power/communications on the physical island, it comes back in an autoconfigured state, and all previously existing custom configuration values are lost. At this point, you should restart the download procedure.
70 890USE18000 September 2003
Download/Upload Configurations
Uploading Configuration Data to the Advantys Configuration Software
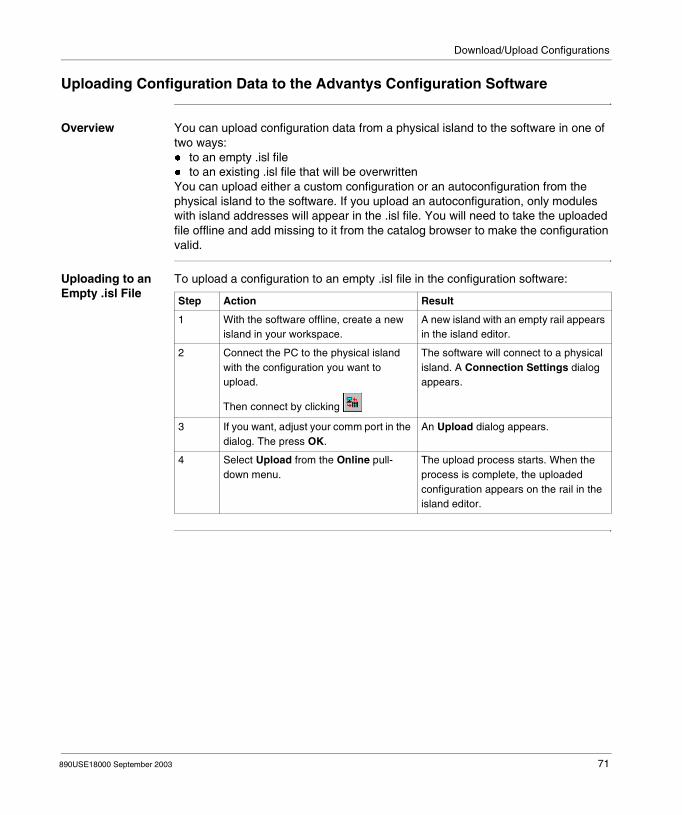
Overview You can upload configuration data from a physical island to the software in one of two ways: to an empty .isl file to an existing .isl file that will be overwrittenYou can upload either a custom configuration or an autoconfiguration from the physical island to the software. If you upload an autoconfiguration, only modules with island addresses will appear in the .isl file. You will need to take the uploaded file offline and add missing to it from the catalog browser to make the configuration valid.
Uploading to an Empty .isl File
To upload a configuration to an empty .isl file in the configuration software:
Step Action Result
1 With the software offline, create a new island in your workspace.
A new island with an empty rail appears in the island editor.
2 Connect the PC to the physical island with the configuration you want to upload.
The software will connect to a physical island. A Connection Settings dialog appears.
3 If you want, adjust your comm port in the dialog. The press OK.
An Upload dialog appears.
4 Select Upload from the Online pull-down menu.
The upload process starts. When the process is complete, the uploaded configuration appears on the rail in the island editor.
Then connect by clicking
890USE18000 September 2003 71

Download/Upload Configurations
Uploading to an Existing .isl File
To upload a configuration to an existing .isl file in the configuration software:
Step Action Result
1 With the software offline, open and unlock the .isl file you want to reconfigure.
The file appears in the island editor and can be edited.
2 Connect the PC to the physical island with the configuration you want to upload.
The software detects a configuration mismatch and displays a dialog asking if you want to upload, download or cancel the connection. An error appears in the log window indicating the configuration mismatch.
3 Select Upload from the Online pull-down menu.
The upload process starts. When the process is complete, the software warns you that you are about to overwrite the configuration in the .isl file.
4 Click OK. The uploaded configuration replaces the old configuration on the rail in the island editor.
Then connect by clicking
72 890USE18000 September 2003

Download/Upload Configurations
Uploading an Auto-configuration
An autoconfiguration is one that has not been configured in the software, where all the modules are using their factory-default operating parameters. If you upload an autoconfiguration, only the modules that have addresses on the island will be uploaded. Modules that do not use island addresses, such as the PDMs, the BOS and EOS extension modules and the terminator plate, will not be uploaded. If you upload an autoconfiguration:
Step Action Result
1 Follow one of the procedures above to complete the upload.
The configuration that appears in the island editor will be missing its unaddressed modules, and it will be invalid.
2 Take the .isl file offline.
3 Pick the missing modules from the catalog browser and drop them in their proper locations on the rail.
4 Connect the PC to the physical island with the configuration and download.Note: This download replaces the autoconfigured physical island with a custom configuration (with factory-default values on the modules). This step will enable you to fully upload the physical configuration in the future.
The software detects a configuration mismatch and displays a dialog asking if you want to upload, download or cancel the connection. An error appears in the log window indicating the configuration mismatch. This mismatch occurs because the configuration on the physical island is unaware of the unaddressed modules.
5 Select Download from the Online pull-down menu.
Then disconnect by clicking
890USE18000 September 2003 73

Download/Upload Configurations
74 890USE18000 September 2003

890USE18000 September 2003
7
Using Other Standard CANopen DevicesImporting and Exporting EDS Files
Overview of Importing an EDS File
To use a standard CANopen device in an island configuration, you must import a description of the device into the Advantys STB module catalog. This description is provided in an electronic data sheet, called the EDS file.When it imports the EDS file, the software reads the file, pulls out the relevant information for the device, and writes it to the software’s catalog database. The new device is then added to the catalog browser (See The Catalog Browser, p. 31) so that can be configured in an island.
Importing an EDS File
To import a standard CANopen device EDS file into the catalog:
Note: Be sure all workspaces are closed when you begin the import procedure.
Step Action
1 From the File menu, click Import.
2 In the Import dialog box, type or navigate to the path where a valid EDS file is located.
3 Type or navigate to the path where the device’s bitmap file is located.This bitmap provides the device image in the island editor. It will be copied to the images folder of the software’s installation directory. The bitmap needs to be 256-color conformant.
4 Click Import.
5 Click OK.
Note: During the import operation, the software validates the EDS file for consistency. If the EDS file has any errors, the software reports them and stops the import. If the catalog already has the EDS file, it will prompt you with a message.
75

Standard CANopen Devices
Exporting an EDS File
If the fieldbus on which your island will operate uses EDS files to define the devices it supports, you can export a system-wide device description of your active island as an EDS file. This feature is fieldbus-specific; some of the fieldbuses that can take advantage of this feature are: CANopen Devicenet INTERBUSTo export your active island as an EDS file:
Step Action
1 Select Export from the File pull-down menu.
2 In the Export dialog box, user the Browse button to navigate to the path where the EDS file is located.
3 Type the name of the EDS file in the Name text box.
4 Click Save.
Note: During the export process, the software will save the island configuration, build the configuration internally, and export it. If the software encounters any problem while saving or building the configuration, the operation will abort. Errors are reported in the log window.
76 890USE18000 September 2003

Glossary
10Base-T An adaptation of the IEEE 802.3 (Ethernet) standard, the 10Base-T standard uses twisted-pair wiring with a maximum segment length of 100 m (328 ft) and terminates with an RJ-45 connector. A 10Base-T network is a baseband network capable of transmitting data at a maximum speed of 10 Mbit/s.
802.3 frame A frame format, specified in the IEEE 802.3 (Ethernet) standard, in which the header specifies the data packet length.
agent 1. SNMP—the SNMP application that runs on a network device. 2. Fipio—a slave device on a network.
analog input A module that contains circuits that convert analog DC input signals to digital values that can be manipulated by the processor. By implication, these analog inputs are usually direct—i.e., a data table value directly reflects the analog signal value.
analog output A module that contains circuits that transmit an analog DC signal proportional to a digital value input to the module from the processor. By implication, these analog outputs are usually direct—i.e., a data table value directly controls the analog signal value.
application object
In CAN-based networks, application objects represent device-specific functionality, such as the state of input or output data.
!
A
890USE18000 September 2003 77
Glossary
ARP address resolution protocol. IP’s network layer protocol uses ARP to map an IP address to a MAC (hardware) address.
auto baud The automatic assignment and detection of a common baud rate as well as the ability of a device on a network to adapt to that rate.
auto-addressing The assignment of an address to each island bus I/O module and preferred device.
auto-configuration
The ability of island modules to operate with predefined default parameters. A configuration of the island bus based completely on the actual assembly of I/O modules.
BootP bootstrap protocol. A UDP/IP protocol that allows an internet node to obtain its IP parameters based on its MAC address.
BOS beginning of segment. When more than one segment of I/O modules is used in an island, an STB XBE 1200 BOS module is installed in the first position in each extension segment. Its job is to carry island bus communications to and generate logic power for the modules in the extension segment.
bus arbitrator A master on a Fipio network.
CAN controller area network. The CAN protocol (ISO 11898) for serial bus networks is designed for the interconnection of smart devices (from multiple manufacturers) in smart systems for real-time industrial applications. CAN multi-master systems ensure high data integrity through the implementation of broadcast messaging and advanced error mechanisms. Originally developed for use in automobiles, CAN is now used in a variety of industrial automation control environments.
CANopen protocol
An open industry standard protocol used on the internal communication bus. The protocol allows the connection of any standard CANopen device to the island bus.
CI command interface.
B
C
78 890USE18000 September 2003
Glossary
CiA CAN in Automation. CiA is a non-profit group of manufacturers and users dedicated to developing and supporting CAN-based higher layer protocols.
COB communication object. A communication object is a unit of transportation (a "message") in a CAN-based network. Communication objects indicate a particular functionality in a device. They are specified in the CANopen communication profile.
COMS island bus scanner.
configuration The arrangement and interconnection of hardware components within a system and the hardware and software selections that determine the operating characteristics of the system.
CRC cyclic redundancy check. Messages that implement this error checking mechanism have a CRC field that is calculated by the transmitter according to the message’s content. Receiving nodes recalculate the field. Disagreement in the two codes indicates a difference between the transmitted message and the one received.
DeviceNet protocol
DeviceNet is a low-level, connection-based network that is based on CAN, a serial bus system without a defined application layer. DeviceNet, therefore, defines a layer for the industrial application of CAN.
DHCP dynamic host configuration protocol. A TCP/IP protocol that allows a server to assign an IP address based on a role name (host name) to a network node.
differential input A type of input design where two wires (+ and -) are run from each signal source to the data acquisition interface. The voltage between the input and the interface ground are measured by two high-impedance amplifiers, and the outputs from the two amplifiers are subtracted by a third amplifier to yield the difference between the + and - inputs. Voltage common to both wires is thereby removed. Differential design solves the problem of ground differences found in single-ended connections, and it also reduces the cross-channel noise problem.
digital I/O An input or output that has an individual circuit connection at the module corresponding directly to a data table bit or word that stores the value of the signal at that I/O circuit. It allows the control logic to have discrete access to the I/O values.
DIN Deutsche industrial norms. A German agency that sets engineering and dimensional standards and now has worldwide recognition.
D
890USE18000 September 2003 79

Glossary
EDS electronic data sheet. The EDS is a standardized ASCII file that contains information about a network device’s communications functionality and the contents of its object dictionary. The EDS also defines device-specific and manufacturer-specific objects.
EIA Electronic Industries Association. An organization that establishes electrical/electronic and data communication standards.
EMC electromagnetic compatibility. Devices that meet EMC requirements can operate within a system’s expected electromagnetic limits without error.
EMI electromagnetic interference. EMI can cause an interruption, malfunction, or disturbance in the performance of electronic equipment. It occurs when a source electronically transmits a signal that interferes with other equipment.
EOS end of segment. When more than one segment of I/O modules is used in an island, an STB XBE 1000 EOS module is installed in the last position in every segment except the final segment on the island. Its job is to extend island bus communications and send 24 VDC for logic power to the next segment.
Ethernet A LAN cabling and signaling specification used to connect devices within a defined area, e.g., a building. Ethernet uses a bus or a star topology to connect different nodes on a network.0
Ethernet II A frame format in which the header specifies the packet type, Ethernet II is the default frame format for STB NIP 2212 communications.
fallback state A safe state to which an Advantys STB I/O module can return in the event that its communication connection fails.
fallback value The value that a device assumes during fallback. Typically, the fallback value is either configurable or the last stored value for the device.
FED_P Fipio extended device profile. On a Fipio network, the standard device profile type for agents whose data length is more than eight words and equal to or less than thirty-two words.
E
F
80 890USE18000 September 2003
Glossary
Fipio Fieldbus Interface Protocol (FIP). An open fieldbus standard and protocol that conforms to the FIP/World FIP standard. Fipio is designed to provide low-level configuration, parameterization, data exchange, and diagnostic services.
Flash memory Flash memory is nonvolatile memory that can be overwritten. It is stored on a special EEPROM that can be erased and reprogrammed.
FRD_P Fipio reduced device profile. On a Fipio network, the standard device profile type for agents whose data length is two words or less.
FSD_P Fipio standard device profile. On a Fipio network, the standard device profile type for agents whose data length is more than two words and equal to or less than eight words.
full scale The maximum level in a specific range—e.g., in an analog input circuit the maximum allowable voltage or current level is at full scale when any increase beyond that level is over-range.
function block A function block performs a specific automation function, such as speed control. A function block comprises configuration data and a set of operating parameters.
function code A function code is an instruction set commanding one or more slave devices at a specified address(es) to perform a type of action, e.g., read a set of data registers and respond with the content.
gateway A program or /hardware that passes data between networks.
global_ID global_identifier. A 16-bit integer that uniquely identifies a device’s location on a network. A global_ID is a symbolic address that is universally recognized by all other devices on the network.
GSD generic slave data (file). A device description file, supplied by the device’s manufacturer, that defines a device’s functionality on a Profibus DP network.
G
890USE18000 September 2003 81

Glossary
HMI human-machine interface An operator interface, usually graphical, for industrial equipment.
HMI human-machine interface An operator interface, usually graphical, for industrial equipment.
hot swapping Replacing a component with a like component while the system remains in operation.
HTTP hypertext transfer protocol. The protocol that a web server and a client browser use to communicate with one another.
I/O base A mounting device, designed to seat an I/O module, hang it on a DIN rail, and connect it to the island bus. It provides the connection point where the module can receive either 24 VDC or 115/230 VAC from the input or output power bus distributed by a PDM.
I/O module In a programmable controller system, an I/O module interfaces directly to the sensors and actuators of the machine/process. This module is the component that mounts in an I/O base and provides electrical connections between the controller and the field devices. Normal I/O module capacities are offered in a variety of signal levels and capacities.
I/O scanning The continuous polling of the Advantys STB I/O modules performed by the COMS to collect data bits, status, error, and diagnostics information.
IEC International Electrotechnical Commission Carrier. Founded in 1884 to focus on advancing the theory and practice of electrical, electronics, and computer engineering, and computer science. IEC 1131 is the specification that deals with industrial automation equipment.
IEC type 1 input Type 1 digital inputs support sensor signals from mechanical switching devices such as relay contacts and push buttons operating in normal environmental conditions.
H
I
82 890USE18000 September 2003

Glossary
IEC type 1+ input Type 1+ digital inputs support sensor signals from mechanical switching devices such as relay contacts, push buttons (in normal-to-moderate environmental conditions), three-wire proximity switches and two-wire proximity switches that have: a voltage drop of no more than 8 V a minimum operating current capability less than or equal to 2 mA a maximum off-state current less than or equal to 0.8 mA
IEC type 2 input Type 2 digital inputs support sensor signals from solid state devices or mechanical contact switching devices such as relay contacts, push buttons (in normal or harsh environmental conditions), and two- or three-wire proximity switches.
IEEE Institute of Electrical and Electronics Engineers, Inc. The international standards and conformity assessment body for all fields of electrotechnology, including electricity and electronics.
industrial I/O An Advantys STB I/O module designed at a moderate cost for typical continuous, high-duty-cycle applications. Modules of this type often feature standard IEC threshold ratings, usually providing user-configurable parameter options, on-board protection, good resolution, and field wiring options. They are designed to operate in moderate-to-high temperature ranges.
input filtering The amount of time that a sensor must hold its signal on or off before the input module detects the change of state.
input polarity An input channel’s polarity determines when the input module sends a 1 and when it sends a 0 to the master controller. If the polarity is normal, an input channel will send a 1 to the controller when its field sensor turns on. If the polarity is reverse, an input channel will send a 0 to the controller when its field sensor turns on.
input response time
The time it takes for an input channel to receive a signal from the field sensor and put it on the island bus.
INTERBUS protocol
The INTERBUS fieldbus protocol observes a master/slave network model with an active ring topology, having all devices integrated in a closed transmission path.
IP internet protocol. That part of the TCP/IP protocol family that tracks the internet addresses of nodes, routes outgoing messages, and recognizes incoming messages.
890USE18000 September 2003 83

Glossary
LAN local area network. A short-distance data communications network.
light industrial I/O
An Advantys STB I/O module designed at a low cost for less rigorous (e.g., intermittent, low-duty-cycle) operating environments. Modules of this type operate in lower temperature ranges with lower qualification and agency requirements and limited on-board protection; they usually have limited or no user-configuration options.
linearity A measure of how closely a characteristic follows a straight-line function.
LSB least significant bit, least significant byte. The part of a number, address, or field that is written as the rightmost single value in conventional hexadecimal or binary notation.
MAC address media access control address. A 48-bit number, unique on a network, that is programmed into each network card or device when it is manufactured.
mandatory module
When an Advantys STB I/O module is configured to be mandatory, it must be present and healthy in the island configuration for the island to be operational. If a mandatory module fails or is removed from its location on the island bus, the island will go into a pre-operational state. By default, all I/O modules are not mandatory. You must use the Advantys configuration software to set this parameter.
master/slave model
The direction of control in a network that implements the master/slave model is always from the master to the slave devices.
Modbus Modbus is an application layer messaging protocol. Modbus provides client and server communications between devices connected on different types of buses or networks. Modbus offers many services specified by function codes.
MSB most significant bit, most significant byte. The part of a number, address, or field that is written as the leftmost single value in conventional hexadecimal or binary notation.
L
M
84 890USE18000 September 2003
Glossary
N.C. contact normally closed contact. A relay contact pair that is closed when the relay coil is de-energized and open when the coil is energized.
N.O. contact normally open. contact. A relay contact pair that is open when the relay coil is de-energized and closed when the coil is energized.
NEMA National Electrical Manufacturers Association.
network cycle time
The time that a master requires to complete a single scan of all of the configured I/O modules on a network device; typically expressed in microseconds.
NIM network interface module. This module is the interface between an island bus and the fieldbus network of which the island is a part. The network interface module’s built-in power supply provides 5 V logic power to the Advantys STB I/O modules as well as 24 V source power, as needed, to the support I/O modules. The NIM also has an RS-232 interface that is the connection point for the Advantys configuration software.
NMT network management. NMT protocols provide services for network initialization, error control, and device status control.
object dictionary Sometimes called the "object directory," this part of the CANopen device model is a map to the internal structure of CANopen devices (according to CANopen profile DS-401). A given device’s object dictionary is a lookup table that describes the data types, communications objects, and application objects the device uses. By accessing a particular device’s object dictionary structure through the CANopen fieldbus, you can predict its network behavior and, therefore, build a distributed application that implements it.
open industrial communication network
A distributed communication network for industrial environments based on open standards (EN 50235, EN50254, and EN50170, and others) that allows the exchange of data between devices from different manufacturers.
output filtering The amount that it takes an output channel to send change-of-state information to an actuator after the output module has received updated data from the NIM.
N
O
890USE18000 September 2003 85
Glossary
output polarity An output channel’s polarity determines when the output module turns its field actuator on and when it turns the actuator off. If the polarity is normal, an output channel will turn its actuator on when the master controller sends it a 1. If the polarity is reverse, an output channel will turn its actuator on when the master controller sends it a 0.
output response time
The time it takes for an output module to take an output signal from the island bus and send it to its field actuator.
parameterize To supply the required value for an attribute of a device at run-time.
PDM power distribution module. A module that distributes either AC or DC field power to a cluster of I/O modules directly to its right on the island bus. A PDM delivers field power separately to the input modules and the output modules. It is important that all the I/O clustered directly to the right of a PDM be in the same voltage group—either 24 VDC, 115 VAC, or 230 VAC.
PDO process data object. In CAN-based networks, PDOs are transmitted as unconfirmed broadcast messages or sent from a producer device to a consumer device. The transmit PDO from the producer device has a specific identifier that corresponds to the receive PDO of the consumer devices.
PE protective earth. A return line across the bus for fault currents generated at a sensor or actuator device in the control system.
peer-to-peer communications
In peer-to-peer communications, there is no master/slave or client/server relationship. Messages are exchanged between entities of comparable or equivalent levels of functionality, without having to go through a third party (like a master device).
PLC programmable logic controller. The PLC is the brain of an industrial manufacturing process. It automates a process as opposed to relay control systems. PLCs are computers suited to survive the harsh conditions of the industrial environment.
P
86 890USE18000 September 2003
Glossary
preferred module An I/O module that functions as an auto-addressable node on an Advantys STB island but is not in the same form factor as a standard Advantys STB I/O module and therefore does not fit in an I/O base. A preferred device connects to the island bus via an STB XBE 1000 EOS module and a length of STB XCA 100x bus extension cable. It can be extended to another preferred module or back into a standard island segment. If it is the last device on the island, it must be terminated with a 120 Ω terminator.
premium network interface
An Advantys STB network interface module designed at a relatively high cost to support high module densities, high transport data capacity (e.g., for web servers), and more diagnostics on the island bus.
prioritization Prioritization is an optional feature that allows you to selectively identify digital input modules to be scanned more frequently during the NIM’s logic scan of the island bus.
process I/O An Advantys STB I/O module designed for operation at extended temperature ranges in conformance with IEC type 2 thresholds. Modules of this type often feature high levels of on-board diagnostics, high resolution, user-configurable parameter options, and higher levels of agency approval.
process image A part of the NIM firmware that serves as a real-time data area for the data exchange process. The process image includes an input buffer that contains current data and status information from the island bus and an output buffer that contains the current outputs for the island bus, from the fieldbus master.
producer/consumer model
In networks that observe the producer/consumer model, data packets are identified according to their data content rather than by their physical location. All nodes "listen" on the network and consume those data packets that have appropriate identifiers.
Profibus DP Profibus Decentralized Peripheral. An open bus system that uses an electrical network based on a shielded two-wire line or an optical network based on a fiber-optic cable. DP transmission allows for high-speed, cyclic exchange of data between the controller CPU and the distributed I/O devices.
reflex action The execution of a simple, logical command function configured locally at an island bus I/O module. Reflex actions are executed by island bus modules on data from various island locations, like input and output modules or the NIM. Examples of reflex actions include compare and copy operations.
R
890USE18000 September 2003 87

Glossary
repeater An interconnection device that extends the permissible length of a bus.
reverse polarity protection
Use of a diode in a circuit to protect against damage and unintended operation in the event that the polarity of the applied power is accidentally reversed.
rms root mean square. The effective value of an alternating current, corresponding to the DC value that produces the same heating effect. The rms value is computed as the square root of the average of the squares of the instantaneous amplitude for one complete cycle. For a sine wave, the rms value is 0.707 times the peak value.
role name A customer-driven, unique logical personal identifier for an Ethernet Modbus TCP/IP NIM. A role name is created either as a combination of a numeric rotary switch setting and the STB NIP 2212 part number or by modifying text on the Configure Role Name web page. After the STB NIP 2212 is configured with a valid role name, the DHCP server will use it to identify the island at power up.
RTD resistive temperature detect. An RTD device is a temperature transducer composed of conductive wire elements typically made of platinum, nickel, copper, or nickel-iron. An RTD device provides a variable resistance across a specified temperature range.
Rx reception. For example, in a CAN-based network, a PDO is described as an RxPDO of the device that receives it.
SAP service access point. The point at which the services of one communications layer, as defined by the ISO OSI reference model, is made available to the next layer.
SCADA supervisory control and data acquisition. Typically accomplished in industrial settings by means of microcomputers.
SDO service data object. In CAN-based networks, SDO messages are used by the fieldbus master to access (read/write) the object directories of network nodes.
segment A group of interconnected I/O and power modules on an island bus. An island must have at least one segment and may have as many as seven segments. The first (leftmost) module in a segment needs to provide logic power and island bus communications to the I/O modules on its right. In the primary segment, that function is filled by a NIM. In an extension segment, that function is filled by an STB XBE 1200 BOS module.
S
88 890USE18000 September 2003

Glossary
SELV safety extra low voltage. A secondary circuit designed and protected so that the voltage between any two accessible parts (or between one accessible part and the PE terminal for Class 1 equipment) does not exceed a specified value under normal conditions or under single-fault conditions.
SIM subscriber identification module. Originally intended for authenticating users of mobile communications, SIMs now have multiple applications. In Advantys STB, configuration data created or modified with the Advantys configuration software can be stored on a SIM and then written to the NIM’s Flash memory.
single-ended inputs
An analog input design technique whereby a wire from each signal source is connected to the data acquisition interface, and the difference between the signal and ground is measured. Two conditions are imperative to the success of this design technique—the signal source must be grounded, and the signal ground and data acquisition interface ground (the PDM lead) must have the same potential.
sink load An output that, when turned on, receives DC current from its load.
size 1 base A mounting device, designed to seat an STB module, hang it on a DIN rail, and connect it to the island bus. It is 13.9 mm wide and 128.25 mm high.
size 2 base A mounting device, designed to seat an STB module, hang it on a DIN rail, and connect it to the island bus. It is 18.4 mm wide and 128.25 mm high.
size 3 base A mounting device, designed to seat an STB module, hang it on a DIN rail, and connect it to the island bus. It is 28.1 mm wide and 128.25 mm high.
slice I/O An I/O module design that combines a small number of channels (usually between two and six) in a small package. The idea is to allow a system developer to purchase just the right amount of I/O and to be able to distribute it around the machine in an efficient, mechatronics way.
SM_MPS state management_message periodic services. The applications and network management services used for process control, data exchange, error reporting, and device status notification on a Fipio network.
SNMP simple network management protocol. The UDP/IP standard protocol used to manage nodes on an IP network.
snubber A circuit generally used to suppress inductive loads—it consists of a resistor in series with a capacitor (in the case of an RC snubber) and/or a metal-oxide varistor placed across the AC load.
source load A load with a current directed into its input; must be driven by a current source.
890USE18000 September 2003 89
Glossary
standard network interface
An Advantys STB network interface module designed at moderate cost to support the kind of configuration capabilities and throughput capacity suitable for most standard applications on the island bus.
STD_P standard profile. On a Fipio network, a standard profile is a fixed set of configuration and operating parameters for an agent device, based on the number of modules that the device contains and the device’s total data length. Three types of standard profiles are available—Fipio reduced device profile (FRD_P), Fipio standard device profile (FSD_P), and the Fipio extended device profile (FED_P).
stepper motor A specialized DC motor that allows discrete positioning without feedback.
subnet A part of a network that shares a network address with the other parts of a network. A subnet may be physically and/or logically independent of the rest of the network. A part of an internet address called a subnet number, which is ignored in IP routing, distinguishes the subnet.
surge suppression
The process of absorbing and clipping voltage transients on an incoming AC line or control circuit. Metal-oxide varistors and specially designed RC networks are frequently used as surge suppression mechanisms.
TC thermocouple. A TC device is a bimetallic temperature transducer that provides a temperature value by measuring the voltage differential caused by joining together two different metals at different temperatures.
TCP transmission control protocol. A connection-oriented transport layer protocol that provides reliable full-duplex data transmission. TCP is part of the TCP/IP suite of protocols.
telegram A data packet used in serial communication.
TFE transparent factory Ethernet. Schneider Electric’s open automation framework based on TCP/IP.
Tx transmission. For example, in a CAN-based network, a PDO is described as a TxPDO of the device that transmits it.
T
90 890USE18000 September 2003

Glossary
UDP user datagram protocol. A connectionless mode protocol in which messages are delivered in a datagram to a destination computer. The UDP protocol is typically bundled with the Internet Protocol (UPD/IP).
varistor A two-electrode semiconductor device with a voltage-dependant nonlinear resistance that drops markedly as the applied voltage is increased. It is used to suppress transient voltage surges.
voltage group A grouping of Advantys STB I/O modules, all with the same voltage requirement, installed directly to the right of the appropriate power distribution module (PDM) and separated from modules with different voltage requirements. Never mix modules with different voltage requirements in the same voltage group.
watchdog timer A timer that monitors a cyclical process and is cleared at the conclusion of each cycle. If the watchdog runs past its programmed time period, it generates a fault.
U
V
W
890USE18000 September 2003 91

Glossary
92 890USE18000 September 2003

CBAIndex
Aaccessories, 31adding annotation, 44adding modules, 38adding rails to the configuration, 40analog input modules, 31analog output modules, 31annotation
adding to a logical island, 44deleting, 44moving a box, 44resizing the box, 44retrieving, 45
BBOS modules, 31build, 64
button, 64
CCANopen extension modules, 31catalog browser, 31
properties, 32create a project, 16creating a workspace, 36customizing the workspace, 18
890USE18000 September 2003
Ddeleting annotation, 44design rules, 28, 64digital input modules, 31digital output modules, 31
Eedit toolbar, 22enhanced CANopen modules, 31EOS modules, 31extending the configuration to a preferred module, 41extending the configuration to standard CANopen devices, 42
Hhardware installation requirements, 10hide a toolbar, 20
Iinstallation requirements, 10installing the software, 11island
description, 14island editor, 26
layout, 28island toolbar, 23
93
Index
Llocking an island file, 46logical island, 15
Mmodule types
listed in the catalog browser, 31modules
adding, 38moving a toolbar, 23moving an annotation box, 44
Nnetworking modules, 31NIM, 31
Ooffline edit protection, 46online protection, 48
Ppassword for online protection, 48password protection, 46, 48PDM, 31physical island, 14power modules, 31preferred modules, 31, 41project
creating, 16work flow diagram, 17
protecting configuration data, 46, 48
Rremoving online access protection, 48removing the software, 11resizing the annotation box, 44retrieving annotation, 45
94
Sshow a toolbar, 20software installation requirements, 10special modules, 31standard CANopen devices, 42standard toolbar, 21
Ttoolbars
edit, 22hide, 20island, 23moving, 23show, 20standard, 21view, 20
Uuninstalling the software, 11unlocking a password-protected island file, 47
Vverify the configuration, 64view toolbar, 20
Wworkspace
relationship to an island, 18screen, 19settings, 18
workspace browserlayout, 24properties, 25shortcut menus, 25
890USE18000 September 2003