Advanced Photoshop the Magazine for Adobe Photoshop Professionals 126 2014
Upload
truonghanhCategory
view
231download
0
Advanced Photoshop

2
Shortcuts You Can’t Live Without! Option + Delete (Alt + Backspace) Fills with foreground color Shift + Option + Delete (Shift + Alt + Backspace) Fills with background color Command + T (Control + T) Brings up the Transform tool for resizing Command + D (Control + D) Deselects Shift + Command + I (Shift + Control + I) Inverts selection. Quick Tool Selections V - Move Tool T - Text Tool Q - Quick Mask Mode M - Marquee Tool For more shortcuts view the help menu. About Photoshop Photoshop is a complex program and not the easiest to learn. Think of it as an iceberg. You only see a small percentage above the surface. Underneath it is much, much more than you will ever discover. I don’t say this to scare you but encourage you. Don’t try to learn it before you use it, but learn it by using it. In this handout you will find projects that contain some basic, intermediate, and advanced techniques in Photoshop. Learning comes through repetition and by repeating the lessons here you will be able to apply what you have learned to future projects. The following projects are a collection gathered from workshops, books. seminars, websites, and videos. You will find this information at the back of the handout. Note: I am assuming you are at least familiar with Photoshop (tool names, how to add a layer, layer visibility etc…if not, use the help menu for areas you are not sure about. If you get stuck or can’t figure something out drop me an email and I will do my best to answer your question.

3
COOL TEXT EFFECTS JAGUAR TEXT EFFECT Step 1: Start with a new blank document ( 5in x 5in, 72 ppi). Mode should be RGB. Step 2: Press the D key to set the colors back to default. Double click on the background color square to bring up the color chooser. Pick a yellow-orange color. Click OK. Now you have a foreground color of black and a background color of yellow orange. Step 3: Go to FILTER > RENDER > CLOUDS. Step 4: Go to FILTER > SKETCH >PHOTOCOPY. Set the detail to 21 and the darkness to 34. Click OK. Step 5: Go to FILTER > ARTISTIC >SMUDGE STICK. Set the stroke length to 4, the highlight area to 10 and the intensity to 8. Click OK. Step 6: Go to FILTER > NOISE > ADD NOISE. Set the amount to around 25 and the distribution to Uniform. Step 7: Go to FILTER > BLUR > MOTION BLUR. Set the angle to –22 and the distance to 9. Step 8: Go to EDIT > Define Pattern. Name it jaguar. Click OK. Step 9: Create a new document the same size as before. Click on the TEXT TOOL. Choose Courier as your font. Type a capital X. Resize using the transform command COMMAND + T (CONTROL + T). Press Enter. Step 10: Go to LAYER > RASTERISE > TYPE. Step 11: Go to EDIT > FILL. Choose Pattern from the pop down menu. Choose the jaguar pattern from the custom pattern pop down menu. Be sure to check the preserve transparency box. Click OK. Step 12: Click the layer effects icon and go up to Bevel and Emboss. Choose Inner bevel, set depth to 91, size to 9, and softness to 1. Click OK. Add a drop shadow with the layer effects icon.

4
EASY NEON TEXT Step 1: Create a new blank document, 7 in x 2 in x 72 dpi. (File, new, type in size.) Fill with black. (Click on the window with the PAINT BUCKET TOOL with black selected as your color or press Option/Delete on a Mac, or alt/backspace on a pc. Step 2: Click on the text tool. Set font to your choice (arial black is a good thick font) and size to 60-80 depending on the font. Step 3: Reposition the text with the move tool if necessary. Step 4: Make background layer visible. (Click on eye but not the layer itself.) Step 5: Make sure you’re still on the text layer. Go to the layer effects button on the layers palette. (Bottom left, “f” on the layers palette.) Step 6: Choose “Outer Glow” Choose a bright color and set size to 5-10. CLIPPING GROUPS Step 1: Open the photo you plan to use (underwater.jpg). Double click on the layer to rename it (Layer 0 is OK ) if the layer is named “background”. Step 2: Click on the TEXT TOOL. Choose a font. Arial Black is a good, bold font. Type “SCUBA”. Use the transform tool (command T on a Mac or control T on a PC) to resize. You can also use the vertical and horizontal scale tools in the resize window to “tweak” the type. Press Enter to apply. Step 3: Move the text layer below the photo layer. Step 4: Make sure the top layer (image) is selected. Press Command (control for PC) + G or go to LAYERS > GROUP with previous. Step 5: Use the MOVE TOOL to adjust the position of the photo. Step 6: Create a new background layer and fill it with black. Move it under the text layer. Note: You can still adjust the position of the picture…
QuickTime™ and aTIFF (Uncompressed) decompressor
are needed to see this picture.

5
TRANSPARENT EMBOSSED TYPE EFFECT Step 1: Open a background image (fruit.jpg). Step 2: Click on the TEXT TOOL. Choose font and size. (Remember, you can resize with the transform command). Click on the document and type your text. For this example I typed “publix”. Step 3: Run the emboss filter. (Filter/Stylize/Emboss). It will ask you to rasterize to apply the filter, so click yes. Step 4: In the layers palette change the mode from Normal to Hard Light. Mode is located at the top of the layers palette. The default selection is Normal. Step 5: Optional: To add a rounded edge effect to your embossed type, use the layer effect of bevel and emboss Layer Effects >Bevel and Emboss.
QuickTime™ and aPhoto - JPEG decompressor
are needed to see this picture.

6
TEXT ON FIRE! Step 1: Create a new document. File >New 7in wide, 5in height, resolution 72 and change mode from RGB to GRAYSCALE. Click OK. Step 2: Press the D key to reset the colors to black and white. Fill the layer with black by pressing Option + Delete (Alt + Backspace). Click on the arrow next to colors to reverse and make white the foreground color. Select to TYPE TOOL. Using ALL CAPS type: SALE. Use the transform command, Command + T (Control + T) to resize. Press Enter. Use the move tool if needed to reposition text. We will need to rasterize the type (make it an image instead of text). Layer > Rasterize >Type. Step 3: Now we are going to create a duplicate layer. Go to Layer > Duplicate layer. In the dialog box change the destination to NEW. This new document we will use later. Click OK. Step 4: Make sure we are still on our original document. Merge the type layer with the background by pressing COMMAND + E (CONTROL + E). Step 5: Go under IMAGE>ROTATE CANVAS>90CW. Step 6: Go to FILTER>STYLIZE>WIND. Make sure Wind is selected and the direction is FROM THE LEFT. Click OK. Press Command + F (Control + F) two more times to repeat the filter. Step 7: Go to IMAGE >ROTATE CANVAS> 90CCW. Then go to FILTER> STYLIZE>DIFFUSE. Make sure it is set to Normal. Click OK. Step 8: Go to FILTER>BLUR>GAUSSIAN BLUR and add a 2pt blur. Click OK. Step 9: Go to IMAGE>MODE>INDEXED COLOR. Go to IMAGE > MODE > COLOR TABLE. In the pop-up menu choose BLACK BODY and click OK. Go to IMAGE > MODE > RGB. Step 10: Switch to the other document you created. Go to LAYER > DUPLICATE LAYER. In the dialog box change the destination to the other document name. Click OK. Step 11: Return to the fire document. First, we will need to make the sale text we just added black. Press the D key to reset the default color to black. Make sure you are on the new layer you just added. Click the lock transparent pixel icon at the top of the layers palette. Press OPTION>DELETE (ALT + BACKSPACE) to fill the text with black. Unlock the transparent pixels. Step 12: Go to FILTER>DISTORT>RIPPLE and choose 27 as the amount and Large for the size. Click OK. Save.

7
Inner Shadow Effect This simple technique is great for adding titles against a photo background. Step 1: Open the image you want to use for your background. (We are using tech.jpg for this example. Step 2: Press the “T” key to go to the text tool. Press the “D” key to set your colors back to default black over white. Step 3: Click on photo and type “TECH”. I used the font Techno in the example. Press Command (Control) + T to transform. Resize and press return/enter when done. Step 4: Hold the Command key (PC: Control key) and click on the text layer name in the layers palette. This will put a selection around the text. Now you can discard the text layer by dragging it the trash icon at the bottom of the layers palette. Step 5: Press Command (PC: Control) + J to put your selection onto it’s own layer above the background photo layer. Step 6: Press Command (PC: Control) + L to bring up levels. (Also located under Image > Adjustments > Levels.) Move the bottom Output Levels black slider to 128 to lighten the layer. Step 7: Choose Inner Shadow from the Layer Style pop-up menu at the bottom of the layers palette. In the dialog box, lower the opacity setting to 50% and click OK. Step 8: Hold the Command key (PC: Control key) and click on the tech layer name in the layers palette. This will put a selection around the text again. Step 9: Go to Select > Modify > Expand and enter 3 pixels. Click OK. Step 10: Click on the bottom photo layer (background) on the layers palette to make it active. Press Command (PC: Control) + J to put your selection onto it’s own layer above the photo layer. Step 11: Drag this new layer above the other layers in the layers palette. Step 12: Command (PC: Control) click the original (middle) text layer name to put a selection around the original text. Note: Make sure your top expanded text layer is still active. Press the Delete (Backspace) key. Step 13: Deselect by pressing Command (PC: Control) + D. Step 14: Press Command (PC: Control) + L to bring up the levels dialog box again. Move the bottom Output Levels black slider to 128 to lighten the layer. Step 15: Choose drop shadow from the layers styles at the bottom of the layers palette. Click OK.

8
Gold Metal Type A great technique for elegant gold type. Step 1: Open a new blank document 7 in wide x 5 in high at 72 dpi in RGB mode. Step 2: Use the type tool to type “Ritz”. I used a script font. Use the transform command to resize. (Command (PC: Control) + T. Press Enter when done. Step 3: Hold the Command (PC: Control) key and click once on the text layer name to place a selection around the type. Step 4: Go to Select > Save Selection. Name it Ritz. Click OK. Step 5: Press Command (PC: Control) + D to deselect. Delete type layer by dragging it to the trash icon at the bottom of the layers palette. Step 6: Go to the channels palette. It should be right behind the layers palette. If not, Windows > Channels will bring it up. Click on the Ritz channel at the bottom. Step 7: Go to Filter > Blur > Gaussian Blur and enter a 1 pixel blur. Click OK. Step 8: Go back to the layers palette and click one time on the background layer to make it active. Step 9: Go to Filter > Render > Lighting Effects. At the bottom change the Texture Channel to the Ritz from the pop up menu. Click OK Step 10: Go to Image > Adjustments > Curves. Create a curve like the one above and click OK. Step 11: Go to Select > Load Selection. Choose Ritz and Click OK. Step 12: We need to expand the selection to include all the type. Go to Select > Modify > Expand. Enter 3 pixels. Click OK. (Adjust the number of pixels to fit your font. Step 13: Press Shift + Command (PC: Control) + J to put selection on its own layer. Step 14: Click on Background layer in the layers palette. Press Command (PC: Control) + A to select all. Press Delete / Backspace. Press Command (PC: Control) + D to deselect. Step 15: Click on text layer and add a drop shadow from the layer styles. Click OK. Step 16: Choose Color Overlay from the layer styles on the layers palette. In the dialog box change the blend mode to Overlay and choose a gold color from the color box. Click OK. Step 17: Add additional type.
QuickTime™ and a TIFF (LZW) decompressor are needed to see this picture.

9
Branded Wood Effect Step 1: Create a new document 1000px x 400px At 72 dpi in RGB mode. Press the D key to set colors back at default. Press Option + Delete (Alt + Backspace) to fill the layer with a black. Create a new layer and choose a light tan/brown for your foreground color and a medium/dark brown as your background color. Step 2: Go to FILTER >RENDER> CLOUDS. Next go to FILTER >NOISE>ADD NOISE. Choose Gaussian / Monochromatic setting of 9. Click OK. Now, go to FILTER > ARTISTIC >DRY BRUSH. Settings of 10/10/3. Step 3: Go to FILTER > DISTORT > SHEAR and use the settings shown as an approximation of creating the wood grain effect. Click OK. Step 4: Now we need to scale our plank and make copies. Switch to move tool. Press Command + T (Control + T) and hold the Shift key and resize the plank to about 25% of the original size. Press Enter. Use Command + J (Control + J) to jump a copy to a new layer. Resize as needed to create the planks. Leave a little black showing between planks. Add three more plank layers using the Command (Control + J). Use arrow keys to fine tune the placement. Step 5: Link all the plank layers by clicking the link box in the layers palette. While one of the plank layers is selected link the other plank layers and choose Merged Linked from the side menu on the layers palette. Step 6: On the “plank” layer go to the Layer Effects icon and choose Bevel & Emboss. Select Pillow Emboss on the Style and click OK. Step 7: Switch from the layers palette to the channels palette. If not visible, go to Windows > Channels. Add a new channel (same as new layer icon). Choose Text Tool and choose a
QuickTime™ and a TIFF (LZW) decompressor are needed to see this picture.
10
“western” font and set the font size to 60. Click and type: Dude Ranch. Use the transform command to resize if needed. Step 8: Return to the layers palette, click on the plank layer, and now you should see the text as a selection. Add a new layer. Press the D key to return colors to default and fill the selection with black by pressing Option + Delete (Alt + backspace). Do not deselect yet. Go to FILTER > STYLIZE > EMBOSS with the amount of 500. Step 9: On the layer palette set the mode from Normal to Color Burn and add a drop shadow from the layer effects icon. Do not deselect yet. Step 10: Your selection should still be active. Click on the “plank” layer. Go to EDIT > COPY. Create a new layer and EDIT > PASTE. Now add a layer effect > Bevel and Emboss / Pillow Emboss / Chisel Hard / 140 /Up / Size 12. Step 11: Crop image if necessary.
11
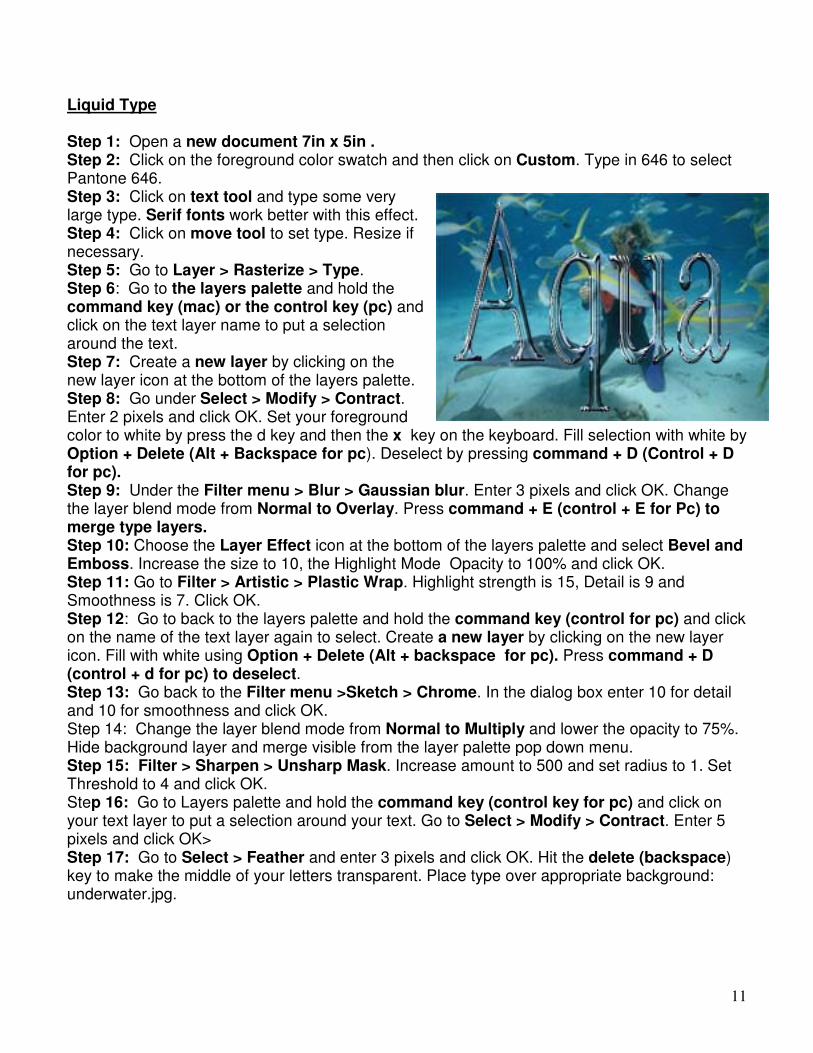
Liquid Type Step 1: Open a new document 7in x 5in . Step 2: Click on the foreground color swatch and then click on Custom. Type in 646 to select Pantone 646. Step 3: Click on text tool and type some very large type. Serif fonts work better with this effect. Step 4: Click on move tool to set type. Resize if necessary. Step 5: Go to Layer > Rasterize > Type. Step 6: Go to the layers palette and hold the command key (mac) or the control key (pc) and click on the text layer name to put a selection around the text. Step 7: Create a new layer by clicking on the new layer icon at the bottom of the layers palette. Step 8: Go under Select > Modify > Contract. Enter 2 pixels and click OK. Set your foreground color to white by press the d key and then the x key on the keyboard. Fill selection with white by Option + Delete (Alt + Backspace for pc). Deselect by pressing command + D (Control + D for pc). Step 9: Under the Filter menu > Blur > Gaussian blur. Enter 3 pixels and click OK. Change the layer blend mode from Normal to Overlay. Press command + E (control + E for Pc) to merge type layers. Step 10: Choose the Layer Effect icon at the bottom of the layers palette and select Bevel and Emboss. Increase the size to 10, the Highlight Mode Opacity to 100% and click OK. Step 11: Go to Filter > Artistic > Plastic Wrap. Highlight strength is 15, Detail is 9 and Smoothness is 7. Click OK. Step 12: Go to back to the layers palette and hold the command key (control for pc) and click on the name of the text layer again to select. Create a new layer by clicking on the new layer icon. Fill with white using Option + Delete (Alt + backspace for pc). Press command + D (control + d for pc) to deselect. Step 13: Go back to the Filter menu >Sketch > Chrome. In the dialog box enter 10 for detail and 10 for smoothness and click OK. Step 14: Change the layer blend mode from Normal to Multiply and lower the opacity to 75%. Hide background layer and merge visible from the layer palette pop down menu. Step 15: Filter > Sharpen > Unsharp Mask. Increase amount to 500 and set radius to 1. Set Threshold to 4 and click OK. Step 16: Go to Layers palette and hold the command key (control key for pc) and click on your text layer to put a selection around your text. Go to Select > Modify > Contract. Enter 5 pixels and click OK> Step 17: Go to Select > Feather and enter 3 pixels and click OK. Hit the delete (backspace) key to make the middle of your letters transparent. Place type over appropriate background: underwater.jpg.

12
How Far Can You Go With Layer Effects? Step 1: Open new document approximate 8 in x 6in. Step 2: Press “D” on the keyboard to make the colors the default black and white. Press Option + Delete (mac) or Alt + backspace (pc) to fill bottom layer with black. Step 3 Press “x” on the keyboard to switch between black and white. Select the type tool and type with all caps “WPTV”. Step 4: Switch to the move tool and press command + T (mac) or control + T (pc) to bring up the transform command. Resize text to fill most of the left two thirds of the document. Press enter when done. Click on the layer effects icon (f) at the bottom of the layers palette. Choose inner shadow. While still in this dialog box click on the word Stroke in the list of styles on the left side. For position, choose Outside, for Fill Type choose Gradient; for Style choose Reflected and for angle 107. Choose the copper gradient from the gradient picker (fifth one second row), click OK. Step 5: Create a new layer by clicking on the new layer icon at the bottom of the layers palette. Select the elliptical marquee tool from the toolbox. (It is under the rectangle marquee tool-click and hold to select it.) Draw an oval to the right of your text. Step 6: Fill oval with white by pressing option + delete (alt + backspace for pc). Press command + D to deselect (Select > Deselect). Press command + T (control + t for pc) to transform to resize. Hold the command key (control for pc) to and grab the bottom center point to skew the oval. Press enter when finished. Step 7: Press the letter “D” again to make the colors default black and white again. Use the type tool to type the number “5”—make sure it goes on it’s own layer. Use move tool and transform command to resize if necessary. Position over white oval. Step 8: Hold the command key (control –pc) and click on the 5 text layer name to select the outline of the five. Change the layer to the oval beneath the 5 text layer. Press the delete key (backspace –pc) to knock out the five in the oval. Press command + D (control + D –pc) to deselect. Drag the 5 text layer to the layer trashcan – you no longer need it. Step 9: On the oval layer choose Drop Shadow from the Layer Style pop-up menu at the bottom of the Layers palette (it’s the little f icon). In the drop shadow dialog box, change the color of the shadow to white by clicking the color swatch. Change the blend mode to Screen, lower the opacity to 50%, and increase the Size to 10. While in the dialog box , click on Bevel and Emboss in the list of Styles on the left side to bring up its options. Step 10: Click on the contour check box just below the name Bevel and Emboss in the Styles list. Lower the size to 4 and set Soften to 1. Under the shading section of the dialog box, change the Altitude to 39 and set the opacity of the Highlight mode to 100%. Then click on the down-facing triangle next to the Gloss Contour sample to reveal the pop out menu. Choose the present “Ring Double” (Third one on the bottom row).

13
Snakeskin Type Effect 1. Create a new document 7in x 3in
and at 72dpi. 2. Choose gold yellow color and fill
background layer by pressing the Option + Delete keys to fill with foreground color.
3. Hit the “D” key to put the colors back to default and then the “X” key to make white the foreground color. Select the Text tool and a large thick font such as Arial Black. Type text in all caps “RATTLE”.
4. Switch to the MOVE TOOL, and press COMMAND / Control + T to resize as needed. Press Return/Enter.
5. Rasterize your type layer by going to Layer > Rasterize > Type or right click on text layer and choose Rasterize Layer.
6. Hold the Command / Control key and click on Text layer name to select text.
7. Press the “D” key to reset colors. 8. Go to Filter > Texture > Stained Glass
and use the setting of Cell size of 4, Border Thickness of 2, and Light Intensity of 5. Click OK.
9. Choose the Magic Wand tool. Go to the option bar at the top and UNCHECK Contiguous. Click one time in the white area of the text. This will allow you to select all the white without shift + selecting each white area.
10. Press Command / Control + J to jump selection to its own layer.
11. Apply a layer effect of Bevel and Emboss to the new layer with the following settings: Style: Inner Bevel; Technique: Smooth; Depth: 121’ Direction: UP; Size : 4; Soften: 0; Angle: 120; Altiitude: 30; Gloss Conour: Choose last one in the first row; The remainder do not change.
12. On the same layer apply a layer effect of Gradient Overlay with the following settings: Blend Mode: Normal; Opacity: 100; Gradient: a gold yellow to a dark green. ( Double click on gradient to change it.)
13. Return to the middle layer (your original text layer and apply a layer effect of a Stroke with a black to white gradient with the following settings: Stroke size of 2, fill type: Gradient (black to white) and leave the rest of the settings as they are.
14. Add a drop shadow to the middle layer.
QuickTime™ and a TIFF (LZW) decompressor are needed to see this picture.
QuickTime™ and a TIFF (LZW) decompressor are needed to see this picture.
QuickTime™ and a TIFF (LZW) decompressor are needed to see this picture.

14
PHOTO EFFECTS CLASSIC VIGNETTE EFFECT Step 1: Open the selected image (head on hands.jpg). Step 2: Use the elliptical selection tool to draw an oval on the image. (Top left corner of toolbox. Click and hold to see options. Select oval. Click and hold on corner of image and drag across to opposite corner.) Step 3: Add a 10 -15 pixel feather. (Select>feather. type in number) Step 4: Inverse the selection. (Select >inverse) Step 5: Hit delete and deselect. (Select > deselect). Please note if you are planning on doing this on a background other than white you need to add that step into the beginning by adding a layer and place it under the photo layer (if photo layer is named background you will need to rename it before you can move a layer below it.)
REMOVING THE EFFECTS OF AGING: DIGITAL PLASTIC SURGERY Step 1: Open image. Double click on layer name to rename layer (layer 0 is ok). Drag layer to new layer icon at the bottom of the layers palette to create a copy. Step 2: Select the bottom layer in the layers palette. Go to Filter > Blur > Gasussian blur and set it to 2-4 pts. Step 3: Select the top layer and the eraser tool. Brush size should be small. Step 4: Now erase the wrinkles.

15
PENCIL SKETCH FROM PHOTOGRAPH Step 1: Open suitable image(headon hands.jpg). Create a copy of the image by dragging the background layer to the new layer icon. Step 2: Select IMAGE > ADJUST >INVERT. Step 3: Select IMAGE > MODE > GRAYSCALE. Don’t Flatten. Step 4: Go to the layers palette and change the Blend mode from normal to Color Dodge. The image will disappear. Step 5: Go to FILTER > BLUR > GAUSSIAN BLUR. Set the amount around 3.5 – 5.5. Adjust until you like your image. Magazine Cover Project Step 1: Open the image you plan to work with(masters.jpg). Step 2: Using the Text tool create the magazine name plate and add a drop shadow. Step 3: Turn off nameplate layer by clicking the eye icon in the layers palette. Step 4: Select the background layer to make it active. Use the pen tool to select the head and shoulders of the person. Adjustments can be made with the sub selection tool (white arrow). Step 5: Click on the paths tab on the layers palette. Select path layer. Click on the convert path to selection icon at the bottom. Edit/copy. Step 7: Create new layer and paste head. Copy layer. Drag under head layer. On the copy layer create old fashion drop shadow by filling with black and turning off preserve transparency and adding a 8pt gaussian blur. Use move tool to place. Step 8: Use lasso tool or eraser to remove unwanted shadow at the bottom of the shoulders.

16
QUICK MASK TORN EDGE EFFECT Step 1: Open the selected image (trailriders.jpg) and make a rectangular selection using the rectangle marquee tool around the image about a half an inch from the edges. Step 2: Switch to quick mask mode by pressing the letter Q or clicking on the icon in the toolbar. (Bottom right dark circle) Step 3: The rectangular selection now appears red (if the outside is red and the middle is clear then double click on the quick mask icon and change the option to the selected areas). Step 4: Run the filter of your choice. (Filter>brush strokes>Spatter. Choose one or try several) Step 5: Click back to normal mode by clicking the icon or hitting Q again. Again, if the color of the background is to be different than white follow the above steps in the previous example. Step 6: Invert the selection. (Select>Inverse) Press the Delete key (Backspace). Deselect. (Select > Deselect)

17
Vintage Warhol �
�� �������� ��������������������� ����������������������������� ������������������������������
�� �������� ��������� �������������������������������������
!� ������"�����#��$�����"�����%�����&������ ������������ $��������������������������
'� &����� ���������(�����������&����� ��)��������������$���*����$�����+������������ ���������$�$����������
�$�������������$��������������������������������� ��,���������� ����������������������� � � ��&�������
������������� $�� ����� ��$��-� �������������������� ������ ��������������������������&������ �������� ��&������ ��� ���� �������������� $�*��� ��������.������� �������� ������������ ����������
/� 0�1������ $���� ������� $��$���� �������&������ �������� $��$����������� ���$����� ����� ����$���
�������� ���������������������� ���������$������� ������
��� *����+������������ ������������$���������&����� ���������$�
��� +��23� $�2��4�5��4�!!64�7'4�8699:�4�!-!4!�/4'899
;���4��7<4!'4'!99"$�������4��6!4!<-4�88��5����������������� ���� ����������������� $��
������������� ��9=�������4�!4!<-4�88������ �������������� $�������������>������� �����������?�
@� ����)3�,���( ��?�=�������)%#,���6� ���������� $������� �����������;$���5 �����������
7� �������������������A���#����������� ����A�������� ���'����# �����B��
8� ����� �����( ��"�����#��$��C� ��������#� ����A���������������� ����A�����6���������$�6��������������������������������� ����������
�<�"������%��������������� ���������������������� $���
���������������(�����������:���������������(����������:���� ��������������� ����
�!��D�����"����%�����3� ����������������������������(�����������:���������������D����������1��������������
�'��� ����
QuickTime™ and aTIFF (LZW) decompressor
are needed to see this picture.
QuickTime™ and aTIFF (LZW) decompressor
are needed to see this picture.
QuickTime™ and aTIFF (LZW) decompressor
are needed to see this picture.
QuickTime™ and aTIFF (LZW) decompressor
are needed to see this picture.

18
Polaroid Snapshot Effect Step 1: Open the image you wish to “polaroid”(girl.jpg). Create a new blank document 2 inches larger than your image and use the MOVE TOOL to drag the image into this new document. Here is a great trick: Go to File > New. While the new dialog box is open go to Window > Document > girl.jpg. This will add the dimensions of the girl photo and you can just add two inches to the measurement. Step 2: Click on new layer. Use the MARQUEE TOOL and draw a rectangular selection about a 1/2” wider than your image. Fill with a pale gray. Move this layer behind the image. With the image layer selected Merge down. Step 3: Make a copy of this image layer and fill with black. This will be our shadow. For this effect you need to do it the old fashion way. Step 4: On the copy layer go to Filter/Distort/Shear. Click to add a center point and move slightly to the left of center. Click OK Step 5: Still on the copy layer turn off preserve transparency and add a gaussian blur and lower the opacity to at least 80%. Use the MOVE TOOL to position the shadow. Use the transform tool (command -T or control-T) to nudge the left side of the shadow in. Step 6: Return to your image layer and go to Filter/Distort/Shear. Click the defaults button to reset. Click in the middle again to add a point. This time move the top and bottom points slightly to the left. Click OK.

19
PHOTO COLLAGE Step 1: Open the images you plan to work with (phone guy, keyboard, and adding machine tape). You can create a new larger document if needed or use one of your opened images as a background. We are going to use the Keyboard Close-up as the background. Double click to rename it layer 0. Step 2: Use the Move Tool to drag the Phone Guy onto the background. Arrange him where you think he looks best. Step 3: Click on the Add Layer Mask icon at the bottom of the layers palette (second from left next to the f). Step 4: Press the D key to set colors to default. Use the gradient tool (if you don’t see it, click on the paint bucket tool) to drag a gradient through your image. Stop before you get to the edge of the image or you will see the hard edge. Keep doing it a little at a time until you reach the desired effect. Step 5: Merge down layer. (In the layers palette, to the far right of the tabs is an arrow in a circle. Click on that and a pop up menu will appear. Click on Merge Layers.) Step 6: I repeated steps 2-5 to add the Adding Machine Tape to the collage. Step 7: Adding Text: Click on the Text Tool and type your words. For example, First Union Online Banking. Make the text white and lower the opacity to around 78. (Choose the color from the lower left tool box, and the opacity from the layers palette). For added effect use the layer effect of bevel and emboss (layers palette, lower left “f”).

20
Adding a Texture Map to an Image Step 1: Open the image that you want to apply texture to. (face4texture.jpg). Step 2: Make a duplicate of your image by clicking on Image > Duplicate. This will create a duplicate open file of the original. Step 3: Go to Mode > Grayscale to convert this copy to a Grayscale image. Step 4: Go to Filter > Blur > Gaussian Blur and enter 2. (We are working in low resolution. For high resolution images enter 5.) Step 5: Save this image as map.psd on your desktop. Close the duplicate image. Step 6: Open the texture image. (texture.jpg) Step7: Use the move tool to drag the texture image onto the original face image you opened in step one. Step 8: Press Command (PC: Control) + A to select all. Step 9: Go to Filter > Distort > Displace. Click OK. (The default setting of scale at 10% for horizontal and vertical, Stretch to fit should be checked, and Repeat Edge Pixels should also be checked.) Step 10: When you click OK in the last step an open file dialog box appears. Navigate to the desktop and find your map.jpg file you save earlier. Click Open. You texture image will warp a bit. Step 11: Press Command (PC: Control) + D to deselect. Step 12: In the layers palette click the eye icon next to texture layer to hide it. Select the bottom layer and use the Magic Wand tool to select the white areas. Hold the Shift key to select all white areas. Step 13: Click back on the texture layer to make it active. Press the Delete Key (PC: Backspace) to remove the texture from the background areas. Press Command (PC: Control) + D to deselect. Step 14: Change the blend mode of the texture layer by clicking on the Normal mode at the top of the layers palette and choosing Soft Light. Lower the opacity to around 60%. Step 15: Use the eraser tool to remove the texture from the sunglasses, hair, lips, and clothes.

21
Another Way to Colorize – Color Extraction
1. Open the picture you plan to work with. For my example I used Strawberry.jpg.
2. Make a duplicate of the background layer by dragging it to the new layer icon.
3. Go to Filter on the Menu bar and down to Extract. 4. When the Extract dialog box appears use the
magnifying tool to enlarge the strawberry on the screen.
5. Select the Highlighter Pen tool at the top of the left hand side of the dialog box. Set the options as seen . You make have to adjust the size for parts of the stem.
6. Draw the Highlighter around the edge of the strawberry and stem. Leave as much of the berry uncovered as you can (hence the small brush size).
7. Select the Fill tool (paint bucket) and click inside to fill the berry.
8. Click the Preview button. Don’t worry about the nasty edges.
9. Select the Edge Touch up Tool from the left side of the box.
10. Run the tool around the edge of the berry. This will clean up the edges.
11. Use the Clean up tool to touch up as well. 12. Click OK when you are satisfied with the extraction. 13. Now your duplicate layer contains only the strawberry. 14. Drag the bottom layer to the new layer icon again to
create another duplicate layer. Go Image > Adjustments > Desatureate to remove the color information from the new layer.
15. Click on the Add Layer Mask icon at the bottom of the layers palette. 16. Make sure black is your foreground color and use a small brush to reveal the color of the
eyes. Lower the opacity of the brush and paint lips and fingernails. 17. Viola!
QuickTime™ and a TIFF (Uncompressed) decompressor are needed to see this picture.
QuickTime™ and a TIFF (Uncompressed) decompressor are needed to see this picture.

22
Easy Retro Art Look
1. Open the image you plan to work with. I used Retroface.jpg. 2. Double click on the background layer to rename to Layer 0. 3. Make sure your image is in RGB mode. 4. Go to Image > Adjustments > Threshold. 5. Adjust the slider until you have the image with some facial
detail. Click OK. 6. Now to smooth it out go to Filter > Stylize > Diffuse. Select
Anisotropic. Click OK. 7. Filter > Sharpen > Unsharp Mask with the setting of: Amount
300, Radius 50, and Threshold of 150. 8. Add a new layer and drag it BELOW layer 0. 9. Choose the gradient tool set to Foreground to Background Linear gradient. Set
foreground color to RGB ( R255, G170, B5) and Background to RGB (R255, G102, B 0). Apply the gradient top to bottom on the new layer.
10. Click back on Layer 0 (face layer) and change the blend mode on the layers palette to Soft Light.
11. Add a new layer. Drag below face layer. 12. Fill with pattern (Edit > Fill, choose pattern) click OK. 13. Lower opacity of the layer and the fill

23
SCANNING TRICKS AND PHOTO RETOUCHING Fixing a Scratchy Photo
1. Open scratchy photo. 2. Double click to rename background layer to layer 0. 3. Copy layer by dragging it to the new layer icon at the
bottom of the layers palette. 4. Hide the new copy layer by click on the eye icon of
that layer. 5. Go to layer 0. 6. Go the Filter > Noise > Dust and Speckle. 7. Move the pixel slider to the right until scratches are
gone. 8. Click OK. 9. Go back to the copy layer and click on it and it will
reappear. 10. Choose the eraser tool. 11. In the options palette at the top select airbrush and a small brush. 12. Zoom into picture and erase the scratches. Another option for skin is to use the rubber stamp tool and option click near the scratch to take a sample. Paint over scratches. This can be a tedious process. FIXING A CROOKED SCAN
1. Open crooked scan. 2. Go to the menu bar Windows > Show Info if not already showing. 3. Choose the line tool. It is located under the rectangle shape tool. Press Shift + “u” on
the keyboard until it comes up. 4. Drag out window so you can see the edge of the
scan. 5. Click on the bottom left corner of the scan and
drag and hold the line tool to the bottom right corner of the scan. Before you let go look in the info palette and it will give you the angle. Make a mental note.
6. Let go and immediately undo the line. 7. Go to Image > Rotate Canvas > Arbitrary. Enter
the angle from above. 8. Click OK. 9. Crop if necessary.

24
Assembling a Multiple Piece Scan
1. Open all parts of the scan to be assembled.
2. Straighten parts if necessary using the previous directions. Crop if necessary to remove any white areas.
3. Either created a new document large enough for all the pieces or go to Image > Canvas Size to increase the size of one of the images to hold all the pieces.
4. Use the move tool to bring in second piece of the scan. This will come on as its own layer. Go to the layers palette and lower the opacity to 40-50%.
5. Use the move tool to line up with the image underneath. Use the arrow keys for exact positioning.
6. When finished return opacity level to 100%. 7. Merge layer down by Command (Control) + E. 8. Repeat if there are other pieces. 9. Crop and adjust levels.
Learning to Love Levels
1. Open a too light or too dark scan or digital image.
2. Go to Image > Adjust > Levels (do not use brightness and contrast to try and fix a scan).
3. Look at histogram—the graph of the range of black to white in the image. The black triangle should be at the left edge of the black graph, the white triangle should be at the right edge of the graph, and the gray triangle can be adjusted to change the midtones.
4. Click OK when satisfied. 5. Another method is to use the levels palette and the eyedroppers to
sample parts of the image. This works better on simpler images.

25
Using Curves and Color Correction Removing color casts from images
1. Open your RGB image. 2. Open the Curves dialog box by pressing Command (Control) + M or going to Image >
Adjustments > Curves. 3. Double Click on the black eyedropper tool in the Curves dialog box to bring up the
curves color picker. In the bottom right hand corner there are entry fields for “CMYK” values. Enter the appropriate settings below, and click OK.
Black (Shadow) Target Color (for print) C=75, M=63, Y=62, K=90 Black Target Color (for Web, inkjet, video) C=75, M=63, Y=62, K=100
Once this has been set, click the black eyedropper on the darkest part of your picture that has detail (the part of the image that should be black). If you click in the wrong area undo your click with Command (Control) + Z. Now for the Highlights
1. Double click on the white eyedropper to open the Curves color picker. Set the CMYK fields for the highlights as : C=5, M= 3, Y=3, and K=0.
2. Click on the area of your image that is the brightest (whitest). Undo if you click in the wrong area. Keep sampling until you are happy with your adjustments.

26
BUILDING FROM SCRATCH
Faux Green Marble
1. Open a new document 5” x 5” at 72 dpi in RGB mode.
2. Press the D key to set the colors back to the default black and white.
3. Go to Filter > Render > Clouds. 4. Go to Filter > Render > Difference Clouds. 5. Press command / control + L to open Levels. Slide the right most triangle to the
beginning of the black mountain like shape. Slide the middle one all the way to the left.
6. Press ok. You should see the beginnings of a great marble effect.
7. Now for the color: Press Command /Control + U to open Hue/ Saturation. Click Colorize and play with the Hue to change the color. Hue = 82, Saturation = 20 and Lightness = 0.
8. Select the text tool. Choose a roman typeface such as times or times roman and a gray green color.
9. Click and type “Classic Roman”. 10. Add a Bevel and Emboss layer effect with the settings on the right. 11. Click OK. 12. Drop the fill opacity to 25% in the layers palette.
�
�
�
QuickTime™ and a TIFF (LZW) decompressor are needed to see this picture.

27
An Easy Interface Design
1. Create a new document in RGB mode 7” x 5” at 72 dpi.
2. Add a new layer. 3. Select the rectangle tool and set the options as below :
4. Make the foreground color a light medium gray. 5. Draw a large rectangle nearly filling
your area. 6. Choose the elliptical marquee tool and
make a circle. Hold down the shift key to constrain to a perfect circle. Hit the delete key to cut a corner out.
7. With the selection tool still selected, click and drag the selection to the opposite corner.
8. Hit delete again�� 9. Choose the polygon lasso tool. Click and move the mouse it will stretch until you click
again to join the dots. Hold down the shift key to constrain the shape to increments of 45 deg. Click all the way around until you get back to the start point. You will see a little circle.
10. Hit the delete key. 11. Choose the rounded rectangle shape tool and use the settings as shown.
12. Create a new layer. 13. Draw a rounded rectangle
about the size you need for a screen.
14. Select the interface layer. Press Delete to knock out the “screen”. Deselect.
15. Make a selection by Command (pc Control) +clicking on the layer thumbnail.
16. Go to Selection > Save Selection. Channel : New; and Name: iface
28
17. Click on Channels Palette (grouped with Layers Palette). At the bottom you will see the selection you just saved as a new Channel. Select the channel iface. Deselect the marching ants by Select > Deselect or Command/ Control + D.
18. Filter>blur>Gaussian blur with a setting of 3.3. Click OK.
19. Now go back to the layers palette and click on layer 1 (interface). Make sure you click on the layer even if it is selected.
20. Filter>render>lighting effects. You will see a big dialog box. Under texture channel, choose iface (the name of the alpha channel you created).
21. Adjust the light in the thumbnail preview by clicking and dragging on any of the 5 points. Try to achieve a pretty even lighting effect without any extreme shadows or highlights. Click OK.
22. Open the curves dialog box. Command /pc-Control+M or go to Image>Adjustments>Curves. You will see a diagonal line Click about a third way from the left and drag up. Click about a third from the right and drag down. Make fine adjustments until your chrome is looking good.
23. Make a color adjustment. By going to Image>adjust>hue/saturation or cmd/ctrl+u. Click colorize and adjust to produce a slight blue hue to the interface to make it appear more like chrome. Hue = 216, Saturation = 11, and Lightness = +8.
24. Use layer effects to add a quick drop shadow and you’re done!
QuickTime™ and a TIFF (LZW) decompressor are needed to see this picture.

29
Metal Interface Design in Adobe Photoshop (Version 6 or 7) (The interface I used in the iShell Session)
1. Launch Adobe Photoshop. 2. Create a new document (File > New) with the
following settings: 3. Click OK. 4. Press the “D” key to set the colors back to
default black over white. 5. Add a new layer by click on the add layer icon
on the layers palette. 6. Press the “P” key to select the pen tool. Click
to create the rectangle slightly in from the edges. Hold the Shift key to get straight line. I clipped the corners to help create a round edge effect.
7. Hold the Command key (Control key PC) and press Return/Enter to change the path to a selection.
8. Press the Option key + Delete (PC – Alt + Backspace) to fill the selection with black
9. Deselect by pressing command (PC-control) + D.
10. Press the “M” key to switch to the marquee tool.
11. Select areas you want to cut out and press the Delete key (PC-Backspace). Note: I knew the movies were 320 x 240. So I used the fixed size option on the options palette to make the movie rectangle the exact size.
12. Once all your areas are punched out it should look like the basic shape of your interface.
13. Command + Click (pc- Control + click) on the Layer 1 name in the layers palette to put a selection around our interface.
14. Go to Select > Save Selection. Give it the name “interface” and click OK.
15. Delete layer 1 by dragging it onto the trash icon at the bottom of the layers palette.
16. Deselect. Command (PC –Control) + D. 17. Click on the Channels palette and select the interface channel at the bottom.
QuickTime™ and a TIFF (LZW) decompressor are needed to see this picture.
QuickTime™ and a TIFF (LZW) decompressor are needed to see this picture.
QuickTime™ and a TIFF (LZW) decompressor are needed to see this picture.

30
18. Go to Filter > Blur > Gaussian Blur. Set the amount between 2 and 4. The bigger the blur the more the edges are rounded. Click OK.
19. To remove the blurriness press Command + L ( PC- control + L) to bring up the levels dialog box. Slide the far left and far right sliders to the middle. (Levels can be found at Image > Adjustments > Levels)
20. Click OK. 21. Return to the layers palette and click on the Background layer. Add a new layer. 22. Go to Select > Load Selection. When the dialog box appears choose “interface”
under Channel and click OK. 23. Switch to the Gradient tool. In the options bar, click the downward facing triangle next
to the Gradient Picker. In the upper right corner click on the pop-down menu and choose Metal. A dialog box will appear. Choose Append. Select the Silver gradient.
24. Drag the gradient through your selection to achieve the desired effect.
25. Go to Filter > Noise > Add Noise. Enter 7 – 10 for the amount. Select Gaussian for Distribution and check Monochromatic. Click OK.
26. Go Filter > Blur > Motion Blur. 27. Set the angle to 20 and the distance
around 9. Click OK. 28. Deselect. (Command/Control + D) 29. Click on the layer effect icon at the bottom of the layers palette. Choose Bevel and
Emboss. Make the following changes:
QuickTime™ and a TIFF (LZW) decompressor are needed to see this picture.
QuickTime™ and a TIFF (LZW) decompressor are needed to see this picture.
QuickTime™ and a TIFF (LZW) decompressor are needed to see this picture.

31
30. Click OK. 31. Select the background layer and fill with black. (Option/Alt + Delete/Backspace)
QuickTime™ and a TIFF (LZW) decompressor are needed to see this picture.
QuickTime™ and a TIFF (LZW) decompressor are needed to see this picture.