Advanced Machine Vision Lighting · · 2017-06-29Basics and Introduction ... •CMOS/CCD converts...
81
Advanced Machine Vision Lighting Jonathan Ludlow Machine Vision Promoter Microscan Systems Inc.
-
Upload
phungthuan -
Category
Documents
-
view
216 -
download
0
Transcript of Advanced Machine Vision Lighting · · 2017-06-29Basics and Introduction ... •CMOS/CCD converts...

Advanced Machine Vision Lighting
Jonathan Ludlow Machine Vision Promoter
Microscan Systems Inc.

Basics and Introduction
Why are you here?
• Your background and experience?
•Attended Basic Vision Lighting course?
•Formal study of optics?
•Amateur photographer?
•Have you ever put a your digital camera into manual mode?
•My background?

Session Objectives • Discuss the “scientific method” for selecting the correct lighting geometry.
• Consider selection and placement of lighting using the scientific method.
• Discuss examples of practical light selection for different geometries and surfaces.
• Review current developments in Machine Vision lighting.
• Discuss how light intensity, color, polarization and part motion factor into design of a robust lighting solution.
• Cover what is in the Exam
Means thinking “What would a photon do”?
Means applying analytical and practical knowledge to make signal
Means thinking about real world lights and surfaces
Means how to deal with color, glare and moving parts
Check on what’s new
Means I will cover everything in the test!

Common Knowledge About Light
WHAT WE TO KNOW
• Fuzzy balls of vibrating energy moving at “c = 300,000,000 Meters/Sec” (Fast!)
• Always travel in very straight lines except when reflected of refracted
• Red light λ ~ 640 nm = 0.64 microns – about a 1000 atoms for one wavelength
WHAT WE CARE ABOUT
• How light interacts with solids (and liquids)
• How it is distributed when it gets to a sensor
• How to distribute light sources to get a useful image on our sensor
• This usually means creating contrast
Pop Quiz – (Easy) – Difference between Reflection and Refraction?

Goals in Machine Vision Lighting Design
• Create Useful Signal!
• Signal carry information – Useful information = S – Irrelevant information = Noise, N
• Create an image with high S/N Ratio
• Machine Vision – extracting useful information from digital images
• Useful information is the Feature Data contained in the Signal part of the Image

The Scientific Method
• The “Scientific Method” of Machine Vision Lighting Design • 3-step procedure to selecting the correct lighting geometry
1 – Consider how light will interact with surfaces in your scene
Think about Surface Properties and Geometry
2 – Think about how light will get to the sensor to be turned into an image
Think about Part and Camera Geometry, Lens, Sensor
3 – Choose a lighting geometry that will maximize Signal to Noise Ratio
Think about Type of Light, Position of Light
What is it made of and what will it do to light?
How do I make an image?
Where should I put the lights?

Step 1 - Light and Surfaces
• Pop Quiz – – In reflection – How does angle of incidence relate to angle of reflection? – In refraction – On entering a denser medium which way does the ray bend? – In fishing – Is the fish actually closer of further away?
Is light a wave or a particle – do we care? Step 1 – Interaction with surfaces
Four things can happen • Reflected • Absorbed • Scattered (reflected or re-radiated in
many directions) • Refracted Always a combination of the above
FB: Science is Awesome

• Real Surfaces – the easy ones
• Specular Flat – First Surface Mirrors – Highly Polished Metal or Ceramics – Mercury – Liquids at low angles
• Amorphous
– White Paper – White Ceramic – Fine White Powders – Inside of a good Dome Light
Light and Surfaces
Reflection I = R
Diffuse Reflection

• Real Surfaces – the common ones
• Specular Multi-faceted – Machined Metal – New as-cast/rolled metal – Fresh solder
• Amorphous/Reflective – Plastics – Coated Paper – Partially Oxidized Metal – Painted surfaces
Light and Surfaces

• Real Surfaces – more common ones
• Partially absorptive – Any printing – Dark or colored materials – Fine powders (not white) – Translucent solids and liquids
• Refractive/Reflective – Glass/Air or Glass/Liquid – Transparent Liquid Surfaces
Light and Surfaces

Step 2 – Turning Light into an Image
Optics get the light into the camera
- Different Seminar!
Sensor turns light into a digital image
- Lighting topic because S/N influenced by
• Sensor sensitivity (type and cell size)
• Frequency/wavelength response

Turning Light into an Image
• The sensor receives wavelengths which make it through the lens system
• CMOS/CCD converts visible and NIR photons to an electrical charge
• Charge is converted to grey level
• Machine Vision is computerized light measurement
CCD Camera Response
Sensors are photovoltaics!
There is another definition
Q - Why do flames often look wrong on the TV? (or cheap/modern movies)
Why are our eyes good at 400 to 700 nm?
HEAT
Goes straight through
Damages tissue
Everything looks the
same
Low resolution
No resolution Ouch!

• High Signal/Low Noise • High Contrast (but not washed out) also
• Evenly Lit • Unaffected by Product Variation • Unaffected by Environmental Variation
Review of Goals for Lighting Design
We have thought about: Properties of light What happens at surfaces and sensors What happens at the sensor Now consider effect of lighting geometry as Part 3 of the “Scientific Method”
But first– review Bright Field, Dark Field and The “W”

Bright Field and Dark Field • Dark Field or Bright Field – you have a sample in your pocket
• “Tuppeny bit” lit by a light in the Bright Field – and in the Dark Field
• On Axis - Flat bits bright Off Axis - Inclined surfaces bright
Only applies to surfaces that are at least a bit specular!

“W” Defines Bright Field and Dark Field Zones
Bright Field
Dark Field
Dark Field
PQ – what is wrong with this guy?
The “W” defines Bright Field/Dark Field boundary for flat/low topology specular objects
Bright Field
Dark Field
Dark Field Ring

Flat Mirror
Reflection Geometry: Defining the “W”
Bright Field
Working Distance
Field of View
• Step 1 – Draw line from lens to extreme edge of FOV

Flat Mirror
Reflection Geometry: the “W”
Working Distance
Field of View
• Step 2 – Reflect this line off a mirror at the object plane

Reflection Geometry: the “W”
Bright Field
Dark Field Dark Field
Bright Field • Step 3 – Do the same on the other side and admire the “W”

Reflection Geometry: the “W”
Working Distance
Field of View
Fill the W (and then a little bit more) to evenly illuminate flat specular surfaces Example is an “on axis” light
How much more depends on surface geometry

Reflection Geometry: the “W”
Stay (low) outside the W to detect scratches, pits, or elevation on flat specular surfaces Example is a “dark field” ring light

Image a Ball Bearing soon!
Bright Field
Dark Field Dark Field
Dark Field
Ambient
Dark Field Ring
Ambient light – and hello from me
On axis light at 4 ins. On axis light at 1 ins. Ring light

Bright Field Lighting with a “Warped W” Uniform lighting is presented within the bright field, providing diffused on-axis illumination.
Dark-field light
Bright-field light
Is this bright field or dark field?
Where does the W go when you tilt the camera?
Backlight
Camera
Nearly the same effect as an on-axis light
(But the image has perspective distortion)

Dark Field Lighting with a “Warped W”
One sided dark field lighting is produced if the camera is tilted > 20 degrees
Camera with built-in or attached light
Dark-field light
Bright-field lightIs this bright field or dark field?
Where does the W go when you tilt the camera?
Nearly the same effect as a low angle ring light
(But the image has perspective distortion)

Ensuring Uniformity
• Uniformity is relative to: – Field of view
• In the camera field of views, is the light intensity equalized? – Surface angularity and shape
• Does the light reflect from all the surfaces of the part evenly? – Equal light delivery/emission
• Is the light transmitted evenly from the source?
• Uniform light provides uniform reflection
Can fix some of this in software but better to have a nice image.
Want the part histogram and the background histogram to be as skinny and as far apart as possible.
Does it all have the same chance of getting to the sensor?

The Story So Far • Consider how light interacts with surfaces • Classify the surfaces you are looking at (specular/crystalline absorptive/
amorphous) • Considered how light effects the sensor • Are aware of the boundary between dark field and bright field • Can draw or imagine the W
Nearly Ready to move on to “Lighting Geometry at the Movies”
But First - Ray Tracing or “Think Like a Photon”

• The Scientific Method: - use tracing to determine
lighting/scene camera geometry to achieve the best result
• Each place on the object that is in the FOV has a corresponding cell on the sensor
• So – Trace all light paths from the SOURCE to the OBJECT to the SENSOR and determine which of the paths land on a particular PIXEL on the SENSOR.
• If there are many paths then this location on the SENSOR and the corresponding location in the IMAGE will be bright.
• No or few paths then the location will be dark
• Takes account of light, object and sensor geometry, shape, and surface properties.
Ray Tracing or “Think Like a Photon” Q - What is ray tracing? A - Follow the rays . All of them!
Why is it important? CGI (Computer Generated Imagery)
Did you enjoy….. TRON(s), Toy Story, Bug’s Life, Finding Nemo, 300! (all CGI) (but not Wallace and Grommet)
Uses MASSIVE computing power!

Amateur Ray Tracing • Draw the rays from the light • Light reflects at the angle of incidence
(angle of incidence = angle of reflection) • Light spread depends upon surface conditions (specular vs
matte) • Draw a simple diagram to understand your setup and determine
light placement. Follow your arrows – Does the arrow terminate at a pixel in the sensor – What does uniformity look like?

Application: Engine Block Pick-up
Putting tracing to work! • Application: Locate Engine Block for
Robot. Identify Cylinder Holes
• Issues: Space Constraints, Ambient Light.
• Solution: Based on simple ray tracing, good contrast between block surface and holes using line array lights and reflectors. Application lighting illuminance (in lux) was much greater than ambient light.

Example - Applying Ray Tracing
•Follow your arrows!
•Is there a ray path to the camera from all the places you want to be bright?
•Do rays get lost from all the places you want dark?
• Identify placement required for lighting (e.g., lighting top of engine block).
Uniform Light Reflector (Passive)
Area LED Array (2x)
Q) How do we light both sides? Engine Blocks on Pallet
Direction of arrows?

More Ray Tracing
Uniform Light Reflector (Passive – 2x)
Area LED Array (4x)
Ray tracing shows that to light both sides, lighting must be placed accordingly.
Two sets of lights and reflectors!

The World of Portrait and Movie Photography
• Finally - Fun at the Movies… or… Where are the Lights? • “Three Point Lighting” is standard for Portraits, Movies & TV
• Back Light • Outline
• Fill Light • Fills Shadows
• Key Light • Brightest

• Natural lighting?
This “candid” shot was probably posed- Key, Fill, Back are all there.
Shrek is “Three Point Lit” with the Key on the right
….but the castle and trees are lit from the left!
May cause
Angry Spouse Syndrome
Strongly recommend the “where is the light coming from” game!
Play Where Is The Light?

Sometimes They Get it Right - Eventually
Second Coors Light Commercial Same Beer Guy is lit from his left Coach is lit from his right OK! Got it right!
First Coors Light Commercial – Coach Jim Mora Beer Guy is lit from his right Coach is also lit from his right No!

Natural Lighting?

• And on another world with two suns
• Tattooine?

Summary
You know a few things about light • Straight lines and fast!
• Reflect / Refract / Absorb / Scatter
• Plan to maximize SNR
• Think Bright Field / Dark Field
•Will fill the “W” for Bright Field
• Know how to follow the rays (ray tracing)
• Play the “where is the light?” game
• You can think like a photon…..
Now to specify real lights to achieve the desired SNR, etc.
Specifying Real Lights
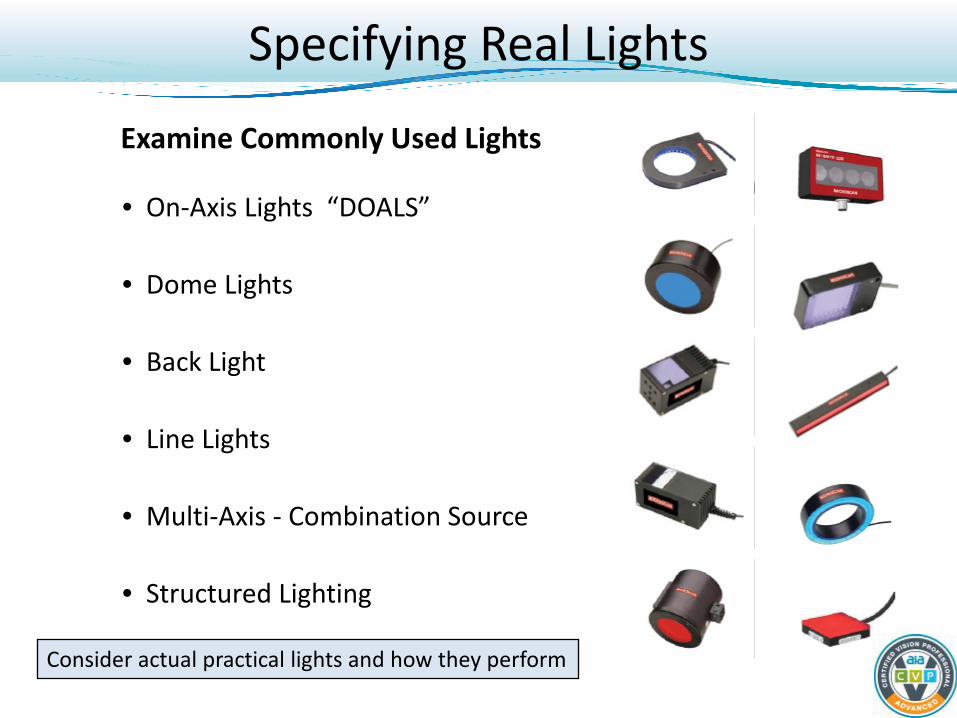
Examine Commonly Used Lights
• On-Axis Lights “DOALS”
• Dome Lights
• Back Light
• Line Lights
• Multi-Axis - Combination Source
• Structured Lighting
Consider actual practical lights and how they perform

Light Source
Object
Diffuser
Beam Splitter
Diffused On-Axis Light
PRO: Can fill the W No hole on the sky CON: 75% of the light gets lost Not completely even
Diffused on-axis light, also know as co-axial light

Emphasize finish / texture (reflection) differences
Use of DOAL 1 – Surface Properties
Laser mark on flat metal surface Laser changes metal surface from crystalline/specular to diffuse/ amorphous Metal Surface is crystalline/specular – predominantly mirror like
If this surface is specular – remember to fill the W

Use of DOAL 2 - Elevation
Emphasize elevation differences
Stamped on flat metal surface Flat surface is rough crystalline/specular Indents are at ~35 degrees Light from the mark is reflected away from the lens so they appear dark

Using a DOAL 3 – Bright Field • Application: Measure angle in
circuit breaker
• Issues: Stamped metal with inconsistent edges
• Solution: Diffused on axis light creates bright field over whole top edge of stamped metal parts

Notched Housing Housing
Spot Quiz
Why does this application work?
Another DOAL® Lighting Example
FIX Better Example

Distant DOAL Effect: Collimation
At long distance a DOAL produced light rays that are almost parallel
Only the surfaces that are perpendicular to the light source will reflect to the camera. Even the slightest indentation creates contrast.
Differences in surface angle are emphasized.
Approximating Parallel Rays Use collimated light to detect small angle changes on specular surfaces

Through hole connector - missing solder at base of a pin
Light reflects at an angle in the presence of solder – so base is dark
Distant DOAL Effect

Dome Lights – for when the W is very BIG

Light source (on-axis)
Object Light source (off-axis)
Beam splitter
The Super Dome! - Continuous Diffuse Illumination (CDI)
Image of Specular Sphere
Inside the milk bowl?
(or an integrating sphere?)

• De-emphasize surface texture • Enhance absorption versus non-absorption • De-emphasize elevation
Creates large solid angle of illumination
φ
Continuous Diffuse Illumination (CDI)
Beverage can with ring light
Beverage can with CDI

Object
Light source (off-axis)
Dome Light Illumination
Simpler than a CDI
Gives a small hole in the sky

Machined surface with area light Machined surface with dome light
Sometimes it is OK
Dome Lighting Example

Dome lights see through packaging
• DOAL or Ring Light produced intense reflections/high lights
• With Dome light (extended bright field) no intense reflection.

Data Matrix on a specular cylindrical surface
Data Matrix can cover 1/6 diameter of the circumference of a cylinder.
Must fill the “W” for at least 10% more than that of the mark.
Lighting Cylindrical Objects

Examples – Lighting a Cylinder
Arbitrary Built-in Light DOAL Light
Dome Light
To light a cylinder you need a big W!

Collimated
Diffused
Use a collimated backlight to avoid glancing stray light off curved surfaces and reflecting to the camera.
To achieve collimated light use a collimated lens or lengthen the optical path behind the part
The shaft diameter measuring problem.
Collimated vs. Diffused Backlight
Distance is the poor man’s collimator.
Nearly Collimated

The Masked Back Light Trick

Problem: Inspecting assembled PWBs The Solution: DOAL Lighting in combination with a Dark Field ring light enabled full “AOI”
Multi-Axis/Combination Lighting Example
Dark field ring light is the laser marked plastic package’s best friend
Consider Image Arithmetic

Laser
Light plane
Light stripe on part and background
Line generator
Structured Light

Structured Lighting Images
Tube with line light
Tube with line light “F-stopped” down Application to measure tube step height

Summary: Advanced Techniques
• Co-Axial (DOAL) – Makes flat shiny things bright, discriminates elevation & texture
• Collimated Co-Axial (Move the DOAL away) – High intensity, parallel rays, detect small angle or elevation changes
• Domes and Continuous Diffused Illumination – Minimize texture, elevation changes, creates a “flat field”, measure
absorption/reflectivity
• Multi-Axis – Combination lighting for interesting projects
• Structured Lighting – Looking at patterns of light and deviations and infer height or profile

Smart Cameras with Built-in Lights
• Smart Cameras and Symbology Readers may have built-in lights
Q - What is a practitioner of the scientific method to do? A - If the surface is crystalline/specular – angle the camera 15 – 20 degrees to
create dark field lighting – without too much distortion.

Other Topics
• Lighting Intensity Specifications
• Polarization
• Color Imaging and Colored Lights
• Lighting Trends and the World of LEDs • Strobe Lighting and Control
• The Eight Things to Remember

• What is the relative overall output of this light? • How much gets to where I need it? • How much do I need? • Definition of Radiometry and Photometry • SI Units
– Lumens– Total amount of visible light emitted by a source. The effective power of a light
• 100 Watt incandescent bulb is 1600 lumens
– Candela – Power in a particular direction. One candela is one lumen heading out in 1 steradian solid angle
– Lux – Luminous Flux per square meter. One Lux is one Lumen arriving at or leaving one square meter.
Lighting Vendors specify in Lumens, Candelas – or not at all Modern High Bright HB-300 5000 lumens On-Axis Light 90 candelas (directional) Backlight 20 candelas (directional) How much light required at the object depends on Object, Sensor, Aperture, Distance, Exposure Time (continuous, strobe, line scan), Ambient Lighting
Lighting Intensity
10 Lux Twilight 100 Lux Dark overcast day 1000 Lux TV Studio 10,000 Lux Full daylight 100,000 Lux Bright Sunlight 2,000,000 Lux Water Cooled Line Light for Line Scan Machine Vision

Aide Memoires

http://hyperphysics.phy-astr.gsu.edu/hbase/vision/radphocon.html#c1
Further Reading

Using Polarized Light
• Polarization? – Light vibrates in two orthogonal planes – Polarizing filter cuts one of these.
In nature light is polarized by reflection from a flat specular surface
Block the uni-polarized light and the reflection goes away

The Polarized Sunglasses Effect • View a scene through a polarized filter that cuts the reflected polarized light and you will cut the reflection • Practical applications
Fishing
Machine Vision
Non-Polarized, F 16 Polarized, F 5.6
Polarizer filter at source or camera or both

col·or
Color - Why Objects Have Color
That aspect of things that is caused by differing qualities of the light reflected or emitted by them, definable in terms of the observer.. or your Machine Vision Sensor! For reflected light - The color perceived by the viewer is the reflected wavelengths, all others are absorbed. (Think about why grass is green!... )
Transmission Radiation Absorption

• Case 1: Illumination with White Light
• Blue darker than green darker than red
• So colors will have different grey levels with white light
• POOR MAN’S COLOR
• Case 2: Illumination with Red Light
• Features that are white or red will be bright
• Other colors will be dark
• ANOTHER WAY TO MAKE CONTRAST
Camera Spectral Response
Color Discrimination with Monochrome Cameras
White Light, B&W Camera

What color light will provide the highest contrast for the red text and wash out the blue graphics?
BLUE LIGHT: Blue light is reflected from the graphics and absorbed into the red text to create high contrast.
Monochromatic Light Effects More than poor man’s color – eliminate background

Bayer Filter
• A quick word about color machine vision cameras – Usually have a Bayer Filter – Green at ½ resolution
• Because we humans see more detail in green
– Blue and Red at ¼ resolution – Software interpolates back to full resolution Remember that you are using a Lower resolution image! For gauging use a 3 sensor camera
Bryce Bayer RIP 2012
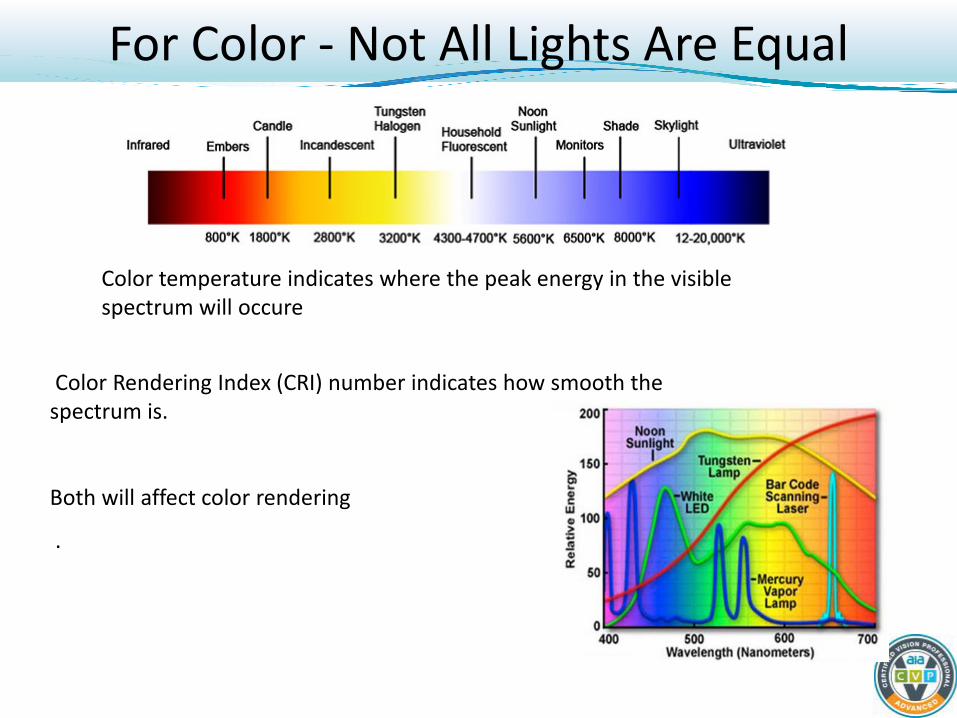
Color Rendering Index (CRI) number indicates how smooth the spectrum is.
Both will affect color rendering
.
For Color - Not All Lights Are Equal
Color temperature indicates where the peak energy in the visible spectrum will occure

LEDs
(Roland) Haitz’s Law Every 10 years – Cost /10, Light per package x 20
Have you noticed that LEDs are getting brighter?
5 Watt LEDs
Big Thank You to all those transportation applications!
Moore’s Law 2x transistors/circuit every two years

Machine Vision LED Lighting Trends
• Brighter
•Why is this good?
•Has anyone ever had too much light?
• Cooler – No Fans
•Allows IP 67 or 65
•Longer life
•Lower maintenance
•Built-in Control
•Current Control
•Built in Strobe
•Network Devices

LEDs as Light Sources • Monochrome LEDs are typically very narrow wavelength band
sources
• White LEDs are of monochrome LEDs plus a phosphor – have a spectral peak
Red LED – single peak
White LED – peaks in blue

• Issue: Moving parts
• Solution:
– Shutter the camera /short image acquisition time • Continuous light can be used if intensity is
adequate • BUT short exposure needs very bright light
– So strobe the light source
• Pulse width of light to stop pixel blur • Synchronize with image capture via strobe
trigger signal from vision system • Trigger acquire when part is in place • Strobed LED lights can be ~10 times brighter
than continuously lit LEDs
If you strobe, you must keep out ambient light.
Lighting Control: Effect of Motion

• RULES OF THUMB
• Standard machine vision inspection or gauging: – Keep the motion during strobe time to < = 1/10th Pixel
• Data Matrix reading:
– Keep motion to < = 1 Pixel
• Calculate the time to move one pixel: – FOV Dimension / (Speed of Part * Number of Pixels)
– [inch] * [secs/inch] * [1/pixels] = secs/pixel
– Example: 1 ins FOV; 2 ins/sec; 1000 pixels in direction of motion 1/(2 * 1000) = 0.0005 seconds (500 microseconds) to move 1 pixel Suggested strobe/shutter duration = 50 microseconds for gauging = 500 microseconds for DM read
Calculating Strobe Timing
Just those three parameters!

To strobe or not to strobe. That is the question! • Camera Shutter Solution/Continuous Light:
• 50 microsecond exposure is 16000/50 = 320 times less light than a normal 16 millisecond exposure. Needs 320 times brighter light.
• Typical LED strobe is about 10 times brighter that a continuous LED light (while it is on).
• Typically need to use strobe to provide enough light in moving part applications – in combination with a larger lens aperture
Exposure Time
Inte
nsity
(Cur
rent
)
16mS – Cont. 30mA
300mA
1.3m
S - S
trob
e
Strobe vs. Continuous

Summary Number 1 - 8 Things to Know
1. The difference between bright field and dark field lighting – BF a light right next to you in front
of the TV. DF- The dust that appears on the floor when the sun comes in low in the evening.
2. How to draw or imagine the “W” – all the things you could see if you stood in front of an
infinitely long flat mirror and looked through an empty picture frame
3. What is takes to smother ambient light - a TV screen so bright that room lights or sun makes no
difference
4. Follow the photons – think about ray tracing – play with a laser pointer and a disco ball
5. Understand the difference between matt and specular surfaces - what changes when you get
condensation on a mirror?
6. Know that most materials are somewhere in between - most print on paper is at least a bit
glossy
7. Know how to calculate how long it takes a part/image to move one pixel. Time and distance
calculation – Driving speed and distance -> time of travel
8. Think in terms of signal to noise ratio - bars on your cell phone
Red – Examples in everyday life

1. Use the scientific method and 3 step approach to identify correct lighting solutions:
Step 1-Think about how light will interact with the object
Step 2-Understand the “W” and use ray tracing to determine where light should be present / absent
Step 3-Select the right geometry to get maximum SNR
2. Use advanced lighting techniques to fit geometry needs (co-axial through continuous diffused
illumination), and keep structured lighting in mind.
3. Use ball bearing / mirror techniques to determine uniformity of light source.
4. Consider polarization to eliminate reflections as a last resort.
5. Consider color regarding absorption / reflection and relative to the source used.
6. Use strobing to stop motion where required and get the maximum intensity.
Summary 2
……and Have Fun with Lights………like these guys


Having Fun With Lights!
Australian Pink Floyd Show

Jonathan Ludlow Machine Vision Promoter Microscan 700 SW 39th Street Renton, Washington 98057 USA
Phone: +1 603-598-8400 Email: [email protected]
www.microscan.com