Adobe Photoshop CC - pearsoncmg.comptgmedia.pearsoncmg.com/imprint_downloads/peachpit/... ·...
16
Photoshop CC Adobe CLASSROOM IN A BOOK ® e official training workbook from Adobe Andrew Faulkner & Conrad Chavez Alberto Seveso ERRATA 2015.5 RELEASE
-
Upload
vuongtuyen -
Category
Documents
-
view
215 -
download
0
Transcript of Adobe Photoshop CC - pearsoncmg.comptgmedia.pearsoncmg.com/imprint_downloads/peachpit/... ·...

Photoshop CCAdobe
2015 release
CLASSROOM IN A BOOK® The official training workbook from AdobeAndrew Faulkner & Conrad Chavez
Alberto Seveso
ERRATA 2015.5 RELEASE

ERRATA AND FEATURE UPDATESErrata and feature updates for Adobe® Photoshop® CC Classroom in a Book® (2015 release)
ISBN 9780134308135.
August 2016
This document contains corrections and updates for Adobe® Photoshop® CC Classroom in a Book® (2015 release).

3 ERRATA AND FEATURE UPDATES Adobe Photoshop CC Classroom in a Book (2015.5 release)
ERRATAThis section contains corrections that bring Adobe® Photoshop® CC Classroom in a Book® (2015 release) up to date with Adobe Photoshop CC 2015.5.
Refine Edge replaced by Select and MaskPhotoshop 2015.5 introduces the new Select and Mask feature, which replaces the Refine Edge feature. When you see references to Refine Edge or Refine Mask in the book, look for Select and Mask instead. In general, you’ll find Select and Mask in the same places in Photoshop where Refine Edge used to be.
Lesson 3: sidebar “Softening the edge of a selection” (Page 62)
All references to Refine Edge now refer to the Select and Mask feature.
Note: The first time you use Select and Mask, a tutorial tip may pop up. You may view it before you continue with the lesson, or you can click Later or Close.
Lesson 6: Getting Started (Page 138)
In the paragraph following Step 5, Refine Edge is now Select and Mask.
Lesson 6, Refining a Mask (Page 141)
In Step 3, Refine Edge is now Select and Mask. The following figure replaces the figure after step 3.
4 ERRATA AND FEATURE UPDATES Adobe Photoshop CC Classroom in a Book (2015.5 release)
Lesson 6: Masks and Channels — Creating and Refining a Mask(Page 139)
Getting the best results with Select and MaskWhen using Select and Mask, it’s important to recognize which parts of the image should be fully revealed, fully masked, and partially masked (such as hair), and to use the tools appropriate for each area. Try these tips:
• The Quick Selection tool is often the fastest way to create a mask because it uses edge detection technology to automatically find mask edges. To manually paint or draw mask areas, use the Brush and Lasso tools.
• To add to the areas you want to be fully revealed, drag the Quick Selection, Brush, and Lasso tools.
• To subtract from the areas you want to be fully masked (that is, to fully reveal them), use the Quick Selection, Brush, and Lasso tools while holding down the Alt (Windows) or Option (Mac OS) key.
• To improve the mask along edges containing complex transitions, drag the Refine Edge Brush. Do not drag the Refine Edge brush over areas that should be fully revealed or fully masked.
The following steps replace the sections “Creating a Mask” and “Refining a Mask” (pages 139–144 of the printed book).
1 Choose File > Save As, rename the file 06Working.psd, and click Save. Click OK if the Photoshop Format Options dialog box appears.
Saving a working version of the file lets you return to the original if you need it.
2 Choose Select > Select and Mask.

5 ERRATA AND FEATURE UPDATES Adobe Photoshop CC Classroom in a Book (2015.5 release)
z
The image appears with a semitransparent “onion skin” overlay to indicate masked areas, represented by the checkerboard background.
Tip: You can adjust the transparency of the onion skin by dragging the Transparency slider under the View Mode options.
3 Make sure the Quick Selection tool ( ) is selected. In the options bar, set up a brush with a size of 15 px and hardness of 100%.
Before

6 ERRATA AND FEATURE UPDATES Adobe Photoshop CC Classroom in a Book (2015.5 release)
After
4 Position the Quick Selection tool within the man, then drag while keeping the tool well within the hair, face, and shirt areas and away from the edges. It’s OK if you release the mouse button and drag more than once, as long as you do not drag over or past the edge to the background. You’re “teaching” Select and Mask which areas should not be part of the mask.
As you drag the Quick Selection tool over the man, the onion skin overlay disappears to indicate which areas will be revealed instead of being masked. If you see any remaining checkerboard areas within the man, drag the Quick Selection tool over them.
The Quick Selection tool should create clean edges for the shirt and face. Don’t worry if the spiked hair edge is not perfect, because you’ll refine that next.

7 ERRATA AND FEATURE UPDATES Adobe Photoshop CC Classroom in a Book (2015.5 release)
5 Click View Mode option and choose Overlay. The masked area is now shown as a semitransparent red color instead of the onion skin checkerboard. The different View Modes are provided so that you can see the mask more easily over different kinds of images. In this case, the red overlay more clearly shows where the hair selection is not precise enough.
6 Zoom in so that you can see the hair edge more clearly.
7 Select the Refine Edge Brush tool ( ). In the options bar, set up a brush with a size of 50 px and hardness of 100%.

8 ERRATA AND FEATURE UPDATES Adobe Photoshop CC Classroom in a Book (2015.5 release)
8 Drag the Refine Edge Brush tool between the top of the head and the ends of the hair, where the selection needs to be improved. As you drag the Refine Edge Brush tool over the complex hair edge, you should see two things happen: Gaps in the mask between hairs should fill in, while fine hairs should become excluded from the mask so that they’re visible.
Before
After

9 ERRATA AND FEATURE UPDATES Adobe Photoshop CC Classroom in a Book (2015.5 release)
9 Zoom in to 400% magnification, and check the ends of the hairs.
If the hair ends are obscured by the red overlay, you’ll want to refine them further.
10 In the options bar, set up a Refine Edge brush with a size of 10 px, and leave the hardness at 100%.
11 Drag the Refine Edge Brush tool over any obscured hairs to reveal them.
10 ERRATA AND FEATURE UPDATES Adobe Photoshop CC Classroom in a Book (2015.5 release)
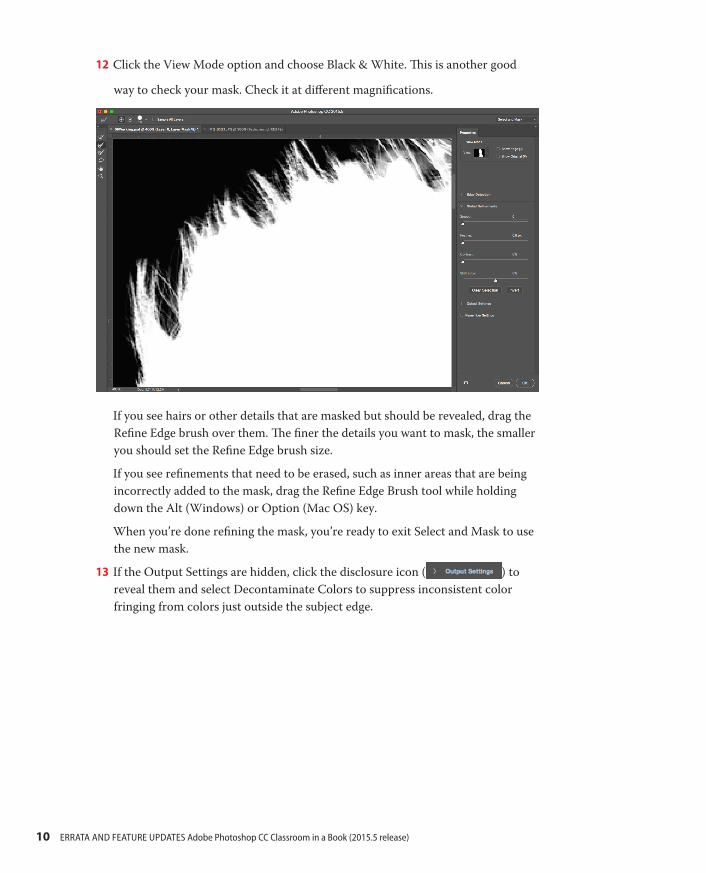
12 Click the View Mode option and choose Black & White. This is another good
way to check your mask. Check it at different magnifications.
If you see hairs or other details that are masked but should be revealed, drag the Refine Edge brush over them. The finer the details you want to mask, the smaller you should set the Refine Edge brush size.
If you see refinements that need to be erased, such as inner areas that are being incorrectly added to the mask, drag the Refine Edge Brush tool while holding down the Alt (Windows) or Option (Mac OS) key.
When you’re done refining the mask, you’re ready to exit Select and Mask to use the new mask.
13 If the Output Settings are hidden, click the disclosure icon ( ) to reveal them and select Decontaminate Colors to suppress inconsistent color fringing from colors just outside the subject edge.

11 ERRATA AND FEATURE UPDATES Adobe Photoshop CC Classroom in a Book (2015.5 release)
14 Choose New Layer With Layer Mask from the Output To menu. Then click OK.

12 ERRATA AND FEATURE UPDATES Adobe Photoshop CC Classroom in a Book (2015.5 release)
Additonal notes for Lesson 6Lesson 6, Using an Alpha Channel to Create a Shadow (Page 149)
In step 4, Refine Edge is now Select and Mask, so choose Select > Select and Mask.
Lesson 6, Adjusting an Individual Channel (Page 153)
In step 11, Refine Edge is now Select and Mask, so choose Select > Select and Mask.
Lesson 9: Liquify feature redesignedThe Liquify feature is now a task space similar to the Blur Gallery or Select and Mask, instead of a dialog box. While the layout of options was redesigned (in part to accommodate the new Face-Aware Liquify feature), the features used in Lesson 9 are still present in the new layout.
Liquify options no longer appear under an Advanced Mode. Instead, all Liquify options are organized into multiple sections that can be hidden or revealed. If you don’t see an option you want, click a disclosure triangle to expand the sections and reveal all available options.

13 ERRATA AND FEATURE UPDATES Adobe Photoshop CC Classroom in a Book (2015.5 release)
Lesson 15: Printing 3D filesPositioning Elements, step 3 (page 352)
If the Move tool doesn’t select the Visit Paris text, make sure you click a solid area of the text, not the space between the letters.
Feature updatesAs part of Adobe Creative Cloud, Photoshop CC is continuously updated with new features and enhancements. You can always keep up with the new features by read-ing the New Features Summary web page, which Adobe updates with every release:
https://helpx.adobe.com/photoshop/using/whats-new.html
You can try some of the features introduced from Photoshop CC 2015.1 and later with lessons in this book.
Content-Aware CropWhen you use the Crop tool to straighten or rotate an image or to extend the canvas area of an image, empty areas can result. The new Content-Aware Crop feature can automatically fill in those areas. You can try this feature using the panorama image created in Lesson 5.
1 Choose File > Browse In Bridge.
2 Navigate to the Lesson05 folder, if you’re not there already. Then, look at the Skyline_End.psd thumbnail preview.
The finished panorama is not quite level. It can be straightened easily by rotating it with the Crop tool, but this will either leave empty spaces around the edges or cut off too much of the image. Fortunately, the new Content-Aware Crop option can automatically fill in empty areas that result from cropping.

14 ERRATA AND FEATURE UPDATES Adobe Photoshop CC Classroom in a Book (2015.5 release)
3 Double-click Skyline_End.psd to open it in Photoshop.
4 Select the Crop tool.
5 In the Options bar, select the Content-Aware Crop option.
If the Content-Aware Crop option is not available or if the crop rectangle is not visible on the image, press Enter or Return.
6 Position the Crop tool just outside the crop rectangle so that the pointer becomes a two-headed curved arrow.
7 Drag to rotate the image until the horizon of the photo is level. Notice that empty areas are appearing between the corners of the rotated image and the canvas.
8 Press Enter or Return. Content-Aware Crop fills in the areas that would have been empty.
9 Close the image without saving changes.
Face-Aware LiquifyYou can try the new Face-Aware Liquify feature with Lesson 9.
1 In the Lesson 9 folder, open the Monster_Makeup folder and then open the file Franken.psd.
2 Choose Filter > Liquify.
3 If the Face-Aware Liquify options group is hidden, click the disclosure triangle next to Face-Aware Liquify to reveal those options.
The Liquify feature will detect one face in the image and label it Face #1. If more faces were detected, each face would get its own set of controls.
4 Experiment with the Eyes, Nose, Mouth, and Face Shape options.
For example, click the disclosure triangle next to the Eyes options to reveal those options, then drag the Eye Size slider to make the eyes larger or smaller. Try to make the face look scarier or angrier.
These options groups work by automatically recognizing the different parts of a face.
Face-Aware Liquify works best for faces that are shown from the front. It may not recognize faces or face parts that are shown at other angles or in profile.
Start/Recent Files workspacesLesson 1, Starting Photoshop and Opening a File (Page 10)
When you start Photoshop or have Photoshop running without any open docu-ments, instead of seeing a blank workspace Photoshop displays the Start workspace.

15 ERRATA AND FEATURE UPDATES Adobe Photoshop CC Classroom in a Book (2015.5 release)
At the top-left corner, the Start workspace gives you quick access to recent files, Creative Cloud libraries, and Photoshop document presets. Below that are New and Open buttons so that you can create new documents or open existing ones without having to use the menus or keyboard shortcuts.
Along the bottom of the Start workspace are ways to find Adobe Stock content, explore new features, and view tutorial files. We encourage you to click Show All to explore all of the links and tutorial videos, because they cover many areas in addi-tion to those in this Classroom in a Book.
You may see more content on the Start workspace when you enlarge the Photoshop application window.
User interface updateAdobe modernized the user experience of Photoshop to align it more closely with current operating systems and touch devices such as the Surface Pro. Throughout the Photoshop application, buttons and controls now have a “flatter” appearance, and are sized more effectively for touch devices.
Also, the color themes for the Photoshop user interface have been refined (see “Changing interface settings” in Lesson 1).

16 ERRATA AND FEATURE UPDATES Adobe Photoshop CC Classroom in a Book (2015.5 release)
Creative Cloud LibrariesIn Photoshop CC 2015.1 and later, Adobe increased Photoshop integration with Creative Cloud Libraries (CC Libraries). As a result, in some lessons you may see integration with Libraries that are not mentioned in the Classroom in a Book. When that happens you should hide or dismiss the Libraries feature.
For example, if the Libraries panel is open in a lesson that doesn’t use it, feel free to close the Libraries panel to free up screen space.
You may also see a New Library From Document dialog box when opening a file. The purpose of this dialog box is to help you create Creative Cloud Libraries from content in your documents. By default, this dialog box appears every time a docu-ment opens that contains content that could be added to a Library.
This dialog box isn’t used in this Classroom in a Book, so the first time you see it, we recommend turning on Don’t Show Again and then clicking Cancel.