Adob Adobbbeeee PPPPageageagemakermakermaker ... - r-iti.com
49
Ado Ado Ado Adobe Page age age agemaker maker maker maker Paper By:- Bhawesh Mandal Mobile: Mobile: Mobile: Mobile:- +977-9842278940 Downloaded From: www.bhawesh.com.np Downloaded From: www.bhawesh.com.np Page: 1 of 49 INTRODUCTION Adobe PageMaker is a graphic application, specially used in page designing. Today its popular in press and screen printing jobs, page designing for news paper & magazines, designing for visiting cards, invitation cards etc. it is quite easy with leading, tracking, set width features to adjust the text and to make publication designing. Otherwise, if a shortcut has set up, than you can activate PageMaker by double-clicking on this icon To open adobe PageMaker Go to START Select program Select Adobe and click on Adobe PageMaker 70 Go to START Click on RUN Type "pm70" then click on ok
Transcript of Adob Adobbbeeee PPPPageageagemakermakermaker ... - r-iti.com

AdoAdoAdoAdobbbbeeee PPPPageageageagemakermakermakermaker
Paper By::::---- Bhawesh Mandal Mobile:Mobile:Mobile:Mobile:---- +977-9842278940
Downloaded From: www.bhawesh.com.np
Downloaded From: www.bhawesh.com.np
Page: 1 of 49
INTRODUCTION Adobe PageMaker is a graphic application, specially used in page designing. Today its popular in press and screen printing jobs, page designing for news paper & magazines, designing for visiting cards, invitation cards etc. it is quite easy with leading, tracking, set width features to adjust the text and to make publication designing. Otherwise, if a shortcut has set up, than you can activate PageMaker by double-clicking on this icon To open adobe PageMaker
� Go to START � Select program � Select Adobe and click on Adobe PageMaker 70
� Go to START � Click on RUN � Type "pm70" then click on ok

AdoAdoAdoAdobbbbeeee PPPPageageageagemakermakermakermaker
Paper By::::---- Bhawesh Mandal Mobile:Mobile:Mobile:Mobile:---- +977-9842278940
Downloaded From: www.bhawesh.com.np
Downloaded From: www.bhawesh.com.np
Page: 2 of 49
Choose new........ From the file menu Click on ok. The screen is arranged as follows. The Document Window You can work on more than one document at a time using PageMaker, each with its own window Note; the maximize and minimize buttons will expend the window or shrink it to a single icon.
Title Bar
Document window
Master pages
Scroll Bars The page
The pasteboard

AdoAdoAdoAdobbbbeeee PPPPageageageagemakermakermakermaker
Paper By::::---- Bhawesh Mandal Mobile:Mobile:Mobile:Mobile:---- +977-9842278940
Downloaded From: www.bhawesh.com.np
Downloaded From: www.bhawesh.com.np
Page: 3 of 49
Tools
Text Tool
Crop Tool
Constrained line Tool
Rectangle frame Tool
Elliptical frame Tool
Polygon frame Tool
Zoom Tool
Pointer Tool
Rotation Tool
Line Tool
Rectangle Tool
Elliptical Tool
Polygon Tool
Hand Tool

AdoAdoAdoAdobbbbeeee PPPPageageageagemakermakermakermaker
Paper By::::---- Bhawesh Mandal Mobile:Mobile:Mobile:Mobile:---- +977-9842278940
Downloaded From: www.bhawesh.com.np
Downloaded From: www.bhawesh.com.np
Page: 4 of 49
THE RULERS The rulers help you make measurements on screen. Do dotted line
markers in each ruler indicate you current position
Horizontal ruler

AdoAdoAdoAdobbbbeeee PPPPageageageagemakermakermakermaker
Paper By::::---- Bhawesh Mandal Mobile:Mobile:Mobile:Mobile:---- +977-9842278940
Downloaded From: www.bhawesh.com.np
Downloaded From: www.bhawesh.com.np
Page: 5 of 49
To change the units of measurement select preferences and general from the file menu.
Vertical ruler
Horizontal ruler position marker

AdoAdoAdoAdobbbbeeee PPPPageageageagemakermakermakermaker
Paper By::::---- Bhawesh Mandal Mobile:Mobile:Mobile:Mobile:---- +977-9842278940
Downloaded From: www.bhawesh.com.np
Downloaded From: www.bhawesh.com.np
Page: 6 of 49

AdoAdoAdoAdobbbbeeee PPPPageageageagemakermakermakermaker
Paper By::::---- Bhawesh Mandal Mobile:Mobile:Mobile:Mobile:---- +977-9842278940
Downloaded From: www.bhawesh.com.np
Downloaded From: www.bhawesh.com.np
Page: 7 of 49
Repositioning the zero point Initially all measurements are from the top left corner of the pag. This can be changed
by moving the zero point.
� Move the mouse pointer directly over the zero point icons. � Drag down wards and to the right until you reach the desired position for the new zero
point. Viewing the page There are eight levels of the page magnification. Those used most often can be accessed directly with the mouse
� Point to the area and hold down the right mouse button. A context opo-up menu will appear
� Select the desired magnification
The zero point icons (start dragging here_

AdoAdoAdoAdobbbbeeee PPPPageageageagemakermakermakermaker
Paper By::::---- Bhawesh Mandal Mobile:Mobile:Mobile:Mobile:---- +977-9842278940
Downloaded From: www.bhawesh.com.np
Downloaded From: www.bhawesh.com.np
Page: 8 of 49
other page views
� Go to view � Select the zoom to � Choose one the eight view options. Note that the rulers expend to revel more
detail as you zoom in.
AdoAdoAdoAdobbbbeeee PPPPageageageagemakermakermakermaker
Paper By::::---- Bhawesh Mandal Mobile:Mobile:Mobile:Mobile:---- +977-9842278940
Downloaded From: www.bhawesh.com.np
Downloaded From: www.bhawesh.com.np
Page: 9 of 49
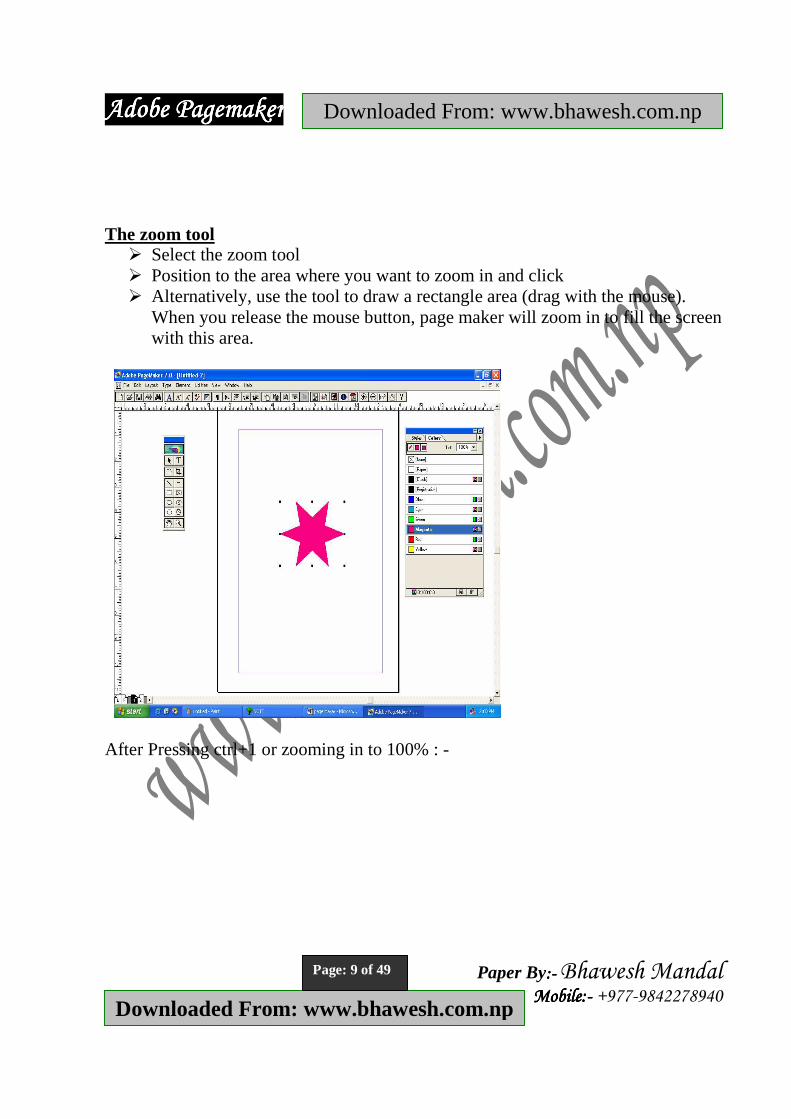
The zoom tool
� Select the zoom tool � Position to the area where you want to zoom in and click � Alternatively, use the tool to draw a rectangle area (drag with the mouse).
When you release the mouse button, page maker will zoom in to fill the screen with this area.
After Pressing ctrl+1 or zooming in to 100% : -

AdoAdoAdoAdobbbbeeee PPPPageageageagemakermakermakermaker
Paper By::::---- Bhawesh Mandal Mobile:Mobile:Mobile:Mobile:---- +977-9842278940
Downloaded From: www.bhawesh.com.np
Downloaded From: www.bhawesh.com.np
Page: 10 of 49
This pointer tool to select, move and resize text blocks and graphic
To select & type the text
To rotate picture, objects and text
To crop the picture
To draw the straight lines in any direction
Use the constrained line tool to draw vertical or horizontal lines
To draw the rectangle, rectangles and squares
Central oval box
Use the ellipse tool to draw ellipses and circles
Use the ellipse frame tool to create a polygonal placeholder for text and graphics
To draw the basic polygons
To draw polygon frame tool to create a polygon placeholder for text and graphics
Zoom tool to magnify or reduce an area of the page
Hand tool to scroll the page or to preview and test hyperlinks

AdoAdoAdoAdobbbbeeee PPPPageageageagemakermakermakermaker
Paper By::::---- Bhawesh Mandal Mobile:Mobile:Mobile:Mobile:---- +977-9842278940
Downloaded From: www.bhawesh.com.np
Downloaded From: www.bhawesh.com.np
Page: 11 of 49
Control palette in character view (for text option {like} Click the close box {x} to close the control palette Apply button click to apply formatting to selected text Character mode set Type or choose a typeface or font style (like Arial) Expert tracking option: type or select the amount of space bet between Letters and words. Font size Normal Bold Italic Reverse sub sc set width option: type values from 5% To 250% in increments of a tenth of 1% (Normal equals 100% or the character width Underline strikethru. (super script) in the original font design) Small caps all caps leading (line spacing)

AdoAdoAdoAdobbbbeeee PPPPageageageagemakermakermakermaker
Paper By::::---- Bhawesh Mandal Mobile:Mobile:Mobile:Mobile:---- +977-9842278940
Downloaded From: www.bhawesh.com.np
Downloaded From: www.bhawesh.com.np
Page: 12 of 49
Baseline shift options specify the vertical position of text relative to the baseline nudge amount 0.01 point. Kerning option: increase, decrease or view kerning increments, accurate to 0.001 of an em space nudge amount 0.01 em Page number icons In the button left corner of the page are the page number icons. Depending on how your document is setup, you may see just a few or many icons in this area. According with the document this icon will 1,2,3.....up to 929 depending upon the number of pages in this publication. You can move to the specific page by clicking on the corresponding page number icon. Control palette in paragraph view Paragraph mode set paragraph style first line indent vertical space above Selected paragraphs Alignment (left) alignment (right) alignment (centre) alignment (justified) Alignment (force-justified) left indent right indent Vertical space below selected paragraphs Control palette with an object selected
To display control palette � Go to WINDOW � Click on SHOW CONTROL
PALETTE
TO hide control palette � Go to WINDOW � Click on HIDE CONTROL PALETTE
Reverse text is the same color as paper, so you will to cerate a dark box behind to be seen

AdoAdoAdoAdobbbbeeee PPPPageageageagemakermakermakermaker
Paper By::::---- Bhawesh Mandal Mobile:Mobile:Mobile:Mobile:---- +977-9842278940
Downloaded From: www.bhawesh.com.np
Downloaded From: www.bhawesh.com.np
Page: 13 of 49
Reflection buttons Apply button reference point coordinates of reference point width and height of Obj Colors Color palette is used for designing, color separation matter. Colors palette, use it to apply colors or view the name or kind of color applied to the selected text or object. To obtain information about specific palette functions, move the cursor over the palette below, then the cursor changes to a small pointing hand, click the moue button. To show colors
� Go to WINDOW � Click on SHOW COLORS.......(CTRL+J)
New It is used to create new publication.
� Go to FILE
FILE MENU

AdoAdoAdoAdobbbbeeee PPPPageageageagemakermakermakermaker
Paper By::::---- Bhawesh Mandal Mobile:Mobile:Mobile:Mobile:---- +977-9842278940
Downloaded From: www.bhawesh.com.np
Downloaded From: www.bhawesh.com.np
Page: 14 of 49
� Click on NEW...(Ctrl+N) From the file menu to display the initial document setup dialog box.
� Click on OK
� choose from one of the preset page size in the page size drop-down menu or enter values directly into the dimensions boxes (this allows you create a custom page size)
� click on tall or wide (vertical/portrait) radio button to choose page orientation (note this affects the entire documents)
� The starting page number will normally be ,i but you may change this by entering a value in the start page # box
� If you know how many pages, you require then enter this value in the number of pages box. However, it is easy to add or remove pages later on.
� Enter your page margins, note that it your document is double-slide than you can set inner and outer margins (the inner margin is at the spine of a bound publication)
� Click on the numbers...button to alter the style of the page numbering. Option includes roman numbers and alphabetic numbering.

AdoAdoAdoAdobbbbeeee PPPPageageageagemakermakermakermaker
Paper By::::---- Bhawesh Mandal Mobile:Mobile:Mobile:Mobile:---- +977-9842278940
Downloaded From: www.bhawesh.com.np
Downloaded From: www.bhawesh.com.np
Page: 15 of 49
Open It is used to open the saves file.
� Go to FILE � Click on OPEN.....(Ctrl+O) � You can see a dialog box in a screen. � Choose the file � Click on OPEN

AdoAdoAdoAdobbbbeeee PPPPageageageagemakermakermakermaker
Paper By::::---- Bhawesh Mandal Mobile:Mobile:Mobile:Mobile:---- +977-9842278940
Downloaded From: www.bhawesh.com.np
Downloaded From: www.bhawesh.com.np
Page: 16 of 49
Recent publication It is used to shows the current close file name
� Go to FILE � Click on RECENT PUBLICATION � Then choose the file and click there
Close This command is used to close the publication document.
� Go to FILE � Click on CLOSE...(Ctrl+w)
Save It is used to store the data and publication permanent in computer.
� Go to FILE � Click on SAVE......(Ctrl+s) � You can see a dialog box in a screen

AdoAdoAdoAdobbbbeeee PPPPageageageagemakermakermakermaker
Paper By::::---- Bhawesh Mandal Mobile:Mobile:Mobile:Mobile:---- +977-9842278940
Downloaded From: www.bhawesh.com.np
Downloaded From: www.bhawesh.com.np
Page: 17 of 49
� Choose the directories (like my documents, c:\etc) � Then click on SAVE
Save As This command is used to make the duplicate file in different kinds of name changing the different directory folder. Revert Removes all changes to the active publication since you last saved it press shift as you choose revert to cancel changes since the last mini-save. Several operations cause mini-saves, including turning, deleting or inserting pages, printing and copying or pasting objects to the clipboard.
� Go to FILE � Click on REVERT � Than you see a dialog box in the screen if you want revert the last action than
click on ok

AdoAdoAdoAdobbbbeeee PPPPageageageagemakermakermakermaker
Paper By::::---- Bhawesh Mandal Mobile:Mobile:Mobile:Mobile:---- +977-9842278940
Downloaded From: www.bhawesh.com.np
Downloaded From: www.bhawesh.com.np
Page: 18 of 49
Place Graphics generated in other application packages can be brought into a page maker document by using the PLACE command.
� Go to FILE � Click on PLACE....(Ctrl+d) � Use the directory list to find the location of the file to be imported or type the
path manually. � Type the file name either followed by return or double clicks directly on a
name displayed in the directory list back on the page your pointer will be changed into a loaded graphic icon. This gives you the opportunity to decide where the graphic will be positioned initially

AdoAdoAdoAdobbbbeeee PPPPageageageagemakermakermakermaker
Paper By::::---- Bhawesh Mandal Mobile:Mobile:Mobile:Mobile:---- +977-9842278940
Downloaded From: www.bhawesh.com.np
Downloaded From: www.bhawesh.com.np
Page: 19 of 49
Document Setup (Ctrl+shift+p) This command is used to change settings for a publication first defined when you choose new such as page size number of ages and page- numbering margins are applied to the document master page. (Format yourself same as NEW)
� Go to FILE � Click on DOCUMENT SETUP � Than for mat yourself (same as new) than click on OK

AdoAdoAdoAdobbbbeeee PPPPageageageagemakermakermakermaker
Paper By::::---- Bhawesh Mandal Mobile:Mobile:Mobile:Mobile:---- +977-9842278940
Downloaded From: www.bhawesh.com.np
Downloaded From: www.bhawesh.com.np
Page: 20 of 49
Printer Styles You can define a printer style to e4nure that your publications print consistently to a specific printer, without resetting all print dialog box options for each print job.
� Go to FILE � Click on PRINTER STYLES � Click on define � Click on new � Type a name for the printer style and click on OK � Click on Edit � Select the desired setting from the print dialog box, click on OK and then
click on OK again to close the define printer styles dialog box.
Print (Ctrl+p) Prints a publication or book on a printer or to a disk as a postscript file the printing options available depend on the printer you are using.
� Click print to print your publication � click cancel to close the printing dialog boxes without printing and to change
back to their previous state any of the printing options you set � click document to display the print document options again � click paper, options, color to view other printing options for postscript
printers � click features to view printer-specific feature for postscript printers

AdoAdoAdoAdobbbbeeee PPPPageageageagemakermakermakermaker
Paper By::::---- Bhawesh Mandal Mobile:Mobile:Mobile:Mobile:---- +977-9842278940
Downloaded From: www.bhawesh.com.np
Downloaded From: www.bhawesh.com.np
Page: 21 of 49
� click setup, options or color to view other printing options for non-postscript printers
� click reset to change the printing options in a dialog box back to their original settings
� click print to print the publication document
Preferences (Ctrl+k) This command is mainly used to changes the measurement scale (MM to inches-inches to MM) alignment typographer's quotes etc.
� go to FILE � click on preferences and click on general � change Vertical and horizontal ruler as your requirement

AdoAdoAdoAdobbbbeeee PPPPageageageagemakermakermakermaker
Paper By::::---- Bhawesh Mandal Mobile:Mobile:Mobile:Mobile:---- +977-9842278940
Downloaded From: www.bhawesh.com.np
Downloaded From: www.bhawesh.com.np
Page: 22 of 49
To Alignment Typographer's Quotes
� go to FILE � click on preferences and click on general � click on more � click on (√) use Typographer Quotes � click on OK
Exit (Ctrl+q) This command is used to close the publication program.
� Go to FILE
Note: - (it is used to remove the squire box while you are typing text in Nepali fonts)
AdoAdoAdoAdobbbbeeee PPPPageageageagemakermakermakermaker
Paper By::::---- Bhawesh Mandal Mobile:Mobile:Mobile:Mobile:---- +977-9842278940
Downloaded From: www.bhawesh.com.np
Downloaded From: www.bhawesh.com.np
Page: 23 of 49
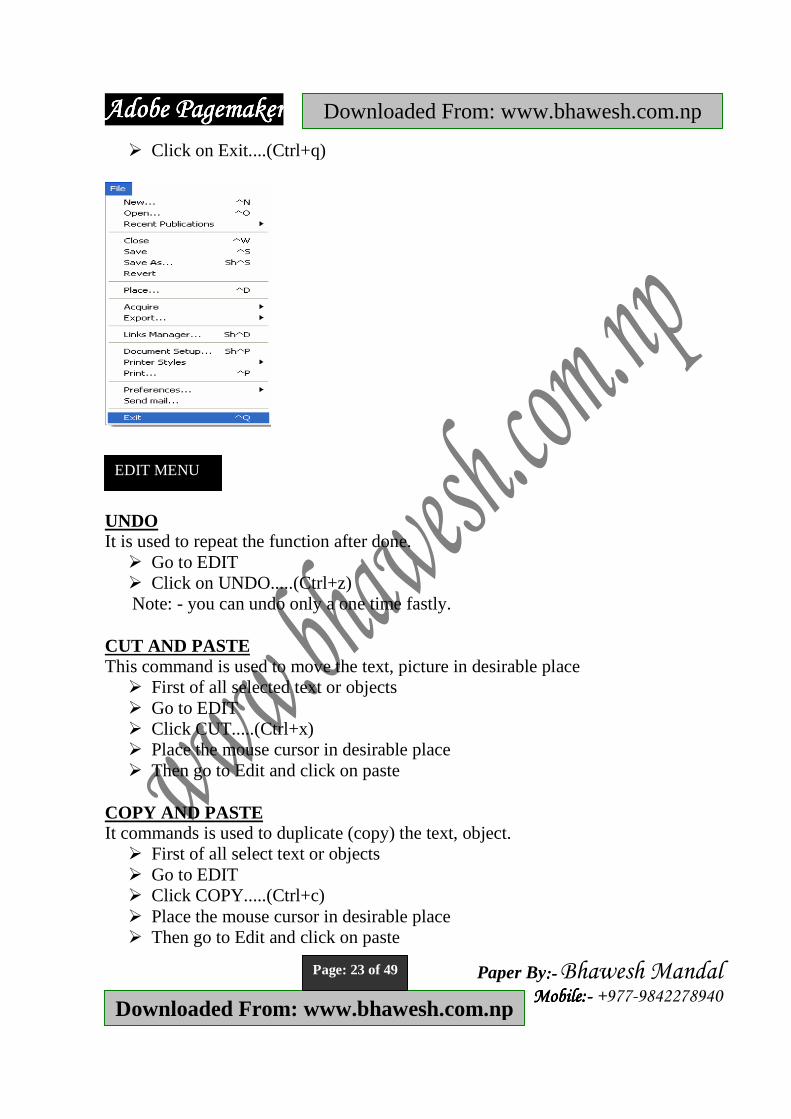
� Click on Exit....(Ctrl+q)
UNDO It is used to repeat the function after done.
� Go to EDIT � Click on UNDO.....(Ctrl+z)
Note: - you can undo only a one time fastly. CUT AND PASTE This command is used to move the text, picture in desirable place
� First of all selected text or objects � Go to EDIT � Click CUT.....(Ctrl+x) � Place the mouse cursor in desirable place � Then go to Edit and click on paste
COPY AND PASTE It commands is used to duplicate (copy) the text, object.
� First of all select text or objects � Go to EDIT � Click COPY.....(Ctrl+c) � Place the mouse cursor in desirable place � Then go to Edit and click on paste
EDIT MENU

AdoAdoAdoAdobbbbeeee PPPPageageageagemakermakermakermaker
Paper By::::---- Bhawesh Mandal Mobile:Mobile:Mobile:Mobile:---- +977-9842278940
Downloaded From: www.bhawesh.com.np
Downloaded From: www.bhawesh.com.np
Page: 24 of 49
CLEAR This command is used to delete the selected text or objects
� Select the object � Go to EDIT � Click on CLEAR or press backspace or delete
SELECT ALL This command is used to select all text or objects of current pages.
� If you want to select a single object, click the objects with the pointer tool � To add objects to a selection hold down shift as you click other objects � To select several objects at once drag the pointer tool around multiple objects � Go to EDIT � Click on SELECT ALL......(Ctrl+a)
DESELECT ALL It is used to deselect all the selected text, object, pictures.
� Go to EDIT � Click on DELECTCT ALL.......(Shift+Ctrl+A)
COPY & PASTE MULTIPLE This command is used to paste numerical offset from the original object
� Go to EDIT � Click on PASTE MULTIPLE..... � Then type numerical copies in paste copies (like 8,10 etc) but you can paste
up-to 8533 copies. � Click on OK
PASTE SPECIAL It is used to paste the special copies text, picture that you cannot do by normal copy-paste. Specially use this option to paste copied from other program.
� Go to EDIT

AdoAdoAdoAdobbbbeeee PPPPageageageagemakermakermakermaker
Paper By::::---- Bhawesh Mandal Mobile:Mobile:Mobile:Mobile:---- +977-9842278940
Downloaded From: www.bhawesh.com.np
Downloaded From: www.bhawesh.com.np
Page: 25 of 49
� Click on PASTE SPECIAL � Select a format in the paste special dialog box � Click on OK
INSERT OBJECT It is used to linking a program or file in your current publication you launch an OLE server application in which you create an object which is then, pasted as an OLE- imbedded object in to the current publication.
� Go to EDIT � Click on INSERT OBJECT � Than choose the object and click on OK
If you want to link the file in the current publication � Go to EDIT � Click on INSERT OBJECT � Click on create from file � Click on browse than choose the file and click on OK

AdoAdoAdoAdobbbbeeee PPPPageageageagemakermakermakermaker
Paper By::::---- Bhawesh Mandal Mobile:Mobile:Mobile:Mobile:---- +977-9842278940
Downloaded From: www.bhawesh.com.np
Downloaded From: www.bhawesh.com.np
Page: 26 of 49
EDIT STORY It is used to edit the text (spelling checking, replace the text, find the text
� Go to EDIT � Click on EDIT STORY.....(Ctrl+E)
EDIT ORIGINAL Opens the source application to which the selected object is linked.
� Go to EDIT � Click on EDIT ORIGINAL.......(Ctrl+E)
Go to page It is used to go desirable page n the active publication
LAYOUT

AdoAdoAdoAdobbbbeeee PPPPageageageagemakermakermakermaker
Paper By::::---- Bhawesh Mandal Mobile:Mobile:Mobile:Mobile:---- +977-9842278940
Downloaded From: www.bhawesh.com.np
Downloaded From: www.bhawesh.com.np
Page: 27 of 49
� Go to LAYOUT � Click on go to page.......(ALT+G) � If you want to go master pages click to master page � Then click on OK
INSERT PAGES It is used add pages to a publication before or after the current page or insert new pages between two facing pages and specifies the mater applied to new pages.
� Go to the place where you want to insert pages � Go to LAYOUT � Click on INERT PAGES.......(ALT+G) � Type the number of pages you want to add and elect a location (after, before
between) for the new pages � Specify the mater pages you want to apply and then click insert � Then click on OK � If you want to insert one page or two facing page you can press short cut key
(Ctrl+Alt+Shift+G) Remove pages It is used to delete (Remove) range of pages in a publication
� Go to LAYOUT � Click on REMOVE PAGES......(ALT+G) � Then type the range of pages you want to remove and then click OK
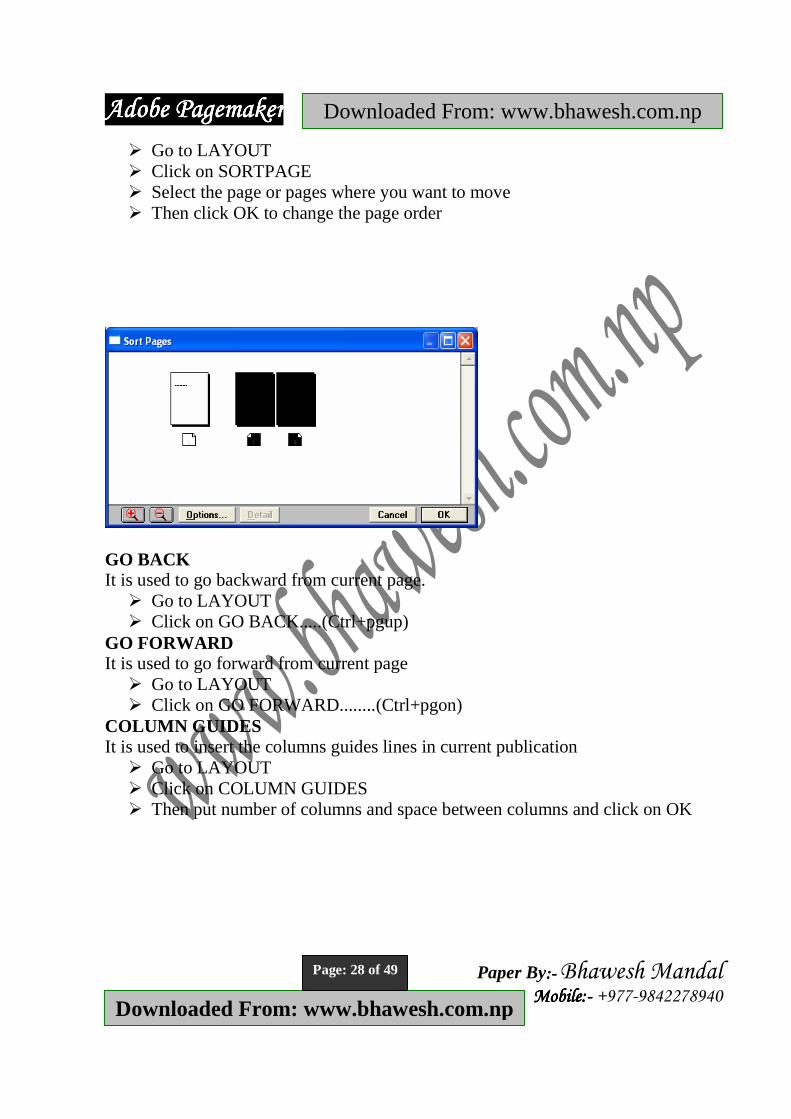
Sort pages It is used to short the pages in current publication. You can change the pages from one position to another in active publication.
AdoAdoAdoAdobbbbeeee PPPPageageageagemakermakermakermaker
Paper By::::---- Bhawesh Mandal Mobile:Mobile:Mobile:Mobile:---- +977-9842278940
Downloaded From: www.bhawesh.com.np
Downloaded From: www.bhawesh.com.np
Page: 28 of 49
� Go to LAYOUT � Click on SORTPAGE � Select the page or pages where you want to move � Then click OK to change the page order
GO BACK It is used to go backward from current page.
� Go to LAYOUT � Click on GO BACK.....(Ctrl+pgup)
GO FORWARD It is used to go forward from current page
� Go to LAYOUT � Click on GO FORWARD........(Ctrl+pgon)
COLUMN GUIDES It is used to insert the columns guides lines in current publication
� Go to LAYOUT � Click on COLUMN GUIDES � Then put number of columns and space between columns and click on OK

AdoAdoAdoAdobbbbeeee PPPPageageageagemakermakermakermaker
Paper By::::---- Bhawesh Mandal Mobile:Mobile:Mobile:Mobile:---- +977-9842278940
Downloaded From: www.bhawesh.com.np
Downloaded From: www.bhawesh.com.np
Page: 29 of 49
AUTOFLOW It is used to insert the text by Auto flow
� Copy or insert the text � Go to LAYOUT then click on AUTOFLOW & click on paste desirable place.
FONT It is used to change font style (face of text)
� Select the text � Go to TYPE � Then choose desirable font style (Like Arial, Times, New Roman, Preeti,
Kantipur etc.) SIZE It is used to change font size or text size(like 12, 18, 20 etc) but you can change the size of font from 4-650
� Select the text � Go to TYPE � Then click on desirable font size. If you want to change you can font size,
click on other.......and change point to click on OK LEADING It is used to set the line space of selected paragraph
� Select the text � Go to TYPE � Then click on desirable leading.....if you want to change other leading, click
on other.....and change point then click on OK you can change leading between 0 to 1300 points
TYPE

AdoAdoAdoAdobbbbeeee PPPPageageageagemakermakermakermaker
Paper By::::---- Bhawesh Mandal Mobile:Mobile:Mobile:Mobile:---- +977-9842278940
Downloaded From: www.bhawesh.com.np
Downloaded From: www.bhawesh.com.np
Page: 30 of 49
Type Style It is used to change the style of selected text (Like Normal, Bold, Remove etc)
� Select the text � Choose TYPE STYLE from TYPE MENU
Expert kerning It is used to change the space between letters
� Select the text � Go to TYPE � Click on export kerning. Then increase or decrease kerning
Expert Tracking It is used to change the track of letters
� Select the text � Go to TYPE � Click on export tracking & choose desirable track (like loose, tight, very loose
etc) Horizontal scale It is used to change the width of text (narrow -width)
� Select the text � Go to TYPE � Click on horizontal scale & set text scale (80%, 100%=normal etc)
Character (Ctrl+T) It is used to change character specification of the text which is you can do from control palette.
� Select the text you want to change � Choose CHARACTER from TYPE menu. Virtually all the character-level text
attributes are present. � The options button allows you to customize the small caps size as well as
super/subscript

AdoAdoAdoAdobbbbeeee PPPPageageageagemakermakermakermaker
Paper By::::---- Bhawesh Mandal Mobile:Mobile:Mobile:Mobile:---- +977-9842278940
Downloaded From: www.bhawesh.com.np
Downloaded From: www.bhawesh.com.np
Page: 31 of 49
PRAGRAPH (Ctrl+M) It is used to set indent and paragraph such as left, right, first, before, after spacing of the selected paragraph.
� First of all select the text � Choose PARAGRAPH from TYPE menu � All the paragraph-level attributes can be accessed from this dialog box e.g.
space above/below, indents, alignment. The other attributes will be discussed later in this chapter.
Indents and Tabs (Ctrl+I) It is used to sets the left and right indents the first-line indent and the tabs. You can use indents/tabs for a selected range of text, for text placed into page maker, for part of a style or for the default settings.
� Select the text you want to change � Choose INDENTS from TYPE menu and set left, right center tab � Click on Apply

AdoAdoAdoAdobbbbeeee PPPPageageageagemakermakermakermaker
Paper By::::---- Bhawesh Mandal Mobile:Mobile:Mobile:Mobile:---- +977-9842278940
Downloaded From: www.bhawesh.com.np
Downloaded From: www.bhawesh.com.np
Page: 32 of 49
� It you want to set the leader in the tab space, click on leader & choose desirable leader line.
� Click on OK
Hyphenation You can turn hyphenation on or off for a selected paragraph from the hyphenation dialog box or for a style from within the define styles dialog box.
� Select the text � Go to type � Click on hyphenation � Click on for on hyphenation � Click on off for off hyphenation
Alignment It is used to change the alignment of text at the paragraph level. You can choose to align left, align center, align right, justify or force justify.
� Select the text which you want to change the alignment � Choose ALIGNMENT from TYPE menu � Then choose left alignment, right alignment, center alignment etc
Style It is used to apply the different style to the selected text.
� First of all select the text

AdoAdoAdoAdobbbbeeee PPPPageageageagemakermakermakermaker
Paper By::::---- Bhawesh Mandal Mobile:Mobile:Mobile:Mobile:---- +977-9842278940
Downloaded From: www.bhawesh.com.np
Downloaded From: www.bhawesh.com.np
Page: 33 of 49
� Choose STYLE from TYPE menu � Then choose different styles (like headline, normal, caption etc)
Define style (Ctrl+3) It is used to create and edit paragraph styles for text typed in or placed into page maker
� Choose DEFINE STYLE from TYPE menu & choose style (body text, headline, caption)
� Click on NEW � Type your style name, format your selves and click on OK
FILL It is used to fill specify a pattern when drawing a rectangle ellipse or polygon. A fill pattern can also be applied to a selected box or oval. With the exception of none, the patterns are opaque hiding whatever is behind them.
� Select the rectangle, box or polygon which you want to fill � Go to element � Click or fill & choose desirable fill � Click on none for to out fill from frame � Click on none for to out fill from frame
ELEMENT

AdoAdoAdoAdobbbbeeee PPPPageageageagemakermakermakermaker
Paper By::::---- Bhawesh Mandal Mobile:Mobile:Mobile:Mobile:---- +977-9842278940
Downloaded From: www.bhawesh.com.np
Downloaded From: www.bhawesh.com.np
Page: 34 of 49
Stroke It is used to apply the different stroke/line. You can change specify other line weights in one-tenth of a point increments, up to 800 points.
� Select the element(s) to be changed � Choose stroke from the element menu � Select the desirable line style � Click on REVERSE for white line � If the stroke size you want is not listed on the stroke menus, choose
element>stroke>custom to specify a weight from 0 to 800 points in 0.1 increments.

AdoAdoAdoAdobbbbeeee PPPPageageageagemakermakermakermaker
Paper By::::---- Bhawesh Mandal Mobile:Mobile:Mobile:Mobile:---- +977-9842278940
Downloaded From: www.bhawesh.com.np
Downloaded From: www.bhawesh.com.np
Page: 35 of 49
FILL AND STROKE (Ctrl+U) The fill and stroke is allows you to specify both color and type of fill and line in one operatic
� If the stroke size you want is not listed on the stroke menus choose
element>stroke>custom to specify a weight from 0 to 800 points in 0.1 increments.
FRAME (Ctrl+U)

AdoAdoAdoAdobbbbeeee PPPPageageageagemakermakermakermaker
Paper By::::---- Bhawesh Mandal Mobile:Mobile:Mobile:Mobile:---- +977-9842278940
Downloaded From: www.bhawesh.com.np
Downloaded From: www.bhawesh.com.np
Page: 36 of 49
This command is used to attach text and graphics to a frame set attributes for frames and the objects they contain and navigate among frames.
To attach existing text or graphics to a frame
� Use the pointer tool to select the frame � Press shift and select the text block or imported graphic you want to
add to the frame � Choose element and choose frame then attach content
To import text or graphics into a frame
� First of all select the FRAME � Choose place from file menu � Select the file you want to place, select the place within frame option along
with other place options and then click OK Note: - if you choose the place command without having elected a frame or if you do not select the place within frame option, you can still add the imported file to a frame after you click OK in the place dialog box simply click the loaded text or graphic cursor on the frame you want the imported content to occupy To type into a frame
� Click the text tool � Click in an empty frame or in a frame containing text and start typing.
To detach content from a frame

AdoAdoAdoAdobbbbeeee PPPPageageageagemakermakermakermaker
Paper By::::---- Bhawesh Mandal Mobile:Mobile:Mobile:Mobile:---- +977-9842278940
Downloaded From: www.bhawesh.com.np
Downloaded From: www.bhawesh.com.np
Page: 37 of 49
� Select a graphic frame or an unthreaded text frame � Go to element, then click on frame and separate (divide) CONTENT.
TO delete content from a frame � Select a frame � Go to element, then click on frame and click on delete CONTENT.
ARRANGE Bring to Front (Ctrl+]) It is used to moves selected objects to the front of any overlapping objects
� Select the element (s) � Go to element, then click on bring to front
Bring forward (Ctrl+Shift+]) It is used to moves selected objects up one level
� Select the element (s) � Go to element, then click on bring forward
Send to back (Ctrl+[) It is used to moves selected objects to the back or any overlapping object
� Select the element (s) � Go to element, then click on send to back
Send backward (Ctrl+Shift+[) It is used to moves selected objects up one level
� Select the element (s) � Go to element then click on send backward
Aligning objects using the align dialog This option is used to align selected objects in relation to each other and then evenly distribute them
� Select the elements to be aligned � Choose align objects from the arrange menu � Choose the appropriate align or distribute option for both the vertical and
horizontal position of elements. Click on OK the shapes will be aligned or distributed accordingly.
Text warp This option is used to prevent graphics and text from overlapping each other. It is applied to a graphic element to create a text exclusion boundary.
� Select the GRAPHIC/OBJECTS

AdoAdoAdoAdobbbbeeee PPPPageageageagemakermakermakermaker
Paper By::::---- Bhawesh Mandal Mobile:Mobile:Mobile:Mobile:---- +977-9842278940
Downloaded From: www.bhawesh.com.np
Downloaded From: www.bhawesh.com.np
Page: 38 of 49
� Choose TEXTWARP from ELEMENT menu the following dialog box will appear
The three-wrap options (from left to right) are
1. no wrap (normal) 2. regular wrap 3. irregular wrap
� Currently, no wrap is selected click on the second option. Which allows text to wrap around a regular object
� Select the type of text flow required, usually the third option (text flowing all around the graphic)
� enter the standoff distance for each side click on OK Group (Ctrl+G) This command is used to combine (joint) one or more selected objects into a group so that the objects are treated as a unit.
� Use SHIFT key to selected objects that you want to group � Choose GROUP from ELEMENT menu
Ungroup (Ctrl+shift+G) Grouped object into constituent objects the objects retain the changes you made while the objects were grouped
� Select the group � Choose ungroup from element menu
AdoAdoAdoAdobbbbeeee PPPPageageageagemakermakermakermaker
Paper By::::---- Bhawesh Mandal Mobile:Mobile:Mobile:Mobile:---- +977-9842278940
Downloaded From: www.bhawesh.com.np
Downloaded From: www.bhawesh.com.np
Page: 39 of 49
Lock position (Ctrl+L) It is used to maintain objects in place. You can change the attributes of a locked object as long as the change does not affect the object's size or position.
� Select the elements to be locked � Choose lock position from element menu
The elements are now immovable. If you want to delete them, then you must firstly select them. Then choose unlock from the element menu. Unlock position (Ctrl+alt+L) It is used to undo lock position command, allowing movement of selected object
� Select the elements � Choose unlock from element menu
Mask (Ctrl+6) It is used to cover part of an object so that only a portion of it appears through a shape drown with the rectangle, ellipse or polygon tool. In page maker, you mask objects by positioning the mask or masking object on the objects you want to mask.
� Select both objects/elements � Choose mask from element menu
Unmask (Ctrl+shift+6) It is to undo a mask by selecting the masking object or the masked object
� First of all select the masked object/elements � Choose unmask from element menu
You can change settings to an existing polygon by selecting it, then choosing polygon settings from the element menu.
� First of all select the polygons which you want to change the settings � Choose polygons settings from element menu � Change the number of sides as your required � Change the star insert percentage 10%, 20%, 45% or 100% etc � At last click on OK
POLYGONS SETTINGS

AdoAdoAdoAdobbbbeeee PPPPageageageagemakermakermakermaker
Paper By::::---- Bhawesh Mandal Mobile:Mobile:Mobile:Mobile:---- +977-9842278940
Downloaded From: www.bhawesh.com.np
Downloaded From: www.bhawesh.com.np
Page: 40 of 49
After you create a rectangle, you can change the shape of its corners, as you are required.
� Select an existing rectangle from the pointer tool � Choose rounded corner the element menu � Choose desirable corners and click on OK
ROUNDED CORNERS
FIND & CHANGE

AdoAdoAdoAdobbbbeeee PPPPageageageagemakermakermakermaker
Paper By::::---- Bhawesh Mandal Mobile:Mobile:Mobile:Mobile:---- +977-9842278940
Downloaded From: www.bhawesh.com.np
Downloaded From: www.bhawesh.com.np
Page: 41 of 49
In story editor, you can search for a word or ground of words and you can search for formatted text once you find what you are looking for, you can change it to something else. FIND
� Click an insertion point in a story or select a range of text if you want to limit your change to that section
� Choose Edit>Edit story � Choose the utilities>find command � In the find what box, type or paste the text you want to find � At last click on find button
Change You can check the spelling in a selected range of text in all text in the active story in all stories in a publication or in all stories in all open publications. Page maker highlights misspelled or unknown words, word typed twice (such as the ) and words with possible capitalization errors
� Choose the utilities>change command � In the find what box, type or paste the text you want to change. Type the new
text in the change to box � Click on change or change all as your required � To close the edit story click on Edit story from edit menu
You can check the spelling in a selected range of text in all text in the active story, in all stories in a publication or in al stories in all open publication page maker
SPELLING

AdoAdoAdoAdobbbbeeee PPPPageageageagemakermakermakermaker
Paper By::::---- Bhawesh Mandal Mobile:Mobile:Mobile:Mobile:---- +977-9842278940
Downloaded From: www.bhawesh.com.np
Downloaded From: www.bhawesh.com.np
Page: 42 of 49
highlights misspelled or unknown words, words typed twice (such as the ) and words with possible capitalization errors
� Click an insertion point in a particular story or select a range of text � Choose Edit>Edit story � In story editor, choose utilities>spelling. � Choose the correct words from the list below � Then click on replace button
To create am index entry do the following using either layout or story view
� Select the relevant word or phrase with the text too � Choose index entry from the utilities menu for a simple index entry
accepting the default settings simply click on ok page maker will set up an index entry, which keeps track of the selected text.
INDEX ENTRY
AdoAdoAdoAdobbbbeeee PPPPageageageagemakermakermakermaker
Paper By::::---- Bhawesh Mandal Mobile:Mobile:Mobile:Mobile:---- +977-9842278940
Downloaded From: www.bhawesh.com.np
Downloaded From: www.bhawesh.com.np
Page: 43 of 49
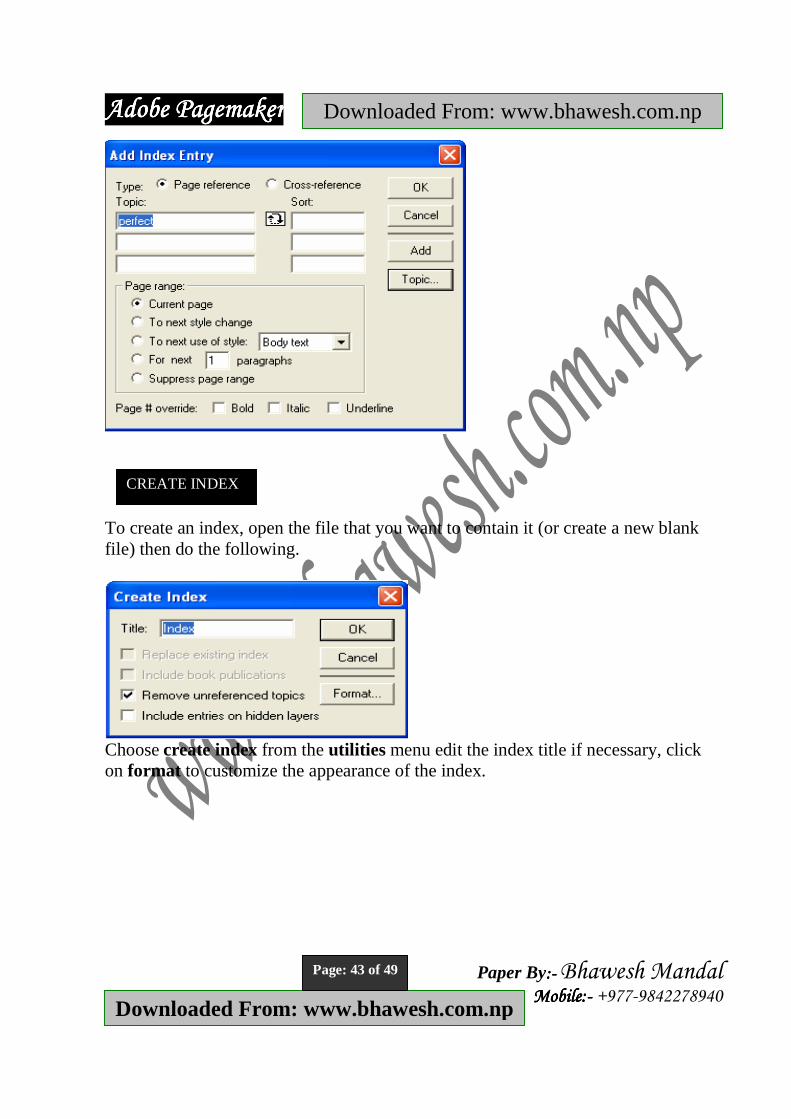
To create an index, open the file that you want to contain it (or create a new blank file) then do the following.
Choose create index from the utilities menu edit the index title if necessary, click on format to customize the appearance of the index.
CREATE INDEX

AdoAdoAdoAdobbbbeeee PPPPageageageagemakermakermakermaker
Paper By::::---- Bhawesh Mandal Mobile:Mobile:Mobile:Mobile:---- +977-9842278940
Downloaded From: www.bhawesh.com.np
Downloaded From: www.bhawesh.com.np
Page: 44 of 49
� Click on ok button to create the index � Find a suitable place for the index and click the new index story will flow
onto the page Creating a Table of Contents
� Set the include in table of contents attribute for your heading styles and also for individual paragraphs if necessary
� Choose create TOC from the utilities menu
� From create table of contents dialog box you can specify the TOC title as well
as the format for the page references. Note the TOC can be compiled for a complete book list.
When page maker is ready, it will display a text place symbol, allowing you to place the TOC on a suitable page. Add Cont'd Line

AdoAdoAdoAdobbbbeeee PPPPageageageagemakermakermakermaker
Paper By::::---- Bhawesh Mandal Mobile:Mobile:Mobile:Mobile:---- +977-9842278940
Downloaded From: www.bhawesh.com.np
Downloaded From: www.bhawesh.com.np
Page: 45 of 49
This command is used to the giving header for the balance text of the other page. Steps
� Place the rich text from word in the page and drag the text placer in different page with place
� Then place that balance text in the first page and select it by the mouse pointer � From utilities click on add cont'd line � Check on the top/bottom
Bullets and Numbering It is used to format the paragraph with bullet/number. Steps
� Select the paragraph which need to bullet/numbered � From utilities choose plug-ins then bullets and numbering � Choose bullet if you need bullet you can click on edit to insert other types of
bullet (while need to numbering then select the numbers) � Select OK
Changing case To change the available option of to the selected text this command is used. Steps
� Select the text � Go to change case of the plug-ins from utilities menu � Select require option and click on OK
Drop cap To drop the first word of the paragraph Steps
� Select the paragraph where you need to drop cap � From utilities menu select plug-ins then drop cap � Type the size to drop an drop and click on apply � Same process to remove the drop cap

AdoAdoAdoAdobbbbeeee PPPPageageageagemakermakermakermaker
Paper By::::---- Bhawesh Mandal Mobile:Mobile:Mobile:Mobile:---- +977-9842278940
Downloaded From: www.bhawesh.com.np
Downloaded From: www.bhawesh.com.np
Page: 46 of 49
It is use to manage the grid column guides etc
� From utilities choose the plug-ins and select the grid manager then set guide type columns fit to gutter then click on apply
� Don't forget to close the grid manager Key line To use the attributes of graphic object Steps
� Import the graphics from any graphical file � Select it and click on key line of the plug-ins from utilities menu � Hold down mouse on attributes then choose option same as fill and stroke � Select OK again OK A
Word counter To count the word, line, characters, objects etc
� From utilities click on plug-ins then word counter � Don't miss to close the message box
Hide rulers/show rulers It helps to us show/hide the rulers to the current publications.
� Click on view menu � Click on show/hide rulers
Zero lock
VIEW MENU

AdoAdoAdoAdobbbbeeee PPPPageageageagemakermakermakermaker
Paper By::::---- Bhawesh Mandal Mobile:Mobile:Mobile:Mobile:---- +977-9842278940
Downloaded From: www.bhawesh.com.np
Downloaded From: www.bhawesh.com.np
Page: 47 of 49
The zero points is the position at which the zeros on the vertical and horizontal rulers intersect To move the zero point
� Position the pointer tool on the crosshair in the zero point window � Drag to the new location � Release the mouse button the zero point is reset
To lock the zero point
� Choose view>zero lock To reset the zero point
� Double-click the zero point to reset it to the default location A publication page can have up to 120 ruler guides in any combination of horizontal and vertical. If a page contains ruler guides from a master page, those guides count toward the 120. To place a ruler guide: Move the pointer over a ruler and then drag a ruler guide from the ruler. If the rulers are not visible, choose view>show rulers. To remove a ruler guide
� Select the guide you want to remove and drag it off the publication page. To remove al ruler guides at once:
� Choose view > clear ruler guides (this command is unavailable if the lock guides command is checked)
To lock or unlock ruler guides:
� Choose view>lock guides If you later change such publication-layout attributes as margins or page size, locking guides can interfere with pager maker's ability to adjust objects on the page. To make objects align to the ruler increments:
� Choose view>snap to rulers Scrolling within a window You can use the scroll bars along the bottom and right sides of the active window to control what displays in the publication window. You can show or hide the scroll bars at any time.

AdoAdoAdoAdobbbbeeee PPPPageageageagemakermakermakermaker
Paper By::::---- Bhawesh Mandal Mobile:Mobile:Mobile:Mobile:---- +977-9842278940
Downloaded From: www.bhawesh.com.np
Downloaded From: www.bhawesh.com.np
Page: 48 of 49
In addition, you can reposition the page quickly by dragging the mouse. This technique works in layout view only. To display or hide the scroll bars:
� Choose view>show/hide scroll bars About master pages In multi page publication, your design will be more cohesive if each page is built on a common foundation or master page. A master page typically contains basic design elements, such as headers, footers and page numbers that are common to most or all pages in your publication. Master pages also contain nonprinting layout guides, such as column guides, ruler guides and margin guides each publication can have a virtually unlimited number of master pages. You can create, modify and delete objects on master pages just like any other objects, but you must do so from the master pages themselves. Each publication you open contains a document master page or (if the publication includes facing pages) a document master page spread. The document master applies to all pages in the publication until you specify otherwise and cannot be renamed or removed from the publication. An icon representing the master pages appears at the lower left corner of a publication window in layout view. The letters L and R (for left and right) mark the master page icon for facing pages a single-sided publication icon is marked by an R alone. Click the icon to turn to the mater applied to the current publication page.

AdoAdoAdoAdobbbbeeee PPPPageageageagemakermakermakermaker
Paper By::::---- Bhawesh Mandal Mobile:Mobile:Mobile:Mobile:---- +977-9842278940
Downloaded From: www.bhawesh.com.np
Downloaded From: www.bhawesh.com.np
Page: 49 of 49
TOOLBOX SHORTCUTS
pointer tool (F9) text tool (shift+Alt+F1) Rotating tool (shift+F2) Cropping tool (shift+Alt+F2) Line tool (shift+F3) Constrained-line tool (shift+Alt+F3) Rectangle tool (shift+F4) Rectangle frame tool (shift+Alt+F4) Ellipse tool (shift+Alt+F5) Ellipse frame tool (shift+Alt+F5) Polygon tool (shift+Alt+F6) Polygon frame tool (shift+Alt+F6) Zoom tool (shift+Alt+F7) Hand tool, constrained-hand tool (shift+Alt+drag left mouse button)