Administrator Manual - Meriworks · Administrator Manual Meridum AB, Svensknabbevägen17, S-393 51...
45
Administrator Manual Meridum AB, Svensknabbevägen17, S-393 51 Kalmar, Sweden, www.meridium.se ImageVault Version 3.5
Transcript of Administrator Manual - Meriworks · Administrator Manual Meridum AB, Svensknabbevägen17, S-393 51...
Administrator Manual
Meridum AB, Svensknabbevägen17, S-393 51 Kalmar, Sweden, www.meridium.se
ImageVaultVersion 3.5

CopyrightThis manual is protected by international copyright laws. No changes of content or reproduction of parts of this publication are allowed without permission from the publisher.
Administrator Manual for ImageVault version 3.5Created October 31, 2007
Last edited December 20, 2011© Meridium AB

ImageVault | Administrator Manual
Content
Administrator Manual_________________________________________1
ImageVault__________________________________________________1
ImageVault | Administrator Manual______________________________1
©Meridium AB_______________________________________________1
Contents | 41_______________________________________________1
1
1. Introduction_______________________________________________4
ImageVault | Administrator Manual______________________________41.1. Manual instructions______________________________________4
©Meridium AB_______________________________________________4
Introduction | 41_____________________________________________4
4
2. Start______________________________________________________5
ImageVault | Administrator Manual______________________________52.1. Starting mode__________________________________________5
©Meridium AB_______________________________________________5
Start | 41___________________________________________________5
5
3. Settings___________________________________________________73.1. Settings view___________________________________________73.2. License_______________________________________________83.3. Complex media_________________________________________93.4. System settings _________________________________________9
ImageVault | Administrator Manual______________________________7
©Meridium AB_______________________________________________7
Album Administration | 41____________________________________7
73.5. Category settings ______________________________________183.6. MetaData settings ______________________________________20
ImageVault | Administrator Manual_____________________________20
©Meridium AB Contents | 1

ImageVault | Administrator Manual
©Meridium AB______________________________________________20
Album Administration | 41___________________________________20
203.7. Conversion format settings _______________________________23
©Meridium AB______________________________________________23
Album Administration | 41___________________________________23
233.8. Max width/height settings ________________________________26
ImageVault | Administrator Manual_____________________________23
4. Album Administration______________________________________27
ImageVault | Administrator Manual_____________________________274.1. Structuring____________________________________________274.2. Managing albums in ImageVault___________________________284.3. Set editor rights for an album_____________________________31
Album Administration | 41___________________________________274.4. Set view rights for an album______________________________35
274.5. Special albums________________________________________37
©Meridium AB______________________________________________27
5. Scheduled jobs___________________________________________395.1. ImageVault Conversion job_______________________________395.2. ImageVault Cleanup job_________________________________405.3. ImageVault Import job___________________________________405.4. ImageVault User/group check_____________________________41
©Meridium AB______________________________________________39
Manage Scheduled jobs | 41__________________________________39
395.5. ImageVault Archiver notification job________________________42
ImageVault | Administrator Manual_____________________________39
6. Settings in the freetext editor________________________________43
ImageVault | Administrator Manual_____________________________436.1. EPiServer CMS 6 and TinyMCE ____________________________43
©Meridium AB______________________________________________43
©Meridium AB Contents | 2

ImageVault | Administrator Manual
| 41_____________________________________43
43
©Meridium AB Contents | 3
ImageVault | Administrator Manual
1. IntroductionWelcome!
The Administrator Manual is designed for people who manage ImageVault. The Manual will cover how to do all settings in ImageVault, how to manage albums, and how to manage users that will have access to the albums.
ImageVault is a supplement to EPiServer, which simplifies and improves the handling of files in EPiServer. The basic function of ImageVault is to store files on a central server, so that all in the organisation can have access to, and use, existing files. ImageVault has even more advanced functions for images, such as editing and conversion to several formats.
1.1. Manual instructionsThe Manual is divided into two main sections. The first section will instruct you how to configure ImageVault for optimal performance. The second section will instruct you how to manage albums and set permissions for different users in the albums.
It would be helpful for you to read the ImageVault Editor Manual, to gain a better understanding of how ImageVault is used.
©Meridium AB Introduction | 4

ImageVault | Administrator Manual
2. StartTo manage ImageVault, you have to have an account in EPiServer with Edit rights, and an account in ImageVault with Administration rights. You also need basic knowledge of how to use EPiServer. In the ImageVault Installation Manual, you can find out more about how permissions are set in ImageVault.
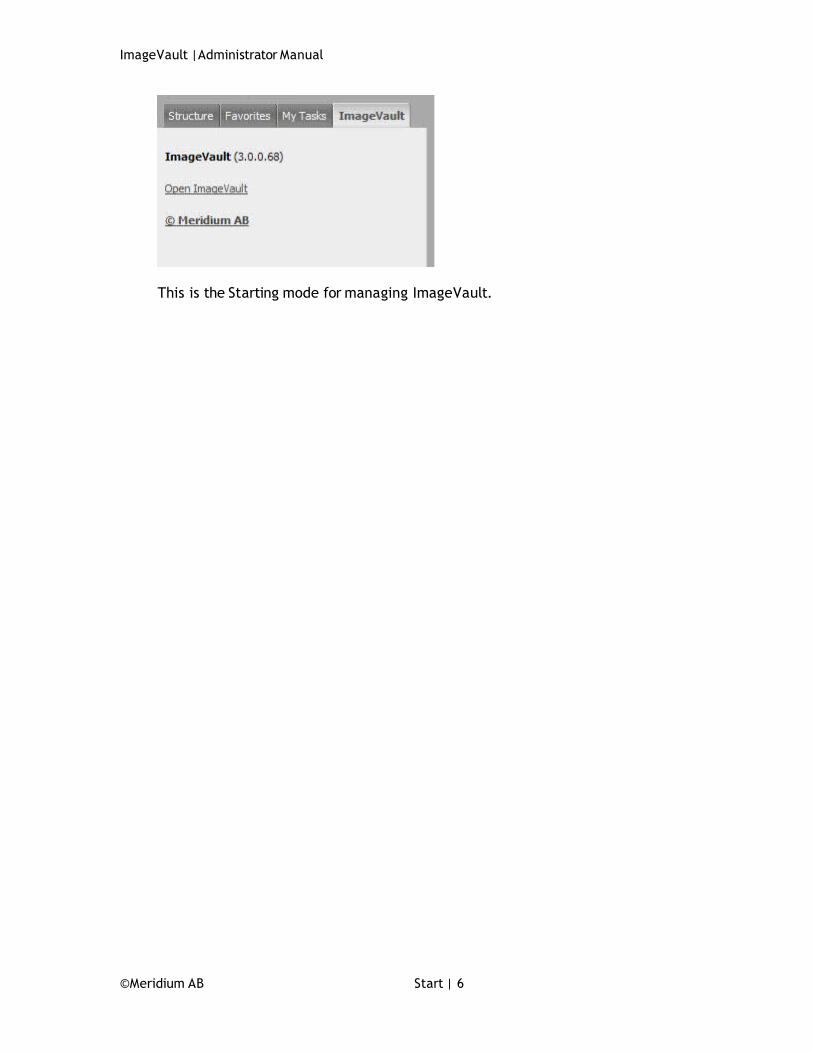
2.1. Starting modeTo enter ImageVault, you have to be in Edit mode in EPiServer. You will recognise the Edit mode by a menu showing up to the left with different options to choose from, e.g. ImageVault.
EPiServer Edit mode
To enter the ImageVault Administration mode, click on the ImageVault tab, which you will find to the left on the screen. Then click on the link Open ImageVault to launch ImageVault in a new window. Once you have opened ImageVault the Administration section can be accessed on the tab at the top.
©Meridium AB Start | 5
ImageVault | Administrator Manual
This is the Starting mode for managing ImageVault.
©Meridium AB Start | 6

ImageVault | Administrator Manual
3. SettingsThere are plenty of settings in ImageVault that have to be adjusted before the system can be used. It is important to really consider everything before launching ImageVault. One incorrect setting can cause files to be published in an incorrect way, and can also cause the server to be overloaded. A change of settings later on will have large consequences. In this Chapter we will cover all settings, and what to consider as you do these settings.
3.1. Settings viewTo enter the Settings view, click Settings tab in ImageVault. In this view you specify all settings in ImageVault. The view consists of a number of sections with text fields and checkboxes, where you set the different parts of ImageVault.
1. Main tabsThis is where you alternate between System settings, License settings and Complex media.
2. Sub tabsBelow the Settings tab you will find a range of sub tabs. These tabs are divided into different areas of settings, to enable a better overview.
©Meridium AB Album Administration | 7

ImageVault | Administrator Manual
3.2. LicenseTo activate ImageVault you need to have a valid license. Your ImageVault retailer supplies the license as a file. The file must then be uploaded into ImageVault for the license to be activated. To enter the License view, firstly, click System configuration in the Administrator menu and then, secondly, click on the License tab.
To upload the file into ImageVault, click Browse. A Choose file window will be opened. Look up the license file and click Open. To upload the license file, click Upload.
Once the license file is uploaded, the system will ask if you want to use the new license file. Click Replace license, to install the license file.
©Meridium AB Album Administration | 8
ImageVault | Administrator Manual
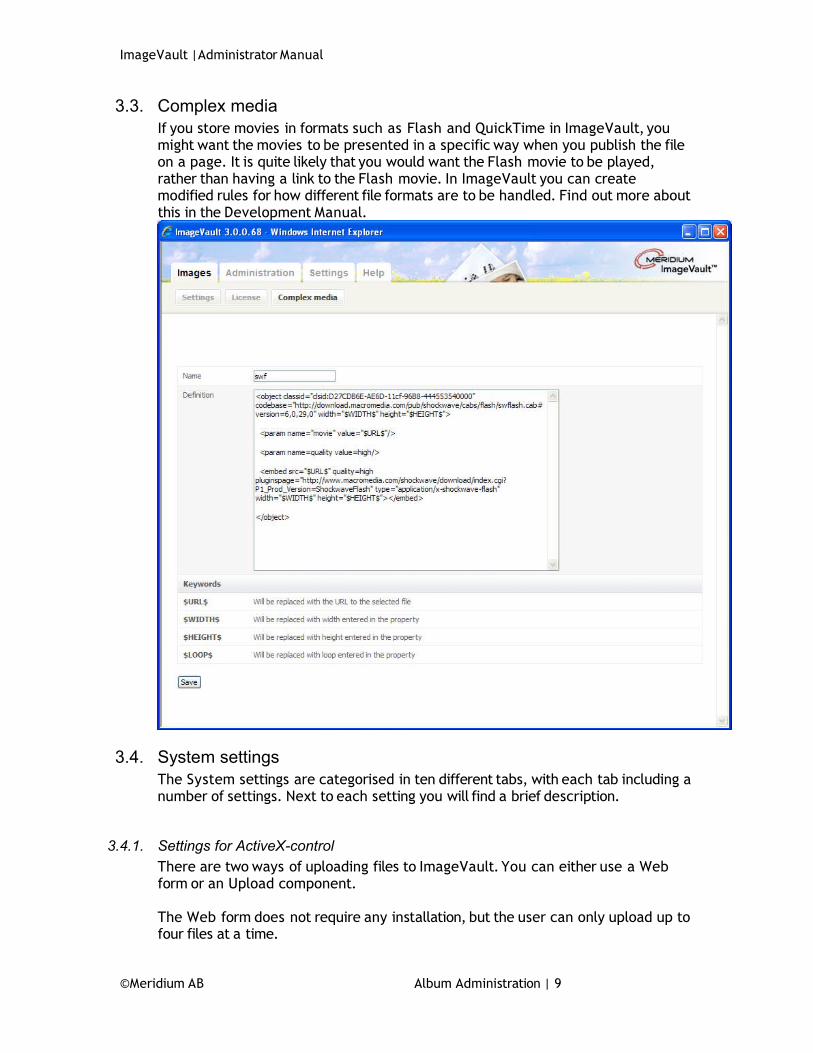
3.3. Complex mediaIf you store movies in formats such as Flash and QuickTime in ImageVault, you might want the movies to be presented in a specific way when you publish the file on a page. It is quite likely that you would want the Flash movie to be played, rather than having a link to the Flash movie. In ImageVault you can create modified rules for how different file formats are to be handled. Find out more about this in the Development Manual.
3.4. System settingsThe System settings are categorised in ten different tabs, with each tab including a number of settings. Next to each setting you will find a brief description.
3.4.1. Settings for ActiveX-controlThere are two ways of uploading files to ImageVault. You can either use a Web form or an Upload component.
The Web form does not require any installation, but the user can only upload up to four files at a time.
©Meridium AB Album Administration | 9

ImageVault | Administrator Manual
The Upload component requires installation, but enables the user to upload several files at the same time.
If you want the ActiveX component to be accessible, check the Use ActiveX upload component checkbox. If the checkboxes remain empty, users will only have access to the Web form.
3.4.2. AdvancedBelow the Advanced tab you will find settings that have quite a large impact on ImageVault.
©Meridium AB Album Administration | 10

ImageVault | Administrator Manual
Automatic import folderIf you have a large quantity of images on a CD or disc, it is advisable to let ImageVault import the images. By indicating a physical search path to the disc space where the images are placed, all images can be imported automatically. The file structure of the server has to follow certain rules in order for ImageVault to keep track of the owner of the imported images. The folder of the file server needs to have the same name as the user account in EPiServer. If users have been imported from an AD, the folder structure on the file server must also include a domain name, e.g. c:\imageimport\domain\user. If many users are to upload images, further user folders have to be created in the file structure. You then indicate the root of the user folders in the field, e.g. c:\imageimport\domain.
©Meridium AB Album Administration | 11

ImageVault | Administrator Manual
The import will move the images physically, to the area for files in ImageVault. When the import is done, the Editor can find his or her images in the Upload album of ImageVault. Note that the Editor will only be able to see his own uploaded images. Only the Administrator of the Upload album will be able to see all users’ uploaded images.
For the import to function optimally the ASPNET account (NetworkService on Windows 2003) server must have the following permissions to the import folder and all subfolders.
It is possible to try to run the import job from the EPiServer Administrator interface. Read more about this in Chapter 6, Scheduled jobs.
Days to keep files in the Upload albumYou can decide how many days a file is allowed to be kept in the Upload album, without the file being moved to a Public album, or being deleted by a user. If value 0 is indicated in the free text field, the files will never be deleted.
Disable child album access controlIn ImageVault it is possible to give a user access to a child album without giving any access rights to the parent album. The user will be able to navigate to the child album in the album tree but not see the content of the parent album. This means
©Meridium AB Album Administration | 12

ImageVault | Administrator Manual
that the access rights for all albums have to be read which can cause performance issues in large album structures and can therefore be disabled. When disabled the user will need access to all the albums in the path.
E-mail from addressWhen the system sends an e-mail to a user, e.g. saying that an order is finalised, you can choose a sender for that e-mail. It would be advisable for that address to reach one or two administrators. Specify the e-mail address in the field.
Enable album size restrictionIf you have limited disc space on the file server, it would be advisable to activate the possibility to set a maximum size for the total amount of files placed in an album. Please, note that the function only regards the size of the original files in the album. Possible conversion formats are not calculated in the amount. The restricted size in a child album can not be larger than that of a parent album. If you want to allow that function, check the box and that field will be activated for the Editor. The Editor will find this function below the tab Album Administration.
Original changeYou can allow users to change the original files in ImageVault. When a user changes the original of a file, the file will be changed on all pages where it appears in EPiServer. If you want to allow that function, select the checkbox and that choice will appear in the Edit menu.
Use ProxyIf there is a fire wall between the Editor and the server this checkbox needs to be selected, if the Upload component is used. Otherwise it should remain empty.
3.4.3. CategoryThis section make will control how categories are used in the system.
Disable check for categoriesBy default all files has to belong to at least one category. By selecting this checkbox this is no longer required, whoever the user will still be asked to enter categories when uploading files or editing properties.
©Meridium AB Album Administration | 13

ImageVault | Administrator Manual
3.4.4. Conversion settings for images
Default image compression qualityIf an Editor or a visitor to the website find that the image quality is low, it might be due to a too low value on this parameter. The system’s default setting is 70 (%). By increasing the value to 100 (%), the quality of the image is improved, and ImageVault will not compress images while converting them. The image will then become larger in Kilobytes, which means it will take longer time to load a page on the website. A system configuration will affect all images. Of course, ImageVault never changes the original, so there is no risk in trying with different values on this parameter.
Enable ICC-profilesICC-profiles can be used with conversion formats. The ICC-profiles are archived as files in a profile album. These are only supported by the JPEG format, and therefore all conversions made with an ICC-profile will also convert the images into JPEG. The conversion also presumes that the image should be converted from RGB to CMYK.
Non-image file types
©Meridium AB Album Administration | 14

ImageVault | Administrator Manual
ImageVault handles all sorts of file formats. Some formats you would definitely not want to be handled as images, e.g. swf (Flash). By indicating the file-type extensions in this free text field, these file formats will not be converted in ImageVault. The file-type extensions are entered as a comma-separated list. The extensions are not case-sensitive.
Original format always availableIt is normally advisable to always have the original format available for downloading and publishing. You should not select the checkbox saying Original format always available, if you want to protect the originals that are kept in a certain album.
If you select the checkbox, you have to add the original conversion format and place it in all albums where downloading of originals should be available.
Preserve IPTC data when converting imagesCheck this box if IPTC data from the original image should be copied to the converted copy. Note that at this time this only works with IPTC data any EXIF data will be lost.
If you check the box, a warning message will appear to the users, when they try to publish an image that is too large. They can then choose to convert the image to the largest allowed size. They can also choose to publish the image as it is. If you do not know what you should allow, it is advisable to select the checkbox and let the users make their own choices. Then users with high knowledge of image handling can publish an image of a larger size, in case that would be needed.
3.4.5. Mirroring
These settings are only used when pages are mirrored or exported in another way (e.g. when exporting from EPiServer’s Administration interface, Tools/Export data). ImageVault supports static export of images/links added from ImageVault in the free text field in EPiServer. Content that is added on a page with other properties will not be exported when using the standard feature.
©Meridium AB Album Administration | 15
ImageVault | Administrator Manual
NOTE! If there is a ImageVault installation on the recieving side it’s possible to use the advanced support for mirroring added in ImageVault 3.2. In this case all ImageVault properties as well as all the metadata in the database can be transfered to the other site. See the chapter regarding mirroring in the installation manual for more information.
The settings that can be done regarding the export are:Physical path - The value indicated here should be a physical search path to the catalogue into which the file was copied during the export, e.g. X:\Sites\EPiServer\Upload\MirroredIVFiles. NOTE! This path is not needed for EPI 5 (CMS).Virtual path - The value in this field should be the virtual search path to the catalogue that has been entered in the Physical path text field, e.g. /Upload/MirroredIVFiles/. The path must be defined in web.config under the virtualPath-tag. The easiest way to do this is to use an already defined path as a template.
When an export takes place the files that are found in ImageVault will be copied to the catalogue that is indicated as Physical path. On that page you set the search path to the search path that is indicated as the Virtual path. The names of the copied files will be changed, so that all the parameters that have been indicated for the files (e.g. height, width, conversion format) are included in the file names. The name of the server is also added to the names of the copied files.
This is done so that the same files are not copied more than once. It also enables mirroring from many servers with ImageVault to the same target, without conflicting with each other.
If any of the above values is not set, ImageVault will interfere at an export.
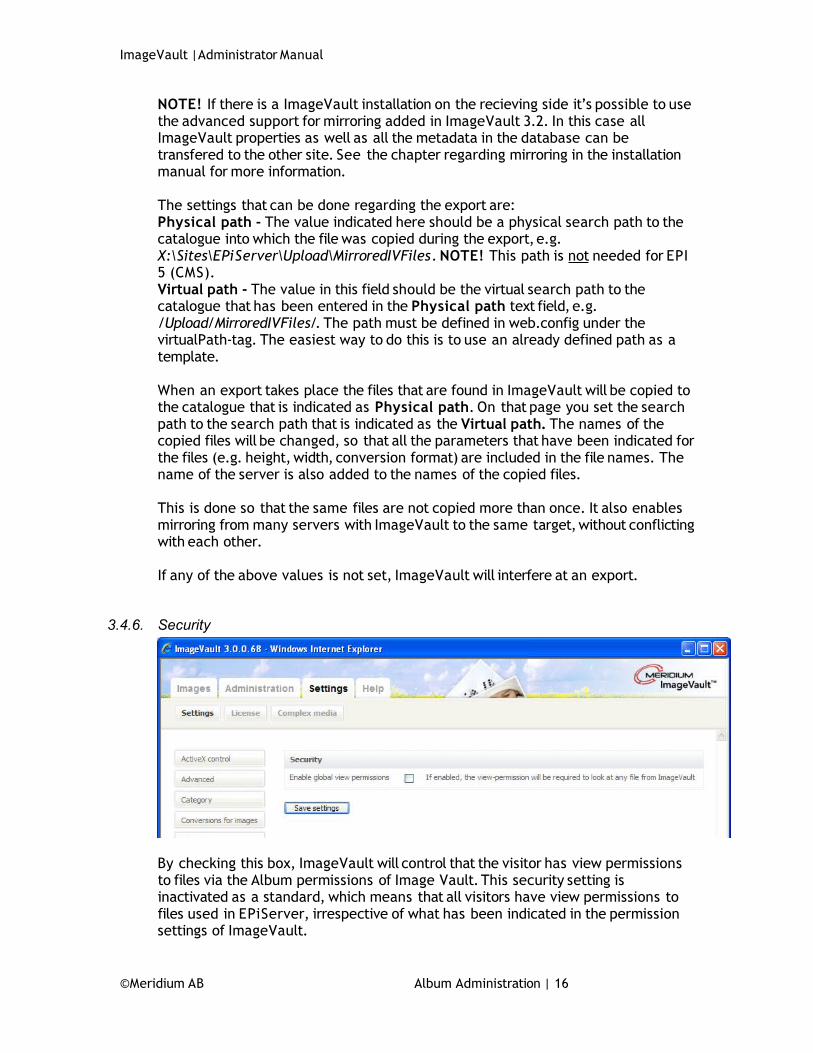
3.4.6. Security
By checking this box, ImageVault will control that the visitor has view permissions to files via the Album permissions of Image Vault. This security setting is inactivated as a standard, which means that all visitors have view permissions to files used in EPiServer, irrespective of what has been indicated in the permission settings of ImageVault.
©Meridium AB Album Administration | 16
ImageVault | Administrator Manual
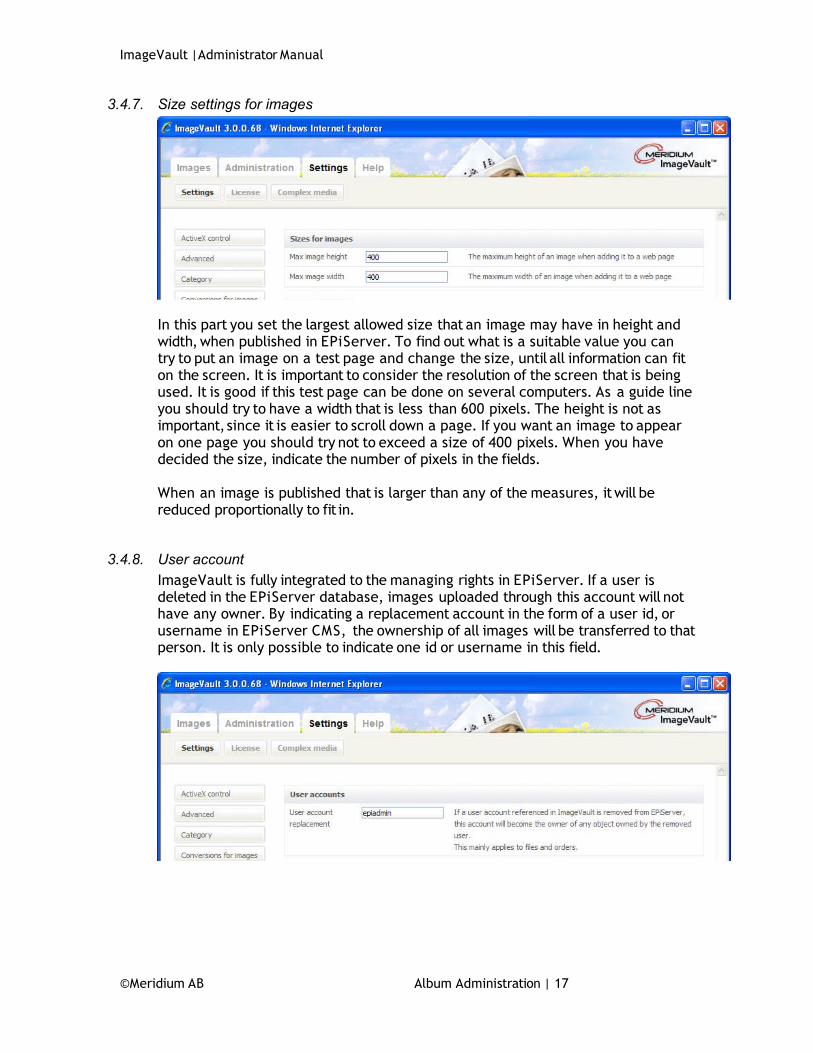
3.4.7. Size settings for images
In this part you set the largest allowed size that an image may have in height and width, when published in EPiServer. To find out what is a suitable value you can try to put an image on a test page and change the size, until all information can fit on the screen. It is important to consider the resolution of the screen that is being used. It is good if this test page can be done on several computers. As a guide line you should try to have a width that is less than 600 pixels. The height is not as important, since it is easier to scroll down a page. If you want an image to appear on one page you should try not to exceed a size of 400 pixels. When you have decided the size, indicate the number of pixels in the fields.
When an image is published that is larger than any of the measures, it will be reduced proportionally to fit in.
3.4.8. User accountImageVault is fully integrated to the managing rights in EPiServer. If a user is deleted in the EPiServer database, images uploaded through this account will not have any owner. By indicating a replacement account in the form of a user id, or username in EPiServer CMS, the ownership of all images will be transferred to that person. It is only possible to indicate one id or username in this field.
©Meridium AB Album Administration | 17

ImageVault | Administrator Manual
3.4.9. User interfaceIt is possible to make minor adjustments in the User interface. If you want a lot of categories in your ImageVault installation, it is possible to have the categories presented in a number of columns, when you search for files via Advanced search. Indicate your desired number of columns in the open text field called Number of category columns.
The function Show personal album, activates a special folder in the Album tree. This folder displays all images that the current user has uploaded to the archive, despite which album the file is saved in. Files in this folder are shown per category.
3.5. Category settingsCategories exist to make it easier for users to find files that they are searching for in ImageVault. It is therefore important to decide which categories to include at an early stage, so that all files will be placed in the correct category.
To reach the Category view to create and edit categories, click Category Administration on the Administration tab.
©Meridium AB Album Administration | 18

ImageVault | Administrator Manual
3. 1. Category listThis is a list of existing categories.
When you create or edit a category, a form with a text field will appear.
4. Category nameThis is where you enter the name of the category.
3.5.1. Create a new CategoryWhen you are in the Category view, click New category. A category field will appear, in which you enter the category name. When you have entered the name in the field, click Add category. The page will be reloaded and the category will appear in the list.
3.5.2. Edit CategoryIf you want to edit a category, click on the category name in the list. The category field will then appear with the category field filled out. Change the category name and click Update. The category will appear in the list by its new name.
3.5.3. Delete CategoryIf you want to delete a category, click on the category name in the list. The category field will appear with the category field filled out. To delete the selected category, click Delete. The category will then be removed from the list.
It is not possible to delete a category that is being used.
©Meridium AB Album Administration | 19
ImageVault | Administrator Manual
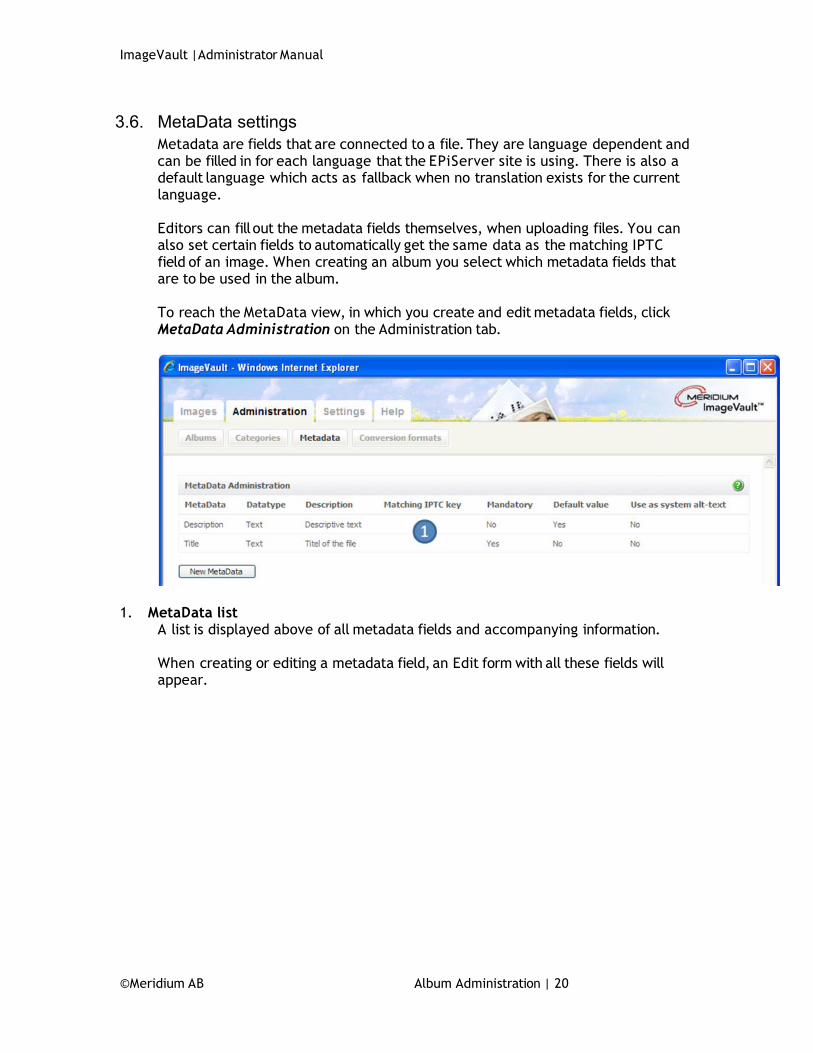
3.6. MetaData settingsMetadata are fields that are connected to a file. They are language dependent and can be filled in for each language that the EPiServer site is using. There is also a default language which acts as fallback when no translation exists for the current language.
Editors can fill out the metadata fields themselves, when uploading files. You can also set certain fields to automatically get the same data as the matching IPTC field of an image. When creating an album you select which metadata fields that are to be used in the album.
To reach the MetaData view, in which you create and edit metadata fields, click MetaData Administration on the Administration tab.
1. MetaData list A list is displayed above of all metadata fields and accompanying information.
When creating or editing a metadata field, an Edit form with all these fields will appear.
©Meridium AB Album Administration | 20

ImageVault | Administrator Manual
1. MetaData This is where you enter the name of the metadata field.
2. Data Type This is where you select the data type of the field. There are five different types of data. The most common one is text, which implies that the field can contain both characters and numbers. Apart from this, there are four different date fields. It is only possible to enter a date in these fields.
3. Matching IPTC key This is where you can set the field to be automatically filled out with data from a certain IPTC field. This only works, though, if the uploaded image contains IPTC information.
4. Description This is where you enter a description of the field.
5. MandatoryHere you set whether this field should be mandatory, or not.
6. Default metadataThis is where you set if the field should appear as file name in the File display view.
7. Use as system ALT text This is where you set if the field should be used as ALT text for the entire system. It is possible to choose another field as ALT text in an album. You can only use one text field as system ALT text. The last field indicated as the system ALT text will be default.
3.6.1. Create a new MetaData fieldWhen you are in the MetaData view and want to create a new metadata field, click New MetaData. The Edit form will appear below the list. Once you have filled out all fields and want to create the new metadata, click Add MetaData. The new field will then be added to the MetaData list.
©Meridium AB Album Administration | 21

ImageVault | Administrator Manual
3.6.2. Edit MetaData fieldWhen you are in the MetaData view, click on the field that you wish to edit. The Edit form will then appear below the list where the fields are, filled out with information from the metadata that you have selected. When you have changed the fields that are to be changed, click Update. The updates will appear in the Metadata list.
3.6.3. Delete MetaData fieldWhen you are in the MetaData view, select the field that you wish to delete. The Edit form will then appear below the list where the fields are, filled out with information from the metadata that you have selected. To delete the selected field, click Delete. The field will be removed from the Metadata list.
It is not possible to delete a MetaData that is being used.
©Meridium AB Album Administration | 22

ImageVault | Administrator Manual
3.7. Conversion format settingsWhen you publish or download images in ImageVault you can select conversion format. When creating an album, you choose which conversion formats that are allowed in the album.
To manage conversion formats, you click Conversion formats on the Administration tab.
1.Format list
All conversion formats with subsequent descriptions are displayed here.
When editing a conversion format, an Edit form will appear below the list, where you can enter information about the conversion format.
1. Name
©Meridium AB Album Administration | 23
ImageVault | Administrator Manual
This is where you enter the name of the conversion format. It is good to name the format by how it will be used, e.g. Small web image.
2. Format This is where you set which image format the conversion format should have.
GIF Good for formats including few colours and toning, e.g. logotypes, illustrations and symbols. The file size will be very small if you use this format to the right kind of images. The format can also handle simple transparency. JPEGThe most common format for publishing images on the Internet. Is excellent for photos and images with a high amount of toning. The file size is small in comparison to the TIFF format.TIFF Is a raw format that is suitable for photos and detailed illustrations for printing. It has a large file size. EPS Is good for all kinds of images that are for printing, and is able to handle vector graphics. It often has a large file size. PNG Is a new format for publishing images on the Internet, and can handle both photos and simpler illustrations. The file size is not larger than JPEG, but it is a non-destructive format, which always has a high image quality. The format can handle advanced transparency. Websafe Is a format that should be used if you want to be sure that the file will work in all web readers on all computers. The file will be saved in a GIF format.Original The file is not converted, but appears in its original format.
If you have not indicated that originals always should be available, this conversion format must be added to all albums where you want to enable downloading of the original.
3. WidthThis is where you enter the width in pixels that the image will have, when published with the conversion format. If no value is indicated, the image will have the same size as the original.
4. Height This is where you enter the height in pixels that the image will have, when published with the conversion format. If no value is indicated, the image will have the same size as the original.
5. ResolutionThis is where you decide the resolution of the image in dpi (dots per inch). The resolution of images is not so important if they will only be published on the Internet, but to use a resolution of 72dpi is advisable. If the photo is to be used for print out it is recommended to have a resolution of at least 300dpi. If the format of the images is to be adjusted to be printed at a printing house, it is good to discuss preferred resolution with their personnel.
6. Quality
©Meridium AB Album Administration | 24

ImageVault | Administrator Manual
This is where you indicate the image quality in % that is applicable to the current conversion format. If the field is left empty, the conversion format will use the overall system setting for image quality in ImageVault. If 100% is indicated, the image will not be compressed, and is then likely to be larger (in MB) than the original.
7. Constrain proportionsThis is where you decide whether the image should have fixed proportions, which means that the image constrains its proportions when the format is used. If you do not use fixed proportions the image will be stretched to cover the entire area that you have indicated that the format will need. It is advisable to always have fixed proportions, since the results may otherwise be quite unpredictable.
8. Unsharp maskMakes the image sharper by increasing the contrast along any lines in the image.
3.7.1. Create Conversion formatWhen you are in the Conversion format view, click New conversion format. The Edit form will appear below the list. Once you have filled out all fields and wish to create the new conversion format, click Add conversion format. The new field will be added to the Conversion format list.
3.7.2. Edit Conversion formatWhen you are in the Conversion format view and want to edit a conversion format, click on the field in the Conversion format list. The Edit form will then appear below the list, with the fields filled out with data from the selected conversion format. When you have changed the fields that you want to change, click Update. The field will be updated in the list.
3.7.3. Delete Conversion formatWhen you are in the Conversion format view and want to delete a conversion format, click on the field in the Conversion format list. The Edit form will then appear below the list, with the fields filled out with data from the selected conversion format. To delete the format, click Delete. The format will be removed from the list.
It is not possible to delete a Conversion format that is being used.
©Meridium AB Album Administration | 25

ImageVault | Administrator Manual
3.8. Max width/height settingsMax widths/heights are used when setting view rights for albums, see 4.4. To manage max widths/heights, you click Max Width/Height on the Administration tab.
All available max widths/heights will be shown as in the image above. To add a new max width/height click New Max Width/Height. To edit an existing one just click the table row for the width/height you want to edit.
In the image above the size 2000 has been clicked. A textbox and new buttons for editing appears. The user is also informed that there is a view right set for this max size for the album “Backdrops”. Therefore it cannot be deleted.
Editing a max width/height is a simple way of changing view rights for many users. If for example many view rights are set for the size 1000. This right can easily be extended by editing the size and change it from 1000 to 1500 or whatever the administrator wishes.
©Meridium AB Album Administration | 26
ImageVault | Administrator Manual
4. Album AdministrationAlbums will help you to sort all material in ImageVault. It is therefore important to really consider how to build the album structure. With the album structure you will be able to control which users that will have access to a certain album. Every organisation must find its own way of structuring the material that is kept in ImageVault. The album structure that you create is not locked, so you can easily move albums and files in the structure.
Before you start to manage albums it is important that you have made all system settings. The properties that you can give an album are based on the settings that you have made, and which Metadata fields and Conversion formats that are available.
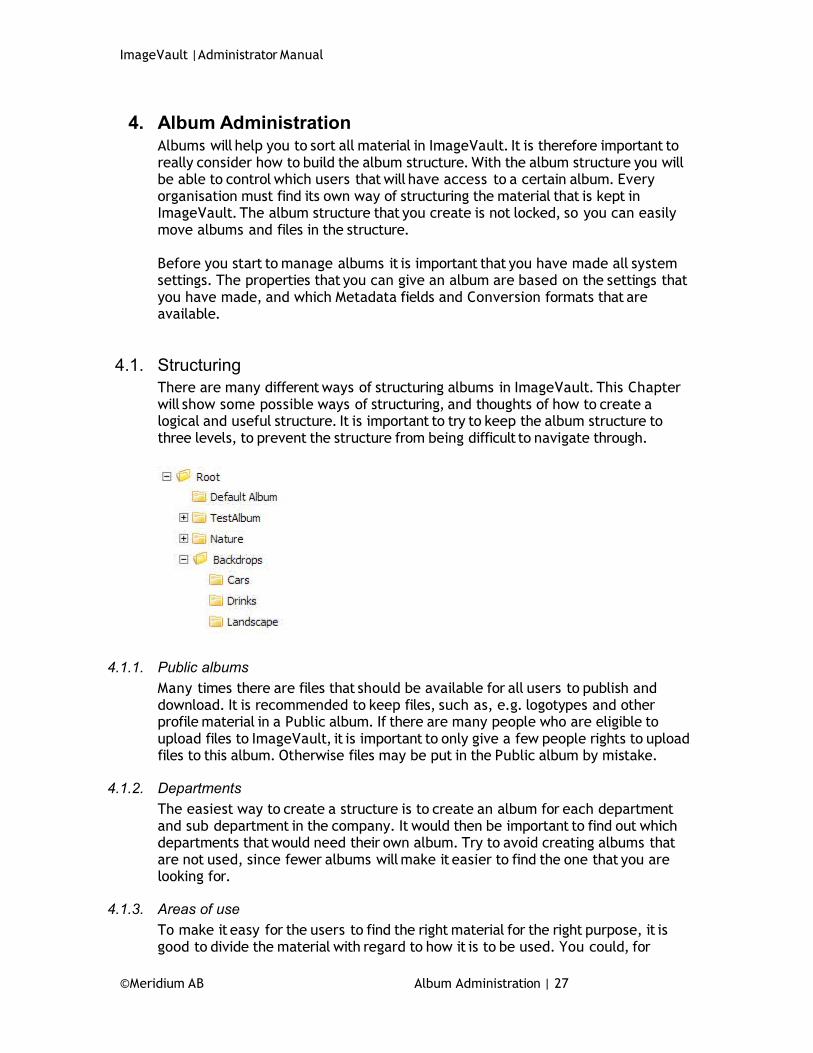
4.1. StructuringThere are many different ways of structuring albums in ImageVault. This Chapter will show some possible ways of structuring, and thoughts of how to create a logical and useful structure. It is important to try to keep the album structure to three levels, to prevent the structure from being difficult to navigate through.
4.1.1. Public albumsMany times there are files that should be available for all users to publish and download. It is recommended to keep files, such as, e.g. logotypes and other profile material in a Public album. If there are many people who are eligible to upload files to ImageVault, it is important to only give a few people rights to upload files to this album. Otherwise files may be put in the Public album by mistake.
4.1.2. DepartmentsThe easiest way to create a structure is to create an album for each department and sub department in the company. It would then be important to find out which departments that would need their own album. Try to avoid creating albums that are not used, since fewer albums will make it easier to find the one that you are looking for.
4.1.3. Areas of useTo make it easy for the users to find the right material for the right purpose, it is good to divide the material with regard to how it is to be used. You could, for
©Meridium AB Album Administration | 27

ImageVault | Administrator Manual
example, create a Web album for files that are to be published on the Web, and an album called Print, for files that are to be used for printing.
4.1.4. ManagingAn important part of structuring is to find ways of proper managing. If the system has many users, it is important to educate all people with permission to upload files, so that everyone knows in which album the files are to be placed. If files are not sorted properly, it will be difficult to find files in ImageVault. If you want to reduce the workload of the System administrators, you could appoint others to be responsible for making sure that all files are placed in the appropriate albums.
4.1.5. CategoriesIt is important that categories do not show the same information as the Album structure does, but provides new information. It is good to let the categories describe the contents of a file that is relevant for its use, e.g. motives, such as, House, Car, Boat, or what kind of a file it is, such as, illustration, photo or text.
4.2. Managing albums in ImageVaultThis Chapter explains how you manage albums in ImageVault.
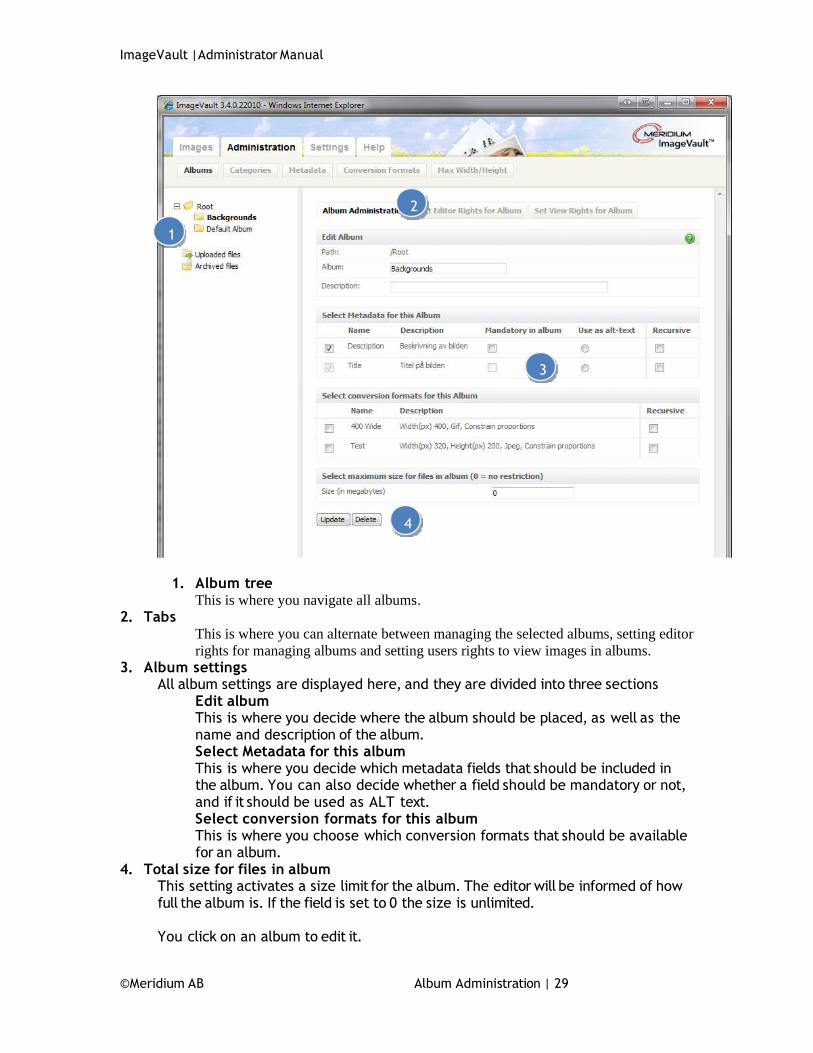
4.2.1. Album viewYou enter the Album view by clicking Album Administration. The album tree appears to the left of the album information, in the view.
©Meridium AB Album Administration | 28
ImageVault | Administrator Manual
1. Album treeThis is where you navigate all albums.
2. TabsThis is where you can alternate between managing the selected albums, setting editor rights for managing albums and setting users rights to view images in albums.
3. Album settingsAll album settings are displayed here, and they are divided into three sections
Edit albumThis is where you decide where the album should be placed, as well as the name and description of the album.Select Metadata for this albumThis is where you decide which metadata fields that should be included in the album. You can also decide whether a field should be mandatory or not, and if it should be used as ALT text.Select conversion formats for this albumThis is where you choose which conversion formats that should be available for an album.
4. Total size for files in albumThis setting activates a size limit for the album. The editor will be informed of how full the album is. If the field is set to 0 the size is unlimited.
You click on an album to edit it.
©Meridium AB Album Administration | 29
1
2
3
4
ImageVault | Administrator Manual
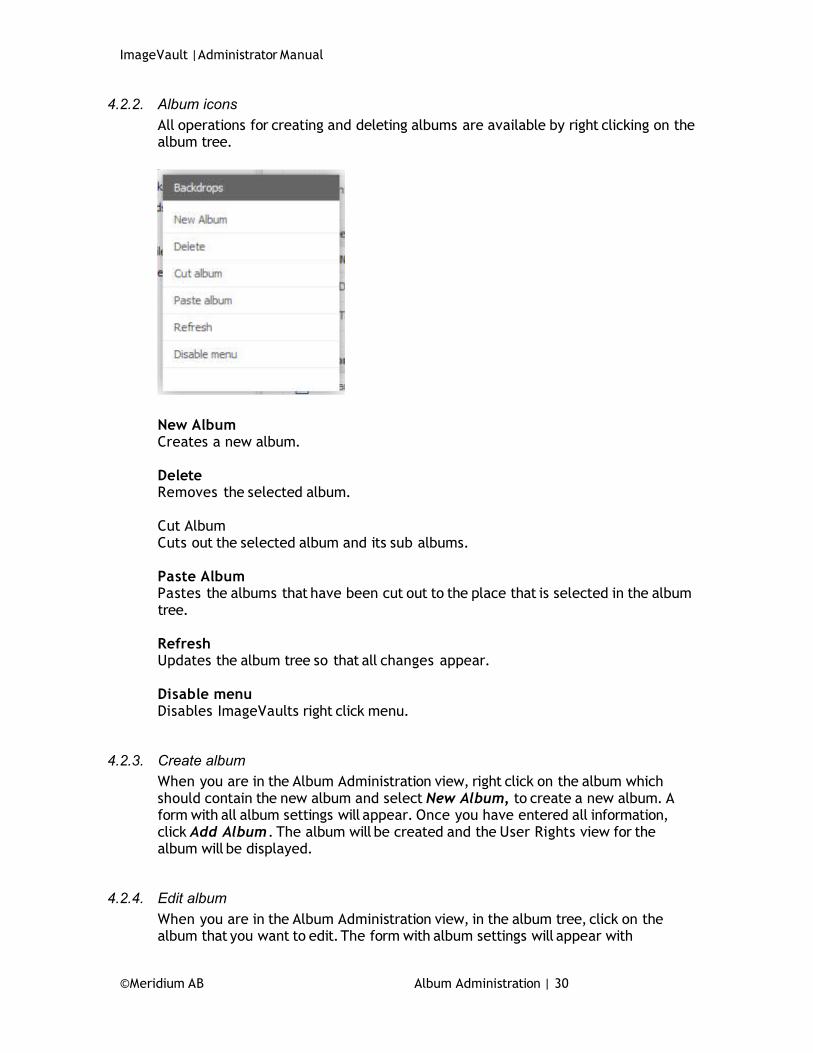
4.2.2. Album iconsAll operations for creating and deleting albums are available by right clicking on the album tree.
New AlbumCreates a new album.
DeleteRemoves the selected album.
Cut AlbumCuts out the selected album and its sub albums.
Paste AlbumPastes the albums that have been cut out to the place that is selected in the album tree.
RefreshUpdates the album tree so that all changes appear.
Disable menuDisables ImageVaults right click menu.
4.2.3. Create albumWhen you are in the Album Administration view, right click on the album which should contain the new album and select New Album, to create a new album. A form with all album settings will appear. Once you have entered all information, click Add Album . The album will be created and the User Rights view for the album will be displayed.
4.2.4. Edit albumWhen you are in the Album Administration view, in the album tree, click on the album that you want to edit. The form with album settings will appear with
©Meridium AB Album Administration | 30

ImageVault | Administrator Manual
information about the selected album. Once you have edited all data that are to be changed, click Update.
4.2.5. Move albumTo move an album right click on it in the album tree and select cut from the menu. Then right click on the album you want to move it to and select paste.
If you want to move the album to the root, select the album called Root.
4.2.6. Delete albumWhen you are in the Album Administration view, click on the album that you want to delete. The form with album settings will appear with information about the selected album. To delete the album, click Delete in the edit page. The album will be removed from the album tree.
4.3. Set editor rights for an albumAn important part of Album Administration is to set rights for editors (previously called user rights). These rights decide what an editor can do with an album using ImageVaults user interface. You set rights per album. Sub albums can inherit rights from the album that it is placed in. Rights can be set both for user groups and for users. The users and user groups of EPiServer are the ones being used in ImageVault.
If many people are going to manage the album, it is better to create a user group and add users to that group, and then set rights for the whole group.
Make sure that the users/groups you give editor rights also have right to access ImageVault. This is configured in web.config.See chapter 4 of the Installation Manual for information.
4.3.1. Editor rights viewWhen you are managing an album, you can enter the view for editor rights by clicking the Set Editor Rights for Albums tab in the Album view. The Users and User Groups will be displayed in the list together with the rights that they have in the album.
©Meridium AB Album Administration | 31

ImageVault | Administrator Manual
Album treeThis is where you can navigate all albums.
5. TabsThis is where you can alternate between managing the selected albums, setting editor rights for managing albums and setting users rights to view images in albums.
6. User listThis is where you find a list of users and user groups that have permissions to manage the album. There are five different album permissions that a user or user group can have.
AdministerThe editor may create and move albums without being an ImageVault
administrator. UseThe editor may publish files from the album in EPiServer. MoveThe editor may move files in the album.ChangeThe editor may edit files in the album.DeleteThe editor may delete files from the album.ViewThe editor may read and download files from the album.
You select the checkboxes in front of the permissions that the user or user group should have in the album.
When you have set all permissions, click Save. To exclude someone when you are saving, simply click Hide for that user. He will be removed from the list and not affected when you save the new rights.
When creating a sub album, it will automatically inherit the same rights as the album it is placed in.
©Meridium AB Album Administration | 32
1
2
3

ImageVault | Administrator Manual
4.3.2. Add user or group When you are in the User Rights view and want to add a user or group, click Add user/group. A window will be opened where you can enter different search criteria to find the user or user group that is to be added.
In the Type drop-down list you choose whether you want to search for users, user groups, or both. When you have entered the preferred search criteria, click Search.
Do not enter anything in the fields if you want all users and user groups to be displayed.
A list of users and user groups, matching the indicated search criteria, will appear in the dialogue.
©Meridium AB Album Administration | 33

ImageVault | Administrator Manual
You select the users and user groups that should have rights in the album, and click Add. The window will be closed and the users or user groups will be added to the list.
4.3.3. Inherit rightsAlbums in ImageVault can inherit rights from their parent albums. This can be hard to understand but is very useful if you have many albums to administer. These are the three possibilities of saving rights with inheritance:
RecursiveIf you click Recursive, all changes will be saved for both for current album and all of its sub albums. This means that afterwards all these albums will have exactly the same rights set.
Add recursiveIf you click Add recursive, rights will only be added to current album and its sub albums. This means that all rights you have set by checking checkboxes will be saved. Cleared checkboxes will be ignored.
Remove recursiveIf you click Remove recursive, rights will only be removed from current album and all its sub albums. In the same way as when rights are added recursively it is the rights with checked checkboxes that is be affected. Cleared checkboxes will be ignored.
©Meridium AB Album Administration | 34

ImageVault | Administrator Manual
4.4. Set view rights for an album
This section only applies to installations that are using the new type of urls. If legacy urls are used this tab will not be available. Check the UseLegacyUrls attribute in web.config if you are unsure which type is used.
The last tab concerning album administration concerns rights to view the images in an album. There are two different rights that a user/group can have: a right to see images up to a certain size in pixels and rights to see certain conversion formats. A user is allowed to see the image if he has either a right to see images of the current size or the current conversion format.
For example, an image is added to a page in a conversion format called Large. This format converts every image to a size of 800 x 600 pixels.
User 1 has right to see images with a maximum size of 1000 pixels and right to see the conversion formats Small and Medium. He will then be able to see the image because both its height and width is smaller than 1000 pixels in its requested format.
User 2 has right to see the conversion formats Small, Medium, Large and Original but has no max width/height right set. He will also see the image due to his right to see the requested format Large.
It is very important to understand that if there are no view rights for an album, no one will be able to see any images in it. This includes thumbnails etc in ImageVaults own user interface.
©Meridium AB Album Administration | 35
ImageVault | Administrator Manual
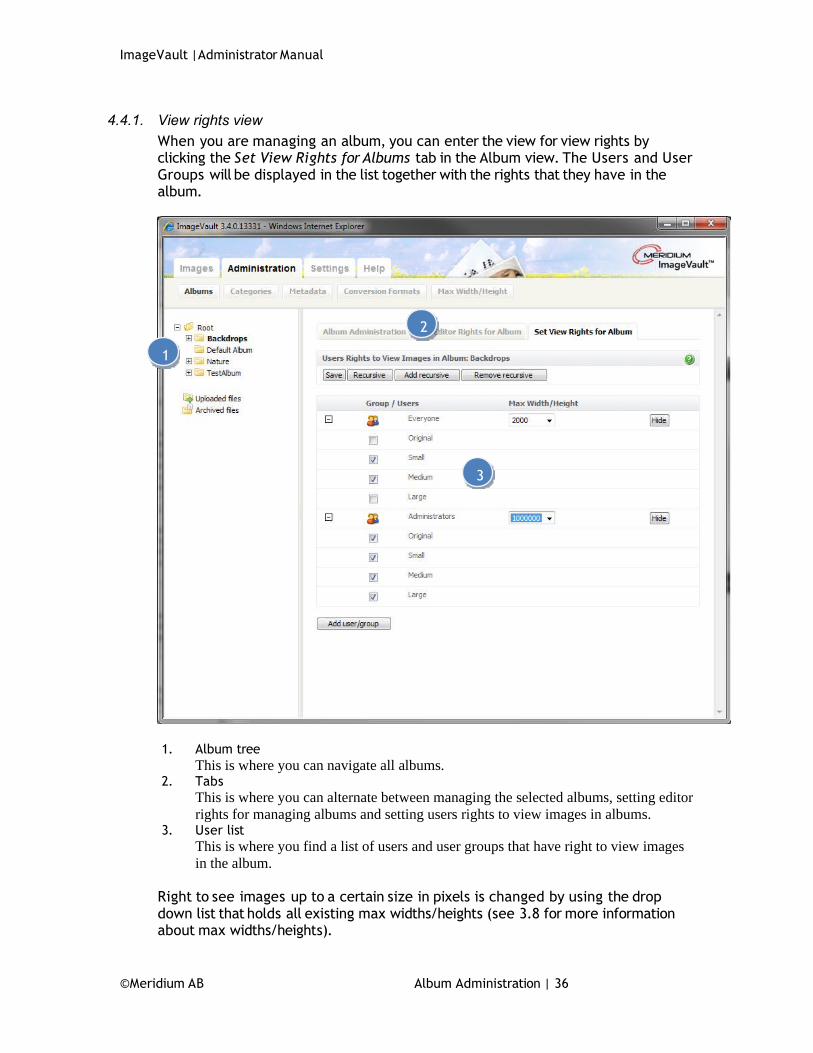
4.4.1. View rights viewWhen you are managing an album, you can enter the view for view rights by clicking the Set View Rights for Albums tab in the Album view. The Users and User Groups will be displayed in the list together with the rights that they have in the album.
1. Album treeThis is where you can navigate all albums.
2. TabsThis is where you can alternate between managing the selected albums, setting editor rights for managing albums and setting users rights to view images in albums.
3. User listThis is where you find a list of users and user groups that have right to view images in the album.
Right to see images up to a certain size in pixels is changed by using the drop down list that holds all existing max widths/heights (see 3.8 for more information about max widths/heights).
©Meridium AB Album Administration | 36
2
1
3

ImageVault | Administrator Manual
Rights to see conversion formats is changed by clicking the small plus icon for a user/group and thus expanding a list of all conversion formats for the current album. Check the checkboxes in belonging to the conversion formats you want the user/group to be allowed to see. Beside conversion formats you can also give the user/group right to see the images in the album in their original format.
When you have set all permissions, click Save. To exclude someone when you are saving, simply click Hide for that user. He will be removed from the list and not affected when you save the new rights.
You can of course add new users/groups and there are also more advanced alternatives when saving rights. This works in the same was as when administrating editor rights. See 4.3.2 and 4.3.4.
When creating a sub album, it will inherit its view rights from its parent.
4.4.2. Special scenariosThe simplest way to give everyone right to see all images is to define a max width/height of 1 000 000 pixels and give the group “Everyone” right to see images of this size. By using one of the advanced alternatives when saving, this right can easily be applied to many albums at once.
If a conversion format is removed from an album, all view rights for it will still exist and be seen among others view rights for the album. Rights for the format can be set as long as any user/group still has a right to see it.
4.5. Special albumsThere are two special albums that have permissions that differ from all other albums. In these albums you add users in the same way as in ordinary albums.
4.5.1. UploadWhen you are in the Album Administration view, click Uploaded files in the album tree, to see the permissions for that album. An Upload Rights view will be displayed, where you can give users permissions in the album. There are two kinds of permissions4. 1. Upload
The user may upload files into ImageVault. 5. 2. Admin
The user gets Administration rights in the album and may edit and delete all files in the album.
You add users and user groups in the same way as in an ordinary album.
4.5.2. ArchiveWhen you are in the Album Administration view, you click Archived files in the album tree, to see the permissions for that album. An Archive Rights view will be displayed, where you can give users permissions in the album. There is one kind of permission6. Read
The user has permission to read and use the files in the archive.
©Meridium AB Album Administration | 37
ImageVault | Administrator Manual
You add users and user groups in the same way as in an ordinary album.
©Meridium AB Album Administration | 38

ImageVault | Administrator Manual
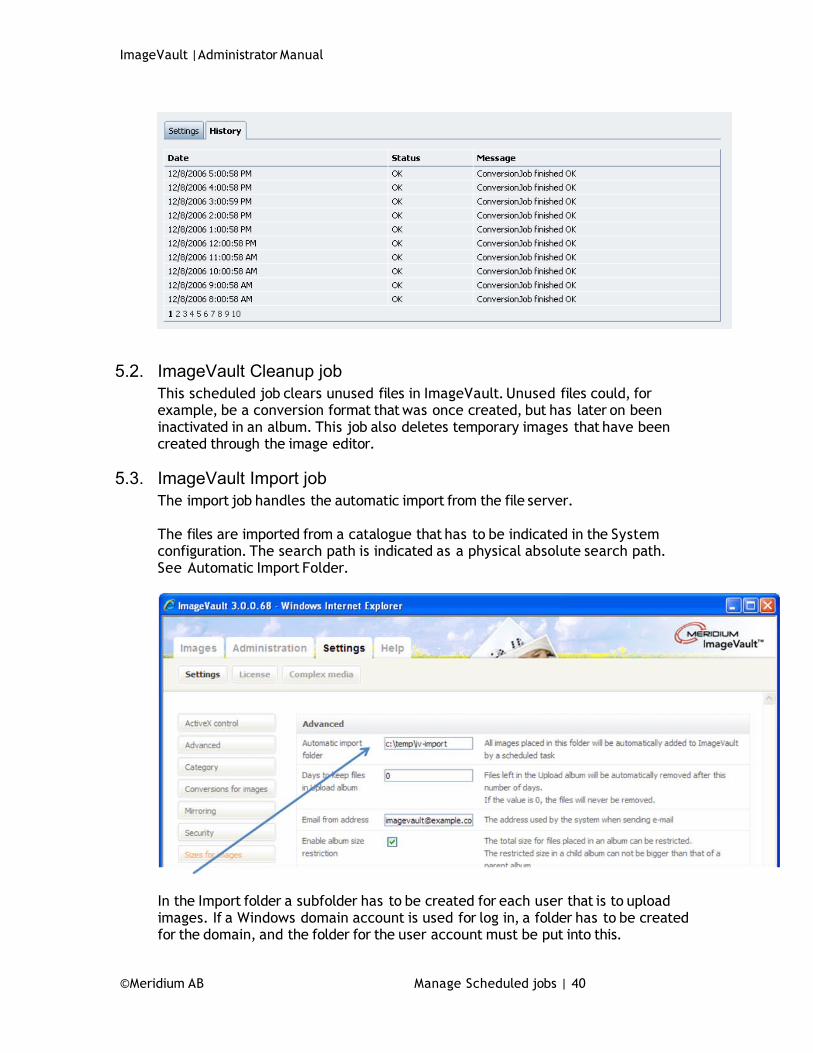
5. Scheduled jobsImageVault uses the built-in handling of scheduled jobs in EPiServer. There are six jobs in ImageVault that can all be configured and test run separately. To each job there is a history that shows whether the job has been run correctly, or not. If the scheduled job has not run correctly an error message will be presented, that could help you to discover the fault.
1.Settings and HistoryUnder Settings you configure the scheduled job, and under History the results of the accomplished jobs are presented.
2. Time intervalsThis is where you indicate how often a job should be run, and when the jobs should start running. Keep in mind that a job can steal some performance from the web server. Consider thoroughly how often a job has to run for the organisation to be satisfied. Larger conversion jobs require an excess of frame memory on the web server.
3. ActiveFor a job to be run it has to be active, otherwise ImageVault will not do anything. Activate it by selecting the checkbox.
4. Manual test runTo secure that a job is run correctly, you can do a manual test run of the job. If the job has been run correctly a dialogue will appear with the text, Job run without problem. If the job, for any reason, would not be run correctly, a dialogue with an error message indicating the reason, will be presented.
5. Date dialogueThis is where you indicate date and time for the first run of the scheduled job.
5.1. ImageVault Conversion jobThis scheduled job converts an image original to the desired file format that has been configured in ImageVault and activated in the albums. It may take some time to convert large image files. The most common reason for a work to fail is that the added image file is not supported by ImageVault.
©Meridium AB Manage Scheduled jobs | 39
ImageVault | Administrator Manual
5.2. ImageVault Cleanup jobThis scheduled job clears unused files in ImageVault. Unused files could, for example, be a conversion format that was once created, but has later on been inactivated in an album. This job also deletes temporary images that have been created through the image editor.
5.3. ImageVault Import jobThe import job handles the automatic import from the file server.
The files are imported from a catalogue that has to be indicated in the System configuration. The search path is indicated as a physical absolute search path.See Automatic Import Folder.
In the Import folder a subfolder has to be created for each user that is to upload images. If a Windows domain account is used for log in, a folder has to be created for the domain, and the folder for the user account must be put into this.
©Meridium AB Manage Scheduled jobs | 40

ImageVault | Administrator Manual
For the import job to function, the user account that the web server is run with, must have permissions to read and delete the images. Normally this would be the user ASP.NET
In the Admin mode you indicate the intervals with which the import job is to run.Below the History tab, you also have the possibility to control the status of jobs that are run. This may be helpful for possible fault searches.
5.4. ImageVault User/group checkThis scheduled job controls the owner handling of images if a user is deleted in EPiServer. The ownership will then be transferred to an Administrator, whose id is indicated in the System configuration.
©Meridium AB Manage Scheduled jobs | 41

ImageVault | Administrator Manual
5.5. ImageVault Archiver notification jobThis job handles the work of sending an e-mail to the Administrator, if an original image that is being used on a page, is archived.
©Meridium AB Manage Scheduled jobs | 42

ImageVault | Administrator Manual
6. Settings in the freetext editor
6.1. EPiServer CMS 6 and TinyMCEIf you use EPiServer CMS 6 and the default free text editor (TinyMCE), ImageVault will add buttons to the toolbar of the editor that allows adding images and links.
These will be added automatically by ImageVault. If you would like to remove or move them, you can modify the current default setting in EPiServer.Go to the admin page and select Page Type->Edit Custom Property Types.
To edit the settings, select the property named XHTML string.
Here you can see the defined settings for the TinyMCE editor. The one named “Default (ImageVault)” is installed by ImageVault and will be recreated if removed. You can copy it or modify it if you want to change the settings. Newer versions of ImageVault can modify this one if new buttons are added or removed. ImageVault will not affect any other buttons than its own.
©Meridium AB | 43