Administrator Guide for Missouri · AdministratorGuideforMissouri 9 TrackingCurrentUse 190...
240
SEMOAG-100716 Administrator Guide for Missouri Release 2018.01 December 2017
Transcript of Administrator Guide for Missouri · AdministratorGuideforMissouri 9 TrackingCurrentUse 190...

SEMOAG-100716
Administrator Guide for Missouri
Release 2018.01
December 2017

The Edupoint software and any form of supporting documentation are proprietary and confidential.Unauthorized reproduction or distribution of the software and any form of supporting documentation is strictlyprohibited andmay result in severe civil and criminal penalties.Information in this document is provided in connection with Edupoint Educational Systems, LLC. products. Nolicense to any intellectual property rights is granted by this document.
The screens, procedural steps, and sample reports in this manual may be slightly different from the actualsoftware due tomodifications in the software based on state requirements and/or school districtcustomization.
The data in this document may include the names of individuals, schools, school districts, companies, brands,and products. Any similarities to actual names and data are entirely coincidental.
Copyright ©2016-2017 Edupoint Educational Systems, LLC.
Edupoint, Synergy Student Information System, Synergy Special Education, Synergy Assessment,TeacherVUE, LessonVUE, StudentVUE, and ParentVUE are registered trademarks of Edupoint EducationalSystems. Inspect is a registered trademark of Key Data Systems. Google and theGoogle logo are registeredtrademarks of Google Inc. Apple and iPad Pro are trademarks of Apple Inc. Microsoft andOneDrive aretrademarks of theMicrosoft group of companies.
Other names and brands may be claimed as the property of others.
Copyright 2016-2017 Edupoint Educational Systems, LLC.

About This ManualEdupoint Educational Systems, LLC. develops software with multiple release dates for the softwareand related documentation. The documentation is released inmultiple volumes tomeet thiscommitment.
This document serves as a reference for Edupoint's recommendations and Best Practices forSynergy processes. Due to the complex nature andmyriad configurations possible within theSynergy software, it is not feasible to include every possible scenario within this guide.
Conventions Used in This Manual
l Bold indicates user interactions such as a button or field on the screen.l Italics indicate the option to select or text to enter.l Notes, Tips, References, and Cautions appear in themargin to provide additional information.
Notes provide additional informationabout the subject.
Tips suggest advanced options orother ways of approaching thesubject.
References list another source ofinformation, such as another manualor website.
Cautionswarn of potential problems.Take special care when readingthese sections.
Before You Begin
Before installing any of the Edupoint family of software products, be sure to review the systemrequirements andmake sure the district’s computer hardware and softwaremeet theminimumrequirements.
Software and Document History
DocumentVersion
ReleaseDate
SoftwareRelease Description
1.0 Jul 2016 10.03 Initial document for release
2.0 Jul 2016 10.04 Updated
Administrator Guide for Missouri 3
Copyright 2016-2017 Edupoint Educational Systems, LLC

DocumentVersion
ReleaseDate
SoftwareRelease Description
3.0 Dec2016 10.05
l Changed format of this page
l Added Print Only PDF Documents
l Added Recovering a Student IEP
l Added AT Tracking
l Added AT Database
l Added Assistive Technology Reports
l Added Setup Frequency Unit
l Added Setup Overview
l Updated Special Flags
l Updated Using Mouseover
l Updated Document List
l Updated IEP and Progress Report Options Tab
l Updated Student and Document Options Tab
4.0 May2017 2018
Updated:
l Document Definition
l IEP and Progress Report Options Tab
l Special Flags
l Translation of Documents
l Recovering a Student IEP or Progress Report
l Student and Document Options or Document Options Tab
Added:
l Transferring IEPs Using ESR
5.0 Dec2017 2018.01
l Modified PAD Security
l Added User Defined Documents
l Corrected path to Personal Goal Library in Setup Overview
l Added Show "Charts and Graphs" memo field in SpecialEd Test Definition
l Updated Working with Processes
l Added Special Flags:
l Updated Form Specific Modifications
4 Administrator Guide for Missouri
Edupoint Proprietary and Confidential

Administrator Guide for Missouri 5
Table of Contents
About ThisManual 3
ConventionsUsed in ThisManual 3
Before You Begin 3
Software and Document History 3
Table of Contents 5
Chapter 1: Synergy SE Overview 10Overview 11
Implementation Considerations 11
Configuration Preparation 11
Launching Synergy SE 12
SetupOverview 13
Chapter 2: District and School Setup 15Introduction 16
Organization Setup 16
NTL Setup 17
Navigating to NTL Setup Screen 17
IEP and ProgressReport Options Tab 18
IEP Options 18
IEP ProgressReport 19
IEP and Document Options 20
Grade Category 21
Next DateWarnings 21
Student and Document Options Tab 22
Document Options 22
Prior Written Notice 23
Timeline Tab 23
IEP Views and Reports Tab 24
Special Ed School Team 24
Update the School Team for Transfer Students 24
Defining the School Team 27
Photo Attach 29
Create Photo Import Directory 29
Mass Attach Photos to Student Records 30
Copyright 2016-2017 Edupoint Educational Systems, LLC

6 Administrator Guide for Missouri
Attach an Individual Photo to Student Record 31
Remove Individual Photo fromStudent Record 31
Setup FrequencyUnit 32
Create a FrequencyUnit 32
Delete a FrequencyUnit 33
Special Ed Calendar 33
Setup 33
Special Ed Services 34
Adding Special Ed Services 34
Adding Students to Synergy SE 36
Student Notifications 38
Chapter 3: Lookup Table Definition 40Lookup Table Setup 41
Add Values to Lookup Tables 42
Assign a State Reporting Code to an Existing Lookup Table Value 43
Deactivate a Lookup Table Value 43
Sort Lookup Values 44
Lookup Table Definitions 45
Chapter 4: Users 49Special Ed Roles 50
Role Setup 50
Special Ed User Setup 51
Security Settings 51
Data EntryOptions 51
Staff Setup 53
PAD Security 54
Security on Buttons and Tabs 54
Manual ProcessMove Setup 57
Chapter 5: Security 60Security Overview 61
Security Definition 62
Security on Student Demographics 63
Security on Delete Functions 64
Security for Unlocking Student Documents 66
Edupoint Proprietary and Confidential
Administrator Guide for Missouri 7
Hiding Ignore Validation 66
Chapter 6: Synergy SE Processes 69Synergy SE Processes 70
Working with Processes 71
Defining the Process 71
Assigning a Timeline to a Process 75
Working with ProcessDocuments 78
Defining Timeline Reports 81
Creating Email Content 81
Setting Up Email Content 86
Assigning Email Content to Timeline Report Type 88
Chapter 7: Document Configuration 89Introduction 91
Document List 91
FormSpecificModifications 93
Special Education Documents 93
504 Documents 109
UsingMouseover 110
Finding the Name of the BusinessObject 110
Using Auto Populate 113
Using Property Override 114
Document Definition 116
Searching for a Document Definition 116
Document Definition Tab 117
Special Flag Descriptions 122
Validation Rule Tab 131
Eligibility Determination Tab 132
Print Only Tab 134
Prior Written Notice Tab 138
Print Only PDF Documents 140
User Defined Documents 141
Components 141
Document Definition 143
Example UD Document 150
Copyright 2016-2017 Edupoint Educational Systems, LLC

8 Administrator Guide for Missouri
Translation of Documents 155
Translation ProcessOverview 155
Setup to Translate Text Boxes 155
Translation Screen 156
Translating a Document 156
Generating a List of Translated Documents 160
Disabling Historical Document Validation 161
Unlocking a Student Document 163
Enabling a Document to be Unlocked 163
Unlocking a Document 163
Recovering a Student IEP or ProgressReport 165
Transferring IEPsUsing ESR 166
Responding to an IEP ESR Request 166
Receiving an ESR IEP 167
Chapter 8: Goal Configuration 169Introduction 170
Area of Need Setup 170
Goal Library 172
State Standard Goal Import 173
NTL Setup 173
Import Standards fromSynergy SIS 174
Chapter 9: Special Ed Test Definitions 177Test Definition for Special Education 178
Special Ed Test Definition 178
Adding a New Category 178
Adding a Test Group to a Category 179
Adding a Test to a Test Group 180
Deactivating a Test 185
Standardized Test Definition 186
Defining Test Definitions 186
Deactivation Standardized Test Definitions 188
Chapter 10: Assistive Technology Tracking 189AT Tracking 190
Adding Devices 190
Edupoint Proprietary and Confidential

Administrator Guide for Missouri 9
Tracking Current Use 190
Uploading Data into AT Tracking 192
AT Database 194
Setup 194
Using AT Database 198
ATQuarterly Checklist 218
Assistive TechnologyReports 219
ATT01 – Tracking Sheet 219
AT Equipment Reports 220
Chapter 11: Medicaid 221Medicaid Overview 222
Setup 222
Lookup Table Setup 222
AddingMedicaid Services 222
Adding Physicians 224
Associating Staff with Provider Type 224
Medicaid Permission Document Setup 225
Document Definition 227
Define Statement in Auto Populate 228
Adding Document to a Process 229
Working with Students 230
Associating Student to Providers 230
LoggingMedicaid Services for a Student as an Administrator 231
Student Medicaid Screen 232
Viewing Extracts 235
Medicaid Billing Extract 235
Provider Service Extracts 237
Copyright 2016-2017 Edupoint Educational Systems, LLC

Chapter 1:Synergy SE Overview
Overview 11Launching Synergy SE 12Setup Overview 13

Administrator Guide for MissouriChapter 1: Synergy SE Overview 11
OverviewSynergy SE system administration includes the initial configuration andmaintenance of the variousspecial educationmodules through Synergy SE.
Implementation Considerations
A critical piece of the implementation process is determining who is responsible for each setup ordata entry process in Synergy SE. This analysis determines the structure and security of the usergroups. For example:
l What role will the IT staff play in both the initial implementation and the ongoingmaintenance?l Is there a dedicated student records system administrator?l What modules do the special education clerks setup andmaintain?l Who enters the document information?l Who can change student address and phone information?
Configuration Preparation
If the district is Synergy SE only, before setting up the system, gather the following information:
l The district address, phone, fax, logo, and state code informationl A list of schools with their address, phone, fax, logo, and state code information, and thenames of the principals.
l A list of staff for each of the schools and their role in the schools. The staff address and phoneinformation, emergency contact information, and credentialsmay also be recorded.
l A list of the staff that will be using Synergy SE, and their duties within Synergy SE.l If LDAP is used, the domain name and server UNC path for the LDAP server.l If Synergy SE is used to send e-mail notifications, the address of themail server to be used aswell as the email address to use as the From address.
If the district uses Synergy SE, then the information is already setupin Synergy SE.
Copyright 2016-2017 Edupoint Educational Systems, LLC

12 Administrator Guide for MissouriChapter 1: Synergy SE Overview
Launching Synergy SE1. Open an internet browser.2. Enter the Synergy SE URL in the address field.3. PressEnter.4. Enter your Login Name andPassword.5. PressEnter.
Login Screen
Edupoint Proprietary and Confidential

Administrator Guide for MissouriChapter 1: Synergy SE Overview 13
Setup OverviewThe following is a list of the items that is recommended be completed for Synergy SE to befunctional:
1. OrganizationSynergy SE > System > Setup > Organization
l Enter the district information that appears on all printed documents.
2. Synergy SE SetupSynergy SE > NTL > Setup
l IEP and ProgressReport Optionsl Document Optionsl Timelinel IEP View and Reports
3. Service FrequencyUnitSynergy SE > System > Setup > Frequency Unit
4. Special Ed ServicesSynergy SE > System > Special Education > Special Ed Services
l Create, modify, or inactivate special education services.
5. User Setup
l Special Education RolesSynergy SE > System > Special Education > Role
l Assign default roles to staff on the SpecialEd tab of the Staff screen.l Specific roles can be required in the IEP. Set up validation rules in DocumentDefinition screen.
l Select roles to staff in the Team tab of the Student screen. SeeSynergy SE UserGuide.
l Security Definition –Synergy SE > System > Security > Security Definition.l Access to ProcessMovel Access toDelete button for IEP, Process, and AdHocDocuments.
l PAD Security – Security on Buttons and Tabs –Synergy SE > System > Security >PAD Security
Copyright 2016-2017 Edupoint Educational Systems, LLC

14 Administrator Guide for MissouriChapter 1: Synergy SE Overview
6. Document DefinitionSynergy SE > System > Special Education > Document Definition
l Document Listl Eligibility Determination Statementsl Prior Written Noticel Auto Populate – Use to populate library statements and grids.l Lookup Table Definition – Use to populate drop-down list in screens and documents.Example of tables that musts be populated are:Synergy SE > System > Setup > Lookup Table Definition
l Disability Codes –K12.SpecialEd > Disability Codel Least Restrictive Environment –K12.SpecialEd > Lre Elemsec andK12.SpecialEd > LrePreschool
l Customized Statements
l Special Flags
7. Test DefinitionsSynergy SE > NTL > Special Ed Test DefinitionsSynergy SE > NTL > Standardized Test Definitions
8. Goals
l Area of Need –Synergy SE > System > Special Education > Area of NeedSetup
l Goal Library –Synergy SE > System > Special Education > Goal Libraryl Personal Goal Library –Synergy SE > Student > Goal Library Personal – SeeSynergy SE User Guide
9. Process SetupSynergy SE > System > Setup > Process Setup
10. Assistive TechnologySynergy SE > NTL > AT Tracking
11. MedicaidSynergy SE > NTL > Medicaid
Edupoint Proprietary and Confidential

Chapter 2:District and School Setup
Introduction 16Organization Setup 16NTL Setup 17IEP and Progress Report Options Tab 18Student and Document Options Tab 22Timeline Tab 23IEP Views and Reports Tab 24Special Ed School Team 24Photo Attach 29Setup Frequency Unit 32Special Ed Calendar 33Special Ed Services 34Adding Students to Synergy SE 36Student Notifications 38

16 Administrator Guide for MissouriChapter 2: District and School Setup
IntroductionThis chapter describes how tomaintain the school district’s special education departmentinformation, such as address and contact information. Districts canmanage:
l IEP and ProgressReport optionsl Timeline Report optionsl Other Synergy SE document options.
An option is available for districts to maintain default special education teams for each school.
Organization SetupTo have district information display in the header of all printed documents.
1. Navigate toSynergy SE > System > Setup > Organization. TheOrganization screendisplays.
2. Select the name of the organization or district. A detail screen displays.3. Click theSpecial Education tab.4. Enter theDepartment Name,Address, Phone and Fax number.5. ClickSave.
Organization Screen, Special Education Tab
Document Header
Edupoint Proprietary and Confidential

Administrator Guide for MissouriChapter 2: District and School Setup 17
6. (Optional) Complete the 504 tab if district is using Synergy SIS for 504 process.
Organization Screen, 504 Tab
7. ClickSave.
NTL SetupTheNTL Setup screen lists the options available for modifying individual documents at the Districtlevel. Settings selected here apply to all documents of the designated type, for all users.
The NTL Setup screen has the following tabs:
l IEP and ProgressReport Optionsl Student and Document Optionsl Timelinel IEP View and Reports
Navigating to NTL Setup Screen
1. Navigate to Synergy SE > NTL > Setup. The NTL Setup screen displays.2. Select the options to be used in the district documents. See the following sections for a
description of the options.
The options are listed in alphabetical order, not in the order shownon the screen.
3. ClickSave.
Copyright 2016-2017 Edupoint Educational Systems, LLC
18 Administrator Guide for MissouriChapter 2: District and School Setup
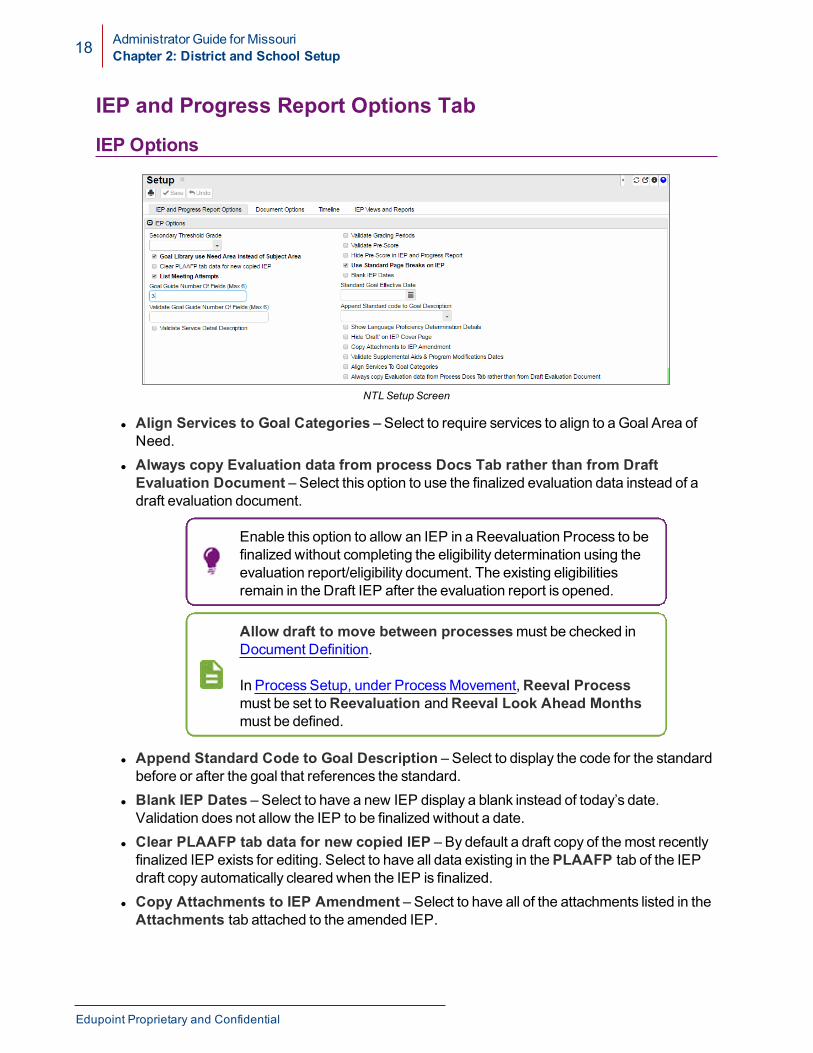
IEP and Progress Report Options Tab
IEP Options
NTL Setup Screen
l Align Services to Goal Categories – Select to require services to align to a Goal Area ofNeed.
l Always copy Evaluation data from process Docs Tab rather than from DraftEvaluation Document – Select this option to use the finalized evaluation data instead of adraft evaluation document.
Enable this option to allow an IEP in a Reevaluation Process to befinalized without completing the eligibility determination using theevaluation report/eligibility document. The existing eligibilitiesremain in the Draft IEP after the evaluation report is opened.
Allow draft to move between processesmust be checked inDocument Definition.
In Process Setup, under ProcessMovement,Reeval Processmust be set toReevaluation andReeval Look Ahead Monthsmust be defined.
l Append Standard Code to Goal Description – Select to display the code for the standardbefore or after the goal that references the standard.
l Blank IEP Dates – Select to have a new IEP display a blank instead of today’s date.Validation does not allow the IEP to be finalized without a date.
l Clear PLAAFP tab data for new copied IEP – By default a draft copy of themost recentlyfinalized IEP exists for editing. Select to have all data existing in thePLAAFP tab of the IEPdraft copy automatically cleared when the IEP is finalized.
l Copy Attachments to IEP Amendment – Select to have all of the attachments listed in theAttachments tab attached to the amended IEP.
Edupoint Proprietary and Confidential

Administrator Guide for MissouriChapter 2: District and School Setup 19
l Goal Guide Number of Fields (Max 6) – Enter the number of text boxes that display on theIEPGoals tab. If the value is greater than 6, only 6 text boxes display. The description of thegoal contains the combined content of the individual text boxes.
l Goal Library use Need Area instead of Subject Area – System default. Must be checked.l Hide Draft on IEP Cover Page – Select to remove the wordDraft on the cover of the printedIEP.
l Hide Pre-Score in IEP and Progress Report – Select to remove these fields in thedocuments.
l List Meeting Attempts – Select to have the Documentation of efforts to schedule the IEPMeeting grid appear on the cover of the IEP that records the dates and description of attemptsto schedule the IEP Meeting.
l Secondary Threshold Grade – Selecting the grade determines the lowest grade thatdisplays the Individual Transition Plan grid in IEP.
l Show Language Proficiency Determination Details – Select to display LanguageProficiencyDetermination details.
l Standard Goal Effective Date – Select to use aGoal format that aligns to State/CommonCore Standards. This date designates a date when the default Goal Library is no longeravailable.
l Use Standard Page Breaks on IEP – Select to use hard page breaks after the Participantslist and before Goals, Services, and Least Restrictive Environment in printed documents.
l Validate Goal Guide Number of Fields (Max 6) – Enter the number of text boxes requiredto be used to build a goal. For example, entering 3means the first three boxes are required forvalidation.
l Validate Grading Periods – Select to have aminimumof four report periods be required ontheGoals tab of the IEP.
l Validate Service Detail Description – Select to require completion of the Detail Descriptionwith the Show Detail of Services in the IEP.
l Validate Supplemental Aids & Program Modification Dates – Select to have the StartDate be required and the End Date no be after the IEP EndDate when Need for Aids andServices and Need for ProgramModifications are answered in the affirmative.
IEP Progress Report
NTL Setup Screen
l Blank IEP Dates – Select to have a new IEP display a blank instead of today’s date.Validation does not allow the IEP to be finalized without a date.
l Hide Signature Grid on Progress Reports – Select to sign the progress reportelectronically andmove the sign-off to the top of the cover page.
Copyright 2016-2017 Edupoint Educational Systems, LLC

20 Administrator Guide for MissouriChapter 2: District and School Setup
l Include Benchmarks on Progress Report – Select to include the progress onbenchmarks on ProgressReports in addition to Progress onGoals.
l Show IEP Date and Case Manager Info on Prog Report – Select to display the date ofthe IEP, Name and e-mail address of the casemanager on the printed ProgressReport. ClickSave to have the following options display:
l Show Next IEP Date in Print – Select to show the IEP Review Date on the printedProgressReport.
l Show Addendum and Original IEP Date in Print – Select to show the original IEPDate and/orAmendment IEP Date on the printed progress report.
Amendment IEP Date prints ONLY if the IEP Type isAmended IEP.Use Property Override tomodify the labels on the screen and printedreports.
l Original IEP Date – Navigate to K12.SpecialEd >K12.SpecialEd.IEP > IEPInfo.Common >OriginalIepDateProgressReportRO
l Addendum IEP Date – Navigate to K12.SpecialEd >K12.SpecialEd.IEP > IEPInfo >AddendumIEPDateProgressReportRO
l Next IEP Date – Navigate toK12.SpecialEd >K12.SpecialEd.IEP > IEPInfo >NextIepDateProgressReportRO
IEP and Document Options
NTL Setup Screen
l Default Document Job Priority - Select the default job priority for documents using thedrop-down.
l Default IEP Job Priority - Select the default job priority for IEPs using the drop-down.l Hide Participants Name in IEP & Documents - Select to display only Roles (for example,General Education Teacher) of participants without naming specific individuals in documents.
l Prevent finalizing if the Draft box on IEP or MET is checked - Select to not allow thedocuments to be finalized whenDisplay 'Draft' is selected in the Dates section of theCovertab.
Edupoint Proprietary and Confidential

Administrator Guide for MissouriChapter 2: District and School Setup 21
Grade Category
l Transition Age - Enter the age of the student when the transition information of the IEP mustdisplay. Transition age is defined as the age the student will turn during the IEP year.
l Transition Age - Enter the age of the student when the transition information of the IEP mustdisplay. Transition age is defined as the age the student will turn during the IEP year.
Grade Category
NTL Setup Screen, IEP And ProgressReport OptionsTab
l Transition Age – Enter the age of the student when the transition information of the IEPmust display. Transition age is defined as the age the student will turn during the IEP year.
l Transition on IEP is Based on Age – Select to cause the transition information of the IEPto display for students turning the specified Transition Age anytime during the IEP year
Next Date Warnings
NTL Setup Screen, IEP And ProgressReport Options, Next DateWarnings
l Next IEP Date Warning Days – Enter the value to display a yellow exclamationmark inPortfolio screen based on the number of days before the annual IEP is due.
l Next Eval Date Warning Days – Enter the value to display a yellow exclamationmark in thePortfolio screen based on the number of days before the next reevaluation is due.
Copyright 2016-2017 Edupoint Educational Systems, LLC

22 Administrator Guide for MissouriChapter 2: District and School Setup
Student and Document Options Tab
Document Options
NTL Setup Screen, Document OptionsTab
l Allow stand-alone GENAZ 24 – By default, the Synergy SE GENAZ 24 Transfer IEPrequires a theGENAZ 09 IEP Meeting Request andGENAZ 23Notice of Transfer befinalized before the GENAZ 24 Transfer IEP can be generated. Select to remove thisrequirement.
l Do not copy Print Only Doc & Doc in PDF Format to History Docs tab – Select to notinclude print only documents or documents in PDF format into theHistory Docs tab.
l Hide Contact section on Eligibility Determination docs – Select to remove thestatement that provides a contact person for parents if they have questions about thedetermination.
l Hide Draft on first page of Evaluation Report – Select to remove the word 'Draft' on theEvaluation/MET report.
l Number of Disabilities in Process Tab – If district uses Secondary and/or Tertiarydisabilities, enter the number of drop-downs to display.
l Remove Page Break Before Signature Block in GENAZ 05 – If the GENAZ 05 ParentPermission is customized to add areas of assessment beyond a single page, the default breakcan be removed to allow for a neater appearance in print.
l Set Default Document Date – Dates in documents other than the IEP are blank by defaultwhen first created. Select to set the default as the date the document is first created.
l Switch to 504 Address for 504 Document Letterheads – Select to have the 504 addressentered in the 504 tab to display on 504 documents.
Edupoint Proprietary and Confidential

Administrator Guide for MissouriChapter 2: District and School Setup 23
Prior Written Notice
NTL Setup Screen, Document OptionsTab
l Hide 'Date Implemented' on Prior Written Notice – Select to remove the second datefield that indicates the decision will be implemented on a different date than the decision isreached.
l Hide Document Prepared By – Select to remove an optional field to identify the author ofthe document.
l Hide Parent Information Network Specialist label on Prior Written Notice – Select toremove a default statement at the top of the printed PWNs to explain the reason for priorwritten notices.
l Hide Purpose Statement on Prior Written Notice – Select to remove the purposestatement on the PWN.
l Hide Sources of Assistance in Prior Written Notice – Select to remove the Sources ofAssistance.
l Use Auto Populate for Sources of Assistance in Prior Written Notice – Select to useasmany as four sources of assistance. Normally District and State Department of Educationappear.
l Use student's school of attendance phone number – Select to use the phone number ofthe student's school of attendance on the PWN.
Timeline Tab
Your district may use a different document than the one listed.
NTL Setup Screen, Timeline Tab
l Default Email – Define the default email sender that displays instead of the actual sender’semail when the Timeline Reports are generated for emailing.
l Use 'Consent Received Date' in 'Eligibility' – Timelines created for GENAZ 05 – ParentPermission use theConsent Received Date field in theEvaluation tab.
Copyright 2016-2017 Edupoint Educational Systems, LLC

24 Administrator Guide for MissouriChapter 2: District and School Setup
IEP Views and Reports Tab
Your district's screenmay have different fields than displayed.
NTL Setup Screen, IEP ViewsAndReportsTab
The IEP Views and Reports tab is setup to work with a district’s specific documents and does notneed to bemodified following setup.
Special Ed School TeamThe Special Ed School Team is an optional tool used by districts who prefer a Default Team List setup for each newly added Special Education or 504 process student.
Update the School Team for Transfer Students
You can have the system update the Special Ed School Teamwhen a special education or 504process student transfers schools.
All SE customer districts who use both the Synergy SIS and Synergy SE can automatically replacethe existing Special Education Student Team for both Special Ed or 504 teamswhen a studenttransfers schools.
Districts have the option to add the Team from the new attending school to the existing team insteadof replacing the team.
New Year Rollover Setup
This process uses the New Year Rollover configuration to define the settings a student receiveswhen they transfer to a school.
New Year Rollover defines the settings a student receiveswhen theytransfer to or enroll in a school. These settings apply to new/transferstudents outside of the New Year Rollover process.
Edupoint Proprietary and Confidential

Administrator Guide for MissouriChapter 2: District and School Setup 25
1. Navigate toSynergy SIS > System > Setup > New Year Rollover Setup.2. ClickAdd to add a new definitionPROCESS STUDENT TEAM.
New Year Rollover Setup Add Screen
3. Select theSchools tab.a. Choose all schools under Affected Schools.b. ClickSave.
New Year Rollover Setup Screen, SchoolsTab
4. Select theGrade Levels tab.a. Select all grades under AffectedGrade Levels.b. ClickSave.
New Year Rollover Setup Screen, Grade LevelsTab
Copyright 2016-2017 Edupoint Educational Systems, LLC

26 Administrator Guide for MissouriChapter 2: District and School Setup
5. Select theConfiguration Files tab.a. Select Student Team NYRProcess andSchool Team Spedb. ClickSave.
New Year Rollover Setup Screen, Configuration Tab
6. Select theExecute tab.a. SelectProgress Configuration Files.b. Set theStudent Filter Type to blank.c. ClickExecute New Year Rollover.
New Year Rollover Setup Screen
Edupoint Proprietary and Confidential

Administrator Guide for MissouriChapter 2: District and School Setup 27
District Setup
Select the New Year Rollover process used when adding new students to a school:
1. Navigate toSynergy SIS > System > Setup > District Setup.2. Select theSystems tab.
3. Click to selectPROCESS SETUP TEAM in Enrollment Options.4. ClickSave.
District Setup Screen, System Tab
Defining the School Team
Setup a team
1. Focus to a school.2. Navigate toSynergy SE > System > Setup > Special Ed School Team.
Special Ed School TeamScreen
3. ClickAdd. A new staff row displays on the Default School Team grid.
4. Click inStaff Name.5. Select theRole.6. Continue adding staff to build the default Special Ed School Team.
Copyright 2016-2017 Edupoint Educational Systems, LLC

28 Administrator Guide for MissouriChapter 2: District and School Setup
7. (Optional) Select theReassign students staying in this school to this team duringNew Year Rollover if appropriate.
Selecting this option affects all existing SE students during NewYear Rollover.
l WhenNew Year Rollover is run, SE teams on existingstudents are replacedwith the default team.
l When a special education or 504 process student transfersfrom another school, the default school team from the newschools replaces the student's team from the previous school.
8. ClickSave.9. Repeat steps for theDefault 504 Team tab.
Use theDefault 504 Team tab to assign the default 504 team tostudents using New Year Rollover.
If an SE student has a 504 Plan and no primary disability on theCompliance tab, they are assigned to the default 504 team. Allother SE students are assigned to the default Special Educationteam.
Delete a Team Member
1. Focus to a school.2. Navigate toSynergy SE > System > Setup > Special Ed School Team.3. Select the line of the staff name to delete.4. ClickSave.
Edupoint Proprietary and Confidential

Administrator Guide for MissouriChapter 2: District and School Setup 29
Photo Attach
If the district has Synergy SIS, the photos fromSynergy SIS are used inSynergy SIS. No further action is required.
You can only attach photos using Internet Explorer.
Photos can be attached to the student’s record in bulk or individually.
The photos are normally provided by the photo vendor for the district. Have the photo vendor supplythe following files:
l Text (*.txt) file containing identification numbers and associated photograph file name. The filemust be in the format: “xxxxxxxxx”,“photographfilename.png”
The reference file must have the format as shown below. Thestudent number must match the student.png file. If photo companyhas placed leading zeros in Student ID, check to remove themduring photo installation.
LinkText File Format
l Photos in PNG format, sized in pixels to 100 (wide) x 125 (high)
Create Photo Import Directory
1. Create aPhoto Import directory on local hard drive or network drive.2. Create these sub-folders in Photo Import directory.
l Photosl LinkText
3. Copy the individual photo files in PNG format into the Photos folder.4. Copy the *.txt file into the LinkText folder.
Copyright 2016-2017 Edupoint Educational Systems, LLC

30 Administrator Guide for MissouriChapter 2: District and School Setup
Mass Attach Photos to Student Records
Use Student Photo Attach to attach photos to student records in bulk.
1. Navigate toSynergy SE > Student > Setup > Student Photo Attach.2. Click the link to open the photo attach application. The Photo Attach screen displays.
Student Photo Attach Screen
3. Complete the Photo Attach screen:
a. Enter your passwordb. Select thePath To Images.c. Select thePath To Reference File.d. CheckRemove leading zeros from student SIS if number, if appropriate.e. ClickUpload Photos. A message displayswith total updates and total errors.
Photo Attach Screen
4. Verify that the permanent ID numbers in LinkText match the permanent ID in Synergy SE.
If an error occurs during the upload, look at the log file for errors.The total number of permanent ID numbers in LinkText file shouldequal the total number of photos in Photos file.
Edupoint Proprietary and Confidential
Administrator Guide for MissouriChapter 2: District and School Setup 31
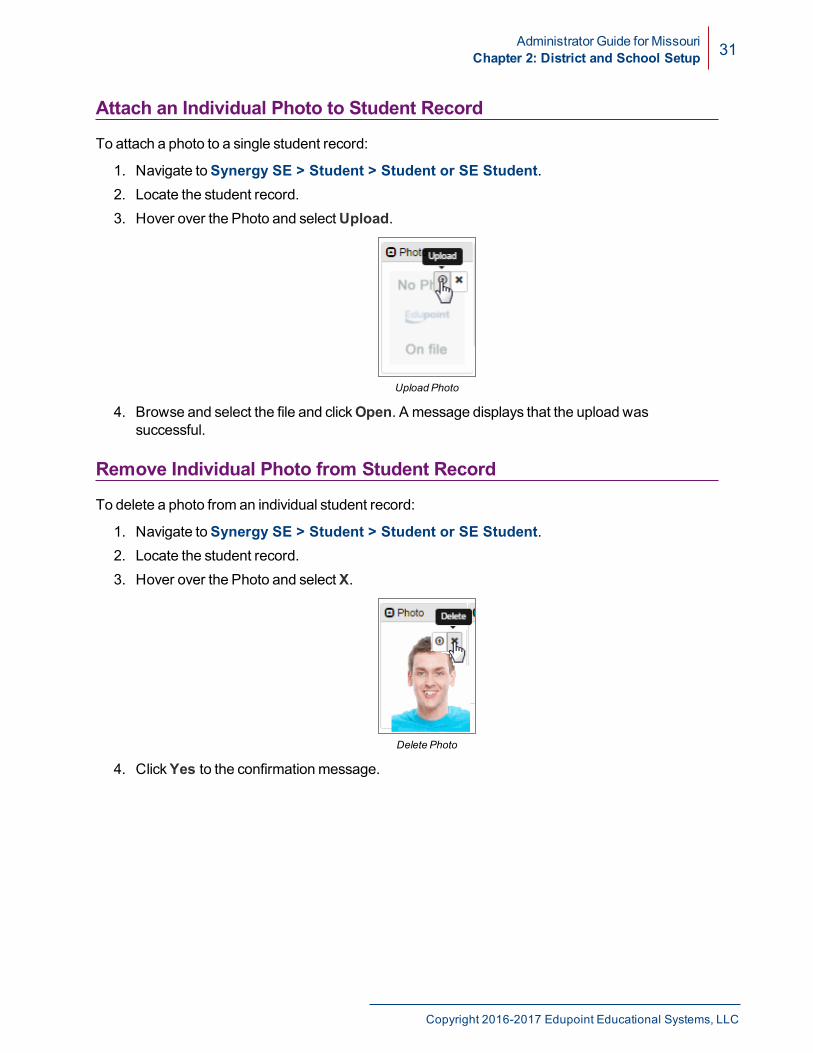
Attach an Individual Photo to Student Record
To attach a photo to a single student record:
1. Navigate toSynergy SE > Student > Student or SE Student.2. Locate the student record.3. Hover over the Photo and selectUpload.
Upload Photo
4. Browse and select the file and clickOpen. A message displays that the upload wassuccessful.
Remove Individual Photo from Student Record
To delete a photo from an individual student record:
1. Navigate toSynergy SE > Student > Student or SE Student.2. Locate the student record.3. Hover over the Photo and selectX.
Delete Photo
4. ClickYes to the confirmationmessage.
Copyright 2016-2017 Edupoint Educational Systems, LLC

32 Administrator Guide for MissouriChapter 2: District and School Setup
Setup Frequency UnitThe FrequencyUnit definitions are time definitions used for calculations in various screens such asthe Immunization Definition screen. They specify what a particular description of a period of timeactuallymeans. For example, it can define quarterly as a 3-month period.
Changesmade in Synergy SE also affect Synergy SIS.
Create a Frequency Unit
1. Navigate toSynergy SE > System > Setup > Frequency Unit.
FrequencyUnit Screen
2. ClickAdd at the top of the screen. The FrequencyUnit (Add) screen opens.
FrequencyUnit (Add) Screen
3. Select theBasic Time Unit use in the calculation. For example, aBasic Time Unit ofWeek.
4. Enter aMultiply Factor to indicate how many of the basic time units define the new unit. Forexample, aMultiply Factor of 2 define a two-week period.
5. Enter aDescription of the frequency unit used in the other screens.6. ClickSave.
FrequencyUnit Screen
Edupoint Proprietary and Confidential

Administrator Guide for MissouriChapter 2: District and School Setup 33
Delete a Frequency Unit
1. Find and select the frequency unit.2. ClickDelete at the top of the screen.
Special Ed CalendarThe Special Ed Calendar screen displays information fromSchool Calendar and student timelineevents.
Some general rules for the calendar:
l If the user is focused to all schools and is exempt from student team, then timelines for allstudents display in the calendar.
l If the user if focused to a school and belongs to student teams, then only the studentsbelonging the user’s team for that particular focus display in the calendar.
l The screen defaults to the current week.
Setup
SystemConfiguration Screen, OptionsTab
1. Navigate toSynergy SE > System > Setup > System Configuration.2. Select theOptions tab.3. SelectAllow HTML in Properties.4. ClickSave.
Copyright 2016-2017 Edupoint Educational Systems, LLC

34 Administrator Guide for MissouriChapter 2: District and School Setup
Special Ed Services
Not all districts use all fields on this screen,
Adding Special Ed Services
1. Navigate to Synergy SE > System > Special Ed > Special Ed Service.2. ClickAdd.3. Enter theDescription.4. Select the Type of the service.
Add Special Ed Service Screen
5. ClickSave.6. Define the Service Details if applicable:
Special Ed Service Screen
l Sub Type – Select a Service Category Code.l Use Type – Select if used in IEP, Service Plan, or both.l Associated Disability – District Specific
Edupoint Proprietary and Confidential

Administrator Guide for MissouriChapter 2: District and School Setup 35
l State Reporting Code – Select the appropriate state reporting code.
Best practice is to align services using Lookup TableK12.SpecialED.IEP > Sped Service.
l Is DIS Only – District Specificl Secondary Only – District Specificl Inactive Date – Enter a date tomake the service unavailable on new IEP documentscreated after this date.
Do not delete a service to ensure that current documents arenot affected by removing the service.
l Medicaid Eligible – Select if the service isMedicaid billable.
The hours calculate in the services section of the IEP. Theservices and hours display on the Consent to ClaimMedicaidReimbursement that prints with the IEP document.
l Associated Role – District Specificl Remarks – District Specificl Goal Category – Select to align IEP with Goal categories.
7. Define the Service Descriptions if applicable to define the service detail.
a. ClickAdd to add a new row.b. Enter the following:
l View Orderl Long Description – Displays in the text boxl Short Description – Displays in the drop-down
Not all districts use this grid.
8. ClickSave.
Copyright 2016-2017 Edupoint Educational Systems, LLC
36 Administrator Guide for MissouriChapter 2: District and School Setup
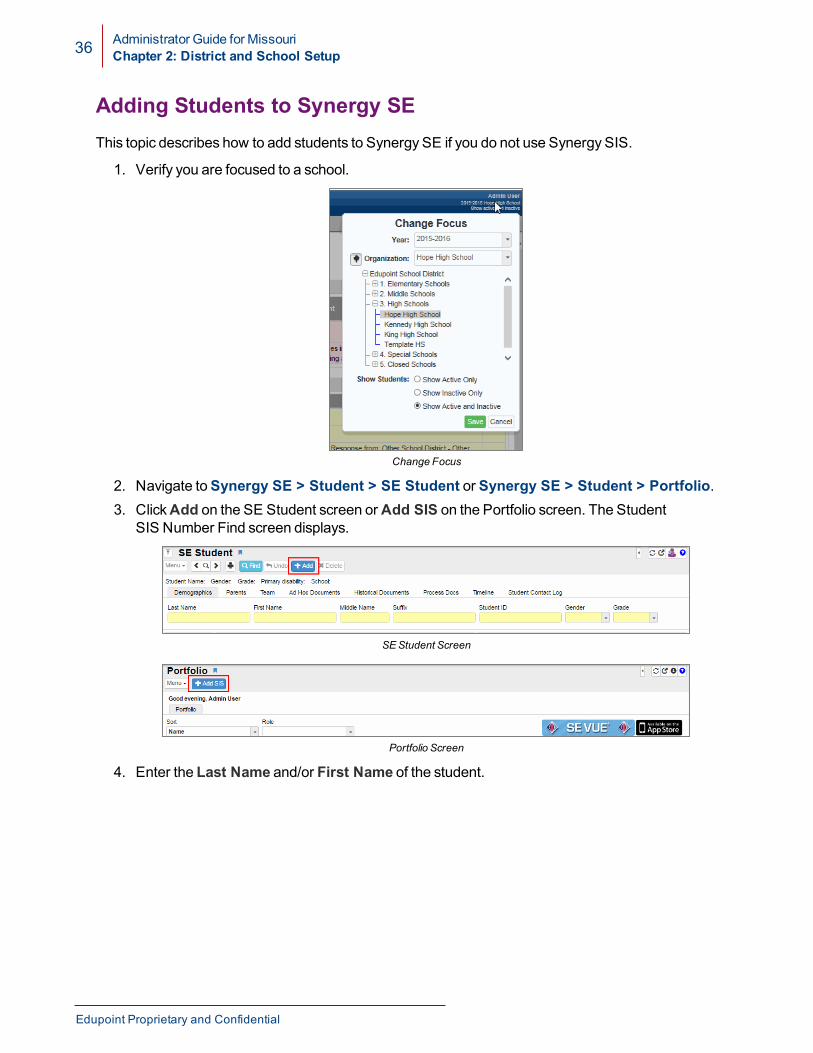
Adding Students to Synergy SEThis topic describes how to add students to Synergy SE if you do not use Synergy SIS.
1. Verify you are focused to a school.
Change Focus
2. Navigate toSynergy SE > Student > SE Student or Synergy SE > Student > Portfolio.3. ClickAdd on the SE Student screen orAdd SIS on the Portfolio screen. The Student
SIS Number Find screen displays.
SE Student Screen
Portfolio Screen
4. Enter the Last Name and/or First Name of the student.
Edupoint Proprietary and Confidential

Administrator Guide for MissouriChapter 2: District and School Setup 37
5. ClickFind.
Student SIS Number Find
If the student is not in Synergy SE, the followingmessage displays.
SynergyNo Student Found
6. ClickOK.7. ClickAdd New.8. Complete all fields in green.9. Select an Initial Process andRace.
SE Student Screen
10. ClickSave.
Copyright 2016-2017 Edupoint Educational Systems, LLC

38 Administrator Guide for MissouriChapter 2: District and School Setup
Student NotificationsAdministrators create student notifications to alert staff about special types of studentcircumstances. The student notification icons display on any screen when the student is in focus.Hover over the icon to view the notification.
Student Screen
To add a notification regarding a student:
1. Navigate toSynergy SE > Student > Student Notifications.2. Find and select a student.3. Manage the student notification:
Student NotificationsScreen
l To delete a notification:�a. Select the checkbox in the X column.b. ClickSave.
Edupoint Proprietary and Confidential

Administrator Guide for MissouriChapter 2: District and School Setup 39
l To add a new notification:�a. ClickAdd. A new row displayswith theBegin Date set to today's date.b. (Optional) Change theBegin Date using the calendar icon.c. Select the type ofNotification.d. (Optional) Enter aComment in the text box.e. (Optional) Enter anEnd Date using the calendar icon if the condition is
temporary.f. ClickSave.
ClickShow Detail to view if the notification was generated by a Ruleset up in Synergy SIS. The Rules section displays that it was added bya rule and includes the name of the rule.
Student Notification Screen, Detail
Copyright 2016-2017 Edupoint Educational Systems, LLC

Chapter 3:Lookup Table Definition
Lookup Table Setup 41

Administrator Guide for MissouriChapter 3: Lookup Table Definition 41
Lookup Table SetupSome drop-downs and checkbox lists use values configured in lookup tables. Hover over a field toview a tooltip icon that indicateswhich table controls the field.
Lookup Table ValuesExample
Product-owned lookup tables use hard-coded values that are core to the programming and cannotbe changed. You can customize other lookup tables tomatch district specifications and statereporting needs.
Consult the list of lookup tables for your state in the appropriate StateReporting Guide to identify tables that require a specific value.
At the top of the table, theName of the table is listed and theNamespacelists the business object the table belongs to. If the table is locked andproduct-owned, it is indicated at the top of the table in the Locked value.
Dwelling Type Lookup Table
Copyright 2016-2017 Edupoint Educational Systems, LLC

42 Administrator Guide for MissouriChapter 3: Lookup Table Definition
Add Values to Lookup Tables
To edit values for one specific field, hover over it and click the tooltip iconto open the Lookup Table screen in a new window. This allows you to
quickly edit values. Youmay need to refresh the original Synergy SISscreen after modifying values in lookup tables to view changes.
1. Navigate toSynergy SIS > System > Setup > Lookup Table Definition.2. Locate the desired table.
PAD Tree
Youmay need to scroll back to the top of the screen to view tableinformation.
Enter Code Lookup Table
3. ClickAdd on the Lookup Values bar. A new line is added to the section.4. (Optional) Enter a ListOrder to display the list in a specific order.5. Enter aCode. This valuemust be unique.6. Enter aDescription. This information displays as an option in the drop-down.
The lookup values are sorted byListOrder first, then byCode, andthen by theDescription.
7. Enter theOther SIS code to import data during the conversion process from another studentrecords system.
8. Enter theState Code, if assigned.9. (Optional) Enter theAlt Code 3 and Alt Code SIF if used for reporting or system
interoperability purposes.
Edupoint Proprietary and Confidential

Administrator Guide for MissouriChapter 3: Lookup Table Definition 43
10. (Optional) Enter theEd-Fi Code if your district is part of the Ed-Fi Alliance.
Refer to your State Reporting Guide to identify if there is a specificcode to select.
11. If appropriate, enter aYear Start and/or Year End date to activate or deactivate the code.
If a code is inactive, it shows in historical data but is not available forselection for new records.
12. ClickSave.
Assign a State Reporting Code to an Existing Lookup Table Value
1. Navigate toSynergy SIS > System > Setup > Lookup Table Definition.2. Locate the desired table.3. Enter the appropriate state reportingCode, State Code, orAlt Code 3 on a populated
Lookup Value line.
Enter Code Lookup Table
4. ClickSave.
Deactivate a Lookup Table Value
This procedure describes how to deactivate a lookup table value containing codes that are no longervalid. Deactivated values are no longer available for selection but remain in Synergy SIS forhistorical reporting purposes.
Do not modify or delete lookup table values that contain outdated statereporting codes. These are still used for historical reporting purposes.Instead, deactivate the value and then add a new lookup table value thatcontains the updated state reporting codes.
1. Navigate toSynergy SIS > System > Setup > Lookup Table Definition.2. Locate the desired table.3. Remove the text inState Code on the lookup value line.
Copyright 2016-2017 Edupoint Educational Systems, LLC

44 Administrator Guide for MissouriChapter 3: Lookup Table Definition
4. Select the last year the lookup table value is valid in theStatus Year End field.
Enter Code Lookup Table
5. ClickSave.
Sort Lookup Values
To temporarily change the sort order of the Lookup Values section, click the up and down arrows inany column heading.
Enter Code Lookup Table
To permanentlymodify the sort order, change the ListOrder.
Enter Code Lookup Table
Edupoint Proprietary and Confidential

Administrator Guide for MissouriChapter 3: Lookup Table Definition 45
Lookup Table Definitions
* Indicates there are specific entries required for these lookup tables. Click the lookup table name to be redirected tothese specific entries.
^ Indicates theremight be state-specific entries required for these lookup tables. Reference your state reporting guidefor these values.
See FormSpecificModifications for your state for Lookup Table Definitions that apply to Documentation Configuration.
Lookup Table Purpose Screen Tab Section FieldK12
Grade *
Lists the exit reason. Populatesthe Special Ed StudentServices screen if the StateCodesmatchK12.SpecialEd.Exit Reason
Student Process DocsCurrent Settings Exit ReasonCurrent 504 Settings Exit ReasonManualProcessMove Exit Reason
Student Exit Confirmation N/A Student Exit FromSpecialEd Exit Reason
Lookup Table Purpose Screen Tab Section FieldK12.ProgramInfo
Sped Exit Reason
Lists the exit reason. Populatesthe Special Ed StudentServices screen if the StateCodesmatchK12.SpecialEd.Exit Reason
Student Process DocsCurrent Settings Exit ReasonCurrent 504 Settings Exit ReasonManualProcessMove Exit Reason
Student Exit Confirmation N/A Student Exit FromSpecialEd Exit Reason
Lookup Table Purpose Screen Tab Section FieldK12.SpecialEd
Exit Reason
Lists the exit reason.Populates the Special EdStudent Services screen if theState CodesmatchK12.ProgramInfo.Sped ExitReason
Student Process DocsCurrent Settings Exit ReasonCurrent 504 Settings Exit ReasonManualProcessMove Exit Reason
Special Ed Student Services Services Services Exit Reason
Student Exit Confirmation N/A Student Exit FromSpecialEd Exit Reason
Copyright 2016-2017 Edupoint Educational Systems, LLC

46 Administrator Guide for MissouriChapter 3: Lookup Table Definition
Lookup Table Purpose Screen Tab Section FieldK12.SpecialEd
DisabilityCode*
Lists the disabilities studentscan be assigned
NOTES:
This Lookup Tablesmust becompleted to validatedocuments and to havecorrect state reporting.
It is recommended but notrequired tomake theStateCode the same as theCode.
Special Ed Student Services Other InformationSpecial EducationRegional TuitionReimbursement
Disability Code
Lookup Table Purpose Screen Tab Section FieldK12.SpecialEd.AZ
At TrackingTypesof assistivetechnologyavailable ininventory.
AT Tracking Inventory Information N/A Category
At CcList Lists the options that displayDevice TrialReport Outcome CC: N/AAT Evaluation Report Summary/Recs CC: N/A
At Device SelectionTechniques Lists the options that display Evaluation Report AAC/AT Info Required/Desired Features
in a DeviceSwitch Scanning/Direct
Selection
Lookup Table Purpose Screen Tab Section FieldK12.SpecialEd.AZ.IEP
Lre Elemsec*
List of Least RestrictiveEnvironment options forElementary and Secondarystudents
NOTE: This Lookup Tablesmust be completed to validatedocuments and to havecorrect state reporting.
IEP LRE Elementary and Secondary LRE Elementary andSecondaryOptions
LrePreschool
List of Least RestrictiveEnvironment options forPreschool students
NOTE: This Lookup Tablesmust be completed to validatedocuments and to havecorrect state reporting.
IEP LRE Preschool LRE PreschoolOptions
Edupoint Proprietary and Confidential

Administrator Guide for MissouriChapter 3: Lookup Table Definition 47
Lookup Table Purpose Screen Tab Section FieldK12.SpecialEd.IEP
Sped Service
Lists the exit reason.Populates the Special EdStudent Services screen if theState CodesmatchK12.SpecialEd.Exit Reason
Special Education Service Special EducationService Service Dates State Reporting Code
Lookup Table Purpose Screen Tab Section FieldK12.SpecialEd.Medicaid
Doctor Title The doctors title or location.For example, Dr. or Office.
Doctor Doctor N/A Title
Provider Type Specialty of theMedicaidprovider. For example,Licensed Audiologist.
Medicaid Service Service N/A Provider Type
AdminMedicaid Provider Provider N/A Type
Service Unit Time intervals for Medicaidservices
Medicaid Service Service N/A Unit
Copyright 2016-2017 Edupoint Educational Systems, LLC

48 Administrator Guide for MissouriChapter 3: Lookup Table Definition
K12.Grade
Enter theAlt Code 3 value shown:l Less than Kindergarten – UsePSl Kindergarten – UseKGl Ungraded Elementary – UseUEl Ungraded Secondary – UseUS
l Do not use leading zeros inAlt Code 3 code.l The listed values are the only permissible values.
Lookup Table Definition Screen
K12.SpecialEd.Disability Code
Enter theAlt Code 3 values.
l Enter LI for Language Impairment.l Enter SI for Speech Impairment.l Enter SLD for Specific Learning Disability.
Edupoint Proprietary and Confidential

Chapter 4:Users
Special Ed Roles 50Special Ed User Setup 51Staff Setup 53PAD Security 54Manual Process Move Setup 57

50 Administrator Guide for MissouriChapter 4: Users
Special Ed RolesSpecial Ed User Roles are assigned to staff records and display in the student’s Team List andSynergy SE documents that display the Special Ed Team List. Role Names are configured using theRole screen.
Role Setup
SynergySE Role Screen
1. Navigate toSynergy SE > System > Special Education > Role. The Role screendisplays.
l To view all current roles, clickFind. The Find Result screen displays. Double-click arole in the Find Result screen to view the role.
l To add a role, clickAdd.l To edit a role, find and select a role.
Do not delete or inactivate the CaseManager or Reader Roletypes.
l To delete a role:
a. Find and select a role.b. ClickDelete. A confirmation dialog displays.c. ClickYes.
No further action required.
l Tomake a role inactive:
a. Find and select a role.b. Select Inactive.c. ClickSave. The Inactive Date displays the date the role was inactivated.
No further action required.
Edupoint Proprietary and Confidential

Administrator Guide for MissouriChapter 4: Users 51
2. Define or edit the role:
a. Enter the Role Name.b. Enter theRole Type using all capital letters with underlines instead of spaces. For
example, FULL_INCLUSION_SPECIALIST.c. (Optional) Enter aView Order to have a role display in a specific order.d. (Optional) Select the process toValidate Role In.
Special Ed User Setup
Security Settings
1. Navigate toSynergy SE > System > User > User.2. Select theSecurity Settings tab.3. Set the Special Education settings:
a. Select if the user isExempt From Student Team.
l No – The user can only view and access students where the user is a teammember.
l Yes – The user can access all students at schools they have access regardless ofwhether they are amember of the student's team.
b. Select if the user is aSystemwide Case Manager.
4. ClickSave.
For SystemAdministrators, selectShow BO On Mouseover toensure that the user can locate BusinessObjects when searchingfor system property tables. See UsingMouseover.
Data Entry Options
When two users are entering data for a student in the same field and the first user saves the data,the second user receives the following error and their entry is deleted:
2147 – Another user has already changed the same data you just tried to change. Please re-enteryour changes.
A setting on the SystemConfiguration screen allows users to copy changes already entered insteadof recreating the change.
Copyright 2016-2017 Edupoint Educational Systems, LLC

52 Administrator Guide for MissouriChapter 4: Users
To avoid users having to recreate the deleted data:
1. Identify the namespace.
a. Navigate to the screen that allows you to copy changes.b. Click theAbout icon for the screen.
Student Screen
c. Identify the Name.
AboutWindow
d. Close the window.
2. Navigate toSynergy SIS > System > Setup > System Configuration.3. Enter the namespaces for the screens under Data EntryOptions that allow users to copy
changes before having to clickUndo andRefresh .
SystemConfiguration Screen
l End a partial namespace with * to use all screens that startwith the partial namespace.
l Use commas to separatemultiple namespaces.
4. ClickSave.
Edupoint Proprietary and Confidential

Administrator Guide for MissouriChapter 4: Users 53
Staff Setup
Staff Screen
1. Navigate toSynergy SE > Staff > Staff.2. Select theSpecialEd tab.3. SelectRole options that apply to the staff member. Check all that apply. The Role displays
along with the staff member's namewhen they are assign to a student's team.
TheOther Info and Services Provided sections are not used.
Copyright 2016-2017 Edupoint Educational Systems, LLC

54 Administrator Guide for MissouriChapter 4: Users
PAD SecurityUse the PAD Security screen to change whether users can see various buttons and tabs on thescreens.
l Group Access tab – Allows configuration of document tabs and buttons for user groups.l User Access tab – Allows configuration of document tabs and buttons for specific users
Security on Buttons and Tabs
The various buttons can be hidden from view for user groups and/or specific users. The buttonsinclude Finalize, Print Preview, and theRefresh from....
Student IEPScreen
Edupoint Proprietary and Confidential

Administrator Guide for MissouriChapter 4: Users 55
You can hide tabs from view using the samemethod.
1. Navigate toSynergy SE > System > Security > PAD Security.2. Navigate toSynergy SE > Non PAD > NTL > Documents.
a. Select the document name. The security grid displays on the right.b. Select the row that contains the User Group Name on theGroup Access tab or find
and select the user on theUser Access tab.c. ClickShow Detail to display the document properties.
l The Type column indicates the property such as Tab or Button.l The Tab Name indicates the location of the property.
d. Select the type ofAccess the group or user should have.e. ClickSave.
PAD SecurityScreen
Copyright 2016-2017 Edupoint Educational Systems, LLC

56 Administrator Guide for MissouriChapter 4: Users
3. Navigate toSynergy SE > Non PAD > Find Object > Find Results.a. Select the row that contains the User Group Name on theGroup Access tab or find
and select the user on theUser Access tab.b. ClickShow Detail to display the document properties.c. Select the type ofAccess the group or user should have.d. ClickSave.
PAD SecurityScreen
Edupoint Proprietary and Confidential

Administrator Guide for MissouriChapter 4: Users 57
Manual Process Move SetupTheManual ProcessMove feature located on theProcess Docs tab of the Student Screen allowsthe user to move the student to any processwithin Synergy SE. The district maywant to limit whichusers canmanuallymove students to another process.
Student IEPScreen, ProcessDocsTab
l For moving students in IEP/IDEA�
l For moving students in 504�To hide the drop-downs and the buttons:
1. Navigate toSynergy SE > System > Security > Security Definition.2. Navigate toK12 > SpecialEd > AZ > StudentUI.
Copyright 2016-2017 Edupoint Educational Systems, LLC

58 Administrator Guide for MissouriChapter 4: Users
3. Select theGroup Property Access tab.a. SetUpdate toNone for the Public user for the following PropertyNames:
l MoveConfirmationl ProcessLookupl ProcessName
SecurityDefinition Screen, Group PropertyAccess
b. SetUpdate toUpdate for the User Group Names that are allowed tomove students.c. ClickSave.
4. Navigate toSynergy SE > System > Security > PAD Security.5. Navigate toSynergy SE > Student > Student.
Edupoint Proprietary and Confidential

Administrator Guide for MissouriChapter 4: Users 59
6. Select the document name. The security grid displays on the right.
a. ClickShow Detail.b. Set theAccess toNo for Public users for the following Tab Names:
l ...Exit Process (Button)l ...Move (Button)
PAD SecurityScreen
c. SetAccess toYes for User Group Names that are allowed tomove students.
7. ClickSave.
Copyright 2016-2017 Edupoint Educational Systems, LLC

Chapter 5:Security
Security Overview 61Security Definition 62

Administrator Guide for MissouriChapter 5: Security 61
Security OverviewThe PAD Security (Synergy SIS > System > Security > PAD Security) and the SecurityDefinition screen (Synergy SIS > System > Security > Security Definition) define security foreach of the screens discussed in this guide. This chapter outlines the security location for each of thescreenswithin Security Definition.
While the Security Definition screen contains report security options,Edupoint recommends that users only secure reports through PADSecurity.
For more details regarding security definitions, see theSynergy SIS –Security Administrator Guide.
Copyright 2016-2017 Edupoint Educational Systems, LLC

62 Administrator Guide for MissouriChapter 5: Security
Security DefinitionScreen PAD Location Tab Grid/Pop-Out
ScreenField Security Node
Student Student All All See Security on StudentDemographics K12.Student
IEP N/A N/A N/A
Delete button at top ofscreen. See RemoveDelete Button from theIEP.
K12.SpecialEd.IEP.IEPInfo
All ProcessDocuments N/A N/A N/A
Delete button at top ofscreen. See RemoveDelete Button from AllProcessDocuments.
K12.SpecialEd.Document.StudentDocument
Delete column. SeeRemove Delete ColumnfromAll ProcessDocuments.
K12.SpecialEd.Document.DocumentGridProcess
Student DocumentUnlock Synergy SE > NTL Documents All
All. See Security forUnlocking StudentDocuments, HidingIgnore Validation, andDisabling HistoricalDocument Validation
K12.SpecialED.Document.StudentDocumenUnlockGrid
IgnoreValidation. SeeHiding Ignore Validation,and Disabling HistoricalDocument Validation
K12.SpecialEd.Document.StudentDocumentUnlockGrid
K12.SpecialEd.Document.IEPUnlockGrid
Edupoint Proprietary and Confidential

Administrator Guide for MissouriChapter 5: Security 63
Security on Student Demographics
As a rule, no User Group or User should be able tomodify thedemographics in SE Student. Most districts prefer to only allowadministrators on the Synergy SIS side tomodify the studentdemographics.
1. Navigate toSynergy SE > System > Security > Security Definition.2. Navigate toK12 > Student.3. Set the Public security (this should include Special Education roles) to:
l Update –Viewl Add –Nol Delete –No
4. Set Synergy SIS principal roles to:
l Update –Yesl Add –Yesl Delete –No
5. Set Synergy SIS administrators and registrars to:
l Update –Updatel Add –Yesl Delete –Yes
SecurityDefinition Screen
Copyright 2016-2017 Edupoint Educational Systems, LLC

64 Administrator Guide for MissouriChapter 5: Security
Security on Delete Functions
You can hide theDelete button and columns from specific user groups.
When taking away access privilege for Public (All Groups) be sure toreassignYes access to the SystemAdministrator Role.
Remove Delete Button from the IEP
1. Locate the IEP in Security Definitions K12 > SpecialEd > IEP > IEPInfo.l To allow only specific user groups to see theDelete button:
a. SelectNo in theDelete column in the Public row.b. SelectYes in theDelete column for the User Group Names that should have
access.
l To allow most user groups to see theDelete button, but only a few groups to not seethe button:
a. SelectYes in theDelete column in the Public row.b. SelectNo in theDelete column for the User Group Names that should not have
access.
2. ClickSave.
SecurityDefinition Screen
Edupoint Proprietary and Confidential

Administrator Guide for MissouriChapter 5: Security 65
Remove Delete Button from All Process Documents
1. Locate the Student Document in Security DefinitionsK12 > SpecialEd > Document >StudentDocument.
l To allow only specific user groups to see theDelete button:a. SelectNo in theDelete column in the Public row.b. SelectYes in theDelete column for the User Group Names that should have
access.
l To allow most user groups to see theDelete button, but only a few groups to not seethe button:
a. SelectYes in theDelete column in the Public row.b. SelectNo f in theDelete column for the User Group Names that should not have
access.
2. ClickSave.
Copyright 2016-2017 Edupoint Educational Systems, LLC

66 Administrator Guide for MissouriChapter 5: Security
Remove Delete Column from All Process Documents
1. Locate the DocumentGridProcess in Security DefinitionsK12 > SpecialEd >Document >DocumentGridProcess.
l To allow only specific user groups to see the Delete button:
a. SelectNo in theDelete column in the Public row.b. SelectYes in theDelete column for the User Group Names that should have
access.
l To allow most user groups to see the Delete button, but only a few groups to not seethe button:
a. SelectYes in theDelete column in the Public row.b. SelectNo in theDelete column for the User Group Names that should not have
access.
2. ClickSave.
Security for Unlocking Student Documents
Use the Security Definition screen to set which usersmay unlock a student's documents.
1. LocateK12 > SpecialED > Document > StudentDocumenUnlockGrid.2. SelectNo in theUpdate column for Public.3. SelectYes in theUpdate column for all User Group Names that should be able to unlock a
student's documents.
SecurityDefinition Screen
Hiding Ignore Validation
1. Navigate toK12 > SpecialEd > Document > StudentDocumentUnlockGrid.2. Select the Group Property Access tab.
Edupoint Proprietary and Confidential

Administrator Guide for MissouriChapter 5: Security 67
3. Hide the Ignore Validation columns from the UnlockDocuments grid:
a. ClickShow Detail.b. Select the desired option from the IsIgnoreValidation drop-down.c. ClickSave.
Set toNone to hide the column.
SecurityDefinition Screen
4. Navigate to K12 > SpecialEd > Document > IEPUnlockGrid.5. Select the Group Property Access tab.
Copyright 2016-2017 Edupoint Educational Systems, LLC

68 Administrator Guide for MissouriChapter 5: Security
6. Hide the Ignore Validation column on the Unlock IEP grid:
a. ClickShow Detail.b. Select the desired option from the IsIgnoreValidation drop-down.c. ClickSave.
Set toNone to hide the column.
SecurityDefinition Screen
Edupoint Proprietary and Confidential

Chapter 6:Synergy SE Processes
Synergy SE Processes 70Working with Processes 71Working with Process Documents 78Defining Timeline Reports 81
70 Administrator Guide for MissouriChapter 6: Synergy SE Processes
Synergy SE ProcessesSynergy SE contains special education processes in which special education students reside. Eachprocess contains documents specific to that process. Use this chapter to modify the processes andthe documents within the processes, to fit the district's unique needs.
Examples of processes are:
l Referrall Initial Evaluationl Annual Reviewl Reevaluationl Transfer
l Preschooll Early Childhoodl Private Schooll 504
Each process contains process documents that coincide with the basic steps of that process.Documents can either be listed in a process or in the AdHoc documents.
To use the same document in both a process and in Ad Hoc, use a copy ofthe document with a differentDocument name.
The processes are developed based on the district preference. Districts have the ability to hide(inactivate) any processwithin the application (for example, the Preschool process), as well as addor hide a document within any process.
Timelinesmay be assigned to any process. Recalculation of timelines occur when:
l The Timeline tab is opened on the SE Student screen.l Recalculate All Students is press in the Process Setup screen, Timeline tab.l Recalculate All Students is pressed in the BusinessCalendar screen.
Eligibility, IEP, and Triennial Reevaluation are events that always appearon the timeline.
Edupoint Proprietary and Confidential

Administrator Guide for MissouriChapter 6: Synergy SE Processes 71
Working with Processes
Defining the Process
1. Navigate toSynergy SE > System > Setup > Process Setup. The Process Setup screendisplayswith thePortfolio Process tab.
l To add a process, selectAdd Process to 'Processes and Associated Documents' fromtheActions menu. The Process screen displays.
ProcessSetup Screen
l To edit a process, select the process. The process definition displays on the right.
ProcessSetup Screen
l To delete a process:
a. Right-click on the process name and selectDelete "Process".b. ClickOK to the confirmation dialog.
No further action required.
ProcessSetup Screen
Copyright 2016-2017 Edupoint Educational Systems, LLC

72 Administrator Guide for MissouriChapter 6: Synergy SE Processes
2. Define the process:
l Process Name – Allows the name of the process to be customized.l Inactive Process – Select to deactivate the process.
l The inactive process still displays in Process Setupl The inactive process does not display in any drop-downs.l A process cannot bemade inactive if a student exists in the process. Remove allstudents from the process prior to deactivation of the process.
l Process Typel SelectSPED Process to display special education drop-downs.l Select 504 Process to display 504 drop-downs.
l View Order – Enter a number to sort the processes in the Portfolio screen.l Allow Concurrent with SpEd – Select to display the 504 Docs tab at the same timeas theSpEd Docs tab.
Only used by districts selectingOption APS in NTL Setup.
l This option is disabled if Process Type is not 504 Processl This option allows students to be in both a SPED process and 504 process at thesame time
l This option allows student to move between SPED and 504 processesl This option adds the following functionality to the Team tab of the SE Studentscreen:
l If student is in SpEd Process and later added to new 504 Process, addsthe 504 school team to the student. The existing staff members do notduplicate.
l If student is in 504 Process and later added to new SpEd process, addsthe SpEd school team to the student. The existing staff members do notduplicate.
l If student is in SpEd Process and removed from 504 process, all staffremains on the Team tab.
l If student is in 504 Process and removed fromSpEd process, all staffremains on the Team tab.
l This option adds the following validationswhenmoving students betweenprocesseswhen theAllow Concurrent with SpEd option is not enabled for theprocess:
l 4405 – Cannot move student to new SPED Process because 504Process doesn't allow concurrent with SPED process.
l 4406 – Cannot move student to new 504 Process because new 504Process doesn't allow concurrent with SPED process
Edupoint Proprietary and Confidential

Administrator Guide for MissouriChapter 6: Synergy SE Processes 73
l Allow Manual Movement with draft IEP – Select to allow teammembers tomanuallymove a student who has a draft IEP to another process.
l Is Initial Process – Select to apply initial process rules to the process.l Is Reeval Process – Select to apply reevaluation process rules to the process.l Is Admin – Not used bymost districts.
ProcessDefinition Screen
3. Skip the Next ProcessOptions. Not used bymost districts.
ProcessDefinition Screen
Copyright 2016-2017 Edupoint Educational Systems, LLC
74 Administrator Guide for MissouriChapter 6: Synergy SE Processes
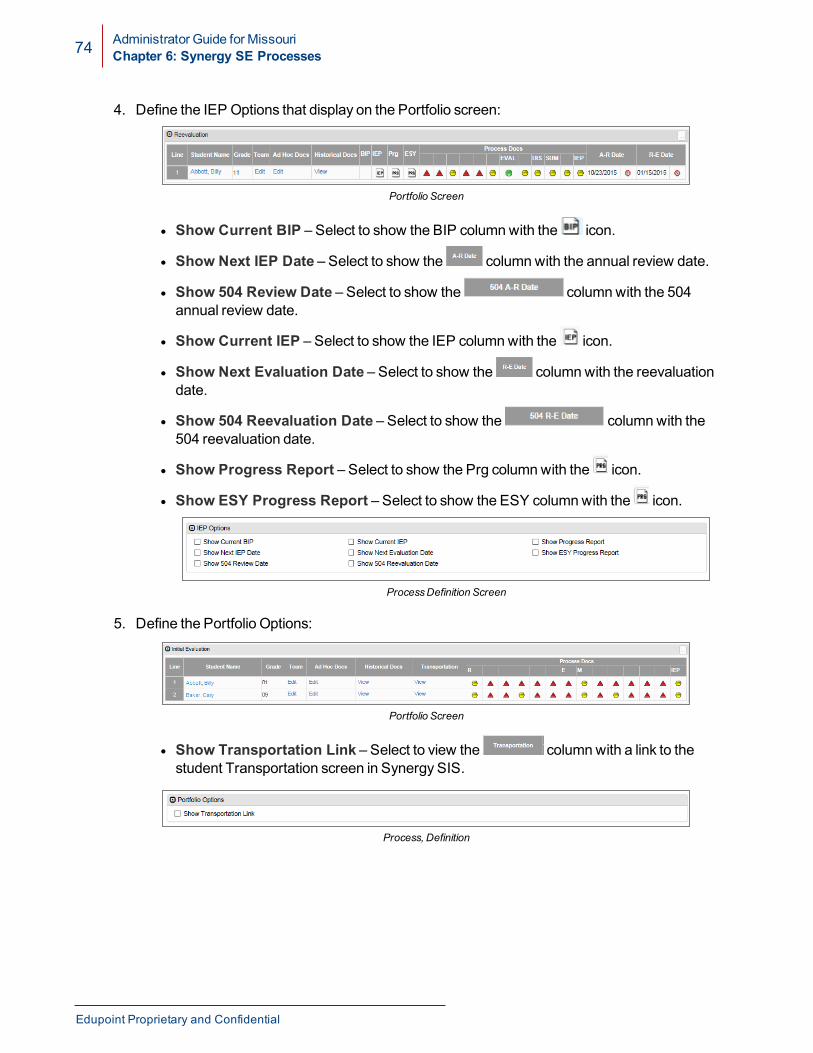
4. Define the IEP Options that display on the Portfolio screen:
Portfolio Screen
l Show Current BIP – Select to show the BIP columnwith the icon.
l Show Next IEP Date – Select to show the columnwith the annual review date.
l Show 504 Review Date – Select to show the columnwith the 504annual review date.
l Show Current IEP – Select to show the IEP columnwith the icon.
l Show Next Evaluation Date – Select to show the columnwith the reevaluationdate.
l Show 504 Reevaluation Date – Select to show the columnwith the504 reevaluation date.
l Show Progress Report – Select to show the Prg columnwith the icon.
l Show ESY Progress Report – Select to show the ESY columnwith the icon.
ProcessDefinition Screen
5. Define the Portfolio Options:
Portfolio Screen
l Show Transportation Link – Select to view the columnwith a link to thestudent Transportation screen in Synergy SIS.
Process, Definition
Edupoint Proprietary and Confidential

Administrator Guide for MissouriChapter 6: Synergy SE Processes 75
6. Define Automatic ProcessMovement to allow a student to automatically out of the process ata specific interval before their next reevaluation. Any finalized documentsmove toHistoricalDocuments tab and any open AdHoc documents remain in the current processwhen thestudent ismoved to the new process.
ProcessDefinition
l Move to Process – Select the process tomove the student to.l Calendar Days Before Triennial Reevaluation Date – Enter the number ofcalendar days (0-365) before the next reevaluation date when the student will move tothe next process.
This setup requires that the APM01Report inSynergy SE >Student > Reports be scheduled to run nightly to activatethe Automatic ProcessMovement.
7. Define the ProcessDocuments that belong in process.8. Select theDelete invalid Process timeline definitions option to remove any invalid
timelineswhen changes aremade to Process Timelines.9. ClickSave.
Assigning a Timeline to a Process
1. Select theProcess Timeline tab.2. Define the process timeline:
l Document Decides Eligibility – Select an evaluation report document as listed in theProcessDocuments.
l Use Document Copy – Select whether the timeline is calculated from a draft orfinalized document using the drop-down.
l Recalculate Students – Click to recalculate the timeline for all students. When adocument is finalized, that student's timeline is recalculates.
l Process Documents – Set timeline definitions for documents.l Timeline Review – Displays a summary of the timeline settings.
Copyright 2016-2017 Edupoint Educational Systems, LLC

76 Administrator Guide for MissouriChapter 6: Synergy SE Processes
3. ClickShow Detail to create or edit the timeline definitions for ProcessDocuments.
ProcessDefinition, ProcessTimeline Tab
l Timeline Name – Title seen when running Timeline Reports and viewing Timelinestatus in the SE Student Timeline screen.
l This document meets requirement with – Determineswhether the timelinecalculates fromDraft or Finalized versions.
l Timeline Date Type – Select whether to use the Prior document or the Referraldocument as the date to use in the calculations. The Prior document is the defaultoption if nothing is selected.
l Calculation is Inclusive of Start and End Date – Select to have the start and enddates of the timeline included in the calculations.
Edupoint Proprietary and Confidential

Administrator Guide for MissouriChapter 6: Synergy SE Processes 77
l Prior Document:
l Prior Document – Select the document that starts the timeline.l Use Document Copy – Select if the draft or final copy of the document startsthe timeline.
l TheView Order in the ProcessDocuments gridis used to enforce the rule that only allowsdocuments to link to a Prior Document with alower view order.
l If view order is changed for one ProcessDocument, the Prior Document rule is erased forall document processes that point to a documentwith higher view order.
l If the document that decides eligibility is deleted,the timeline definitions are removed.
A prompt displays to selectDelete invalid ProcessTimeline definitions on thePortfolio Process tab if achange ismade that causes a timeline to change.
l DueDate:
l Days – Enter the number of days that this document will be due from theselected Prior Document.
l Type – Select the type of day:l Calendar Days – Calculate using a regular calendar year that includesSunday through Saturday.
l Business Calendar Days – Calculate using the calendar set up inSynergy SE > System > Setup > Business Calendar.
l School Calendar and Business Calendar – Calculate using the SchoolCalendar. If the Timeline runs into next year and the School Calendar hasnot been setup, the timeline defaults to the BusinessCalendar.
l Next IEP / Next Evaluation – Use tomake the Next IEP or Next Evaluation datedependent on the timeline of this document.
l Days – Enter the number of days to use in the calculationl Calculation Type – Select if days isAfter or Beforel Type – Select the type of day.l Event – Select if the event is theNext IEP orNext Evaluation.
Copyright 2016-2017 Edupoint Educational Systems, LLC

78 Administrator Guide for MissouriChapter 6: Synergy SE Processes
l Pre School Age – Enter the age for preschool students that is used to calculate thetimeline.
This setting overrides the timeline setup for preschoolstudents. The student's age is used in the calculationswhenthe student reaches this age before the next due date.
4. ClickSave.5. ClickHide Detail.
Working with Process Documents1. Navigate to a process:
l To add a document, clickAdd in the ProcessDocuments grid or selectAddDocumentsto ... from theActions menu. The ProcessDocument screen displays.
ProcessDefinition Screen
l To edit a document:
a. Use to locate an existing document in the process.b. Select the document. It displays on the right side of the screen.
ProcessSetup Screen, IEP ProcessesTab
Edupoint Proprietary and Confidential

Administrator Guide for MissouriChapter 6: Synergy SE Processes 79
TheView Order andShort Titlemay be edited in theProcessDocuments section of the Process.
l To delete a document:
a. Click the box in theX column.b. ClickSave.
ProcessSetup Screen, IEP ProcessesTab
2. Enter or modify the document details.
When creating an IEP document, only theView Order and IEPOptionsmust be completed.
ProcessDocument Screen
l Document Definition – Select a document. Only documents that are not identified asa AdHocDocument display in the drop-down. If the document is an IEP, see SpecialIEP Type.
l View Order – Enter the number to have the document display in a specific order.l Short Title – Enter to display a short title over the ProcessDocs column.
Portfolio Screen
l Document required to finalize IEP – Select to require that this document be finalizedbefore finalizing the IEP.
Copyright 2016-2017 Edupoint Educational Systems, LLC

80 Administrator Guide for MissouriChapter 6: Synergy SE Processes
l Document required to finalize Amendment IEP – Select to require that thisdocument be finalized before finalizing an amended IEP.
3. (For IEP documents only) Complete the IEP Options and ProcessMovement sections.
l IEP Options:
l Clicking the icon in Portfolio launches the IEP – Select to allow the IEP beopened from the Portfolio screen.
l Include Parent Statement in the IEP – Select to include theParentStatement tab in the IEP.
l Auto-create new IEP on finalize
l Do not select to have display for a draft IEP after the IEP is finalized.
l Select to have display after the IEP is finalized. No draft IEP is created.
l Special IEP Type – Select the type of IEP.l IEP Report Title – Enter the name of the IEP that displays on the IEP screenand printed IEP.
l Clicking the icon in the Portfolio brings up a list of child documents –Select to have the Document List screen display for eligibility documents.
Document List Screen
Edupoint Proprietary and Confidential

Administrator Guide for MissouriChapter 6: Synergy SE Processes 81
l ProcessMovement:Annual Processl Annual Process – Select from the drop-down.l Reeval Process – Select from the drop-down.l Reeval Look Ahead Months – Enter the number of months that if the AnnualReview and Reevaluation are due within that amount of time, the student ismoved to Reeval Process and not the Annual Process.
ProcessDocument Screen
4. ClickSave.
Defining Timeline Reports
Creating Email Content
Create email content to use the EMAIL options in the Synergy SE Student reports that reportoverdue evaluations, events, and IEPs:
l EMAIL-EVAL – Triennial reevaluation due datesl EMAIL-EVENT – All timeline events selected by userl EMAIL-IEP – IEP Due Datesl EMAIL-OVER – All overdue timeline events, including eligibility, IEP, triennial reevaluations.
See theSynergy SIS User Guide for more information on using thesereports.
Create HTML Versions of the Emails
1. Copy the text in the following sections in to a text editor such asNotepad.2. Save as a .txt file.
Copyright 2016-2017 Edupoint Educational Systems, LLC
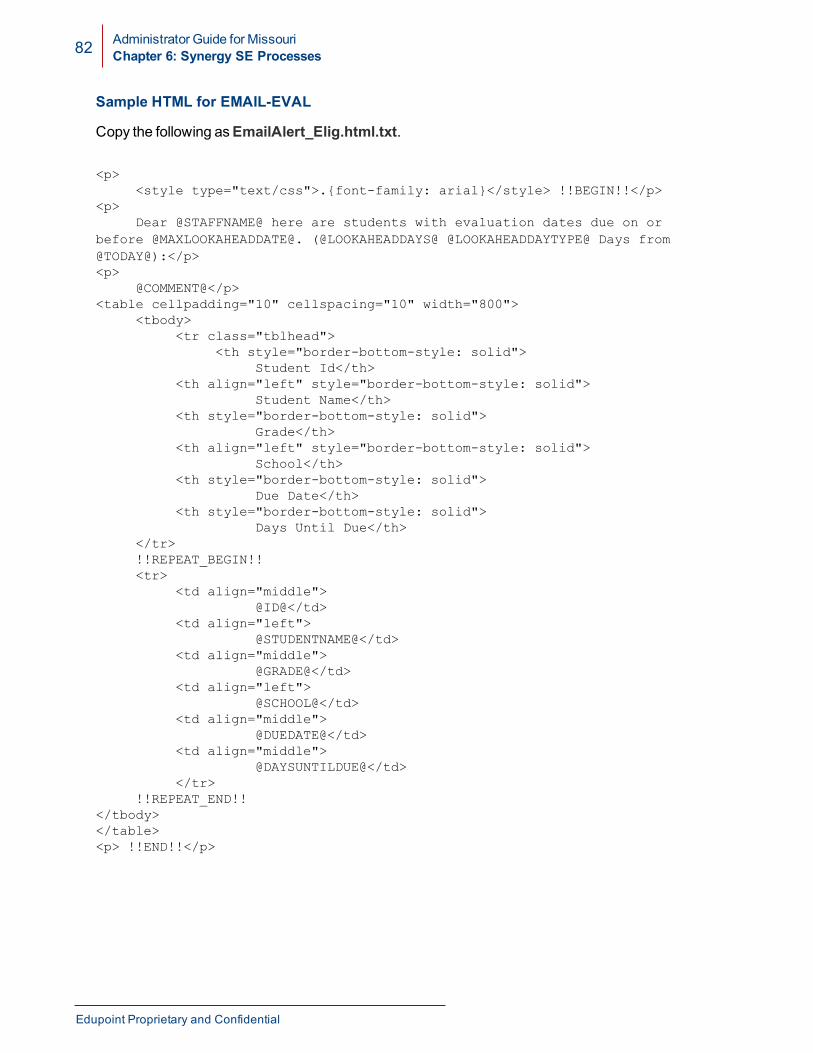
82 Administrator Guide for MissouriChapter 6: Synergy SE Processes
Sample HTML for EMAIL-EVAL
Copy the following asEmailAlert_Elig.html.txt.
<p> <style type="text/css">.{font-family: arial}</style> !!BEGIN!!</p><p> Dear @STAFFNAME@ here are students with evaluation dates due on orbefore @MAXLOOKAHEADDATE@. (@LOOKAHEADDAYS@ @LOOKAHEADDAYTYPE@ Days from@TODAY@):</p><p> @COMMENT@</p><table cellpadding="10" cellspacing="10" width="800"> <tbody> <tr class="tblhead"> <th style="border-bottom-style: solid"> Student Id</th> <th align="left" style="border-bottom-style: solid"> Student Name</th> <th style="border-bottom-style: solid"> Grade</th> <th align="left" style="border-bottom-style: solid"> School</th> <th style="border-bottom-style: solid"> Due Date</th> <th style="border-bottom-style: solid"> Days Until Due</th> </tr> !!REPEAT_BEGIN!! <tr> <td align="middle"> @ID@</td> <td align="left"> @STUDENTNAME@</td> <td align="middle"> @GRADE@</td> <td align="left"> @SCHOOL@</td> <td align="middle"> @DUEDATE@</td> <td align="middle"> @DAYSUNTILDUE@</td> </tr> !!REPEAT_END!!</tbody></table><p> !!END!!</p>
Edupoint Proprietary and Confidential
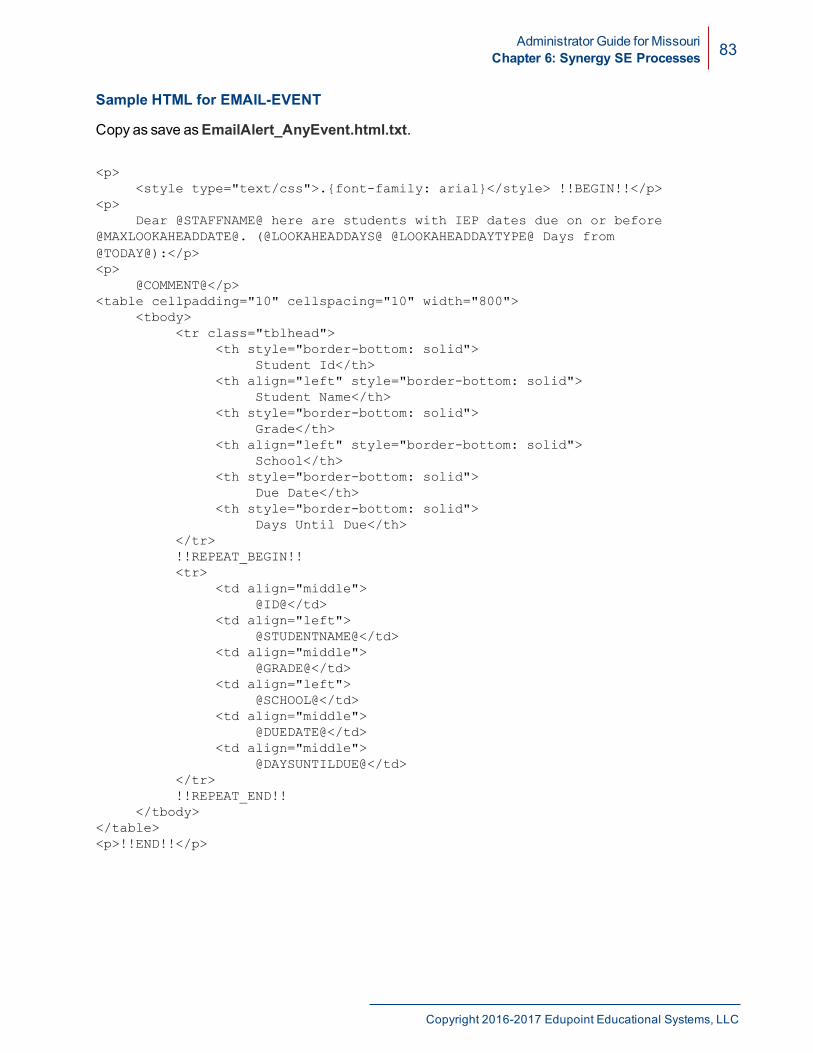
Administrator Guide for MissouriChapter 6: Synergy SE Processes 83
Sample HTML for EMAIL-EVENT
Copy as save asEmailAlert_AnyEvent.html.txt.
<p> <style type="text/css">.{font-family: arial}</style> !!BEGIN!!</p><p> Dear @STAFFNAME@ here are students with IEP dates due on or before@MAXLOOKAHEADDATE@. (@LOOKAHEADDAYS@ @LOOKAHEADDAYTYPE@ Days from@TODAY@):</p><p> @COMMENT@</p><table cellpadding="10" cellspacing="10" width="800"> <tbody> <tr class="tblhead"> <th style="border-bottom: solid"> Student Id</th> <th align="left" style="border-bottom: solid"> Student Name</th> <th style="border-bottom: solid"> Grade</th> <th align="left" style="border-bottom: solid"> School</th> <th style="border-bottom: solid"> Due Date</th> <th style="border-bottom: solid"> Days Until Due</th> </tr> !!REPEAT_BEGIN!! <tr> <td align="middle"> @ID@</td> <td align="left"> @STUDENTNAME@</td> <td align="middle"> @GRADE@</td> <td align="left"> @SCHOOL@</td> <td align="middle"> @DUEDATE@</td> <td align="middle"> @DAYSUNTILDUE@</td> </tr> !!REPEAT_END!! </tbody></table><p>!!END!!</p>
Copyright 2016-2017 Edupoint Educational Systems, LLC

84 Administrator Guide for MissouriChapter 6: Synergy SE Processes
Sample HTML for EMAIL-IEP
Copy the following asEmailAlert_IEP.html.txt.
<p> <style type="text/css">.{font-family: arial}</style> !!BEGIN!!</p><p> Dear @STAFFNAME@ here are students with IEP dates due on or before@MAXLOOKAHEADDATE@. (@LOOKAHEADDAYS@ @LOOKAHEADDAYTYPE@ Days from@TODAY@):</p><p>@COMMENT@</p><table cellpadding="10" cellspacing="10" width="800"> <tbody> <tr class="tblhead"> <th style="border-bottom: solid"> Student Id</th> <th align="left" style="border-bottom: solid"> Student Name</th> <th style="border-bottom: solid"> Grade</th> <th align="left" style="border-bottom: solid"> School</th> <th style="border-bottom: solid"> Due Date</th> <th style="border-bottom: solid"> Days Until Due</th> </tr> !!REPEAT_BEGIN!! <tr> <td align="middle"> @ID@</td> <td align="left"> @STUDENTNAME@</td> <td align="middle"> @GRADE@</td> <td align="left"> @SCHOOL@</td> <td align="middle"> @DUEDATE@</td> <td align="middle"> @DAYSUNTILDUE@</td>
</tr> !!REPEAT_END!! </tbody></table><p>!!END!!</p>
Edupoint Proprietary and Confidential

Administrator Guide for MissouriChapter 6: Synergy SE Processes 85
Sample HTML for EMAIL-OVER
Copy and save asEmailAlert_AllOverdue.html.txt.
<p> <style type="text/css">.{font-family: arial}</style> !!BEGIN!!</p><p> Dear @STAFFNAME@ here are students with due dates of @TODAY@ or earlier.(Days calculated are in @LOOKAHEADDAYTYPE@ Days):</p><p> @COMMENT@</p><table cellpadding="10" cellspacing="10" width="800"> <tbody> <tr class="tblhead"> <th style="border-bottom: solid"> Student Id</th> <th align="left" style="border-bottom: solid"> Student Name</th> <th style="border-bottom: solid"> Grade</th> <th align="left" style="border-bottom: solid"> School</th> <th style="border-bottom: solid"> Event</th> <th style="border-bottom: solid"> Overdue Days</th> </tr> !!REPEAT_BEGIN!! <tr> <td align="middle"> @ID@</td> <td align="left"> @STUDENTNAME@</td> <td align="middle"> @GRADE@</td> <td align="left"> @SCHOOL@</td> <td align="middle"> @EVENT@</td> <td align="middle"> @OVERDUEDAYS@</td> </tr> !!REPEAT_END!! </tbody></table><p>!!END!!</p>
Copyright 2016-2017 Edupoint Educational Systems, LLC
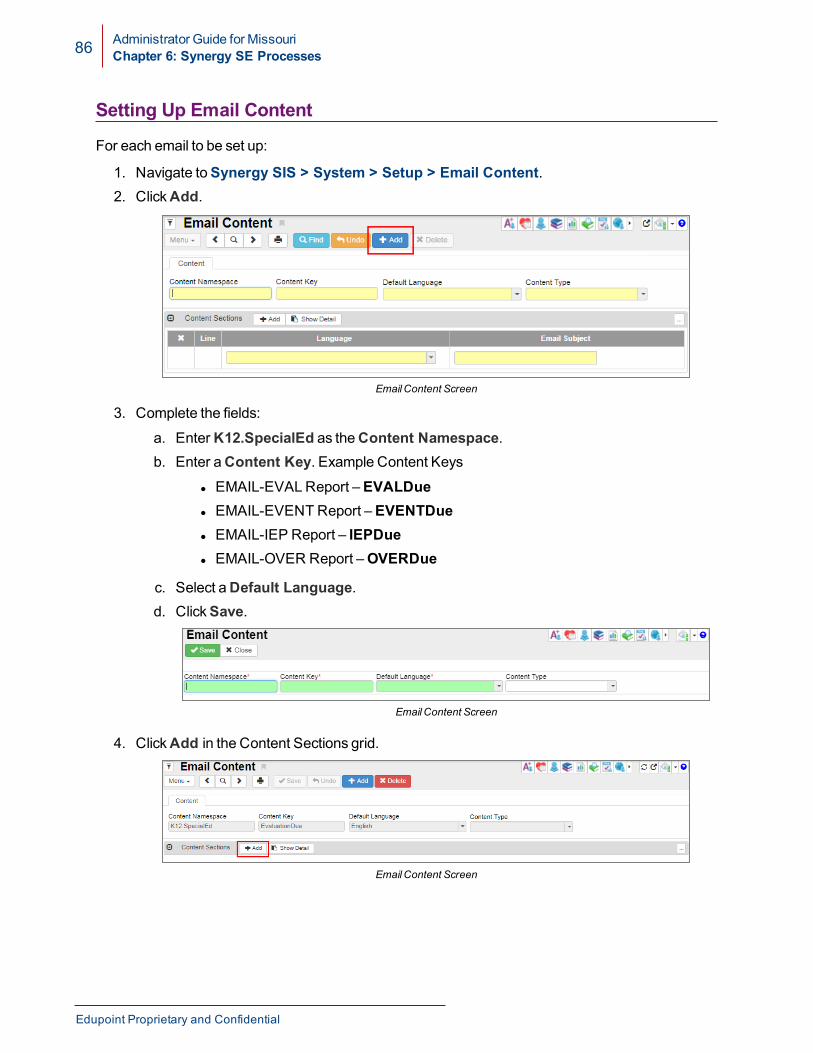
86 Administrator Guide for MissouriChapter 6: Synergy SE Processes
Setting Up Email Content
For each email to be set up:
1. Navigate toSynergy SIS > System > Setup > Email Content.2. ClickAdd.
EmailContent Screen
3. Complete the fields:
a. EnterK12.SpecialEd as theContent Namespace.b. Enter aContent Key. Example Content Keys
l EMAIL-EVALReport –EVALDuel EMAIL-EVENT Report –EVENTDuel EMAIL-IEP Report – IEPDuel EMAIL-OVER Report –OVERDue
c. Select aDefault Language.d. ClickSave.
EmailContent Screen
4. ClickAdd in the Content Sections grid.
EmailContent Screen
Edupoint Proprietary and Confidential

Administrator Guide for MissouriChapter 6: Synergy SE Processes 87
5. Complete the fields.
a. Select the Language.b. Enter theEmail Subject.c. ClickSave.
EmailContent Detail Screen
6. ClickShow Detail for the line that was added.a. ClickAttach HTML Content.
EmailContent Screen, Content SectionsDetail
Copyright 2016-2017 Edupoint Educational Systems, LLC

88 Administrator Guide for MissouriChapter 6: Synergy SE Processes
b. Upload the text file that was saved previously. The content of the text file displays inEmail Content.
EmailContent Screen
Assigning Email Content to Timeline Report Type
1. Navigate toSynergy SE > System > Special Education > Timeline Report Definition.All email content that begins with the NamespaceK12.SpecialEd appear in the grid.
Timeline Report Definition Screen
2. Select theReport Type for each Email Content Name.
Leave blank if not using the email content.
Edupoint Proprietary and Confidential

Chapter 7:Document Configuration
Introduction 91Document List 91Form Specific Modifications 93Special Education Documents 93504 Documents 109
Using Mouseover 110Finding the Name of the Business Object 110
Using Auto Populate 113Using Property Override 114Document Definition 116Searching for a Document Definition 116Document Definition Tab 117Special Flag Descriptions 122Validation Rule Tab 131Eligibility Determination Tab 132Print Only Tab 134Prior Written Notice Tab 138
Print Only PDF Documents 140User Defined Documents 141Components 141Document Definition 143Example UD Document 150
Translation of Documents 155Translation Process Overview 155Setup to Translate Text Boxes 155

Translation Screen 156Translating a Document 156Generating a List of Translated Documents 160
Disabling Historical Document Validation 161Unlocking a Student Document 163Enabling a Document to be Unlocked 163Unlocking a Document 163
Recovering a Student IEP or Progress Report 165Transferring IEPs Using ESR 166Responding to an IEP ESR Request 166Receiving an ESR IEP 167
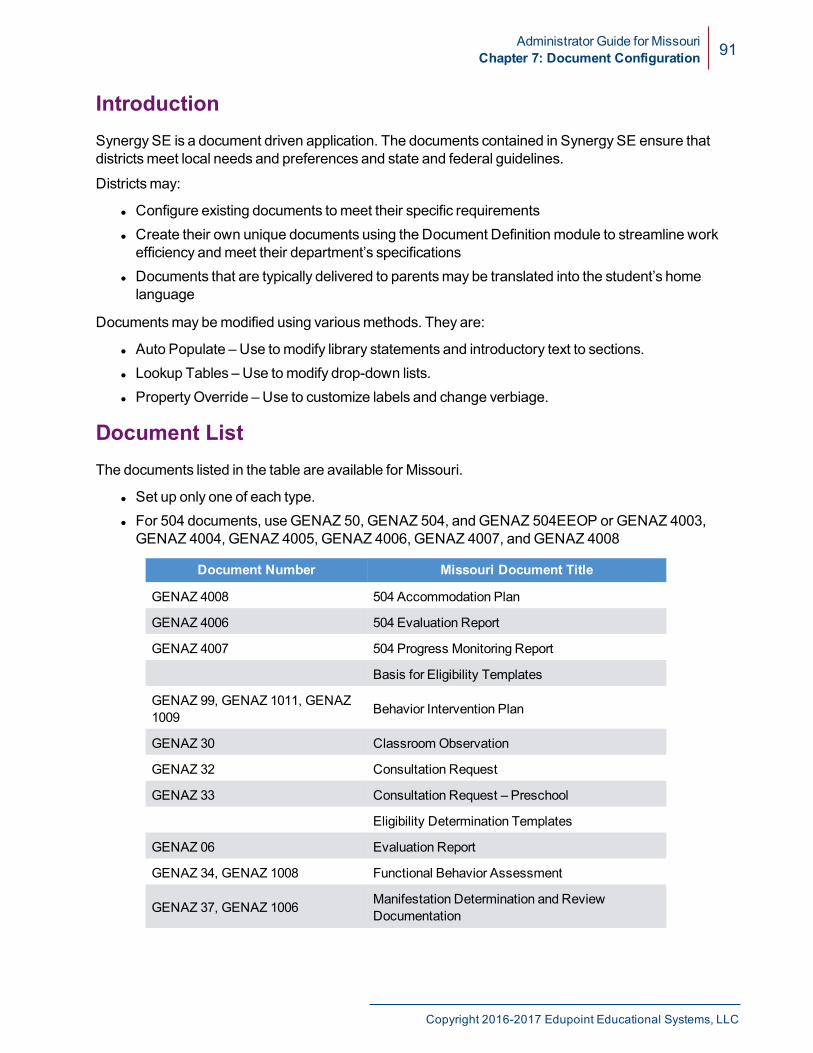
Administrator Guide for MissouriChapter 7: Document Configuration 91
IntroductionSynergy SE is a document driven application. The documents contained in Synergy SE ensure thatdistrictsmeet local needs and preferences and state and federal guidelines.
Districtsmay:
l Configure existing documents tomeet their specific requirementsl Create their own unique documents using the Document Definitionmodule to streamline workefficiency andmeet their department’s specifications
l Documents that are typically delivered to parentsmay be translated into the student’s homelanguage
Documentsmay bemodified using variousmethods. They are:
l Auto Populate – Use tomodify library statements and introductory text to sections.l Lookup Tables – Use tomodify drop-down lists.l PropertyOverride – Use to customize labels and change verbiage.
Document ListThe documents listed in the table are available for Missouri.
l Set up only one of each type.l For 504 documents, useGENAZ 50, GENAZ 504, andGENAZ 504EEOP or GENAZ 4003,GENAZ 4004, GENAZ 4005, GENAZ 4006, GENAZ 4007, andGENAZ 4008
Document Number Missouri Document Title
GENAZ 4008 504 Accommodation Plan
GENAZ 4006 504 Evaluation Report
GENAZ 4007 504 Progress Monitoring Report
Basis for Eligibility Templates
GENAZ 99, GENAZ 1011, GENAZ1009 Behavior Intervention Plan
GENAZ 30 Classroom Observation
GENAZ 32 Consultation Request
GENAZ 33 Consultation Request – Preschool
Eligibility Determination Templates
GENAZ 06 Evaluation Report
GENAZ 34, GENAZ 1008 Functional Behavior Assessment
GENAZ 37, GENAZ 1006 Manifestation Determination and ReviewDocumentation
Copyright 2016-2017 Edupoint Educational Systems, LLC

92 Administrator Guide for MissouriChapter 7: Document Configuration
Document Number Missouri Document Title
GENAZ 38 Meeting Request – Generic
GENAZ 09 Meeting Request IEP
GENAZ 07 Meeting Request MET
GENAZ 39 More Restrictive Placement Referral
GENAZ 504 Notice of Section 504 Student Eligibility Form
GENAZ 4005 Notice To Conduct A 504 Evaluation
GENAZ 4004 Notice To Conduct A 504Meeting
GENAZ 03 Parent Input
GENAZ 05 Parent Permission to Evaluate
GENAZ 520 Parental Consent to Claim MedicaidReimbursement
GENAZ 3002 Preschool Transition Conference Summary
GENAZ 40, GENAZ 40A,GENAZ 41E andGENAZ 41F PriorWritten Notice of Refusal/FAPE
PriorWritten Notice Template – A and B Type
PriorWritten Notice Template – General
GENAZ 4003 Receipt for 504 Notice of Parents and StudentRights
GENAZ 01 Referral
GENAZ 42 Request for Bilingual Transcription
GENAZ 504 EEOP Section 504 Equal Education Opportunity Plan
GENAZ 43 Summary of Performance
GENAZ 44 Transportation Request
Edupoint Proprietary and Confidential

Administrator Guide for MissouriChapter 7: Document Configuration 93
Form Specific Modifications
l Access through either Synergy SE or Synergy SIS.l The termProperty refers to fields, sections, or text boxes.l Not all modifications are listed.
Special Education Documents
IEPProperty Location Lookup Special ValuesCover Tab
Primary and SecondaryDisability Lookup Table K12.SpecialEd >DisabilityCode
K12.SpecialEd >DisabilityCodePs (preschool)
Alt Code 3
EnterMD to displaycheckboxes forsecondary disabilitycodees.
Property Location Lookup Special ValuesMedical Tab
Health Issues Auto Populate AZ > IEP>HealthIssues
Property Location Lookup Special ValuesPLAAFP Tab
Strengthsof Student Auto Populate AZ >MET >Strength
NeedsasTheyAffect Learning Auto Populate AZ >MET >Weakness
Medicaid Service Category Auto Populate AZ > IEP>MedicaidService
Medicaid Service Code Auto Populate AZ > IEP>MedicaidService
SpecificService
Property Location Lookup Special ValuesSpecial Cons Tab
Is/not needed statements Lookup Table K12.SpecialEd.AZ.IEP>Alt CommYn(Communication)
K12.SpecialEd.AZ.IEP>BenchmarkNeed Yn (Benchmarks/Short TermObjective)
K12.SpecialEd.AZ.IEP>Asst Tech Yn(Assistive Technology)
K12.SpecialEd.AZ.IEP>BehavNeedsYn (BehavioralNeeds)
K12.SpecialEd.AZ.IEP>Ell Yn(Student with Limited EnglishProficiency)
K12.SpecialEd.AZ.IEP>BrailleServicesYn (Blind/Visually Impaired)
K12.SpecialEd.AZ.IEP>Other CommNeedsYn (Deaf/Hearing Impaired)
Copyright 2016-2017 Edupoint Educational Systems, LLC

94 Administrator Guide for MissouriChapter 7: Document Configuration
Property Location Lookup Special ValuesSpecial Cons Tab
Assistive Technology Auto Populate AZ > IEP>AsstTech
Property Location Lookup Special ValuesGoals Tab
Goals Goal Library
Property Location Lookup Special ValuesServices Tab
SpeciallyDesigned Instruction/RelatedServices
Special EdServices
Transportation Details Lookup Table K12.SpecialEd.AZ.IEP>Transportation Significant NeedsLst
K12.SpecialEd.AZ.IEP>MedicaidVehicle Adap Lst
Property Location Lookup Special ValuesSupl. Aids and ESY Tab
Accommodation Category Auto Populate AZ > IEP>Accommodations
Accommodation CategoryDetail Auto Populate AZ > IEP>Accommodations
SpecificAccommodations
Property Location Lookup Special ValuesTesting Tab
Accommodations Auto Populate AZ > IEP>TestAccomm
Property Location Lookup Special ValuesLRE Tab
Preschool Lookup Table K12.SpecialEd.AZ.IEP>Lre Preschool
Elementary and Secondary Lookup Table K12.SpecialEd.AZ.IEP>Lre Elemsec
Progress in the GeneralCurriculum Auto Populate AZ > IEP> ImpactByDisab
PotentialHarmfulEffects Auto Populate AZ > IEP>EffectsOfPlcmnt
Property Location Lookup Special ValuesTransitionTab
AdditionalYears for the Project Course ofStudyYear drop-down
Lookup Table K12.SpecialEd.IEP>SchoolYear
Evaluation Report – GENAZ 06Property Location Lookup Special Values
Team Conclusions and Decisions Tab
The student wasassessed... Lookup Table K12.SpecialEd.AZ.Document >METImpairment Yn
Edupoint Proprietary and Confidential

Administrator Guide for MissouriChapter 7: Document Configuration 95
Property Location Lookup Special ValuesTeam Conclusions and Decisions Tab
DOMAIN_DOCUMENTATION_SH -Text under the Evaluation Resultslabel
SIGNATURE_STATEMENT -Statement above the signatures
TOP_STATEMENT - Text under thedemographics table
DOMAIN_DOCUMENTATION_H -Grid Label
DOMAIN_NOT_ASSESSED_H -Header for AreasNot Assessed
DOMAIN_ASSESSED_H - Headerfor AreasAssessed
ELIGIBILITY_H - Lable for teamconclusions
Auto Populate MO>Documents>MET
Property Location Lookup Special ValuesReferral Tab
Referralmust be specific Auto Populate AZ >MET >Reason for Referral
Property Location Lookup Special ValuesExisting Data Tab
These intervention efforts resulted in Auto Populate AZ >MET > InterventnEffortsDesc
Summaryof PreviousAssessments Auto Populate AZ >MET >PreviousAssessmentSummary
State and District Testing Not Applicable Auto Populate AZ >MET >DistrictTestingStatement
determinant factors Lookup Table K12.SpecialEd.Document >Met FactorDiff ProgMath
K12.SpecialEd.Document >Met FactorDiff Prog Reading
K12.SpecialEd.Document >Met FactorDiff Prog EngPro
On the basis of the review Lookup Table K12.SpecialEd.Document>Met AddlData
Property Location Lookup Special ValuesAdditional Data Tab
Evaluation Procedures Auto Populate AZ >MET >Evaluation Procedure
Evaluation Procedure Summary Auto Populate AZ >MET >EvaluationProcedureSummary
ClassroomObservations Auto Populate AZ >MET >ClassroomObservation
Test Behavior Auto Populate AZ >MET >TestBehavior
Assessment ResultsCategory and Test Special Ed TestDefinitions
Copyright 2016-2017 Edupoint Educational Systems, LLC
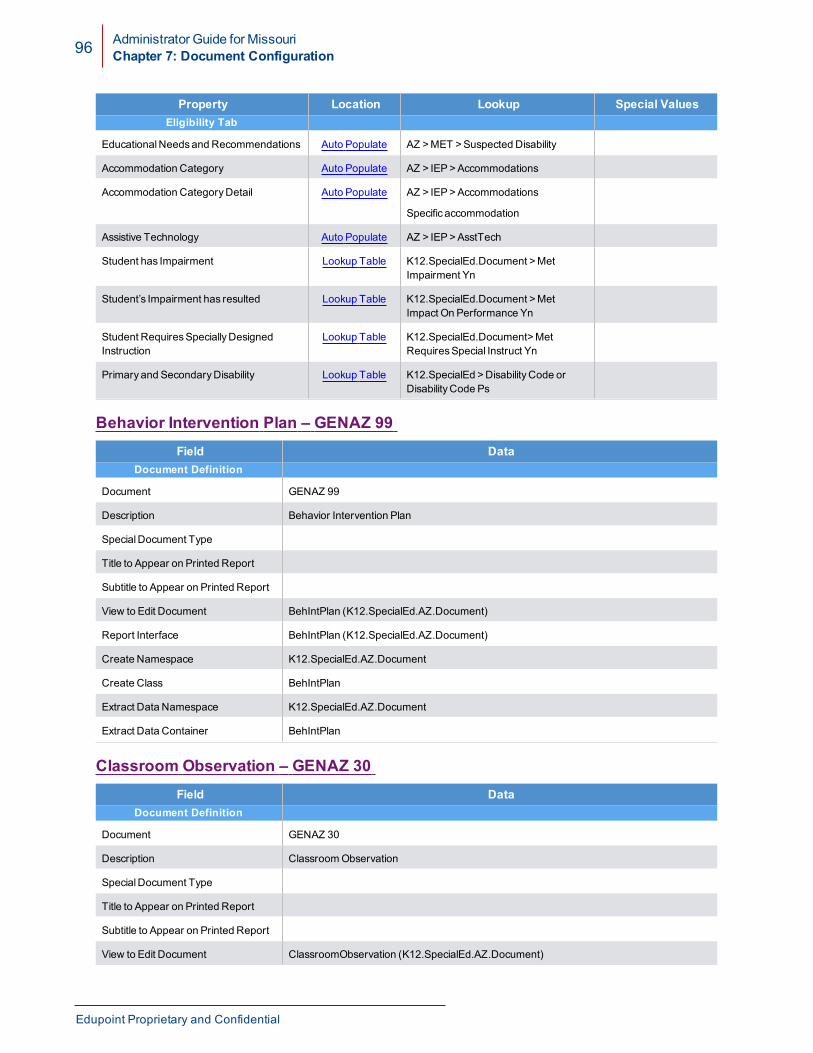
96 Administrator Guide for MissouriChapter 7: Document Configuration
Property Location Lookup Special ValuesEligibility Tab
EducationalNeedsand Recommendations Auto Populate AZ >MET >Suspected Disability
Accommodation Category Auto Populate AZ > IEP>Accommodations
Accommodation CategoryDetail Auto Populate AZ > IEP>Accommodations
Specific accommodation
Assistive Technology Auto Populate AZ > IEP>AsstTech
Student has Impairment Lookup Table K12.SpecialEd.Document >MetImpairment Yn
Student’s Impairment has resulted Lookup Table K12.SpecialEd.Document >MetImpact On Performance Yn
Student RequiresSpeciallyDesignedInstruction
Lookup Table K12.SpecialEd.Document>MetRequiresSpecial Instruct Yn
Primary and SecondaryDisability Lookup Table K12.SpecialEd >DisabilityCode orDisabilityCode Ps
Behavior Intervention Plan – GENAZ 99Field Data
Document Definition
Document GENAZ 99
Description Behavior Intervention Plan
SpecialDocument Type
Title to Appear on Printed Report
Subtitle to Appear on Printed Report
View to Edit Document BehIntPlan (K12.SpecialEd.AZ.Document)
Report Interface BehIntPlan (K12.SpecialEd.AZ.Document)
Create Namespace K12.SpecialEd.AZ.Document
Create Class BehIntPlan
Extract Data Namespace K12.SpecialEd.AZ.Document
Extract Data Container BehIntPlan
Classroom Observation – GENAZ 30Field Data
Document Definition
Document GENAZ 30
Description ClassroomObservation
SpecialDocument Type
Title to Appear on Printed Report
Subtitle to Appear on Printed Report
View to Edit Document ClassroomObservation (K12.SpecialEd.AZ.Document)
Edupoint Proprietary and Confidential

Administrator Guide for MissouriChapter 7: Document Configuration 97
Field DataDocument Definition
Report Interface ClassroomObservation (K12.SpecialEd.AZ.Document)
Create Namespace K12.SpecialEd.AZ.Document
Create Class ClassroomObservation
Extract Data Namespace K12.SpecialEd.AZ.Document
Extract Data Container ClassroomObservation
Consultation Request – GENAZ 32Field Data
Document Definition
Document GENAZ 32
Description Consultation Request
SpecialDocument Type
Title to Appear on Printed Report
Subtitle to Appear on Printed Report
View to Edit Document ConsultationRequest (K12.SpecialEd.AZ.Document)
Report Interface ConsultationRequest (K12.SpecialEd.AZ.Document)
Create Namespace K12.SpecialEd.AZ.Document
Create Class ConsultationRequest
Extract Data Namespace K12.SpecialEd.AZ.Document
Extract Data Container ConsultationRequest
Consultation Request – Preschool – GENAZ 33Field Data
Document Definition
Document GENAZ 33
Description Consultation Request – Preschool
SpecialDocument Type
Title to Appear on Printed Report
Subtitle to Appear on Printed Report
View to Edit Document PreSchoolConsultationRequest (K12.SpecialEd.AZ.Document)
Report Interface PreSchoolConsultationRequest (K12.SpecialEd.AZ.Document)
Create Namespace K12.SpecialEd.AZ.Document
Create Class PreSchoolConsultationRequest
Extract Data Namespace K12.SpecialEd.AZ.Document
Extract Data Container PreSchoolConsultationRequest
Copyright 2016-2017 Edupoint Educational Systems, LLC

98 Administrator Guide for MissouriChapter 7: Document Configuration
Descriptions of Areas to be Assessed and Known Tests to Use – GENAZ 6201Field Data
Document Definition
Document GENAZ 6201
Description AreasAssessed
SpecialDocument Type
Title to Appear on Printed Report Descriptionsof Areas to be Assessed and Known Tests to Use
Subtitle to Appear on Printed Report
View to Edit Document MOAreasAssessed (K12.SpecialEd.AZ.Document)
Report Interface AreasAssessedMO(K12.SpecialEd.AZ.Document)
Create Namespace K12.SpecialEd.AZ.Document
Create Class AlternateAssessmentAddendum
Extract Data Namespace K12.SpecialEd.AZ.Document
Extract Data Container MOAreasAssessed
For the Lookup Tables, use the followingAlt Code 3 options:
Enter V for Vision options
Enter H for Hearing options
Enter HM for Health Motor Skills options
Enter S for Speech options
Enter L for Language options
Enter IC for Intellectual/Cognitive options
Enter AB for Adaptive Behavior options
Enter SC for Social/Emotional options
Enter AA for Academic Achievement options
Enter T for Transtion options
Enter AT of Assistive Technology options
Enter O for Observation options
Enter OTH for Other options
Property Location Lookup Special Values
Assessment Category Lookup Table K12.SpecialEd.Document >Assessment Category
Alt Code 3
See list
Assessment CategoryType Lookup Table K12.SpecialEd.AZ.Document >Assessment CategoryType
Alt Code 3
See list
Assessment CategoryType Lookup Table K12.SpecialEd.AZ.Document >Assessment CategoryType Aca Ach
Alt Code 3
See list
Assessment CategoryType AdaptiveBehavior
Lookup Table K12.SpecialEd.AZ.Document >Assessment CategoryType Adapt Beh
Alt Code 3
See list
Assessment CategoryType AssistiveTechnology
Lookup Table K12.SpecialEd.AZ.Document >Assessment CategoryType AssistiveTech
Alt Code 3
See list
Assessment CategoryType Health MotorSkills
Lookup Table K12.SpecialEd.AZ.Document >Assessment CategoryType HealthMotor
Alt Code 3
See list
Edupoint Proprietary and Confidential

Administrator Guide for MissouriChapter 7: Document Configuration 99
Property Location Lookup Special Values
Assessment CategoryType Hearing Lookup Table K12.SpecialEd.AZ.Document >Assessment CategoryType Hearing
Alt Code 3
See list
Assessment CategoryType IntellectualCognitive
Lookup Table K12.SpecialEd.AZ.Document >Assessment CategoryType Int Cog
Alt Code 3
See list
Assessment CategoryType Language Lookup Table K12.SpecialEd.AZ.Document >Assessment CategoryType Language
Alt Code 3
See list
Assessment CategoryTypeObservation Lookup Table K12.SpecialEd.AZ.Document >Assessment CategoryTypeObservation
Alt Code 3
See list
Assessment CategoryType SocialEmotional and Behavioral
Lookup Table K12.SpecialEd.AZ.Document >Assessment CategoryType SocEmoBeh
Alt Code 3
See list
Assessment CategoryType Speech Lookup Table K12.SpecialEd.AZ.Document >Assessment CategoryType Speech
Alt Code 3
See list
Assessment CategoryType Transition Lookup Table K12.SpecialEd.AZ.Document >Assessment CategoryType Trans
Alt Code 3
See list
Assessment CategoryType Vision Lookup Table K12.SpecialEd.AZ.Document >Assessment CategoryType Vision
Alt Code 3
See list
Copyright 2016-2017 Edupoint Educational Systems, LLC

100 Administrator Guide for MissouriChapter 7: Document Configuration
Property Location Lookup Special Values
ACA_ACH_ST –Changes the text in theparagraph above the AcademicAchievement options
ADAPT_BEH_ST –Changes the text in theparagraph above the Adaptive Behavioroptions
ASST_TECH_ST –Changes the text in theparagraph above the Assistive Technologyoptions
BOTTOM_ST –Changes the text in theparagraph below the table
HEALTH_ST –Changes the text in theparagraph above the Health/Motor options
HEARING_ST –Changes the text in theparagraph above the Hearing options
INT_COG_ST –Changes the text in theparagraph above the Intellectual/Cognitiveoptions
OBSERVE_ST –Changes the text in theparagraph above theObservation options
SOC_EMO_BEH_ST –Changes the text inthe paragraph above theSocial/Emotional/Behavioral options
SPEECH_ST –Changes the text in theparagraph above the Speech/Languageoptions
TOP_ST –Changes the text in theparagraph above the table
TRANS_ST –Changes the text in theparagraph above the Transition options
VISION_ST –Changes the text in theparagraph above the Vision options
Auto Populate MO>Documents>AreasAssessed
Functional Behavior Assessment Plan – GENAZ 34Field Data
Document Definition
Document GENAZ 34
Description FunctionalBehavior Assessment Plan
SpecialDocument Type
Title to Appear on Printed Report
Subtitle to Appear on Printed Report
View to Edit Document FuncBehAssessPlan (K12.SpecialEd.AZ.Document)
Report Interface FunctionalBehaviorAssessmentPlan (K12.SpecialEd.AZ.Document)
Create Namespace K12.SpecialEd.AZ.Document
Create Class FuncBehAssessPlan
Edupoint Proprietary and Confidential

Administrator Guide for MissouriChapter 7: Document Configuration 101
Field DataDocument Definition
Extract Data Namespace K12.SpecialEd.AZ.Document
Extract Data Container FuncBehAssessPlan
Functional Behavior Assessment Summary – GENAZ 1008Field Data
Document Definition
Document GENAZ 1008
Description FunctionalBehavior Assessment Summary
SpecialDocument Type
Title to Appear on Printed Report
Subtitle to Appear on Printed Report
View to Edit Document FuncBehAssessPlanVA (K12.SpecialEd.AZ.Document)
Report Interface FunctionalBehaviorAssessmentPlanVA (K12.SpecialEd.AZ.Document)
Create Namespace K12.SpecialEd.AZ.Document
Create Class FuncBehAssessPlan
Extract Data Namespace K12.SpecialEd.AZ.Document
Extract Data Container FuncBehAssessPlan
Functional Behavior Assessment Plan – GENAZ 1010Field Data
Document Definition
Document GENAZ 1010
Description FunctionalBehavior Assessment Plan
SpecialDocument Type
Title to Appear on Printed Report
Subtitle to Appear on Printed Report
View to Edit Document FuncBehAssessPlanVAL (K12.SpecialEd.AZ.Document)
Report Interface BehaviorAssessmentPlanVAL (K12.SpecialEd.AZ.Document)
Create Namespace K12.SpecialEd.AZ.Document
Create Class FuncBehAssessPlan
Extract Data Namespace K12.SpecialEd.AZ.Document
Extract Data Container FuncBehAssessPlan
Manifestation Determination and Review Documentation – GENAZ 37Field Data
Document Definition
Document GENAZ 37
Copyright 2016-2017 Edupoint Educational Systems, LLC

102 Administrator Guide for MissouriChapter 7: Document Configuration
Field DataDocument Definition
Description Manifestation Determination and Review Documentation
SpecialDocument Type
Title to Appear on Printed Report
Subtitle to Appear on Printed Report
View to Edit Document ManifestationDeterminationReview (K12.SpecialEd.AZ.Document)
Report Interface ManifestationDeterminationReview (K12.SpecialEd.AZ.Document)
Create Namespace K12.SpecialEd.AZ.Document
Create Class ManifestationDeterminationReview
Extract Data Namespace K12.SpecialEd.AZ.Document
Extract Data Container ManifestationDeterminationReview
Medicaid Parent Permission – GENAZ 520Field Data
Document Definition
Document GENAZ 520
Description ParentalConsent To ClaimMedicaid Reimbursement
SpecialDocument Type
Title to Appear on Printed Report ParentalConsent To ClaimMedicaid Reimbursement
Subtitle to Appear on Printed Report
View to Edit Document MedicaidPermission (K12.SpecialED.AZ.Document)
Report Interface MedicaidPermission (K12.SpecialED.AZ.Document)
Create Namespace K12.SpecialEd.AZ.Document
Create Class MedicaidPermission
Extract Data Namespace K12.SpecialEd.AZ.Document
Extract Data Container MedicaidPermission
Property Location Lookup Special Values
Response Lookup Table K12.SpecialEd.AZ.Document >Medicaid Permission Response
Statement - Defines the text of thepermission statement
Auto Populate NTL >Documents>MedicaidPermission
ParentSignature - Defines the text underthe parent/guardian's signature
Enter Parent/GuardianSignature in theResponse column
Meeting Request – GENAZ 38Field Data
Document Definition
Document GENAZ 38
Edupoint Proprietary and Confidential

Administrator Guide for MissouriChapter 7: Document Configuration 103
Field DataDocument Definition
Description Meeting Request
SpecialDocument Type
Title to Appear on Printed Report
Subtitle to Appear on Printed Report
View to Edit Document MeetingRequest (K12.SpecialEd.AZ.Document)
Report Interface MeetingRequest (K12.SpecialEd.AZ.Document)
Create Namespace K12.SpecialEd.AZ.Document
Create Class MeetingRequest
Extract Data Namespace K12.SpecialEd.AZ.Document
Extract Data Container MeetingRequest
IEP Meeting Request – GENAZ 09Field Data
Document Definition
Document GENAZ 3009
Description IEP Meeting Request
SpecialDocument Type
Title to Appear on Printed Report
Subtitle to Appear on Printed Report
View to Edit Document IEPMeetingRequest (K12.SpecialEd.AZ.Document)
Report Interface IEPMeetingRequest (K12.SpecialEd.AZ.Document)
Create Namespace K12.SpecialEd.AZ.Document
Create Class MeetingRequest
Extract Data Namespace K12.SpecialEd.AZ.Document
Extract Data Container MeetingRequest
MET Meeting Request – GENAZ 07Field Data
Document Definition
Document GENAZ 07
Description MET Meeting Request
SpecialDocument Type
Title to Appear on Printed Report
Subtitle to Appear on Printed Report
View to Edit Document METMeetingRequest (K12.SpecialEd.AZ.Document)
Report Interface METMeetingRequest (K12.SpecialEd.AZ.Document)
Copyright 2016-2017 Edupoint Educational Systems, LLC

104 Administrator Guide for MissouriChapter 7: Document Configuration
Field DataDocument Definition
Create Namespace K12.SpecialEd.AZ.Document
Create Class MeetingRequest
Extract Data Namespace K12.SpecialEd.AZ.Document
Extract Data Container MeetingRequest
More Restrictive Placement Referral – GENAZ 39Field Data
Document Definition
Document GENAZ 39
Description More Restrictive Placement Referral
SpecialDocument Type
Title to Appear on Printed Report
Subtitle to Appear on Printed Report
View to Edit Document ReferralRestrictivePlacement (K12.SpecialEd.AZ.Document)
Report Interface ReferralRestrictivePlacement (K12.SpecialEd.AZ.Document)
Create Namespace K12.SpecialEd.AZ.Document
Create Class ReferralRestrictivePlacement
Extract Data Namespace K12.SpecialEd.AZ.Document
Extract Data Container ReferralRestrictivePlacement
Parent Input – GENAZ 03Field Data
Document Definition
Document GENAZ 03
Description Parent Input
SpecialDocument Type
Title to Appear on Printed Report
Subtitle to Appear on Printed Report
View to Edit Document ParentInput (K12.SpecialEd.AZ.Document)
Report Interface ParentInput (K12.SpecialEd.AZ.Document)
Create Namespace K12.SpecialEd.AZ.Document
Create Class ParentInput
Extract Data Namespace K12.SpecialEd.AZ.Document
Extract Data Container ParentInput
Edupoint Proprietary and Confidential

Administrator Guide for MissouriChapter 7: Document Configuration 105
Property Location Lookup Special Values
FamilyMember difficulties Lookup Table K12.SpecialEd.Document >FamilyStressEvent
Functional Information Lookup Table K12.SpecialEd.Document >Behavior
Prior Written Notice
Examples of Prior Written Notices are:
l Notice of IEP (GENAZ 11, GENAZ 14, GENAZ 22)l Notice of Placement (GENAZ 13, GENAZ 27)l Notice of Eligibility (GENAZ 08)
Field DataDocument Definition
Document GENAZ ##
Description AnyTitle
SpecialDocument Type Prior Written Notice
Title to Appear on Printed Report
Subtitle to Appear on Printed Report
View to Edit Document PriorWrittenNotice (K12.SpecialEd.AZ.Document)
Report Interface PriorWrittenNotice (K12.SpecialEd.AZ.Document)
Create Namespace K12.SpecialEd.AZ.Document
Create Class PriorWrittenNotice
Extract Data Namespace K12.SpecialEd.AZ.Document
Extract Data Container PriorWrittenNotice
Property Location Lookup Special Values
Statement Drop Downs Prior WrittenNotice Tab
Document Definition
Referral – GENAZ 01Field Data
Document Definition
Document GENAZ 01
Description Referral
SpecialDocument Type
Title to Appear on Printed Report
Subtitle to Appear on Printed Report
View to Edit Document Referral (K12.SpecialEd.AZ.Document)
Report Interface Referral (K12.SpecialEd.AZ.Document)
Create Namespace K12.SpecialEd.AZ.Document
Create Class Referral
Copyright 2016-2017 Edupoint Educational Systems, LLC

106 Administrator Guide for MissouriChapter 7: Document Configuration
Field DataDocument Definition
Extract Data Namespace K12.SpecialEd.AZ.Document
Extract Data Container Referral
Property Location Lookup Special Values
Areasof Concern Lookup Table K12.SpecialEd.AZ.Document >Ref(Area) List
Student Evaluation Report >Details Lookup Table K12.SpecialEd.AZ.Document >RefStudent Eval List
Referral – GENAZ 01MOField Data
Document Definition
Document GENAZ 01MO
Description Referral
SpecialDocument Type
Title to Appear on Printed Report Request for Consideration for Initial Special Education Evaluation
Subtitle to Appear on Printed Report
View to Edit Document ReferralMO (K12.SpecialEd.AZ.Document)
Report Interface ReferralMO (K12.SpecialEd.AZ.Document)
Create Namespace K12.SpecialEd.AZ.Document
Create Class Referral
Extract Data Namespace K12.SpecialEd.AZ.Document
Extract Data Container Referral
Property Location Lookup Special Values
Area of Concern column of theDescription of the concernsof theindividuals… grid
Lookup Table K12.SpecialEd.AZ.Document >AreaConcern
Student Evaluation Report >Details Lookup Table K12.SpecialEd.AZ.Document >RefStudent Eval List
Form inWhich RequestWasReceived Lookup Table K12.SpecialEd.AZ.Document >ReferralDeliveryMethod
Request for Bilingual Transcription – GENAZ 42Field Data
Document Definition
Document GENAZ 42
Description Request for Bilingual Transcription
SpecialDocument Type
Title to Appear on Printed Report
Subtitle to Appear on Printed Report
Edupoint Proprietary and Confidential

Administrator Guide for MissouriChapter 7: Document Configuration 107
Field DataDocument Definition
View to Edit Document BilingualTranscriptionRequest (K12.SpecialEd.AZ.Document)
Report Interface BilingualTranscriptionRequest (K12.SpecialEd.AZ.Document)
Create Namespace K12.SpecialEd.AZ.Document
Create Class BilingualTranscriptionRequest
Extract Data Namespace K12.SpecialEd.AZ.Document
Extract Data Container BilingualTranscriptionRequest
Summary of Performance – GENAZ 43Field Data
Document Definition
Document GENAZ 43
Description Summaryof Performance
SpecialDocument Type
Title to Appear on Printed Report
Subtitle to Appear on Printed Report
View to Edit Document SummaryOfPerformance (K12.SpecialEd.AZ.Document)
Report Interface SummaryOfPerformancet (K12.SpecialEd.AZ.Document)
Create Namespace K12.SpecialEd.AZ.Document
Create Class SummaryOfPerformance
Extract Data Namespace K12.SpecialEd.AZ.Document
Extract Data Container SummaryOfPerformance
IDEA IN-STATE Transfer Student – GENAZ 24MO ISField Data
Document Definition
Document GENAZ 24MO IS
Description IDEA IN-STATETransfer Student
SpecialDocument Type
Title to Appear on Printed Report IDEA IN-STATETransfer Student
Subtitle to Appear on Printed Report
View to Edit Document MOTransferDocumentIS (K12.SpecialEd.AZ.Document)
Report Interface MOTransferDocumentIS (K12.SpecialEd.AZ.Document)
Create Namespace K12.SpecialEd.AZ.Document
Create Class MOTransferDocumentIS
Extract Data Namespace K12.SpecialEd.AZ.Document
Extract Data Container MOTransferDocumentIS
Copyright 2016-2017 Edupoint Educational Systems, LLC

108 Administrator Guide for MissouriChapter 7: Document Configuration
Property Location Lookup Special Values
Transfer Interview Method Lookup Table K12.SpecialEd.AZ.Document >Mo_Tfr_Interview_Method
Transfer Specific Learning Disability List Lookup Table K12.SpecialEd.AZ.Document >Mo_Tfr_Sld_Lst
Transfer Speech Impairment List Lookup Table K12.SpecialEd.AZ.Document >Mo_Tfr_Si_Lst
Transfer Language Impairment List Lookup Table K12.SpecialEd.AZ.Document >Mo_Tfr_Li_Lst
Transfer ConsultationMethod Lookup Table K12.SpecialEd.AZ.Document >Mo_Tfr_Consult_Method
IDEA OUT-OF-STATE Transfer Student – GENAZ 24MOOOSField Data
Document Definition
Document GENAZ 24MOOS
Description IDEAOUT-OF-STATETransfer Student
SpecialDocument Type
Title to Appear on Printed Report IDEAOUT-OF-STATETransfer Student
Subtitle to Appear on Printed Report
View to Edit Document MOTransferDocumentOOS (K12.SpecialEd.AZ.Document)
Report Interface MOTransferDocumentOOS (K12.SpecialEd.AZ.Document)
Create Namespace K12.SpecialEd.AZ.Document
Create Class MOTransferDocumentIS
Extract Data Namespace K12.SpecialEd.AZ.Document
Extract Data Container MOTransferDocumentIS
Property Location Lookup Special Values
Transfer Interview Method Lookup Table K12.SpecialEd.AZ.Document >Mo_Tfr_Interview_Method
Transfer Specific Learning Disability List Lookup Table K12.SpecialEd.AZ.Document >Mo_Tfr_Sld_Lst
Transfer Speech Impairment List Lookup Table K12.SpecialEd.AZ.Document >Mo_Tfr_Si_Lst
Transfer Language Impairment List Lookup Table K12.SpecialEd.AZ.Document >Mo_Tfr_Li_Lst
Transfer ConsultationMethod Lookup Table K12.SpecialEd.AZ.Document >Mo_Tfr_Consult_Method
Transportation Request – GENAZ 44Field Data
Document Definition
Document GENAZ 44
Edupoint Proprietary and Confidential

Administrator Guide for MissouriChapter 7: Document Configuration 109
Field DataDocument Definition
Description Transportation Request
SpecialDocument Type
Title to Appear on Printed Report
Subtitle to Appear on Printed Report
View to Edit Document TransportationRequest (K12.SpecialEd.AZ.Document)
Report Interface TransportationRequest (K12.SpecialEd.AZ.Document)
Create Namespace K12.SpecialEd.AZ.Document
Create Class TransportationRequest
Extract Data Namespace K12.SpecialEd.AZ.Document
Extract Data Container TransportationRequest
504 Documents
504 Evaluation Report – GENAZ 4006Field Data
Document Definition
Document GENAZ4006
Description 504 Evaluation Report
SpecialDocument Type
Title to Appear on Printed Report 504 Evaluation Report
Subtitle to Appear on Printed Report
View to Edit Document NTL504Evaluation (K12.SpecialEd.AZ.Document)
Report Interface NTL504Evaluation (K12.SpecialEd.AZ.Document)
Create Namespace K12.SpecialEd.AZ.Document
Create Class NTL504Evaluation
Extract Data Namespace K12.SpecialEd.AZ.Document
Extract Data Container NTL504Evaluation
Copyright 2016-2017 Edupoint Educational Systems, LLC

110 Administrator Guide for MissouriChapter 7: Document Configuration
Using MouseoverSystemAdministrators have the ability to see information when theymouseover a field if thisfunction is turned on in Security Settings for the role. See Special Ed User Setup.
Options
l Select Show Field Information in Options to toggle the field information off and on.
Finding the Name of the Business Object
Hover the cursor over the text to display the name of the BusinessObject
l PropertyOverride or Security Definition
l Lookup Table Definition
l Lookup Function – The content comes from another location within Synergy, such as theProcessDefinition or Auto Populate screen.
Edupoint Proprietary and Confidential
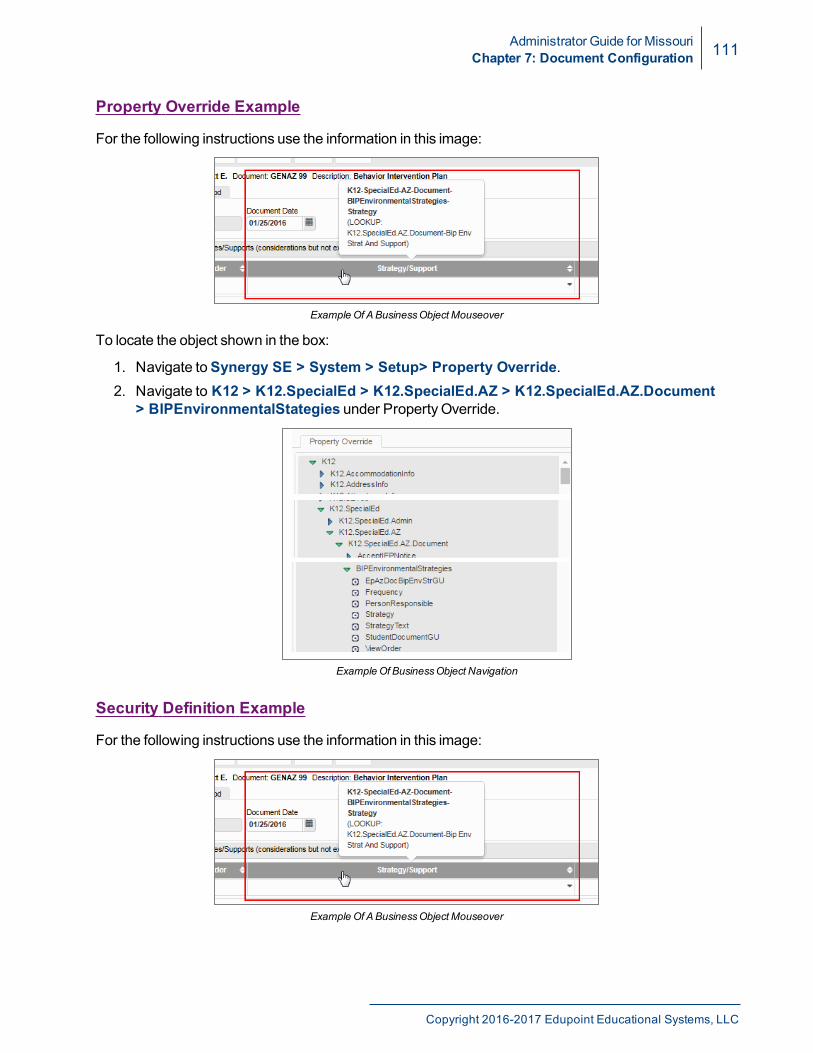
Administrator Guide for MissouriChapter 7: Document Configuration 111
Property Override Example
For the following instructions use the information in this image:
Example Of ABusinessObject Mouseover
To locate the object shown in the box:
1. Navigate toSynergy SE > System > Setup> Property Override.2. Navigate to K12 > K12.SpecialEd > K12.SpecialEd.AZ > K12.SpecialEd.AZ.Document
> BIPEnvironmentalStategies under Property Override.
Example Of BusinessObject Navigation
Security Definition Example
For the following instructions use the information in this image:
Example Of ABusinessObject Mouseover
Copyright 2016-2017 Edupoint Educational Systems, LLC

112 Administrator Guide for MissouriChapter 7: Document Configuration
To locate the object shown in the box:
1. Navigate toSynergy SE > System > Security > Security Definition.2. Navigate to K12 > SpecialEd > AZ > Document > BIPEnvironmentalStategies under
BusinessObjects.
Example Of BusinessObject Navigation
Lookup Table Example
For the following instructions use the information in this image:
Example Of A Lookup TableMouseover
To locate the Lookup table shown in the box:
1. Navigate toSynergy SE > System > Setup > Lookup Table Definition.2. Navigate toK 12.SpecialEd.IEP > Placement K12 under Lookup TableMaintenance.
Example Of Lookup Table Navigation
Edupoint Proprietary and Confidential

Administrator Guide for MissouriChapter 7: Document Configuration 113
Using Auto PopulateUse Auto Populate tomodify responses to statements in the documents. Examples are:
l Library statements available from drop-downs in the IEP or evaluation documents.l The default introductory text or evaluation components in the Parent Permission screen.
When referring to documents and screens in Synergy SE, exact spellingand capitalization is required for Auto Populate to function properly.
To locate where the Auto Populates are used. Copy theName into theResponse column and view results.
1. Navigate toSynergy SE > System > Setup > Auto Populate. The Auto Populate screendisplays.
2. Navigate to the appropriate Auto Populate area.
Auto Populate Screen
ClickAdd to add a row.
3. Modify the text as needed.
l Name – Name that displays in the Auto Populate navigation.�
l Question – Description of theName.�
l Name – Supplied keyword that display in the drop-down.�l Response – The text that displays in the text box after the Name is selected from thedrop-down.� Tokensmay be used to display organization or student names. Forexample:
l Use [!Organization] to display the school name in the text.l Use [Student] , [he/she], [his/her] to display the student name and theircorrect gender where used in the statement.
Copyright 2016-2017 Edupoint Educational Systems, LLC

114 Administrator Guide for MissouriChapter 7: Document Configuration
l Additional Response – Use to insert a validation.�
4. ClickSave.
Using Property OverrideUse PropertyOverride to customize labels and change the verbiage of statements in specificdocuments.
1. Navigate to Synergy SE > System > Setup >Property Override.2. Navigate to the Property Override identified usingmouseover. The original label and related
information displays under Current.�
3. Makemodifications under Override.�
Edupoint Proprietary and Confidential

Administrator Guide for MissouriChapter 7: Document Configuration 115
PropertyOverride Screen
l Label – Use this field to change the text that displays on the screen.l Short Labell Display Length – Use to reduce the number of characters entered.
If a larger number is entered than displays under Current, thefield width increases but not the number of characters allowedis not increased.
l Default Value – Use to insert a default value for the fieldl Default value not set for this fieldl Mandatory – Use to change whether the field is requiredl Rows – Use to adjust the height of the fieldl Cols – Use to increase number of columns displaying
l Lookup Name – Click to select and find theNamespace andName of the lookuptable.
l Lookup Display Type – Select the type of lookup informationl Property is used in state reporting – Use to adjust whether the field is shown instate reporting
4. Clear SystemCache if you do not see the change:
a. Navigate toSynergy SE > Setup > System Configuration.b. ClickClear Cache on theOptions tab.
5. Restart the Process Servers if you do not see the change.
Copyright 2016-2017 Edupoint Educational Systems, LLC

116 Administrator Guide for MissouriChapter 7: Document Configuration
Document DefinitionUse the Document Definition screen to define all documents used with Synergy SE.
The screen has the different tabs depending on the Special DocumentType selected. Districts do not normally customize the Validation BO orText Overrides tabs.
All documents listed in Document Definition are available to use by alldistricts. However, some functionality only workswith specific districtsettings that may not be available to your district.
Searching for a Document Definition
1. Navigate toSynergy SE > System > Special Education > Document Definition.2. Select theSpecial Document Type.
Document Definition Screen
3. ClickFind. A list of documents of that type display.
Find Result Screen
Edupoint Proprietary and Confidential

Administrator Guide for MissouriChapter 7: Document Configuration 117
Document Definition Tab
1. Navigate toSynergy SE > System > Special Education > Document Definition.2. Enter the identifying information for the document:
Document Definition Screen
l Customer Name – UsuallyUSA.AZ, but can vary if the document was created for aspecific state.
l Duplicates cannot exist unless the Customer Name isdifferent.
l Use duplicates to have documents in both a Processand as an AdHoc document.
l Document – The name that the system uses to identify certain functionality of thedocument.
l If the document is a Special Document Type, then the value you enter can beanything.
l If the document was created by Edupoint, Special Document Type is normallyblank andDocument should not bemodified.
Do not add letters or numerals to an existingDocumentID. It can disable functionality in the document. UseDocument ID Alias to change the name displayed tousers.
l If the document is a User Defined Document, Special Document Type isnormally blank and we recommend thatDocument begin withUD.
l Document ID Alias – (Optional) – The name users see for this document in Ad Hoc orwhile hovering over the document icon in ProcessDocuments.
Districts use this field to have all documents conform to anaming convention.
Copyright 2016-2017 Edupoint Educational Systems, LLC
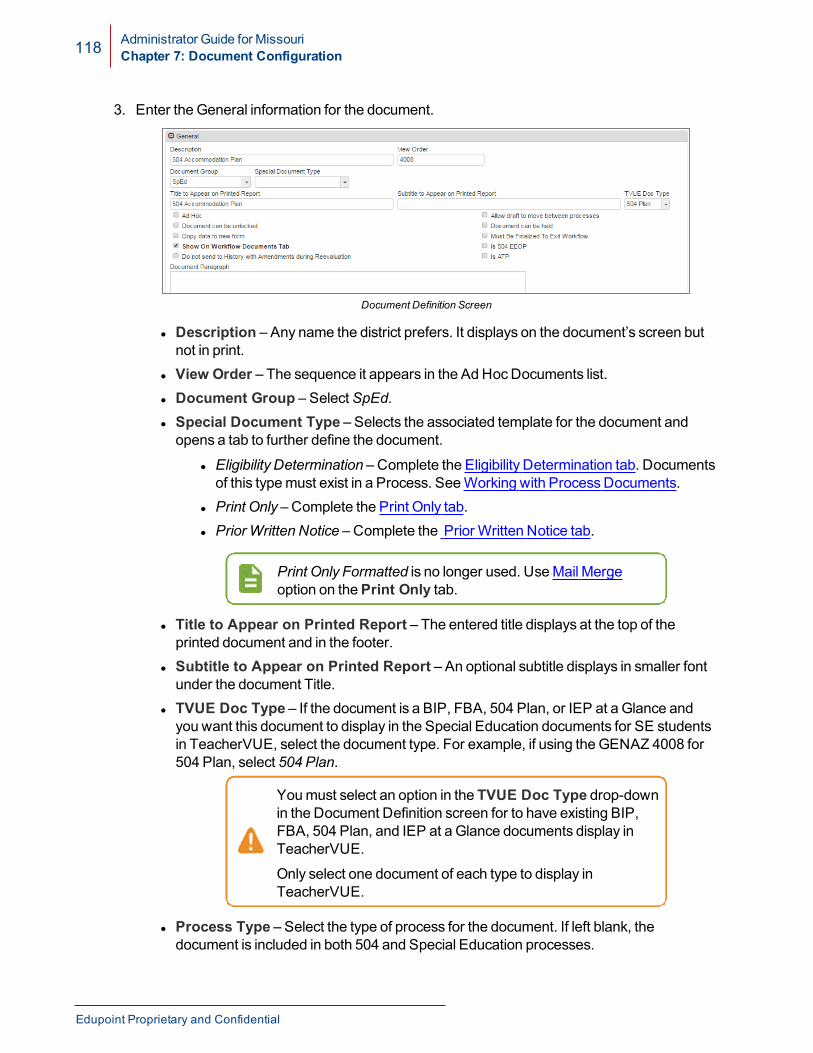
118 Administrator Guide for MissouriChapter 7: Document Configuration
3. Enter the General information for the document.
Document Definition Screen
l Description – Any name the district prefers. It displays on the document’s screen butnot in print.
l View Order – The sequence it appears in the AdHocDocuments list.l Document Group – SelectSpEd.l Special Document Type – Selects the associated template for the document andopens a tab to further define the document.
l Eligibility Determination – Complete the Eligibility Determination tab. Documentsof this typemust exist in a Process. SeeWorking with ProcessDocuments.
l Print Only – Complete the Print Only tab.l Prior Written Notice – Complete the Prior Written Notice tab.
Print Only Formatted is no longer used. UseMail Mergeoption on thePrint Only tab.
l Title to Appear on Printed Report – The entered title displays at the top of theprinted document and in the footer.
l Subtitle to Appear on Printed Report – An optional subtitle displays in smaller fontunder the document Title.
l TVUE Doc Type – If the document is a BIP, FBA, 504 Plan, or IEP at a Glance andyou want this document to display in the Special Education documents for SE studentsin TeacherVUE, select the document type. For example, if using theGENAZ 4008 for504 Plan, select 504 Plan.
Youmust select an option in the TVUE Doc Type drop-downin the Document Definition screen for to have existing BIP,FBA, 504 Plan, and IEP at a Glance documents display inTeacherVUE.
Only select one document of each type to display inTeacherVUE.
l Process Type – Select the type of process for the document. If left blank, thedocument is included in both 504 and Special Education processes.
Edupoint Proprietary and Confidential

Administrator Guide for MissouriChapter 7: Document Configuration 119
4. (Option) Select additional options.
l Ad Hoc – Select to list the document theAd Hoc Documents tab.l Document can be unlocked – Select to allow the document to be unlocked after it isfinalized.
l Copy data to new form – Allows information from a previous document of the sametype (for example, and evaluation report) to be copied to a text field of new document.
l Show On Workflow Documents Tab – Automatically populates whenSpEd isselected fromDocument Group. Not used in National Product.
l Do not send to History with Amendments during Reevaluation – Select thisoption so that documents do not move to the Historical Documents of the original IEPalong with the addendum. If not checked, the documentsmove to the HistoricalDocuments.
l Allow draft to move between processes – Select this option to use the finalizedevaluation data instead of a draft evaluation document.
l Always copy Evaluation data from process DocsTab rather than from Draft Evaluation Documentmust be checked in IEP and ProgressReport Optionstab in NTL Setup to allow IEPs to finalize with a draftevaluation document.
l In Process Setup, under ProcessMovement,ReevalProcessmust be set toReevaluation andReevalLook Ahead Monthsmust be defined.
l Document can be held – Not used in the National Product.l Must Be Finalized to Exit Workflow – Not used in National Product.l Is 504 EEOP – Select this option if the document is 504 EEOP.l Is ATP – Not used in the National Product.l Is ISP – Select if the document is an Individualized Service Plan.
Select an ISP process inAnnual Process in ProcessMovement when setting up the document for process.
5. (Optional) Select the 504 type using the options if appropriate.
Document Definition Screen
Copyright 2016-2017 Edupoint Educational Systems, LLC
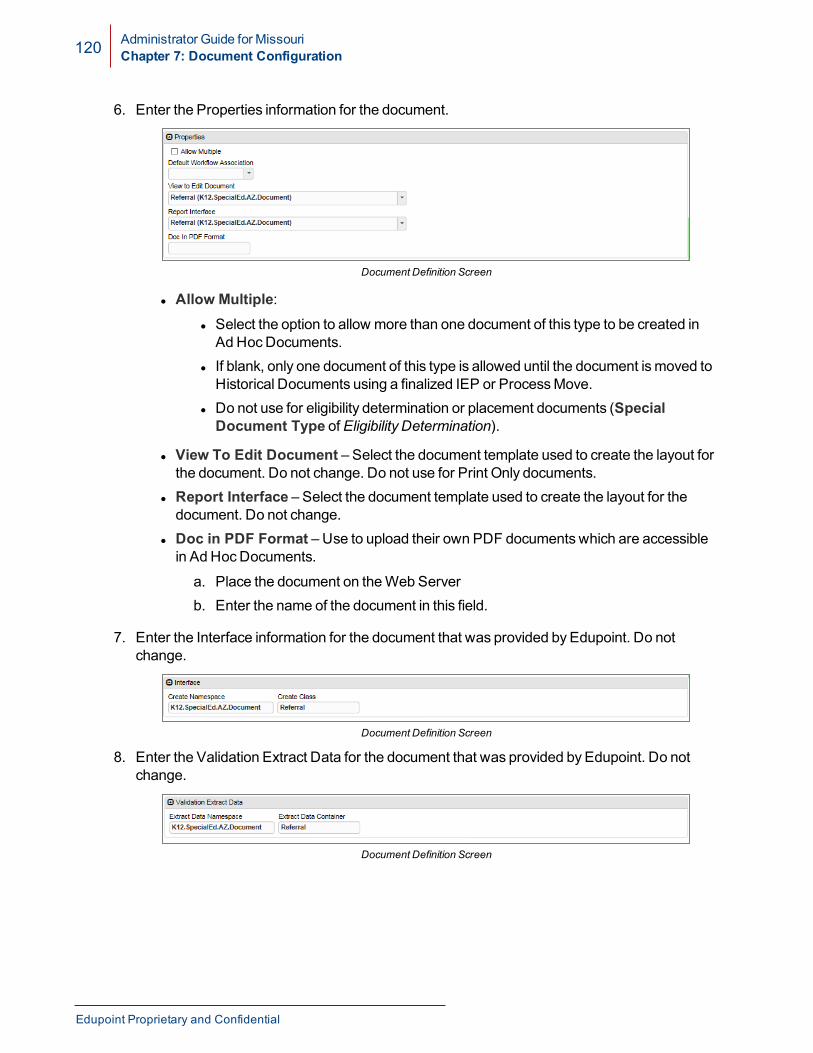
120 Administrator Guide for MissouriChapter 7: Document Configuration
6. Enter the Properties information for the document.
Document Definition Screen
l Allow Multiple:l Select the option to allow more than one document of this type to be created inAd HocDocuments.
l If blank, only one document of this type is allowed until the document ismoved toHistorical Documents using a finalized IEP or ProcessMove.
l Do not use for eligibility determination or placement documents (SpecialDocument Type of Eligibility Determination).
l View To Edit Document – Select the document template used to create the layout forthe document. Do not change. Do not use for Print Only documents.
l Report Interface – Select the document template used to create the layout for thedocument. Do not change.
l Doc in PDF Format – Use to upload their own PDF documents which are accessiblein Ad HocDocuments.
a. Place the document on theWeb Serverb. Enter the name of the document in this field.
7. Enter the Interface information for the document that was provided by Edupoint. Do notchange.
Document Definition Screen
8. Enter the Validation Extract Data for the document that was provided by Edupoint. Do notchange.
Document Definition Screen
Edupoint Proprietary and Confidential

Administrator Guide for MissouriChapter 7: Document Configuration 121
9. (Optional) Select themandatory Validation Roles for the document.
Document Definition Screen
10. (Optional) Select the Security Override to set security for specific user groups for thisdocument.
Document Definition Screen
11. (Optional) Enter the Special Flags for the document using the following format:Flag="value or custom text"Examples:504EEOP_CUST="YES"PARENT_TEXT="Please review the following:"
Document Definition Screen
Certain documents have special flags that can be added in order to give documentsdesired functionality. See the Special Flag Descriptions for list of available flags.
l Flags created for specific districts do not all apply to allnational documents.
l Flagsmust use the format shown in Special FlagDescriptions. They are case sensitive and space sensitive.
l Separatemultiple flagswith a semi-colon.
12. ClickSave.
Copyright 2016-2017 Edupoint Educational Systems, LLC
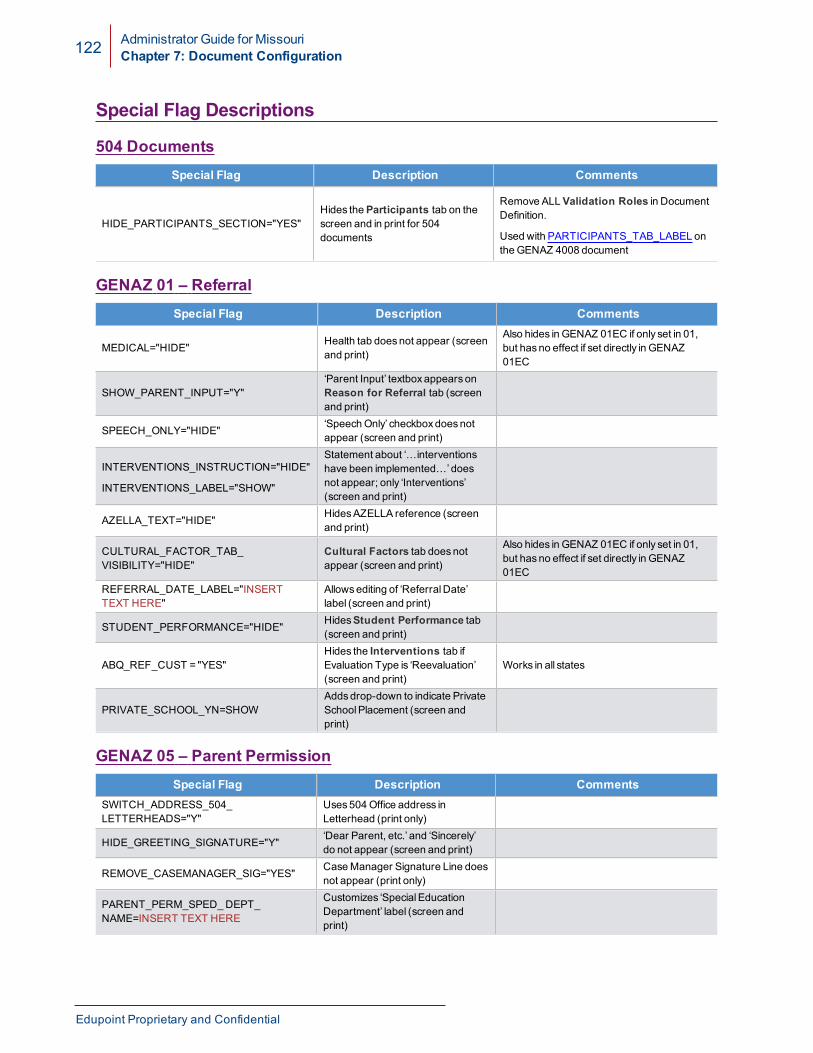
122 Administrator Guide for MissouriChapter 7: Document Configuration
Special Flag Descriptions
504 DocumentsSpecial Flag Description Comments
HIDE_PARTICIPANTS_SECTION="YES"Hides theParticipants tab on thescreen and in print for 504documents
Remove ALLValidation Roles in DocumentDefinition.
Used with PARTICIPANTS_TAB_LABEL ontheGENAZ 4008 document
GENAZ 01 – ReferralSpecial Flag Description Comments
MEDICAL="HIDE" Health tab doesnot appear (screenand print)
Also hides in GENAZ 01EC if only set in 01,but hasno effect if set directly in GENAZ01EC
SHOW_PARENT_INPUT="Y"‘Parent Input’ textboxappears onReason for Referral tab (screenand print)
SPEECH_ONLY="HIDE" ‘SpeechOnly’ checkboxdoesnotappear (screen and print)
INTERVENTIONS_INSTRUCTION="HIDE"
INTERVENTIONS_LABEL="SHOW"
Statement about ‘…interventionshave been implemented…’doesnot appear; only ‘Interventions’(screen and print)
AZELLA_TEXT="HIDE" HidesAZELLA reference (screenand print)
CULTURAL_FACTOR_TAB_VISIBILITY="HIDE"
Cultural Factors tab doesnotappear (screen and print)
Also hides in GENAZ 01EC if only set in 01,but hasno effect if set directly in GENAZ01EC
REFERRAL_DATE_LABEL="INSERTTEXT HERE"
Allowsediting of ‘ReferralDate’label (screen and print)
STUDENT_PERFORMANCE="HIDE" HidesStudent Performance tab(screen and print)
ABQ_REF_CUST = "YES"Hides the Interventions tab ifEvaluation Type is ‘Reevaluation’(screen and print)
Works in all states
PRIVATE_SCHOOL_YN=SHOWAddsdrop-down to indicate PrivateSchoolPlacement (screen andprint)
GENAZ 05 – Parent PermissionSpecial Flag Description Comments
SWITCH_ADDRESS_504_LETTERHEADS="Y"
Uses504Office address inLetterhead (print only)
HIDE_GREETING_SIGNATURE="Y" ‘Dear Parent, etc.’ and ‘Sincerely’do not appear (screen and print)
REMOVE_CASEMANAGER_SIG="YES" CaseManager Signature Line doesnot appear (print only)
PARENT_PERM_SPED_DEPT_NAME=INSERT TEXT HERE
Customizes ‘Special EducationDepartment’ label (screen andprint)
Edupoint Proprietary and Confidential

Administrator Guide for MissouriChapter 7: Document Configuration 123
Special Flag Description Comments
ST_EVAL_PROP_TXT ="INSERT TEXTHERE"
Customizes ‘In order to…’statement onEvaluation tab(screen and print)
EVAL_TEXT ="INSERT TEXT HERE"Customizes ‘To determine potentialeligibility…’ statement (screen andprint)
EVALUATION_LIST="NEW"
Test list comes fromAutoPopulate > National >Documents > GENAZ 05 (screenand print)
EVALUATION_LIST="BOTH"Test list includesboth ‘standard’ andAuto Populate tests (screen andprint)
EVALUATION_LIST="NEW_PART" Only tests that are selected appearin print (print only)
PARENT_TEXT="INSERT TEXT HERE"Customizes ‘Upon completion..’statement onEvaluation tab(screen and print)
EVAL_MAY_INCLUDE="YES"Statement above tests is ‘mayinclude’, not ‘will include’ (screenand print)
GENAZ 05OR – Oregon Parent PermissionSpecial Flag Description Comments
HIDE_CONTACT=YESRemovesContact Name andPhone fromParent Permissiontab (screen and print)
REMOVE_REFERRAL_REASON=YES Removes ‘This evaluation is beingproposed because:’ (print only)
PARENT_PERM_EVAL_STMNT_1="INSERT TEXT HERE"
Allow edit of ‘In order to bestmeet…’ statement onEvaluationtab (screen and print)
HIDE_PARENT_RIGHTS=Y RemovesParent Rights tab(screen and print)
REMOVE_CASEMANAGER_SIG=YES Removes line for CaseManagerSignature (print only)
GENAZ 06 – METSpecial Flag Description Comments
USE_CUSTOMIZED_ADDTNL_DATA_MSG="Y"
Existing Data tab > ‘On the basisof the review…’ response printsexact text from Lookup Table >K12.SpecialEd.AZ.Document >Met Addl Data (print only)
GET_PI_DOC_DATE="YES"
Inserts date fromGENAZ 05 ParentInput into ‘Background Information’inExisting Data tab (screen andprint)
MET_DATE_LABEL="INSERT TEXTHERE"
Allows for editing of ‘MET Date’ labelonCover tab (screen and print)
Copyright 2016-2017 Edupoint Educational Systems, LLC

124 Administrator Guide for MissouriChapter 7: Document Configuration
Special Flag Description Comments
ABQ_MET_CUST = "YES"
- Hides the Intervention (‘Efforts toEducate..’) field in theExistingData tab if Evaluation Type is‘Reevaluation’
- Adds validation for Reading, Mathand English Proficiency ruleouts
-If eligibility isSLD, addsadditionalvalidations for visual, hearing,motor; IntellectualDisability,EmotionalDisturbance, CulturalFactors, andEnvironmental/economicdisadvantage
- Adds ‘Initial Test Date’ field toAdditional Data tab (screen andprint; validation)
Works in all states
GENAZ 15 – Reevaluation WaiverSpecial Flag Description Comments
REPLACE_2ND_SIGNATURE =YES
Label for the second signature line isAdministrator, not Parent/LegalGuardian (print only; SetupOptionfor PWNmust be checked: ShowParent Acknowledgement on PriorWritten Notice (print only)
KEEP_REEVAL_DATE="YES"
When finalized,Reevaluation DueDate doesnot change inProcessDocs tab of SEStudent (screenonly)
UPDATE_PREV_EVAL_DATE="YES"Updates the Previous Eval DateinProcess Docs tab whenGENAZ15 is finalized. (screen only)
GENAZ 30 – Classroom ObservationSpecial Flag Description Comments
ALLOW_DIFFERENT_OBSERVER=YES Label for Signature is ‘OBSERVER’,not ‘CASEMANAGER’ (print only)
GENAZ 38MN – Meeting NoticeSpecial Flag Description Comments
HIDE_PARENT_RIGHTS=Y RemovesParent Rights tab(screen and print) Large font meeting notice
GENAZ 38OR – Meeting NoticeSpecial Flag Description Comments
HIDE_PARENT_RIGHTS=Y RemovesParent Rights tab(screen and print)
Edupoint Proprietary and Confidential

Administrator Guide for MissouriChapter 7: Document Configuration 125
GENAZ 40 – Refusal NoticeSpecial Flag Description Comments
PARENT_INITIALS=HIDE‘ProceduralSafeguardsprovided toparent(s)’ field doesnot appear(screen and print)
GENAZ 40A – Generic NoticeSpecial Flag Description Comments
IS_DIVISION="Yes"; Changes ‘District’ to ‘Division’(screen and print)
GENAZ 43 – Summary of PerformanceSpecial Flag Description Comments
HIDE_COLUMNS_RECOMMENDATIONS_GRID=YES
Columns for ‘Individuals/Agencies’and ‘Time Frame’ do not appear inthe Show Detail ofRecommendationsgrid. (screenand print)
ASSESS_REPORT_LABEL=HIDE
‘Themost recent assessmentreports are attached to assist in postsecondary planning.’ doesnotappear (screen and print)
GENAZ 44 – Transportation RequestSpecial Flag Description Comments
HIDE_AGREEMENT=Y Hides ‘Agreements’ tab (screenand print)
USE_ALT_SPEC_CON_GB=Y
Substitutes checkbox list fromLookup >K12.SpecialEd.AZ.Document >Special Cond Lst onSpecialConditions tab (screen and print)
GENAZ 69 – Non-Eligible ChildSpecial Flag Description Comments
SHOW_PARTICIPANT_AGREE_DISAGREE="YES"
Adds ‘Agree/Disagree’ column toStaff Participants grid (screen andprint)
GENAZ 504 – 504 EligibilitySpecial Flag Description Comments
504ELIG_CUST="YES" ‘Purpose for Evaluation’ checkboxlist appears (screen and print)
USE_MLA_GRID="YES"Addsgrid for ‘Substantially Limitedby the Impairment’ toEligibilityAnalysis tab (screen and print)
Copyright 2016-2017 Edupoint Educational Systems, LLC

126 Administrator Guide for MissouriChapter 7: Document Configuration
GENAZ 504EEOP – 504 PlanSpecial Flag Description Comments
504EEOP_CUST="YES"
Adds textbox for ‘QualifyingDisability’ and hidesResponsibilities tab (screen andprint)
HIDE_EEOP_AGREEMENT="YES" Hides the parent consent statement
GENAZ 520 – Medicaid ConsentSpecial Flag Description Comments
USE_END_DATE=YES Addsan ‘End Date’ field to ParentConsent (screen and print)
GENAZ 1006 – Manifestation Determination ReviewSpecial Flag Description Comments
SHOW_PARENT_AGREEMENT = "Y" AddsParent Agreement drop-down/statement (screen and print) VA Beach Version
GENAZ 1009 – Behavior Intervention PlanSpecial Flag Description Comments
HIDE_PERSON_RESPONSIBLE="YES" Hides ‘Person Responsible’ field(screen and print) VA Beach Version
GENAZ 1011W – Behavior Intervention PlanSpecial Flag Description Comments
REPLACEMENT_BEHAVIOR_AND_MATERIAL=HIDE
Possible setting events, Goal forReplacement Behavior fields andMaterials required grid do notdisplay. (screen and print)
HIDE_PARENT_SIGNATURE=YESDrop-down for Parent Statement(did/not sign) doesnot appear(screen and print)
GENAZ 1012 – Plan of CareSpecial Flag Description Comments
DISABLE_MEDICARE_NUMBER_VALIDATION="YES"
Removes theMedicaid/FAMISvalidations3070 and 3096
Also worksonGENAZ 1012A, GENAZ 1012Pand 1012N
SHOW_DIAGNOSIS_GRID=YES Addsgrid for listing of multiplediagnoses (screen and print)
SUP_VALDN_LT_GOALS="YES"Remove the 3065 validation forLong termGoalDescription, but notthe Interventions validation
USE_THERAPY_CBLIST="YES" ListsTherapyTypesas checkboxes,not dropdown (screen and print)
Edupoint Proprietary and Confidential

Administrator Guide for MissouriChapter 7: Document Configuration 127
GENAZ 1012A – Plan of Care AddendumSpecial Flag Description Comments
DISABLE_MEDICARE_NUMBER_VALIDATION="YES"
Removes theMedicaid/FAMISvalidations3070 and 3096
Also worksonGENAZ 1012, GENAZ 1012Pand 1012N
SHOW_DIAGNOSIS_GRID=YES Addsgrid for listing of multiplediagnoses (screen and print)
USE_THERAPY_CBLIST="YES" ListsTherapyTypesas checkboxes,not dropdown (screen and print)
GENAZ 1028 – Summary of Eligibility DeliberationsSpecial Flag Description Comments
REMOVE_ELIG_504="YES" Removesboxes for 504 Eligibility(screen and print)
SHOW_AGREE_DISAGREE="Y" Adds ‘Agree/Disagree’ column toStaff grid (screen and print)
GENAZ 2001 – Evaluation ReportSpecial Flag Description Comments
USE_PROP_OVERRIDE_FOR_TEST_SCORE_ LABEL=YES
Allows for PropertyOverride ofScore column title in ExistingData,State and District Tests >Show Detail (screen and print)
Doesnot apply to 2001W (MTR)
COM_DEV_PS_GD =SHOW
For PS-Grade students only, a‘Comprehensive DevelopmentalAssessments’ grid appears onExisting Data tab. (screen andprint)
Doesnot apply to 2001W (MTR)
GENAZ 2001W – Evaluation ReportSpecial Flag Description Comments
SHOW_PARENT_AGREE_DISAGREE="YES"
Enables theAgree/Disagreecolumn of Parent Participants onscreen and corresponding checkboxes in print. Anyother value than "YES" or omission
disables the function.SHOW_STUDENT_AGREE_DISAGREE="YES"
Enables theAgree/Disagree drop-down for the student on screen andcorresponding checkboxes in print.
GENAZ 3001 – Three Year Reevaluation DeterminationSpecial Flag Description Comments
DETERMINATION_STATIC_TEXT_1="INSERT TEXT HERE"
DETERMINATION_STATIC_TEXT_2="INSERT TEXT HERE"
Allows for custom text before andafter checkbox for ‘Continue toidentify the student…’ (screen andprint)
Copyright 2016-2017 Edupoint Educational Systems, LLC

128 Administrator Guide for MissouriChapter 7: Document Configuration
GENAZ 4001 – Meeting RequestSpecial Flag Description Comments
USE_MAILING_ADDRESS=YES Parent address isMailing, not Home(screen and print)
ACKNOWLEDGEMENT_LIST =SHOW
Allow for substitution of Parentstatements (Lookup:K12.SpecialEd.AZ.Document >Bv104 Acknowledgment List)(screen and print)
SHOW_SHORT_POSTSEC_STMT =YES
Statement in print is the same asonscreen, without additional text aboutstudent invited to attend, etc. (printonly)
DEFAULT_RESULT_AVAILABLE_LABEL=TRUE
Allows for printing of PropertyOverride,K12.SpecialEd.AZ.Document >BV104MeetingNotice >ResultAvailable (print only)
GENAZ 4003 – Receipt for 504 NoticeSpecial Flag Description Comments
NO_DEFAULT_CASE_MANAGER="Y"
‘Staff Name’ doesnot auto fill withCaseManager name, but isrequired to be completed on finalize(screen only)
CASE_MANAGER_LABEL="INSERTTEXT HERE"
‘CaseManager’ staff link label canbe edited (screen and print)
GENAZ 4004 – 504 Meeting NoticeSpecial Flag Description Comments
NO_DEFAULT_CASE_MANAGER="Y"
‘Staff Member’ doesnot auto fill withCaseManager name, but isrequired to be completed on finalize(screen only)
STAFF_PARTICIPANTS="SHOW" AddsStaff (Team) grid andOtherParticipants grid (screen and print)
GENAZ 4005 – Consent for 504 EvaluationSpecial Flag Description Comments
NO_DEFAULT_CASE_MANAGER="Y"
‘Staff Name’ doesnot auto fill withCaseManager name, but isrequired to be completed on finalize(screen only)
CASE_MANAGER_LABEL="INSERTTEXT HERE"
‘CaseManager’ staff link label canbe edited (screen and print)
Edupoint Proprietary and Confidential

Administrator Guide for MissouriChapter 7: Document Configuration 129
GENAZ 4006 – 504 Evaluation ReportSpecial Flag Description Comments
HIDE_OTHER_INFO="YES"
Controls the visibility ofOtherInfofield on the screen and in print. Avalue of Yesor Y hides the field, anyother value or omission of thespecial flag displays the field.
SHOW_NEED_ACCOMM_YN="YES"
Controls the visibility ofNeedAccommYN field on thescreen and corresponding label andcheckboxes in print. A value of Yesor Y displays the field, anyothervalue or omission of the special flaghides the field
SHOW_IMPAIRMENT_YN="YES"
Controls the visibility ofImpairmentYN field on screen andthe corresponding label andcheckboxes in print. A value of Yesor Y displays the field, anyothervalue or omission of the special flaghides the field
GENAZ 4007 – 504 Progress MonitoringSpecial Flag Description Comments
NO_DEFAULT_CASE_MANAGER="Y"
‘Staff Name’ doesnot auto fill withCaseManager name, but isrequired to be completed on finalize(screen only)
CASE_MANAGER_LABEL="INSERTTEXT HERE"
‘CaseManager’ staff link label canbe edited (screen and print)
GENAZ 4008 – 504 PlanSpecial Flag Description Comments
NO_DEFAULT_CASE_MANAGER="Y"
‘Staff Name’ doesnot auto fill withCaseManager name, but isrequired to be completed on finalize(screen only)
REMOVE_CONSENT=YESRemoves ‘Consent Given’ and‘Consent Received Date’ fields(screen and print)
PARTICIPANTS_TAB_LABEL="Customize"
Changes the label of theParticipants tab
Use with HIDE_PARTICIPANTS_SECTIONspecial flag to removeConsent from the tablable when you remove the Participantssection.
GENAZ 5000 – Placement DeterminationSpecial Flag Description Comments
USE_CUSTOM=Y Adds ‘Consulted/Present’ column toParticipants (screen and print)
Copyright 2016-2017 Edupoint Educational Systems, LLC

130 Administrator Guide for MissouriChapter 7: Document Configuration
Special Flag Description Comments
PLCMNT_DISPLAY_TYPE=CODE
Placement Code in PlacementDecision in Show Detail of‘Description of Option considered’ inPlacement Decisions tab showsasCode only (for example, ‘36’)(screen and print)
PLCMNT_DISPLAY_TYPE=CODE_DESC
Placement Code in PlacementDecision in Show Detail of‘Description of Option considered’ inPlacement Decisions tab showsasCode +Description (for example,’36-Oregon School for the Deaf’)(screen and print)
GENAZ 5001 – Eligibility SummarySpecial Flag Description Comments
STATIC_MTG_PART_INST = "DO_NOT_SHOW"
Removes ‘EligibilityDetermination’groupbox fromEligibilityDetermination tab (screen andprint)
STATIC_ELIG_DET_INST = "DO_NOT_SHOW"
Removes ‘Instruction’ groupboxfromEligibility Determination tab(screen and print)
GENAZ 5002 – Evaluation Report (METOR)Special Flag Description Comments
SHOW_ADL_DATA_DES_LBL=SHOW
PropertyOverride for AdditionalData Description on Existing Datatab appears in print when ‘dataneeded’ is selected. (screen andprint)
NO_DATA_NO_PRINT_LABEL="YES"
If no data is entered, the labels for‘Eligibility Text: ‘, ‘Referral’, ‘Stateand District Testing’, ‘Background,Medical and DevelopmentalInformation...’, and ’ Impact ofEducationalDisadvantage…’do notappear in print (print only)
Prior Written NoticeSpecial Flag Description Comments
PARENT_CONSENT=SHOWAddsConsent for SpecialEducation Action section to anyPWN (screen and print)
STU_PARENT_SALUTATION = "YES"Adds ‘/Student’ to ‘DearParents/Guardians’ (screen andprint)
PAR_NOT_REQUIRE_ADVANCED_NOTICE="SHOW"
Adds reference to 10 DayNotice toParent RightsStatements (screenand print)
LACK_INSTR_LIMITED_ENG_SECTION="HIDE"
Hides statements about ‘lack ofinstruction’ and ‘limited Englishproficient’ (screen and print)
Edupoint Proprietary and Confidential

Administrator Guide for MissouriChapter 7: Document Configuration 131
Special Flag Description CommentsPURPOSE_STATEMENT="INSERT TEXTHERE"
Allows for editing of ‘To be given toparents…’ statement (print only)
PARENT_INITIALS="HIDE"‘ProceduralSafeguardsprovided toparent(s)’ field doesnot appear(screen and print)
Eligibility DeterminationSpecial Flag Description Comments
BED_VALID_DECISION="YES" Adds validation to require anEligibilityDecision
Validation Rule Tab
The Validation Rules for PWNs are set to flag the user before the document can be saved.
Use theValidation Rule tab to change the validation to occur only when finalizing the PWN.
Document Definition Screen, Validation Rule Tab
1. Select the Finalize Only option that you want validated only when finalizing the document.2. ClickSave.
Copyright 2016-2017 Edupoint Educational Systems, LLC

132 Administrator Guide for MissouriChapter 7: Document Configuration
Eligibility Determination Tab
The Eligibility document templates have specific settings applied.
TheValidation BO, Validation Rules, and Text Overrides tabs do notapply to Eligibility Determination documents.
The followingmay bemodified to fit the district's needs.
Document Definition Screen, EligibilityDetermination Tab
l Description of Eligibility –Modify the description in the text box.l Disabilities covered by this document – Connects this document to specific disabilities inthe system.
l Eligibility Criteria – Use to add the Eligibility Criteria options in a student's eligibilitydocuments.
Document Definition Screen, EligibilityDetermination TabMatched To Student EligibilityDetermination Screen
Edupoint Proprietary and Confidential

Administrator Guide for MissouriChapter 7: Document Configuration 133
1. ClickShow Detail.2. Define the Eligibility Criteria.
l Title of Checkbox List – (Optional) Enter a sentence to display before thecriteria options.
l Validation Rule – (Optional) Check to allow only one option to be selected.l Checkbox List:
a. ClickAdd. A new row displays.b. Enter theView Order,Code, andCheckbox Text.
Document Definition Screen, EligibilityDetermination Tab
3. ClickSave.
Copyright 2016-2017 Edupoint Educational Systems, LLC

134 Administrator Guide for MissouriChapter 7: Document Configuration
Print Only Tab
Print only documentsmay be added to Synergy SE asAdHoc documents. There are twomethodsfor creating the format of the document.
l Entering the text directly in thePrint Only tabl UsingMail Merge 2.0 to import the formatting.
Using Document Body
Use theDocument Body field to create documents with simple formatting similar to using a texteditor.
1. Enter theDocument Body:l Type the documentl Copy and paste text from a text editor
2. ClickSave.
Document Definition Screen, Print OnlyTab
Edupoint Proprietary and Confidential
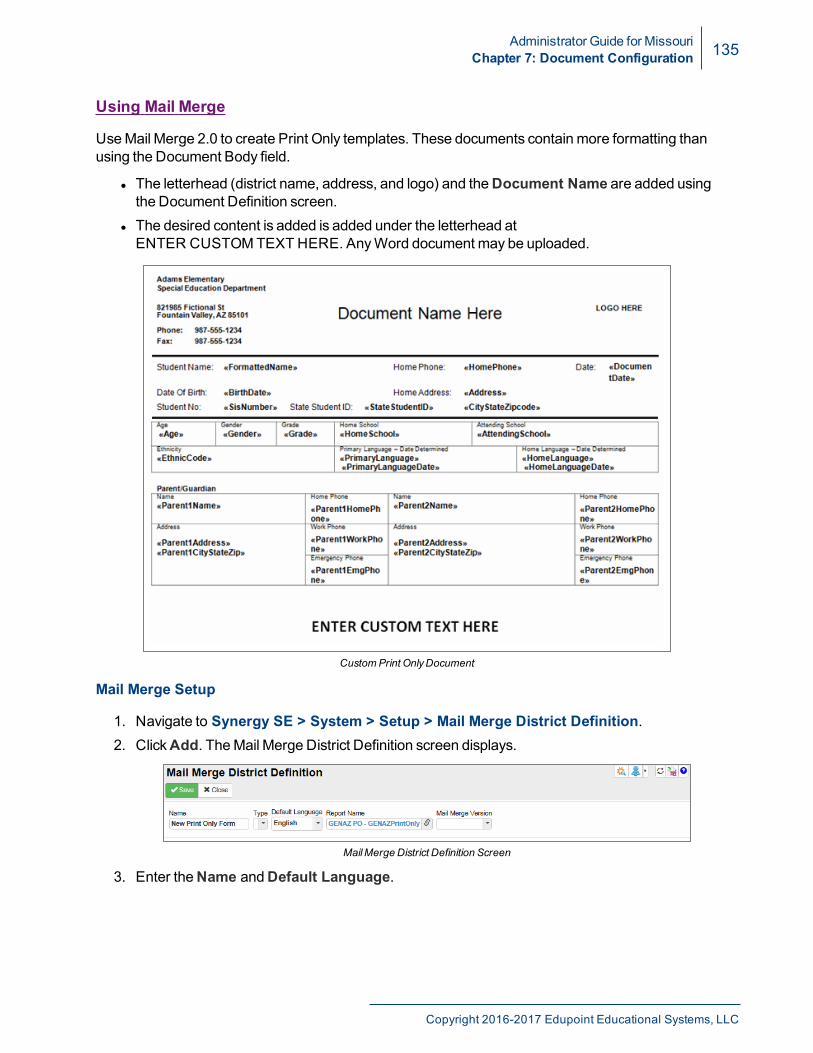
Administrator Guide for MissouriChapter 7: Document Configuration 135
Using Mail Merge
UseMail Merge 2.0 to create Print Only templates. These documents contain more formatting thanusing the Document Body field.
l The letterhead (district name, address, and logo) and theDocument Name are added usingthe Document Definition screen.
l The desired content is added is added under the letterhead atENTER CUSTOM TEXT HERE. AnyWord document may be uploaded.
CustomPrint OnlyDocument
Mail Merge Setup
1. Navigate to Synergy SE > System > Setup > Mail Merge District Definition.2. ClickAdd. TheMail Merge District Definition screen displays.
MailMerge District Definition Screen
3. Enter theName andDefault Language.
Copyright 2016-2017 Edupoint Educational Systems, LLC

136 Administrator Guide for MissouriChapter 7: Document Configuration
4. Click to select theReport Name ofGENAZPrintOnly.
Find: ReportDef Screen
5. ClickSave.6. ClickAdd to browse to select and find theWord document to upload.7. Select the Language.
MailMerge District Definition Screen
8. ClickSave.
Document Definition Setup
1. Use the Document Definition Tab instructions to define the document. Use the followingsettings:
l Under General:
l Special Document Type – SelectPrint Only.l Ad Hoc – Select the option.
l Under Properties:
l Allow Multiple –May be checked.l Report Interface – EnterGENAZPrintOnly (K12.SpecialEd.AZ.Document).l Leave all other fields blank.
Edupoint Proprietary and Confidential

Administrator Guide for MissouriChapter 7: Document Configuration 137
l Under Interface:
l Create Namespace – Enter K12.SpecialEd.AZ.Document.l Create Class – EnterGENAZPrintOnly.l Extract Data Namespace – Enter K12.SpecialEd.AZ.Document.l Extract Data Container – EnterGENAZPrintOnly.
Document Definition Screen, Print OnlyTab
2. ClickSave.3. On thePrint Only tab, select the name of the document in theMail Merge District
Document drop-down.4. ClickSave. The document is available in the student's Ad Hoc Documents tab.
Copyright 2016-2017 Edupoint Educational Systems, LLC

138 Administrator Guide for MissouriChapter 7: Document Configuration
Prior Written Notice Tab
For documents that are Special Document Type Prior Written Notice (PWN):
1. Complete theMain section:
Document Definition Screen, Prior Written Notice Tab
l A/B Type –Select to have two states for the PWN. For example,Eligible orNotEligible.�
l Reeval Process Movement�l N – DisplaysN to indicate that the document uses the normal process document.Same as blank.
l Allow ProcessMovement – Select to indicate that when the document is finalizedthe student moves to the next process.
l Exit Process – Select to indicate that when the document is finalized the studentexits fromSynergy SE. For example: Notice of Termination.
l Short Description – Enter an abbreviated description of the PWN action whichappears on the printable document.�
l Long Description – Enter a detailed description of the PWN action, which appears onthe printable document.�
l Procedural Safeguards Statement – Enter a statement that overrides the defaultProcedural Safeguards statement or the Procedural Safeguards text entered in AutoPopulate for the this PWN.�
l Only or “Y” Statement – Enter the statement that appears on the PWN document.�
Edupoint Proprietary and Confidential

Administrator Guide for MissouriChapter 7: Document Configuration 139
l "N" Statement – If this PWN isA/B Type, enter a statement that is displaysdepending on the state of the document selected by the user.�
l Short Description of “Y” Statement – Enter an abbreviated description. Forexample,Evaluate.�
l Short Description of “N” Statement – If this PWN isA/B Type, enter an abbreviatedescription. For example,DoNot Evaluate.�
2. Complete the Statement List – Contains the descriptions for the four areas in the PWN. Thesestatements provide library statement options.
a. ClickShow Detail.b. Select a row.c. Edit the statements for the selection:
l ClickAdd to add a statement.l Short Description – Abbreviated version of the Long Description thatdisplays in the drop-down.
l Long Description – Themessage the displays in the printed form of the PWN.l A/B Type Yes – If the PWN is A/B Type, select the statement used for theYesanswer.
Document Definition Screen
Prior Written Notice Statement List
3. ClickSave.
Copyright 2016-2017 Edupoint Educational Systems, LLC

140 Administrator Guide for MissouriChapter 7: Document Configuration
Print Only PDF Documents
Edupoint recommends using thePrint Only tab in Document Definitioninstead of this process tomake updating the documents easier. Thismethod requires the server administrators to replace the files on all web-servers when an update to the document ismade.
Tomake PDFs available that can be placed on theAdHoc Documents tab:
1. Place the PDFs in a folder on each web-server. For example, your folder might be inc:/inetpub/wwwroot.
WindowsExplorer
2. Create a new Document Definition with the following.
l Documentl Descriptionl Ad Hoc – Select the option.l Doc in PDF Format – Exact file namewith .pdf. For example, if the file name is Spec EdPlan.pdf, enter Spec Ed Plan.
Document Definition Screen
3. ClickSave.
Edupoint Proprietary and Confidential

Administrator Guide for MissouriChapter 7: Document Configuration 141
User Defined DocumentsUser Defined Documents allow district staff to build fully functional Synergy documents used in theSpecial Education system. These documents create both a data entry screen and a printeddocument that have the same look and feel as documents built by Edupoint developers.
Student data gathered by these documents saves to the Synergy database, whichmakes it availablefor query.
Use these documents:
l For Special Education, 504, or bothl As part of a process or as an AdHoc document
User Defined Documents do not contain logic such as the IEP, IFSP,METs, 504 Plan, Eligibility Documents.
Components
User Defined SE Documents use four separate components found in in the PAD tree.
l Document Definition located at Synergy SE > System > Special Education >Document Definition – Used for defining a variety of documents including general purpose,Eligibility Determination, Prior Written Notice, PDF, and Print Only
l User Defined Data located at Synergy SE > System > Data and Views > User DefinedData – Used to create a variety of fields (individual or in grids) such as drop-downmenus,checkboxes, dates, and text boxes.
l View Change located at Synergy SE > System > Data and Views > View Change –Used to create tabs, group boxes, and allows placement of fields and grids in various screens.
l Mail Merge District Definition located at Synergy SE > System > Setup > Mail MergeDistrict Definition – Allows the creation of aWord document that canmerge data from thedatabase. The product is a printed format that includes individual student information.
Those with experience using any of these components already have the ability to create documentsusing the User Defined SE Documents tool.
See the Customizing Screens chapter in theSynergy SIS – SystemAdministrator Guide for more information.
Copyright 2016-2017 Edupoint Educational Systems, LLC

142 Administrator Guide for MissouriChapter 7: Document Configuration
A unique feature of User Defined SE Documents is that it pulls all of these components together onthe Document Definition screen in the Properties section to simplify the steps required to build adigital document. It empowers the user to replicate documents that meet the specific needs of theSpecial Education and 504 departments.
l Open UD Document View�
Same asView Change found in the PAD Tree.
l Creates the data entry screenl Adds tabsl Adds group boxesl Places fields and grids in the various locations of the data entry screen
l View to Edit Document�
l Blank until you add the view/data entry screen�
l Mail Merge�
Same asMail Merge District Definition found in the PAD Tree
l Mail Merge District Document – Blank until you create document withCreateStarter Mail Merge Template
l Complete the Document Definition prior to configuringMail Merge.
Document Definition Screen
Edupoint Proprietary and Confidential

Administrator Guide for MissouriChapter 7: Document Configuration 143
Document Definition
It is useful to have a prototype of the finished product for reference.However, a new look for the document may enhance the original concept.For example, replacing blank lineswith a drop-downmenu or date field.
If youmakemodifications to the document such as adding fields,remember to update and repost the template.
1. Navigate toSynergy SE > System > Special Education > Document Definition.2. ClickAdd.3. Complete the fields.
Field Name Notes
Document (Required) Enter a unique identifier
User Defined Document Select
Description (Required) Description of the document
View Order (Required) Enter a number to define the sequence order
Title to Appear on Printed Report Enter a title to appear at the top of the document
Create Namespace K12.SpecialEd.Document
Create Class UDDocument
Even if the final destination is a process, selectAd Hoc to have atemporary easy to find location to check your work.
Selecting User Defined Document changes the fields displayed onthe screen.
Copyright 2016-2017 Edupoint Educational Systems, LLC

144 Administrator Guide for MissouriChapter 7: Document Configuration
Document Definition Screen
Create Fields and Grids
See Adding CustomFields in theSynergy SIS - SystemAdministratorGuide for more information.
1. ClickOpen UD Document View.
Document Definition Screen
2. ClickOpen UD Document Data.
UDDocument View Screen
Edupoint Proprietary and Confidential

Administrator Guide for MissouriChapter 7: Document Configuration 145
3. ClickAdd.
UDDocument View Screen
4. SelectOne ToOne inRelationship Type to StudentDocument.
Create aOne-to-OneUD BusinessObject for each new userdefined document.
l One ToMany (Grid) – To create a UD table for a grid, create aUD Document Data (BO) that is of One-To-Many relation typeto K12.SpecialEd.Document. Add properties used for thecolumns.
l One ToMany (Checkbox List) – To create a UD table for acheckbox list, use a Lookup Table property.
5. Enter aBO Name that begins withUD.6. Enter aDB Table Name that begins withUD.7. ClickSave.
UDDocument Data Add Screen
8. Select theProperties tab.9. ClickAdd to add the desired properties for the UD BO.10. ClickSave.
UDDocument Data Screen, PropertiesTab
Copyright 2016-2017 Edupoint Educational Systems, LLC

146 Administrator Guide for MissouriChapter 7: Document Configuration
11. Select theBasic Info tab.12. ClickSynchronize Database.
Youmust synchronize the database anytime properties aremodified for UD Document Data
13. The Job Result screen displays.
Create UD Table Screen
Create the UD Document View
SeeChanging Screens in theSynergy SIS - SystemAdministrator Guidefor more information.
1. ClickAdd View.
UDDocument View Screen
2. Enter theName.3. Select to includeParticipants Tab and/orAttachments Tab if needed.
Add View Screen
Edupoint Proprietary and Confidential

Administrator Guide for MissouriChapter 7: Document Configuration 147
4. Click Is Detail View to include a detail view for the grid.
l Enter aName.l Select thePrimary Object for this Detail View.
Add View Screen
5. ClickSave.
All UD Documents contain aDocumentDate field. DONOTremove.
UDDocument View Screen
6. Use theActions menu to add content to the screen. The list differs depending on the locationin the View Modifications tree.
UDDocument View Screen
Copyright 2016-2017 Edupoint Educational Systems, LLC

148 Administrator Guide for MissouriChapter 7: Document Configuration
Select View to Edit
1. Select theView to Edit Document on the Document Definition screen for the document.2. ClickSave.
Document Definition Screen
Edupoint Proprietary and Confidential

Administrator Guide for MissouriChapter 7: Document Configuration 149
Mail Merge Definition
You can create your ownmail merge template using the instructions in theSynergy SIS - Mail Merge 2.0 User Guide or useCreate Starter MailMerge Template.
1. ClickCreate Starter Mail Merge Template on the Document Definition screen for thedocument.
2. Modify the template if needed. The user defined information displays after the templateinformation.
MailMerge Starter Template
Once you have opened the starter template, clickOpen Mail MergeDistrict Definition to view andmake changes.
Copyright 2016-2017 Edupoint Educational Systems, LLC

150 Administrator Guide for MissouriChapter 7: Document Configuration
3. Select your document fromMail Merge District Document.
Document Definition Screen
4. ClickSave.
Example UD Document
An example UD Document View:
UDDocument View Screen
Edupoint Proprietary and Confidential

Administrator Guide for MissouriChapter 7: Document Configuration 151
1. Navigate toSynergy SE > Student > Student.2. Locate the document in theAd Hoc Documents tab or Process Docs tab.3. Open the UD Document screen.
UDDocument Screen
Copyright 2016-2017 Edupoint Educational Systems, LLC

152 Administrator Guide for MissouriChapter 7: Document Configuration
UDDocument Screen, User Defined Tab (Interventions)
UD Document Screen, User Defined Tab (Attendance History)
UD Document Screen, User Defined Tab (Cultural Factors)
Edupoint Proprietary and Confidential

Administrator Guide for MissouriChapter 7: Document Configuration 153
4. ClickPrint Preview to view the printed document
Printed UD Document – Page 1
Copyright 2016-2017 Edupoint Educational Systems, LLC
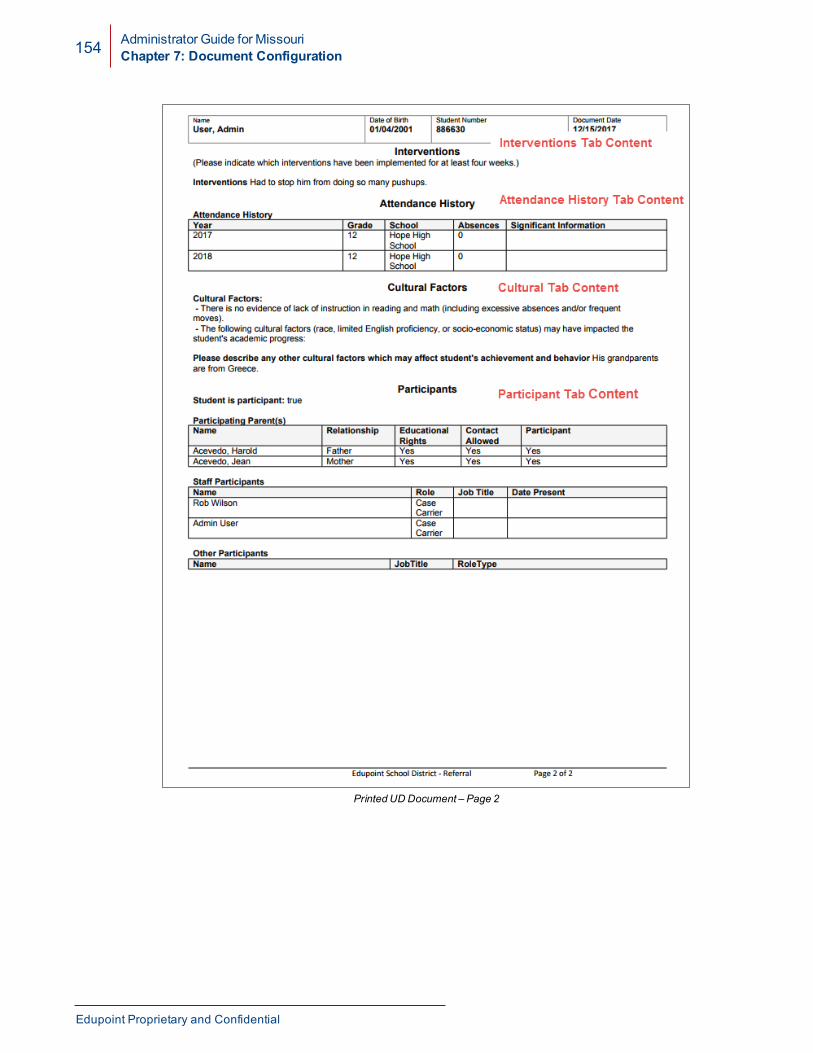
154 Administrator Guide for MissouriChapter 7: Document Configuration
Printed UD Document – Page 2
Edupoint Proprietary and Confidential

Administrator Guide for MissouriChapter 7: Document Configuration 155
Translation of Documents
The required language packsmust have been imported to Synergy SIS.See theSynergy SIS – SystemAdministrator Guide.
Translation Process Overview
The documents that can be currently translated are:
l Individualized Education Plan (IEP)l Evaluation reportsl Meeting notices
l Prior Written Noticesl Parent permissionl Behavior Intervention Plan (BIP)
The Translation process includes:
1. Selecting the language2. Selecting items to be translated3. Running the items through a translation engine4. Refining the translation
Setup to Translate Text Boxes
1. Navigate toSynergy SE > System > Setup > System Configuration.2. Select theOptions tab.3. In the API Configuration section, enter yourMicrosoft Translate Subscription Key.
If you do not have a key, click theMicrosoft Translation API linkthat appears above the box in order to purchase a key.
SystemConfiguration Screen, OptionsTab
4. ClickSave.
Copyright 2016-2017 Edupoint Educational Systems, LLC

156 Administrator Guide for MissouriChapter 7: Document Configuration
Translation Screen
The Translation screen has five tabs:
Translation Screen
l Reports – Use to translate large portions of documents such as the IEPl BusinessObjects – Use to translate specific items that are not translated using the other tabsl Lookup – Use to translate individual drop-downmenus based on the lookup table identifiedusingmouseover
l Views – Use to translate an entire view. Most commonly used for documentsl Master Data – Use to translate Auto Populate items and Prior Written Notices
Translating a Document
These steps describe theReports tab. Additional translationmay berequired on the other tabs.
1. Navigate toSynergy SE > System > Setup > Translation.2. Select the Translation Language.
Translation Screen
Edupoint Proprietary and Confidential

Administrator Guide for MissouriChapter 7: Document Configuration 157
3. Use the Filter Options to select the document to be translated:
l Reports Tab
a. Select theNamespace andName.�
b. ClickFilter�. The grid updates.
4. Translate the sections of the report:
l To translate a specific section, clickTranslate� on the row to be translated. The rowdisplays as translated.
Translation Screen
l To translate all of the BusinessObjects and/or Lookup table items:
a. Select the options:�l Apply Report Filters to Business Objectsl Apply Report Filters to Lookups
b. Click Create Default Translation�. The Job Details window displays.
c. ClickRefresh Condition Status�. The Translation displays in the Reports
grid� and the options show the items that were translated�.
Translation Screen
Copyright 2016-2017 Edupoint Educational Systems, LLC

158 Administrator Guide for MissouriChapter 7: Document Configuration
5. Review the translated sections.
a. Modify the Translation as needed in the text box.
Youmust change the tokens back to English in the Translationcolumn.
For example, change [! Organizacion] to [!Organization] to printthe Organization name on the translated document.
Translation Screen
b. Select the Lock option if youmodified the Translation.c. ClickSave.
6. Preview a student's document that was translated.
If additional translation is required complete these steps on theother tabs. See PerformAdditional Translation.
Perform Additional Translation
If translation is required using the other tabs, use the steps inTranslating aDocument with the following steps to complete the translation.
1. Identify any BusinessObjects that were not translated.
a. Usemouseover to locate the BusinessObjects that still need translation.b. On theBusiness Objects tab, enter theNamespace,Name, andProperty for the
BusinessObject in the text box.c. ClickFilter. The grid updates.
Translation Screen, BusinessObjectsTab
Edupoint Proprietary and Confidential

Administrator Guide for MissouriChapter 7: Document Configuration 159
2. Identify any Lookup drop-downs that were not translated.
a. Usemouseover to locate the Lookup drop-downs that still need translation.b. On the Lookup tab, enter theNamespace andName in the text box.c. ClickFilter. The grid updates.
Translation Screen, Lookup Tab
3. Identify any Auto Populate data that was not translated. On theMaster Data tab:a. SelectAuto Populate from Filter Group.b. Select theNamespace andName.c. SelectAuto Populate.d. Select theProperties.e. ClickFilter. The grid updates.
Translation Screen, Master Data Tab
Copyright 2016-2017 Edupoint Educational Systems, LLC

160 Administrator Guide for MissouriChapter 7: Document Configuration
4. Identify any Prior Written Notice data that was not translated. On theMaster Data tab:a. SelectPrior Written Notice from Filter Group.b. Select theNamespace andName.c. SelectDocument Definition.d. Select theProperties.e. ClickFilter. The grid updates.
Translation Screen, Master Data Tab
5. Translate any screen information. On theViews tab:a. Select theNamespace andName.b. ClickFilter. The grid updates.
Translation Screen, ViewsTab
Generating a List of Translated Documents
Setup
1. Download theU-TRANS-01.RPT Siren Report from ftp://ftp.edupoint.com/_Documentation/Synergy_Technology/SIREN/Sample_Reports/.
2. Import the report.
For instructions seeSIREN Report DesignersGuide.
Edupoint Proprietary and Confidential

Administrator Guide for MissouriChapter 7: Document Configuration 161
Running the Report
1. Open the Report Interface2. Select the options.3. ClickPrint.
List Of Translated Report Definitions
Disabling Historical Document ValidationNew validations provide amethod to exempt unlocked documents from new validations. To bypassvalidations for historical documents, including IEPs, hide the columns using Security Definition.
Security Definition
1. Navigate toSynergy SE > System > Security > Security Definition.2. Navigate toK12 > SpecialEd > Document > StudentDocumentUnlockGrid.
a. Select the Group Property Access tab.b. ClickShow Detail.c. Select the desired option from the IsIgnoreValidation drop-down.
Set toNone to hide the columns.
SecurityDefinition Screen
3. ClickSave.
Copyright 2016-2017 Edupoint Educational Systems, LLC

162 Administrator Guide for MissouriChapter 7: Document Configuration
4. Navigate to K12 > SpecialEd > Document > IEPUnlockGrid.a. Select the Group Property Access tab.b. ClickShow Detail.c. Select the desired option from the IsIgnoreValidation drop-down.
Set toNone to hide the columns.
SecurityDefinition Screen
5. ClickSave.
Edupoint Proprietary and Confidential

Administrator Guide for MissouriChapter 7: Document Configuration 163
Unlocking a Student Document
Enabling a Document to be Unlocked
1. Navigate toSynergy SE > System > Special Education > Document Definition.2. Find and select the document.3. Select theDocument can be unlocked option.
Document Definition Screen
4. ClickSave.
Unlocking a Document
1. Navigate toSynergy SE > NTL > Student Document Unlock.2. Find and select student. A list of finalized documents that have been set toDocument can be
unlocked in Document Definition and any IEPs or amendments appear in the list.
3. Click theUnlock� link in the Action column. The PDF icon turns and the Action is Edit.
Edit the documents in the normal manner from the Student orPortfolio screens. They cannot be edited from the StudentDocument Unlock screen.
Copyright 2016-2017 Edupoint Educational Systems, LLC

164 Administrator Guide for MissouriChapter 7: Document Configuration
l ClickEdit� to view amessage that the IEP is unlocked. ClickOK to close themessage.
l Select the Ignore Validations option� to not check historical document against anynew validations that might be in force.
4. ClickShow Detail to see the unlock history.�
l Click to view the IEP.
Student Document UnlockScreen
Edupoint Proprietary and Confidential

Administrator Guide for MissouriChapter 7: Document Configuration 165
Recovering a Student IEP or Progress Report
Student IEPAnd ProgressReport Recover Screen
There are times that a student's IEP fails to create the PDF. The displays, but the PDF cannot beopened. Sometimes a teammember forgets to print and save a ProgressReport with additionalprogress periods before they finalize the IEP. The Student IEP and ProgressReport Recoverscreen allows administrators to create the PDFs.
The system ismost successful when recovering the IEP shortly after thefailure of the creation of the PDF. It is possible that the system can fail torecover the IEP when:
l A long time has passed between the PDF failure and the recoveryattempt
l The IEP itself is very oldl The IEP report template changed structurallyl There is a corrupt or poorly formatted attachment
1. Navigate toSynergy SE > NTL > Student IEP And Progress Report Recover.2. Find and select the student record.3. Recover the document:
l To recover an IEP, clickRecover. After processing:l The IEP displays as a PDFl The IEP is available in the Historical Documents
If the IEP cannot be recovered, a error message displays.
Copyright 2016-2017 Edupoint Educational Systems, LLC

166 Administrator Guide for MissouriChapter 7: Document Configuration
l To recover a ProgressReport, clickPrint Progress Report and Save to Historicalfolder. After processing:
l The ProgressReport displays as a PDF showing all progress periodsl The ProgressReport is available in the Historical Documents
Transferring IEPs Using ESRYou can request and receive an SE student’s IEP from a participating district.
For more information on setup and registering for Electronic StudentRecord (ESR), see the ESR section theSystemAdministrator Guide.
Responding to an IEP ESR Request
1. Log in to Synergy. A task displays an Electronic Student Data Request.
SynergyTaskList
2. Select the student’s name. The Electronic Student Record Received screen displayswith aWill Send IEP column representing the IEP status.
l If a student has a Current IEP, the box is checked.
a. Select I understand that choosing accept will send this studentsinformation to another district option.
b. ClickAccept. The IEP for the student transmits to the requesting district.
ElectronicStudent Record Request Received Screen
Edupoint Proprietary and Confidential

Administrator Guide for MissouriChapter 7: Document Configuration 167
c. If a student does not have a Current IEP in Synergy, the box is blank.
a. Add aComment to alert the requesting district that the student does nothave an IEP.
b. ClickReject. The requesting district is notified that the request wasrejected based on the Comment.
Receiving an ESR IEP
1. Log in to Synergy. A task displays an Electronic Student Data Request.
SynergyTaskList
2. Select the student’s name. The Electronic Student Record Response screen displayswith aStudent Special Ed Documents grid that includes the requested student’s Current IEP.
ElectronicStudent Record Response Screen
Copyright 2016-2017 Edupoint Educational Systems, LLC

168 Administrator Guide for MissouriChapter 7: Document Configuration
l To accept the IEP:
a. Select the appropriate value from theCategory drop-down.b. Add anyComments.c. ClickAccept. A confirmationmessage displays.d. ClickOK. The IEP saves to theHistorical Documents tab on the SE Student
screen.
If the student is not currently in SE, a record for the studentautomatically creates and the document displays in theHistorical Documents tab.
SEStudent Screen, HistoricalDocumentsTab
l To reject the IEP, clickReject. The student record is not changed.
Edupoint Proprietary and Confidential
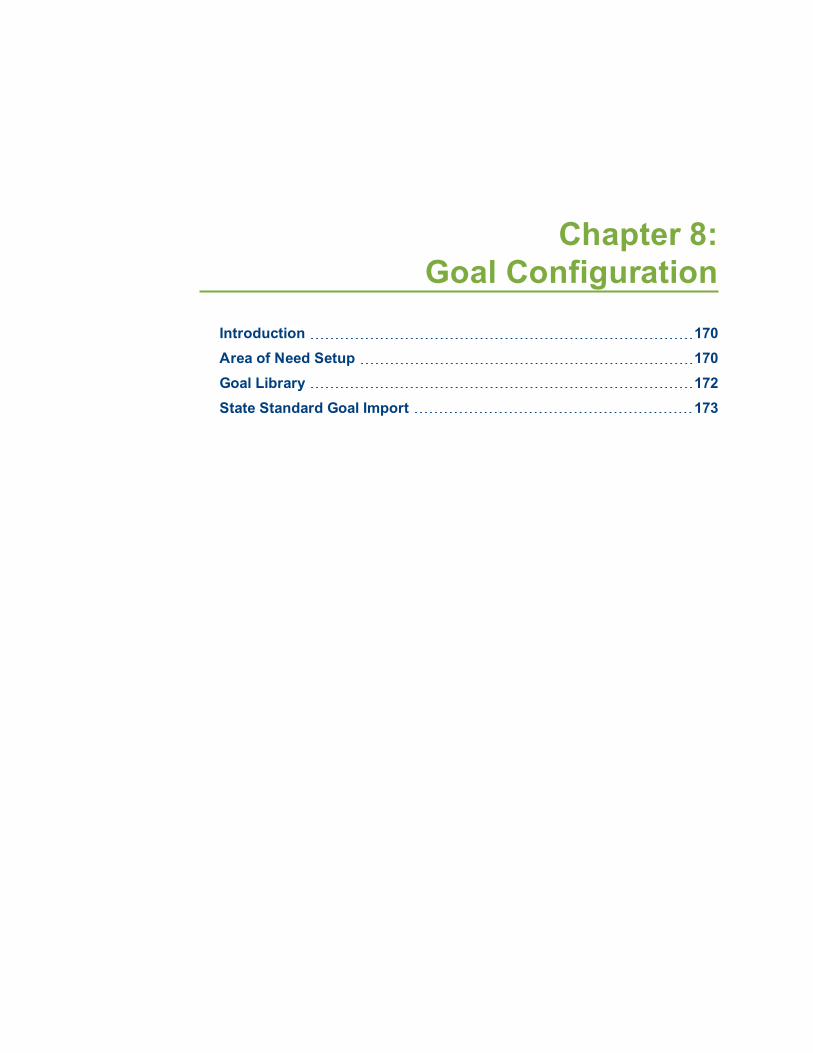
Chapter 8:Goal Configuration
Introduction 170Area of Need Setup 170Goal Library 172State Standard Goal Import 173

170 Administrator Guide for MissouriChapter 8: Goal Configuration
IntroductionDistrictsmay have a goal library that is organized into areas that focus on specific student needs.These goalsmay be aligned to the state standards. Existing district goalsmay be imported toSynergy SE with assistance fromEdupoint.
Use theGoal and Area of Needmodules to:
l Edit existing goalsl Add new goals including goals linked to standards
Area of Need SetupThe Area of Need Setup screen contains the Goal Categories and Sub-Categories that hold theindividual goal statements.
AreaOf Need Setup Screen
1. Navigate toSynergy SE > System > Special Education > Area of Need Setup.l ClickAdd to add an Area of Need Category. The Area of Need Setup screen displays.l Find and select an Area of Need tomodify an Area of Need Category. The Area ofNeed Setup screen displays.
It is recommended that Area of Needs are not deleted. Make theminactive using the Inactive Date field. Inactive Area of Needs are nolonger available for selection in any future IEP documents.
Edupoint Proprietary and Confidential

Administrator Guide for MissouriChapter 8: Goal Configuration 171
2. Define or modify the Area of Need:
l View Order – (Optional) Enter a number to sort the Categories in a specific order.l Area of Need – Enter a title for the Area of Need.l Inactive Date – (Optional) Select the date using the calendar icon that the Area ofNeed is no longer available for future IEP documents.
l IEP Titles ID – (Optional) – Enter a short title for the Area of Need.l Signature Title – (Optional)l Required if ELL Specified – Select if this goal is required when ELL is specified.
3. Define the Sub-Area of Need:
l To add a Sub-Area of Need:
a. ClickAdd. A new row displays.b. Enter aView Order andSub -Area of Need. The other fields are optional.
l Tomodify a Sub-Area of Need, modify the information in the row.
4. ClickSave.
Copyright 2016-2017 Edupoint Educational Systems, LLC

172 Administrator Guide for MissouriChapter 8: Goal Configuration
Goal LibraryTheGoal Library contains goal statements for each of the Area of Need categories.
Goal LibraryScreen
1. Navigate toSynergy SE > System > Special Education > Goal Library.2. Define the Goal:
l Goal Number – Not used by SE.l Need Area – Select a Area of Need category.l Need Sub Area – Select a Sub Area of Need category.l Key Word – Not used by SE.l Description – Enter the description of the goal that appears on the IEP.l State Standard – Not used by SE.l District Standard – Not used by SE.l Applicable to Disabilities – Not used by SE.l Applicable to Grades – Not used by SE.l Other – Not used by SE.
Edupoint Proprietary and Confidential

Administrator Guide for MissouriChapter 8: Goal Configuration 173
3. Add Benchmarks:
a. ClickAdd. A new row displays.b. Enter theDescription of the benchmark in the text box.
4. ClickSave.
State Standard Goal ImportStandards can be aligned with goals. There is a district option to import state standards fromSynergy SIS into Synergy SE.
If the district has not imported standards into Synergy SIS, contactEdupoint for assistance in importing the standards using SQL.
Goals that are attached to standards are selected for the IEP by selecting the Grade and Need Areaand searching by Strand/Concept/PerformanceObjective.
NTL Setup
1. Navigate toSynergy SE > NTL > Setup.2. Enter theStandard Goal Effective Date using the calendar icon on the IEP and Progress
Report Options tab.3. (Optional) Select whether to Append Standard code to Goal Description as aPrefix or
Suffix.
NTL Setup Screen
4. ClickSave.
Copyright 2016-2017 Edupoint Educational Systems, LLC
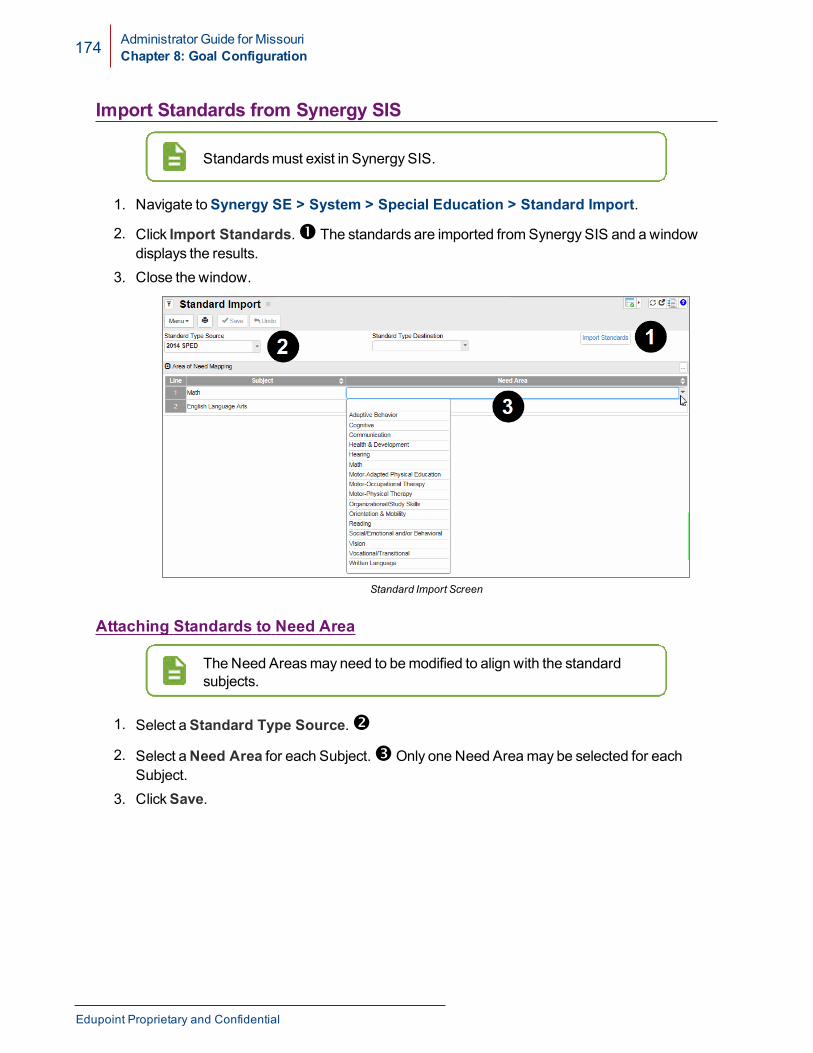
174 Administrator Guide for MissouriChapter 8: Goal Configuration
Import Standards from Synergy SIS
Standardsmust exist in Synergy SIS.
1. Navigate toSynergy SE > System > Special Education > Standard Import.
2. Click Import Standards.� The standards are imported fromSynergy SIS and a windowdisplays the results.
3. Close the window.
Standard Import Screen
Attaching Standards to Need Area
TheNeed Areasmay need to bemodified to align with the standardsubjects.
1. Select aStandard Type Source.�
2. Select aNeed Area for each Subject.�Only one Need Areamay be selected for eachSubject.
3. ClickSave.
Edupoint Proprietary and Confidential
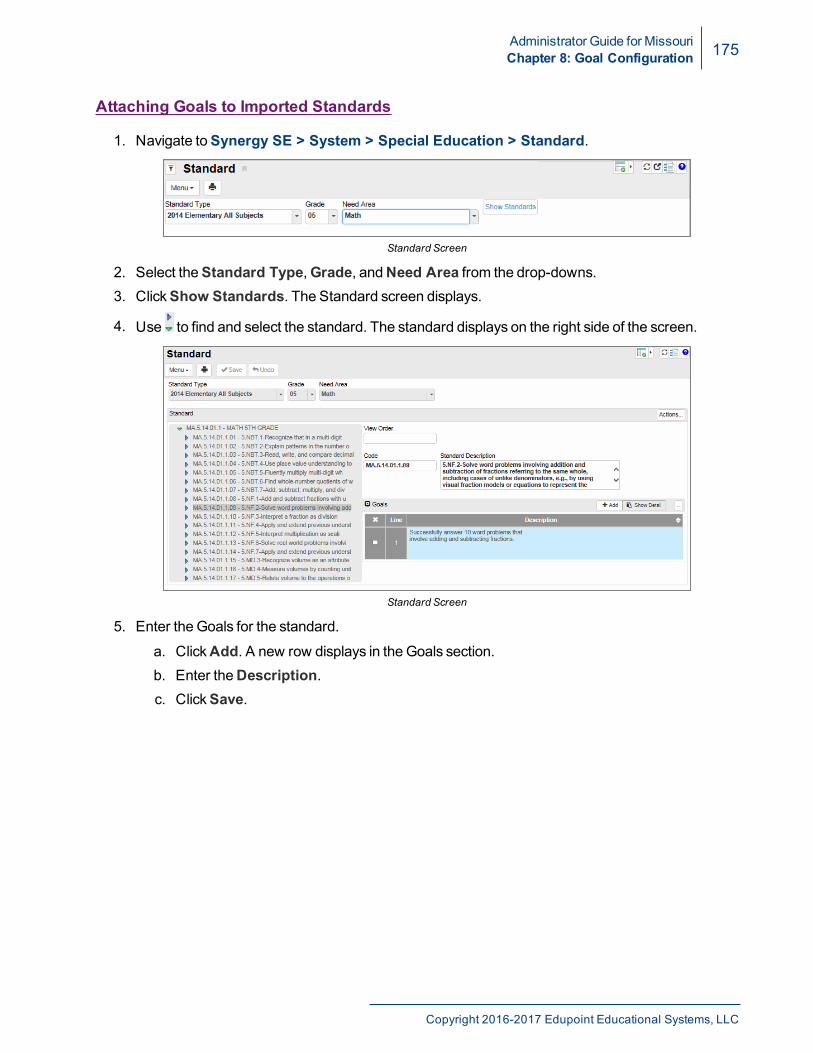
Administrator Guide for MissouriChapter 8: Goal Configuration 175
Attaching Goals to Imported Standards
1. Navigate toSynergy SE > System > Special Education > Standard.
Standard Screen
2. Select theStandard Type,Grade, andNeed Area from the drop-downs.3. ClickShow Standards. The Standard screen displays.
4. Use to find and select the standard. The standard displays on the right side of the screen.
Standard Screen
5. Enter the Goals for the standard.
a. ClickAdd. A new row displays in the Goals section.b. Enter theDescription.c. ClickSave.
Copyright 2016-2017 Edupoint Educational Systems, LLC

176 Administrator Guide for MissouriChapter 8: Goal Configuration
6. (Optional) Enter the benchmarks.
a. ClickShow Detail to add benchmarks.
Standard Screen Detail
b. Enter theSequence Number andDescription of the benchmark.c. ClickSave.
Edupoint Proprietary and Confidential

Chapter 9:Special Ed Test Definitions
Test Definition for Special Education 178Special Ed Test Definition 178Standardized Test Definition 186

178 Administrator Guide for MissouriChapter 9: Special Ed Test Definitions
Test Definition for Special EducationDistricts have the ability to edit existing test definitions aswell as create new definitions. Special Edtests exist in two categories:
l Special Ed Test Definitions are templates based on evaluation assessments. The templatesare accessed through the evaluation report (GENAZ 06).
l Standardized Test Definitions are templates based on district tests. The Standardized TestDefinitions are accessed through the:
l Referral document (GENAZ 01)l Evaluation report (GENAZ 06)l IEP
Special Ed Test DefinitionSynergy SE contains various assessment templates that are used in the student’s evaluationprocess. Existing assessments can be edited or removed and new assessments can be added tothe Standardized Test or Special Ed Test modules.
For more information on the other modules not covered in this Guide, refertoSynergy SIS – SystemAdministrator Guide
Adding a New Category
1. Navigate toSynergy SE > NTL > Special Ed Test Definitions.2. SelectAddCategory from theActions menu. The Special Ed Test Definition Category
screen displays.
Special Ed Test DefinitionsScreen
Edupoint Proprietary and Confidential

Administrator Guide for MissouriChapter 9: Special Ed Test Definitions 179
3. Define the category:
Special Ed Test Definition CategoryScreen
l Long Name – Enter the name to display in the tree.l Short Name – Enter a shorter version (maximumof 15 characters) of the name.l View Order – Enter a view order to display the test in a specific order, if needed.
4. ClickSave. The category displays in the tree.
Adding a Test Group to a Category
1. Select the category to bemodified. The Category Definition displays on the right.2. SelectAddGroup to 'Category' from theActions menu. The Special Ed Test Definition
Group screen displays.
Special Ed Test DefinitionsScreen
3. Define the test group.
Special Ed Test Definition Group Screen
l Long Name – Enter the name to display in the tree.l Short Name – Enter a shorter version (maximumof 15 characters) of the name.l View Order – Enter a view order to display the test in a specific order, if needed.l Report In Met Summary – Not used.
4. ClickSave. The Test Group displays in the tree
Copyright 2016-2017 Edupoint Educational Systems, LLC

180 Administrator Guide for MissouriChapter 9: Special Ed Test Definitions
Adding a Test to a Test Group
1. Use to find and select the Test Group.2. SelectAction > Add Test to 'Test Group'. The Special Ed Test Definitions screen displays.
Special Ed Test DefinitionsScreen
3. Define the test.
Special Ed Test Definition Test Screen
l Long Name – Enter the name to display in the tree.l Short Name – Enter a shorter version (maximumof 15 characters) of the name.l View Order – Enter a view order to display the test in a specific order, if needed.l Allow Not Applicable – Select to allow this test to bemarked not applicable.
4. ClickSave. The test displays in the tree.
Edupoint Proprietary and Confidential

Administrator Guide for MissouriChapter 9: Special Ed Test Definitions 181
Defining the Test
View a test that is similar to the one being created to understand how the setupworks.
1. Use to find and select the test. The Test Definition tab displays on the right.
Test Navigation
2. (Optional) Modify the Long Name, Short Name, or View Order3. Enter a Pre-Comment.
Test Definition Screen
l Visible – Select to have the Pre Comment text display on the screen.l Read Only – Select to not allow editing of the Pre Comment text.l Pre Comment:
l Enter the test name to have it display on the report.l Enter additional information to display after the test name but before the gridinformation.
4. Enter the Grid Definitions that contain the test scoring tables.
a. ClickAdd. A new row displays.
Do not addmore than eight rows per test definition.
b. Enter the Title andView Order.
Copyright 2016-2017 Edupoint Educational Systems, LLC

182 Administrator Guide for MissouriChapter 9: Special Ed Test Definitions
c. ClickSave.
Special Ed Test DefinitionsScreen
d. ClickShow Detail.
Special Ed Test Definition Screen
e. Define the Column.
l Column Name – Enter the column headingl Column Type – Select Text,Date, Yes/No drop-down, orMulti-Line Text.l Default Value – Select a default value for the column, if needed.l View Order – Enter a sequence number for the column.l Pre Population Type –Make a row selection:
l Nonel Number of Rows – If selected, enter the Number of Rows in the text box.l Define Rows – If selected, complete the Row Definition grid. Usually thisoption is selected.
l Subject Column Name – Enter the title of the first column of the table.l Pre-Defined Column Type – Select the type of data to be entered in the firstcolumn of the table.
Edupoint Proprietary and Confidential
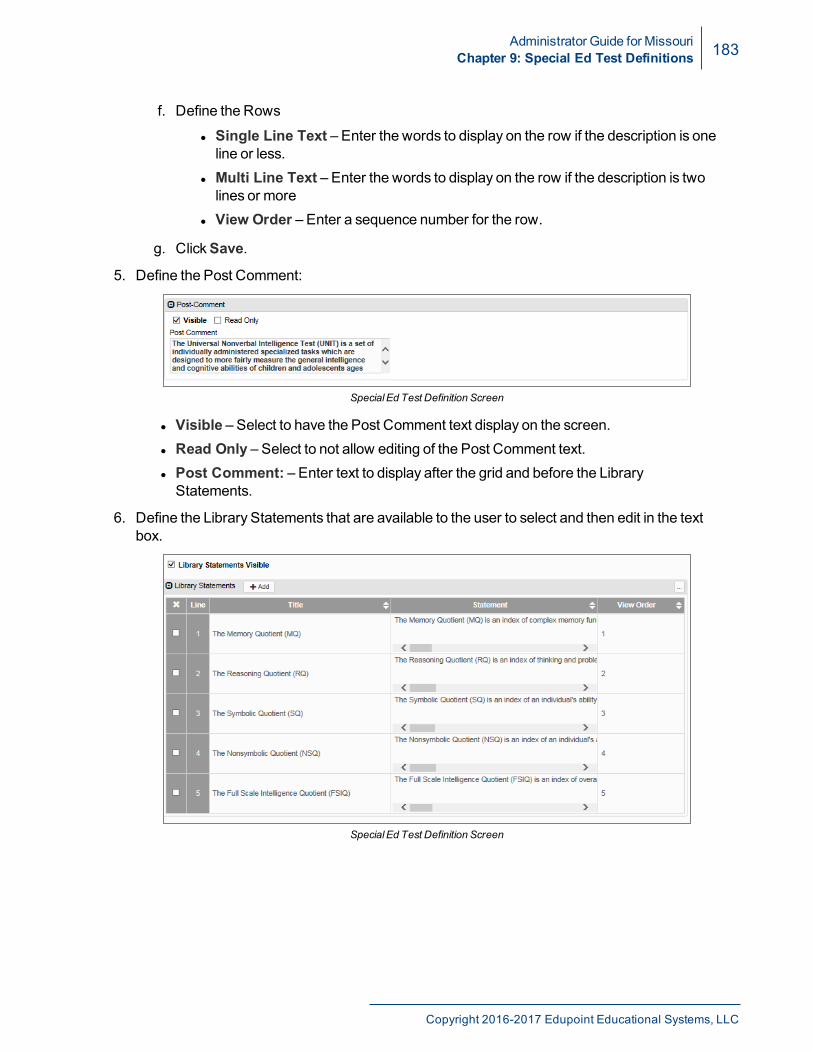
Administrator Guide for MissouriChapter 9: Special Ed Test Definitions 183
f. Define the Rows
l Single Line Text – Enter the words to display on the row if the description is oneline or less.
l Multi Line Text – Enter the words to display on the row if the description is twolines or more
l View Order – Enter a sequence number for the row.
g. ClickSave.
5. Define the Post Comment:
Special Ed Test Definition Screen
l Visible – Select to have the Post Comment text display on the screen.l Read Only – Select to not allow editing of the Post Comment text.l Post Comment: – Enter text to display after the grid and before the LibraryStatements.
6. Define the Library Statements that are available to the user to select and then edit in the textbox.
Special Ed Test Definition Screen
Copyright 2016-2017 Edupoint Educational Systems, LLC

184 Administrator Guide for MissouriChapter 9: Special Ed Test Definitions
7. Define Additional Data.
a. SelectShow "Charts and Graphs" memo field to allow staff to paste table andgraphs containing test information from a document created in another application suchasWord.
b. ClickSave.
c. Click to expand the formatting bar.
Special Ed Test DefinitionsScreen
8. ClickSave.
Test Definition Example
Student Evaluation Test Example
Edupoint Proprietary and Confidential

Administrator Guide for MissouriChapter 9: Special Ed Test Definitions 185
The test appears per the Test Definition:
l Pre-Comment�
l Subject Column Name usingPre-Defined Column Type�
l Column from theColumn Definition grid�
l Rows from theRow Definition grid�
l Post Comment�
l Library Statements�
Deactivating a Test
Make Special Ed Test DefinitionsCategories or Groups (Tests) Inactive.Do not delete tests.
From the Special Ed Test Definitions screen.
1. Select the category to be deactivated. The Category Definition displays on the right.2. Select the Inactivate option.
Special Ed Test DefinitionsScreen
3. ClickSave. The Special EdGroups and Sub-groupswhich exist under the selected Categoryare no longer accessible in theMET Report.
Special EdGroups and Sub-groupsmay be inactivated by checking Inactivateon their respective screens.
Special Ed Test DefinitionsScreen
Copyright 2016-2017 Edupoint Educational Systems, LLC

186 Administrator Guide for MissouriChapter 9: Special Ed Test Definitions
Standardized Test Definition
Defining Test Definitions
1. Navigate toSynergy SE > NTL > Standardized Test Definition. The Standardized TestDefinition screen displays.
l To add a test definition:
a. ClickAdd.b. Enter the Test Name and theView Order the test appears in Synergy
SE documents.c. ClickSave.
l To view or edit a test definition:
a. Enter the test name and clickFind.b. Select the test to be viewed on the Standardized Test Definition screen.
2. Define or modify the test.
l To allow users to define the subjects and test scores:
Standardized Test Definition Screen
a. Select User Defined Subjects.b. Enter the name of the columnwhere the score is entered in the User Defined
Score Label text box.
Edupoint Proprietary and Confidential

Administrator Guide for MissouriChapter 9: Special Ed Test Definitions 187
l To have the users select from a defined list of subjects and score names.
Standardized Test Definition Screen
l Define the Subjects
a. ClickAdd. A new row displays.b. Enter theSubject Name andView Order.
l Define the Score ColumnNames
a. ClickAdd. A new row displays.b. Enter theScore Name andView Order.
l (Optional) To have the user select the score from a list.
a. SelectPredefined Values.b. ClickSave.c. ClickShow Detail.d. ClickAdd. A new row displays.
Copyright 2016-2017 Edupoint Educational Systems, LLC

188 Administrator Guide for MissouriChapter 9: Special Ed Test Definitions
e. Enter theCode andDescription.
Standardized Test DefinitionsScreen
f. ClickSave.
3. (Optional) SelectGraduation Only if the test is for 12th Grade students only.4. ClickSave.
Deactivation Standardized Test Definitions
Make Standardized Test Definitions Inactive so they no longer display in SynergySE documents. Do not delete tests.
From the Standardized Definitions screen.
1. Find and select the test to be deactivated.2. Select Inactivate.3. ClickSave.
Edupoint Proprietary and Confidential

Chapter 10:Assistive Technology Tracking
AT Tracking 190AT Database 194Assistive Technology Reports 219

190 Administrator Guide for MissouriChapter 10: Assistive Technology Tracking
AT TrackingSynergy SE tracks an inventory, including current usage and location/assignment of AssistiveTechnology devices.
Define the Lookup Table Definitions.
Adding Devices
1. Navigate toSynergy SE > NTL > AT Tracking > AT Tracking.2. ClickAdd.
At Tracking Add Screen
3. Enter the Asset ID/Number, Item Description, andCategory.4. (Optional) Enter theModel Number, Serial Number and whether the device hasMissing
Parts or wasDisposed Of.5. ClickSave.
Tracking Current Use
1. Navigate toSynergy SE > NTL > AT Tracking > AT Tracking.2. Find and select the device.
Edupoint Proprietary and Confidential

Administrator Guide for MissouriChapter 10: Assistive Technology Tracking 191
3. Enter the CURRENT USE details:
AT Tracking Screen
l School – Select from all schools in the organization.l Other School – Enter any other location the item is located.l Staff Name – Select the staff member who has the device in their control.l Student – Enter the student name or other description of who is using the device.l Room Numberl Software Comp Inst ID – If software, indicate the asset information where thesoftware is installed.
l Descriptionl Notes
4. Enter the circulation history for the item under STATUS.
a. ClickAdd. A new line displays.
l Select theDate Out and enter Staff Name when the item is checked out.l Select the Date Returned and enter Staff Namewhen the item is returned.
AT Tracking Screen
Copyright 2016-2017 Edupoint Educational Systems, LLC

192 Administrator Guide for MissouriChapter 10: Assistive Technology Tracking
5. Record the origin and purchase history for the item under PRODUCT HISTORY.
AT Tracking Screen
6. ClickSave.
Uploading Data into AT Tracking
You can upload the information stored in the AT Tracking screen from a spreadsheet using theGeneric Conversion Tool (GCT) under Synergy SE > NTL > AT Tracking > AT Database.
Creating the Source Data File
1. Download theSpedATTracking.xlsx file from the FTP site.2. Complete the spreadsheet.
Do not change the column names or order. Theymust remain astheywere in the downloaded file.
3. Save theSpedATTracking.xlsx file on the server using theGCT.
Edupoint Proprietary and Confidential

Administrator Guide for MissouriChapter 10: Assistive Technology Tracking 193
Uploading the Source Data File
1. Open theGCT located in ../Program Files / Edupoint.
SynergyGenericConversion
2. Enter theUser Name andPassword used to login the website.3. Enter the serverApplication Path.4. Select thePath to Source Data Fileswhere theSpedATTracking.xlsx file resides.5. Enter School Year.6. Select theChild Data Processing Action from drop-down.7. ClickTest Connection to verify that the connection betweenGCT and the website is
successful.8. ClickGo to run the Tool. The Conversion Status shows the status of run.9. (Optional) View log files.
a. ClickOpen Log Folder to open the folder containing all the log files.b. Open the latest log file to see the changes.
Copyright 2016-2017 Edupoint Educational Systems, LLC

194 Administrator Guide for MissouriChapter 10: Assistive Technology Tracking
AT Database
Setup
Lookup Table Definition
Define the Lookup Table Definitions.
Auto Populate
Use Auto Populate to populate grids and drop-downs on the AT Database screen tabs.
AT Evaluation Report
Lists the options available in a drop-down for various sections of the AT Evaluation Report.
1. Navigate toSynergy SE > System > Setup > Auto Populate.2. Navigate toNTL > ATStudentDatabase > EvaluationReports.3. Enter theName andResponse for each option to display.
TheResponse displays in the text box below the drop-down.
Auto Populate Document Location
DisOrgStoreVocab AAC/AT Info tab, Vocabulary drop-down�
GoalOptionsAddl. Recomm & Supports tab, Possible Goals
for Home drop -down�
OtherAddArea AT Info tab, Other Additional Areas drop-down�
SpecialConsAAC/AT Info tab, Special Considerations drop-
down�
SwitchDirectSelect
l DirectSelectValues
l OneSwitchValues
l TwoSwitchValues
AAC/AT Info tab, Switch Scanning/Direct
Selection drop-down�You can enter options that display in theDetails drop-down that correspond toOne Switch/AutomaticScanning, Two Switch Step Scanning, and DirectSelection options.
SystemOutput AAC/AT Info tab, System Output drop-down�
TechnologyMatchAAC/AT Info tab, Technology Match drop-down
�
TrainingOptionsAddl. Recomm & Supports tab, Training drop-
down�
Edupoint Proprietary and Confidential

Administrator Guide for MissouriChapter 10: Assistive Technology Tracking 195
AT Evaluation Report, AAC/AT Info Tab
AT Evaluation Report, AAC/AT Info Tab
Copyright 2016-2017 Edupoint Educational Systems, LLC

196 Administrator Guide for MissouriChapter 10: Assistive Technology Tracking
AT Evaluation Report, Addl. Recomm. &SupportsTab
Referral Meeting Notes
Lists the options available in grids and drop-downs for various sections of the AT Evaluation Report.
1. Navigate toSynergy SE > System > Setup > Auto Populate.2. Navigate toNTL > ATStudentDatabase > ReferralMeetingNotes.3. Enter theName for each.
Entering aResponse has no affect on the grids.
Auto Populate Document Location
AACExperienceGridStudent tab, AAC Experience and
Current Use grid�
ComputerExperienceGridStudent tab, Computer Experience grid
�
CurrentCommunicationsModesGridStudent tab, Current Communications
Mode grid�
HomeGridEnvironment/Task/Tools tab, Home grid
�
Option
l N
l Y
Decision tab, Options drop-down�You can enter options that display in theOptiondrop-down that correspond toYesandNo option in theAT Evaluation isNecessary drop-down.
TheResponse displays in the drop-downand text box.
ParentalInvolvementGrid Student tab, Parental Involvement grid�
Edupoint Proprietary and Confidential

Administrator Guide for MissouriChapter 10: Assistive Technology Tracking 197
Auto Populate Document Location
TeamAgreementEnvironment/Task/Tools tab, Team
Agreement drop-down�
AT ReferralMeeting NotesScreen, Student Tab
AT ReferralMeeting NotesScreen, Environment/Tasks/ToolsTab
Copyright 2016-2017 Edupoint Educational Systems, LLC

198 Administrator Guide for MissouriChapter 10: Assistive Technology Tracking
AT ReferralMeeting Notes, Decision Tab
Device Trials Report
Replaces the Prior Written Notice text in the report.
1. Navigate toSynergy SE > System > Setup > Auto Populate.2. Navigate toNTL > ATStudentDatabase > Statements.3. Enter PWN as theName.4. Enter theResponse that replaces the original PWN statement.
Printed Device TrialsReport
Using AT Database
1. Navigate toSynergy SE > NTL > AT Tracking > AT Database.2. Find and select a student. TheDemographics tab displayswith the read-only student
information including name, Student ID, Grade, and Birth Date.
School pulls from the Attending School on theDemographics tabof the SE Student screen and is the location in effect on thedocument creation date.
Edupoint Proprietary and Confidential

Administrator Guide for MissouriChapter 10: Assistive Technology Tracking 199
3. Modify the student'sDemographics if needed.
AT Database Screen, DemographicsTab
a. Modify the student's team if needed. The Current Team pulls from the Team tab of theSE Student screen. Add or deletemembers for AT Tracking.
Modifications do not change the Team displayed on theSE Student screen.
Copyright 2016-2017 Edupoint Educational Systems, LLC

200 Administrator Guide for MissouriChapter 10: Assistive Technology Tracking
b. Add Assigned AT Devices.
l ClickAdd to find and select devices from the AT Inventory byAsset ID, ItemDesc andCategory.
l You can only add devices to students that exist in the inventory.l Current school, staff and student assignment display to determine if thedevice is in use.
l The student’s name is added to the AT Tracking screen for that device.
l If the line is later deleted from the student database, thestudent name is removed from the device in the ATTracking Inventory.
l If the same device is assigned tomultiple students, thestudents assigned to the device display with commaseparators. A maximumof 50 characters are visible,although there is no limit to the number of students whocan be assigned to a device.
c. Indicate the student's DDD Status:
a. Select the student'sDDD Eligibility.b. Enter the DDD Support Coordinator andPhone Number.
d. Indicate the Evaluation/IEP Status:
l Existing dates (such as theMET and IEP) are read-only.l Enter additional dates if needed:
e. ClickAdd to addOther Evaluations if needed.f. EnterComments if needed.g. ClickSave.
Edupoint Proprietary and Confidential

Administrator Guide for MissouriChapter 10: Assistive Technology Tracking 201
Action Log Tab
Select theAction Log tab to enter any actions relevant to this student.
l To add an action:
1. ClickAdd. A new row displays.2. Enter theDate,Hours,AT Provider, andAction Taken.3. ClickSave.
AT Database Screen, Action Log Tab
l To print the log:
l ClickPrint Time Log to print a log that includes the dates, names of individuals, andthe time spent.
Printed AT Time Log
Copyright 2016-2017 Edupoint Educational Systems, LLC

202 Administrator Guide for MissouriChapter 10: Assistive Technology Tracking
l ClickPrint Action Log to print a log that includes action details.
Printed AT Action Log
Meeting Notes Tab
Select the Meeting Notes tab to record notes frommeetings related to AT tracking.
l To add ameeting note:
1. ClickAdd. A new row displays.2. Enter theMeeting Date andMeeting Notes.3. ClickSave.
AT Database Screen, Meeting NotesTab
Edupoint Proprietary and Confidential

Administrator Guide for MissouriChapter 10: Assistive Technology Tracking 203
l To print themeeting notes:
1. (Optional) Select theStart Date and End Date.2. ClickPrint Preview.
Printed AT Meeting Notes
Referral Meeting Notes Tab
Select theReferral Meeting Notes tab to add notes for multiple referral meetings:
1. ClickAdd. A new row displays.2. Select the date and clickSave. A View link displays under Referral Meeting Notes.
AT Database Screen, ReferralMeeting NotesTab
3. ClickView. The Referral Meeting Notes screen displays.4. Complete the tabs.
To print the AT Referral Meeting Notes, click Print Preview anduse the printer in the browser.
Copyright 2016-2017 Edupoint Educational Systems, LLC

204 Administrator Guide for MissouriChapter 10: Assistive Technology Tracking
Student Tab
TheStudent tab includes the student's name, Student ID, Staff Participants, and currentIEP Eligibility.
1. Indicate if the Staff Participants wereConsulted/Present.2. Enter theBackground Information, Strengths,Needs, Vision/Hearing, andAdditional
Student Information.3. Select the Language at Home.
AT ReferralMeeting Notes, Student Tab
Edupoint Proprietary and Confidential

Administrator Guide for MissouriChapter 10: Assistive Technology Tracking 205
4. Enter the Current CommunicationModes, AAC Experience and Current Use, ComputerExperience, And Parental Involvement.
a. ClickAdd. A blank grid� or a grid with suggested elements to review� displays.
b. Enter theDescription.c. Delete any rows that do not apply to the student.
AT ReferralMeeting Notes, Student Tab
5. Enter details about student'sAccess or Transportation of Device.6. ClickSave.
Copyright 2016-2017 Edupoint Educational Systems, LLC

206 Administrator Guide for MissouriChapter 10: Assistive Technology Tracking
Environment/Tasks/Tools Tab
1. Select theEnvironment/Tasks/Tools tab.2. Enter the currentPlacement.3. To enter information about who is living in the home, clickAdd. A new row displays.
l Enter theDescription andDetail.
AT ReferralMeeting Notes, Environment/Tasks/ToolsTab
4. Enter Tasks for the student:
l Communication Tasks Student Needs AssistanceWithl AcademicTasksl The Team is Looking for Something to Help With
AT ReferralMeeting Notes, Environment/Tasks/ToolsTab
Edupoint Proprietary and Confidential

Administrator Guide for MissouriChapter 10: Assistive Technology Tracking 207
5. Enter appropriate Tools for the student.
l Types of/Devices that might be appropriate
AT ReferralMeeting Notes, Environment/Tasks/ToolsTab
6. Select the Team Agreement andmodify the agreement if necessary.7. ClickSave.
Decision Tab
1. Select theDecision tab to record whether and the next steps.2. Select whether anAT Evaluation is Necessary.3. Select theOption.4. Modify theDescription if needed.
AT ReferralMeeting Notes, Decision Tab
Copyright 2016-2017 Edupoint Educational Systems, LLC

208 Administrator Guide for MissouriChapter 10: Assistive Technology Tracking
Device Trials Report Tab
Select theDevice Trials Report tab to record information about the student's use of AT devices:
1. ClickAdd. A new row displays.2. Select the date and clickSave. A View link displays under Trials Report.
AT Database Screen, ReferralMeeting NotesTab
3. ClickView. The AT Device Trials Report screen displays.4. Complete the tabs.
To print the Device Trials Report, click Print Preview and use theprinter in the browser.
Demographic/Background Tab
AT Device TrialReport, Demographic/Background Tab
Edupoint Proprietary and Confidential

Administrator Guide for MissouriChapter 10: Assistive Technology Tracking 209
1. Enter the Teacher Name.2. Select theDate of the Trial.
If there is an existing IEP, the IEP Date displays in a read-only field.
3. Enter theBackground,Baseline/No Accommodations, andKey Features of the trial.4. ClickAdd to enter Devices Tried.
l Enter theName andResult for the device.
5. ClickSave.
Outcome Tab
1. Select theOutcome tab.2. Enter theSummary, Education Implications, andRecommendations.
AT Device TrialsReport, Outcome Tab
3. Indicate if the Staff Participants wereConsulted/Present.
Copyright 2016-2017 Edupoint Educational Systems, LLC

210 Administrator Guide for MissouriChapter 10: Assistive Technology Tracking
4. Select who to copy on the report.
AT Device TrialReport, Demographic/Background Tab
AT Evaluation Report Tab
Select theAT Evaluation Report tab to capture specific data related to the evaluation for the needfor Assistive Technology devices:
1. ClickAdd. A new row displays.2. Select the date and clickSave. A View link displays under Trials Report.
AT Database Screen, ReferralMeeting NotesTab
3. ClickView. The AT Evaluation Report screen displays.4. Complete the tabs.
To print the AT Evaluation Report, click Print Preview and use theprinter in the browser.
Edupoint Proprietary and Confidential

Administrator Guide for MissouriChapter 10: Assistive Technology Tracking 211
Background Info Tab
1. Enter the Teacher Name. TheGrade, IEP Date and Home Language are read-only.2. Indicate if the Evaluators wereConsulted/Present.3. Enter the Input Provided By,Reason for Referral,Diagnoses/Eligibility,Medical
History, andParent Participation.4. ClickSave.
AT Evaluation Report, Background Info Tab
Copyright 2016-2017 Edupoint Educational Systems, LLC

212 Administrator Guide for MissouriChapter 10: Assistive Technology Tracking
Educational Info Tab
1. Select theEducational Info tab.2. EnterCurrent Placement,Academic/Cognitive/Present Levels from current IEP, and
Hearing, andVision information.3. ClickSave.
AT Evaluation Report, Education Info Tab
Edupoint Proprietary and Confidential

Administrator Guide for MissouriChapter 10: Assistive Technology Tracking 213
Speech/Language Info Tab
1. Select theSpeech/Language Info tab.2. Enter theReceptive Language, Expressive Language/Speech Production, Functional
Communication Skills, andCurrent Communication Modes.3. ClickSave.
AT Evaluation Report, Speech/Language Info Tab
Motor Skills Tab
1. Select theMotor Skills tab.2. Enter the Fine & Visual Motor Skills andPositioning Needs &/or Equipment.3. ClickSave.
AT Evaluation Report, Motor Skills Tab
Copyright 2016-2017 Edupoint Educational Systems, LLC

214 Administrator Guide for MissouriChapter 10: Assistive Technology Tracking
AT Info Tab
1. Select theAT Info tab.2. EnterAssistive Technology Observations, Transportation Method, andAccess
Methods.3. Select theOther Additional Areas. Modify the text if required.
AT Evaluation Report, AT Info Tab
AAC/AT Info Tab
1. Select theAAC/AT Info tab.2. Select the Selection Techniques using theSwitch Scanning/Direct Selection andDetails
drop-downs.
Edupoint Proprietary and Confidential

Administrator Guide for MissouriChapter 10: Assistive Technology Tracking 215
3. SelectVocabulary, System Output, Special Considerations, and Technology Match.Modify the text if needed.
AT Evaluation Report, AAC/AT Info Tab
4. Enter Device/Equipment Tried.
a. ClickAdd. A new row displays.b. Enter theDevice/Equipment and anyNotes.
AT Evaluation Report, AAC/AT Info Tab
5. ClickSave.
Copyright 2016-2017 Edupoint Educational Systems, LLC

216 Administrator Guide for MissouriChapter 10: Assistive Technology Tracking
Summary/Recs Tab
1. Select theSummary/Recs tab.2. Enter theSummary.3. Enter Recommendations.
a. ClickAdd. A new row displays.b. Enter the Item andPrice/Time.
4. Indicate if the Evaluators were Consulted/Present during the evaluation.5. Select who receives a copy of the report.6. ClickSave.
AT Evaluation Report, AAC/AT Info Tab
Edupoint Proprietary and Confidential

Administrator Guide for MissouriChapter 10: Assistive Technology Tracking 217
Addl. Recomm & Supports Tab
1. Select theAddl. Recomm & Supports tab.2. Select the Training Recommendations andPossible Goals for the Home. Modify the
text if needed.3. ClickSave.
AT Evaluation Report, Addl. Recomm&SupportsTab
Copyright 2016-2017 Edupoint Educational Systems, LLC

218 Administrator Guide for MissouriChapter 10: Assistive Technology Tracking
AT Quarterly Checklist
You can create aQuarterly Checklist as a Print Only Ad HocDocument to provide to classroomteachers to assist in determining the effectiveness of the AT interventions being provided. Thefollowing is a representation of the blank document.
AT QuarterlyChecklist
Edupoint Proprietary and Confidential

Administrator Guide for MissouriChapter 10: Assistive Technology Tracking 219
Assistive Technology Reports
ATT01 – Tracking Sheet
The ATT101 report creates a page for each item that lists all of these fields, including the completecirculation history.
ATT AT Tracking Sheet
l Sort/Output allows for sorting the report results and providing options for the file output type.l Prompt for download prevents the report results from loading in a browser windowand instead prompts to download the results directly to a directory.
l Show Active/Inactive allows the user to define the students to include in the reportwithout changing the focus.
l Conditions allows specific data and value ranges.l Selection provides the user the ability to filter the report to include a given ad-hoc set ofstudents, courses, sections, staff, and to be filtered by student group.
l Advanced provides options to schedule the report to be processed at intervals and to notifyand send the report to designated users within the school district network.
Completed reportsmay also be saved and placed in designated serverfolders if desired.
Copyright 2016-2017 Edupoint Educational Systems, LLC

220 Administrator Guide for MissouriChapter 10: Assistive Technology Tracking
AT Equipment Reports
There are two options available for selection.
l Equipment Summary by Teacher provides a simple listing of teachers, their location, andthe number of items they have on the given date.
Equipment SummaryByTeacher
l Equipment Detail by Teacher creates a document that can be sent to the teacher at theend of the school year as a reminder to return the item and/or get additional information fromthe teacher. The report lists all items under their responsibility.
Equipment Detail ByTeacher
Edupoint Proprietary and Confidential

Chapter 11:Medicaid
Medicaid Overview 222Setup 222Medicaid Permission Document Setup 225Working with Students 230Viewing Extracts 235

222 Administrator Guide for MissouriChapter 11: Medicaid
Medicaid OverviewSynergy SE allows the district to trackMedicaid parental consent, Medicaid billing, and servicesprovided that can be claimed throughMedicaid. TheMedicaid screens are available under theMedicaid node of the PAD tree.
Medicaid PAD Tree
Setup
Lookup Table Setup
Define the Lookup Table Definitions.
Adding Medicaid Services
1. Navigate toSynergy SE > NTL > Medicaid > Medicaid Service. TheMedicaid Servicescreen displays.
2. ClickAdd. TheMedicaid Service screen displays.
Medicaid Service Screen
3. Define the following fields:
l Service Code – District code for the service. May be the same as the StateMedicaidReporting Code.
Edupoint Proprietary and Confidential

Administrator Guide for MissouriChapter 11: Medicaid 223
l State Medicaid Reporting Codel Provider Type – Select the type.l Effective Date – The date that this servicemay be selected in Synergy SE or theAmount billed changes to the amount displayed.
l Amount – The amount being billed
TheService History tab record changes in theAmount fieldover time.
l End Date – (Optional) – Use to remove the service from being selected from this date.l State Reporting Code – Select the Special Ed Service. Multiple Titlesmaymap to theState Reporting Code.
l Unit – Select the Service Unit.l Title – Enter the title for theMedicaid Service.l Description – (Optional) A detailed description of the servicel Limitations – (Optional) Enter the Limit Amount and select the Limit Type andLimit Span from the drop-downs.
l Rx Required – Select to indicate a prescription is required for this service.
4. ClickSave.
Copyright 2016-2017 Edupoint Educational Systems, LLC
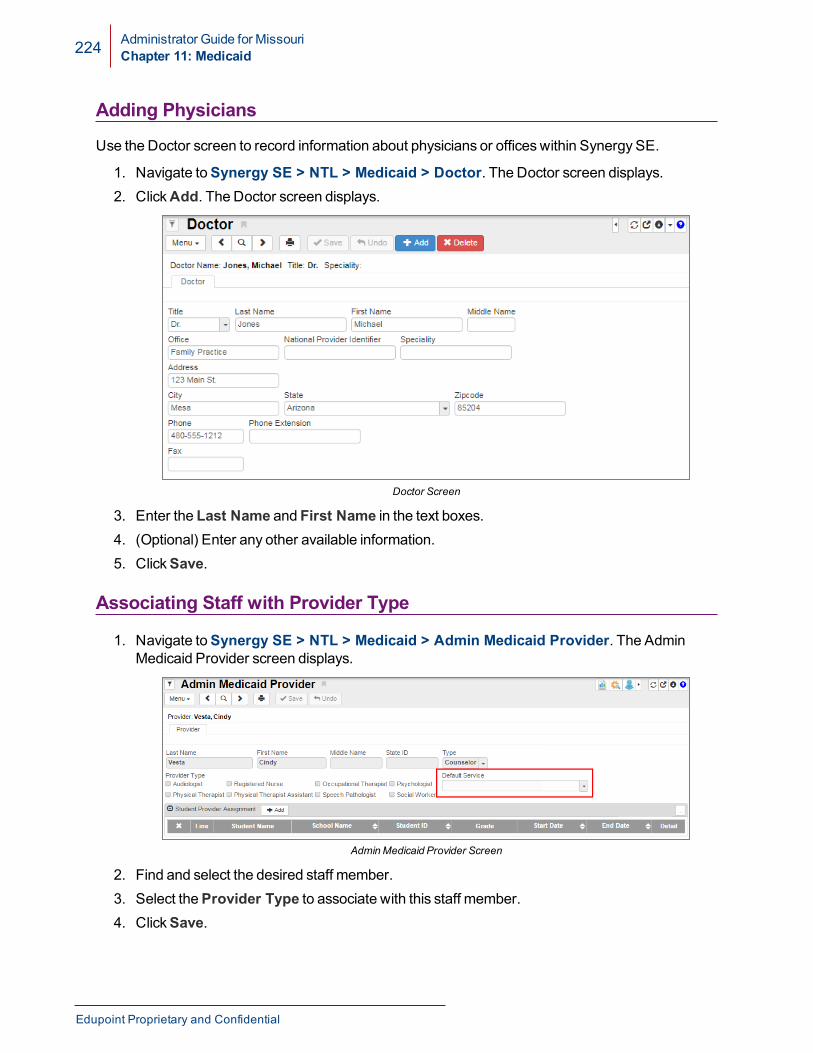
224 Administrator Guide for MissouriChapter 11: Medicaid
Adding Physicians
Use the Doctor screen to record information about physicians or officeswithin Synergy SE.
1. Navigate toSynergy SE > NTL > Medicaid > Doctor. The Doctor screen displays.2. ClickAdd. The Doctor screen displays.
Doctor Screen
3. Enter the Last Name and First Name in the text boxes.4. (Optional) Enter any other available information.5. ClickSave.
Associating Staff with Provider Type
1. Navigate toSynergy SE > NTL > Medicaid > Admin Medicaid Provider. The AdminMedicaid Provider screen displays.
AdminMedicaid Provider Screen
2. Find and select the desired staff member.3. Select theProvider Type to associate with this staff member.4. ClickSave.
Edupoint Proprietary and Confidential

Administrator Guide for MissouriChapter 11: Medicaid 225
Medicaid Permission Document SetupFederal regulations permit a singleMedicaid reimbursement permission statement signed byparents, to remain in effect as long as the student is enrolled in the school district.
The document is defined using the Document Definition screen.
l It has a permission statement defined using Auto Populate.�l It may include parent response statements that are defined in Lookup Table Definition screen.�
MedicalAid Permission Screen
Copyright 2016-2017 Edupoint Educational Systems, LLC

226 Administrator Guide for MissouriChapter 11: Medicaid
Printed Parent Permission
Remember to enter the parent consent on theStudent Demographicstab of the Student Medicaid screen.
Edupoint Proprietary and Confidential
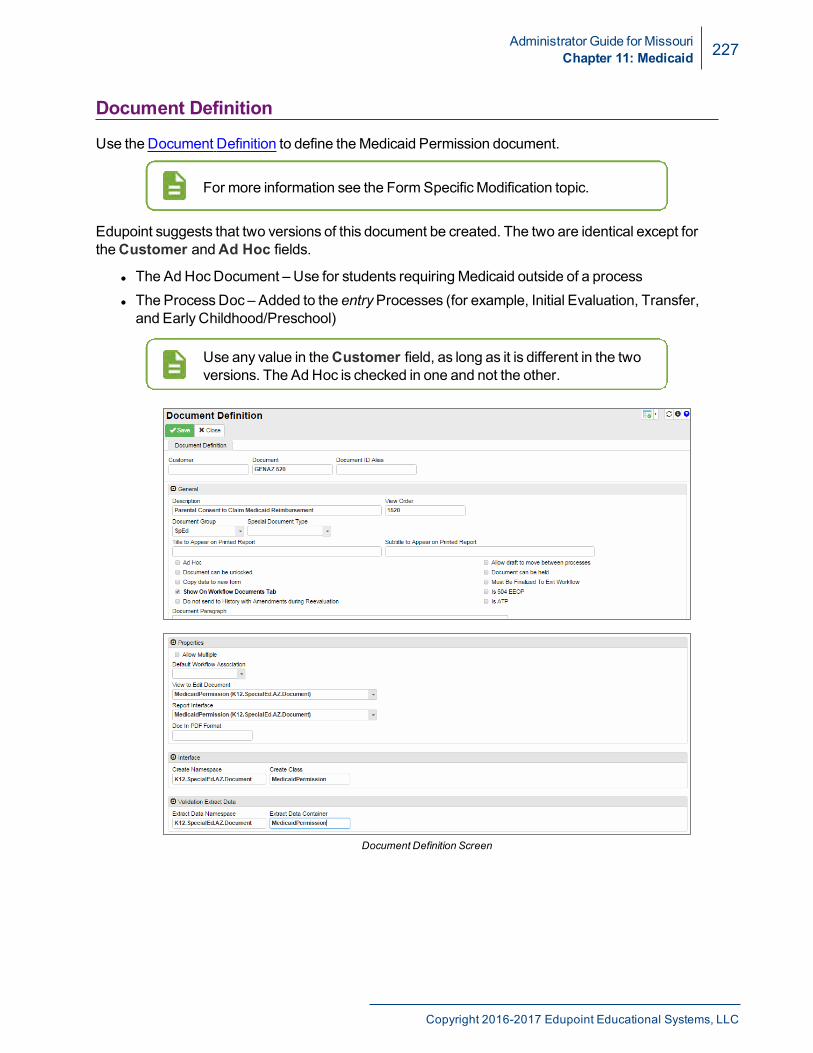
Administrator Guide for MissouriChapter 11: Medicaid 227
Document Definition
Use the Document Definition to define theMedicaid Permission document.
For more information see the FormSpecificModification topic.
Edupoint suggests that two versions of this document be created. The two are identical except fortheCustomer andAd Hoc fields.
l The AdHocDocument – Use for students requiringMedicaid outside of a processl The ProcessDoc – Added to the entryProcesses (for example, Initial Evaluation, Transfer,and Early Childhood/Preschool)
Use any value in theCustomer field, as long as it is different in the twoversions. The AdHoc is checked in one and not the other.
Document Definition Screen
Copyright 2016-2017 Edupoint Educational Systems, LLC

228 Administrator Guide for MissouriChapter 11: Medicaid
Define Statement in Auto Populate
Use the Auto Populate screen to define the text of the permission statement. The following is asample statement but the district may compose and use any statement.
Sample Statement
The School Agency receives funding from theMedicaid Direct Service Claiming program forIEP covered services to eligible children through the State'sMedicaid agency. This is astate-approved program that allows the School Agency to receive reimbursement fromfederal funds for providing some health-related covered services to eligible children in ourschool system. Examples of covered services include speech therapy, assistance with dailyliving skills, physical therapy, and nursing services.
The School Agency, working with the StateMedicaid agency, will need to determine if mychild is eligible or should become eligible in the school-basedMedicaid program. The SchoolAgencymay useMedicaid benefits in which a child participates to provide or pay for servicesdocumented in the Individualized Education Program (IEP.) Parents are not required to signup for or enroll in Medicaid to receive IEP services or a free appropriate public education, norare they responsible for any out of pocket expenses for these IEP services. Also, the SchoolAgency's access to these benefits is not allowed if it would have a negative impact on thechild's or parent's public insurance.
The School Agencywill provide the required services tomy child at no cost to mewhether ornot I grant mywritten consent. My consent is voluntary andmay be revoked at any time. TheSchool Agency's use of this reimbursement program does not in anyway affect or impactother Medicaid benefits to whichmy child is entitled, including any otherwise eligible servicesoutside of school.
I understand and agree toMedicaid eligibility verification and claims submission by theDistrict for IEP specified services.
For more information see the FormSpecificModification topic.
Edupoint Proprietary and Confidential

Administrator Guide for MissouriChapter 11: Medicaid 229
Adding Document to a Process
UseWorking with ProcessDocuments to insert the GENAZ 520 Parent Permission documentbefore the IEP in all initial processes (for example, Transfer, Early Childhood/Preschool).
Modify the View Order to insert the Parent Permission before the IEP.
ProcessDocument Screen
ProcessSetup Screen
Copyright 2016-2017 Edupoint Educational Systems, LLC

230 Administrator Guide for MissouriChapter 11: Medicaid
Working with Students
Not all districts use theMedicaidmodule.
Associating Student to Providers
1. Navigate toSynergy SE > NTL > Medicaid > Admin Medicaid Provider. The AdminMedicaid Provider screen displays.
2. Select theDefault Service to assign to students when adding a new service to the grid on theProvider Student screen.
AdminMedicaid Provider Screen
3. ClickAdd. The Admin Provider Student screen displays.
4. Click to find and select the students.5. Enter anEffective Date and an optionalEnd Date.6. ClickSave. The student displays in the Student Provider Assignment grid.
Admin Provider Student
Edupoint Proprietary and Confidential

Administrator Guide for MissouriChapter 11: Medicaid 231
The student displays in the Student Provider Assignment grid.
AdminMedicaid Provider Screen
Logging Medicaid Services for a Student as an Administrator
1. Navigate toSynergy SE > NTL > Medicaid > Admin Medicaid Provider.
2. Click for the student in the Student Provider Assignment grid. The Admin ProviderStudent screen displays.
3. ClickAdd in the Service grid. The Add Student Service screen displays.
Add Student Service Screen
4. Select theService.5. Select aService Date.6. Enter aStart Time andEnd Time.7. (Optional) Select aService Status.8. (Optional) Enter aNote.9. Select theSign Student option when the service is completed andmay be billed.
Copyright 2016-2017 Edupoint Educational Systems, LLC

232 Administrator Guide for MissouriChapter 11: Medicaid
10. ClickSave. The service displays in the Service or Signed Service grid on the Admin ProviderStudent screen.
Admin Provider Student Screen, Student Provider Service Tab
l TheService History tab records all service entriesmade for the student.
Admin Provider Student Screen, Service HistoryTab
l TheProvider History tab lists the time periods that the staff member provided serviceto the student.
Admin Provider Student Screen, Provider HistoryTab
Student Medicaid Screen
The Student Medicaid screen displays student information pulled from other areas of Synergy SE.
l Navigate toSynergy SE > NTL > Medicaid > Student Medicaid. The Student Medicaidscreen displays. The screen has the following tabs:
Edupoint Proprietary and Confidential

Administrator Guide for MissouriChapter 11: Medicaid 233
l Rxl Providerl Service History
Rx Tab
TheRx tab contains details of prescriptionmedications for the student related to aMedicaid service.
Student Medicaid Screen, RxTab
Adding a Medication
1. ClickAdd. A new line displays under the Student RX grid.2. Enter aRx Number.
3. Click to find and select aDoctor Name.
If the doctor does not appear in the list, clickAdd New Doctor andfollow the instruction in Adding Physicians.
4. Enter an Effective Date andExpire Date.5. ClickSave.
Selecting a Service Category Code
1. ClickShow Detail on the Student Rx grid of theRx tab. TheRx detail tab appears.
Student Medicaid Screen, RxDetail Tab
2. Select aService Category Code from the options.3. ClickSave.
Copyright 2016-2017 Edupoint Educational Systems, LLC

234 Administrator Guide for MissouriChapter 11: Medicaid
Provider Tab
TheProvider tab lists existing Service Providers.
Adding a Provider for a Student
1. Select the staff member from theProvider drop-down field.2. ClickAdd Provider. The staff member displays in the Student Provider Assignment grid.3. ClickSave.
Student Medicaid Screen, Provider Tab
Adding a Staff Member Not Labeled a Provider
1. ClickAdd on the Student Provider Assignment grid. The Staff screen displays.2. Find and select a staff member.3. Enter anEffective Date and an optionalEnd Date4. ClickSave. The new provider displays under displays under the Student Provider
Assignment grid.5. ClickSave.
Adding a Service
1. Click on the Student Provider Assignment grid. The Student Provider Detail screendisplays.
2. ClickAdd in the Service grid. The Add Student Service screen displays.
Add Student Service Screen
Edupoint Proprietary and Confidential

Administrator Guide for MissouriChapter 11: Medicaid 235
3. Select theService.4. Enter aStart Time andEnd Time.5. (Optional) Select aService Status.6. (Optional) Enter aNote.7. ClickSave. The Student Provider Detail screen displayswith the service added.
Student Provider Detail Screen
Service History Tab
TheService History tab contains a detailed listing of all services that the student has hadrelated toMedicaid services.
Student Medicaid Screen, Service HistoryTab
Viewing Extracts
Medicaid Billing Extract
Use theMedicaid Extract to bill Medicaid.
1. Navigate toSynergy SE > NTL > Medicaid > Medicaid Extract. TheMedicaid Extractscreen displays.
2. Enter theExtract Date.3. ClickExtract Medicaid. When complete, amessage displays stating Extract Complete.
Copyright 2016-2017 Edupoint Educational Systems, LLC

236 Administrator Guide for MissouriChapter 11: Medicaid
Medicaid Extract Screen
4. ClickOK.l If all the extract requirements aremet, the services are extracted and display in the csv
file in the Extract Result column�. Click to view.
l Log Sequence (computergenerated when Service providerlogs a service)
l Batch Date (date batch was run)
l Medicaid Number of Student (ifavailable)
l SSN of Student (if available)
l Last Name of Student
l First Name of Student
l Date of Birth
l Student Number
l Date of Service
l Service Code (CPT Code)
l Service Code ReimbursementRate
l Service Code Unit Measurement
l Service Provider Category(examples, OT, PT, Speech,etc.)
l ServiceMinutes
l Consent Start Date
l Consent End Date
l Rx Required (dependent uponCPT Code)
l Rx Start Date
l Rx EndDate
Medicaid Extract
Edupoint Proprietary and Confidential

Administrator Guide for MissouriChapter 11: Medicaid 237
l If there are errors, they display in the csv file in the Error Report column�. Click toview.
l Service Sequencel Student Numberl Last Namel First Namel Service Datel Error Message
Extract Error Report
Provider Service Extracts
The extracted services display on the Student Medicaid and AdminMedicaid Provider screens.
Student Medicaid Screen
1. Navigate toSynergy SE > NTL > Medicaid > Student Medicaid.2. Find and select the student with Medicaid services.3. Select theProvider tab.
Copyright 2016-2017 Edupoint Educational Systems, LLC

238 Administrator Guide for MissouriChapter 11: Medicaid
4. Click in the Student Provider Assignment grid next to the provider.
TheMedicaid services that have been extracted display on the Extracted Service grid.
Student Provider Detail Screen
Edupoint Proprietary and Confidential

Administrator Guide for MissouriChapter 11: Medicaid 239
Admin Medicaid Provider Screen
1. Navigate toSynergy SE > NTL > Medicaid > Admin Medicaid Provider.2. Select the desired student from the Student Provider Assignment grid.3. Select the desired provider in the Student Provider Assignment grid.
4. Click . Medicaid services that have been extracted display on the Extracted Service grid.
AdminMedicaid Provider Screen
TheMedicaid services that have been extracted display on the Extracted Service grid.
Admin Provider Student Screen
Copyright 2016-2017 Edupoint Educational Systems, LLC

240 Administrator Guide for MissouriChapter 11: Medicaid
Medicaid Provider Screen
1. Navigate toSynergy SE > NTL > Medicaid > Medicaid Provider.2. Select theProvider Type.3. Select the desired student from the Student List grid.
4. Click . Medicaid services that have been extracted display on the Extracted Service grid.
Medicaid Provider Screen
TheMedicaid services that have been extracted display on the Extracted Service grid.
Provider Student Screen
Edupoint Proprietary and Confidential