ADMINISTRATION HANDS-ON. Page 2 Agenda Task 1: Initial Configuration Task 2: Testing disinfection...
61
ADMINISTRATION HANDS-ON
-
Upload
eleanore-sims -
Category
Documents
-
view
227 -
download
0
Transcript of ADMINISTRATION HANDS-ON. Page 2 Agenda Task 1: Initial Configuration Task 2: Testing disinfection...
ADMINISTRATION HANDS-ON

Page 2
Agenda
Task 1: Initial Configuration
Task 2: Testing disinfection with eicar.com• HTTP traffic scanning, manual scanning and real-time scanning
Task 3: Testing email scanning
Task 4: Automatic Update Setup
Task 5: Advanced Anti-Virus Management
Task 6: Spyware Scanning
Task 7: Using Browser Control
Task 8: Manage Spyware Centrally
Task 9: Using System Control

Page 3
Task 1:Initial Configuration
Configure your AVCS client from the Policy Manager Console with the following settings
• Real-time scanning and email scanning should be enabled and the settings should be locked
• Check that archives are not scanned in real-time scanning, but are scanned in manual scans and email scans
• Enable HTTP traffic scanning
• Scanned file types: ”All files” in manual scanning, ”All attachements” in email scanning and only ”files with certain extension” in real-time scanning
• Disable the firewall
• Configure the console in such way so that security alerts are sent to [email protected], with email server 192.168.100.50 (XX is the number of your workstation)
Task continues on next page…
Page 4
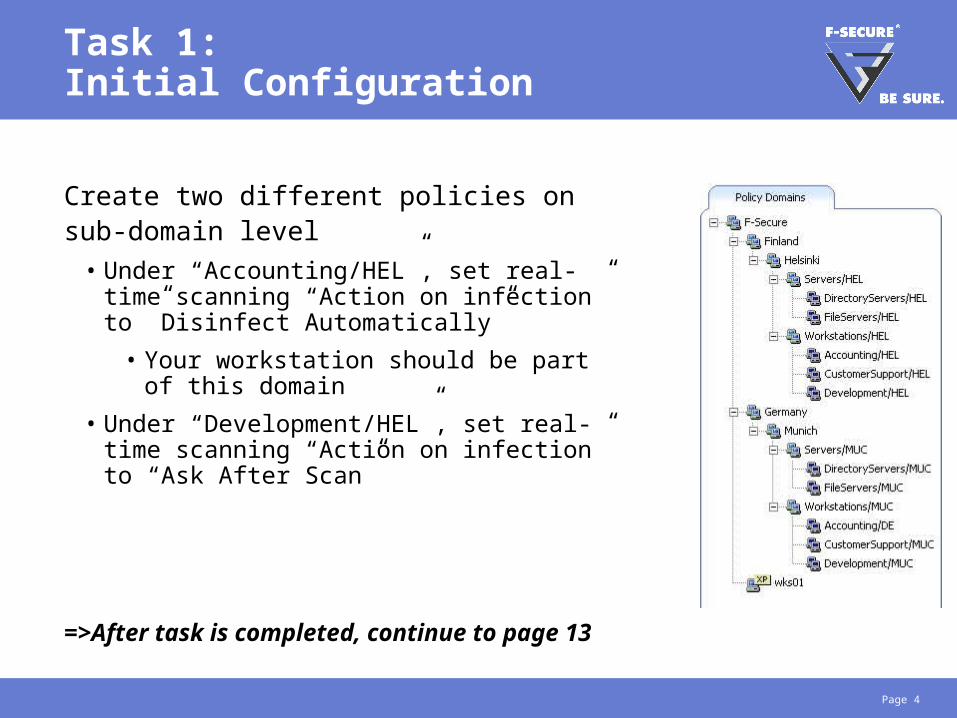
Task 1:Initial Configuration
Create two different policies on sub-domain level
• Under “Accounting/HEL”, set real-time scanning “Action on infection” to ”Disinfect Automatically”
• Your workstation should be part of this domain
• Under “Development/HEL”, set real-time scanning “Action on infection” to “Ask After Scan”
=>After task is completed, continue to page 13

Page 5
Walk Through:Initial Configuration
In Real-Time Scanning,
check if the most critical
settings are locked (select
the root domain level)
• Real-Time scanning = enabled
• Files to scan = Files with these extensions
• Included extensions list should be locked

Page 6
Walk Through:Initial Configuration
In Manual scanning, check that the most important settings are locked
aswell and that they are configured correctly
• Files to scan = All Files
• Scan inside compressed files = Enabled

Page 7
Walk Through:Initial Configuration
In Email scanning, check
that the most important
settings are locked and that
they are configured correctly
• Incoming and out going email scanning = enabled
• Action on infected attachments locked
• Attachments to scan = All attachments

Page 8
Walk Through:Initial Configuration
Enable HTTP scanning and lock the setting

Page 9
Walk Through:Initial Configuration
Setup email alert sending
• Server address = 192.168.100.50
• Sender address = [email protected]
• Recipient address = [email protected]

Page 10
Walk Through:Initial Configuration
Disable Internet Shield (on root domain level)

Page 11
Walk Through:Initial Configuration
Create two different policies
on sub-domain level
• Under “Accounting/HEL”, set real-time scanning “Action on infection” to ”Disinfect Automatically”
• Under “Development/HEL”, set real-time scanning “Action on infection” to “Ask After Scan”

Page 12
Walk Through:Initial Configuration
Place your workstation in the “Accounting/HEL” sub-domain
• Use context menu (right-click, cut and paste)
Distribute the policies
Page 13
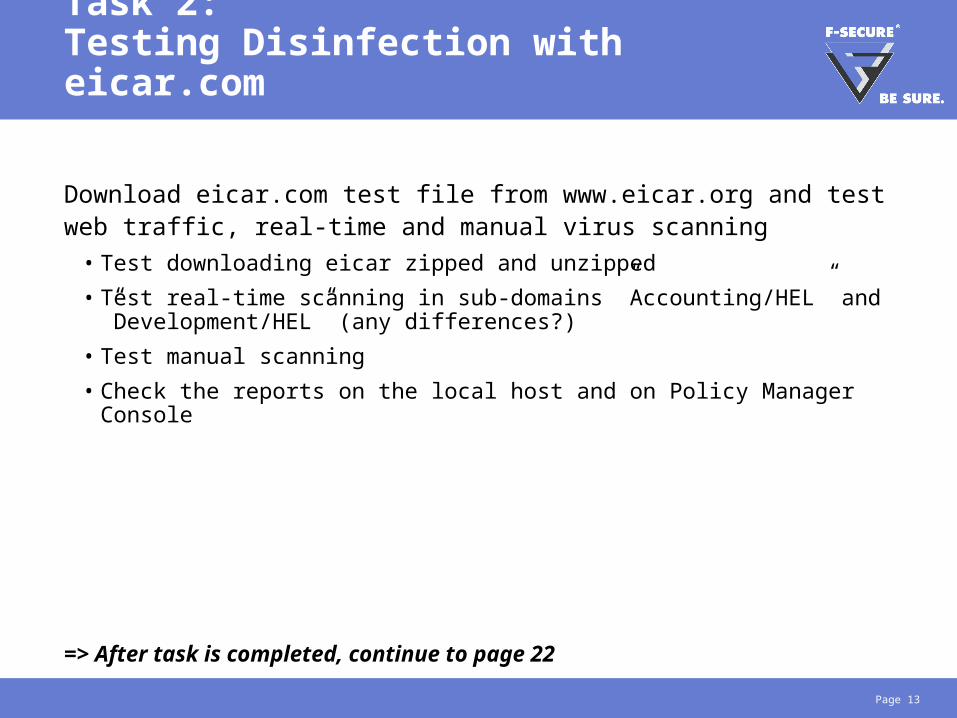
Task 2:Testing Disinfection with eicar.com
Download eicar.com test file from www.eicar.org and test web traffic, real-time and manual virus scanning
• Test downloading eicar zipped and unzipped
• Test real-time scanning in sub-domains ”Accounting/HEL” and ”Development/HEL” (any differences?)
• Test manual scanning
• Check the reports on the local host and on Policy Manager Console
=> After task is completed, continue to page 22

Page 14
Walk Through:Testing Disinfection
Attempt to download the eicar test file
• Download eicar.txt from http://www.eicar.org/
• Test downloading different alternatives

Page 15
Walk Through:Testing Disinfection
Web traffic scanner should pick up the file
when downloading (using HTTP)
• Note that real-time scanner would prevent saving the file save, if malware was downloaded using HTTPs (SSL)
• File is disinfected (deleted) automatically as the workstation is currently in the “Accounting/HEL” sub-domain
Page 16
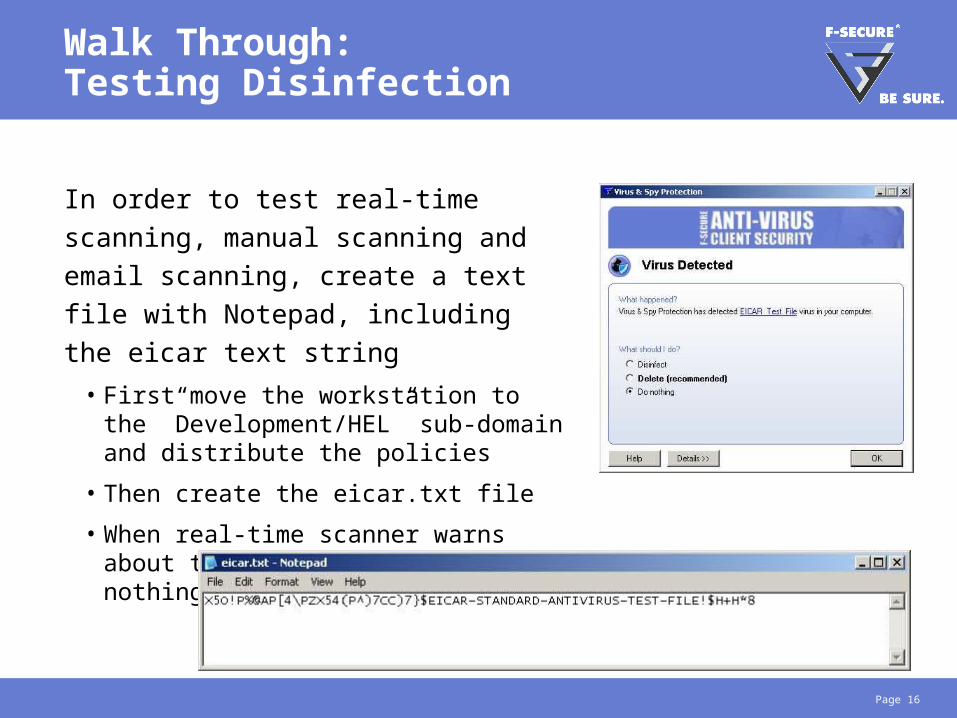
Walk Through:Testing Disinfection
In order to test real-time scanning, manual
scanning and email scanning, create a
text file with Notepad, including the eicar
text string
• First move the workstation to the ”Development/HEL” sub-domain and distribute the policies
• Then create the eicar.txt file
• When real-time scanner warns about the infection, select “Do nothing”
Page 17
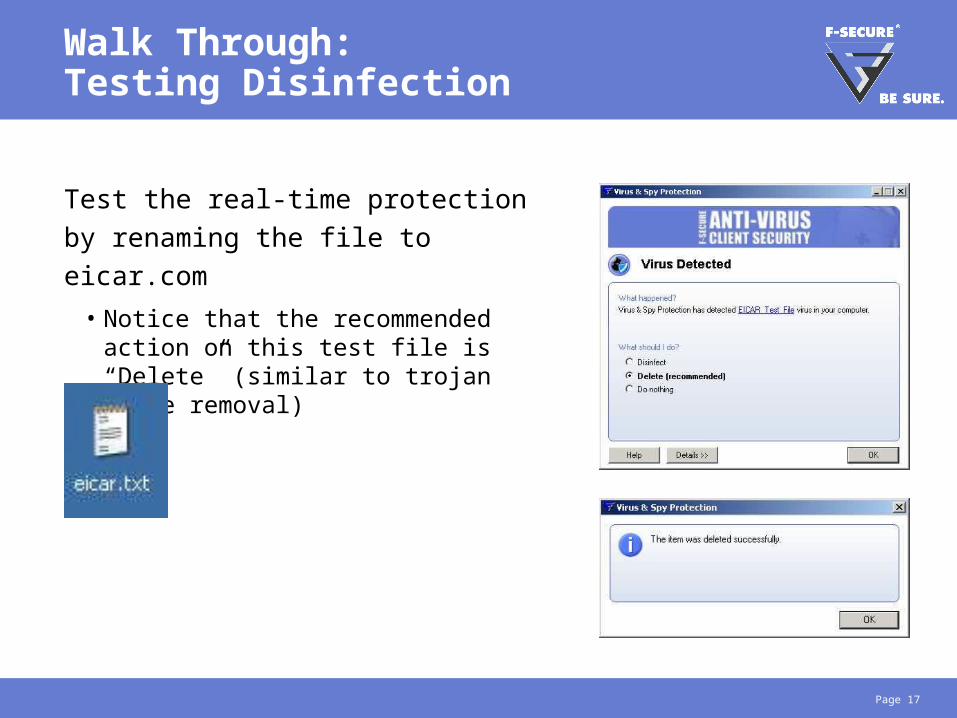
Walk Through:Testing Disinfection
Test the real-time protection by renaming
the file to eicar.com
• Notice that the recommended action on this test file is “Delete” (similar to trojan horse removal)

Page 18
Walk Through:Testing Disinfection
Run a Manual scan of the
folder where eicar.txt is
located
• If you deleted eicar.com, you need to recreate it
• Launch the scan for example through the system tray AVCS icon

Page 19
Walk Through:Testing Disinfection
Check also the Scanning Report created by
the Manual scan

Page 20
Walk Through:Testing Disinfection
Check the security alerts on
Policy Manager Console
Page 21
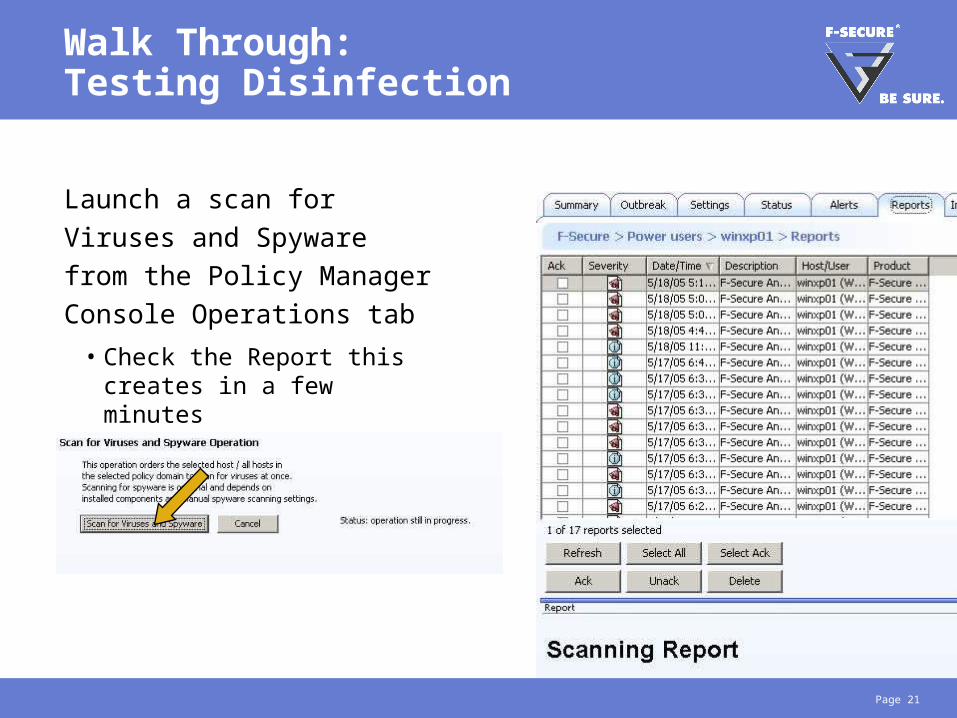
Walk Through:Testing Disinfection
Launch a scan for Viruses and
Spyware from the Policy
Manager Console Operations
tab
• Check the Report this creates in a few minutes
Page 22
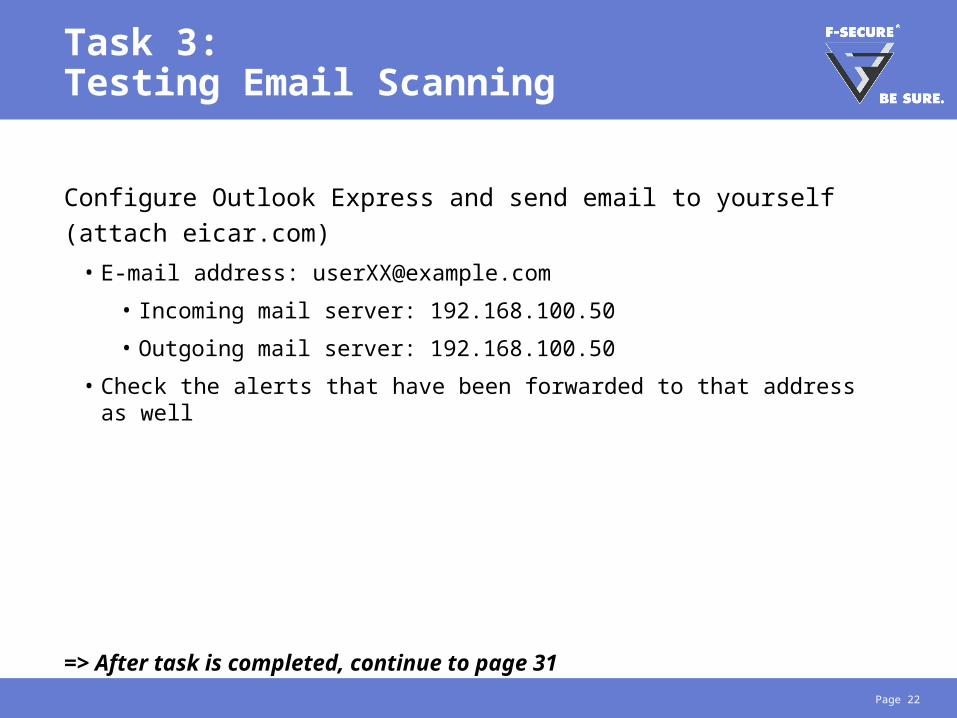
Task 3:Testing Email Scanning
Configure Outlook Express and send email to yourself (attach
eicar.com)
• E-mail address: [email protected]
• Incoming mail server: 192.168.100.50
• Outgoing mail server: 192.168.100.50
• Check the alerts that have been forwarded to that address as well
=> After task is completed, continue to page 31

Page 23
Walk Through:Testing E-mail Scanning
Check that e-mail scanning works
• Open and configure Outlook Express

Page 24
Walk Through:Testing E-mail Scanning
E-mail address: [email protected]
• Incoming mail server: 192.168.100.50
• Outgoing mail server: 192.168.100.50
Page 25
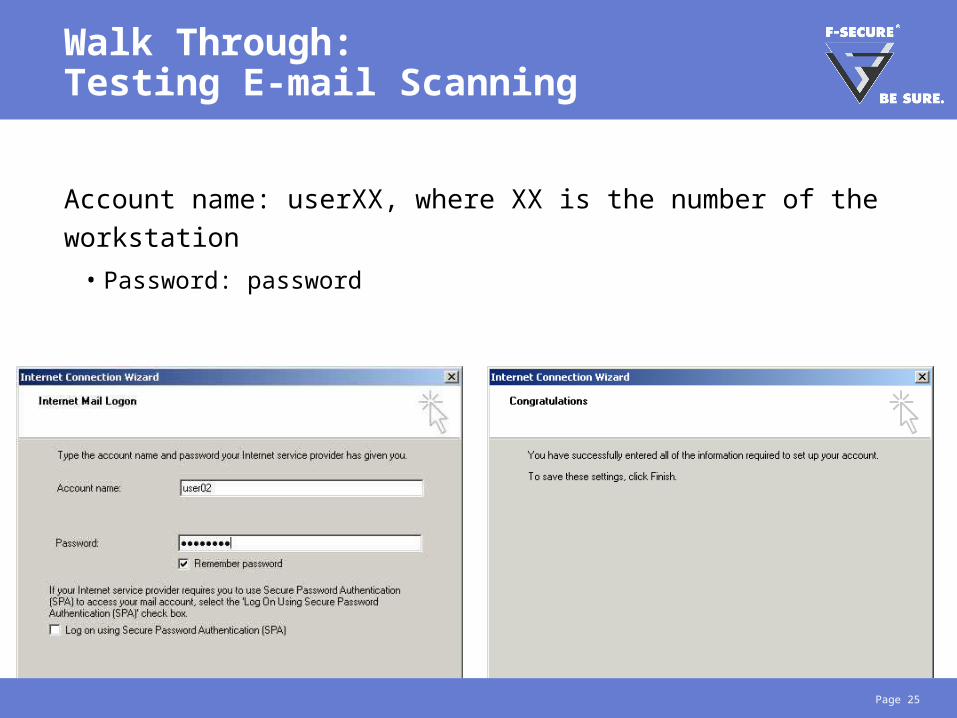
Walk Through:Testing E-mail Scanning
Account name: userXX, where XX is the number of the workstation
• Password: password
Page 26
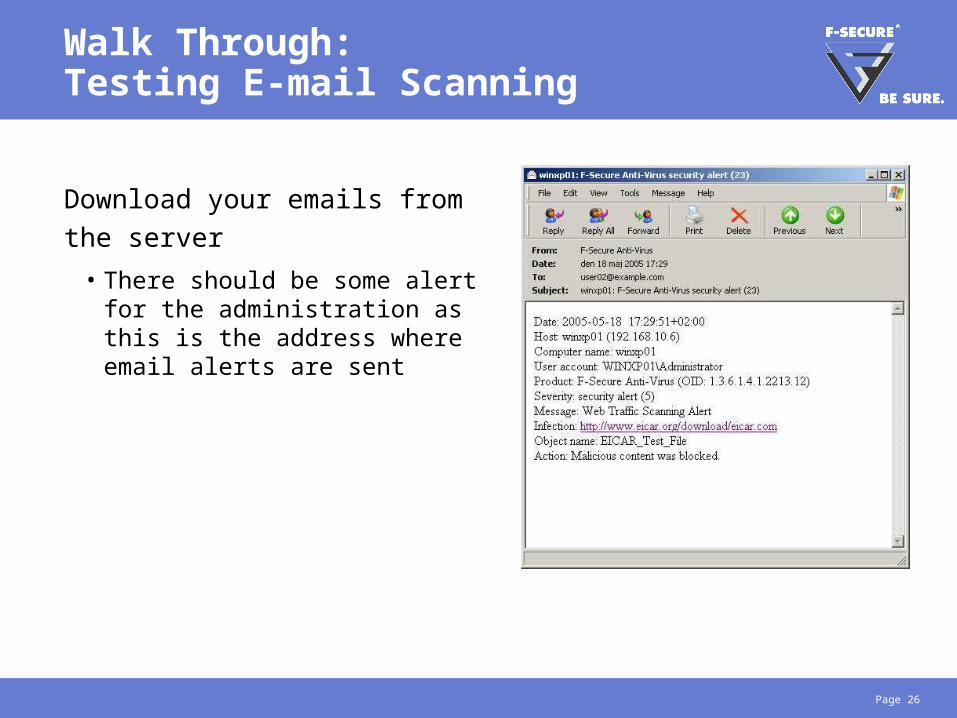
Walk Through:Testing E-mail Scanning
Download your emails from the
server
• There should be some alert for the administration as this is the address where email alerts are sent

Page 27
Walk Through:Testing E-mail Scanning
Send a email to yourself
• Disable “real-time scanning” from PMC (distribute policies)
• Attach eicar.txt to your e-mail and send it
Page 28
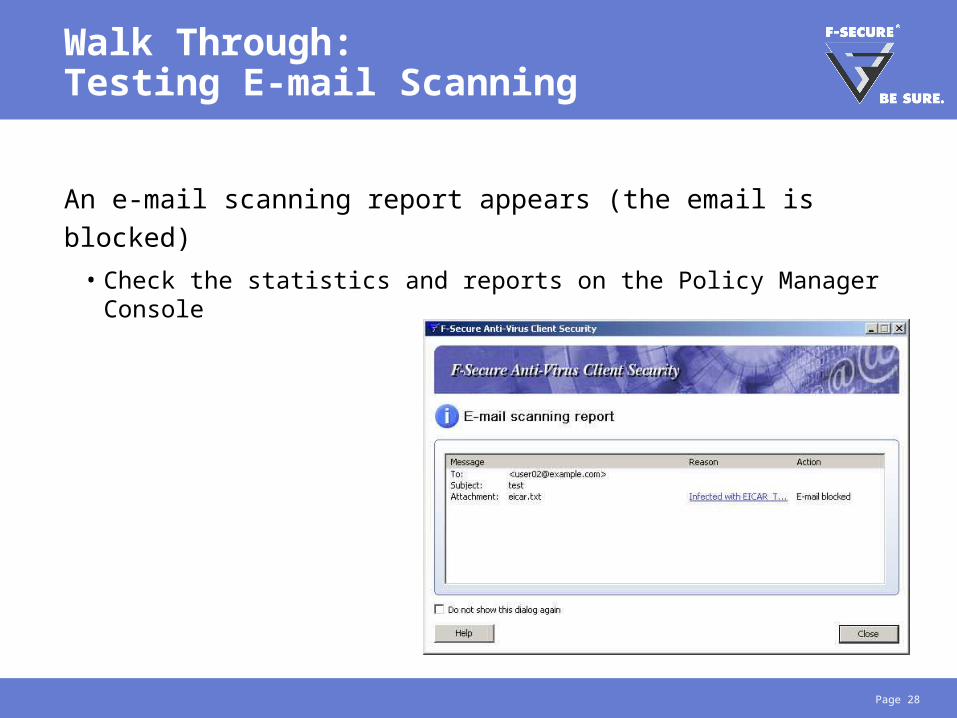
Walk Through:Testing E-mail Scanning
An e-mail scanning report appears (the email is blocked)
• Check the statistics and reports on the Policy Manager Console

Page 29
Walk Through:Testing E-mail Scanning
Test incoming email
scanning
• In order to test incoming email scanning you need to disable outgoing email scanning,
• Do so from the Policy Manager Console (distribute the policies)
• Send another email

Page 30
Walk Through:Testing E-mail Scanning
Re-enable Virus & Spy Protection
• Turn real-time scanning back on
• Enable outgoing email scanning
• Remember to lock the settings
Page 31
Task 4: Automatic Update Confirmation
In case the hosts AUA cannot connect to PMS, then it will
automatically fetch virus definitions from the F-Secure Root Update
Server.
Try to come up with a way to test the fail-over mechanism
=> After task is completed, continue to page 37
Page 32
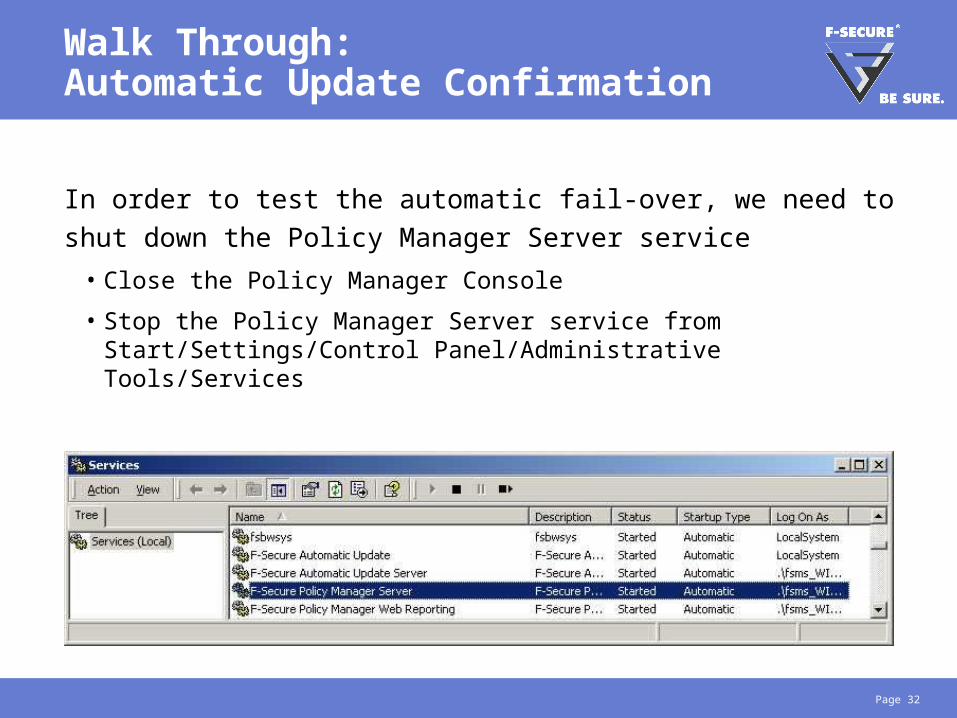
Walk Through:Automatic Update Confirmation
In order to test the automatic fail-over, we need to shut down the
Policy Manager Server service
• Close the Policy Manager Console
• Stop the Policy Manager Server service from Start/Settings/Control Panel/Administrative Tools/Services
Page 33
Walk Through:Automatic Update Confirmation
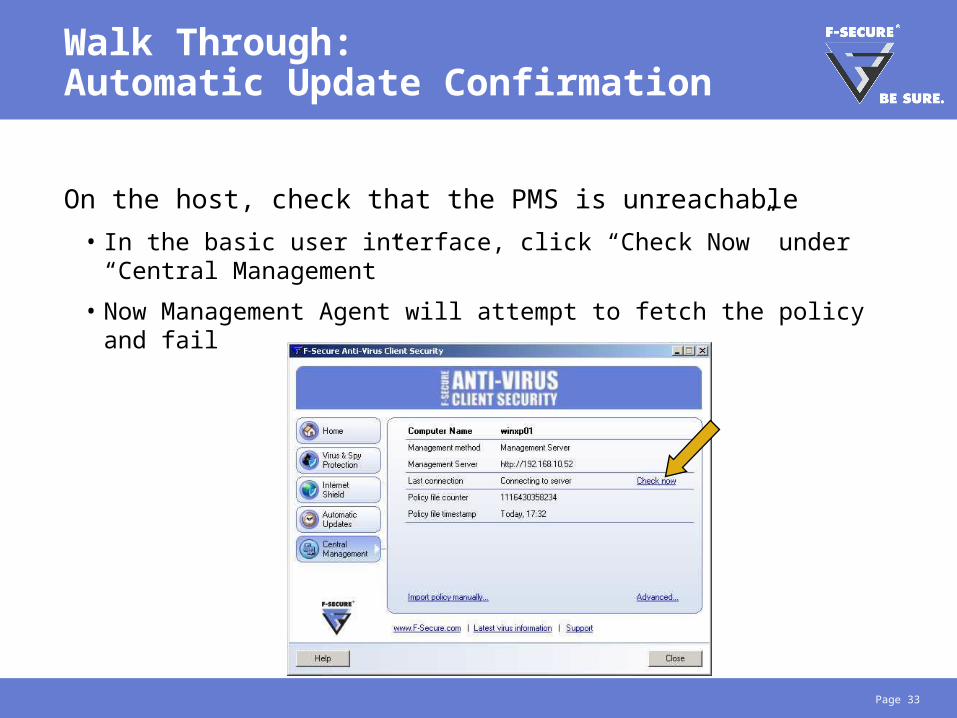
On the host, check that the PMS is unreachable
• In the basic user interface, click “Check Now” under “Central Management”
• Now Management Agent will attempt to fetch the policy and fail

Page 34
Walk Through:Automatic Update Confirmation
Check the Logfile.log for a possible connection problem reason
• Logfile.log can either be launched from the Advanced User interface (under Central Management) or it can be found from c:\Program Files\F-Secure\Common\

Page 35
Walk Through:Automatic Update Confirmation
Trigger the virus definitions update
from the Advanced User Interface
• Under Automatic updates, click “Check now”
• At first the connection fails (to PMS), but as soon as it has failed, another connection is opened (UDP connection to the F-Secure Root Update Server)
Page 36
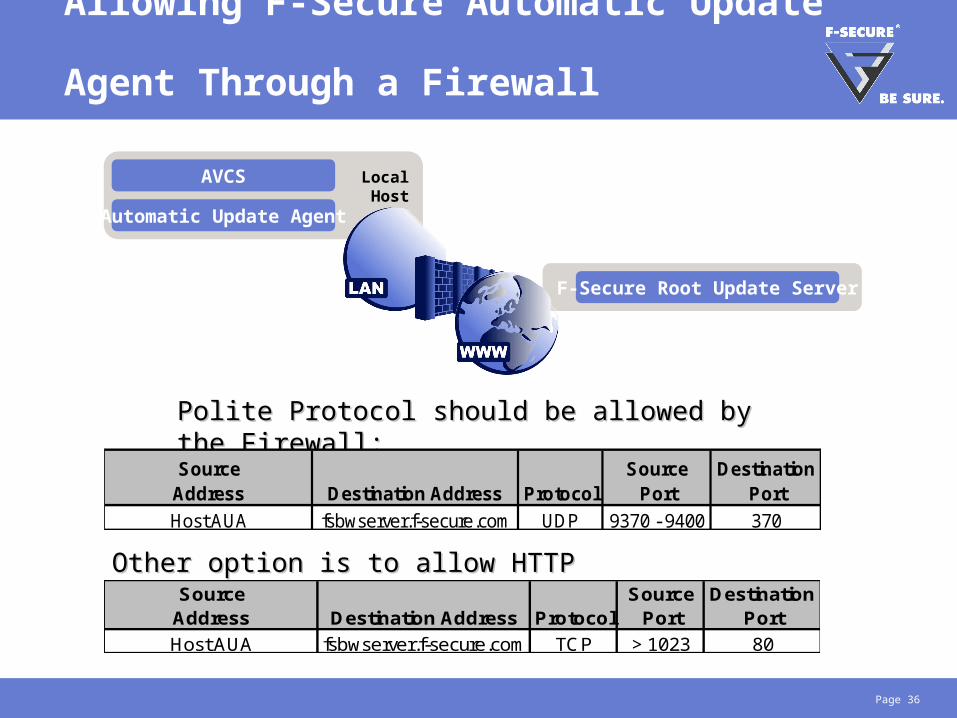
Allowing F-Secure Automatic Update Agent Through a Firewall
LocalHost
F-Secure Root Update Server
AVCS
Automatic Update Agent
Polite Protocol should be allowed by the Firewall:Polite Protocol should be allowed by the Firewall:
Other option is to allow HTTPOther option is to allow HTTP
SourceAddress Destination Address Protocol
SourcePort
Destination Port
Host AUA fsbwserver.f-secure.com UDP 9370 - 9400 370
SourceAddress Destination Address Protocol
SourcePort
Destination Port
Host AUA fsbwserver.f-secure.com TCP > 1023 80

Page 37
Task 5:Advanced Mode Management
Set up a scheduled scan that takes place weekly and add a custom
message, that is shown to end users on local infections
=> After task is completed, continue to page 42
Page 38
Walk Through:Advanced Mode Management
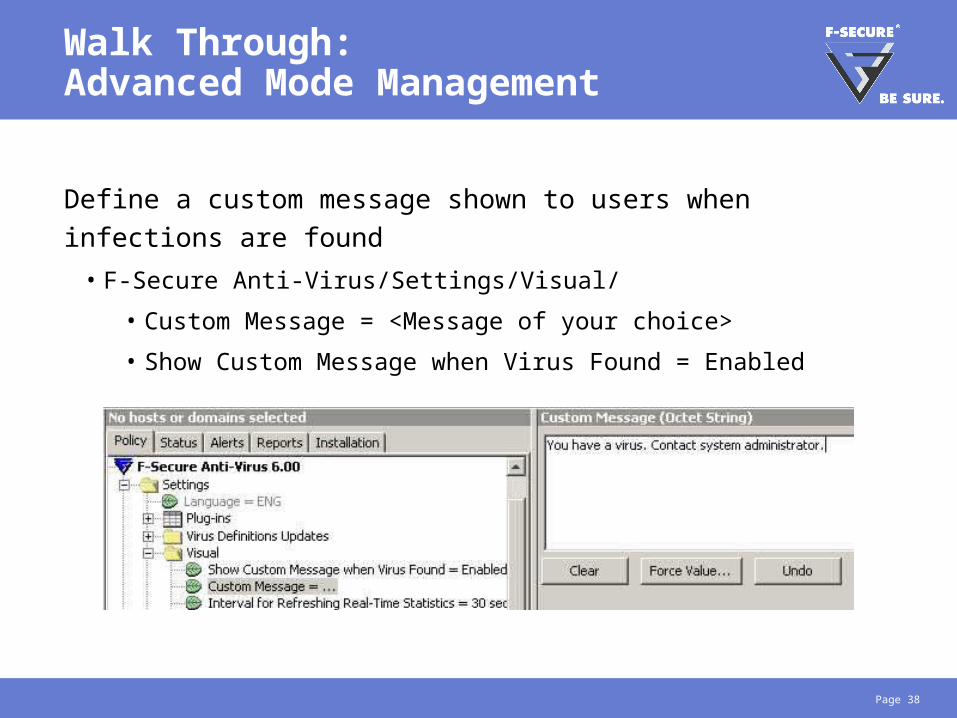
Define a custom message shown to users when infections are found
• F-Secure Anti-Virus/Settings/Visual/
• Custom Message = <Message of your choice>
• Show Custom Message when Virus Found = Enabled

Page 39
Walk Through:Advanced Mode Management
Add a scheduled task
• F-Secure Anti-Virus/Settings/Scheduler/Scheduled Task
• Choose Add

Page 40
Walk Through:Advanced Mode Management
Choose Scheduling Parameters
• Read the help text for instructions
• Schedule a scan task to start in a few minutes (24 hour format!), which will from now on run once a week
• Distribute the policies

Page 41
Walk Through:Advanced Mode Management
Check the scanning report created
by the scheduled task on the
Policy Manager Console

Page 42
Internet Explorer Configuration
Windows XP service pack 2 has enhanced Internet Explorer with several security features. In order to be able to test all Spyware Protection features (incl. Browser Control and System Control), we need to disable some features• Open Internet Explorer and goto Tools/Internet Options
• Adjust the Internet Security Level (click “Custom Level”)
• Download Signed ActiveX Controls: Enabled
• Adjust the “Privacy” settings
• Lower the privacy settings to “Accept all Cookies”
• Disable the XP SP2 popup blocker
=> After task is completed, continue to page 47

Page 43
Task 6:Spyware Scanning
Try out spyware scanning
• Run a spyware scan on the host
• Check the logfiles and alerts
=> After task is completed, continue to page 47

Page 44
Walk Through:Spyware Scanning
Execute a spyware scan on the
local host
• Launch the scan from system tray
• Usually there is some spyware to be found on a Windows computer
• Once the scan is complete, select “I want to decide item by item”

Page 45
Walk Through:Spyware Scanning
Get rid of the spyware
• Select the file and either delete them or quarantine them

Page 46
Walk Through:Spyware Scanning
Check also the scanning report

Page 47
Walk Through:Spyware Scanning
Now test, how easy it is to get infected with tracking cookies
• Browse through some high profile commercial sites like www.msn.com, www.yahoo.com, www.foxnews.com, www.cnet.com etc…
• Most of these push tracking cookies on your local disk
• Open logfile.log and search for spyware detections

Page 48
Task 7:Using Browser Control
Test Browser Control
• Enable Browser Control
• Simulate an attack on your hosts file
• Attempt to change the start page on Internet Explorer
• Test ActiveX protection using F-Secure Online Scanner
=> After task is completed, continue to page 54

Page 49
Walk Through:Using Browser Control
Test Browser Control
• Enable Browser Control either from the local user interface (if current policy allows this) or from Policy Manager Console Advanced Mode
• Then browse to http://www.popuptest.com/ => “Multi-PopUp Test #2” and test the popup blocker

Page 50
Walk Through:Using Browser Control
Simulate a redirection attempt
• Add the following line to your HOSTS file (in the folder C:\WINDOWS\system32\drivers\etc) to simulate a network re-direction attempt:
127.0.0.1 www.f-secure.com
• This will cause, that you now longer can use DNS names to access the F-Secure Webpage
• IP addresses still work!

Page 51
Walk Through:Using Browser Control
The hosts file redirection will be
detected by the Spyware real-
time scanner
• Accept the recommended action (Quarantine the object)
• Wait for the item being processed

Page 52
Walk Through:Using Browser Control
Check the logfile and hosts file
• Open the logfile.log to confirm that FSAVCS noticed the hosts file redirection
• Also open the hosts file and check, if malicious entry has been removed

Page 53
Walk Through:Using Browser Control
Now try to change the start page of the
Internet Explorer
• Open Tools/Internet Options on Internet Explorer
• Change the default home page
• Browser Control will prevent the change

Page 54
Walk Through:Using Browser Control
Browser Control also prevents
ActiveX installations
• Test this with the F-Secure Online Scanner http://support.f-secure.com/enu/home/ols.shtml
• This application is actually white listed, so the installation goes through, but if you open the logfile.log you’ll notice that Browser Control has noticed the operation

Page 55
Task 8:Manage Spyware Centrally
On the Policy Manager Console, manage the spyware reported by your host (test the spyware exclusion function)
=> After task is completed, continue to page 56
Page 56
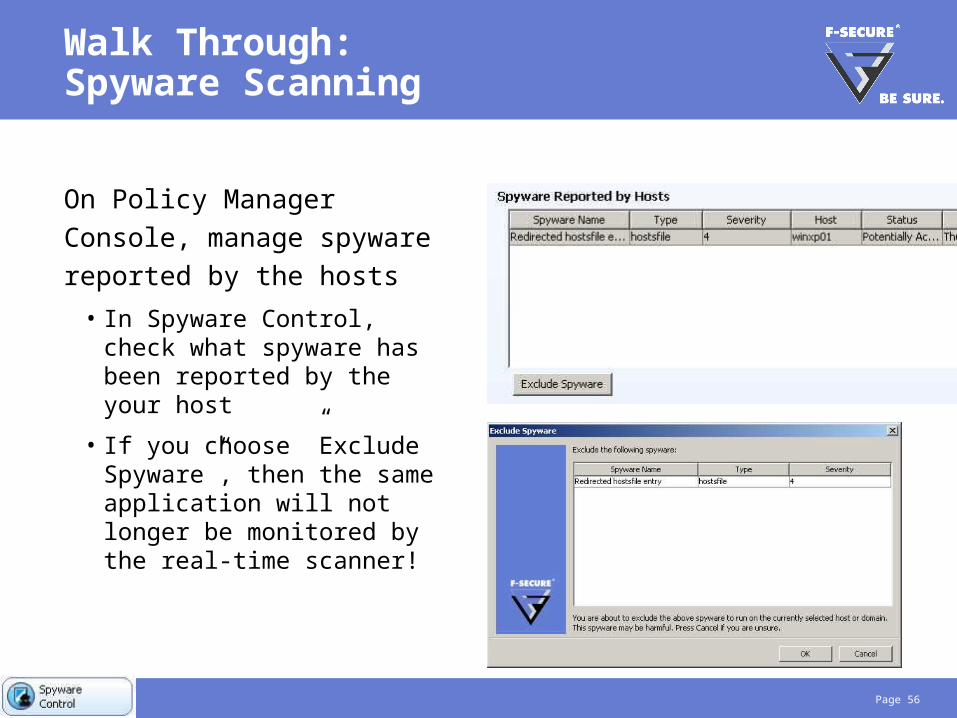
Walk Through:Spyware Scanning
On Policy Manager Console,
manage spyware reported by the
hosts
• In Spyware Control, check what spyware has been reported by the your host
• If you choose ”Exclude Spyware”, then the same application will not longer be monitored by the real-time scanner!

Page 57
Task 9:Using System Control
Enable System Control and test it by tampering directly with the registry
Some of the monitored registry sections
• HKEY_LOCAL_MACHINE\SOFTWARE\CLASSES (file extension associations)
• HKEY_LOCAL_MACHINE\SOFTWARE\MICROSOFT\WINDOWS\CURRENTVERSION\RUN (and ”RUNONCE”, applications launched at each startup)
=> After task is completed, continue to page 60

Page 58
Walk Through:Using System Control
Enable System Control
• System Control can be enabled either from the local user interface (if the current policy allows) or from the Policy Manager Console (Advanced Mode only!)
Page 59
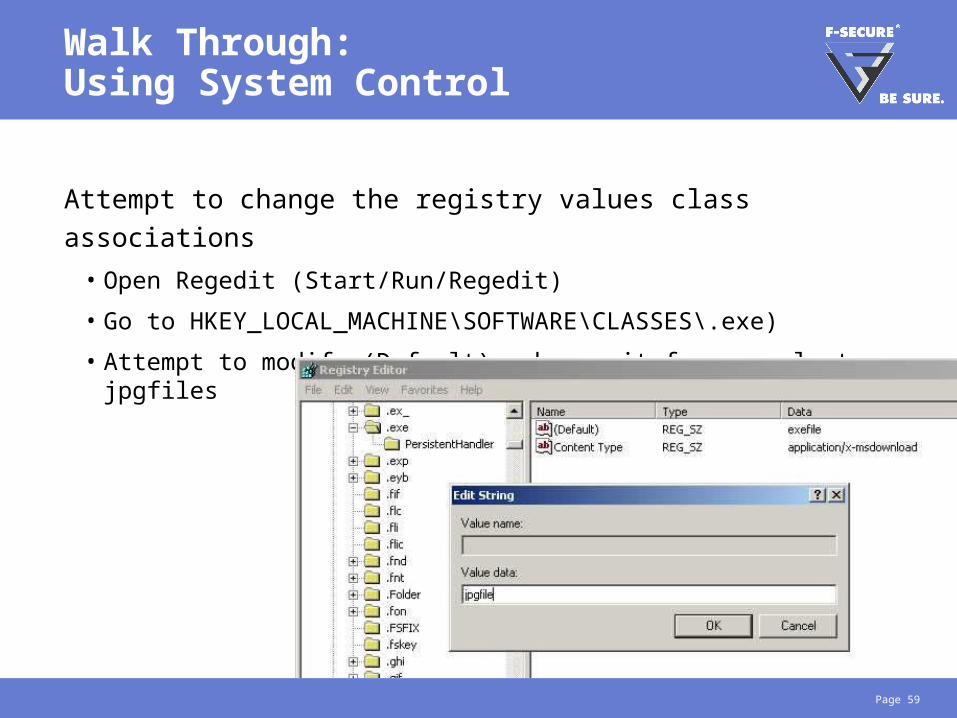
Walk Through:Using System Control
Attempt to change the registry values class associations
• Open Regedit (Start/Run/Regedit)
• Go to HKEY_LOCAL_MACHINE\SOFTWARE\CLASSES\.exe)
• Attempt to modify (Default), change it for example to jpgfiles
Page 60
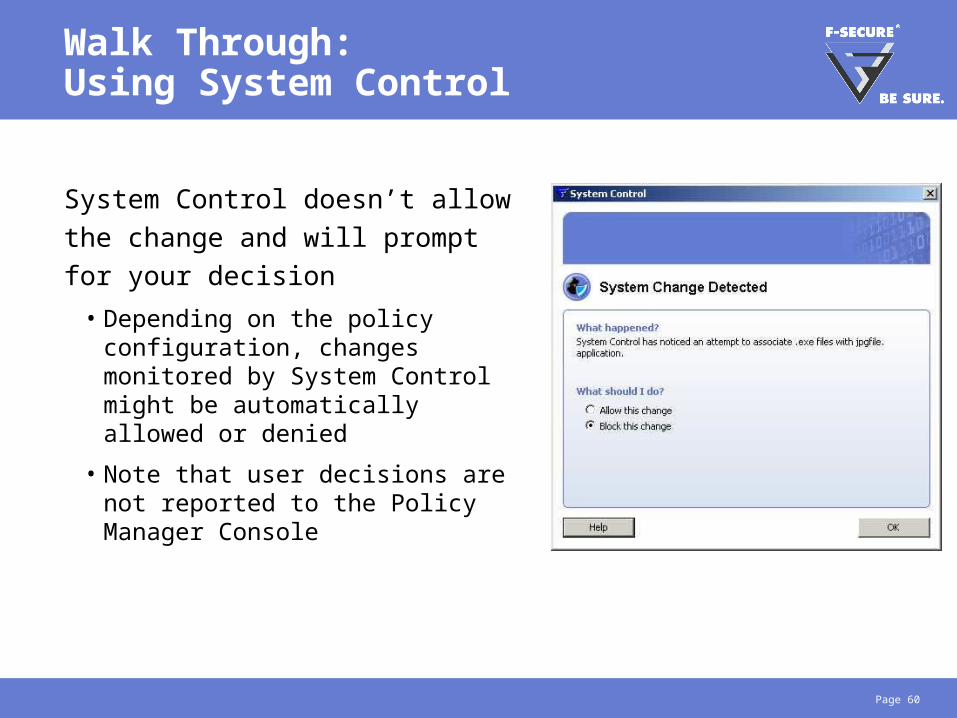
Walk Through:Using System Control
System Control doesn’t allow the
change and will prompt for your
decision
• Depending on the policy configuration, changes monitored by System Control might be automatically allowed or denied
• Note that user decisions are not reported to the Policy Manager Console

HANDS-ON FINISHED!