
Administration Guide for Cisco V irtualization Experience ... · Set DHCP options for device...
124
Administration Guide for Cisco Virtualization Experience Client 6215 Firmware Release 9.3 First Published: August 26, 2013 Last Modified: October 25, 2013 Americas Headquarters Cisco Systems, Inc. 170 West Tasman Drive San Jose, CA 95134-1706 USA http://www.cisco.com Tel: 408 526-4000 800 553-NETS (6387) Fax: 408 527-0883
Transcript of Administration Guide for Cisco V irtualization Experience ... · Set DHCP options for device...

Administration Guide for Cisco Virtualization Experience Client 6215Firmware Release 9.3First Published: August 26, 2013
Last Modified: October 25, 2013
Americas HeadquartersCisco Systems, Inc.170 West Tasman DriveSan Jose, CA 95134-1706USAhttp://www.cisco.comTel: 408 526-4000 800 553-NETS (6387)Fax: 408 527-0883

THE SPECIFICATIONS AND INFORMATION REGARDING THE PRODUCTS IN THIS MANUAL ARE SUBJECT TO CHANGE WITHOUT NOTICE. ALL STATEMENTS,INFORMATION, AND RECOMMENDATIONS IN THIS MANUAL ARE BELIEVED TO BE ACCURATE BUT ARE PRESENTED WITHOUT WARRANTY OF ANY KIND,EXPRESS OR IMPLIED. USERS MUST TAKE FULL RESPONSIBILITY FOR THEIR APPLICATION OF ANY PRODUCTS.
THE SOFTWARE LICENSE AND LIMITEDWARRANTY FOR THE ACCOMPANYING PRODUCT ARE SET FORTH IN THE INFORMATION PACKET THAT SHIPPED WITHTHE PRODUCT AND ARE INCORPORATED HEREIN BY THIS REFERENCE. IF YOU ARE UNABLE TO LOCATE THE SOFTWARE LICENSE OR LIMITED WARRANTY,CONTACT YOUR CISCO REPRESENTATIVE FOR A COPY.
The Cisco implementation of TCP header compression is an adaptation of a program developed by the University of California, Berkeley (UCB) as part of UCB's public domain versionof the UNIX operating system. All rights reserved. Copyright © 1981, Regents of the University of California.
NOTWITHSTANDINGANYOTHERWARRANTYHEREIN, ALL DOCUMENT FILES AND SOFTWARE OF THESE SUPPLIERS ARE PROVIDED “AS IS"WITH ALL FAULTS.CISCO AND THE ABOVE-NAMED SUPPLIERS DISCLAIM ALL WARRANTIES, EXPRESSED OR IMPLIED, INCLUDING, WITHOUT LIMITATION, THOSE OFMERCHANTABILITY, FITNESS FORA PARTICULAR PURPOSEANDNONINFRINGEMENTORARISING FROMACOURSEOFDEALING, USAGE, OR TRADE PRACTICE.
IN NO EVENT SHALL CISCO OR ITS SUPPLIERS BE LIABLE FOR ANY INDIRECT, SPECIAL, CONSEQUENTIAL, OR INCIDENTAL DAMAGES, INCLUDING, WITHOUTLIMITATION, LOST PROFITS OR LOSS OR DAMAGE TO DATA ARISING OUT OF THE USE OR INABILITY TO USE THIS MANUAL, EVEN IF CISCO OR ITS SUPPLIERSHAVE BEEN ADVISED OF THE POSSIBILITY OF SUCH DAMAGES.
Any Internet Protocol (IP) addresses and phone numbers used in this document are not intended to be actual addresses and phone numbers. Any examples, command display output, networktopology diagrams, and other figures included in the document are shown for illustrative purposes only. Any use of actual IP addresses or phone numbers in illustrative content is unintentionaland coincidental.
Cisco and the Cisco logo are trademarks or registered trademarks of Cisco and/or its affiliates in the U.S. and other countries. To view a list of Cisco trademarks, go to this URL: http://www.cisco.com/go/trademarks. Third-party trademarks mentioned are the property of their respective owners. The use of the word partner does not imply a partnershiprelationship between Cisco and any other company. (1110R)
© 2013 Cisco Systems, Inc. All rights reserved.

C O N T E N T S
C H A P T E R 1 Preface 1
Overview 1
Supported Flash version 3
Audience 3
Organization 3
Related documentation 4
Documentation, support, and security guidelines 4
Document conventions 4
C H A P T E R 2 Release 9.3 upgrade and setup using Cisco VXC Manager 7
High-level steps for initial setup 8
Cisco Virtualization Experience Media Engine 9
Best practices for management using Cisco VXC Manager 9
Client discovery using Cisco VXC Manager 11
Set DHCP options for device discovery 12
INI files 16
Create wlx.ini file for client configuration 16
INI file examples 17
Mandatory INI parameters 17
Firefox browser configuration example 18
XenDesktop INI configuration example 18
XenApp INI configuration example 18
VMware View INI configuration example 19
RDP INI configuration example 19
Enable VNC configuration example 20
Time settings configuration example 20
Display and keyboard settings configuration example 20
Create package for wlx.ini file 20
Administration Guide for Cisco Virtualization Experience Client 6215 Firmware Release 9.3 iii
Schedule device updates using Default Device Configuration 24
Configure Default Device Configuration preferences 24
First-time Default Device Configuration 24
Existing Default Device Configuration 25
Deploy devices behind Cisco Virtual Office router 26
Monitor resolution 26
SSH connections 26
C H A P T E R 3 USB redirection 27
Recognizing USB cameras using HDX RealTime Webcam with Citrix 27
USB camera redirection not supported with VMware View 27
USB redirection not supported for Logitech UC Keyboard with Cisco VXME 28
C H A P T E R 4 Desktop basics 29
Login 29
Desktop applications and tools 30
Desktop keyboard shortcuts 31
Thin client settings and connections 32
Network and Session Services 33
Printer connections 33
Monitor connections 33
Shutdown, restart, and suspend 34
View system information 34
Restore default settings 35
Boot menu 35
Restore default user settings 36
Restore all original factory default settings during firmware update 36
C H A P T E R 5 Configure thin client settings locally 37
Display 38
Keyboard 40
Mouse 41
Printers 41
Install a network printer 42
Install a local printer 43
Administration Guide for Cisco Virtualization Experience Client 6215 Firmware Release 9.3iv
Contents

Appearance 45
Language 45
Panel Settings 46
Screensaver 46
Add-on manager 47
Citrix global settings 47
Network 48
Drive mapping 49
Add drives 49
Edit and delete drives 50
Hotkeys 50
COM ports 51
Add COM ports 51
Delete COM ports 52
Display 52
Firewall 52
Trusted server configuration 53
Configure VDA 54
Configure desktop appliance settings 54
Device settings 56
Terminal name 56
Hosts 57
Ethernet Speed 58
COM 58
NTP 59
Advanced 59
Import certificates 60
Add certificates from a remote server 61
Add certificates from a local device 62
INI and upgrade settings 62
Image upgrade options 64
Network connections 65
Power management 66
TCX USB virtualizer 66
User administration 66
Administration Guide for Cisco Virtualization Experience Client 6215 Firmware Release 9.3 v
Contents

Configure Cisco VXC Manager agent settings 67
C H A P T E R 6 Configure connections locally 69
Mozilla Firefox 70
Network 70
Window 70
Auto Reconnect 71
Citrix 71
Network 71
Connection 72
Window 72
Application 72
Login 73
Auto Reconnect 73
Firewall 73
Custom 74
Application 74
Auto Reconnect 74
Ericom PowerTerm TEC 75
Network 75
Window 75
Connection 76
Setting 76
Remote Configuration 76
View 76
Ericom PowerTerm WebConnect 76
RDP 77
Network 77
Window 78
Login 78
Connection 79
Experience 79
Auto Reconnect 80
Application 80
Drive Mapping 80
Administration Guide for Cisco Virtualization Experience Client 6215 Firmware Release 9.3vi
Contents
Add share names 80
Edit and delete share names 81
Device mapping 81
Add devices 82
Delete devices 82
SSH 82
Network 83
Connection 83
VMware View Client 83
Network 84
Secure Preferences 84
Connection 84
Desktop 85
Login 85
VNC Viewer 85
Network 86
Connection 86
Window 86
Login 86
XDMCP 87
Network 87
Window 87
Connection 88
C H A P T E R 7 Accessing additional features with the application browser 89
Diagnostics 90
Diagnostic log viewer 91
Ericom PowerTerm TEC 92
Volume control 92
Take Screenshots 93
VNC Server 94
Monitor a thin client 94
Xterm 96
A P P E N D I X A Cisco AnyConnect Secure Mobility Client 97
Administration Guide for Cisco Virtualization Experience Client 6215 Firmware Release 9.3 vii
Contents

Feature support 97
Setup 99
Profile setup on Cisco ASA 99
Cisco AnyConnect setup using INI parameters 99
A P P E N D I X B Using central configuration to automate updates and configuration 103
INI files 103
Automatic configuration and update setup 105
Prepare the server root directory and folder structure 105
Direct the thin client to the server 106
Reboot the thin client 109
A P P E N D I X C Cisco VXC Manager and Wyse Device Manager 111
Cisco VXC Manager with WDM 111
Set up Cisco VXC Manager 111
Set devices to use Cisco VXC Manager 112
A P P E N D I X D BIOS upgrade 113
Overview 113
Extract BIOS 114
Install BIOS 114
Limitations 115
Administration Guide for Cisco Virtualization Experience Client 6215 Firmware Release 9.3viii
Contents

C H A P T E R 1Preface
• Overview, page 1
• Audience, page 3
• Organization, page 3
• Related documentation, page 4
• Documentation, support, and security guidelines, page 4
• Document conventions, page 4
OverviewTheCiscoVirtualization Experience Client 6215 (CiscoVXC 6215) running the CiscoVirtualization ExperienceMedia Engine (VXME) delivers superior voice and video collaboration capabilities in desktop virtualization.It unifies voice, video, and virtual desktop in one device.
The Cisco VXC 6215 provides workers with secure, real-time access to business applications and contentwithout compromising the collaborative user experience. The Cisco VXC 6215 supports the followingcapabilities:
• Combines virtual desktops with voice and video capabilities
• Supports processing capabilities that use network and data center CPU resources efficiently
• Supports high-quality, scalable voice and video, delivering an optimal user experience
The Cisco VXC 6215 provides support for the following hosted virtual desktop protocols:
• Citrix Independent Computing Architecture (ICA)
• PC over IP (PCoIP)
• Remote Desktop Protocol (RDP) (does not support the Cisco VXME add-on)
By default, the firmware installed on the Cisco VXC 6215 supports desktop virtualization capabilities, butdoes not provide the additional voice and video functionality required for Unified Communications. To supportUnified Communications, you must purchase the Cisco Virtualization Experience Media Engine (VXME).
Administration Guide for Cisco Virtualization Experience Client 6215 Firmware Release 9.3 1

For detailed information about CiscoVXME, see theDeployment Guide for Cisco Virtualization ExperienceMedia Engine for Cisco Virtualization Experience Client 6215.
Note
The following tables describe the virtual desktop protocols and applications that support the Cisco VXC 6215base firmware and those that support the Cisco VXME.
Table 1: Supported Virtual Desktop Protocols and Applications (Citrix)
Releases Supported with CiscoVXME
Releases Supported with BaseFirmware
Supported Virtual DesktopProtocols and Applications
5.0, 5.5, 5.6Release 5.0 requires thelatest VDA 5.5 pluginwith latest hotfix (hotfix100 minimum)
Note5.0, 5.5, 5.6
Release 5.0 requires thelatest VDA 5.5 pluginwith latest hotfix (hotfix100 minimum)
NoteCitrix XenDesktop
6.0 and 6.56.0 and 6.5Citrix XenApp (PublishedDesktoponly – no support for PublishedApplications)
12.1.6Supported with XenAppconnections only
12.1.6Supported with XenAppconnections only
Citrix ICA Client
12.1.612.1.6Citrix ICA Browser Plugin
5.0, 5.5, 5.65.0, 5.5, 5.6Citrix Virtual Desktop Agent
Table 2: Supported Virtual Desktop Protocols and Applications (VMware)
Releases Supported with CiscoVXME
Releases Supported with BaseFirmware
Supported Virtual DesktopProtocols and Applications
5.0, 5.1, and 5.2 using VMwareHorizon View Client 2.1.
VMware Horizon ViewClient requires SSL forconnections to a ViewConnection Server
Note
5.0, 5.1, and 5.2 using VMwareHorizon View Client 2.1.
VMware Horizon ViewClient requires SSL forconnections to a ViewConnection Server
Note
VMware Horizon View (PCoIP)
Table 3: Supported Virtual Desktop Protocols and Applications (RDP)
Releases Supported with CiscoVXME
Releases Supported with BaseFirmware
Supported Virtual DesktopProtocols and Applications
Not supported7.0 and 7.1, using Wyse RDPClient
RDP
Administration Guide for Cisco Virtualization Experience Client 6215 Firmware Release 9.32
PrefaceOverview

Supported Flash versionCisco VXC 6215 Release 9.3 includes Flash version 11.2.202.235-21.1+1. To ensure interoperability, installFlash 11.x on the hosted desktop. Cisco recommends you install the latest available 11.x version of FlashPlayer.
AudienceThis guide is intended for administrators of Cisco VXC 6215 clients. It provides information and detailedsystem configurations to help you design and manage your thin client environment.
OrganizationThis manual is organized as described in the following table.
DescriptionChapter
Describes how to set up and manage the thin clientusing Cisco VXC Manager.
Release 9.3 upgrade and setup using Cisco VXCManager, on page 7
Provides guidelines for USB redirection on devices.USB redirection, on page 27
Describes desktop basics.Desktop basics, on page 29
Describes how to set up your thin client hardware,look and feel, and system settings using the ControlCenter.
Configure thin client settings locally, on page 37
Describes how to configure and add connections toyour Desktop to access the enterprise serverenvironment.
Configure connections locally, on page 69
Describes how to use the Application Browser toaccess the applications, audio and video, and systemfeatures installed on the thin client.
Accessing additional features with the applicationbrowser, on page 89
Describes how to setup the Cisco AnyConnect SecureMobility client for secure VPN connections.
Cisco AnyConnect Secure Mobility Client, on page97
Describes how to set up your environment to provideyour thin clients with automatic updates andconfigurations.
Using central configuration to automate updates andconfiguration, on page 103
Describes how to manage a Cisco VXC 6215environment containing a Cisco VXC Manager anda Wyse Device Manager (WDM).
Cisco VXCManager andWyse Device Manager, onpage 111
Describes how to upgrade the BIOS for a BIOSpassword change.
BIOS upgrade, on page 113
Administration Guide for Cisco Virtualization Experience Client 6215 Firmware Release 9.3 3
PrefaceSupported Flash version

Related documentationFor more information, see the documents available at the following URLs:
Cisco Virtualization Experience Client 6000 Series
http://www.cisco.com/en/US/products/ps11976/tsd_products_support_series_home.html
Cisco Virtualization Experience Client Manager
http://www.cisco.com/en/US/products/ps11582/tsd_products_support_series_home.html
Cisco Virtualization Experience Media Engine
http://www.cisco.com/en/US/products/ps12862/tsd_products_support_series_home.html
Documentation, support, and security guidelinesFor information on obtaining documentation, obtaining support, providing documentation feedback, securityguidelines, and also recommended aliases and general Cisco documents, see the monthlyWhat's New in CiscoProduct Documentation, which also lists all new and revised Cisco technical documentation, at:
http://www.cisco.com/en/US/docs/general/whatsnew/whatsnew.html
Subscribe to theWhat's New in Cisco Product Documentation as a Really Simple Syndication (RSS) feedand set content to be delivered directly to your desktop using a reader application. The RSS feeds are a freeservice and Cisco currently supports RSS Version 2.0.
Document conventionsThis document uses the following conventions:
Means reader take note. Notes contain helpful suggestions or references to material that is not covered inthe publication.
Note
Means reader be careful. In this situation, you might do something that could result in equipment damageor loss of data.
Caution
Warnings use the following convention:
Warning IMPORTANT SAFETY INSTRUCTIONS
This warning symbol means danger. You are in a situation that could cause bodily injury. Beforeyou work on any equipment, be aware of the hazards involved with electrical circuitry and befamiliar with standard practices for preventing accidents. Use the statement number provided atthe end of each warning to locate its translation in the translated safety warnings that accompaniedthis device. Statement 1071
Warning
Administration Guide for Cisco Virtualization Experience Client 6215 Firmware Release 9.34
PrefaceRelated documentation

SAVE THESE INSTRUCTIONS
Administration Guide for Cisco Virtualization Experience Client 6215 Firmware Release 9.3 5
PrefaceDocument conventions

Administration Guide for Cisco Virtualization Experience Client 6215 Firmware Release 9.36
PrefaceDocument conventions

C H A P T E R 2Release 9.3 upgrade and setup using Cisco VXCManager
Cisco thin clients are designed to be centrally managed and configured using INI files and the Cisco VXCManager. This chapter describes the Cisco VXC Manager procedures required to upgrade from Release 9.0or Release 9.2(1) to Release 9.3 as well as apply client configurations on Cisco VXC 6215 devices alreadyrunning Firmware Release 9.3. For detailed information about using Cisco VXCManager, see AdministrationGuide for Cisco Virtualization Experience Client Manager.
This chapter describes the steps required to upgrade devices that are running Firmware Release 9.0 or9.2(1). The Cisco VXC 6215 does not support direct upgrades fromRelease 8.7 to Release 9.3. To upgradefrom Release 8.7 to Release 9.3, you must first upgrade to Release 9.0 or 9.2(1), in accordance with theupgrade instructions for those releases.
Note
This chapter contains the following topics:
• High-level steps for initial setup, page 8
• Cisco Virtualization Experience Media Engine, page 9
• Best practices for management using Cisco VXC Manager, page 9
• Client discovery using Cisco VXC Manager, page 11
• INI files, page 16
• Create wlx.ini file for client configuration, page 16
• INI file examples, page 17
• Create package for wlx.ini file, page 20
• Schedule device updates using Default Device Configuration, page 24
• Deploy devices behind Cisco Virtual Office router, page 26
• Monitor resolution, page 26
• SSH connections, page 26
Administration Guide for Cisco Virtualization Experience Client 6215 Firmware Release 9.3 7

High-level steps for initial setupThe following are the high-level steps required to set up your Cisco VXC 6215 environment.
To interoperate with Cisco VXC 6215 Firmware Release 9.0 and later, you must run Cisco VXCManager4.9.1. If you are running a previous release of Cisco VXC Manager, you can still discover and manageCisco VXC 6215 devices running Firmware Release 9.0 and later, but real-time commands are notsupported.
For upgrade instructions, see the Release Notes for Cisco Virtualization Experience Client ManagerRelease 4.9.1.
Note
Procedure
Step 1 Install or upgrade to Cisco VXC Manager 4.9.1 (see Installation Guide for Cisco Virtualization ExperienceClient Manager).
Step 2 Download the Cisco VXC 6215 firmware from the Cisco Software Download page:
1 Go to the following URL:
http://www.cisco.com/cisco/software/navigator.html
2 Choose Products > Voice and Unified Communications > IP Telephony > Virtualized Endpoints.
3 ChooseCisco Virtualization Experience Client 6000 Series >Cisco Virtualization Experience Client6215.
For the CiscoVXME add-on, chooseCiscoVirtualization ExperienceMedia Engine.Note
4 Choose the desired release version from the list.
5 Click the Download or Add to cart button and follow the prompts.
Step 3 Connect at least one Cisco VXC 6215 to your network and power it on.Step 4 Set up device discovery in Cisco VXC Manager (DHCP is the recommended method—see Client discovery
using Cisco VXC Manager, on page 11).Step 5 Create the INI files to centrally configure the thin clients (see Create wlx.ini file for client configuration, on
page 16).Step 6 Set up a configuration package in Cisco VXCManager referencing the desired INI configuration (see Create
package for wlx.ini file, on page 20).Step 7 Push the configuration package to your thin clients (see Schedule device updates using Default Device
Configuration, on page 24).
Administration Guide for Cisco Virtualization Experience Client 6215 Firmware Release 9.38
Release 9.3 upgrade and setup using Cisco VXC ManagerHigh-level steps for initial setup

Cisco Virtualization Experience Media EngineTo support Unified Communications on the Cisco VXC 6215, you must purchase and install the CiscoVirtualization Experience Media Engine (VXME). Cisco VXME provides Unified Communicationsfunctionality on the Cisco VXC 6215.
You can install the Cisco VXME add-on on the Cisco VXC 6215 as part of the upgrade to Firmware Release9.3. For detailed deployment information about Cisco VXME, see the Deployment Guide for CiscoVirtualization Experience Media Engine for Cisco Virtualization Experience Client 6215.
Best practices for management using Cisco VXC ManagerThe following are best practices for management of Cisco VXC 6215 devices using Cisco VXC Manager.
HTTP and HTTPS with Cisco VXC Manager
•With Firmware Release 9.3, the Cisco VXC 6215 can support Cisco VXC Manager 4.9.1 using HTTPor HTTPS , but not FTP. Set the Cisco VXCManager to use HTTP or HTTPS for server communications(using a custom installation).
•When communicatingwith Cisco VXCManager, Cisco VXC 6215 devices always attempt to use HTTPSfirst. If both HTTP and HTTPS are enabled on Cisco VXC Manager, the HTTP protocol will only beused for communication as a backup option (if a device does not have a Cisco VXCManager certificate).After the upgrade, Cisco VXC 6215 devices lose the Cisco VXC Manager certificates, so thecommunication will fallback to HTTP, until the Cisco VXC Manager certificate is re-deployed.
• If you enable only HTTPS and disable HTTP on Cisco VXC Manager, and an upgrade for the CiscoVXC 6215 fails, Cisco VXCManager does not fallback to attempting HTTP, unlike the standard HAgentprocess. Instead, Cisco VXC Manager returns an error after three attempts using HTTPS.
•When you configure the software repository, you can check the Secure (HTTPS) check box to enableHTTPS. However, the Validate Certificate with CA check box has no effect. Regardless of whether thelatter option is enabled, the certificates are used for encryption only, not authentication, and so they arenot validated against a trusted CA.
• To upgrade to Firmware Release 9.3, you must first ensure HTTPS is disabled on Cisco VXCManager.The upgrade process supports HTTP only. After you perform the update to Firmware Release 9.3, youcan then re-enable HTTPS.
Drag-and-Drop not supported
With Firmware Release 9.3, DDC is the only supported method available to push packages. Drag-and-Dropis not supported. (Drag-and-Drop may function in small environments or for test purposes. However, it willnot function at all for thin clients behind a Cisco AnyConnect VPN.)
The benefits of using DDC are as follows:
• A specific configuration for your thin clients is always available for download (Drag-and-Drop is availableonly once, and in case of errors, the thin client cannot download the same configuration again).
• A specific configuration can be applied to multiple machines (all devices or sub-groups).
Administration Guide for Cisco Virtualization Experience Client 6215 Firmware Release 9.3 9
Release 9.3 upgrade and setup using Cisco VXC ManagerCisco Virtualization Experience Media Engine

• A brand new device can download the correct package without the need to specify a new configuration(all new devices will use the same applied DDC configuration).
Single package deployment
Cisco recommends that you always deploy only one DDC package containing the base image, all the add-onsyou need, and the required INI file. If you must change anything inside the package, create a brand newpackage with a different name.
INI and RSP files from Release 8.x incompatible with Firmware Release 9.x
The INI and RSP files used in Release 8.6 and 8.7 are incompatible with those used with Firmware Release9.0 and later. Do not try to re-use the Release 8.6 or 8.7 RSP and INI files with Firmware Release 9.x. Youmust use the appropriate RSP and INI files for the Release 9.x packages.
Required preserve changes setting
For devices running 9.0 and later firmware, in order for the hostname on the device to be retained after areboot, you must enable the preserve changes option in the RSP file (set-preserve-changes yes) and in theINI file (Update.Preserve_changes=yes). If these parameters are not set correctly, your previous configurationswill be lost after a reboot and the hostname on the thin client will revert to the device MAC address.
Editing INI and RSP files
Use only a plain text editor to edit INI and RSP files. Do not use word processing program such as Word orWordPad to edit these files, otherwise package deployment errors can occur.
INI caching
In the INI file, include the INIFileSource=cache parameter to ensure that devices use the local cached versionof the INI file if they cannot access the INI file from Cisco VXC Manager. This is particularly important fordevices running the Cisco AnyConnect VPN, so that they have a configuration to reference at bootup beforeconnecting to the network over VPN.
Cisco AnyConnect deployments
For devices running the Cisco AnyConnect VPN, before you provide the devices to your remote employees,you must first push the required configuration to the devices on your local network first. After you haveupgraded the devices with the required parameters locally, you can then provide the preconfigured devicesto remote users to operate behind the Cisco AnyConnect VPN.
Deploying add-ons
•When you deploy an add-on to the device, include the base image in the DDC package. This ensuresthat the devices that apply the add-on are also running the required base image version. For devicesalready running the required base image, they will install the add-on only.
• To check which specific add-ons and RPMs are installed on the thin client, see the Application Info tabfor the device in Cisco VXC Manager (at the bottom of the details pane in Device Manager).
Administration Guide for Cisco Virtualization Experience Client 6215 Firmware Release 9.310
Release 9.3 upgrade and setup using Cisco VXC ManagerBest practices for management using Cisco VXC Manager

Package and file naming
• All Cisco VXCManager package names, filenames (including .rsp and .ini), folders, and so on must belower-case.
• Every time you push a new package, you must use a new name for the package. (You can copy thepackage, change the name, make the required changes, and then push the renamed package.) Do notmake changes to an existing package and push it again with the same name; otherwise, the clients maynot apply the latest changes. As a best practice, add the date to each package you create.
• If you downgrade a Cisco VXC 6215 thin client from a newer Image DDC (for example, DDC_10) toany older Image DDC (for example, DDC_09), and then try to re-apply the newer image DDC to theclient, the operation fails. To successfully re-apply the newer image DDC (DDC_10) to the thin clientafter a downgrade, youmust first rename the newer image DDC using Cisco VXCManager (for example,to DDC_10a).
Minimum checkin time
In the Device Manager preferences (Configuration Manager > Preferences > Device Manager), the minimumcheckin time must be no less than 5 minutes, otherwise devices will experience issues. For large deployments,the default value of 1 hour is appropriate.
Scheduled Packages error
If you deploy a package from Cisco VXC Manager and an error message appears in the Schedule Packages,delete this error. Any errors associated with a specific thin client prevent future package deployments to thethin client until the errors are deleted.
Device discovery using static configuration rather than DHCP
DHCP is the Cisco-recommended method for device discovery with Cisco VXC Manager. As an alternative,you can specify the Cisco VXC Manager address on the thin client statically in the INI file using theMgmtDiscoveryMethod=STATIC parameter together with the RapportServer and the RapportSecurePortparameters. For more information, see INI Files Reference Guide for Virtualization Experience Client 6215Firmware.
Execute command
In Device Manager, if you enter a command in the Execute Command dialog box (right-click the device andchoose Execute Command), always add an ampersand to the end of the command (for example,/etc/init.d/sshd start &). Otherwise, the command can leave the thin client unusable, requiring a manualreboot.
Log History tab
In the Log history tab (at the bottom of the details pane in Device Manager), if you list the logs by date, theentries are not listed in chronological order, but rather in alphabetical order.
Client discovery using Cisco VXC ManagerCisco VXCManager allows you to configure, upgrade, and administer your thin clients from a single interface.It also allows you to specify default configurations that are common to all of the thin clients in your
Administration Guide for Cisco Virtualization Experience Client 6215 Firmware Release 9.3 11
Release 9.3 upgrade and setup using Cisco VXC ManagerClient discovery using Cisco VXC Manager

environment. You can also use it to enable add-ons, which provide additional functionality in addition to theunderlying firmware.
CiscoVXCManager can discover the CiscoVXC 6215 devices in your network using either dynamic discoveryor a manual process. After Cisco VXC Manager identifies the devices in the network, it stores informationabout them in the Cisco VXC Manager Database. You can then use Cisco VXC Manager to manage thedevices.
For the Cisco VXC 6215, the recommended discovery method uses a DHCP server. In this case, you mustconfigure DHCP Option Tags on your DHCP server to specify the IP address and port of the Cisco VXCManagerWeb Server. The Cisco VXCManager Agent (HAgent) on the Cisco VXC 6215 uses this informationto communicate with the Cisco VXC Manager Web Server, performing check-ins at boot up and at regularintervals. The HAgent provides the Cisco VXC Manager with device information including device name,hardware information, network information, and image version.
For detailed configuration steps for DHCP discovery, see Set DHCP options for device discovery, on page12.
For proper operation of the thin clients, you must also specify a value either for DHCPOption 15 (DomainName) or for DHCP Option 6 (Domain Server) in the DHCP server configuration. If you do not specifya standard domain name for DHCP Option 15, and you do not specify a standard domain server for DHCPOption 6, you must at minimum specify "none" for DHCP Option 15. This configuration is necessarywhether or not you are using DHCP to direct the thin clients to the central server.
Caution
For information about additional discovery methods with Cisco VXCManager, see Administration Guide forCisco Virtualization Experience Client Manager.
Set DHCP options for device discoveryTo allow Cisco VXC Manager to discover the Cisco VXC 6215 devices, configure the following option tagvalues on your DHCP server:
• Option tag 186—IP address of your Cisco VXCManager server (for example, 192.168.1.10). The valueshould be in 4-byte IP address format.
• Option tag 194—As an alternative to option tag 186, you can use option tag 194 to specify the FQDNof the Cisco VXC Manager server.
• Option tag 190—Secure port number to which Cisco VXC Manager server listens (for example, port443). The value should be in word format (value = 0x01bb) or 2-byte array format (value = 0x01 0xbb).
• Option tag 192—Non-secure port number to which Cisco VXC Manager server listens (for example,80). The value should be in either word format (value = 0x0050), or 2-byte array format (value= 0x000x50).
Do not run the Cisco VXC Manager server and the DHCP server on the same machine.Tip
To configure the Cisco VXC Manager server IP address and port option values on a Windows DHCP server:
Administration Guide for Cisco Virtualization Experience Client 6215 Firmware Release 9.312
Release 9.3 upgrade and setup using Cisco VXC ManagerSet DHCP options for device discovery

Procedure
Step 1 Open the DHCP management wizard, choose the DHCP server to be configured, right-click the server name,and choose Set Predefined Options to open the Select Predefined Options and Values window.
Figure 1: DHCP Window
Figure 2: Select Predefined Options and Values
Step 2 On the Predefined Options and Values screen, click the Add button. The Option Type window appears.Step 3 In the Option Type window, enter the required information:
• Name—Cisco VXC Manager Server
• Data Type—IP Address
• Code—186
Administration Guide for Cisco Virtualization Experience Client 6215 Firmware Release 9.3 13
Release 9.3 upgrade and setup using Cisco VXC ManagerSet DHCP options for device discovery

• Description (optional)—Enter desired information
Figure 3: Option Type: Server IP
Step 4 Click OK.Step 5 Repeat Steps 2 and 3 for the Cisco VXC Manager Server Secure port, with these changes:
• Name—Cisco VXC Manager Server Secure Port
• Data Type—Word
• Code—190
Step 6 Repeat Steps 2 and 3 for the Cisco VXC Manager Server port, with these changes:
• Name—Cisco VXC Manager Server Port
• Data Type—Byte or Word
• Code—192
Figure 4: Option Type: Cisco VXC Manager Server Port
Administration Guide for Cisco Virtualization Experience Client 6215 Firmware Release 9.314
Release 9.3 upgrade and setup using Cisco VXC ManagerSet DHCP options for device discovery

Step 7 Click OK.
Figure 5: DHCP Scope Options: Cisco VXC Manager Server
Step 8 From the DHCP management wizard, right-click Scope Options (from the target DHCP Server Scope, asshown in Step 7) and choose Configure Options.
• In the list of Available Options, check option number 186, and enter the IP address of the Cisco VXCManager server.
• In the list of Available Options, check option number 190, and enter the port number at which yourCisco VXC Manager server listens for secure communication.
• In the list of Available Options, check option number 192, and enter the port number at which yourCisco VXC Manager server listens (Port 80 is shown below).
Figure 6: DHCP Scope Options: Cisco VXC Manager Server Port
Administration Guide for Cisco Virtualization Experience Client 6215 Firmware Release 9.3 15
Release 9.3 upgrade and setup using Cisco VXC ManagerSet DHCP options for device discovery

Step 9 Click OK.
Figure 7: DHCP Scope Options List
Step 10 Confirm that options 186, 190 and 192 are listed with proper values under the target DHCP server and scope.
INI filesINI files are plain-text files that you can use to centrally manage and configure your thin clients on a globallevel. For example, you can use INI files to configure and save information about connection settings, displayoptions, and printer options. The INI files are maintained on the central Cisco VXC Manager server, and thethin client accesses the INI files from the server during the initialization process (using HTTP, or HTTPS).
For more information, see INI files, on page 103
Create wlx.ini file for client configurationThe most commonly used INI file, wlx.ini, contains the global parameters you want to apply to all thin clientsin your environment. (Cisco VXC Manager also allows you to specify a subset of thin clients to which aparticular wlx.ini configuration applies.)
The Cisco VXC 6215 supports a number of INI configuration parameters. See INI file examples, on page17 for some useful examples, including configurations required to create XenDesktop, VMware View, andRDP connections. For a complete list of supported INI parameters, see INI Files Reference Guide for CiscoVirtualization Experience Client 6215 .
Administration Guide for Cisco Virtualization Experience Client 6215 Firmware Release 9.316
Release 9.3 upgrade and setup using Cisco VXC ManagerINI files

By default, administrator and root user credentials are specified on the thin client. Cisco stronglyrecommends that you change the passwords for these users to prevent unauthorized access to the client,using the following INI parameters.
INI parameter used to changepassword
Default passwordUsername
Caution
ChangeAdminPasswordadminadmin
ChangeRootPasswordadminroot
To create the wlx.ini file, perform the following procedure.
Procedure
Step 1 Open a text file.Step 2 Enter the INI parameters required in accordance with INI file examples, on page 17 or Cisco Virtualization
Experience Client 6215 INI Files Reference Guide.Step 3 Save the file as wlx.ini.Step 4 After you create the wlx.ini file, you must create a Cisco VXC Manager package to push the wlx.ini
configuration to your clients. See Create package for wlx.ini file, on page 20.
INI file examplesThis section contains sample INI files. For detailed information about INI parameters and definitions, see theINI Files Reference Guide for Cisco Virtualization Experience Client 6215.
Mandatory INI parametersTo push updates to devices running Firmware Release 9.0 and later, you must include the following mandatoryparameter in the INI file:IniFileSource=cache
This section describes the required parameters for updating Release 9.x devices only.Note
Static IP INI parameters for Cisco VXC Manager
If you are deploying using static Cisco VXC Manager IP configuration, also include the following:
MgmtDiscoveryMethod=STATICRapportServer=xxx.xxx.xxx.xxxRapportSecurePort=443
Administration Guide for Cisco Virtualization Experience Client 6215 Firmware Release 9.3 17
Release 9.3 upgrade and setup using Cisco VXC ManagerINI file examples

In the above, replace xxx.xxx.xxx.xxx and 443 with your Cisco VXC Manager IP address and secure portnumber.
Firefox browser configuration exampleThe following is a simple INI file that you can use to test the Cisco VXCManager client update process. Afterthe package process is successful using this file, the client will load the INI file, and launch the Firefox browserwith cisco.com as the home page.
Example:CONNECT=BROWSER \Description="Cisco Home Page" \URL=http://www.cisco.com \Resolution=FullScreen \Mode=Normal \autoconnect=yes
XenDesktop INI configuration exampleTo create XenDesktop server connections, use the Mozilla Firefox Connect options to specify the URL of theXenDesktop server to which users must connect. When the server URL is specified in the INI configuration,Firefox opens to this URL and the user can enter their credentials to initiate the connection to the HVD.
Example:CONNECT=BROWSER \Description="Windows Desktop" \URL=http://xd.company.com \Reconnect=yes \ReconnectSeconds=5 \AutoConnect=yes \mode=kiosk
In the above example, replace xd.company.com with the URL of your XenDesktop server.Caution
With the optional Autoconnect=yes parameter specified in the preceding example, the browser connects tothe specified URLwhen the client boots up. In addition, the optional Reconnect=yes and ReconnectSeconds=5parameters specify to reconnect a disconnected connection after 5 seconds. Finally, the optional mode=kioskparameter specifies to operate in kiosk mode, in which Firefox operates in full-screen mode with no accessto the address bar.
XenApp INI configuration exampleThe following is an example configuration for a Citrix XenApp connection.
The Cisco VXC 6215 supports the ICAConnect Options only with XenApp connections. The ICAConnectOptions are not supported with XenDesktop connections.
Note
Example:CONNECT=ICA \BrowserIP=192.168.0.3 \Application="Desktop" \
Administration Guide for Cisco Virtualization Experience Client 6215 Firmware Release 9.318
Release 9.3 upgrade and setup using Cisco VXC ManagerFirefox browser configuration example

Description="ICA_Desktop " \AutoConnect=yes \Reconnect=yes \Encryption=128 \Colors=16m \Fullscreen=no \Resolution=800x600 \Username=$UN \Password=$PW \Domainname=$DN \Alternate=yes \LowBand=yes
In the above example, replace 192.168.0.3 with the IP address of the ICA browser.Caution
VMware View INI configuration exampleThe following is an example configuration for a VMware View connection.
Example:CONNECT=VMWARE_VIEWCLIENT \Description="VMview" \Host=192.168.0.2 \DomainName=$DN \Username=Administrator \Password=Password \DesktopSize=800x600 \Ping=yes \UseSSL=yes
In the above example, replace 192.168.0.2 with the IP address of your VMware View server.Caution
RDP INI configuration exampleThe following is an example configuration for an RDP connection.
Example:CONNECT=RDP \Host=x.x.x.x \Description="RDP_Server" \AutoConnect=yes \Colors=16m \Username=Administrator \Password=Password \Domainname=$DN \Resolution=800x600 \Reconnect=no \Drives=J=disk \Drives=k=floppy \Sound=off
In the above example, replace x.x.x.x with the IP address of your RDP server.Caution
Administration Guide for Cisco Virtualization Experience Client 6215 Firmware Release 9.3 19
Release 9.3 upgrade and setup using Cisco VXC ManagerVMware View INI configuration example

Enable VNC configuration exampleThe following is an example configuration to enable VNC.
Example:DisableVnc=noVNCAuthTypes=noneVNCPrompt=no
Time settings configuration exampleThe following is an example configuration for time settings.
Example:Timeserver=yourntpserver.comTimeformat="24-hour format"TimeZone="US/Eastern"ManualOverride=1
Display and keyboard settings configuration exampleThe following is an example configuration for display and keyboard settings.
Example:DisplaySettings=MON1 rotate-normal 1440x900DesktopTaskBar=leftAutoHide=yesKeyboard.layouts=us
Create package for wlx.ini fileTo push a wlx.ini file to your clients, you must create a Cisco VXC Manager package, which you can thenschedule for distribution to your devices.
Required folder structure with Cisco VXC Manager
With Firmware Release 9.3, all Cisco VXC Manager package names, filenames (including .rsp and .inifiles), folders, and so on must be lower-case.
Note
With Cisco VXCManager, you must create and register specific packages to push upgrades and configurationsto your clients.
To register the package with Cisco VXCManager, youmust create a unique RSP file and, in the same directory,a matching folder of the same name. This matching folder serves as the root directory for the remainingconfiguration files in the package.
For example, assuming <packagename>.rsp is the RSP file, the folder structure required to register the packageis as follows:
Administration Guide for Cisco Virtualization Experience Client 6215 Firmware Release 9.320
Release 9.3 upgrade and setup using Cisco VXC ManagerEnable VNC configuration example

Table 4: Package Folder Structure
DescriptionDirectory
The unique RSP file, located in the same directory as the matching rootpackage directory.
~\<packagename>.rsp
The root package directory. It stores the wlx folder and the add-ons folder.It also stores the following files, which are used for imaging and updatingdevices:
• Latest-image.raw
• Latest-image.raw.info
~\<packagename>\
The main INI configuration folder. It stores the following:
• wlx.ini file and $MAC.ini file
• bitmap folder
• certs folder
• ini folder
~\<packagename>\wlx
The folder where you can place custom images you plan to use.~\<packagename>\wlx\bitmap
The folder where you can place the CA certificates that can be imported toa thin client.
Use the Certs and ImportCerts INI parameters in the wlx.ini fileto import the certificates to thin clients.
Note
~\<packagename>\wlx\certs
The folder where you can place the {username}.ini files.~ \<packagename>\wlx\ini
The folder where you can place the add-ons you want to use. It also storesthe directory file and the *.rpm packages available to be installed on thethin client. The directory file should list all available add-ons. The directoryfile is required in the add-ons folder to guarantee that add-ons are properlylocated.
~\<packagename>\addons
You can create this structure in any location on your Cisco VXC Manager server, as long as all required filesare in the appropriate folders.
If a folder does not contain a required file for the package, the folder can be omitted from the packagedirectory structure. For example, if the package contains no graphics, the \wlx\bitmap folder is not required.
Note
After you register the package, Cisco VXCManager stores the package files in the software repository underc:\inetpub\ftproot\Rapport\<packagename>.
Administration Guide for Cisco Virtualization Experience Client 6215 Firmware Release 9.3 21
Release 9.3 upgrade and setup using Cisco VXC ManagerCreate package for wlx.ini file

Do not attempt to modify a registered package located in the Rapport folder. To modify a package, youmust create and register a new package that includes the required changes.
Caution
Use the following procedure to create a Cisco VXC Manager package containing the wlx.ini file for CiscoVXC 6215 client configuration.
Procedure
Step 1 Create a folder to contain the client configurations, for example 6215-9.3.0-platform-files.Step 2 In the 6215-9.3.0-platform-files folder, create an RSP file, for example 6215-9.3.0-datetime-template.rsp,
with the following content (to create the RSP file, enter the required content in a text editor, and then savethe file with a .rsp extension):
This RSP script is provided as an example; you may need to reconfigure the parameters dependingon your environment. See the Administration Guide for Cisco Virtualization Experience ClientManager for details about configuring RSP files.
Note
[Version]Number=6215-9.3.0-datetime-templateDescription=Cisco firmware 11.2.038cOS=SLXCategory=CiscoUSE_Pxe=NO
[Script]RP "<regroot>"EX "/usr/bin/perl /sbin/dhcp2registry"EX "/usr/sbin/thinclient-config --set-update-mode both"EX "/usr/sbin/thinclient-config --set-force-image-update no"EX "/usr/sbin/thinclient-config --set-preserve-changes yes"EX "sync"EX "(test -e /usr/sbin/imageupgrade && imageupgrade; exit 0)"EX "(! test -e /usr/sbin/imageupgrade && (sleep 10; /sbin/reboot)&)"
where the Number= segment must have the exact same value as the RSP file name.
This example RSP script is applicable only for devices already running Firmware Release 9.0 andlater.
Caution
Step 3 Create a matching folder to contain the remaining package files, in this example, 6215-9.3.0-datetime-template.Step 4 In the 6215-9.3.0-datetime-template folder, add the required package files to create the following folder
structure:C:\6215-9.3.0-platform-files\6215-9.3.0-datetime-template.rsp
C:\6215-9.3.0-platform-files\6215-9.3.0-datetime-template\latest-image.raw
C:\6215-9.3.0-platform-files\6215-9.3.0-datetime-template\latest-image.raw.info
C:\6215-9.3.0-platform-files\6215-9.3.0-datetime-template\wlx\wlx.ini
See the end of this procedure for the mandatory INI parameters with Firmware Release 9.3 deviceupdates.
Note
Step 5 To install an add-on, include the addons subfolder under the 6215-9.3.0-datetime-template folder, and copythe RPM and directory file to this folder:C:\6215-9.3.0-platform-files\6215-9.3.0-datetime-template\addons\add-on-name.rpm
Administration Guide for Cisco Virtualization Experience Client 6215 Firmware Release 9.322
Release 9.3 upgrade and setup using Cisco VXC ManagerCreate package for wlx.ini file

C:\6215-9.3.0-platform-files\6215-9.3.0-datetime-template\addons\directory
To install add-ons on devices running Firmware Release 9.3, you do not need to include theInstallAddons parameter in the wlx.ini file.
Note
Example:To install Cisco VXME, you need to copy the following two files to the specified folder as shown:
C:\6215-9.3.0-platform-files\6215-9.3.0-datetime-template\addons\vxme-pre-reqs-9.3.0-27.sletc11sp2.rpm
C:\6215-9.3.0-platform-files\6215-9.3.0-datetime-template\addons\vxme-9.3.0-77.sletc11sp2.rpm
In addition, ensure that the directory file contains the following two lines:vxme-pre-reqs-9.3.0-27.sletc11sp2.rpmvxme-9.3.0-77.sletc11sp2.rpm
The order in which the VXME Pre-Reqs add-on and the VXME add-on appear in the directoryfile is important. The VXME Pre-Reqs add-on must be specified before the VXME addon. Andany additional add-ons must be specified before the VXME Pre-Req add-on.
Caution
Step 6 Register the package:a) In the tree pane of the Administrator Console, expand Package Manager.b) In the details pane, right-click Other Packages and choose New > Package.c) Choose Register a Package from a Script file (.RSP) and click Next.d) Click Browse and choose the RSP file you want to register and click Open.e) Click Next to display the Package Wizard summary.f) Click Next to see the Package Registration Progress screen.g) Click Next to create the package.h) After the package is created and registered, click Finish.
Step 7 To upgrade the Cisco VXC 6215, use the Default Device Configuration (DDC) method (see Schedule deviceupdates using Default Device Configuration, on page 24).
Mandatory INI parameters
To push updates to Release 9.3 devices, you must include the following mandatory parameter in the INI file:IniFileSource=cache
Static IP INI parameters for Cisco VXC Manager
If you are deploying using static Cisco VXC Manager IP configuration, also include the following:
MgmtDiscoveryMethod=STATICRapportServer=xxx.xxx.xxx.xxxRapportSecurePort=443
In the above, replace xxx.xxx.xxx.xxx and 443 with your Cisco VXC Manager IP address and secure portnumber.
InstallAddon parameter not required
To install add-ons on devices running Firmware Release 9.0 and later using Cisco VXCManager, you do notneed to include the InstallAddons parameter in the wlx.ini file. The thin client successfully installs the add-onas long as the /addons folder for the package contains the required add-on files and the accompanyingdirectory file.
Administration Guide for Cisco Virtualization Experience Client 6215 Firmware Release 9.3 23
Release 9.3 upgrade and setup using Cisco VXC ManagerCreate package for wlx.ini file

Schedule device updates using Default Device ConfigurationTo update a group of Cisco VXC 6215 devices, you can assign a Default Device Configuration (DDC). ADDC allows you to set default configurations for a group of devices and ensures that the devices conform toyour configurations. That is, if there is any deviation from your default configurations, Cisco VXC Managerreverts the devices to your specified configurations automatically (Cisco VXC Manager automatically sendsthe Cisco VXC Manager packages in the DDC to the devices according to your schedule and without yourintervention).
See the following sections to configure a DDC.
Configure Default Device Configuration preferencesBefore you create a Default Device Configuration, ensure to configure the DDC preferences as follows:
Procedure
Step 1 In the tree pane of the Administrator Console, choose Configuration Manager > Preferences.Step 2 In the details pane, click Device Manager Preferences.Step 3 In the tree pane of the Preferences dialog box, click DDC.Step 4 Under Default Device Configuration, check the Enable Default Device Configuration box.Step 5 Under Time to Schedule DDC Reconciliation, click Upon Checkin.Step 6 In the tree pane of the Preferences dialog box, click Scheduling.Step 7 Under Imaging Option, clickMerlin.Step 8 Click OK.
First-time Default Device ConfigurationPerform this procedure each time you create a new image package that you want to specify as the defaultimage for client upgrades.
Procedure
Step 1 Determine whether a Default Device Configuration already exists:a) In the tree pane of the Administrator Console, expandConfigurationManager and clickDefault Device
Configuration.
Administration Guide for Cisco Virtualization Experience Client 6215 Firmware Release 9.324
Release 9.3 upgrade and setup using Cisco VXC ManagerSchedule device updates using Default Device Configuration

b) If a default configuration appears in the details pane, go to Existing Default Device Configuration, onpage 25. Otherwise, go to the next step.
Step 2 In the tree pane of the Administrator Console, expand Configuration Manager, right-click Default DeviceConfiguration, and chooseNew >Default Device Configuration to open the Default Device ConfigurationWizard.
Step 3 In the Operating System field, choose SUSE Linux.Step 4 In the Media Size field, choose 4000 MB.Step 5 In the Qualifying OS Image field, choose No Image.Step 6 In the Software Packages tab, check the required package for the upgrade to and click Add to add it to the
Selected column. (The packages listed in this tab match the packages that you have registered in the CiscoVXC Manager.)
Step 7 Click Next and under Execute DDC, chooseWhenever a device checks in.Step 8 Click Next and click Finish.Step 9 After a DDC has been configured for the Cisco VXC 6215, the clients are updated to the selected package
configuration automatically: either at their regularly scheduled checkin time or according to the update timeset in the Device Manager DDC preferences in Configuration Manager. You can also right-click the CiscoVXC 6215 you want to upgrade, and choose Reboot to perform a manual upgrade.
Step 10 After the devices are upgraded, click the top Refresh icon in Device Manager to see the changed softwarerevision.
To verify that Cisco VXC Manager has successfully pushed a package to a device, click Device Manager,and choose a target device. In the bottom right hand corner, of the details pane, click the plus icon (+) tomaximize the properties for the device, then click the Deployed Package tab to show all packages that areon the device.
Existing Default Device ConfigurationPerform this procedure when you want to specify an existing image package as the default image for clientupgrades.
Procedure
Step 1 In the tree pane of the Administrator Console, expand Configuration Manager, and click Default DeviceConfiguration.
Step 2 Right click SUSE Linux, and choose Properties.Step 3 In the Software Packages field, choose the package to upgrade to.Step 4 Click Finish.
After a DDC has been configured for the Cisco VXC 6215, the clients are updated to the selected packageconfiguration automatically: either at their regularly scheduled checkin time or according to the update timeset in the Device Manager DDC preferences in Configuration Manager. You can also right-click the CiscoVXC 6215 you want to upgrade, and choose Reboot to perform a manual upgrade.
Administration Guide for Cisco Virtualization Experience Client 6215 Firmware Release 9.3 25
Release 9.3 upgrade and setup using Cisco VXC ManagerExisting Default Device Configuration
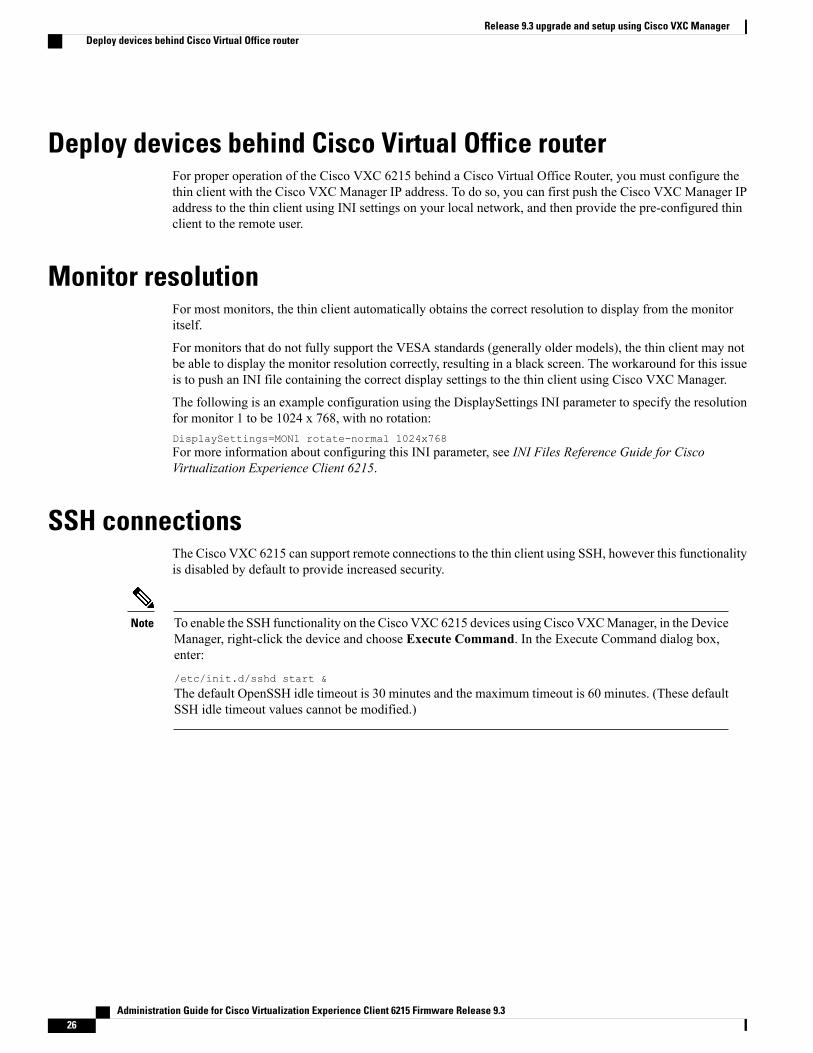
Deploy devices behind Cisco Virtual Office routerFor proper operation of the Cisco VXC 6215 behind a Cisco Virtual Office Router, you must configure thethin client with the Cisco VXC Manager IP address. To do so, you can first push the Cisco VXC Manager IPaddress to the thin client using INI settings on your local network, and then provide the pre-configured thinclient to the remote user.
Monitor resolutionFor most monitors, the thin client automatically obtains the correct resolution to display from the monitoritself.
For monitors that do not fully support the VESA standards (generally older models), the thin client may notbe able to display the monitor resolution correctly, resulting in a black screen. The workaround for this issueis to push an INI file containing the correct display settings to the thin client using Cisco VXC Manager.
The following is an example configuration using the DisplaySettings INI parameter to specify the resolutionfor monitor 1 to be 1024 x 768, with no rotation:DisplaySettings=MON1 rotate-normal 1024x768For more information about configuring this INI parameter, see INI Files Reference Guide for CiscoVirtualization Experience Client 6215.
SSH connectionsThe Cisco VXC 6215 can support remote connections to the thin client using SSH, however this functionalityis disabled by default to provide increased security.
To enable the SSH functionality on the Cisco VXC 6215 devices using Cisco VXCManager, in the DeviceManager, right-click the device and choose Execute Command. In the Execute Command dialog box,enter:
/etc/init.d/sshd start &
The default OpenSSH idle timeout is 30 minutes and the maximum timeout is 60 minutes. (These defaultSSH idle timeout values cannot be modified.)
Note
Administration Guide for Cisco Virtualization Experience Client 6215 Firmware Release 9.326
Release 9.3 upgrade and setup using Cisco VXC ManagerDeploy devices behind Cisco Virtual Office router

C H A P T E R 3USB redirection
This chapter provides guidelines for setting up USB camera redirection on the Cisco VXC 6215 devices.
• Recognizing USB cameras using HDX RealTime Webcam with Citrix, page 27
• USB camera redirection not supported with VMware View, page 27
• USB redirection not supported for Logitech UC Keyboard with Cisco VXME, page 28
Recognizing USB cameras using HDX RealTime Webcam withCitrix
To allow applications to use USB cameras within the XenDesktop session, the Cisco VXC 6215 supports theuse of HDX RealTime Webcam video compression. HDX RealTime Webcam is supported with the CiscoVXC 6215 base firmware and with the Cisco VXME add-on.
With HDX RealTime Webcam, the Cisco VXC 6215 captures the video data, compresses it, and then sendsthe video data to the XenDesktop session.
By default, the Cisco VXC 6215 is configured to support HDX RealTime Webcam. To use HDX RealtimeWebcam with XenDesktop 5.0 and above, you must configure the XenDesktop policies to enable HDXRealTime. (See XenDesktop documentation for details.)
Note • On the base firmware without the VXME, you can alternatively enable HDX Plug-and-Play forconnectivity of USB devices, but it does not support webcams.
• HDXPlug-n-Play for cameras is not supported on the Cisco VXC 6215 with the Cisco VXME add-on(Citrix recommends using HDX Webcam for camera interactions).
USB camera redirection not supported with VMware ViewUSB camera redirection is not supported with VMware View.
Administration Guide for Cisco Virtualization Experience Client 6215 Firmware Release 9.3 27

USB redirection not supported for Logitech UC Keyboard withCisco VXME
In all cases where it is available, Cisco strongly recommends that you enable Citrix HDX rather than use USBredirection. If you do enable USB redirection when running Cisco VXME, you must deny the Logitech UCKeyboard K725-C from USB redirection, otherwise the keyboard may not function properly.
To deny the Logitech UC Keyboard K725-C from USB redirection, include the following line in the INI file:ICADenyUSB=vid=046d pid=b320, vid=046d pid=b321
Administration Guide for Cisco Virtualization Experience Client 6215 Firmware Release 9.328
USB redirectionUSB redirection not supported for Logitech UC Keyboard with Cisco VXME

C H A P T E R 4Desktop basics
Use the information in the following sections to quickly learn the basics and get started using your thin client.
While they can be used in environments without central configuration for basic connectivity needs, Ciscothin clients are designed to be centrally managed and configured using INI files. In general, it isrecommended that you use central configuration to enable you to automatically push updates and anydesired default configuration to all supported thin clients in your environment (see Release 9.3 upgradeand setup using Cisco VXC Manager, on page 7).
Note
• Login, page 29
• Desktop applications and tools, page 30
• Thin client settings and connections, page 32
• Network and Session Services, page 33
• Printer connections, page 33
• Monitor connections, page 33
• Shutdown, restart, and suspend, page 34
• View system information, page 34
• Restore default settings, page 35
Login
On your initial connection to central configuration, plug in the network-connected Ethernet cable to yourthin client before starting the thin client to obtain the configurations desired by the administrator(connections, system settings, required certificates and so on). This "wired connection" will also provideany configurations provided by the administrator through the INI files.
Tip
Administration Guide for Cisco Virtualization Experience Client 6215 Firmware Release 9.3 29

After your thin client starts and displays the login screen, you can log in to your desktop using the defaultuser name admin and the default password admin. It is highly recommended that you change the defaultpassword by using the User Administration dialog box in the Control Center (see User administration, onpage 66).
Desktop applications and toolsFigure 8: Desktop
The desktop provides various applications and tools. Use the following guidelines:
• Computer button—Displays the Computer menu containing frequently used programs and commonsystem areas (you can right-click an icon in the Control Center to add the application to your FavoriteApplications area).
◦Connection Manager—Opens the Connection Manager. Use the Connection Manager to view,use, and locally configure connections on the thin client (see Configure connections locally, onpage 69).
◦Firefox—Opens the Firefox Web Browser.
◦More Applications—Opens the Application Browser. Use the Application Browser to use andmanage additional features on the thin client (see Accessing additional features with the applicationbrowser, on page 89).
◦Control Center—Opens the Control Center. Use the Control Center to configure the hardware,look and feel, and system settings of your thin client (see Configure thin client settings locally,on page 37).
◦Lock Screen—Locks your Desktop (desktop displays blank after you click the icon). To restoreyour screen, move the mouse, enter your credentials, and then click Unlock.
Administration Guide for Cisco Virtualization Experience Client 6215 Firmware Release 9.330
Desktop basicsDesktop applications and tools

◦Logout—Opens the Log Out dialog box (click Log Out to end your session but continue to runthe thin client).
◦Shutdown—Opens the Shutdown dialog box (where you can shut down your thin client, restartyour thin client, or put your thin client in Standby mode-see Shutdown, restart, and suspend, onpage 34).
If you open the Shutdown dialog box and do not choose a shutdown option, the systemautomatically shuts down after 60 seconds.
Note
• Volume Control icon—Controls the audio volume (use the slider as needed). Note that for settings totake effect, sound must be supported and enabled on the server used for ICA or RDP connections (seeVolume control, on page 92).
• System Information icon—Opens the System Information dialog box. Use this dialog box to view systeminformation about the thin client (see View system information, on page 34).
• Network Manager icon—Manages your network connections (see Network and Session Services, onpage 33).
• Display Settings icon—Manages your monitor display settings (see Display, on page 52).
• Calendar—Lists the day of the week, date, and time. You can click the calendar to open the calendarwindow and reset the date.
Desktop keyboard shortcutsDepending on the type of application window you are using (full screen, standard, or seamless), you can useshortcut keys to manage windows.
You can disable some of these shortcuts by including the INI parameters listed below in your INI file. Bydefault, every shortcut listed is enabled. (Possible values for each parameter are yes or no.)
In VMware HorizonView environments, the keyboard shortcut INI parameters are not functioning properly.For every keyboard shortcut parameter (for example, Cisco.DisableKeyBinding.Close={yes,no}), whetheryou set the value to yes or no, the default keyboard behavior remains the same.
Caution
Table 5: Desktop Keyboard Shortcuts
INI parameter to disable shortcutActionPress
Cisco.DisableKeyBinding.Close=yesClose windowAlt+F4
Cisco.DisableKeyBinding.Close=yesClose browser windowCtrl+F4
Not applicableMaximize windowAlt+F10
Cisco.DisableKeyBinding.Minimize=YesMinimize windowAlt+F9
Cisco.DisableKeyBinding.ShowDesktop=yesMinimize or maximize all windowsAlt+Ctrl+DownArrow
Administration Guide for Cisco Virtualization Experience Client 6215 Firmware Release 9.3 31
Desktop basicsDesktop keyboard shortcuts

INI parameter to disable shortcutActionPress
Cisco.DisableKeyBinding.MouseButtonModifier=yesMouse modifier (used by default as amouse modifier)
Alt
Not applicableMove focus to next windowAlt+Esc
Not applicableMove focus to previous windowAlt+Shift+Esc
Not applicableMove window with arrow keysAlt+F7 and press an arrowkey
Not applicableResize the windowAlt+F8 and press an arrowkey
Not applicableRestore maximized window to previoussize
Alt+F5
Not applicableSwitch keyboard focus back to thinclient (used by Citrix Linux receiver tobring keyboard focus back to thin clientlocally)
Ctrl+F2
Cisco.DisableKeyBinding.SwitchWindows=yesSwitch windows using a dialog boxAlt+DownArrow
Not applicableSwitch panel focusAlt+Ctrl+Shift+DownArrow
Cisco.DisableKeyBinding.RunCommand1=yesShow Logout optionAlt+Ctrl+Delete
Cisco.DisableKeyBinding.PanelMainMenu=yesShow Computer Menu windowAlt+F1
Cisco.DisableKeyBinding.PanelMainMenu=yesShow Windows start menuCtrl+Esc
Cisco.DisableKeyBinding.PanelMainMenuList=yesShow main panel list when keyboardfocus is shifted to the thin client
Windows Key
Cisco.DisableKeyBinding.WindowMenu=yesShow window menuAlt+Space (you can alsoright-click the window titlebar or border, or click thewindow icon)
The shortcut keys Alt+DownArrow (allows you to switch windows using a dialog box) andAlt+Ctrl+DownArrow (minimizes or maximizes all windows) are useful for navigating multiple remotesessions without having to log out.
Tip
Thin client settings and connectionsWhile the use of INI files is recommended to configure thin client settings and connections available to users,you can use dialog boxes on a thin client to:
• Set up your thin client hardware, look and feel, and system settings (see Configure thin client settingslocally, on page 37).
Administration Guide for Cisco Virtualization Experience Client 6215 Firmware Release 9.332
Desktop basicsThin client settings and connections

• Configure and add connections to your Desktop for use (see Configure connections locally, on page69).
Network and Session ServicesUse the Network Manager icon, located on the right side of the Desktop, to display information about yournetwork connection and to connect or disconnect.
Use the following guidelines:
• Click the Network Manager icon to display the Wired Network menu. For example you can click theNetwork Manager icon, and then select an available wired network to use.
• Right-click the Network Manager icon to display the Enable Networking, Enable Notifications, andConnection Information options. For example, you can right-click the Network Manager icon, andthen click Enable Networking to clear the check box and disable networking.
• Hover your mouse pointer over the icon to view amessage displaying the status (NoNetwork Connection,andWired Network Connection Active) and name of the network to which your thin client is connected.For example, connecting your thin client to a wired network (by attaching the network cable to yourthin client) displays the Wired Network Connection Active status.
For information on importing certificates that your network may require, see Import certificates, on page60.
Tip
Printer connectionsTo connect a printer to your thin client through a USB port, you will need a USB-to-printer adapter cable (notincluded). Before use, you may need to install the driver for the printer by following the printer driverinstallation instructions. For information on connecting to printers, see Printers, on page 41.
Monitor connectionsMonitor connections can be made using the DVI (digital) monitor port and the proper monitor cables/splitters.For VGA (analog) monitor connections, you must use the included DVI-to-VGA adapter. For information onconfiguring display settings, see Display, on page 38.
Dual Monitors—When using a DVI to DVI/VGA splitter with VGA and DVI monitors at the same time,note that the VGA monitor will be the primary monitor. For dual-monitor supported thin clients using aDVI to DVI and Display Port to DVI adapter with both DVI monitors at the same time, note that theDisplay Port monitor will be the primary monitor.
Tip
Administration Guide for Cisco Virtualization Experience Client 6215 Firmware Release 9.3 33
Desktop basicsNetwork and Session Services

Shutdown, restart, and suspendAfter using your thin client, you can click Computer > Shutdown and select:
Shutdown—Shuts down and turns off your thin client.
Restart—Shuts down and restarts your thin client.
Suspend—Places the thin client in Standby mode to preserve power. To exit Standby mode, click the mouse.
If the ReadyMode feature has been enabled and the thin client is shut down, the session ends, the powerbutton LED is put in a state of OFF, and the thin client is placed in Standby mode to preserve power. Uponpressing the power button, the thin client exits Standby mode, and immediately prompts the user with thelogin dialog box. For more information on ReadyMode, see the Advanced tab in Device settings, on page56.
Tip
View system informationClicking the System Information icon in the Control Center (or in the system tray of the taskbar) opens theSystem Information dialog box. Use this dialog box to view Identity, Network, Packages, System Log, andCopyright information:
• Identity tab—Displays identity information such as Current User, Terminal Name, Product Name,Platform, Build, SLETC, OSVersion, Uptime, Processor, Processor, Speed, TotalMemory, FreeMemory,Flash Size, Serial Number, and BIOS Version.
• Network tab—Displays network information such as Network Device, MAC Address, Network Speed,MTU, IP Address, IPv6 Address, Subnet Mask, Gateway, Domain, Primary DNS, Secondary DNS,DHCP Server, Lease, and Elapsed time.
• Packages tab—Displays the Package information, including packages names, versions, and sizes thatare installed on the thin client.
• System Log tab—Displays the System Log information, including various messages generated duringthe operation of the thin client.
Administration Guide for Cisco Virtualization Experience Client 6215 Firmware Release 9.334
Desktop basicsShutdown, restart, and suspend

• Copyright tab—Displays the software copyright and patent notices.
Figure 9: System Information
Restore default settingsDepending on the default settings you want to restore on the thin client, you can use the:
• Boot Menu to restore default values for all the items in the BIOS setup utility
• Restore/Reset options to restore default users settings – that is, user customizations are deleted, however,add-on applications that you installed are retained, and applications that you removed are not restored
• Force option to restore all original factory default settings during firmware update
Boot menuPower off the thin client. After starting your client you will see a Cisco logo for a short period of time. Duringthis period you can press and hold the Delete key to enter and use the Boot Menu to make your modifications(type Fireport as the password).
Administration Guide for Cisco Virtualization Experience Client 6215 Firmware Release 9.3 35
Desktop basicsRestore default settings

Restore default user settingsYou can restore default user settings (user customizations are deleted, however, add-on applications that youinstalled are retained, and applications that you removed are not restored) by using the:
• Restore Factory Defaults When Upgrading check box in the Thin Client Settings dialog box whenupdating firmware (see INI and upgrade settings, on page 62).
• Reset to Factory Defaults command button in the Advanced tab of the Device Settings dialog box (seeDevice settings, on page 56).
• G-key Reset feature. To use this type of restoration, when you see the splash screen during system boot(the screen shows the Cisco logo and displays a progress bar), hold down the G key to restore the defaultuser settings.
Restore all original factory default settings during firmware updateUse the Thin Client Settings dialog box to restore all factory default settings when updating firmware.
Procedure
Step 1 Click the Computer button on the Desktop and select Control Center to open the Control Center.Step 2 Click INI Settings to open the INI and Upgrade Network Settings dialog box.Step 3 If necessary, clear the Get INI and upgrade server details via DHCP check box.Step 4 Click Image upgrade settings to open the Thin Client Settings dialog box.Step 5 Select the Restore factory defaults when upgrading check box.Step 6 Select the Force base system update check box.Step 7 Click OK.
Administration Guide for Cisco Virtualization Experience Client 6215 Firmware Release 9.336
Desktop basicsRestore default user settings

C H A P T E R 5Configure thin client settings locally
This chapter contains information to help you set up your thin client hardware, look and feel, and systemsettings using the Control Center.
While it is not recommended to use dialog boxes for configuring thin client system settings, they areavailable in case you want to temporarily override central default configurations or you do not have theoption to set up central configuration (smaller environments). In general, it is recommended that you usecentral configuration to enable you to automatically push updates and any desired default configurationto all supported thin clients in your environment (see Release 9.3 upgrade and setup using Cisco VXCManager, on page 7).
Tip
Clicking Control Center in the Computer menu or in the Connection Manager opens the Control Center.
Figure 10: Control Center
Administration Guide for Cisco Virtualization Experience Client 6215 Firmware Release 9.3 37

You can right-click an icon in the Control Center to add the application to your Favorite Applications area(shown in the Computer menu) or to your Startup Programs.
Tip
The Control Center displays the following thin client options that you can configure locally on a thin clientusing dialog boxes (depending on user privilege level, some dialog boxes and options may not be availablefor use):
• Display, page 38
• Keyboard, page 40
• Mouse, page 41
• Printers, page 41
• Appearance, page 45
• Language, page 45
• Panel Settings, page 46
• Screensaver, page 46
• Add-on manager, page 47
• Citrix global settings, page 47
• Configure VDA, page 54
• Configure desktop appliance settings, page 54
• Device settings, page 56
• Import certificates, page 60
• INI and upgrade settings, page 62
• Network connections, page 65
• Power management, page 66
• TCX USB virtualizer, page 66
• User administration, page 66
• Configure Cisco VXC Manager agent settings, page 67
DisplayUse the Display Preferences dialog box (click Display) to set the monitor display settings (Primary DisplayOutput, Resolution, Refresh Rate, and Rotation). For most monitors, resolution is obtained automatically fromthe monitor.
Administration Guide for Cisco Virtualization Experience Client 6215 Firmware Release 9.338
Configure thin client settings locallyDisplay

When multiple monitors are identified, the screens are extended by default.
To set up mirrored monitors, check theMirror Screens check box.
Tip
If you manually set the monitor settings using the Display Preferences dialog box, the settings are lost at thenext reboot. To retain the monitor settings after a reboot, set the display settings using the INI file.
Figure 11: Display Preferences
Administration Guide for Cisco Virtualization Experience Client 6215 Firmware Release 9.3 39
Configure thin client settings locallyDisplay

KeyboardUse the Keyboard Preferences dialog box (clickKeyboard) to select general (repeat key and cursor blinking),layout (keyboard models and layout options), accessibility (sticky key, slow key, bounce, key audio feedback),mouse keys (keypad control of pointer), and typing break (reminder) preferences.
Figure 12: Keyboard Preferences
Administration Guide for Cisco Virtualization Experience Client 6215 Firmware Release 9.340
Configure thin client settings locallyKeyboard

MouseUse the Mouse Preferences dialog box (clickMouse) to select general (mouse orientation, locate pointer,pointer speed, drag-and-drop, double-click time out) and accessibility (simulated secondary click and Dwellclick) preferences.
Figure 13: Mouse Preferences
PrintersUse the Printer Configuration dialog box (click Printing) to:
• View the list of currently configured printers.
• Add and configure a network or local printer (click theNew icon to open and use the New Printer wizard).
• Select the default printer (select a printer in the list and click Printer > Set as Default). Note thatadministrators can specify system-wide and personal default printers.
• Change printer settings (right-click a printer in the list, select Properties, and then click Settings).
• Change printer policies (right-click a printer in the list, select Properties, and then click Policies).
• Change user access to the printer (right-click a printer in the list, select Properties, and then clickAccessControl).
• Change printer job options (right-click a printer in the list, select Properties, and then click JobOptions).
Administration Guide for Cisco Virtualization Experience Client 6215 Firmware Release 9.3 41
Configure thin client settings locallyMouse

• Delete a printer (right-click a printer in the list, select Delete, and click OK).
Figure 14: Printer Configuration
Install a network printer
Procedure
Step 1 Click the New icon in the Printer Configuration dialog box to open the New Printer wizard.
Step 2 Select the printer option you want from the Devices list and follow the New Printer wizard using the followingguidelines:
• AppSocket/HP JetDirect—Use this option for a printer connected directly to the network instead ofthrough a computer.
• Forward print job data like a pipe to another command—Use this option to "pipe" the output of theprinting command into another command or to "redirect" the output to a file.
• Internet Printing Protocol (IPP)—Use this option for a printer attached to a different Linux system onthe same network running CUPS or a printer configured on another operating system to use IPP (httpprinting).
• LPD/LPR Host or Printer—Use this option for a printer attached to a different UNIX system that canbe accessed over a TCP/IP network (for example, a printer attached to another Linux system on your
Administration Guide for Cisco Virtualization Experience Client 6215 Firmware Release 9.342
Configure thin client settings locallyInstall a network printer
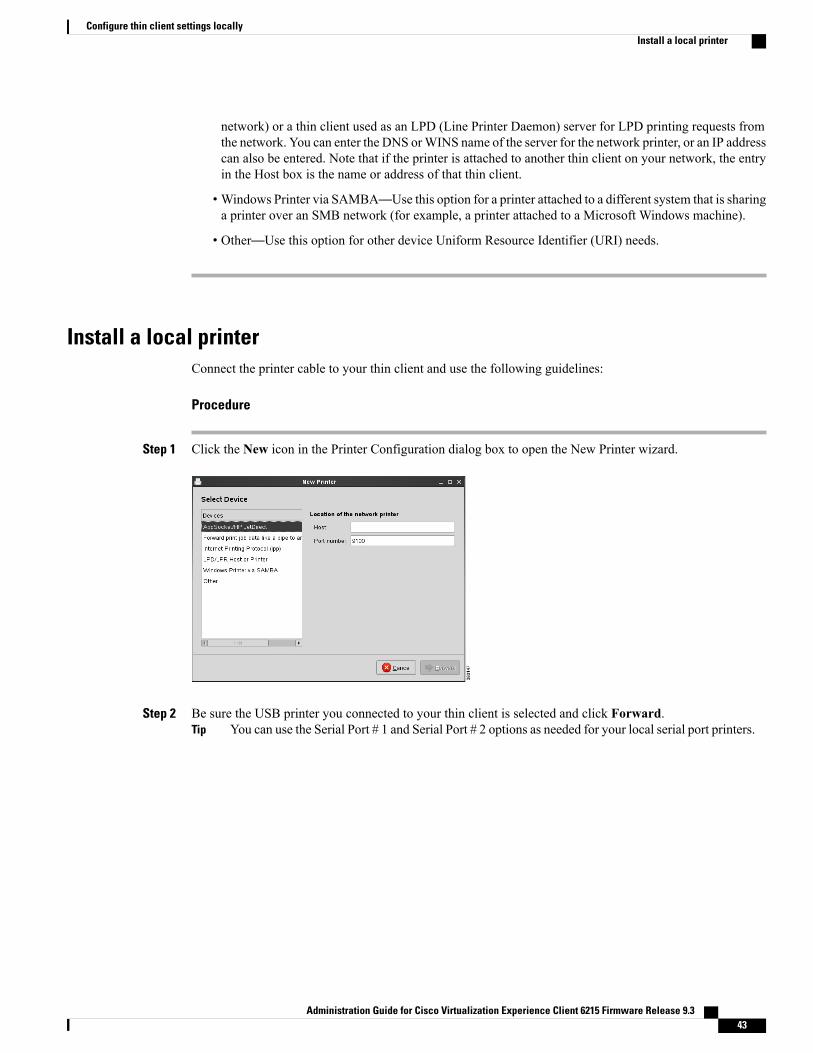
network) or a thin client used as an LPD (Line Printer Daemon) server for LPD printing requests fromthe network. You can enter the DNS orWINS name of the server for the network printer, or an IP addresscan also be entered. Note that if the printer is attached to another thin client on your network, the entryin the Host box is the name or address of that thin client.
•Windows Printer via SAMBA—Use this option for a printer attached to a different system that is sharinga printer over an SMB network (for example, a printer attached to a Microsoft Windows machine).
• Other—Use this option for other device Uniform Resource Identifier (URI) needs.
Install a local printerConnect the printer cable to your thin client and use the following guidelines:
Procedure
Step 1 Click the New icon in the Printer Configuration dialog box to open the New Printer wizard.
Step 2 Be sure the USB printer you connected to your thin client is selected and click Forward.You can use the Serial Port # 1 and Serial Port # 2 options as needed for your local serial port printers.Tip
Administration Guide for Cisco Virtualization Experience Client 6215 Firmware Release 9.3 43
Configure thin client settings locallyInstall a local printer

Step 3 Select the option with which you want to obtain your printer driver and click Forward.
Step 4 Select the Model and Driver and click Forward.
Step 5 Enter the Printer Name, Description, Location, and then click Apply.The printer is added to the Printer Configuration dialog box and is ready for use.
Administration Guide for Cisco Virtualization Experience Client 6215 Firmware Release 9.344
Configure thin client settings locallyInstall a local printer
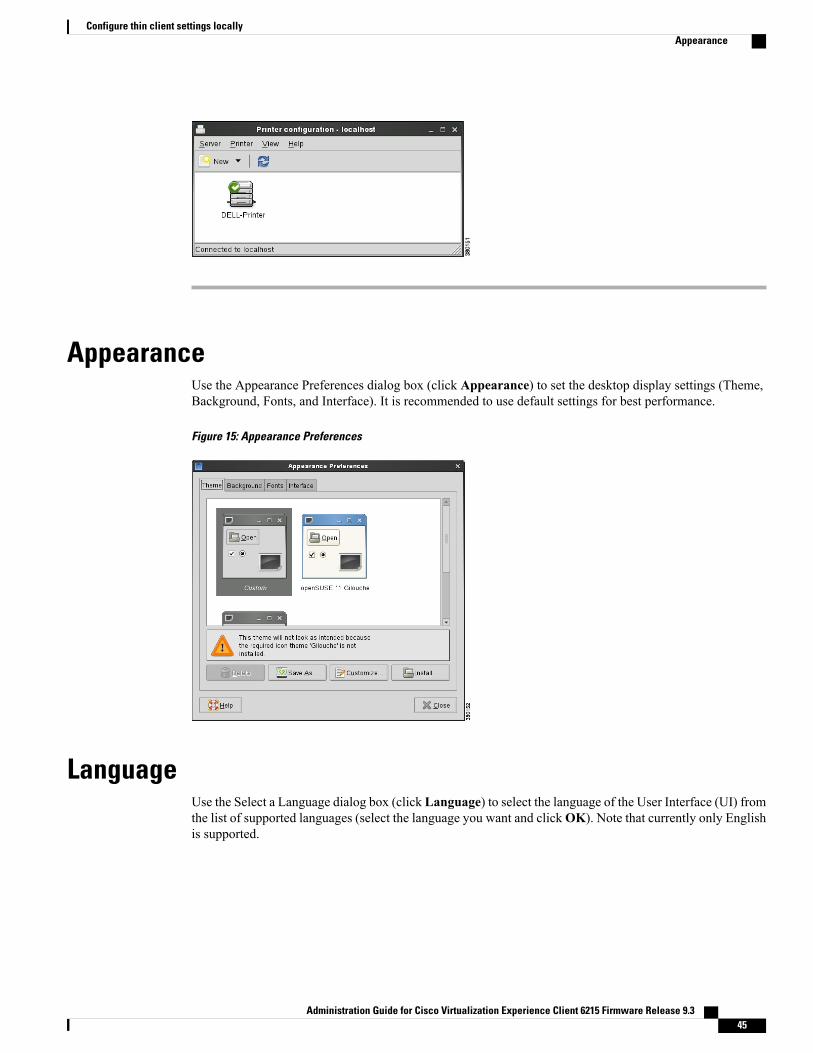
AppearanceUse the Appearance Preferences dialog box (click Appearance) to set the desktop display settings (Theme,Background, Fonts, and Interface). It is recommended to use default settings for best performance.
Figure 15: Appearance Preferences
LanguageUse the Select a Language dialog box (click Language) to select the language of the User Interface (UI) fromthe list of supported languages (select the language you want and clickOK). Note that currently only Englishis supported.
Administration Guide for Cisco Virtualization Experience Client 6215 Firmware Release 9.3 45
Configure thin client settings locallyAppearance

Panel SettingsUse the Panel Settings dialog box (click Panel Settings) to set whether or not to always display the taskbaron top of all other windows.
Figure 16: Panel Settings
ScreensaverUse the Screensaver Preferences dialog box (click Screensaver) to select screen saver theme settings andpower management settings (click PowerManagement to open and use the Power Management Preferencesdialog box. See Power management, on page 66).
Press the Power button to wake the computer from standby or sleep mode.Tip
Figure 17: Screensaver Preferences
Administration Guide for Cisco Virtualization Experience Client 6215 Firmware Release 9.346
Configure thin client settings locallyPanel Settings

Add-on managerUse the Add-on Manager dialog box (click Add-on Manager) to view and manage (add and remove) the listof add-on packages available. Add-ons that are selected in the list have been installed on your thin client.
Figure 18: Add-on Manager
To install add-ons, your thin client must be connected to the correct update server and folder on that server.If you receive a Failed to download available add-on list error message, click ServerSettings in the Add-on Manager dialog box to open and use the Thin Client Settings dialog box as describedin Image upgrade options, on page 64.
In the Update Server URL text box, be sure to enter the root path on the server followed by the path tothe Addons folder.
Important
The Add-OnManager populates the list with add-ons listed in the directory plain text file located in the addonsfolder.
Use the following guidelines to install and uninstall add-ons:
• Installing add-ons—Select the check box of the add-on and click Execute.
• Uninstalling add-ons—Clear the check box of the add-on and click Execute.
Citrix global settingsClicking the Citrix Settings icon in the Control Center opens the Citrix Settings dialog box. Use this dialogbox to configure the common settings you want for all Citrix connections, and then click OK.
Administration Guide for Cisco Virtualization Experience Client 6215 Firmware Release 9.3 47
Configure thin client settings locallyAdd-on manager

NetworkUse the Network tab to configure the servers and reconnection settings.
Figure 19: Citrix Settings
Use the following guidelines:
• PN Agent Server—Enter the PN Agent Server you want to use (this can be a list of servers with eachserver separated by a semi-colon).
• Metaframe Server—Enter the Metaframe Server you want to use (this can be a list of servers with eachserver separated by a semi-colon).
• Browsing Protocol—Select the browsing protocol to use from the list.
• PN Logon Domains—Enter the PN logon domains.
• PN Desktop Setup—Select the Show All Applications check box to display all published applicationson the desktop.
• PN Login Method—Select the Force Https check box to make the connection use the HTTPS protocolfor secure communication.
•Window Style—Select the Seamless check box to display the connection in a seamless window.
• Application Reconnection—Select the Automatic reconnection at logon check box to enablereconnection, and then select the connect option you want.
Administration Guide for Cisco Virtualization Experience Client 6215 Firmware Release 9.348
Configure thin client settings locallyNetwork

Drive mappingUse the Drive Mapping tab to map drives on the server to devices on the thin client, and to view and manage(add, edit, and delete) the list of current drives (including drive information) mapped on the thin client.
Figure 20: Drive Mapping
Add drives
Procedure
Step 1 Clear the Dynamic Mapping check box, and then click Add to open the Citrix Drive Map dialog box.
Administration Guide for Cisco Virtualization Experience Client 6215 Firmware Release 9.3 49
Configure thin client settings locallyDrive mapping

Step 2 Select a drive letter (A to Z) from the Drive Letter list.Step 3 To enable or disable reading and writing for the drive, select or clear the Enable Read and Enable Write
check boxes.Step 4 Select a drive type (USB Floppy, USB CDROM, USB Disk or Memory Stick, or Local or Mounted Disk)
from the Drive Type list.Step 5 (Optional) Enter the directory on the USB device to access in the Base Directory text box.Step 6 Click OK to add the drive to the list of available drives.
Edit and delete drives
Procedure
To edit or delete a drive, select a drive from the list of available drives and do one of the following:
• Edit—Click Edit and configure the drive as described in Add drives, on page 49.
• Delete—Click Delete to remove the drive.
HotkeysUse the Hotkeys tab to map hotkeys on the thin client (select a Hotkey option using the Hotkey lists for eachfunction you want).
Figure 21: Hotkeys
Administration Guide for Cisco Virtualization Experience Client 6215 Firmware Release 9.350
Configure thin client settings locallyHotkeys

COM portsUse the COM Ports tab to map COM ports on the server to devices on the thin client, and to view and manage(add and delete) the list of current COM ports (including device information) mapped on the thin client.
Figure 22: COM ports
Add COM ports
Procedure
Step 1 Click Add to open the Add COM Port Mapping dialog box.
Step 2 Select a COM Port (1 to 4) from the COM Port list.Step 3 Select a device from the Device list.Step 4 Click OK to add the COM port and device to the list of available COM Ports.
Administration Guide for Cisco Virtualization Experience Client 6215 Firmware Release 9.3 51
Configure thin client settings locallyCOM ports

Delete COM ports
Procedure
To delete a COM Port, select a COM Port from the list of available COM Ports and click Delete.
DisplayUse the Display tab to set:
• Scroll Adjustment—If you encounter over-scrolling when using certain published applications, increasethe adjustment by 100 until the display improves (maximum scroll adjustment is 1000).
• PrintScreen—Select to use the Print Screen key to capture an image of the desktop to the Clipboard(used for Citrix XCapture support). If the check box is selected, a message appears warning about theinfluence of this setting on other applications.
Figure 23: Display
FirewallUse the Firewall tab to set the firewall options on the thin client:
• Automatically detect proxy—Detects proxy servers automatically.
• Use Alternate Address for Firewalls—Enables connections behind a firewall.
Administration Guide for Cisco Virtualization Experience Client 6215 Firmware Release 9.352
Configure thin client settings locallyDisplay

• Proxy Type—Select a Proxy Type from the list and if necessary (Secure (HTTPS) or SOCKS), enterthe Proxy Address and Port.
Figure 24: Firewall
Trusted server configurationUse the Trusted Server Configuration tab to set and enforce the trusted server configuration. To enforce atrusted server configuration, select the Enabled option, select the Enforce trusted server configurationcheck box, enter the Address of the trusted server, and then clickOK (you can also use the Enabled or Disabledoptions to quickly enable or disable the enforcement configuration).
Figure 25: Trusted Server Configuration
Administration Guide for Cisco Virtualization Experience Client 6215 Firmware Release 9.3 53
Configure thin client settings locallyTrusted server configuration

Configure VDAClick Configure VDA to open the VDA Configuration dialog box.
The Cisco VXC 6215 does not support the configuration of Wyse VDA.
Configure desktop appliance settingsUse the Desktop Appliance Configuration dialog box (clickDesktop Appliance) to configure your thin clientto easily access your XenDesktop. Once the thin client is in Desktop Appliance Mode, a user can login to aXenDesktop with an "Out-of-the-box HDX Plug-n-play" experience.
Figure 26: Desktop Appliance Configuration
Use the following guidelines:
Procedure
Step 1 Select the Desktop Appliance Mode check box.Step 2 Enter the XenDesktop URL (this is the location of the XenDesktop server where you can log in and use your
desktop). Note that Desktop Appliance Mode can also be enabled through the INI parametersEnableApplianceMode=Yes and Xendesktop URL=<URL> as described in INI Files Reference Guide forCisco VIrtualization Experience Client 6215. Note also that you can connect to your XenDesktop environmentby using DCHP Option tag 191 on your DHCP server to specify the XenDesktop DDC URL (see Direct thethin client to the server, on page 106).
Step 3 Click OK to open the confirmation message.
Administration Guide for Cisco Virtualization Experience Client 6215 Firmware Release 9.354
Configure thin client settings locallyConfigure VDA

Step 4 Click Yes to reboot the thin client.Step 5 Upon system reboot the thin client will connect to your XenDesktop server and prompt you for your XenDesktop
login credentials (enter your login credentials to access your desktop). The following Citrix example is onlyan example of a supported protocol; the Desktop Appliance can be configured to point to any protocol supported(Citrix, RDP, VMware View, FireFox, and so on).
To exit Desktop Appliance Mode and allow normal log in after system start, administrators can useALT+F4 to display the Desktop Appliance Admin Login dialog box, where you can enter youradministrator login credentials and access the Control Center to use the Desktop Appliance icon andclear the Desktop Appliance Mode check box (be sure to click OK to reboot the thin client).
Tip
Step 6 (Administrators Only) While in Desktop Appliance Mode, administrators can use ALT+F4 to display theDesktop Appliance Admin Login dialog box, where you can enter your administrator login credentials andaccess the Control Center for administrative setup.
Administration Guide for Cisco Virtualization Experience Client 6215 Firmware Release 9.3 55
Configure thin client settings locallyConfigure desktop appliance settings
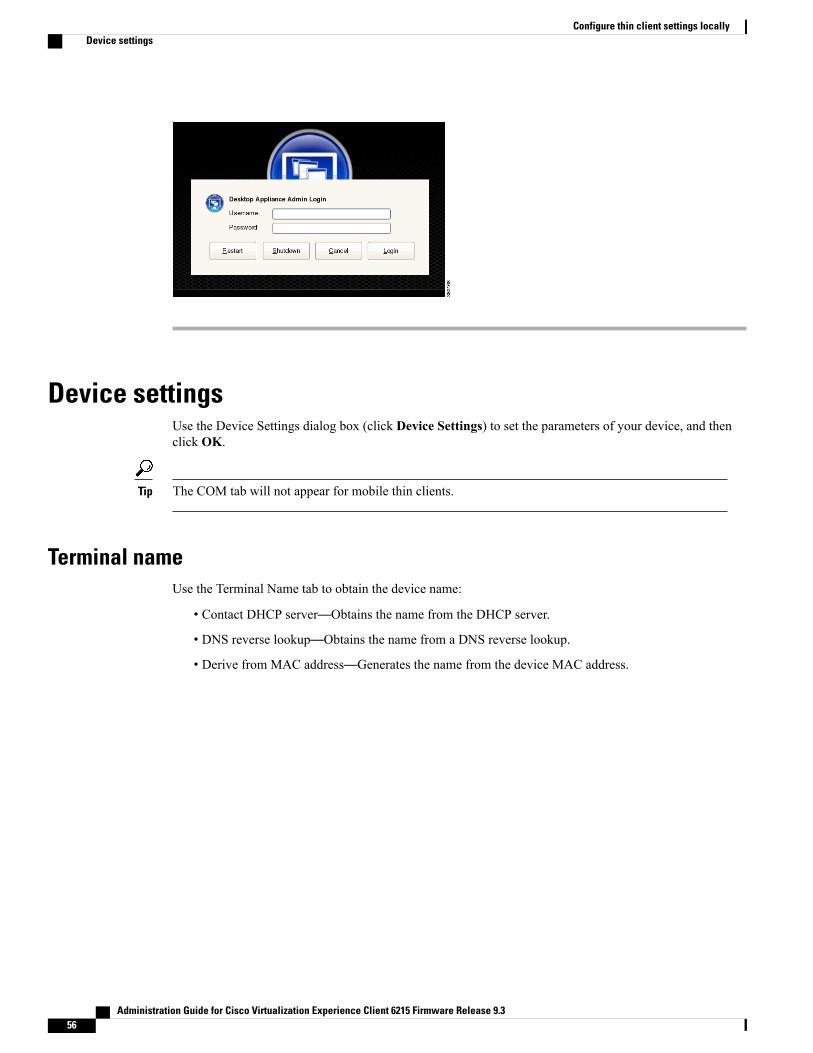
Device settingsUse the Device Settings dialog box (click Device Settings) to set the parameters of your device, and thenclick OK.
The COM tab will not appear for mobile thin clients.Tip
Terminal nameUse the Terminal Name tab to obtain the device name:
• Contact DHCP server—Obtains the name from the DHCP server.
• DNS reverse lookup—Obtains the name from a DNS reverse lookup.
• Derive from MAC address—Generates the name from the device MAC address.
Administration Guide for Cisco Virtualization Experience Client 6215 Firmware Release 9.356
Configure thin client settings locallyDevice settings

• Use the following name—Allows you to manually enter a name.
Figure 27: Terminal Name
HostsUse the Hosts tab to add mappings of IP addresses to hostnames that are not available through DNS (thenames of mapped addresses appear on the Hosts tab):
• Adding an IP address—ClickAdd to open the /etc hosts entry dialog box, enter an IP Address, Hostname(and optionally, Aliases), and then click OK.
• Editing a Host—Select a host from the list, click Edit, and configure the host.
• Deleting a Host—Select a host from the list and click Delete.
Figure 28: Hosts
Administration Guide for Cisco Virtualization Experience Client 6215 Firmware Release 9.3 57
Configure thin client settings locallyHosts

Ethernet SpeedUse the Ethernet Speed tab to select the Ethernet speed.
Figure 29: Ethernet Speed
COMUse the COM tab to select COM1 and COM2 Speed, Parity, Size, Flow control, and Stop bits (the size of thestop bit with respect to the size of all the other signaling bits in a character).
Administration Guide for Cisco Virtualization Experience Client 6215 Firmware Release 9.358
Configure thin client settings locallyEthernet Speed

NTPUse the NTP tab to enter the IP Address or hostname of the Network Time Protocol (NTP) server (the currentNTP server is shown) to synchronize the clock time and date of the thin client.
Figure 30: NTP
AdvancedUse the Advanced tab to:
• Enable or disable ReadyMode—You can use ReadyMode for easy login after thin client shut down. Ifthe ReadyMode feature has been enabled (select the ReadyMode check box) and the thin client is shutdown, the session ends, the power button LED is put in a state of OFF, and the thin client is placed inStandby mode to preserve power. Upon pressing the power button, the thin client exits Standby mode,and immediately prompts the user with the login dialog box.
Administration Guide for Cisco Virtualization Experience Client 6215 Firmware Release 9.3 59
Configure thin client settings locallyNTP

• Restore default user settings—When you use the Reset to Factory Defaults command button, usercustomizations are deleted. However, add-on applications that you installed are retained, and applicationsthat you removed are not restored.
Figure 31: Advanced
Import certificatesClicking the Import Certificates icon in the Control Center opens the Import Certificates dialog box. Usethis dialog box to import and manage (add and delete) ICA Digital Certificates as described in the followingsections.
Figure 32: Import Certificates
Administration Guide for Cisco Virtualization Experience Client 6215 Firmware Release 9.360
Configure thin client settings locallyImport certificates

Add certificates from a remote serverUse the following guidelines (certificate files you add from a remote server must end with the extension .crt,and be DER-encoded or Base64-encoded):
Procedure
Step 1 In the Import Certificates dialog box, click Add to open the Add Certificate dialog box.
Step 2 Select the Remote Server option, and then click Next to open the Certificate Import Server Settings dialogbox.
Step 3 Select the Remote Certificate Source server option that contains the certificate you want. If you select theUsethe following Server option, enter the Import Server URL (supported protocols are ftp, http, and https) andthe User name, and Password required for that server.
Step 4 Select the certificate file from the Certificate file list (if the Import Server URL, User name, and Passwordare entered correctly, this list automatically displays the names of available certificates on the server).
Step 5 After configuring the Remote Certificate Source server option you selected, click Add.
Administration Guide for Cisco Virtualization Experience Client 6215 Firmware Release 9.3 61
Configure thin client settings locallyAdd certificates from a remote server

Add certificates from a local device
Procedure
Step 1 In the Import Certificates dialog box, click Add to open the Add Certificate dialog box.
Step 2 Select the Local Server option, and then click Next to open the Open File dialog box.
Step 3 Use the folders and command buttons to find and select the certificate you want to use.
INI and upgrade settingsUse the INI and Upgrade Network Settings dialog box (click INI Settings) to direct the thin client to thesource (server location) of INI files and image updates.
It is recommended to obtain INI files through a DHCP server using DHCP options rather than through astatic IP address. For information about how INI files and images are downloaded from the server, seeUsing central configuration to automate updates and configuration, on page 103.
Caution
Administration Guide for Cisco Virtualization Experience Client 6215 Firmware Release 9.362
Configure thin client settings locallyAdd certificates from a local device

Cisco VXC 6215 devices also support INI updates through Cisco VXCManager's DDC (see Release 9.3upgrade and setup using Cisco VXC Manager, on page 7).
Tip
Figure 33: INI and Upgrade Settings
Use the following guidelines:
• Do not use INI files—Use this option when you want to use only locally configured settings (using thethin client dialog boxes available) and do not want to use available INI files on the network or local INIfiles.
• Use INI files from server only—Use this option when you want to use INI files from the specified serveronly (for example, you do not want to use local INI files or do not want to allow INI use whendisconnected from the server for security reasons). When using this option you can direct the thin clientto the server location through either of the following ways:
◦DHCP Server—Select theGet INI andUpgrade server details via DHCP check box. The DHCPserver will direct the thin client (using DHCP options) to the server location where the INI filesand image updates reside.
◦Manually entered server address - Clear theGet INI andUpgrade server details via DHCP checkbox and enter the static INI Settings (INI Server URL, and optionally the Username and Passwordof the server, if selecting the Server requires authentication check box).
• If server is available, use INI files from server only; otherwise use local INI files—Use this option whenyou want to use INI files from the specified server, however, local INI files can be used if that server isunavailable. When using this option you can direct the thin client to the server location through eitherof the following ways:
◦DHCP Server—Select theGet INI andUpgrade server details via DHCP check box. The DHCPserver will direct the thin client (using DHCP options) to the server location where the INI filesand image updates reside.
Administration Guide for Cisco Virtualization Experience Client 6215 Firmware Release 9.3 63
Configure thin client settings locallyINI and upgrade settings

◦Manually entered server address—Clear the Get INI and Upgrade server details via DHCPcheck box and enter the INI Settings (INI Server URL, and optionally the Username and Passwordof the server, if selecting the Server requires authentication check box).
• Use local INI files only—Use this option when you want to use only local INI files and do not want touse available INI files on the network.
INI files can be cached locally if using the EnableLocal and LocalCopy INI parameters;see INI Files Reference Guide For Cisco Virtualization Experience Client 6215.
Tip
• Image Upgrade Settings—You can click Image Upgrade Settings to configure the INI and upgradenetwork settings as described in Image upgrade options, on page 64.
Image upgrade optionsUsing the INI and Upgrade Network Settings dialog box, you can configure how the image on the thin clientis updated if you manually configure the INI server URL as described in INI and upgrade settings, on page62.
In the INI and Upgrade Network Settings dialog box, click the Image Upgrade Settings to open and use theThin Client Settings dialog box.
Figure 34: Thin Client Settings
Use the following guidelines:
• Update Mode—select one of the following:
◦No Update—Image updates are disabled.
◦Base System & Add-ons—The base image and add-ons are updated at each reboot.
◦Base System Only—Only the base image is updated at each reboot.
Administration Guide for Cisco Virtualization Experience Client 6215 Firmware Release 9.364
Configure thin client settings locallyImage upgrade options

◦Add-ons Only—Only add-ons are updated at each reboot.
• Enter the Update Server URL—If the server from which the thin client updates requires authentication,select the Server required authentication check box and enter the Username and Password.
• Restore factory defaults when updating—When selected, removes all local-machine customizationswhen software is updated from the file server. This setting is enabled by default and is recommended.However, if you want to keep locally defined connections or custom changes to installed applications,you can clear this check box.
In order to update with the Restore Factory Defaults When Updating option disabled,you must have a properly set-up add-ons folder with a directory file that defines whichsoftware versions you want on the thin client. Moreover, it may take two full rebootsto restore the latest software as well as your customizations.
Tip
• Force base system update—If you want to install the image and add-ons available on the file serverregardless of whether they are the same as the currently installed image and add-ons on the thin client,select this check box.
The Restore Factory DefaultsWhen Updating option and the Force Base SystemUpdateoption are useful when you want to fully restore the unit to factory defaults. Theseoptions remove any customizations and install only the base image.
Tip
• Click OK to return to the INI and Upgrade Network Settings dialog box.
Network connectionsUse the Network Connections dialog box (click Network Connections) to configure the settings you wantfor supported network connections. Use the Wired, Mobile Broadband, VPN, and DSL tabs to view andmanage (add, edit, and delete) the list of network connections configured on the thin client. By default, yourthin client obtains information from the DHCP server about network connections (highly recommended), but
Administration Guide for Cisco Virtualization Experience Client 6215 Firmware Release 9.3 65
Configure thin client settings locallyNetwork connections

you can manually enter connection information (provided by your network administrator) to connect to othernetworks (experienced users only).
Figure 35: Network Connections
Power managementUse the Power Management Preferences dialog box (click Power Management) to select On AC Power(actions and display) power preferences. Press the Power button to wake the thin client from standby or sleepmode.
Figure 36: Power Management Preferences
TCX USB virtualizerYou can click TCX USB Virtualizer to open the TCX USB Virtualizer Configuration Utility dialog box.The Cisco VXC 6215 does not support TCX configuration.
User administrationUse the User Administration dialog box (clickUser Administration) to view and edit passwords for all users(both built-in defaults and those defined through INI files) and to enable automatic login for a user
Administration Guide for Cisco Virtualization Experience Client 6215 Firmware Release 9.366
Configure thin client settings locallyPower management

(automatically log in a user at system start up). In addition, you can manage SSH root User password andlogin (using the SSH Root User tab).
While this dialog box allows you to edit the passwords and automatic login for users of the thin client,you must use central configuration (INI files) to add or delete users beyond the built-in default usersprovided. In general, it is recommended that you use user.ini files to manage (add, edit, or delete) usersfor normal use cases. For example, a new user should be created through a user.ini file with the appropriateprivilege level defined in the text file.
Caution
To edit a user password, select the change password check box you want, and then enter a new password inthe New Password and Confirm Password boxes.
The Users tab can be a convenient way to locally change the password and enable automatic login for aspecific user.
Tip
Figure 37: User Administration
Configure Cisco VXC Manager agent settingsUse the Cisco VXC Manager Agent Configuration dialog box (click Cisco VXC-M) to configure the CiscoVXC Manager server location and discovery settings.
You can use this dialog box to specify which method the client uses to discover Cisco VXC Manager. Bydefault, all discovery methods listed are enabled. You can also use this dialog box to manually specify the
Administration Guide for Cisco Virtualization Experience Client 6215 Firmware Release 9.3 67
Configure thin client settings locallyConfigure Cisco VXC Manager agent settings

Cisco VXC Manager server IP address. In addition, you can specify the number of Cisco VXC Managercheckins that the device can miss before the device reenables the specified discovery methods. (The defaultis 15 checkins; 0 specifies to not reenable discovery if Cisco VXC Manager checkins fail.)
After the device is discovered, the discovery preferences specified on CiscoVXCManager (under ConfigurationManager > Preferences > Discovery) take precedence over the settings specified on the client (either throughthe GUI or using the MgmtDiscoveryMethod INI parameter).
It is recommended that after configuring, you reboot the thin client.Tip
Figure 38: VXC Manager Agent Configuration Dialog Box
To configure the Cisco VXC Manager server location:
Procedure
Step 1 Enter the Cisco VXC Manager Server IP address.Step 2 Enter the Non-secure Port (HTTP) for client to server communication (default is 80).Step 3 Enter the Secure Port (HTTPS) for client to server communication (default is 443).Step 4 Select the Discovery Settings you want. For more information on Cisco VXCManager, see your Cisco VXC
Manager documentation.Step 5 Click OK.
After you reboot the thin client, the thin client performs a checkin with the Cisco VXC Manager.
Administration Guide for Cisco Virtualization Experience Client 6215 Firmware Release 9.368
Configure thin client settings locallyConfigure Cisco VXC Manager agent settings

C H A P T E R 6Configure connections locally
This chapter provides instructions on configuring and adding connections to your Desktop for use (to accessthe enterprise server environment available to the thin client).
While it is not recommended to use dialog boxes for configuring connections for thin client use, they areavailable in case you want to temporarily override central default configurations or you do not have theoption to set up central configuration (smaller environments). In general, it is recommended that you usecentral configuration to enable you to automatically push updates and any desired default configurationto all supported thin clients in your environment (see Release 9.3 upgrade and setup using Cisco VXCManager, on page 7).
Tip
Clicking Connection Manager in the Computer menu or in the Application Browser opens the ConnectionManager.
Figure 39: Connection Manager
You can also access the Control Center (click Control Center) and use the Shut Down dialog box (clickLogout). Depending on user privilege level, some dialog boxes and options may not be available for use.
Note
Use the Connection Manager to manage (edit and delete), connect to, and add the following connections:
• Mozilla Firefox, page 70
• Citrix, page 71
Administration Guide for Cisco Virtualization Experience Client 6215 Firmware Release 9.3 69

• Custom, page 74
• Ericom PowerTerm TEC, page 75
• Ericom PowerTerm WebConnect, page 76
• RDP, page 77
• SSH, page 82
• VMware View Client, page 83
• VNC Viewer, page 85
• XDMCP, page 87
Mozilla FirefoxProcedure
Step 1 In the Connection Manager, click Add to open the Add Connection dialog box.Step 2 Select Browser from the list and click Next to open the Mozilla Firefox Browser Configuration dialog box.
Step 3 Use this dialog box to configure the settings you want, and then click OK. The connection appears in theConnection Manager and is ready to use.
NetworkUse the Network tab to configure the description and URL (optional if you want the browser to open to aparticular Web page each time you connect). If you want the browser to launch automatically after systemstartup, select the Auto Connect check box.
WindowUse the Window tab to configure how the browser window is displayed. If you want the browser to appearwithout any menus or toolbars, select Kiosk Mode. Select the Window Size you want from the list.
Administration Guide for Cisco Virtualization Experience Client 6215 Firmware Release 9.370
Configure connections locallyMozilla Firefox

Auto ReconnectUse the Auto Reconnect tab to enable automatic reconnect after a disconnection (select the Enable AutoReconnect check box, and then select the amount of time to delay the reconnection attempt after a disconnectionoccurs).
CitrixProcedure
Step 1 In the Connection Manager, click Add to open the Add Connection dialog box.Step 2 Select Citrix from the list and click Next to open the Citrix ICA Client Settings dialog box.
Step 3 Use this dialog box to configure the settings you want, and then click OK. The connection appears in theConnection Manager and is ready to use.
When using multiple ICA connections, you can use the ICA Connection Center to manage the open ICAconnections.
Tip
NetworkUse the Network tab to configure the network settings:
• Server or Published Application—Select an option for making the connection.
• Description—Enter a description for the connection.
• Network Protocol—Select a network protocol.
• Browser Server—Enter the Browser Server name (this can be a list of server names with each nameseparated by a semi-colon).
Administration Guide for Cisco Virtualization Experience Client 6215 Firmware Release 9.3 71
Configure connections locallyAuto Reconnect

You do not need to enter a browser server name if you do not want to connect to eithera published application or a server by name. Generating an ICA connection to a serverusing a server name in the Server text box for the connection does not require a BrowserServer address, as long as the DNS information is properly entered.
Tip
• Server or Application Name—Select a server from the Server list or a published application from theApplication Name list. If needed, click Refresh to refresh the list of servers or published applications.
You can enter the IP address of the target server as long as there is no need to resolvea name.
Tip
ConnectionUse the Connection tab to configure the connection settings:
• Enable compression—Enables compression.
• Low bandwidth—Enables low-bandwidth optimization.
• Enable sound—Enables sound.
• Ping before connect—Pings the connection to see if it is reachable before the connection is attempted.
• Enable Middle Button Paste—Enables middle button paste for the mouse.
• Encryption—Select an encryption type (default is Basic).
WindowUse the Window tab to select the Window Colors and the Window Size you want.
ApplicationUse the Application tab to enter the command line and Working Directory of the application (if you selectedthe Published Application option on the Network tab):
• Command Line—Enter the command line for the program on the server.
•Working Directory—Enter the working directory for the program.
Administration Guide for Cisco Virtualization Experience Client 6215 Firmware Release 9.372
Configure connections locallyConnection

Login
The User Name, Password, Domain, and Serial Number fields are optional. If the User Name, Password,and Domain fields are blank, interactive login is required (users must enter the information at login time).
Tip
Use the Login tab to configure credentials used to automatically log in to the server:
• User Name—Enter a user name for the connection.
• Password—Enter the password.
• Domain—Enter the domain name.
• Serial Number—Enter the serial number for Metaframe environments that require the thin client licenseserial number.
• Connect automatically after login—Enables an automatic connection after successful login to the thinclient.
Auto ReconnectUse the Auto Reconnect tab to enable automatic reconnect after a disconnection (select the Enable AutoReconnect check box, and then select the amount of time to delay the reconnection attempt after a disconnectionoccurs).
Firewall
Published applications do not support Firewall functions.Tip
Use the Firewall tab to configure an alternate address for firewalls:
• Automatically detect proxy—Select to automatically detect the proxy type.
• Use Alternate Address for Firewalls—Select Yes to use an alternate address for firewalls.
• Proxy Type—Select a proxy type.
• Proxy Address and Port—If you select Secure (HTTPS) or SOCKS as the Proxy Type, you must enterthe Proxy Address and Port.
Administration Guide for Cisco Virtualization Experience Client 6215 Firmware Release 9.3 73
Configure connections locallyLogin

CustomProcedure
Step 1 In the Connection Manager, click Add to open the Add Connection dialog box.Step 2 Select Custom from the list and click Next to open the Custom Connection Configuration dialog box.
Step 3 Use this dialog box to configure the settings you want, and then click OK. The connection appears in theConnection Manager and is ready to use.
ApplicationUse the Application tab to configure:
• Description—Enter the description.
• Command Line—Enter the command line for the program on the server.
• Run in terminal window—Runs the application in a terminal window (use with applications that requirea terminal window such a consol program).
• Auto Connect—Starts the connection automatically after system startup.
Auto ReconnectUse the Auto Reconnect tab to enable automatic reconnect after a disconnection (select the Enable AutoReconnect check box, and then select the amount of time to delay the reconnection attempt after a disconnectionoccurs).
Administration Guide for Cisco Virtualization Experience Client 6215 Firmware Release 9.374
Configure connections locallyCustom

Ericom PowerTerm TECProcedure
Step 1 In the Connection Manager, click Add to open the Add Connection dialog box.Step 2 Select Ericom_PowerTerm from the list and clickNext to open the Terminal Emulator Configuration dialog
box.
Step 3 Use this dialog box to configure the settings you want, and then click OK. The connection appears in theConnection Manager and is ready to use.
NetworkUse the Network tab to configure the network settings:
• Network Connection or Serial Connection—Select Network Connection for connections over TCP/IP,or Serial Connection for connections through a serial port.
• Description—Enter a description for the connection.
• Host—Enter a host name or IP Address (or select one from the list). Host can be populated from theglobal Ericom - PowerTerm TEC connection application.
• Port—Enter the port of the host.
• Terminal Type—Select a terminal type.
• Terminal Name—Enter a name for the terminal.
• Save Configuration Locally—Saves the font, color, key-mapping and other settings of the Ericom -PowerTerm TEC application locally.
WindowUse the Window tab to select the Window Size you want.
Administration Guide for Cisco Virtualization Experience Client 6215 Firmware Release 9.3 75
Configure connections locallyEricom PowerTerm TEC

ConnectionUse the Connection tab to configure the connection settings:
• Auto Connect—Starts the connection automatically after system startup.
• Ping Before Connect—Pings the connection to see if it is reachable before the connection is attempted.
• Auto Reconnect—Reconnects automatically after a disconnection occurs.
• Delay before retrying—Select the amount of time to delay the reconnection attempt after a disconnectionoccurs.
SettingUse the Setting tab to automatically run script during user logon (enter the script name and path).
Remote ConfigurationUse the Remote Configuration tab to configure:
• Remote Configuration Filename—Enter the remote configuration filename for the connection.
• Remote Configuration Path—Enter the remote configuration path for the connection.
ViewUse the View tab to select the items that will appear when using the connection (menu, toolbar, status bar,and buttons).
Ericom PowerTerm WebConnectProcedure
Step 1 In the Connection Manager, click Add to open the Add Connection dialog box.Step 2 SelectEricom_Webconnect from the list and clickNext to open the Terminal Emulator Configuration dialog
box.
Administration Guide for Cisco Virtualization Experience Client 6215 Firmware Release 9.376
Configure connections locallyConnection

Step 3 Use this dialog box to configure the settings you want (Server can be a host name or IP Address), and thenclick OK. The connection appears in the Connection Manager and is ready to use.
RDPProcedure
Step 1 In the Connection Manager, click Add to open the Add Connection dialog box.Step 2 Select RDP from the list and click Next to open the Remote Desktop (RDP) Configuration dialog box.
Step 3 Use this dialog box to configure the settings you want, and then click OK. The connection appears in theConnection Manager and is ready to use.
NetworkUse the Network tab to configure the network settings:
• Description—Enter a description for the connection.
• Server—Enter a server name or IP address.
• Ping Before Connect—Pings the connection to see if it is reachable before the connection is attempted.
• Notify When Disconnected—Notifies you when the connection is broken.
Administration Guide for Cisco Virtualization Experience Client 6215 Firmware Release 9.3 77
Configure connections locallyRDP

WindowUse the Window tab to select the Window Colors and the Window Size you want.
Login
The Username, Password, and Domain fields are optional. If you leave any of these fields blank, interactivelogin is required (users must enter the information at login time).
Tip
Use the Login tab to configure credentials used to automatically log in to the connection:
• Use smart card—Enables the use of a smart card when connecting.
The Cisco VXC 6215 firmware supports smart cards, but Cisco does not provide supportfor smart card solutions. For information about smart cards, contact your smart cardvendor.
Note
• Network Level Authentication—Enables Network Level Authentication (NLA) and is required if NLAis enabled on your remote computer (your remote computer requires NLA user authentication beforeyou establish a full Remote Desktop connection and the logon screen appears).
• User Name—Enter a user name for the connection.
• Password—Enter the password.
• Domain—Enter the domain name.
• Connect automatically after login—Enables an automatic connection after successful login to the thinclient.
• Use RD Gateway Settings—Select to enable and configure an RD Gateway to connect to your remotecomputers (if required by your network administrator) and then do one of the following:
◦RD Server, and then Use Remote Desktop Credentials for RD Gateway—Enter the RD Server IPaddress or URL of the Remote Desktop Gateway (RD Gateway) server, and then select the UseRemote Desktop credentials for RD Gateway check box (select if the server credentials are thesame credentials as your RDP host remote computer credentials).
◦RD Server, and then Manually enter RD User Name , RD Password, RD Domain—Enter the RDServer IP address or URL of the Remote Desktop Gateway (RD Gateway) server, clear the UseRemote Desktop credentials for RDGateway check box and then manually enter the Username,Password, and Domain of the RD Gateway server (if required).
Administration Guide for Cisco Virtualization Experience Client 6215 Firmware Release 9.378
Configure connections locallyWindow

An RD Gateway server is a type of gateway that enables authorized users to connect toremote computers on a corporate network from any computer with an Internet connection.An RD Gateway server enables Remote Desktop connections to a corporate networkfrom the Internet without having to set up virtual private network (VPN) connections.Ask your network administrator whether you need to specify an RD Gateway server.
Tip
ConnectionUse the Connection tab to configure the connection settings:
• Compression—Enables compression.
• NT4 compatible—Enables RDP protocol version 4.
• Low bandwidth—Enables low-bandwidth optimization.
• Sound—Select audio source for the connection (Local or Remote).
• Encryption Level—Select an encryption level (Normal or None).
For servers with data encryption settings, you must select Normal for the encryption level.Tip
Experience
Consider your network restrictions when you select options on the Experience tab. For example, be sureto configure the settings appropriately for your bandwidth level and so on.
Tip
Use the Experience tab to configure the experience settings for a user desktop:
• Grab ALL keyboard events when window has focus—Enables all keyboard events within the connectionwindow to always be sent to the connection's applications.
• Speed Level—Select a speed level to describe the network connection.
• Desktop Background—Displays the desktop background.
• Font Smoothing—Enables font smoothing (smooth type).
• Menu and window animation—Enables menu and window animation.
• RemoteFX—Enables a RemoteFX session. To use an RDP USB redirection type you must use aRemoteFX session (RDP USB is not supported using a standard RDP session).
• Show contents of window while dragging—Shows the window content when the user drags the windowon screen.
Administration Guide for Cisco Virtualization Experience Client 6215 Firmware Release 9.3 79
Configure connections locallyConnection

• Subsampling—Enables color space conversion required for chroma subsampling (the practice ofencoding/compressing images for a higher transmission experience).
Auto ReconnectUse the Auto Reconnect tab to enable automatic reconnect after a disconnection (select the Enable AutoReconnect check box, and then select the amount of time to delay the reconnection attempt after a disconnectionoccurs).
ApplicationUse the Application tab to enter the command line and Working Directory of the application that will run atthe beginning of a session:
• Command Line—Enter the command line for the program on the server.
•Working Directory—Enter the working directory for the program.
Drive MappingUse the Drive Mapping tab to map share names on the server to USB mass storage devices attached to thethin client, and to view and manage (add, edit, and delete) the list of current server share names (includingdrive information) mapped on the thin client.
Figure 40: Drive Mapping
Add share names
Procedure
Step 1 Click Add to open the RDP Drive Map dialog box.
Administration Guide for Cisco Virtualization Experience Client 6215 Firmware Release 9.380
Configure connections locallyAuto Reconnect

Step 2 Enter a Share Name.Step 3 Select a Drive Type (USB Floppy, USB CDROM, USB Disk or Memory Stick, or Local or Mounted Disk).Step 4 (Optional) Enter the directory on the USB device to access in the Base Directory text box.Step 5 Click OK to add the Share Name to the list of available Share Names.
Edit and delete share names
Procedure
To edit or delete a Share Name, select a Share Name from the list of available Share Names and do one ofthe following:
• Edit—Click Edit and configure the Share Name as described in Add share names, on page 80.
• Delete—Click Delete to remove the Share Name.
Device mappingUse the Device Mapping tab to map devices to ports on the thin client, and to view and manage (add anddelete) the list of current devices (including device information) mapped on the thin client.
Figure 41: Device Mapping
Administration Guide for Cisco Virtualization Experience Client 6215 Firmware Release 9.3 81
Configure connections locallyDevice mapping

Add devices
Procedure
Step 1 Click Add to open the Add Port Mapping dialog box.
Step 2 Select a port from the Port list.Step 3 Select the directory of the device to access from the Device list.Step 4 Click OK to add the device to the list of available devices.
Delete devices
Procedure
To delete a device, select a device from the list of available devices and click Delete.
SSHProcedure
Step 1 In the Connection Manager, click Add to open the Add Connection dialog box.Step 2 Select SSH from the list and click Next to open the SSH Configuration dialog box.
Administration Guide for Cisco Virtualization Experience Client 6215 Firmware Release 9.382
Configure connections locallySSH

Step 3 Use this dialog box to configure the settings you want, and then click OK. The connection appears in theConnection Manager and is ready to use.
NetworkUse the Network tab to configure the network settings:
• Description—Enter a description for the connection.
• Host—Enter a host name or IP address.
• Remote Username—Enter a username.
• Remote Command—Enter the command to execute on the server.
ConnectionUse the Connection tab to configure the connection settings:
• Auto Connect—Starts the connection automatically after system startup.
• Ping Before Connect—Pings the connection to see if it is reachable before the connection is attempted.
• Auto Reconnect—Reconnects automatically after a disconnection occurs.
• Delay before retrying—Select the amount of time to delay the reconnection attempt after a disconnectionoccurs.
VMware View ClientProcedure
Step 1 In the Connection Manager, click Add to open the Add Connection dialog box.Step 2 Select VMware_ViewClient from the list and click Next to open the VMware View Client Settings dialog
box.
Administration Guide for Cisco Virtualization Experience Client 6215 Firmware Release 9.3 83
Configure connections locallyNetwork

Step 3 Use this dialog box to configure the settings you want, and then click OK. The connection appears in theConnection Manager and is ready to use.
No special client-side configuration is needed to enable PCOIP connections. This is configured on the Viewbroker, and once a user logs in from the client and obtains a list of desktops, they will be presented with anoption to choose PCOIP or RDP (based on server settings).
NetworkUse the Network tab to configure the network settings:
• Description—Enter a description for the connection.
• Host—Enter a host name or IP address.
• Port—Enter the port of the host.
• Use Secure Connection (SSL)—Select to use an SSL connection.
• Enable interactive mode—Enables interactive mode.
Secure PreferencesUse the Secure Preferences tab to select the option you want that determines how the client will proceed whenit cannot verify that your connection to the server is secure.
It is not recommended that you change this setting unless instructed to do so by your system administrator.Caution
ConnectionUse the Connection tab to configure the connection settings:
Ping Before Connect—Pings the connection to see if it is reachable before the connection is attempted.
Connect automatically after login—Enables an automatic connection after successful login to the thin client.
Administration Guide for Cisco Virtualization Experience Client 6215 Firmware Release 9.384
Configure connections locallyNetwork

Auto Reconnect—Reconnects automatically after a disconnection occurs.
Delay before retrying—Select the amount of time to delay the reconnection attempt after a disconnectionoccurs.
DesktopUse the Desktop tab to configure the desktop settings for the connection (use a full screen on all monitors,select a Desktop size, disable the full screen drop down menu bar, and disable exit on disconnect).
LoginUse the Login tab to configure credentials used to automatically log in to the connection:
• User Name—Enter a user name for the connection.
• Password—Enter the password.
• Domain Name—Enter the domain name.
• Desktop—Enter the desktop name.
VNC ViewerProcedure
Step 1 In the Connection Manager, click Add to open the Add Connection dialog box.Step 2 Select VNC_Viewer from the list and click Next to open the VNC Viewer Settings dialog box.
Step 3 Use this dialog box to configure the settings you want, and then click OK. The connection appears in theConnection Manager and is ready to use.
Administration Guide for Cisco Virtualization Experience Client 6215 Firmware Release 9.3 85
Configure connections locallyDesktop

NetworkUse the Network tab to configure the network settings:
• Description—Enter a description for the connection.
• Host—Enter a host name or IP address.
• Connect to—Select a connection type of either Display number (enter the display to connect to on theserver) or Port number (enter the port to connect to on the server).
• Ping Before Connect—Pings the connection to see if it is reachable before the connection is attempted.
ConnectionUse the Connection tab to configure the connection settings:
• Compression Level—Select a compression level for encoding.
• Shared—Enables or disables a shared connection.
• View Only—Blocks mouse and keyboard events for a view-only connection.
WindowUse the Window tab to configure window settings:
• Full Screen—Opens the connection in a full-screen window.
• Color Depth—Controls how many colors to display with each on-screen pixel.
• JPEG Quality—Specifies the image quality for encoding.
LoginUse the Login tab to configure credentials used to automatically log in to the VNC server:
• Password—Enter the password to connect to the VNC server.
• Connect automatically after login—Enables an automatic connection after successful login to the thinclient.
Administration Guide for Cisco Virtualization Experience Client 6215 Firmware Release 9.386
Configure connections locallyNetwork

XDMCPProcedure
Step 1 In the Connection Manager, click Add to open the Add Connection dialog box.Step 2 Select XDMCP from the list and click Next to open the XDMCP Client Settings dialog box.
Step 3 Use this dialog box to configure the settings you want, and then click OK. The connection appears in theConnection Manager and is ready to use.
The Help tab provides information on XDMCP settings (for example, "Query mode directly connectsremote server so IP is needed").
Note
NetworkUse the Network tab to configure the network settings:
• Description—Enter a description for the connection.
• Host—Enter a host name or IP address of an XDMCP server.
• Connect Mode—Select a connection style: Query, Chooser, or Broadcast.
• Connect Program—Select the program through which the connection is made: Xnest or Xserver.
WindowUse the Window tab to select the Window Colors and the Window Size you want.
Administration Guide for Cisco Virtualization Experience Client 6215 Firmware Release 9.3 87
Configure connections locallyXDMCP

ConnectionUse the Connection tab to configure the connection settings:
• Auto Connect—Starts the connection automatically after system startup.
• Ping Before Connect—Pings the connection to see if it is reachable before the connection is attempted.
• Auto Reconnect—Reconnects automatically after a disconnection occurs.
• Delay before retrying—Select the amount of time to delay the reconnection attempt after a disconnectionoccurs.
Administration Guide for Cisco Virtualization Experience Client 6215 Firmware Release 9.388
Configure connections locallyConnection

C H A P T E R 7Accessing additional features with theapplication browser
This chapter provides detailed information about using the Application Browser to access the applications,audio and video, and system features installed on the thin client.
For information on adding and managing addons, see Using central configuration to automate updatesand configuration, on page 103 and Add-on manager, on page 47.
Tip
ClickingMore Applications in the Computer menu opens the Application Browser.
Figure 42: Application Browser
Clicking the Connection Manager icon in the Application Browser opens the Connection Manager. Usethe ConnectionManager to configure and add connections to your Desktop for use as described in Configureconnections locally, on page 69.
Tip
Use the Application Browser to access the following additional features:
• Diagnostics, page 90
• Diagnostic log viewer, page 91
• Ericom PowerTerm TEC, page 92
• Volume control, page 92
• Take Screenshots, page 93
Administration Guide for Cisco Virtualization Experience Client 6215 Firmware Release 9.3 89

• VNC Server, page 94
• Xterm, page 96
DiagnosticsUse the Diagnostics dialog box (click Diagnostics) to select and use a diagnostic tool:
• Ping—Enter or select a destination from the Destination list and click Ping.
• Trace Route—Enter or select a destination from the Destination list and click Trace Route (diagnosticinformation appears on the Trace Route tab).
• Temporary Settings—View the temporary settings of the thin client.
• Permanent Settings—View the permanent settings of the thin client.
• wlx.ini/wnos.ini—View the wlx.ini or wnos.ini file as copied to the thin client.
• user.ini—View the user.ini file as copied to the thin client.
The Cisco VXC 6215 supports wlx.ini files, but does not support wnos.ini files. For more information,see the INI Files Reference Guide for Cisco Virtualization Experience Client 6215.
Note
Figure 43: Diagnostics Dialog Box
The title of the Diagnostics dialog box contains "(as superuser)" even when you are logged into the clientusing thinuser credentials.
Note
Administration Guide for Cisco Virtualization Experience Client 6215 Firmware Release 9.390
Accessing additional features with the application browserDiagnostics

Diagnostic log viewerUse the Diagnostics Log Viewer dialog box (click Diagnostics Log Viewer) to display and export log filesto a USB key or remote server.
The title of the Diagnostics Log Viewer dialog box contains "(as superuser)" even when you are loggedinto the client using thinuser credentials.
Note
Figure 44: Diagnostics Log Viewer
The Diagnostics Log Viewer displays the related messages of the log file name you have highlighted (clickthe name to highlight) in the Log Name list. To include debug messages for log files, select theMore Logscheck box, click OK, and then restart the device for the change to take effect (now when you highlight thelog file you want to display, debug messages will also display in the results pane).
You can export the log files you select (click all or any of the check boxes you want in the Log Name list) toa:
• USB Key—Attach a USB key to the client, open the Diagnostics Log Viewer, select the check boxesyou want in the Log Name list, select USB Key, and then click Next to use the Export Logs dialog box.
• Remote Server—Select the check boxes you want in the Log Name list, selectRemote Server, and thenclick Next to use the Export Logs dialog box. Note that, you can export the log files to a default server(server from the default registry) or to any server by specifying the URL path and server credentials.
Permanent and temporary registry logs will be exported by default.Note
Administration Guide for Cisco Virtualization Experience Client 6215 Firmware Release 9.3 91
Accessing additional features with the application browserDiagnostic log viewer

Ericom PowerTerm TECUse the Ericom PowerTerm Terminal Emulation dialog box (click Ericom PowerTerm) to view and manage(add and delete) the list of servers that are presented when an Ericom PowerTerm TEC connection is beingconfigured for thin client access to network resources as described in Ericom PowerTerm TEC, on page 75.
Figure 45: Ericom PowerTerm TEC
Use the following guidelines:
• Adding a hostname—ClickAdd to open the Add host dialog box, enter a Hostname, and then clickOK.The hostname is added to the Hostname list.
• Deleting a hostname—Select a hostname and clickDelete. The hostname is removed from the Hostnamelist.
Volume controlUse the Volume Control dialog box (click Volume Control) to select Playback (system sounds), Recording(application recording sounds), Output Devices (left and right sounds), Input Devices (left and right sounds),
Administration Guide for Cisco Virtualization Experience Client 6215 Firmware Release 9.392
Accessing additional features with the application browserEricom PowerTerm TEC

and Configuration (profile) volume preferences. You can use the Show list on the Playback, Recording, OutputDevices, and Input Devices tabs to select which items you want shown.
Figure 46: Volume Control
For these settings to take effect, sound must be supported and enabled on the server used for ICAconnections, RDP connections, orMPlayer. Sound requires significant bandwidth that may not be availableon some WAN and dial-up connections.
Tip
Take ScreenshotsUse the Take Screenshot dialog box (click Take Screenshot) to select screenshot preferences and effects (forexample, entire desktop with pointer, current window with a border, or a selected area). After setting your
Administration Guide for Cisco Virtualization Experience Client 6215 Firmware Release 9.3 93
Accessing additional features with the application browserTake Screenshots

preferences, click Take Screenshot to take the screenshot and open the Save Screenshot dialog box allowingyou to name and save the file.
Figure 47: Take Screenshot
VNC ServerUse the VNC Server Preferences dialog box (clickVNC Server) to select Sharing, Security, and NotificationVNC Server preferences for use with remote administration. For example, you can set the Security password(the password an administrator must use when shadowing the thin client) in this dialog box.
Figure 48: VNC Server Preferences
Monitor a thin clientTightVNCServer is installed locally on the thin client. It allows a thin client to be shadowed/operated/monitoredfrom a remote machine on which TightVNC Viewer is installed (TightVNC Viewer is available from the
Administration Guide for Cisco Virtualization Experience Client 6215 Firmware Release 9.394
Accessing additional features with the application browserVNC Server
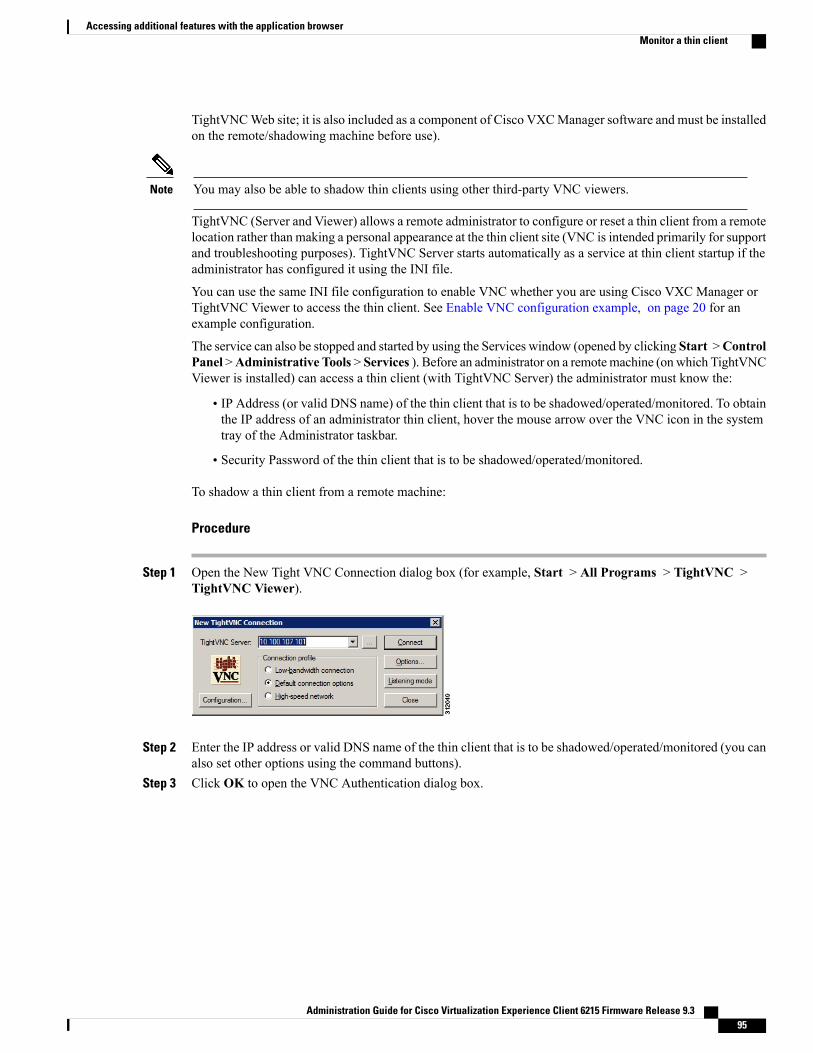
TightVNCWeb site; it is also included as a component of Cisco VXCManager software and must be installedon the remote/shadowing machine before use).
You may also be able to shadow thin clients using other third-party VNC viewers.Note
TightVNC (Server and Viewer) allows a remote administrator to configure or reset a thin client from a remotelocation rather than making a personal appearance at the thin client site (VNC is intended primarily for supportand troubleshooting purposes). TightVNC Server starts automatically as a service at thin client startup if theadministrator has configured it using the INI file.
You can use the same INI file configuration to enable VNC whether you are using Cisco VXC Manager orTightVNC Viewer to access the thin client. See Enable VNC configuration example, on page 20 for anexample configuration.
The service can also be stopped and started by using the Services window (opened by clicking Start >ControlPanel >Administrative Tools > Services ). Before an administrator on a remotemachine (on which TightVNCViewer is installed) can access a thin client (with TightVNC Server) the administrator must know the:
• IP Address (or valid DNS name) of the thin client that is to be shadowed/operated/monitored. To obtainthe IP address of an administrator thin client, hover the mouse arrow over the VNC icon in the systemtray of the Administrator taskbar.
• Security Password of the thin client that is to be shadowed/operated/monitored.
To shadow a thin client from a remote machine:
Procedure
Step 1 Open the New Tight VNC Connection dialog box (for example, Start > All Programs > TightVNC >TightVNC Viewer).
Step 2 Enter the IP address or valid DNS name of the thin client that is to be shadowed/operated/monitored (you canalso set other options using the command buttons).
Step 3 Click OK to open the VNC Authentication dialog box.
Administration Guide for Cisco Virtualization Experience Client 6215 Firmware Release 9.3 95
Accessing additional features with the application browserMonitor a thin client

Step 4 Enter the Password of the thin client that is to be shadowed (this is the Security Password of the thin clientthat is to be shadowed) and click OK. The thin client that is to be shadowed/operated/monitored will bedisplayed for the administrator in a separate window on the remote machine. Use the mouse and keyboard onthe remote machine to operate the thin client just as you would if you were operating it locally.
XtermXTerm is the standard terminal emulator for the X Window System. Use the terminal emulator window forX (click XTerm) to access a text terminal and all its applications such as command line interfaces (CLI) andtext user interface applications. You can click the Window menu (upper left icon) to open and use the XTermmenu. You can type help and press Enter to display a verbose message describing XTerm options.
Figure 49: Xterm
Administration Guide for Cisco Virtualization Experience Client 6215 Firmware Release 9.396
Accessing additional features with the application browserXterm

A P P E N D I X ACisco AnyConnect Secure Mobility Client
To provide secure VPN connections, the Cisco VXC 6215 supports the Cisco AnyConnect Secure MobilityClient, Release 3.1. The Cisco AnyConnect Secure Mobility client provides remote users with secure VPNconnections to the Cisco 5500 Series Adaptive Security Appliance (ASA). On the Cisco VXC 6215, theCisco AnyConnect Secure Mobility client supports Cisco ASA version 8.0(4) or later and the AdaptiveSecurity Device Manager (ASDM) 6.4(1) or later.
With Release 9.3, Cisco AnyConnect is not bundled with the firmware, but is provided as a separate add-oninstead. You can push this add-on to your devices using the standard add-on procedure.
• Feature support, page 97
• Setup, page 99
Feature supportThe following table shows the AnyConnect features supported on the Cisco VXC 6215.
Note • Cisco AnyConnect release 3.1 is only supported with Cisco VXC 6215 Firmware Release 9.3.
• Application upgrades of Cisco AnyConnect 3.1 on the Cisco VXC 6215 device from the ASA aredisabled and not supported.
• Cisco AnyConnect 3.1 on Cisco VXC 6215 does not support self-signed certificates and thereforethe ASA certificate must be signed by some trusted certificate authority (CA). If you decide to signthe ASA certificate by some internal CA or any other CA that is not trusted on the Cisco VXC 6215device by default, you must import the CA certificate to the device in order to make it trusted. Thatprocedure is described in Administration Guide for Cisco Virtualization Experience Client Manager4.9.1 in the "Import Certificates on Devices" section.
• In order to troubleshoot potential Cisco AnyConnect issues, you can enable Syslog using an add-on.
Administration Guide for Cisco Virtualization Experience Client 6215 Firmware Release 9.3 97

Table 6: AnyConnect Feature Support
Supported on Cisco VXC 6215Feature
YesDatagramTransport Layer Security (DTLS) with SSLaccess to VPN
NoIPSec/IKEv2 support
YesCompression -Increases the communicationsperformance between the security appliance and theclient
YesFallback from DTLS to TLS if DTLS fails
NoCertificate-only authentication
NoMachine certificate authentication for standalonemode
NoRSA SecurID integration
NoSmartcard support
NoDownload certificate from ASA via Get Certificate
NoSimple Certificate Enrollment Protocol (SCEP) toprovision and renew a certificate used for clientauthentication
Yes, LegacyGUI interface
YesMinimize on connect
NoIPv6 VPN access-Allows access to IPv6 resourcesover a public IPv4 connection
NoLocal LAN access
NoLocal printer access via client firewall rules
NoTrusted network detection (TND)
NoCaptive portal (hotspot) detection
NoStart Before Logon (SBL)
YesAutoconnect on start
YesResume session after loss of connectivity
N/A (update using Cisco VXC Manager only)Auto update AnyConnect
YesAuto update AnyConnect profile
N/A (integrated with Cisco VXC troubleshootingtool)
Diagnostic AnyConnect Reporting Tool (DART)
YesFederal Information Processing Standard (FIPS)security
Administration Guide for Cisco Virtualization Experience Client 6215 Firmware Release 9.398
Cisco AnyConnect Secure Mobility ClientFeature support

Supported on Cisco VXC 6215Feature
NoBrowser-based (clientless) VPN access
NoEndpoint assessment (Posture)
NoEndpoint remediation
NoWeb security-Enforces acceptable use policies toprotect endpoints from websites found to be unsafe
NoNetwork Access Manager (NAM) - L2
SetupTo enable Cisco AnyConnect connections, you must set up Cisco AnyConnect profiles on the Cisco ASAand specify the required VPN INI connection parameters on the Cisco VXC 6215. After you set up the requiredprofiles and push the INI parameters to the client, users can then initiate secure connections.
Before you provide the devices to your remote employees, you must first push the required configuration tothe devices on your local network first. After you have upgraded the devices with the required parameterslocally, you can then provide the preconfigured devices to remote users to operate behind the Cisco AnyConnectVPN.
Profile setup on Cisco ASAOn the Cisco ASA, AnyConnect profiles provide basic information about connection setup, and users cannotmanage or modify them. The profile is an XML file that lets you identify the secure gateway (Cisco ASA)hosts that you want to make accessible. In addition, the profile specifies additional connection attributes andconstraints for a user. Usually, a user has a single profile file. This profile contains all the hosts needed by auser, and additional settings as needed.
By creating and assigning different profiles to group policies configured on the Cisco ASA, you can differentiateaccess to Cisco ASA features. The Cisco ASA automatically pushes the profile assigned to the user uponconnection setup.
You can configure a profile using the AnyConnect profile editor, a GUI-based configuration tool launchedfrom the Adaptive Security Device Manager (ASDM). The AnyConnect software package, version 3.0 andlater, includes the editor, which activates when you load the AnyConnect package on the Cisco ASA as anSSL VPN client image.
For detailed configuration information, see Cisco AnyConnect Secure Mobility Client Administrator Guide,Release 3.0.
Cisco AnyConnect setup using INI parametersTo set up Cisco AnyConnect on the device, you must configure the Custom Connect INI parameter to createa Cisco AnyConnect connection, and use additional INI parameters to specify the Cisco ASA address andsettings.
Administration Guide for Cisco Virtualization Experience Client 6215 Firmware Release 9.3 99
Cisco AnyConnect Secure Mobility ClientSetup
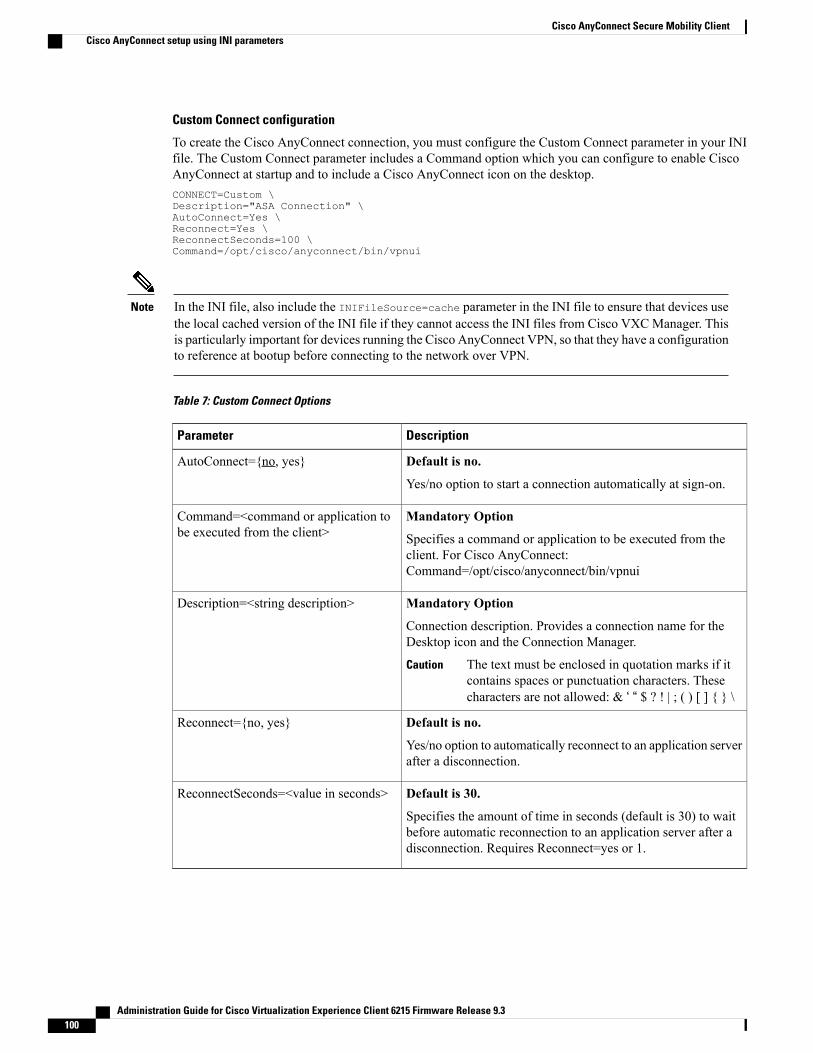
Custom Connect configuration
To create the Cisco AnyConnect connection, you must configure the Custom Connect parameter in your INIfile. The Custom Connect parameter includes a Command option which you can configure to enable CiscoAnyConnect at startup and to include a Cisco AnyConnect icon on the desktop.CONNECT=Custom \Description="ASA Connection" \AutoConnect=Yes \Reconnect=Yes \ReconnectSeconds=100 \Command=/opt/cisco/anyconnect/bin/vpnui
In the INI file, also include the INIFileSource=cache parameter in the INI file to ensure that devices usethe local cached version of the INI file if they cannot access the INI files from Cisco VXCManager. Thisis particularly important for devices running the Cisco AnyConnect VPN, so that they have a configurationto reference at bootup before connecting to the network over VPN.
Note
Table 7: Custom Connect Options
DescriptionParameter
Default is no.
Yes/no option to start a connection automatically at sign-on.
AutoConnect={no, yes}
Mandatory Option
Specifies a command or application to be executed from theclient. For Cisco AnyConnect:Command=/opt/cisco/anyconnect/bin/vpnui
Command=<command or application tobe executed from the client>
Mandatory Option
Connection description. Provides a connection name for theDesktop icon and the Connection Manager.
The text must be enclosed in quotation marks if itcontains spaces or punctuation characters. Thesecharacters are not allowed: & ‘ “ $ ? ! | ; ( ) [ ] { } \
Caution
Description=<string description>
Default is no.
Yes/no option to automatically reconnect to an application serverafter a disconnection.
Reconnect={no, yes}
Default is 30.
Specifies the amount of time in seconds (default is 30) to waitbefore automatic reconnection to an application server after adisconnection. Requires Reconnect=yes or 1.
ReconnectSeconds=<value in seconds>
Administration Guide for Cisco Virtualization Experience Client 6215 Firmware Release 9.3100
Cisco AnyConnect Secure Mobility ClientCisco AnyConnect setup using INI parameters

Do not insert any additional spaces at the end of lines in the INI file, otherwise the device may not be ableto parse the INI file correctly.
Caution
INI parameters for Cisco ASA settings
To complete the Cisco AnyConnect setup, you must also specify the Cisco ASA address and settings usingthe following INI parameters. After you configure these settings and the Custom Connect parameter, pushthe updated INI file to your devices to enable the connection.
Table 8: Cisco AnyConnect INI parameters
DescriptionParameter
If you configure groups on the Cisco ASA, this parameter allowsyou to specify the group name or names (separated by commas)that the Cisco AnyConnect Client can use for the VPNconnection.
VPNGroup=<Group name>,... (optional)
Specifies theVPNheadend FQDNor IPAddress to autoconfigurethe Cisco AnyConnect Client. For example, VPN.Cisco.com or192.168.0.1.
VPNHeadendAddress= <FQDN or IPaddress> (required)
The following shows an example configuration:VPNGroup= profilenameVPNHeadendAddress=192.168.0.1
Upgrades over VPN
If you upgrade devices over VPN, be aware of the following considerations:
• Be aware of the configured Cisco VXC Manager address discovery mechanism (if DHCP, be sureAnyConnect is propagating these tags across the VPN).
• An image upgrade over VPN can take a few hours (depending on the speed of the link). If the user isnot connected to the VPN for enough time, you will lnot be able to start the upgrade process, and thedownload will start from scratch every time.
Administration Guide for Cisco Virtualization Experience Client 6215 Firmware Release 9.3 101
Cisco AnyConnect Secure Mobility ClientCisco AnyConnect setup using INI parameters

Administration Guide for Cisco Virtualization Experience Client 6215 Firmware Release 9.3102
Cisco AnyConnect Secure Mobility ClientCisco AnyConnect setup using INI parameters

A P P E N D I X BUsing central configuration to automate updatesand configuration
This appendix describes how to set up your environment to provide your thin clients with automatic updatesand configurations in three simple steps.
Cisco thin clients do not require device management software. They are configured to obtain their IPaddress, as well as the location of firmware and configuration instructions from a DHCP server. However,you can use Cisco VXC Manager for a more hands-on management of client configurations and updates.For information about configuring thin clients to communicate with a Cisco VXC Manager server, seeRelease 9.3 upgrade and setup using Cisco VXC Manager, on page 7.
Tip
• INI files, page 103
• Automatic configuration and update setup, page 105
INI filesINI files (created and maintained by the network administrator) determine how the thin client is configuredand updated. The thin client accesses INI files from the server during the initialization process. Typically, INIfiles are accessed through FTP, HTTP, and HTTPS; if no protocol is specified, the default is anonymous FTP.
Administration Guide for Cisco Virtualization Experience Client 6215 Firmware Release 9.3 103

The INI file processing hierarchy is as follows:Important
• Scenario 1—MAC.ini exists. The MAC.ini file is processed and if the Include=WLX.ini statementis included, then the WLX.ini file is processed.
• Scenario 2—MAC.ini exists and {username}.ini exists. The MAC.ini file is processed and if theInclude=WLX.ini statement is included, then the WLX.ini file is processed. Once the credentialsare provided, the {username}.ini file is processed.
• Scenario 3—WLX.ini exists. The WLX.ini file is processed.
• Scenario 4—WLX.ini exists and {username}.ini exists. The WLX.ini file processed. Once thecredentials are provided, the {username}.ini file is processed.
• Scenario 5—No ini files exist. Local configuration is applied.
INI files are employed as follows:
• wlx.ini—This is the global INI file. One wlx.ini file is available to all users. It contains global parametersfor all thin clients accessing the server.
• {username}.ini—This file is unique to each user. The {username}.ini file contains the connection profilefor each user. Parameters in the user profile generally supersede the identically named global parameters.
• $MAC.ini—This file can be used for device-specific configuration. If the thin client locates this INI file(it is stored in the same directory as wlx.ini), wlx.ini is not accessed, unless you use the include=wlx.iniparameter.
Note also that the placement of the include=wlx.ini parameter within the $MAC.ini file will dictatewhich value will take priority for a same specific parameter that is contained in both the wlx.ini file andthe $MAC.ini file but is defined differently (different values for the same parameter).
For example, if the wlx.ini file has parameterA=valueB, and the $MAC.ini file has the sameparameterA=valueC, then:
◦If the include=wlx.ini parameter is included in the $MAC.ini file before the parameterA=valueCstatement, then the wlx.ini parameterA=valueB is discarded and parameterA=valueC (from the$MAC.ini file) is the final value used.
◦If the include=wlx.ini parameter is included in the $MAC.ini file after the parameterA=valueCstatement, then the $MAC.ini parameterA=valueC is discarded and parameterA=valueB (from thewlx.ini file) is the final value used.
When a thin client is initialized, it accesses the global wlx.ini file. When a user logs in, the thin client accessesthe user’s unique {username}.ini file. For detailed information on constructing and using INI files, see INIFiles Reference Guide for Cisco VIrtualization Experience Client 6215.
If both PNLite and a user profile are being used, the username must be defined in the Windows domainto be used, and the password must be the same for the domain and the profile.
Tip
Administration Guide for Cisco Virtualization Experience Client 6215 Firmware Release 9.3104
Using central configuration to automate updates and configurationINI files

Automatic configuration and update setupFor a Cisco VXC 6215 thin client to successfully access INI files and update itself from a server, you mustset up the server with the correct folder structure (where the INI files and other update files are located), directthe thin client to the server, and then reboot or start the thin client.
After DHCP and servers are configured and available, the thin client checks (at each boot up) to see whetheror not any updates are available on a predefined server (DCHP Option #161specifies the server URL, DCHPOption #162 specifies the root path to the server). If updates are available, the updates are automaticallyinstalled.
Prepare the server root directory and folder structureSet up the following folder structure on your server under the C:/inetpub/ftproot folder (for FTP)or C:/inetpub/wwwroot folder (for HTTP or HTTPS) and place your INI files and other necessaryfiles inside the structure as noted (This list describes the folder structure, starting with the default root directory/wyse. You can specify a different root directory as long as you use DHCP option 162 to communicate thenew root directory name to the thin client).
Table 9: Root Directory and Folder Structure
DescriptionDirectory
The root directory. It stores the wlx folder and the add-ons folder. It alsostores the following files, which are used for imaging and updating devices:
• Latest-image.raw
• Latest-image.raw.info
/wyse/
The main INI configuration folder. It stores the following:
• wlx.ini file and $MAC.ini file
• bitmap folder
• certs folder
• ini folder
/wyse/wlx
The folder where you can place custom images you plan to use./wyse/wlx/bitmap
The folder where you can place the CA certificates that can be imported toa thin client.
Use the Certs and ImportCerts INI parameters in the wlx.ini fileto import the certificates to thin clients.
Note
/wyse/wlx/certs
The folder where you can place the {username}.ini files./wyse/wlx/ini
Administration Guide for Cisco Virtualization Experience Client 6215 Firmware Release 9.3 105
Using central configuration to automate updates and configurationAutomatic configuration and update setup

DescriptionDirectory
The folder where you can place the add-ons you want to use. It also storesthe directory file and the *.rpm packages available to be installed on thethin client. The directory file should list all available add-ons. The directoryfile is required in the add-ons folder to guarantee that add-ons are properlylocated.
/wyse/addons
Be sure to create/activate the required MIME Types (.ini, .raw, .info, .rpm, and .) under IIS (on a per sitebasis) to enable downloading. Also be sure your web server can identify the file types used by Cisco thinclients.
To create/activate a MIME Type:
1 On your IIS server, use the File Types menu to add a New Type.
2 In the File Type dialog box, enter the Associated extension: (.ini, .raw. .info, .rpm, or .). and Content type.
3 Click OK to apply the settings.
Repeat the steps above for each required MIME type, specifying the appropriate extension and content type.
Direct the thin client to the serverAfter you set up the folder structure and populate it with the correct files, you must then direct the thin clientto the location of the server using DHCP.
Cisco strongly recommends that you use DHCP.Note
Using DHCP
With the DHCP method of configuring the file server location (recommended), the thin clients obtaininformation about the server and root directory using the following DHCP options:
• 161—Specifies the server
• 162—Specifies the root path to the server (ftp/http/https)
◦If no root path is defined, /wyse is assumed.
◦If a root path is defined, the additional path is appended to the URL supplied by Option 161.
• 184—(Optional) Specifies the server username (for the server specified in Option 161)
• 185—(Optional) Specifies the server password (for the server specified in Option 161.
Administration Guide for Cisco Virtualization Experience Client 6215 Firmware Release 9.3106
Using central configuration to automate updates and configurationDirect the thin client to the server

The thin clients perform the check-in for firmware updates early in the boot process. For that reason, aunit may not receive changes in DHCP information until it completes a full boot. However, you can avoidthis scenario by forcing a renewing of the DHCP lease, which ensures that the unit has the latest file-serverlocation before the next firmware check.
Tip
Use the guidelines shown in the following table when you create and add the DHCP options you need.
Table 10: DHCP Option Tags
NotesDescriptionTag
Always sentClient identifier001
OptionalTime Offset002
Optional but recommended. It is not required unless the appliancemust interactwith servers on a different subnet.
Router003
Optional but recommendedDomain Name Server (DNS)006
Optional string. The hostname or terminal name to be set.Host Name/Terminal Name012
Optional but recommended. See Option 6.Domain Name015
OptionalBroadcast Address028
OptionalWINS servers IP Address044
Optional but recommendedLease Time051
OptionalOption Overload052
RecommendedDHCP Message Type053
RecommendedDHCP Server IP Address054
Sent by applianceParameter Request List055
Optional (always sent by appliance)Maximum DHCP Message Size057
Optional but recommendedT1 (renew) Time058
Optional but recommendedT2 (rebind) Time059
Always sentClient identifier061
Optional string. If this is an IP address or resolvable hostname, the protocolis assumed to be FTP; however, it may be the leading portion of a URL thatspecifies another protocol. If the URL form is used, it should not include atrailing slash (for example, http://server.example.com or ftp://192.168.0.1).
Server (ftp/http/https)161
Administration Guide for Cisco Virtualization Experience Client 6215 Firmware Release 9.3 107
Using central configuration to automate updates and configurationDirect the thin client to the server

NotesDescriptionTag
Optional string. The relative directory starting from the root directory mustbe given. For example, on an FTP server, the full directory may beC:/Inetpub/ftproot/wyse, where wyse is the directory that contains thefirmware. In this example, the correct string value for this DHCP option is/wyse. On a Linux server, an FTP user-based directory might be/home/test/wyse. In this example, if the FTP user is test, then the FTP rootpath is /wyse and not the full path (/home/test/wyse). This value should useURL path notation (start with a forward slash, /, and use a forward slash asfolder separators).
Root path to the server (ftp/http/https)162
Optional string. IP address or FQDN of the PNLite server.PN Server181
Optional string. DHCP equivalent of the DomainList INI file parameter.Admin List182
Optional string. Username to use when authenticating to the server specifiedin Option 161.
Server Username184
Optional string. Password to use when authenticating to the server specifiedin Option 161.
Server Password185
Optional IP address of the Cisco VXCManager server. This option can specifyup to one Cisco VXC Manager server.
Cisco VXC Manager IP Address186
Optional string. You can connect to your XenDesktop URL by using DHCPOption tag 191 to specify the XenDesktop DDC URL.
XenDesktop DDC URL191
Optional FQDN of the Cisco VXC Manager server. This option can specifyup to one Cisco VXC Manager server.
Cisco VXC Manager FQDN194
Manually configuring the server location
To manually configure the file server location (not recommended), open the INI and Upgrade Settings dialogbox (Computer >Control Panel > INI Settings), clear theGet INI and Upgrade server details via DHCPcheck box, and then enter the URL (for HTTP or HTTPS; FTP URL is allowed for FTP) for the INI serverin the INI Server URL text box. For more information, see INI and upgrade settings, on page 62.
Administration Guide for Cisco Virtualization Experience Client 6215 Firmware Release 9.3108
Using central configuration to automate updates and configurationDirect the thin client to the server

You can also click Image Upgrade Settings to configure the INI and upgrade network settings as describedin Image upgrade options, on page 64.
Tip
Figure 50: INI and Upgrade Settings
Reboot the thin clientAfter you reboot (or start the thin client), the thin client will look in the defined root path for the latest availableimage and update if necessary. Additionally, it will check the directory file in the addons folder to see if anyupdates for installed add-ons are defined. Add-ons that exist in the addons folder but are not listed in thedirectory file, will be ignored during update check-in.
Administration Guide for Cisco Virtualization Experience Client 6215 Firmware Release 9.3 109
Using central configuration to automate updates and configurationReboot the thin client

Administration Guide for Cisco Virtualization Experience Client 6215 Firmware Release 9.3110
Using central configuration to automate updates and configurationReboot the thin client

A P P E N D I X CCisco VXC Manager and Wyse Device Manager
• Cisco VXC Manager with WDM, page 111
Cisco VXC Manager with WDMThis section describes how to manage a network containing a Cisco VXC Manager server and Cisco VXC6215 devices together with a Wyse Device Manager (WDM) server that controls Wyse devices using DHCPtags. The assumption is that the Cisco VXC Manager server is added to a network that already contains aWDM server.
No changes are needed to the production WDM network configuration.Note
Set up Cisco VXC Manager
Procedure
Step 1 Do not modify the existing WDM system with legacy devices and WDM DHCP tags.Step 2 Set up the Cisco VXC Manager 4.9.1 server as normal.Step 3 Configure a DDC package for upgrade on the Cisco VXC Manager server.Step 4 Boot the Cisco VXC 6215 devices.
The devices check in to the WDM server as they boot up for the first time in the network due to theexisting DHCP tags in the network.
Note
Administration Guide for Cisco Virtualization Experience Client 6215 Firmware Release 9.3 111

Set devices to use Cisco VXC Manager
Procedure
Step 1 After the device boots up, access Cisco VXC Manager and right-click on the device and choose ExecuteCommand.
Step 2 Enter /etc/init.d/sshd start & to enable SSH.Step 3 Use an SSH client to connect to the device and enter su to acquire root privileges.Step 4 Enter the administrator password.Step 5 Execute the following commands:
regset --persist Rapport Servers “xx.xxx.xxx.xx” (IP address of Cisco VXC Manager 4.9.1)regset --persist Rapport MgmtDiscoveryMethod STATICthinclient-config –set-preserve-changes yes (if the .RSP script does not have thiscommand)
Step 6 The device may reboot to allow checkins to the Cisco VXC Manager 4.9.1 server.Step 7 The moment a device checks in to Cisco VXC Manager, the scheduled DDC with the image upgrade is
initiated. When the reimaged device reboots, it automatically continues to report to the same Cisco VXCManager 4.9.1 server.
After you verify the devices check in to the Cisco VXCManager 4.9.1, delete the device entries fromthe WDM server.
Note
Administration Guide for Cisco Virtualization Experience Client 6215 Firmware Release 9.3112
Cisco VXC Manager and Wyse Device ManagerSet devices to use Cisco VXC Manager

A P P E N D I X DBIOS upgrade
• Overview, page 113
• Extract BIOS, page 114
• Install BIOS, page 114
• Limitations, page 115
OverviewSummary
This appendix describes how to distribute a BIOS update for a BIOS password change or a BIOS versionupdate.
Description
The Cisco VXC 6215 provides two BIOS utilities. The first utility (bios_util) is used to extract the existingBIOS from a Cisco VXC 6215 unit. The second utility (rpmbuild) creates a squash rpm from the extractedBIOS so that the BIOS image can be deployed as an add-on.
The following instructions are divided into two sections: one for extraction and another for installation.
The extraction instructions describe how to extract a BIOS image from a device and convert the image intoan rpm addon. Use these instructions to create a BIOS add-on to change the BIOS password.
The installation instructions describe how to distribute and install a BIOS add-on. Use these instructions todistribute either a BIOS password or a new BIOS to one or more Cisco VXC 6215 units.
The instructions must be executed in the order provided to update a group of Cisco VXC 6215 devices.
Administration Guide for Cisco Virtualization Experience Client 6215 Firmware Release 9.3 113

Extract BIOSProcedure
Step 1 Prior to running the utility to extract the BIOS from a Cisco VXC 6215 unit, make the required changes tothe existing BIOS: access the BIOS (reboot the device and repeatedly press or hold down the Delete key tobring up the BIOS menu), update the BIOS password, and save it.
Step 2 After the device boots up, access Cisco VXC Manager and right-click on the device and choose ExecuteCommand.
Step 3 Enter /etc/init.d/sshd start & to enable SSH.Step 4 Use an SSH client to connect to the device and enter su to acquire root privileges.Step 5 Enter the administrator password.Step 6 Launch the following script to extract the BIOS for the device and create an addon:
/etc/addons.d/BIOS_UTIL/createBiosCmos.sh.Step 7 An add-on with the captured BIOS/CMOS image is created in the following directory:
/usr/src/pacakages/RPPMS/. The RPM file name consists of the platform name and the BIOS version.For example:vxc6215_bioscmos_update-3.0b_cso-1.slet11sp2.rpm
Step 8 Copy this captured BIOSRPM to aUSB storage device and deploy the RPM to other CiscoVXC 6215 devicesfrom Cisco VXC Manager.
Install BIOSIn Cisco VXCManager, use DDC to deploy the updated BIOS RPM to one or more Cisco VXC 6215 devices.
Unlike standard add-ons, the BIOS RPMmust be placed in the root package folder and not in the /addonsfolder.
Note
Use the following steps to deploy the BIOS RPM to your devices. In the sample scripts provided, be sure toupdate the .sh and .rpm file names as required.
Procedure
Step 1 To install the .rpm file, use a text editor to create a .sh script file (in this example,vxc6215_bioscmos_update-a3.0c_cso-1.sh) with the following content:#!/bin/bash/usr/sbin/addon-install /tmp/vxc6215_bioscmos_update-a3.0c_cso-1.sletc11sp2.rpm
Step 2 Also, create the biosupgrade.rsp file with the following content:[Version]Number=biosupgrade
Administration Guide for Cisco Virtualization Experience Client 6215 Firmware Release 9.3114
BIOS upgradeExtract BIOS

Description=BIOS upgradeOS=SLXCategory=CiscoUSE_Pxe=NO
[Script]CO "SLX"SF "<regroot>/vxc6215_bioscmos_update-a3.0c_cso-1.sh" \"/tmp/vxc6215_bioscmos_update-a3.0c_cso-1.sh"SF "<regroot>/vxc6215_bioscmos_update-a3.0c_cso-1.sletc11sp2.rpm" \"/tmp/vxc6215_bioscmos_update-a3.0c_cso-1.sletc11sp2.rpm"EX "dos2unix /tmp/vxc6215_bioscmos_update-a3.0c_cso-1.sh"EX "chmod u+x /tmp/vxc6215_bioscmos_update-a3.0c_cso-1.sh"EX "/tmp/vxc6215_bioscmos_update-a3.0c_cso-1.sh"
Step 3 Create a DDC package to push the .rpm file. Place the .rpm file and thevxc6215_bioscmos_update-a3.0c_cso-1.sh script file in the root package folder. For example:C:\6215-configs\biosupgrade.rsp
C:\6215-configs\biosupgrade\vxc6215_bioscmos_update-3.0b_cso-1.slet11sp2.rpm
C:\6215-configs\biosupgrade\vxc6215_bioscmos_update-a3.0c_cso-1.sh
Step 4 Register and push the package to your devices using DDC.Step 5 When the BIOS RPM is deployed, a splash screen appears on the target Cisco VXC 6215 devices indicating
the BIOS upgrade is about to begin and the devices will be automatically rebooted.
Step 6 The new BIOS is flashed during the reboot process.The BIOS is not flashed if the device platformmismatches the platform of the BIOS add-on.Note
LimitationsAs with other add-ons, the updated BIOS add-on is installed on a Cisco VXC 6215 device only if it is the firstBIOS add-on installed on that device, or if the new BIOS add-on version number is different from the lastinstalled BIOS add-on.
Administration Guide for Cisco Virtualization Experience Client 6215 Firmware Release 9.3 115
BIOS upgradeLimitations

Administration Guide for Cisco Virtualization Experience Client 6215 Firmware Release 9.3116
BIOS upgradeLimitations


![RESEARCHARTICLE Group-LevelSelectionIncreasesCooperation ... · bevictoriousovermostother tribes;and thiswould benatural selection”[3].Thusintergroup competition increases thevalue](https://static.fdocuments.net/doc/165x107/5ed93c0d6714ca7f476963b4/researcharticle-group-levelselectionincreasescooperation-bevictoriousovermostother.jpg)
![List of hosts - jriit.jp · List of hosts 192.168.1.10 Medium Severity problem(s) found [^] Back 192.168.1.10 Scan Time ... several web servers were detected by Nessus, but neither](https://static.fdocuments.net/doc/165x107/5aee1cb47f8b9ac62b8b8da9/list-of-hosts-jriitjp-of-hosts-192168110-medium-severity-problems-found.jpg)

