Admin Guide Server Administration - XgenPlus Plus Server Administration Guide Page 3 1. Introduction...
41
Admin Guide – Server Administration
Transcript of Admin Guide Server Administration - XgenPlus Plus Server Administration Guide Page 3 1. Introduction...
Admin Guide –
Server
Administration
XGen Plus Server Administration Guide
Page 2
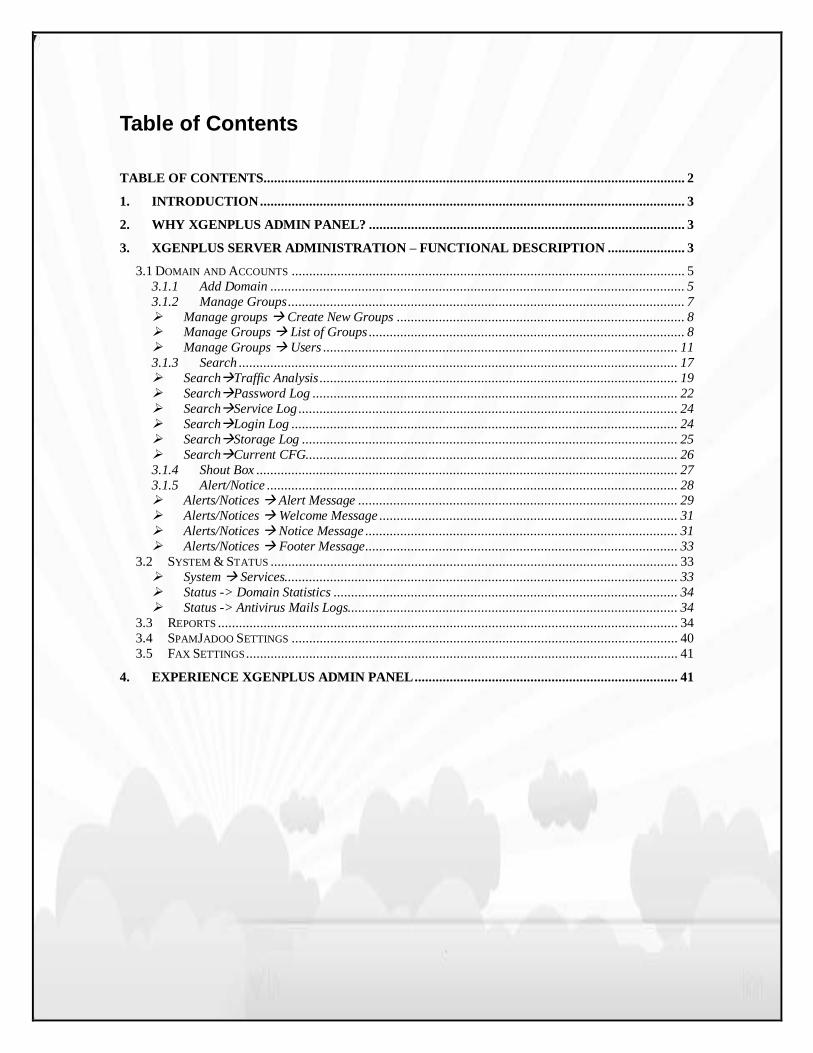
Table of Contents
TABLE OF CONTENTS ........................................................................................................................ 2
1. INTRODUCTION ......................................................................................................................... 3
2. WHY XGENPLUS ADMIN PANEL? .......................................................................................... 3
3. XGENPLUS SERVER ADMINISTRATION – FUNCTIONAL DESCRIPTION ...................... 3
3.1 DOMAIN AND ACCOUNTS ................................................................................................................ 5 3.1.1 Add Domain ...................................................................................................................... 5 3.1.2 Manage Groups ................................................................................................................. 7 Manage groups Create New Groups .................................................................................. 8 Manage Groups List of Groups .......................................................................................... 8 Manage Groups Users ..................................................................................................... 11 3.1.3 Search ............................................................................................................................. 17 SearchTraffic Analysis ...................................................................................................... 19 SearchPassword Log ........................................................................................................ 22 SearchService Log ............................................................................................................ 24 SearchLogin Log .............................................................................................................. 24 SearchStorage Log ........................................................................................................... 25 SearchCurrent CFG.......................................................................................................... 26 3.1.4 Shout Box ........................................................................................................................ 27 3.1.5 Alert/Notice ..................................................................................................................... 28 Alerts/Notices Alert Message ........................................................................................... 29 Alerts/Notices Welcome Message ..................................................................................... 31 Alerts/Notices Notice Message ......................................................................................... 31 Alerts/Notices Footer Message ......................................................................................... 33
3.2 SYSTEM & STATUS .................................................................................................................... 33 System Services................................................................................................................ 33 Status -> Domain Statistics .................................................................................................. 34 Status -> Antivirus Mails Logs.............................................................................................. 34
3.3 REPORTS ................................................................................................................................... 34 3.4 SPAMJADOO SETTINGS .............................................................................................................. 40 3.5 FAX SETTINGS ........................................................................................................................... 41
4. EXPERIENCE XGENPLUS ADMIN PANEL ........................................................................... 41
XGen Plus Server Administration Guide
Page 3
1. Introduction
XGenPlus is the most advanced mail server and web mail client which provides fast, secure and reliable emailing solution along with unified mailing service. It's a total email management and relationship solution that has been designed especially to cater to the needs of any organization, be it an ISP, Hosting Companies, Larger Enterprise, SMB, BPO, Colleges, Schools or Government offices. XGen Plus makes email communication agile for all users.
And to bring in the same experience for server and domain administrators, XGenPlus has got a secured & powerful yet easy UI interfaced administrator panel.
This document outlines the detailed functionality of XGenPlus Server Admin panel.
2. Why XGenPlus Admin Panel? What is so special in Admin panel in XGenPlus? How is it different from other email products‟ admin functionalities? What does it hold unique for administrators? And how does it ease Server admin‟s job? Above questions have been answered through the list of advantages mentioned below. XGenPlus admin can:
Manage Server Admin, Domain Admin, Billing Admin, User Level and Owner Level Controls along with easy management of multiple domains and users through single Web Based admin panel
Easily control space quota, SMS & fax quota, IP address range and other features for each domain
Set Login limits, Authentication & Password policies for users on domain level
Easily add bulk users to domains by using „Bulk Add‟ option, thus, getting freedom from manual work involved in adding each user one by one
Send automated Alert/Warning/notice messages without admin‟s intervention, thereby, reducing admin‟s manual work
Easily manage domain as well individual settings from admin panel
Easily get audit details for each user through admin panel
Easily create multiple reports as and when required
3. XGenPlus Server Administration – Functional Description
Administration section of XGEN is most important part of the system. Through this system administrator can control the application. Administrator can perform following tasks using Administration Section-
View Mail Server Details
Manage Domain and Accounts
o Add Domain
o Manage Groups
o Search
o Generate Alerts through Shout Box
o Add Resource
o Add Resource Type
XGen Plus Server Administration Guide
Page 4
o Alerts/Notice
Manage System Services
View the Status of Server & Domain statistics and antivirus mails logs
Reports
Spamjadoo Settings
Fax Settings
A user with server administrative rights can see an Admin Button on the top right side of the main window. There is an Admin button in the right side of the tool bar (Below figure).
Fig. 1 XGen Plus - Admin Button
Server administrator can view XgenPlus Mail Server overview page. The overview page shows the following details: 1. Domain Name-- It shows the name of the domain.
2. Access-- It shows whether the users of that particular domain have full access or restricted access.
a. Full - users with full access will be able to send as well as receive emails in their mailbox. b. Restricted - users with restricted access can only view the mails in their mailbox. They will not have
permissions to send the emails.
3. User- It shows total number of active users & total number of users registered on the particular domain.
4. Space (MB) -- It shows the utilized space & total space allotted (in MB) to the domain. 5. SMS Allotted-- It shows the number of utilized SMSs & total number of SMSs allotted to the domain. 6. Organization Name- It shows the name of the organization of that particular domain. 7. Status-- It shows whether the particular domain is active or deactivated currently.
a. Active - users of active domain will be able to send as well as receive emails in their mailbox. b. De Active - users of de-activated domain will not be able to login to their mailbox. The domain will
stop receiving emails and no user will be allowed to use web/pop/imap/mobile or smtp.
8. Expiry Date-- It shows the expiry date of domain. Below is the screen shot for the same.

XGen Plus Server Administration Guide
Page 5
Fig. 2 XGen Plus -XGen Mail Server
Please note that Server admin can also start and stop the system services of the Xgen mail sever forcefully. Also, Server administrator has all the rights of Domain Administrator as well.
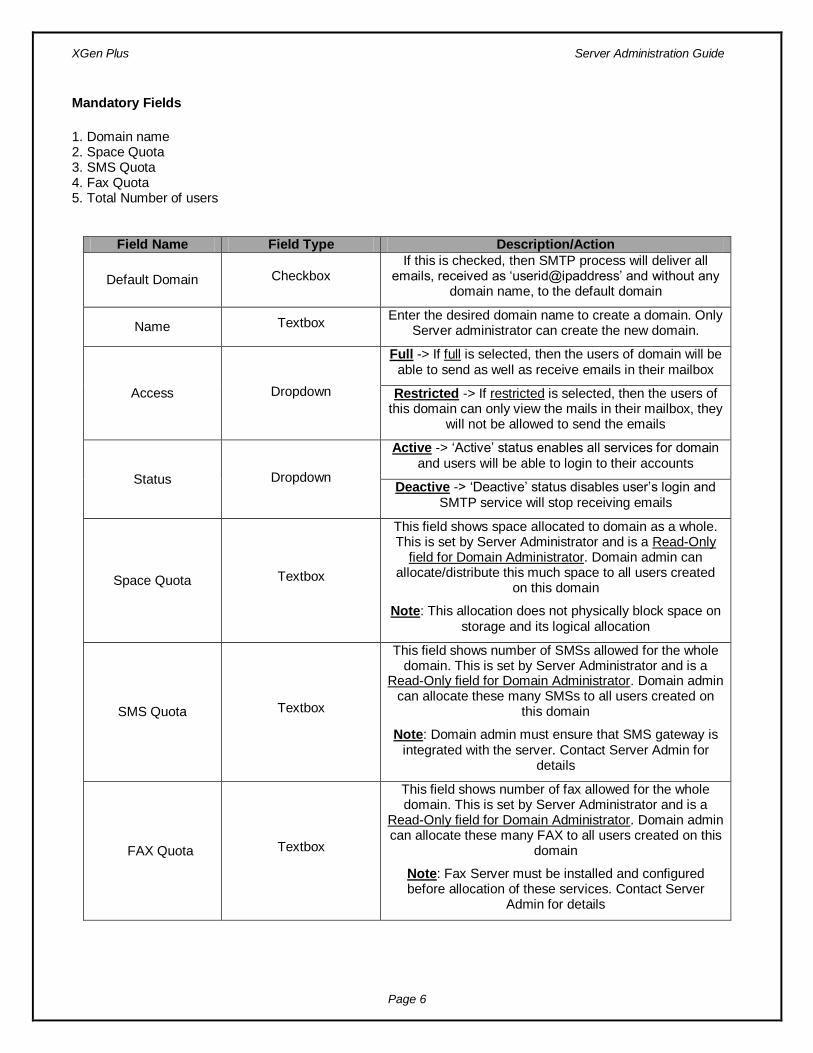
3.1 Domain and Accounts
3.1.1 Add Domain
This page allows server admin to create a new domain on the server and set the settings for it. To create a new domain, administrator needs to fill mandatory fields on Domain Creation page and then click on ‟Save’ button. The contents of the Domain Creation page are described below.
Fig. 3 XGen Plus - Create a New Domain
XGen Plus Server Administration Guide
Page 6
Mandatory Fields
1. Domain name 2. Space Quota 3. SMS Quota 4. Fax Quota 5. Total Number of users
Field Name Field Type Description/Action
Default Domain Checkbox If this is checked, then SMTP process will deliver all
emails, received as „userid@ipaddress‟ and without any domain name, to the default domain
Name Textbox Enter the desired domain name to create a domain. Only
Server administrator can create the new domain.
Access Dropdown
Full -> If full is selected, then the users of domain will be able to send as well as receive emails in their mailbox
Restricted -> If restricted is selected, then the users of this domain can only view the mails in their mailbox, they
will not be allowed to send the emails
Status Dropdown
Active -> „Active‟ status enables all services for domain and users will be able to login to their accounts
Deactive -> „Deactive‟ status disables user‟s login and SMTP service will stop receiving emails
Space Quota Textbox
This field shows space allocated to domain as a whole. This is set by Server Administrator and is a Read-Only
field for Domain Administrator. Domain admin can allocate/distribute this much space to all users created
on this domain
Note: This allocation does not physically block space on storage and its logical allocation
SMS Quota Textbox
This field shows number of SMSs allowed for the whole domain. This is set by Server Administrator and is a
Read-Only field for Domain Administrator. Domain admin can allocate these many SMSs to all users created on
this domain
Note: Domain admin must ensure that SMS gateway is integrated with the server. Contact Server Admin for
details
FAX Quota Textbox
This field shows number of fax allowed for the whole domain. This is set by Server Administrator and is a
Read-Only field for Domain Administrator. Domain admin can allocate these many FAX to all users created on this
domain
Note: Fax Server must be installed and configured before allocation of these services. Contact Server
Admin for details

XGen Plus Server Administration Guide
Page 7
Field Name Field Type Description/Action
Allowed Host IP Range
Textbox
This field allows you to set the host of IP ranges for your domain. Once set, users of this domain can login ONLY
from allowed IP ranges.
Note: This IP range is in IP v4 and server admin can enable it for IP v6 as well.
Total Number of users
Textbox
This field shows number of users allowed for the whole domain. This is set by Server Administrator and is a
Read-Only field for Domain Administrator. Domain admin can create these many users on this domain
Enable Assignment Module
Checkbox
If this is checked, all users of the domain will be able to access Patent Pending „AIR‟ (Automated Inward
Routing) module through their mailbox. For more details about AIR, please visit www.xgen.in
Note: Excellent module for managing Customer Care, Support and BPO
Enable Data Security
Checkbox
If this is checked, all received & sent emails for this domain will be encrypted before being stored into database, thus, making it impossible to be read by
anyone else
Note: This encryption takes away 33% of the space allocated for each email. E.g. Assume that normally you are allowed to send 10MB mail. But after encryption, you will be able to send only 6.7 MB mail. Rest 3.3 MB space will be taken for encryption. Highly Recommended for
Security Agencies, Banks, Govt. Organisations
Save Button Saves the settings
Reset Button Re-Loads existing settings
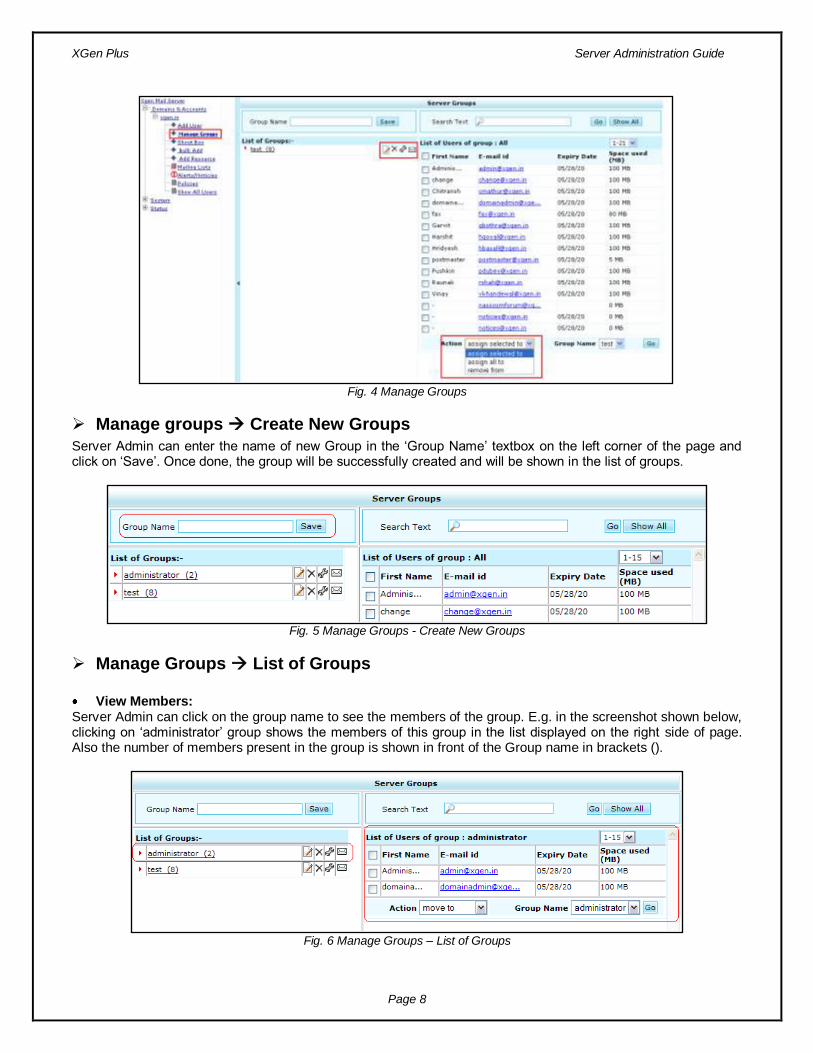
3.1.2 Manage Groups
Click on „Manage Groups‟ link in domain sub-menu on the left menu bar. This will take you to the page where you can manage the groups for the domain and add/remove users from different groups. Server Admin can perform following tasks from „Manage Groups‟ page:
Create New Groups
Modify existing groups
Assign/remove users from different groups
XGen Plus Server Administration Guide
Page 8
Fig. 4 Manage Groups
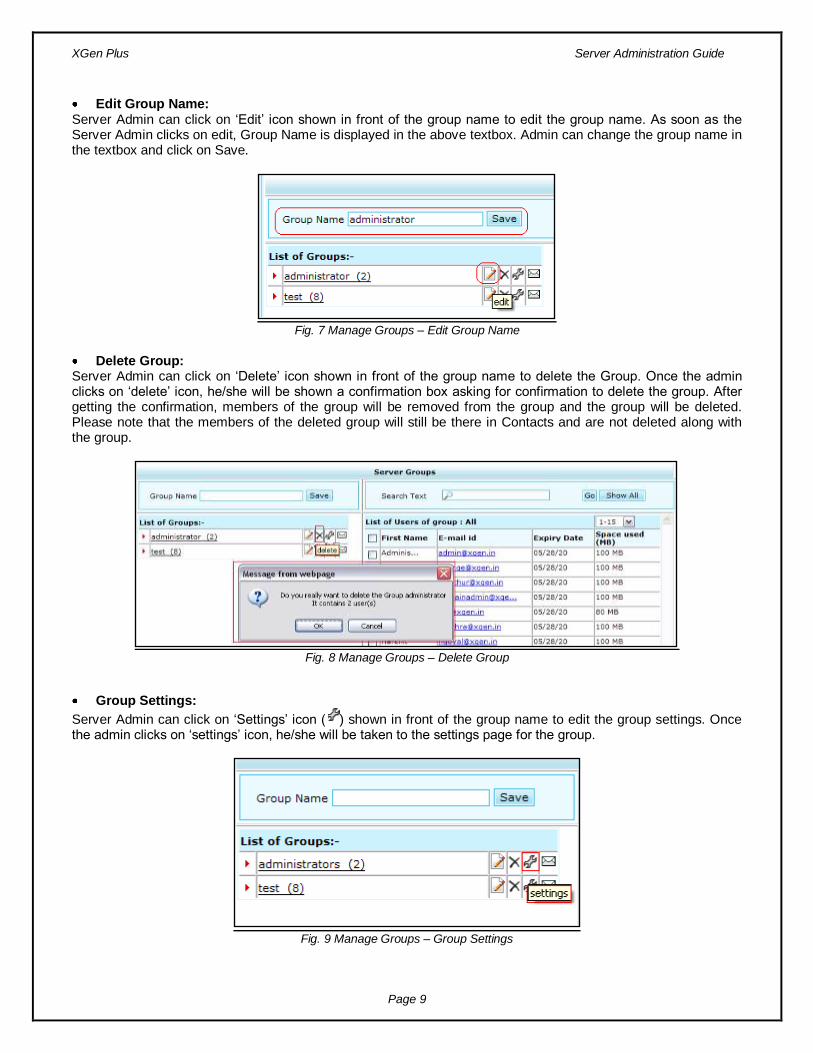
Manage groups Create New Groups
Server Admin can enter the name of new Group in the „Group Name‟ textbox on the left corner of the page and click on „Save‟. Once done, the group will be successfully created and will be shown in the list of groups.
Fig. 5 Manage Groups - Create New Groups
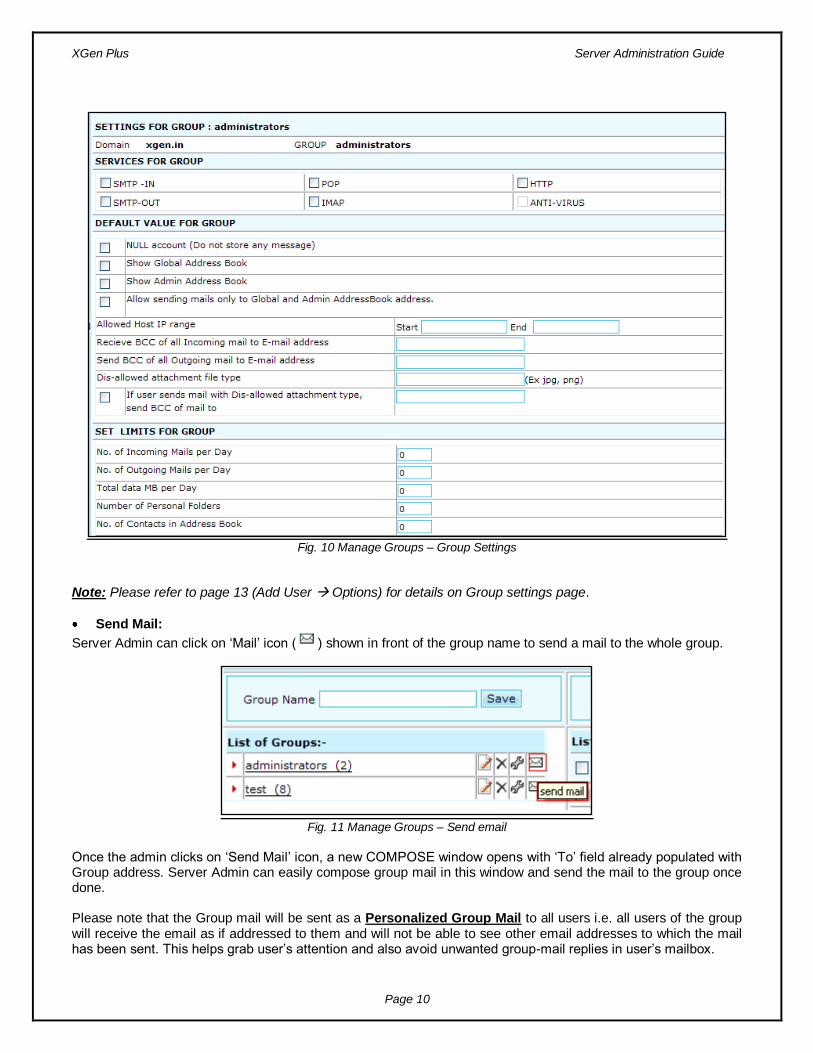
Manage Groups List of Groups
View Members: Server Admin can click on the group name to see the members of the group. E.g. in the screenshot shown below, clicking on „administrator‟ group shows the members of this group in the list displayed on the right side of page. Also the number of members present in the group is shown in front of the Group name in brackets ().
Fig. 6 Manage Groups – List of Groups
XGen Plus Server Administration Guide
Page 9
Edit Group Name: Server Admin can click on „Edit‟ icon shown in front of the group name to edit the group name. As soon as the Server Admin clicks on edit, Group Name is displayed in the above textbox. Admin can change the group name in the textbox and click on Save.
Fig. 7 Manage Groups – Edit Group Name
Delete Group: Server Admin can click on „Delete‟ icon shown in front of the group name to delete the Group. Once the admin clicks on „delete‟ icon, he/she will be shown a confirmation box asking for confirmation to delete the group. After getting the confirmation, members of the group will be removed from the group and the group will be deleted. Please note that the members of the deleted group will still be there in Contacts and are not deleted along with the group.
Fig. 8 Manage Groups – Delete Group
Group Settings:
Server Admin can click on „Settings‟ icon ( ) shown in front of the group name to edit the group settings. Once the admin clicks on „settings‟ icon, he/she will be taken to the settings page for the group.
Fig. 9 Manage Groups – Group Settings
XGen Plus Server Administration Guide
Page 10
Fig. 10 Manage Groups – Group Settings
Note: Please refer to page 13 (Add User Options) for details on Group settings page.
Send Mail:
Server Admin can click on „Mail‟ icon ( ) shown in front of the group name to send a mail to the whole group.
Fig. 11 Manage Groups – Send email
Once the admin clicks on „Send Mail‟ icon, a new COMPOSE window opens with „To‟ field already populated with Group address. Server Admin can easily compose group mail in this window and send the mail to the group once done. Please note that the Group mail will be sent as a Personalized Group Mail to all users i.e. all users of the group will receive the email as if addressed to them and will not be able to see other email addresses to which the mail has been sent. This helps grab user‟s attention and also avoid unwanted group-mail replies in user‟s mailbox.

XGen Plus Server Administration Guide
Page 11
Fig. 12 Group Mail – Send Personalized Group Mails
Manage Groups Users
The panel on the right side of „Manage Groups‟ page shows all the users listed in the domain. E.g. the screenshot below shows al the users of domain „xgen.in‟ listed on the right panel of the page. Server Admin can carry out following tasks to manage the users:
Search for user
Move Users to groups a) Move selected users to a selected group b) Move ALL users to a selected group c) Move users from one Group to another d) Copy users from one Group to another
Remove users from Groups
Fig. 13 Manage Groups - Users

XGen Plus Server Administration Guide
Page 12
Search for User:
Server Admin can search for any user by entering his/her name in the „Search text‟ textbox and then clicking on „Go‟ button.
Fig. 14 Manage Groups – Users - Search Users
Clicking on „Show All‟ button will clear the search result and show the list of all users as shown in the screenshot below.
Fig. 15 Manage Groups - Users – Show All Users
XGen Plus Server Administration Guide
Page 13
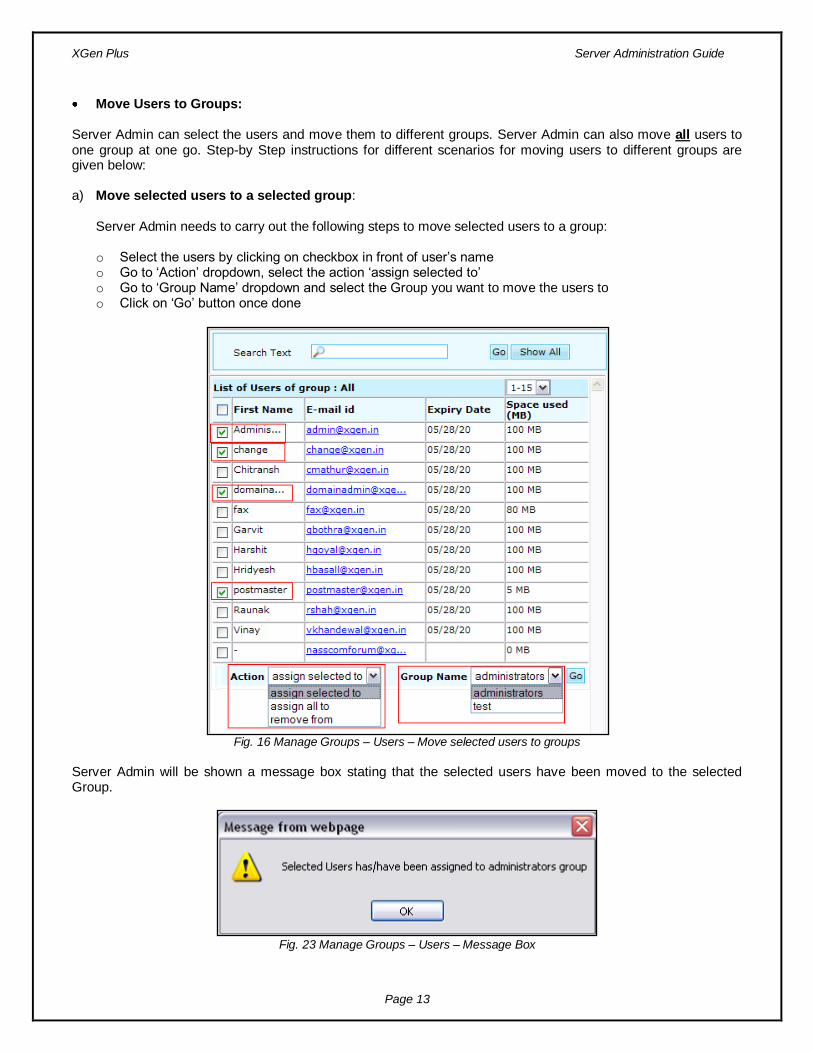
Move Users to Groups:
Server Admin can select the users and move them to different groups. Server Admin can also move all users to one group at one go. Step-by Step instructions for different scenarios for moving users to different groups are given below: a) Move selected users to a selected group:
Server Admin needs to carry out the following steps to move selected users to a group: o Select the users by clicking on checkbox in front of user‟s name o Go to „Action‟ dropdown, select the action „assign selected to‟ o Go to „Group Name‟ dropdown and select the Group you want to move the users to o Click on „Go‟ button once done
Fig. 16 Manage Groups – Users – Move selected users to groups
Server Admin will be shown a message box stating that the selected users have been moved to the selected Group.
Fig. 23 Manage Groups – Users – Message Box
XGen Plus Server Administration Guide
Page 14
The confirmation can also be obtained by checking the number of users in brackets in front of the Group in list of groups.
Fig. 17 Manage Groups – Users – confirmation after moving users to group
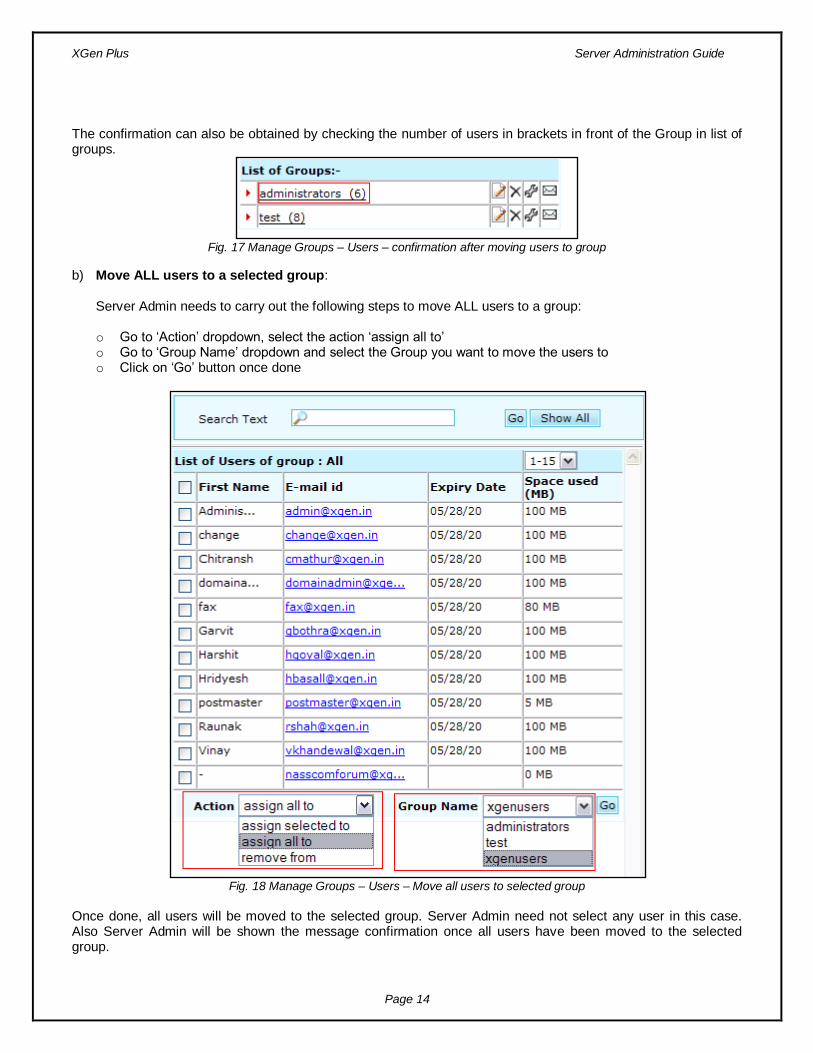
b) Move ALL users to a selected group: Server Admin needs to carry out the following steps to move ALL users to a group: o Go to „Action‟ dropdown, select the action „assign all to‟ o Go to „Group Name‟ dropdown and select the Group you want to move the users to o Click on „Go‟ button once done
Fig. 18 Manage Groups – Users – Move all users to selected group
Once done, all users will be moved to the selected group. Server Admin need not select any user in this case. Also Server Admin will be shown the message confirmation once all users have been moved to the selected group.
XGen Plus Server Administration Guide
Page 15
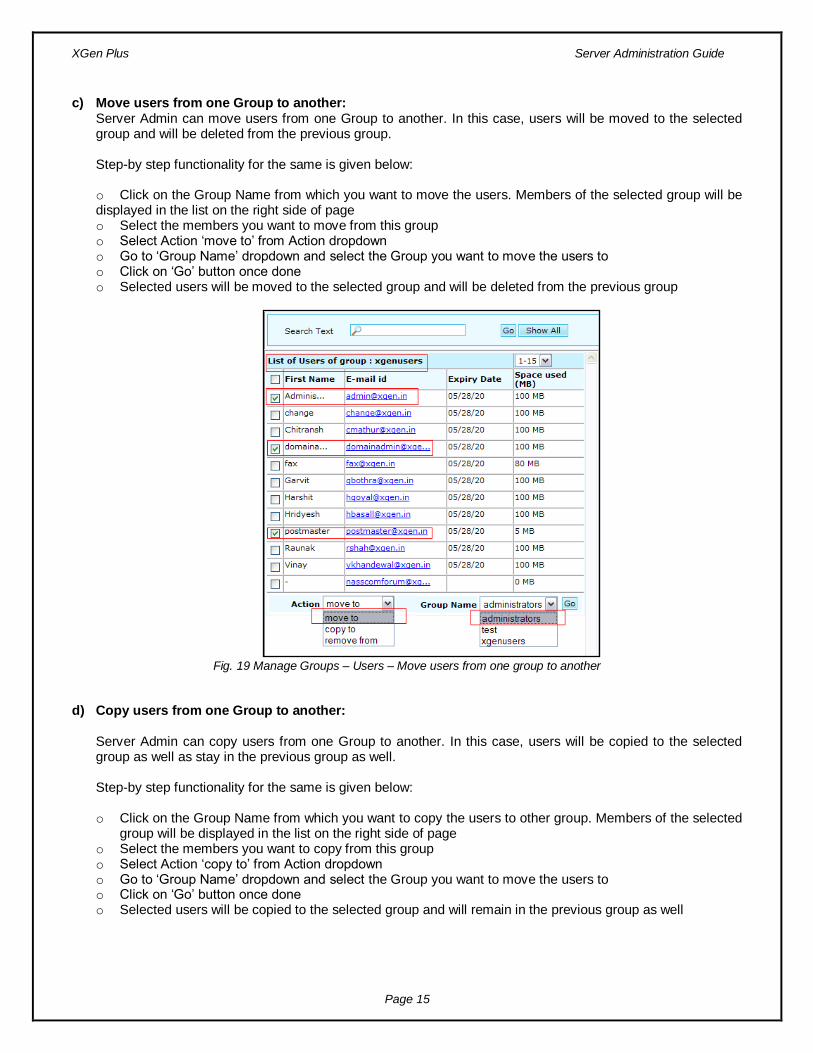
c) Move users from one Group to another: Server Admin can move users from one Group to another. In this case, users will be moved to the selected group and will be deleted from the previous group. Step-by step functionality for the same is given below: o Click on the Group Name from which you want to move the users. Members of the selected group will be displayed in the list on the right side of page o Select the members you want to move from this group o Select Action „move to‟ from Action dropdown o Go to „Group Name‟ dropdown and select the Group you want to move the users to o Click on „Go‟ button once done o Selected users will be moved to the selected group and will be deleted from the previous group
Fig. 19 Manage Groups – Users – Move users from one group to another
d) Copy users from one Group to another: Server Admin can copy users from one Group to another. In this case, users will be copied to the selected group as well as stay in the previous group as well. Step-by step functionality for the same is given below:
o Click on the Group Name from which you want to copy the users to other group. Members of the selected
group will be displayed in the list on the right side of page o Select the members you want to copy from this group o Select Action „copy to‟ from Action dropdown o Go to „Group Name‟ dropdown and select the Group you want to move the users to o Click on „Go‟ button once done o Selected users will be copied to the selected group and will remain in the previous group as well
XGen Plus Server Administration Guide
Page 16
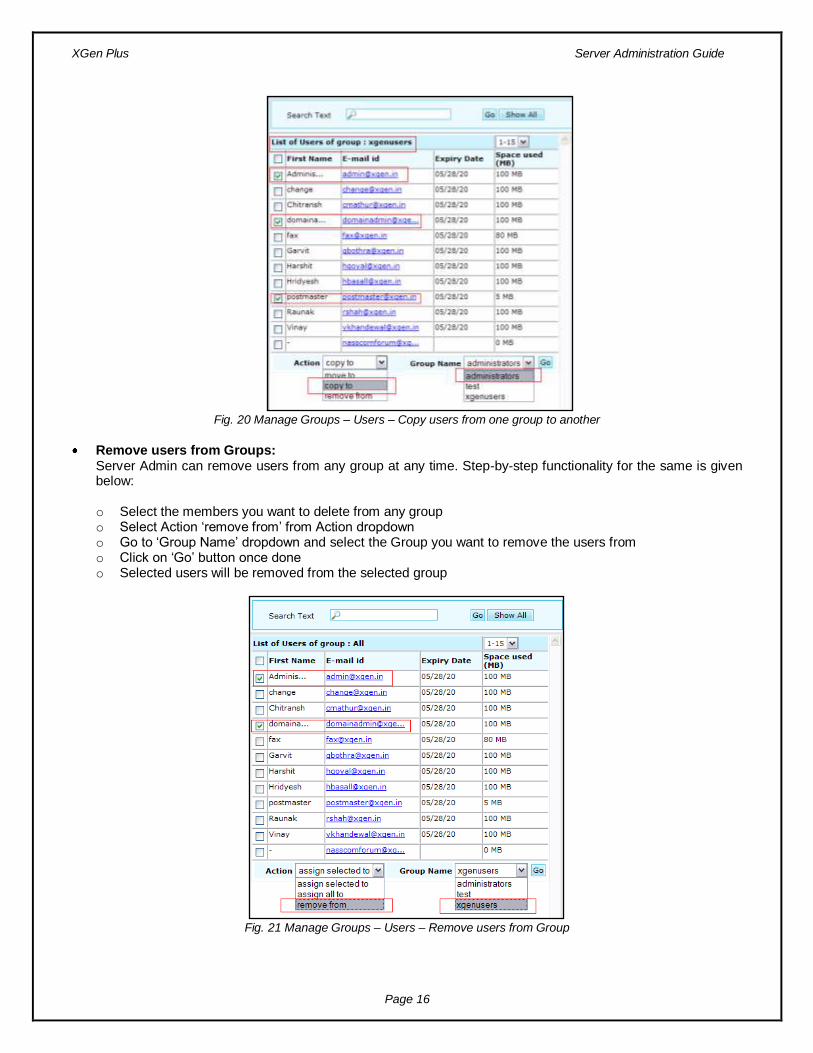
Fig. 20 Manage Groups – Users – Copy users from one group to another
Remove users from Groups: Server Admin can remove users from any group at any time. Step-by-step functionality for the same is given below:
o Select the members you want to delete from any group o Select Action „remove from‟ from Action dropdown o Go to „Group Name‟ dropdown and select the Group you want to remove the users from o Click on „Go‟ button once done o Selected users will be removed from the selected group
Fig. 21 Manage Groups – Users – Remove users from Group
XGen Plus Server Administration Guide
Page 17
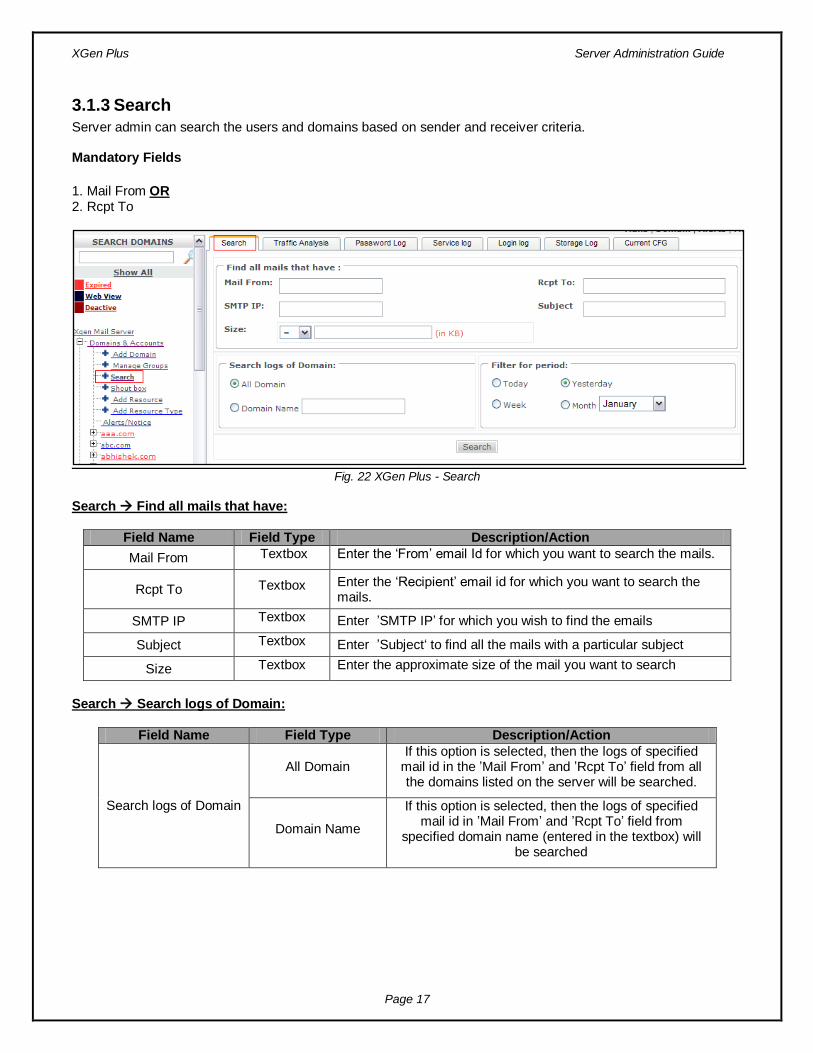
3.1.3 Search
Server admin can search the users and domains based on sender and receiver criteria. Mandatory Fields
1. Mail From OR 2. Rcpt To
Fig. 22 XGen Plus - Search
Search Find all mails that have:
Field Name Field Type Description/Action
Mail From Textbox Enter the „From‟ email Id for which you want to search the mails.
Rcpt To Textbox Enter the „Recipient‟ email id for which you want to search the mails.
SMTP IP Textbox Enter ‟SMTP IP‟ for which you wish to find the emails
Subject Textbox Enter ‟Subject„ to find all the mails with a particular subject
Size Textbox Enter the approximate size of the mail you want to search
Search Search logs of Domain:
Field Name Field Type Description/Action
Search logs of Domain
All Domain If this option is selected, then the logs of specified
mail id in the ‟Mail From‟ and ‟Rcpt To‟ field from all the domains listed on the server will be searched.
Domain Name
If this option is selected, then the logs of specified mail id in ‟Mail From‟ and ‟Rcpt To‟ field from
specified domain name (entered in the textbox) will be searched
XGen Plus Server Administration Guide
Page 18
Search Filter for period:
Field Name Field Type Description/Action
Filter for period
Today if this option is selected, then search will be carried out for today‟s
emails only
Yesterday if this option is selected, then search will be carried out for
yesterday‟s emails only
Week if this option is selected, then search will be carried out for current
week‟s emails only
Month if this option is selected, then search will be carried out for
specified month‟s emails only
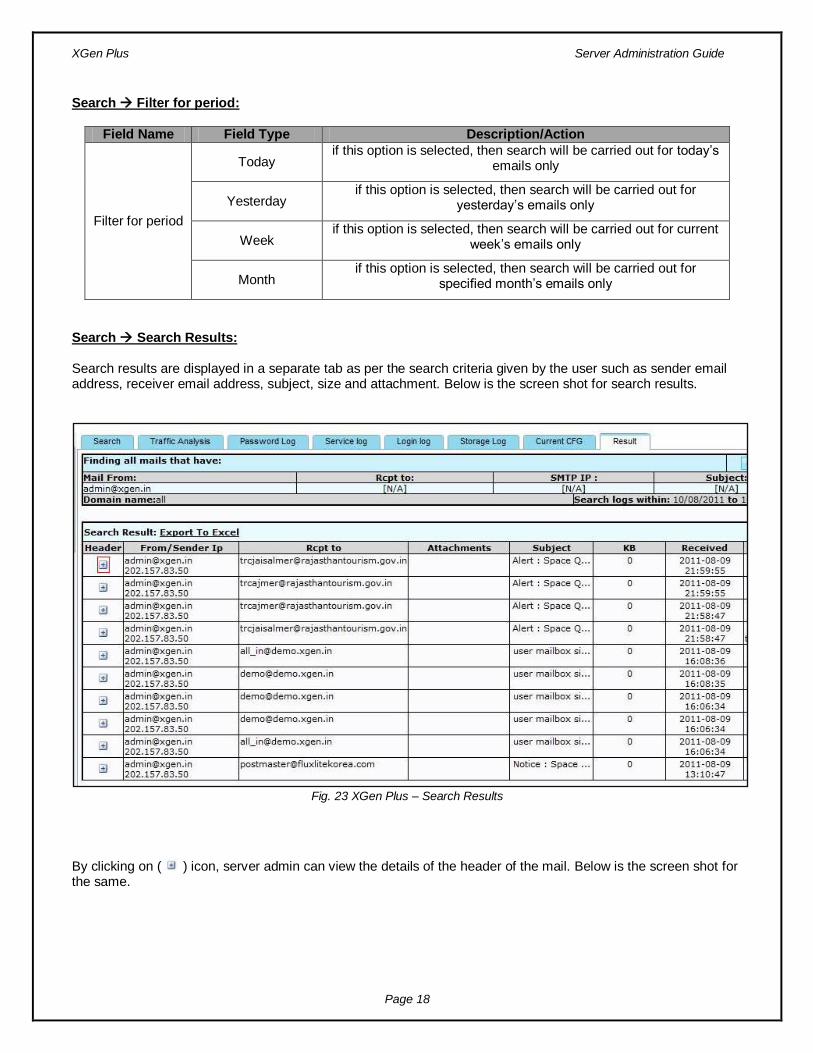
Search Search Results: Search results are displayed in a separate tab as per the search criteria given by the user such as sender email address, receiver email address, subject, size and attachment. Below is the screen shot for search results.
Fig. 23 XGen Plus – Search Results
By clicking on ( ) icon, server admin can view the details of the header of the mail. Below is the screen shot for the same.
XGen Plus Server Administration Guide
Page 19
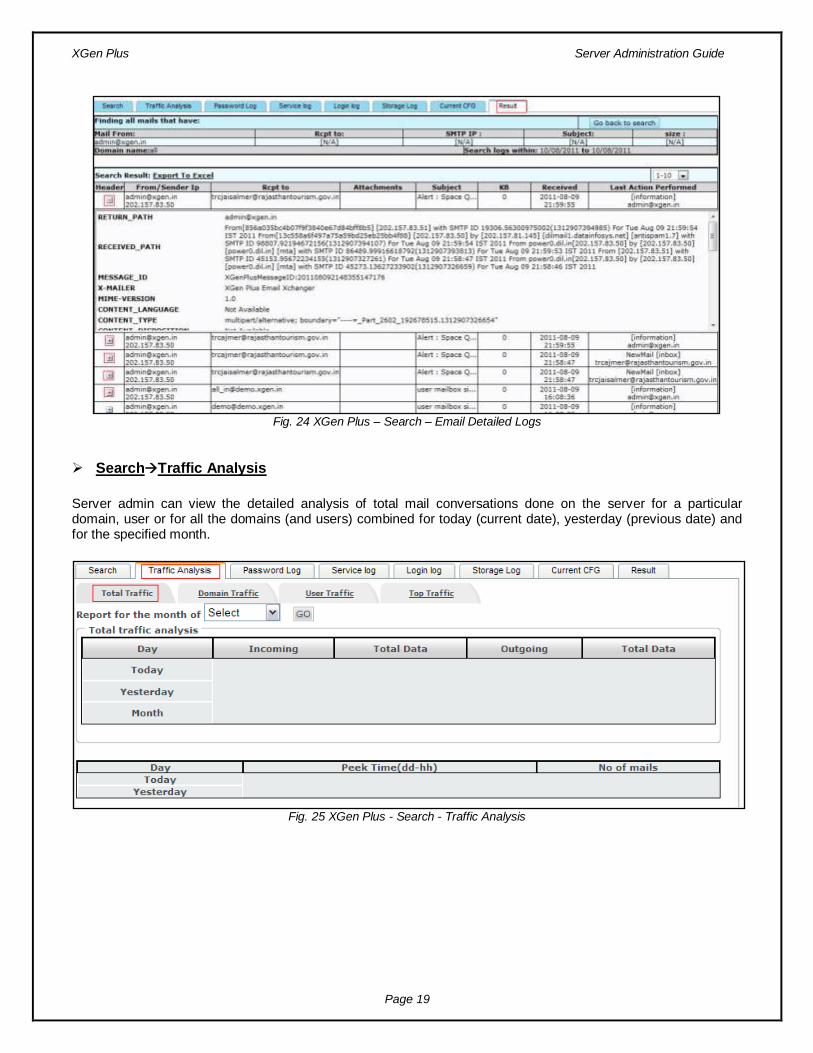
Fig. 24 XGen Plus – Search – Email Detailed Logs
SearchTraffic Analysis
Server admin can view the detailed analysis of total mail conversations done on the server for a particular domain, user or for all the domains (and users) combined for today (current date), yesterday (previous date) and for the specified month.
Fig. 25 XGen Plus - Search - Traffic Analysis
XGen Plus Server Administration Guide
Page 20
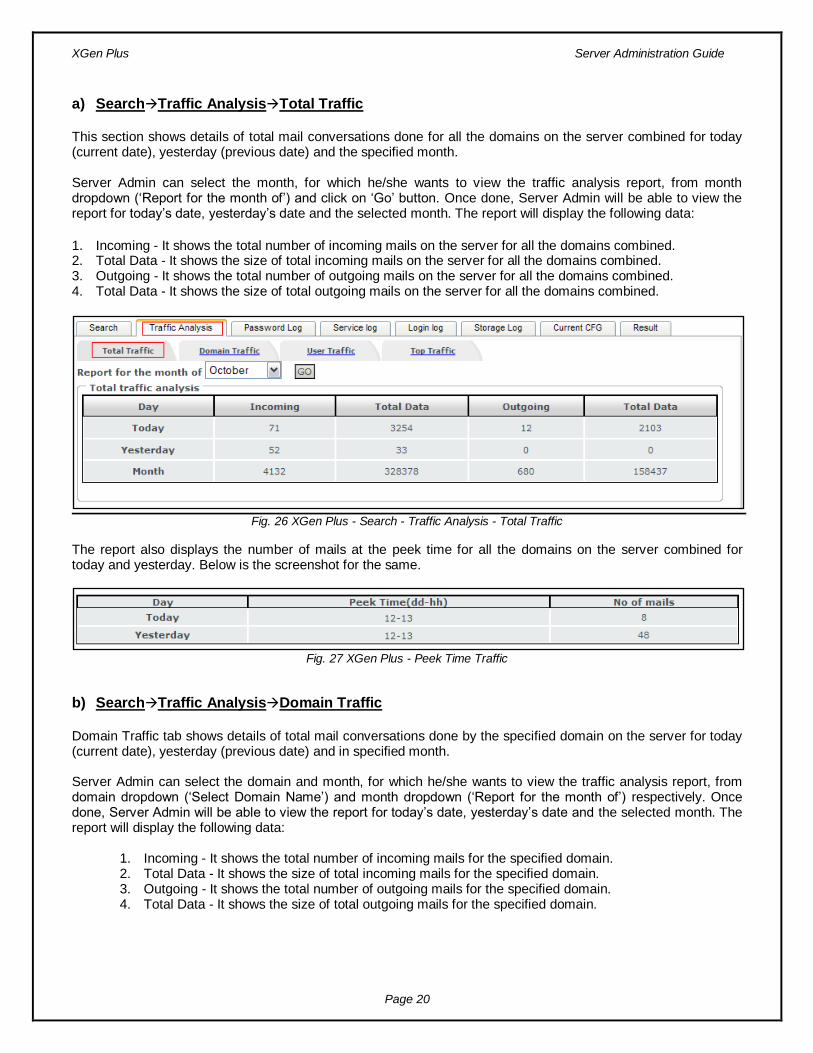
a) SearchTraffic AnalysisTotal Traffic
This section shows details of total mail conversations done for all the domains on the server combined for today (current date), yesterday (previous date) and the specified month. Server Admin can select the month, for which he/she wants to view the traffic analysis report, from month dropdown („Report for the month of‟) and click on „Go‟ button. Once done, Server Admin will be able to view the report for today‟s date, yesterday‟s date and the selected month. The report will display the following data:
1. Incoming - It shows the total number of incoming mails on the server for all the domains combined. 2. Total Data - It shows the size of total incoming mails on the server for all the domains combined. 3. Outgoing - It shows the total number of outgoing mails on the server for all the domains combined. 4. Total Data - It shows the size of total outgoing mails on the server for all the domains combined.
Fig. 26 XGen Plus - Search - Traffic Analysis - Total Traffic
The report also displays the number of mails at the peek time for all the domains on the server combined for today and yesterday. Below is the screenshot for the same.
Fig. 27 XGen Plus - Peek Time Traffic
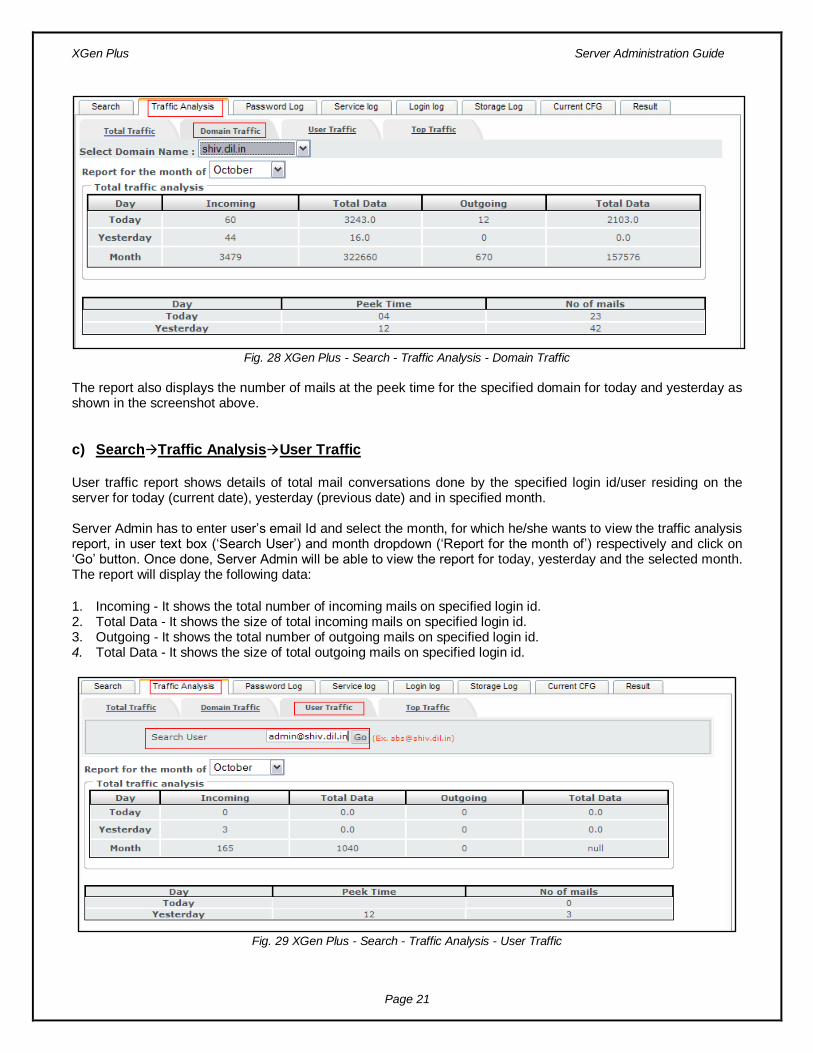
b) SearchTraffic AnalysisDomain Traffic
Domain Traffic tab shows details of total mail conversations done by the specified domain on the server for today (current date), yesterday (previous date) and in specified month. Server Admin can select the domain and month, for which he/she wants to view the traffic analysis report, from domain dropdown („Select Domain Name‟) and month dropdown („Report for the month of‟) respectively. Once done, Server Admin will be able to view the report for today‟s date, yesterday‟s date and the selected month. The report will display the following data:
1. Incoming - It shows the total number of incoming mails for the specified domain. 2. Total Data - It shows the size of total incoming mails for the specified domain. 3. Outgoing - It shows the total number of outgoing mails for the specified domain. 4. Total Data - It shows the size of total outgoing mails for the specified domain.
XGen Plus Server Administration Guide
Page 21
Fig. 28 XGen Plus - Search - Traffic Analysis - Domain Traffic
The report also displays the number of mails at the peek time for the specified domain for today and yesterday as shown in the screenshot above.
c) SearchTraffic AnalysisUser Traffic User traffic report shows details of total mail conversations done by the specified login id/user residing on the server for today (current date), yesterday (previous date) and in specified month. Server Admin has to enter user‟s email Id and select the month, for which he/she wants to view the traffic analysis report, in user text box („Search User‟) and month dropdown („Report for the month of‟) respectively and click on „Go‟ button. Once done, Server Admin will be able to view the report for today, yesterday and the selected month. The report will display the following data:
1. Incoming - It shows the total number of incoming mails on specified login id. 2. Total Data - It shows the size of total incoming mails on specified login id. 3. Outgoing - It shows the total number of outgoing mails on specified login id. 4. Total Data - It shows the size of total outgoing mails on specified login id.
Fig. 29 XGen Plus - Search - Traffic Analysis - User Traffic
XGen Plus Server Administration Guide
Page 22
This report also displays the number of mails at the peek time for specified login id for today and tomorrow. Below is the screenshot for the same.
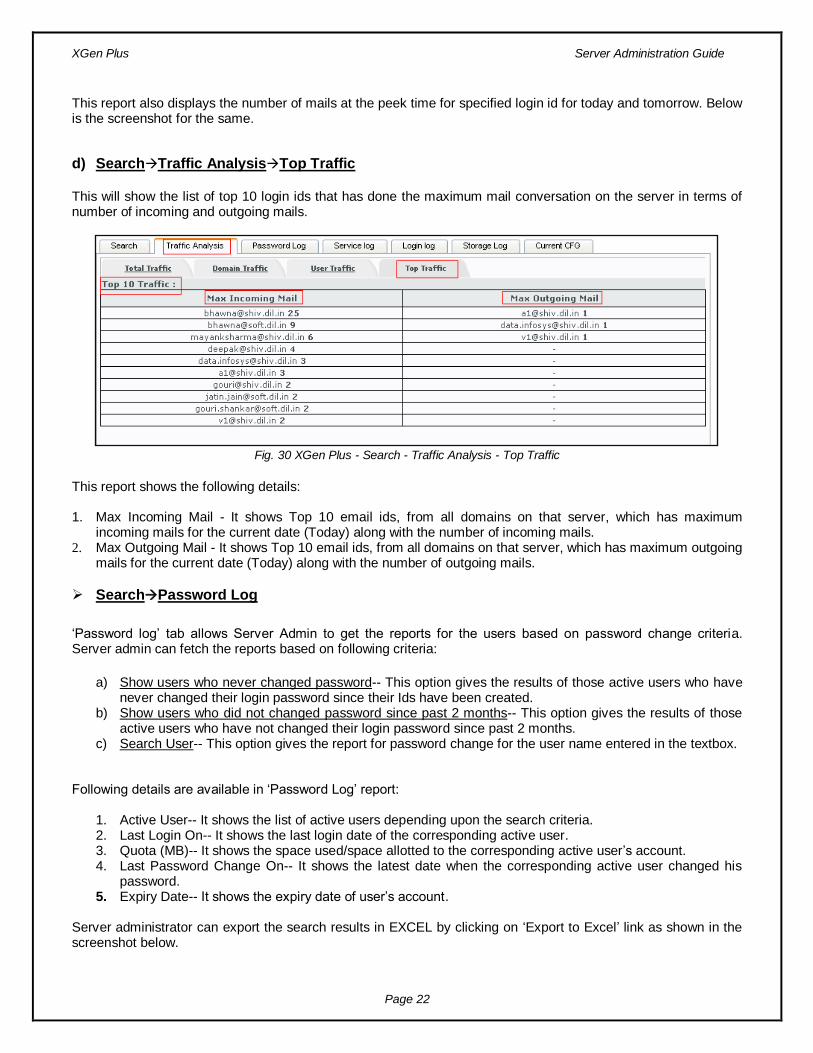
d) SearchTraffic AnalysisTop Traffic
This will show the list of top 10 login ids that has done the maximum mail conversation on the server in terms of number of incoming and outgoing mails.
Fig. 30 XGen Plus - Search - Traffic Analysis - Top Traffic
This report shows the following details: 1. Max Incoming Mail - It shows Top 10 email ids, from all domains on that server, which has maximum
incoming mails for the current date (Today) along with the number of incoming mails. 2. Max Outgoing Mail - It shows Top 10 email ids, from all domains on that server, which has maximum outgoing
mails for the current date (Today) along with the number of outgoing mails.
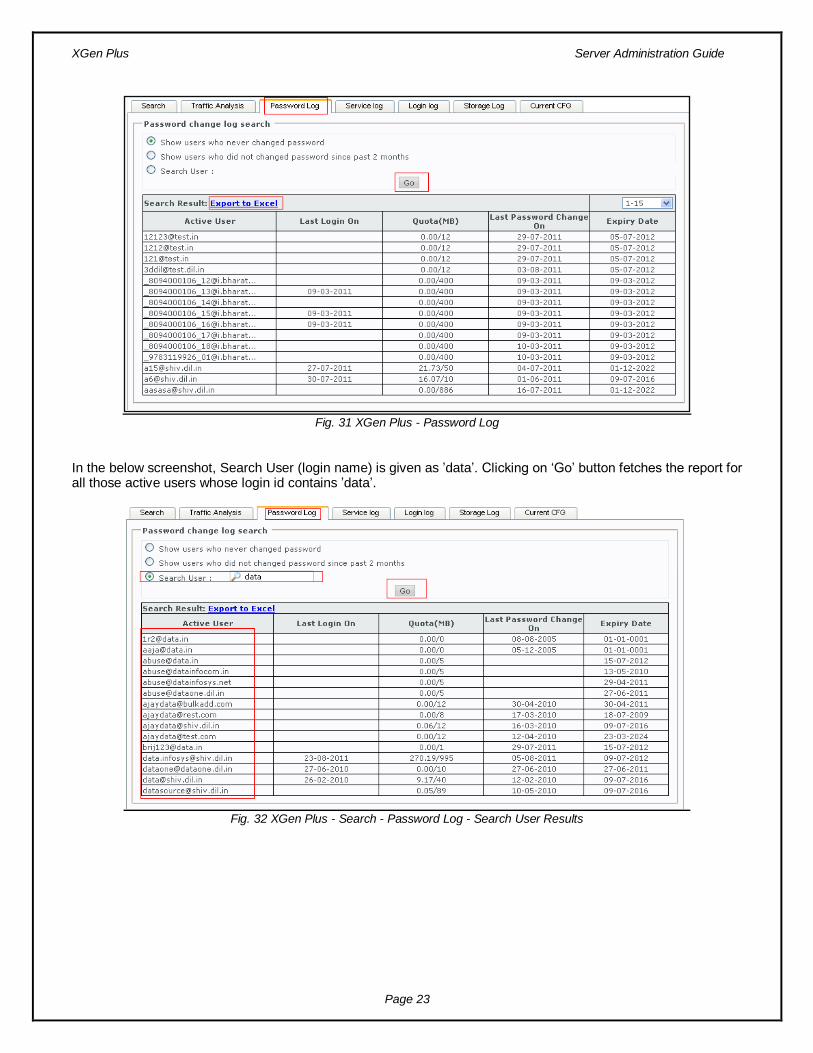
SearchPassword Log
„Password log‟ tab allows Server Admin to get the reports for the users based on password change criteria. Server admin can fetch the reports based on following criteria:
a) Show users who never changed password-- This option gives the results of those active users who have
never changed their login password since their Ids have been created. b) Show users who did not changed password since past 2 months-- This option gives the results of those
active users who have not changed their login password since past 2 months. c) Search User-- This option gives the report for password change for the user name entered in the textbox.
Following details are available in „Password Log‟ report:
1. Active User-- It shows the list of active users depending upon the search criteria. 2. Last Login On-- It shows the last login date of the corresponding active user. 3. Quota (MB)-- It shows the space used/space allotted to the corresponding active user‟s account. 4. Last Password Change On-- It shows the latest date when the corresponding active user changed his
password. 5. Expiry Date-- It shows the expiry date of user‟s account.
Server administrator can export the search results in EXCEL by clicking on „Export to Excel‟ link as shown in the screenshot below.
XGen Plus Server Administration Guide
Page 23
Fig. 31 XGen Plus - Password Log
In the below screenshot, Search User (login name) is given as ‟data‟. Clicking on „Go‟ button fetches the report for all those active users whose login id contains ‟data‟.
Fig. 32 XGen Plus - Search - Password Log - Search User Results
XGen Plus Server Administration Guide
Page 24
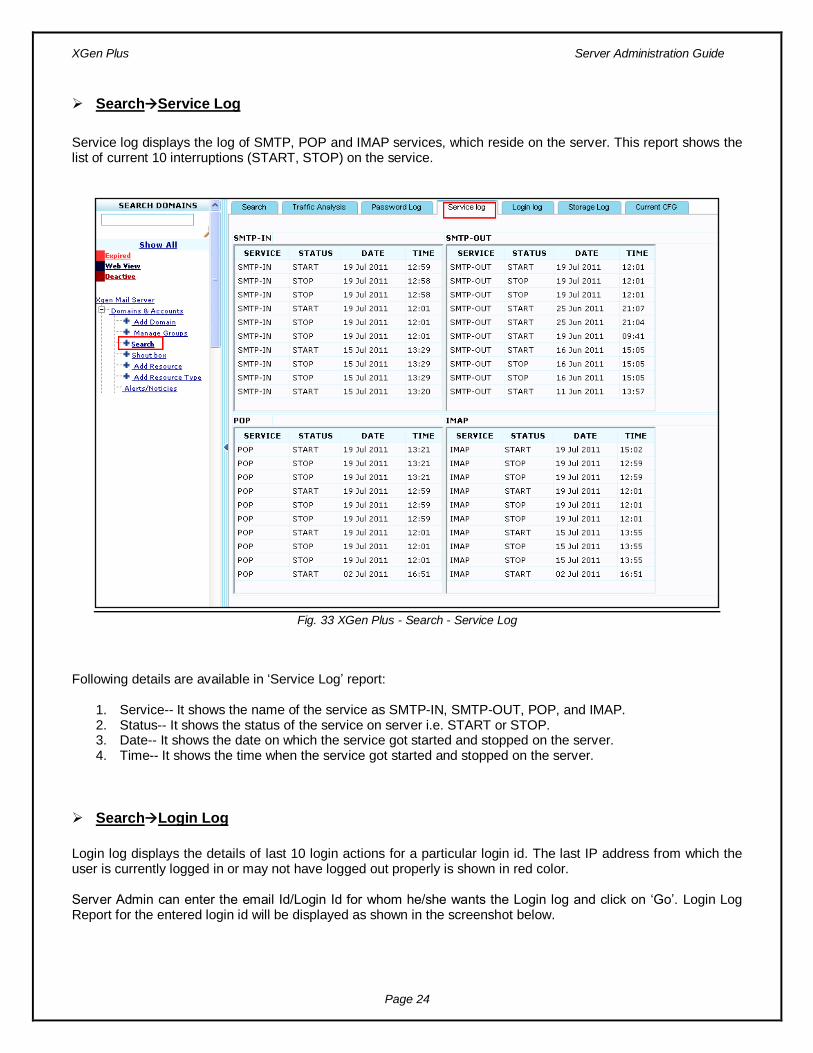
SearchService Log
Service log displays the log of SMTP, POP and IMAP services, which reside on the server. This report shows the list of current 10 interruptions (START, STOP) on the service.
Fig. 33 XGen Plus - Search - Service Log
Following details are available in „Service Log‟ report:
1. Service-- It shows the name of the service as SMTP-IN, SMTP-OUT, POP, and IMAP. 2. Status-- It shows the status of the service on server i.e. START or STOP. 3. Date-- It shows the date on which the service got started and stopped on the server. 4. Time-- It shows the time when the service got started and stopped on the server.
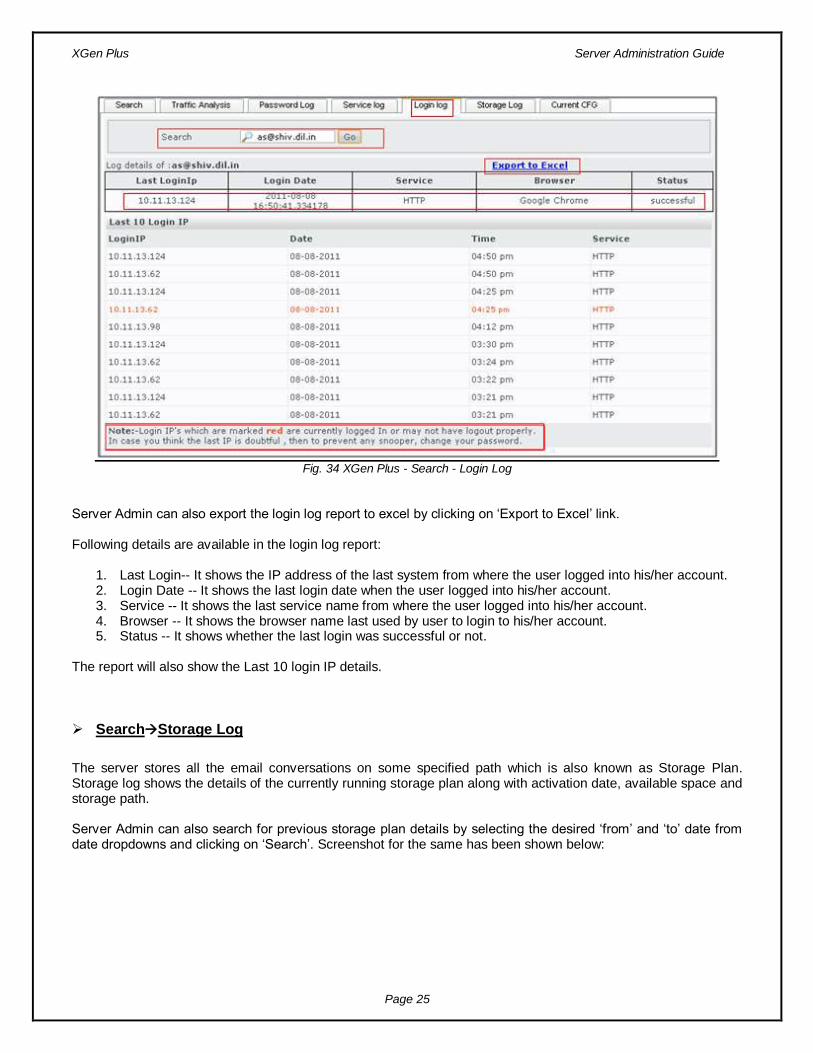
SearchLogin Log
Login log displays the details of last 10 login actions for a particular login id. The last IP address from which the user is currently logged in or may not have logged out properly is shown in red color. Server Admin can enter the email Id/Login Id for whom he/she wants the Login log and click on „Go‟. Login Log Report for the entered login id will be displayed as shown in the screenshot below.
XGen Plus Server Administration Guide
Page 25
Fig. 34 XGen Plus - Search - Login Log
Server Admin can also export the login log report to excel by clicking on „Export to Excel‟ link. Following details are available in the login log report:
1. Last Login-- It shows the IP address of the last system from where the user logged into his/her account. 2. Login Date -- It shows the last login date when the user logged into his/her account. 3. Service -- It shows the last service name from where the user logged into his/her account. 4. Browser -- It shows the browser name last used by user to login to his/her account. 5. Status -- It shows whether the last login was successful or not.
The report will also show the Last 10 login IP details.
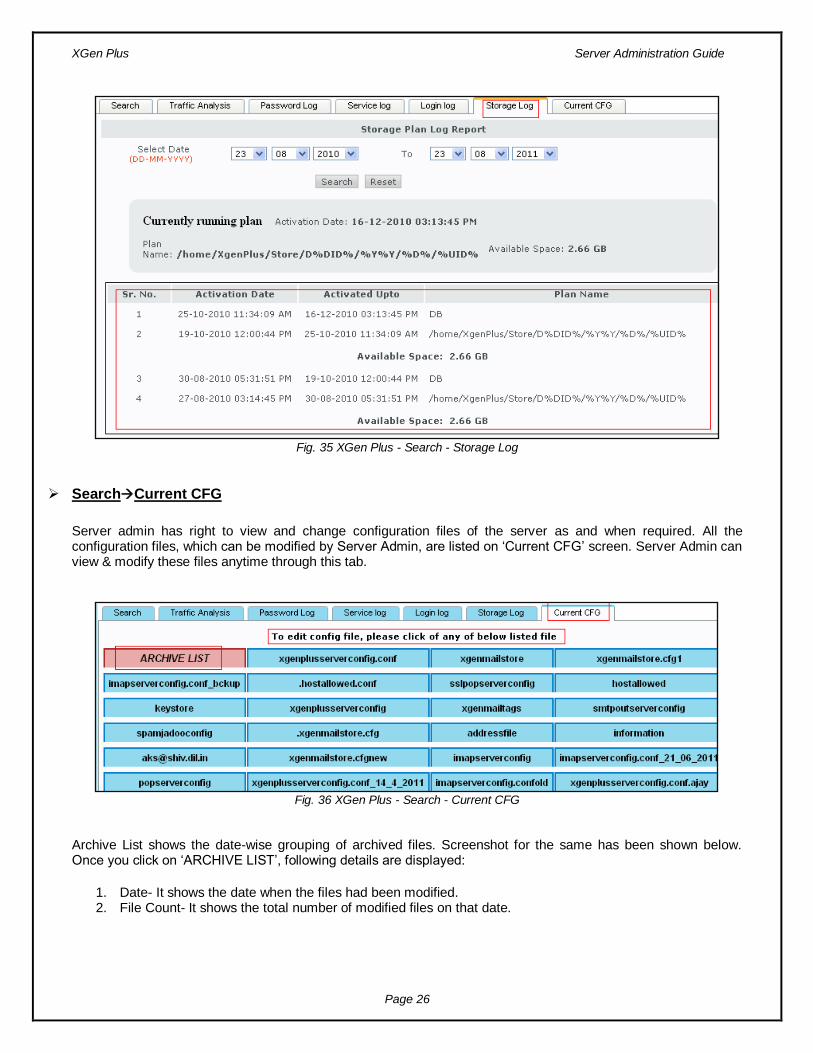
SearchStorage Log
The server stores all the email conversations on some specified path which is also known as Storage Plan. Storage log shows the details of the currently running storage plan along with activation date, available space and storage path. Server Admin can also search for previous storage plan details by selecting the desired „from‟ and „to‟ date from date dropdowns and clicking on „Search‟. Screenshot for the same has been shown below:
XGen Plus Server Administration Guide
Page 26
Fig. 35 XGen Plus - Search - Storage Log
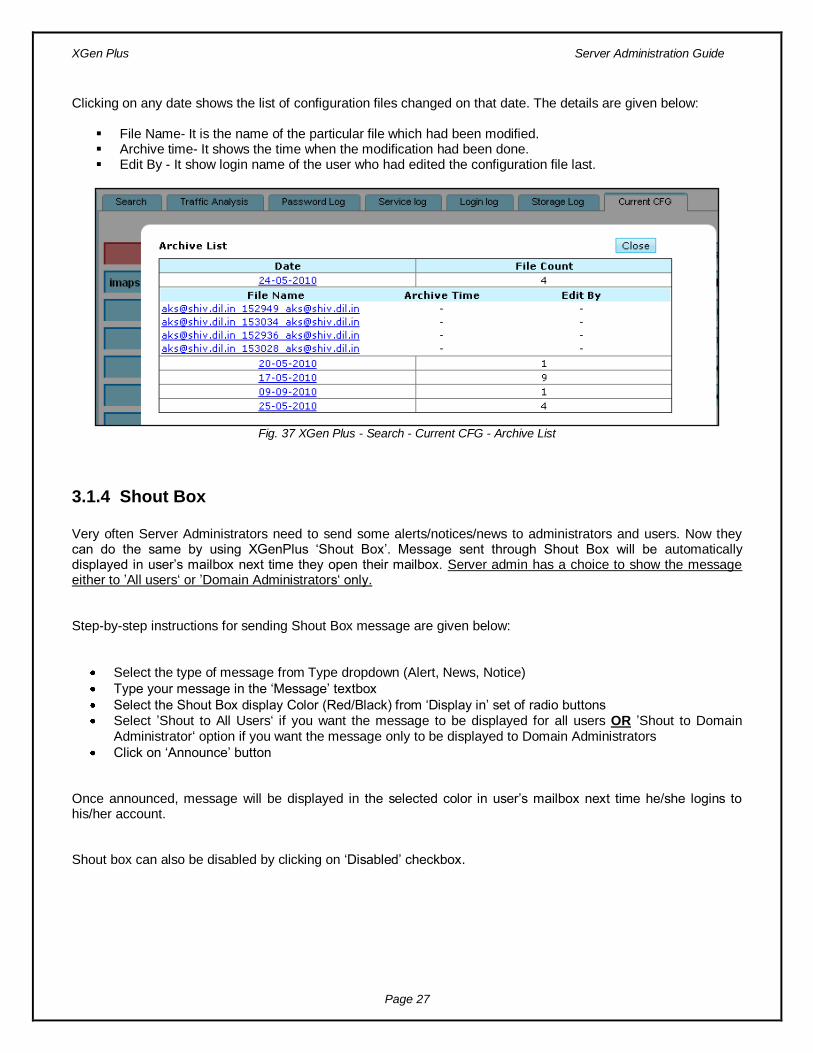
SearchCurrent CFG
Server admin has right to view and change configuration files of the server as and when required. All the configuration files, which can be modified by Server Admin, are listed on „Current CFG‟ screen. Server Admin can view & modify these files anytime through this tab.
Fig. 36 XGen Plus - Search - Current CFG
Archive List shows the date-wise grouping of archived files. Screenshot for the same has been shown below. Once you click on „ARCHIVE LIST‟, following details are displayed:
1. Date- It shows the date when the files had been modified. 2. File Count- It shows the total number of modified files on that date.
XGen Plus Server Administration Guide
Page 27
Clicking on any date shows the list of configuration files changed on that date. The details are given below:
File Name- It is the name of the particular file which had been modified. Archive time- It shows the time when the modification had been done. Edit By - It show login name of the user who had edited the configuration file last.
Fig. 37 XGen Plus - Search - Current CFG - Archive List
3.1.4 Shout Box
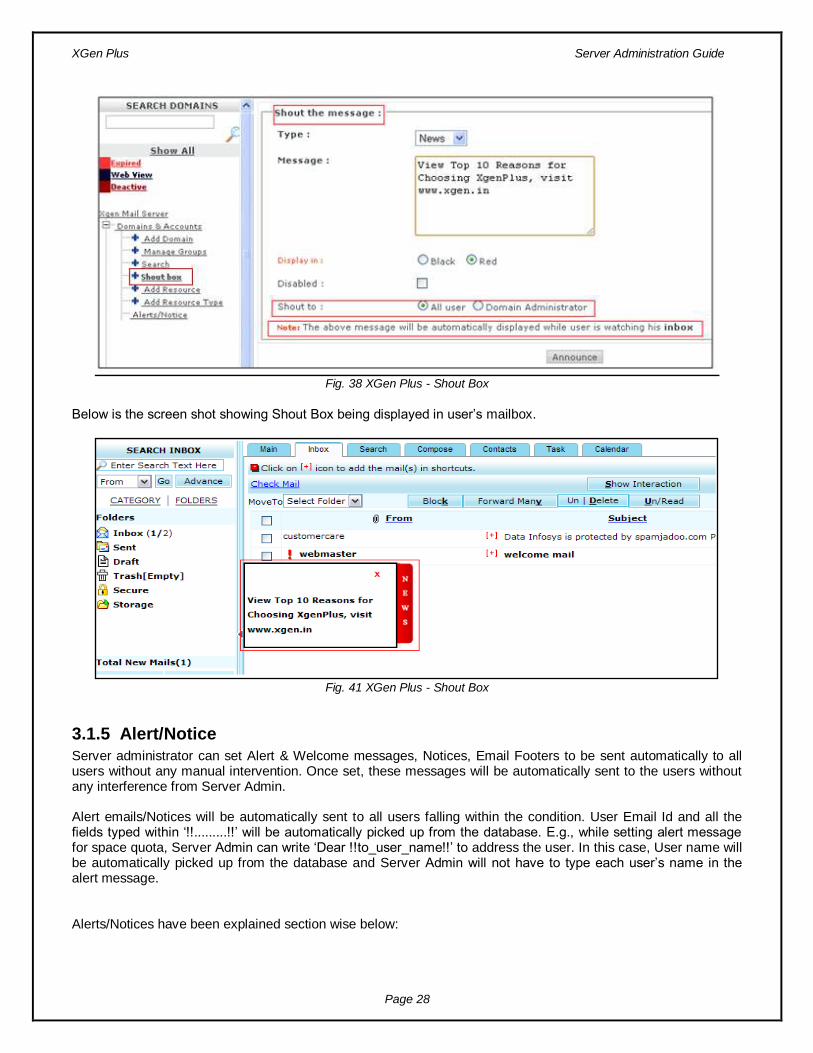
Very often Server Administrators need to send some alerts/notices/news to administrators and users. Now they can do the same by using XGenPlus „Shout Box‟. Message sent through Shout Box will be automatically displayed in user‟s mailbox next time they open their mailbox. Server admin has a choice to show the message either to ‟All users„ or ‟Domain Administrators„ only. Step-by-step instructions for sending Shout Box message are given below:
Select the type of message from Type dropdown (Alert, News, Notice)
Type your message in the „Message‟ textbox
Select the Shout Box display Color (Red/Black) from „Display in‟ set of radio buttons Select ‟Shout to All Users„ if you want the message to be displayed for all users OR ‟Shout to Domain
Administrator„ option if you want the message only to be displayed to Domain Administrators
Click on „Announce‟ button
Once announced, message will be displayed in the selected color in user‟s mailbox next time he/she logins to his/her account. Shout box can also be disabled by clicking on „Disabled‟ checkbox.
XGen Plus Server Administration Guide
Page 28
Fig. 38 XGen Plus - Shout Box
Below is the screen shot showing Shout Box being displayed in user‟s mailbox.
Fig. 41 XGen Plus - Shout Box
3.1.5 Alert/Notice
Server administrator can set Alert & Welcome messages, Notices, Email Footers to be sent automatically to all users without any manual intervention. Once set, these messages will be automatically sent to the users without any interference from Server Admin. Alert emails/Notices will be automatically sent to all users falling within the condition. User Email Id and all the fields typed within „!!.........!!‟ will be automatically picked up from the database. E.g., while setting alert message for space quota, Server Admin can write „Dear !!to_user_name!!‟ to address the user. In this case, User name will be automatically picked up from the database and Server Admin will not have to type each user‟s name in the alert message. Alerts/Notices have been explained section wise below:
XGen Plus Server Administration Guide
Page 29
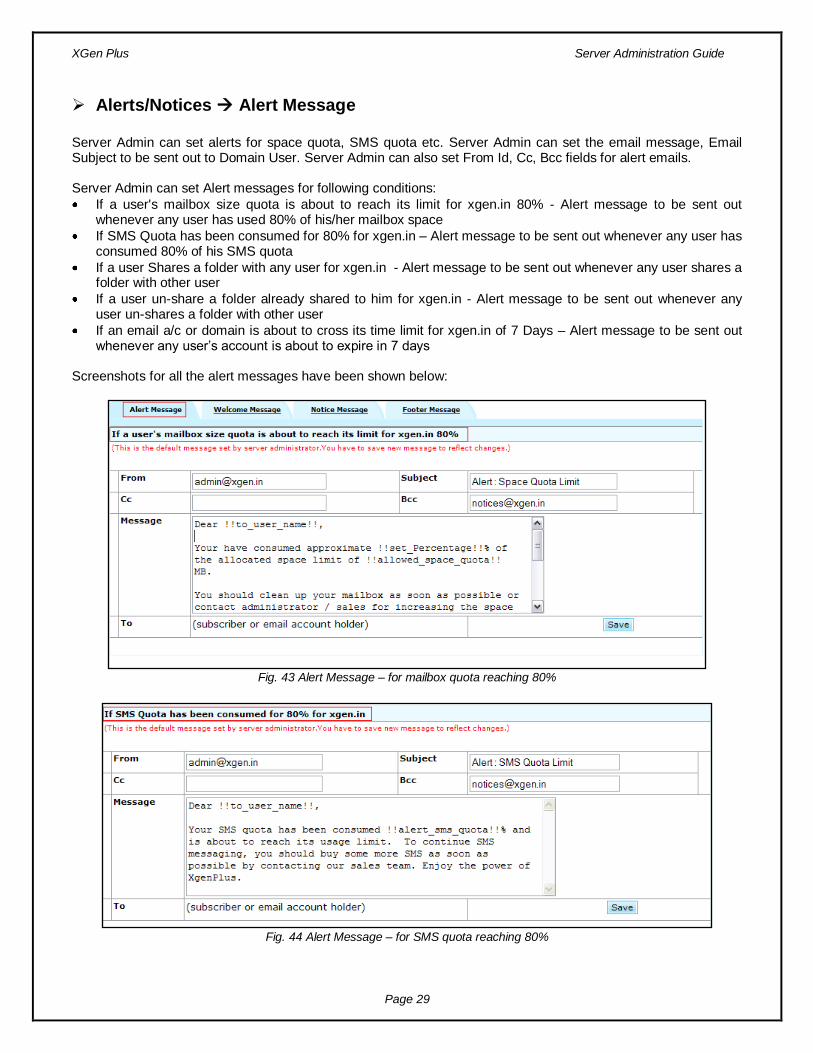
Alerts/Notices Alert Message
Server Admin can set alerts for space quota, SMS quota etc. Server Admin can set the email message, Email Subject to be sent out to Domain User. Server Admin can also set From Id, Cc, Bcc fields for alert emails. Server Admin can set Alert messages for following conditions:
If a user's mailbox size quota is about to reach its limit for xgen.in 80% - Alert message to be sent out whenever any user has used 80% of his/her mailbox space
If SMS Quota has been consumed for 80% for xgen.in – Alert message to be sent out whenever any user has consumed 80% of his SMS quota
If a user Shares a folder with any user for xgen.in - Alert message to be sent out whenever any user shares a folder with other user
If a user un-share a folder already shared to him for xgen.in - Alert message to be sent out whenever any user un-shares a folder with other user
If an email a/c or domain is about to cross its time limit for xgen.in of 7 Days – Alert message to be sent out whenever any user‟s account is about to expire in 7 days
Screenshots for all the alert messages have been shown below:
Fig. 43 Alert Message – for mailbox quota reaching 80%
Fig. 44 Alert Message – for SMS quota reaching 80%
XGen Plus Server Administration Guide
Page 30
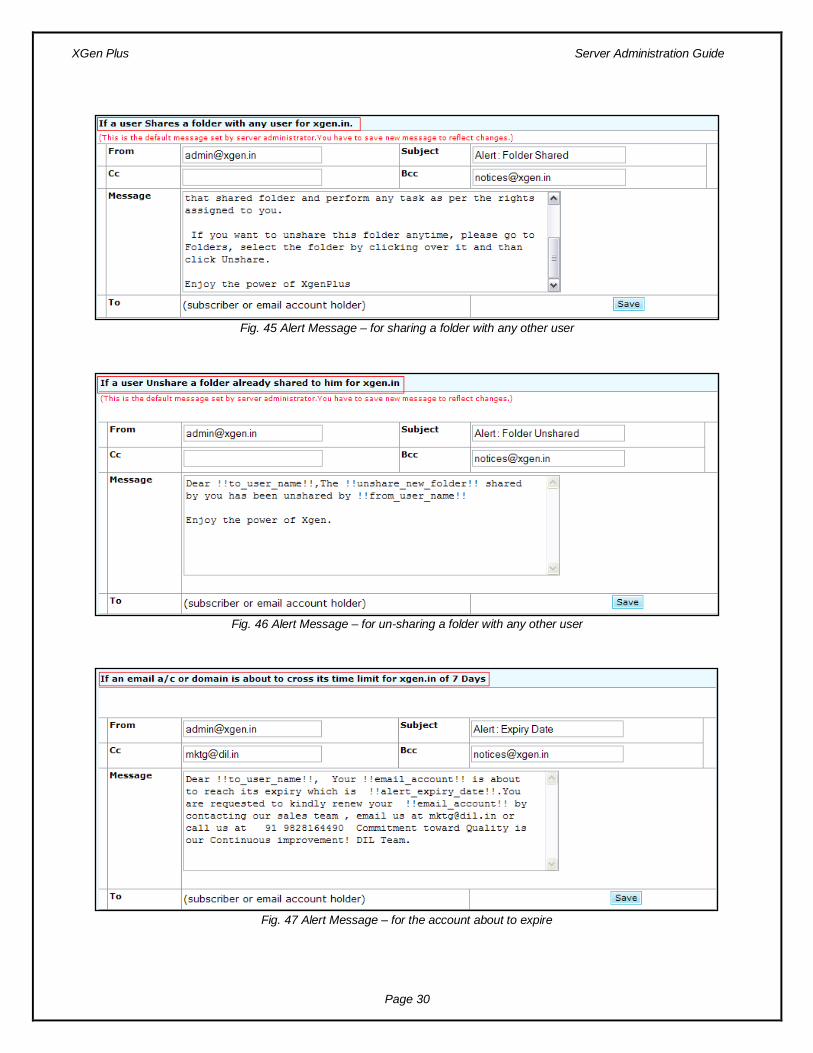
Fig. 45 Alert Message – for sharing a folder with any other user
Fig. 46 Alert Message – for un-sharing a folder with any other user
Fig. 47 Alert Message – for the account about to expire
XGen Plus Server Administration Guide
Page 31
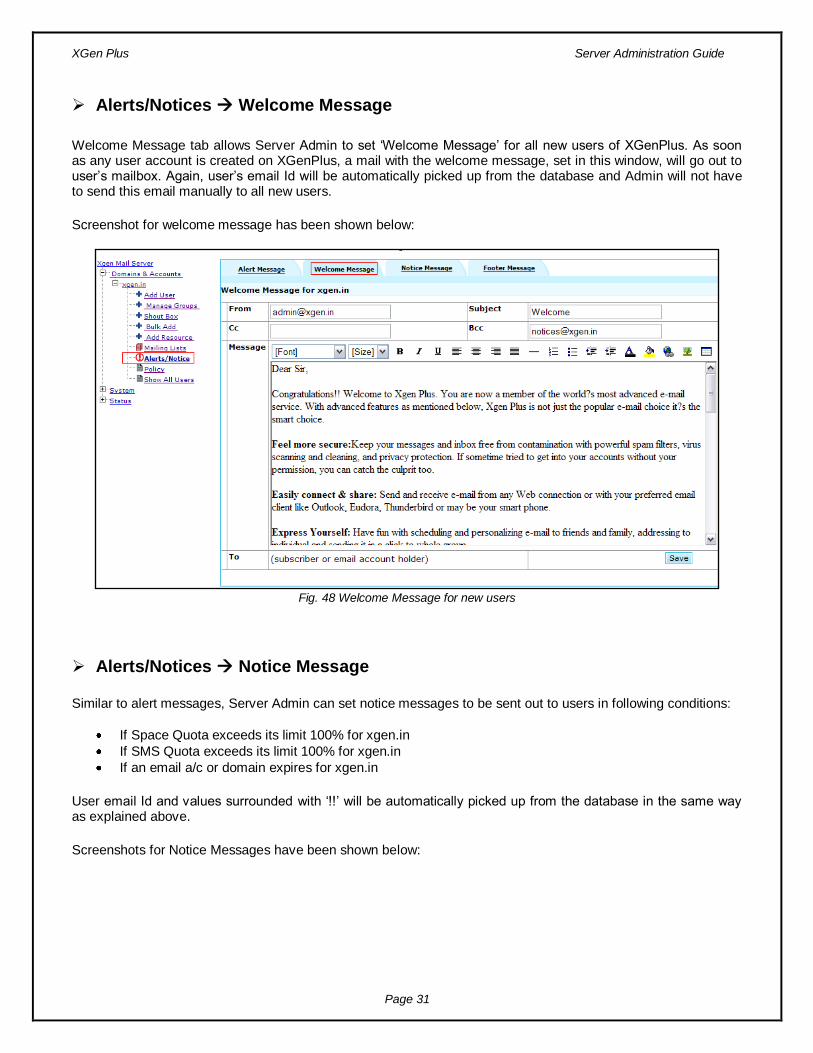
Alerts/Notices Welcome Message
Welcome Message tab allows Server Admin to set „Welcome Message‟ for all new users of XGenPlus. As soon as any user account is created on XGenPlus, a mail with the welcome message, set in this window, will go out to user‟s mailbox. Again, user‟s email Id will be automatically picked up from the database and Admin will not have to send this email manually to all new users.
Screenshot for welcome message has been shown below:
Fig. 48 Welcome Message for new users
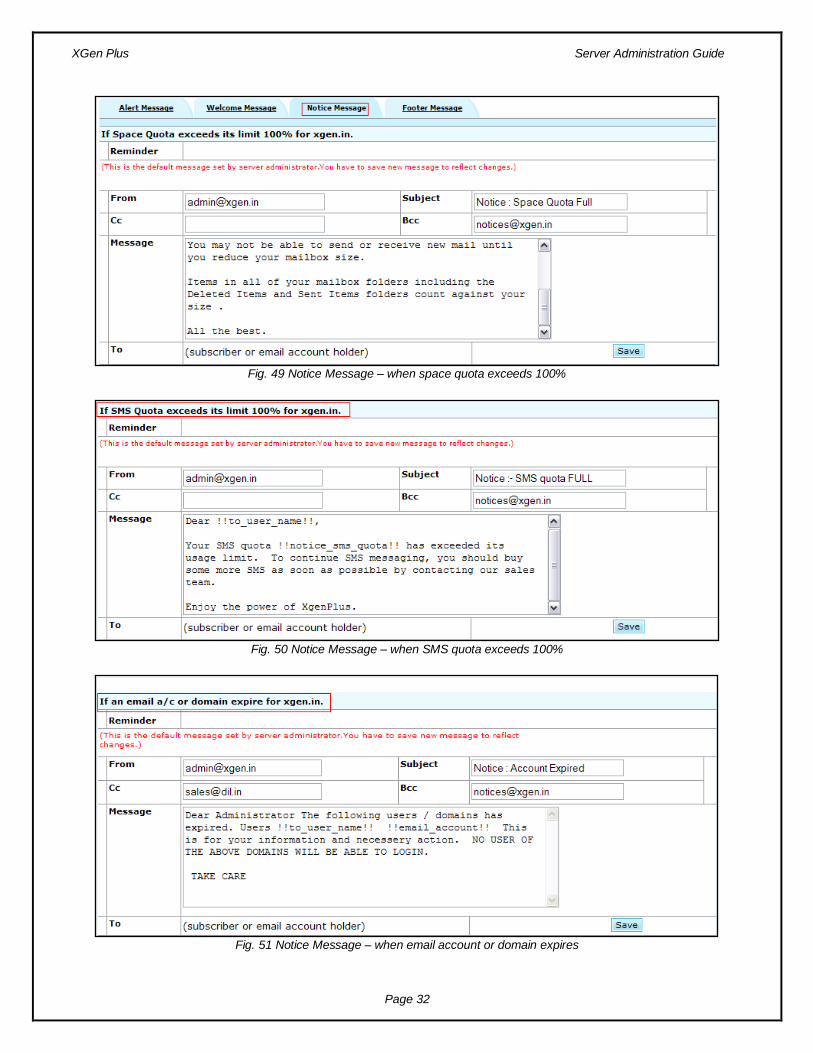
Alerts/Notices Notice Message
Similar to alert messages, Server Admin can set notice messages to be sent out to users in following conditions:
If Space Quota exceeds its limit 100% for xgen.in
If SMS Quota exceeds its limit 100% for xgen.in
If an email a/c or domain expires for xgen.in
User email Id and values surrounded with „!!‟ will be automatically picked up from the database in the same way as explained above.
Screenshots for Notice Messages have been shown below:
XGen Plus Server Administration Guide
Page 32
Fig. 49 Notice Message – when space quota exceeds 100%
Fig. 50 Notice Message – when SMS quota exceeds 100%
Fig. 51 Notice Message – when email account or domain expires
XGen Plus Server Administration Guide
Page 33
Alerts/Notices Footer Message
Server Admin can set the footer message through this tab. This footer message will be sent out as email footer with all outgoing emails for the domain.
Fig. 52 Email Footer Message
3.2 System & Status
Domain Statistics include some general statistics like Domain Name, SMTP/POP services, Total space allowed, logs etc. for domain.
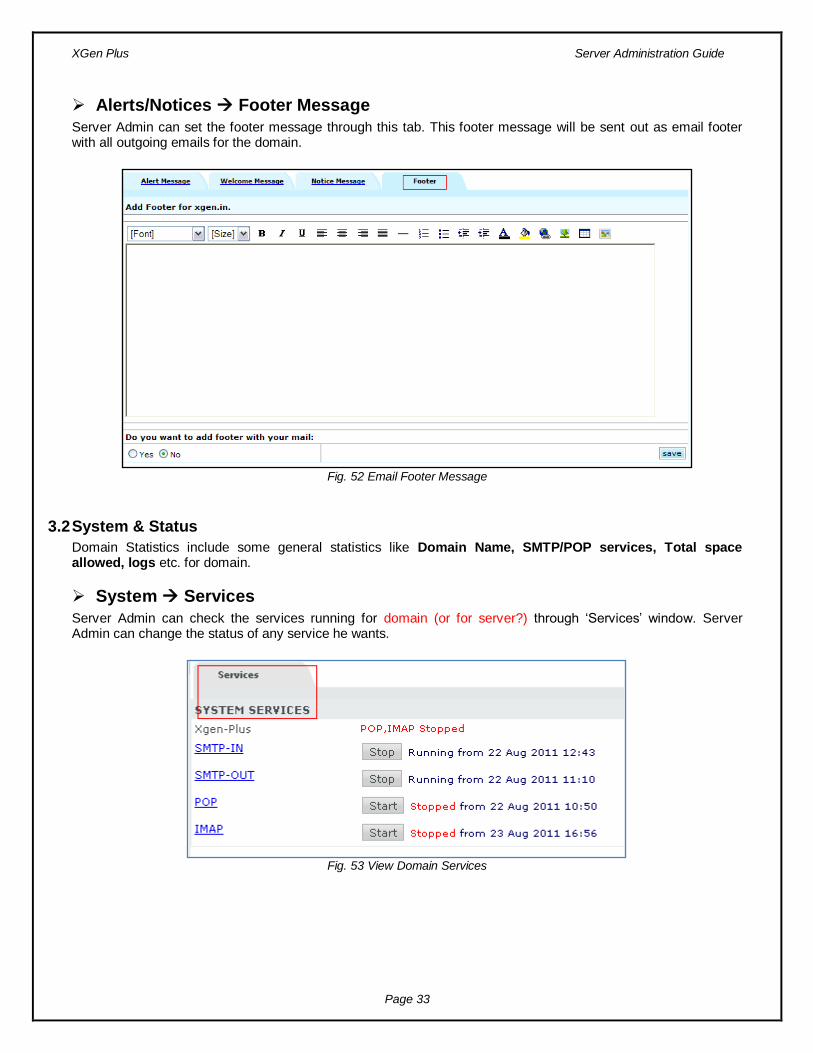
System Services
Server Admin can check the services running for domain (or for server?) through „Services‟ window. Server Admin can change the status of any service he wants.
Fig. 53 View Domain Services
XGen Plus Server Administration Guide
Page 34
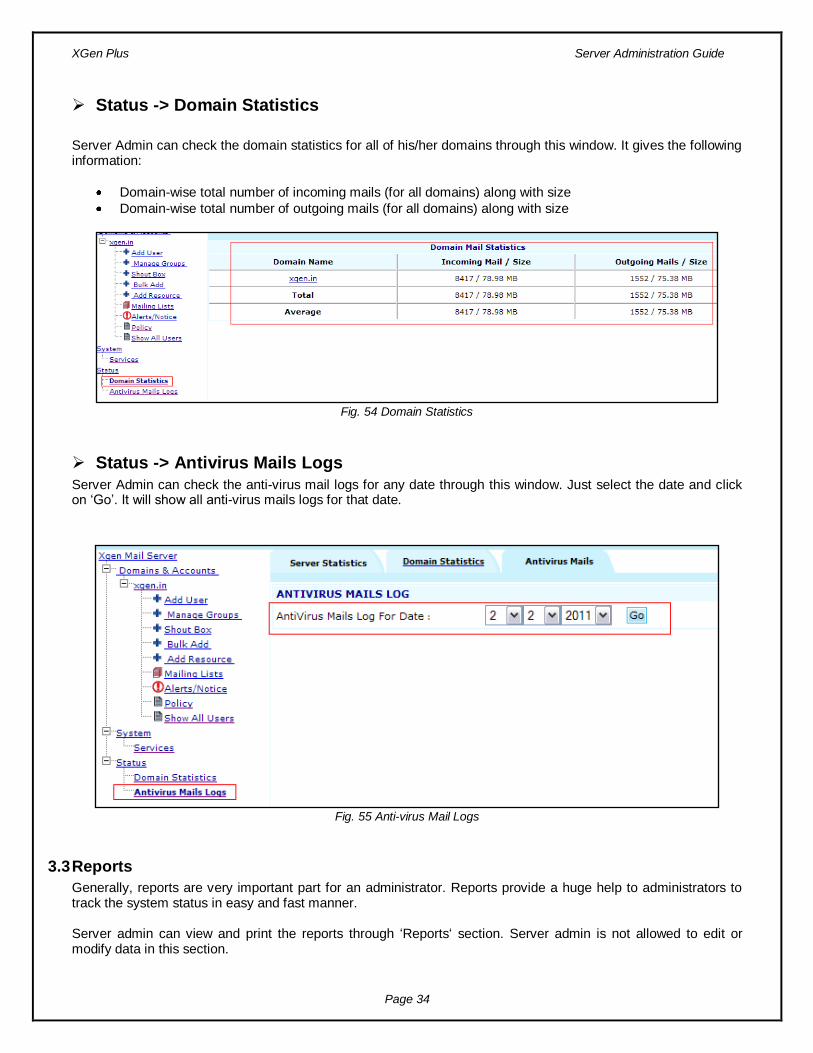
Status -> Domain Statistics
Server Admin can check the domain statistics for all of his/her domains through this window. It gives the following information:
Domain-wise total number of incoming mails (for all domains) along with size
Domain-wise total number of outgoing mails (for all domains) along with size
Fig. 54 Domain Statistics
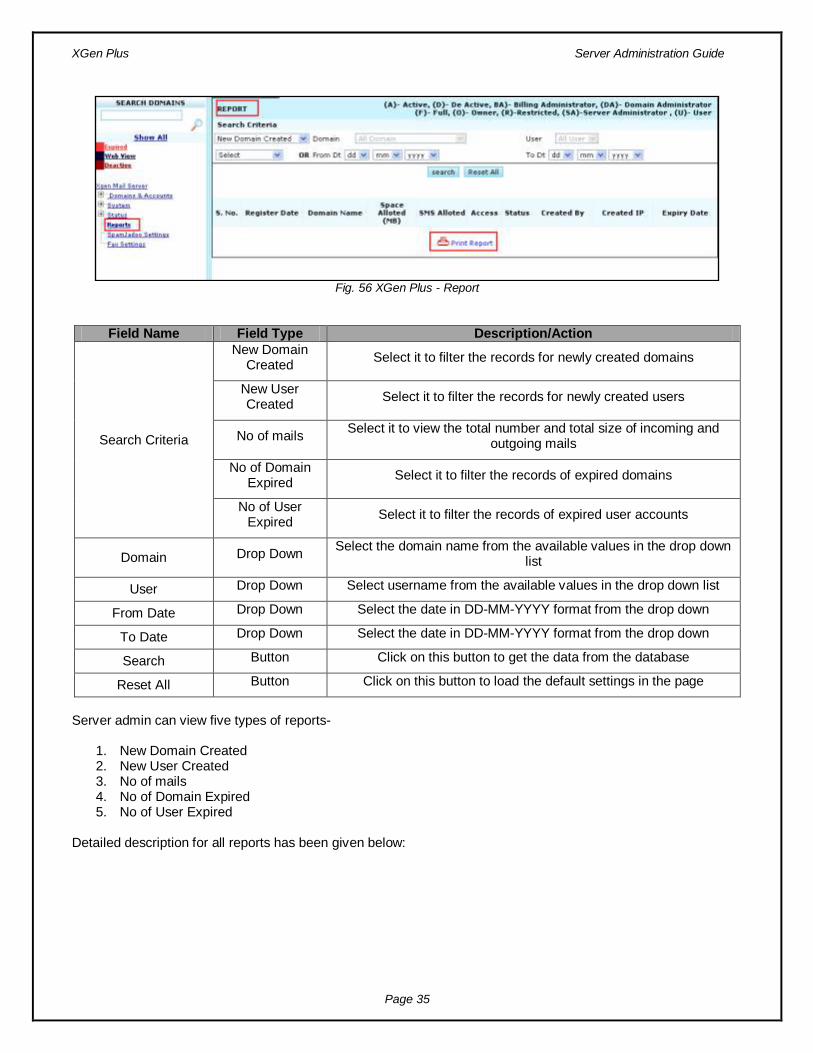
Status -> Antivirus Mails Logs
Server Admin can check the anti-virus mail logs for any date through this window. Just select the date and click on „Go‟. It will show all anti-virus mails logs for that date.
Fig. 55 Anti-virus Mail Logs
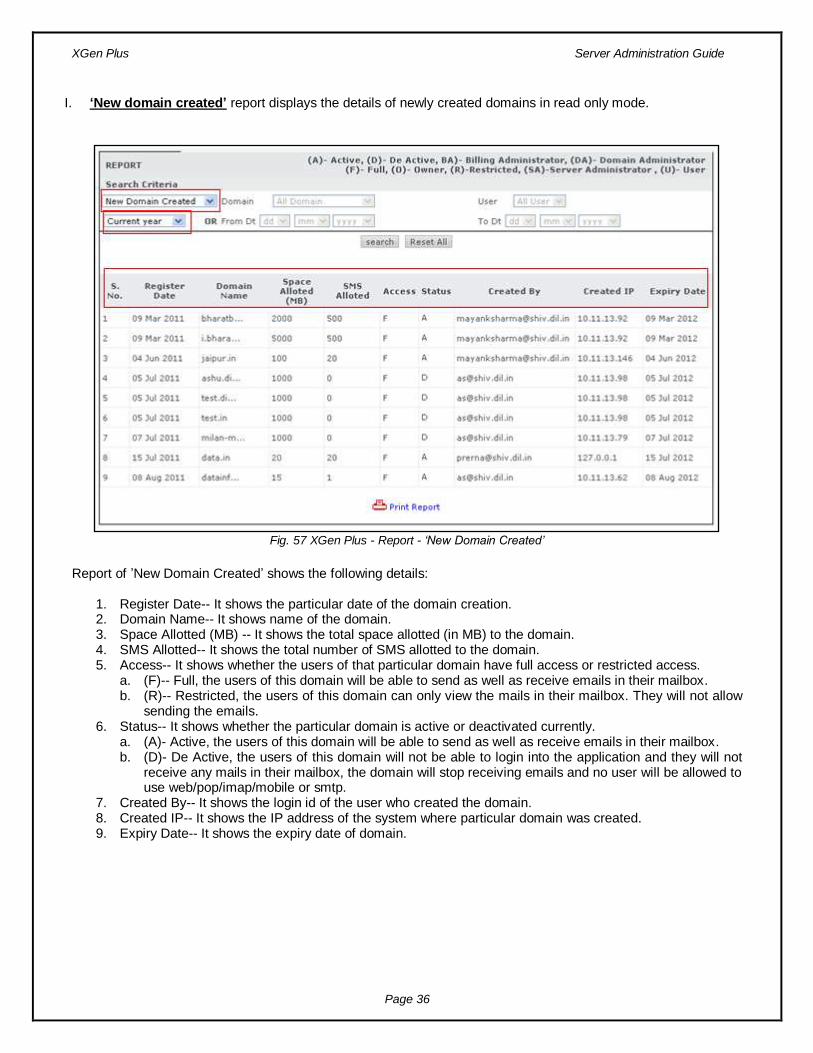
3.3 Reports
Generally, reports are very important part for an administrator. Reports provide a huge help to administrators to track the system status in easy and fast manner. Server admin can view and print the reports through „Reports„ section. Server admin is not allowed to edit or modify data in this section.
XGen Plus Server Administration Guide
Page 35
Fig. 56 XGen Plus - Report
Field Name Field Type Description/Action
Search Criteria
New Domain Created
Select it to filter the records for newly created domains
New User Created
Select it to filter the records for newly created users
No of mails Select it to view the total number and total size of incoming and
outgoing mails
No of Domain Expired
Select it to filter the records of expired domains
No of User Expired
Select it to filter the records of expired user accounts
Domain Drop Down Select the domain name from the available values in the drop down
list
User Drop Down Select username from the available values in the drop down list
From Date Drop Down Select the date in DD-MM-YYYY format from the drop down
To Date Drop Down Select the date in DD-MM-YYYY format from the drop down
Search Button Click on this button to get the data from the database
Reset All Button Click on this button to load the default settings in the page
Server admin can view five types of reports-
1. New Domain Created 2. New User Created 3. No of mails 4. No of Domain Expired 5. No of User Expired
Detailed description for all reports has been given below:
XGen Plus Server Administration Guide
Page 36
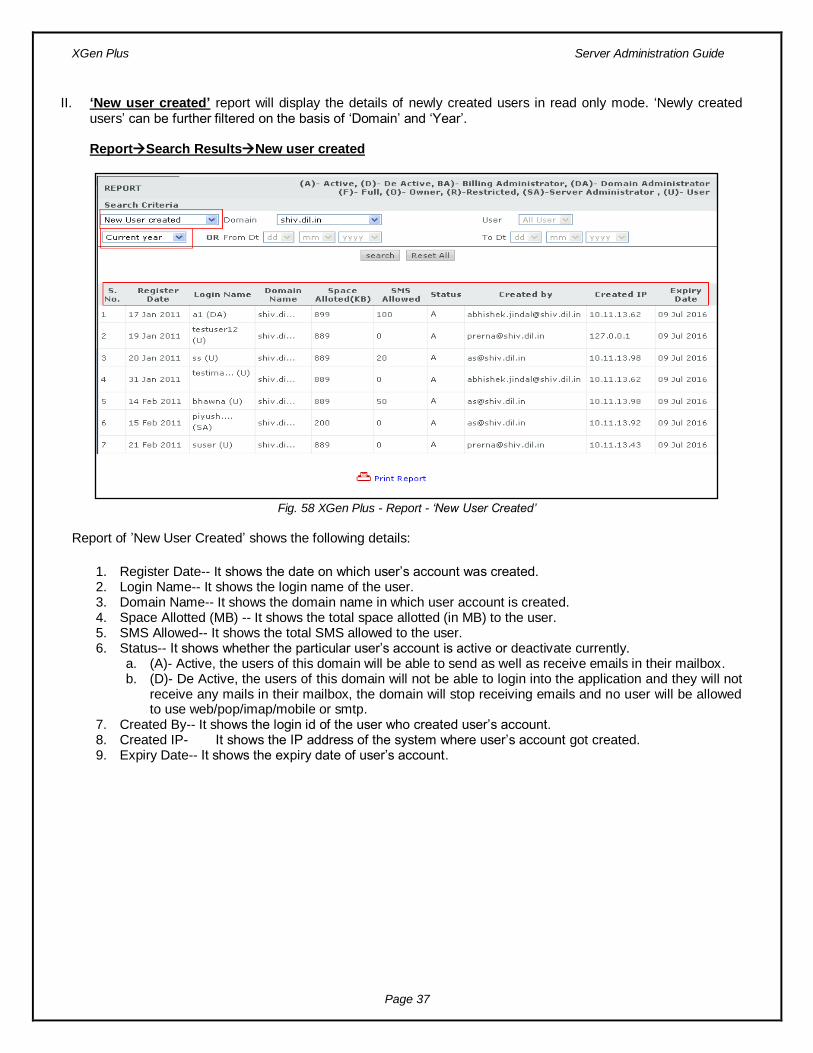
I. ‘New domain created’ report displays the details of newly created domains in read only mode.
Fig. 57 XGen Plus - Report - ‘New Domain Created’
Report of ‟New Domain Created‟ shows the following details:
1. Register Date-- It shows the particular date of the domain creation. 2. Domain Name-- It shows name of the domain. 3. Space Allotted (MB) -- It shows the total space allotted (in MB) to the domain. 4. SMS Allotted-- It shows the total number of SMS allotted to the domain. 5. Access-- It shows whether the users of that particular domain have full access or restricted access.
a. (F)-- Full, the users of this domain will be able to send as well as receive emails in their mailbox. b. (R)-- Restricted, the users of this domain can only view the mails in their mailbox. They will not allow
sending the emails. 6. Status-- It shows whether the particular domain is active or deactivated currently.
a. (A)- Active, the users of this domain will be able to send as well as receive emails in their mailbox. b. (D)- De Active, the users of this domain will not be able to login into the application and they will not
receive any mails in their mailbox, the domain will stop receiving emails and no user will be allowed to use web/pop/imap/mobile or smtp.
7. Created By-- It shows the login id of the user who created the domain. 8. Created IP-- It shows the IP address of the system where particular domain was created. 9. Expiry Date-- It shows the expiry date of domain.
XGen Plus Server Administration Guide
Page 37
II. ‘New user created’ report will display the details of newly created users in read only mode. „Newly created users‟ can be further filtered on the basis of „Domain‟ and „Year‟.
ReportSearch ResultsNew user created
Fig. 58 XGen Plus - Report - ‘New User Created’
Report of ‟New User Created‟ shows the following details:
1. Register Date-- It shows the date on which user‟s account was created. 2. Login Name-- It shows the login name of the user. 3. Domain Name-- It shows the domain name in which user account is created. 4. Space Allotted (MB) -- It shows the total space allotted (in MB) to the user. 5. SMS Allowed-- It shows the total SMS allowed to the user. 6. Status-- It shows whether the particular user‟s account is active or deactivate currently.
a. (A)- Active, the users of this domain will be able to send as well as receive emails in their mailbox. b. (D)- De Active, the users of this domain will not be able to login into the application and they will not
receive any mails in their mailbox, the domain will stop receiving emails and no user will be allowed to use web/pop/imap/mobile or smtp.
7. Created By-- It shows the login id of the user who created user‟s account. 8. Created IP- It shows the IP address of the system where user‟s account got created. 9. Expiry Date-- It shows the expiry date of user‟s account.
XGen Plus Server Administration Guide
Page 38
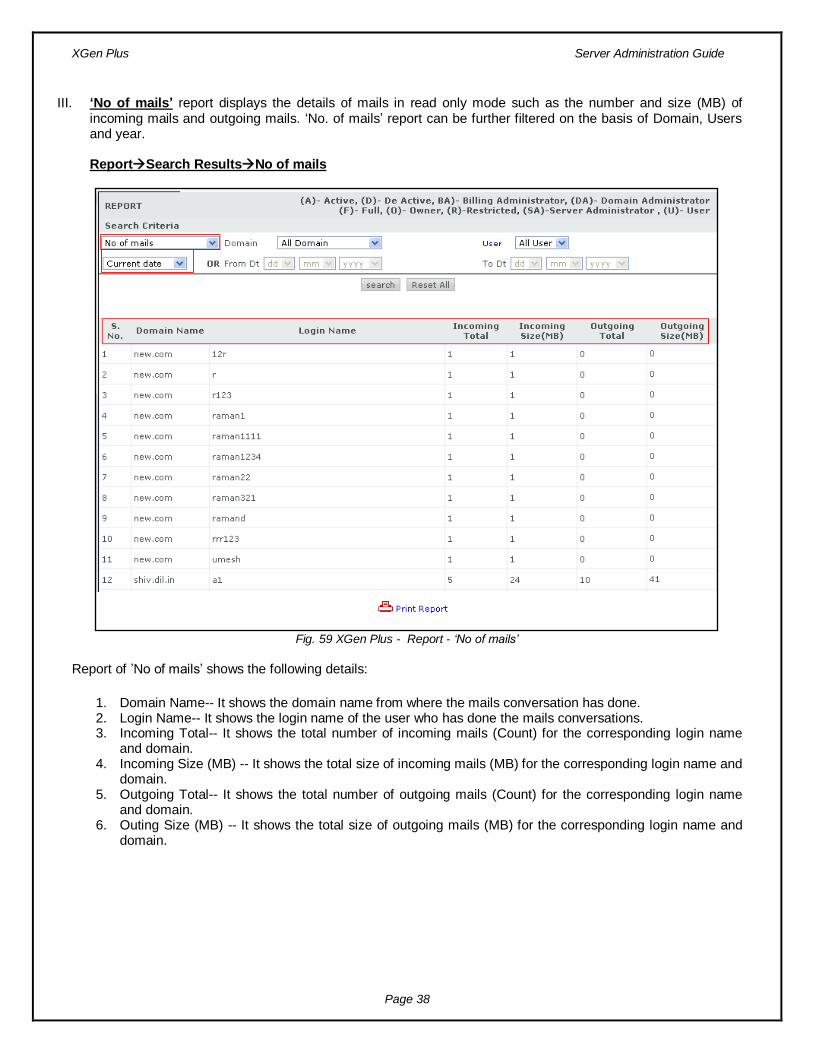
III. ‘No of mails’ report displays the details of mails in read only mode such as the number and size (MB) of incoming mails and outgoing mails. „No. of mails‟ report can be further filtered on the basis of Domain, Users and year.
ReportSearch ResultsNo of mails
Fig. 59 XGen Plus - Report - ‘No of mails’
Report of ‟No of mails‟ shows the following details:
1. Domain Name-- It shows the domain name from where the mails conversation has done. 2. Login Name-- It shows the login name of the user who has done the mails conversations. 3. Incoming Total-- It shows the total number of incoming mails (Count) for the corresponding login name
and domain. 4. Incoming Size (MB) -- It shows the total size of incoming mails (MB) for the corresponding login name and
domain. 5. Outgoing Total-- It shows the total number of outgoing mails (Count) for the corresponding login name
and domain. 6. Outing Size (MB) -- It shows the total size of outgoing mails (MB) for the corresponding login name and
domain.
XGen Plus Server Administration Guide
Page 39
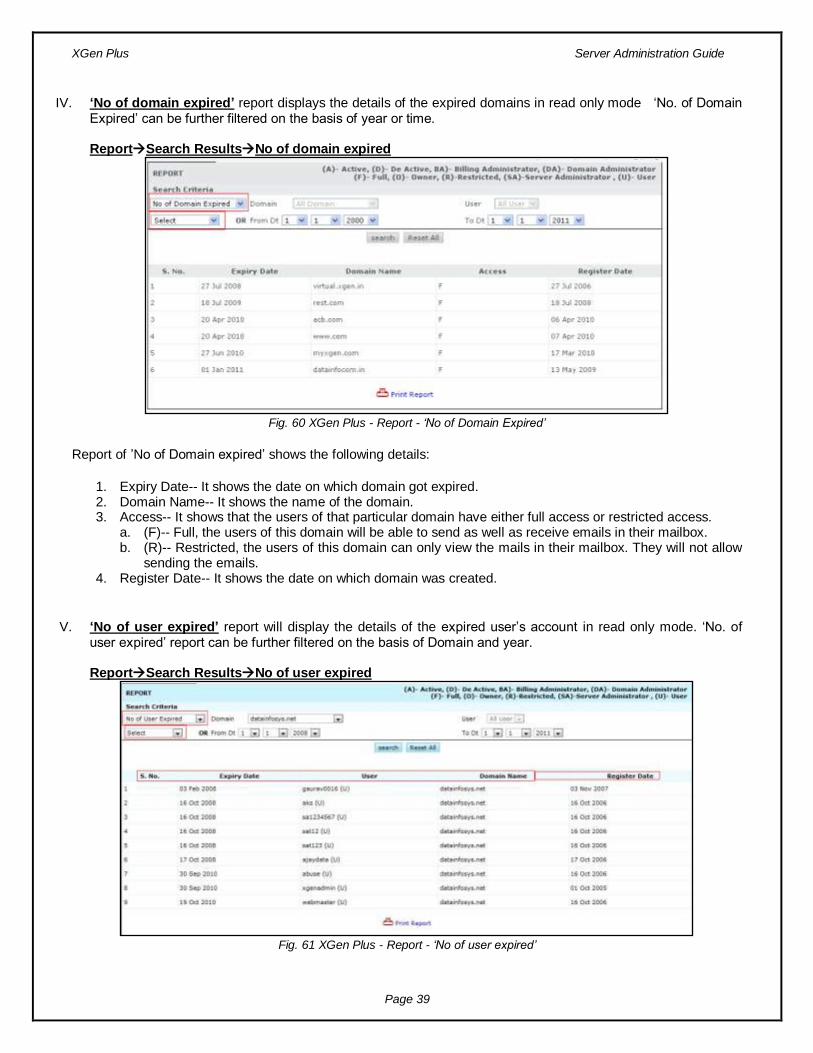
IV. ‘No of domain expired’ report displays the details of the expired domains in read only mode „No. of Domain Expired‟ can be further filtered on the basis of year or time.
ReportSearch ResultsNo of domain expired
Fig. 60 XGen Plus - Report - ‘No of Domain Expired’
Report of ‟No of Domain expired‟ shows the following details:
1. Expiry Date-- It shows the date on which domain got expired. 2. Domain Name-- It shows the name of the domain. 3. Access-- It shows that the users of that particular domain have either full access or restricted access.
a. (F)-- Full, the users of this domain will be able to send as well as receive emails in their mailbox. b. (R)-- Restricted, the users of this domain can only view the mails in their mailbox. They will not allow
sending the emails. 4. Register Date-- It shows the date on which domain was created.
V. ‘No of user expired’ report will display the details of the expired user‟s account in read only mode. „No. of user expired‟ report can be further filtered on the basis of Domain and year.
ReportSearch ResultsNo of user expired
Fig. 61 XGen Plus - Report - ‘No of user expired’
XGen Plus Server Administration Guide
Page 40
Report of ‟No of user expired‟ shows the following details:
1. Expiry Date-- It shows the date on which user account got expired. 2. User-- It shows the login name of the user. 3. Domain Name-- It shows the name of the domain where user‟s account resides.
4. Register Date-- It shows the date on which the user‟s account was created.
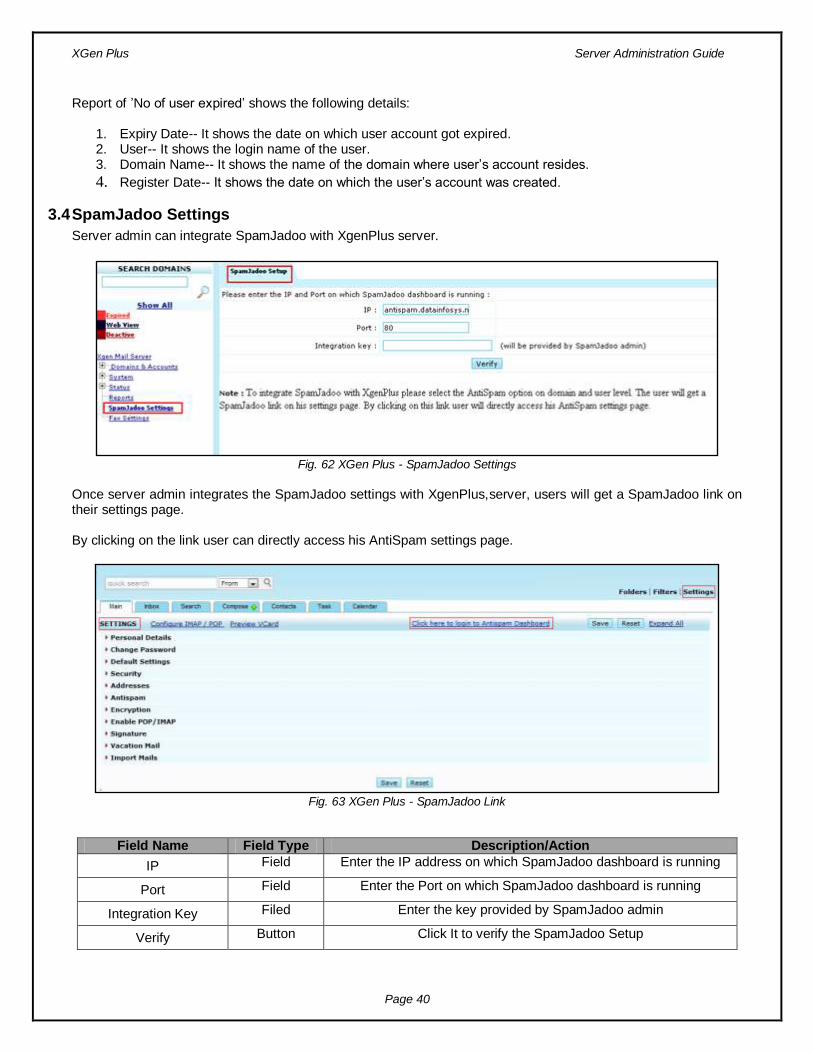
3.4 SpamJadoo Settings
Server admin can integrate SpamJadoo with XgenPlus server.
Fig. 62 XGen Plus - SpamJadoo Settings
Once server admin integrates the SpamJadoo settings with XgenPlus,server, users will get a SpamJadoo link on their settings page. By clicking on the link user can directly access his AntiSpam settings page.
Fig. 63 XGen Plus - SpamJadoo Link
Field Name Field Type Description/Action
IP Field Enter the IP address on which SpamJadoo dashboard is running
Port Field Enter the Port on which SpamJadoo dashboard is running
Integration Key Filed Enter the key provided by SpamJadoo admin
Verify Button Click It to verify the SpamJadoo Setup
XGen Plus Server Administration Guide
Page 41
3.5 Fax Settings
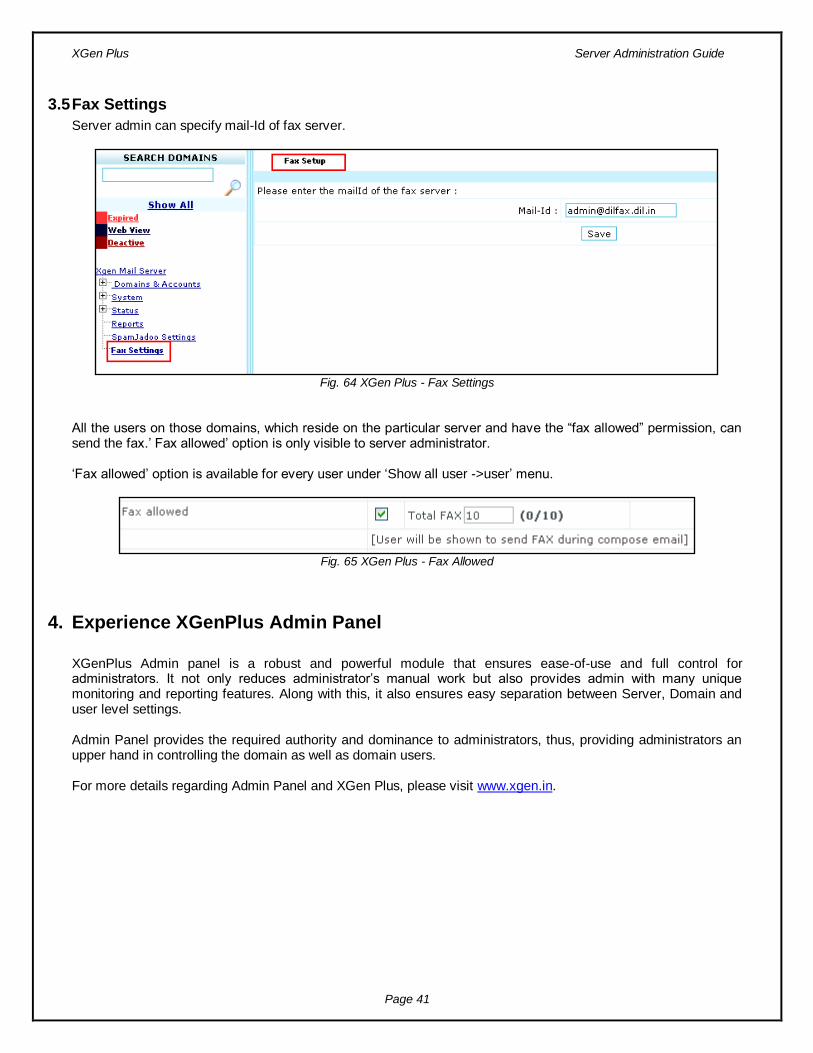
Server admin can specify mail-Id of fax server.
Fig. 64 XGen Plus - Fax Settings
All the users on those domains, which reside on the particular server and have the “fax allowed” permission, can send the fax.‟ Fax allowed‟ option is only visible to server administrator. „Fax allowed‟ option is available for every user under „Show all user ->user‟ menu.
Fig. 65 XGen Plus - Fax Allowed
4. Experience XGenPlus Admin Panel
XGenPlus Admin panel is a robust and powerful module that ensures ease-of-use and full control for administrators. It not only reduces administrator‟s manual work but also provides admin with many unique monitoring and reporting features. Along with this, it also ensures easy separation between Server, Domain and user level settings. Admin Panel provides the required authority and dominance to administrators, thus, providing administrators an upper hand in controlling the domain as well as domain users. For more details regarding Admin Panel and XGen Plus, please visit www.xgen.in.