ADMIN GUIDE Sennheiser HeadSetup Pro Manager On Premises Pro Manager Manual... · – Accomplish...
44
Sennheiser HeadSetup ™ Pro Manager On Premises ADMIN GUIDE
Transcript of ADMIN GUIDE Sennheiser HeadSetup Pro Manager On Premises Pro Manager Manual... · – Accomplish...

Sennheiser HeadSetup™ Pro Manager On Premises
ADMIN GUIDE


1. Introduction 4
1.1 Product overview 41.2 Attributes of Sennheiser HeadSetup™ Pro Manager 41.3 Scope of the document 41.4 Intended audience of this document 41.5 Sennheiser HeadSetup™ Pro Manager Workflow 4
2. System Requirement 5
2.1 Overview of system requirement 52.2 Hardware requirement 52.3 Software requirement 52.3.1 Installing IIS features on Windows server 2012 52.4 Operating system requirement 7
3. Installing HeadSetup™ Pro Manager 7
3.1 Prerequisites 73.2 Installation step 73.2.1 Install HeadSetup™ Pro Manager API 83.2.2 Install HeadSetup™ Pro Manager 103.3 Configuring HeadSetup™ Pro Manager 113.3.1 Changing the port for IIS services 123.3.2 Configuring IIS to support http 123.4 Configuring custom ports for HeadSetup™
Pro Manager API and UI 13
4. Getting started 15
4.1 Registration 154.1.1 On Premise SignUp 154.1.2 Logging in 164.1.3 Forgot Password 164.2 Deployment of the Sennheiser HeadSetup™ Pro 164.2.1 Retrieving client client files for the first time 164.2.2 Installing the client manually for the first time 174.3 Sennheiser HeadSetup™ Pro Manager Layout 174.3.1 Login information 184.3.1.1 Settings 184.3.1.2 Administration 194.3.1.2.1 View Admins 194.3.1.2.1.1 Add/Edit Admin Admin 194.3.1.3 Client config 204.3.1.4 Change Password 214.3.1.5 Help 214.3.1.6 About 214.3.1.7 Logout 214.3.2 Grid settings 214.3.2.1 Row count 224.3.2.2 Display sections 224.3.2.3 Column display order 234.3.3 Search 234.3.4 Information fields 234.3.5 Page navigation 234.3.6 Application menu 23
5. Manage user 23
5.1 Users 245.2 Manual group 245.3 AD group 255.4 Inactive users 265.5 Deleted users 27
6. Manage updates 27
6.1 All devices 286.2 Unregistered devices 306.3 Removed device 306.4 On stock 31
7. Manage updates 31
7.1 Firmware updates 337.2 Software updates 347.3 Uphold updates 347.4 Deployment status 357.5 Deployment details 36
8. Configuration 37
8.1 Configuration Overview 378.2 Configuration Repository 378.2.1 Duplicate configuration package 388.2.2 Edit configuration package 388.2.3 Deployment configuration 398.3 Upload Configuration 398.4 Deployment Status 39
9. Reports 39
9.1 User 409.1.1 User Overview 409.1.2 Client versions 409.1.3 Monthly Overview 409.2.1 Device Overview 419.2.2 Other devices 419.2.3 Monthly Overview 419.2.4 Headsets Per User 429.2.5 Update Overview 42
10. Uninstalling HeadSetup™ Pro Manager 43
10.1 Uninstall HeadSetup™ Pro Manager 4310.2 Uninstall HeadSetup™ Pro Manager API 43

1. Introduction1.1 Product overviewSennheiser HeadSetup™ Pro Manager is a cloud-based multi-tenant server application used for managing and supporting Sennheiser devices in Enterprise environments.
Companies signing up for a tenant (company) account will gain access to an easy to manage system, from where enrolled Sennheiser HeadSetup™ Pro clients (End-users) in the organization can be managed.
A company IT administrator can easily track Sennheiser devices in the environment from any PC , push configurations and quickly deploy software and firmware updates to a vast number of users.
Sennheiser HeadSetup™ Pro Manager: Administering devices, end-users and associated PC client application.
Sennheiser HeadSetup™ Pro:
End-user PC client, providing local update service for connected devices.
1.2 Attributes of Sennheiser HeadSetup™ Pro ManagerSennheiser HeadSetup™ Pro Manager enables a tenant administrator in an organization to:
– Manage assets by providing full status overview
– Locate devices and fetch device details from anywhere.
– Identify devices in the organization having an outdated version of firmware
– Accomplish uniform attributes throughout the environment by deploying firmware/ software updates
– Read and set settings on Sennheiser devices from anywhere.
– Identify underutilized devices to fully use the inventory, hence optimizing the benefit of the device investment.
1.3 Scope of the documentThis document contains an overview of Sennheiser HeadSetup™ Pro Manager features and how to perform tenant administrative tasks using the Sennheiser HeadSetup™ Pro Manager.
1.4 Intended audience of this documentThis document is intended for the selected Tenant Administrator. The tenant administrator will be able to manage deployed devices from Sennheiser.
1.5 Sennheiser HeadSetup™ Pro Manager WorkflowThe following diagram shows the basic workflow of the Sennheiser HeadSetup™ Pro Manager (used by Tenant Administrator) and Sennheiser HeadSetup™ Pro (used by end-users) applications.
4
2. System Requirement2.1 Overview of system requirementAdministrators typically can manage several phases of firmware or software deployment, including preparation, distribution and up gradation in different phases, depending on their infrastructure and requirements:
– SQL server, UI server and Web API server hosted on the same machine.
– SQL server deployed on one system, UI and Web API together hosted on another sys-tem.
– SQL server, UI server and Web API on three different machines
2.2 Hardware requirementThe following minimal hardware is required for the HeadSetup™ Pro Manager to install and run successfully in the system:
– Processor :- 2 GHz processor
– RAM :- 4 GB RAM
– Storage :- 50 GB available
– Network card (Gigabit (10/100/1000baseT) Ethernet adapter)
– Desired Configuration :- RAID 1 ( recommend for SQL server)
2.3 Software requirement
The following minimal software is required for the HeadSetup™ Pro Manager to install and run successfully in the system:
– Supported Database Edition:- SQL 2012 Standard/Express Edition 64 bit
– Web Server: - IIS 8.5.
– Software framework: - .NET 4.5.1.
2.3.1 Installing IIS features on windows server 20121. On the Start page, choose Server Manager.
2. In the navigation pane, choose Dashboard, and then choose Add roles and features.
3. In the Add Roles and Features Wizard, in the Before You Begin page, choose the Next button
4. On the Select installation type page, select Role-based or feature-based ins-tallation, and then choose the Next button.
5. On the Select destination server page, select Select a server from the server pool, select your server from Server Pool list, and then choose the Next button.
6. In the Select Server Roles window, select Web Server (IIS), and then choose the Next button.
7. If the Add features that are required for Web Server (IIS) dialog box appears, then choose Add Features.
8. On the Select features page, expand .NET Framework 4.5, and then select ASP.NET 4.5.
9. In the Add features that are required for ASP.NET 4.5? Dialog box, choose the Add Features button.
The following additional features are added. 1. ASP.NET 4.5 2. ISAPI Extensions 3. ISAPI Filters 4. .NET Extensibility 4.5
If .NET Framework 3.5 is installed, then do the following: (Please ref below Fig1)
5

10. Expand the .NET Framework 3.5 Features node.
11. Select HTTP Activate.
12. If the Add features that are required for ASP.NET 3.5 dialog box appears, choose the Add Features button. The following additional features are added.
1. .NET Framework 3.5 (including .NET 2.0 and 3.0)
2. .NET Extensibility 3.5
On the Select role services page, verify that the following role services are selected at a minimum.
13. Common HTTP Features 1. Static Content
14. Security 1. Request Filtering 2. Windows Authentication
15. Application Development 1. .NET Extensibility 3.5 (if .NET Framework 3.5 is installed) 2. .NET Extensibility 4.5 3. ASP.NET 3.5 (if .NET Framework 3.5 is installed) 4. ASP.NET 4.5 5. ISAPI Extensions 6. ISAPI Filters
16. Management Tools IIS Management Console
17. Choose the Next button
18. On the Confirm installation selections page, choose the Install button.
19. On the Installation progress page, confirm that your installation completed successfully, and then choose the Close button.
20. To verify that the web server has been installed correctly, start your browser, and then type http://localhost in the address.
The default website opens and should display an IIS 8 image.
Note: Please check all the features for Webserver (IIS) as shown in Fig 2 is selec-ted
21. Configure Default web site Bindings (Port 8080 is used by default by Default web site) 1. In IIS Manager, expand the local computer and the Site
folder, and then find the Default web site. 2. Right-click Default web site and Select Edit Bindings. 3. Click on the row showing Port number 8080. 4. Click Edit 5. Change the port number to any other port number ( if Port 8080 is alrea-
dy used by another web sites in the IIS Manager . Please follow above steps to change the same )
Note: By Default port 8080 is used by Default Web site in IIS Manager either De-fault Web Site can be deleted or the above steps can be used to change port.
6

Fig 1: Adding features in Windows server 2012
Fig 2: Adding features in Windows server 2012
2.4 Operating system requirementThe desired operating system for HeadSetup™ Pro Manager is Windows Server 2012 R2, 64 Bit or higher
3 Installing
HeadSetup™ Pro Manager3.1 PrerequisitesThe customer will receive a package containing two setup files from Sennheiser to start with the installation:
1. Install HeadSetup™ Pro Manager API
2. Install HeadSetup™ Pro Manager
3.2 Installation stepInstalling or updating the HeadSetup™ Pro Manager for functioning in the local host administration environment involves the following steps:
1. Install HeadSetup™ Pro Manager API
2. Install HeadSetup™ Pro Manager
For Updates of the HeadSetup™ Pro, install HeadSetup™ Pro Manager API and HeadSe-tup™ Pro Manager of the new version. The installer will automatically close the process, uninstall existing version and install the new version.Note:-Always install HeadSetup™ Pro Manager API first and then install HeadSetup™ Pro Manager
7

3.2.1 Install HeadSetup™ Pro Manager APITo install HeadSetup™ Pro Manager API in the system follow the steps sequentially:
Step 1: Open HeadSetup™ Pro Manager API folder from the given location.
Step 2: Right click on the setup icon and select Run as administrator.
Step 3: A User Account Control window will appear and ask for permission to make changes to the system. Select yes and then click OK.
Step 4: Install HeadSetup™ Pro Manager API-InstallShield Wizard window will appear. Select the language from the drop down menu. Click OK.
Step 5: A window will appear and a progress bar will track the process.
Step 6: A welcome window will appear. Click Next.
Step 7: A License Agreement page will appear. Select I accept check box. Click Next.
Step 8: A Database Server window will appear. Enter the Database Server and the database catalog by the following methods: 1. Manually
2. Selecting from the drop down menu
3. Clicking Browse button to browse from the given list and select.
For selecting the database server, click the browse button corresponding to the field box. A window showing the list of the available servers will be shown. Select the server and click OK.
For selecting the catalog name, click the browse button corresponding to the field box. A window showing the list of the available names will be shown. Select the desired name and click OK.
8

After filling server authentication and other fields, click next to proceed with the installation process
Note: HeadSetupTM Pro Manager API only supports server authentication for SQL connection.
Step 9: Ready to install page will appear. Click Install to start the installation.
Step 10: A window of Web API is hosted will appear. Click OK.
9

Step 11: The Installation is completed page appears. Click Finish to close the setup program
3.2.2 Install HeadSetup™ Pro Manager To install HeadSetup™ Pro Manager in the system follow the steps sequentially.
Note: To review or change any of the settings click Back or click Cancel to exit the wizard.
Step 1: Open HeadSetup™ Pro Manager folder from the given location.
Step 2: Right click on the setup icon and select Run as administrator.
Step 3: A User Account Control window will appear and ask for permission to make changes to the system.
Select Yes and then click OK.
Step 4: Install HeadSetup™ Pro Manager -InstallShield Wizard window will appear. Select the language from the drop down menu.
Click OK.
Step 5: A window will appear and a progress bar will track the process.
Step 6: A welcome window will appear.
Click Next.
Step 7: A License Agreement page will appear. Select I accept check box.
Click Next.
Step 8: A ready to install page will appear. Click Install to start the installation.
Step 9: Enter the HeadSetupTM Pro Manager API hostname/IP address in the Enter API URL window
The API URL should be of the format http://<API hostname/IP address>>:8080
It is recommended to use hostname for API URL.
Click OK.
Step 10: Select OK in the confirmation window
Step 11: A window showing the entered API URL will appear. Click OK to complete the installation process
Step 12: A progress bar is shown to track the installation process.
Step 13: The Installation is completed page appears. Click Finish to close the setup program.
10

3.3 Configuring HeadSetupTM Pro ManagerSSL (Secure Sockets Layer) certificates are the integral part of securing the sensitive information sent across the internet. Information is encrypted to block any unintended access.
Post installation, the default website for HeadSetup™ Pro API will use port 8080 and HeadSetup™ Pro will use port 80. Both the websites will have HTTP as their default set protocol. For a more secure connection, the tenant may edit port or configure protocol to HTTPS for both websites. The below stated procedures are same for HeadSetup™ Pro API and HeadSetup™ Pro.
Open the Internet Information Services (IIS) Manager on the server running IIS, from the Start menu (Start menu / Control Panel / Administrative Tools / Internet Information Services Manager) or the Search box.
The following steps are shown by considering HeadSetup™ Pro API website as example.
In the left hand panel, expand the tree structure. Beneath the ‘Sites’ folder select HeadSetup™ Pro Manager API.
Click Bindings from the right sidebar to open Site Bindings dialog box
11

3.3.1 Changing the port for IIS servicesSelect desired record from the grid and click Edit.
An Add Site Binding window will appear. Changing the Port field to the new port value (For example, new port value is 8082) will enable the OK button. Select OK to apply the changes.
3.3.2 Configuring IIS to support httpsProtocol cannot be edited. To add binding with new protocol click Add button. An Add Site Binding window will appear. Fill the following fields to create a new binding.
– Change the default protocol (HTTP) in Type field, to the new protocol with the help of drop down list (For example, new protocol is HTTPS).
– Select an IP address from the drop down list.
– Enter a port number which does not match with any other port number available for the specific website.
– Enter a Hostname if desired.
– Click the checkbox for Require Server Name Indication.
12

– Select the SSL Certificate from the drop down menu to enable the OK button.
– Select OK to add the new binding. There will be a new binding added to the existing list.
Note: The website will use different protocols depending on the usage of the port.
For removal of a binding, select record from the grid and click Remove. (For example, http protocol with 8082 port). Select Yes in the Site Binding window confirming the removal of the binding.
3.4 Configuring custom ports for HeadSetupTM Pro Manager API and UIBy design below are some limitations
– API installation should precede UI installation
– API is always installed on port 8080 and UI on 80
– https is not supported by installer
To enable custom bindings for API and UI installation below are the Workarounds:Scenario 1API is installed and the IIS bindings is customized only for API URL. Assuming UI is not yet installed.
Workaround
– Install UI. When prompted for API URL, give the customized API URL.
– The API URL will be treated as backend endpoint in tenant settings and tenant configScenario 2 When both API and UI are installed and the IIS bindings is customized for both. Tenant Signup is not yet done.
Workaround 1: – Uninstall and reinstall the UI installer. It will prompt for API url and enter the new API url.
– If a UI binding is changed we need to manually update the UI Url in web.config
– Download the latest tenantconfiguration.dat from webtool UI and circulate to all users
13
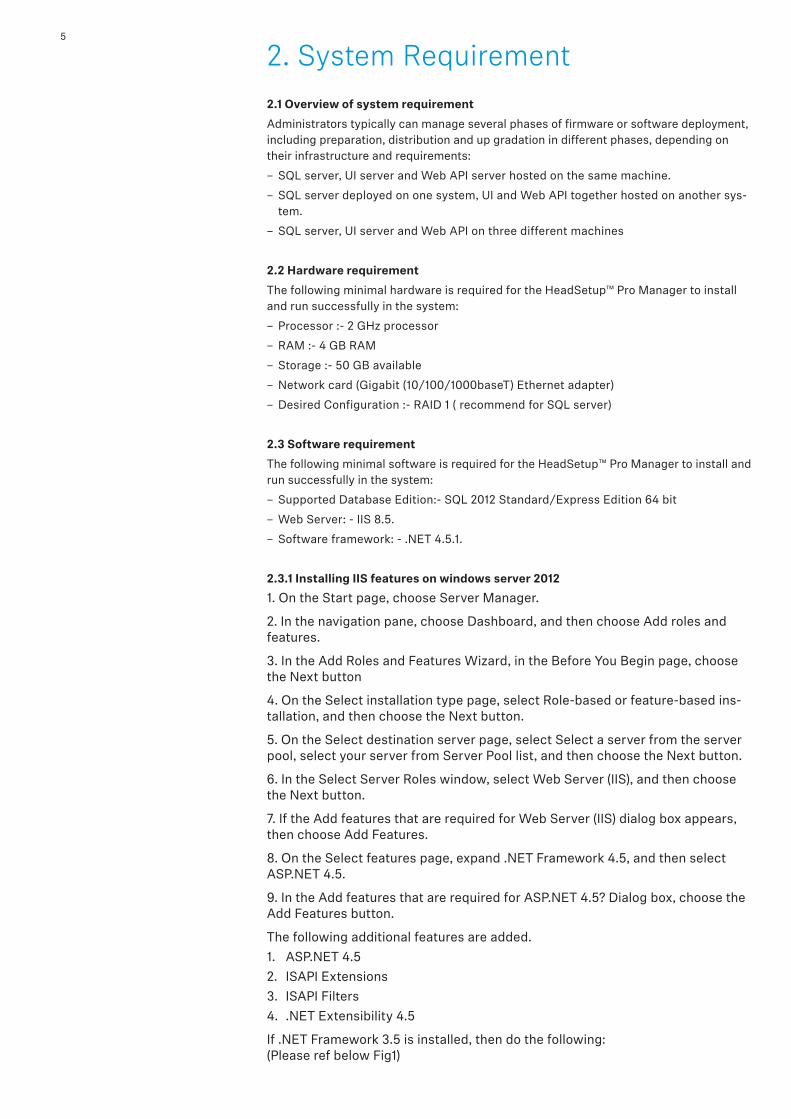
Workaround 2Manually update the below files:
WebApiConnection.json at location [IISInstallatedDrive]\inetpub\wwwroot\ \ForOnPremiseUI\Content\data
{
“WebAPIUrl”: “< > “,
“cloudTenant”: false,
}
Update the WebAPIUrl
– Web.Config at location [IISInstallatedDrive]\inetpub\wwwroot\ForOnPremiseAPI <appSettings> section the below entries
WebUIUrl – “< >”
ResetPasswordLink – “<WebUIUrl>/resetpassword?token=”
– Update SennComWebTool.ReportsWS.exe.config in loactionn C:\inetpub\wwwroot\WindowsService
– <add key=”WebApiUrl” value=”<“<WebAPIUrl >” />
– Login to webtool. Navigate to tenantsettings. Update the backend endpoint to the cor-rect API Url.
– Download the latest tenantconfiguration.dat from webtool UI and circulate to all users
Scenario 3If API and UI are installed and no bindings are changed. And tenantSignUp is also done.
After this if bindings are changed.
Workaround:Same solution as scenario 2.
Note: On upgrade of API and UI service, the customized IIS bindings are not erased. On UI installation when prompted for API url, give the customized API url.
API url entered by the end user is not validated. If a wrong URL is entered, application will not work
14

4. Getting Started4.1 Registration
4.1.1 On Premise SignUpYou can sign up on HeadSetup™ Pro Manager at http://<<UI URL>>:80/#/signup
UI URL – the hostname/IP address of the system where the HeadSetup™ Pro Manager is installed.
For the signing up in the network, following company information is required:
– SMTP Settings
– Server Name Port Number User Name Password
– Company Name
– Tenant Name
– Admin First Name
– Admin Last Name
– Admin Email ID
– Region
– Country
– Time Zone
Note: SMTP settings are required to trigger emails from HeadSetupTM Pro to Tenant Ad-ministrator using the given credentials
Click Submit button to finish signing up in the on premise environment.
The below shown confirmation mail will be received by the tenant administrator.
Note: In this image 10.100.9.222 denotes the local IP address.
15

4.1.2 Logging inPost registration, you can login by using your Email ID as the username and the desired password. For connecting to HeadSetup™ Pro Manager, following browsers are recom-mended:
– Google Chrome
– Internet Explorer (IE) 10
– Internet Explorer (IE) 11
– Mozilla Firefox.
For connecting to HeadSetup™ Pro Manager from a Mac OS, Safari browser is recommended. Login to HeadSetup™ Pro Manager at:
http://<<UI URL>>:80
UI URL – the hostname/IP address of the system where the HeadSetup™ Pro Manager is installed.
4.1.3 Forgot PasswordIn case the login password has been forgotten, click “Forgot Password?” Type in the registered email address and select Submit. A response email with a URL link will be sent to the registered email address. You can reset the password by following the URL provided in the response email sent.
4.2 Deployment of the Sennheiser HeadSetup™ ProThe end-user application “Sennheiser HeadSetup™ Pro” must be installed on end-user PCs required to be managed via the Sennheiser HeadSetup™ Pro Manager
4.2.1 Retrieving client files for the first timeOnce package containing zip file is downloaded, please create a folder where you unpack the downloaded file. After unpacking the file, folder should now contain the following files: (version number can vary).
16

4.2.2 Installing the client manually for the first timeFrom the installation folder where you placed the installation files and the TenantConfiguration.dat file, run the exe file. (Administration rights to the PC are required.)
Follow the guide and complete installation. Start the application by clicking the HeadSetup Pro shortcut ( ) on the desktop – or find it by typing HeadSetup in the search program under the Windows menu.
Please leave time for the product to initialize and negotiate with the cloud service. Usually it takes a few minutes, but in a few cases it can take up to 5 minutes.
Log in to your web portal and click on the Manage User menu item. Your user automatically gets added to the system after the negotiation has taken place.
Mass DeploymentThe ability to distribute software to a number of users or computers from a centralized location has become a requirement for many administrators.
The software is installed without the administrator physically visiting each machine. An administrator can use system management software to control a user’s environment.
HeadSetup Pro installation support silent installation and uninstall.
The command line arguments used for the silent installation of the Sennheiser HeadSetup™ Pro Application is: HeadSetupPro.exe /S /v /qn8
For silent uninstalling Sennheiser HeadSetup™ Pro Application, the command line arguments are: HeadSetupPro.exe /X /S /v /qn.
Note: The silent installation does not trigger the application to start, so a restart of the PC is required to start up application.
Product Code The Product details.txt files contain the Product Code. This is used for detection validation.
4.3 Sennheiser HeadSetup™ Pro Manager Layout The layout of Sennheiser HeadSetup™ Pro Manager is divided into sections as shown in the below screenshot.
Note: The references to the following topics are shown in the diagram: A- 2.2.1 Login Information B- B-2.2.3 Grid Settings C- C-2.2.4 Search D- D-2.2.5 Column Header E- E-2.2.6 Page Navigation F- F-2.2.7 Application menu.
17

4.3.1 Login informationThe login information will give the administrator access to access settings, download the account unique “TenantConfiguration.dat” file, change credentials and terminate the current session.
In the dropdown menu, select the option that corresponds to the required function to be performed.
4.3.1.1 SettingsSystem settings are displayed here.
General settings:“Time Zone Preference” can be set according to relevant location
SMTP settings:“Server Name” SMTP server name
“Port Number” Port at which SMTP server is listening
“Username” Email address which is used to send out emails from application
“Password” Email address password
Client settings:“Back End Point” Server address. Configurable
“Tenant ID” Tenant specific system ID. Not configurable
“Heart Beat” Interval in Sec. for client polling Configurable
Sennheiser HeadSetup™ Pro Manager for updates
Update mode Configurable
Enable option for Update from File on clients.
This is by default disabled so end-user will not have the option to select upgrade from file.
Allow Downgrade Configurable
Enable option for Allow Downgrade of the firmware.
This is by default disabled as Sennheiser always recommend to run on the latest firmware version.
18

Please note that changes made in settings will be applicable for all users
4.3.1.2 AdministrationHeadSetup Pro™ Manager enables the possibility to create more admin users with different roles and privileges to manage this application.
Note: In the current implementation only ‘Super Tenant Admin’ user can create more
4.3.1.2.1 View Admins
The tab ‘View Admins’ is in the main view of the ‘Manage Admin’ layout, showing all the admins information.
The following details can be found in the view:
– Admin Name
– Role
– Email ID
– Contact
– Country
– Region
– Created On
– Created By
You can edit or permanently delete a specific admin from the database using the icon buttons available in the grid ‘Action’ column.
To create a new admin, click ‘Add Admin’ button available in the ‘Manage Admin’ layout and fill in the required information
4.3.1.2.1.1 Add/Edit Admin
A
BCD
E
F
19

To create new admin, following information is required:
– Admin First Name
– Admin Last Name
– Admin Email ID
– Admin Contact Number
– Region
– Country
– Time Zone
– Role
After filling in all the required details, click on ‘Add’ button to submit the details. Once details submitted successfully, E-mail(s) sent to newly created user to reset password.
In the current implementation, two different roles are supported to create admins
– Power User
(Provides full permissions for all the features except no access to ‘Administration’ feature)
– Internal User
(Provides read-only permission for all the features except no access to ‘Administration’ feature)
4.3.1.3 Client configA Tenant account specific Token (TenantConfiguration.dat) can be downloaded here, for deploying to end-user installations.
1. The token must be deployed to end-user PCs when installing the Sennheiser HeadSetup™ Pro client.
2. The token ensures that the clients are allowed to connect the tenant-specific account on the Sennheiser HeadSetup™ Pro Manager system.
3. The token is required for clients to be managed and to receive updates from the IT administrator.
The token (TenantConfiguration.dat) contains Tenant account specific information, ensuring a secure connection between the end-user application and the tenant-specific account.
Once downloaded, the TenantConfiguration.dat file is encrypted and cannot be read.
1. Backend Endpoint (address of the server with which the HeadSetup™ Pro will communicate)
2. Initial Heartbeat Time (The value set in “Heart Beat” indicates the duration in seconds for when the HeadSetup™ Pro will contact the server and check for available FW and SW updates).
3 Tenant specific ID
20

4.3.1.4 Change PasswordThe administrator can change the account password at any time. Go to the tenant drop-down menu and select “Change Password”
4.3.1.5 HelpDocumentation and user guides for the system can be accessed by selecting “Help.”
4.3.1.6 AboutSelect “About” to learn about system information and licenses.
The following system info will be shown:
– Version
– Build
– Date of the application.
The following details of the license will be shown:
– License information
– License key
– Company name
– Tenant name
– License activation date
– License expiration date
– Maximum number of devices
– Maximum number of users
– License status (4 different license status shown)
– Demo
– Active
– Near expiration
– Expired
– License type:
– Evaluation - This license is a trial license (3 months)
– Commercial – A license has been purchased
For changing any of these values a new license is required. Please contact Sennheiser support at: [email protected]
4.3.1.7 LogoutTo secure account details and eliminate misuse of the system, select Logout after finishing tasks in the system
4.3.2 Grid settingsIn Grid Settings, the listed column view can be arranged.
21

A user can customize the field columns by changing the following settings:
– Column properties
– Display selections
– Column display order
The changes made in the grid will be valid only for that specific machine and specific browser until that specific browser’s application data is cleared.
4.3.2.1 Row count“Number of rows” per page to be viewed can be set by clicking the dropdown button.
4.3.2.2 Display selectionsIncluding, excluding and order of displayed fields can be set in the grid settings view.
Add to the Selected Column from the Available Column.
Remove from the Selected Column to the Available Column.
Add all fields to the Selected Column from the Available Column.
Remove all fields from the Selected Column to the Available Column.
22

4.3.2.3 Column display orderThe column display order in the Selected Columns box determines the display order in the final view. Top to bottom order in the list box makes the change in reference of left to right order in the display. Once the column selection is highlighted in the Selected Columns, the column display order can be changed using the following functions.
Moves the selected column up in the list box (left in the final display).
Moves the selected column down in the list box (right in the final display).
To get the default settings, click “Restore Default Settings.”
4.3.3 SearchUse the Search bar to quickly search for a specific attribute in the current view.
4.3.4 Information fieldsThe information field shows the result of the chosen main menu and associated tabs. The listed order can be sorted alphabetically and numerically in ascending or descending or-der.
To change the order of sorting, click on the field name to change the displayed order.
4.3.5 Page navigationNavigating multiple pages in Sennheiser HeadSetup™ Pro Manager is easily accessed at the bottom of the displayed view.
4.3.6 Application menuThe main menu contains associated selectable tabs, which will display subject specific information:
– Manage Device
– Manage Updates
– Manage User
– Configuration
– Reports
The selected menu will always be highlighted.
5. Manage userManage user menu is for managing users having the client application Sennheiser HeadSetup™ Pro installed on their local PC.
The user are automatically created in the system the first time the Sennheiser HeadSetup™ Pro is started on the end-user PC.
23

5.1 UsersFor the user to be created in the system the information FirstName, LastName and Email address needs to be available. This will happen automatically by the client querying the AD. If these information are not available or empty the user will not be created and the client will not be connected.
Information such as Office, Country and City will also be queried. If no information is available the user information will stay blank.
The Administrator can manually add this information on the user if desired by clicking the edit icon on every user.
Information about contact number is not taken from AD and if you desire that information it needs to be typed in manually.
5.2 Manual groupWhen deploying a FW or SW update, this must be done to a group.
(In case just one user is to receive an update, add the user to an empty group)
The Manual Group tab allows the tenant administrator to organize users into groups. In case a more detailed grouping of users is desired based on member criteria, sub-groups to an existing group can be created.
Example: A tenant administrator can choose to create groups for indicating departments, locations, floors, etc. having attached sub-groups containing members based on user/device profile.
For creating a new group or sub-group, click “Create New Group.”
Select New Group from group type and fill in the group name and group description fields.
For a sub-group, select new sub-group from group type and fill in the following details:
– Parent group
– Sub-group name
– Description
Add relevant users to a group by selecting users enrolled into the system and transfer to the group member list.
To quickly identify a specific user in the system, use the search bar located above the users list to search for the user to be added to the group.
To remove user(s) from a group, click the “x” icon in the action column inside the group member list.
Once group information and users have been added, click “Save” to save the created group.
Select all users checkbox can be used if you want all users registered in the system to receive the updates, also users added in the future. Enabling this checkbox will overrule any other selecting you might have made and will disable the grids for manual selection.
24

In the manual group list, a “+” sign next to a group name indicates that the group contains sub-groups. Click the “+” sign to expand the structure to view the sub-groups connected.
Clicking “-” next to an expanded group structure will collapse the group view.
You can edit or permanently delete a specific group. To edit the parameters for a group or sub-group, click the edit icon.
When a change to folder parameters has been performed, click “Save” to apply changes.
The following details are available in the view:
– Device name or software name targeted by the update
– Type of device
– Version of the firmware/software
– Release notes for the update
– Date and time of receiving the update
5.3 AD groupAdding users to Sennheiser HeadSetup™ Pro Manager AD Group Active Directory (AD) provides options to create groups and is used by Sennheiser
HeadSetupTM Pro to determine if the end-user belongs to the group or not and also to handle large number of users. The data in the Active Directory is stored in a hierarchical and extensible form. The AD group tab enables the tenant to create, view and edit an AD group.
The following details can be viewed:
– AD group name
– Creator
– Date and time
You can edit or permanently delete a specific AD group from the database.
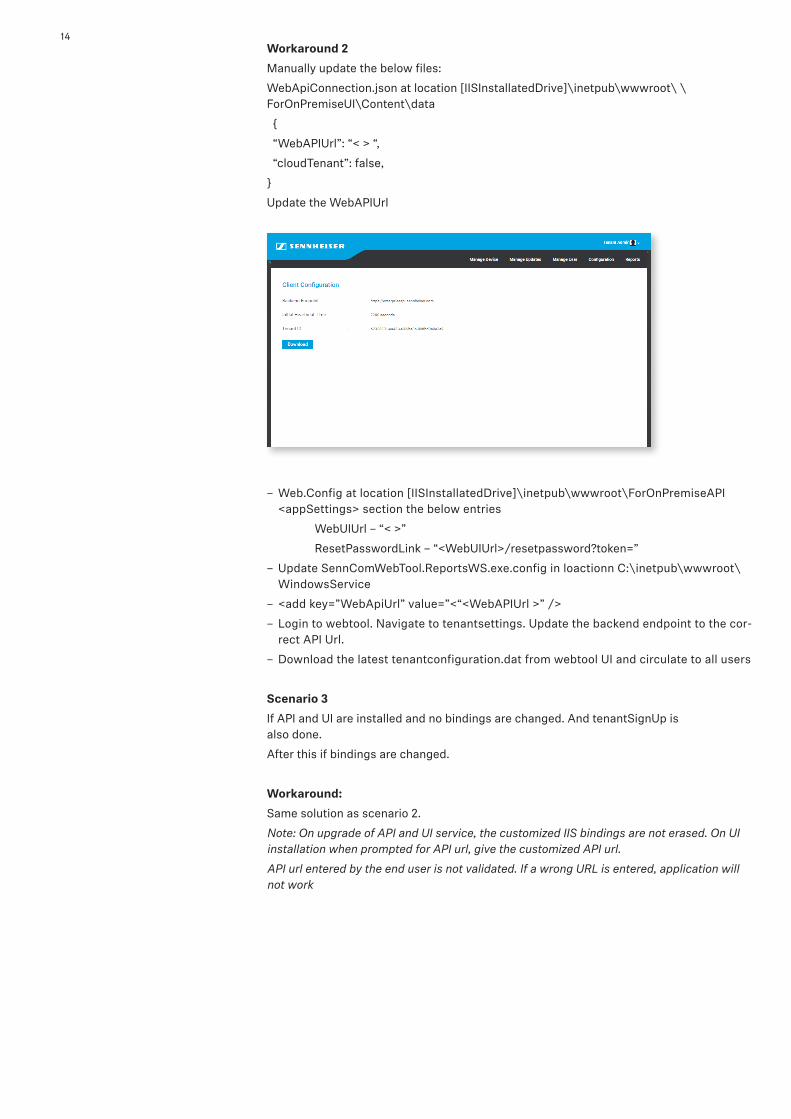
To create a new AD group, select the Create AD Group button. Fill in the AD group name (according the syntax AD_*) and AD search string. Click Add to create the new AD group.
25
Note: As an example, the below stated information is required to be filled in the “Create AD Group” window to create an AD Group under the name GroupIdentifier.
AD Group name: AD_GroupIdentifier
AD search string: LDAP://LocalDomain/CN=GroupIdentifier,
OU= Group,OU=Department,OU=Organization,OU=Operating region,DC= Root do-main,DC=com
Where
CN = Common name
OU = Organizational unit Name
DC = Domain component.
To edit an AD Group, click the button and make the desired changes for the AD Group name and AD search string.
Click “Save” to apply the changes.
Note: It is not possible to edit an AD Group if there are active deployments using the group. It is required to stop deployments, edit and then resend the deployment.
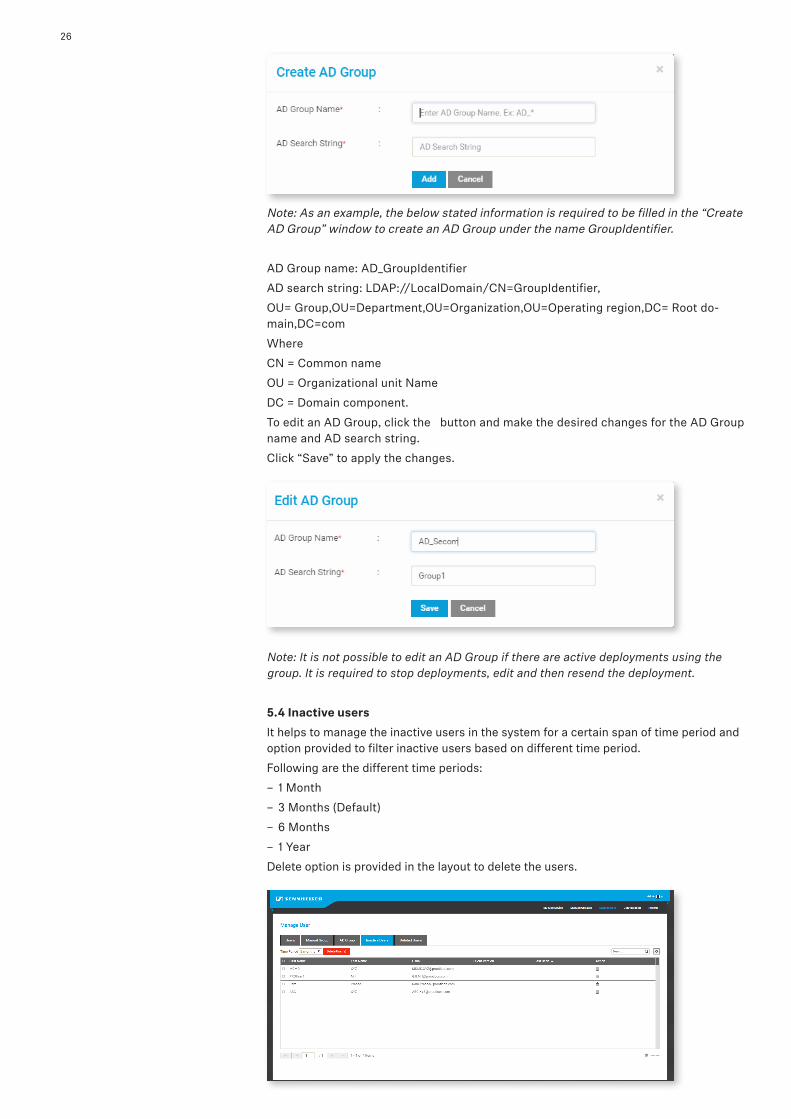
5.4 Inactive usersIt helps to manage the inactive users in the system for a certain span of time period and option provided to filter inactive users based on different time period.
Following are the different time periods:
– 1 Month
– 3 Months (Default)
– 6 Months
– 1 Year
Delete option is provided in the layout to delete the users.
26

5.5 Deleted users Users deleted from the “Manage User” list will be placed under the “Deleted User” tab.
A tenant administrator can choose to either permanently delete a user from the system, or to restore the user.
If a user resides in the “Deleted users” list, the HeadSetup™ Pro client belonging to the user will no longer be able to receive updates.
If a user is permanently removed from the “Deleted Users” tab, all user specific information and historical data about usage is deleted.
Select the “Restore User” button to move the user from the deleted users tab list to the Users tab list and the user will be able to receive updates again.
Select the “Delete User” button to permanently delete the user from the system.
For the deleted user to be re-enabled into the system, it is required that the HeadSetup™ Pro is removed and reinstalled on the user PC.
6. Manage deviceThe Manage Device menu is for managing the assets deployed in the organization. The devices can be registered manually. You can view the details such as firmware version and configuration settings by selecting an asset.
The symbol shows that the device is Active. (Connected)
The symbol shows that the device is Inactive. (Not connected or HeadsetupTM is not running)
The symbol shows that the device is not registered to a user
27

6.1 All devices The tab “All Devices” is the main view, showing all Sennheiser devices, as well as competi-tor products.
– The following details can be found in the view:
– Device name
– Registered user
– Current user
– Type of device
– Device ID
– Firmware version installed on the device
– Vendor (competitor devices will be recognized and displayed, but the
– update/detail info possibility is limited)
– If a device is registered (no symbol) or not registered (symbol).
For even more detailed information about a device, click on the device name and find the following information about the device.
– Device name
– Status of device
– Registered/Not registered
– Type
– Device ID
– Firmware version installed
– Username
– First seen
– Last used date
– Last user
– Country
– Office
– City
– Description
28
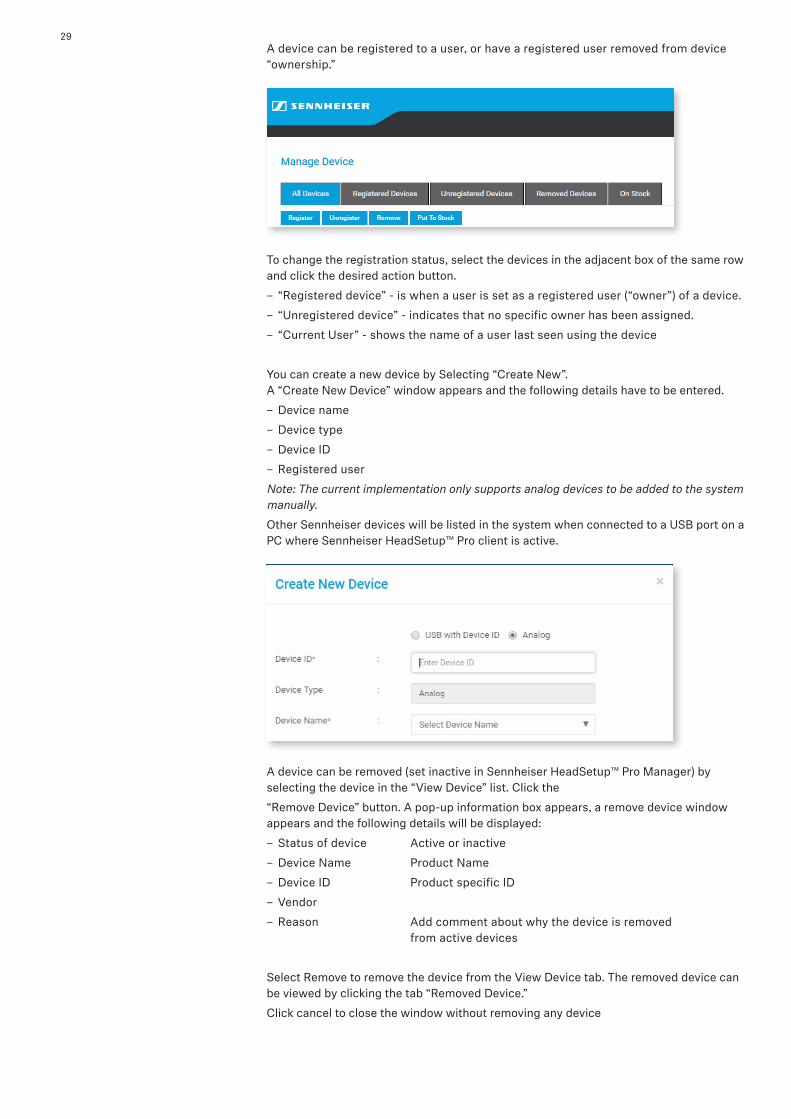
A device can be registered to a user, or have a registered user removed from device “ownership.”
To change the registration status, select the devices in the adjacent box of the same row and click the desired action button.
– “Registered device” - is when a user is set as a registered user (“owner”) of a device.
– “Unregistered device” - indicates that no specific owner has been assigned.
– “Current User” - shows the name of a user last seen using the device
You can create a new device by Selecting “Create New”. A “Create New Device” window appears and the following details have to be entered.
– Device name
– Device type
– Device ID
– Registered user
Note: The current implementation only supports analog devices to be added to the system manually.
Other Sennheiser devices will be listed in the system when connected to a USB port on a PC where Sennheiser HeadSetup™ Pro client is active.
A device can be removed (set inactive in Sennheiser HeadSetup™ Pro Manager) by selecting the device in the “View Device” list. Click the
“Remove Device” button. A pop-up information box appears, a remove device window appears and the following details will be displayed:
– Status of device Active or inactive
– Device Name Product Name
– Device ID Product specific ID
– Vendor
– Reason Add comment about why the device is removed from active devices
Select Remove to remove the device from the View Device tab. The removed device can be viewed by clicking the tab “Removed Device.”
Click cancel to close the window without removing any device
29

In more detailed information layout (Device Details) about a device, new section added to show the connected devices (paired devices) with respect to the parent device
Following information is shown in ‘Connected To’ section:
– Device Name
– Last Seen
– Last User
6.2 Unregistered devices“Unregistered devices” are not tagged to a particular user. However, in the column “Current User,” the name of the latest user of the device can be seen, no matter if the device is registered or not.
A device can be restored and then registered to a user by selecting it from the “Unregistered Devices” list.
You can view the following details by default:
– Device Name
– Device ID
– Firmware Version
– Type of the device
– Additional columns can be added in grid settings
– To move a device from the unregistered device to the Registered Device tab, select the specific device/devices and click “Register Device” and select a user.
6.3 Removed deviceDevices taken out for maintenance, or discarded can be removed from the system by using the Removed Device tab. Once a device is removed from the View Device tab, the device is moved to the Removed Device tab. A removed device can be set active again by clicking “Put On Stock” action button. Details will then be updated when device is being used
30

The view includes the following details:
– Device Name
– Device ID
– Firmware Version
– Current User
– Type of the device
– Last used time and date
– Reason for removal
To perform any of the actions, select the checkbox for the device/devices being targeted for the same action.
– Select “Delete Device” to remove a device from the system.
– Select “Restore Device” to restore a device to the View device List.
6.4 On StockUnder the TAB On stock devices that haves no current user, not registered user are listed. If the administrator gets back a device, he can find the device in the overview by searching for user or device and click the Put to stock button to place the device in stock. All user information is cleared from the device. The device can be removed from stock by clicking the
Register button to assign the device to a new user.
Note: If the system detects a device being connected, the device will be moved from On stock list to the Unregistered list. (See definition of an unregistered device above).
In ‘On Stock’ tab, while creating new device in the system, extended the implementation to add ‘USB with Device ID’ devices.
You can create a new device by Selecting “Create New” in on-stock tab. A “Create New Device” window appears and the following details have to be entered.
– Device ID
– Device Type
– Device Name
User has to input the 16 characters alphanumeric device ID, based on the device ID, system will identify the device family and device name and auto-fill the information.
Note: The current implementation supports both ‘USB with Device ID’ and ‘Analog’ de-vices to be added to the system manually.
7. Manage updates You can use “Manage Updates” menu for managing software updates of application and firmware updates of the assets (headsets) deployed in the organization. You can choose to schedule updates to take place at specific time of the day. You can choose to deploy a “Forced Update” to a device, to ensure that an important update of that device will be per-formed mandatorily.
31

Note: The administrator can accomplish the following actions by clicking on their respec-tive buttons
– For deploying the update, click button and enter the relevant data.
– You can select the type of update from the drop down menu.
– You can choose specific user group for the update by clicking on the drop down menu and selecting the boxes adjacent to the desired user group. Select All will select all the user groups. Deselect All will clear all the selections in the list. To ease the selecti-on, type the name of the user group in the search box and perform the desired action.
– You can select yes in the drop down menu to enable Forced Upgrade.
– For scheduling date and time click in the box and select date and time as required.
– To select date click on the specific day in the month of the year.
Click button to view the next month.
Click button to view the next month.
Click button to view the next month.
Click button to view the next month.
Click button to view the next month.
32

To return to the date selection, click the button.
– It is possible to download the software or a firmware locally by clicking the download icon.
– To discard any version of the software or firmware,
click on the button.
7.1 Firmware updatesUnder the tab “Firmware Updates,” new device-specific firmware releases from Sennheiser will be available for deployment in the organization.
To benefit from device firmware improvements and enhanced functionality released via updates from Sennheiser, it is highly recommended to keep devices in the organization updated.
The following details about the release can be viewed:
– Device name of the device to be upgraded
– Latest version of the firmware in the device
– Release notes by clicking on the associated icon
– Date and time of receiving the update notification
– Source from where the update is sent.
From the column “Action,” you can deploy, download or delete the software released from Sennheiser.
33

7.2 Software updatesUnder the tab “Software Updates,” new versions of the end-user software
“Sennheiser HeadSetup™ Pro” will be available for deployment in your organization.
The following details can be viewed:
– Release notes
– Date and time of receiving the update notification.
– Source from where the update has been sent.
From the column “Action,” you can deploy, download or delete the software released from Sennheiser.
Note: When deploying a software update of the client a warning will be presented.
This is because the HeadSetupTM Pro software requires administrative rights for installation. This has the following impact.
For users without administrative rights on their PC, they will be prompted to enter user credentials and password for a user with the right permissions.
For user with administrative rights the user can still be prompted with a “Do you want allow the following program to make changes to this computer” message box. This is default windows behaviour caused by the UAC settings. This can be removed by changing the UAC settings to never notify, but this is not recommended. The user has to click yes for the software to install.
The recommended way of updating the software is to use a mass deployment tool such as SCCM.
When deploying you need to choose a user group (see section 3). To send the package click the Deploy Now button. The configuration will happen silently on the end user device on the next heartbeat.
7.3 Upload updatesSennheiser will be sending out notifications whenever there is a new firmware or software release to the Tenant Admin who has signed up for HeadSetupTM Pro Manager.
IT admin can download the update from the cloud server and upload it to local HeadSetupTM Pro Manager so that they are available to be deployed with in the organization.
The Administrator can select radio button for either software or firmware update.
Note: The following three priorities can be selected by the administrator.
– Critical Update
– Recommended Update
– Minor Update
For software or firmware update select the priority .Click in the box to browse or drag the file in the box to attach the file. Select Upload to deploy it later.
34

7.4 Deployment Status
All active deployment jobs are listed in this view.
The following information is presented here:
– Job Created : Time stamp the job was created.
– Type: The job type. (Currently only Update)
– Device: The device or software targeted with this job.
– Group name: The name of the group the update is sent to.
– Version: Version of the software or firmware that was deployed.
– Devices Reached: KPI of the distribution.
– Update success: KPI of update being completed.
The “Device Reached “ KPI represents:
Gray color as status is not yet available - It is a background job, it collects the KPI status and display one of the
below status after some time interval.Green color as download success. Red color as download not yet done.
On hovering overthe color bar, it shows the no of devices for which firmware download was success or not yet downloaded.
The “Upgrade Status” KPI represents –
Gray color as status is not yet available - It is a background job, it collects the KPI status and display one of the
below status after some time interval.
35

Green color as Upgrade successRed color as upgrade failed
Orange color as upgrade pending.
When clicking the color bar or device link will bring you to the details page.
Note: The KPI information is only rendered after 60 minutes and will therefore only be available thereafter.
7.5 Deployment details
The deployment details page gives you more specific information of the actual status.
– Scheduled Time: The schedule time that was given when deployed.
– Update: The name of the device or software and its new version.
– Deploy Group: The name of the group the update is sent to.
– Devices Reached: KPI of the distribution.
– Update success rate: KPI of update being completed.
The “Device Reached “ KPI represents:
Gray color as status is not yet available - It is a background job, it collects the KPI status and display one of the
below status after some time interval.
Green color as download success.Red color as download not yet done.
On hovering over the color bar, it shows the no of devices for which firmware download was success or not yet downloaded.
The “Upgrade Status” KPI represents –
Gray color as status is not yet available - It is a background job, it collects the KPI status and display one of the
below status after some time interval.
Green color as Upgrade successRed color as upgrade failed
Orange color as upgrade pending.
Update Success tab displays the devices for which deployment succeeded.
Update Failure tab displays the devices for which deployment failed. (Update was downloaded and update attempt was done.)
Update pending tab displays the devices for which update is pending. Download had been done but update has not yet started.)
Device not Reached tab displays the devices which have not yet downloaded the update.
36

8 ConfigurationHeadSetup ProTM Manager enables the possibility to read the settings of the connected devices.
Using the tool you are also able to push configurations and lock specific settings on the end users devices by pushing a configuration package.
Note: In current implementation only DECT product family is supported and in future versions other product families will be supported.
In the current example we will be pushing a regulatory compliance setting to a group. The flow is very similar to a firmware update so prerequisites are the same.
Before start using the configuration please ensure that the devices are updated with the latest firmware.
8.1 Configuration OverviewThe configuration overview page is designed to have a one place to see and easily com-pare a configuration setting. The page lists all devices that are applicable for a configura-tion and gather all the settings in one place.
In Configuration overview layout, implemented ‘Device Type’ filter and currently this filter supports to filter on two device types
– Wireless DECT
– Wired USB
By default, ‘Wireless DECT’ filter will be applied
In this view all configurable devices are listed and you can do a global search to filter on either devices, users or deployed configuration package.
The deployed pack column shows if and what configuration package has been pushed to the specific device.
Shows the number of configuration parameters available on the product. Clicking it will open up a view of all the configurations and their value on the product.
If the number shows 0 it means that the device did not support any configuration. Most likely because the firmware version is not supporting it. Suggestion is to update to latest firmware.
For comparing a single value, it is possible to click the drop down on the title bar to select 1 of the available configurations. The grid now changes to only show the selected configuration and value. This provides an easy way to compare many devices quickly just by looking.
8.2 Configuration RepositoryThe Approved Configuration TAB contains a list of all raw packages received and approved. These packages will be read only when received and all values will be empty.
37
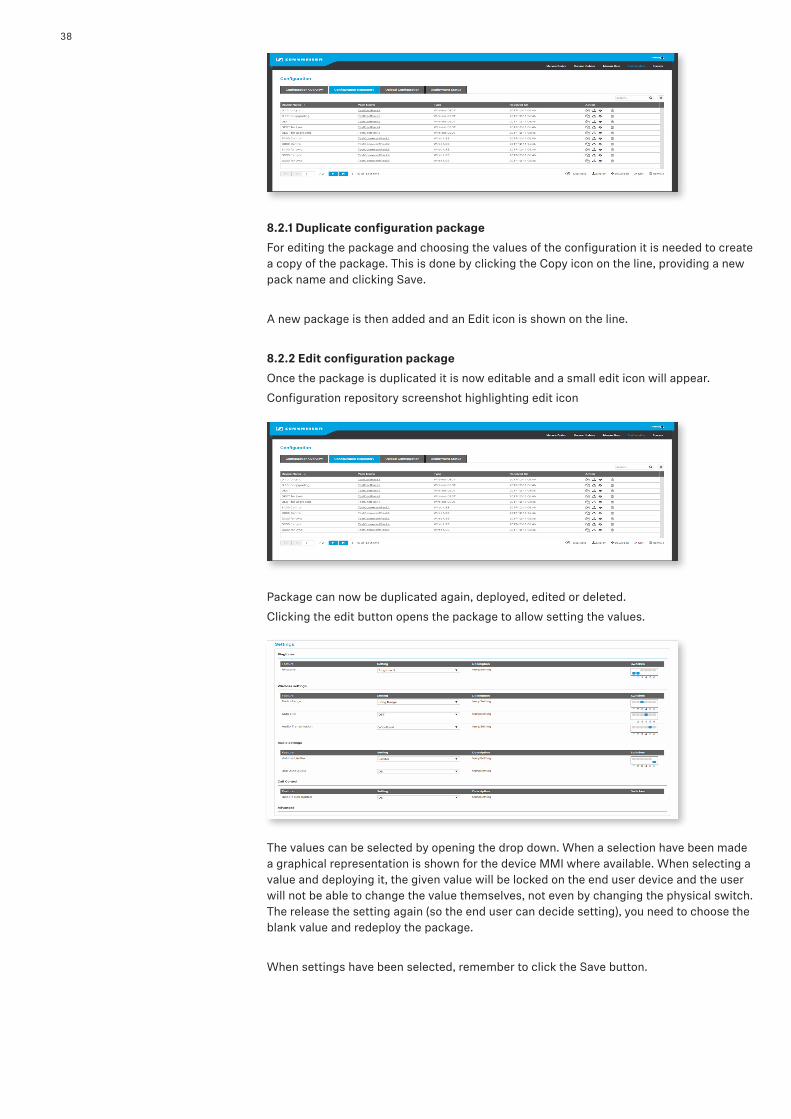
8.2.1 Duplicate configuration packageFor editing the package and choosing the values of the configuration it is needed to create a copy of the package. This is done by clicking the Copy icon on the line, providing a new pack name and clicking Save.
A new package is then added and an Edit icon is shown on the line.
8.2.2 Edit configuration packageOnce the package is duplicated it is now editable and a small edit icon will appear.
Configuration repository screenshot highlighting edit icon
Package can now be duplicated again, deployed, edited or deleted.
Clicking the edit button opens the package to allow setting the values.
The values can be selected by opening the drop down. When a selection have been made a graphical representation is shown for the device MMI where available. When selecting a value and deploying it, the given value will be locked on the end user device and the user will not be able to change the value themselves, not even by changing the physical switch. The release the setting again (so the end user can decide setting), you need to choose the blank value and redeploy the package.
When settings have been selected, remember to click the Save button.
38

8.2.3 Deploying ConfigurationOnce package is ready, it can be deployed to a user group. This is done by clicking the Deploy icon on the line.
When deploying you need to choose a user group (see section 3). To send the package click the Deploy Now button. The configuration will happen silently on the end user device on the next heartbeat.
8.3 Upload ConfigurationSennheiser will be sending out notifications whenever there is a configuration update to the Tenant Admin who has signed up for HeadSetupTM Pro Manager.
IT admin can download the configuration from the cloud server and upload it to local HeadSetupTM Pro Manager so that they are available to be deployed within the organization
The Tenant Administrator can then upload a configuration package as zip file and the package will be uploaded.
8.4 Deployment StatusVery similar to the firmware deployment it is possible to follow the status of the deployment. (Referring to the section 7.4).
9. ReportsReports offer an in-depth analysis of existing conditions in the company.
The reports have two sub-menus showing the details of the following:
– User
– Device
A chart being viewed can be downloaded or printed by clicking the icon shown at the right top corner of the chart interactive region.
To select the desired output format, click the icon and select the relevant option.
The below stated options are available to the tenant:
Click the legends to show or hide the values in the existing chart.
An active user for a monthly statistics is defined as:
“Someone who has used the Sennheiser HeadSetup™ Pro at least once during the month”
39

An active user for daily statistics is defined as:
“Someone who has used the Sennheiser HeadSetup™ Pro at least once during the day”
Note: All the data for the reports are with reference to Greenwich Mean Time (GMT).
9.1 UserThe total number of active and inactive users will display an index with a standard goal and help to identify inactive devices. A status summary of deployed Sennheiser HeadSetup™ Pro client software compared to available versions is also available.
9.1.1 User Overview “Users overview” will show the daily statistics summary of the total number of active users in a week.
The pointer can be placed over any section of the day column for the exact key values.
For example, the below shown figure displays the exact number of active users for a periode of the last 7 days.
9.1.2 Client versionsThe Client versions pie chart shows the version of the Sennheiser HeadSetup™ Pro being used.
The following views can be selected:
1. Active in the last 30 days: View the percentage of active users using Sennheiser HeadSetup™ Pro versions.
2. Total (active/inactive): View the percentage of all users (active and inactive) throughout time using Sennheiser HeadSetup™ Pro versions.
9.1.3 Monthly Overview The overview will show the monthly statistics summary of the total number of users and active users in a year. To view the exact numeric value, position the pointer over any section. For example, the below shown figure displays the exact number of total users and active users in the months from March to July.
This graph can be used to monitor that your installations correspond to the number of users/employees.
9.2 DeviceEvaluating the statistics of the devices used by the end-user reflects the device usage by
40
the company.
The device menu does a competitive analysis based on the competitors and the product criteria.
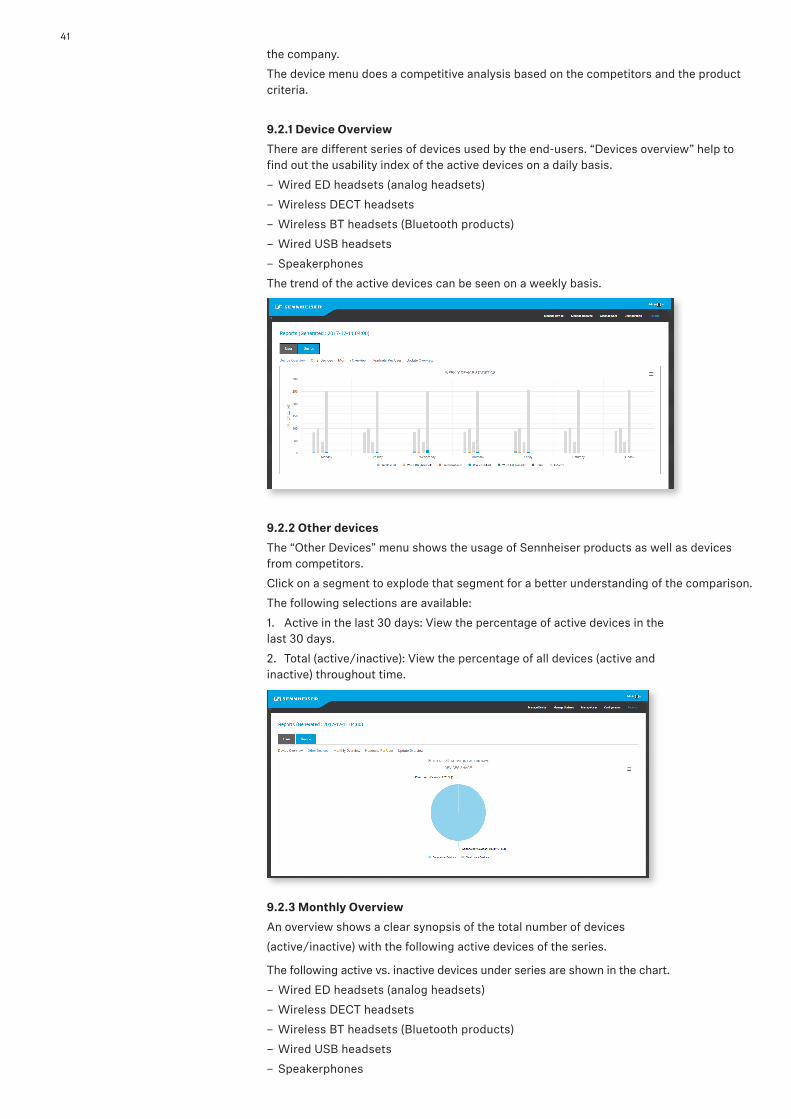
9.2.1 Device Overview There are different series of devices used by the end-users. “Devices overview” help to find out the usability index of the active devices on a daily basis.
– Wired ED headsets (analog headsets)
– Wireless DECT headsets
– Wireless BT headsets (Bluetooth products)
– Wired USB headsets
– Speakerphones
The trend of the active devices can be seen on a weekly basis.
9.2.2 Other devicesThe “Other Devices” menu shows the usage of Sennheiser products as well as devices from competitors.
Click on a segment to explode that segment for a better understanding of the comparison.
The following selections are available:
1. Active in the last 30 days: View the percentage of active devices in the last 30 days.
2. Total (active/inactive): View the percentage of all devices (active and inactive) throughout time.
9.2.3 Monthly Overview An overview shows a clear synopsis of the total number of devices
(active/inactive) with the following active devices of the series.
The following active vs. inactive devices under series are shown in the chart.
– Wired ED headsets (analog headsets)
– Wireless DECT headsets
– Wireless BT headsets (Bluetooth products)
– Wired USB headsets
– Speakerphones
41

The chart identifies the number of devices that have not been connected in a full calender month.
For the existing report, extended the report to view the active vs. inactive status of each specific device.
We can switch to this detailed view by clicking on any of the device family series for the full calendar month.
9.2.4 Headsets Per User This report overview shows the user count based on the number of headsets being used.
9.2.5 Update OverviewThe overview will show the percentage of the devices which are having the latest version to the ones which are yet to be updated. The firmware version approved by the tenant is taken as reference to calculate the percentage.
The following views can be selected:
- Total: This view considers all the devices added in the system.
- Active in last 30 days: This view considers only the devices connected in last 30 days.
On clicking the report, user can view the detailed report for each device model which shows the count of the devices with different firmware version currently used.
42

10. Uninstalling HeadSetup™ Pro ManagerTo Uninstall HeadSetup™ Pro Manager from the system follow the steps:- Step 1: Open Control Panel. Step 2: Select Programs. Step 3: Click Uninstall a Program from Programs and Features.
Locate the following two files to successfully uninstall the application:- – Install HeadSetup™ Pro Manager. – Install HeadSetup™ Pro Manager API.
Note:- When uninstalling the application always uninstall Install HeadSetup™ Pro Manager and then uninstall Install HeadSetup™ Pro Manager API.
10.1 Uninstall HeadSetup™ Pro ManagerTo uninstall HeadSetup™ Pro Manager from the system follow the steps sequentially.
Note:- To continue using the application click No or click Cancel to exit the process.
Right click on the Installed HeadSetup™ Pro Manager and select Uninstall. In the Programs and Features dialogue box click Yes. Click OK in the Install HeadSetup™ Pro Manager UI box. A progress bar will track the uninstalling of the application.
10.2 Uninstall HeadSetup™ Pro Manager APITo uninstall HeadSetup™ Pro Manager API from the system follow the steps sequentially.
Note:- To continue using the application click No or click Cancel to exit the process.
Right click on the Installed HeadSetup™ Pro Manager API and select Uninstall. In the Programs and Features dialogue box click Yes. A progress bar will track the uninstalling of the application.
Note:
If custom ports are used during installation, post uninstalling HeadSetupTM Pro Manager API and HeadSetupTM Pro Manager we recommend you to perform following task for clean uninstallation
1. Go to C:\inetpub\wwwroot and delete highlighted folders
2. Go to IIS manager homepage, click on sites select HeadSetup Pro Manager API and HeadSetup Pro Manager right click and click on remove.
43
0546 2018
Sennheiser Communications A ⁄ SIndustriparken 27, DK-2750 Ballerup, Denmarkwww.sennheiser.com
Contact information Support Portal: www.sennheiser.com/cco-support E-mail: [email protected] Phone: Find your local support phone number and opening hours here below.
Asia-PacificAustraliaT +61 2 9910 67008:00 - 17:00
ChinaT +86 10573196669:00 - 18:00
Hong Kong S.A.R., ChinaT +85 2341284009:00 - 18:00
IndiaT 1 800 200 36329:00 - 18:00
JapanT +81 364 068 9199:00 - 18:00
New ZealandT +64 (9) 580 04898:00 - 17:00
SingaporeT +65 6408 51439:00 - 18:00
South KoreaT +82 1544 169910:00 - 18:00
EuropeAustriaT +43 7208808578:00 - 17:00
BelgiumT +32 280807848:00 - 17:00
DenmarkT +45 898828418:00 - 17:00
FinlandT +358 9424503528:00 - 17:00
FranceT +33 1706103868:00 - 17:00
GermanyT +49 30308080458:00 - 17:00
HungaryT +36 140880568:00 - 17:00
IcelandT +353 152625728:00 - 17:00
IrelandT +353 152625728:00 - 17:00
LuxembourgT +352 278602348:00 - 17:00
NetherlandsT +31 20-80809568:00 - 17:00
NorwayT +47 239610528:00 - 17:00
RussiaT 8800-10085578:00 - 17:00
SpainT +34 9112380858:00 - 17:00
SwedenT +46 8446808958:00 - 17:00
SwitzerlandT +41 3152811328:00 - 17:00
United KingdomT +44 20351440728:00 - 17:00
Latin AmericaBrazilT +55 11438075568:00 - 17:00
MexicoT +52 55535024018:00 - 17:00
North AmericaCanadaT 1-800-895-74128:00 - 17:00
United StatesT 1-800-895-74128:00 - 17:00
Middle East / AfricaUnited Arab EmiratesT 800 0357038448:00 - 17:00