Adhesive Anchoring System -...
20
Construction Sika Corporation Sikaflex 15 LM Application Instructions
Transcript of Adhesive Anchoring System -...

Con
stru
ctio
n
Sika Corporation
Sikaflex 15 LM
Application Instructions

Con
stru
ctio
n
Sika Corporation
Sikaflex 15 LMA high-performance, low-modulus elastomeric sealant.
Where to use:Excellent for moving joints in vertical applicationsSuitable for use between similar as well as dissimilar materialsTypical applications include joints in concrete panel and wall systems, around window and door frames, reglets, flashing etc.Exceptional sealant choice for high-rise façade applications where high movement capability is requiredAs effective sealant for use in Exterior Insulation Finish Systems (EIFS)

Con
stru
ctio
n
Sika Corporation
Sikaflex 15LM High Performance, Low Modulus Elastomeric Sealant
High movement jointsExcellent primer-less adhesion to
many substratesExceptional cut and tear resistancePaintable and sandableNon stainingProven in tough climates around the
worldASTM C920 Class 100/50
• +100/-50% movement• SWR Institute Validated
16 standard colorsCartridges & sausages
• Pails & drums special order

Con
stru
ctio
n
Sika Corporation
Sikaflex 15LM High Performance, Low Modulus Elastomeric
Sealant
Where to use:Excellent for moving joints in vertical applicationsSuitable for use between similar as well as dissimilar materialsTypical applications include joints in concrete panel and wall systems, around window and door frames, reglets, flashing etc.Exceptional sealant choice for high-rise façade applications where high movement capability is requiredAs effective sealant for use in Exterior Insulation Finish Systems (EIFS)Can be used in silicone applications• No primer needed• Better against
– Moisture in the substrate– Dirt and dust pick up

Con
stru
ctio
n
Sika Corporation
Sealant Installation Substrate Preparation
Proper preparation will eliminate majority of installation failures• Most common mode of sealant failure is
adhesiveRemove all weak material on bonding surface of porous substratesSurfaces must be clean, dry, and free of dew or frostUse best practices per industry standards• Porous substrate: abrasive, high pressure
water (allow to dry after), grinding, wire brush• Non-porous substrate: 2 rag method
Presenter
Presentation Notes
Stress that the most common sealant failure is adhesion loss. This directly ties back into UV discussion about silicones vs. polyurethane. If your sealant does not bond, nothing else matters. Bond does not mean it lasts long enough for payment to take place.

Con
stru
ctio
n
Sika Corporation
Mechanical Methods
Wire brushingSand blastingGrindingSawing

Con
stru
ctio
n
Sika Corporation
Critical Success Factors Priming
Priming can help get a better bond in many situations
•
Priming does no substitute for good prep
•
Many products perform w/out primers
•
Most commonly used on horizontal and submerged applications
•
Must be done properly to work (primers are not error free: ponding, waiting time, etc.)
Proper primer application with brushPrime only sides of the joint.Prime only sides of the joint.Primer outside the joint may stain the substrate.Primer outside the joint may stain the substrate.Prime & seal the same dayPrime & seal the same day

Con
stru
ctio
n
Sika Corporation
Critical Success Factors Backing materials
Why use backer rod:•
Attain proper wetting of substrate when sealant is tooled
•
Control sealant depth•
Prevent 3-sided adhesion
•
Provide support for traffic areas

Con
stru
ctio
n
Sika Corporation
Critical Success Factors Backing materials
Recommended Materials•
Closed cell backer rod: primarily a foam material with a surface skin
•
Open cell backer rod: primarily a foam material without a skin
•
Bicellular
backer rod: sometimes called “soft”
rod, this foam acts like a hybrid
between open and closed cell rods•
Backing tape: primarily a self-adhesive polyethylene or Teflon material
•
Hard rectangular extrusions for horizontals

Con
stru
ctio
n
Sika Corporation
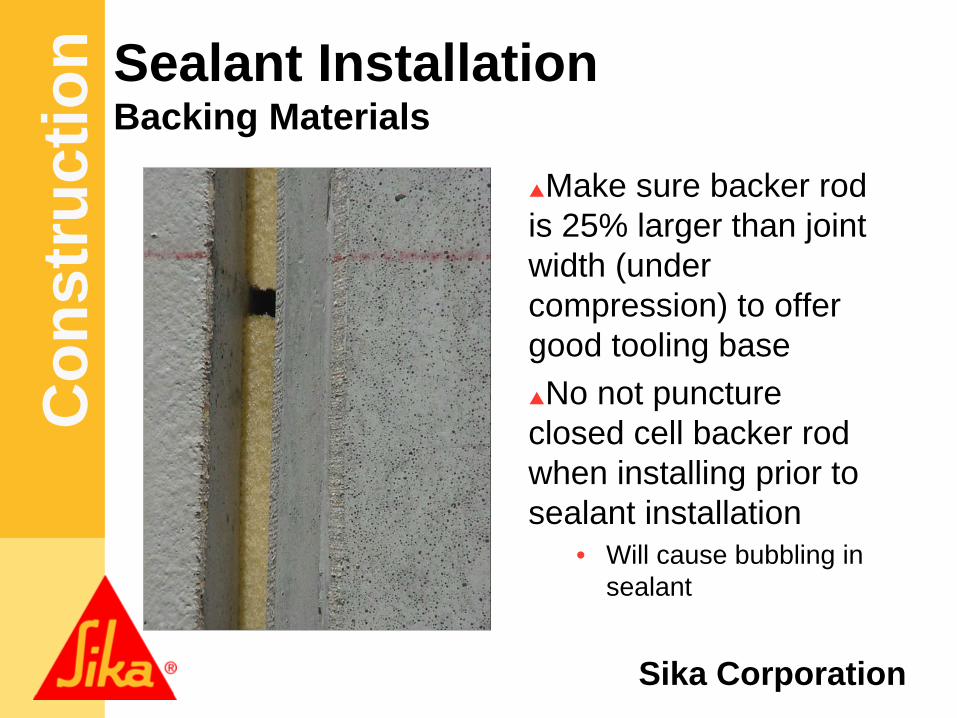
Sealant Installation Backing Materials
Con
stru
ctio
n
Sika Corporation
Sealant Installation Backing Materials
Make sure backer rod is 25% larger than joint width (under compression) to offer good tooling baseNo not puncture
closed cell backer rod when installing prior to sealant installation
• Will cause bubbling in sealant

Con
stru
ctio
n
Sika Corporation
15 lm Packaging10.1 oz (300 ml) cartridges
• 24 per case• Stocked item
20 oz (600 ml) “unipack”sausages
• 20 per case• Stocked item
5 gallon pail with 4.5 gallons• 20 L pail with 17 L of material• Non stock – 3 week lead time
55 gallon drum with 50 gallons
• 200 L drum with 190 L of material
• Non Stock – 3 week lead time

Con
stru
ctio
n
Sika Corporation
Sealant Installation Loading
Cartridge• Cut cartridge tip and
puncture seal at the nozzle base
• Load cartridge into caulk gun
Sausage• Load sausage into
sausage gun, then cut the metal clip off
• Attach nozzle

Con
stru
ctio
n
Sika Corporation
Sealant Installation Gunning
Place nozzle of gun into the bottom of the
joint and fill the entire jointKeeping nozzle deep in the
sealant, continue a steady flow of sealant preceding the nozzle to avoid air entrapmentAvoid overlapping sealantCoverage:• 10.1 fl oz yields 12.2 linear feet of ½” x
¼” joint• 20 fl oz uni-pac yields 24 linear ft of a
½ “ x ¼“ joint

Con
stru
ctio
n
Sika Corporation
Sealant Installation Tooling
Dry tool sealant to press material against joint walls or bonding surface

Con
stru
ctio
n
Sika Corporation
Sealant Installation Joint Design
1. Install appropriate backer material to prevent three-sided adhesion and to control sealant depth.
2. Sealant should be gunned into joint at mid-point of designed expansion and contraction to maximize accommodation of movement. Joint dimension of 4X anticipated movement allows proper function of high performance sealants even if applied at temperature extremes.
3. Tool as required to properly fill joints and force sealant against joint interfaces, maximizing bond.
Backer rod
Sealant
Depth = ½ Width
Presenter
Presentation Notes
Proper joint dimensions and shape factor of a properly constructed sealed joint. Joints that are ¼” wide should be ¼” deep. Between ¼” and 1” joints the ration of width to depth should be 2:1. The maximum thickness depth should be ½”.

Con
stru
ctio
n
Sika Corporation
Sealant Installation Joint Design
2:1 or 1:1 width:depthMinimum ¼” x ¼”Minimum ½” depth for traffic2 sided adhesion, not 3Joint movement to match product
Protect nosingNeeds supportMay separate

Con
stru
ctio
n
Sika Corporation
Jobsite Mock-UpJobsite Pull Test: • After material has
cured to ensure proper bond

Con
stru
ctio
n
Sika Corporation
Jobsite Pull Test
Place sealant and allow to cure. Cut a 2-3” piece of the sealant and pull at a 90º angle from the substrate. The sealant should not “peel” from the joint interface.

Con
stru
ctio
n
Sika Corporation
Sikaflex 15 LMSika Technical Data Sheets can be
obtained via:
www.sikaconstruction.com
Refer to data sheets for specific information on each Sika product.