ADDING EMITTERS AND CUSTOM EFFECTS TO DOTA2 … emitters and custom effects to... · ADDING...
26
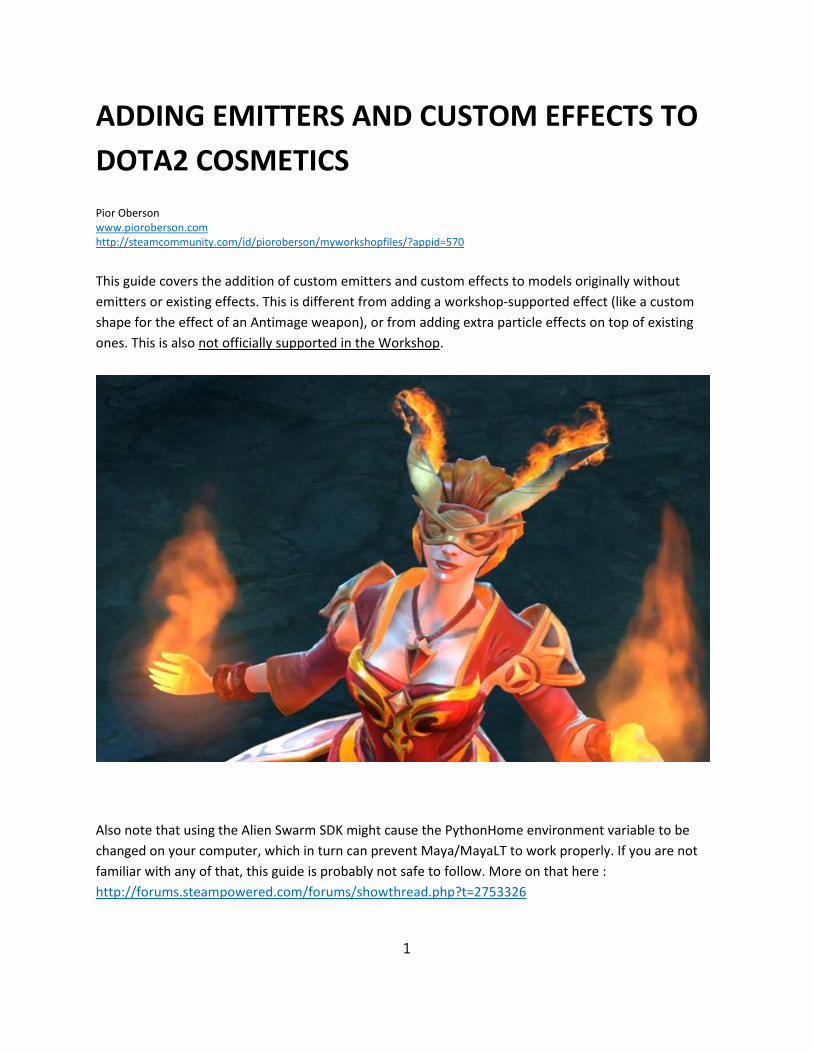
ADDING EMITTERS AND CUSTOM EFFECTS TO DOTA2 COSMETICS Pior Oberson www.pioroberson.com http://steamcommunity.com/id/pioroberson/myworkshopfiles/?appid=570 This guide covers the addition of custom emitters and custom effects to models originally without emitters or existing effects. This is different from adding a workshop-supported effect (like a custom shape for the effect of an Antimage weapon), or from adding extra particle effects on top of existing ones. This is also not officially supported in the Workshop . Also note that using the Alien Swarm SDK might cause the PythonHome environment variable to be changed on your computer, which in turn can prevent Maya/MayaLT to work properly. If you are not familiar with any of that, this guide is probably not safe to follow. More on that here : http://forums.steampowered.com/forums/showthread.php?t=2753326 1
Transcript of ADDING EMITTERS AND CUSTOM EFFECTS TO DOTA2 … emitters and custom effects to... · ADDING...
ADDING EMITTERS AND CUSTOM EFFECTS TO
DOTA2 COSMETICS
Pior Obersonwww.pioroberson.comhttp://steamcommunity.com/id/pioroberson/myworkshopfiles/?appid=570
This guide covers the addition of custom emitters and custom effects to models originally without
emitters or existing effects. This is different from adding a workshop-supported effect (like a custom
shape for the effect of an Antimage weapon), or from adding extra particle effects on top of existing
ones. This is also not officially supported in the Workshop.
Also note that using the Alien Swarm SDK might cause the PythonHome environment variable to be
changed on your computer, which in turn can prevent Maya/MayaLT to work properly. If you are not
familiar with any of that, this guide is probably not safe to follow. More on that here :
http://forums.steampowered.com/forums/showthread.php?t=2753326
1
OVERVIEW
The main steps are :
1 - Decompiling an imported model in order to have access to a rebuilt .qc file ;
NOTE : There are twp categories of models that can be decompiled and used in the context of this guide. The first, referred to in this document
as "category 1" models , consists of models officially shipping with the game anf patches - that is to say, Valve content as well as user-generated
workshop submissions accepted into the game. These models are good for practicing what is explained in this guide. The second category,
referred to here as "category 2" models consists of one's own models, as compiled by the ingame importer. This is ultimately what we are
interested in in the long run.
2 - Creating a new .qc and adding extra information to it in order to specify an emitter point and an
effect to be played by it ;
NOTE : The effect being played can be an existing effect already created for that hero, or, a new effect created from scratch to be added to that
specific hero's effects file (hero_nameofthehero.pcf file) using the Alien Swarm particle editor.
Adding new effects to a hero's file is an undocumented process ; workshop wise, I suppose that one could decide to submit the full hero .pcf ,
updated with the newly created effect(s) added to it ; or, one could submit a smaller effects file with only the newly created effect(s) in it, to be
merged in by Valve.
3 - Recompiling the model based on this new .qc file, and placing the resulting compiled files in the
appropriate folders ;
5 - Telling the game to load these custom files (newly created model, and hero particle file with a new
effect in it) so that we can see the effect attached to the item in game.
NOTE : depending on the kind of model you are working with, the steps required to force the game to load it are different. Working with
existing game models (=category 1) requires using the "override VPK" startup option in order to tell the game to give priority to unpacked files ;
Working with newly imported models (category 2) simply requires a file swap withing the compiled models directory and loading the newly
compiled model with the "additional items" button in the workshop tab.
6 - from there on, the effect can be edited freely (no need to re-compile the model each time) and seen
in the game.
2
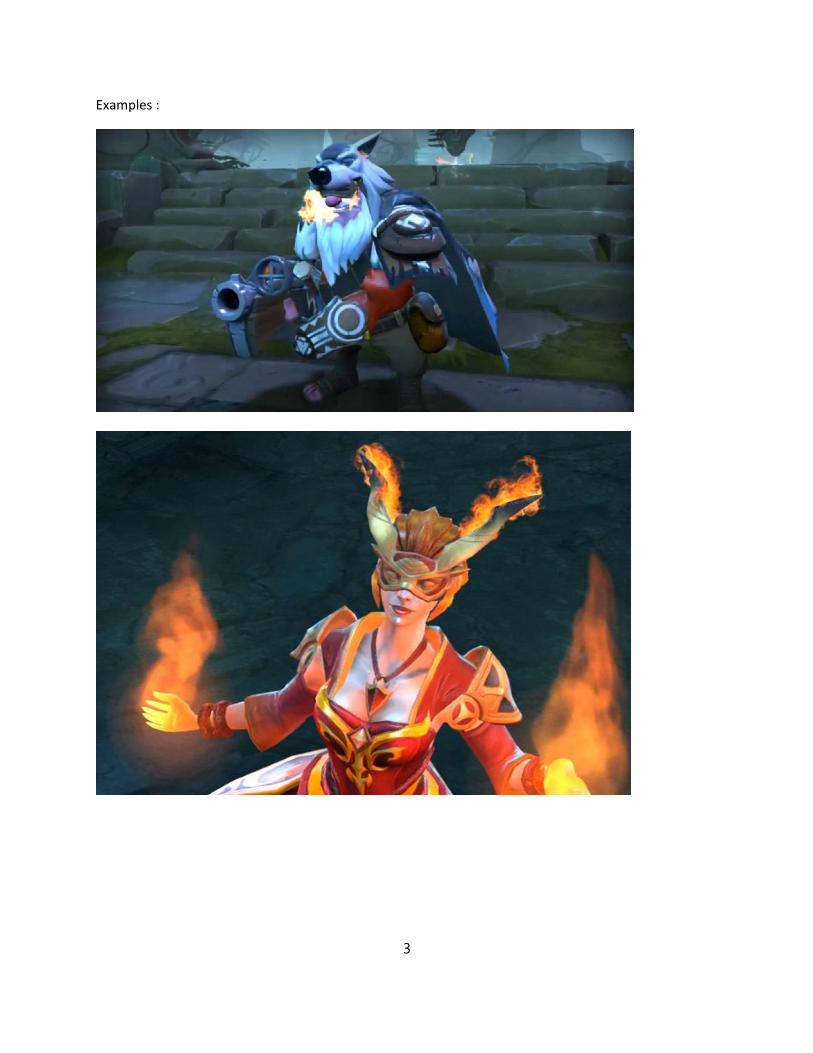
Examples :
3
TOOLS NEEDED AND PREREQUISITES
For category 2 models, an item created for another slot of the desired hero than the one that
will ultimately receive an effect. (The reason behind this is that one needs to reach the page of
the workshop where it is made possible to load existing compiled items for various slots of a
hero, and this page is only accessible after a sucessful import of any other slot.)
GCFScape, used to extract Dota2 game files.
'Alien Swarm' game with launch options :
-tools -nop4
'Dota 2 beta' game with launch options :
-novid -console -override_vpk
(override_vpk only useful for category 1 models. However, if you are created a fully custom effect relying on a custom .pcf
file for a given hero, override_vpk will be required for the effect to show)
A copy of the .pcf file of the hero being worked on, duplicated into the corresponding Alien
Swarm directory.
To access and extract the .pcf of a given hero, proceed as follows :
- launch GCFScape,
- File>Open - browse to Steam\steamapps\common\dota 2 beta\dota
- open pak01_dir.vpk
- Navigate to particles/units/heroes
- Select hero_nameofthehero.pcf, and either drag it out to where you want to extract it, or right
click > extract.
Create a folder structure within the Alien Swarm directory as follows, and place the .pcf in it :
Steam\steamapps\common\alien swarm\swarm\particles\units\heroes
\hero_nameofthehero.pcf
A good practice would be to also put a backup of the original, unmodified .pcf in there - named
something like hero_nameofthehero - original.bak
NOTE : If the whole Dota2 particle folder is being copied onto AS as opposed to just copying a single hero .pcf file, AS might not start,
which would then require temporarily renaming the 'particles' folder into a temp name, start AS, delete the automatically create
'particles' folder generated on startup, and rename the temporarily renamed dota particle folder to 'particles'
4
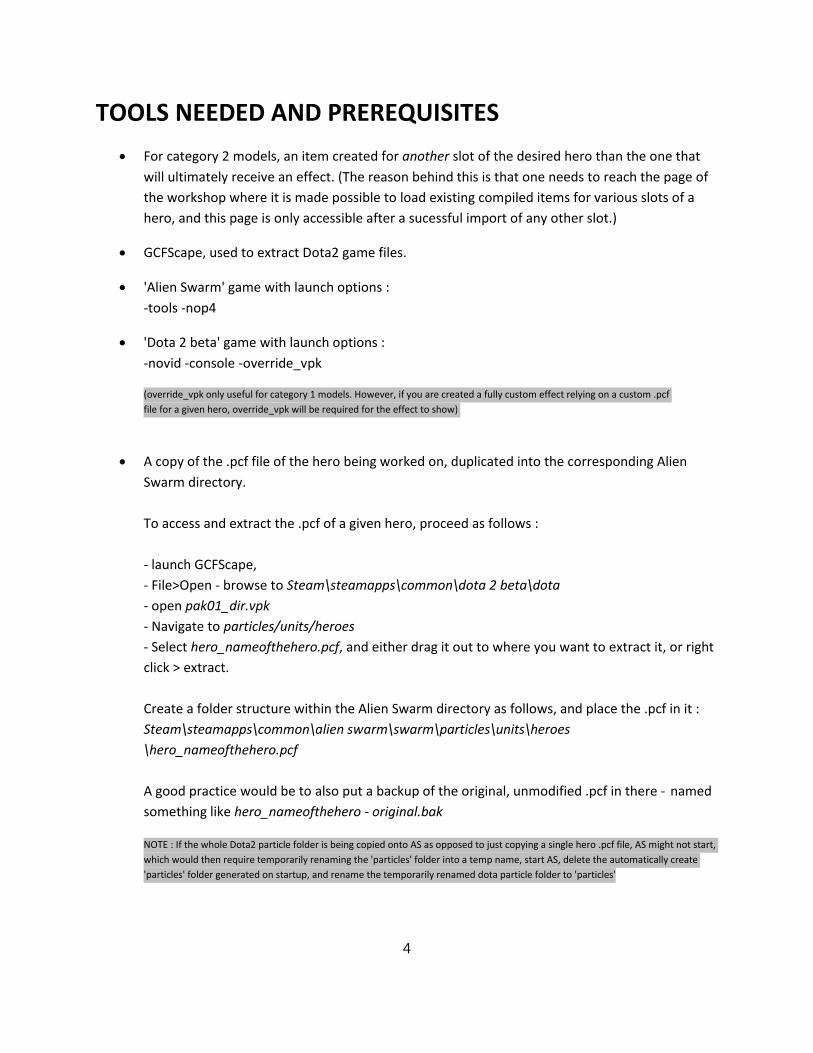
The model to be given a fully custom effect must have gone through the ingame importer or
another compiler at least once, so that proper mdl/vvd/vtx are generated and working well.
Models imported/compiled using the in-game importer are located in :
Steam\steamapps\common\dota 2 beta\dota\models\items\nameofthehero\0xXXXXXXXX
\nameofthemodel, like so :
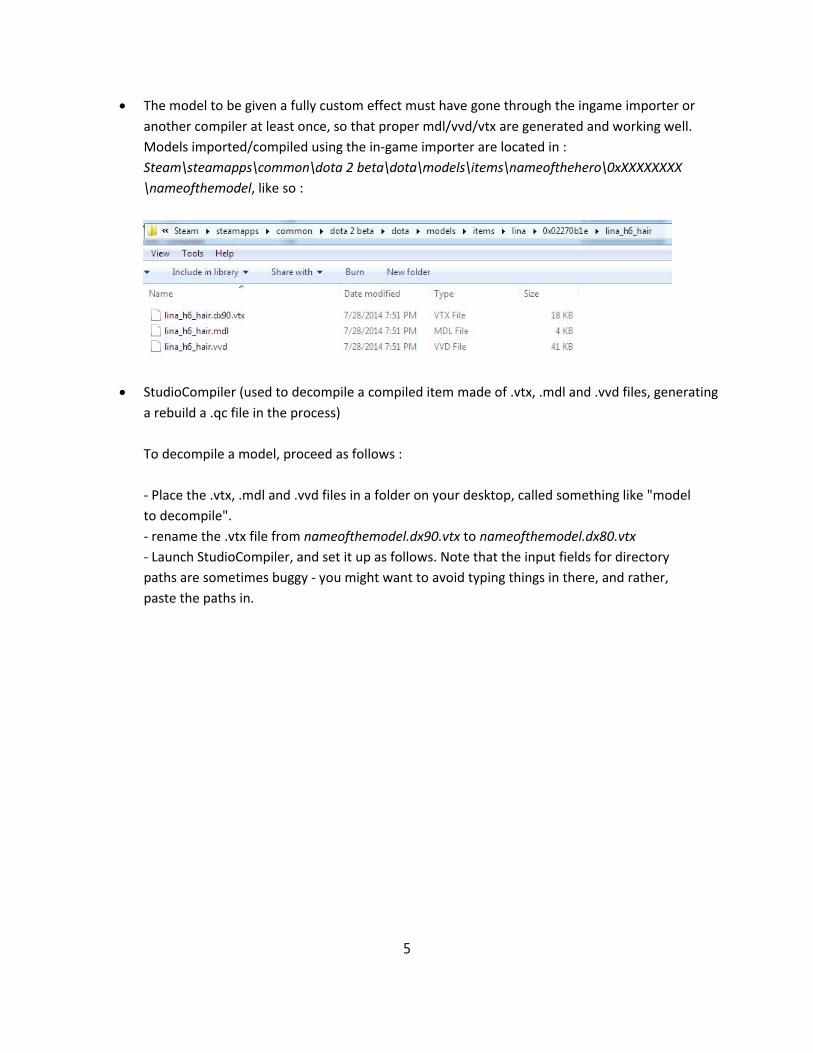
StudioCompiler (used to decompile a compiled item made of .vtx, .mdl and .vvd files, generating
a rebuild a .qc file in the process)
To decompile a model, proceed as follows :
- Place the .vtx, .mdl and .vvd files in a folder on your desktop, called something like "model
to decompile".
- rename the .vtx file from nameofthemodel.dx90.vtx to nameofthemodel.dx80.vtx
- Launch StudioCompiler, and set it up as follows. Note that the input fields for directory
paths are sometimes buggy - you might want to avoid typing things in there, and rather,
paste the paths in.
5
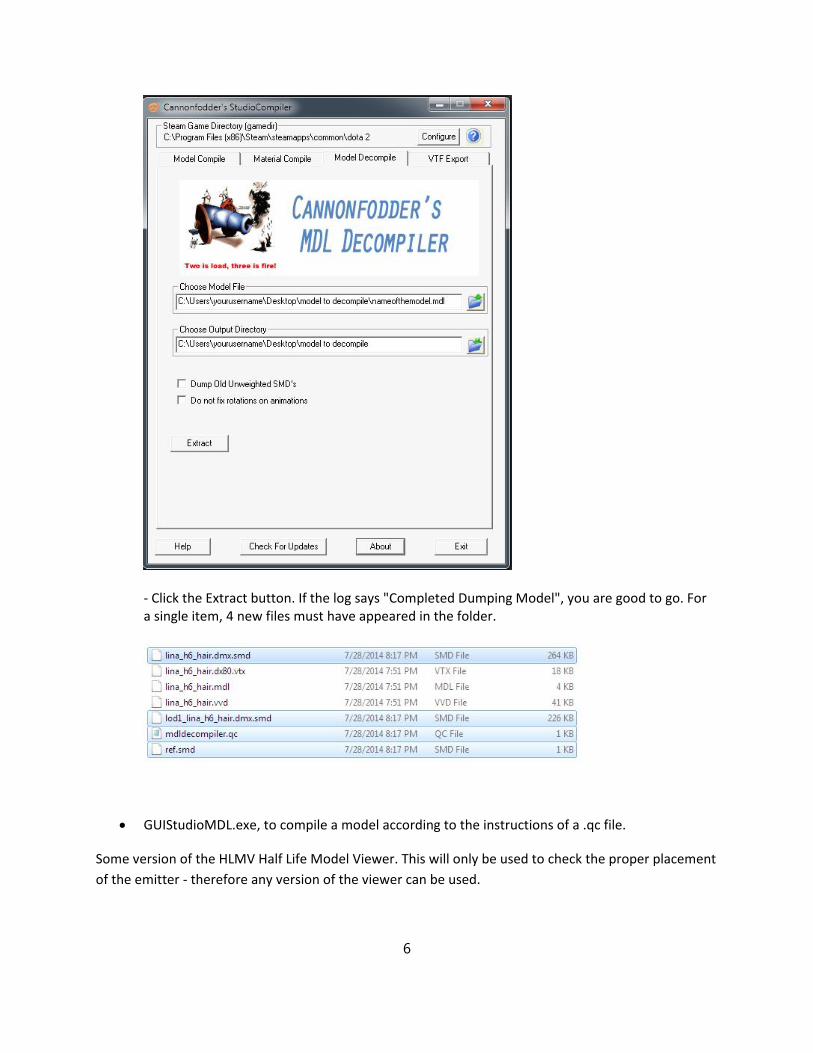
- Click the Extract button. If the log says "Completed Dumping Model", you are good to go. For a single item, 4 new files must have appeared in the folder.
GUIStudioMDL.exe, to compile a model according to the instructions of a .qc file.
Some version of the HLMV Half Life Model Viewer. This will only be used to check the proper placement
of the emitter - therefore any version of the viewer can be used.
6
CREATING THE A .QC FILE WITH EMITTER AND FX
DECLARATIONS
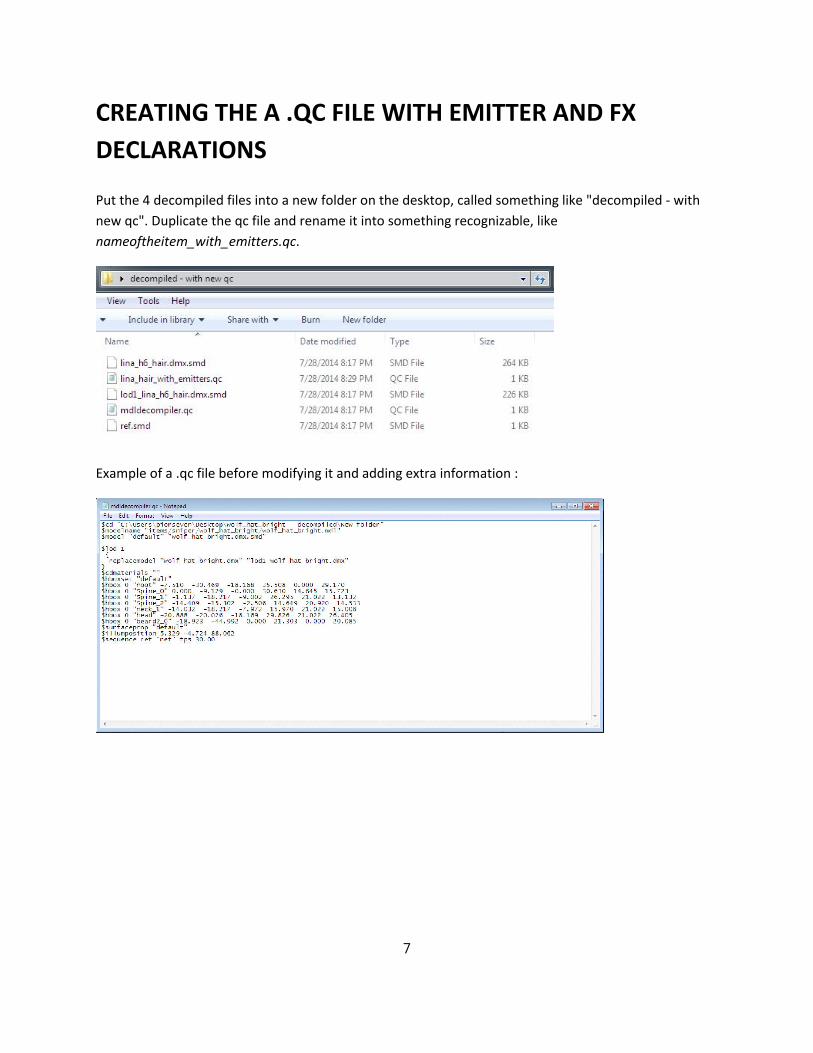
Put the 4 decompiled files into a new folder on the desktop, called something like "decompiled - with
new qc". Duplicate the qc file and rename it into something recognizable, like
nameoftheitem_with_emitters.qc.
Example of a .qc file before modifying it and adding extra information :
7
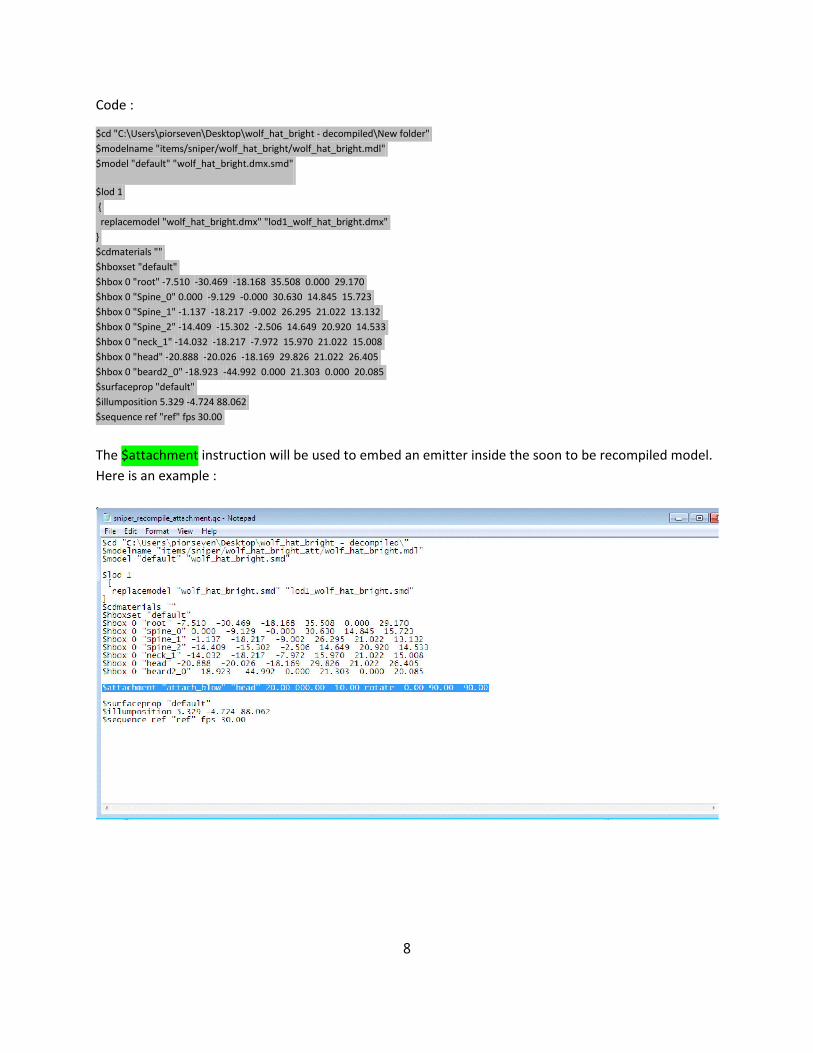
Code :
$cd "C:\Users\piorseven\Desktop\wolf_hat_bright - decompiled\New folder"
$modelname "items/sniper/wolf_hat_bright/wolf_hat_bright.mdl"
$model "default" "wolf_hat_bright.dmx.smd"
$lod 1
{
replacemodel "wolf_hat_bright.dmx" "lod1_wolf_hat_bright.dmx"
}
$cdmaterials ""
$hboxset "default"
$hbox 0 "root" -7.510 -30.469 -18.168 35.508 0.000 29.170
$hbox 0 "Spine_0" 0.000 -9.129 -0.000 30.630 14.845 15.723
$hbox 0 "Spine_1" -1.137 -18.217 -9.002 26.295 21.022 13.132
$hbox 0 "Spine_2" -14.409 -15.302 -2.506 14.649 20.920 14.533
$hbox 0 "neck_1" -14.032 -18.217 -7.972 15.970 21.022 15.008
$hbox 0 "head" -20.888 -20.026 -18.169 29.826 21.022 26.405
$hbox 0 "beard2_0" -18.923 -44.992 0.000 21.303 0.000 20.085
$surfaceprop "default"
$illumposition 5.329 -4.724 88.062
$sequence ref "ref" fps 30.00
The $attachment instruction will be used to embed an emitter inside the soon to be recompiled model.
Here is an example :
8
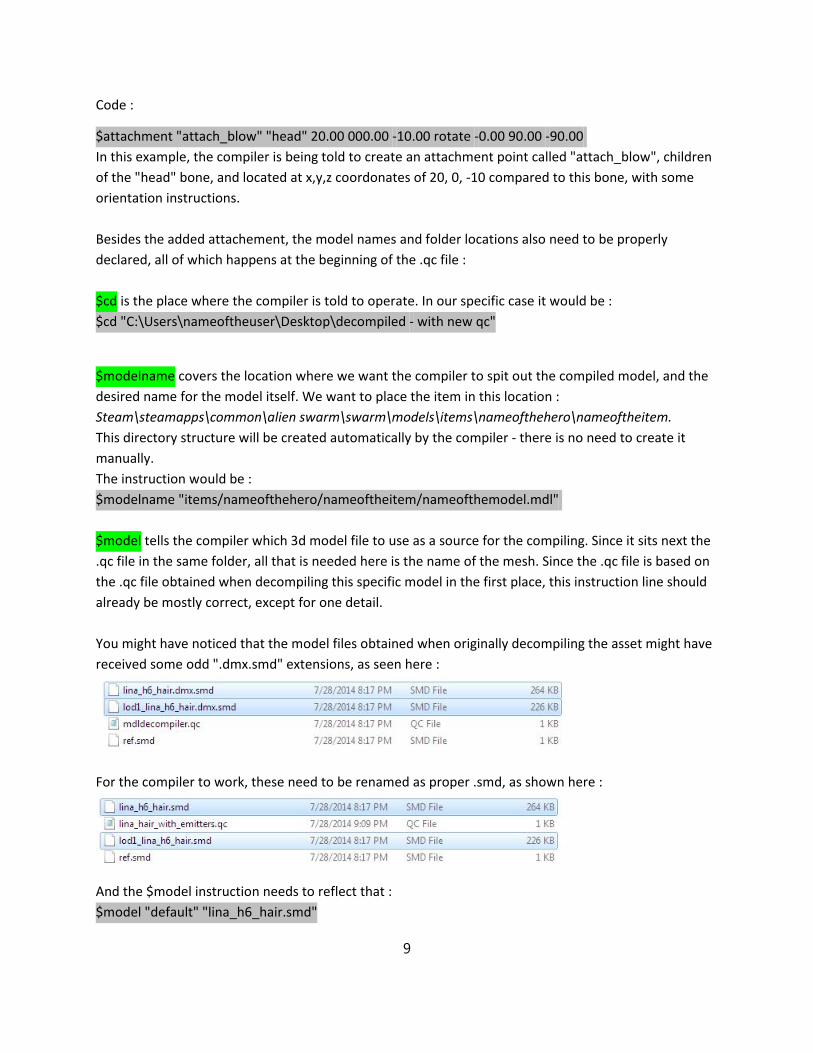
Code :
$attachment "attach_blow" "head" 20.00 000.00 -10.00 rotate -0.00 90.00 -90.00
In this example, the compiler is being told to create an attachment point called "attach_blow", children
of the "head" bone, and located at x,y,z coordonates of 20, 0, -10 compared to this bone, with some
orientation instructions.
Besides the added attachement, the model names and folder locations also need to be properly
declared, all of which happens at the beginning of the .qc file :
$cd is the place where the compiler is told to operate. In our specific case it would be :
$cd "C:\Users\nameoftheuser\Desktop\decompiled - with new qc"
$modelname covers the location where we want the compiler to spit out the compiled model, and the
desired name for the model itself. We want to place the item in this location :
Steam\steamapps\common\alien swarm\swarm\models\items\nameofthehero\nameoftheitem.
This directory structure will be created automatically by the compiler - there is no need to create it
manually.
The instruction would be :
$modelname "items/nameofthehero/nameoftheitem/nameofthemodel.mdl"
$model tells the compiler which 3d model file to use as a source for the compiling. Since it sits next the
.qc file in the same folder, all that is needed here is the name of the mesh. Since the .qc file is based on
the .qc file obtained when decompiling this specific model in the first place, this instruction line should
already be mostly correct, except for one detail.
You might have noticed that the model files obtained when originally decompiling the asset might have
received some odd ".dmx.smd" extensions, as seen here :
For the compiler to work, these need to be renamed as proper .smd, as shown here :
And the $model instruction needs to reflect that :
$model "default" "lina_h6_hair.smd"
9
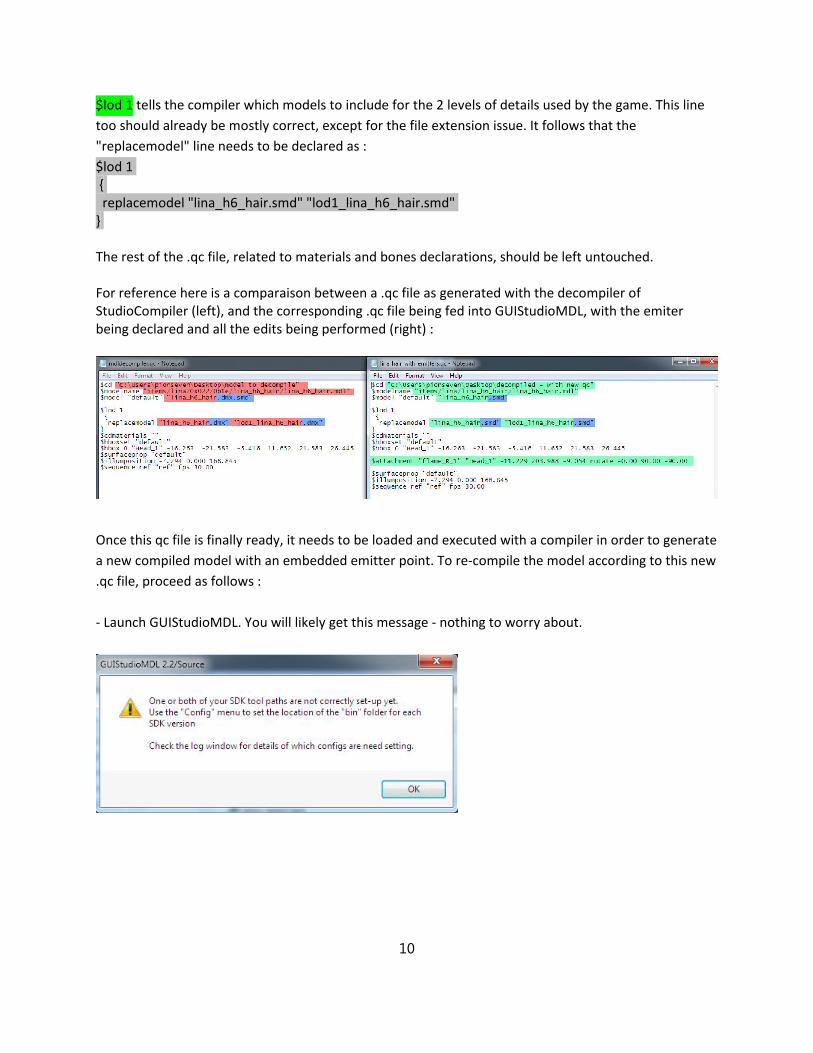
$lod 1 tells the compiler which models to include for the 2 levels of details used by the game. This line
too should already be mostly correct, except for the file extension issue. It follows that the
"replacemodel" line needs to be declared as :
$lod 1 { replacemodel "lina_h6_hair.smd" "lod1_lina_h6_hair.smd" }
The rest of the .qc file, related to materials and bones declarations, should be left untouched.
For reference here is a comparaison between a .qc file as generated with the decompiler of StudioCompiler (left), and the corresponding .qc file being fed into GUIStudioMDL, with the emiter being declared and all the edits being performed (right) :
Once this qc file is finally ready, it needs to be loaded and executed with a compiler in order to generate
a new compiled model with an embedded emitter point. To re-compile the model according to this new
.qc file, proceed as follows :
- Launch GUIStudioMDL. You will likely get this message - nothing to worry about.
10
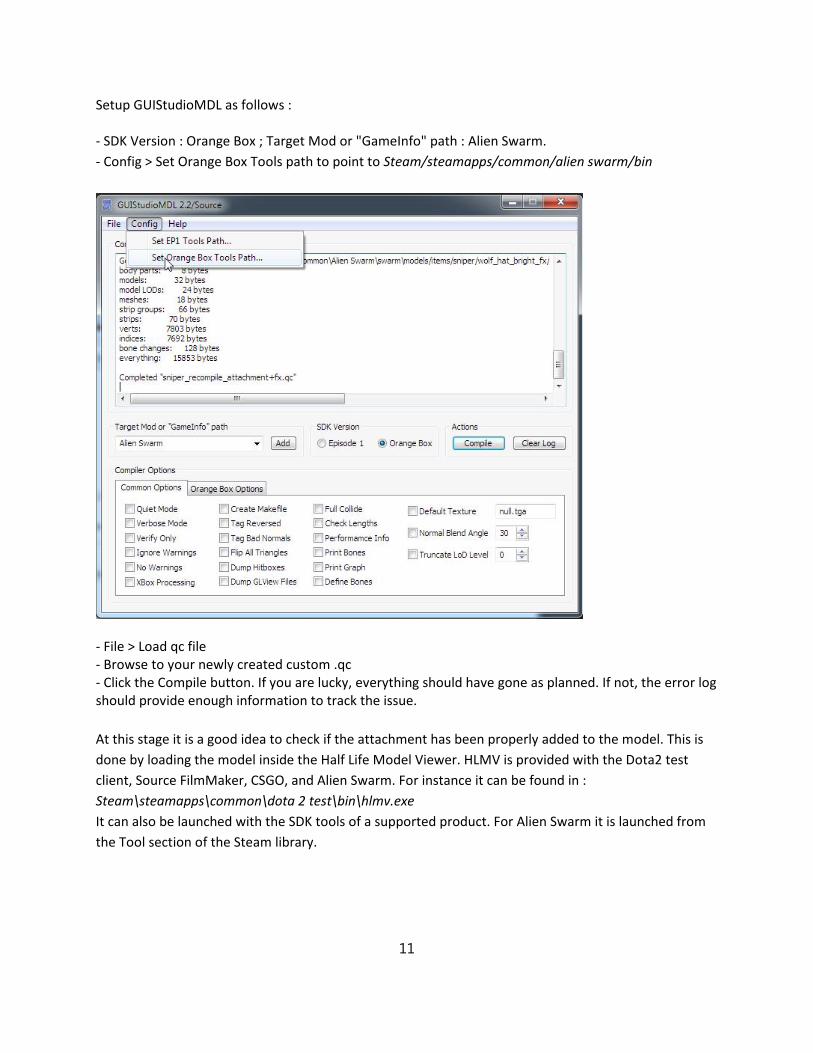
Setup GUIStudioMDL as follows :
- SDK Version : Orange Box ; Target Mod or "GameInfo" path : Alien Swarm.
- Config > Set Orange Box Tools path to point to Steam/steamapps/common/alien swarm/bin
- File > Load qc file- Browse to your newly created custom .qc- Click the Compile button. If you are lucky, everything should have gone as planned. If not, the error log should provide enough information to track the issue.
At this stage it is a good idea to check if the attachment has been properly added to the model. This is
done by loading the model inside the Half Life Model Viewer. HLMV is provided with the Dota2 test
client, Source FilmMaker, CSGO, and Alien Swarm. For instance it can be found in :
Steam\steamapps\common\dota 2 test\bin\hlmv.exe
It can also be launched with the SDK tools of a supported product. For Alien Swarm it is launched from
the Tool section of the Steam library.
11
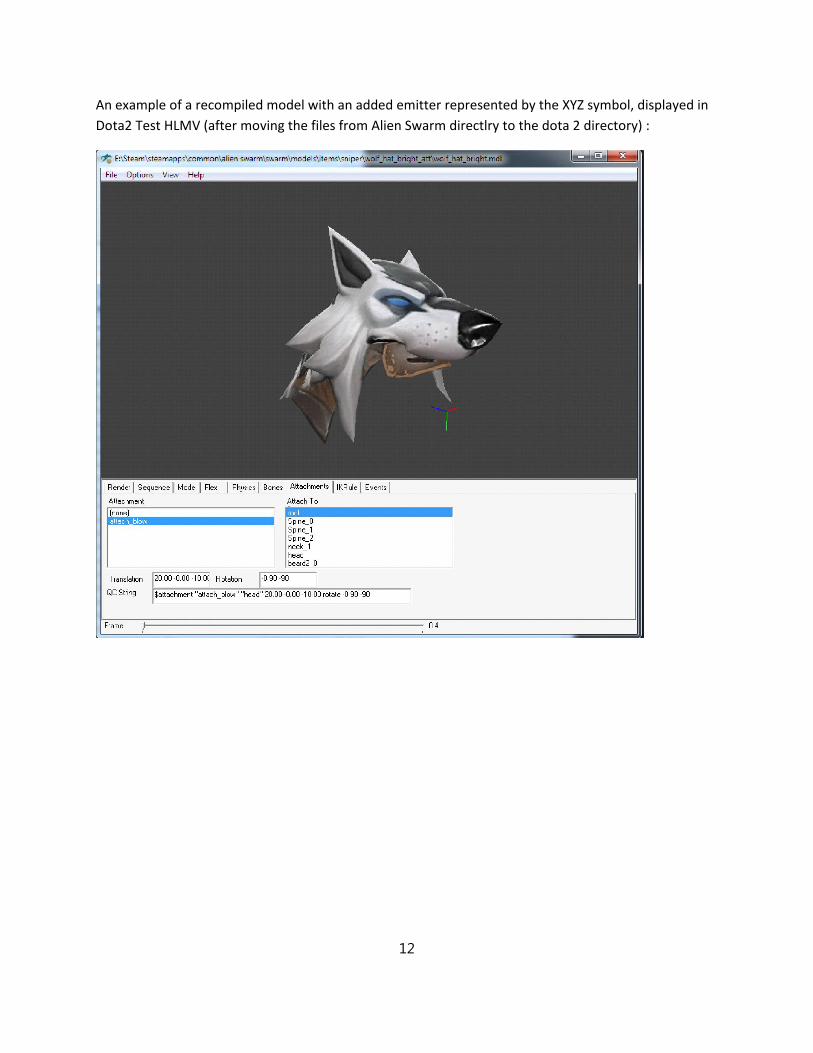
An example of a recompiled model with an added emitter represented by the XYZ symbol, displayed in
Dota2 Test HLMV (after moving the files from Alien Swarm directlry to the dota 2 directory) :
12
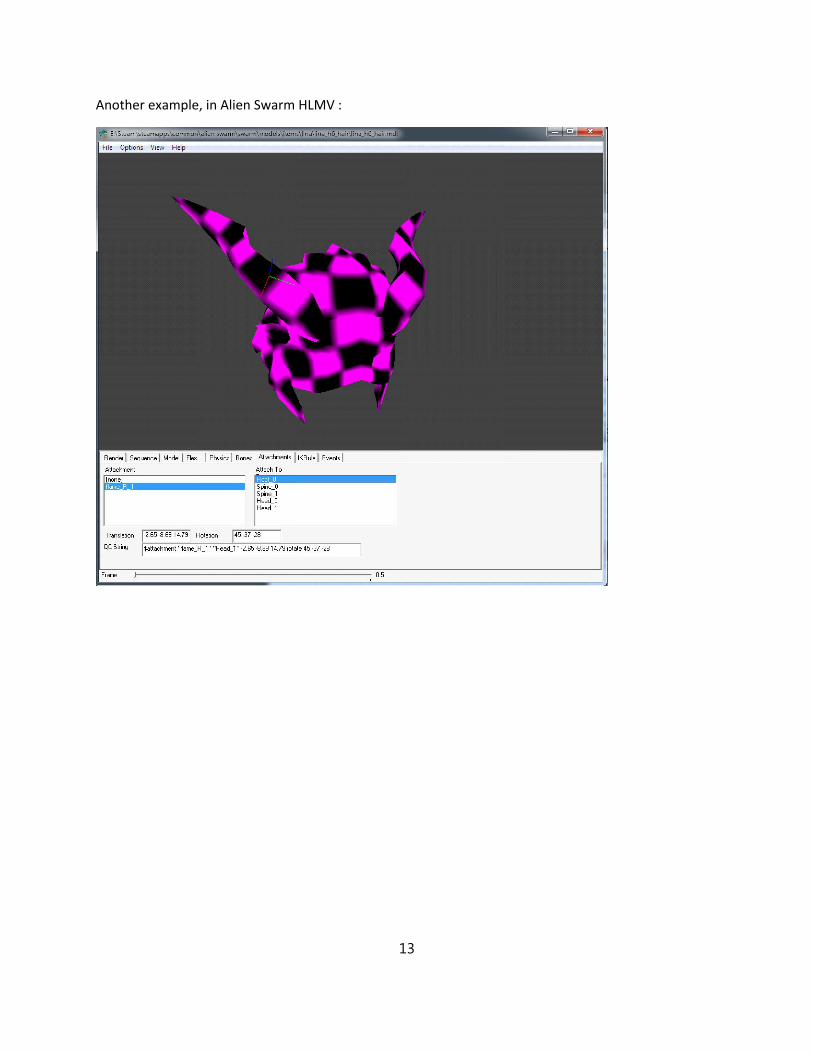
Another example, in Alien Swarm HLMV :
13
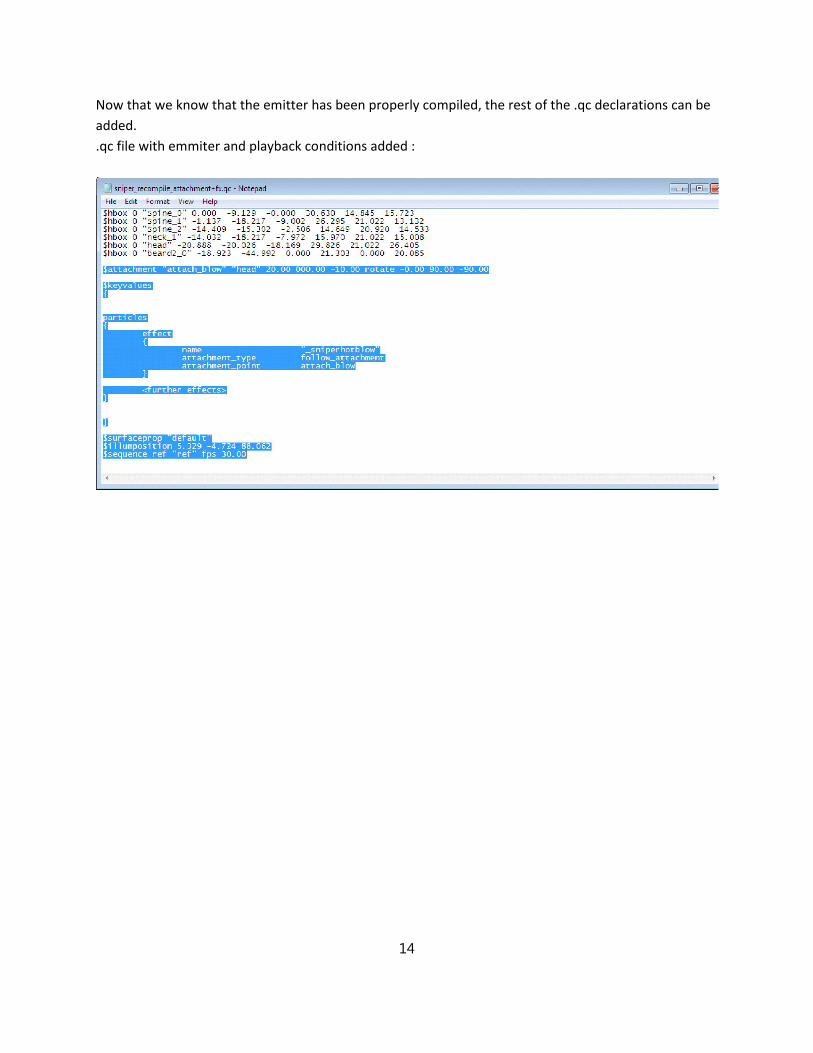
Now that we know that the emitter has been properly compiled, the rest of the .qc declarations can be
added.
.qc file with emmiter and playback conditions added :
14
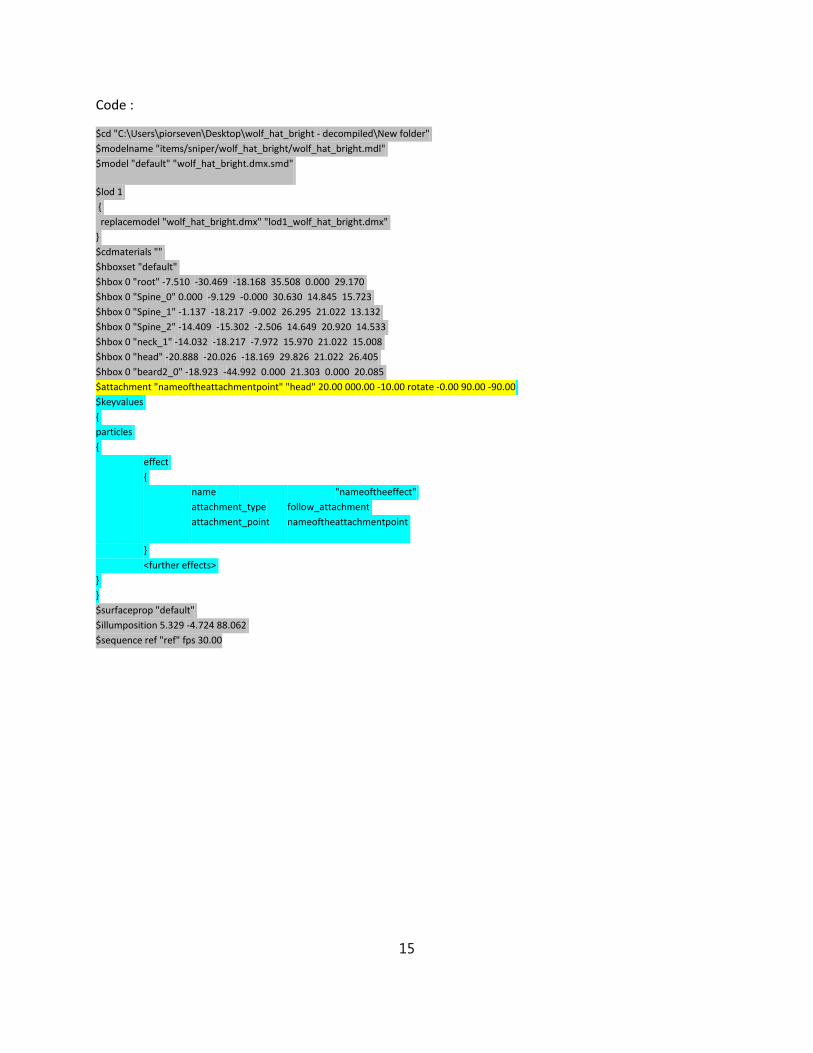
Code :
$cd "C:\Users\piorseven\Desktop\wolf_hat_bright - decompiled\New folder"
$modelname "items/sniper/wolf_hat_bright/wolf_hat_bright.mdl"
$model "default" "wolf_hat_bright.dmx.smd"
$lod 1
{
replacemodel "wolf_hat_bright.dmx" "lod1_wolf_hat_bright.dmx"
}
$cdmaterials ""
$hboxset "default"
$hbox 0 "root" -7.510 -30.469 -18.168 35.508 0.000 29.170
$hbox 0 "Spine_0" 0.000 -9.129 -0.000 30.630 14.845 15.723
$hbox 0 "Spine_1" -1.137 -18.217 -9.002 26.295 21.022 13.132
$hbox 0 "Spine_2" -14.409 -15.302 -2.506 14.649 20.920 14.533
$hbox 0 "neck_1" -14.032 -18.217 -7.972 15.970 21.022 15.008
$hbox 0 "head" -20.888 -20.026 -18.169 29.826 21.022 26.405
$hbox 0 "beard2_0" -18.923 -44.992 0.000 21.303 0.000 20.085
$attachment "nameoftheattachmentpoint" "head" 20.00 000.00 -10.00 rotate -0.00 90.00 -90.00
$keyvalues
{
particles
{
effect
{
name "nameoftheeffect"
attachment_type follow_attachment
attachment_point nameoftheattachmentpoint
}
<further effects>
}
}
$surfaceprop "default"
$illumposition 5.329 -4.724 88.062
$sequence ref "ref" fps 30.00
15
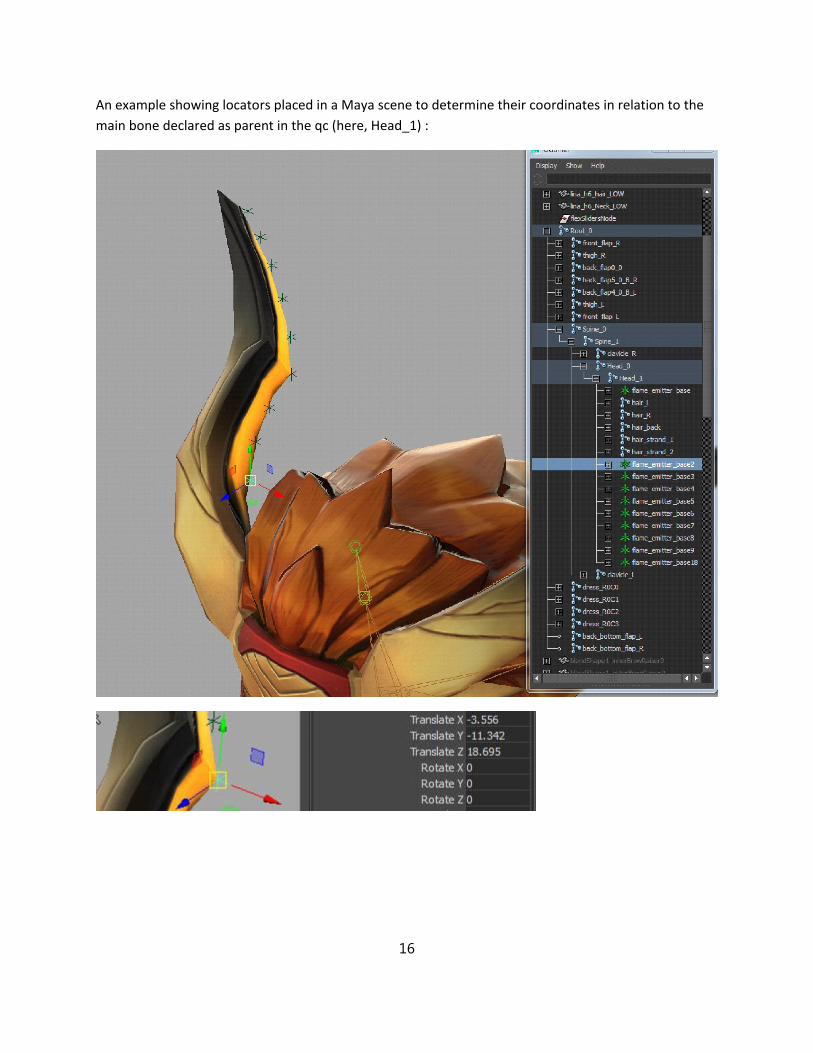
An example showing locators placed in a Maya scene to determine their coordinates in relation to the
main bone declared as parent in the qc (here, Head_1) :
16
To determine the coordinates of a locator in relation to a specific bone/joint :
- Create a locator anywhere in the scene- Snap-move it to the center of the joint- Make the locator a child of that joint - which in turn will make the Locator inherit its transforms. You will notice that at this point, all the coordinates become 0.- Move the locator to the desired location- The coordinates of the locator are now displayed in relation to the bone it is parented to, which is what needs to be declared in the .qc file.
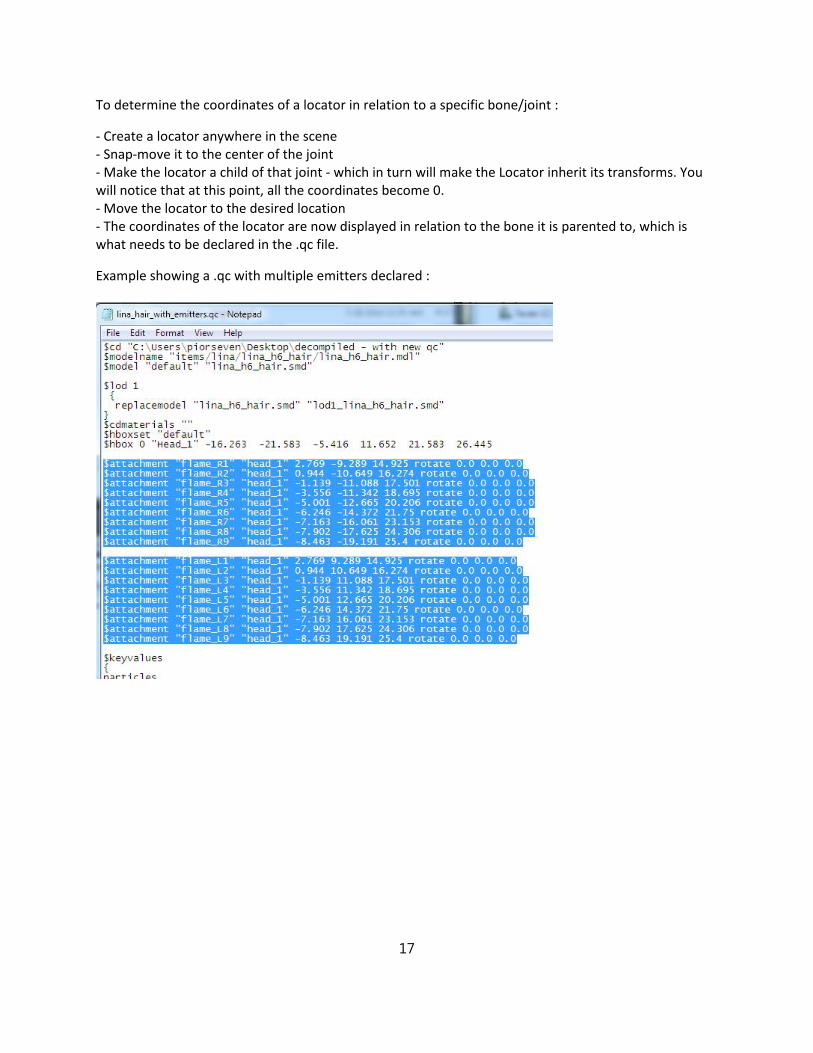
Example showing a .qc with multiple emitters declared :
17
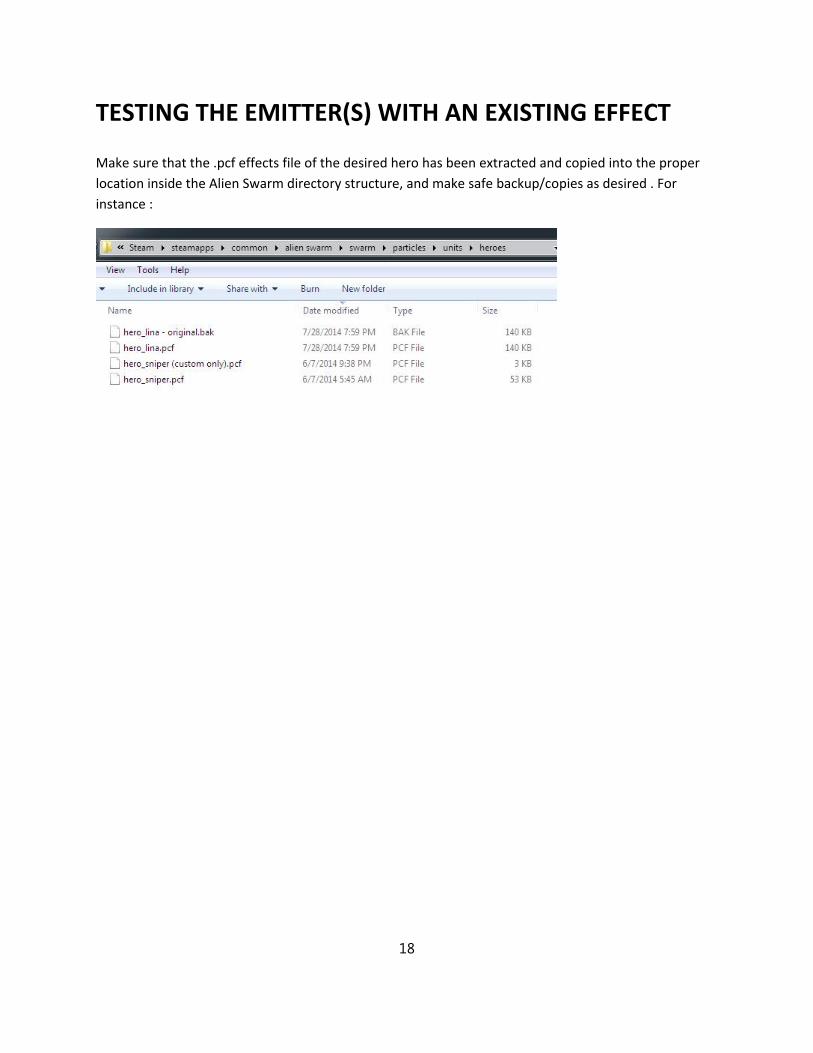
TESTING THE EMITTER(S) WITH AN EXISTING EFFECT
Make sure that the .pcf effects file of the desired hero has been extracted and copied into the proper
location inside the Alien Swarm directory structure, and make safe backup/copies as desired . For
instance :
18
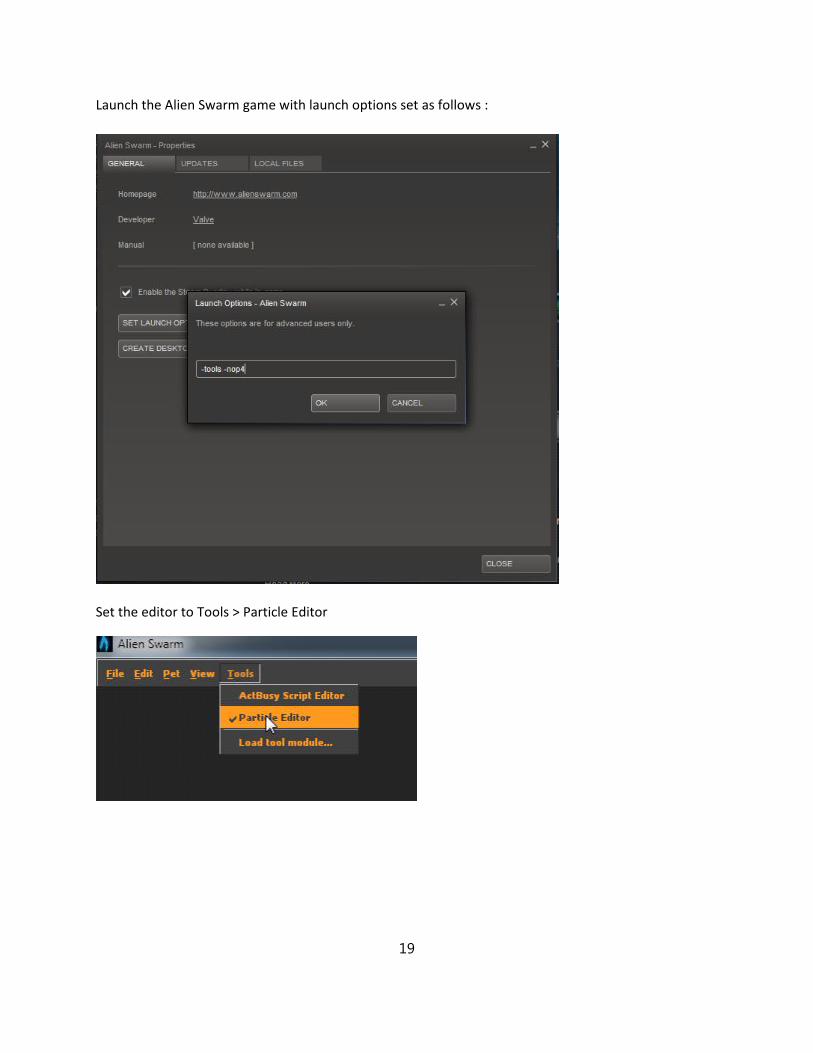
Launch the Alien Swarm game with launch options set as follows :
Set the editor to Tools > Particle Editor
19
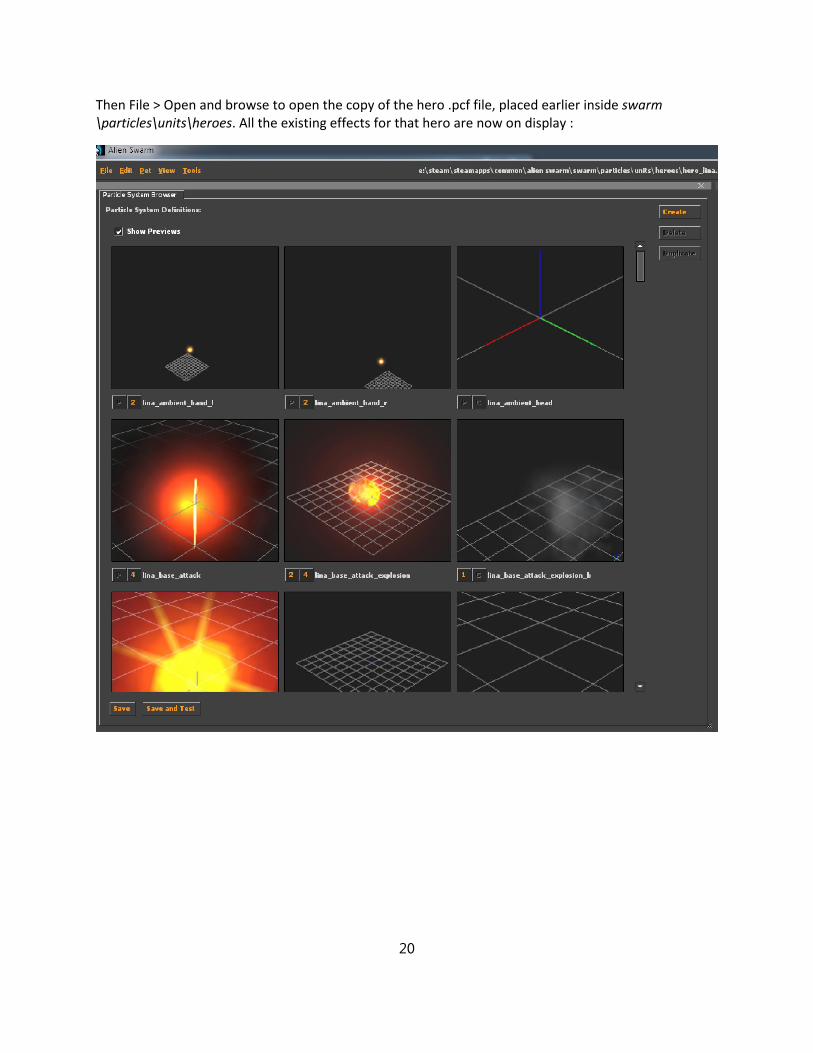
Then File > Open and browse to open the copy of the hero .pcf file, placed earlier inside swarm\particles\units\heroes. All the existing effects for that hero are now on display :
20
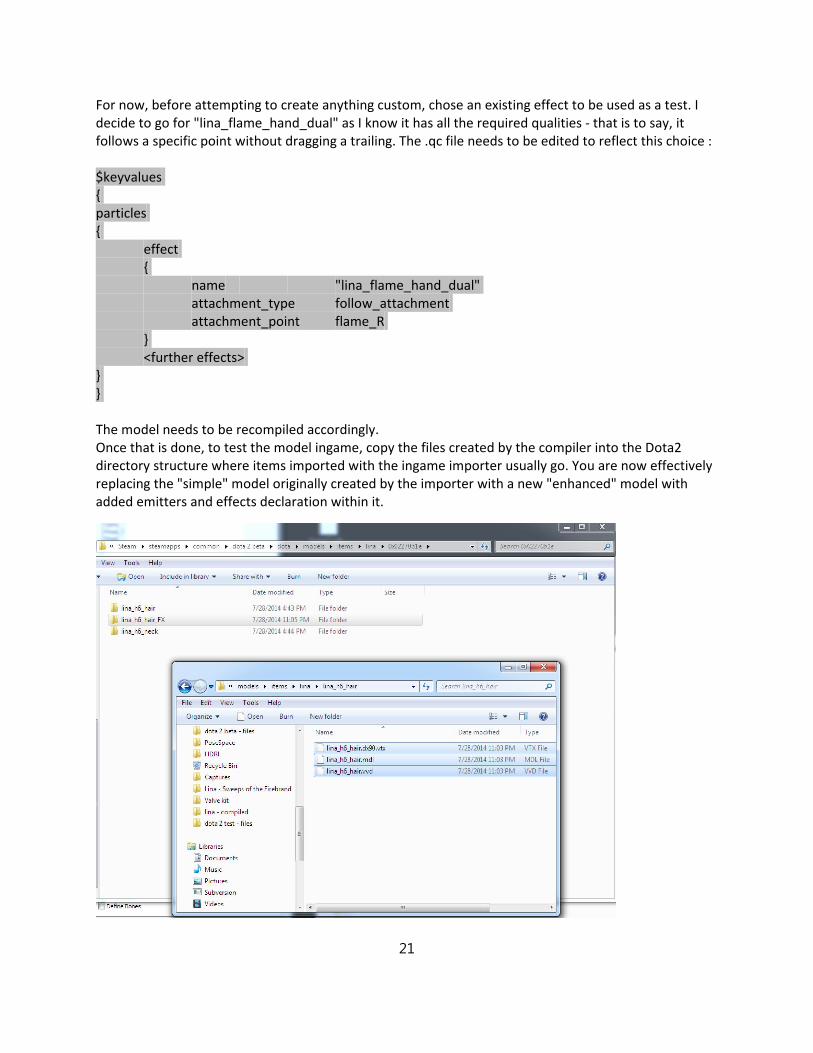
For now, before attempting to create anything custom, chose an existing effect to be used as a test. I decide to go for "lina_flame_hand_dual" as I know it has all the required qualities - that is to say, it follows a specific point without dragging a trailing. The .qc file needs to be edited to reflect this choice :
$keyvalues { particles { effect { name "lina_flame_hand_dual" attachment_type follow_attachment attachment_point flame_R } <further effects> } }
The model needs to be recompiled accordingly.Once that is done, to test the model ingame, copy the files created by the compiler into the Dota2 directory structure where items imported with the ingame importer usually go. You are now effectively replacing the "simple" model originally created by the importer with a new "enhanced" model with added emitters and effects declaration within it.
21
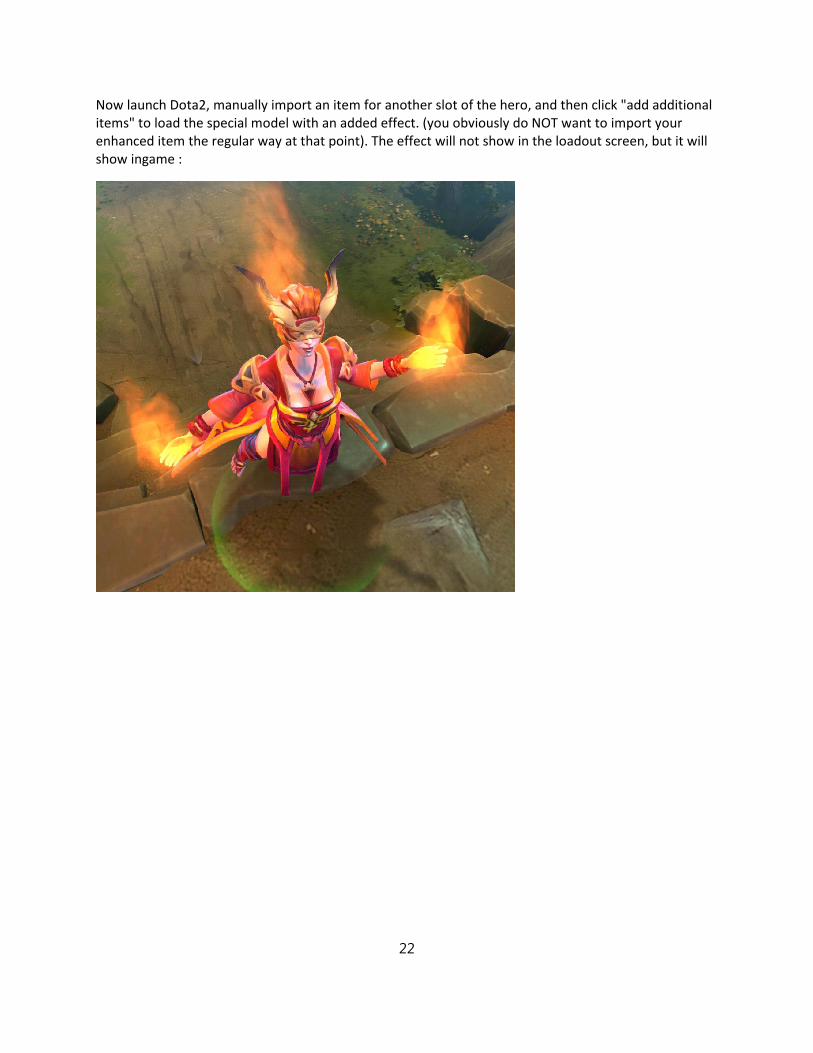
Now launch Dota2, manually import an item for another slot of the hero, and then click "add additional items" to load the special model with an added effect. (you obviously do NOT want to import your enhanced item the regular way at that point). The effect will not show in the loadout screen, but it will show ingame :
22
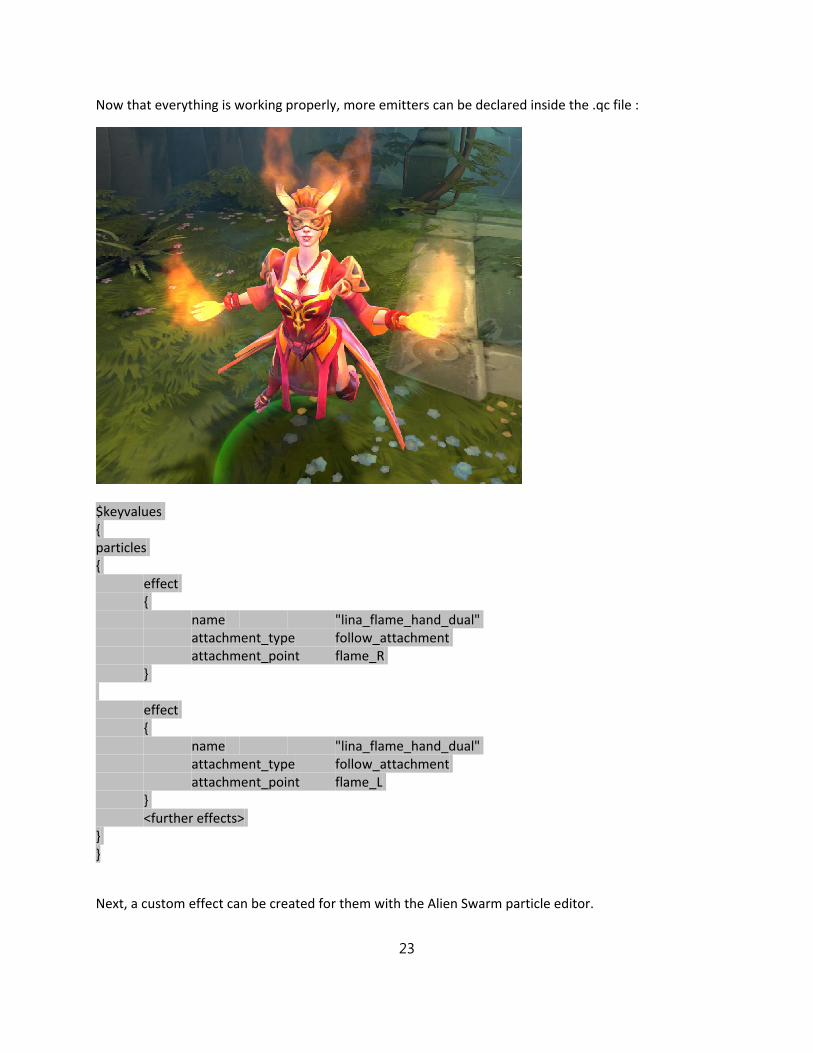
Now that everything is working properly, more emitters can be declared inside the .qc file :
$keyvalues { particles { effect { name "lina_flame_hand_dual" attachment_type follow_attachment attachment_point flame_R } effect { name "lina_flame_hand_dual" attachment_type follow_attachment attachment_point flame_L } <further effects> } }
Next, a custom effect can be created for them with the Alien Swarm particle editor.
23
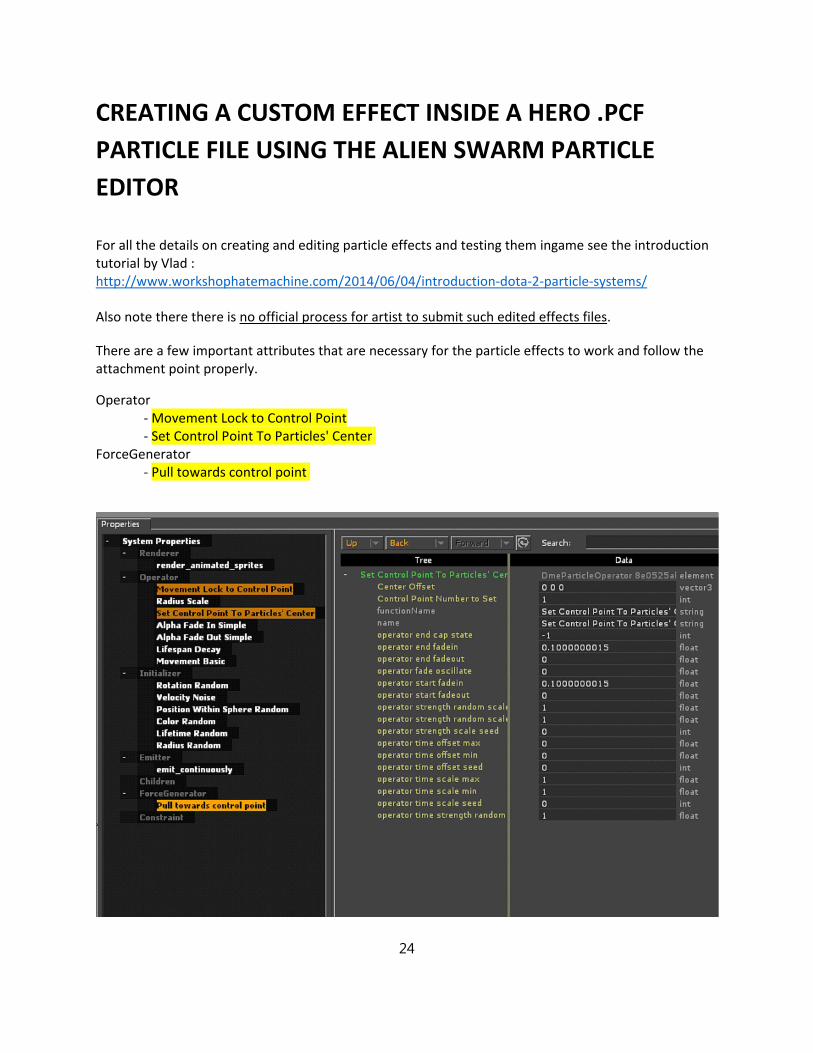
CREATING A CUSTOM EFFECT INSIDE A HERO .PCF
PARTICLE FILE USING THE ALIEN SWARM PARTICLE
EDITOR
For all the details on creating and editing particle effects and testing them ingame see the introduction tutorial by Vlad :http://www.workshophatemachine.com/2014/06/04/introduction-dota-2-particle-systems/
Also note there there is no official process for artist to submit such edited effects files.
There are a few important attributes that are necessary for the particle effects to work and follow the attachment point properly.
Operator- Movement Lock to Control Point- Set Control Point To Particles' Center
ForceGenerator- Pull towards control point
24
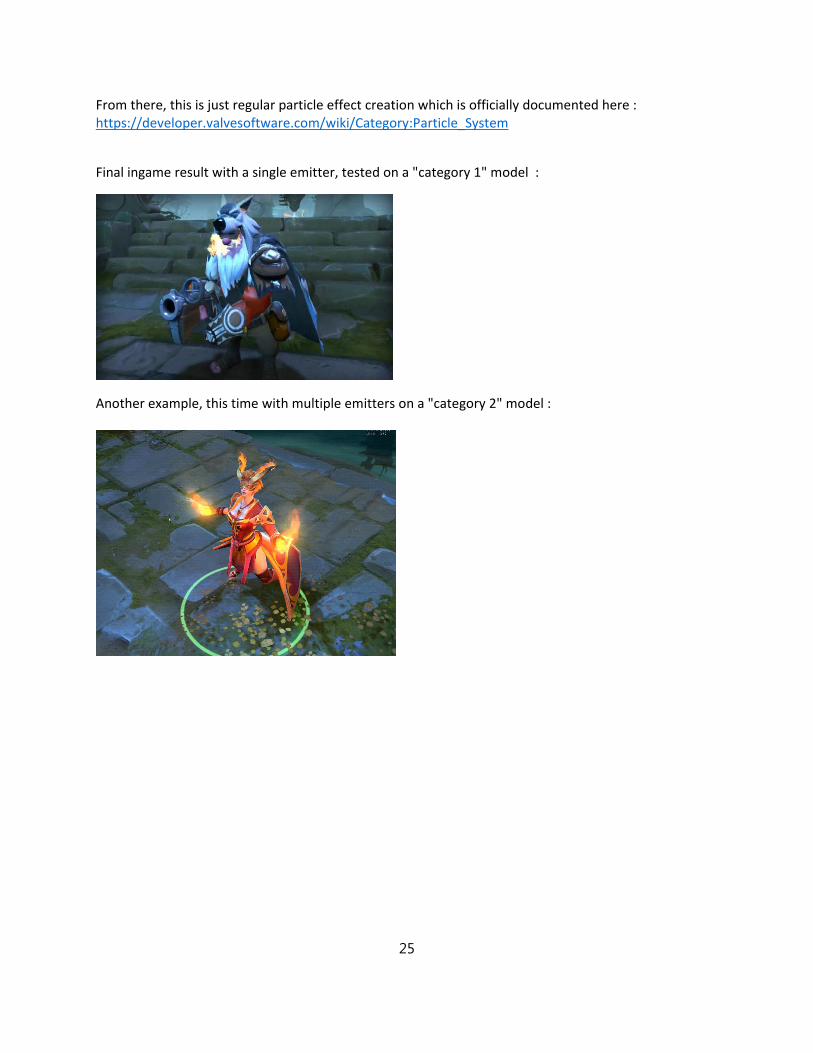
From there, this is just regular particle effect creation which is officially documented here :https://developer.valvesoftware.com/wiki/Category:Particle_System
Final ingame result with a single emitter, tested on a "category 1" model :
Another example, this time with multiple emitters on a "category 2" model :
25
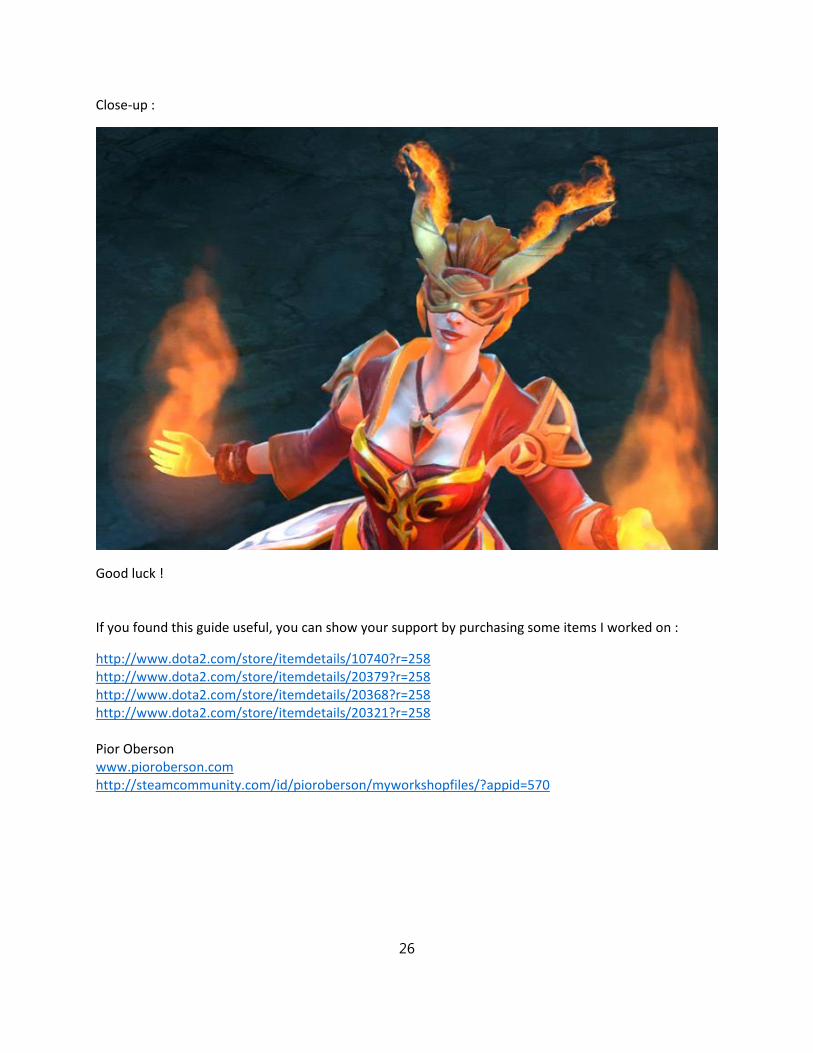
Close-up :
Good luck !
If you found this guide useful, you can show your support by purchasing some items I worked on :
http://www.dota2.com/store/itemdetails/10740?r=258http://www.dota2.com/store/itemdetails/20379?r=258http://www.dota2.com/store/itemdetails/20368?r=258http://www.dota2.com/store/itemdetails/20321?r=258
Pior Obersonwww.pioroberson.comhttp://steamcommunity.com/id/pioroberson/myworkshopfiles/?appid=570
26