Active Merchandiser: How to Load Product Data · Active Merchandiser uses a standard vocabulary ......
9
Active Merchandiser: How to Load Product Data www.activemerchandiser.com 1 | Page NOTE: To show product information mouseovers in Flip, or to use the Product Tab in Create, you need to import product data into the Active Merchandiser Product Library. NOTE: If your account uses Active Merchandiser automated product loading, you will not need to use the Product Library to load your data. It’s already done for you! Step 1 Log in to your Active Merchandiser account. On your Home page, select “Product Library.” You will then be presented with the “My Product Data” page. This is where you will be able to upload and review your products. Step 2 Select “Add Products,” then choose “browse” on the following page to search for your product file. When you’ve found it, double-click to select it. The upload will begin automatically.
Transcript of Active Merchandiser: How to Load Product Data · Active Merchandiser uses a standard vocabulary ......
Active Merchandiser: How to Load Product Data
www.activemerchandiser.com 1 | P a g e
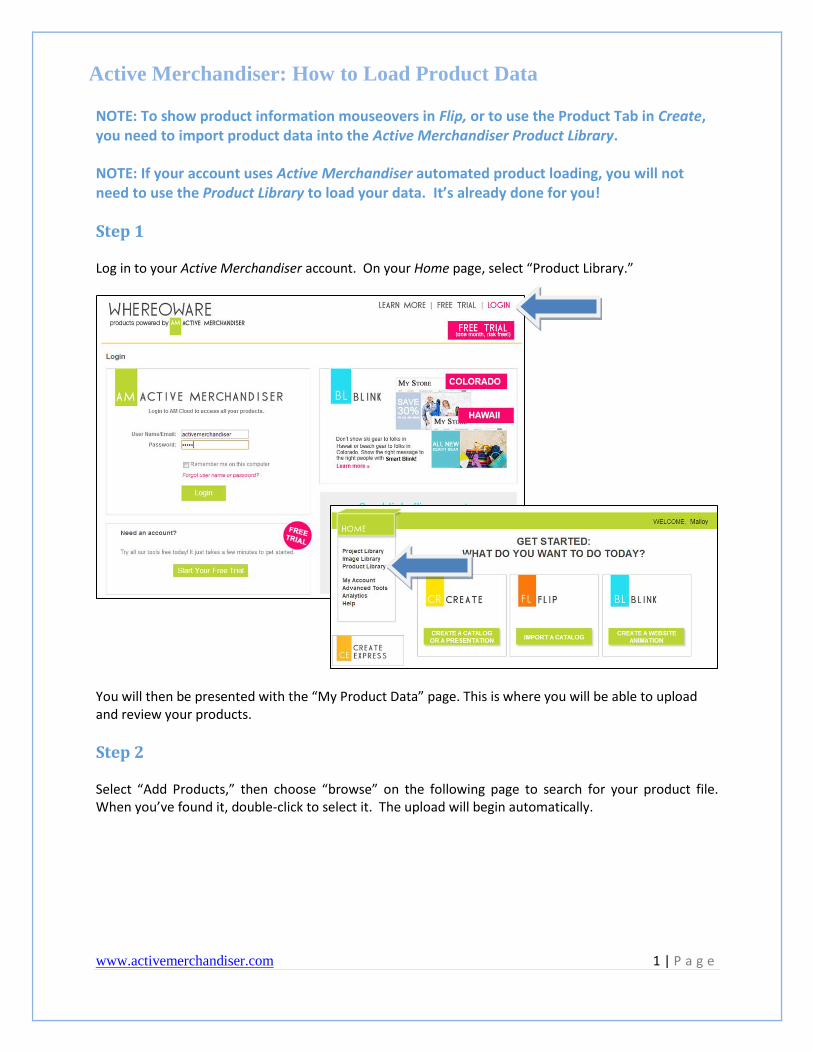
NOTE: To show product information mouseovers in Flip, or to use the Product Tab in Create, you need to import product data into the Active Merchandiser Product Library.
NOTE: If your account uses Active Merchandiser automated product loading, you will not need to use the Product Library to load your data. It’s already done for you!
Step 1 Log in to your Active Merchandiser account. On your Home page, select “Product Library.”
You will then be presented with the “My Product Data” page. This is where you will be able to upload and review your products.
Step 2 Select “Add Products,” then choose “browse” on the following page to search for your product file. When you’ve found it, double-click to select it. The upload will begin automatically.
Active Merchandiser: How to Load Product Data
www.activemerchandiser.com 2 | P a g e
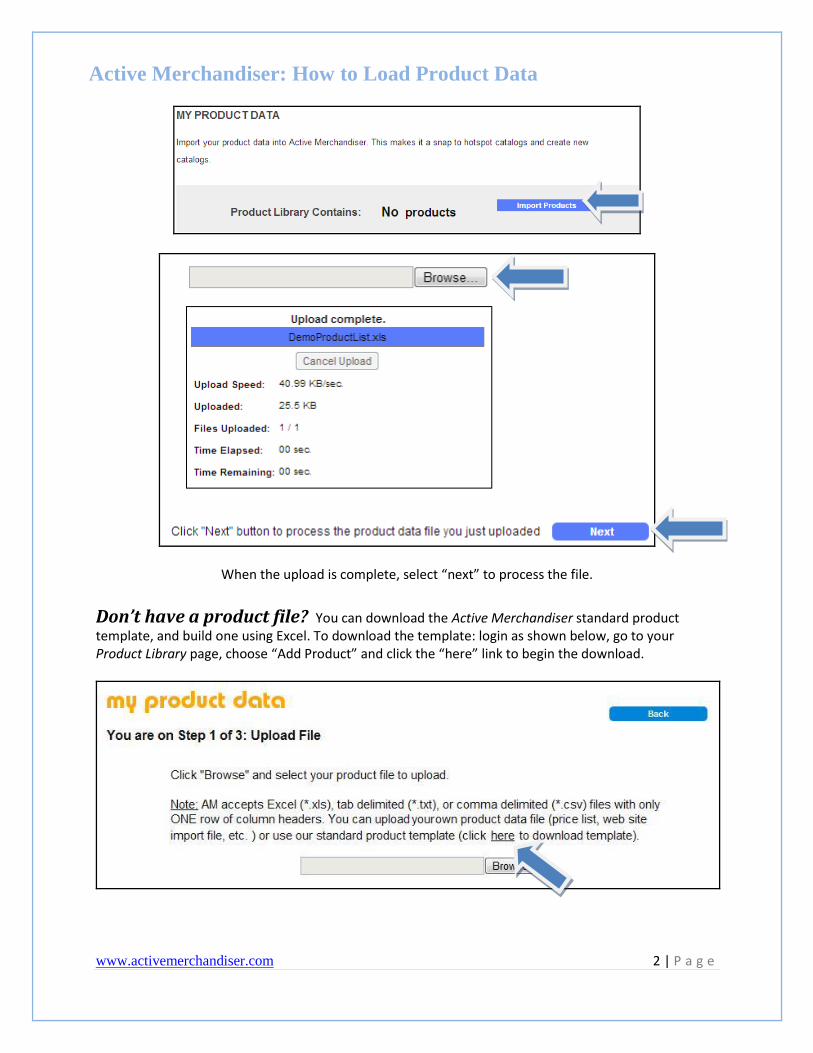
When the upload is complete, select “next” to process the file.
Don’t have a product file? You can download the Active Merchandiser standard product template, and build one using Excel. To download the template: login as shown below, go to your Product Library page, choose “Add Product” and click the “here” link to begin the download.

Active Merchandiser: How to Load Product Data
www.activemerchandiser.com 3 | P a g e
Step 3 When the upload is complete, Active Merchandiser will display a preview of your data. Please check it for accuracy, and make any necessary changes to the field mappings. To make changes, select the “Map Fields” tab. Note: Ignored fields will be displayed in grey and notation of affected fields will be displayed above the chart.
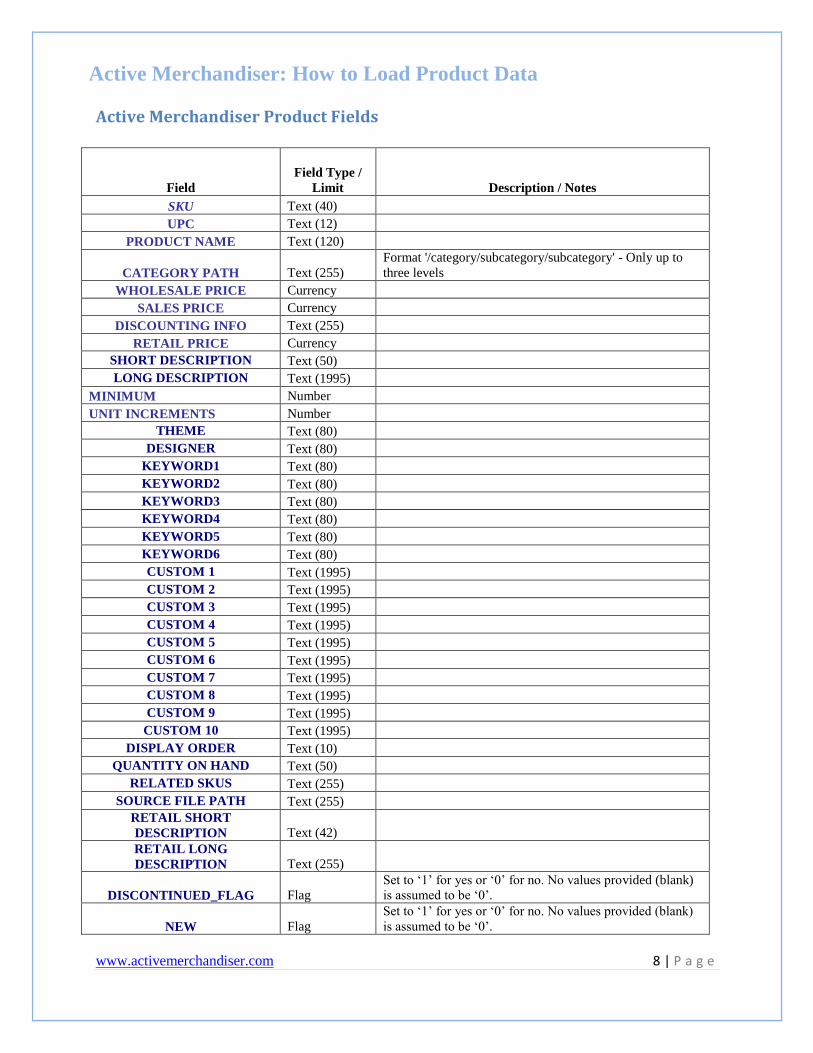
Step 4 Active Merchandiser uses a standard vocabulary for product fields. For example, if you use “Item ID” for your unique product identifier, you will need to change that field to “SKU” (Active Merchandiser’s standard field for identifying a product code). See the Active Merchandiser Product Fields table (found at the end of this tutorial) for a list of Active Merchandiser’s standard fields. In the “Map Fields” window, you can change your fields to those that Active Merchandiser recognizes. If fields do not comply with the correct vocabulary, they will be ignored by default and displayed in grey.

Active Merchandiser: How to Load Product Data
www.activemerchandiser.com 4 | P a g e
After you have made your changes, click “save.”
Step 5 Select “Next.” The Import Report will tell you if any products were not successfully imported and why. Click the “Done” button to finish.
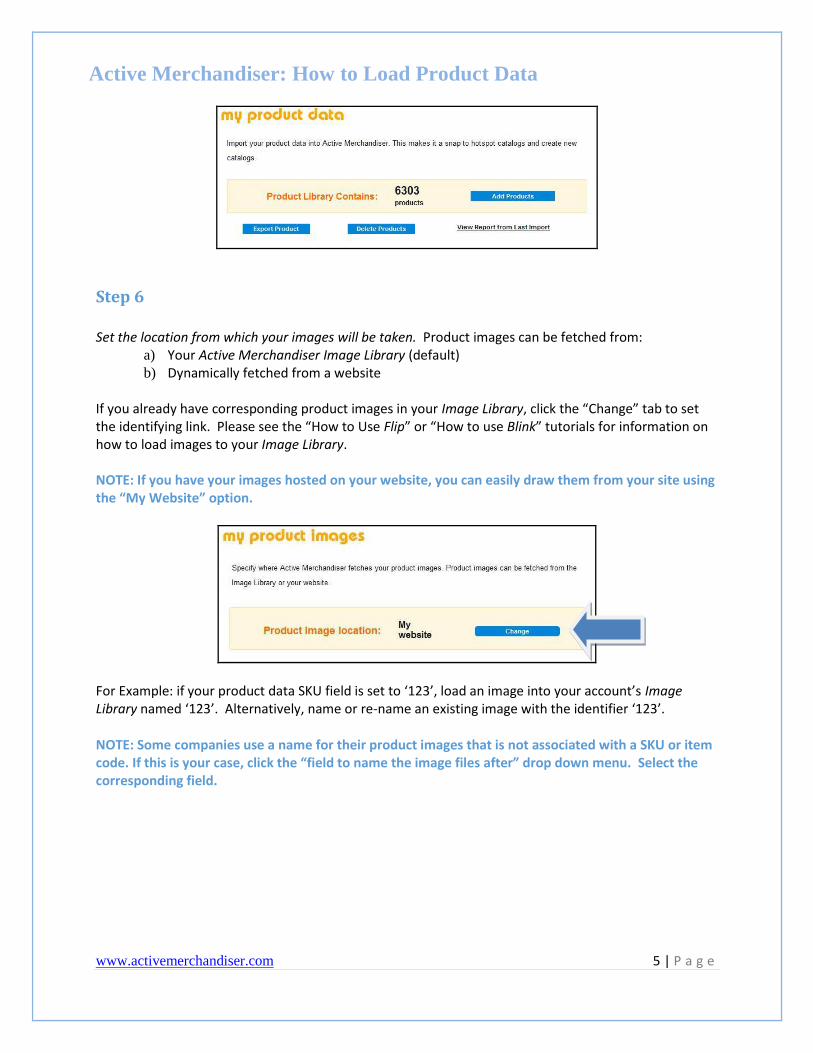
Your Product Data page will now show the number of all the successfully imported products. From this page, you can delete, add, or replace products; export your data as an .xls (Excel) file; review your last import; and select the source for your product images.
Active Merchandiser: How to Load Product Data
www.activemerchandiser.com 5 | P a g e
Step 6 Set the location from which your images will be taken. Product images can be fetched from:
a) Your Active Merchandiser Image Library (default) b) Dynamically fetched from a website
If you already have corresponding product images in your Image Library, click the “Change” tab to set the identifying link. Please see the “How to Use Flip” or “How to use Blink” tutorials for information on how to load images to your Image Library. NOTE: If you have your images hosted on your website, you can easily draw them from your site using the “My Website” option.
For Example: if your product data SKU field is set to ‘123’, load an image into your account’s Image Library named ‘123’. Alternatively, name or re-name an existing image with the identifier ‘123’.
NOTE: Some companies use a name for their product images that is not associated with a SKU or item code. If this is your case, click the “field to name the image files after” drop down menu. Select the corresponding field.

Active Merchandiser: How to Load Product Data
www.activemerchandiser.com 6 | P a g e
Click “Save Settings” button when you have finished.
To fetch images from your Website, first switch the configuration option to “My Website,” then enter the URL paths for your images in the boxes provided. An easy way to do this using Internet Explorer is to browse to the product detail page on your website, right click the product image, and copy the address found on the “properties” menu. Paste this address into the appropriate (thumbnail or large image) “beginning path” area. Add the term ‘.jpg’ to the “ending path” area, removing it from the “beginning path” address if necessary.
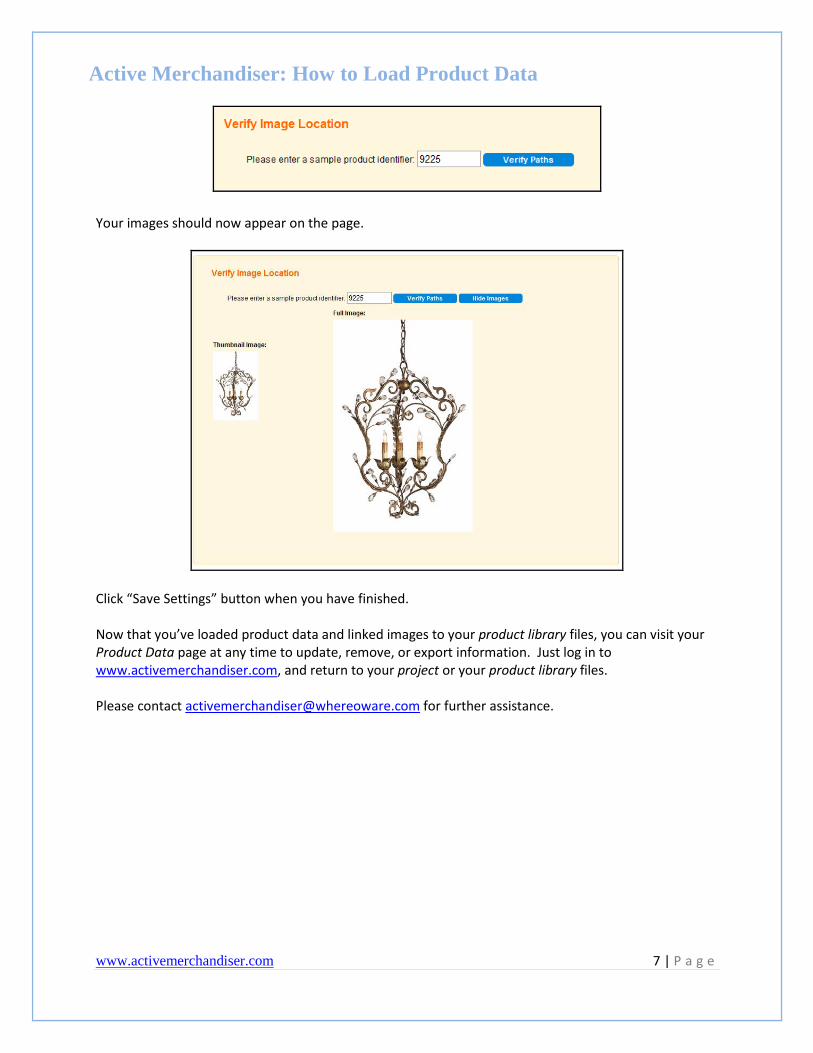
NOTE: for most websites, smaller (thumbnail) images are shown on search result pages, and larger (full size) images are shown on the product detail pages. In Active Merchandiser, the thumbnail image path is used only to display product images in the “Select Products” function of the Active Merchandiser Blink or Create menus. The full-size image path is used for inserting large images into your catalog. To test the image path set up, enter one of your image name field values in the test box at the bottom of the Product Image Location Page, and click “Verify Paths.”
Active Merchandiser: How to Load Product Data
www.activemerchandiser.com 7 | P a g e
Your images should now appear on the page.
Click “Save Settings” button when you have finished. Now that you’ve loaded product data and linked images to your product library files, you can visit your Product Data page at any time to update, remove, or export information. Just log in to www.activemerchandiser.com, and return to your project or your product library files. Please contact [email protected] for further assistance.
Active Merchandiser: How to Load Product Data
www.activemerchandiser.com 8 | P a g e
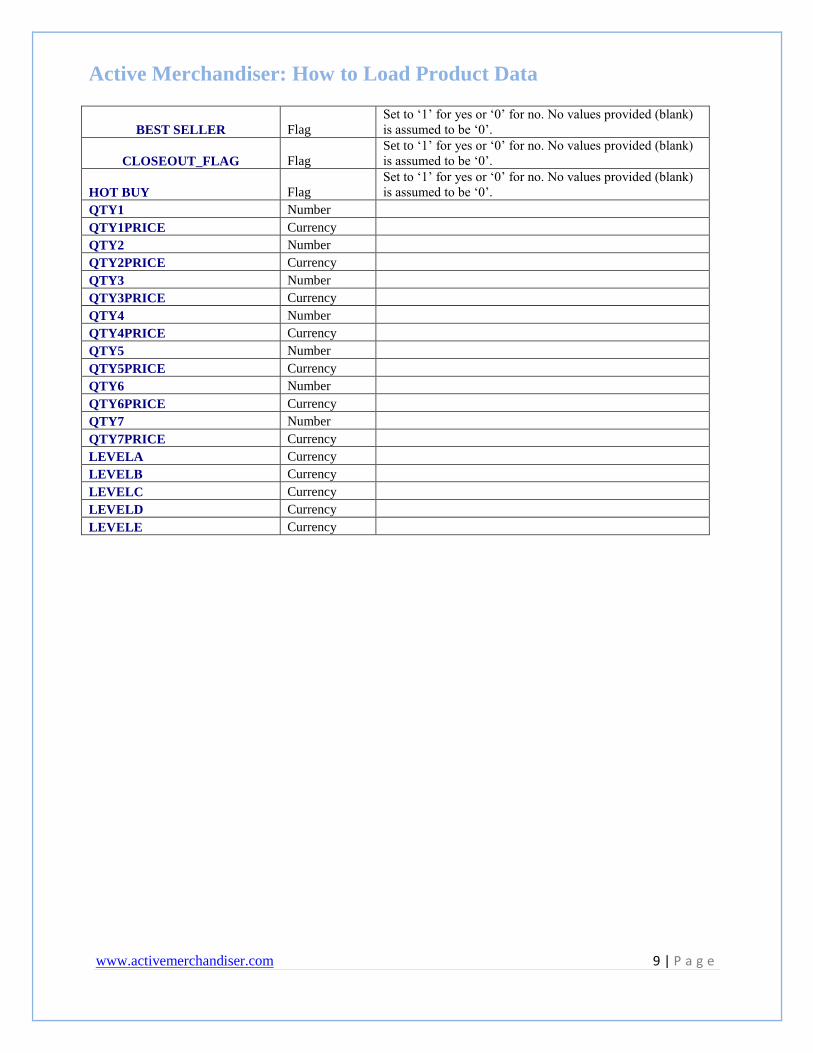
Active Merchandiser Product Fields
Field
Field Type /
Limit Description / Notes
SKU Text (40)
UPC Text (12)
PRODUCT NAME Text (120)
CATEGORY PATH Text (255)
Format '/category/subcategory/subcategory' - Only up to
three levels
WHOLESALE PRICE Currency
SALES PRICE Currency
DISCOUNTING INFO Text (255)
RETAIL PRICE Currency
SHORT DESCRIPTION Text (50)
LONG DESCRIPTION Text (1995)
MINIMUM Number
UNIT INCREMENTS Number
THEME Text (80)
DESIGNER Text (80)
KEYWORD1 Text (80)
KEYWORD2 Text (80)
KEYWORD3 Text (80)
KEYWORD4 Text (80)
KEYWORD5 Text (80)
KEYWORD6 Text (80)
CUSTOM 1 Text (1995)
CUSTOM 2 Text (1995)
CUSTOM 3 Text (1995)
CUSTOM 4 Text (1995)
CUSTOM 5 Text (1995)
CUSTOM 6 Text (1995)
CUSTOM 7 Text (1995)
CUSTOM 8 Text (1995)
CUSTOM 9 Text (1995)
CUSTOM 10 Text (1995)
DISPLAY ORDER Text (10)
QUANTITY ON HAND Text (50)
RELATED SKUS Text (255)
SOURCE FILE PATH Text (255)
RETAIL SHORT
DESCRIPTION Text (42)
RETAIL LONG
DESCRIPTION Text (255)
DISCONTINUED_FLAG Flag
Set to ‘1’ for yes or ‘0’ for no. No values provided (blank)
is assumed to be ‘0’.
NEW Flag
Set to ‘1’ for yes or ‘0’ for no. No values provided (blank)
is assumed to be ‘0’.
Active Merchandiser: How to Load Product Data
www.activemerchandiser.com 9 | P a g e
BEST SELLER Flag
Set to ‘1’ for yes or ‘0’ for no. No values provided (blank)
is assumed to be ‘0’.
CLOSEOUT_FLAG Flag
Set to ‘1’ for yes or ‘0’ for no. No values provided (blank)
is assumed to be ‘0’.
HOT BUY Flag
Set to ‘1’ for yes or ‘0’ for no. No values provided (blank)
is assumed to be ‘0’.
QTY1 Number
QTY1PRICE Currency
QTY2 Number
QTY2PRICE Currency
QTY3 Number
QTY3PRICE Currency
QTY4 Number
QTY4PRICE Currency
QTY5 Number
QTY5PRICE Currency
QTY6 Number
QTY6PRICE Currency
QTY7 Number
QTY7PRICE Currency
LEVELA Currency
LEVELB Currency
LEVELC Currency
LEVELD Currency
LEVELE Currency