Active Display System Getting Results...
86
ACTIVE DISPLAY SYSTEM GETTING RESULTS GUIDE PUBLICATION VW32AD-GR001E-EN-E–July 2011 Supersedes Publication VW32AD-GR001D-EN-E RSView 32 ®
Transcript of Active Display System Getting Results...
ACTIVE DISPLAY SYSTEM GETTING RESULTS GUIDE
PUBLICATION VW32AD-GR001E-EN-E–July 2011Supersedes Publication VW32AD-GR001D-EN-E
RSView 32®
VW32AD-GR001C-EN-E 5/1/07 3:42 PM Page 1
1
Contact Rockwell Customer Support Telephone — 1.440.646.3434Online Support — http://support.rockwellautomation.com
Copyright Notice © 2011 Rockwell Automation Technologies, Inc. All rights reserved. Printed in USA.
This document and any accompanying Rockwell Software products are copyrighted by Rockwell Automation Technologies, Inc. Any reproduction and/or distribution without prior written consent from Rockwell Automation Technologies, Inc. is strictly prohibited. Please refer to the license agreement for details.
Trademark Notices Allen-Bradley, ControlLogix, FactoryTalk, Rockwell Automation, Rockwell Software, RSLinx, RSView and the Rockwell Software logo are registered trademarks of Rockwell Automation, Inc.
The following logos and products are trademarks of Rockwell Automation, Inc.:
AdvanceDDE, ControlView, Data Highway Plus, DH+, RSView32, RSView32 Resource Kit, and WINtelligent.
FactoryTalk Activation, FactoryTalk Live Data, and FactoryTalk Transaction Manager.
RSLinx Classic, SLC 5, SLC 500, and SoftLogix.
Other Trademarks ActiveX, Microsoft, Microsoft Access, SQL Server, Visual Basic, Visual C++, Visual SourceSafe, Windows, Windows ME, Windows NT, Windows 2000, Windows Server 2003, Windows XP, and Windows Vista are either registered trademarks or trademarks of Microsoft Corporation in the United States and/or other countries.
Adobe, Acrobat, and Reader are either registered trademarks or trademarks of Adobe Systems Incorporated in the United States and/or other countries.
ControlNet is a registered trademark of ControlNet International.
DeviceNet is a trademark of the Open DeviceNet Vendor Association, Inc. (ODVA).
Ethernet is a registered trademark of Digital Equipment Corporation, Intel, and Xerox Corporation.
OLE for Process Control (OPC) is a registered trademark of the OPC Foundation.
Oracle, SQL*Net, and SQL*Plus are registered trademarks of Oracle Corporation.
All other trademarks are the property of their respective holders and are hereby acknowledged.
Warranty This product is warranted in accordance with the product license. The product’s performance may be affected by system configuration, the application being performed, operator control, maintenance, and other related factors. Rockwell Automation is not responsible for these intervening factors. The instructions in this document do not cover all the details or variations in the equipment, procedure, or process described, nor do they provide directions for meeting every possible contingency during installation, operation, or maintenance. This product’s implementation may vary among users.
This document is current as of the time of release of the product; however, the accompanying software may have changed since the release. Rockwell Automation, Inc. reserves the right to change any information contained in this document or the software at anytime without prior notice. It is your responsibility to obtain the most current information available from Rockwell when installing or using this product.
i
ContentsGetting started.................................................................................................................................. 1
Quick start steps ................................................................................................... 1
Step 1 Plan your implementation............................................................................ 2
Step 2 Determine system requirements .................................................................2
Step 3 Install supporting software .......................................................................... 3
Step 4 Set up the server ............................................................................................ 6
Step 5 Set up the station........................................................................................... 6
Step 6 Set up the browser ........................................................................................ 6
Chapter 1
Setting up the server ................................................................................................................. 7
Determining system requirements............................................................ 7
Step 1 Total your points ........................................................................................... 7
Step 2 Determine the recommended system configuration ............................... 8
Determining which software components to install .................... 9
Microsoft Internet Information Server ...................................................................... 9
Windows network connections ...................................................................................11
Windows 2000 network connections..........................................................................11
Windows Vista/ Windows 7 network connections..................................................11
Windows Server 2008 network connections. ............................................................12
In the Windows Control Panel, select Network and Sharing Center. Inthe left pane, select Manage network connections. From the File menu, select Set up a connection or network and then work through the remaining steps in the wizard.12
Installing the RSView32 Active Display Server ...........................12
Activation keys ...............................................................................................................13
FactoryTalk® Activation Grace Period .....................................................................14
Increasing the number of clients you can connect to the server............................14
ii Getting Results with RSView32 Active Display System
Starting and stopping the server ............................................................. 16
If you don’t want to use the browser ......................................................................... 16
If you do want to use the browser .............................................................................. 17
Stopping the server........................................................................................................ 20
Starting and stopping the server automatically ......................................................... 21
Chapter 2
Setting up the station ............................................................................................................. 23
About the RSView32 Active Display Station ................................... 23
Determining system requirements ......................................................... 23
Step 1 Total your points ......................................................................................... 24
Step 2 Determine the recommended system configuration ............................. 25
Installing the RSView32 Active Display Station ........................... 25
Installing the client software from CD-ROM........................................................... 26
Installing the client software from a network ........................................................... 27
Activation keys ............................................................................................................... 27
FactoryTalk® Activation Grace Period ..................................................................... 28
Configuring stations .......................................................................................... 28
Editing station configurations.................................................................... 29
Using clients with a dial-up connection ............................................. 31
Configuring Windows Server 2003 or Windows XP for dial-up networking ...... 31
Configuring Windows 2000 for dial-up networking ................................................ 33
Configuring Windows Vista Business for dial-up networking ............................... 34
Starting the RSView32 Active Display Station .............................. 36
Bypassing proxy server connections........................................................................... 36
Starting a station using a direct network or dial-up connection............................. 37
Bypassing the station login dialog box ....................................................................... 38
Starting the station automatically when Windows starts ......................................... 39
Chapter 3
Setting up the browser .......................................................................................................... 41
Determining system requirements ......................................................... 41
Contents iii
Installing the RSView32 Active Display Browser.........................42
Connecting to an RSView32 Active Display Server....................42
Connecting to a server using a direct Internet connection .....................................42
Connecting to an Active Display Server using a dial-up connection.....................43
Chapter 4
Using the Active Display System .............................................................................. 45
Integrating your RSView32 project withthe Active Display System ............................................................................45
Activity bar support.......................................................................................................45
Activity logging ..............................................................................................................46
Alarms..............................................................................................................................46
File locations...................................................................................................................46
Key definitions ...............................................................................................................47
Security ............................................................................................................................47
Startup and shutdown macros .....................................................................................49
Trends..............................................................................................................................49
RSView32 VBA code ....................................................................................................50
Runtime features not supported in the Active Display System..............................50
Configuring your RSView32 project for browser navigation 60
Modifying the Display and Abort commands...........................................................60
Integrating the browser with other web sites ............................................................60
Adding parameters to the Display command............................................................62
Making your RSView32 project work with a browser .............................................63
Avoiding navigation among graphic displays on different servers.........................63
Maintaining the connection to the server ..................................................................64
Deploying ActiveX components automatically ..............................64
Differences between the station and the browser......................65
Chapter 5
Commands............................................................................................................................................ 67

iv Getting Results with RSView32 Active Display System
Chapter 6
Getting the information you need ............................................................................. 71
Using Help ................................................................................................................ 71
Viewing the Help contents........................................................................................... 72
Using the index .............................................................................................................. 73
Finding words or topics................................................................................................ 74
Technical support ............................................................................................... 75
When you call ................................................................................................................. 75
Index ........................................................................................................................................................... 77
1
Getting started
The RSView32™ Active Display System is an optional client/server extension to RSView32. It enables you to load, run, and interact remotely with RSView32 graphic displays, from almost any computer on a network.
The RSView32 Active Display System consists of the RSView32 Active Display Server, that runs on the computer on which RSView32 is installed, and one or more clients that run remotely on machines connected to the server. There are two kinds of client:
the RSView32 Active Display Station, a complete runtime operation environment that can run on a remote client computer
the RSView32 Active Display Browser, a “rich” web client implementation, for integrating fully interactive, real-time RSView32 graphic displays into the Microsoft® Internet Explorer web browser. The Active Display Browser allows you to link your RSView32 graphic displays to other web pages, providing a common, browser-style method of navigation to multiple information systems in a single web browser (for example, an intranet application).
Quick start stepsThe following steps explain how to get up and running with the RSView32 Active Display System. To work with the RSView32 Active Display System, you will need at least one server, and one client. Complete steps 1 and 2 in order. The other steps can be completed in any order.
2 Getting Results with RSView32 Active Display System
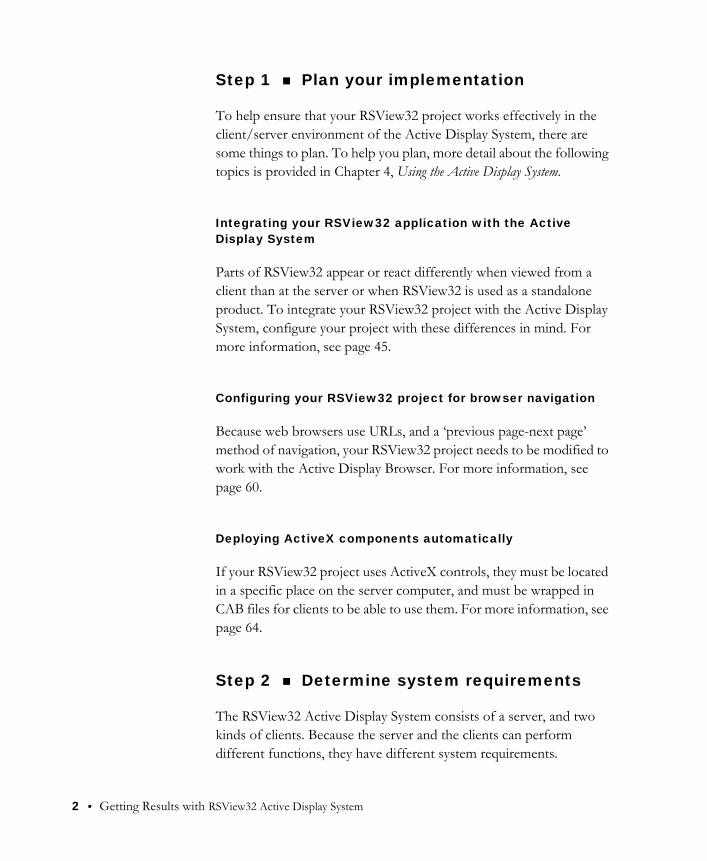
Step 1 Plan your implementation
To help ensure that your RSView32 project works effectively in the client/server environment of the Active Display System, there are some things to plan. To help you plan, more detail about the following topics is provided in Chapter 4, Using the Active Display System.
Integrating your RSView32 application with the Active Display System
Parts of RSView32 appear or react differently when viewed from a client than at the server or when RSView32 is used as a standalone product. To integrate your RSView32 project with the Active Display System, configure your project with these differences in mind. For more information, see page 45.
Configuring your RSView32 project for browser navigation
Because web browsers use URLs, and a ‘previous page-next page’ method of navigation, your RSView32 project needs to be modified to work with the Active Display Browser. For more information, see page 60.
Deploying ActiveX components automatically
If your RSView32 project uses ActiveX controls, they must be located in a specific place on the server computer, and must be wrapped in CAB files for clients to be able to use them. For more information, see page 64.
Step 2 Determine system requirements
The RSView32 Active Display System consists of a server, and two kinds of clients. Because the server and the clients can perform different functions, they have different system requirements.

Getting started 3
For details about determining the system requirements for the server, see page 7.
For details about determining the system requirements for the station and the browser, see page 23.
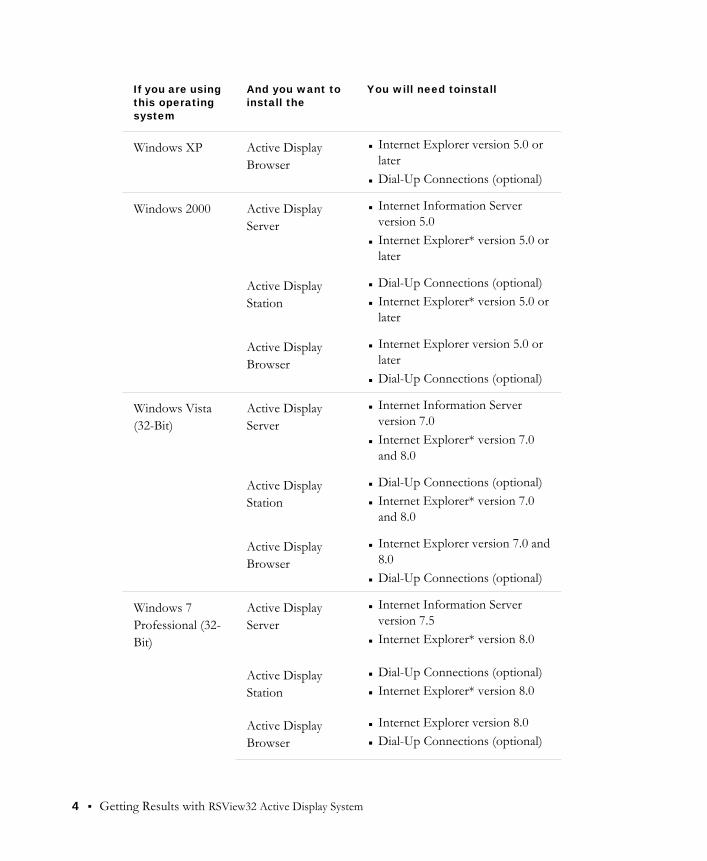
Step 3 Install supporting software
For the RSView32 Active Display System to run, you may need to install and configure some software components that provide services to the Windows® operating system you are using. To perform its tasks at runtime, the Active Display System “piggy-backs” on these services.
If you are using this operating system
And you want toinstall the
You will need toinstall
Windows Server 2003
Active Display Server
Internet Information Server version 6.0
Internet Explorer* version 6.0 or later
Active Display Station
Dial-Up Connections (optional) Internet Explorer* version 6.0 or
later
Active Display Browser
Internet Explorer version 6.0 or later
Dial-Up Connections (optional)
Windows XP Active Display Server
Internet Information Server version 5.0
Internet Explorer* version 5.0 or later
Active Display Station
Dial-Up Connections (optional) Internet Explorer* version 5.0 or
later
4 Getting Results with RSView32 Active Display System
Windows XP Active Display Browser
Internet Explorer version 5.0 or later
Dial-Up Connections (optional)
Windows 2000 Active Display Server
Internet Information Server version 5.0
Internet Explorer* version 5.0 or later
Active Display Station
Dial-Up Connections (optional) Internet Explorer* version 5.0 or
later
Active Display Browser
Internet Explorer version 5.0 or later
Dial-Up Connections (optional)
Windows Vista (32-Bit)
Active Display Server
Internet Information Server version 7.0
Internet Explorer* version 7.0 and 8.0
Active Display Station
Dial-Up Connections (optional) Internet Explorer* version 7.0
and 8.0
Active Display Browser
Internet Explorer version 7.0 and 8.0
Dial-Up Connections (optional)
Windows 7 Professional (32-Bit)
Active Display Server
Internet Information Server version 7.5
Internet Explorer* version 8.0
Active Display Station
Dial-Up Connections (optional) Internet Explorer* version 8.0
Active Display Browser
Internet Explorer version 8.0 Dial-Up Connections (optional)
If you are using this operating system
And you want toinstall the
You will need toinstall

Getting started 5
For details, see the chapter for the Active Display System software you are installing.
Windows Server 2008 (32-Bit)
Active Display Server
Internet Information Server version 7.0
Internet Explorer* version 8.0
Active Display Station
Dial-Up Connections (optional) Internet Explorer* version 8.0
Active Display Browser
Internet Explorer version 8.0 Dial-Up Connections (optional)
* Some components installed with Internet Explorer are required for the Active Dis-play System to work. That is why Internet Explorer must be installed, even if it is not being used.
If you are using this operating system
And you want toinstall the
You will need toinstall
Step 4 Set up the server
For details about setting up and starting or stopping the server, see Chapter 1.
Step 5 Set up the station
For details about setting up and using the Active Display Station, see Chapter 2.
Step 6 Set up the browser
For details about setting up and using the Active Display Browser, seeChapter 3.

7
Chapter
1 Setting up the server
Determining system requirementsThe hardware and software you use with the Active Display Server depends on the demands your project places on the system. The greater the demand, the more powerful a system you need.
The recommendations below are based on field experience. It is possible that your application will operate on a platform below these recommendations.
In the following tables, the demands your project places on the system are represented by points. Total your points in step 1, and then use the table in step 2 to determine the hardware and software you need.
Step 1 Total your points
For If you are Add points
RSView32™ project running displays, or editing your project on the RSView32 Active Display Server computer
1
using more than 30,000 tags 2
using more than 5,000 tags 1
changing displays, on average, more than five times per minute on the RSView32 Active Display Server computer
1
Alarms displaying alarm summaries with more than 500 outstanding transactions (the number of lines in an unfiltered alarm summary)
2
displaying more than 100 outstanding alarm transactions 1
8 Getting Results with RSView32 Active Display System
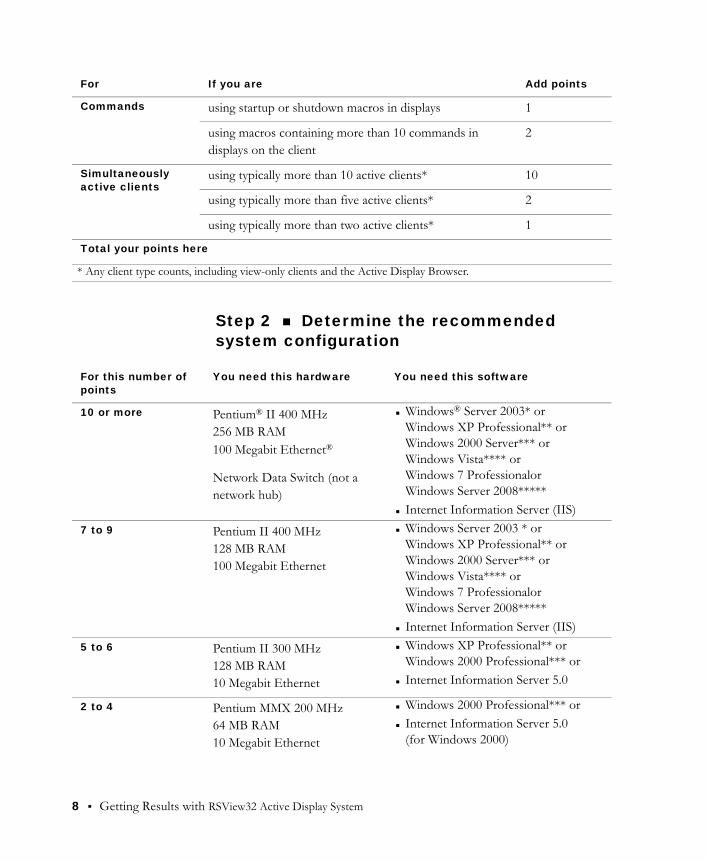
Step 2 Determine the recommended system configuration
Commands using startup or shutdown macros in displays 1
using macros containing more than 10 commands in displays on the client
2
Simultaneously active clients
using typically more than 10 active clients* 10
using typically more than five active clients* 2
using typically more than two active clients* 1
Total your points here
* Any client type counts, including view-only clients and the Active Display Browser.
For If you are Add points
For this number of points
You need this hardware You need this software
10 or more Pentium® II 400 MHz256 MB RAM100 Megabit Ethernet®
Network Data Switch (not a network hub)
Windows® Server 2003* orWindows XP Professional** orWindows 2000 Server*** orWindows Vista**** orWindows 7 ProfessionalorWindows Server 2008*****
Internet Information Server (IIS)
7 to 9 Pentium II 400 MHz128 MB RAM100 Megabit Ethernet
Windows Server 2003 * orWindows XP Professional** orWindows 2000 Server*** orWindows Vista**** orWindows 7 ProfessionalorWindows Server 2008*****
Internet Information Server (IIS)
5 to 6 Pentium II 300 MHz128 MB RAM10 Megabit Ethernet
Windows XP Professional** orWindows 2000 Professional*** or
Internet Information Server 5.0
2 to 4 Pentium MMX 200 MHz64 MB RAM10 Megabit Ethernet
Windows 2000 Professional*** or Internet Information Server 5.0
(for Windows 2000)

Setting up the server 9
Determining which software components to install
For the RSView32 Active Display Server to run, in addition to installing the Active Display server software, you may need to install and configure some software components that provide services to the Windows operating system. To perform its tasks at runtime, the Active Display Server “piggy-backs” on these services.
The following sections provide information about installing and configuring these components. You may not need to install and configure all of the following components.
Microsoft Internet Information Server
The Microsoft® Internet Information Server is a set of services that allows the Windows Server 2003, Windows XP, Windows 2000 or Windows Vista Business computer to run as an Internet server. The
0 to 1 Pentium 133 MHz32 MB RAM10 Megabit Ethernet
Windows 2000 Professional*** or Internet Information Server 5.0
(for Windows 2000)
Important: The hardware should meet or exceed the minimum hardware requirements of the operating system you will run.
* With Service Pack 1 or later.
** With Service Pack 1 or later.
*** With Service Pack 3 or later.
**** With Service Pack 1 or later.
***** With Service Pack 2.
For this number of points
You need this hardware You need this software
The order in which you install components is important. Follow the instructions in the order in which they appear. The Windows service pack must be installed after all other components have been installed.
IMPORTANT
10 Getting Results with RSView32 Active Display System
Active Display Server needs these services to communicate with Active Display Stations and Active Display Browsers.
Where to obtain the software
Internet services for Windows Server 2003, Windows XP, Windows 2000 and Windows Vista Business are available on the operating system CD.
If you want to use the Active Display Browser, you must install version 5.0 or later of Internet Information Server on the server..
How to check what version is installed
To identify the version of Internet Information Server you have installed on the Active Display Server computer:
1. Start Internet Explorer.
2. Type the following URL and then press Enter:
http://server_computer_name
where server_computer_name is the name of the computer on which the Active Display Server is installed. Internet Explorer displays version information for Internet Information Server installed on the server computer.
What you need to install
The Microsoft Internet Information Server consists of several components, which you may or may not need for other programs you are running. At a minimum, you must install the following two components, for the Active Display Server to run:
Internet Service Manager
World Wide Web Service

Setting up the server 11
Windows network connections
If the Active Display Server is running on Windows Server 2003, Windows XP, Windows 2000, or Windows Vista Business, and you want Active Display Stations or Active Display Browsers to be able to dial up to the Active Display Server using a phone line, you must set up network connections on the computer on which the Active Display Server is installed.
Windows Server 2003 /XP network connections .
In the Windows Control Panel, select Network Connections, and then start the New Connections wizard. Select Set up an advanced connection and Accept incoming connections, then work through the remaining steps in the wizard.
Windows 2000 network connections.
In the Windows Control Panel, select Network and Dial-up Connections, and then start the Network Connections wizard. Select Accept incoming calls, and then work through the remaining steps in the wizard.
Windows Vista/ Windows 7 network connections.
In the Windows Control Panel, select Network and Sharing Center. Inthe left pane, select Manage connections. From the File menu, select New incoming connection and then work through the remaining steps in the wizard.
12 Getting Results with RSView32 Active Display System
Windows Server 2008 network connections.
In the Windows Control Panel, select Network and Sharing Center. Inthe left pane, select Manage network connections. From the File menu, select Set up a connection or network and then work through the remaining steps in the wizard.
Installing the RSView32 Active Display Server The steps below explain how to install the Active Display Server from the CD-ROM to your computer.
Important: RSView32 Works or RSView32 Runtime must be installed, and the computer must be restarted, before the Active Display Server can be installed.
To install the RSView32 Active Display Server
1. Close all open Windows programs.
2. Place the RSView32 Active Display System CD-ROM into your CD-ROM drive. The CD should start running automatically.
If the CD does not start automatically, run D:\SETUP.EXE, where D is the drive containing the CD.
3. Choose to install the RSView32 Active Display Server.
4. Follow the on-screen instructions.
5. During installation, you will be prompted to activate the RSView32 Active Display Server. Insert the Master disk in the disk drive, and then click Activate. For details about activation, see the activation utilities Help file, COPYPROT.CHM.
During installation, only one activation key of each type is moved to the server. To connect more than one client to the Active Display Server, you must install additional activation keys for each client. These client keys are either installed on the Active Display Server or on the Active
Setting up the server 13
Display Client. For more information, see “Activation keys” on page 13 and “‘Dedicated’ client licenses” on page 16.
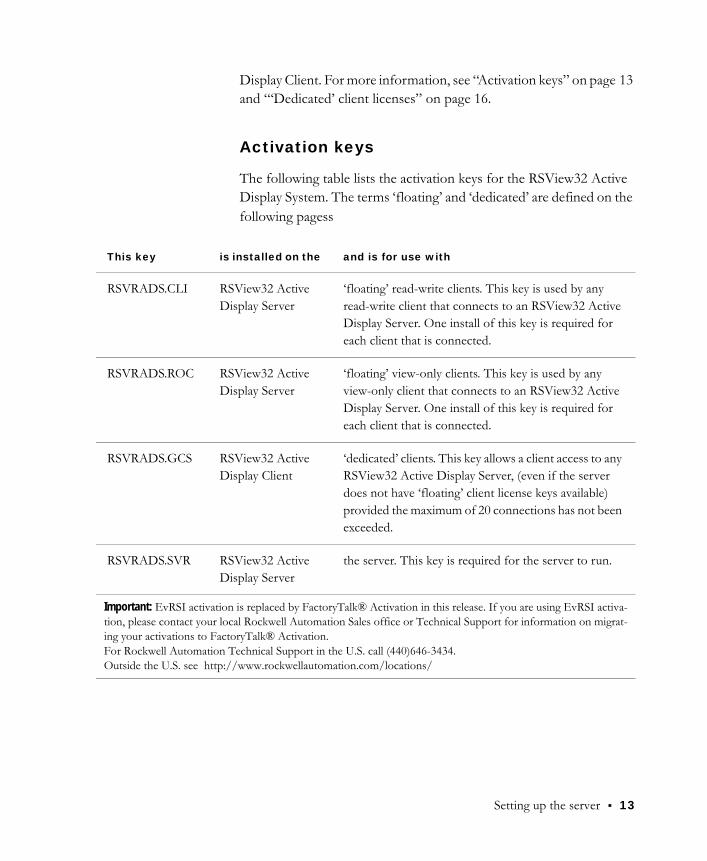
Activation keys
The following table lists the activation keys for the RSView32 Active Display System. The terms ‘floating’ and ‘dedicated’ are defined on the following pagess
This key is installed on the and is for use with
RSVRADS.CLI RSView32 Active Display Server
‘floating’ read-write clients. This key is used by any read-write client that connects to an RSView32 Active Display Server. One install of this key is required for each client that is connected.
RSVRADS.ROC RSView32 Active Display Server
‘floating’ view-only clients. This key is used by any view-only client that connects to an RSView32 Active Display Server. One install of this key is required for each client that is connected.
RSVRADS.GCS RSView32 Active Display Client
‘dedicated’ clients. This key allows a client access to any RSView32 Active Display Server, (even if the server does not have ‘floating’ client license keys available) provided the maximum of 20 connections has not been exceeded.
RSVRADS.SVR RSView32 Active Display Server
the server. This key is required for the server to run.
Important: EvRSI activation is replaced by FactoryTalk® Activation in this release. If you are using EvRSI activa-tion, please contact your local Rockwell Automation Sales office or Technical Support for information on migrat-ing your activations to FactoryTalk® Activation.For Rockwell Automation Technical Support in the U.S. call (440)646-3434. Outside the U.S. see http://www.rockwellautomation.com/locations/
14 Getting Results with RSView32 Active Display System
FactoryTalk® Activation Grace Period
FactoryTalk® Activation provides customers with access to critical software components for a grace period of 7 days regardless of availability of valid activations. When a product is successfully activated, all grace period records will be cleared and the product will proceed with valid activations.
RSView32 Active Display Server
During the grace period, FactoryTalk® Activation will display a warning message box to the user and log a diagnostic warning message to FactoryTalk® Diagnostics every four hours if no valid activation key detected.
When the grace period expires, Active Display Server will continue to run as in the grace period until it is restarted; however, after Active Display Server is restarted, the DisplayServerOn command will not work.
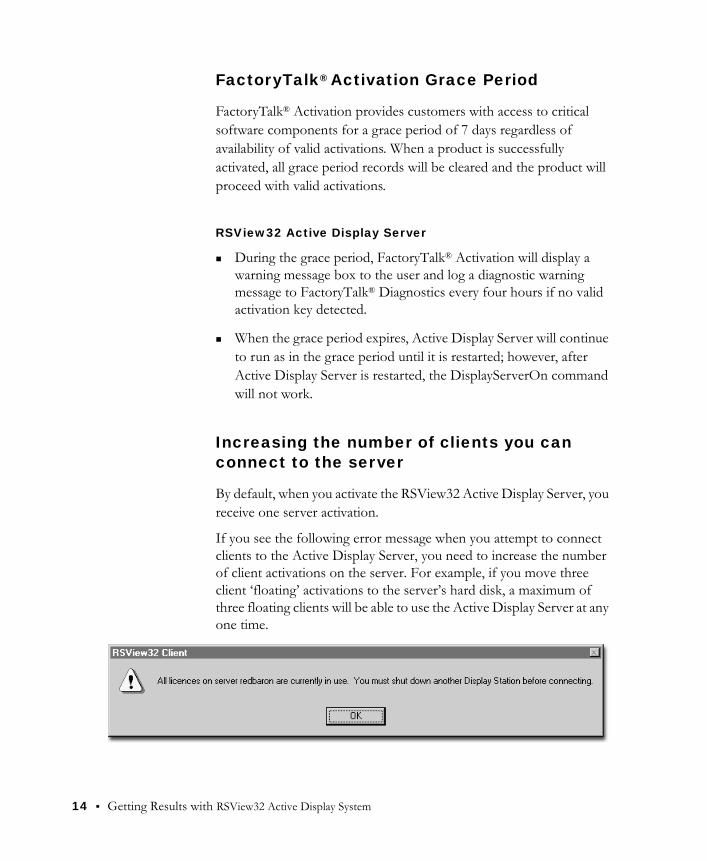
Increasing the number of clients you can connect to the server
By default, when you activate the RSView32 Active Display Server, you receive one server activation.
If you see the following error message when you attempt to connect clients to the Active Display Server, you need to increase the number of client activations on the server. For example, if you move three client ‘floating’ activations to the server’s hard disk, a maximum of three floating clients will be able to use the Active Display Server at any one time.
Setting up the server 15
For information about how to add, remove, or update activation keys, see the activation utilities Help file, COPYPROT.CHM.
Simultaneous client connections
Up to 20 licensed clients can connect to a server at one time.
‘Floating’ client licenses
Floating client licenses are installed on the server and “float” to whichever client needs them. This means that the license is granted for the exclusive use of any client while that client is connected. When the client disconnects, the license becomes available for other client connections.
There are two types of floating licenses: read-write licenses and view-only licenses. Read-write licenses allow full read-write privileges. View-only licenses allow read-only privileges.
If a client is configured as read-write, and only view-only licenses are available, the client will be view-only, and the activation key will override the read-write configuration of the client.
If a client is configured as view-only, and only read-write licenses are available, the client will use a read-write license, but the view-only configuration of the client will override the read-write activation key, and will allow view-only access to the project on the server.
Do not rely on the activation key to determine whether the client is view-only. Always configure the client deliberately as view-only.
Each floating license requires one installation of the appropriate activation key on the server. For read-write licenses, the RSVRADS.CLI key is required. For view-only licenses, the RSVRADS.ROC key is required. To increase the number of client licenses available, install additional activation keys on the server. Keep in mind, however, that no matter how many licenses you have, the maximum number of clients that can be connected at one time is 20.
16 Getting Results with RSView32 Active Display System
‘Dedicated’ client licenses
Dedicated client licenses are installed on the client. These licenses ensure a particular client will always have a license to connect to any RSView32 Active Display Server. Keep in mind, however, that no matter how many licenses you have, the maximum number of clients that can be connected to a server at one time is 20. The client checks for locally installed, dedicated licenses before requesting a floating license from the server.
Starting and stopping the server
You cannot start or stop an Active Display Server from a remote computer. Starting or stopping the server must take place at the server computer, and can take place automatically when RSView32 starts or stops. For details, see page 21.
The method you choose for starting the RSView32 Active Display Server depends on whether you want to connect RSView32 Active Display Browsers to the server.
If you don’t want to use the browser
To start the RSView32 Active Display Server
1. Click the Windows Start button, point to Programs, Rockwell Software, RSView32, and then click RSView32 Works or RSView32 Runtime.
2. Open a project: on the File menu, click Open, and then double-click a project name.
3. Open the RSView32 System folder in the Project Manager, and then double-click Command Line.
Setting up the server 17
4. Type DisplayServerOn. You can also execute the command in a startup macro, or you can assign it to a touch control or an object, such as a button.
The Active Display Server icon appears in the taskbar:
If you do want to use the browser
Deciding what users see
The default.htm file that is generated when you start the Active Display Server gives the user of the Active Display Browser different options, depending on whether:
the Active Display Server is running on the computer to which the Active Display Browser is connected
you specified a default graphic display for browsers when you issued the DisplayServerOn command at the server
If the Active Display Server is running, and you specified an initial graphic display
To specify a graphic display that appears automatically when the user connects to the Active Display Server, start the RSView32 Active Display Server with the /G parameter. For example, the command
DisplayServerOn /GMain
The project you load must have at least one user account, other than the default, before clients can connect and log in. For more information about security and the RSView32 Active Display System, see page 47.
IMPORTANT

18 Getting Results with RSView32 Active Display System
starts the RSView32 Active Display Server, and points Active Display Browsers to the Main graphic display file in the RSView32 project running on the server.
If the RSView32 project does not use Windows Security Options, when the user clicks Next, the following screen appears in the browser window:
If the user name and password are correct, when the user clicks OK, the initial graphic specified for the DisplayServerOn command appears in the browser window.
Setting up the server 19
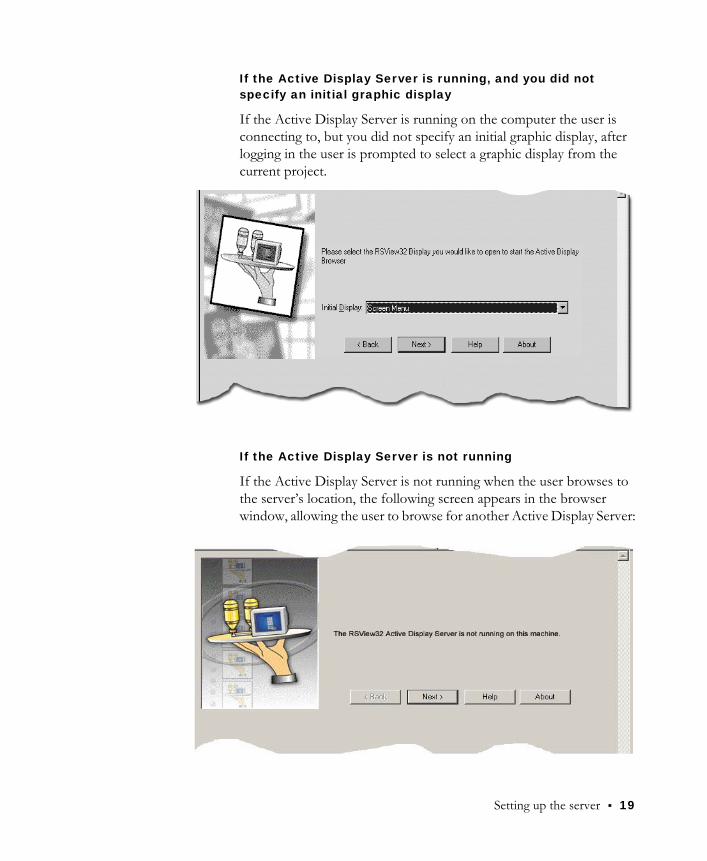
If the Active Display Server is running, and you did not specify an initial graphic display
If the Active Display Server is running on the computer the user is connecting to, but you did not specify an initial graphic display, after logging in the user is prompted to select a graphic display from the current project.
If the Active Display Server is not running
If the Active Display Server is not running when the user browses to the server’s location, the following screen appears in the browser window, allowing the user to browse for another Active Display Server:
20 Getting Results with RSView32 Active Display System
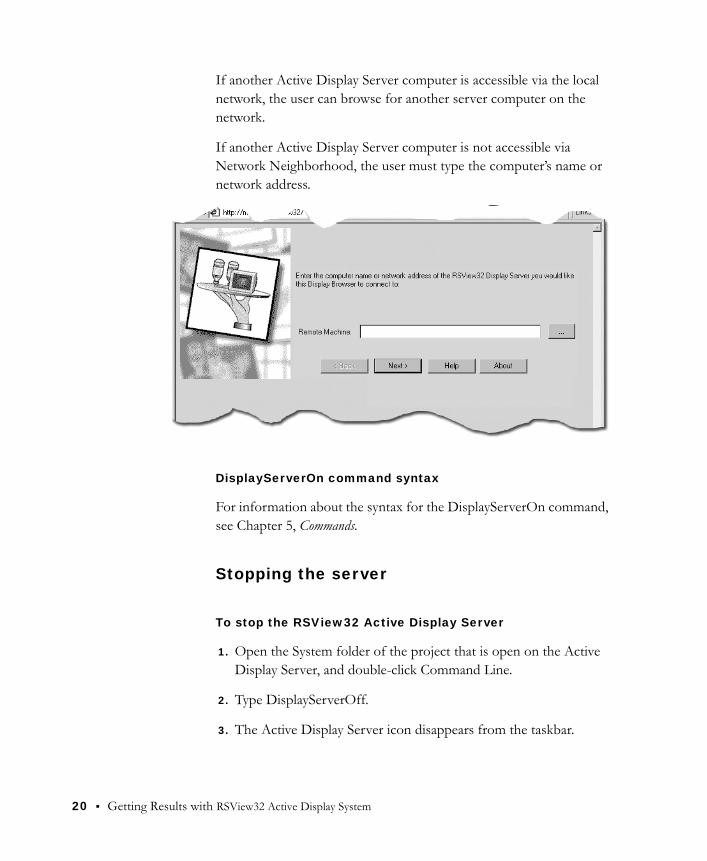
If another Active Display Server computer is accessible via the local network, the user can browse for another server computer on the network.
If another Active Display Server computer is not accessible via Network Neighborhood, the user must type the computer’s name or network address.
DisplayServerOn command syntax
For information about the syntax for the DisplayServerOn command, see Chapter 5, Commands.
Stopping the server
To stop the RSView32 Active Display Server
1. Open the System folder of the project that is open on the Active Display Server, and double-click Command Line.
2. Type DisplayServerOff.
3. The Active Display Server icon disappears from the taskbar.
Setting up the server 21
Starting and stopping the server automatically
When you run your project, the DisplayServerOn command can be executed automatically. To do this, add the DisplayServerOn command to a startup macro for your project. When you close your project, the DisplayServerOff command is executed automatically.

22 Getting Results with RSView32 Active Display System

23
Chapter
2 Setting up the station
About the RSView32 Active Display Station
Install the RSView32™ Active Display Station on workstations you want to connect to a project on an Active Display Server.
You can use the Active Display Station to perform all the activities of RSView32 Runtime, including:
loading, viewing, and interacting with graphic displays
adjusting set points
viewing real-time and historical trends
performing global alarm management
providing a secure runtime operator environment
Determining system requirements
The hardware and software you use with the RSView32 Active Display Station depend on the demands your project places on the system. The greater the demand, the more powerful a system you need.
The recommendations below are based on field experience. It is possible that your application will operate on a platform below these recommendations.
In the following tables, the demands your project places on the system are represented by points. Total your points in step 1, and then use the table in step 2 to determine the hardware and software you need.
24 Getting Results with RSView32 Active Display System
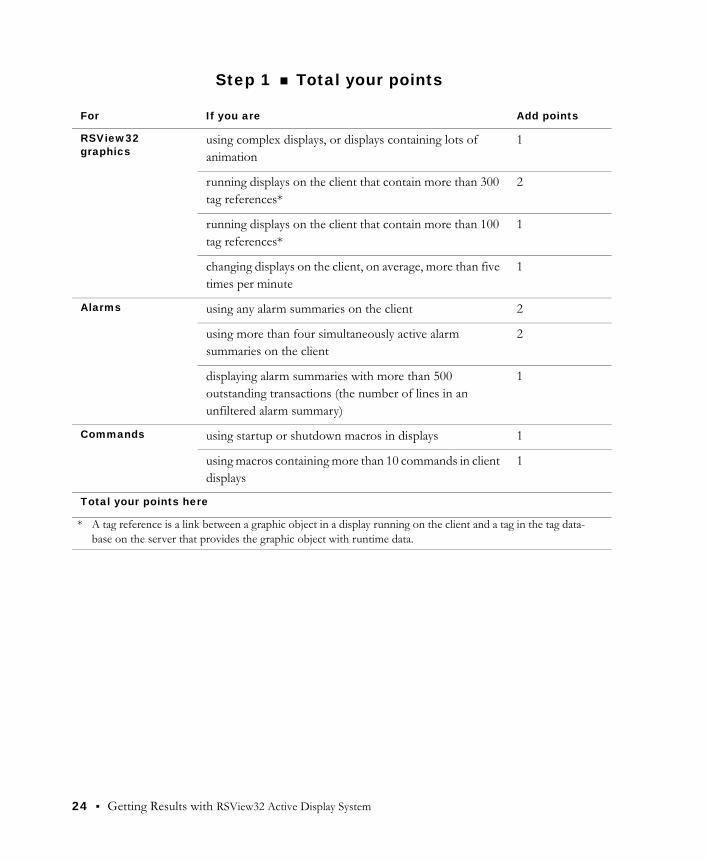
Step 1 Total your points
For If you are Add points
RSView32 graphics
using complex displays, or displays containing lots of animation
1
running displays on the client that contain more than 300 tag references*
2
running displays on the client that contain more than 100 tag references*
1
changing displays on the client, on average, more than five times per minute
1
Alarms using any alarm summaries on the client 2
using more than four simultaneously active alarm summaries on the client
2
displaying alarm summaries with more than 500 outstanding transactions (the number of lines in an unfiltered alarm summary)
1
Commands using startup or shutdown macros in displays 1
using macros containing more than 10 commands in client displays
1
Total your points here
* A tag reference is a link between a graphic object in a display running on the client and a tag in the tag data-base on the server that provides the graphic object with runtime data.
Setting up the station 25
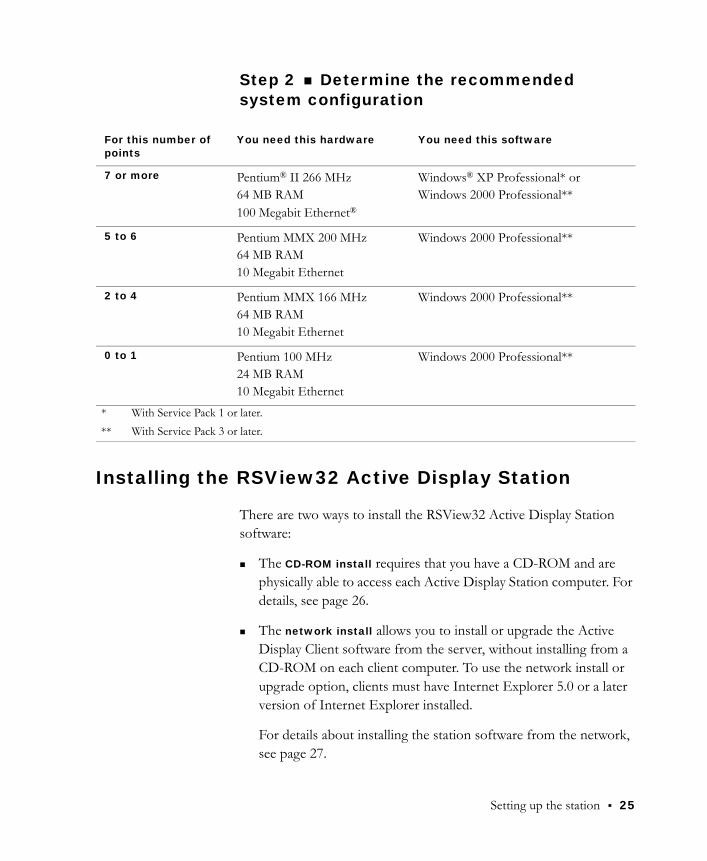
Step 2 Determine the recommended system configuration
Installing the RSView32 Active Display Station
There are two ways to install the RSView32 Active Display Station software:
The CD-ROM install requires that you have a CD-ROM and are physically able to access each Active Display Station computer. For details, see page 26.
The network install allows you to install or upgrade the Active Display Client software from the server, without installing from a CD-ROM on each client computer. To use the network install or upgrade option, clients must have Internet Explorer 5.0 or a later version of Internet Explorer installed.
For details about installing the station software from the network, see page 27.
For this number of points
You need this hardware You need this software
7 or more Pentium® II 266 MHz64 MB RAM100 Megabit Ethernet®
Windows® XP Professional* or Windows 2000 Professional**
5 to 6 Pentium MMX 200 MHz64 MB RAM10 Megabit Ethernet
Windows 2000 Professional**
2 to 4 Pentium MMX 166 MHz64 MB RAM10 Megabit Ethernet
Windows 2000 Professional**
0 to 1 Pentium 100 MHz24 MB RAM10 Megabit Ethernet
Windows 2000 Professional**
* With Service Pack 1 or later.
** With Service Pack 3 or later.
26 Getting Results with RSView32 Active Display System
How clients install the software over the network
When you start the Active Display Server using the DisplayServerOn command, the server generates a web page called default.htm in the RSView32 project directory. You can connect to the project running on the server using Internet Explorer, by browsing to the URL:
http://<ServerComputer >/RSView32
where ServerComputer is the name of the computer on which the Active Display Server is running.
The default.htm file connects Internet Explorer to the project running on the server, and checks if the RSView32 Active Display Station software is installed on the client computer.
If the software is installed, the browser connects to the server. If the software is not installed, or if the software is out of date, the software is installed or upgraded automatically from a default directory on the RSView32 Active Display Server.
You can specify an alternate location for the Active Display Station setup files. For details about using the DisplayServerOn command, see page 67.
Installing the client software from CD-ROM
The steps below explain how to install the Active Display Station from the CD-ROM to your computer.
To install the RSView32 Active Display Station on Windows Server 2003, Windows XP, Windows 2000 or Windows Vista
1. Close all open Windows programs.
2. Place the RSView32 Active Display System CD-ROM into your CD-ROM drive. The CD should start running automatically.
If the CD does not start automatically, run D:\SETUP.EXE, where D is the drive containing the CD.
Setting up the station 27
3. Follow the instructions on the screen.
4. During installation, you will be prompted to activate the RSView32 Active Display Station.
If you want to install a dedicated client license, insert the Master disk in the disk drive, and then click Activate.
If you want to install a floating client license, you must install it on the server.
For more information about the different kinds of licenses and activation keys, see “Activation keys” on page 13.
5. When prompted, restart Windows.
Installing the client software from a network
1. Start Internet Explorer.
2. Browse to the address http://Servername/RSView32, where Servername is the name of the server computer.
3. Wait for the Active Display Client setup program to download. When it is finished downloading, the Active Display Client setup program will start automatically.
4. To install the Active Display Client software, follow the instructions on the screen.
To install the required software, the Internet Explorer security level for your local intranet zone must be medium or lower. For information about changing the security level of your local intranet zone, see Internet Explorer Help.
Activation keys
If you are using ‘floating’ client licences, the RSView32 Active Display Station uses any RSVRADS.CLI (for read-write licenses) or RSVRADS.ROC (for view-only licenses) activation keys that are not in
28 Getting Results with RSView32 Active Display System
use on the server. You do not need to activate the RSView32 Active Display Station after installation.
If you want to ensure that a particular client will have a license to connect to an RSView32 Active Display Server (even if the server does not have a license available), you must activate the RSView32 Active Display Station by installing a dedicated client activation key (RSVRADS.GCS) on the RSView32 Active Display Station. Keep in mind, though, that no matter how many licenses you have, the maximum number of simultaneous client connections on the server is 20. For more information, see “Activation keys” on page 13 and “‘Dedicated’ client licenses” on page 16.
FactoryTalk® Activation Grace Period
FactoryTalk® Activation provides customers with access to critical software components for a grace period of 7 days regardless of availability of valid activations. When a product is successfully activated, all grace period records will be cleared and the product will proceed with valid activations.
RSView32 Active Display Station
During the grace period, FactoryTalk® Activation will display a Grace Period warning message box to the user and log a diagnostic warning message to FactoryTalk® Diagnostics every four hours if no valid activation key located on Station side detected.
If there is more than one RSView32 Active Display Station running on the same computer, the grace period start time is counted from the time when the first client launches. When the grace period expires, RSView32 Active Display Client will not be launched.
Configuring stations
Once the Active Display Station (client) software has been installed on your computer, you need to configure it with information about:
Setting up the station 29
which display server to connect to
which RSView32 components to load from the server
the runtime properties of the Active Display Station window (for example, whether the window is maximized or whether it has a title bar)
whether the station is view-only or read-write
There are six steps in configuring an Active Display Station. The Active Display Station Configuration Wizard walks you through the process of configuring client windows. The configuration information is stored in a file with a .dst extension.
To connect with multiple Display Servers, or to load different components when establishing a connection, you can configure multiple windows on an Active Display Station. Each client window can connect to only one Active Display Server.
To configure a new RSView32 Active Display Station window
1. Click the Windows Start button, point to Programs, Rockwell Software, RAD System, and then click RSView32 Active Display Station.
2. The configuration wizard appears. Follow the instructions on the screen.
If you need more information as you use the configuration wizard, click Help.
Editing station configurations
To edit an Active Display Station configuration, right-click the configuration file’s icon from My Computer, Windows Explorer, or File Manager.
30 Getting Results with RSView32 Active Display System
To edit an RSView32 Active Display Station configuration
1. Locate the configuration file using My Computer, Windows Explorer, or File Manager, and right-click the file’s icon.
2. Click Edit.
3. Follow the configuration wizard’s steps to edit the configuration.
To rename an RSView32 Active Display Station configuration
1. Locate the configuration file using My Computer, Windows Explorer, or File Manager, and right-click the file’s icon.
2. Click Rename.
3. Type the new name for the configuration. The configuration file must have the extension .dst.
To delete an RSView32 Active Display Station configuration
1. Locate the configuration file using My Computer, Windows Explorer, or File Manager, and right-click the file’s icon.
2. Click Delete.
Creating shortcuts to an RSView32 Active Display Station configuration
1. Locate the configuration file using My Computer, Windows Explorer, or File Manager, and right-click the file’s icon.
2. Click Create Shortcut.
3. Drag the shortcut to the desired folder, or to the Windows desktop.
Setting up the station 31
Using clients with a dial-up connection
If you do not want to connect Active Display Stations to an Active Display Server through dial-up networking, proceed to “Starting the RSView32 Active Display Station” on page 36.
If you want to use dial-up networking to connect Active Display Stations or Active Display Browsers to an Active Display Server, you must configure the following:
for the server:
On Windows Server 2003/XP/2000, set up network connections on the server. If you have not already done so, see “Windows Server 2003 /XP network connections .” on page 11 or “Windows 2000 network connections.” on page 11.
for the clients, install and configure Dial-Up Networking. For more information, see the sections that follow.
Configuring Windows Server 2003 or Windows XP for dial-up networking
Step 1 Install TCP/IP
1. Click Start, point to Settings, and then click Control Panel.
2. Double-click Network Connections.
3. Right-click Local Area Connections, and then select Properties.
4. Click Install.
5. Select Protocol, and then click Add.
6. Select Internet Protocol (TCP/IP).
32 Getting Results with RSView32 Active Display System
7. Configure the TCP/IP settings for your network in the Microsoft® TCP/IP Properties dialog box.
For information about the settings in this dialog box, see your network administrator.
Step 2 Create a network connection
1. Click Start, point to Settings, and then click Control Panel.
2. In the Control Panel double-click Network Connections.
3. Select Create a new connection.
4. Work through the dialog boxes in the Network Connection wizard, selecting Connect to the network at my workplace, and Dial-up connection.
5. In the phone number box in the wizard, type the phone number of the computer that is running the Active Display Server.
Step 3 Configure the network connection
1. Right-click the connection you just created, and then click Properties.
2. Click the Networking tab, and in the list for Type of dial-up server I am calling, click PPP: Windows 95/98/NT4/2000, Internet.
3. Select the Internet Protocol (TCP/IP) check box. And then click the Properties button.
4. Select the following before clicking OK:Obtain an IP address automaticallyObtain DNS server address automaticallyUse default gateway on remote networkUse IP header compression
5. Click Settings, and then click Enable LCP extensions and Enable software compression.

Setting up the station 33
6. Click the Security tab, and then select Allow unsecured password.
7. Click OK to save the changes.
Configuring Windows 2000 for dial-up networking
Step 1 Install TCP/IP
1. Click Start, point to Settings, and then click Control Panel.
2. Double-click Network and Dial-up Connections.
3. Right-click Local Area Connections, and then select Properties.
4. Click Install.
5. Select Protocol, and then click Add.
6. Select Internet Protocol (TCP/IP).
7. Configure the TCP/IP settings for your network in the Microsoft TCP/IP Properties dialog box.
For information about the settings in this dialog box, see your network administrator.
Step 2 Create a network connection
1. Click Start, point to Settings, and then click Control Panel.
2. Double-click Network and Dial-up Connections.
3. Double-click Make New Connection.
4. Work through the dialog boxes in the Network Connection wizard, selecting Dial-up to a private network.
5. In the phone number box in the wizard, type the phone number of the computer that is running the Active Display Server.

34 Getting Results with RSView32 Active Display System
Step 3 Configure the network connection
1. Right-click the connection you just created, and then click Properties.
2. Click the Networking tab, and in the list for Type of dial-up server I am calling, click PPP: Windows 95/98/NT4/2000, Internet.
3. Select the Internet Protocol (TCP/IP) check box. And then click the Properties button.
4. Select the following before clicking OK:Obtain an IP address automaticallyObtain DNS server address automaticallyUse default gateway on remote networkUse IP header compression
5. Click Settings, and then click Enable LCP extensions and Enable software compression.
6. Click the Security tab, and then select Allow unsecured password.
7. Click OK to save the changes.
Configuring Windows Vista Business for dial-up networking
Step 1 Install TCP/IP
1. Click Start, and then click Control Panel.
2. Double-click Network and Sharing Center.
3. At Local Area Connections, click View Status.
4. Click Properties.
5. Click Install.
6. Select Protocol, and then click Add.

Setting up the station 35
7. Select Internet Protocol (TCP/IP).
8. Configure the TCP/IP settings for your network in the Microsoft® TCP/IP Properties dialog box.
For information about the settings in this dialog box, see your network administrator.
Step 2 Create a network connection
1. Click Start, and then click Control Panel.
2. In the Control Panel double-click Network and Sharing Center.
3. In the left hand pane, click Set up a connection or network.
4. Select Connect to a workplace and click Next.
5. Select Set up a dial-up connection, and then Dial Directly.
6. In the phone number box in the wizard, type the phone number of the computer that is running the Active Display Server.
Step 3 Configure the network connection
1. In the left hand pane, select Manage network connections.
2. Right-click the dial-up connection you have just created, and then click Properties.
3. Click the Networking tab.
4. Select the Internet Protocol (TCP/IP/4) check box, and then click the Properties button.
5. Check the following boxes in the General tab:Obtain an IP address automaticallyObtain DNS server address automatically

36 Getting Results with RSView32 Active Display System
6. Click the Advanced button and check the following boxes:Use default gateway on remote networkUse IP header compression
7. In the Options tab, click PPP Settings, and then click Enable LCP extensions and Enable software compression.
8. Inthe Security tab, select Allow unsecured password.
Click OK to save the changes.
Starting the RSView32 Active Display StationWhen you have configured one or more Active Display Station windows, you are ready to connect to an Active Display Server.
Bypassing proxy server connections
If your network makes use of proxy connections, you must bypass them before connecting to an Active Display Server.
To bypass proxy server connections in Windows Server 2003, Windows XP and Windows 2000
1. Click Start, point to Settings, and then click Control Panel.(For Windows Server 2003, just click Start and then click Control Panel.)
2. Double-click Internet Options.
3. Click the Connections tab.
4. Do one of the following:
If you are using a dial-up connection to connect to the server computer, click the dial-up connection, and then click Settings.
If you are using a direct network connection to the server computer, click LAN Settings.
Setting up the station 37
5. Select Bypass proxy server for local addresses.
6. Click OK.
Starting a station using a direct network or dial-up connection
1. If you are not connecting to the server using dial-up networking, skip to the next step. Otherwise, connect to the computer running the Active Display Server.
For details about connecting to a remote computer using dial-up networking, see Help for your Windows operating system.
2. Do one of the following:
Locate the configuration file using My Computer, Windows Explorer, or File Manager, and double-click it.
Click the Windows Start button, point to Programs, Rockwell Software, RAD System, and then click RSView32 Active Display Station. The client configuration wizard appears.
Choose Run an Existing Client Window Connection, then select a configuration file from the list, or choose the Browse button to locate a configuration file. When you have located a configuration file, click OK.
If you want to open an Active Display Station automatically when Windows starts, place a shortcut to its configuration file in the Windows Startup folder.
3. If your RSView32 project does not use Windows Security Options you will be prompted to type the user name and password assigned to you by the system administrator of the Active Display Server to which you are connecting.
If you don’t want to type your user name and password every time you log in, check the “Remember name and password” option. However, the login dialog box appears each time, prompting for

38 Getting Results with RSView32 Active Display System
confirmation of the user name and password. You can omit this prompt by starting the Active Display Station from the command line using the /AUTOLOGIN option, described in the next section.
4. Once you have entered all the information, click OK.
Bypassing the station login dialog box
If you are using RSView32 security and have not configured your project for Windows Security Options, you can have the Active Display Station log you into the server automatically, bypassing the login dialog box on every login after the first.
1. Supply a valid user name and password, and check the “Remember name and password” option the first time you log in.
2. On subsequent logins, use the /AutoLogin option and a configuration file as command-line parameters to the RADSTATION32.EXE program. To do this, modify the text in the shortcut’s Target box to read:
C:\<path>\RADSTATION32.EXE C:\<path>\SERVER1.DST /AUTOLOGIN
This logs the user into the server specified in the SERVER1.DST file, using the login name and password you specified the first time you logged in. The login user name and password are saved in the SERVER1.DST file. The login dialog box is not displayed.
You can also bypass the login screen by configuring your RSView32 project for Windows Security Options. For more information, see the RSView32 User’s Guide, or see Help.

Setting up the station 39
Starting the station automatically when Windows starts
Create a shortcut to the .dst file you want to start automatically, and put the shortcut in the Windows Startup folder.

40 Getting Results with RSView32 Active Display System

41
Chapter
3 Setting up the browser
The Active Display Browser helps you integrate fully interactive, real-time RSView32™ graphic displays into the Microsoft® Internet Explorer web browser, version 5.0 or later. The Active Display Browser allows you to link your RSView32 graphic displays to other web pages, providing a common, browser-style method of navigation to multiple information systems in a single web browser (for example, an intranet application).
It is not necessary to use the Active Display Browser for remote dial-up use. Use the Active Display Station instead, because the Active Display Station has capabilities not available with the Active Display Browser. For more information about the differences between the Active Display Station and the Active Display Browser, see page 65.
This chapter describes how to install and configure the Active Display Browser. For information about installing and configuring the Active Display Station, see Chapter 2, Setting up the station.
Determining system requirements
The system requirements for the browser are the same as for the station. For details, see page 23.
The Active Display Browser is not intended for long-term system operation, because it depends on third-party software that is not guaranteed to be fully compatible or reliable when used with the RSView32 Active Display System. The Active Display Browser also has no “lockdown” capabilities, and features limited window management.
IMPORTANT
42 Getting Results with RSView32 Active Display System
Installing the RSView32 Active Display Browser
To use the Active Display Browser, you must have Microsoft Internet Explorer version 5.0 or later installed on your computer.
The Active Display Browser uses the same client setup program as the Active Display Station. When you first connect to a server, using Internet Explorer, the client setup program is downloaded and started automatically. For more information, see “Installing the client software from a network” on page 27.
Connecting to an RSView32 Active Display Server
You cannot access an Active Display Server located on the protected side of a firewall. For information about bypassing proxy server connections for local network addresses, see “Bypassing proxy server connections” on page 36.
Connecting to a server using a direct Internet connection
To connect to an Active Display Server
1. Start Internet Explorer
2. In the Address box, type:
http://<ServerComputer>/RSView32
where <ServerComputer> is the host name, Windows® computer name, or TCP/IP address of a computer running the Active Display Server.
3. Follow the instructions on the screen. If you need more information as you connect to a graphic display, click Help.
Setting up the browser 43
Connecting to an Active Display Server using a dial-up connection
To connect to an Active Display Server using a dial-up connection, you must first configure the operating system you are using for Dial-Up Networking, establish a connection with the server computer, and then browse to the URL for the RSView32 project running on the server.
Step 1 Configure your operating system for dial-up networking
The procedure for configuring an Active Display Browser computer for Dial-Up Networking is the same as for an Active Display Station computer. For details, see “Using clients with a dial-up connection” on page 31.
Step 2 Connect to the server computer
For information about using Dial-Up Networking to establish a connection with the RSView32 Active Display Server computer, see Help for your Windows operating system.
Step 3 Type the address for the project
When you are connected to the Windows Vista, Windows Server 2003, Windows XP or Windows 2000 network on which the Active Display Server is running, in the browser’s Address box type the address for the project that is running on the server.

44 Getting Results with RSView32 Active Display System
To connect to an Active Display Server
1. Start Internet Explorer
2. In the Address box, type:
http://<ServerComputer>/RSView32
where <ServerComputer> is the host name, Windows computer name, or TCP/IP address of a computer running the Active Display Server.
3. Follow the instructions on the screen. If you need more information as you connect to a graphic display, click Help.

45
Chapter
4 Using the Active Display System
Integrating your RSView32 project withthe Active Display System
Parts of RSView32™ appear or react differently when viewed from a client than at the server or when RSView32 is used as a standalone product. To integrate your RSView32 project with the Active Display System, configure your project with these differences in mind.
Activity bar support
The activity bar is supported in the station, but not in the browser.
The activity bar displays client-side information or error messages. You can use the configuration wizard to specify whether or not to display an activity bar along the bottom of each Active Display Station window. The activity bar is exactly the same as the RSView32 activity bar, except that you cannot specify what information the activity bar displays—all the information categories are displayed.
Use the configuration wizard to enable or disable the activity bar. The activity bar is enabled by default for the Active Display Station.
To scroll through entries in the activity bar, click an entry and use the scrollbars to view the history of messages. To display more messages, you can undock the activity bar and resize it.

46 Getting Results with RSView32 Active Display System
Activity logging
Clients do not have a locally-stored activity log. Only commands sent to the Active Display Server are logged in the server’s log file.
Alarms
Clients do not support objects not contained in graphic displays. Only graphic displays with embedded objects are supported. You can only use commands that are related to embedded alarm summaries (for example, AcknowledgeAll).
Each alarm summary object displays the state of the alarms found on the Active Display Server with which the Active Display Station is associated.
Only the internal bell on the server sounds to announce an alarm.
All alarm-related commands operate on the alarms found on the server. This provides global alarm management capabilities. When alarms are acknowledged from a client, the user name recorded in the alarm log file is the name of the user that is logged in at the server, not the client.
File locations
Store all project-related files in their default locations at the server. When you issue the DisplayServerOn command for the first time for a project, an alias for the project’s directory is created by the Windows® Internet Service Manager. If the project uses files that are not in their default locations, clients will not be able to access them, unless you set up an alias for them manually in the Internet Service Manager.
Using the Active Display System 47
Key definitions
Object and display keys that are associated with a graphic display can be used with stations and browsers just as they would be at runtime if the graphic display were running with RSView32.
You can also configure the Active Display Station to download and run a global key definition file when the connection is established with the server, or when a Key command is issued. Global keys are active only when the Active Display Station window has focus.
Global keys cannot be used with the Active Display Browser.
Security
Starting a client connection
If your RSView32 project uses Windows Security Options, when a client first connects to an Active Display Server the user is validated by the Windows domain controller, and the user is not prompted again for a name and password to access the project.
To use Windows Security Options, the user accounts must be set up for Windows User Lists in the RSView32 project.
If your project is not using Windows Security Options, when a client first connects to a server the user is prompted for a login name and password.
For the client to use the RSView32 internal user list, at least one account must exist in the RSView32 project.
Before a client can log in, you must make either of the above configurations.
Once logged in, all commands issued from a client are checked for privileges (as they are at runtime by RSView32).
48 Getting Results with RSView32 Active Display System
Use the RSView32 Security Codes and User Accounts editors on the Active Display Server to configure security access for users of the system.
If your project uses Windows Security Options, users must have an operating system user account on the Active Display Server. If your project does not use Windows Security Options, users do not need an operating system user account on the server.
Configuring clients as read-only
If you want to configure a client as ‘read-only’ (the client cannot write to tags), you can do so in several ways:
for the station, configure the client window to be view-only. For information about editing Active Display Station configurations, see page 29.
Alternatively, secure all the RSView32 commands that result in tag writes. For example, assign the Set, =, Ramp, Download, and DownloadAll commands to a security code to which the client user account does not have access. This works for both stations and browsers.
To prevent only Active Display Browsers from writing tag information, start the Active Display Server with the command, DisplayServerOn /V.
Changing the logged-in user
To log a different user into the RSView32 Active Display System without disconnecting the client, you can configure a display to issue the login command. If no match is found for the name or password, the current user remains logged in. If you configure a display to issue the logout command, the login dialog box is displayed. If the new login is successful, the previous user is logged out.
Using the Active Display System 49
Operating system access control
You cannot prevent users of Active Display Browsers from accessing the Windows operating system or other Windows applications.
To prevent the operator of an Active Display Station from accessing the Windows operating system or other Windows applications, disable all the relevant keyboard shortcuts, and configure the Active Display Station window to display maximized and without a title bar.
For Windows Vista, Windows Server 2003, Windows XP, and Windows 2000, operating system access can be disabled using the Win2K XP DeskLock software included with the RSView32 Active Display System. For information about configuring the DeskLock tool, click the Windows Start button, point to Programs, Rockwell Software, RAD System, and then click Win2K XP DeskLock Help.
For Windows Vista, Windows Server 2003, Windows XP, and Windows 2000, you must also configure Active Display Station windows to disable access to the operating system, using the Active Display Station Configuration Wizard. For details about editing station configurations, see page 29.
Startup and shutdown macros
Display startup and shutdown commands or macros execute every time a client or server opens or closes a graphic display. Avoid using tags in your startup or shutdown macros, because tag operations like starting and stopping derived tag files, event files, or setting and resetting tags can have unexpected results.
Trends
Clients can run graphic displays with embedded Trend objects with real-time or historical data sources. For historical trends, the client
50 Getting Results with RSView32 Active Display System
retrieves the data for the trend object from the data log that is running on the Active Display Server to which the client is connected.
RSView32 VBA code
VBA code is processed at the Active Display Server, but can be started from a client. VBA forms or message boxes display only at the Active Display Server.
VBA code stops running while the forms are visible. For this reason, avoid executing VBA code that launches forms from a client.
Runtime features not supported in the Active Display System
The following features of RSView32 Runtime are not supported in the Active Display System:
Activity logging and printing. Activity logging cannot be performed on a client, and activity logs cannot be printed from the client. However, all commands sent to the Active Display Server, and any errors that result, are logged in the server’s activity log.
Alarm logging and printing. Alarm logging cannot be performed on a client, and alarm logs cannot be printed from the client.
Data logging. Data logging cannot be performed on a client. However, you can view logged data stored on an Active Display Server through historical trend objects. For more information, see “Trends” on page 49.
It is possible for one client to affect the behavior of a Trend object running on another client, by writing to a common Trend control tag. To avoid this problem, set up your application so that each client uses unique Trend control tags.
IMPORTANT
Using the Active Display System 51
Electronic signatures. The functions of the electronic signature button do not work on a client.
Event detection and derived tags. These features are not supported for use with clients (they run on the Active Display Server). However, you can start or stop these components by issuing the appropriate commands remotely, embedded in an object key, push button, macro, and so on.
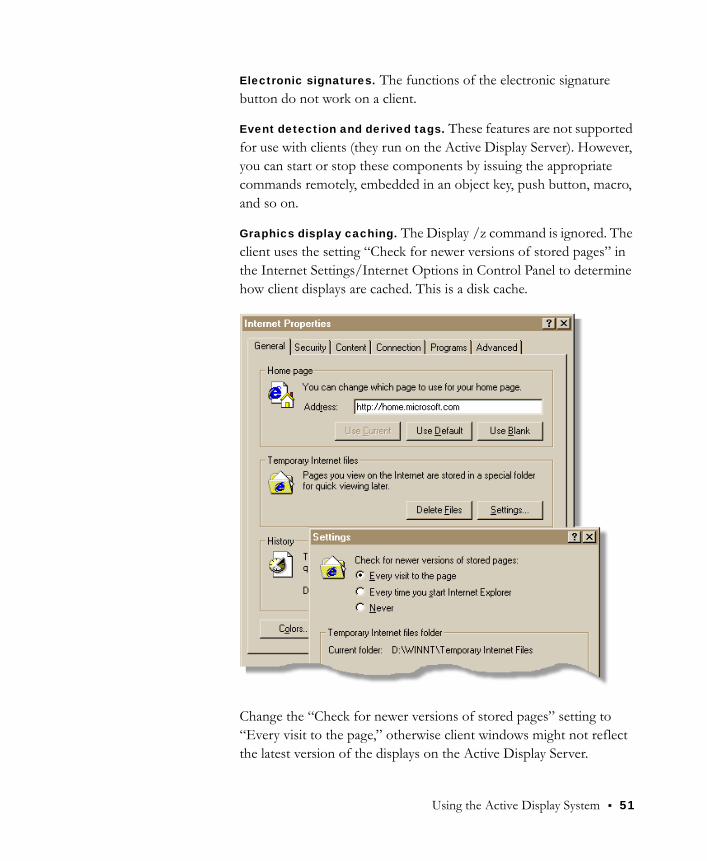
Graphics display caching. The Display /z command is ignored. The client uses the setting “Check for newer versions of stored pages” in the Internet Settings/Internet Options in Control Panel to determine how client displays are cached. This is a disk cache.
Change the “Check for newer versions of stored pages” setting to “Every visit to the page,” otherwise client windows might not reflect the latest version of the displays on the Active Display Server.
52 Getting Results with RSView32 Active Display System
To improve performance over a dial-up connection, change the “Check for newer versions of stored pages” setting to “Never,” to prevent graphic displays from being downloaded over the modem every time a display is opened.
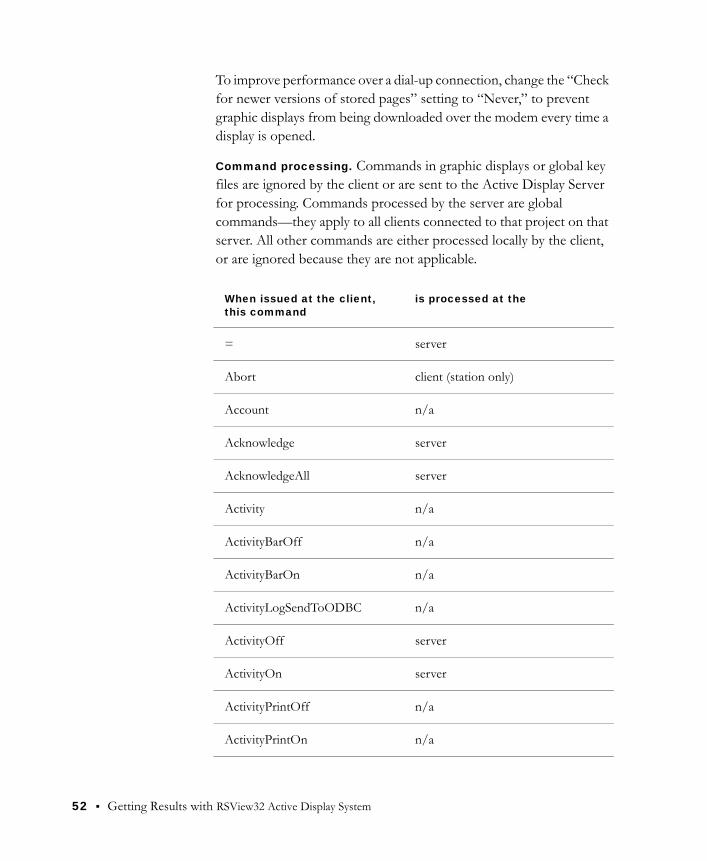
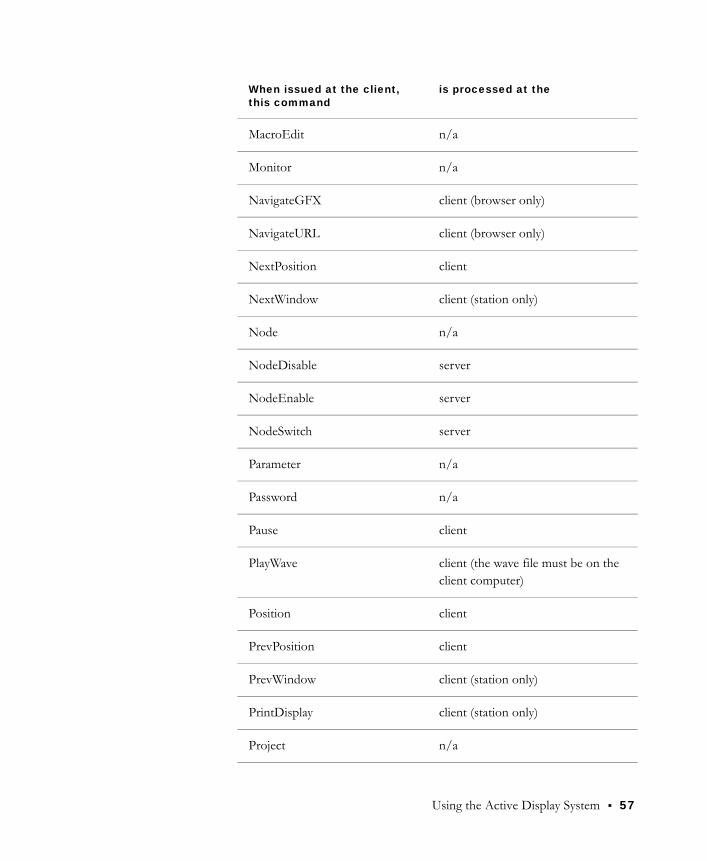
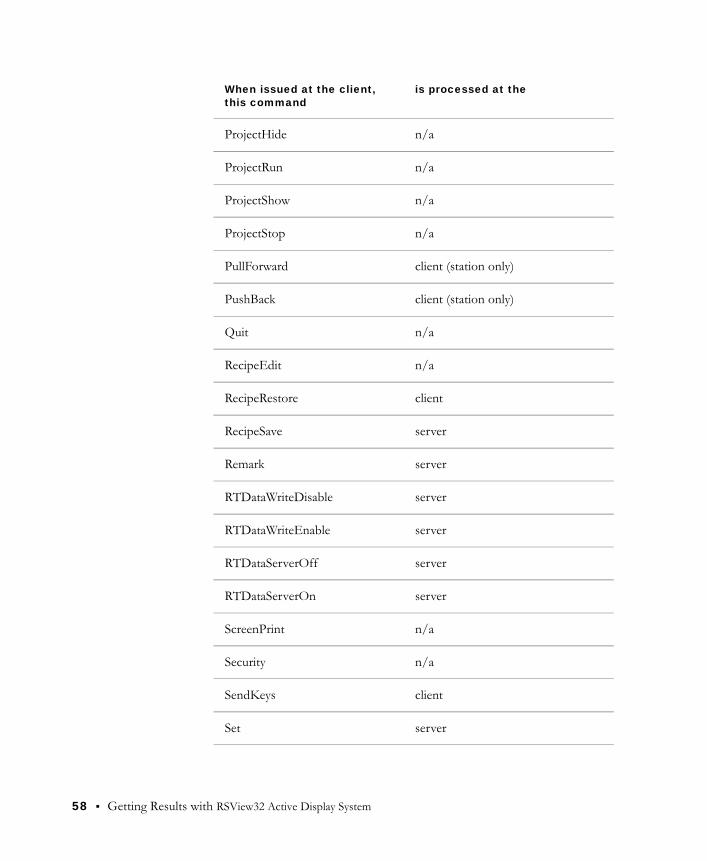
Command processing. Commands in graphic displays or global key files are ignored by the client or are sent to the Active Display Server for processing. Commands processed by the server are global commands—they apply to all clients connected to that project on that server. All other commands are either processed locally by the client, or are ignored because they are not applicable.
When issued at the client, this command
is processed at the
= server
Abort client (station only)
Account n/a
Acknowledge server
AcknowledgeAll server
Activity n/a
ActivityBarOff n/a
ActivityBarOn n/a
ActivityLogSendToODBC n/a
ActivityOff server
ActivityOn server
ActivityPrintOff n/a
ActivityPrintOn n/a
Using the Active Display System 53
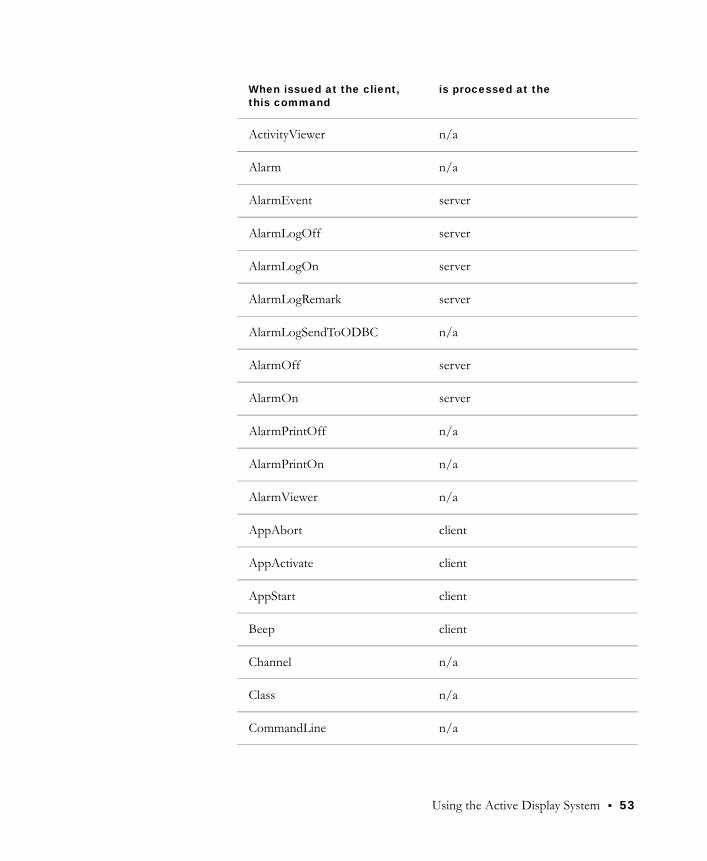
ActivityViewer n/a
Alarm n/a
AlarmEvent server
AlarmLogOff server
AlarmLogOn server
AlarmLogRemark server
AlarmLogSendToODBC n/a
AlarmOff server
AlarmOn server
AlarmPrintOff n/a
AlarmPrintOn n/a
AlarmViewer n/a
AppAbort client
AppActivate client
AppStart client
Beep client
Channel n/a
Class n/a
CommandLine n/a
When issued at the client, this command
is processed at the
54 Getting Results with RSView32 Active Display System
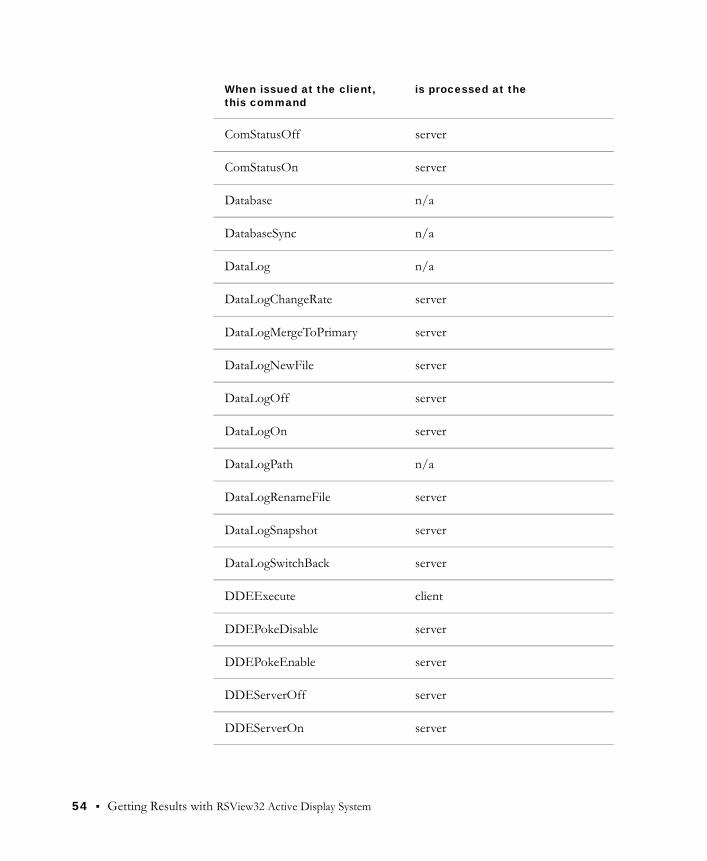
ComStatusOff server
ComStatusOn server
Database n/a
DatabaseSync n/a
DataLog n/a
DataLogChangeRate server
DataLogMergeToPrimary server
DataLogNewFile server
DataLogOff server
DataLogOn server
DataLogPath n/a
DataLogRenameFile server
DataLogSnapshot server
DataLogSwitchBack server
DDEExecute client
DDEPokeDisable server
DDEPokeEnable server
DDEServerOff server
DDEServerOn server
When issued at the client, this command
is processed at the
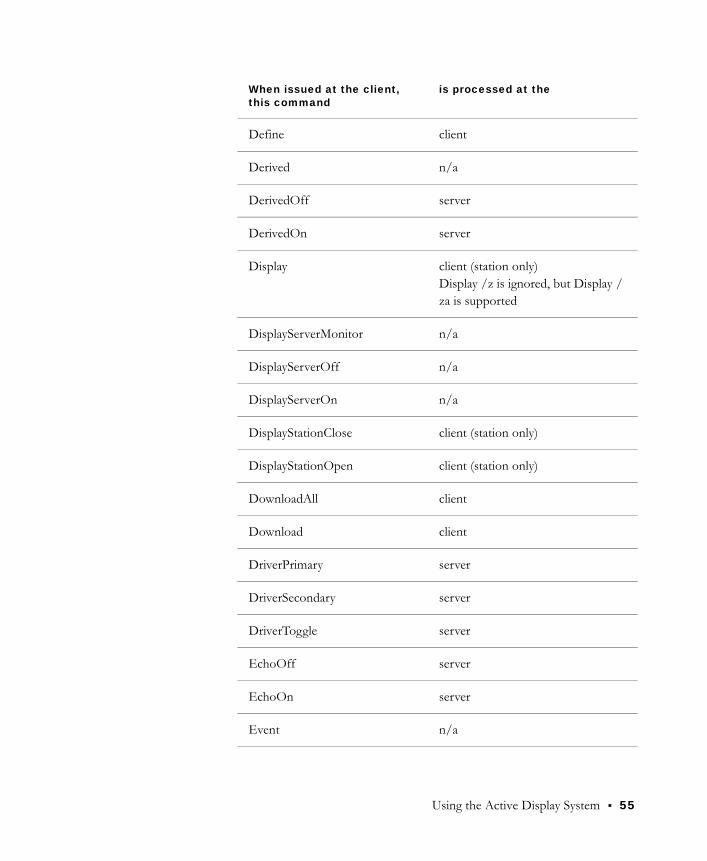
Using the Active Display System 55
Define client
Derived n/a
DerivedOff server
DerivedOn server
Display client (station only)Display /z is ignored, but Display /za is supported
DisplayServerMonitor n/a
DisplayServerOff n/a
DisplayServerOn n/a
DisplayStationClose client (station only)
DisplayStationOpen client (station only)
DownloadAll client
Download client
DriverPrimary server
DriverSecondary server
DriverToggle server
EchoOff server
EchoOn server
Event n/a
When issued at the client, this command
is processed at the

56 Getting Results with RSView32 Active Display System
EventOff server
EventOn server
FlushCache client
FTDataServerOff server
FTDataServerOn server
FTDataWriteDisable server
FTDataWriteEnable server
Graphic n/a
HandshakeOn server
HandshakeOff server
Help n/a
Identify client
Invoke client
Key client
KeyEdit n/a
LInsertStringTag server
Login client (station only)
Logout client (station only)(Logout issues the Login command)
LTagSubstitute server
When issued at the client, this command
is processed at the
Using the Active Display System 57
MacroEdit n/a
Monitor n/a
NavigateGFX client (browser only)
NavigateURL client (browser only)
NextPosition client
NextWindow client (station only)
Node n/a
NodeDisable server
NodeEnable server
NodeSwitch server
Parameter n/a
Password n/a
Pause client
PlayWave client (the wave file must be on the client computer)
Position client
PrevPosition client
PrevWindow client (station only)
PrintDisplay client (station only)
Project n/a
When issued at the client, this command
is processed at the
58 Getting Results with RSView32 Active Display System
ProjectHide n/a
ProjectRun n/a
ProjectShow n/a
ProjectStop n/a
PullForward client (station only)
PushBack client (station only)
Quit n/a
RecipeEdit n/a
RecipeRestore client
RecipeSave server
Remark server
RTDataWriteDisable server
RTDataWriteEnable server
RTDataServerOff server
RTDataServerOn server
ScreenPrint n/a
Security n/a
SendKeys client
Set server
When issued at the client, this command
is processed at the

Using the Active Display System 59
SetFocus client (station only)
Silence server
SilenceAll server
StartupConfig n/a
Summary n/a
SuppressOff server
SuppressOn server
Suppressed n/a
SuppressOffAll server
Ramp server
Toggle server
Undefine client
UploadAll client
Upload client
VBAEdit n/a
VBAExec server
When issued at the client, this command
is processed at the
60 Getting Results with RSView32 Active Display System
Configuring your RSView32 project for browser navigation
Because web browsers use Universal Resource Locators (URLs) and a ‘previous page - next page’ method of navigation, your RSView32 project needs to be modified to work with the Active Display Browser.
Modifying the Display and Abort commands
The Display and Abort commands used in RSView32 to open and close graphic displays are ignored by the Active Display Browser.
To navigate from one graphic display to another on the same server, the Active Display Browser uses the NavigateGFX command. The browser does not require an equivalent of the Abort command, because only one graphic display can appear in a browser window at one time, and each graphic display replaces the previous one.
Using the NavigateGFX command
The NavigateGFX command requires the name of a graphic display on the same server. For example, the command NavigateGFX ProcessSummary displays the current project’s graphic display ProcessSummary.gfx. You do not need to specify the .gfx extension with the NavigateGFX command.
For more information about the NavigateGFX command, see page 69.
Integrating the browser with other web sites
The NavigateURL command provides a means of browsing from RSView32 to another URL or address, and back again. Use the NavigateURL command to integrate RSView32 with other web sites (for example, into your corporate intranet), providing users with a simple, common user interface.
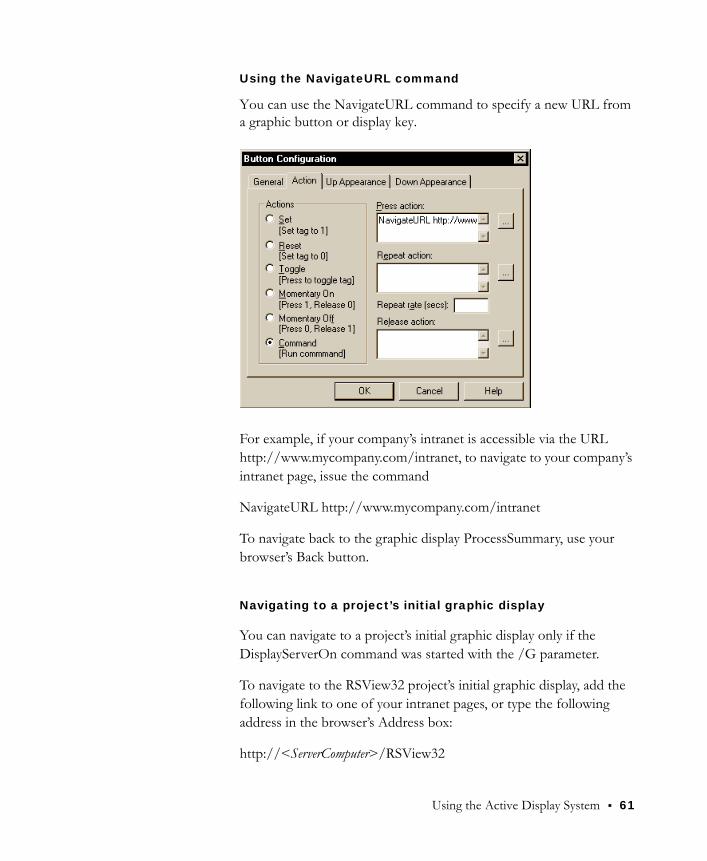
Using the Active Display System 61
Using the NavigateURL command
You can use the NavigateURL command to specify a new URL from a graphic button or display key.
For example, if your company’s intranet is accessible via the URLhttp://www.mycompany.com/intranet, to navigate to your company’s intranet page, issue the command
NavigateURL http://www.mycompany.com/intranet
To navigate back to the graphic display ProcessSummary, use your browser’s Back button.
Navigating to a project’s initial graphic display
You can navigate to a project’s initial graphic display only if the DisplayServerOn command was started with the /G parameter.
To navigate to the RSView32 project’s initial graphic display, add the following link to one of your intranet pages, or type the following address in the browser’s Address box:
http://<ServerComputer>/RSView32

62 Getting Results with RSView32 Active Display System
You can also navigate to the project’s initial graphic display using the NavigateGFX command:
NavigateGFX RSView32
Navigating to a project’s list of graphic displays
If you did not start the server using the /G parameter to the DisplayServerOn command, the following address will show a list of graphic displays in the project:
http://<ServerComputer>/RSView32
You can then select the graphic display you want to navigate to.
Navigating to a specific graphic display
You can navigate from a web page to a specific RSView32 graphic display. For example, if the graphic display ProcessSummary is one you use frequently, you can navigate to it directly. To do this, use a URL of the form:
http://<ServerComputer>/RSView32/default.htm?gfx=ProcessSummary
Similarly, you can navigate to any graphic display on the RSView32 Active Display Server by substituting the name of the graphic display for ProcessSummary in the link shown above.
For more information about the NavigateURL command, see page 70.
Adding parameters to the Display command
You can use most of the command line parameters for the Display command with the URL for a graphic display, or with the NavigateGFX command. However, because all graphic displays occupy the entire browser window, the command line parameters used for screen size and positioning are ignored.

Using the Active Display System 63
For example, to specify the parameter file “AssemblyLineEast” with the ProcessSummary display, type the URL
http://Servername/RSView32/default.htm?gfx=ProcessSummary /pAssemblyLineEast
If you are using the NavigateGFX command, the command would read
NavigateGFX ProcessSummary /pAssemblyLineEast
Making your RSView32 project work with a browser
You can make your RSView32 project work with a browser by adding a NavigateGFX command everywhere you have a Display command. By using both commands, you can make objects work both in RSView32 Runtime, and in the Active Display Browser.
To do this, copy and paste the Display command and its parameters, and replace the command Display with NavigateGFX.
For example, the command for a button might be
Display ProcessSummary /pAssemblyLineEast
You can make this button browser capable by modifying the button’s command to read
Display ProcessSummary /pAssemblyLineEast;NavigateGFX ProcessSummary /pAssemblyLineEast
Avoiding navigation among graphic displays on different servers
While it is possible to navigate from a graphic display on one server to a graphic display on a different server using the NavigateURL command, this is not recommended, because the NavigateURL command requires that you specify the name of the computer on which the Active Display Server is running. If you move the RSView32

64 Getting Results with RSView32 Active Display System
project to a computer with a different network address, browser navigation will no longer work.
Maintaining the connection to the server
The connection between the Active Display Browser and the server is maintained for as long as the browser is displaying a graphic on the server.
If the user navigates to an address that is not part of the RSView32 project (for example, the company intranet page), the connection between the browser and the server is maintained for five minutes, to enable the user to go back to the RSView32 graphic display without having to log in again, or be re-authenticated by the server.
If the user views a page that is not part of the RSView32 project for more than five minutes, the connection between the browser and the server is dropped, and the user will have to log in, or be re-authenticated the next time he or she attempts to view an RSView32 graphic display on the server. If a dedicated license is not being used, the client will once again have to acquire a floating client license from the server.
If your RSView32 project is using Windows Security Options, users will be re-authenticated after the five-minute timeout period, but they will not be prompted for a user name and password.
Deploying ActiveX components automatically
RSView32 Active Display Clients can automatically install the correct versions of ActiveX controls required for RSView32 graphic displays.
To deploy ActiveX controls automatically, you must create .cab files for your ActiveX controls using the program CABARC.exe located in the directory \ActiveXControlSetup in the same directory where you installed RSView32.

Using the Active Display System 65
For information about creating .cab files, see the text file, CreatingCabFiles.txt in the \ActiveXControlSetup directory. The text file contains examples for creating CAB files, and information about the naming conventions that must be used.
If you open a graphic file containing an embedded ActiveX object that is not installed on the Active Display Client, the file will run, but a rectangle containing the text “ActiveX Component Not Installed on Client” will appear in place of the embedded ActiveX object.
Differences between the station and the browserThe Active Display Browser is identical to the Active Display Station, except:
global keys are not supported in the browser. Display and object keys are supported.
it is not possible to disable access to the Windows operating system or other windows applications in the browser.
the Client Window Configuration wizard is not used to set up the Active Display Browser. The browser relies on URLs for locating graphic displays.
all displays opened in the Active Display Browser occupy the entire browser window—Windows-style pop-up windows (for messages, for example) are not supported.
tooltips are not supported in the browser.
the activity bar and status bar are not supported in the browser.
the Display and Abort commands are ignored by the browser. Use the NavigateGFX command instead.

67
Chapter
5 Commands
The following commands are specific to the RSView32™ Active Display System. They are added to RSView32 automatically when you install the Active Display Server.
DisplayServerOn DisplayServerOn [/G<display>] [/V]
This command starts the Active Display Server.
/G<display> For use with the RSView32 Active Display Browser. Opens the specified graphic display in the Active Display Browser when the browser first connects to the server. The specified graphic display is the browser’s initial graphic display.
If the display name contains spaces, enclose the display name in quotes, for example, DisplayServerOn /G“Process Overview”.
/V For use only with the RSView32 Active Display Browser. Opens the browser as read-only, and any commands normally executed at the server, are ignored.
DisplayServerOff
DisplayServerOff [/Q]
This command stops the Active Display Server.This command is ignored if it is given from a client. If a client is active when the command is given, a warning message is displayed on the server. You can continue to shut down the server or cancel the command. If you proceed with shutting down the server, all active connections are closed.
/Q Closes all active client connections without prompting the user for confirmation.
68 Getting Results with RSView32 Active Display System
DisplayServerMonitor
DisplayServerMonitor
This command is issued from the Active Display Server. It has no parameters. It displays the list of clients currently connected to the Active Display Server. The Display Server Monitor also displays version and serial number information in the Help About box.
You can terminate a client connection by selecting the connection and pressing Delete.
DisplayStationOpen
DisplayStationOpen <[display_station_path]filename>
This command, when executed from an Active Display Station, opens the specified Active Display Station window.
For example, the command
DisplayStationOpen \\Production1\Program Files\Rockwell Software\Samples\RSView\Samples\Samples.dst
opens the Sample Active Display Station Window on the Production1 server.
If the client you are opening is not in the path of the client you are issuing the command from, you must use the <display_station_path> parameter.
Examples
To open a client that is on the local drive and in the path:DisplayStationOpen Client1.dst
To open a client that is on a local drive but not in the path:DisplayStationOpen C:\DST\Client1.dst
To open a client that is on a network drive but not in the path:DisplayStationOpen J:\DST\Client1.dst
Commands 69
DisplayStationClose
DisplayStationClose [display_station_path] [parameter]
When executed from an Active Display Station, this command closes the specified Active Display Station window if it is open. If you use this command without a parameter, the current Active Display Station window closes.
Parameter can be:
[DST file] The .dst file for the client window you want to close.
Me Closes the client window that has focus.
[title bar text] Closes the client window with the specified text in its title bar.
If the client you are closing is not in the path of the client you are issuing the command from, you must use the <display_station_path> parameter.
NavigateGFX NavigateGFX <file> [/E] [/U] [/O] [/Pfile] [/Ttag_name]
This command opens and runs the specified graphic display file in the Active Display Browser. Any parameters specified here override settings in the Display Settings dialog box in the Graphic Display editor.
<file> The name of a graphic display file without a file extension.
[/E] Disables the Enter key so it does not download values in numeric input fields to the programmable controller or server, unless the Display On-Screen Keyboard option is selected (in the Behavior tab of the Display Settings dialog box).
[/U] Updates tag values in all input fields when the display first opens.
[/O] Suppresses the display of the key list.
[/Pfile] The name of the parameter file that contains the tag names to be substituted for placeholders in the display. If the display does not contain placeholders, do not use this parameter.

70 Getting Results with RSView32 Active Display System
If the parameter file has a long file name, enclose the file name in quotes, for example /P“Long file name”.
[/Ttag_name] One or more tags, separated by commas and no spaces, to be substituted for placeholders in the display. If the display does not contain placeholders, do not use this parameter.
NavigateURL NavigateURL <URL>
This command navigates to the web page specified by the URL. The NavigateURL command must be issued from the Active Display Browser.
<URL> The address for any web page.
Example
To open the Rockwell Software home page, type:NavigateURL www.rockwellsoftware.com
71
Chapter
6 Getting the information you need
Using HelpThe RSView32™ Active Display System Help provides procedures and reference information for working with all the features in the RSView32 Active Display System. To open Help while the RSView32 Active Display System is running:
on the taskbar, click Start, point to Programs, Rockwell Software, RAD System, and then click RSView32 Active Display System Help
click the Help button in the RSView32 Active Display Station Configuration Wizard
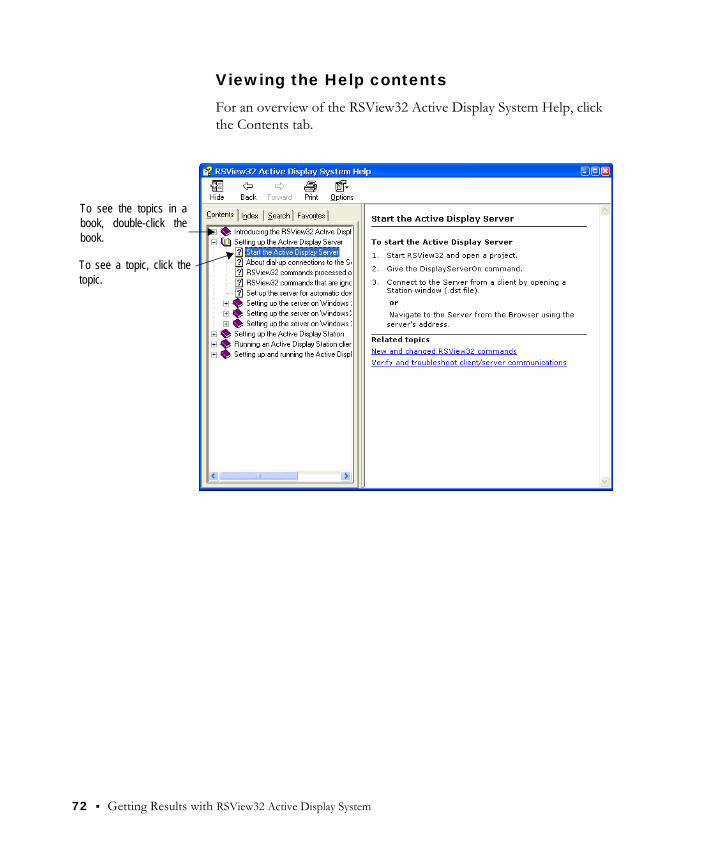
72 Getting Results with RSView32 Active Display System
Viewing the Help contentsFor an overview of the RSView32 Active Display System Help, click the Contents tab.
To see the topics in a book, double-click the book.
To see a topic, click the topic.
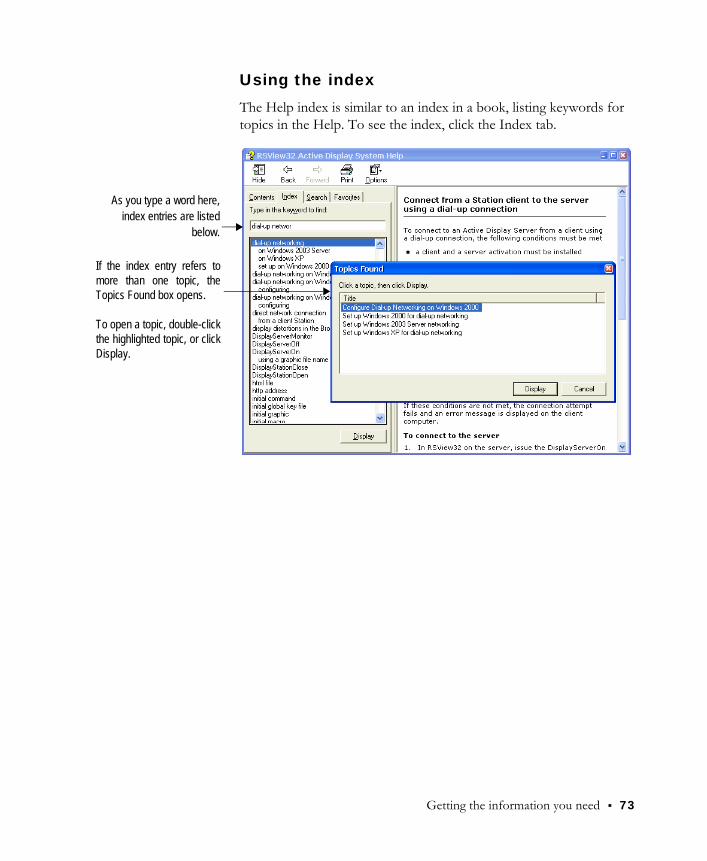
Getting the information you need 73
Using the indexThe Help index is similar to an index in a book, listing keywords for topics in the Help. To see the index, click the Index tab.
As you type a word here, index entries are listed
below.
If the index entry refers to more than one topic, the Topics Found box opens.
To open a topic, double-click the highlighted topic, or click Display.
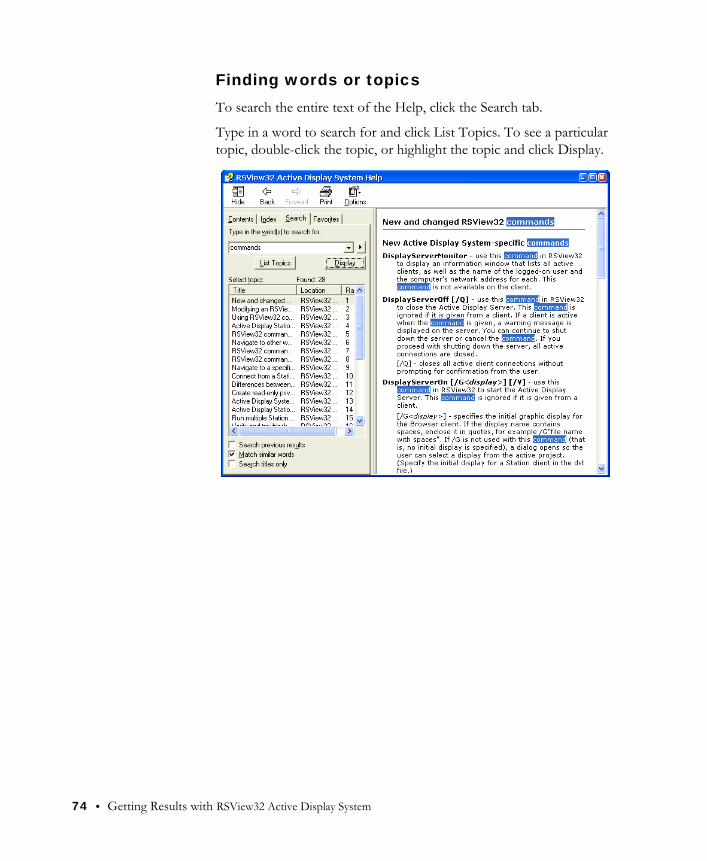
74 Getting Results with RSView32 Active Display System
Finding words or topicsTo search the entire text of the Help, click the Search tab.
Type in a word to search for and click List Topics. To see a particular topic, double-click the topic, or highlight the topic and click Display.

Getting the information you need 75
Technical support
If you have questions about configuring network connections, consult your Windows® documentation. For information about configuring your web browser, consult the documentation for your web browser.
If you have questions about RSView32, consult the user’s guides or the Help. Or, click Help, Rockwell Software on the Web, and then click the name of the web page you want to view. To use Rockwell Software on the Web, you must have a web browser installed on your computer and a current internet connection.
If you can’t find the answers, contact Rockwell Software Technical Support:
Telephone 440-646-3434
Internet support http://www.rockwellsoftware.com or
http://support.rockwellautomation.com
Support staff are available Monday through Friday from 8 A.M. to 5 P.M. eastern time, except during holidays.
When you call
When you call, be at your computer and be prepared to give the following information:
the product serial number and product version number
You’ll find these numbers on the Activation Disk label, or in either of the following places in the software:
in RSView32, click Help, and then click About RSView32. Click the Add-Ons button, click RSView32 Active Display System, and then click the Details button
in the Help About box of the Active Display Server Monitor (not in the Active Display Station Help About dialog box)
the type of hardware you are using

76 Getting Results with RSView32 Active Display System
the exact wording of any messages that appeared on your screen
a description of what happened and what you were doing when the problem occurred
a description of how you tried to solve the problem
You may also be required to provide information about the RSView32 add-ons and updates that are installed on your computer.
To view the list of installed add-ons and updates
1. With the Project Manager window active, click Help, About RSView32.
2. Click Add-ons to view the list of installed add-ons. Click Updates to view the list of installed updates.

Index n 77
Index
AAbort command
troubleshooting 65About
Active Display Browser 41Active Display Server 1Active Display Station 23security 47
ActivationActive Display Station 27client activations 14dedicated licenses 16, 27errors 14floating licenses 15read-write licenses 27server activations 14view-only licenses 15, 27
Activation diskactivation keys 13
Activation keysfor RSView32 Active Display System 13
Active Display Browserabout 41commands 52configuring as view-only 48, 67configuring for navigation 60connecting to server 42connecting to server via dial-up 43differences from Active Display Station 65initial graphic display 17installing 42integrating with web sites 60navigating to initial display 61navigating to list of displays 62navigating to specific display 62using with dial-up connection 31
Active Display Serverabout 1commands 52installing 12specifying initial graphic display 17starting and stopping 16starting and stopping automatically 21starting for use with the browser 17stopping 20
Active Display Stationabout 23activation 27bypassing login 38CD-ROM install 26commands 52configuring as view-only 29, 48creating shortcuts 30deleting 30differences from Active Display Browser 65editing configuration 29network install 27new configuration 29renaming 30starting 36, 37starting automatically 39using 36using with dial-up connection 31
ActiveX objectsdeploying automatically 64troubleshooting 65
Activity barusing 45
Activity loggingtroubleshooting 50using 46
Alarm logging
78 n Getting Results with RSView32 Acitve Display System
troubleshooting 50Alarm printing
troubleshooting 50Alarms
using 46Aliases for directories 46AUTOLOGIN option 39Automatic deployment of ActiveX controls 65
BBypassing logins 38Bypassing proxy server 36
CCAB files 65Caching
troubleshooting 51Commands
Abort 60Display 60, 62DisplayServerMonitor 68DisplayServerOff 67DisplayServerOn 67DisplayStationClose 69DisplayStationOpen 68NavigateGFX 60, 69NavigateURL 61, 70processing at server or client 52troubleshooting 52
ConfiguringActive Display Stations 29Internet Information Server 9
DData logging
troubleshooting 50default.htm file 17, 26, 62, 63Deleting
Active Display Station configurations 30Deploying ActiveX controls 65Derived tags
troubleshooting 51
Dial-up connectionsusing clients with 31
Dial-up networkingconfiguring in Windows 2000 33configuring in Windows Server 2003 31, 34configuring in Windows XP 31, 34
Directory aliases 46Disabling operating system access 49Display command
troubleshooting 65DisplayServerMonitor command 68DisplayServerOff command 67DisplayServerOn command 67DisplayStationClose command 69DisplayStationOpen command 68
EElectronic signatures
troubleshooting 51Embedded alarm objects 46Event detection
troubleshooting 51
FFile locations 46Forms
problems with at clients 50
GGlobal key file
using 47Global keys
troubleshooting 65Graphic displays
troubleshooting caching 51
HHelp
contents 72finding words in 74index 73opening 71

Index n 79
IInitial display
navigating to 61Installation
Active Display Browser 42Active Display Server 12Active Display Station from CD-ROM 26Active Display Station from network 27before you begin 9Microsoft Internet Information Server 9
Internet Information Serverinstalling and configuring 9
KKey definitions
using 47
LLicences
all in use 14List of displays
navigating to 62Login
at runtime 47bypassing 38changing the current user 48
MMacros 49Modifying
RSView32 project for browser 63
NNavigateGFX command 69NavigateURL command 70
OObjects
embedded 46Operating system access
disabling 49troubleshooting 65
PPrinting
troubleshooting 50Proxy server
bypassing 36
QQuick start 1
RRead-only clients
configuring 48Renaming
Active Display Station configurations 30RSView32 project
modifying for browser 63
SSecurity
at runtime 47disabling operating system access 49logging in at runtime 47
SetupActive Display Server 12Active Display Station from CD-ROM 26Active Display Station from network 27before you begin 9Microsoft Internet Information Server 9
Shortcutsto Active Display Station configurations 30
StartingActive Display Stations 37Active Display Stations automatically 39
Starting Active Display Stations 36Startup and shutdown macros 49Status bar
troubleshooting 65Support 75
TTechnical support 75Tooltips
80 n Getting Results with RSView32 Acitve Display System
troubleshooting 65Trends
affected by other clients 49using 49
Troubleshooting 75Abort command 65ActiveX objects 65activity logging 50alarm logging 50alarm printing 50browser navigation 63commands 52connections to server 64data logging 50derived tags 51differences between clients 65Display command 65electronic signatures 51event detection 51global keys 65graphics display caching 51operating system access 65printing 50RSView32 features not supported on Active Display System 50status bar 65tooltips 65VBA forms 50window sizing in browser 65
UUsing
Active Display Stations 36
activity bar 45activity logging 46alarms 46global key file 47key definitions 47startup and shutdown macros 49trends 49VBA code 50
VVBA code
at runtime 50problems with forms 50
WWin2K XP DeskLock tool 49Windows 2000
configuring for dial-up networking 33network connections, setting up 11, 12Service Pack 9, 25
Windows Security Options 47Windows Server 2003
configuring for dial-up networking 31, 34network connections, setting up 11Service Pack 9
Windows Service Packs 9, 25Windows Vista
network connections, setting up 11, 12Windows XP
configuring for dial-up networking 31, 34network connections, setting up 11Service Pack 9, 25