ACTIVATE! Activity Book October 08 - The...
42
ACTIVATE! A guide to using activities in learning The Curriculum Project October 2008
Transcript of ACTIVATE! Activity Book October 08 - The...

ACTIVATE!
A guide to using activities in learning
The Curriculum Project
October 2008

ACTIVATE! A guide to using activities in learning – October 2008
The Curriculum Project
2
CONTENTS Page(s) Introduction 3-14 1. Why should you use activities? 3-4 2. Input and Output 5 3. From Input to Output 6 4. How we learn and remember 7 5. Learning stages 8-9 6. Practice and Control 10 7. Using Control 11-12 8. Using this book 13 9. If you don’t like it, change it 14 Part 1: Warm-up Activities 15-16 Part 2: Introduction Activities 17-19 Part 3: Presentation Activities 20-23 Part 4: Practice Activities 24-41 4A – High Control Activities 25-29 4B – Medium Control Activities 30-36 4C – Low Control Activities Index of Activities
37-41 42

ACTIVATE! A guide to using activities in learning – October 2008
The Curriculum Project
3
INFO
INFO
1. WHY SHOULD YOU USE ACTIVITIES?
Do you want learners to be motivated to learn? Do you want to create a learner-centred classroom?
Do you want learners to develop many skills? Do you want learners to be confident and independent? Do you want learners to develop problem-solving skills?
Do you want your classroom to be a fun learning environment?
Do you want learners to be able to use what they have learnt?
If you answer ‘Yes!’ to any of these questions, then activities can help you! Have a look at the pictures below:
DIAGRAM 1:
A teacher-centred classroom. The teacher feeds all the information to the learners.
Learners are not encouraged to get involved in finding out, understanding, and using
information. Learners are PASSIVE.
DIAGRAM 2:
Diagram 2: A learner-centred classroom. By using activities, the teacher involves
learners in the learning process. Activities help learners to acquire, understand and use
new information. Learners are ACTIVE.

ACTIVATE! A guide to using activities in learning – October 2008
The Curriculum Project
4
LEARNERS
GIVEN AN
ACTIVITY
LEARNERS
INVOLVED IN THE
LEARNING
PROCESS
LEARNERS
INTERESTED &
MOTIVATED
LEARNERS LEARN NEW
SKILLS &
INFORMATION
LEARNERS LEARN
TO SOLVE
PROBLEMS / THINK
ANALYTICALLY
LEARNERS
SUCCEED. GAIN
CONFIDENCE &
INDPENDENCE
LEARNERS CAN
USE THEIR
SKILLS
WHY SHOULD YOU USE ACTIVITIES? (CONT’D)
In an activity, learners are asked to do something. The teacher gives them a task to complete. It is usually learner-centred. Learners are involved in the learning process.
A well-known Chinese proverb reads:
What is the purpose of education?
Is the purpose of education to pass exams? Is it to tell learners what to think?
Or is the purpose of education to produce useful community members –
knowledgeable people who know how to think?
Have a look at the diagram below. It shows why activities are important in learning.
Tell me, I forget.
Show me, I remember.
IIIInvolve me, I learnnvolve me, I learnnvolve me, I learnnvolve me, I learn. . . .

ACTIVATE! A guide to using activities in learning – October 2008
The Curriculum Project
5
2. INPUT & OUTPUT
Often in teaching we talk about ‘Input’ and ‘Output’.
INPUT: Information going into the learner’s brain
OUTPUT: Information coming out of the learner’s brain
GOOD TEACHING = GOOD INPUT + GOOD OUTPUT = GOOD LEARNING
In teacher-centred education, most learning is INPUT. The teacher
gives the learners new information. Often this information is not
presented in an interesting or easy to understand way.
Learners are not given many opportunities to produce anything, or to
USE what they have learned.
In successful learner-centred education, there is a balance between
good INPUT and good OUTPUT.
Good INPUT activities encourage learners to get involved with the
new information that the teacher is presenting to them.
Good OUPUT activities help learners to understand the new
information, and to USE it.

ACTIVATE! A guide to using activities in learning – October 2008
The Curriculum Project
6
3. FROM INPUT TO OUTPUT Three different people decide to teach their friends how
to catch a fish. They do it in very different ways.
Whose teaching method is the best and why? Whose
friend will learn to fish properly and why?
Have a look at what each person is saying below.
1.1.1.1. KO AUNGKO AUNGKO AUNGKO AUNG
2.2.2.2. HTAY HTAYHTAY HTAYHTAY HTAYHTAY HTAY
3.3.3.3. SU SUSU SUSU SUSU SU
Who has a balance of INPUT and OUTPUT in their teaching? Who gives their friend
an opportunity to understand and USE this new skill?
What does this tell you about how to teach?
I gave my friend a bookI gave my friend a bookI gave my friend a bookI gave my friend a book to read about fishing.to read about fishing.to read about fishing.to read about fishing. IIII alsalsalsalso gave her o gave her o gave her o gave her
some advice. some advice. some advice. some advice. IIII think that’s the best way to teach her.think that’s the best way to teach her.think that’s the best way to teach her.think that’s the best way to teach her.
I explainedI explainedI explainedI explained the important point about fishing to my the important point about fishing to my the important point about fishing to my the important point about fishing to my
friendfriendfriendfriend and thenand thenand thenand then showed her somshowed her somshowed her somshowed her someeee pictures. Tpictures. Tpictures. Tpictures. Then Ihen Ihen Ihen I showed showed showed showed
her how to use the differenther how to use the differenther how to use the differenther how to use the different pieces of equipment. Then pieces of equipment. Then pieces of equipment. Then pieces of equipment. Then
we wentwe wentwe wentwe went to the river and Ito the river and Ito the river and Ito the river and I showed her how to fish.showed her how to fish.showed her how to fish.showed her how to fish.
I explained the important points about fishing to my I explained the important points about fishing to my I explained the important points about fishing to my I explained the important points about fishing to my
ffffriend and showed her how to use the equipment. Then riend and showed her how to use the equipment. Then riend and showed her how to use the equipment. Then riend and showed her how to use the equipment. Then
we went to the river and we went to the river and we went to the river and we went to the river and IIII showed her how to fish. Then showed her how to fish. Then showed her how to fish. Then showed her how to fish. Then
she tried she tried she tried she tried herself withherself withherself withherself with memememe helping her. As she got more helping her. As she got more helping her. As she got more helping her. As she got more
aaaand more confidentnd more confidentnd more confidentnd more confident IIII gave her less and less help. Then gave her less and less help. Then gave her less and less help. Then gave her less and less help. Then IIII
left her alone to fleft her alone to fleft her alone to fleft her alone to fish.ish.ish.ish.

ACTIVATE! A guide to using activities in learning – October 2008
The Curriculum Project
7
4. HOW WE LEARN AND REMEMBER
We learn many things all the time. Some of those things we remember for short time, others we
remember for a long time. Why do we remember some things and not others?
We remember information if:
1.1.1.1. IT IS INTERESTING / IMPORTANT / USEFULIT IS INTERESTING / IMPORTANT / USEFULIT IS INTERESTING / IMPORTANT / USEFULIT IS INTERESTING / IMPORTANT / USEFUL
2.2.2.2. WE USE IT OFTENWE USE IT OFTENWE USE IT OFTENWE USE IT OFTEN
Have a look at the diagram below. It shows how deeply information is stored in the brain.
So, if a teacher wants to help learners to learn and remember new information, what should they do?
1. Involve students in the learning process when presenting new information. 2. Give learners the opportunity to gradually understand the new information through practice. 3. Get learners to USE the new information to show them why it is useful to them.
How can teachers do this? Use activities!Use activities!Use activities!Use activities!

ACTIVATE! A guide to using activities in learning – October 2008
The Curriculum Project
8
}
5. LEARNING STAGES
This book divides learning into FIVE learning stages:
1. (Warm-up)
2. Introduction
3. Presentation
4. Practice
5. (Review)
Warm-ups are a bit different - they are used to get learners’ attention, and prepare
them to learn. They do not have to be connected to the topic/sub-topic. Review is
usually done every few months depending on the learners’ needs, or before an exam.
What happens at each learning stage?
(Warm(Warm(Warm(Warm----up)up)up)up) A short activity (5-10 mins) to wake learners up, prepare them
to learn, and perhaps refresh the previous day’s learning.
IntroductionIntroductionIntroductionIntroduction The teacher finds out what the learners already know about the
topic / sub-topic, and gives basic information about the topic.
PresentationPresentationPresentationPresentation The teacher presents detailed new information to the learners in
an interesting way, drawing their attention to the key points.
PracticePracticePracticePractice Step by step, the learners understand and use new information.
Learners are gradually given more and more independence.
((((ReviewReviewReviewReview) The teacher gives learners another opportunity to understand
and use the key information, and checks understanding.
When you teach a topic, or sub-topic, you need to divide it into the different learning
stages, and think about suitable activities to use for each leaning stage. The diagram
below shows the topic ‘Economics’ divided into sub-topics and learning stages:
WIPPR
GOODS & SERVICESGOODS & SERVICESGOODS & SERVICESGOODS & SERVICES NEEDS & WANTSNEEDS & WANTSNEEDS & WANTSNEEDS & WANTS
INTROINTROINTROINTRO PRESPRESPRESPRES PRACPRACPRACPRAC INTROINTROINTROINTRO PRESPRESPRESPRES PRACPRACPRACPRAC
ACTIVITIESACTIVITIESACTIVITIESACTIVITIES ACTIVITIESACTIVITIESACTIVITIESACTIVITIES
ECONOMICSECONOMICSECONOMICSECONOMICS

ACTIVATE! A guide to using activities in learning – October 2008
The Curriculum Project
9
LEARNING STAGES (CONT’D)
How long should you spend on each learning stage?
The amount of time that you spend on each learning stage depends on:
1. The topic / sub-topic 2. The level and ability of the learners 3. The time available to teach the topic / sub-topic
However, as a guide, you should think about the following percentages:
INTRODUCTIONINTRODUCTIONINTRODUCTIONINTRODUCTION 10101010----15%15%15%15%
PRESENTATIONPRESENTATIONPRESENTATIONPRESENTATION 30303030----40%40%40%40%
PRACTICEPRACTICEPRACTICEPRACTICE 50505050----60606060%%%%
So for example, let’s say you are teaching ‘Climate Change’ as a sub-topic of
Environment, and you have five lessons of one hour, you might divide it up as
follows:
Lessons on ‘Climate Change’Lessons on ‘Climate Change’Lessons on ‘Climate Change’Lessons on ‘Climate Change’
Lesson 1Lesson 1Lesson 1Lesson 1 Introduction 30 minutes
Presentation 30 minutes
Lesson 2Lesson 2Lesson 2Lesson 2 Presentation 60 minutes
Lesson 3Lesson 3Lesson 3Lesson 3 Presentation 15 minutes
Practice 45 minutes
Lesson 4Lesson 4Lesson 4Lesson 4 Practice 60 minutes
Lesson 5Lesson 5Lesson 5Lesson 5 Practice 60 minutes
If learners have homework time, this also needs to be considered by the teacher, and
divided between Introduction, Presentation and Practice.
If possible, include a quick Warm-up activity at the beginning of each lesson.
At the end of the Environment topic, or before an examination, the teacher might
decide to give learners some Review activities on the whole topic (including the
Climate Change sub-topic).

ACTIVATE! A guide to using activities in learning – October 2008
The Curriculum Project
10
6. PRACTICE & CONTROL
The ‘Practice’ learning stage is where learners are given opportunities to understand
and use new information that the teacher has given them.
Imagine you are teaching someone to juggle
three objects.
Would you give them all three objects to juggle
at the beginning? Would this be too difficult?
The best way to help them is to give them ONE
object at the beginning.
When they have practiced a lot and are
confident, give them the SECOND object and
let them practice again.
When they can juggle two objects confidently,
give them the THIRD object and let them
practice until they can do it confidently.
This is step-by-step learning.
Often in teaching we use the word ‘control’ to describe step-by-step learning in Practice. In this book we use three levels of control:
1.1.1.1. HIGH CHIGH CHIGH CHIGH CONTROL ACTIVITIESONTROL ACTIVITIESONTROL ACTIVITIESONTROL ACTIVITIES
Not many choices or opportunities to make mistakes. Mostly Input, some Output.
2.2.2.2. MEDIUM CONTROL ACTIVITIESMEDIUM CONTROL ACTIVITIESMEDIUM CONTROL ACTIVITIESMEDIUM CONTROL ACTIVITIES
More difficult. More choices and more opportunities to make mistakes. Balance of
Input and Output.
3.3.3.3. LOW CONTROL ACTIVITIESLOW CONTROL ACTIVITIESLOW CONTROL ACTIVITIESLOW CONTROL ACTIVITIES
Difficult. Many choices and many opportunities to make mistakes. Mostly Output.
‘Control’ helps learners to gain confidence step-by-step. In High Control activities,
the teacher gives a lot of help (High Input). The learners are only asked to do a small
amount (Low Output). In Low Control activities, the teacher doesn’t give much help
(Low Input), and learners are expected to do a lot (High Output).

ACTIVATE! A guide to using activities in learning – October 2008
The Curriculum Project
11
7. USING CONTROL
When setting the level of control of an activity, we need to think about the following
things:
1.1.1.1. CHOICES AND MISTAKESCHOICES AND MISTAKESCHOICES AND MISTAKESCHOICES AND MISTAKES How many choices does the learner have to make? How many opportunities are there
to make mistakes?
In High Control activities, there are few choices, and few opportunities to make
mistakes. In Low Control activities there are many choices and many opportunities to
make mistakes.
2.2.2.2. INPUT AND OUTPUTINPUT AND OUTPUTINPUT AND OUTPUTINPUT AND OUTPUT How much information is the teacher giving to the learners (Input)? How much do the
learners have to do (Output)?
In High Control activities, there is a lot of Input and a little Output. In Low Control
activities there is a little Input and a lot of Output.
3.3.3.3. DIFFICULTYDIFFICULTYDIFFICULTYDIFFICULTY High Control activities should usually be easier than Medium Control activities.
Medium Control activities should usually be easier than Low Control activities.
4.4.4.4. THE LEVETHE LEVETHE LEVETHE LEVEL OF ABILITY OF YOUR LEARNERSL OF ABILITY OF YOUR LEARNERSL OF ABILITY OF YOUR LEARNERSL OF ABILITY OF YOUR LEARNERS A Low Control activity for elementary level students could be a High Control activity
for intermediate level students, depending on their level of ability. Control is relative
to learners’ ability.
Below is a simple example of different levels of control for an elementary level
English language writing activity:
A. HIGH CONTROL
Last weekend I ___________ to the market. (go)Last weekend I ___________ to the market. (go)Last weekend I ___________ to the market. (go)Last weekend I ___________ to the market. (go) Only one choice: tense; Mostly Input, a little Output; Quite easy.
B. MEDIUM CONTROL
Last weekend I ______Last weekend I ______Last weekend I ______Last weekend I ___________ to the ____________._____ to the ____________._____ to the ____________._____ to the ____________. Three choices: verb, tense, object; Balance of Input and Output; More difficult.
C. LOW CONTROL
What did you do last weekend? WriteWhat did you do last weekend? WriteWhat did you do last weekend? WriteWhat did you do last weekend? Write fivefivefivefive sentencesentencesentencesentencessss.... Many choices; Mostly Output, a little Input; Quite difficult.

ACTIVATE! A guide to using activities in learning – October 2008
The Curriculum Project
12
USING CONTROL (CONT’D)
Each teacher must decide how to manage control, depending on the level of their
learners and the time available. Every class of learners has different needs.
The graph below shows how control can be used.
You will notice that the line is not perfectly straight. For instance, the learners did
very well in Lesson 5, so the teacher lowered the level of control in Lesson 6.
However, the learners found this too difficult so the teacher had to move back to a
higher level of control in Lesson 7.
Again, it’s a bit like catching a fish. If you pull too hard on the fishing line, and try to
catch the fish too quickly, you will probably lose it. If you go step-by-step, and make
changes depending on the fish’s behaviour, you will probably be successful.
If control is used correctly, learners will:
� Gain confidence and ability step-by-step.
� Learn from their mistakes, rather than
become discouraged by them.
� Fully understand new information.
� Learn how to USE new
information.

ACTIVATE! A guide to using activities in learning – October 2008
The Curriculum Project
13
8. USING THIS BOOK
To use activities well, you need to plan your course, lessons and activities carefully.
STEP 1: STEP 1: STEP 1: STEP 1: COURSECOURSECOURSECOURSE PLANNINGPLANNINGPLANNINGPLANNING
� What is the key information that you want learners to learn during the course?
� What skills do you want to help learners to develop?
� How much time do you have?
� How will you organize the topics and learning stages in that time?
STEP 2: LESSON PLANNINGSTEP 2: LESSON PLANNINGSTEP 2: LESSON PLANNINGSTEP 2: LESSON PLANNING
� What are the aims and objectives of each lesson?
� Which activities can you use for each learning stage?
� Time management – how much time will you spend on each part of the lesson?
STEP 3: ACTIVITY PLANNINGSTEP 3: ACTIVITY PLANNINGSTEP 3: ACTIVITY PLANNINGSTEP 3: ACTIVITY PLANNING
Before you use an activity, try to think about as many of these things as possible:
� Is the activity suitable for the learning stage?
� Is the activity suitable for the topic/sub-topic?
� Is the activity the right level for the learners?
� What are the aims / objectives of the activity?
� Do you fully understand the how the activity works?
� Does the activity involve every learner?
� How long will the activity last?
� How can you explain the activity clearly to learners - instructions?
� How will you organize the classroom – tables / chairs, etc.?
� How will you organize the learners – groups, pairs, or individuals?
� Which mistakes should you correct?
� What materials do you need?
� Can you change the activity to make it more suitable for your classroom?
IF YOU’RE NOT SURE, TRY THE ACTIVITY AND SEE IF IT WORKS.IF YOU’RE NOT SURE, TRY THE ACTIVITY AND SEE IF IT WORKS.IF YOU’RE NOT SURE, TRY THE ACTIVITY AND SEE IF IT WORKS.IF YOU’RE NOT SURE, TRY THE ACTIVITY AND SEE IF IT WORKS.
Preparation is incredibly important if you want an activity to be successful.
Whatever teaching materials you are using, you need to think about how you can use
activities in your teaching. Some course books may have activities already included
BUT you should still think about what you can add and / or modify.
YOU KNOW YOUR LEARNERS BETTER THAN ANYONE ELSE.YOU KNOW YOUR LEARNERS BETTER THAN ANYONE ELSE.YOU KNOW YOUR LEARNERS BETTER THAN ANYONE ELSE.YOU KNOW YOUR LEARNERS BETTER THAN ANYONE ELSE.

ACTIVATE! A guide to using activities in learning – October 2008
The Curriculum Project
14
9. IF YOU DON’T LIKE IT, CHANGE IT! This book is a collection of ideas. If you can improve any of these ideas, or make
them better for your learners…
…go ahead! Here are some things that you might want to change:
1.1.1.1. GROUPS, PAIRS AND INDIVIDUALSGROUPS, PAIRS AND INDIVIDUALSGROUPS, PAIRS AND INDIVIDUALSGROUPS, PAIRS AND INDIVIDUALS
You decide how you want to organize your learners for each activity depending on the
size of the class, the needs of the learners and the time available for the activity.
2.2.2.2. TIMETIMETIMETIME
If you think an activity is useful but you don’t think you have enough time to do it,
think of ways to make the activity shorter.
3.3.3.3. SKILSKILSKILSKILLSLSLSLS
What kinds of skills do you want the learners to practice? How can you change an
activity so that learners are practicing these skills as much as possible?
4.4.4.4. LEVEL OF DIFFICULTYLEVEL OF DIFFICULTYLEVEL OF DIFFICULTYLEVEL OF DIFFICULTY
If you think that an activity is too difficult, think of ways to make it easier. If it is too
easy, think of ways to make it more difficult.
5.5.5.5. SUBJECT NEEDSSUBJECT NEEDSSUBJECT NEEDSSUBJECT NEEDS
We have tried to choose activities in this book that can be used in many different
subjects: English language, social studies, community management etc. However,
some of the activities are more suitable for some subjects than others. Where
necessary, change an activity so that it is more suitable for your subject.
6.6.6.6. NEW ACTIVITIESNEW ACTIVITIESNEW ACTIVITIESNEW ACTIVITIES
Don’t be afraid to design new kinds of activities, or use other activity resource books.
You will learn very quickly what works and what doesn’t. If you good ideas, please
let us know and perhaps we will incorporate them into our next activity book.
GOOD LUCK!GOOD LUCK!GOOD LUCK!GOOD LUCK!
Please send your questions, comments and ideas toPlease send your questions, comments and ideas toPlease send your questions, comments and ideas toPlease send your questions, comments and ideas to:::: The Curriculum Project, P.O. Box 114, Mae Sot, Tak 63110
Tel.Tel.Tel.Tel. -055 544 557, Email:Email:Email:Email: [email protected] Website:Website:Website:Website: www.curriculumproject.org

ACTIVATE! A guide to using activities in learning – October 2008
The Curriculum Project
15
Part 1 - Warm-up Activities Warm-up activities should last about 5-10 minutes, unless they are particularly useful.
They can be introduced at any time to get the learners in the right frame of mind for
the lesson but are usually used at the beginning of a lesson. They don’t have to be
connected to the day’s learning, though they are often useful as a review of the
previous day’s learning.
Here are some benefits of Warm-up activities:
� WAKE EVERYBODY UP!
� Focus attention after a break or another lesson.
� Prepare learners to learn.
� Refresh previous topic – review and reinforce.
� Highlight previous day’s learning.
� Get learners interested.
� Make lessons unpredictable / more exciting – more variety.
� Get learners to practice in an informal / low-risk atmosphere. Warm-ups can be useful in many ways. However, if you are short of time, it is okay to
miss the Warm-up from time to time. It is less important than the other learning
stages.
Many of the activities listed in the other learning stages can be also used as warm-ups (as
indicated). It is up to the teacher to decide.

ACTIVATE! A guide to using activities in learning – October 2008
The Curriculum Project
16
1. SHOW AND TELL
� Every day, a different learner makes a brief presentation about something (2-3 minutes). This can be an object that they have brought into the class (if they don’t
have the object they can write its name on the board), or a topic that they know
about.
� Learners are put into pairs and groups and must think of and ask some questions about the presentation.
2. YES / NO PENALTY GAME
� Split the class into two teams: A and B. � One learner in Team A sits in a chair at the front of the class. � For one minute, learners in Team B ask questions that require the answer ‘Yes’ or
‘No.’ The learner in the chair cannot say ‘Yes’ or ‘No,’ or nod or shake their head,
but they MUST answer. For instance, if Team B asks, ‘Are you a girl’, the learner
(if she is a girl) can reply ‘I am a girl’, or ‘That’s correct’, or something similar. If
the learner can remain in the chair for ONE minute without saying ‘Yes’ or ‘No’,
or nodding or shaking their head, then their team receives a point. If Team B
succeeds in getting the learner to make a mistake, they get a point.
� Once the minute is finished, or the learner from Team A has made a mistake, ask a learner from Team B to come and sit in the chair at the front.
� Now Team A must ask the questions for one minute. � Continue for 5-10 minutes, or until everyone has had a turn in the chair.
Note: It is a good idea to explain the activity clearly first and give the learners a few
minutes to think of good questions.
3. WHISPERS
� Seat the class in a semi-circle shape, with space between each learner. � Give each learner at the two ends of the semi-circle a different word of sentence
on a piece of paper. No one else must see this word. When they have seen the
word, take the piece of paper back.
� Then the learners on each end of the semi-circle must whisper what they saw to their neighbour. Their neighbour can ask them to repeat it ONCE only.
� Their neighbour then whispers what they hear to their neighbour. In this way, the two messages are passed in opposite directions around the semi-circle.
� When the messages reach the two ends of the semi-circle, the last learner writes down what they hear and hands it to the you.
� Compares the original versions with what the learner wrote.
VARIATION: Whisper, Write, Draw - The game is almost the same, except that the
first learner whispers to their neighbour, the second learner has to write what they
hear, the third learner has to draw what is written, and the fourth learner has to
whisper what they see written etc. The two messages are passed around the semi-
circle in opposite directions by whispering, writing, drawing, then whispering again,
then writing again, then drawing again, etc..

ACTIVATE! A guide to using activities in learning – October 2008
The Curriculum Project
17
Part 2 - Introduction Activities Introduction activities are used to introduce new topics to learners, with a particular
focus on drawing out existing knowledge, and preparing them to learn new
information.
Here are some benefits of Introduction activities:
� Prepare learners to learn.
� Find out what learners already know.
� Begin to define the topic in the learners’ minds.
� Get learners to share their knowledge with each other – balance.
� Show learners their ideas and opinions are important.
� Make learners feel they are involved in their own learning.
� Get learners thinking about the topic.
When using Introduction activities, do not go into detail about the topic / sub-topic.
Remember, the important thing at this learning stage is to find out what the learners
already know, and encourage them to share this knowledge with the class. The
learners should be doing most of the talking, not you. Save detailed information for
the next learning stage - Presentation.

ACTIVATE! A guide to using activities in learning – October 2008
The Curriculum Project
18
4. BRAINSTORMING
� Write the topic or sub-topic on the board. � Put learners into groups of 3-5 and give them a few minutes to think of words
related to the topic/subtopic.
� When they have finished, elicit one work from each group in turn. Ask the group why it is related to the topic.
� Continue until every group has contributed a few words.
5. PRE-TASK VOCABULARY
� Present important vocabulary that will be used often in the topic. Don’t choose too many words (5-10 is enough).
� Put learners into groups or pairs and see if they know, or can guess, the meaning of the words.
� Ask each group / pair to give you the meaning of one of the words and check with the class if they agree.
� Get each group to look up their word in the dictionary and provide the ‘official’ definitions.
6. LINKSTORMING
� Write a word (related to a topic or subtopic) on the board. � Put learners into groups and ask them to think of other words connected to the
word on the board. Give them about 5 minutes.
� Ask each group in turn to give you a word, and write them on the board also. � When you have enough words on the board, ask a learner to come to the board,
draw a line (if possible in a different coloured pen) between two of the words, and
explain why they are linked. Then ask each learner in turn to do the same thing. A
learner can choose the same two words as a previous learner, as long as they give
a different reason for the link.
7. VOCAB LINKS
� Bring in cards with key vocabulary about the topic. � Place the cards on the table so the learners can see the words. � Put learners in to groups of 3-5 people. Can they guess what the topic is about?
Give them a few minutes to think.
� If they can’t guess, give them some clues. � When they have guessed, or you have given them the answer, ask the groups to
think about why the words on the cards are related to the topic / sub-topic. Give
them a few minutes to think.
� Ask one learner from one group to come and pick a card and explain what their group thinks is the link with the topic / sub-topic. Do the other groups agree?
� Ask another learner from another group to do the same with another word. � Repeat the process until all the words have been picked and discussed.

ACTIVATE! A guide to using activities in learning – October 2008
The Curriculum Project
19
Natural Resources
Land Rights
8. MIND MAP
� Draw a key word in the middle of the board in a circle. � Put learners into groups of 3-5 people and give them 10 minutes to prepare a
‘Mind Map’ around the word.
� Give them the example below to help them.
� Get each group to give a short presentation (1 minute) of their mind map, explaining why they have chosen the words.
� Develop a final mind map on the board including all the good ideas that the learners presented, and any other important words that you want to add.
This activity can also be used for Practice and Review learning stages.
9. PRE-TASK QUESTIONS
� Prepare some questions about the topic / sub-topic. Make them quite open, and focused on opinions. For example, if the topic was ‘Hydroelectricity’:
1. Can you explain what ‘hydroelectricity’ means? 2. Do you think hydroelectricity is a good way to make electricity? Why/Why
not?
3. What do you think might be the environmental problems caused by hydroelectricity?
� Give learners a couple of minutes to read and understand the questions. � Put them into groups of 3-5 people to discuss the questions and write answers. � When they have finished, ask one group to answer one of the questions. � Ask the other groups whether they agree / disagree with the answer. � Develop a discussion.
10. PICTURE PROMPT
� Bring some pictures or drawings related to the topic (4 – 6 pictures if possible). � Divide the class into groups of 3-5 people and show them the pictures. � Ask them, ‘Why do you think these pictures are related to the topic?’ � Ask them to discuss in their groups and write down some notes for each picture. � After 10 minutes or so, ask each group to give you an idea for each picture.
This activity can also be used for Presentation, Practice and Review learning stages.
HYDROELECTRICITY
Electricity Rivers
Renewable
Energy
Pollution
Wildlife
Flooding
Environment
Dams

ACTIVATE! A guide to using activities in learning – October 2008
The Curriculum Project
20
Part 3 - Presentation Activities Presentation activities are used to present detailed new information about a topic /
sub-topic to learners in a clear and engaging way. They also focus the learners’
attention on the key information.
Here are some benefits of Presentation activities:
� Present new information about a topic / sub-topic in an interesting way.
� Focus learners’ attention on the key information.
� Give learners many opportunities to understand the key information.
� Help all learning styles – Visual, Auditory and Kinaesthetic (movement).
� Involve learners in finding out new information - learners are active.
� Give learners a reason to learn.
� Introduce variety in the way that new information is presented.
� Help learners to develop problem-solving skills.
It can be difficult for teachers to present all new information using activities,
particularly if you don’t have much time to prepare and/or teach a topic/sub-topic.
Presentation is more teacher-centred than other learning stages. Don’t worry if you
can’t use activities every time during Presentation - just try to use them where you
can.
Remember that you don‘t only have to use text-based materials for Presentation. It is
also a good idea, if possible, to include graphs, charts, diagrams, cartoons and other
visual materials. You should also think about using listening material, such as reading
text to learners, or perhaps using radio broadcasts. Choose carefully though!

ACTIVATE! A guide to using activities in learning – October 2008
The Curriculum Project
21
11. JIGSAW GAP-FILL
� Prepare text about the topic containing key information. � Make two different versions of the text. Each version should contain gaps to fill in
key information, but the gaps should be different in each text. For example, Text
A has the answers for Text B, and Text B has the answers to text A.
� Put learners into pairs, give each member of the pair a different text, and get them to ask each other questions to fill in the gaps in their text. Here is an example:
Text A:
Kofi Annan was Secretary-General of the United Nations. He comes from Ghana, in
Africa. His name, Kofi, means ______________.
Text B:
Kofi Annan was Secretary-General of the United Nations. He comes from _______,
in Africa. His name, Kofi, means ‘born on a Friday’.
The person with Text A has to ask their partner: What does the name Kofi mean?
The person with Text B has to ask their partner: Where is Kofi Annan from?
12. ORAL GAP-FILL (CLOZE)
� Prepare a text that is not too long, and related to the topic. Underline some keywords (about 10 or 15) which you want learners to focus on.
� Write these keywords on the board. Elicit meanings for these words if you think the learners will not know them.
� Put learners into small groups or pairs. Do not give learners a copy of the text. � Read text aloud to the learners all the way through, leaving out the underlined
keywords (you can say ‘Blank!’ for each key word if you want). Learners listen
and do not have a copy of the text to read.
� Give learners a few minutes to think about which words they might put where in the text.
� Then read the text again, and stop at each gap. If a pair / group thinks they know which word should fill the gap they should put their hands up. Choose one of the
groups to give you a word. If the word is correct, continue reading until you get to
the next blank. If the word is incorrect, do not continue reading and choose
another group to give you another word.
� Continue until the learners have correctly filled all of the gaps. Then give learners a copy of the text and look through it with the whole class.
This activity can also be used for Practice and Review learning stages.
ACTIVATE! A guide to using activities in learning – October 2008
The Curriculum Project
22
13. DICTOGLOSS
� Choose a text more than one paragraph long that learners will understand easily. � Read text aloud to the learners at normal speed. Learners listen carefully. � Then, read the first paragraph of the text again. � Learners write notes on the content of the paragraph. They don’t have to use the
exact words, and they don’t have to worry about grammar.
� Read the next paragraph. Again, learners just take notes. � Continue until you have read the whole text and learners have notes on it. � In pairs, learners work to reconstruct the text and write it out in good English.
They don’t have to use the same words from the original text, but they should try
to get all the important content and details.
� When the writing is checked, focus on content rather than accuracy. They don’t need the exact words. Spelling and grammar are not so important.
This activity can also be used for Practice and Review learning stages.
14. RUNNING DICTATION
� Prepare some text about the topic / sub-topic. � Write it on a large piece of paper and put it in a place where the class can’t see it
clearly (perhaps somewhere outside the classroom).
� Divide the class into teams of 3-5 people. � Each team selects a writer, who is the only person allowed to have pen and paper. � When the game begins, one member from each team runs to text ONCE, reads and
memorises as much text as they can, runs back to their writer, and dictates what
they can remember to the writer. The writer writes this down.
� When the writer has finished writing, the next team member runs to the text, reads, memorises, runs back and dictates.
� This continues until both teams have written down the complete text (though you may want to set a time limit). The team who finishes first gets 5 points.
� Show the original text to the teams. Swap the text between the teams and get them to correct each other’s text.
� The team that made the fewest mistakes is the winner (remember to take 5 mistakes off the team who finished writing the text first).
This activity can also be used for Practice and Review learning stages.
15. PICTURE AND TEXT MATCH � Prepare some text about the topic / sub-topic. Divide it into paragraphs, and give
each paragraph a number (1, 2, 3, etc.)
� Prepare some pictures that relate to the text, giving each one a letter (A, B, C, etc.).
� Make sure the numbers of the paragraphs and the pictures don’t go in the same sequence.
� Put the pictures up around the room. � Put students into groups of pairs and give them a copy of the paragraphs.
ACTIVATE! A guide to using activities in learning – October 2008
The Curriculum Project
23
� In groups of pairs, they must read the paragraphs, look at the pictures and decide with paragraph goes with which picture, and why. Also, if necessary, they should
put the paragraphs in the correct order (e.g. if it’s a story, or a historical timeline).
� When they have finished, bring the class together and elicit one answer in turn from different students about which paragraph goes with which picture. Don’t
forget to ask them why! Check agreement with the rest of the class and draw their
attention to the key information.
This activity can also be used for Practice and Review learning stages.
16. CHECK THE CHART � This activity is particularly good for social studies, science and maths. � Prepare one or more charts, graphs or diagrams about the topic. � Divide the class into groups or pairs. � Put the charts around the room. � Write statements, about the chart(s), some true, some false, on the board. The
students should copy these in their books.
� In their groups or pairs students should look at the graph(s) and decided which statements are true and which are false. If the statements are false they should
provide a correct answer.
� When they have finished, elicit answers from different pairs or groups in turn and check agreement with the rest of the class.
ACTIVATE! A guide to using activities in learning – October 2008
The Curriculum Project
24
Part 4 – Practice activities Practice activities are used to help learners to understand and use new information
step-by-step.
Here are some benefits of Practice activities:
� Help learners to learn step-by-step, and gain confidence.
� Help to learn by doing.
� Engage learners’ interest by giving them a task / challenge.
� Help the teacher to see if learners understand.
� Give learners a reason to learn – show them why the information is useful.
� Help learners to rely less and less on the teacher.
� Help learners to USE new information.
� Encourage learners to develop problem-solving skills.
One important thing to remember about these activities is that the level of control can
be changed depending on:
1. No of choices and opportunities to make mistakes. 2. Amount of Input and Output.
So, although the activities have been put into the ‘High’, ‘Medium’ and ‘Low’
categories, they can often be changed to fit other kinds of practice.
It should also be remembered that the level of control depends on the level of ability
of the learners. For instance, writing the sentence, ‘I like rice’ might be very high
control for pre-intermediate language learners, but very low control for beginners.
Like in Presentation, it is a good idea to introduce as much variety as possible into the
materials for Practice activities. Therefore, think about how you can use pictures,
graphs, charts, diagrams and other visual materials, and listening practice.

ACTIVATE! A guide to using activities in learning – October 2008
The Curriculum Project
25
4A: High Control Activities
17. PARAGRAPHS IN THE CORRECT ORDER
� Prepare a text with paragraphs in the wrong order. � Make sure that there are strong clues in each paragraph to show which order it
should be in.
� Give the learners some key vocabulary if necessary. � Ask the learners to read the text individually. � Then put the learners into groups or pairs and ask them to put the paragraphs in
the correct order.
� Check the order with the learners. � Then look at the text in detail to make sure the learners have understood it.
This activity can also be used for Presentation and Review learning stages.
18. WORD / SENTENCE MIME
� Write a group of words or short sentences onto cards. � Divide the class into two teams. Ask one learner from one team to pick a card. � The learner then has one minute (or more for sentences) to mime the word or
sentence to their team.
� If a team guesses correctly within the time set, they get a point. � If they can’t guess it, the other team has ONE guess. If they get it right, they get
the point.
� Then, ask a learner from the other team to come up and repeat the process.
This activity can also be used for Practice and Review learning stages.
19. TRUE OR FALSE
� Learners have to decide whether a statement is true or false.
Saudi Arabia is in Europe.
True False
� To make the exercise more difficult, you can require the learner to give the correct answer if they have circled ‘False’.
Saudi Arabia is in the Middle East.
20. RACE TO WRITE
� Prepare some questions (one for every two learners, or more) about the topic which require short (ideally one-word) answers.
� Write the answers randomly on the board.

ACTIVATE! A guide to using activities in learning – October 2008
The Curriculum Project
26
� Divide the class into two teams. � Place the teams next to each other in a line (one learner behind the other) a short
distance from the board, so that they can’t see the answers.
� Give the first person in the line of each team a piece of chalk / board marker. � Ask the first question loudly, for example, ‘What is the capital of China?’ � The first person in the line of each team now has to walk / run as fast as they can
to the board and circle the correct answer.
� The learner who circles the correct answer first wins a point for their team. These two learners then go to the back of the line of their teams.
� The next learners in each team must now listen to the next question and walk/run to the board.
� The game continues until every learner has had a go.
VARIATIONS: You can make this a Medium / Low Control activity by not writing
the answers on the board. The learners have to run to the board, and the first one to
write the correct answer wins the point.
If your classroom doesn’t have much space, ask the learners to stand each side of the
board, rather than far away from it.
This activity can also be used for the Warm-up and Review learning stages.
21. SENTENCE NONSENSE
� Get three slips of paper for every learner in the class. So if you have twenty students you need sixty slips of paper.
� On two of the slips of paper write the name of two different nouns. Good nouns can include learners’ names, the names of famous people, animals, and things in
the classroom.
� On one of the slips of paper, write a verb. Good verbs to use include: kiss, marry, eat, live (with), play (with), clean, watch, throw, lift, fight (with), drive, ride,
meet, chase, talk (to), cook, bite, hold, buy, and steal.
� So, if you have twenty students in your class, you should now have 40 slips of paper with different nouns written on them, and 20 slips of paper with different
verbs on them.
� Divide the nouns equally into two containers (i.e. 20 in each). Label one container ‘Subject’ and the other container ‘Object. Put the verbs into a container labelled
‘Verb’. Put the pots in a line on a table at the front of the class in the following
order: Subject, Verb, Object.
� Explain to the learners that the idea of the game is to make a simple sentence, containing a subject, a verb and an object.
� Decide the tense of the verb beforehand, or let the learners choose which tense they will use.
� Demonstrate by taking one noun from the ‘Subject’ pot, unfolding it, and reading it out with the definite article ‘the’, for instance, ‘The crocodile…’
� Then take a verb from the ‘Verb’ pot, unfold it, and add it to the sentence using the correct tense, for example, ‘…is marrying…’
� Finally, take noun from the ‘Object’ pot, unfold it, and add it to the sentence using the definite article again. For example ‘…the pencil.’

ACTIVATE! A guide to using activities in learning – October 2008
The Curriculum Project
27
� Read out the sentence again, ‘The crocodile is marrying the pencil’ and then write it on the board.
� Ask each learner in turn to come up to the front of the class and repeat this, making new sentences. Make sure the say the sentence AND write it on the board.
� There will be some strange results!
22. GAP-FILL (CLOZE)
� Learners must fill in the gaps using their knowledge. These exercises can get progressively more difficult. For example:
a. Yesterday, Ko Shwe went to the market. (go)
b. Htay Htay didn’t see her friend at the teashop. (not see)
c. The population of China is nearly 1.3 billion.
23. TRUE AND FALSE CHAIRS
� Divide the class into Teams A and B.
� Put the two teams in two lines, a few metres away from the front of the class.
� Put two chairs in front of each team and label the chairs, ‘True’ and ‘False’ with a
piece of paper.
� Prepare statements that are either true or false, for instance, ‘New York is the
capital of the United States of America’, or ’Twelve multiplied by seven equals
sixty-three.’
� When the statement is read, the first learners in line for Teams A and B quickly
decide if the answer is true or false and then walk as quickly as possible (NO
RUNNING!) to sit down in the true or false chair in front of their team. The
person who sits first in the correct chair wins a point for their team.
� These two learners then go to the back of the team line and it is the turn of the
next two learners.
� Continue until every learners has had a turn, or you think it is a good moment ot
stop. The team with the most points at the end of the game wins.
VARIATION: Get the learners to write two statements each, one true and one false.
Place them all in a bag and have one learner draw one out at random and say the
statement aloud. The first two learners in line then decide which chair to sit in. Then
another learner picks out the next statement, read it out aloud, and the game
continues.
This activity can also be used for Warm-up, Introduction and Review learning
stages.
24. MATCH THE QUESTION AND ANSWER
� Write a question on a piece of paper. � Write an answer to the question on another piece of paper. � Prepare enough of these so that each learner has either a question or an answer.
ACTIVATE! A guide to using activities in learning – October 2008
The Curriculum Project
28
� Give each learner a piece of paper. They read it, memorise it and give it back to you. Don’t allow them to write it down!
� Learners then walk around the class, questioning and answering. � When a question fits their answer, they come to you and check. � If they are correct, they sit down; if they don’t match, they try again. � Continue until all the questions and answers are matched.
This activity can also be used for the Introduction, Presentation and Review learning
stages.
25. MULTIPLE CHOICE
� Learners are given questions/statements, or a paragraph of text. � They are asked to select the right answer from a group (usually three). For
example:
Which country is UN Secretary-General Ban Ki-moon from?
a. Sweden b. Ghana c. South Korea
26. MIX AND MATCH
� Use quite a difficult text that learners have already read. � Divide the text into sentences. Cut each sentence in half. � Mix all the half sentences and give half a sentence to each learner. � Learners then go around the room trying to find the other half of their sentence. � When the learners with matching halves find each other, they come to you and
read out the sentence. If they are correct, they sit down. If not, they try again.
� Continue until all the sentences are matched.
27. TEXTS AROUND THE ROOM
� Attach 4 - 7 different texts to the walls around the classroom. � Write a list of comprehension questions about the texts. Mix them up, so that
Question 1 is about Text 3, Question 2 is about Text 5, etc. (Don’t let the learners
know which question is about which text.)
� Learners work in pairs or groups. Give each group the list of questions. Learners have to find the answers to the questions by identifying which question refers to
which text and then looking for the answers in the text.
� Set a time and then ask the pair or groups how they did.
This activity can also be used for the Review learning stage.
28. ORDER THE PARAGRAPH
� Prepare a text about the topic / sub-topic. � Cut paragraphs into sentences. � Divide the class into groups, one sentence per learner, and one paragraph per
group. For example, if you have paragraphs of five sentences, divide the class into

ACTIVATE! A guide to using activities in learning – October 2008
The Curriculum Project
29
groups of five, with each member of the group getting one sentence from the
paragraph.
� Learners read out their sentences within their group. They stand in a line to order themselves into a paragraph. When they think they are right, get them to read all
the sentences in the right order.
This activity can also be used for the Presentation learning stage.
29. PICTURE GAP-FILL (CLOZE)
� Prepare a picture, or a group of pictures, related to the topic / sub-topic. � Prepare some text related to the picture. Put gaps for some key words in the text. � Put the learners into pairs and ask them to fill in the gaps in the text by looking at
the picture(s).
� When they have finished, put the pairs in groups of four to compare answers.
This activity can also be used for Presentation and Review learning stages.
ACTIVATE! A guide to using activities in learning – October 2008
The Curriculum Project
30
4B: Medium Control Activities
30. COMPLETE THE CATEGORIES
� Ask learners to write down a table of categories linked with identity, like name, age, country, hobbies, single, married, future ambitions, etc. All learners should
have the same categories.
� Ask learners to fill in the table with information about themselves or about an imaginary or famous person.
� Then ask them to prepare five to ten blank tables in their books. � When they are ready, ask learners to mingle with each other and ask questions.
They must interview enough people to fill in all of the tables in their books.
� When they have finished, ask them some questions like, ‘Who did you meet?’, ‘What do they do?’, ‘How old are they?’ etc.
VARIATION: For social studies, you can write down other categories. For instance,
learners could choose a country, and have categories like capital city, population, land
mass, natural resources, borders, etc.
31. CONDITIONAL CONSEQUENCES
� This game is useful for Social Studies. It can also be useful for English language, although the students are only practising a very specific grammar structure.
� Say a sentence using a conditional (‘will’ or ‘would’ depending on what the learners know). Here are two examples:
If I win the lottery I will buy a new car.
If I won the lottery I would buy a new car.
� Ask the next learner to say a sentence beginning with the end of yours. For example:
If I buy a new car, I will drive around the country.
If I bought a new car, I would drive around the country.
� The next learner then says another sentence using the end of the sentence of the previous learner, e.g., ‘If I drive around the country, I will visit my friends.
� Continue until everyone in the class has given a sentence.
VARIATION: For big classes, split the learners into groups of 5-8 and ask each group
to practice on their own. Make sure to walk around checking each group.
This activity can also be used for Warm-up and Review learning stages.

ACTIVATE! A guide to using activities in learning – October 2008
The Curriculum Project
31
32. TWO TRUTHS, ONE LIE
� Ask learners to write three statements. Two of them should be true, and one should be false. These statements can be about themselves, or the topic / sub-topic
that they are studying, depending on what you decide.
� Put them into groups of three or four people (let’s say Groups A, B, C and D) and get them to share their truths and ‘lies’ for a few minutes. Can they make the lie
more difficult to spot?
� Then put groups facing each other in sets of two (so Group A opposite Group B, and Group C opposite Group D). In each set of groups, one person from one group
(e.g. Group A) then says their three statements to the other group. The other group
(e.g. Group B) discuss among themselves and decide which statement is the lie.
� When they have decided, they say ‘We think statement number X is a lie.’ � If they are correct, they win one point. If they are not correct the other team wins
one point.
� Then one person from the other group (e.g. Group B) says their three statements to the other group (e.g. Group A).
� Now Group A must decide which is the lie. � The game continues until all of the learners in both of the groups have said their
three statements.
� If you have time, ask each learner to read out their two truths and one lie. They should also explain why the lie is untrue.
This activity can also be used for Warm-up and Review learning stages.
33. PASS THE QUESTION � In this game the students are working together against you. � Get a ball, or something that can be thrown easily without causing damage. � Ask the learners to stand in a circle with you standing in the middle. � Prepare a group of question linked to what the learners are learning. � Ask a question and then pass/throw the ball to a learner at random (for example,
‘What is the past tense of run?' or ‘What is the capital of Malaysia?').
� If the learner knows the correct answer, they should answer and throw the ball back to you as they answer. If they don't know, they say ‘Pass!’ and also throw the
ball back to you.
� If they answer correctly, you say ‘Correct!’ If they answer incorrectly you say ‘Incorrect!’ and throw the ball to another learner to try the same question.’
� If the second learner knows the answer, they give it and return the ball to you Again, if the answer is incorrect, you say ‘Incorrect!’ If they don’t know they also
say ‘Pass!’ and throw the ball back to you.
� For each question the students get correct they receive one point. However, if two students in a row say ‘Pass!’ or answer the question incorrectly, you get one point.
� Continue until you have asked all the questions. � At the end, go through the questions with the whole class, counting the number of
point that you and the class received, and go through the incorrect answers.
This activity can also be used for Introduction, Warm-up and Review learning
stages.

ACTIVATE! A guide to using activities in learning – October 2008
The Curriculum Project
32
34. SPEAKING STICK
� Prepare a group of different objects (‘sticks’), e.g. different coloured pens. Each object represents a question which you have prepared beforehand.
� Hand one object to a learner and ask them one of the questions. � The learner takes the stick and answers the question. � They then pass the object to another learner (not somebody sitting near them) and
ask the same question. The other learner answers and passes the stick to someone
else.
� The object goes around the room from learner to learner, while they ask and answer the question.
� While the first object is moving around the room, pass another object to a learner and ask another question. This object, and the question, will now also go around
the class.
� Do the same with the other objects until all the objects are moving around the classroom at the same time, and the learners are asking and answering questions.
� Encourage everyone to get up and move around!
This activity can also be used for Warm-up and Review learning stages.
35. FIND SOMEONE WHO
� Think of about ten habits, abilities, achievements, etc., that can be used to practice structures learners are learning.
� Write ‘Find someone who…’ on the board and underneath it write the ten things. For example, Find someone who…can play the guitar…has been to Taunggyi
…likes rock music…wants to marry someone in this class.
� Learners copy this list into their notebooks. � They then have to find someone who does these things by walking around the
classroom and asking each other questions. For example, ‘Can you play the
guitar?’; ‘Have you been to Taunggyi?’ If the other person answers ‘Yes’ then
they write their name by that item on the list.
� See if the learners can find someone for every statement. � After a few minutes, get them to sit down again and ask them questions about
people’s findings. For example: Who can play the guitar? Who has been to
Taunggyi?
This activity can also be used for Warm-up and Review learning stages.
36. CHAIN STORY
� Learners sit in a circle. Either you or a learner starts the story with a sentence or gives the title to the story.
� The next learner adds the next sentence to the story. � Continue until you have a good story.
VARIATION: For Social Studies you can pick a topic rather than a story title.

ACTIVATE! A guide to using activities in learning – October 2008
The Curriculum Project
33
some any many
a lot of much fewer
a few more less
some any many
a lot of much fewer
a few more less
37. TRANSLATION DIALOGUES
� Write conversation in learners’ first language on the board. � As a class activity, translate the conversation into English on the board. � Drill the conversation several times. Erase. � In pairs, learners reconstruct the dialogue in English. � Pairs present their dialogues to the class.
38. X’S AND O’S
� Draw a nine square (3 x 3) grid on the board and fill each box with one word. Use vocabulary based on the subject or lesson you are teaching. (These could be
social studies terms, general vocabulary, parts of speech, and verb forms, etc.)
� Divide the class into two teams, X and O. Decide which team will start. � The starting team chooses a square with a word in it. They have one minute to
write a correct sentence using the word in that square. After one minute, one
member of the team has to go to the board and write their sentence on it.
� The other team decides whether the sentence is correct or not. � If it is correct, the team who wrote the sentence wins that square. They draw their
mark (X or O) over that square. If it is incorrect, the do not win the square and it
remains available.
� Now the other team chooses a square, makes a sentence in one minute, writes it on the board, and asks the other team to decide if it is correct.
� The game continues until one of the team wins three squares in a row, vertically, horizontally of diagonally. The teams try to block each other to stop the other
team from getting three in a row.
� Below is an example of the 3 x 3 grid with words for uncountable nouns, and a finished game. Group O is the winner in this example.
This activity can also be used for the Review stage.
39. WORD-CARD STORY
� Prepare a group of cards with words written on them (can be nouns, verbs, adjectives, adverbs, etc., depending on the particular topic being practiced). You
need at least one card for every learner.
� Place the cards face down, in a pile or spread out, so that learners cannot see the word.
� Decide the title of a story, either yourself, or by asking the class, and perhaps also the first line.
� Then ask one learner to pick up a card, look at the word, and make the next sentence for the story using that word.

ACTIVATE! A guide to using activities in learning – October 2008
The Curriculum Project
34
� Check with the class whether the learner has correctly used the word. Write the sentence on the board.
� Then ask a second learner to pick up another word and add the next sentence. � Continue around the class. Each word card should only be used once.
This activity can also be used for the Review learning stage.
40. TWO-MINUTE INTERVIEWS
� Divide the class into pairs. � Each pair interviews each other for two-minutes each. They can be themselves or
be other fictional and/or famous people.
� They should write the information down. � At the end of the activity, ask each learner to briefly present their partner.
This activity can also be used for Warm-up and Review learning stages.
41. SPOT THE MISTAKE
� Split the class into groups of 2-5. � Ask each group to write down 3-5 sentences. Each sentence should contain a
mistake, perhaps related to the topic that the class is studying, which they think
other people will not see.
� Then get groups to swap their sentences with another group, and ask them to correct the sentences they receive.
� When all the groups have finished, ask each group to come to board and write out each sentence and correct the mistakes.
� They get one point for each mistake corrected. � If they do not see the mistake, the team who wrote the sentence get one point. If
they see extra mistakes, they get extra points.
This activity can also be used for Warm-up and Review learning stages.
42. GUESS THE THING / PERSON
� One learner writes the thing or person’s name secretly on a piece of paper. � Split the class into two teams. Each team can ask one question in turn (a different
learner each time), which requires the answer ‘Yes’ or ‘No’. The learner with the
object cannot say anything else.
� The first team to guess what the thing or person is wins the game.
This activity can also be used for Warm-up and Review learning stages.
43. TIMELINES
� Present a brief text and make sure learners understand all key information. � Draw a timeline on the board to demonstrate. For example:
Now 2000 1990 1985 1995

ACTIVATE! A guide to using activities in learning – October 2008
The Curriculum Project
35
� Explain that the learners must write all the main events from the texts in chronological order (order of when they happened) on the timeline.
� Write some events on the timeline to show what is needed. � In groups of three or four, learners decide on the most important events from the
texts (or background knowledge).
� They then put these events on their timeline. � When the groups are ready, groups will show their timelines. � If there are differences, encourage discussion about the differences.
This activity can also be used for Presentation and Review.
44. INVISIBLE STORY
� Divide the class into groups of 3-5 people. � Give the title of a story, or decide on a title with the class. � Give a sheet of paper to a learner in each group and ask the learner to write two
sentences, one underneath the other, across the top of the paper. These two
sentences should be the beginning of the story.
� Once those two lines are written, the learner folds the paper so that the first sentence is not visible but the second sentence is.
� The paper is then passed to the next learner in the group. This learner, who can only see the second sentence, writes two more sentences to continue the story.
This same learner folds the paper so that only the last (fourth) sentence can be
read. Then they pass the sheet to the next learner in the group.
� The sheet continues like this two or three times around the group (depending on how much time you have).
� Ask each group to unfold their piece of paper, and read the story to the class.
45. DISAPPEARING PARAGRAPH
� Write a short paragraph on the board (not more than about 40 words). It should be related to the topic. Ask learners to read aloud the paragraph together.
� Erase some of the words from the paragraph (maybe 5-10). Ask learners to say the paragraph together filling in the missing words.
� Erase more words from the paragraph (maybe 5-10 more). Ask learners to say the paragraph again.
� Continue until the whole paragraph has been erased, and see if the learners can say the whole paragraph from memory.
This activity can also be used for Presentation and Review.
46. CIRCLE GAME
� Learners sit in a circle, if possible on chairs. If not, the place of each learner should be marked by something on the floor, a pen perhaps.
� You always sit in the middle of circle to begin activity.

ACTIVATE! A guide to using activities in learning – October 2008
The Curriculum Project
36
� Make a sentence, using a grammar or vocabulary point that the learners are learning; for example, “I have black hair,” or, “Yesterday I went to the market.”
� Learners must quickly decide if the statement is true for them. � If the statement is true, they must stand up and find another chair to sit in. If it is
not true, they can stay sitting. (The person in the middle ALWAYS moves to an
empty chair in the circle.)
� The learner left without a chair must sit in the middle and say the next sentence.
VARIATIONS: This activity can be used for many different kinds of grammar and
vocabulary practice. It is particularly good for tense practice, and you can include
negative and question forms. For questions, the learner in the middle has to ask
someone in the circle a question about themselves, e.g. ‘Do you like eating
caterpillars?’ If the learner in the circle replies ‘Yes, I do,’ then everybody who likes
eating caterpillars must stand up and find another chair to sit in. If the learner in the
circle replies, ‘No, I don’t,’ then everybody who doesn’t like eating caterpillars must
stand up and find another chair to sit in.
This activity can also be used for Warm-up and Review learning stages.
47. WHO / WHAT AM I?
� Write the names of people, animals, countries or things on small pieces of paper (if people, they should be well-known to everyone in the class).
� One piece of paper is then attached to the back of each learner without showing them what is written.
� Then, learners have to find out who or what they are by moving around the room and asking each other questions which need ‘Yes / No’ answers, e.g., ‘Do you…?
Are you…? Can you…?’
� For each person they meet, they must ask and answer only one question and then move on to the next person. Their partner each time can ONLY answer ‘Yes’ or
‘No.’ They are not allowed to give any extra information.
� Give them a set amount of time to ask their questions (for example, 10 minutes). When time is up, ask whether any of the learners can guess who or what they are.
VARIATIONS: Get learners to decide what to write on the pieces of paper (give them
a category) and stick them onto each other’s backs. Allow learners to ask more than
just Yes-No questions.
This activity can also be used for Introduction, Practice and Review learning stages.

ACTIVATE! A guide to using activities in learning – October 2008
The Curriculum Project
37
4C: Low Control Activities
48. BEHIND THE PICTURE
� Divide learners into groups of about 5. � Distribute a picture to each group. � Each group discusses what is happening in the picture. � Groups then move to ‘imagination,’ where they give ideas about things they can’t
see in the picture. Encourage the learners to be as creative as possible.
� Ask groups to share what is happening in the picture.
This activity can also be used for Introduction and Review learning stages.
49. SOMETHING ABOUT ME
� Each day, a different learner stands in front of the group and makes one statement about yesterday, such as: “Yesterday I went shopping." or “I have a large family”.
� In turn, the other learners ask questions to gather more information. For example, "What did you buy?” or “How many brothers and sisters do you have?”
� This activity has many variations depending on what class is studying.
This activity can also be used for Warm-up and Review learning stages.
50. KEEP TALKING
� Find a picture with lots of activity and a watch or clock with an alarm or stopwatch.
� Split the class into Teams A and B. � Set the alarm or stopwatch for a short period of time (e.g. 1 minute) but don’t tell
the learner how much time they have.
� Give the picture to a learner in Team A. This learner has to say a sentence about the picture; for example, ‘There is a big tree,’ or, ‘A bird is flying in the sky’. You
can decide whether learners have to use a particular grammar structure of
vocabulary group.
� Make sure the sentence is correct. If not, they ask the learner to correct themselves, or say another sentence (You must decide which mistakes they will
correct).
� Once the sentence is correct, the learner can pass the picture to a learner in Team B (they can choose any person from the other team).
� Now the new learner must make a different sentence. � Picture goes back and forth between the teams with each learner making a new
sentence.
� When the time you have decided is up (e.g. the alarm sounds), the learner who is holding the piece of paper is ‘caught’. The other team gets one point.
� Continue the game with a different time on the alarm each time until the game has reached its useful end.
This activity can also be used for Warm-up and Review learning stages.

ACTIVATE! A guide to using activities in learning – October 2008
The Curriculum Project
38
51. COMPREHENSION QUESTIONS
� Give learners text related to the topic they are learning with a set of questions to answer. They can do this individually, in groups or in pairs.
VARIATIONS:
One variation is to ask the learners to answer the questions individually, but then to
get into pairs or groups to compare their answers. They can then write a ‘fair copy’
which they all agree on.
Another variation is to put the learners into groups and ask them to think of a set
number of questions for the text. You then ask them to swap questions with another
group to answer the questions they receive.
52. ANALYSE THE GRAPH, CHART OR DIAGRAM
� Here are two ways in which you can use graphs, charts and diagrams in low control:
� Give learners a graph, chart or diagram about the topic / sub-topic, and ask
them to write an analysis of the information it contains.
� Give learners some information and ask them to convert it into a graph, chart
and / or diagram.
53. WRITE ABOUT A PICTURE
� Put learners into groups. Give each group a different picture about the topic. � Give them 15-20 minutes to write down as much information as they can about
that picture, using information that they have learned in previous lessons.
� Ask each group to present their picture to the class with their information. � After each presentation ask whether the other groups can add any more
information.
54. DESCRIBE IT!
� Divide the class into two teams, Team A and Team B. � Prepare words on pieces of paper, related to the topic. You need at least one word
for each learner. Fold these pieces of paper and put them into a bag.
� Ask one learner from Team A to come to the front of the class. They should take one piece of paper from the bag and look at the word. Now they have 30 seconds to describe
the word to Team A without saying the word or any part of it. Team B should not speak.
� If Team A guess the word correctly within 30 seconds they get one point. If they don’t guess it in time Team B has one chance to try and guess it, and win the point.
� Then one person from Team B should come to the front and repeat the process. � Continue until every learner has had a chance to describe a word.
This activity can also be used for Warm-up and Review.
ACTIVATE! A guide to using activities in learning – October 2008
The Curriculum Project
39
55. PROJECTS AND REPORTS
� Give learners projects to develop about the topic / sub-topic. � It can be a good idea to put learners into pairs or groups of three so they can share
ideas and tasks.
� Include research tasks using surveys / questionnaires, text resources (books, CDs etc.), observation and analysis, etc.
� If possible, ask them to write a report summarising. This can include research results, analysis, conclusions, and other useful information.
56. DISCUSSIONS
There are many ways organise discussions, but it is always a good idea to give
learners some time to prepare information and ideas. It is also usually a good idea to
give them some resources to help them. Here is one way to organise a discussion:
� Split the class into group of 3-5. Give them the discussion topic. Give them some information about the topic if possible, giving the different sides of the arguments.
� Prepare two or three questions about the topic. These questions should provoke discussion. ‘Do you think that…?’
� As homework, ask each learner to think individually about answers to these questions. They need to be ready to JUSTIFY their answers / ideas with opinion
supported by fact (if possible).
� At the beginning of the discussion, ask all the groups to get together and elect one ‘chairman’, one ‘writer’, and one ‘speaker’.
� Give them up to 15 minutes to discuss the answers to their questions and reach an AGREEMENT about how they will answer. The ‘chairman’ should lead the
discussion, and the ‘writer’ should write down the final version.
� Then, ask the ‘speaker’ in each group to read the group’s answer to each question in turn, i.e. ‘We think that…’
� You and the learners should make brief notes about the answers. � Finally, lead a free discussion about the questions and topic. All learners can now
contribute as individuals, not in groups.
57. POSTER PRESENTATION
� In pairs or groups, learners prepare a poster on a topic / sub-topic they have been studying.
� After the posters are completed, each group prepares a presentation about their poster. They explain the meaning and expand on the ideas from the poster.
� Make sure that all members of the group participate in the presentation! � Put all the posters up on the wall.
58. QUIZ
� Split the class into two teams, and then split each team into groups of 3-4 people. � Each group has to write three or four factual questions and answers about a topic
you are studying. The questions must have a correct answer (no opinion

ACTIVATE! A guide to using activities in learning – October 2008
The Curriculum Project
40
questions). The group must know the correct answer. For example, ‘What's the
capital city of Bangladesh?’ ‘How many legs does a spider have?’ ‘Are dolphins
a type of fish?’ ‘What's the teachers' husband's name?’
� When they have finished writing questions and answers, they return to their teams. � Team A asks a question to Team B. If team B gets the correct answer, they get a
point. Next, Team B asks a question, Team A answers.
� Continue until all questions have been asked and answered.
59. ROLE-PLAY
� Define a group of different characters in role-play. � Divide the class into equal groups of the same characters. For example, for a role-
play about apartheid in South Africa you might have three groups of characters –
indigenous people, British people, and Boers (Dutch South Africans). Put groups
of characters together.
� Each group brainstorms their ideas and opinions about their characters. You may want to provide some questions to get them thinking about their characters. For
example, for indigenous people, a question could be ‘How do you think your lives
were before the Boer?’ For the Boers, ‘Why did you move to South Africa?’ For
the British it could be ‘What do you want in South Africa?’
� When these same-character groups have discussed their ideas and opinions, they re-form into new groups. Each group must have one or more of each character.
For example, each group must have some indigenous people, some British and
some Boers.
� The groups each discuss, organise and practice their role-play. Each group should make sure that all group members are participating. This organising and practising
session may take more than one lesson.
� Each group performs their role-play to the rest of the class. � This is a good activity for the end of a topic when learners understand it clearly.
60. MATCH THE DESCRIPTION
� Prepare a group of pictures. Put learners into groups of 3-5 people. � Give two or three pictures to each group, with a slip of paper for each picture. � As a group, learners write a short description of each picture on each slip of paper. � Collect all the pictures from all the groups and mix them up. Then collect all the
pieces of paper and mix them up also.
� Redistribute pictures and pieces of paper to each group at random. � Group 1 reads out one of the descriptions. Other groups look at their pictures. � The group that has the picture that Group 1 is describing has to call out and hold
up the picture.
� Group 2 then reads out one of the descriptions that have been given to them, and the game continues.
61. 30-SECONDS GAME
� Prepare some nouns, related to the topic, on slips of paper. You should prepare at least one slip for every learner. Fold up the slips of paper and place them in a
container. You will also need a watch or a clock to keep time.

ACTIVATE! A guide to using activities in learning – October 2008
The Curriculum Project
41
� Divide the class into two teams, A and B. � Ask one person from Group A to come to the front of the class and pick a noun
randomly from the bag, and tell the class what the word is.
� The learner now has to speak on this subject for 30 seconds WITHOUT pausing. If they succeed, they get two points for their team.
� If they pause for more than a second, anybody in Group B can shout ‘Pause!’ � If you agree that there was a pause, stop the clock and give Group B one point.
Now the learner in Group B who shouted ‘Pause!’ must come to the front and
continue talking about the noun for the remainder of the 30 seconds. If they
succeed, they win one point for their team.
� Group A listen for pauses, and can interrupt again if they hear one. If they interrupt successfully, they also win one point, and the person who shouted
‘Pause!’ gets the chance try and finish the 30 seconds and win another point.
� When the 30 seconds is finished, choose a learner from Group B to come and pick a new word, and the game begins again. Continue until you run out of time.
VARIATION: You can make this more difficult by not allowing speakers to repeat
verbs, nouns and/or adjectives. You can disallow the use of ‘Ehmm…’, Errr…’ and
other similar ‘thinking’ words. You can also ask people to speak for one minute.
This activity can also be used for Warm-up, Introduction or Review.
62. 3-2-1
� Give learners ten minutes to prepare a three minute talk on an easy, familiar topic. They don’t need to memorise exactly what they are going to say, just some notes.
� Learners get into pairs with Learner A who speaks, and a Learner B who listens. � Learner A speaks for three minutes. You keep time, and tell them when three
minutes has finished.
� Learners change partners. This time, the A’s give the same speech in two minutes. They should try to give all the same information they did in the three minute talk.
� Learners change partners. This time, the A’s give the same speech in one minute. They should try to give all the same information they did in the two minute talk.
� Repeat the activity, with A’s listening and B’s speaking.
63. WORKSTATIONS
� Organize a group of activities (perhaps four) and place them at different ‘workstations’ around the classroom. Learners, individually, in pairs or in groups,
must visit each workstation and complete the activity that they find.
For the Review learning stage, you can use almost any of the activities in this
book. Review activities should help learners revisit key information in the topic.
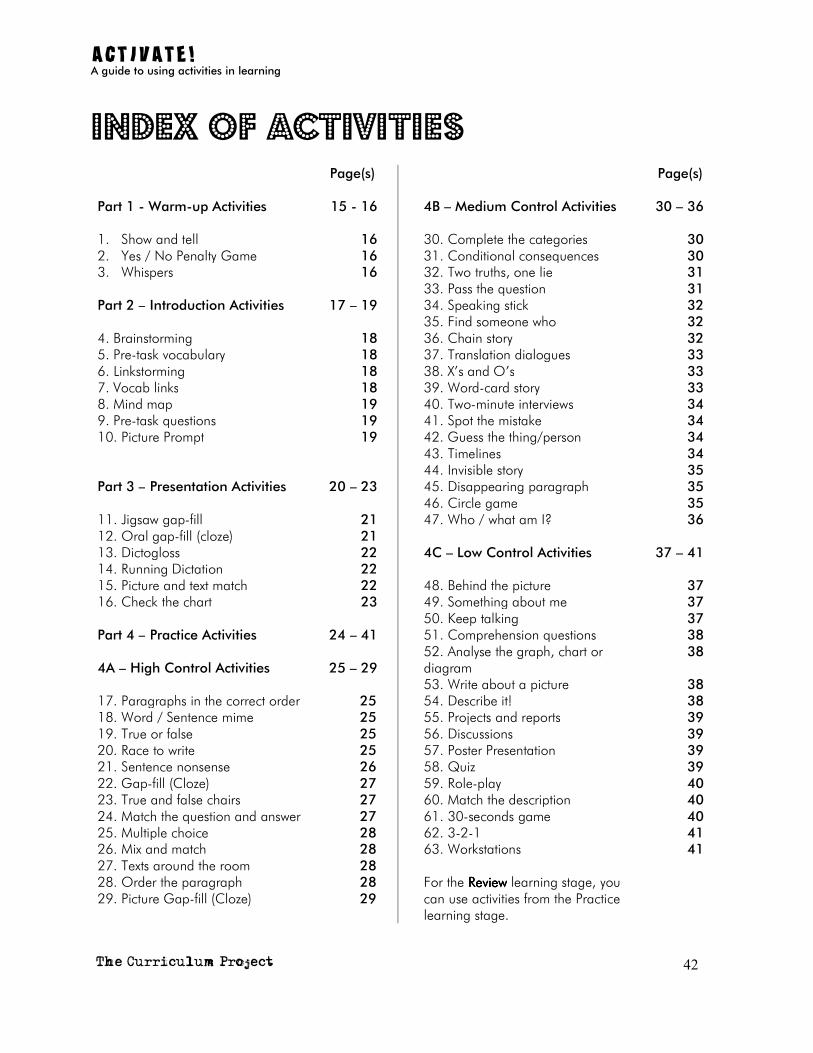
ACTIVATE! A guide to using activities in learning
The Curriculum Project
42
INDEX OF ACTIVITIES
Page(s) Page(s) Part 1 - Warm-up Activities 15 - 16 4B – Medium Control Activities 30 – 36 1. Show and tell 16 30. Complete the categories 30 2. Yes / No Penalty Game 16 31. Conditional consequences 30 3. Whispers 16 32. Two truths, one lie 31 33. Pass the question 31 Part 2 – Introduction Activities 17 – 19 34. Speaking stick 32 4. Brainstorming
18
35. Find someone who 36. Chain story
32 32
5. Pre-task vocabulary 18 37. Translation dialogues 33 6. Linkstorming 18 38. X’s and O’s 33 7. Vocab links 18 39. Word-card story 33 8. Mind map 19 40. Two-minute interviews 34 9. Pre-task questions 19 41. Spot the mistake 34 10. Picture Prompt 19 42. Guess the thing/person 34 43. Timelines 34 44. Invisible story 35 Part 3 – Presentation Activities 20 – 23 45. Disappearing paragraph 35 46. Circle game 35 11. Jigsaw gap-fill 21 47. Who / what am I? 36 12. Oral gap-fill (cloze) 21 13. Dictogloss 22 4C – Low Control Activities 37 – 41 14. Running Dictation 22 15. Picture and text match 22 48. Behind the picture 37 16. Check the chart 23 49. Something about me 37 50. Keep talking 37 Part 4 – Practice Activities 24 – 41 51. Comprehension questions 38 4A – High Control Activities
25 – 29
52. Analyse the graph, chart or diagram
38
53. Write about a picture 38 17. Paragraphs in the correct order 25 54. Describe it! 38 18. Word / Sentence mime 25 55. Projects and reports 39 19. True or false 25 56. Discussions 39 20. Race to write 25 57. Poster Presentation 39 21. Sentence nonsense 26 58. Quiz 39 22. Gap-fill (Cloze) 27 59. Role-play 40 23. True and false chairs 27 60. Match the description 40 24. Match the question and answer 27 61. 30-seconds game 40 25. Multiple choice 28 62. 3-2-1 41 26. Mix and match 28 63. Workstations 41 27. Texts around the room 28 28. Order the paragraph 29. Picture Gap-fill (Cloze)
28 29
For the ReviewReviewReviewReview learning stage, you can use activities from the Practice learning stage.