ACRYLIC ROOFING HANDBOOK - Conservation · PDF fileACRYLIC ROOFING HANDBOOK ... Conservation...
18
© Conservation Technology 800-477-7724 www.conservationtechnology.com 10/08 ACRYLIC ROOFING HANDBOOK
Transcript of ACRYLIC ROOFING HANDBOOK - Conservation · PDF fileACRYLIC ROOFING HANDBOOK ... Conservation...

© Conservation Technology 800-477-7724 www.conservationtechnology.com 10/08
ACRYLIC ROOFING HANDBOOK

© Conservation Technology 800-477-7724 www.conservationtechnology.com 10/08
GENERAL INFORMATIONConservation Technology has supplied state-of-the-art technology for waterproofing, green roofs, rainwater collection, garden ponds, and energy-efficient building since 1984: for more information, visit our website www.conservationtechnology.com. We supply superior-quality solutions for low-slope roofs including sheet rubber membranes (request our publication EPDM ROOFING HANDBOOK) as well as liquid rubber coatings described in this handbook.
CONTENTS OF THIS HANDBOOK: Introduction 1Preparing an Asphalt Roof 4Preparing a Metal Roof 5Preparing a Wood Roof 6
PRICING AND DISCOUNTS: End-user pricing can be found on page 3. Building and roofing contractors and dealers with appropriate credentials are eligible for discounted pricing based on annual purchases. We also offer discounts to end-users for large projects. Please note that all prices and product specifications are subject to change without notice.
TECHNICAL ASSISTANCE: For advice about a specific project, please call and request assistance, or fax a simple sketch of your roof. You can also email questions and drawings to [email protected]. We will need to know the dimensions, slope, desired color, edge conditions, and intended use of the roof.
PAYMENT: Our minimum order is $25. We accept Mastercard, VISA, Discover, American Express, checks, bank drafts, money orders, or wire transfers. Most UPS shippable items can also be sent COD. If you wish to send payment by mail or wire, please call or write to obtain an exact total including shipping charges. Credit terms are available for dealers and active contractors.
HOURS OF OPERATION: We're open Monday through Friday from 8:30 AM until 5:30 PM Eastern time. If our telephones are busy, you can fax an order or a list of questions at any time to (410) 366-1202, but please remember to supply your telephone number and to indicate when you can be reached during business hours.
PICKUPS: You are welcome to visit our Baltimore warehouse at 2233 Huntingdon Avenue to pick up merchandise, but please place your order by telephone before you visit and ask for directions. We do not currently have a showroom.
SHIPPING: We stock white and concrete gray Acrylic ST in moderate quantities for immediate shipment, since these are our most popular products. Stock of other colors and compounds may be limited, so allow time for production. All acrylic roofing products can ship UPS, but large quantities are more economical to ship by truck. Please note, however, that truck shipments to residential addresses can be significantly more expensive than shipments to commercial addresses, and someone must be available to unload and inspect the merchandise. It's always best to arrange for a commercial delivery address or to request shipment to the closest truck terminal (we can locate a terminal in your area). We regret that we cannot ship orders via the US Postal Service.
INSPECTING TRUCK SHIPMENTS: Although we rarely have shipping damage, it is essential that you inspect all truck ship-ments thoroughly before signing the freight bill, note any damage on the freight bill, and call us within one business day to report the damage. If you follow this procedure, we will guarantee free replacement materials. If you fail to note damage before accepting a truck shipment, you may be denied this protection, so insist on taking the time for a thorough inspection.
RETURNS: Acrylic roofing products are not returnable unless defective. However, under special circumstances we may accept returns of recently purchased materials in clean, unopened condition. Before attempting to return any products, you must first call for a return authorization and shipping instructions. We do not refund shipping charges, and we will charge a restocking fee.
WARRANTY: When applied according to our specifications, we warrant fabric-reinforced systems against deterioration from weathering for five years. If a maintenance coat is applied according to our specifications before the end of the warranty pe-riod, we will extend the warranty to five years from the date the maintenance materials are purchased. The warranty can be extended to twenty years with two additional maintenance coats.
Preparing a Concrete Roof 7Preparing an Insulated Roof 8Basic Procedure 9 Inside Corners 12
Outside Corners 13Skylights 14Posts 15Pipes and Drains 16
CONSERVATION TECHNOLOGYtel: (800) 477-7724 fax: (410) 366-1202 email: [email protected]

1
© Conservation Technology 800-477-7724 www.conservationtechnology.com 10/08
INTRODUCTIONConservaion Technology Acrylic Roof System is designed to permanently waterproof most new or existing roofs with positive drainage, including roofs with low slopes and complicated flashings. The system consists of two principal components: a premium elastomeric liquid acrylic coating and a polyester reinforcing fabric. The fabric is embedded between multiple layers of the coating to create a seamless, reinforced flexible membrane that can last indefinitely with minimal maintenance. Flashings are simply painted in place and become an integral part of the membrane. Features include:
suitable for any climate - remains flexible in arctic cold; will not crack or dry out in desert heat; unaffected by ultraviolet radia-tion resulting from long-term sun exposure; resistant to ozone, acid rain, and most other air pollution
environmentally friendly - water-base coatings contain no toxic dispersants or tints; ideal for roofs used for rainwater collection; safety precautions for applicators are same as for water-base house paints
bonds to almost anything - suitable substrates include asphalt, wood, metal, concrete, and rigid foam insulation boards
durable in colors - architectural colors such as reds, greens, and grays match traditional metal roofs; white keeps buildings significantly cooler in the summer, saves energy, and minimizes urban heat-island effect
affordable - cost for materials is less than $2.00 per square foot delivered; any contractor or homeowner can obtain excellent results without prior experience; repair patches are just painted on
STANDARD APPLICATION PROCEDURE: Conservation Technology Acrylic Roof System is usually applied in the four-step process outlined below. Details for each step can be found on the following pages.
1st coat
2nd coat
3rd coat
4th coat
fabric
1) PREPARATION: Sweep, vacuum, scrub, or pressure wash to clean the surface. Then sand, grind, patch, fill, caulk, and prime as appropriate to create a sound, sealed surface.
2) FLASHING: Attach metal drip-edge if desired. Embed re-inforcing fabric between two coats of liquid at roof edges, wall transitions, and penetrations such as pipes and skylights.
3) BASE COATS AND FABRIC: Embed reinforcing fabric between two coats of liquid on the roof surface, overlapping successive sheets of fabric until the entire roof is covered.
4) TOP COATS: After the base coats are dry, apply a top coat in the finish color. When this is dry, apply additional top coats as needed to achieve the desired membrane thickness.

2
© Conservation Technology 800-477-7724 www.conservationtechnology.com 10/08
ALTERNATE APPLICATION WITHOUT REINFORCING FABRIC: Reinforcing fabric can be omitted when acrylic is applied in order to change the color or extend the life of a well-drained roof in good condition with no evidence of cracking or seam failure. Fabric can also be omitted when coating standing-seam or corrugated-metal roofs.
APPLICABILITY AND LIMITATIONS: Conservation Technology Acrylic Roof System can be applied over hot-applied asphalts, cold-applied asphalts, asphalt composite sheets, metals, plywood, wood composite sheets, concrete, rigid foam, spray-applied foam, fiberglass, and many other substrates. We do not recommend coating board sheathing, tongue and groove decking, shingled roofs, and many plastics. The substrate must be firm and mechanically sound with no loose material or trapped water. Old asphalt roofs with extensive deep fissures and large bubbles should be stripped and the underlying roof deck should be re-sheathed.
Conservation Technology Acrylic is recommended for use on well-drained roofs with at least 1/8" per 12" slope and should not be used on roofs subject to long-term ponding of water. However, small puddles that evaporate within a day in the summer are generally not a problem; nor is winter snowfall that can remain for many weeks. The roof must be fully exposed so that it can dry rapidly after rainfall: it cannot be covered with wood decks, tile pavers, outdoor carpets, soil, or other coverings that can trap water. For the same reason, heat pumps, solar collectors, and other rooftop equipment should be elevated on curbs or other supports. To prevent mechanical damage, roof furniture should not have pointed legs.
For best results, apply acrylic roofs in warm, dry weather. However, application temperatures can be as low as 45° if the roof receives direct sunshine, the humidity is low, and it will not rain or freeze within 48 hours.
MATERIALS AND COVERAGE: Conservation Technology Acrylic Roof System consists of three primary components: acrylic coatings, water-base primers, and polyester reinforcing fabrics.
Acrylic coatings are available in four formulations. Acrylic ST is our time-tested standard formulation recommended for almost all fabric-reinforced systems. Acrylic HS is a high-strength formulation designed for top coating walkable decks and other surfaces where additional abrasion or dirt resistance is desirable, as well as for unreinforced application over spray-applied foams. Acrylic HP is a high-performance formulation optimized for unreinforced coating of asphalt roofs in good condition, and offers an ideal way to apply a reflective elastomeric skin over new modified bitumen or built-up roofs. Acrylic AE is a low-cost emulsion of acrylic, asphalt, and clay used to repair and build up deteriorated asphalt surfaces prior to applying the other more expensive acrylic coatings. Acrylic ST standard colors are white, antique white, concrete gray, aluminum gray, blue gray, slate gray, black, tan, terra-cotta, tin red, barn red, dark bronze , copper green, and forest green; white and concrete gray are stocked in quantity for quick shipping. Acrylic HS and HP standard colors are white and aluminum gray, but the other Acrylic ST colors are available, subject to production delays and minimum quantities. Acrylic AE is available in black only.
Determine the minimum number of gallons required for a fabric-reinforced system with a finished thickness of 50 mils by dividing the roof area in square feet by 20. To assure uniform coverage during installation, order half in an inexpensive color to embed the fabric and the other half in the desired finish color for the top coats. This color change will also provide a warning system: immediate re-coating is necessary if the base color ever becomes visible. For a non-reinforced system, divide the roof area in square feet by 40 and order a single color. Apply acrylics with a 3/4" nap roller cover mounted on a sturdy roller frame. Priming is recommended over most substrates in order to increase the bond strength, seal the substrate surface, and extend the coverage of the acrylic. Plywood sheathing and foam insulation boards are primed with a thin application of Acrylic ST: to determine the number of gallons required, divide the roof area by 150. Other substrates are primed with Asphalt Primer, Metal Primer, or Concrete Primer: to determine the required number of gallons, divide the roof area by 250. Note that priming is not required when coating Acrylic HS over spray-applied foam or when coating Acrylic HP over asphalt roofs in good condition.
We offer two types of reinforcing fabric. Our standard fabric is a flexible, woven version ideal for irregular surfaces such as asphalt and concrete. We also offer a stiffer, non-woven version for use over flat surfaces such as plywood and foam boards, especially where the roof is to serve as a recreational deck. Both fabrics are 40" wide and yield a net width of 36" after sub-
45°
acrylic and primers in one-gallon or five-gallon pails
woven and non-woven 40" poly-ester reinforcing fabric
woven flashing fabric in 6", 9", and 12" widths

3
© Conservation Technology 800-477-7724 www.conservationtechnology.com 10/08
tracting the overlap. Regardless of which fabric is chosen for the roof surface, flashings are always made with 6", 9", or 12" strips of woven fabric.
APPLICATION MATRIX: Use the following chart to determine required materials for different roof types. In addition, most roofs will require woven flashing fabric. Call for more assistance with material selection.
STORAGE: Store coatings in a cool location that does not freeze. We recommend using coatings within one year, but un-opened pails stored in a cool location will usually last two years or more. Always stir well before use. If the water and solids have separated and do not easily combine into a creamy heavy-paint consistency, discard the coating.
MAINTENANCE AND LONGEVITY: Minor damage to acrylic roofs can be quickly repaired by cleaning the problem area and painting a few coats of acrylic. More severe damage is only slightly more difficult since it is necessary to first embed reinforc-ing fabric. Since acrylic roofs typically lose one to two mils of thickness each year by weathering, or the equivalent of a full coat every five to ten years, they must be pressure-washed and re-coated every five to ten years to prevent long-term loss of membrane thickness. Determine the minimum number of gallons required for maintenance by dividing the roof area in square feet by 80. If periodic re-coating will be difficult, double the gallons in the initial top coat to significantly prolong the re-coat interval.
PRICING: (Materials for a fabric reinforced acrylic roof will generally cost $1.50 to $2.00 per square foot delivered.)
Acrylic ST, white, 1 gallon 32.00Acrylic ST, white, 5 gallon 150.00Acrylic ST, antique white, 1 gallon 38.00Acrylic ST, antique white, 5 gallon 180.00Acrylic ST, concrete gray, 1 gallon 32.00Acrylic ST, concrete gray, 5 gallon 150.00Acrylic ST, aluminum gray, 1 gallon 34.00Acrylic ST, aluminum gray, 5 gallon 160.00Acrylic ST, blue gray, 1 gallon 38.00Acrylic ST, blue gray, 5 gallon 180.00Acrylic ST, slate gray, 1 gallon 36.00Acrylic ST, slate gray, 5 gallon 170.00Acrylic ST, black, 1 gallon 36.00Acrylic ST, black, 5 gallon 170.00Acrylic ST, tan, 1 gallon 36.00Acrylic ST, tan, 5 gallon 170.00Acrylic ST, terra cotta, 1 gallon 36.00Acrylic ST, terra cotta, 5 gallon 170.00Acrylic ST, tin red, 1 gallon 36.00Acrylic ST, tin red, 5 gallon 170.00Acrylic ST, barn red, 1 gallon 36.00Acrylic ST, barn red, 5 gallon 170.00Acrylic ST, dark brown, 1 gallon 36.00Acrylic ST, dark brown, 5 gallon 170.00Acrylic ST, copper green, 1 gallon 36.00Acrylic ST, copper green, 5 gallon 170.00
ROOF TYPE REPAIRS PRIMER BASE COATS TOP COATS FABRICwood caulk, wood fillers Acrylic ST Acrylic ST Acrylic ST non-wovenwood - walk deck caulk, wood fillers Acrylic ST Acrylic ST Acrylic HS non-wovenmetal caulk, metal fillers Metal Primer Acrylic ST Acrylic ST wovenmetal - good condtion none Metal Primer none Acrylic ST noneconcrete caulk, concrete fillers Concrete Primer Acrylic ST Acrylic ST wovenconcrete - walk deck caulk, concrete fillers Concrete Primer Acrylic ST Acrylic HS wovenasphalt roof cement, Acrylic AE Asphalt Primer Acrylic ST Acrylic ST wovenasphalt - good condition none none none Acrylic HP nonefoam - boards caulk, spray foam Acrylic ST Acrylic ST Acrylic ST non-wovenfoam - sprayed caulk, spray foam none none Acrylic HS none
Acrylic ST, forest green, 1 gallon 38.00Acrylic ST, forest green, 5 gallon 180.00
Acrylic HS, white, 1 gallon 40.00Acrylic HS, white, 5 gallon 190.00Acrylic HS, antique white, 1 gal 44.00Acrylic HS, antique white, 5 gal 210.00Acrylic HS, concrete gray, 1 gal 40.00Acrylic HS, concrete gray, 5 gal 190.00Acrylic HS, aluminum gray, 1 gal 40.00Acrylic HS, aluminum gray, 5 gal 190.00
Acrylic HP, white, 1 gallon 34.00Acrylic HP, white, 5 gallon 160.00
Acrylic AE, black, 1 gallon 16.00Acrylic AE, black, 5 gallon 70.00
Asphalt Primer, 1 gallon 24.00Metal Primer, 1 gallon 38.00Concrete Primer, 1 gallon 18.00
Acrylic Roof Fabric, woven, 6", per foot 0.20Acrylic Roof Fabric, woven, 6" x 300' 40.00Acrylic Roof Fabric, woven, 40", per foot 0.65Acrylic Roof Fabric, woven, 40" x 324' 148.00

4
© Conservation Technology 800-477-7724 www.conservationtechnology.com 10/08
The following procedures apply to all hot-applied or cold-applied asphalt sheet roofs, including mineral-surface roll roofing, built-up hot asphalt, and modified bitumen. Roofs that pond water may require structural repairs to eliminate low spots. Gravel-covered roofs should be stripped to bare asphalt and filled with several heavy coats of Acrylic AE. Badly deteriorated roofs with many large bubbles, deep fis-sures, and crumbling asphalt should be stripped completely, re-sheathed, and treated the same as new wood roofs.
Scrub the roof with a detergent solution.
After the roof dries completely, apply asphalt roof cement to the cut-out areas.
PREPARING AN ASPHALT ROOF
Cut patches of roll roofing the same size as the cut-out areas and nail the patches in place over the wet cement.
Pressure-wash with a generous amount of water to remove all traces of the detergent.
Using a utility knife, cut out defects such as bubbles and loose asphalt sheets.
Apply Conservation Technology Acrylic AE as needed to seal repairs and other problem areas.
Apply a coat of Conservation Technology Asphalt Primer over the entire roof.

5
© Conservation Technology 800-477-7724 www.conservationtechnology.com 10/08
PREPARING A METAL ROOFThe following procedures apply to all metal roofs, including flat-seam, standing seam, and metal-shingle roofs. We do not recommend using rust consolidators: always remove rust, replace missing metal, and fill as needed with patching compounds. Small areas that have been cleaned and patched can be primed with any good rust-inhibiting primer, but use Conservation Technology Metal Primer for large areas. Call for advice about coating metal roofs in good condition where reinforcing fabric may not be required.
Scrub the roof with detergent solution.
Caulk all gaps larger than 1/16".
Patch deteriorated metal or low areas where water might collect using a metal repair compound
Pressure-wash with a generous amount of water to re-move all traces of the detergent.
Wire brush any rusted areas, preferably with a cup wheel in a grinder.
Prime bare metal and patched areas with Conservation Technology Metal Primer.
Scrape any residue, such as thick accumulations of asphalt patching compounds.

6
© Conservation Technology 800-477-7724 www.conservationtechnology.com 10/08
PREPARING A WOOD ROOFThe following procedures apply to wood roofs sheathed with exterior plywood or oriented strand board (OSB). Board sheathing is not an acceptable base for acrylic and must be covered with plywood or OSB. Since joints and defects may show through the acrylic, choose a plywood with one filled face and apply it neatly if the roof is to serve as a deck or will be very visible. Keep gaps between sheets less than 1/4", but observe minimum gaps specified by the sheathing manufacturer. If the weather is hot, priming is essential.
Fasten both new or existing sheathing with screws, ring-shank nails, or other pop-resistant fasteners.
Belt sand any patches, as well as splintering wood and offset seams.
Patch large defects with a wood filler.
Caulk all sheathing joints and tool the caulk flat.Vacuum well to remove all dust.
Prime the sheathing with a thin coat of Conservation Technology Acrylic ST.
Caulk all transitions and tool a cove in the caulk.

7
© Conservation Technology 800-477-7724 www.conservationtechnology.com 10/08
PREPARING A CONCRETE ROOFThe following procedures apply to pre-cast or cast-in-place concrete, either coated or uncoated, but could be used with unglazed concrete tiles used for floors and roofs. Since concrete roof decks are frequently dead-flat, check care-fully for the presence of ponding and fill as needed. If the weather is hot, priming is essential, but it is also essential to observe minimum curing times specified for any concrete repair materials before priming. Scrub with a detergent solution.
Scrape any residue, such as thick accumulations of asphalt patching compounds.
Pressure-wash with a generous amount of water to remove all traces of the detergent.
Grind out cracks to at least 1/4" widthand vacuum the dust.
Fill defects and low areas with concrete repair compounds with bond-enhancing additives.
Seal and prime the roof with Conservation Technology Concrete Primer.
Caulk all cracks and transitionsand tool the caulk flat.

8
© Conservation Technology 800-477-7724 www.conservationtechnology.com 10/08
PREPARING AN INSULATED ROOFThe following procedure offers an effective way to waterproof and insulate existing low-slope roofs. It is ideal for older, poorly-insulated structures because there is no interior mess and no risk of roof condensation. If the insulation is to be coated with acrylic, use extruded polystyrene insulation with 40 psi compres-sive strength. For a more abuse-resistant surface, or where the roof is to serve as a walkable deck, apply plywood or OSB sheathing over the foam. If the existing waterproofing is to be left in place, the plastic air/vapor barrier film can be omitted.
Broom the surface clean and remove any sharp protrusions.
Attach decay-treated boards around the edge. The boards must be as thick as the insulation that follows.
Apply a high-quality air/vapor barrier film, such as Tenoarm, over the surface.
Caulk small gaps in the foam boards with water-base acrylic caulk and tool the joints flat.
Screw foam insulation boards using at least six insulation washers per 2 ft x 8 ft sheet.
Prime the foam boards with a thin coat of Conservation Technology Acrylic ST.
Spray foam larger joints in the foam boards and cut off the excess with a knife after the foam has fully hardened.

9
© Conservation Technology 800-477-7724 www.conservationtechnology.com 10/08
Before beginning the following procedure, prepare the roof as described on the preceding pages. Next, if there are any inside corners, outside corners, skylights, pipes, or drains, flash as described later in this manual. Finally, apply acrylic as described below.
To achieve adequate membrane thickness, it is essential to apply at least one gallon of Conservation Technology Acrylic for every 20 square feet of roof surface. Although the follow-ing procedure describes a four-coat process, additional coats may be necessary to apply the proper quantity of acrylic.
BASIC PROCEDURE
Attach a metal drip flashing at the roof edge. Select a flashing without a raised lip that would retain water.
Embed 6" reinforcing fabric in the wet acrylic, stopping approximately 1/2" short of the roof edge.
Apply a heavy coat of acrylic over the flashing and onto the roof surface.
Using a short roller, apply a coat of acrylic at least 4" up the wall and 4" onto the adjacent roof surface.
Roll a second coat of acrylic on top, completely saturating the fabric.
Roll a second coat of acrylic on top, completely saturating the fabric.
Embed 6" fabric into the wet acrylic so that it extends 3" up the wall and 3" onto the roof surface.

10
© Conservation Technology 800-477-7724 www.conservationtechnology.com 10/08
Using a full-length roller, re-apply acrylic over the wall fab-ric and continue upward to the desired flashing height.
Embed a strip of fabric in the wet acrylic, overlapping the first fabric by at least an inch.
Roll a coat of acrylic on top, completely saturating the fabric.
Apply a heavy coat of acrylic to the roof surface, extending approximately 44" from one end.
Unroll 40" fabric into the wet acrylic, making sure there are no wrinkles or bubbles.
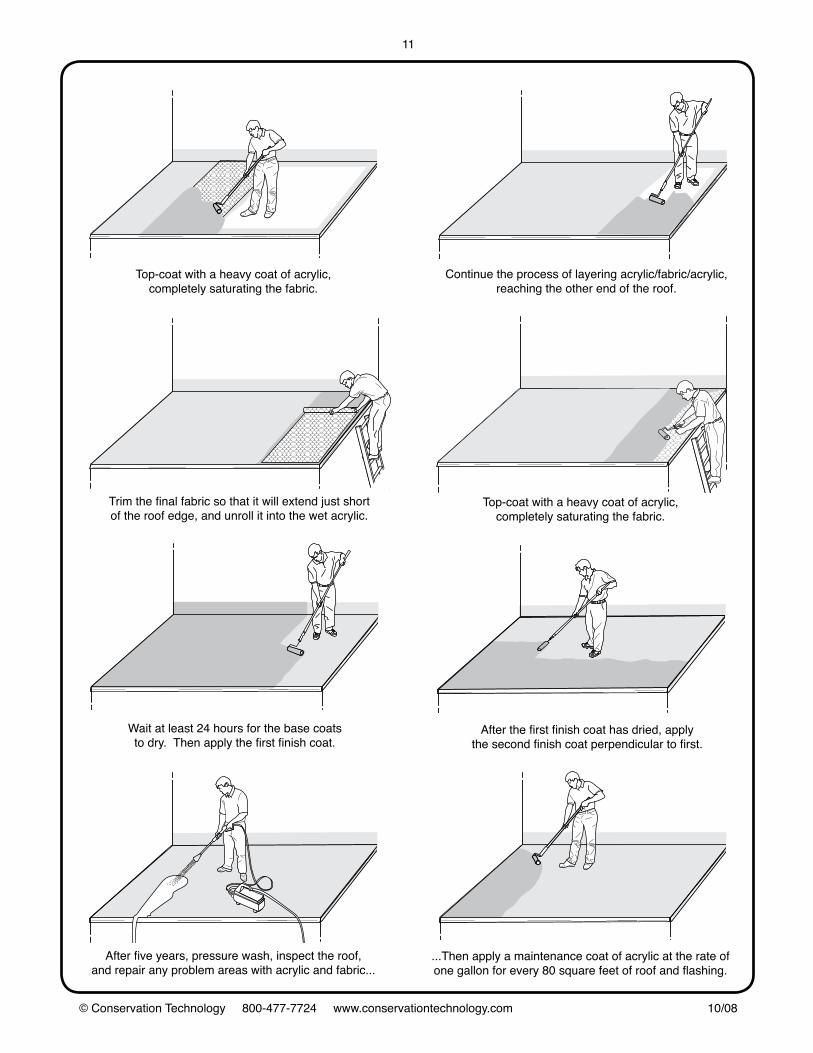
Top-coat with a heavy coat of acrylic, completely saturating the fabric.
Apply acrylic 40" beyond the edge of the fabric, and re-apply acrylic over the last 6" of fabric.
Immediately embed 40" fabric into the wet acrylic, overlapping the first fabric by 3" to 4".
11
© Conservation Technology 800-477-7724 www.conservationtechnology.com 10/08
Top-coat with a heavy coat of acrylic, completely saturating the fabric.
Top-coat with a heavy coat of acrylic, completely saturating the fabric.
Wait at least 24 hours for the base coats to dry. Then apply the first finish coat.
After the first finish coat has dried, apply the second finish coat perpendicular to first.
...Then apply a maintenance coat of acrylic at the rate of one gallon for every 80 square feet of roof and flashing.
Continue the process of layering acrylic/fabric/acrylic, reaching the other end of the roof.
Trim the final fabric so that it will extend just short of the roof edge, and unroll it into the wet acrylic.
After five years, pressure wash, inspect the roof, and repair any problem areas with acrylic and fabric...

12
© Conservation Technology 800-477-7724 www.conservationtechnology.com 10/08
INSIDE CORNERS
Caulk any voids in the corner and tool a cove in the caulk.
Apply a coat of acrylic 4" up one wall and 4" out onto the roof.
Embed 6" fabric in the wet acrylic,half on the wall and half on the roof.
Topcoat the fabric with a heavy coat of acrylic.
Apply acrylic 4" up the second wall and 4" out onto the roof.
Embed 6" fabric in the wet acrylic, half on the wall and half on the roof.
Topcoat the second fabric with a heavy coat of acrylic.
Recoat 4" from either side of the corner and 8" up from the roof.
Dab the corner with a paint brush to remove any puddles of acrylic.
Embed 6" x 6" fabric in the wet acrylic, half on each wall.
Topcoat the corner fabric with a heavy coat of acrylic.
The intersection of two vertical walls with a roof is called an "inside cor-ner" if the walls intersect at an angle measuring less than 180°. Although the illustrations show a 90° angle, the same procedure works for other angles. Follow these procedures just before beginning to waterproof the main roof surface.

13
© Conservation Technology 800-477-7724 www.conservationtechnology.com 10/08
OUTSIDE CORNERS
Caulk any voids in the corner and tool a cove in the caulk.
Apply acrylic to one wall, around the corner, and onto the roof.
Embed 6" fabric in the wet coating, extend-ing past the corner.
Slit the extending fabric with a utillity knife and wrap it around the corner.
Topcoat the fabric with a heavy coat of acrylic.
Apply acrylic to the second wall, around the corner, and onto the roof.
Embed 6" fabric in the wet acrylic, ex-tending past the corner.
Slit the extending fabric with a utility knife and wrap it around the corner.
Topcoat the second fabric with a heavy coat of acrylic.
Dab the corner with a paint brush to remove any puddles of acrylic.
The intersection of two vertical walls with a roof is called an "outside cor-ner" if the walls intersect at an angle measuring more than 180°. Although the illustrations show a 90° angle, the same procedure works for other angles. Follow these procedures just before beginning to waterproof the main roof surface.
To extend the flashing higher, apply ad-ditional coating and fabric

14
© Conservation Technology 800-477-7724 www.conservationtechnology.com 10/08
SKYLIGHTS
Caulk any voids in the corner and tool a cove in the caulk.
Apply acrylic to one wall, around the corners, and onto the roof.
Embed 6" fabric in the wet acrylic, ex-tending past the corners.
Slit the extending fabric with a utillity knife and wrap it around the corners.
Topcoat the fabric with a heavy coat of acrylic.
Apply acrylic to the second wall, around the corners, and onto the roof.
Embed 6" fabric in the wet acrylic, ex-tending past the corners.
Slit and topcoat the fabric. Apply acrylic and fabric to the third and fourth sides.
Topcoat the second fabric with a heavy coat of acrylic.
Remove any puddles at the corners and apply acrylic up to the top of the curb.
Embed fabric in the wet coating, overlapping the lower fabric.
Skylights have four outside corners, so the flashing technique is very similar to that for outside corners. If the skylight and mounting curb are two separate pieces, removing the skylight while applying the acrylic roof will keep the glazing clean and make it easier to properly waterproof the curb. Follow these procedures just before beginning to waterproof the main roof surface.

15
© Conservation Technology 800-477-7724 www.conservationtechnology.com 10/08
Caulk any voids in the corner and tool a cove in the caulk.
Apply acrylic to one side, the two adja-cent sides, and onto the roof.
POSTSPosts have four outside corners, so the flashing technique is very similar to that for outside corners. If the posts are made of wood, use only quality kiln-dried lumber, preferably lami-nated to resist warping. To prevent water flow behind the acrylic flashing, cap post tops and paint or seal the post sides. Follow these procedures just before beginning to waterproof the main roof surface.
Slit the extending fabric with a utillity knife and wrap it around the corners.
Topcoat the fabric with a heavy coat of acrylic.
Embed 6" fabric in the wet coating, ex-tending past the corners.
Embed 6" fabric in the wet acrylic so it extends past both corners.
Slit the extending fabric, wrap it around the corners, and topcoat the fabric.
Embed 6" fabric in the wet acrylic so it extends past both corners.
Top coat third side with acrylic and repeat the process on the fourth side.
Apply acrylic to the third side and onto the roof.
Apply acrylic to the opposite side and onto the roof.

16
© Conservation Technology 800-477-7724 www.conservationtechnology.com 10/08
Caulk any voids in the corner and tool a cove in the caulk.
Using scissors, cut radial slits in the center of a square piece of fabric.
Apply acrylic to the roof surface and several inches up the pipe.
Lower the fabric over the pipeand embed it into the wet acrylic.
Topcoat the fabric with a heavy coat of acrylic.
Apply acrylic to the remainder of the pipe.
Wrap fabric around the pipe,overlapping the slits in the base fabric.
Top-coat the fabric wrapping the pipe with a heavy coat of acrylic.
PIPES AND DRAINS
Top-coat the fabric, extending well into the interior of the pipe.
For bottom drains, cut slits in a square of fabric and embed it into acrylic.
Press the fabric slits against the acrylic-coated interior of the pipe.
Acrylic bonds well to most plastic or metal pipes and drains. However, never flash directly to metal chimney or flue pipes: always fasten the ap-propriate ventilated metal flashing to the roof and and apply acrylic and fabric to the flashing. Follow these procedures just before beginning to waterproof the main roof surface.