Acoustic Wave Music System - Bose
22
Acoustic Wave ® Music System Owner’s Guide October 16, 2001 AM253543_03_V.pdf
Transcript of Acoustic Wave Music System - Bose

Acoustic Wave® Music System
Owner’s GuideOctober 16, 2001
AM253543_03_V.pdf

2 October 16, 2001 AM253543_03_V.PDF
Important Safety Information
WARNING: To reduce the risk of electrical shock, do not expose yourAcoustic Wave® music system to rain or moisture.
As with any electronic product, use care notto spill liquids into any part of the system.Liquids can cause a failure and/or a firehazard.
CAUTION: For units with a polarized power plug, to prevent electricshock, match wide blade of plug to wide slot, insert fully.
These CAUTION marks appear on your Acoustic Wave® music system.
The lightning flash with arrowhead, inside an equilateral triangle,warns the user that uninsulated dangerous voltage inside thesystem may cause an electrical shock.
The exclamation point, inside an equilateral triangle, reminds theuser to read the important operation and maintenance instructionsin this owner’s guide.
WARNING: Use of controls or adjustments or performance of proce-dures other than those specified herein may result in hazardous radiationexposure. The compact disc player should not be adjusted or repaired byanyone except properly qualified service personnel.
A severe shock hazard exists if the Acoustic Wave® music system falls intowater while plugged in. Use battery power when operating near water.
CAUTION: Using an adapter other than the UL Listed Bose® 12V DCpower cord can damage your system. For ordering information see yourOwner’s Kit.
When using the Acoustic Wave® music system in a mobile environmentsuch as an automobile, recreational vehicle or boat, be sure that it issecured to prevent accidental movement.
Do not place your system near recorded materials such as audio or videotapes, computer discs, and credit or bank cards. It may erase them.
Be sure the system has enough ventilation.
Class 1 Laser ProductThis CD player is classified as a CLASS 1 LASERPRODUCT. The CLASS 1 LASER PRODUCT label islocated on the back of the system.
WARNING: Mishandling the remote control battery may cause a fire orchemical burn. Keep the battery away from children. Do not recharge,disassemble, heat above 212˚F (100˚C), or incinerate the battery.Dispose of the used battery promptly and responsibly.
WARNING: No naked flame sources, such as lighted candles, shouldbe placed on the apparatus.
BatteriesPlease dispose of used batteries properly, following any local regulations.Do not incinerate.
CLASS 1 LASER PRODUCT
KLASSE 1 LASER PRODUKT
LOUKAN 1 LASER LAITE
KLASS 1 LASER APPARAT
CAUTIONRISK OF ELECTRICAL SHOCK
DO NOT OPEN
CAUTION: TO REDUCE THE RISK OF ELECTRIC SHOCK,DO NOT REMOVE COVER (OR BACK).
NO USER-SERVICABLE PARTS INSIDE.REFER SERVICING TO QUALIFIED PERSONNEL.
Acoustic Wave Music System
FMAMCDAUX VOLUME MUTE
PRESET
TRACK
STEREOREPEAT TRACKREPEAT DISC RANDOM
CD Play/Pause Stop Skip/Scan CD Mode
1 2 3 4 5
FM AM
Seek/TuneVolume
On/OffAUX
Presets
Acoustic Wave Music System
FMAMCDAUX VOLUME MUTE
PRESET
TRACK
STEREOREPEAT TRACKREPEAT DISC RANDOM
CD Play/Pause Stop Skip/Scan CD Mode
1 2 3 4 5
FM AM
Seek/TuneVolume
On/OffAUX
Presets
AM253543_03_V.PDF October 16, 2001 2a
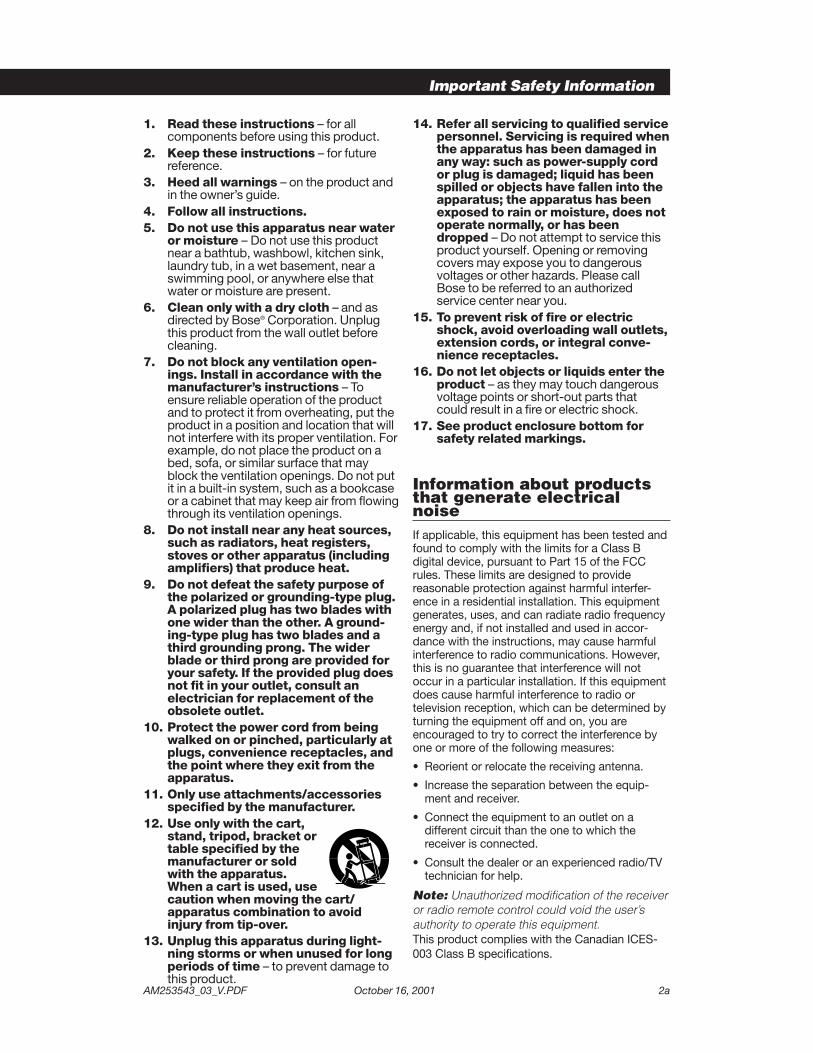
Important Safety Information
1. Read these instructions – for allcomponents before using this product.
2. Keep these instructions – for futurereference.
3. Heed all warnings – on the product andin the owner’s guide.
4. Follow all instructions.5. Do not use this apparatus near water
or moisture – Do not use this productnear a bathtub, washbowl, kitchen sink,laundry tub, in a wet basement, near aswimming pool, or anywhere else thatwater or moisture are present.
6. Clean only with a dry cloth – and asdirected by Bose® Corporation. Unplugthis product from the wall outlet beforecleaning.
7. Do not block any ventilation open-ings. Install in accordance with themanufacturer’s instructions – Toensure reliable operation of the productand to protect it from overheating, put theproduct in a position and location that willnot interfere with its proper ventilation. Forexample, do not place the product on abed, sofa, or similar surface that mayblock the ventilation openings. Do not putit in a built-in system, such as a bookcaseor a cabinet that may keep air from flowingthrough its ventilation openings.
8. Do not install near any heat sources,such as radiators, heat registers,stoves or other apparatus (includingamplifiers) that produce heat.
9. Do not defeat the safety purpose ofthe polarized or grounding-type plug.A polarized plug has two blades withone wider than the other. A ground-ing-type plug has two blades and athird grounding prong. The widerblade or third prong are provided foryour safety. If the provided plug doesnot fit in your outlet, consult anelectrician for replacement of theobsolete outlet.
10. Protect the power cord from beingwalked on or pinched, particularly atplugs, convenience receptacles, andthe point where they exit from theapparatus.
11. Only use attachments/accessoriesspecified by the manufacturer.
12. Use only with the cart,stand, tripod, bracket ortable specified by themanufacturer or soldwith the apparatus.When a cart is used, usecaution when moving the cart/apparatus combination to avoidinjury from tip-over.
13. Unplug this apparatus during light-ning storms or when unused for longperiods of time – to prevent damage tothis product.
14. Refer all servicing to qualified servicepersonnel. Servicing is required whenthe apparatus has been damaged inany way: such as power-supply cordor plug is damaged; liquid has beenspilled or objects have fallen into theapparatus; the apparatus has beenexposed to rain or moisture, does notoperate normally, or has beendropped – Do not attempt to service thisproduct yourself. Opening or removingcovers may expose you to dangerousvoltages or other hazards. Please callBose to be referred to an authorizedservice center near you.
15. To prevent risk of fire or electricshock, avoid overloading wall outlets,extension cords, or integral conve-nience receptacles.
16. Do not let objects or liquids enter theproduct – as they may touch dangerousvoltage points or short-out parts thatcould result in a fire or electric shock.
17. See product enclosure bottom forsafety related markings.
Information about productsthat generate electricalnoiseIf applicable, this equipment has been tested andfound to comply with the limits for a Class Bdigital device, pursuant to Part 15 of the FCCrules. These limits are designed to providereasonable protection against harmful interfer-ence in a residential installation. This equipmentgenerates, uses, and can radiate radio frequencyenergy and, if not installed and used in accor-dance with the instructions, may cause harmfulinterference to radio communications. However,this is no guarantee that interference will notoccur in a particular installation. If this equipmentdoes cause harmful interference to radio ortelevision reception, which can be determined byturning the equipment off and on, you areencouraged to try to correct the interference byone or more of the following measures:
• Reorient or relocate the receiving antenna.
• Increase the separation between the equip-ment and receiver.
• Connect the equipment to an outlet on adifferent circuit than the one to which thereceiver is connected.
• Consult the dealer or an experienced radio/TVtechnician for help.
Note: Unauthorized modification of the receiveror radio remote control could void the user’sauthority to operate this equipment.This product complies with the Canadian ICES-003 Class B specifications.

2b October 16, 2001 AM253543_03_V.PDF
Important Safety Information
18. Use Proper Power Sources – Plug theproduct into a proper power source, asdescribed in the operating instructions or asmarked on the product.
19. Avoid Power Lines – Use extreme carewhen installing an outside antenna system tokeep from touching power lines or circuits,as contact with them may be fatal. Do notinstall external antennas near overheadpower lines or other electric light or powercircuits, nor where an antenna can fall intosuch circuits or power lines.
20. Ground All Outdoor Antennas – If anexternal antenna or cable system isconnected to this product, be sure theantenna or cable system is grounded. Thiswill provide some protection against voltagesurges and built-up static charges.
Section 810 of the National Electrical CodeANSI/NFPA No. 70 provides informaiton withrespect to proper grounding of the mast andsupporting structure, grounding of the lead-in wire to an antenna discharge unit, size ofgrounding conductors, location of antenna-discharge unit, connection to groundingelectrodes, and requirements for the groundelectrode. Refer to the antenna groundingillustration on this page.
Antenna groundingExample of antenna grounding as per NationalElectrical Code, ANSI/NFPA 70.
Note to CATV systeminstallerThis reminder is provided to call the CATV systeminstaller’s attention to Article 820-40 of the NEC (ofUSA) that provides guidelines for proper ground-ing. In particular, it specifies that the cable groundshall be connected to the grounding system of thebuilding, as close to the point of cable entry as ispractical.
Antenna lead-in wire
Antenna discharge unit(NEC Section 810-20)Grounding conductors(NEC Section 810-21)
Power service groundingelectrode system
(NEC ART 250, Part H)
Ground clamps
Ground clamp
Electric serviceequipment
AM253543_03_V.PDF October 16, 2001 3
Contents
Where to find …
Setting Up Your Acoustic Wave® Music System ...................................... 4Before you begin ................................................................................ 4Unpacking the carton ......................................................................... 5Selecting a location for your music system ....................................... 6Installing the remote control battery .................................................. 6Connecting the power cord ............................................................... 7Choosing an FM antenna ................................................................... 7
Operating Your Acoustic Wave® Music System ....................................... 8Operating with the remote control ..................................................... 8Operating with the control panel ........................................................ 9Controlling the system ..................................................................... 10Operating on battery power ............................................................. 10Listening to the radio ....................................................................... 11Using the CD player ......................................................................... 12Listening to a component connected to AUX .................................. 13
Using External Components .................................................................. 14Connecting external components to the system ............................. 14Using a CD player, VCR, tape deck, or TV ....................................... 14Using a turntable .............................................................................. 14Using the system as expansion speakers ........................................ 15Using the Bose® powered microphone ............................................ 15
Maintaining Your Acoustic Wave® Music System................................... 16Taking care of your Acoustic Wave® music system ......................... 16Technical information ....................................................................... 16Troubleshooting ................................................................................ 17Warranty period ................................................................................ 17Customer service ............................................................................. 17
Bose Corporation ........................................................... Inside back cover
For your recordsThe serial number is located on the back of your system.
System serial number: ______________________________________________
Purchase date: ____________________________________________________
We suggest you keep your sales receipt together with this owner’s guide.
Please read this owner’s guidePlease take the time to follow this owner’s guide carefully. It will help youset up and operate your system properly, and enjoy all of its features. Saveyour owner’s guide for future reference.
4 October 16, 2001 AM253543_03_V.PDF
Before you beginThank you for purchasing the Bose® Acoustic Wave® music system.Engineered to be the finest compact sound system you’ve ever heard, itproduces lifelike tones and full bass with true clarity.
The benefits of exclusive Bose technologies help the Acoustic Wave® musicsystem exceed all your musical expectations. Our award-winning acousticwaveguide speaker technology produces full, clear stereo sound by guidingair through a labyrinth air chamber. Proprietary circuitry automaticallyadjusts the tonal balance so that you hear natural sound at all volumelevels. This means that you can hear full, realistic bass at all volume levels.
Your Acoustic Wave® music system includes:
• Integrated system design for high acoustic quality and ease of use.
• A high-performance AM/FM tuner with 5 AM and 5 FM station presets.
• Full-function CD player.
• Credit card-size remote.
• Molded inset handles for easy carrying.
Optional accessories available through Bose include:
• Power Case – Plug your system into the hidden battery compartment inthis padded case to enjoy 8 to 10 hours of portable entertainment(batteries not included).
• Power Pack – This rechargeable, portable power system fits neatly intothe Power Case for 10 to 12 hours of play time. Includes a 12-volt DCbattery, power cord, and charger.
• Power Microphone – To sing along with the music or make announce-ments, use this battery powered microphone to create a mini PA system(batteries included).
• Power Cord – Enjoy your favorite music anywhere you go. A DC adapterconnects your system to any standard vehicle cigarette lighter for lifelikesound in your car, boat or RV.
To order any accessory, call Bose Customer Service. See the inside backcover for telephone listings.
Setting Up Your Acoustic Wave® Music System

AM253543_03_V.PDF October 16, 2001 5
Unpacking the cartonCarefully unpack your music system. Save all packing materials for possiblefuture use. The original packing materials provide the safest way totransport your Acoustic Wave® music system. If any part of the productappears damaged, do not attempt to use it. Notify Bose® Customer Serviceimmediately (see phone numbers on the inside back cover).
Check to be sure you received the parts identified in Figure 1.
Note: Find the serial number on the back of your music system. Write it inthe space provided on page 3.
Figure 1
Contents of theshipping carton
• Acoustic Wave®
music system
• Remote control
• Lithium battery
• Power cord (1)
• Stereo audio cable
• Owner’s kit
Setting Up Your Acoustic Wave® Music System
®
Acoustic Wave Music System
1
2
3
4
5PresetsSkipScan
Seek
Tune
OnOff
FM
AM
AUX
CD
Volume
Mute
PRESETS
1
2
3
4
5
1
FM
AM
‹›
1
AUX
ON/OFFSEEK/TUNE
VOLUME
ACOUSTIC WAVE® MUSIC SYSTEM
CD PLAY/PAUSE
RANDOM REPEAT
STOP
SKIP/SCAN
Remote control
Lithium battery Stereo audio cable
120 VAC power cord(US/Canada)
Owner’s Kit with Demonstration CD and Owner’s Guide
Acoustic Wave®
music system
AC power cords (1 included)
240 VAC power cord(Australia)
230 VAC power cord(UK/Singapore)
230 VAC power cord(Europe)
6 October 16, 2001 AM253543_03_V.PDF
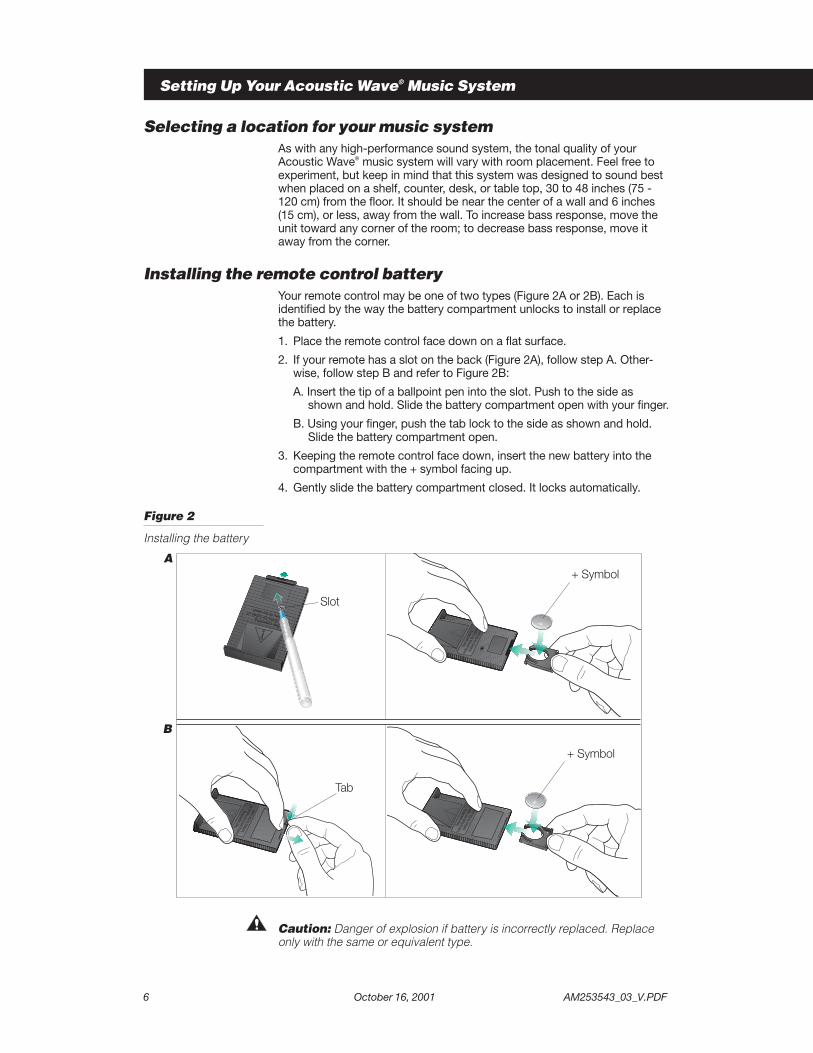
Selecting a location for your music systemAs with any high-performance sound system, the tonal quality of yourAcoustic Wave® music system will vary with room placement. Feel free toexperiment, but keep in mind that this system was designed to sound bestwhen placed on a shelf, counter, desk, or table top, 30 to 48 inches (75 -120 cm) from the floor. It should be near the center of a wall and 6 inches(15 cm), or less, away from the wall. To increase bass response, move theunit toward any corner of the room; to decrease bass response, move itaway from the corner.
Installing the remote control batteryYour remote control may be one of two types (Figure 2A or 2B). Each isidentified by the way the battery compartment unlocks to install or replacethe battery.
1. Place the remote control face down on a flat surface.
2. If your remote has a slot on the back (Figure 2A), follow step A. Other-wise, follow step B and refer to Figure 2B:
A. Insert the tip of a ballpoint pen into the slot. Push to the side asshown and hold. Slide the battery compartment open with your finger.
B. Using your finger, push the tab lock to the side as shown and hold.Slide the battery compartment open.
3. Keeping the remote control face down, insert the new battery into thecompartment with the + symbol facing up.
4. Gently slide the battery compartment closed. It locks automatically.
Figure 2
Installing the battery
Setting Up Your Acoustic Wave® Music System
See operatinginstructions for types of
battery to be used
See o
perat
ing
instru
ction
s for
type
s of
batte
ry to
be us
ed
+ Symbol
See o
perat
ing
instru
ction
s for
type
s of
batte
ry to
be us
ed
See o
perat
ing
instru
ction
s for
type
s of
batte
ry to
be us
ed
A
B
+ Symbol
Slot
Tab
Caution: Danger of explosion if battery is incorrectly replaced. Replaceonly with the same or equivalent type.
AM253543_03_V.PDF October 16, 2001 7
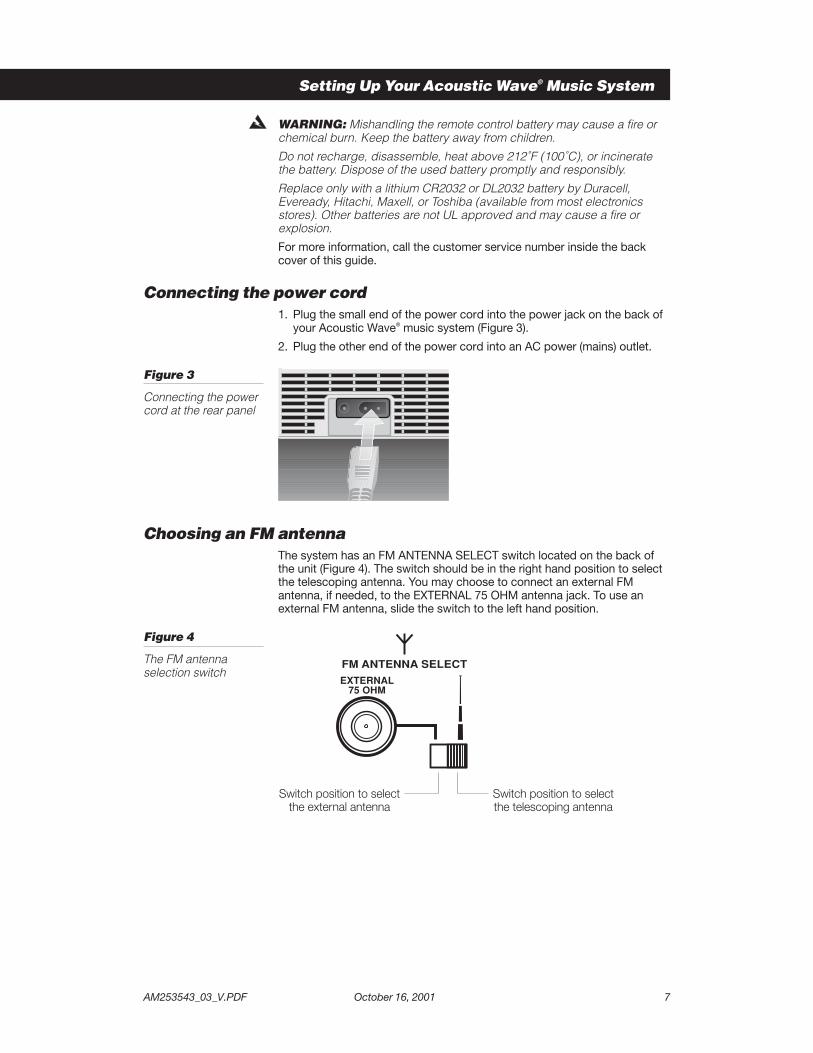
Choosing an FM antennaThe system has an FM ANTENNA SELECT switch located on the back ofthe unit (Figure 4). The switch should be in the right hand position to selectthe telescoping antenna. You may choose to connect an external FMantenna, if needed, to the EXTERNAL 75 OHM antenna jack. To use anexternal FM antenna, slide the switch to the left hand position.
Figure 4
The FM antennaselection switch
Setting Up Your Acoustic Wave® Music System
WARNING: Mishandling the remote control battery may cause a fire orchemical burn. Keep the battery away from children.
Do not recharge, disassemble, heat above 212˚F (100˚C), or incineratethe battery. Dispose of the used battery promptly and responsibly.
Replace only with a lithium CR2032 or DL2032 battery by Duracell,Eveready, Hitachi, Maxell, or Toshiba (available from most electronicsstores). Other batteries are not UL approved and may cause a fire orexplosion.
For more information, call the customer service number inside the backcover of this guide.
Connecting the power cord1. Plug the small end of the power cord into the power jack on the back of
your Acoustic Wave® music system (Figure 3).
2. Plug the other end of the power cord into an AC power (mains) outlet.
Figure 3
Connecting the powercord at the rear panel
FM ANTENNA SELECT
EXTERNAL75 OHM
Switch position to selectthe telescoping antenna
Switch position to selectthe external antenna

8 October 16, 2001 AM253543_03_V.PDF
Operating Your Acoustic Wave® Music System
Operating with the remote controlYou can use the remote control (Figure 5) to operate most functions of yourAcoustic Wave® music system. For CD repeat and random play modes,however, you need to use the CD Mode button on the system control panel.
If the remote stops operating, or its range seems reduced, try replacing thebattery. However, keep in mind that lighting and other room conditions, inaddition to battery age, can affect the operating range of an infrared remotecontrol.
Note: The remote control feature does not work when operating yourAcoustic Wave® music system on battery power. This function is disabledto conserve battery power. See “Operating on battery power” on page 10.
Figure 5
The Acoustic Wave®
music system remotecontrol
Acoustic Wave Music System
1
2
3
4
5
Presets
SkipScan
SeekTune
OnOff
FM
AM
AUX
CD
Volume
Mute
Press to play orpause a CD.
Press to stopthe CD player.
Press to play next/previous CD track.Press and hold to scan forward/backward through CD tracks.
Press and hold toraise or lower thesystem volume.
Press to play anauxiliary source
connected to yoursystem.
Press to turn the systemon to the last source
selected, or off.
Press to turn on theradio to the last AM/FM
station selected.
Press briefly to tune the next strongstation, or press and hold until you
reach the desired station.
Press to tune to apreset radio station.
Press to silencethe music system.

AM253543_03_V.PDF October 16, 2001 9
Operating Your Acoustic Wave® Music System
Operating with the control panelThe control panel (Figure 6) has all the same keys as the remote controlexcept that instead of the Mute button, the control panel has a CD Modebutton to select CD random and repeat play modes.
Figure 6
The Acoustic Wave®
music system controlpanel
1 2 3 4 5
FM AM
Seek/TuneVolume
On/OffAUX
Presets
CD Play/Pause Stop Skip/Scan CD Mode
Acoustic Wave Music System
FMAMCDAUX VOLUME MUTE
PRESET
TRACK
STEREOREPEAT TRACKREPEAT DISC RANDOM
CD Play/Pause Stop Skip/Scan CD Mode
1 2 3 4 5
FM AM
Seek/TuneVolume
On/OffAUX
Presets
Press to playor pause a
CD.
Press to stopthe CD player.
Press to play previous/next CD track. Press and holdto scan backward/forward through CD tracks.
Press a number to tuneto a preset radio station.
Press and hold to raiseor lower the system
volume.
Press to turn on the radio to thelast AM/FM station selected.
Press to play an auxiliarysource connected to
your system.
Press to turn the system on tothe last source selected, or off.
CD compartment:Press and release to open.
Display window
Press to changethe CD play
mode.
Press briefly to tune thenext strong station, or
press and hold until youreach the desired station.
10 October 16, 2001 AM253543_03_V.PDF
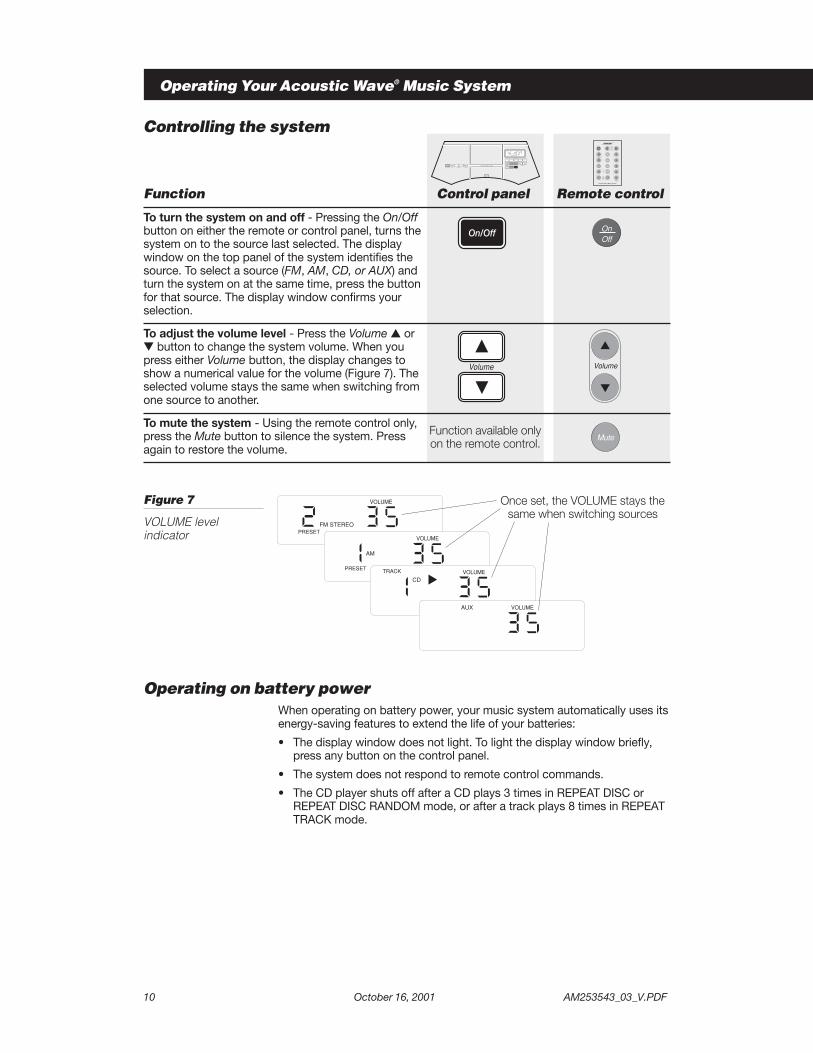
Controlling the system
Function Control panel Remote control
To turn the system on and off - Pressing the On/Offbutton on either the remote or control panel, turns thesystem on to the source last selected. The displaywindow on the top panel of the system identifies thesource. To select a source (FM, AM, CD, or AUX) andturn the system on at the same time, press the buttonfor that source. The display window confirms yourselection.
To adjust the volume level - Press the Volume � or� button to change the system volume. When youpress either Volume button, the display changes toshow a numerical value for the volume (Figure 7). Theselected volume stays the same when switching fromone source to another.
To mute the system - Using the remote control only,press the Mute button to silence the system. Pressagain to restore the volume.
Figure 7
VOLUME levelindicator
Operating Your Acoustic Wave® Music System
FM
VOLUME
PRESETSTEREO
AM
VOLUME
PRESET
CDVOLUMETRACK
AUX VOLUME
Once set, the VOLUME stays thesame when switching sources
Acoustic Wave Music System
FMAMCDAUX VOLUME MUTE
PRESET
TRACK
STEREOREPEAT TRACKREPEAT DISC RANDOM
CD Play/Pause Stop Skip/Scan CD Mode
1 2 3 4 5
FM AM
Seek/TuneVolume
On/OffAUX
Presets
Acoustic Wave Music System
1
2
3
4
5
Presets
SkipScan
SeekTune
OnOff
FM
AM
AUX
CD
Volume
Mute
On/Off OnOff
Volume Volume
MuteFunction available onlyon the remote control.
Operating on battery powerWhen operating on battery power, your music system automatically uses itsenergy-saving features to extend the life of your batteries:
• The display window does not light. To light the display window briefly,press any button on the control panel.
• The system does not respond to remote control commands.
• The CD player shuts off after a CD plays 3 times in REPEAT DISC orREPEAT DISC RANDOM mode, or after a track plays 8 times in REPEATTRACK mode.
AM253543_03_V.PDF October 16, 2001 11
Operating Your Acoustic Wave® Music System
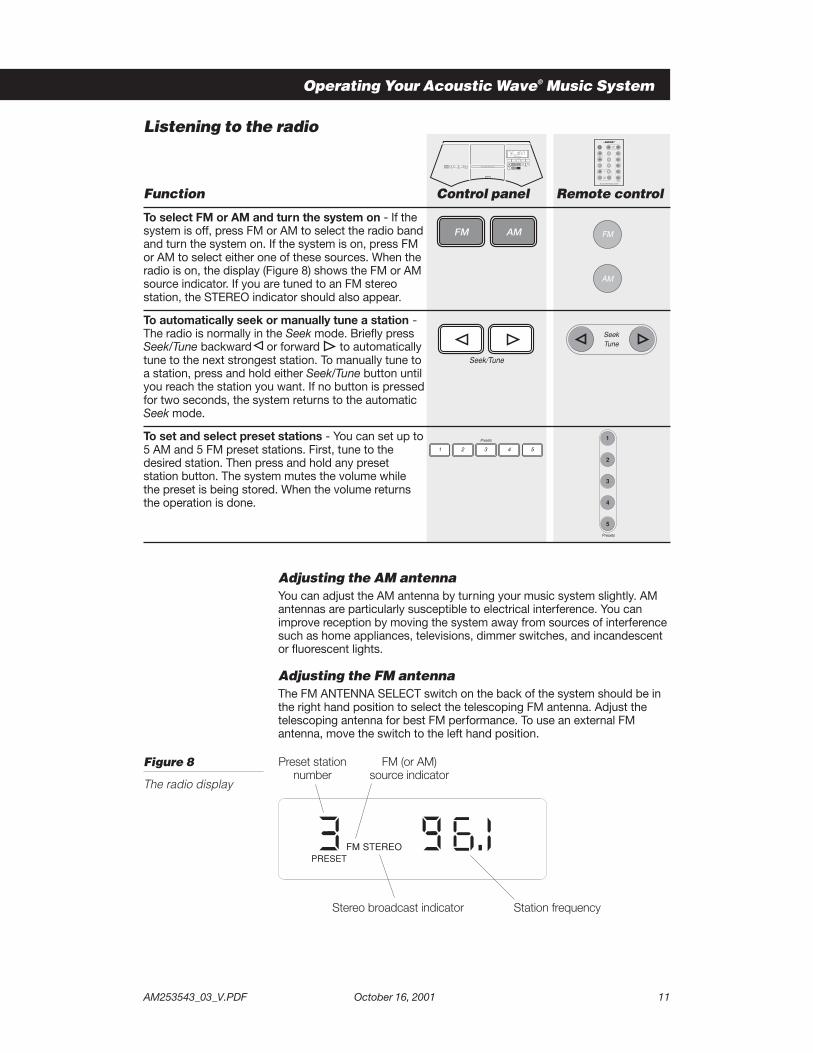
Listening to the radio
Function Control panel Remote control
To select FM or AM and turn the system on - If thesystem is off, press FM or AM to select the radio bandand turn the system on. If the system is on, press FMor AM to select either one of these sources. When theradio is on, the display (Figure 8) shows the FM or AMsource indicator. If you are tuned to an FM stereostation, the STEREO indicator should also appear.
To automatically seek or manually tune a station -The radio is normally in the Seek mode. Briefly pressSeek/Tune backward or forward to automaticallytune to the next strongest station. To manually tune toa station, press and hold either Seek/Tune button untilyou reach the station you want. If no button is pressedfor two seconds, the system returns to the automaticSeek mode.
To set and select preset stations - You can set up to5 AM and 5 FM preset stations. First, tune to thedesired station. Then press and hold any presetstation button. The system mutes the volume whilethe preset is being stored. When the volume returnsthe operation is done.
Adjusting the AM antennaYou can adjust the AM antenna by turning your music system slightly. AMantennas are particularly susceptible to electrical interference. You canimprove reception by moving the system away from sources of interferencesuch as home appliances, televisions, dimmer switches, and incandescentor fluorescent lights.
Adjusting the FM antennaThe FM ANTENNA SELECT switch on the back of the system should be inthe right hand position to select the telescoping FM antenna. Adjust thetelescoping antenna for best FM performance. To use an external FMantenna, move the switch to the left hand position.
Figure 8
The radio display
FMPRESET
STEREO
Preset stationnumber
FM (or AM)source indicator
Stereo broadcast indicator Station frequency
Acoustic Wave Music System
FMAMCDAUX VOLUME MUTE
PRESET
TRACK
STEREOREPEAT TRACKREPEAT DISC RANDOM
CD Play/Pause Stop Skip/Scan CD Mode
1 2 3 4 5
FM AM
Seek/TuneVolume
On/OffAUX
Presets
Acoustic Wave Music System
1
2
3
4
5
Presets
SkipScan
SeekTune
OnOff
FM
AM
AUX
CD
Volume
Mute
FM AM FM
AM
Seek/Tune
SeekTune
1
2
3
4
5
Presets
1 2 3 4 5
Presets
12 October 16, 2001 AM253543_03_V.PDF
Acoustic Wave Music System
1
2
3
4
5
Presets
SkipScan
SeekTune
OnOff
FM
AM
AUX
CD
Volume
Mute
CD Mode
CD Play/Pause
Stop
Using the CD playerPress the tab on the top of the CD compartment cover and release to open(Figure 9). Insert a CD, label side up, into the player. Push the cover downto close it. If the system is on when you load a disc, the display brieflyshows the total play time on the CD (Figure 10) and the CD begins to play.
Figure 9
Loading a CD
Acoustic Wave Music System
FMAMCDAUX VOLUME MUTE
PRESET
TRACK
STEREOREPEAT TRACKREPEAT DISC RANDOM
CD Play/Pause Stop Skip/Scan CD Mode
1 2 3 4 5
FM AM
Seek/TuneVolume
On/OffAUX
Presets
CD Play/Pause
Operating Your Acoustic Wave® Music System
Function available onlyon the control panel.
PRESETS
1
2
3
4
5
1
FM
AM
‹›
1
AUX
ON/OFFSEEK/TUNE
VOLUME
CD PLAY/PAUSE
RANDOM REPEAT
STOP
SKIP/SCAN
PRESETS
1
2
3
4
5
1
FM
AM
‹›
1
AUX
ON/OFFSEEK/TUNE
VOLUME
CD PLAY/PAUSE
RANDOM REPEAT
STOP
SKIP/SCAN
Function Control panel Remote control
To select the CD player and turn on the system - Ifthe system is off, load a CD into the compartment andpress the CD Play/Pause button to select the CDplayer and turn on the system. If the system is on,press CD Play/Pause to select this source.
To play or pause the CD - Press CD Play/Pause .The CD starts playing and the display briefly showsthe total number of tracks on the CD and the totalplaying time (Figure 10). If there is no CD in thecompartment, the word “DISC” flashes on the display.If there is a disc, the display shows the current trackplaying and elapsed play time. While a CD is playing,press CD Play/Pause to pause the CD. PressCD Play/Pause again to resume play.
To stop the CD - Press Stop �. In the displaywindow, the track number and elapsed time bothreturn to zero.
To skip/scan through a CD - Press the Skip/Scanbackward or forward button to play thenext or previous track. The display shows the newtrack number and elapsed time. Press and hold thebackward or forward button to scanthrough a CD. Continue holding to scan the next orprevious track(s).
To change the play mode - Press the CD Modebutton to select a repeat/random play mode:• RANDOM – plays all tracks in random order.• REPEAT DISC RANDOM – continuously plays all tracks in random order until stopped.• REPEAT DISC – plays the CD continuously until stopped.• REPEAT TRACK – plays the current track continuously until stopped.
PRESETS
1
2
3
4
5
1
FM
AM
‹›
1
AUX
ON/OFFSEEK/TUNE
VOLUME
ACOUSTIC WAVE® MUSIC SYSTEM
CD PLAY/PAUSE
RANDOM REPEAT
STOP
SKIP/SCAN
Skip/Scan
SkipScan
AM253543_03_V.PDF October 16, 2001 13
Operating Your Acoustic Wave® Music System
Function Control panel Remote control
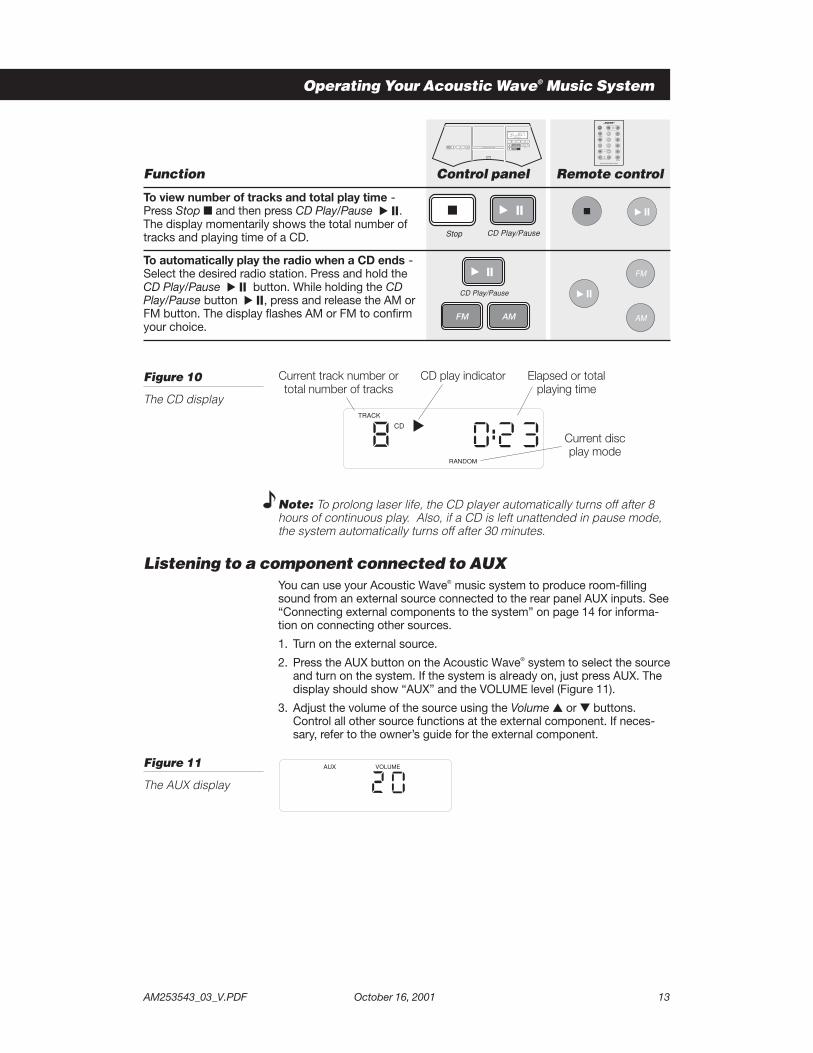
To view number of tracks and total play time -Press Stop � and then press CD Play/Pause .The display momentarily shows the total number oftracks and playing time of a CD.
To automatically play the radio when a CD ends -Select the desired radio station. Press and hold theCD Play/Pause button. While holding the CDPlay/Pause button , press and release the AM orFM button. The display flashes AM or FM to confirmyour choice.
Figure 10
The CD display
Stop CD Play/Pause
CD Play/Pause
FM AM
FM
AM
Note: To prolong laser life, the CD player automatically turns off after 8hours of continuous play. Also, if a CD is left unattended in pause mode,the system automatically turns off after 30 minutes.
Listening to a component connected to AUXYou can use your Acoustic Wave® music system to produce room-fillingsound from an external source connected to the rear panel AUX inputs. See“Connecting external components to the system” on page 14 for informa-tion on connecting other sources.
1. Turn on the external source.
2. Press the AUX button on the Acoustic Wave® system to select the sourceand turn on the system. If the system is already on, just press AUX. Thedisplay should show “AUX” and the VOLUME level (Figure 11).
3. Adjust the volume of the source using the Volume � or � buttons.Control all other source functions at the external component. If neces-sary, refer to the owner’s guide for the external component.
Figure 11
The AUX display
AUX VOLUME
CD
TRACK
RANDOM
Current track number ortotal number of tracks
CD play indicator Elapsed or totalplaying time
Current discplay mode
Acoustic Wave Music System
FMAMCDAUX VOLUME MUTE
PRESET
TRACK
STEREOREPEAT TRACKREPEAT DISC RANDOM
CD Play/Pause Stop Skip/Scan CD Mode
1 2 3 4 5
FM AM
Seek/TuneVolume
On/OffAUX
Presets
Acoustic Wave Music System
1
2
3
4
5
Presets
SkipScan
SeekTune
OnOff
FM
AM
AUX
CD
Volume
Mute

14 October 16, 2001 AM253543_03_V.PDF
Using External Components
AUX IN MIC LINE OUT
L
R
Connecting external components to the systemYou can connect other components to the rear panel of your AcousticWave® system (Figure 12).
CAUTION: Turn off the power to the system and any component beinginstalled before making connections.
Figure 12
Rear panel input/output connections
Using a CD player, VCR, tape deck, or TV1. Plug one end of the stereo audio cable supplied with your Acoustic
Wave® music system into the output jacks of the component.
2. Plug the other end of the cable into the AUX IN jacks of your musicsystem.
3. Press the AUX button to select the external component.
Note: If the component has a mono output, use a Y-adapter cable toconnect the single mono output of the component to the stereo audiocable. If you need help finding a Y-adapter cable, call the customerservice number inside the back cover.
Note: To prevent interference with the screen image, keep the musicsystem at least one foot (30 cm) from a television or computer monitor.
Using a turntableTo connect a turntable, you need a phono preamplifier with RIAA equaliza-tion.
1. Plug the turntable cable into the preamplifier.
2. Plug one end of the stereo audio cable supplied with your AcousticWave® music system into the output jacks of the preamplifier. Match thered plug to R (right) and black or white plug to L (left).
3. Plug the other end of the stereo cable into the AUX IN jacks of yourmusic system. Match the red plug to R (right) and black or white plug toL (left).
4. Press the AUX button to select the turntable.
Line inputs for a CD player,VCR, tape deck, TV, turntable,
or Lifestyle® system
Line outputsfor a tape deck
or poweredspeakers
Inputs for the Bose®
powered microphone
AM253543_03_V.PDF October 16, 2001 15
Using the system as expansion speakersYou can use your Acoustic Wave® music system as expansion speakers fora Lifestyle® music system. To do this, connect the output of the Lifestyle®
music system to the AUX IN jacks of your Acoustic Wave® music system.Refer to the owner’s guide for your Lifestyle® system for wiring information.
Using the Bose® powered microphoneFollow the instructions for your Bose powered microphone to connect tothe MIC jacks. This allows you to mix the microphone with any selectedsource.
• For public address, select AUX.
• For karaoke, insert a CD and press CD Play/Pause. The CD plays whileyou sing along.
Using External Components
16 October 16, 2001 AM253543_03_V.PDF
Maintaining Your Acoustic Wave® Music System
Taking care of your Acoustic Wave® music systemThe only necessary maintenance is cleaning and periodic batteryreplacement.
Handling CDsHandle discs by their edges to prevent fingerprints andscratches.
To remove stains or fingerprints from the surface of a discuse a soft, lint-free, dry cloth. Wipe in straight movementsfrom the center of the disc to the outside. Do not use anychemical products; they can damage the disc.
Do not write on, or attach labels to the surface of the disc.
To minimize exposure to dust and dirt, replace discs intheir cases after use. Store each disc in its case, out ofdirect sunlight, high temperatures, and humidity.
Cleaning the enclosureUse only a cloth to clean the outside of your Acoustic Wave® music system.If necessary, you may use a soft-bristled attachment to gently vacuum thefront of the unit.
Do not use any solvents, chemicals, or cleaning solutions containingalcohol, ammonia, or abrasives. Do not spray cleaners directly on the musicsystem. Do not allow liquids to spill into any openings on the case.
If liquids get into the product, turn it off. Call Bose® Customer Service assoon as possible to arrange for service (see phone numbers on inside backcover).
Replacing batteries WARNING: Keep the remote control battery away from children. It may
cause a fire or chemical burn if mishandled. Do not recharge, disas-semble, heat above 212˚F (100˚C), or incinerate. Dispose of used batterypromptly. Replace only with a lithium CR2032 or DL2032 battery byDuracell, Eveready, Hitachi, Maxell, or Toshiba (available from mostelectronics stores).
To ensure correct operation of your Acoustic Wave® system, replace thebattery in the remote every year and following an extended power loss. Adead battery may leak and cause damage. For instructions on replacing thebattery, see “Installing the remote control battery” on page 6.
Technical information
Dimensions10.5"H x 18"W x 6.5"D (26.7cm x 45.7cm x 19.1cm)
Product weight14.5 lb (6.5 kg)
Power ratingUSA/Canada: 120VAC, 50/60Hz
International: 220-240VAC, 50/60Hz
12-15VDC

AM253543_03_V.PDF October 16, 2001 17
Troubleshooting
Problem Solution
No system operation Make sure power cord is completely plugged into both the system andthe wall outlet.
FM reception is poor • An external antenna may be needed. Call the customer service numberinside the back cover.
• If the external antenna is not connected, be sure the switch is selectingthe telescoping antenna.
No remote control • If the system is on battery power, return to regular AC power.
• Replace the remote control battery. Follow the battery replacementprocedure on page 6.
Display does not light Return to regular AC power or press any button to briefly light the display.
CD does not play • Make sure a CD is in the compartment, label side up.
• Make sure the CD compartment is closed.• Clean the CD as described on page 16.
CD skips If the unit is getting bumped, place it where it is less likely to be bumpedor jolted.
Customer serviceFor additional help in solving problems, contact Bose Customer Service.See the inside back cover for office locations and phone numbers.
Maintaining Your Acoustic Wave® Music System
18 October 16, 2001 AM253543_03_V.PDF
Limited warrantyThe Bose® Acoustic Wave® music system is covered by a limited 1-yeartransferable warranty.
What is covered:All parts defective in material or workmanship.
For how long:One year from the purchase date.
What we will do:We will, at our sole option, repair or replace any defective parts free ofcharge.
What you must do:1. Call Bose Customer Service and ask for shipping instructions.
2. Properly pack the unit, if possible, in the original carton for shipping.
Other conditions:This warranty is fully transferable for the one year period followingpurchase.
THE PROVISIONS OF THIS WARRANTY ARE IN LIEU OF ANY OTHER WARRANTY,WHETHER EXPRESS OR IMPLIED, WRITTEN OR ORAL, INCLUDING ANYWARRANTY OF MERCHANTABILITY OR FITNESS FOR A PARTICULAR PURPOSE.BOSE’S MAXIMUM LIABILITY SHALL NOT EXCEED THE ACTUAL PURCHASEPRICE PAID BY YOU FOR THE PRODUCT. IN NO EVENT SHALL BOSE BE LIABLEFOR SPECIAL, INCIDENTAL, CONSEQUENTIAL, OR INDIRECT DAMAGES.
This warranty does not cover a defect that has resulted from improper orunreasonable use or maintenance, accident, improper packing, or unautho-rized tampering, alteration, or modification as determined solely by us. Thiswarranty is void if the label bearing the serial number has been removed ordefaced.

AM253543_03_V.PDF October 16, 2001 19
Bose® Corporation

©2001 Bose Corporation, The Mountain,Framingham, MA 01701-9168 USA253543 AM Rev . 03 JN10846