
About the DVD - Alfred Music If you have completed Alfred’s Kid’s Drum Course, you are now ready...
5
Choosing a Drumset to Use with This Book 3 The Basic Drumset Setup 3 The Throne 3 The Snare Drum 3 The Tom-Tom 4 The Ride Cymbal 4 Tuning Your Drums 4 The Drumset 5 Basic Four-Piece Setup 5 Drumset Notation 5 Basic Music Notation Review6 Getting Ready to Play 6 Reading Music Notation 6 Basic Playing Techniques 7 Let’s Review the Matched Grip 7 Striking the Drum 8 Striking the Ride Cymbal 8 The Bass Drum 9 The Hi-Hat 9 Practice Warm-up 9 Jump Back 10 Practice Warm-up 11 Howlin’ Dog 11 Introducing Drum Fills 12 Drum Fill Practice Loop 12 Review: Measure Repeat Sign 13 Trash Truck 13 Spy Rock 14 Review: Dotted Notes 15 Practice Warm-up 15 Mozart Rocks! 15 Introducing the Cross-Stick 16 The Lone Star Trail 16 Introducing the Two-Beat Rhythm 17 The Yellow Rose of Texas 17 Introducing Two-Bar Fills 18 Two-Bar Fill Practice Loop 18 Rockin’ 1812 Overture 19 Introducing the Double Paradiddle and the Paradiddle-Diddle 20 New Rudiment Practice Loop 20 Introducing the Fermata 20 Introducing Ties 20 Introducing First and Second Endings 21 Dad’s Classic Car 21 Review: The Sixteenth Note 22 Funky Beat 22 Practice Warm-up 23 Daisy Bell 23 Sixteenth-Note Fill Practice Loop 24 Boogie Blues 25 Practice Warm-up 26 Let’s Dance 26 Two-Bar Fills Using Sixteenth Notes 27 Two-Bar Fill Practice Loop 27 Flyin’ High 28 Review: Syncopation 29 Cleaning Up! 30 Cruisin’ 31 Introducing 12/8 Time 32 Practice Warm-up 32 Sweetheart Blues 33 Aura Lee 34 America, the Beautiful 35 Swingin’ Hard 36 A Brief History of Dixieland 37 When the Saints Go Marching In 37 Review: Jazz 38 London Bridge 38 Introducing Triplets 39 The Basic Jazz Ride Rhythm 39 Jazz Independence Warm-up 40 A Swing and a Miss 41 Introducing Jazz Fills 42 One-Bar Jazz Fill Practice Loop . . . . . . . 42 A-Tisket, A-Tasket 43 Trading 2’s and 4’s 44 Tradin’ the Blues 44 CATch Me If You Can 45 Practice Tips 46 Certificate of Completion 47 2 The Alfred's Kid's Drumset Course DVD contains all the instruction in the book plus video demonstra- tions of each song and exercise. Be sure to take full advantage of the method by following along with the book as you watch the DVD. MP3 audio tracks of the examples in the book are also provided for listening and playing along. To access the MP3 files, follow the instructions in the DVD-ROM menu. About the DVD
Transcript of About the DVD - Alfred Music If you have completed Alfred’s Kid’s Drum Course, you are now ready...
Choosing a Drumset to Use with This Book . . . 3The Basic Drumset Setup . . . . . . . . . . . . 3The Throne . . . . . . . . . . . . . . . . . . . . . . . 3The Snare Drum . . . . . . . . . . . . . . . . . . . 3The Tom-Tom . . . . . . . . . . . . . . . . . . . . . 4The Ride Cymbal . . . . . . . . . . . . . . . . . . . 4Tuning Your Drums . . . . . . . . . . . . . . . . . 4
The Drumset . . . . . . . . . . . . . . . . . . . . . . . . . . . 5Basic Four-Piece Setup . . . . . . . . . . . . . . 5Drumset Notation . . . . . . . . . . . . . . . . . . 5
Basic Music Notation Review . . . . . . . . . . . . . . . 6Getting Ready to Play . . . . . . . . . . . . . . . 6Reading Music Notation . . . . . . . . . . . . . 6
Basic Playing Techniques . . . . . . . . . . . . . . . . . . 7Let’s Review the Matched Grip . . . . . . . . 7Striking the Drum . . . . . . . . . . . . . . . . . . 8Striking the Ride Cymbal . . . . . . . . . . . . . 8The Bass Drum . . . . . . . . . . . . . . . . . . . . 9The Hi-Hat . . . . . . . . . . . . . . . . . . . . . . . 9Practice Warm-up . . . . . . . . . . . . . . . . . . 9Jump Back . . . . . . . . . . . . . . . . . . . . . . . . 10Practice Warm-up . . . . . . . . . . . . . . . . . 11Howlin’ Dog . . . . . . . . . . . . . . . . . . . . . . 11
Introducing Drum Fills . . . . . . . . . . . . . . . . . . . 12Drum Fill Practice Loop . . . . . . . . . . . . 12
Review: Measure Repeat Sign . . . . . . . . . . . . . 13Trash Truck . . . . . . . . . . . . . . . . . . . . . . . 13Spy Rock . . . . . . . . . . . . . . . . . . . . . . . . . 14
Review: Dotted Notes . . . . . . . . . . . . . . . . . . . 15Practice Warm-up . . . . . . . . . . . . . . . . . 15Mozart Rocks! . . . . . . . . . . . . . . . . . . . . . 15
Introducing the Cross-Stick . . . . . . . . . . . . . . . 16The Lone Star Trail . . . . . . . . . . . . . . . . . 16
Introducing the Two-Beat Rhythm . . . . . . . . . 17The Yellow Rose of Texas . . . . . . . . . . . . . . 17
Introducing Two-Bar Fills . . . . . . . . . . . . . . . . . 18Two-Bar Fill Practice Loop . . . . . . . . . . 18Rockin’ 1812 Overture . . . . . . . . . . . . . . . 19
Introducing the Double Paradiddle and the Paradiddle-Diddle . . . . . . . . . . . . . . 20
New Rudiment Practice Loop . . . . . . . . 20
Introducing the Fermata . . . . . . . . . . . . . . . . . 20 Introducing Ties . . . . . . . . . . . . . . . . . . . . . . . . 20Introducing First and Second Endings . . . . . . . 21
Dad’s Classic Car . . . . . . . . . . . . . . . . . . . 21Review: The Sixteenth Note . . . . . . . . . . . . . . . 22
Funky Beat . . . . . . . . . . . . . . . . . . . . . . . 22Practice Warm-up . . . . . . . . . . . . . . . . . 23Daisy Bell . . . . . . . . . . . . . . . . . . . . . . . . 23Sixteenth-Note Fill Practice Loop . . . . . 24Boogie Blues . . . . . . . . . . . . . . . . . . . . . . 25Practice Warm-up . . . . . . . . . . . . . . . . . 26Let’s Dance . . . . . . . . . . . . . . . . . . . . . . . 26
Two-Bar Fills Using Sixteenth Notes . . . . . . . 27Two-Bar Fill Practice Loop . . . . . . . . . . 27Flyin’ High . . . . . . . . . . . . . . . . . . . . . . . 28
Review: Syncopation . . . . . . . . . . . . . . . . . . . . 29Cleaning Up! . . . . . . . . . . . . . . . . . . . . . . 30Cruisin’ . . . . . . . . . . . . . . . . . . . . . . . . . . 31
Introducing 12/8 Time . . . . . . . . . . . . . . . . . . . 32Practice Warm-up . . . . . . . . . . . . . . . . . 32Sweetheart Blues . . . . . . . . . . . . . . . . . . . 33Aura Lee . . . . . . . . . . . . . . . . . . . . . . . . . 34America, the Beautiful . . . . . . . . . . . . . . . 35Swingin’ Hard . . . . . . . . . . . . . . . . . . . . . 36
A Brief History of Dixieland . . . . . . . . . . . . . . 37When the Saints Go Marching In . . . . . . . . 37
Review: Jazz . . . . . . . . . . . . . . . . . . . . . . . . . . . 38London Bridge . . . . . . . . . . . . . . . . . . . . . 38
Introducing Triplets . . . . . . . . . . . . . . . . . . . . . 39The Basic Jazz Ride Rhythm . . . . . . . . . . 39Jazz Independence Warm-up . . . . . . . . . 40A Swing and a Miss . . . . . . . . . . . . . . . . . 41
Introducing Jazz Fills . . . . . . . . . . . . . . . . . . . . 42One-Bar Jazz Fill Practice Loop . . . . . . . 42A-Tisket, A-Tasket . . . . . . . . . . . . . . . . . . 43
Trading 2’s and 4’s . . . . . . . . . . . . . . . . . . . . . 44Tradin’ the Blues . . . . . . . . . . . . . . . . . . . 44CATch Me If You Can . . . . . . . . . . . . . . . . 45
Practice Tips . . . . . . . . . . . . . . . . . . . . . . . . . . . 46Certificate of Completion . . . . . . . . . . . . . . . . . 47
2
The Alfred's Kid's Drumset Course DVD contains all the instruction in the book plus video demonstra-tions of each song and exercise. Be sure to take full advantage of the method by following along with the book as you watch the DVD. MP3 audio tracks of the examples in the book are also provided for listening and playing along. To access the MP3 files, follow the instructions in the DVD-ROM menu.
About the DVD
3
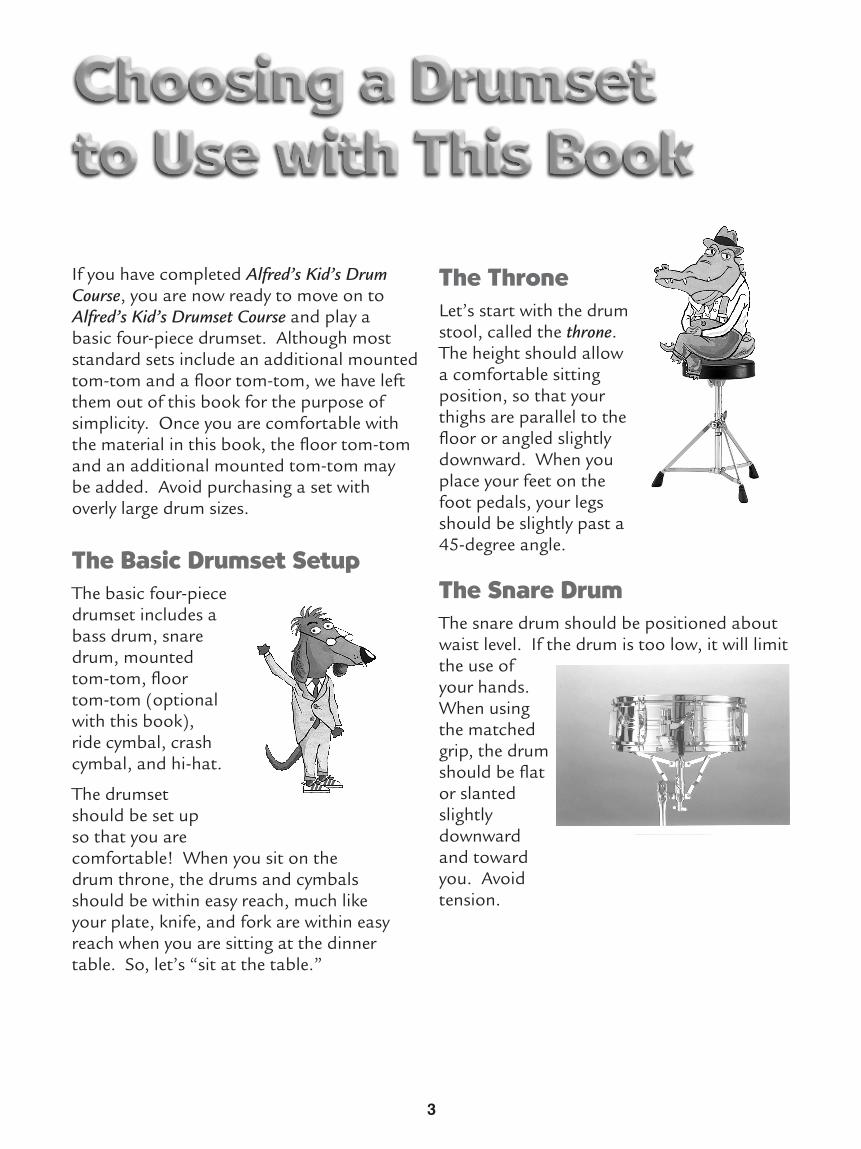
If you have completed Alfred’s Kid’s Drum Course, you are now ready to move on to Alfred’s Kid’s Drumset Course and play a basic four-piece drumset . Although most standard sets include an additional mounted tom-tom and a floor tom-tom, we have left them out of this book for the purpose of simplicity . Once you are comfortable with the material in this book, the floor tom-tom and an additional mounted tom-tom may be added . Avoid purchasing a set with overly large drum sizes .
The Basic Drumset SetupThe basic four-piece drumset includes a bass drum, snare drum, mounted tom-tom, floor tom-tom (optional with this book), ride cymbal, crash cymbal, and hi-hat .
The drumset should be set up so that you are comfortable! When you sit on the drum throne, the drums and cymbals should be within easy reach, much like your plate, knife, and fork are within easy reach when you are sitting at the dinner table . So, let’s “sit at the table .”
The ThroneLet’s start with the drum stool, called the throne . The height should allow a comfortable sitting position, so that your thighs are parallel to the floor or angled slightly downward . When you place your feet on the foot pedals, your legs should be slightly past a 45-degree angle .
The Snare DrumThe snare drum should be positioned about waist level . If the drum is too low, it will limit the use of your hands . When using the matched grip, the drum should be flat or slanted slightly downward and toward you . Avoid tension .

4
The Tom-TomA mounted tom-tom should be positioned so there are no large gaps in height between the drumheads . It should also be tilted slightly towards you so the drumstick clears the rim when striking the head . This will make the movements between the snare drum and the tom-tom smooth .
The Ride CymbalThe ride cymbal should be placed to the right of your drumset . It should be positioned so that when you extend your arm (like for a handshake), the stick will strike two to four inches from the edge of the cymbal .
Tuning Your DrumsProper tuning of your drums is important to achieve a good sound . There are many things to consider before tuning your drums . First, make sure your drumheads are in good shape . If they’re not, replace them with new heads . Before selecting a particular type of drumhead, it is important to decide which style of music you will be playing (rock, jazz, country, R&B, etc .) .
Drumheads are held in place by wooden or metal counterhoops, and are adjusted by threaded rods . Tightening or loosening these rods will alter the tension of the heads .
The batter head is the top head of the snare drum, the top head of a tom-tom, and the back head of the bass drum . It is best to start with the batter head when tuning your drums .
Tension your drums so they sound high to low as you move from the snare drum to the bass drum .
When tuning your drums, we recommend using the cross-tension system because it maintains even tensioning around the drum during the entire tuning process . To tune your drums using this method, start with tension rod number 1 and tighten each screw one twist of the wrist at a time until the drumhead feels firm . Be sure not to tension any lug more than the others . Tap the head with a drumstick about two inches in from each rod to be certain the pitch is consistent around the drum . If it is not, adjust individual tension rods as needed .
Cross-Tension System of TensioningFor a more detailed reference guide on tuning, please refer to How to Tune Your Drums (Alfred item 20426) .
1
2
34
5
6
7
8
8
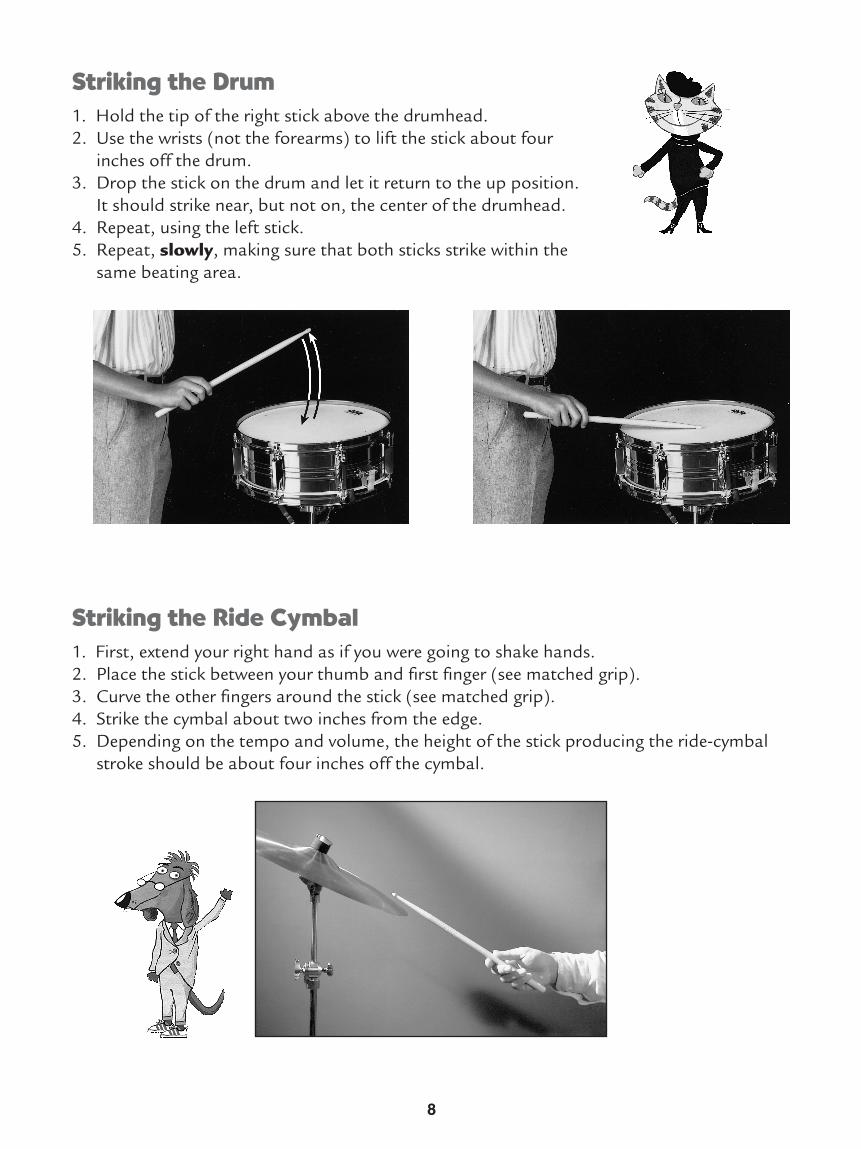
Striking the Ride Cymbal1 . First, extend your right hand as if you were going to shake hands .2 . Place the stick between your thumb and first finger (see matched grip) .3 . Curve the other fingers around the stick (see matched grip) .4 . Strike the cymbal about two inches from the edge .5 . Depending on the tempo and volume, the height of the stick producing the ride-cymbal
stroke should be about four inches off the cymbal .
Striking the Drum1 . Hold the tip of the right stick above the drumhead .2 . Use the wrists (not the forearms) to lift the stick about four
inches off the drum .3 . Drop the stick on the drum and let it return to the up position .
It should strike near, but not on, the center of the drumhead .4 . Repeat, using the left stick .5 . Repeat, slowly, making sure that both sticks strike within the
same beating area .

19
ã¿ ¿ ¿ ¿ ¿œ ¿ ¿ ¿œ ‰ Jœ Œ œ ‘ ‘ ‘
ã¿ ¿ ¿ ¿ ¿œ ¿ ¿ ¿œ ‰ Jœ Œ œ ‘
Fill
’ ’ ’ ’ ’ ’ ’ ’
ã¿ ¿ ¿ ¿ ¿œ ¿ ¿ ¿œ ‰ Jœ Œ œ ‘ ‘ ‘
ã¿ ¿ ¿ ¿ ¿œ ¿ ¿ ¿œ ‰ Jœ Œ œ ‘ ‘ ‘
ã ..¿ ¿ ¿ ¿ ¿œ ¿ ¿ ¿œ ‰ Jœ Œ œ ‘Fill
’’’’ ’’’’¿œ Œ Óœ
ã 44¿
Half-time rock (q = 120) (Play 2 times)
¿ ¿ ¿ ¿œ ¿ ¿ ¿œ ‰ Jœ Œ œ ‘ ‘ ‘
Rockin’ 1812 OvertureThis song is played using a half-time feel, which means that the beat will feel half as fast as the original tempo . Before playing along with the audio, practice this song alone until you are comfortable with it .
Track 12


