Abacus Quilt Pattern - · PDF fileAbacus Quilt Pattern 18. Repeat steps 14 through 17 to...
7
freespiritfabric.com makeitcoats.com Page 1 of 7 FS0204 Featuring the Moon Shine fabric collection by Tula Pink for FreeSpirit Fabrics Skill level: Easy The rows of chevrons are reminiscent of an abacus. Practice your counting skills on this fun quilt by Tula Pink. Quilt Approx: 80“ x 90” (203cm x 229cm) Supplies Fabrics from FreeSpirit Moon shine by Tula Pink MOONSHINE 24 Fat Quarters (45.5 cm x 56 cm), (see fabric pairing chart) CSFSESS.CREAM 2 ½ yds (2.3m) (for background) PWTP055.STRAW 8 ¼ yd (7/65m) (backing, extra for aligning print) PWTP061.TANGE 5/8 yd (.60m) (binding) Technique: Patchwork Brand: FreeSpirit fabric Crafting time: Longer Term Abacus Quilt Pattern
Transcript of Abacus Quilt Pattern - · PDF fileAbacus Quilt Pattern 18. Repeat steps 14 through 17 to...

freespiritfabric.com
makeitcoats.com
Page 1 of 7
FS0204
Featuring the Moon Shine fabric collection byTula Pink for FreeSpirit FabricsSkill level: Easy
The rows of chevrons are reminiscent of an abacus. Practice your counting skills on this fun quilt by Tula Pink.
Quilt Approx: 80“ x 90” (203cm x 229cm)
SuppliesFabrics from FreeSpirit Moon shine by Tula PinkMOONSHINE24 Fat Quarters (45.5 cm x 56 cm), (see fabric pairing chart)CSFSESS.CREAM 2 ½ yds (2.3m) (for background)PWTP055.STRAW 8 ¼ yd (7/65m) (backing, extra for aligning print)PWTP061.TANGE 5/8 yd (.60m) (binding)
Technique: Patchwork
Brand: FreeSpirit fabric
Crafting time: Longer Term
Abacus Quilt Pattern

Page 2 of 7
Copyright © 2014
Coats PLC freespiritfabric.com
makeitcoats.com
FS0204
CuttingFrom each fat quarter (1) 11½“ x 111⁄2” (29cm x 29cm) square(4) 57⁄8” x 57⁄8” (14.92cm x 14.92cm) square
From the background fabric(2) 11½ “ x 111⁄2” square (29cm x 29cm)(8) 57⁄8 x 57⁄8” square (14.92cm x 14.92 cm)(8) 101⁄2” x 26” rectangle (26.5cm x 66cm)
From the backing fabric(2) 148” x Width of Fabric (375.92 cm) From the binding fabric(9) 21⁄4” (6.5cm) x Width of Fabric
Instructions1. Draw a diagonal line from one corner
to the opposing corner of all 57⁄8” (14.92cm) squares (both the prints and the background fabrics).
2. Pair all 57⁄8” squares with their coordinating 111⁄2” (29 cm) square according to the fabric pairing chart.
3. Place two 57⁄8” (14.92cm) squares on opposing corners of the 111⁄2” (29 cm) square, right sides together, carefully lining up the outside corners of each piece and pin in place.
Abacus Quilt Pattern
4. Sew a scant ¼“ (6cm) seam on either side of the drawn line across all three fabric squares.
5. Cut across all three fabric squares ON the drawn line to create two identical units.
6. Fold the small triangles back so all fabrics are right side up and press.
7. Place the third coordinating 57⁄8” (14.92cm) square on the larger triangle, right sides together, carefully lining up the top point and sides with the drawn line running down the middle of the piece separating the two smaller triangles. Pin in place.
8. Sew a scant ¼“ (6cm) seam on either side of the drawn line.
9. Cut ON the drawn line creating two identical “flying geese” units.
10. Fold the small triangle back so all fabrics are right side up and press.
11. Repeat steps 7 through 10 to create two more identical units for a total of four identical units.
(26.5cm x 14 cm)

Page 3 of 7
Copyright © 2014
Coats PLC freespiritfabric.com
makeitcoats.com
FS0204
12. Repeat Steps 2 through 11 using all of the remaining fabric pairings to create a total of 104 complete flying geese units.
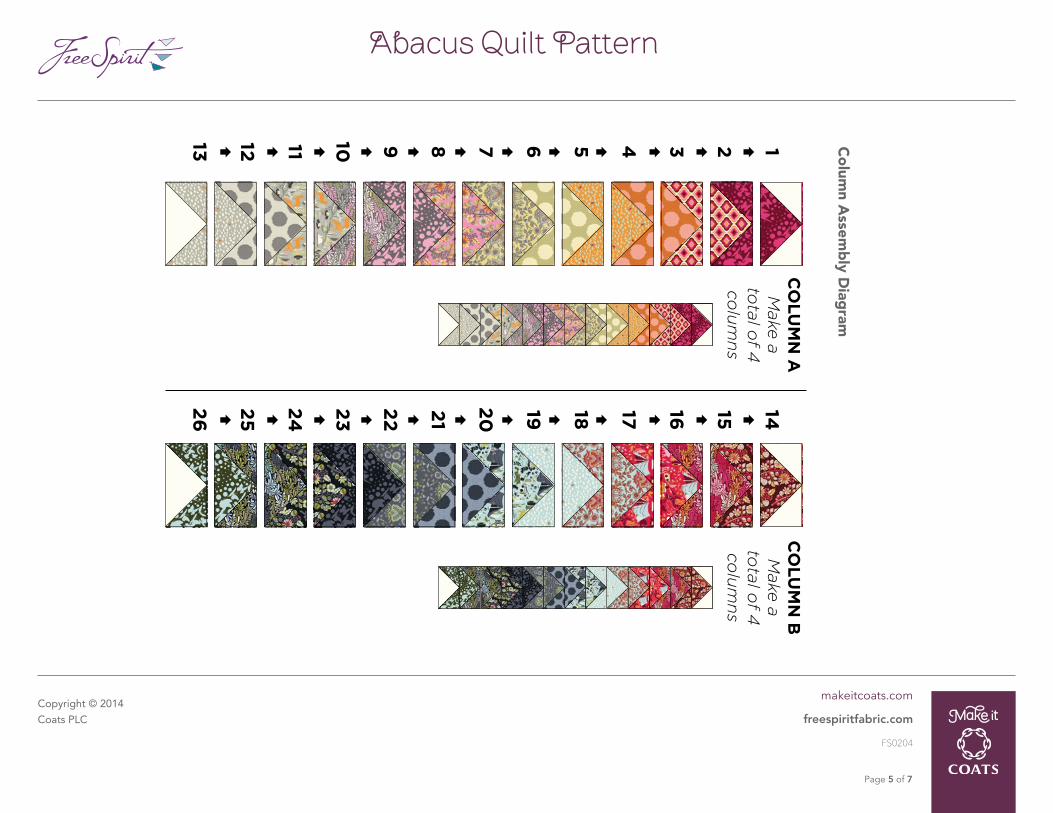
13. Assemble all flying geese units according to the column assembly diagram for a total of eight columns.
14. Sew one background 10½” x 26” (26.5cm x 14cm) rectangle to the top of one completed column along the 10-1/2”(26.5cm)” edge, right sides together.
15. Sew the remaining edge of the 10½” x 26” (26.5cm x 66cm) rectangle to the bottom of the column creating a closed circle or tube.
16. Cut RANDOMLY across the 101⁄2” (26.5cm) width on the BACKGROUND fabric only to create the visual effect of the chevrons sliding up and down the column.
17. Press the seams where the column meets the background fabric.
Abacus Quilt Pattern
18. Repeat steps 14 through 17 to create a total of 8 columns with background strips.
19. Sew all eight columns together according to the Quilt Top Assembly Diagram.

Page 4 of 7
Copyright © 2014
Coats PLC freespiritfabric.com
makeitcoats.com
FS0204
Abacus Quilt Pattern
Fabric P
airing C
hart
111⁄2” SQ
UA
RE
111⁄2” SQ
UA
RE
Page 5 of 7
Copyright © 2014
Coats PLC freespiritfabric.com
makeitcoats.com
FS0204
Abacus Quilt Pattern
Co
lumn A
ssemb
ly Diag
ram

Page 6 of 7
Copyright © 2014
Coats PLC freespiritfabric.com
makeitcoats.com
FS0204
Abacus Quilt Pattern
Quilt To
p A
ssemb
ly Diag
ram

Page 7 of 7
Copyright © 2014
Coats PLC freespiritfabric.com
makeitcoats.com
FS0204
Abacus Quilt Pattern
Simple Straight Grain, Tuck-In Binding 1. From the binding fabric cut (9) strips 2 1⁄4” (5.5cm) x
With of fabric.2. With RIGHT sides together overlap two strips at a 90°
angle. Stitch a diagonal line from one corner to the opposite corner and trim the excess fabric leaving a 1⁄4” (6mm) seam allowance. Press open.
3. Repeat to connect all 9 strips into one long binding strip.
4. Fold one end of the binding in and press to create a 45° angle with a clean folded edge.
5. Fold the binding strip in half and press.
6. Beginning with the angled end of binding strip, align the raw edges of the binding strip with the edge of the finished quilt, do not start at a corner. Using a walking foot and a 1⁄4” (6cm) seam allowance begin stitching the binding strip to the quilt as least 6” (15cm) down from the angled edge. Stitch down one side of the quilt stopping 1⁄4” (6cm) inch from the corner and backstitch.
7. Remove the quilt from the sewing machine. Fold the binding up, away from the quilt so that it forms a 45° angle. Fold the binding back down, over itself so the new fold is aligned with the edge of the quilt.
8. Begin sewing along the next edge starting 1⁄4” (6cm) from the folded edge. Continue to miter each corner as you come to it.
9. To finish the binding, tuck the end tail into the folded start tail and continue sewing until your stitch line has overlapped the beginning stitch line by at least 1” (2.5cm).
10. Fold the binding around to the back of the quilt. Use a coordinating thread color and hand stitch the binding in place so that it covers the machine stitch line. Use a basic whip stitch. Miter each corner as you come to it.