A5 Handbook Cover
44
OWNERS HANDBOOK ai157548216253_A5_Handbook Cover.pdf 1 04/12/2019 17:56
Transcript of A5 Handbook Cover

OWNERS HANDBOOK
ai157548216253_A5_Handbook Cover.pdf 1 04/12/2019 17:56

Contents3.p GNINRAW LARENEG3.p stnerap rof eton laiceps A
1. First4.ptiF ekiB.A4.ptsriF ytefaS.B5.pkcehC ytefaS lacinahceM.C7.pediR tsriF.D
2. Safety8.pscisaB ehT.A9.pytefaS gnidiR.B01.pytefaS daoR ffO.C01.pgnidiR rehtaeW teW.D11 .pgnidiR thgiN .E
F. Extreme, Stunt Or Competition Riding p. 12G. Changing Components Or Adding Accessories p. 13
3. Fit41.pthgieH revodnatS.A51.pnoitisoP elddaS.B71.pelgnA dnA thgieH rabeldnaH.C81.pstnemtsujdA noitisoP lortnoC.D81.phcaeR ekarB.E
4. Technical91.psleehW.A91.pesaeleR kciuQ leehW.1
2. Removing And Installing Quick Release Wheels p. 203. Removing And Installing Bolt-On Wheels p. 23
42.pesaeleR kciuQ tsoptaeS.B52.psekarB.C72.psraeG gnitfihS.D92.psladeP.E03.pnoisnepsuS elcyciB.F13.psebuT dna seryT.G
H. BMX Stunt Pegs p. 32
33.pslavretnI ecivreS.AB. If Your Bicycle Sustains An Impact p. 34
6. Children’s Bikes14.psnoitcurtsnI laicepS.A
Appendix A:Life Expectancy Of Your Bike And Its Components p. 35
NOTE:This manual is not intended as a comprehensive use, service, repair or maintenance manual. Please see your Halfords Bikehut store for all service, repairs or maintenance.
5. Servicing
Halfords Generic manual V4 2018 page 1

Halfords Generic manual V4 2018 page 2
IMPORTANT:This manual contains important safety, performance and service information. Read it before you take the first ride on your new bicycle, and keep it for reference. Additional safety, performance and service information for specific components such as suspension or pedals on your bicycle, or for accessories such as helmets or lights that you purchase, may also be available. Make sure that your Halfords Bikehut store has given you all the manufacturers’ literature that was included with your bicycle or accessories. If you have any questions or do not understand something, take responsibility for your own safety and consult with your Halfords Bikehut store.
Halfords Lifetime GuaranteeOur Limited Lifetime Cycle Guarantee includes free replacement of the frame and rigid forks of all Halfords and Halfords exclusive brands for the original owner. For any of our own brand bikes, providing the damage was down to a manufacturing defect, you can enjoy a lifetime of cover and a peace of mind. On top of this, we also cover all other components on the bike for 1 year unless the manufacturer states otherwise.
Paintwork – this has a 2 year guaranteeSuspension forks – these have a Guarantee from the manufacturer that’s normally 2 years.Other components – most components will usually carry their own Guarantee, ranging from 1 year upwards depending on the brand.
Failure of components caused by misuse, lack of servicing and/or care – looking after your bike is important. This includes keeping it clean, well serviced and using it for what it’s intended for. If you push a bike past what it was designed to do then you’re more likely to cause harm to the bike and disqualify your Guarantee rights.
Electric components – the Guarantee on these usually vary between 1 year and 2 years depending on the brand.What’s classed as a “manufacturing defect”? A manufacturing defect is where a component fails or shows a sign of failure due to poor manufacturing from the factory. If your bike is having issues and it’s not technically classed as a manufacturing defect, look at the “What happens if I crash my bike” section.
What’s not covered for a lifetime?It’s important to understand that all bike parts are subject to general wear and tear, frames and forks included. This is where a bike part has simply done what was expected of it and has worn out or failed through general use. Some of the more common parts subject to general wear and tear are usually the bike chain, cassette, brake pads and tyres. In this case, your Lifetime Cycle Guarantee won’t cover the replacement cost. Your guarantee will also be void if you modified or alter your bike in a way that affects its geometry or puts unnecessary stress on the structure of it.
Need to make a guarantee claim?If you find yourself needing to make a guarantee claim, then please take your bike into any Halfords store with proof of purchase. If the bike was purchased online or you’re unable to make the journey to store, get in touch with our customer support team. Please don’t try and repair any damage that may have occurred, as this can affect our guarantee assessment. Just leave it to our shop colleagues and they will assess your bike, find out what caused the failure and find a solution.As part of our Limited Lifetime Cycle Guarantee, we’ll replace the frame/fork with a model that is either like for like, or an upgrade to the previous model for the first 2 years of ownership. After 2 years, we’ll provide a replacement of the next best frame on offer at that time. Please note, due to the models of your bike changing over time, component compatibility, design and geometry may vary. If we can’t replace the frame or fork, we’ll offer you a replacement bike of a similar retail price value. There are no refunds or vouchers given in exchange.
1

Halfords Generic manual V4 2018 pange 3
What happens if I crash my bike? Sometimes accidents happen and won’t be classed as a manufacturing defect. However, as we want to help you get back on your bike as quickly as possible, we’ll happily offer a replacement frame and/or forks, plus our fitting service at a reduced price.Please note, we’ll offer the closest available product at the time of your claim, please contact your local store or our Customer Support team for more detail.
Providing that the cycle:• Has been properly cared for, regularly serviced and maintained.• Has only been fitted with parts recommended by Halfords.• Has not been modified or altered in any way.• Has not been damaged by accident or misuse.Any failure caused by normal wear and tear or a lack of servicing and maintenance is excluded.Under the terms of this guarantee Halfords will bear the cost of the replacement parts and labour to carry outthe repair.
Important: This guarantee applies only to cycles used under normal riding conditions. The components specified on all terrain cycles are guaranteed for normal off road use. However, no cycles sold by Halfords are guaranteed to withstand stunt riding, jumping, trials riding, misuse, accidents, lack of maintenance, abuse, use in competition or commercial use (e.g. hire). This guarantee does not affect your statutory rights. Suitable terrain City and Trekking bikes are designed only for use on roads, cycle paths and smooth trail paths. Young adult bikes are designed only for riders who weigh less than 40kg (6st 4lbs) to use on roads, cycle paths & smooth trail paths Mountain and Jump style bikes are designed for on road and moderate off road use only. They are not intended for extreme off road conditions, severe downhill riding or for jumping and stunt riding. Racing bikes are designed for use on roads and other smooth tarmac surfaces only. BMX bikes are designed for use on roads, smooth tracks and ramps. If the rider has sufficient skills, they can be used for acrobatic ground manoeuvres and stunt riding.Hazard of misuse The misuse of any bike will subject both the frame and components to excessive loading; this will greatly accelerate wear and ultimately cause failure. Any such failure of the frame or components could result inserious injury. (see section 2F and Appendix A).
Maximum weightsUnless otherwise stated, adult bicycles are designed to carry a rider of up to 120 Kg (18st 12lbs) and up to 20 Kg ofluggage. All luggage carried must be securely mounted on the frame, uniformly distributed and fitted as low as possible, to minimize any adverse effect upon stability. The maximum total weight of the cycle, rider and luggage should never exceed 160 Kg. Unless otherwise stated, folding bikes are designed to carry a rider of up to 85kg (13st 5lbs) and up to 15Kg of luggage. Unless otherwise stated, children’s bicycles are BMX category 1 (Cat 1) bicycles are designed to carry a rider of up to 45 Kg (7st) and no luggage. BMX category 2 (Cat 2) bicycles are designed to carry a rider of up to 80 Kg (12st 8lbs). The maximum total weight of the cycle, rider and luggage should never exceed 90 Kg. designed to carry a rider of up to 45 Kg (7st) and no luggage. The maximum total weight of the cycle and rider should never exceed 60 Kg.
2

Like any sport, cycling involves risk of injury anddamage. By choosing to ride a bicycle, youassume the responsibility for that risk, so youneed to know – and to practice – the rules ofsafe and responsible riding and of proper useand maintenance. Proper use and maintenanceof your bicycle reduces risk of injury.
This Manual contains many “Warnings” and“Cautions” concerning the consequences offailure to maintain or inspect your bicycle and offailure to follow safe cycling practices.
• The combination of the safety alertsymbol and the word WARNING indicates apotentially hazardous situation which, if notavoided, could result in serious injury or death.
• The combination of the safety alertsymbol and the word CAUTION indicates apotentially hazardous situation which, if notavoided, may result in minor or moderateinjury, or is an alert against unsafe practices.
• The word CAUTION used without the safetyalert symbol indicates a situation which, if notavoided, could result in serious damage to thebicycle or the voiding of your warranty.
Many of the Warnings and Cautions say “you maylose control and fall”. Because any fall can resultin serious injury or even death, we do not alwaysrepeat the warning of possible injury or death.
Because it is impossible to anticipate everysituation or condition, which can occur whileriding, this Manual makes no representation aboutthe safe use of the bicycle under all conditions.There are risks associated with the use of anybicycle which cannot be predicted or avoided,and which are the sole responsibility of the rider.
A special note for parents:
As a parent or guardian, you are responsible for the activities and safety of your child, and thatincludes making sure that the bicycle is the right size and is properly fitted to the child; that it is ingood repair and safe operating condition; that you and your child have learned and understand thesafe operation of the bicycle; and that you and your child have learned, understand and obey notonly the applicable local motor vehicle, bicycle and traffic laws, but also the common sense rulesof safe and responsible bicycling. As a parent, you should read this manual, as well as review itswarnings and the bicycle’s functions and operating procedures with your child, before letting yourchild ride the bicycle. Children must be under adult supervision, whilst learning to ride. Once theycan ride and are familiar with the bike, the appropriate level of supervision can only be thejudgement of the parent. In making this judgement; you should consider the riding skills of thechild, the risks associated with the riding conditions (e.g. traffic, wet, poor light, muddy, roughsurfaces, etc.) and their experience in riding in those conditions.
WARNING: Make sure that your child always wears an approved bicycle helmet when riding; but also make sure that your child understands that a bicycle helmet is
for bicycling only, and must be removed when not riding. A helmet must not be worn whileplaying, in play areas, on playground equipment, while climbing trees, or at any time whilenot riding a bicycle. Failure to follow this warning could result in serious injury or death.
GENERAL WARNING:
3
Halfords Generic manual V4 2018 page 4

? Need assistance? Ask your local Halfords Bikehut store 4
1. FirstNOTE: We strongly urge you to read this Manual in its entiretybefore your first ride. At the very least, read and make sure thatyou understand each point in this section, and refer to the citedsections on any issue which you don’t completely understand.Please note that not all bicycles have all of the features describedin this Manual. Ask your Halfords Bikehut store to point out thefeatures of your bicycle.
1 Always wear an approved helmet when ridingyour bike, and follow the helmet manufacturer’sinstructions for fit, use and care.
2 Do you have all the other required andrecommended safety equipment? See Section2. It’s your responsibility to familiarize yourselfwith the laws of the areas where you ride, andto comply with all applicable laws.
3 Do you know how to correctly operate yourwheel quick releases? Check Section 4.A.1 tomake sure. Riding with an improperly adjustedwheel quick release can cause the wheel towobble or disengage from the bicycle, andcause serious injury or death.
4 If your bike has toeclips and straps or clipless(SPD type) pedals, make sure you know howthey work (see Section 4.E). These pedalsrequire special techniques and skills. Followthe pedal manufacturer’s instructions for use,adjustment and care.
5 Do you have “toe overlap”? On smaller framedbicycles your toe or toeclip may be able tocontact the front wheel when a pedal is all theway forward and the wheel is turned. ReadSection 4.E. to check whether you have toe overlap.
6 Does your bike have suspension? If so, checkSection 4.F. Suspension can change the way abicycle performs. Follow the suspensionmanufacturer’s instructions for use, adjustmentand care.
1 Is your bike the right size? To check, seeSection 3.A. If your bicycle is too large or toosmall for you, you may lose control and fall. Ifyour new bike is not the right size for you, donot ride it. Ask your Halfords Bikehut store toexchange it before you ride it.
2 Is the saddle at the right height? To check, seeSection 3.B. If you adjust your saddle height,follow the Minimum Insertion instructions inSection 3.B.
3 Are saddle and seatpost securely clamped? Acorrectly tightened saddle will allow no saddlemovement in any direction. See Section 3.B.
4 Are the stem and handlebars at the right heightfor you? If not, see Section 3.C.
5 Can you comfortably operate the brakes? Ifnot, you may be able to adjust their angle andreach. See Section 3.D and 3.E.
6 Do you fully understand how to operate yournew bicycle? If not, before your first ride, have your Halfords Bikehut store explain any functions or features which you do not understand.
B. Safety First
A. Bike Fit
Halfords Generic manual V4 2018 page 5

mN euqroT gninethgiTrenetsaF
5.0 -/+ 52stun leehw raer dna tnorF5.0 -/+ 51stlob pmalc mets ot rabeldnaH5.0 -/+ 71stlob pmalc rereets krof ot metS5.0 -/+ 81tlob rednapxe lliuQ5.0 -/+ 51)pmalc tlob nella( tsop taes ot pmalc elddaS
Saddle clamp to seat post (conventional bolt clamp) 20 +/- 0.55.0 -/+ 11)pmalc tlob nella( pmalc emarf ot tsop taeS
Seat post to frame clamp (conventional bolt clamp) 16 +/- 0.5.rfm eht yb deificeps sA )seirossecca( snoisnetxe cimanydorea ynA
If you choose to carry out further work on yourown bicycle you must get the correct tighteningtorque specifications from the bicycle orcomponent manufacturer or from your HalfordsBikehut store. If you need to make an adjustmentat home or on a ride, we urge you to exercisecare, and to have the fasteners you worked onchecked by your Halfords Bikehut store as soonas possible.
WARNING: Correct tightening force on fasteners – nuts, bolts, screws – on
your bicycle is important. Too little force, andthe fastener may not hold securely. Too muchforce, and the fastener can strip threads,stretch, deform or break. Either way,incorrect tightening force can result incomponent failure, which can cause you tolose control and fall.
1 Everything Secure?Make sure nothing is loose. Lift the front wheeloff the ground by 50 to 75 mm (2 to 3”), then letit bounce on the ground. Anything sound, feel orlook loose? Do a visual and tactile inspection ofthe whole bike. Any loose parts or accessories?If so, secure them. If you’re not sure, asksomeone with experience to check.
5
Halfords Generic manual V4 2018 Page 6
C. Mechanical Safety CheckRoutinely check the condition of your bicycle before every ride.Nuts, bolts, screws and other fasteners:Because manufacturers use a wide variety of fastener sizes and shapes made in a range of materials, often differing by model and component, it is not possible for this Manual to specify the correct torque (tightening force) for all of the fasteners on your bicycle.
a) Check if the component is marked with the recommended torque in the vicinity of the fastener(e.g. 10 Nm). If marked the fastener should be torque tightened the marked torque value (in Nm).
b) If the component is not marked with a recommended torque, use the tightening torque for the keysafety parts that are listed below.
CAUTION - A bike has many moving parts, some with sharp edges (e.g. chain ring). Always be careful when riding or maintaining the bike to avoid injury or entrapment of your fingers, or any other part of your body.
CAUTION - the strength & stiffness of carbon fibre composite frames & components can be adversely affected by high temperatures. Do not keep the bike in poorly ventilated areas, where it is exposed to radiant heat sources.

? Need assistance? Ask your local Halfords Bikehut store 6
2 Tyres And Wheels
Make sure tyres are correctly inflated (seeSection 4.G.1). Check by putting one hand onthe saddle, one on the intersection of thehandlebars and stem, then bouncing your weighton the bike while looking at tyre deflection.Compare what you see with how it looks whenyou know the tyres are correctly inflated; andadjust if necessary.
Tyres in good shape? Spin each wheel slowlyand look for cuts in the tread and sidewall.Replace damaged tyres before riding the bike.
Wheels true? Spin each wheel and check forbrake clearance and side-to-side wobble. If awheel wobbles side to side even slightly, or rubsagainst or hits the brake blocks, take the bike toa Halfords Bikehut store to have the wheel trued.
CAUTION: Wheels must be true for the brakes to work effectively. Wheel
truing is a skill, which requires special toolsand experience. Do not attempt to true awheel unless you have the knowledge,experience and tools needed to do the jobcorrectly.
Wheel rims clean and undamaged? Make surethe rims are clean and undamaged along thebraking surface, and check for excess rim wear(see Section 4.C).
3 Brakes
Check the brakes for proper operation (seeSection 4.C). squeeze the brake levers. Are thebrake quick-releases closed? All control cablesseated and securely engaged? Do the brakeblocks contact the wheel rim squarely and makefull contact with the rim? Do the brake blockstouch the wheel rim within 25 mm (1”) of brakelever movement? Can you apply full brakingforce at the levers without having them touch thehandlebar? If not, your brakes need adjustment.
Minor adjustments can be made using thethreaded cable adjusters at the brake levers. Ifthis is insufficient, the cable clamp at the brakelever may need to be moved or there could besome other fault.
Do not ride the bike until the brakes are properlyadjusted by a professional bicycle mechanic.
4 Quick Releases
Make sure the front wheel, rear wheel and seatpost quick releases are properly adjusted and inthe locked position. See Section 4.A and 4.B.
5 Handlebar And Saddle Alignment
Make sure the saddle and handlebar stem areparallel to the bike’s centre line and clampedtight enough so that you can’t twist them out ofalignment. See Sections 3.B and 3.C.
6 Handlebar Ends
Make sure the handlebar grips are secure and ingood condition. If not, have your HalfordsBikehut store replace them. Make sure thehandlebar ends and extensions are plugged. Ifnot, have your Halfords Bikehut store plug thembefore you ride. If the handlebars have bar endextensions, make sure they are clamped tightenough so you can’t twist them.
WARNING: Loose or damaged handlebar grips or extensions can
cause you to lose control and fall. Unpluggedhandlebars or extensions can cut you andcause serious injury in an otherwise minoraccident.
VERY IMPORTANT SAFETY NOTE:Please also read and become thoroughlyfamiliar with the important information on thelifespan of your bicycle and its componentsin Appendix A on Page 35.
Halfords Generic manual V4 2018 Page 7

D. First RideWhen you buckle on your helmet and go for yourfirst familiarisation ride on your new bicycle, besure to pick a controlled environment, away fromcars, other cyclists, obstacles or other hazards.Ride to become familiar with the controls,features and performance of your new bike.
Familiarise yourself with the braking action of thebike (see Section 4.C). The right hand brakelever operates the front brake and the left, therear. Test the brakes at slow speed, putting yourweight toward the rear and gently applying thebrakes, rear brake first. Sudden or excessiveapplication of the front brake could pitch you overthe handlebars. Applying brakes too hard canlock up a wheel, which could cause you to losecontrol and fall. Skidding is an example of whatcan happen when a wheel locks up.
The braking performance of a new bike may improve if you complete the brake blocks and pads ‘bedding in’ procedure described in Section 4.C.4
If your bicycle has toeclips or clipless pedals,practice getting in and out of the pedals (seeparagraph B.4 above and Section 4.E.4).
If your bike has suspension, familiarise yourselfwith how the suspension responds to brakeapplication and rider weight shifts (see paragraphB.6 above and Section 4.F).
Practice shifting the gears (see Section 4.D).Remember never move the shifter whilststationary, whilst pedalling backwards, or pedalbackwards immediately after having moved theshifter. This could jam the chain and causeserious damage to the bicycle.
Check out the handling and response of the bike;and check the comfort.
If you have any questions, or if you feel anything about the bike is not as it should be,consult your Halfords Bikehut store before yournext ride.
7
Head tube
Seat post
Freewheel/cassettesprocketcluster
Seat stayDown tube
Top tube
Seattube
Chainrings
CrankFront gear
mechanism
Rear gearmechanism
Chain stay
Stem
Headset
Fig. 1
Halfords Generic manual V4 2018 Page 8

? Need assistance? Ask your local Halfords Bikehut store 8
2. Safety
WARNING: Observe all local bicycle laws and regulations. Observe
regulations about bicycle lighting, riding onpavements, laws regulating bike path andtrail use, helmet laws, child carrier laws,special bicycle traffic laws. It’s yourresponsibility to know and obey the laws.
1 Always wear a cycling helmet which meetsthe latest certification standards and isappropriate for the type of riding you do.Always follow the helmet manufacturer’sinstructions for fit, use and care of yourhelmet. Most serious bicycle injuries involvehead injuries, which might have been avoidedif the rider had worn an appropriate helmet. Acycle ridden on public roads during daylighthours should be fitted with reflectors (front,rear, pedals and wheels) and have a bell.
WARNING: Failure to wear a helmet when riding may result in serious
injury or death.
2 Always do the Mechanical Safety Check(Section 1.C) before you get on a bike.
3 Be thoroughly familiar with the controls of yourbicycle: brakes (Section 4.C.), pedals (Section 4.E.), gear shifting (Section 4.D.).
4 Be careful to keep body parts and otherobjects away from the sharp teeth ofchainrings, the moving chain, the turningpedals and cranks, and the spinning wheels of your bicycle.
5 Always wear:• Shoes that will stay on your feet and will grip
the pedals. Make sure that shoe laces cannotget into moving parts, and never ridebarefoot or in sandals.
• Bright, visible clothing that is not so loosethat it can be tangled in the bicycle orsnagged by objects at the side of the roador trail.
• Protective eyewear, to protect againstairborne dirt, dust and bugs – tinted when thesun is bright, clear when it’s not.
6 Don’t jump with your bike. Jumping a bike,particularly a BMX or mountain bike, can befun; but it can put huge and unpredictablestress on the bicycle and its components.Riders who insist on jumping their bikes riskserious damage, to their bicycles as well as tothemselves. Before you attempt to jump, dostunt riding or race with your bike, read andunderstand Section 2.F.
7 Ride at a speed appropriate for conditions.Increased speed means higher risk.
A. The Basics
Halfords Generic manual V4 2018 Page 9

1 You are sharing the road or the path withothers – motorists, pedestrians and othercyclists. Respect their rights.
2 Ride defensively. Always assume that othersdo not see you.
3 Look ahead, and be ready to avoid:• Vehicles slowing or turning, entering the
road or your lane ahead of you, or comingup behind you.
• Parked car doors opening.• Pedestrians stepping out.• Children or pets playing near the road.• Pot holes, drain gratings, tram tracks,
expansion joints, road or pavementconstruction, debris and other obstructionsthat could cause you to swerve into traffic,catch your wheel or cause you to havean accident.
• The many other hazards and distractionswhich can occur on a bicycle ride.
4 Ride in designated bike lanes, on designatedbike paths or as close to the edge of the roadas possible, in the direction of traffic flow oras directed by local laws.
5 Stop at stop signs and traffic lights; slowdown and look both ways at road junctions.Remember that a bicycle always loses in acollision with a motor vehicle; so be preparedto yield even if you have the right of way.
6 Use approved hand signals for turning and stopping.
7 Never ride with headphones. They masktraffic sounds and emergency vehicle sirens,distract you from concentrating on what’sgoing on around you, and their wires cantangle in the moving parts of the bicycle,causing you to lose control.
8 Never carry a passenger, unless it is a smallchild wearing an approved helmet andsecured in a correctly mounted child carrier ora child-carrying trailer. When carrying a childin a child seat, ensure that any saddle coilsprings are covered to eliminate the possibilityof the child’s fingers becoming trapped.
9 Never carry anything which obstructs yourvision or your complete control of the bicycle,or which could become entangled in themoving parts of the bicycle.
10 Never hitch a ride by holding on to another vehicle.
11Don’t do stunts, wheelies or jumps. If youintend to do stunts, wheelies, jumps or goracing with your bike read Section 2.F,Downhill, Stunt or Competition Riding, now.Think carefully about your skills beforedeciding to take the significant risks that gowith this kind of riding.
12 Don’t weave through traffic or make anymoves that may surprise the people withwhom you are sharing the road.
13 Observe and yield the right of way.
14 Never ride your bicycle while under theinfluence of alcohol or drugs.
15 If possible, avoid riding in bad weather, whenvisibility is obscured, at dawn, dusk or in thedark, or when extremely tired. Each of theseconditions increases the risk of accident.
B. Riding Safety
9
Halfords Generic manual V4 2018 Page 10

? Need assistance? Ask your local Halfords Bikehut store 10
C. Off Road Safety
D. Wet Weather Riding
We recommend that children do not ride onrough terrain unless they are accompanied by an adult.
1 The variable conditions and hazards of off-road riding require close attention and specificskills. Start slowly on easier terrain and buildup your skills. If your bike has suspension, theincreased speed you may develop alsoincreases your risk of losing control andfalling. Get to know how to handle your bikesafely before trying increased speed or moredifficult terrain.
2 Wear safety gear appropriate to the kind ofriding you plan to do.
3 Don’t ride alone in remote areas. Even whenriding with others, make sure that someoneknows where you’re going and when youexpect to be back.
4 Always take along some kind of identification,so that people know who you are in case ofan accident; and take along a some cash for asnack, a cool drink or an emergency phone call.
5 Yield right of way to pedestrians and animals.Ride in a way that does not frighten orendanger them, and give them enough roomso that their unexpected moves don’tendanger you.
6 Be prepared. If something goes wrong whileyou’re riding off-road, help may not be close.
7 Before you attempt to jump, do stunt riding orrace with your bike, read and understandSection 2.F.
Off Road respectObey the local laws regulating where and howyou can ride off road, and respect privateproperty. You may be sharing the trail with others– hikers, equestrians, other cyclists. Respecttheir rights. Stay on the designated trail. Don’tcontribute to erosion by riding in mud or withunnecessary sliding. Don’t disturb the ecosystemby cutting your own trail or take a shortcutthrough vegetation or streams. It is yourresponsibility to minimise your impact on theenvironment. Leave things as you found them;and always take out everything you brought in.
WARNING: Wet weather impairs traction, braking and visibility, both for
the cyclist and for other vehicles sharing theroad. The risk of an accident is dramaticallyincreased in wet conditions.
Under wet conditions, the stopping power of yourbrakes (as well as the brakes of other vehiclessharing the road) is dramatically reduced andyour tyres don’t grip nearly as well. This makes itharder to control speed and easier to losecontrol. To make sure that you can slow downand stop safely in wet conditions, ride moreslowly and apply your brakes earlier and moregradually than you would under normal, dryconditions (see also Section 4.C).
Halfords Generic manual V4 2018 Page 11

E. Night Riding
Riding a bicycle at night is many times moredangerous than riding during the day. A cyclist isvery difficult for motorists and pedestrians to see.Therefore, children should never ride at dawn, atdusk or at night.
Adults who choose to accept the greatlyincreased risk of riding at dawn, at dusk or atnight need to take extra care both riding andchoosing specialised equipment, which helpsreduce that risk. Consult your Halfords Bikehutstore about night riding safety equipment.
WARNING: Reflectors are not a substitute for required lights. Riding at
dawn, at dusk, at night or at other times ofpoor visibility without an adequate bicyclelighting system and without reflectors isdangerous and may result in serious injury or death.
Bicycle reflectors are designed to pick up andreflect car lights and street lights in a way thatmay help you to be seen and recognized as amoving cyclist.
CAUTION: Check reflectors and their mounting brackets regularly to make
sure that they are clean, straight, unbrokenand securely mounted. Have your HalfordsBikehut store replace damaged reflectors andstraighten or tighten any that are bent orloose.
WARNING: Do not remove the front orrear reflectors or reflector brackets
from your bicycle. They are an integral part ofthe bicycle’s safety system. Removing thereflectors may reduce your visibility to othersusing the roadway. Being struck by othervehicles may result in serious injury or death.The reflector brackets may protect you fromthe brake straddle cable catching on the tyrein the event of brake cable failure. If a brakestraddle cable catches on the tyre, it cancause the wheel to stop suddenly, causingyou to lose control and fall.
If you choose to ride under conditions of poorvisibility, check and be sure you comply with alllocal laws about night riding, and take thefollowing strongly recommended additionalprecautions:
• Purchase and install battery powered front andrear lights, which meet all regulatoryrequirements and provide adequate visibility.
In the UK white front and red rear lights mustbe fitted, which either comply with BS 6102 - 3or are flashing LED lights with a light output ofmore than 4 candela and a flashing rate ofbetween 1 and 4 times per second. It isrecommended that flashing LED lights areused in conjunction with a steady light, whenriding on unlit roads.
In the Republic of Ireland you must show awhite or yellow front light and a red rear light.The rear light should be visible from adistance of at least 152m (500 ft).
• Wear light coloured, reflective clothing andaccessories, such as a reflective vest,reflective arm and leg bands, flashing LEDlights attached to your body and/or yourbicycle – any reflective device or light sourcethat moves will help you get the attention ofapproaching motorists, pedestrians andother traffic.
• Make sure your clothing or anything you maybe carrying on the bicycle does not obstruct areflector or light.
• Make sure that your bicycle is equipped withcorrectly positioned and securely mountedreflectors.
While riding at dawn, at dusk or at night:• Ride slowly.• Avoid dark areas and areas of heavy or fast-
moving traffic.• Avoid road hazards.• If possible, ride on familiar routes.
When riding in traffic:• Be predictable. Ride so that drivers can see
you and predict your movements.• Be alert. Ride defensively and expect the
unexpected.• If you plan to ride in traffic often, ask your
Halfords Bikehut store about traffic safetyclasses or a good book on bicycle traffic safety.
11
Halfords Generic manual V4 2018 Page 12

? Need assistance? Ask your local Halfords Bikehut store 12
F. Extreme, Stunt Or
Competition Riding
Whether you call it Aggro, Freeride, North Shore,Downhill, Jumping, Stunt Riding, Racing orsomething else; by engaging in this sort ofextreme, aggressive riding you are accepting anincreased risk of injury or death. Not all bicyclesare designed for these types of riding, and thosethat are may not be suitable for all types ofaggressive riding. Check with your HalfordsBikehut store or the bicycle’s manufacturer aboutthe suitability of your bicycle before engaging inany type of extreme riding.
When riding fast down hill, you can reach speedsseen on motorcycles, and therefore face similarhazards and risks. Have your bicycle andequipment carefully inspected by a qualifiedmechanic and be sure it is in perfect condition.Consult with expert riders and race officials onconditions and equipment advisable at the sitewhere you plan to ride.
Wear appropriate safety gear, including anapproved full face helmet, full finger gloves, andbody armour. Ultimately, it is your responsibilityto have proper equipment and to be familiar withcourse conditions.
WARNING: Although many magazines,advertisements and articles about
cycling depict riders engaged in extremeriding, this activity is extremely dangerous,increases your risk of injury or death, andincreases the severity of any injury.Remember that the action depicted is beingperformed by professionals with many yearsof training and experience.
Know your limits and always wear a helmetand other appropriate safety gear. Even withstate-of-the-art protective safety gear, youcould be seriously injured or killed whenjumping, stunt riding, riding downhill at speedor in competition.
CAUTION: Bicycles and bicycle parts have limitations with regard to
strength and integrity, and this type of ridingcan exceed those limitations.
We strongly recommend against this type ofriding because of the increased risks; but if youchoose to take the risk, at least:
• Take lessons from a competent instructor first• Start with easy learning exercises and slowly
develop your skills before trying more difficult ordangerous riding
• Do stunts, jumping, racing or fast downhillriding only in areas designated for this typeof riding
• Wear a full face helmet, safety pads and othersafety gear
• Understand and recognize that the stressesimposed on your bike by this kind of activitymay break or damage parts of the bicycle andvoid the warranty
• Take your bicycle to your Halfords Bikehut storeif anything breaks or bends. Do not ride yourbicycle when any part is damaged.
If you ride downhill at speed, do stunt riding orride in competition, know the limits of your skilland experience. Ultimately, avoiding injury isyour responsibility.
Halfords Generic manual V4 2018 Page 13
There are many components and accessoriesavailable to enhance the comfort, performanceand appearance of your bicycle. However, if youchange components or add accessories, you doso at your own risk. The bicycle’s manufacturermay not have tested that component oraccessory for compatibility, reliability or safety onyour bicycle. Almost every component used on acycle has safety related features; always onlyuse genuine replacement parts. This isparticularly important for the safety critical areasof braking, steering, wheels and tyres. Theaddition of any aerodynamic extensions mayadversely affect the cycle’s response to steeringand braking.
Before installing any component or accessory,including a different size tyre, make sure that it iscompatible with your bicycle by checking withyour Halfords Bikehut store. Be sure to read,understand and follow the instructions thataccompany the products you purchase for yourbicycle (See also Appendix A p. 35).
WARNING: Failure to confirm compatibility, properly install, operate
and maintain any component or accessorycan result in serious injury or death.
CAUTION: Changing the components on your bike may void the warranty.
Refer to your warranty, and check with yourHalfords Bikehut store before changing thecomponents on your bike.
G. Changing ComponentsOr Adding Accessories
13
CAUTION: If you fit a rear mount child cycle seat to your bike. Always ensure that any under saddle coil springs are covered to prevent any risk of finger entrapment for the child.
Halfords Generic manual V4 2018 Page 14

? Need assistance? Ask your local Halfords Bikehut store 14
3. FitNOTE: Correct fit is an essential element for safety, performanceand comfort. Making the adjustments to your bicycle, which resultin correct fit for your body and riding conditions requiresexperience, skill and special tools. Always have your HalfordsBikehut store make the adjustments on your bicycle; or, if you havethe experience, skill and tools, have your Halfords Bikehut storecheck your work before riding.
WARNING: If your bicycle does not fit properly, you may lose control and fall. If your new bike doesn’t fit, ask your Halfords Bikehut store to exchange it before you ride it.
Standover height is the basic element of bike fit(see fig. 2). It is the distance from the ground tothe top of the bicycle’s frame at that point whereyour crotch is when straddling the bike. To check for correct standover height, straddlethe bike while wearing the kind of shoes in whichyou’ll be riding, and bounce vigorously on yourheels. If your crotch touches the frame, the bikeis too big for you. Don’t even ride the bikearound the corner. A bike should give you aminimum standover height clearance of twoinches (50 mm).
WARNING: If you plan to use your bikefor jumping or stunt riding, read
Section 2.F again.
A. Standover Height
Fig. 2
Halfords Generic manual V4 2018 Page 15

B. Saddle Position
Correct saddle adjustment is an important factorin getting the most performance and comfortfrom your bicycle. If the saddle position is notcomfortable for you, see your Halfords Bikehut store.
The saddle can be adjusted in three directions:
1 Up and down adjustment. To check for correctsaddle height (fig. 3):• sit on the saddle;• place one heel on a pedal;• rotate the crank until the pedal with your
heel on it is in the down position and thecrank arm is parallel to the seat tube.
If your leg is not completely straight, your saddleheight needs to be adjusted. If your hips mustrock for the heel to reach the pedal, the saddle istoo high. If your leg is bent at the knee with yourheel on the pedal, the saddle is too low.
Once the saddle is at the correct height, makesure that the seatpost does not project from theframe beyond its “Minimum Insertion” mark (fig. 4).
If your bike has an interrupted seat tube, as isthe case on some bikes with rear suspension,you must also make sure that the seat post is farenough into the frame so that you can touch itthrough the bottom of the interrupted seat tubewith the tip of your finger, without inserting yourfinger beyond its first knuckle (see fig. 5). Ensure that any seat post projecting from theinterrupted seat tube does not interfere with thefree movement of the rear suspension.
WARNING: If your seat post projects from the frame beyond the Minimum
Insertion mark (see fig. 4) or you cannottouch the bottom of the seat post through thebottom of the interrupted seat tube with thetip of your finger without inserting your fingerbeyond its first knuckle (see fig. 5), the seatpost may break, which could cause you tolose control and fall.
15
Fig. 3
Fig. 4
Fig. 5
Halfords Generic manual V4 2018 Page 16

? Need assistance? Ask your local Halfords Bikehut store 16
2 Front and back adjustment. The saddle can beadjusted forward or back to help you get theoptimal position on the bike. Ask your HalfordsBikehut store to set the saddle for your optimalriding position and to show you how to makethis adjustment.
3 Saddle angle adjustment. Most people prefer ahorizontal saddle; but some riders like thesaddle nose angled up or down very slightly.Your Halfords Bikehut store can adjust saddleangle or teach you how to do it.
The minimum saddle height varies for each model, it is achieved by putting the seat post at its lowest position and is measured from the ground to the middle of the upper surface of the saddle
Note: If your bicycle is equipped with asuspension seat post, periodically ask yourHalfords Bikehut store to check it.
Small changes in saddle position can have asubstantial effect on performance and comfort.To find your best saddle position, make only oneadjustment at a time.
WARNING: After any saddle adjustment, be sure that the saddle
adjusting mechanism is properly tightenedbefore riding. A loose saddle clamp or seatpost binder can cause damage to the seatpost, or can cause you to lose control andfall. A correctly tightened saddle adjustingmechanism will allow no saddle movement inany direction. Periodically check to makesure that the saddle adjusting mechanism isproperly tightened.
If, in spite of carefully adjusting the saddleheight, tilt and fore-and aft position, your saddleis still uncomfortable, you may need a differentsaddle design. Saddles, like people, come inmany different shapes, sizes and resilience. YourHalfords Bikehut store can help you select asaddle which, when correctly adjusted for yourbody and riding style, will be comfortable.
WARNING: Some people have claimedthat extended riding with a saddle
which is incorrectly adjusted or which doesnot support your pelvic area correctly cancause short-term or long-term injury tonerves and blood vessels, or even impotence.If your saddle causes you pain, numbness orother discomfort, listen to your body and stopriding until you see your Halfords Bikehutstore about saddle adjustment or a differentsaddle.
Halfords Generic manual V4 2018 Page 17

C. Handlebar Height
And Angle
Your bike is equipped either with a “threadless”stem, which clamps on to the outside of thesteerer tube, or with a “quill” stem, which clampsinside the steerer tube by way of an expandingbinder bolt. If you aren’t absolutely sure whichtype of stem your bike has, ask your HalfordsBikehut store.
If your bike has a “threadless” stem (fig. 6), yourHalfords Bikehut store may be able to changehandlebar height by moving height adjustmentspacers from below the stem to above the stem,or vice versa. Otherwise, you’ll have to get astem of different length or rise. Consult yourHalfords Bikehut store. Do not attempt to do thisyourself, as it requires special knowledge.
If your bike has a “quill” stem (fig. 7), you canask your Halfords Bikehut store to adjust thehandlebar height a bit by adjusting stem height.A quill stem has an etched or stamped mark onits shaft, which designates the stem’s “MinimumInsertion”. This mark must not be visible abovethe headset.
WARNING: On some bicycles, changing the stem or stem height can
affect the tension of the front brake cable,locking the front brake or creating excesscable slack, which can make the front brakeinoperable. If the front brake blocks move intowards the wheel rim or out away from thewheel rim when the stem or stem height ischanged, the brakes must be correctlyadjusted before you ride the bicycle.
WARNING: The stem’s Minimum Insertion Mark must not be visible
above the top of the headset. If the stem isextended beyond the Minimum InsertionMark the stem may break or damage thefork’s steerer tube, which could cause you tolose control and fall.
Your Halfords Bikehut store can also change the angle of the handlebar or any bar endextensions.
WARNING: An insufficiently tightened stem binder bolt, handlebar binder
bolt or bar end extension clamping bolt maycompromise the steering action, which couldcause you to lose control and fall. Place thefront wheel of the bicycle between your legsand attempt to twist the handlebar/stemassembly. If you can twist the stem in relationto the front wheel, turn the handlebars inrelation to the stem, or turn the bar endextensions in relation to the handlebar, thebolts are insufficiently tightened.
17
Fig. 6
Fig. 7
Halfords Generic manual V4 2018 Page 18

? Need assistance? Ask your local Halfords Bikehut store 18
D. Control Position
Adjustments
The angle of the brake and shift control leversand their position on the handlebars can bechanged. Ask your Halfords Bikehut store tomake the adjustments for you.
E. Brake Reach
Many bikes have brake levers, which can beadjusted for reach. If you have small hands orfind it difficult to squeeze the brake levers, yourHalfords Bikehut store can either adjust thereach or fit shorter reach brake levers.
WARNING: The shorter the brake leverreach, the more critical it is to have
correctly adjusted brakes, so that full brakingpower can be applied within available brakelever travel. Brake lever travel insufficient toapply full braking power can result in loss ofcontrol, which may result in serious injury or death.
Halfords Generic manual V4 2018 Page 19

4. TechnicalIt’s important to your safety, performance and enjoyment tounderstand how things work on your bicycle. We urge you to askyour Halfords Bikehut store how to do the things described in thissection before you attempt them yourself, and that you have yourHalfords Bikehut store check your work before you ride the bike. Ifyou have even the slightest doubt as to whether you understandsomething in this section of the Manual, talk to your HalfordsBikehut store (See also Appendix A p. 35).
A. Wheels
NOTE: If you have a bike equipped with quickrelease axles on the front or rear wheels,make sure that your Halfords Bikehut storehas given you the manufacturer’s instructions,and follow those when installing or removinga quick release axle wheel. If you don’t knowwhat a quick release axle is, ask yourHalfords Bikehut store.
1 Wheel QuickRelease
WARNING: Riding with an improperly adjusted wheel quick release can
allow the wheel to wobble or fall off thebicycle, which can cause serious injury ordeath. Therefore, it is essential that you:
1 Ask your Halfords Bikehut store to help youmake sure you know how to install andremove your wheels safely.
2 Understand and apply the correcttechnique for clamping your wheel in placewith a quick release.
3 Each time, before you ride the bike, checkthat the wheel is securely clamped (see fig. 8).
A wheel quick release uses a cam action toclamp the bike’s wheel in place (see fig. 8).Because of its adjustable nature, it is critical that you understand how it works, how to use itproperly, and how much force you need to applyto secure the wheel.
WARNING: The full force of the cam action is needed to clamp the wheel
securely. Holding the nut with one hand andturning the lever like a wing nut with theother hand until everything is as tight as youcan get it will not clamp the wheel safely inthe dropouts.
19
Fig. 8
closedclosed openopen
turn to adjustclamping force
open position
Halfords Generic manual V4 2018 Page 20

? Need assistance? Ask your local Halfords Bikehut store 20
2 Removing AndInstalling QuickRelease Wheels
a. Removing A Quick ReleaseFront Wheel
CAUTION: If your bike has a disc frontbrake, exercise care in touching it.
Discs have sharp edges and can get very hotduring use.
1 If your bike has rim brakes, disengage thebrake’s quick-release mechanism to increasethe clearance between the tyre and brakeblocks (See Section 4.C fig.14 through to 18).
2 Move the wheel’s quick-release lever from thelocked or CLOSED position to the OPENposition (figs. 10a & b).
3 If your front fork does not have a secondaryretention device go to step (5).
a. Adjusting The Quick ReleaseMechanism
The wheel hub is clamped in place by the forceof the quick release cam pushing against onedropout and pulling the tension-adjusting nut, byway of the skewer, against the other dropout. Theamount of clamping force is controlled by thetension-adjusting nut. Turning the tension-adjusting nut clockwise whilst keeping the camlever from rotating increases clamping force;turning it anticlockwise whilst keeping the camlever from rotating reduces clamping force. Lessthan half a turn of the tension-adjusting nut canmake the difference between safe clamping forceand unsafe clamping force.
b. Front Wheel SecondaryRetention Devices
Most bicycles have front forks, which utilize asecondary wheel retention device to reduce therisk of the wheel disengaging from the fork if thequick release is incorrectly adjusted. Secondaryretention devices are not a substitute for correctquick release adjustment. Secondary retentiondevices fall into two basic categories:
1 The clip-on type is an oval washer with a tab,(fig. 9) which the manufacturer adds to thefront wheel hub. The tabs must be located inthe holes or slots at the ends of the fork legs,before tightening the wheel nuts.
2 The integral type is a recess that is moulded,cast or machined into the outer faces of thefront fork dropouts.
Ask your Halfords Bikehut store to explain the particular secondary retention device on your bike.
WARNING: Do not remove or disable the secondary retention device. As its
name implies, it serves as a back up for acritical adjustment. If the quick release is notadjusted correctly, the secondary retentiondevice can reduce the risk of the wheeldisengaging from the fork. Removing ordisabling the secondary retention device may also void the warranty.
Secondary retention devices are not asubstitute for correct quick releaseadjustment. Failure to properly adjust thequick release mechanism can cause thewheel to wobble or disengage, which couldcause you to loose control and fall, resultingin serious injury or death.
Tabwasher
open
closed
Fig. 10a
Fig. 9
Fig. 10b
Halfords Generic manual V4 2018 Page 21

4 If your front fork has a clip-on type secondaryretention device, disengage it and go to step(5). If your front fork has an integral secondaryretention device, loosen the tension-adjustingnut enough to allow removal of the wheel; thengo to the next step.
5 Raise the front wheel a few inches off theground and tap the top of the wheel with thepalm of your hand to release the wheel fromthe front fork.
b. Installing A Quick ReleaseFront Wheel
CAUTION: If your bike is equipped with disc brakes, be careful not to
damage the disc, caliper or brake pads whenre-inserting the disc into the caliper. Neveractivate a disc brake’s control lever unlessthe disc is correctly inserted in the caliper.See also Section 4.C.
1 Move the quick-release lever so that it curvesaway from the wheel (fig. 10b). This is theOPEN position.
2 With the steering fork facing forward, insert thewheel between the fork blades so that the axleseats firmly at the top of the slots, which are atthe tips of the fork blades – the fork dropouts.The quick-release lever should be on the leftside of the bicycle (fig.10a & b). If your bikehas a clip-on type secondary retention device,engage it.
3 Holding the quick-release lever in the OPENposition with your right hand, tighten thetension adjusting nut with your left hand until itis finger tight against the fork dropout (fig. 8).
4 While pushing the wheel firmly to the top ofthe slots in the fork dropouts, and at the sametime centering the wheel rim in the fork, movethe quick-release lever upwards and swing itinto the CLOSED position (fig. 8 & 10a). Thelever should now be parallel to the fork bladeand curved toward the wheel. To apply enoughclamping force, you should have to wrap yourfingers around the fork blade for leverage, andthe lever should leave a clear imprint in thepalm of your hand.
WARNING: Securely clamping the wheel takes considerable force. If you
can fully close the quick release withoutwrapping your fingers around the fork bladefor leverage, and the lever does not leave aclear imprint in the palm of your hand, thetension is insufficient. Open the lever; turnthe tension-adjusting nut clockwise a quarterturn; then try again.
5 If the lever cannot be pushed all the way to aposition parallel to the fork blade, return thelever to the OPEN position. Then turn thetension adjusting nut anticlockwise one-quarterturn and try tightening the lever again.
6 Re-engage the brake quick-releasemechanism to restore correct brake block-to-rim clearance; spin the wheel to make surethat it is centered in the frame and clears thebrake blocks; then squeeze the brake leverand make sure that the brakes are operatingcorrectly.
c. Removing A Quick ReleaseRear Wheel
1 Shift the rear derailleur to high gear (thesmallest, outermost rear sprocket).
2 If your bike has rim brakes, disengage thebrake’s quick-release mechanism to increasethe clearance between the wheel rim and thebrake blocks (see Section 4.C, figs. 14 throughto 18).
3 Pull the derailleur body back with your right hand.
4 Move the quick-release lever to the OPENposition (fig. 10b).
5 Lift the rear wheel off the ground a few inchesand, with the derailleur still pulled back, pushthe wheel forward and down until it comes outof the rear dropouts.
21
Fig. 11
Wheel in dropouts
Halfords Generic manual V4 2018 Page 22

? Need assistance? Ask your local Halfords Bikehut store 22
d. Installing A Quick ReleaseRear Wheel
NOTE: If your bike is equipped with discbrakes, be careful not to damage the disc,caliper or brake pads when re-inserting thedisc into the caliper. Never activate a discbrake’s control lever unless the disc iscorrectly inserted in the caliper.
1 Make sure that the rear derailleur is still in itsoutermost, high gear, position
2 Pull the derailleur body back with your right hand.
3 Move the quick-release lever to the OPENposition (see fig. 8). The lever should be onthe side of the wheel opposite the derailleurand freewheel sprockets.
4 Put the chain on top of the smallest freewheelsprocket. Then, insert the wheel up and backinto the frame dropouts and pull it all the wayin to the dropouts.
5 Tighten the quick-release adjusting nut until itis finger tight against the frame dropout; thenswing the lever toward the front of the bikeuntil it is parallel to the frame’s chain stay orseat stay and is curved toward the wheel (fig.10a & fig. 11). To apply enough clampingforce, you should have to wrap your fingersaround a frame tube for leverage, and thelever should leave a clear imprint in the palmof your hand.
WARNING: Securely clamping the wheel takes considerable force. If you
can fully close the quick release withoutwrapping your fingers around the seat stay orchain stay for leverage, and the lever doesnot leave a clear imprint in the palm of yourhand, the tension is insufficient. Open thelever; turn the tension-adjusting nutclockwise a quarter turn; then try again.
The rear wheel must be secured to thebicycle frame with sufficient force so that itcannot be pulled forward by the chain, evenunder the greatest pedaling force. If thewheel moves under pedaling force, the tyrecan touch the frame, which can cause you toloose control and fall.
6 If the lever cannot be pushed all the way to aposition parallel to the chain stay or seat staytube, return the lever to the OPEN position.Then turn the adjusting nut anticlockwise one-quarter turn and try tightening again.
7 Push the rear derailleur back into position.
8 Re-engage the brake quick-releasemechanism to restore correct brake block-to-rim clearance; spin the wheel to make surethat it is centered in the frame and clears thebrake blocks; then squeeze the brake leverand make sure that the brakes are operatingcorrectly.
Halfords Generic manual V4 2018 Page 23

3 Removing AndInstalling Bolt-OnWheels
a. Removing A Bolt-On Front Wheel
1 If your bike has rim brakes, disengage thebrake’s quick-release mechanism to increasethe clearance between the tyre and the brakeblocks (see Section 4.C, figs. 14 through to 18).
2 Using a correct size spanner, loosen the twoaxle nuts.
3 If your front fork has a clip-on type secondaryretention device, disengage it and go to thenext step. If your front fork has an integralsecondary retention device, loosen the axlenuts enough to allow wheel removal; then goto the next step.
4 Raise the front wheel a few inches off theground and tap the top of the wheel with thepalm of your hand to knock the wheel out ofthe fork ends.
b. Installing A Bolt-On Front Wheel
1 With the steering fork facing forward, insertthe wheel between the fork blades so that theaxle seats firmly at the top of the slots, whichare at the tips of the fork blades. The axle nutwashers should be on the outside, betweenthe fork blade and the axle nut. If your bikehas a clip-on type tab washer secondaryretention device, engage it (see Section 4.A 1b).
2 While pushing the wheel firmly to the top of theslots in the fork dropouts, and at the sametime centering the wheel rim in the fork, usethe correct size spanner to tighten the axlenuts enough so that the wheel stays in place;then use a spanner on each nutsimultaneously to fully tighten the nuts.
3 Re-engage the brake quick-releasemechanism to restore correct brake block-to-rim clearance; spin the wheel to make surethat it is centered in the frame and clears thebrake blocks; then squeeze the brake leverand make sure that the brakes are operatingcorrectly.
c. Removing A Bolt-On Rear Wheel
WARNING: If your bike is equipped with an internal gear rear hub, do not
attempt to remove the rear wheel. Theremoval and re-installation of internal gearhubs require special knowledge. Incorrectremoval or assembly can result in hub failure,which can cause you to lose control and fall.
1 If your bike has rim brakes, disengage thebrake’s quick-release mechanism to open theclearance between the tyre and the brakeblocks (see Section 4.C, figs. 14 through to 18).
2 Shift the rear derailleur to high gear (thesmallest rear sprocket) and pull the derailleurbody back with your right hand.
3 Using the correct size spanner, loosen the twoaxle nuts.
4 Lift the rear wheel off the ground a few inchesand, with the derailleur still pulled back, pushthe wheel forward and down until it comes outof the rear dropouts.
d. Installing A Bolt-On Rear Wheel
1 Shift the rear derailleur to its outermostposition and pull the derailleur body back withyour right hand.
2 Put the chain on to the smallest sprocket.Then, insert the wheel into the frame dropoutsand pull it up and back completely in to thedropouts. The axle nut washers should be onthe outside, between the frame and the axle nut.
3 Using the correct size spanner, tighten the axlenuts enough so that the wheel stays in place;then use a spanner on each nutsimultaneously to fully tighten the nuts.
4 Push the rear derailleur back into position.
5 Re-engage the brake quick-releasemechanism to restore correct brake block-to-rim clearance; spin the wheel to makesure that it is centered in the frame and clearsthe brake blocks; then squeeze the brake lever and make sure that the brakes areoperating correctly.23
Fig. 12
open
Halfords Generic manual V4 2018 Page 24

? Need assistance? Ask your local Halfords Bikehut store 24
B. Seat Post Quick Release
e. Chain TensionSingle Speed Cycles
1 Finger tighten both axle nuts. Pull the wheelbackwards, ensuring that it is centralized andthat there is approximately 12mm (1/2”) of playin the chain. Check the play at the mid point ofthe chain between the chain ring and the rear sprocket.
2 Use a spanner on each nut simultaneously tofully tighten the nuts.
3 Turn the cranks through at least one fullrevolution and check that eccentricity does not cause the chain to become too taut at any point.
f. Chain TensionHub Geared Cycles
1 This bike is fitted with an eccentric bottombracket. If the chain tension needs adjustment,loosen the two pinch bolts at the bottombracket and rotate it until there is approximately12mm (1/2") of play in the chain. Check theplay at the mid point of the chain ring and therear sprocket. Ensure that the two pinch boltsare securely tightened to lock the bottombracket in position.
2 Turn the cranks through at least one fullrevolution and check that eccentricity does not cause the chain to become too taut at any point.
Some bikes are equipped with a quick-releaseseat post binder. The seat post quick-releasebinder works exactly like the wheel quick-release(Section 4.A.1) While a quick release looks like along bolt with a lever on one end and a nut on theother, the quick release uses a cam action tofirmly clamp the seat post (see fig. 8).
WARNING: Riding with an improperly tightened seat post can allow the
saddle to turn or move and cause you to losecontrol and fall. Therefore:
1 Ask your Halfords Bikehut store to help youmake sure you know how to correctlyclamp your seat post.
2 Understand and apply the correcttechnique for clamping your seat postquick release.
3 Before you ride the bike, first check thatthe seat post is securely clamped.
Adjusting The Seat Post QuickRelease Mechanism
The action of the quick release cam squeezesthe seat collar around the seat post to hold theseat post securely in place. The amount ofclamping force is controlled by the tension-adjusting nut. Turning the tension-adjusting nutclockwise while keeping the cam lever fromrotating increases clamping force; turning itanticlockwise while keeping the cam lever fromrotating reduces clamping force. Less than half aturn of the tension-adjusting nut can make thedifference between safe and unsafe clampingforce.
WARNING: The full force of the cam action is needed to clamp the seat
post securely. Holding the nut with one handand turning the lever like a wing nut with theother hand until everything is as tight as youcan get it will not clamp the seat post safely.
Fig. 13
Bolt-on Rear Wheelin Dropouts
Halfords Generic manual V4 2018 Page 25

C. Brakes
WARNING: If you can fully close the quick release without wrapping your
fingers around the seat post or a frame tubefor leverage, and the lever does not leave a
clear imprint in the palm of your hand, thetension is insufficient. Open the lever; turnthe tension-adjusting nut clockwise a quarterturn; then try again.
WARNING:1 Riding with improperly adjusted brakes or
worn brake blocks is dangerous and canresult in serious injury or death.
2 Applying brakes too hard or too suddenlycan lock up a wheel, which could causeyou to lose control and fall. Sudden orexcessive application of the front brakemay pitch the rider over the handlebars,which may result in serious injury or death.
3 Some bicycle brakes, such as disc brakes(fig. 14) and V brakes (fig. 15), are extremelypowerful. Take extra care in becomingfamiliar with these brakes and exerciseparticular care when using them.
4 Disc brakes can get extremely hot withextended use. Be careful not to touch a discbrake until it has had plenty of time to cool.
5 See the brake manufacturer’s instructionsfor operation and care of your brakes. Ifyou do not have the manufacturer’sinstructions, see your Halfords Bikehutstore or contact the brake manufacturer.
1 Brake ControlAnd Features
It’s very important to your safety that you learnand remember which brake lever controls whichbrake on your bike. The right hand lever controlsthe front brake and the left controls the rear.
Make sure that your hands can reach andsqueeze the brake levers comfortably. If yourhands are too small to operate the leverscomfortably, consult your Halfords Bikehut storebefore riding the bike. The lever reach may beadjustable; or you may need a different brakelever design.
Most brakes have some form of quick-releasemechanism to allow the brake blocks to clear thetyre when a wheel is removed or reinstalled.When the brake quick release is in the openposition, the brakes are inoperative. Ask yourHalfords Bikehut store to make sure that you
understand the way the brake quick releaseworks on your bike (see figs. 14 through to 18)and check each time to make sure both brakeswork correctly before you get on the bike.
2 How Brakes Work
The braking action of a bicycle is a function ofthe friction between the brake surfaces – usuallythe brake blocks and the wheel rim.
To make sure that you have maximum frictionavailable, keep your wheel rims and brakeblocks clean and free of dirt, lubricants, waxesor polishes. Do not allow the build up of roadand trail dirt on the rims; this acts as an abrasiveand can cause the rims to wear to the pointwhere the sidewalls could fail.
If a rim fails the wheel will collapse, which couldresult in serious injury to the rider. Regularlycheck the rims and immediately replace anywheel where the rim shows significant wear.Some rims include wear indicator grooves ordimples in the braking surface. These rims areidentified by the application of rim wear warningstickers, shown below:
If the rim has worn to the bottom of the wear Indicator groove or dimple, at any point on thebraking surfaces, do not ride the cycle until therim has been replaced.
25
Fig. 14
DISC
Halfords Generic manual V4 2018 Page 26

26
Brakes are designed to control your speed, notjust to stop the bike. Maximum braking force foreach wheel occurs at the point just before thewheel “locks up” (stops rotating) and starts to skid.Once the tyre skids, you actually lose most of yourstopping force and all directional control. You needto practice slowing and stopping smoothly withoutlocking up a wheel. The technique is calledprogressive brake modulation. Instead of jerkingthe brake lever to the position where you thinkyou’ll generate appropriate braking force, squeezethe lever, progressively increasing the brakingforce. If you feel the wheel begin to lock up,release pressure just a little to keep the wheelrotating just short of lockup. It’s important todevelop a feel for the amount of brake leverpressure required for each wheel at differentspeeds and on different surfaces. To betterunderstand this, experiment a little by walking yourbike and applying different amounts of pressure toeach brake lever, until the wheel locks.
When you apply one or both brakes, the bikebegins to slow, but your body wants to continue atthe speed at which it was going. This causes atransfer of weight to the front wheel (or, underheavy braking, around the front wheel hub, whichcould send you flying over the handlebars).
A wheel with more weight on it will accept greaterbrake pressure before lockup; a wheel with lessweight will lock up with less brake pressure. So,as you apply brakes and your weight is transferredforward, you need to shift your body toward therear of the bike, to transfer weight back on to therear wheel; and at the same time, you need toboth decrease rear braking and increase frontbraking force. This is even more important ondescents, because descents shift weight forward.
Two keys to effective speed control and safestopping are controlling wheel lockup and weighttransfer. This weight transfer is even morepronounced if your bike has a front suspensionfork. Front suspension “dips” under braking,increasing the weight transfer (see also Section 4.F).
Practice braking and weight transfer techniqueswhere there is no traffic or other hazards and distractions.
Everything changes when you ride on loosesurfaces or in wet weather. Tyre adhesion isreduced, so the wheels have less cornering andbraking traction and can lock up with less brakeforce. Moisture or dirt on the brake blocks reducestheir ability to grip.
The best way to maintain control on loose or wetsurfaces is to go more slowly to begin with.
? Need assistance? Ask your local Halfords Bikehut store
Fig. 15
Fig. 16
Fig. 17
Fig. 18
open
open
open
push
Halfords Generic manual V4 2018 Page 27

3 Brake Power 5 BMX RotorModulatorsSome V brakes have a brake modulator fitted inthe control cable. This reduces the severity of theapplication of the brakes, helping the rider toachieve a smooth safe stop. Modulators are nonadjustable and do not require any specificmaintenance.
4 Brake Blocks And PadsBrake blocks must be replaced when they haveworn to the base of the grooves in the frictionsurface. Disc brake pads must be replaced whenthe friction material has worn to a thickness of0.5 mm (minimum of 1mm for Shimano pads).
1 How a Derailleur Drive Train Works
If your bicycle has a derailleur drive train, thegear-changing mechanism will have:• a rear cassette or freewheel sprocket cluster• a rear derailleur• usually a front derailleur• one or two shifters• one, two or three front sprockets called
chainrings• a drive chain
a. Shifting Gears
Your multi-speed bicycle will either have aderailler drive train or an internal gear hub drivetrain. There are several different types and stylesof shifting controls: levers, twist grips, triggers,combination shift/brake controls and pushbuttons. Ask your Halfords Bikehut store toexplain the type of shifting controls that are onyour bike, and to show you how they work.The vocabulary of shifting can be prettyconfusing. A downshift is a shift to a “lower” or“slower” gear, one which is easier to pedal. Anupshift is a shift to a “higher” or “faster”, harder topedal gear. What’s confusing is that what’shappening at the front derailleur is the oppositeof what’s happening at the rear derailleur (for
details, read the instructions on Shifting the RearDerailleur and Shifting the Front Derailleurbelow). For example, you can select a gearwhich will make pedaling easier on a hill (make adownshift) in one of two ways: shift the chaindown the gear “steps” to a smaller gear at thefront, or up the gear “steps” to a larger gear atthe rear. So, at the rear gear cluster, what iscalled a downshift looks like an upshift. The wayto keep things straight is to remember thatshifting the chain in towards the centreline of thebike is for accelerating and climbing and is calleda downshift. Moving the chain out or away fromthe centreline of the bike is for speed and iscalled an upshift.
Whether upshifting or downshifting, the bicyclederailleur system design requires that the drivechain be moving forward and be under at leastsome tension. A derailleur will shift only if you arepedaling forward.
CAUTION: Never move the shifter whilst stationary, whilst pedalling
backwards, or pedal backwards immediatelyafter having moved the shifter. This could
For best performance and braking power new disc brake pads and brake blocks need to be ‘bedded in’. ‘Bed in’ the brakes by riding at a moderate speed and firmly braking to a walking pace, repeat this several times. Then ride at a faster speed and brake very firmly to a walking pace, several times.
jam the chain and cause serious damage tothe bicycle.
D. Shifting Gears
27
Halfords Generic manual V4 2018 Page 28
Your multi-speed bicycle will have a derailleur drive train or an internal gear hub drive train.
Some BMX bikes are fitted with a rotor beneath the handlebars. This device connects the cables between the brake lever and the rear brake, whilst allowing the rider to rotate the handlebars through 360 degrees. The threaded cable adjusters fitted here must be adjusted carefully to ensure the correct operation of the rear brake. Always check that the rear brake is functioning correctly after making any cable adjustments.
? Need assistance? Ask your local Halfords Bikehut store 28
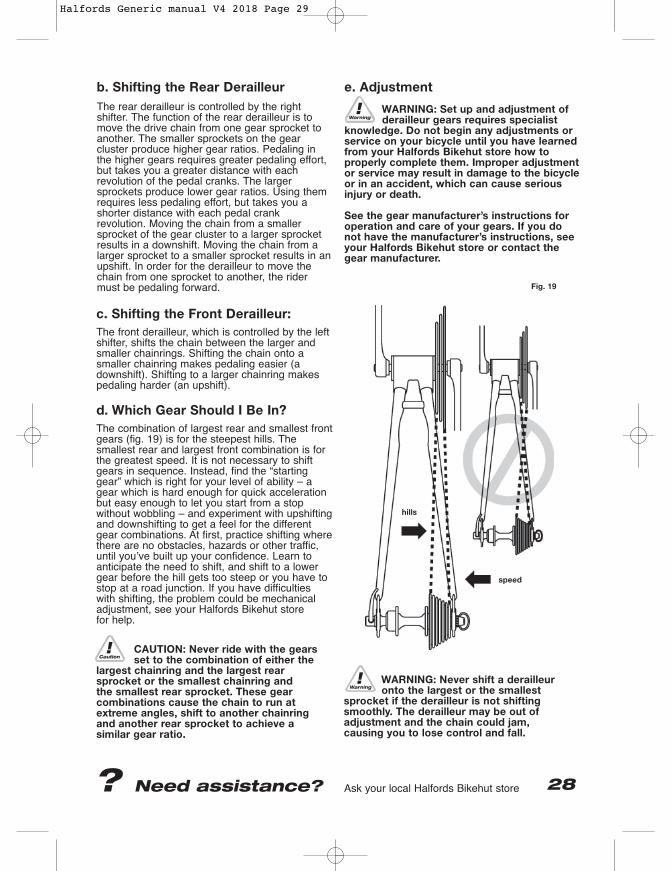
c. Shifting the Front Derailleur:The front derailleur, which is controlled by the leftshifter, shifts the chain between the larger andsmaller chainrings. Shifting the chain onto asmaller chainring makes pedaling easier (adownshift). Shifting to a larger chainring makespedaling harder (an upshift).
d. Which Gear Should I Be In?The combination of largest rear and smallest frontgears (fig. 19) is for the steepest hills. Thesmallest rear and largest front combination is forthe greatest speed. It is not necessary to shiftgears in sequence. Instead, find the “startinggear” which is right for your level of ability – agear which is hard enough for quick accelerationbut easy enough to let you start from a stopwithout wobbling – and experiment with upshiftingand downshifting to get a feel for the differentgear combinations. At first, practice shifting wherethere are no obstacles, hazards or other traffic,until you’ve built up your confidence. Learn toanticipate the need to shift, and shift to a lowergear before the hill gets too steep or you have tostop at a road junction. If you have difficultieswith shifting, the problem could be mechanicaladjustment, see your Halfords Bikehut store for help.
CAUTION: Never ride with the gears set to the combination of either the
largest chainring and the largest rearsprocket or the smallest chainring and the smallest rear sprocket. These gearcombinations cause the chain to run atextreme angles, shift to another chainring and another rear sprocket to achieve a similar gear ratio.
WARNING: Never shift a derailleur onto the largest or the smallest
sprocket if the derailleur is not shiftingsmoothly. The derailleur may be out ofadjustment and the chain could jam, causing you to lose control and fall.
Fig. 19
speed
hills
Halfords Generic manual V4 2018 Page 29
e. Adjustment
WARNING: Set up and adjustment of derailleur gears requires specialist
knowledge. Do not begin any adjustments orservice on your bicycle until you have learnedfrom your Halfords Bikehut store how toproperly complete them. Improper adjustmentor service may result in damage to the bicycleor in an accident, which can cause seriousinjury or death.
See the gear manufacturer’s instructions foroperation and care of your gears. If you donot have the manufacturer’s instructions, seeyour Halfords Bikehut store or contact thegear manufacturer.
b. Shifting the Rear DerailleurThe rear derailleur is controlled by the rightshifter. The function of the rear derailleur is tomove the drive chain from one gear sprocket toanother. The smaller sprockets on the gearcluster produce higher gear ratios. Pedaling inthe higher gears requires greater pedaling effort,but takes you a greater distance with eachrevolution of the pedal cranks. The largersprockets produce lower gear ratios. Using themrequires less pedaling effort, but takes you ashorter distance with each pedal crankrevolution. Moving the chain from a smallersprocket of the gear cluster to a larger sprocketresults in a downshift. Moving the chain from alarger sprocket to a smaller sprocket results in anupshift. In order for the derailleur to move thechain from one sprocket to another, the ridermust be pedaling forward.

2 How An InternalGear Hub DriveTrain Works
If your bicycle has an internal gear hub drivetrain, the gear changing mechanism will consistof:• a 3, 5, 7, 8, 9 or possibly 12 speed internal
gear hub• one, or sometimes two shifters• one or two control cables• one front sprocket called a chainring• a drive chain
a. Shifting Internal Gear Hub Gears
Shifting with an internal gear hub drive train issimply a matter of moving the shifter to theindicated position for the desired gear. After youhave moved the shifter to the gear position ofyour choice, ease the pressure on the pedals foran instant to allow the hub to complete the shift.
b. Which Gear Should I Be In?
The numerically lowest gear (1) is for thesteepest hills. The numerically largest gear (3, 5,7, 8, 9 or 12, depending on the number ofspeeds of your hub) is for the greatest speed.Shifting from an easier, “slower” gear (like 1) to aharder, “faster” gear (like 2 or 3) is called anupshift. Shifting from a harder, “faster” gear to aneasier, “slower” gear is called a downshift. It isnot necessary to shift gears in sequence.Instead, find the “starting gear” for the conditions– a gear which is hard enough for quickacceleration but easy enough to let you startfrom a stop without wobbling – and experimentwith upshifting and downshifting to get a feel forthe different gears. At first, practice shiftingwhere there are no obstacles, hazards or othertraffic, until you’ve built up your confidence.Learn to anticipate the need to shift, and shift toa lower gear before the hill gets too steep. If youhave difficulties with shifting, the problem couldbe mechanical adjustment, see your HalfordsBikehut store for help.
E. Pedals
1 Toe Overlap is when your toe can touch thefront wheel when you turn the handlebars tosteer while a pedal is in the forward mostposition. This is possible if you fit larger / widertyres or longer replacement cranks, and isavoided by keeping the inside pedal up and theoutside pedal down when making sharp turns.On any bicycle, this turning technique willprevent the inside pedal from striking the ground.
WARNING: Toe Overlap could cause you to lose control and fall. Ask your
Halfords Bikehut store to help you determineif the combination of frame size, crank armlength, pedal design and shoes you will useresults in pedal overlap.
Whether you have overlap or not, you mustkeep the inside pedal up and the outsidepedal down for maximum ground clearancewhen making sharp turns.
2 Some bicycles come equipped with pedals thathave sharp and potentially dangeroussurfaces. These surfaces are designed to addsafety by increasing grip between the rider’s
shoe and the pedal. If your bicycle has thistype of high-performance pedal, you must takeextra care to avoid serious injury from thepedals’ sharp surfaces. Based on your ridingstyle or skill level, you may prefer a lessaggressive pedal design, or chose to ride withshin pads. Your Halfords Bikehut store canshow you a number of options and makesuitable recommendations.
3 Toeclips and straps are a means to keep feetcorrectly positioned and engaged with thepedals. The toeclip positions the ball of the footover the pedal spindle, which gives maximumpedaling power. The toe strap, when tightened,keeps the foot engaged throughout the rotationcycle of the pedal. While toeclips and strapsgive some benefit with any kind of shoe, theywork most effectively with cycling shoesdesigned for use with toeclips. Your HalfordsBikehut store can explain how toeclips andstraps work. Shoes with deep treaded soles orwelts, which might make it more difficult for youto remove your foot, should not be used withtoeclips and straps.
29
Halfords Generic manual V4 2018 Page 30

? Need assistance? Ask your local Halfords Bikehut store 30
F. Bicycle Suspension
WARNING: Getting into and out of pedals with toeclips and straps
requires skill which can only be acquired withpractice. Until it becomes a reflex action, thistechnique requires concentration, which candistract your attention and cause you to losecontrol and fall. Practice the use of toeclipsand straps where there are no obstacles,hazards or traffic. Keep the straps loose, anddon’t tighten them until your technique andconfidence in getting in and out of the pedalswarrants it. Never ride in traffic with your toestraps tight.
4 Clipless pedals (sometimes called “SPD typepedals”) are another means to keep feetsecurely in the correct position for maximumpedaling efficiency. They have a plate, called a“cleat,” on the sole of the shoe, which clicksinto a mating spring-loaded fixture on thepedal. They only engage or disengage with avery specific motion, which must be practiceduntil it becomes instinctive. Clipless pedalsrequire shoes and cleats, which arecompatible with the make and model of pedalbeing used.
Many clipless pedals are designed to allow therider to adjust the amount of force needed to
engage or disengage the foot. Follow thepedal manufacturer’s instructions, or ask yourHalfords Bikehut store to show you how tomake this adjustment. Use the easiest settinguntil engaging and disengaging becomes areflex action, but always make sure that thereis sufficient tension to prevent unintendedrelease of your foot from the pedal.
WARNING: Clipless pedals are intended for use with shoes
specifically made to fit them and aredesigned to firmly keep the foot engagedwith the pedal. Using shoes which do notengage the pedals correctly is dangerous.
Practice is required to learn to engage anddisengage the foot safely. Until engaging anddisengaging the foot becomes a reflex action, thetechnique requires concentration which candistract your attention and cause you to losecontrol and fall. Practice engaging anddisengaging clipless pedals in a place wherethere are no obstacles, hazards or traffic; and besure to follow the pedal manufacturer’s setupand service instructions. If you do not have themanufacturer’s instructions, see your HalfordsBikehut store or contact the manufacturer.Many mountain bike and BMX pedals are designed with high grip tread surfaces. These can be rougherthan ordinary bicycle pedals and they may have sharper edges. Riders should wear adequate safety protection.
Many bicycles are equipped with suspensionsystems. There are many different types ofsuspension systems – too many to deal withindividually in this Manual. If your bicycle has asuspension system of any kind, be sure to readand follow the suspension manufacturer’s setupand service instructions. If you do not have themanufacturer’s instructions, see your HalfordsBikehut store or contact the manufacturer.
Winding a rear suspension spring tension nutanti-clockwise will increase the travel of the rearsuspension, for a given load. However, neverreduce this pre-tension to such an extent that thespring becomes loose when you lift the bike offthe ground.
Regularly inspect all suspension joints andbushes for wear. If there is excessive play do not ride the bicycle until that joint or bush hasbeen replaced.
WARNING: Failure to maintain, check and properly adjust the suspension
system may result in suspension malfunction,which may cause you to lose control and fall.
If your bike has suspension, the increased speedyou may develop also increases your risk ofinjury. For example, when braking, the front of asuspended bike dips. You could lose control andfall if you do not have experience with thissystem. Learn to handle your suspension systemsafely. See also Section 4.C.
Halfords Generic manual V4 2018 Page 31

WARNING: Changing suspension adjustment can change the handling
and braking characteristics of your bicycle.Never change suspension adjustment unlessyou are thoroughly familiar with thesuspension system manufacturer’sinstructions and recommendations, andalways check for changes in the handling andbraking characteristics of the bicycle after asuspension adjustment by taking a carefultest ride in a hazard-free area.
Suspension can increase control and comfort byallowing the wheels to better follow the terrain.This enhanced capability may allow you to ridefaster; but you must not confuse the enhancedcapabilities of the bicycle with your owncapabilities as a rider. Increasing your skill willtake time and practice. Proceed carefully untilyou have learned to handle the full capabilities ofyour bike.
CAUTION: Not all bicycles can be safely retrofitted with some types of
suspension systems. Before retrofitting abicycle with any suspension, check with thebicycle’s manufacturer to make sure thatwhat you want to do is compatible with thebicycle’s design.
G. Tyres and Tubes
1 Tyres
Bicycle tyres are available in many designs and specifications, ranging from general-purposedesigns to tyres designed to perform best undervery specific weather or terrain conditions. If,once you’ve gained experience with your newbike, you feel that a different tyre might bettersuit your riding needs, your Halfords Bikehutstore can help you select the most appropriatedesign.
The size, pressure rating, and on some highperformance tyres the specific recommendeduse, are marked on the sidewall of the tyre (seefig. 20). The part of this information, which ismost important to you, is tyre pressure.
WARNING: Never inflate a tyre beyondthe maximum pressure marked on the
tyre’s sidewall. Exceeding the recommendedmaximum pressure may blow the tyre off therim, which could cause damage to the bikeand injury to the rider and bystanders.
The best and safest way to inflate a bicycle tyreto the correct pressure is with a bicycle pump,which has a built-in pressure gauge.
WARNING: There is a safety risk in using petrol station air hoses or other
air compressors. They are not made forbicycle tyres. They move a large volume of airvery rapidly, and will raise the pressure inyour tyre very rapidly, which could cause thetube to explode.
31
Fig. 20
Halfords Generic manual V4 2018 Page 32

? Need assistance? Ask your local Halfords Bikehut store 32
Tyre pressure is given either as maximumpressure or as a pressure range. How a tyreperforms under different terrain or weatherconditions depends largely on tyre pressure.Inflating the tyre to near its maximumrecommended pressure gives the lowest rollingresistance; but also produces the harshest ride.High pressures work best on smooth, drypavement. Very low pressures, at the bottom ofthe recommended pressure range, give the bestperformance on smooth, slick terrain such ashard-packed clay, and on deep, loose surfacessuch as deep, dry sand. Tyre pressure that is toolow for your weight and the riding conditions cancause a puncture of the tube by allowing the tyreto deform sufficiently to pinch the inner tubebetween the rim and the riding surface. Ask yourHalfords Bikehut store to recommend the besttyre pressure for the kind of riding you will mostoften do. Inflate your tyres to that pressure, usinga pressure gauge. Then, check inflation asdescribed in Section 1.C so you’ll know howcorrectly inflated tyres should look and feel whenyou don’t have access to a gauge. Some tyresmay need to be brought up to pressure everyweek or two.
Some special high-performance tyres haveunidirectional treads: their tread pattern isdesigned to work better in one direction than inthe other. The sidewall marking of aunidirectional tyre will have an arrow showing thecorrect rotation direction. If your bike hasunidirectional tyres, make sure that they aremounted to rotate in the correct direction.
2 Tyre ValvesThere are primarily two kinds of bicycle tubevalves: The Schraeder Valve and the PrestaValve. The bicycle pump you use must have the fitting appropriate to the valve stems on your bicycle.
The Schraeder valve is like the valve on a cartyre. To inflate a Schraeder valve tube, removethe valve cap and clamp the pump fitting ontothe end of the valve stem. To let air out of aSchraeder valve, depress the pin in the end ofthe valve stem with the end of a key or otherappropriate object.
The Presta valve (fig. 21) has a narrowerdiameter and is only found on bicycle tyres. To inflate a Presta valve tube using a Prestaheaded bicycle pump, remove the valve cap;unscrew (anticlockwise) the valve stem lock nut; and push down on the valve stem to free it up.Then push the pump head on to the valve head,and inflate.
To inflate a Presta valve with a Schraeder pumpfitting, you’ll need a Presta adapter (available atyour Halfords Bikehut store) which screws on tothe valve stem once you’ve freed up the valve.The adapter fits into the Schraeder pump fitting.Close the valve after inflation. To let air out of aPresta valve, open up the valve stem lock nutand depress the valve stem.
WARNING: Patching a tube is an emergency repair. If you do not apply
the patch correctly or apply several patches,the tube can fail, resulting in possible tubefailure, which could cause you to lose controland fall. Replace a patched tube as soon aspossible.
Fig. 21turn locknut
Presta valve
Halfords Generic manual V4 2018 Page 33
H. BMXStunt pegsYour BMX bike may come equipped with stunt pegs, regularly check that the stunt pegs are securely tightened. If your BMX has extended wheel axles, with two sets of wheel nuts on each axle, it will be suitable for fitting aftermarket stunt pegs.

WARNING: Technological advances have made bicycles and bicycle
components more complex, and the pace ofinnovation is increasing. It is impossible forthis manual to provide all the informationrequired to properly repair and/or maintainyour bicycle. In order to help minimize thechances of an accident and possible injury, itis critical that you have any repair ormaintenance, which is not specificallydescribed in this manual, performed by yourHalfords Bikehut store. Equally important isthat your individual maintenancerequirements will be determined byeverything from your riding style togeographic location. Consult your HalfordsBikehut store for help in determining yourmaintenance requirements.
WARNING: Many bicycle service and repair tasks require special
knowledge and tools. Do not begin anyadjustments or service on your bicycle untilyou have learned from your Halfords Bikehutstore how to properly complete them.Improper adjustment or service may result indamage to the bicycle or in an accident,which can cause serious injury or death.
If you want to learn to do major service andrepair work on your bike:
2 Ask your Halfords Bikehut store for copies of
1 Check the many useful How to Guides / Videos and Expert Advice articles available on Halfords.com or Halfords.ie at Cycling / Help & Advice.
the manufacturer’s installation and serviceinstructions for the components on your bike,or contact the component manufacturer.
3 Ask your Halfords Bikehut store to recommenda book on bicycle repair.
We recommend that you ask your HalfordsBikehut store to check the quality of your workthe first time you work on something and beforeyou ride the bike, just to make sure that you dideverything correctly. Since that will require thetime of a mechanic, there may be a modestcharge for this service.
A. Service Intervals
5. Servicing
Some service and maintenance can and shouldbe performed by the owner, and requires nospecial tools or knowledge beyond what ispresented in this manual.
The following are examples of the type of serviceyou should perform yourself. All other service,maintenance and repairs should be performed ina properly equipped facility by a qualified bicyclemechanic using the correct tools and proceduresspecified by the manufacturer.
1 Break-in Period: Your bike will last longer andwork better if you break it in before riding it hard. Control cables and wheel spokes may stretch or “seat” when a new bike is first used and may require readjustment by your Halfords Bikehut store. Your Mechanical Safety Check (Section 1.C) will help you identify some things that need readjustment. But even if everything seems fine to you, it’s best to take your bike back to the Halfords Bikehut store for a checkup.
Another way to judge when it’s time for the firstcheckup is to bring the bike in after three tofive hours of hard off-road use, or about 10 to15 hours of on-road or more casual off-roaduse. But if you think something is wrong withthe bike, take it to your Halfords Bikehut storebefore riding it again.
2 Before every ride: carry out the MechanicalSafety Check (Section 1.C)
3 After every long or hard ride: especially if thebike has been exposed to water or grit; or atleast every 100 miles: Clean the bike andlightly oil the chain. Wipe off any excess oil.Apply an aerosol spray lubricant to the brakeand gear control cables, to ensure that theymove freely.
The need for lubrication is affected by theclimate in which you ride. Talk to yourHalfords Bikehut store about the bestlubricants and the recommended lubricationfrequency for your area.
33
Halfords Generic manual V4 2018 Page 34

? Need assistance? Ask your local Halfords Bikehut store 34
4 After every long or hard ride or after every 10to 20 hours of riding:
• Squeeze the front brake and rock the bikeforward and back. Everything feel solid? If youfeel a clunk with each forward or backwardmovement of the bike, you probably have aloose headset. Have your Halfords Bikehutstore check it.
• Lift the front wheel off the ground and swing itfrom side to side. Feel smooth? If you feel anybinding or roughness in the steering, you mayhave a tight headset. Have your HalfordsBikehut store check it.
• Grab one pedal and rock it toward and awayfrom the centreline of the bike; then do thesame with the other pedal. Anything feelloose? If so, have your Halfords Bikehut storecheck it.
• Take a look at the brake blocks. Starting tolook worn or not hitting the wheel rimsquarely? Time to have the Halfords Bikehutstore adjust or replace them.
• Carefully check the control cables and cablehousings. Any rust? Kinks? Fraying? If so,have your Halfords Bikehut store replace them.
• Squeeze each adjoining pair of spokes oneither side of each wheel between your thumband index finger. Do they all feel about thesame? If any feel loose, have your HalfordsBikehut store check the wheel for tension and trueness.
• Check to make sure that all parts andaccessories are still secure, and tighten anythat are not.
• Check the frame, particularly in the areaaround all tube joints; the handlebars; thestem; and the seat post for any deepscratches, cracks or discoloration. These aresigns of stress-caused fatigue and indicatethat a part is at the end of its useful life andneeds to be replaced. See Appendix A.
WARNING: Like any mechanical device, a bicycle and its components
are subject to wear and stress. Differentmaterials and mechanisms wear or fatiguefrom stress at different rates and havedifferent life cycles. If a component’s lifecycle is exceeded, the component cansuddenly and catastrophically fail, causingserious injury or death to the rider. Scratches,cracks, fraying and discoloration are signs ofstress-caused fatigue and indicate that a partis at the end of its useful life and needs to bereplaced. While the materials andworkmanship of your bicycle or of individualcomponents may be covered by a warrantyfor a specified period of time by themanufacturer, this is no guarantee that theproduct will last the term of the warranty.Product life is often related to the kind ofriding you do and to the treatment to whichyou submit the bicycle. The bicycle’swarranty is not meant to suggest that thebicycle cannot be broken or will last forever.It only means that the bicycle is coveredsubject to the terms of the warranty. Pleasebe sure to read Appendix A, Life ExpectancyOf Your Bike And Its Components, starting onpage 35.
5 If either brake lever fails the Mechanical SafetyCheck (Section 1.C), don’t ride the bike. Haveyour Halfords Bikehut store check the brakes.
6 If the chain won’t shift smoothly and quietlyfrom gear to gear, the derailleur is out ofadjustment. See your Halfords Bikehut store.
B. If Your Bicycle SustainsAn Impact
First check yourself for injuries, and take care of them as best you can. Seek medical help if necessary. Next check your bike for damage. After any crash take your bike to your Halfords Bikehut store for a thorough check.
Carbon frames and forks require very careful examination after any crash. See Appendix A, Life expectancy of your bike and its components
WARNING: A crash or other impact can put extraordinary stresses on
bicycle components, causing them to fatigueprematurely. Components suffering fromstress fatigue can fail suddenly andcatastrophically, causing loss of control,serious injury or death. Even if a helmet thathas sustained an impact is not broken, itmust be replaced. The structure of the helmetis deformed in absorbing the impact and thisdamage will reduce the protection it offers.
Halfords Generic manual V4 2018 Page 35

Appendix ALife Expectancy Of Your Bike And Its Components
1 Nothing Lasts Forever, Including Your Bike
When the useful life of your bike or its components is over, continued use is hazardous.Every bicycle and its component parts have a finite, limited useful life. The length of that life willvary with the construction and materials used in the frame and components; the maintenanceand care the frame and components receive over their life; and the type and amount of use towhich the frame and components are subjected.
Use in competitive events, trick riding, ramp riding, jumping, aggressive riding, riding on severeterrain, riding in severe climates, riding with heavy loads, commercial activities and other typesof non-standard use can dramatically shorten the life of the frame and components. Any one ora combination of these conditions may result in an unpredictable failure.
All aspects of use being identical, lightweight bicycles and their components will usually have ashorter life than heavier bicycles and their components. In selecting a lightweight bicycle orcomponents you are making a tradeoff, favoring the higher performance that comes with lighterweight over longevity. So, If you choose lightweight, high performance equipment, be sure tohave it inspected frequently.
You should have your bicycle and its components checked periodically by your Halfords Bikehutstore for indicators of stress and/or potential failure, including cracks, deformation, corrosion,paint peeling, dents, and any other indicators of potential problems, inappropriate use or abuse.These are important safety checks and very important to help prevent accidents, bodily injury tothe rider and shortened product life.
2 PerspectiveToday’s high-performance bicycles require frequent and careful inspection and service. In thisAppendix we try to explain some underlying material science basics and how they relate to yourbicycle. We discuss some of the trade-offs made in designing your bicycle and what you canexpect from your bicycle; and we provide important, basic guidelines on how to maintain andinspect it. We cannot teach you everything you need to know to properly inspect and serviceyour bicycle; and that is why we repeatedly urge you to take your bicycle to your HalfordsBikehut store for professional care and attention.
WARNING: Frequent inspection of your bike is important to your safety.
Follow the Mechanical Safety Check in Section 1.C of this Manual before every ride.
Periodic, more detailed inspection of your bicycle is important. How often this moredetailed inspection is needed depends upon you. You, the rider/owner, have control andknowledge of how often you use your bike, how hard you use it and where you use it.Because your Halfords Bikehut store cannot track your use, you must take responsibilityfor periodically bringing your bike to your Halfords Bikehut store for inspection andservice. Your Halfords Bikehut store will help you decide what frequency of inspectionand service is appropriate for how and where you use your bike.
For your safety, understanding and communication with your Halfords Bikehut store, weurge you to read this Appendix in its entirety.
The materials used to make your bike determine how and how frequently to inspect.
Ignoring this WARNING can lead to frame, fork or other component failure, which canresult in serious injury or death.
35
Halfords Generic manual V4 2018 Page 36

? Need assistance? Ask your local Halfords Bikehut store 36
A. Understanding Metals
Steel is the traditional material for building bicycle frames. It has good characteristics, but inhigh performance bicycles, steel has been largely replaced by aluminium and occasionally bytitanium. The main factor driving this change is interest by cycling enthusiasts in lighter bicycles.
Properties of MetalsPlease understand that there is no simple statement that can be made that characterizes theuse of different metals for bicycles. What is true is how the metal chosen is applied is muchmore important than the material alone. One must look at the way the bike is designed, tested,manufactured, supported along with the characteristics of the metal rather than seeking asimplistic answer.
Metals vary widely in their resistance to corrosion. Steel must be protected or rust will attack it.Aluminium and titanium quickly develop an oxide film that protects the metal from furthercorrosion. Both are therefore quite resistant to corrosion. Aluminium is not perfectly corrosionresistant, and particular care must be used where it contacts other metals as galvanic corrosioncan occur.
Metals are comparatively ductile. Ductile means bending, buckling and stretching beforebreaking. Generally speaking, of the common bicycle frame building materials steel is the mostductile, titanium less ductile, followed by aluminium.
Metals vary in density. Density is weight per unit of material. Steel weighs 7.8 grams/cm3(grams per cubic centimeter), titanium 4.5 grams/cm3, aluminium 2.75 grams/cm3. Contrastthese numbers with carbon fibre composite at 1.45 grams/cm3.
Metals are subject to fatigue. With enough cycles of use, at high enough loads, metals willeventually develop cracks that lead to failure. It is very important that you read the basics ofmetal fatigue below.
Let’s say you hit a kerb, ditch, rock, car, another cyclist or other object. At any speed above afast walk, your body will continue to move forward, momentum carrying you over the front of thebike. You cannot and will not stay on the bike, and what happens to the frame, fork and othercomponents is irrelevant to what happens to your body. What should you expect from yourmetal frame? It depends on many complex factors, which is why we tell you thatcrashworthiness cannot be a design criteria. With that important note, we can tell you that if theimpact is hard enough the fork or frame may be bent or buckled.
On a steel bike, the steel fork may be severely bent and the frame undamaged. Aluminium isless ductile than steel, but you can expect the fork and frame to be bent or buckled. Hit harderand the top tube may be broken in tension and the down tube buckled. Hit harder and the toptube may be broken, the down tube buckled and broken, leaving the head tube and forkseparated from the main triangle. When a metal bike crashes, you will usually see someevidence of this ductility in bent, buckled or folded metal.
It is now common for the main frame to be made of metal and the fork of carbon fibre (seeSection B, Understanding composites below). The relative ductility of metals and the lack ofductility of carbon fibre, means that in a crash scenario, you can expect some bending orbucking in the metal but none in the carbon. Below a given load the carbon fork may be intacteven though the frame is damaged. Above that load the carbon fork will be completely broken.
Halfords Generic manual V4 2018 Page 37
The Basics of Metal FatigueCommon sense tells us that nothing that is used lasts forever. The more you use something,and the harder you use it, and the worse the conditions you use it in, the shorter its life.
Fatigue is the term used to describe accumulated damage to a part caused by repeatedloading. To cause fatigue damage, the load the part receives must be great enough. A crude,often-used example is bending a paper clip back and forth (repeated loading) until it breaks.This simple definition will help you understand that fatigue has nothing to do with time or age. A bicycle in a garage does not fatigue. Fatigue happens only through use.
So what kind of “damage” are we talking about? On a microscopic level, a crack forms in ahighly stressed area. As the load is repeatedly applied, the crack grows. At some point thecrack becomes visible to the naked eye. Eventually it becomes so large that the part is tooweak to carry the load that it could carry without the crack. At that point there can be acomplete and immediate failure of the part.
One can design a part that is so strong that fatigue life is nearly infinite. This requires a lot ofmaterial and a lot of weight. Any structure that must be light and strong will have a finite fatiguelife. Aircraft, racing cars, motorcycles all have parts with finite fatigue lives. If you wanted abicycle with an infinite fatigue life, it would weigh far more than any bicycle sold today. So weall make a tradeoff: the wonderful, lightweight performance we want requires that we inspectthe structure.
A Few Things to Think About
In most cases a fatigue crack is not a defect. It is a sign that the part has worn out; a sign thepart has reached the end of its useful life.
When your car tyres wear down to the point that the tread bars are contacting the road, thosetyres are not defective. Those tyres are worn out and the tread bar says “time for replacement.”
When a metal part shows a fatigue crack, it is worn out. The crack says “time for replacement.”
37
• ONCE A CRACKS STARTS IT CAN GROW AND GROW FAST.Think about the crack as forming a pathway to failure. Thismeans that any crack is potentially dangerous and will onlybecome more dangerous.
• CORROSION SPEEDS DAMAGE.Cracks grow more quickly when they are in a corrosiveenvironment.Think about the corrosive solution further weakening andextending the crack.
• STAINS AND DISCOLORATION CAN OCCURNEAR A CRACK.Such staining may be a warning sign that a crack exists.
• SIGNIFICANT SCRATCHES, GOUGES, DENTS OR SCORINGCREATE STARTING POINTS FOR CRACKS.Think about the cut surface as a focal point for stress (in factengineers call such areas “stress raisers,” areas where thestress is increased). Perhaps you have seen glass cut? Recallhow the glass was scored and then broke on the scored line.
• SOME CRACKS (particularly larger ones) MAY MAKECREAKING NOISES AS YOU RIDE.Think about such a noise as a serious warning signal. Note thata well-maintained bicycle will be very quiet and free of creaksand squeaks.
SIMPLE RULE 1: If you find a crack, replacethe part.
SIMPLE RULE 2: Clean your bike, lubricateyour bike, protect your bikefrom salt, remove any saltas soon as you can.
SIMPLE RULE 3: Inspect and investigate anystaining to see if it isassociated with a crack.
SIMPLE RULE 4: Do not scratch, gouge orscore any surface. If you do,pay frequent attention to thisarea or replace the part.
SIMPLE RULE 5:Investigate and find thesource of any noise. It maynot a be a crack, but what-ever is causing the noiseshould be fixed promptly.
Halfords Generic manual V4 2018 Page 38

? Need assistance? Ask your local Halfords Bikehut store 38
Fatigue is not a Perfectly Predictable ScienceFatigue is not a perfectly predictable science, but here are some general factors to help youand your Halfords Bikehut store determine how often your bicycle should be inspected. Themore you fit the “shorten product life” profile, the more frequent your need to inspect. The moreyou fit the “lengthen product life” profile, the less frequently you will need to inspect.
Factors that shorten product life:
• Hard, harsh riding style
• ”Hits,” crashes, jumps, other shocks to bike
• High mileage
• Higher body weight
• Stronger, more fit, more aggressive rider
• Corrosive environment (wet, salt air, winterroad salt, accumulated sweat)
• Presence of abrasive mud, dirt, sand,soil in the riding environment
Factors that lengthen product life:
• Smooth, fluid riding style
• No “hits,” crashes, jumps, other shocks to bike
• Low mileage
• Lower body weight
• Less aggressive rider
• Non-corrosive environment (dry, salt-free air)
• Clean riding environment
WARNING: Do not ride a bicycle or component with any crack, bulge or dent, even a small one. Riding a cracked frame, fork or component could lead to
complete failure, with risk of serious injury or death.
B. Understanding
Composites
All riders must understand a fundamental reality of composites. Composite materials constructedof carbon fibres are strong and light, but when crashed or overloaded, carbon fibres do not bend,they break.
What Are Composites?The term “composites” refers to the fact that a part or parts are made up of different componentsor materials. You’ve heard the term “carbon fibre bike.” This really means “composite bike.”
Carbon fibre composites are typically a strong, light fibre in a matrix of resin, moulded to form ashape. Carbon composites are light relative to metals. Steel weighs 7.8 grams/cm3 (grams percubic centimeter), titanium 4.5 grams/cm3, aluminium 2.75 grams/cm3. Contrast these numberswith carbon fibre composite at 1.45 grams/cm3.
The composites with the best strength-to-weight ratios are made of carbon fibre in a matrix ofepoxy resin. The epoxy matrix bonds the carbon fibres together, transfers load to other fibres,and provides a smooth outer surface. The carbon fibres are the “skeleton” that carries the load.
Why Are Composites Used?Unlike metals, which have uniform properties in all directions (engineers call this isotropic),carbon fibres can be placed in specific orientations to optimize the structure for particular loads.The choice of where to place the carbon fibres gives engineers a powerful tool to create strong,light bicycles. Engineers may also orient fibres to suit other goals such as comfort and vibration damping.
Halfords Generic manual V4 2018 Page 39

Carbon fibre composites are very corrosion resistant, much more so than most metals. Thinkabout carbon fibre or fibreglass boats.Carbon fibre materials have a very high strength-to-weight ratio.
What are the Limits of Composites?Well designed “composite” or carbon fibre bicycles and components have long fatigue lives,usually better than their metal equivalents.While fatigue life is an advantage of carbon fibre, you must still regularly inspect your carbonfibre frame, fork, or components. Carbon fibre composites are not ductile. Once a carbonstructure is overloaded, it will not bend; it will break. At and near the break, there will be rough,sharp edges and maybe delamination of carbon fibre or carbon fibre fabric layers. There will beno bending, buckling, or stretching.
If you Hit Something or have a Crash, What can you Expect from your Carbon Fibre Bike?Let’s say you hit a kerb, ditch, rock, car, other cyclist or other object. At any speed above a fastwalk, your body will continue to move forward, the momentum carrying you over the front ofthe bike. You cannot and will not stay on the bike and what happens to the frame fork andother components is irrelevant to what happens to your body.What should you expect from your carbon frame? It depends on many complex factors, whichis why we tell you that crash worthiness cannot be a design criteria. With that important note,we can tell you that if the impact is hard enough, the fork or frame may be completely broken.Note the significant difference in behavior between carbon and metal (see Section 2. A,Understanding metals in this Appendix). Even if the carbon frame was twice as strong as ametal frame, once the carbon is overloaded it will not bend, it will break completely.
Inspection of Composite Frame, Fork, and Components Cracks:Inspect for cracks, broken, or splintered areas. Any crack is serious. Do not ride any bicycle where the frame or any component has a crackof any size.
If your bike has a carbon fibre fork steerer tube, this part of the fork must be inspected with great care after any impact or crash. The fork has to be completely removed from the frame head tube,to allow close examination of the full length of the steerer tube for any signs of cracking or delamination.
Delamination:Delamination is serious damage. Composites are made from layers of fabric. Delaminationmeans that the layers of fabric are no longer bonded together. Do not ride any bicycle orcomponent that has any delamination. These are some delamination clues:• A cloudy or white area. This kind of area looks different from the ordinary undamaged areas.
Undamaged areas will look glassy, shiny, or “deep,” as if one was looking into a clear liquid.Delaminated areas will look opaque and cloudy.
• Bulging or deformed shape. If delamination occurs, the surface shape may change. Thesurface may have a bump, a bulge, soft spot, or not be smooth and fair.
• A difference in sound when tapping the surface. If you gently tap the surface of anundamaged composite you will hear a consistent sound, usually a hard, sharp sound. If youthen tap a delaminated area, you will hear a different sound, usually duller, less sharp.
39
Halfords Generic manual V4 2018 Page 40

? Need assistance? Ask your local Halfords Bikehut store 40
Unusual Noises:Either a crack or delamination can cause creaking noises while riding. Think about such anoise as a serious warning signal. A well maintained bicycle will be very quiet and free ofcreaks and squeaks. Investigate and find the source of any noise. It may not be a crack ordelamination, but whatever is causing the noise must be fixed before riding.
WARNING: Do not ride a bicycle or component with any delamination or crack. Riding a delaminated or cracked frame, fork or other component could lead to
complete failure, with risk of serious injury or death.
C. UnderstandingComponents
It is often necessary to remove and disassemble components in order to properly and carefullyinspect them. This is a job for a professional bicycle mechanic with the special tools, skills andexperience to inspect and service today’s high-tech high-performance bicycles and theircomponents.
Aftermarket “Super Light” ComponentsThink carefully about your rider profile as outlined above. The more you fit the “shorten productlife” profile, the more you must question the use of super light components. The more you fitthe “lengthen product life” profile, the more likely it is that lighter components may be suitablefor you. Discuss your needs and your profile very honestly with your Halfords Bikehut store.Take these choices seriously and understand that you are responsible for the changes you make.
Original Equipment ComponentsBicycle and component manufacturers test the fatigue life of the components that are originalequipment on your bike. This means that they have met test criteria and have a reasonablefatigue life. It does not mean that the original components will last forever. They won’t.
© HALFORDS LIMITED 2013, ICKNIELD STREET DRIVE, WASHFORD, WEST REDDITCH, WORCESTERSHIRE, B98 ODE
V4 1
0/18
Halfords Generic manual V4 2018 Page 41

6. Children’s Bikes
41
Fitting StabilisersLoosen and remove both rear wheel axle nuts. Fit the rectangular washers over both ends of theaxle, with their projecting tabs facing inwards. Slide the washers along the axle until theirprojecting tabs locate in the frame axle slot. Fit the stabilisers on to both sides of the rear axleand secure with the axle nuts. The stabilisers should be set at a height of approximately 12mm(“1/2) above level ground, when the cycle is upright.
Riding with Stabilisers
Cycles fitted with stabilisers should only be used on smooth level surfaces. Do not use them onrough ground or over kerbs, as there is a risk that they may cause the rider to fall. Also do notuse in overhanging bushes or weeds, where they could become entangled and cause the riderto fall.
When your child can safely balance their bicycle, the stabilisers may be removed.
Braking Control
It is particularly important that you teach your child how to safely use the brakes fitted to theirbicycle. For best performance, both brakes should be used simultaneously. The front brakeshould never just be used on its own, as this could cause the rider to fall over the handlebars.
Halfords Generic manual V4 2018 Page 42

© Halfords Limited 2019
ai157548216253_A5_Handbook Cover.pdf 2 04/12/2019 17:56