A. Retaining Walls - theconcreteservice.com · lower wall. The distance should be equal to or...
7
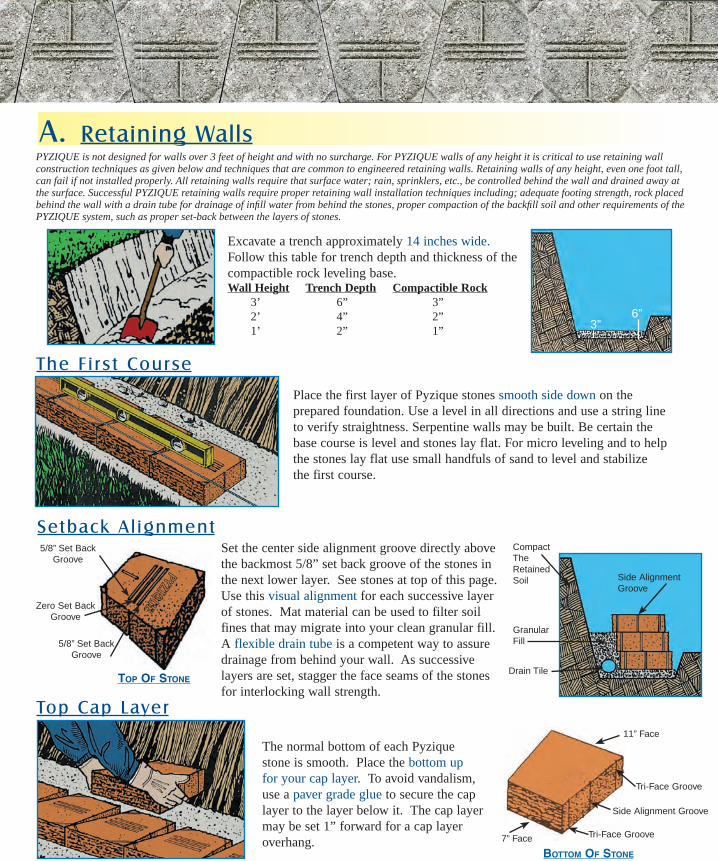
A. Retaining Walls Excavate a trench approximately 14 inches wide. Follow this table for trench depth and thickness of the compactible rock leveling base. Wall Height Trench Depth Compactible Rock 3’ 6” 3” 2’ 4” 2” 1’ 2” 1” The First Course Place the first layer of Pyzique stones smooth side down on the prepared foundation. Use a level in all directions and use a string line to verify straightness. Serpentine walls may be built. Be certain the base course is level and stones lay flat. For micro leveling and to help the stones lay flat use small handfuls of sand to level and stabilize the first course. 6” 3” Top Cap Layer The normal bottom of each Pyzique stone is smooth. Place the bottom up for your cap layer . To avoid vandalism, use a paver grade glue to secure the cap layer to the layer below it. The cap layer may be set 1” forward for a cap layer overhang. Tri-Face Groove Tri-Face Groove Side Alignment Groove BOTTOM OF STONE 7” Face 11” Face PYZIQUE is not designed for walls over 3 feet of height and with no surcharge. For PYZIQUE walls of any height it is critical to use retaining wall construction techniques as given below and techniques that are common to engineered retaining walls. Retaining walls of any height, even one foot tall, can fail if not installed properly. All retaining walls require that surface water; rain, sprinklers, etc., be controlled behind the wall and drained away at the surface. Successful PYZIQUE retaining walls require proper retaining wall installation techniques including; adequate footing strength, rock placed behind the wall with a drain tube for drainage of infill water from behind the stones, proper compaction of the backfill soil and other requirements of the PYZIQUE system, such as proper set-back between the layers of stones. TOP OF STONE 5/8” Set Back Groove 5/8” Set Back Groove Zero Set Back Groove Setback Alignment Granular Fill Drain Tile Compact The Retained Soil Side Alignment Groove Set the center side alignment groove directly above the backmost 5/8” set back groove of the stones in the next lower layer. See stones at top of this page. Use this visual alignment for each successive layer of stones. Mat material can be used to filter soil fines that may migrate into your clean granular fill. A flexible drain tube is a competent way to assure drainage from behind your wall. As successive layers are set, stagger the face seams of the stones for interlocking wall strength.
Transcript of A. Retaining Walls - theconcreteservice.com · lower wall. The distance should be equal to or...
A. Retaining Walls
Excavate a trench approximately 14 inches wide. Follow this table for trench depth and thickness of the compactible rock leveling base.Wall Height Trench Depth Compactible Rock 3’ 6” 3” 2’ 4” 2” 1’ 2” 1”
The F i rs t Course
Place the first layer of Pyzique stones smooth side down on the prepared foundation. Use a level in all directions and use a string line to verify straightness. Serpentine walls may be built. Be certain the base course is level and stones lay flat. For micro leveling and to help the stones lay flat use small handfuls of sand to level and stabilize the first course.
6”3”
Building With
Top Cap Layer
The normal bottom of each Pyzique stone is smooth. Place the bottom up for your cap layer. To avoid vandalism, use a paver grade glue to secure the cap layer to the layer below it. The cap layer may be set 1” forward for a cap layer overhang.
Tri-Face Groove
Tri-Face Groove
Side Alignment Groove
Bottom of Stone
7” Face
11” Face
PYZIQUE is not designed for walls over 3 feet of height and with no surcharge. For PYZIQUE walls of any height it is critical to use retaining wall construction techniques as given below and techniques that are common to engineered retaining walls. Retaining walls of any height, even one foot tall, can fail if not installed properly. All retaining walls require that surface water; rain, sprinklers, etc., be controlled behind the wall and drained away at the surface. Successful PYZIQUE retaining walls require proper retaining wall installation techniques including; adequate footing strength, rock placed behind the wall with a drain tube for drainage of infill water from behind the stones, proper compaction of the backfill soil and other requirements of the PYZIQUE system, such as proper set-back between the layers of stones.
top of Stone
5/8” Set BackGroove
5/8” Set Back Groove
Zero Set Back Groove
Setback Al ignment
GranularFill
Drain Tile
Compact The Retained Soil Side Alignment
Groove
Set the center side alignment groove directly above the backmost 5/8” set back groove of the stones in the next lower layer. See stones at top of this page. Use this visual alignment for each successive layer of stones. Mat material can be used to filter soil fines that may migrate into your clean granular fill. A flexible drain tube is a competent way to assure drainage from behind your wall. As successive layers are set, stagger the face seams of the stones for interlocking wall strength.

Making Tr i -Face OptionYou may wish to take advantage of Pyzique’s tri-face option. Place a stone chisel in the corner tri-face groove of the face that will be exposed. One hit with a hammer on the chisel at each corner will give the tri-face option.
Water Damage For all landscape retaining wall structures do not allow rain or other surface water, such as sprinkler water, to accumulate behind the wall and saturate the soil. This can cause wall failure. Use swales and/or drain tile to carry any surface water away from behind the landscape wall structure.
Retaining walls are not built straight up unless expensive geogrid materials are used. Walls must have a horizontal force equal to or greater than the horizontal force of the soil being retained, otherwise the wall will fail. Pyzique is designed with a 5/8” set back for each row (5/8” horizontal tilt per 4” of wall height) to impose a horizontal force against the retained soil.
For any of these projects, paver adhesive may be used to secure the stones in place. For The Best Adhesive Bond, Stones Should Be Clean And Dry.
Making A Square CornerStart all corner layers at the corner and build away from that corner in both directions. Pyzique can make square corners by splitting one stone from front to back through the middle. Use paver adhesive at each “X”. Alternate Layer “A” with Layer “B” allowing for setback in both directions.
(Layer A)1/2 Stone
(Layer B)
1/2 Stone
The X Factor. It is important that the upper wall does not become a load on the lower wall. Set the upper wall’s footing back (a minimum of x feet) from the top of the next lower wall. The distance should be equal to or greater than the height (x feet) of the lower wall. If the soil above your wall slopes upward you may be overloading the retaining wall. A tiered wall arrangement may be required to properly load the retaining walls. Any tiered wall structure exceeding 3 feet of total height should be designed by a segmental retaining wall engineer.
T iered Retaining Wal ls (The X Factor)
Center Split Groove
Top Soil
Mat Material
Clean Granular Backfill
Drain Tile
Drain Tile
Compacted Rock BaseGrade
Mat Material
Clean Granular Backfill
CompactedRock Base
x
xMinimum
SWALE
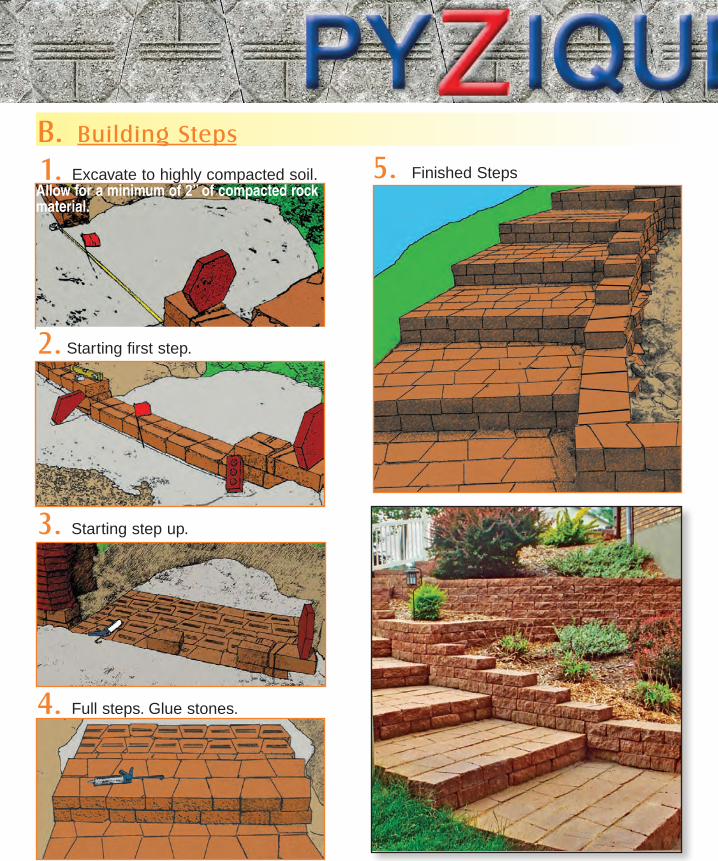
B. Building Steps
1. Excavate to highly compacted soil. Allow for a minimum of 2” of compacted rock material.
4. Full steps. Glue stones.
3. Starting step up.
2. Starting first step.
Building With
5. Finished Steps
P Y Z I Q U E 5 7 3 - 2 3 0 - 4 9 7 4 P Y Z I Q U E
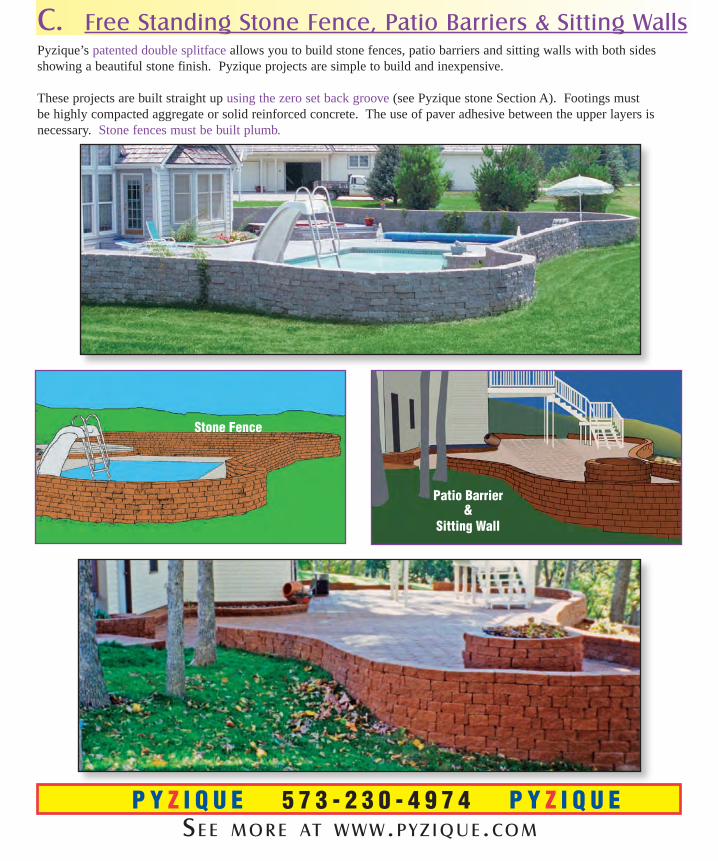
C. Free Standing Stone Fence, Patio Barriers & Sitting WallsPyzique’s patented double splitface allows you to build stone fences, patio barriers and sitting walls with both sides showing a beautiful stone finish. Pyzique projects are simple to build and inexpensive.
These projects are built straight up using the zero set back groove (see Pyzique stone Section A). Footings must be highly compacted aggregate or solid reinforced concrete. The use of paver adhesive between the upper layers is necessary. Stone fences must be built plumb.
Se e m o r e At w w w.p y z i q u e .co m
Stone Fence
Patio Barrier &
Sitting Wall

D. Borders
Split stones across middle and lay as border stones.
(1 stone high)
Stone
(2 stones high)
E. Path & Paver BordersStand Pyzique stones upright. Glue stone to stone.
Sand
PYZIQUE
as
Paver
Border

Multiple Projects – One Job
OptionsPYZIQUE as Path Border
Paver Border
Garden BorderTetra Ponds
Double Border
Path
Lawn
LevelPaver
PY
ZIQ
UE
Sand
Aggregate 9”
Not LevelPaver
PY
ZIQ
UE
Sand
Aggregate 9”