a perfect bottle, in seconds · cool bottle based on temperature of water in the water tank. “...
16
Thank you for purchasing the Bottle Genius™ by Born Free. This product was proudly designed in the USA. If you have any trouble using this product, please do not return it to the store. Check the troubleshooting section in this booklet or give us a call. We’re happy to help. 47713 Please read the following instructions carefully. Keep this instruction manual for future reference. No tools required. For technical support, contact us at 1-800-268-6237 or www.newbornfree.com/contact Keep small parts away from children. Adult assembly required. For a video showing how to set up and use the Bottle Genius, scan the QR code with your smart phone, or find the video online at: http://www.newbornfree.com/bottlegenius a perfect bottle, in seconds
Transcript of a perfect bottle, in seconds · cool bottle based on temperature of water in the water tank. “...
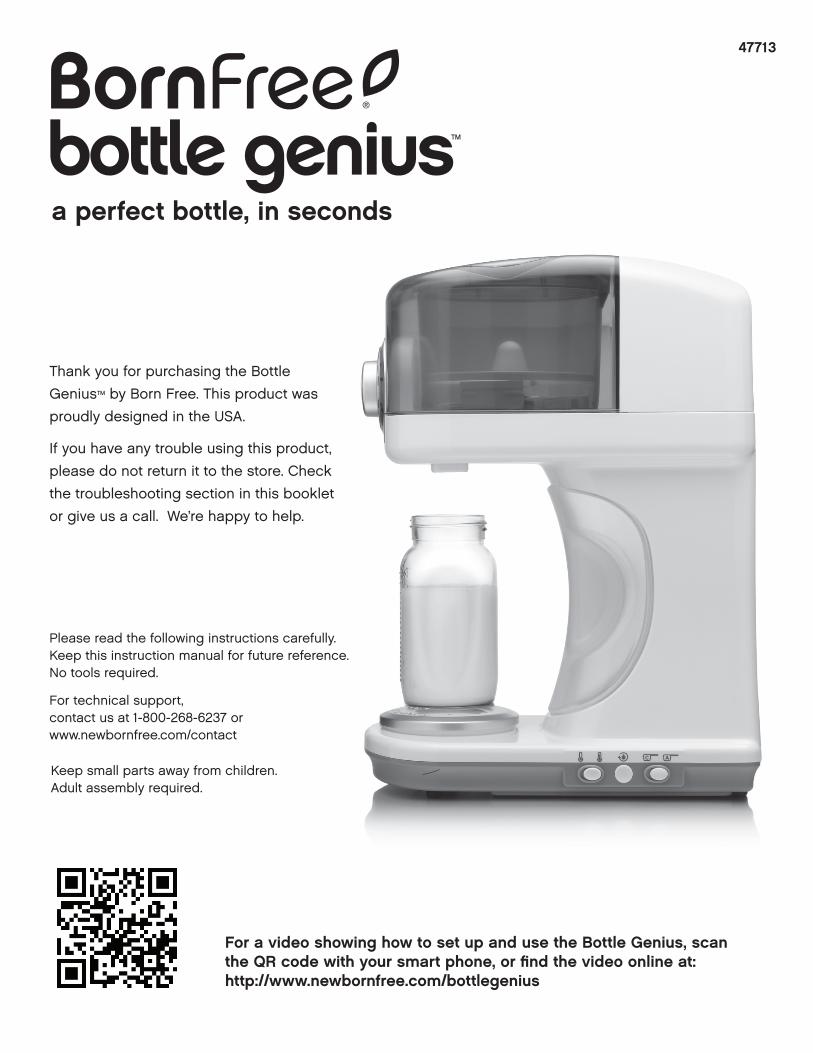
Thank you for purchasing the Bottle
Genius™ by Born Free. This product was
proudly designed in the USA.
If you have any trouble using this product,
please do not return it to the store. Check
the troubleshooting section in this booklet
or give us a call. We’re happy to help.
47713
Please read the following instructions carefully.Keep this instruction manual for future reference.No tools required.
For technical support, contact us at 1-800-268-6237 or www.newbornfree.com/contact
Keep small parts away from children.Adult assembly required.
For a video showing how to set up and use the Bottle Genius, scan the QR code with your smart phone, or find the video online at: http://www.newbornfree.com/bottlegenius
a perfect bottle, in seconds
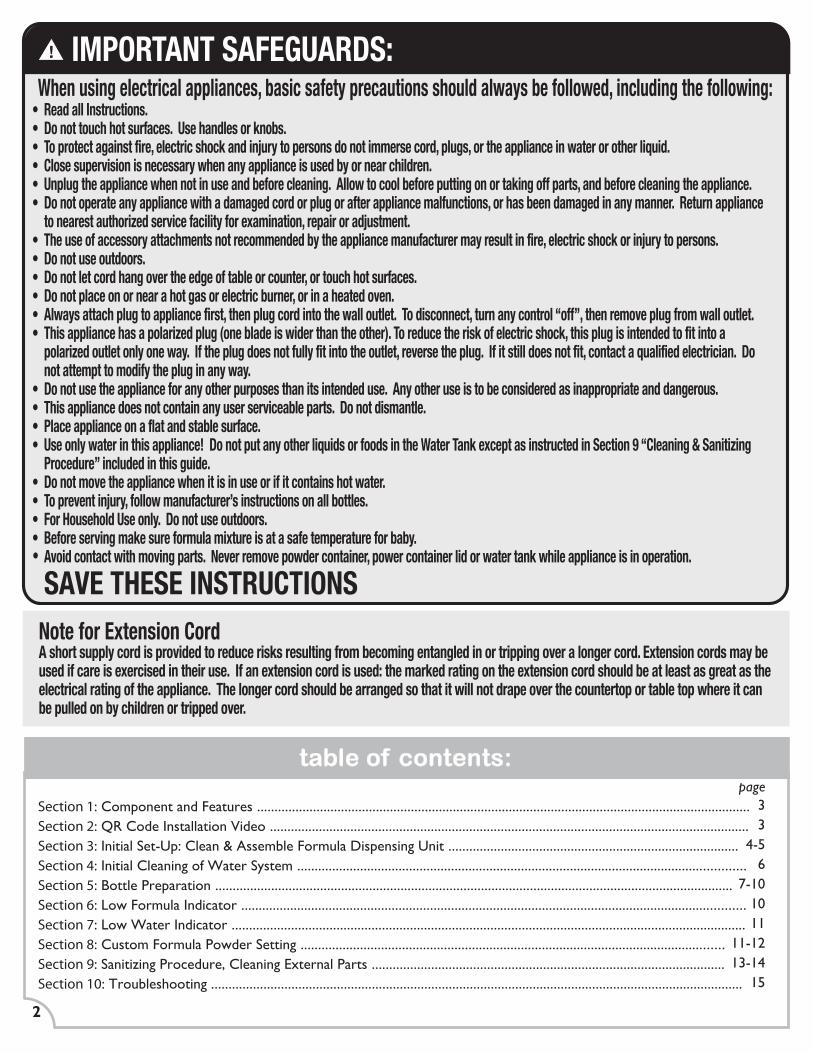
table of contents:
IMPORTANT SAFEGUARDS:
• Read all Instructions.• Do not touch hot surfaces. Use handles or knobs.• To protect against fire, electric shock and injury to persons do not immerse cord, plugs, or the appliance in water or other liquid.• Close supervision is necessary when any appliance is used by or near children.• Unplug the appliance when not in use and before cleaning. Allow to cool before putting on or taking off parts, and before cleaning the appliance.• Do not operate any appliance with a damaged cord or plug or after appliance malfunctions, or has been damaged in any manner. Return appliance
to nearest authorized service facility for examination, repair or adjustment.• The use of accessory attachments not recommended by the appliance manufacturer may result in fire, electric shock or injury to persons.• Do not use outdoors.• Do not let cord hang over the edge of table or counter, or touch hot surfaces.• Do not place on or near a hot gas or electric burner, or in a heated oven.• Always attach plug to appliance first, then plug cord into the wall outlet. To disconnect, turn any control “off”, then remove plug from wall outlet.• This appliance has a polarized plug (one blade is wider than the other). To reduce the risk of electric shock, this plug is intended to fit into a
polarized outlet only one way. If the plug does not fully fit into the outlet, reverse the plug. If it still does not fit, contact a qualified electrician. Do not attempt to modify the plug in any way.
• Do not use the appliance for any other purposes than its intended use. Any other use is to be considered as inappropriate and dangerous.• This appliance does not contain any user serviceable parts. Do not dismantle.• Place appliance on a flat and stable surface.• Use only water in this appliance! Do not put any other liquids or foods in the Water Tank except as instructed in Section 9 “Cleaning & Sanitizing
Procedure” included in this guide.• Do not move the appliance when it is in use or if it contains hot water.• To prevent injury, follow manufacturer’s instructions on all bottles.• For Household Use only. Do not use outdoors.• Before serving make sure formula mixture is at a safe temperature for baby.
Avoid contact with moving parts. Never remove powder container, power container lid or water tank while appliance is in operation.
SAVE THESE INSTRUCTIONS
When using electrical appliances, basic safety precautions should always be followed, including the following:
Section 1: Component and Features .............................................................................................................................................Section 2: QR Code Installation Video .........................................................................................................................................Section 3: Initial Set-Up: Clean & Assemble Formula Dispensing Unit ...................................................................................Section 4: Initial Cleaning of Water System ................................................................................................................................Section 5: Bottle Preparation ....................................................................................................................................................Section 6: Low Formula Indicator ................................................................................................................................................Section 7: Low Water Indicator ...................................................................................................................................................Section 8: Custom Formula Powder Setting .........................................................................................................................Section 9: Sanitizing Procedure, Cleaning External Parts .....................................................................................................Section 10: Troubleshooting ........................................................................................................................................................
page33
4-56
7-101011
11-1213-14
15
2
Note for Extension CordA short supply cord is provided to reduce risks resulting from becoming entangled in or tripping over a longer cord. Extension cords may be used if care is exercised in their use. If an extension cord is used: the marked rating on the extension cord should be at least as great as the electrical rating of the appliance. The longer cord should be arranged so that it will not drape over the countertop or table top where it can be pulled on by children or tripped over.
•

#47563-02
components & features:
instructional video:
Scan the QR code with your smart phone for a video showing how to set up and use the Bottle Genius. Find the video online at:
http://www.newbornfree.com/bottlegenius
3
1
2
Bottle Genius Unit
Water Tank
A
A
B
Short Bottle Stand
C
I
Stirring Fan
G
Formula Lid with gasket
H
Formula Container
Wheel Lock
Wheel Cover
D
D
E
E
G
F
H
C
Dispensing Wheel
F
seeinset
seeinset
Smart Scale
I
J Drive Shaft
J
KSelection Dial
K
L
Cleaning Cycle Indicator
O
P
P
Q
S T
Status LightQ
Water Temp Indicator
Water Temp Switch
R
Cleaning Cycle Button
S
Custom Formula Switch
T
U
U
R
Power Button
Dispense Button
L
M
M
N
Light RingN
O
ReplacementParts Set47563-04
ReplacementPart
47563-02
B
ReplacementPart
47563-01
ReplacementPart
47563-03
#47563-01
#47563-03
#47563-04
#47563-05
ReplacementPart
47563-05
ReplacementPart
47563-06V
#47563-06Formula NozzleV
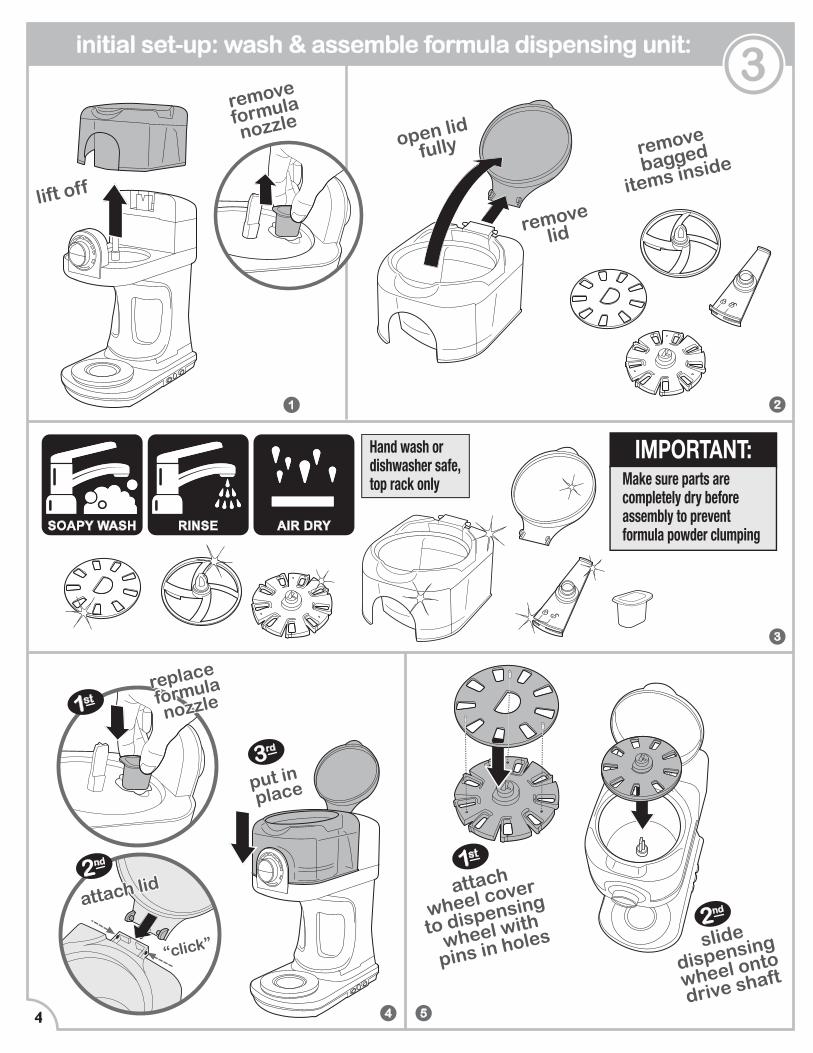
initial set-up: wash & assemble formula dispensing unit:
lift off
slide
dispensing
wheel onto
drive shaft
attach
wheel cover
to dispensing
wheel with
pins in holes
open lid
fully
removelid
remove
bagged
items inside
1 2
3
4
IMPORTANT:Make sure parts are completely dry before assembly to prevent formula powder clumping
SOAPY WASH RINSE AIR DRY
3
4 5
1st
2nd
put in
place
attach lidattach lid
“click”
Hand wash or dishwasher safe, top rack only
2nd
3rd
1streplace
formula
nozzlereplace
formula
nozzle
remove
formula
nozzleremove
formula
nozzle
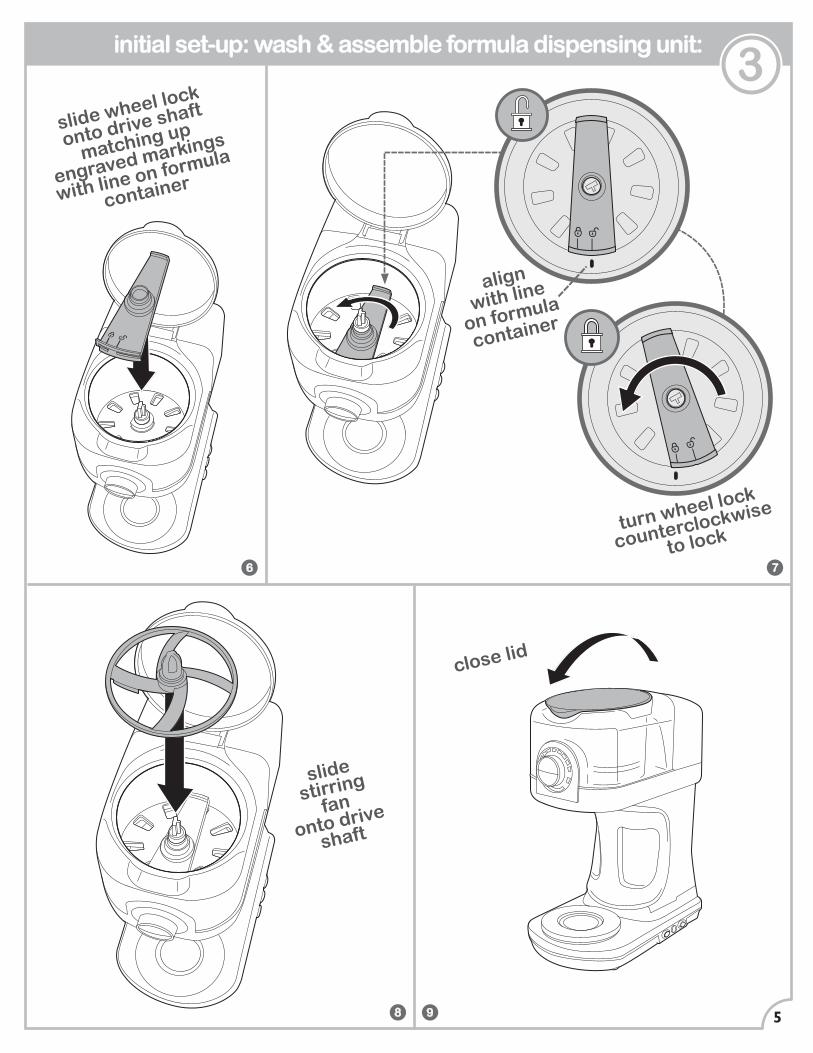
slide wheel lock
onto drive shaft
matching up
engraved markings
with line on formula
container
slidestirring
fan
onto drive
shaft
close lid
turn wheel lock
counterclockwise
to lock
align
with line
on formula
container
initial set-up: wash & assemble formula dispensing unit:3
6 7
98 5
3rd
press
dispense button
(bottle will fill)
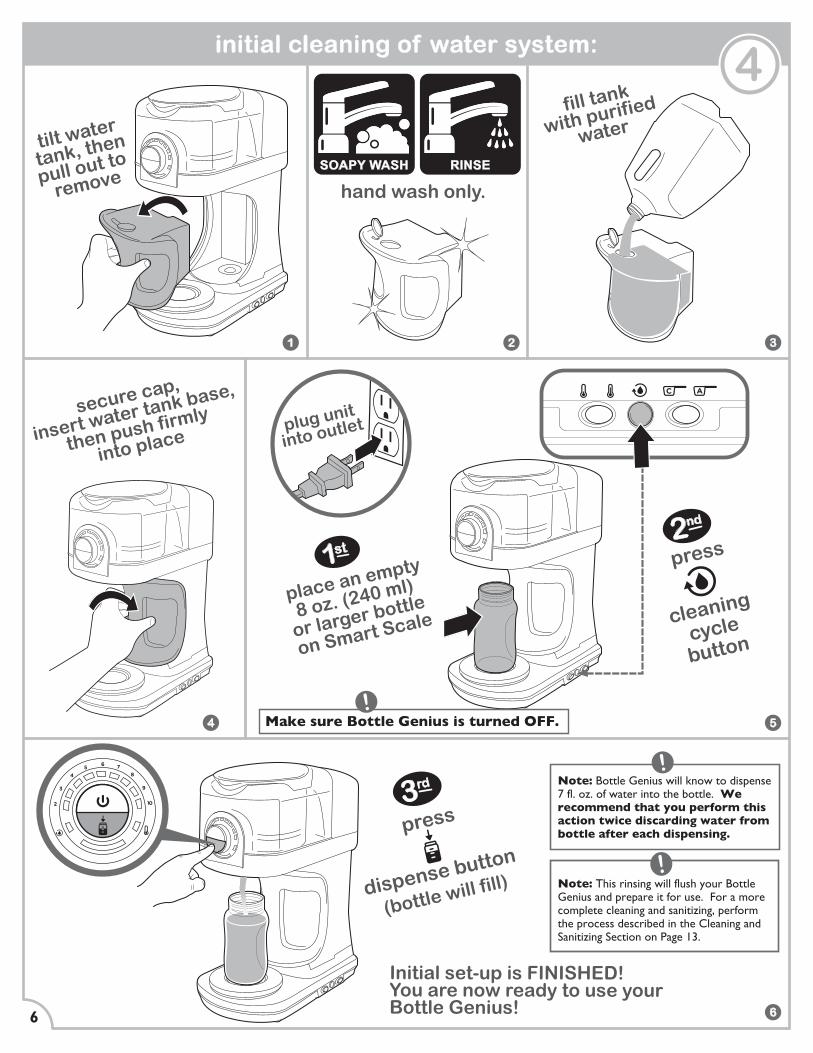
initial cleaning of water system:
place an empty
8 oz. (240 ml)
or larger bottle
on Smart Scale
fill tank
with purified
water
secure cap,
insert water tank base,
then push firmly
into place
tilt water
tank, then
pull out to
remove
2nd
Note: This rinsing will flush your Bottle Genius and prepare it for use. For a more complete cleaning and sanitizing, perform the process described in the Cleaning and Sanitizing Section on Page 13.
Note: Bottle Genius will know to dispense 7 fl. oz. of water into the bottle. We recommend that you perform this action twice discarding water from bottle after each dispensing.
4
!
!
1st
plug unit
into outlet
SOAPY WASH RINSE
Initial set-up is FINISHED!You are now ready to use your Bottle Genius!6
1 2 3
4 5
6
press
cleaning
cycle
button
Make sure Bottle Genius is turned OFF. !
hand wash only.
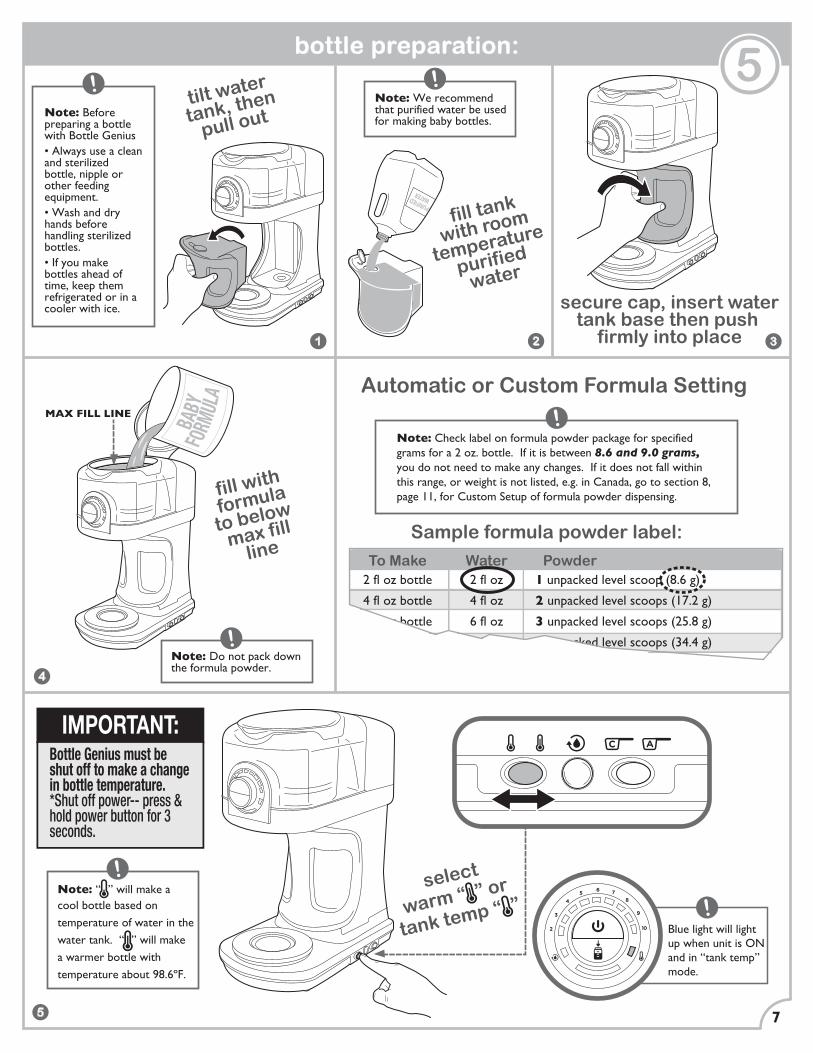
bottle preparation:
fill with
formula
to below
max fillline
fill tank
with room
temperature
purified
water
5Note: Before preparing a bottle with Bottle Genius• Always use a clean and sterilized bottle, nipple or other feeding equipment.• Wash and dry hands before handling sterilized bottles.• If you make bottles ahead of time, keep them refrigerated or in a cooler with ice.
!
!
Note: We recommend that purified water be used for making baby bottles.
!
Note: Do not pack down the formula powder.
MAX FILL LINE
Note: Check label on formula powder package for specified grams for a 2 oz. bottle. If it is between 8.6 and 9.0 grams, you do not need to make any changes. If it does not fall within this range, or weight is not listed, e.g. in Canada, go to section 8, page 11, for Custom Setup of formula powder dispensing.
!
Blue light will light up when unit is ON and in “tank temp” mode.
!
1 2
4
5
3
IMPORTANT:Bottle Genius must be shut off to make a change in bottle temperature.*Shut off power-- press & hold power button for 3 seconds.
7
Note: “ ” will make a cool bottle based on temperature of water in the water tank. “ ” will make a warmer bottle with temperature about 98.6ºF.
! select
warm “ ” or
tank temp “ ”
tilt water
tank, then
pull out
2 fl oz
4 fl oz
6 fl oz
8 fl oz
29 fl oz
1 unpacked level scoop (8.6 g)
2 unpacked level scoops (17.2 g)
3 unpacked level scoops (25.8 g)
4 unpacked level scoops (34.4 g)
1 unpacked level standard measuring cup &2 unpacked level scoops (122 g)
2 fl oz bottle
4 fl oz bottle
6 fl oz bottle
8 fl oz bottle
1 quart
To Make Water Powder
Use this feeding chart for proper amount of water and powder.
Sample formula powder label:
Automatic or Custom Formula Setting
secure cap, insert watertank base then push
firmly into place
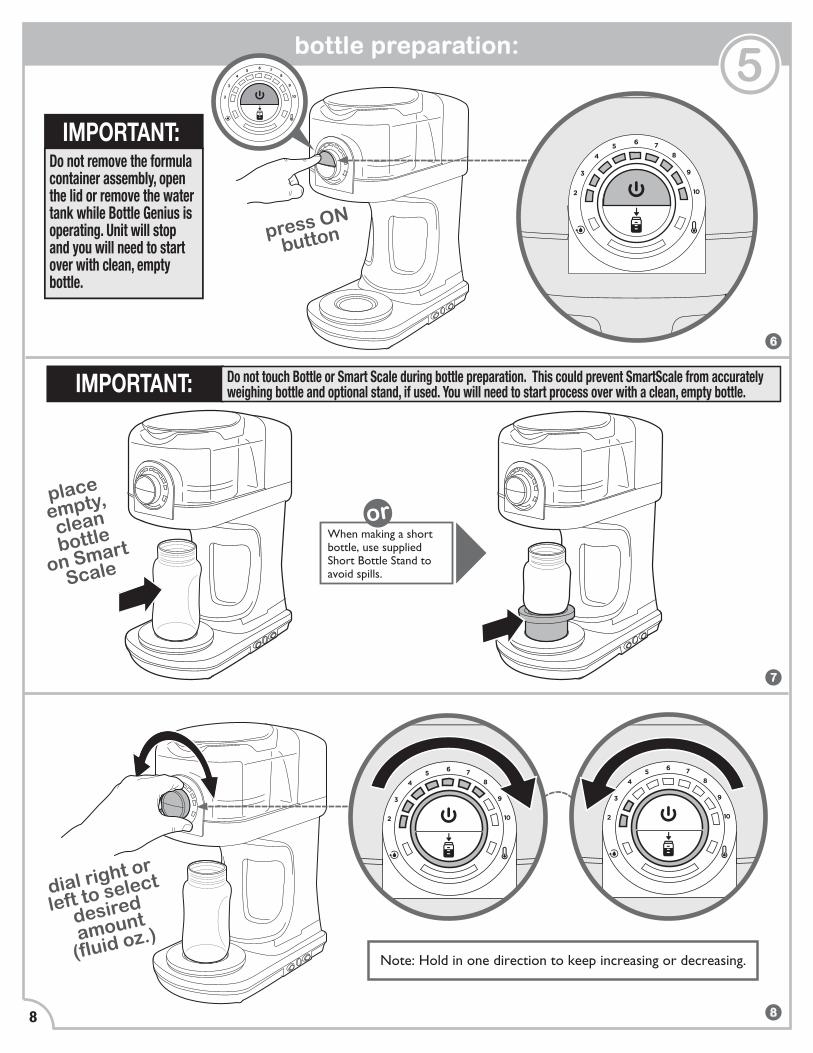
bottle preparation:
press ON
button
placeempty,
cleanbottle
on Smart
Scale
dial right or
left to select
desired
amount
(fluid oz.)
8
6
7
8
IMPORTANT:Do not remove the formula container assembly, open the lid or remove the water tank while Bottle Genius is operating. Unit will stop and you will need to start over with clean, empty bottle.
When making a short bottle, use supplied Short Bottle Stand to avoid spills.
or
5
IMPORTANT: Do not touch Bottle or Smart Scale during bottle preparation. This could prevent SmartScale from accurately weighing bottle and optional stand, if used. You will need to start process over with a clean, empty bottle.
Note: Hold in one direction to keep increasing or decreasing.
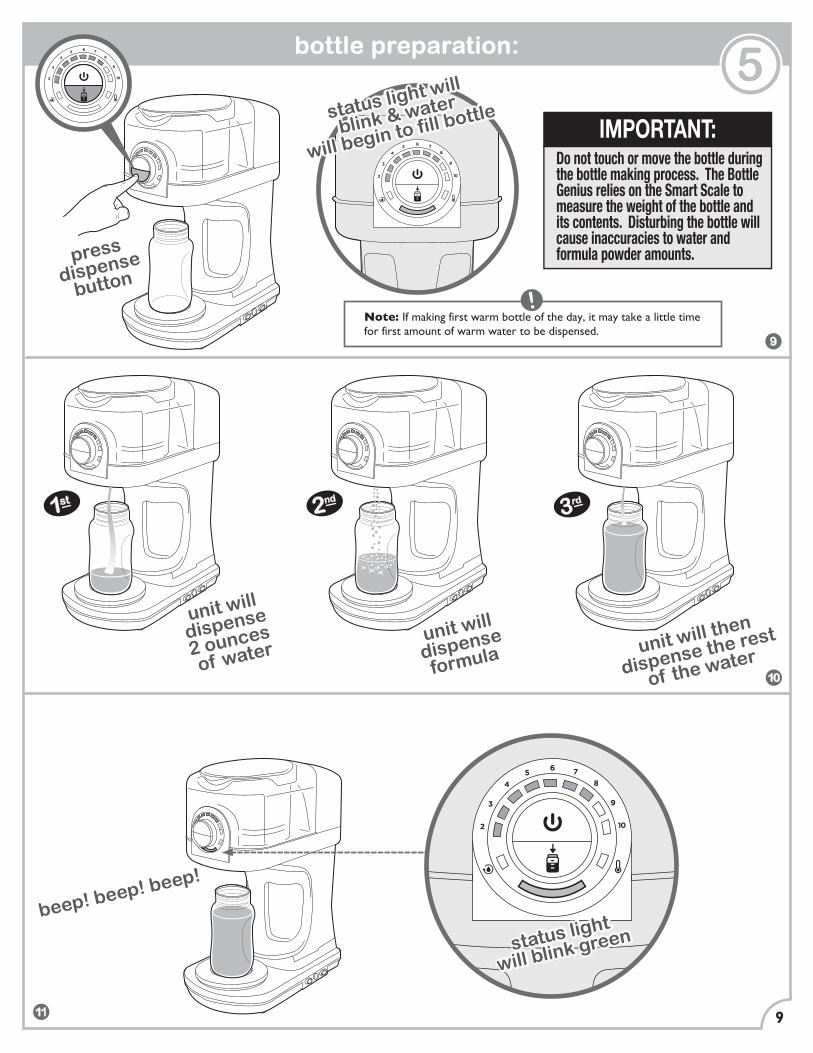
unit will
dispense
2 ounces
of water unit will then
dispense the rest
of the water
beep! beep! beep!
unit will
dispense
formula
bottle preparation:5
1st 2nd 3rd
11
10
9
Note: If making first warm bottle of the day, it may take a little time for first amount of warm water to be dispensed.
!
IMPORTANT:Do not touch or move the bottle during the bottle making process. The Bottle Genius relies on the Smart Scale to measure the weight of the bottle and its contents. Disturbing the bottle will cause inaccuracies to water and formula powder amounts.
9
press
dispense
button
status light
will blink greenstatus light
will blink green
status light will
blink & water
will begin to fill bottlestatus light will
blink & water
will begin to fill bottle
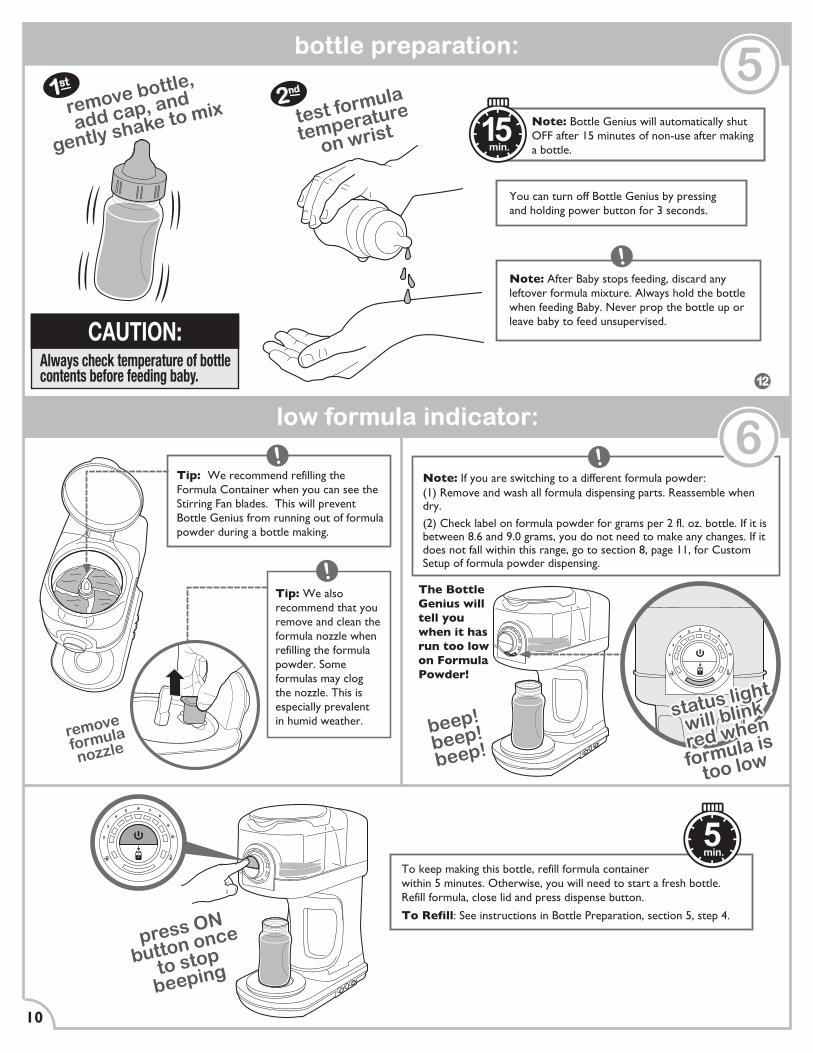
remove bottle,
add cap, and
gently shake to mix test formula
temperature
on wrist
bottle preparation:5
low formula indicator:
CAUTION:
Note: Bottle Genius will automatically shut OFF after 15 minutes of non-use after making a bottle.
To keep making this bottle, refill formula container within 5 minutes. Otherwise, you will need to start a fresh bottle. Refill formula, close lid and press dispense button.
To Refill: See instructions in Bottle Preparation, section 5, step 4.
Tip: We recommend refilling the Formula Container when you can see the Stirring Fan blades. This will prevent Bottle Genius from running out of formula powder during a bottle making.
Note: If you are switching to a different formula powder:(1) Remove and wash all formula dispensing parts. Reassemble when dry.(2) Check label on formula powder for grams per 2 fl. oz. bottle. If it is between 8.6 and 9.0 grams, you do not need to make any changes. If it does not fall within this range, go to section 8, page 11, for Custom Setup of formula powder dispensing.
Tip: We also recommend that you remove and clean the formula nozzle when refilling the formula powder. Some formulas may clog the nozzle. This is especially prevalent in humid weather.
The Bottle Genius will tell you when it has run too low on Formula Powder!
!
!
!
Note: After Baby stops feeding, discard any leftover formula mixture. Always hold the bottle when feeding Baby. Never prop the bottle up or leave baby to feed unsupervised.
Always check temperature of bottle contents before feeding baby.
!
10
15 min.
beep!beep!beep!
5 min.
press ON
button once
to stop
beeping
status light
will blink
red when
formula
is low
status light
will blink
red when
formula is
too low
12
1st
2nd
6
remove
formula
nozzle
You can turn off Bottle Genius by pressing and holding power button for 3 seconds.
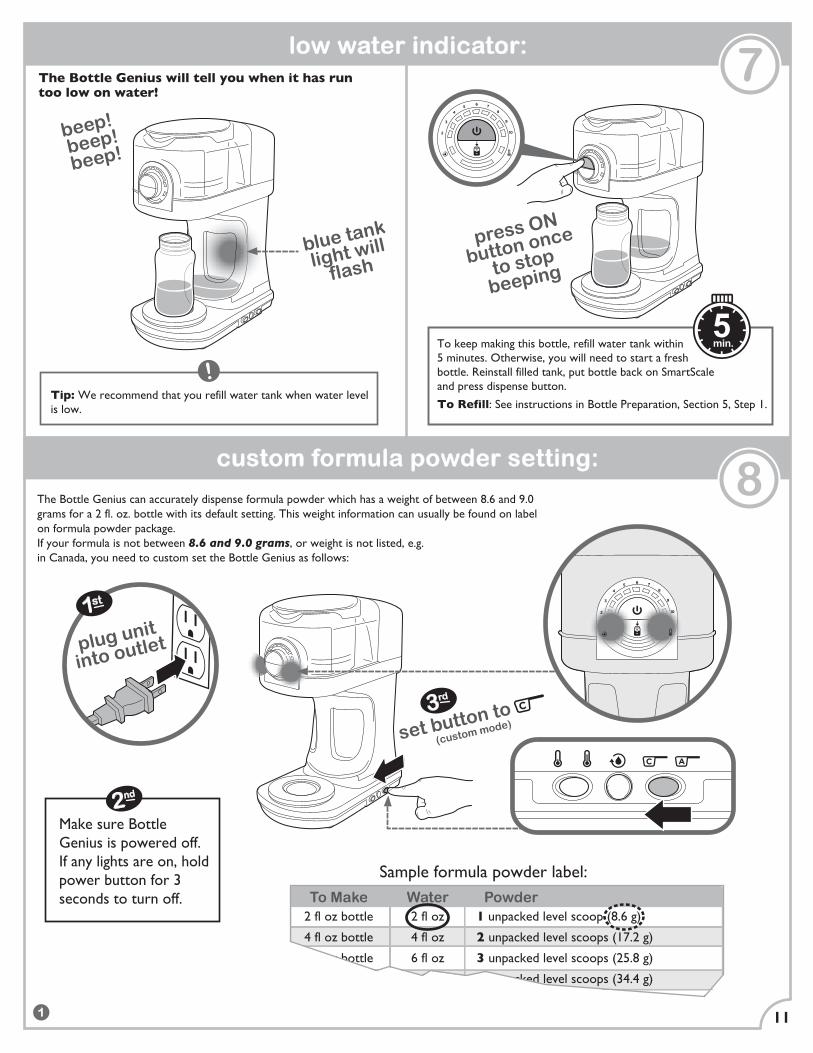
low water indicator:7
custom formula powder setting:8
The Bottle Genius will tell you when it has run too low on water!
11
Tip: We recommend that you refill water tank when water level is low.
!
beep!
beep!
beep!
To keep making this bottle, refill water tank within 5 minutes. Otherwise, you will need to start a fresh bottle. Reinstall filled tank, put bottle back on SmartScale and press dispense button.
To Refill: See instructions in Bottle Preparation, Section 5, Step 1.
5 min.
press ON
button once
to stop
beeping
1
1st
plug unit
into outlet
Make sure Bottle Genius is powered off. If any lights are on, hold power button for 3 seconds to turn off.
The Bottle Genius can accurately dispense formula powder which has a weight of between 8.6 and 9.0 grams for a 2 fl. oz. bottle with its default setting. This weight information can usually be found on label on formula powder package. If your formula is not between 8.6 and 9.0 grams, or weight is not listed, e.g. in Canada, you need to custom set the Bottle Genius as follows:
blue tank
light will
flash
set button to
(custom mode)
3rd
2 fl oz
4 fl oz
6 fl oz
8 fl oz
29 fl oz
1 unpacked level scoop (8.6 g)
2 unpacked level scoops (17.2 g)
3 unpacked level scoops (25.8 g)
4 unpacked level scoops (34.4 g)
1 unpacked level standard measuring cup &2 unpacked level scoops (122 g)
2 fl oz bottle
4 fl oz bottle
6 fl oz bottle
8 fl oz bottle
1 quart
To Make Water Powder
Use this feeding chart for proper amount of water and powder.
Sample formula powder label:
2nd
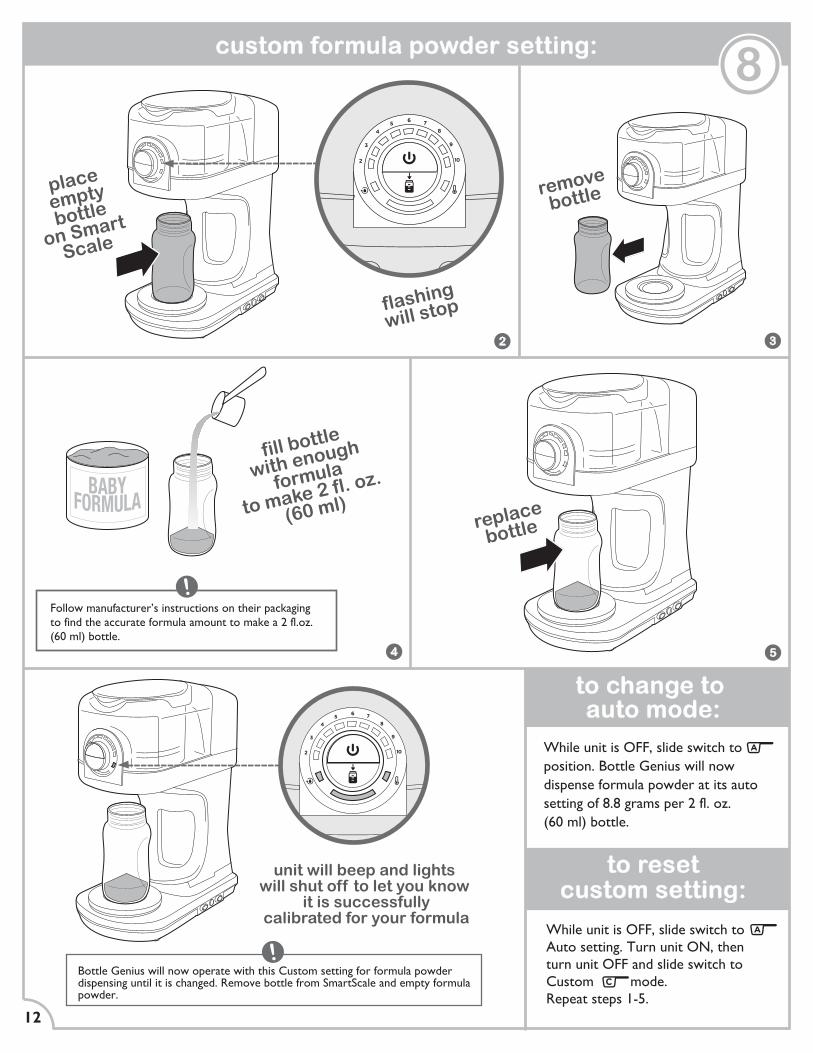
custom formula powder setting:8
12
32
4 5
placeemptybottle
on Smart
Scale
replace
bottle
remove
bottle
flashing
will stop
fill bottle
with enough
formula
to make 2 fl. oz.
(60 ml)
Follow manufacturer’s instructions on their packaging to find the accurate formula amount to make a 2 fl.oz. (60 ml) bottle.
!
Bottle Genius will now operate with this Custom setting for formula powder dispensing until it is changed. Remove bottle from SmartScale and empty formula powder.
!While unit is OFF, slide switch to Auto setting. Turn unit ON, then turn unit OFF and slide switch to Custom mode. Repeat steps 1-5.
to resetcustom setting:
to change to auto mode:
unit will beep and lights will shut off to let you know
it is successfully calibrated for your formula
While unit is OFF, slide switch to position. Bottle Genius will now dispense formula powder at its auto setting of 8.8 grams per 2 fl. oz. (60 ml) bottle.
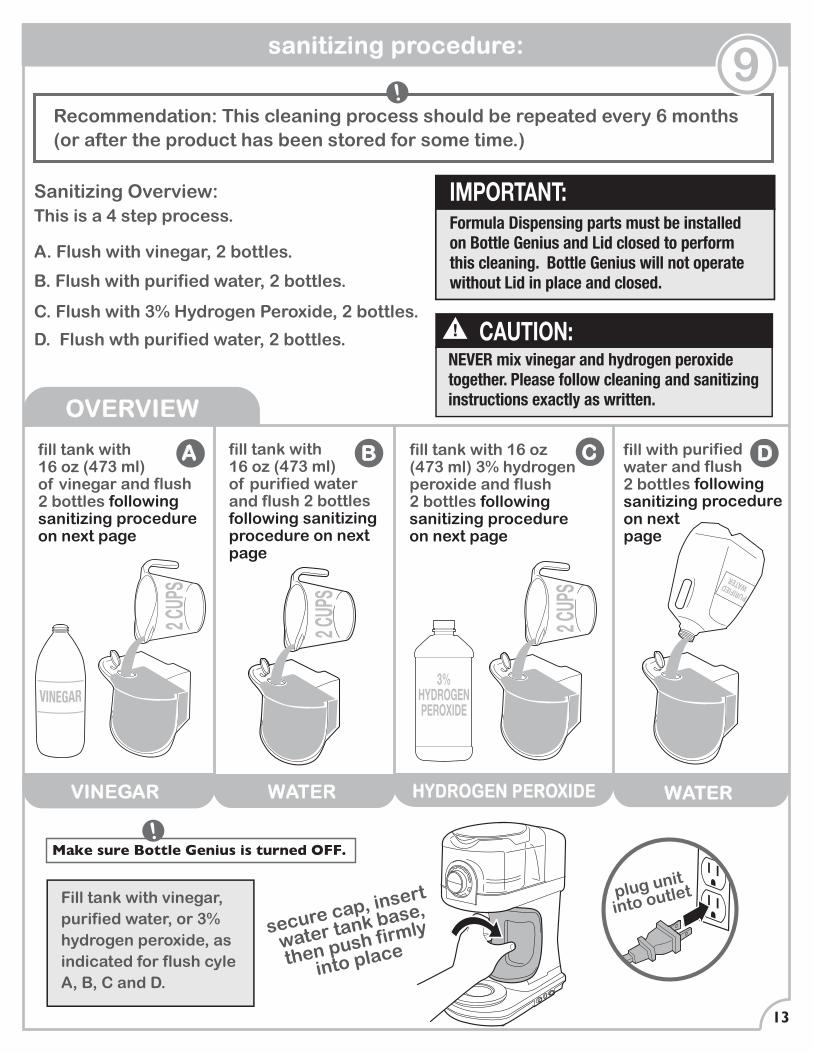
fill with purified water and flush 2 bottles following sanitizing procedure on nextpage
sanitizing procedure:
fill tank with 16 oz (473 ml) of vinegar and flush 2 bottles following sanitizing procedure on next page
13
fill tank with 16 oz (473 ml) 3% hydrogen peroxide and flush 2 bottles following sanitizing procedure on next page
fill tank with 16 oz (473 ml)of purified water and flush 2 bottles following sanitizingprocedure on next page
3%HYDROGENPEROXIDE
Recommendation: This cleaning process should be repeated every 6 months (or after the product has been stored for some time.)
!9
CAUTION:NEVER mix vinegar and hydrogen peroxide together. Please follow cleaning and sanitizing instructions exactly as written.
IMPORTANT:Formula Dispensing parts must be installed on Bottle Genius and Lid closed to perform this cleaning. Bottle Genius will not operate without Lid in place and closed.
Sanitizing Overview: This is a 4 step process.
A. Flush with vinegar, 2 bottles.
B. Flush with purified water, 2 bottles.
C. Flush with 3% Hydrogen Peroxide, 2 bottles.
D. Flush wth purified water, 2 bottles.
A B C D
Fill tank with vinegar, purified water, or 3% hydrogen peroxide, as indicated for flush cyle A, B, C and D.
OVERVIEW
WATERVINEGAR WATERHYDROGEN PEROXIDE
plug unit
into outlet
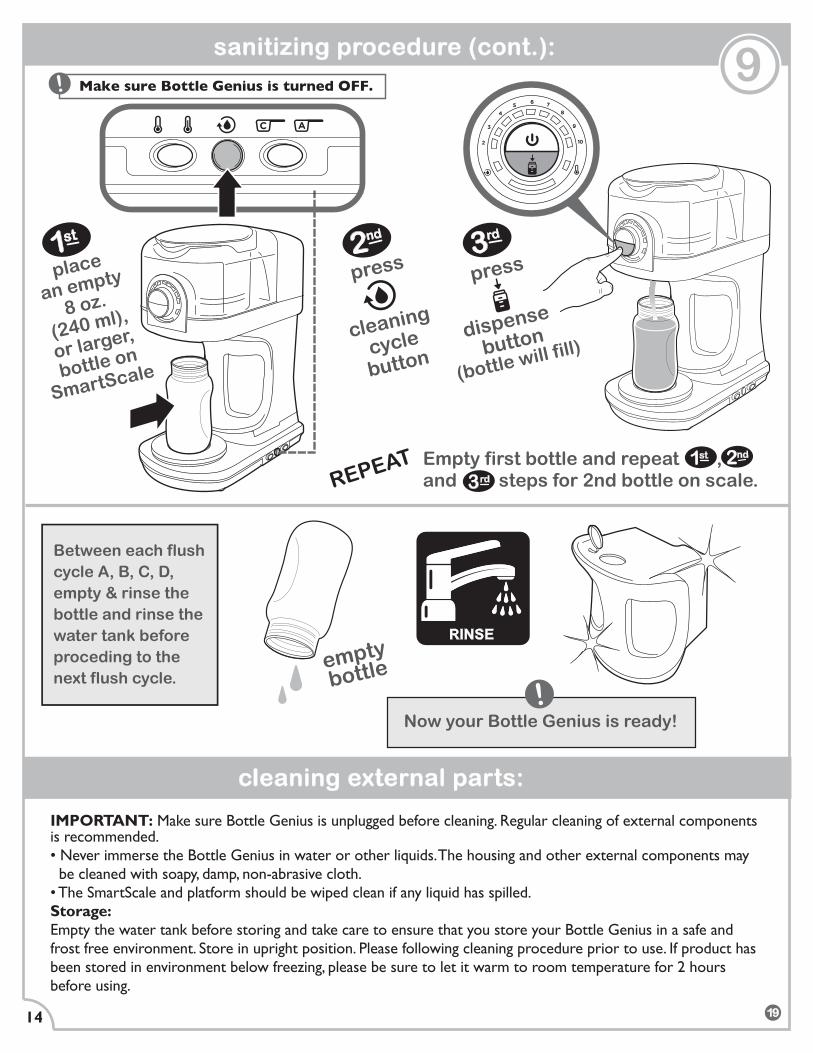
Make sure Bottle Genius is turned OFF. !
secure cap, insert
water tank base,
then push firmly
into place
14 19
place
an empty
8 oz.
(240 ml),
or larger,
bottle on
SmartScale
1st 2nd
press
cleaning
cycle
button
RINSE
Between each flush cycle A, B, C, D, empty & rinse the bottle and rinse the water tank before proceding to the next flush cycle.
sanitizing procedure (cont.):
Empty first bottle and repeat , and steps for 2nd bottle on scale.REPEAT
cleaning external parts:
IMPORTANT: Make sure Bottle Genius is unplugged before cleaning. Regular cleaning of external components is recommended.• Never immerse the Bottle Genius in water or other liquids. The housing and other external components may be cleaned with soapy, damp, non-abrasive cloth.• The SmartScale and platform should be wiped clean if any liquid has spilled.Storage:Empty the water tank before storing and take care to ensure that you store your Bottle Genius in a safe and frost free environment. Store in upright position. Please following cleaning procedure prior to use. If product has been stored in environment below freezing, please be sure to let it warm to room temperature for 2 hours before using.
emptybottle
!Now your Bottle Genius is ready!
9
3rd
press
dispense
button
(bottle will fill)
1st 2nd
3rd
Make sure Bottle Genius is turned OFF. !

troubleshooting: 10
15
ProblemWill not turn ON.
Will not power OFF.
• Product is not plugged into power outlet.
• Power outlet is not active.
• Did not hold power button long enough.
Turns ON, cannot adjust formula mixture amount by turning dial or will not dispense formula powder or water. Sanitize feature will not work.
• Lid for Formula Container is open.• Formula Container is not completely
pushed down.
• Close Lid.• Check fit of Formula Housing and push down
until it is seated in product.
Turns ON, but will not dispense - Blue Water Tank light is blinking.
• Water tank is empty.• Water tank not firmly in place.
• Refill Water tank.• Check fit of water tank and secure firmly in place.
Turns ON, but will not dispense formula powder - Red Status light is blinking.
• Formula Container is empty. • Refill Formula Container.
Turns ON, but Cleaning Cycle, Status and Water temp lights are blinking. Will not start dispense cycle.
• Custom programming of formula powder was not completed.
• Redo custom programming with formula powder as described on page 11, or shut OFF unit and slide formula programming switch to AUTO position.
Temperature of formula mix is not warm. • Water temperature switch is set to Water tank temperature setting. Blue light on Right is ON.
• Shut product OFF by pressing and holding power button for 3 seconds. Slide water temperature switch to Warm setting. Turn unit back ON.
Formula dispensing is very slow. Formula container is full.
• Formula in formula container has clumped together. This can happen in high humidity after a few days of non-use.
• Formula nozzle may be clogged.
• Formula Dispensing mechanism is damaged or worn.
• Manually agitate the formula using a utensil, such as a spoon, or remove formula powder from formula container to mix and refill formula container.
• Remove formula housing, remove formula nozzle and clean nozzle. Once clean and dry, replace nozzle and formula housing. If above is done in 5 minutes, press dispense and machine will finish making the bottle.
• Replace formula dispensing mechanism by contacting our Consumer Relations Team at 1-800-268-6237 or www.newbornfree.com/contact. Use replacement part numbers shown on page 3.
Excessive amount of formula is being dispensed.
• Custom formula calibration error. • Redo custom programming with formula powder as described on page 11. Be careful not to hold onto bottle while it is on SmartScale during programming steps.
If you cannot remedy problems with the Bottle Genius by using the troubleshooting guide above, please contact our Consumer Relations Team at 1-800-268-6237 or www.newbornfree.com/contact.
Water does not dispense right away after dispense button is pressed.
• Water heater needs to warm up before dispensing warm water, especially after water tank is filled with cold water.
• Time can be shortened by using room temperature water in Water Tank.
Potential Cause Remedy
During bottle preparation, machine stops dispensing, Red status light is blinking.
• Formula powder needs to be refilled. • Refill formula powder. If this is done in 5 minutes, you can press the dispensing button and machine will finish dispensing for bottle.• If formula housing is full, formula powder
may have clumped together in formula housing.
• If formula housing is full, formula nozzle may be clogged.
During bottle preparation, machine stops
dispensing. Blue water tank light is blinking.Water tank needs to be refilled. • Remove bottle from SmartScale. Remove and
refill water tank. Install water tank into machine and replace bottle on SmartScale. If this is done in 5 minutes, press dispense button and machine will finish making the bottle.
• Make sure plug is securely inserted into power outlet.
• Check outlet for power.• Press power button and hold for 3 seconds.
Bottle preparation is taking a long time.
Machine shuts off. • Machine will shut off automatically after 15 minutes of non-use after making a bottle.
• Water tank is empty and dispense button is pressed without refilling the water tank.
• Press power button to turn machine ON.
• Refill water tank and press power button. Discard contents of any partially made bottles. Bottle preparation must be started with a clean, empty bottle.
• Refer to above remedies if refill is not needed.
© 2014 Born Free.Patent Pending.Born Free, a division of Summer InfantDistributed in the USA exclusively by Summer Infant (USA), Inc.1275 Park East Drive Woonsocket, RI 02895 USASummer Infant Canada200 First Gulf Blvd., Unit CBrampton, OntarioCanada, L6W 4T5Designed in the USA. Made in China. Household Use Only.
For customer service call1-800-268-6237www.newbornfree.com05/15
Born Free will repair or replace (at our option) your unit free of charge for 12 months from the date of purchase if the unit is defective in workmanship or materials. To claim your repair/replacement, the product must be returned to Born Free along with a copy of the original purchase receipt. In the absence of the purchase receipt, the warranty will be 12 months from the date of manufacture.
This warranty does not apply to normal wear or damage from misuse, abuse, improper storage and handling, installation, accident, unauthorized repair or alteration.
For sale and use in the USA and Canada. The warranty is null and void if used outside its intended territory.
Please contact our Consumer Relations Team by phone at 1-800-268-6237 or www.newbornfree.com/contact for details.
If you experience a problem that is not noted in this manual, please do not return the product to the store. Our Consumer Relations Team may have a simple solution to your problem. Please contact us at 1-800-268-6237 or email us at www.newbornfree.com/contact
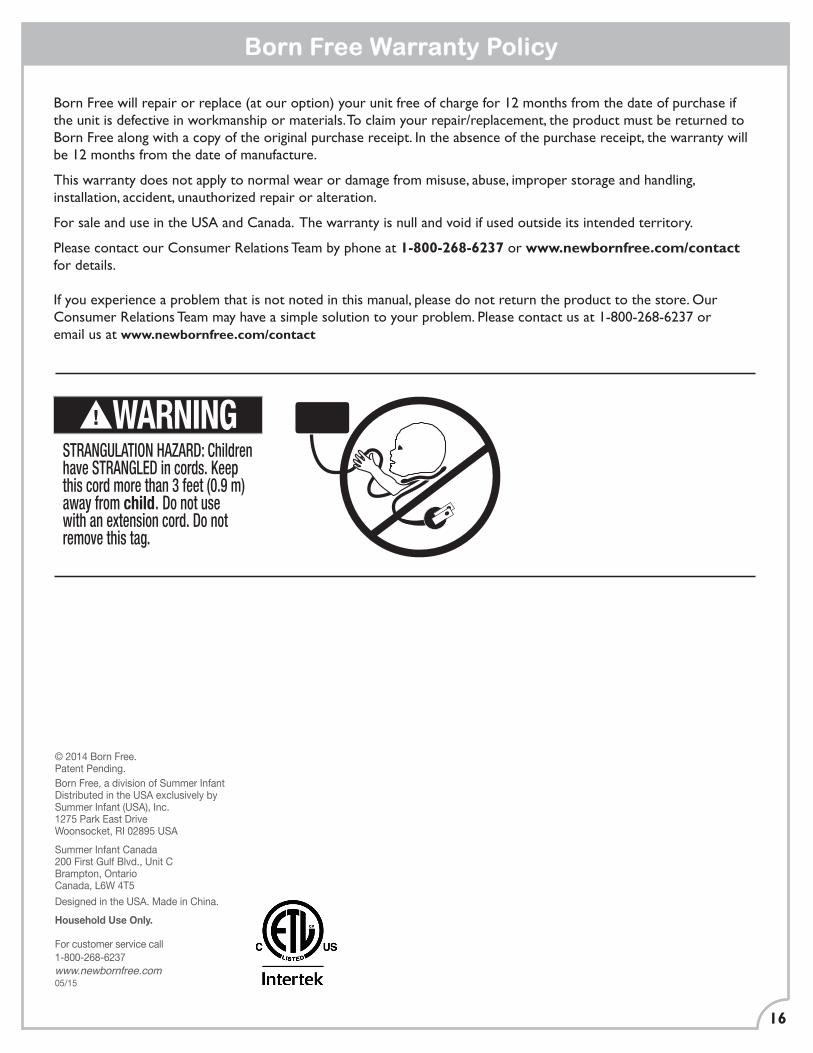
child
Born Free Warranty Policy
16