A HP-41 Bar Code Decoder - mh-aerotools.de
17
1 A HP-41 Bar Code Decoder Martin Hepperle 27 December 2014 Bar codes are a low cost means to store information using printed labels. They can encode any kind of binary data and it has also been proposed quite early to use them as a means to distribute software [1], [2], [3]. Bar codes come in many flavors and have developed from the classical linear bar codes sequences to two dimensional QR code patterns. A wide variety of encoding schemes exists and for each encoding scheme a suitable decoder is required. Therefore many different bar code readers are available. Today, most of these devices contain the optical scanner and the decoder software in a single unit. The decoder software is usually written to decode several standard bar code formats. One example where the optical scanner device is separated from the decoder software is the HEDS- 3000 wand and its derivatives. This wand is part of the HP-82153A wand system for the HP-41C. In this case the decoder software lives inside the ROM module in the plug that connects the wand to the calculator. The ROM routines were designed to decode the HP-specific bar codes for the HP-41C only. This is a bar code scheme where the white gaps between the bars have a constant width and only the bar width varies between two cases: "narrow" and "wide" to represent binary zeroes and ones. In addition to the encoded data additional checksums and flags are present as well as direction indicator bars. Commercially available bar code scanners cannot read this scheme because it is not one of the standard schemes. Another example is the HP-82725A bar code reader module for the HP-75D, which used the HP- 92267A or HP-92267B wand together with the 82725A module (the HP 82718A expansion pod also provided two decoders). Again the decoding was done with the help of a plug-in module. The code in this module was designed to decode several standard formats: • Code 11 (USD-8) (also provided by HP 82718A) • 3-of-9 Code (USD-3) (also provided by HP 82718A) • Interleaved 2-of-5 Code (USD-1) • Industrial 2-of-5 Code • 2-of-7 Code (Codabar, USD-4) • Universal Product Code (UPC A, UPC E) • European Article Number (EAN 8, EAN 13) Interestingly the HP-75D module cannot decode the HP specific bar codes used for the HP-41C. Finally, a similar wand was available as a third-party product for the HP-71B. The ZENWAND was designed to read the same barcode types as the wand for the HP-75. Its ROM contained more useful routines including functions to print barcodes. How does a Wand Work? The articles [6] and [7] give very a good overview of the working of the HEDS-3000 and the HP-41 wand system. The wand contains a very sensitive optical sensor with amplifiers which detects whether a white (reflective) or black area is in front of the wands tip. The measuring area is a small dot of about 0.5 mm diameter. By sliding the tip of the wand across a strip of bar codes a time history corresponding to white and black bars can be recorded. The major difficulty in manual operation is the variable scanning speed, which leads to a variable duration of the same bar type. A decoding algorithm has to take this variable timing into account. For this purpose all white spaces in the HP-specific barcode scheme have the same width, thus serving as a timing reference. More difficulties arise from printing quality and tolerances. Therefore decoding barcodes can be a rather difficult process. Simple
Transcript of A HP-41 Bar Code Decoder - mh-aerotools.de

1
A HP-41 Bar Code Decoder Martin Hepperle
27 December 2014
Bar codes are a low cost means to store information using printed labels. They can encode any kind of binary data and it has also been proposed quite early to use them as a means to distribute software [1], [2], [3]. Bar codes come in many flavors and have developed from the classical linear bar codes sequences to two dimensional QR code patterns. A wide variety of encoding schemes exists and for each encoding scheme a suitable decoder is required.
Therefore many different bar code readers are available. Today, most of these devices contain the optical scanner and the decoder software in a single unit. The decoder software is usually written to decode several standard bar code formats.
One example where the optical scanner device is separated from the decoder software is the HEDS-3000 wand and its derivatives. This wand is part of the HP-82153A wand system for the HP-41C. In this case the decoder software lives inside the ROM module in the plug that connects the wand to the calculator. The ROM routines were designed to decode the HP-specific bar codes for the HP-41C only. This is a bar code scheme where the white gaps between the bars have a constant width and only the bar width varies between two cases: "narrow" and "wide" to represent binary zeroes and ones. In addition to the encoded data additional checksums and flags are present as well as direction indicator bars. Commercially available bar code scanners cannot read this scheme because it is not one of the standard schemes.
Another example is the HP-82725A bar code reader module for the HP-75D, which used the HP-92267A or HP-92267B wand together with the 82725A module (the HP 82718A expansion pod also provided two decoders). Again the decoding was done with the help of a plug-in module. The code in this module was designed to decode several standard formats:
• Code 11 (USD-8) (also provided by HP 82718A) • 3-of-9 Code (USD-3) (also provided by HP 82718A) • Interleaved 2-of-5 Code (USD-1) • Industrial 2-of-5 Code • 2-of-7 Code (Codabar, USD-4) • Universal Product Code (UPC A, UPC E) • European Article Number (EAN 8, EAN 13)
Interestingly the HP-75D module cannot decode the HP specific bar codes used for the HP-41C.
Finally, a similar wand was available as a third-party product for the HP-71B. The ZENWAND was designed to read the same barcode types as the wand for the HP-75. Its ROM contained more useful routines including functions to print barcodes.
How does a Wand Work?
The articles [6] and [7] give very a good overview of the working of the HEDS-3000 and the HP-41 wand system. The wand contains a very sensitive optical sensor with amplifiers which detects whether a white (reflective) or black area is in front of the wands tip. The measuring area is a small dot of about 0.5 mm diameter. By sliding the tip of the wand across a strip of bar codes a time history corresponding to white and black bars can be recorded. The major difficulty in manual operation is the variable scanning speed, which leads to a variable duration of the same bar type. A decoding algorithm has to take this variable timing into account. For this purpose all white spaces in the HP-specific barcode scheme have the same width, thus serving as a timing reference. More difficulties arise from printing quality and tolerances. Therefore decoding barcodes can be a rather difficult process. Simple

2
checksums allow for error checking but not error recovery. Multiple errors can even lead to a correct checksum so that sometimes errors are not detected. If everything goes well, the final result is a bit stream which must be decoded into data or program instructions.
Figure 1: Exploded view of a HEDS-3000 as used for the HP-41 wand system. The optical sensor is clearly visible at the left. The HP-41 variant used a black case.
Figure 2: Schematic of the HEDS-3000 wand with interface to the HP-41 showing sensor and amplifier chain (image lifted from [8]).
The HEDS-3000 contains all the circuitry to deliver a well formed digital signal. Further processing must be done with additional hard- and software.
The wand has a switch so that it only draws power when switched on. This is useful because the optical sensor contains a power consuming LED to illuminate the barcode. In case of the HP-41 the switch can also trigger a wake-up of the calculator up if it was switched off.

3
The BarcodeReader Software
The BARCODEREADER application was written in Java and is therefore useable on any platform for which a Java Virtual Machine (JVM) exists. It can be used for the following tasks:
• Decode program and data barcode information from scanned images. A scan resolution of at least 400 dpi in pure black and white quality is recommended. Grayscale images look good on screen but yield poor scanning results.
• Import programs in binary (.raw), binary (.p41) or hexadecimal (.dat) format. • Save programs in different formats: binary (.raw), binary (.p41), hexadecimal (.dat), text (.txt) • Save program bar codes as a Postscript program for converting to bitmap images or printing. • Print programs in text or barcode form directly to the system printer.
Figure 3: Application window with first rows of program barcodes in the image scanned.
Running the Application The program is contained in a single .jar archive file and can be run using the following command:
java –jar barcodescanner.jar
If you do not want to open a command window, you can also create a shortcut or command file or even better associate all .jar files with the command
java –jar %1
So that the application can be run by activating the archive file by single or double click or by pressing the enter key.
4
Notes for Windows Users
Under Windows you can find out whether a file association for java archives exists by issuing the following commands in a command window. The “assoc” command checks whether a file type association for files with names ending in “.jar” exists:
C:\>assoc .jar .jar=jarfile
If no file type is associated, you can specify one by typing
C:\>assoc .jar=jarFile
Then the “ftype” command can be used to check which command is associated with files of this type (in this case with “jarFile”).
C:\>ftype jarFile jarFile="D:\Java\jre8\bin\javaw.exe" -jar "%1" %*
If no command is associated, you can define it by issuing the command
C:\> ftype jarFile="D:\Java\jre8\bin\javaw.exe" -jar "%1" %*
In Windows versions prior to version 7 you could easily perform these changes with the Windows GUI, but in later windows versions this option seems to have been “optimized” away.
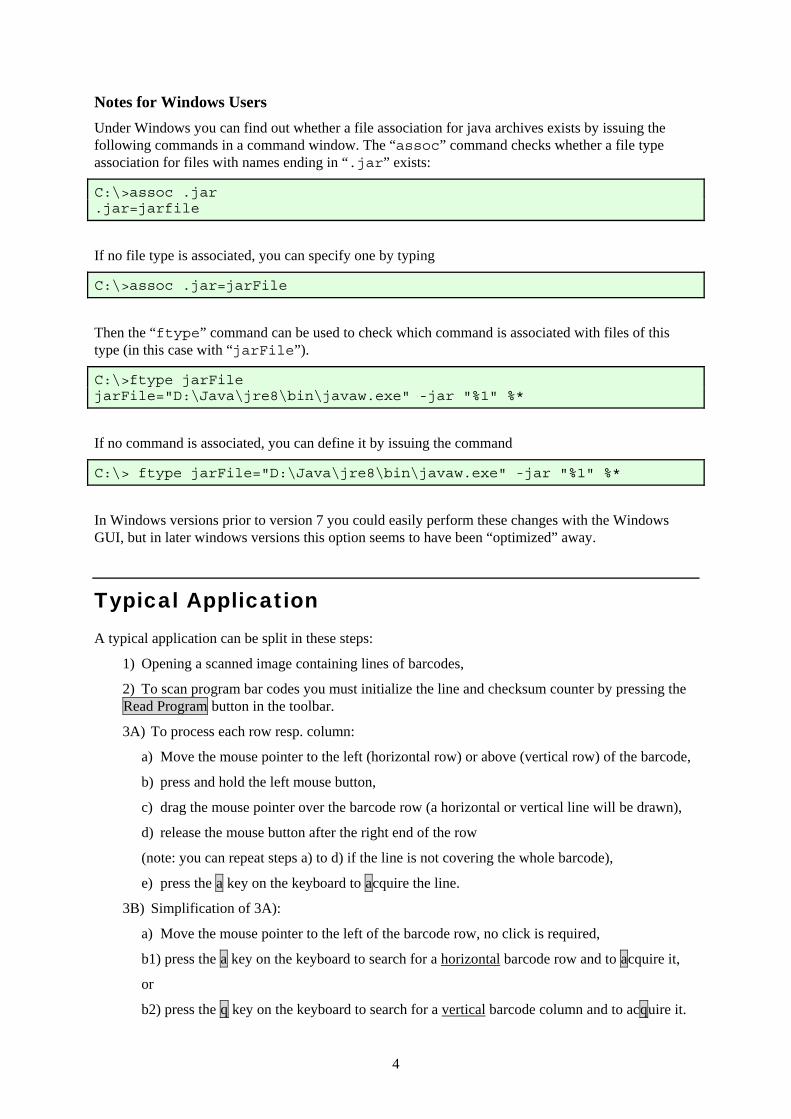
Typical Application A typical application can be split in these steps:
1) Opening a scanned image containing lines of barcodes,
2) To scan program bar codes you must initialize the line and checksum counter by pressing the Read Program button in the toolbar.
3A) To process each row resp. column:
a) Move the mouse pointer to the left (horizontal row) or above (vertical row) of the barcode,
b) press and hold the left mouse button,
c) drag the mouse pointer over the barcode row (a horizontal or vertical line will be drawn),
d) release the mouse button after the right end of the row
(note: you can repeat steps a) to d) if the line is not covering the whole barcode),
e) press the a key on the keyboard to acquire the line.
3B) Simplification of 3A):
a) Move the mouse pointer to the left of the barcode row, no click is required,
b1) press the a key on the keyboard to search for a horizontal barcode row and to acquire it,
or
b2) press the q key on the keyboard to search for a vertical barcode column and to acquire it.

5
(Note that the automatic search for the barcode row resp. column may not work if text or another row of barcodes is immediately following the end of the barcode row. Then use the procedure according to step 3A).
4) When all lines are read (programs should end with an END instruction), the program can be exported or printed.
Controls and OptionsStatus and error messages are displayed in the console window.
The alpha field shows the current content of the alpha register including any appended text strings. Its content can be copied to the clipboard.
If data barcodes are scanned their values are collected in this field. Sequenced bar codes contain a prepended sequence number.
If program bar codes are scanned the program lines read so far are shown in this field. A complete program should include its END.
This field is for display purposes only. While you can edit the content of this field this will have no effect on the currently loaded or scanned program, i.e. you cannot edit a program and save the modified variant.
The content of this field can be copied to the clipboard.
Toolbar Items
The record button resets the checksum and line count and prepares for reading multi-line program bar codes. For these bar codes the checksum is carried over from row to row, so that it must be reset before scanning the first row. While scanning a program the number of bytes read so far is updated for each line.
The zoom factor only affects the display. The scanning operation is always performed on the full resolution of the image. Usually it is a good idea to adjust the zoom factor so that the whole width of the longest bars is visible.
Rotates the current image 90° counter clockwise.
This threshold defines the separation between narrow and wide bars. Following the documentation this value should be 150%, i.e. a wide bar is at least 150% times as wide as the white space between the bars. Depending on print quality this value can be set to values as high as 200%.

6
Note that a self-adaptive algorithm has been implemented which starts with the value defined in this field. In case of checksum errors the algorithm adjusts the threshold based on the statistical distribution of the bars and spaces found in the scan area. After 6 readjustments the algorithm gives up.
The scan height defines the height of the rectangle over which the pixels are averaged. In most cases values between 20 and 80 achieve a high success rate. In critical cases a lower value may reduce the error rate.
The name of the current program as it will be exported respectively printed on barcode pages and program listings.
Menu Items
Open Image…
• Open a bitmap file with barcodes. Scans should have about 400 dpi or better. Best results are obtained for pure black and white images (not grayscale).
Note: Instead of using this menu command you can also drag and drop image files of type PNG, BMP, JPG or GIF onto the BARCODEREADER window.
Read Program…
• Open a HP-41 program stored in a file. The file can be either in binary (.raw or .p41), hexadecimal encoded (.dat) or LIF (.lif) format. In case of the LIF format a dialog will be presented to select the desired file.
Note: Instead of using this menu command you can also drag and drop files of type RAW, P41, DAT onto the BARCODEREADER window.
Save Program…
• Save a program in binary (raw or p41), hexadecimal encoded (dat), or plain text listing (txt) format.
• The export to a Postscript file produces one or more pages of barcode for conversion to PDF or printing to a postscript printer. These files can be converted with Adobe Acrobat or Ghostscript or other tools like CorelDraw.
Print Program…
• Prints pages with the program listing to your system printer.
Print Barcodes…
• Prints pages with barcodes to your system printer.
Export Barcodes…
• Prints barcodes to a sequence of numbered image files.
Exit
• Stores preferences and exits the program.

7
Paste Image
• Pastes an image with barcodes from the clipboard. Scans should have at least 400 dpi and should be in pure black and white.
Paste Program
• Pastes a program from the clipboard. The program must be a text string in text hexadecimal encoded (dat) format, complete with header and checksum. Line breaks, tabs and spaces are ignored and can be used for grouping if desired. They will be ignored when parsing the string.
Show Line Numbers
• Three digits line numbers are prepended to each program line.
Show Statistics Window
• Display a window with the width of bars and spaces.
Decode XROM Functions
• For some known modules the XROM numbers are decoded and the function name is shown in human readable form.
Annotate XROM Functions
• If XROM functions are decoded o the ROM id and function is shown as a
comment. • Otherwise
o the decoded function name is shown as a comment.
Enter Raw Bar Codes…
• Opens a dialog where you can enter a sequence of “0” and “1” characters to read as a line of bar codes if the optical scanning process has repeatedly failed. You can insert spaces or dots to separate groups for readability.
Settings…
• Opens a dialog to specify options for printing and exporting.

8
Figure 4: The raw bar code entry dialog can be used as a last resort to enter a line which cannot be read from a scanned image of poor quality.
Figure 5: The Settings dialog allows adjusting parameters for the loading of images and the printout of programs in text as well as in barcode form. It also contains some general parameters.
Note that the 82143A printer font was originally created by Luiz Vieira, Brazil as “HP 82143A Charset 4”. I have modified this font by moving its standard characters from private encoding to the lower code range and by shifting the special characters to the Unicode equivalent. This makes it possible to use it as a replacement for the “Deja Vu Mono” font in HP-41 code listings without the need of translation.
Shows the usual About dialog with the version number.
001 LBL "SET" 002 PINIT // XROM 17,25 003 6 004 ENTER
005 256 006 ENTER 007 7 008 ENTER

9
009 187 010 LIMIT // XROM 17,13 011 FRAME // XROM 17,6 012 10 013 ENTER 014 90 015 ENTER 016 10 017 ENTER 018 90
019 LOCATE // XROM 17,15 020 CLST 021 100 022 STO Z 023 SCALE // XROM 17,30 024 FRAME // XROM 17,6 025 FIX 00 026 DEG 027 CLX 028 END
Figure 6: Example program decoded from the image. Active options: , , .

10
Fonts and Character Sets
In order to display the HP-41 character set the BARCODEREADER application uses a variant of the font “DejaVu Sans Mono”. This freely available font was modified to include the “x with overbar” character (code #2) and all unused glyphs have been removed to conserve space. Additionally the “HP 82143A” font, created by Luiz Vieira is available if a more WYSIWYG look is desired. This font has been modified to move all characters to the normal Unicode range. BARCODEREADER uses its own font resources (embedded in its Java archive) so that it is not necessary to install fonts on the target system. Note that the copyright to all glyphs is with their respective creators and copyright holders.
dec hex char
0 0 ♦
1 1 ×
2 2 x_
3 3 ←
4 4 α
5 5 β
6 6 Γ
7 7 ↓
8 8 Δ
9 9 σ
10 a ♦
11 b λ
12 c μ
13 d ∠
14 e τ
15 f Φ
16 10 Θ
17 11 Ω
18 12 δ
19 13 Å
20 14 å
21 15 Ä
22 16 ä
23 17 Ö
24 18 ö
25 19 Ü
26 1a ü
27 1b Æ
28 1c œ
29 1d ≠
30 1e £
31 1f
dec hex char
32 20
33 21 !
34 22 "
35 23 #
36 24 $
37 25 %
38 26 &
39 27 '
40 28 (
41 29 )
42 2a *
43 2b +
44 2c ,
45 2d -
46 2e .
47 2f /
48 30 0
49 31 1
50 32 2
51 33 3
52 34 4
53 35 5
54 36 6
55 37 7
56 38 8
57 39 9
58 3a :
59 3b ;
60 3c <
61 3d =
62 3e >
63 3f ?
dec hex char
64 40 @
65 41 A
66 42 B
67 43 C
68 44 D
69 45 E
70 46 F
71 47 G
72 48 H
73 49 I
74 4a J
75 4b K
76 4c L
77 4d M
78 4e N
79 4f O
80 50 P
81 51 Q
82 52 R
83 53 S
84 54 T
85 55 U
86 56 V
87 57 W
88 58 X
89 59 Y
90 5a Z
91 5b [
92 5c \
93 5d ]
94 5e ↑
95 5f _
dec hex char
96 60
97 61 a
98 62 b
99 63 c
100 64 d
101 65 e
102 66 f
103 67 g
104 68 h
105 69 i
106 6a j
107 6b k
108 6c l
109 6d m
110 6e n
111 6f o
112 70 p
113 71 q
114 72 r
115 73 s
116 74 t
117 75 u
118 76 v
119 77 w
120 78 x
121 79 y
122 7a z
123 7b π
124 7c
125 7d →
126 7e Σ
127 7f ⊢
Table 1: HP-41 character set as printed with the “DejaVu Sans Mono” font.

11
Figure 7: First page of a program exported in Postscript format. The numbers below the bar code groups denote the decimal value of the corresponding byte.
0036C600F400534554A4591683121516831783111817A44DA4461110831910831110831910A44F731110109171A45EA4469C008077C4072F16
Figure 8: Barcodes exported in hexadecimal format (.dat file extension). Note: the sequence is written as a single line without line breaks.

12
Figure 9: First page of a program as printed via the “File”-“Print Program…” option.
13
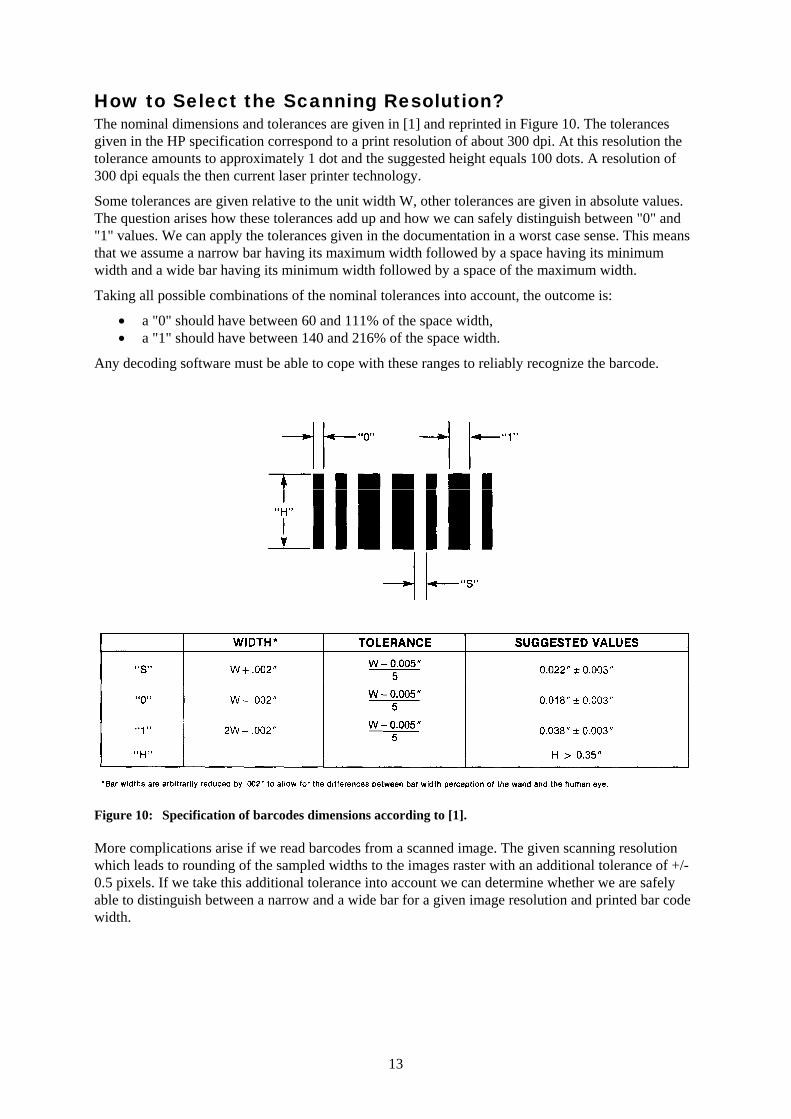
How to Select the Scanning Resolution? The nominal dimensions and tolerances are given in [1] and reprinted in Figure 10. The tolerances given in the HP specification correspond to a print resolution of about 300 dpi. At this resolution the tolerance amounts to approximately 1 dot and the suggested height equals 100 dots. A resolution of 300 dpi equals the then current laser printer technology.
Some tolerances are given relative to the unit width W, other tolerances are given in absolute values. The question arises how these tolerances add up and how we can safely distinguish between "0" and "1" values. We can apply the tolerances given in the documentation in a worst case sense. This means that we assume a narrow bar having its maximum width followed by a space having its minimum width and a wide bar having its minimum width followed by a space of the maximum width.
Taking all possible combinations of the nominal tolerances into account, the outcome is:
• a "0" should have between 60 and 111% of the space width, • a "1" should have between 140 and 216% of the space width.
Any decoding software must be able to cope with these ranges to reliably recognize the barcode.
Figure 10: Specification of barcodes dimensions according to [1].
More complications arise if we read barcodes from a scanned image. The given scanning resolution which leads to rounding of the sampled widths to the images raster with an additional tolerance of +/-0.5 pixels. If we take this additional tolerance into account we can determine whether we are safely able to distinguish between a narrow and a wide bar for a given image resolution and printed bar code width.
14
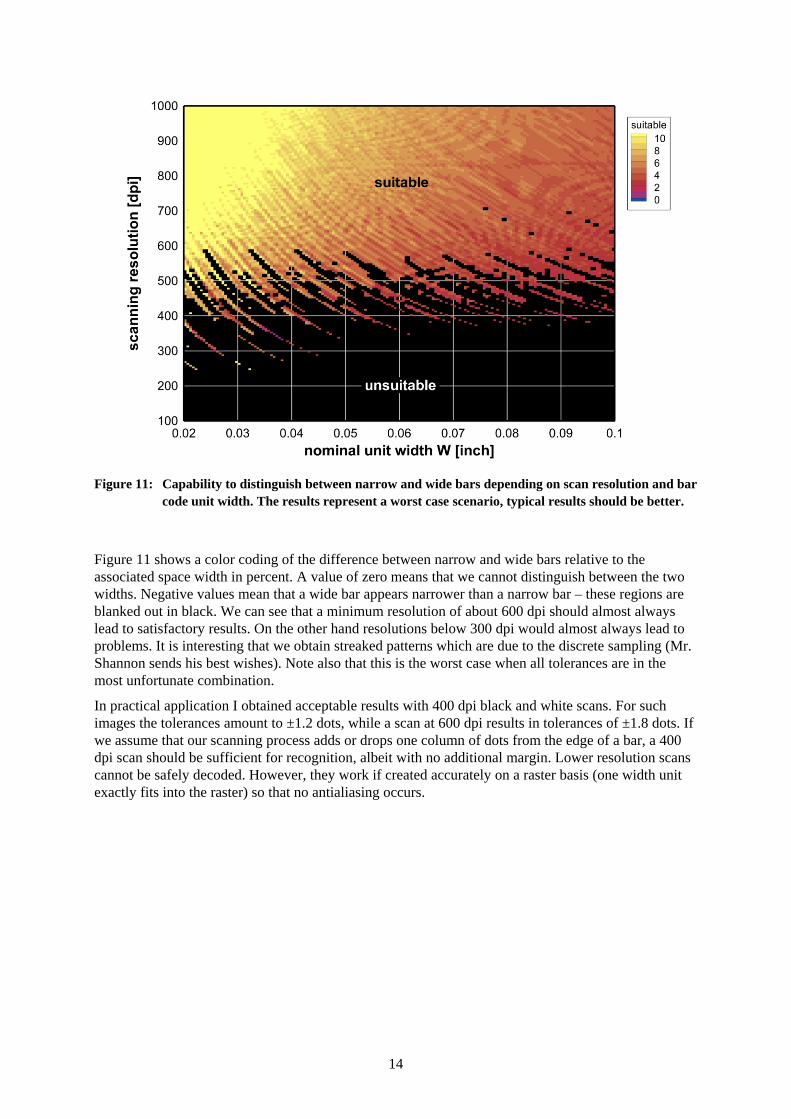
Figure 11: Capability to distinguish between narrow and wide bars depending on scan resolution and bar code unit width. The results represent a worst case scenario, typical results should be better.
Figure 11 shows a color coding of the difference between narrow and wide bars relative to the associated space width in percent. A value of zero means that we cannot distinguish between the two widths. Negative values mean that a wide bar appears narrower than a narrow bar – these regions are blanked out in black. We can see that a minimum resolution of about 600 dpi should almost always lead to satisfactory results. On the other hand resolutions below 300 dpi would almost always lead to problems. It is interesting that we obtain streaked patterns which are due to the discrete sampling (Mr. Shannon sends his best wishes). Note also that this is the worst case when all tolerances are in the most unfortunate combination.
In practical application I obtained acceptable results with 400 dpi black and white scans. For such images the tolerances amount to ±1.2 dots, while a scan at 600 dpi results in tolerances of ±1.8 dots. If we assume that our scanning process adds or drops one column of dots from the edge of a bar, a 400 dpi scan should be sufficient for recognition, albeit with no additional margin. Lower resolution scans cannot be safely decoded. However, they work if created accurately on a raster basis (one width unit exactly fits into the raster) so that no antialiasing occurs.

15
Statistical Properties of Bar Width Distributions
In the ideal case we would find only two bar widths: narrow and wide. However, the variation due to the printing and scanning processes leads to a spread of the bar widths. The distribution of the widths should show two narrow peaks, one centered on the narrow and one around the wide bars.
If the scan is of lower quality, the distributions will be wider and less focused. Such distributions make the recognition process more difficult because a variation exist for the spaces between the bars as well and a worst case combination can lead to the incorrect identification of a bar width.
Figure 12: Typical distribution of the bar and space width as obtained from a relatively poor print of a program line. The widths of bars and spaces show a considerable variation. The lowest chart shows the relative bar width, i.e. the ratio of bar width to the width of the immediately following space, expressed in percent. Due to integer math we see gaps between the bars.
In almost all cases errors are detected by comparing with the checksum. Often it is sufficient to rescan the bar at a slightly different position.
If this does not work it may be helpful to change the height of the scanning rectangle, sometimes a lower, sometimes a higher rectangle improves the recognition performance.
It is also helpful to align the barcode properly on the scanner or photocopier plate to minimize the effect of jagged edges.
Bar Width DistributionFor exporting in postscript format we define the nominal widths of the spaces and bars in default 1/72 inch units in accordance with [1] as:
/space 1.6 def /narrow 1.3 def /wide 2.7 def /height 26 def
These values can be found in the exported Postscript files.

16
If we decode the barcode using a hand held scanner, the actual time resolution depends on the variable scanning speed. Therefore the width of a space has to be constantly recalculated. Only then can we determine whether we have seen a narrow or a wide bar.
After scanning a narrow bar + space pair, we can calculate the nominal space width from
spacewidth = (barwidth + spacewidth) * 40 / 73
and if the current pair contained a wide bar we use
spacewidth = (barwidth + spacewidth) * 16 / 43
These equations yield a good approximation using only integer arithmetic. They allow for resolutions of up to 4800 dpi without exceeding the range of 16 bit integers. This is important if we want to implement a fast algorithm in a small microcontroller.
A technique useful to improve decoding reliability was the application of a slight relaxation to the space timing so that spurious noise is filtered out. The aim here is to track the variable timing but to avoid too large fluctuations. The BARCODEREADER application applies a sliding average over 4 samples of the space widths to reduce the risk of misinterpretation of single very short or long spaces.
Another measure to improve the reliability proved to be very useful: during the evaluation of the timing the distribution of bar widths is collected so that a probability distribution results. This allows to automatically re-adjust the detection threshold between narrow and wide bars. If decoding fails another pass over the already collected timing data can be started with the adjusted threshold value. This process can be repeated several times. In the BARCODEREADER application a maximum of five iterations is performed before the scan is declared unreadable.
Type Header Length
Total Length
Description
Program 1 3 4+ non private program
Program 2 3 4+ private program
Execute 4 2 3+ direct execution of command
Data 6 1.5 3+ numeric to X register, BCD digits packed in nibbles, filled to minimum length resp. to next byte boundary with NULL nibbles
Data 7 2 3+ alphanumeric replace alpha register, 1 byte per character
Data 8 2 3+ alphanumeric append to alpha register, 1 byte per character
Data 9 3 4+ sequenced numeric to X register
Data 10 3 4+ sequenced alphanumeric replace alpha register
Data 11 3 4+ sequenced alphanumeric append to alpha register
Keyboard 1 or 2 alphanumeric characters, programmable and non-programmable functions, XROM functions
Table 2: Summary of bar code types recognized by BARCODEREADER. All lengths are in bytes.
17
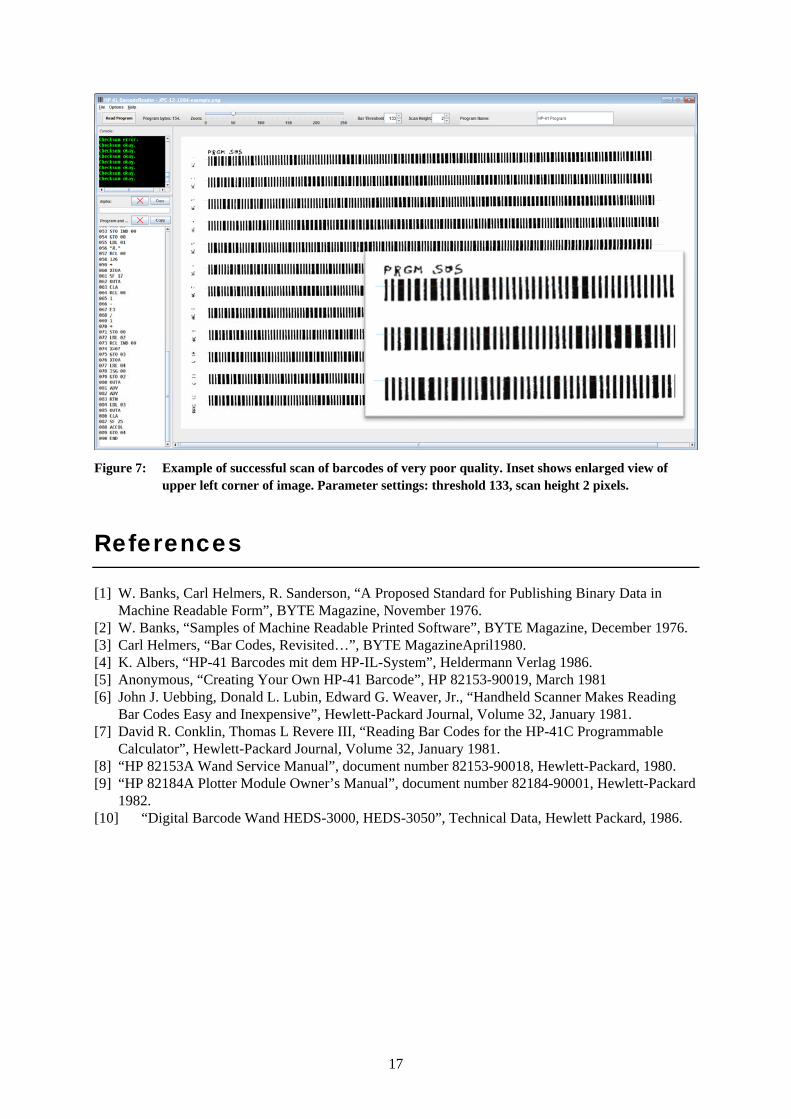
Figure 7: Example of successful scan of barcodes of very poor quality. Inset shows enlarged view of upper left corner of image. Parameter settings: threshold 133, scan height 2 pixels.
References
[1] W. Banks, Carl Helmers, R. Sanderson, “A Proposed Standard for Publishing Binary Data in Machine Readable Form”, BYTE Magazine, November 1976.
[2] W. Banks, “Samples of Machine Readable Printed Software”, BYTE Magazine, December 1976. [3] Carl Helmers, “Bar Codes, Revisited…”, BYTE MagazineApril1980. [4] K. Albers, “HP-41 Barcodes mit dem HP-IL-System”, Heldermann Verlag 1986. [5] Anonymous, “Creating Your Own HP-41 Barcode”, HP 82153-90019, March 1981 [6] John J. Uebbing, Donald L. Lubin, Edward G. Weaver, Jr., “Handheld Scanner Makes Reading
Bar Codes Easy and Inexpensive”, Hewlett-Packard Journal, Volume 32, January 1981. [7] David R. Conklin, Thomas L Revere III, “Reading Bar Codes for the HP-41C Programmable
Calculator”, Hewlett-Packard Journal, Volume 32, January 1981. [8] “HP 82153A Wand Service Manual”, document number 82153-90018, Hewlett-Packard, 1980. [9] “HP 82184A Plotter Module Owner’s Manual”, document number 82184-90001, Hewlett-Packard
1982. [10] “Digital Barcode Wand HEDS-3000, HEDS-3050”, Technical Data, Hewlett Packard, 1986.