A Guide to Stretching - TotalCardiology Rehab...• Hold stretch for 10 –30 seconds and repeat...
14
A Guide to Stretching © TotalCardiology Rehabilitation, Inc. All rights reserved.
Transcript of A Guide to Stretching - TotalCardiology Rehab...• Hold stretch for 10 –30 seconds and repeat...

A Guide to Stretching
© TotalCardiology Rehabilitation, Inc. All rights reserved.

Flexibility may decrease as a part of the natural aging process. Incorrect posture or lack of muscle
strength can also contribute to deceased flexibility.
Stretching is the best way to promote and maintain flexibility.
A GUIDE TO STRETCHING SAFELY
WARM-UPIt is very important to warm-up your muscles and joints before stretching. During
warm-up and exercise, your muscles and joints gradually ‘loosen’ allowing them
to be safely stretched.
STRETCH AFTER EXERCISE
We strongly recommend stretching after you have done an aerobic warm- up or
exercise session to avoid risk of injury. Stretching before exercising, when your
muscles are “cold” and relatively stiff can increase the risk of injury.
Avoid any stretch that causes muscle or joint pain, shortness of breath, dizziness, or chest pain. If it
bothers you to do any certain stretch, do not do that stretch. If you have any specific questions
regarding how to modify a stretch or how exercise can affect arthritis, osteoporosis or osteoarthritis,
please speak to a clinical exercise physiologist.

• Perform each stretch slowly and gently. This allows the connective tissues and muscles to safely
lengthen and prevents injuries occurring from during stretching.
• Stretch to where you feel mild tension, not pain in the muscle.
• Once you feel a comfortable stretch, hold for 10 – 30 seconds. Stretches may be safely held for 60
seconds.
• Perform each stretch 2 – 3 times. Remember to breathe normally as you are holding the stretch –
never hold your breath.
• Don’t overstretch, bounce, or jerk – this will increase your chance of injury.
• Your effort should be light intensity AND below your target heart rate (if you were given one) while
stretching. If your effort level is above either of those, stop and take a break.
A GUIDE TO STRETCHING SAFELY
Each stretch includes a picture to demonstrate the exercise,
along with a white circle to show where you should feel the
stretch. The lower grey bar on each slide also tells you where
the stretch should be felt when performed correctly.
TIP
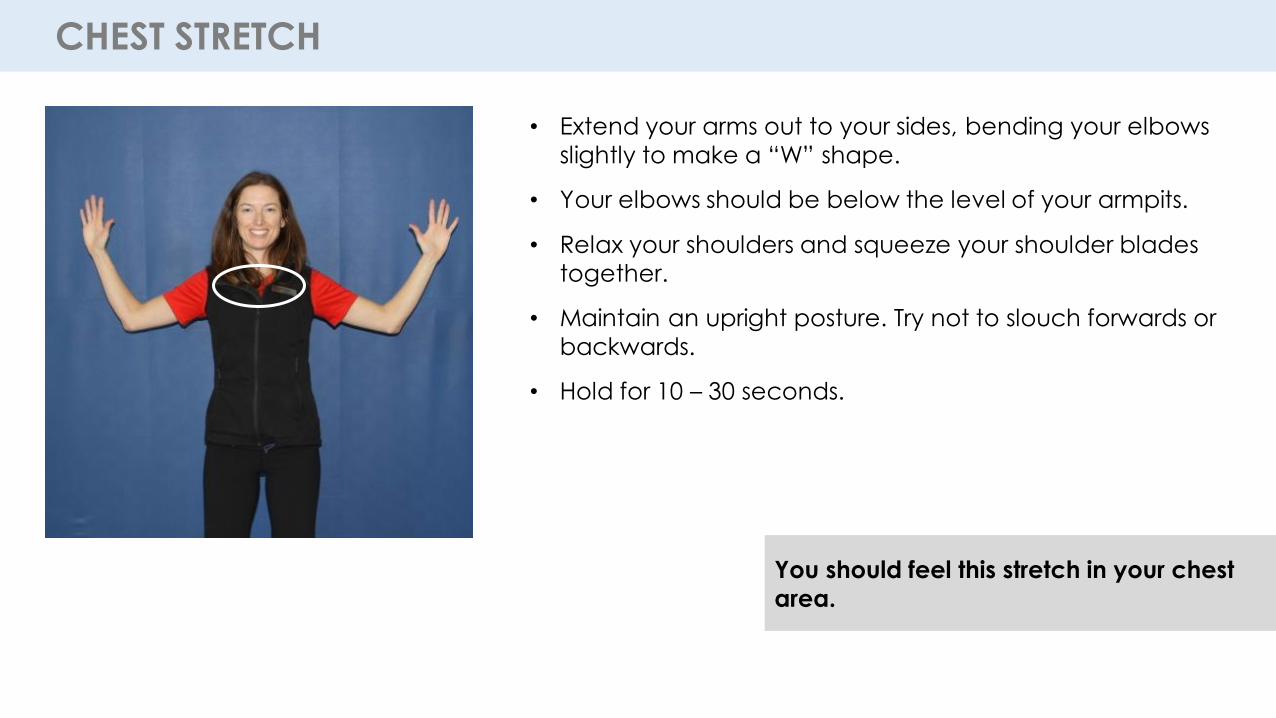
• Extend your arms out to your sides, bending your elbows
slightly to make a “W” shape.
• Your elbows should be below the level of your armpits.
• Relax your shoulders and squeeze your shoulder blades
together.
• Maintain an upright posture. Try not to slouch forwards or
backwards.
• Hold for 10 – 30 seconds.
CHEST STRETCH
You should feel this stretch in your chest
area.

• Bring one arm across your body while keeping it straight.
• With your opposite hand, hold your arm above or below
the elbow and pull it towards your body.
• Avoid pressing directly on the elbow as this will stress the
joint.
• Hold for 10 – 30 seconds and repeat with your other arm.
Tip: Try to keep your shoulders relaxed (try not to let your
shoulder rise up to your ear).
SHOULDER STRETCH
You should feel this stretch in the shoulder of
the arm that is stretched across your body.

• Stand up straight with your feet hip width apart.
• Relax your shoulders down away from your ears.
• Slowly lower your head toward one shoulder, only tilting
far enough to feel a gentle stretch on the opposite side
of your neck.
• Hold for 10 – 30 seconds and repeat on the other side.
EAR TO SHOULDER STRETCH
You should feel this stretch on the side of
your neck.

• Stand up straight with your feet hip width apart.
• Relax your shoulders down away from your ears.
• Slowly lower your chin down towards your chest, stopping at
the point of gentle tension.
• Hold for 10 – 30 seconds.
CHIN TO CHEST STRETCH
You should feel this stretch in your upper
back and neck.

• Take a large step forward and bend your front knee.
• Press your back heel down to the floor and keep the back leg
straight.
• Make sure that both feet are pointing forward and that you
can see your toes under your front knee (if you cannot see
your toes, take a larger step forward).
• Hold for 10 – 30 seconds and repeat with the other leg.
Tip: Hold onto a stable surface like a chair or counter, if you
need more balance.
STANDING CALF STRETCH
You should feel this stretch in the calf
(lower portion) of your back leg.

• Begin seated at the edge of a chair.
• Bend one leg and reach behind the knee to gently pull your leg
in toward your chest.
• Maintain upright posture. Ensure that you are not slouching or
rounding into the lower back.
• Lean back so that your upper back is against the back of the
chair – keep sitting at the edge of the chair.
• Hold for 10 – 30 seconds, and then repeat with the other leg.
Tip: To progress this stretch, try to bring your knee across your
body (e.g. right knee to left chest).
SEATED GLUTEAL STRETCH
You should feel this in the buttock of the
leg that is being held.

• Begin seated at the edge of a chair.
• Extend one leg and plant your heel on the floor, toes
pointing up.
• Maintain upright posture. Keep your chest up and bend
forward from the hips toward the extended leg until a
comfortable stretch is felt in the back of your leg.
• It is important to avoid rounding or slouching in the lower
back.
• Hold stretch for 10 – 30 seconds and repeat with other leg.
Tip: If lower back pain or discomfort occurs with seated
hamstring stretch, try the alternate supine hamstring
stretch on next page. If no relief is provided, speak to
your clinical exercise physiologist.
SEATED HAMSTRING STRETCH
You should feel this stretch in hamstrings
(back of upper leg).

• Laying on your back, bend both legs so that your
feet are flat on the floor.
• Extend one leg straight, grasping below the back of
the knee and pull gently until you feel a comfortable
stretch in the back of the leg.
• It is important that the lower back and buttocks stay
on the floor.
• Hold for 10 – 30 seconds and repeat with the other
leg.
SUPINE HAMSTRING STRETCH
You should feel this stretch in hamstrings
(back of upper leg).

• While seated in a chair cross your right foot over your
left ankle. Allow the right knee to relax down away
from the body until a gentle stretch is felt in the
external hip/ buttock.
• Hold for 10 – 30 seconds.
• Repeat with the other leg.
Tip: To progress this exercise, bring your right ankle
to your left knee. Allow the knee to relax down
away from the body.
SEATED PIRIFORMIS STRETCH
IMPORTANT:
If you have had hip replacement surgery, please do NOT do this stretch. For the remaining stretches, please
pay attention to how you are feeling and do not perform any stretch that causes pain or discomfort.
You should feel this stretch in the outside
hip and buttock.

• While seated with your back straight, place the soles of your feet
together. Allow your knees to relax and fall to the floor.
• You can place your hands behind you to help support your back.
• Hold this stretch for 10 – 30 seconds.
• Bringing your feet closer to your body will increase the stretch.
SEATED GROIN STRETCH
IMPORTANT: If you have had hip replacement
surgery, please pay attention to how you are feeling and do not perform any stretch that
causes pain or discomfort.
CHAIR MODIFICATION:
• This stretch can also be done in a chair.
• Shift your body to the right side of the chair. Sit up straight and open
your right leg to the side.
• Hold for 10 – 30 seconds. Repeat on opposite side.
You should feel this stretch in the
groin/inner thigh area.

• While seated, shift your body to the right side of a chair.
• Drop your right knee toward the ground, keeping your
knee bent.
• Tilt your pelvis under and press down through the bent
leg.
• Keep your body upright with your chest up.
• Hold for 10 – 30 seconds.
• Repeat the stretch on your left side.
Tip: To increase the stretch more, extend your bent leg
farther back. If you need more of a stretch, try
pushing the ground back away from your body.
SEATED QUADRICEPS + HIP FLEXOR STRETCH
You should feel this stretch throughout
the front of your hip and thigh.
IMPORTANT: If you have had hip
replacement surgery, please pay attention to how you are feeling and do not perform
any stretch that causes pain or discomfort.