HolophoneTM · • Evanescence • Extreme Makeover, Home Edition TV • Fogo Labs • FOX HDTV •...
28
Holophone TM H2-PRO Surround Sound Microphone User Guide Copyright © 2001, 2004 Rising Sun Productions Ltd.
Transcript of HolophoneTM · • Evanescence • Extreme Makeover, Home Edition TV • Fogo Labs • FOX HDTV •...
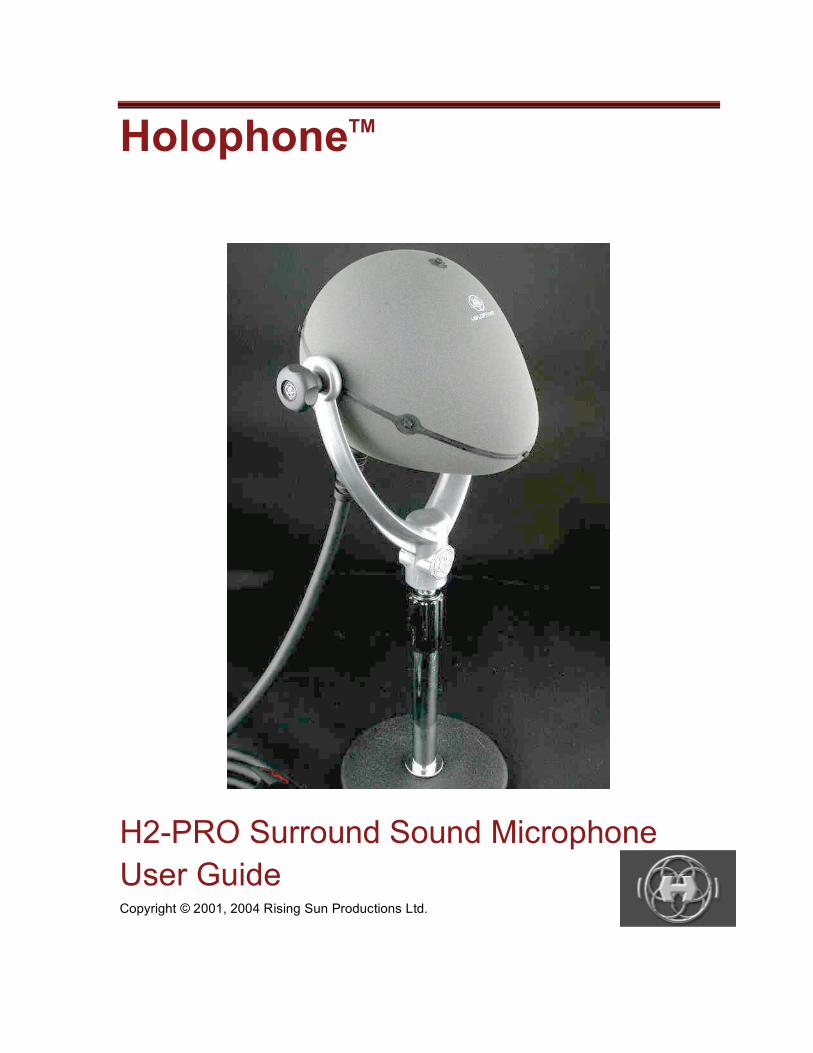
HolophoneTM
H2-PRO Surround Sound Microphone
User Guide Copyright © 2001, 2004 Rising Sun Productions Ltd.

“...I think I may have just heard the future...This mic is gonna RULE. It is so utterly simple and so utterly natural, it’s a total no brainer!!! Point ‘n’ shoot.” Dave Moulton, TV Technology

User list• ABC HDTV• Any Given Sunday (film)• Apple Inc• Asbury College, KY• ATK Audiotek• Bell Expressview-Canada• Bose Corporation• Branford Marsalis live in Amsterdam• BTV Beijing TV - China• Bonnaroo Festival• CBC HDTV• CBS HDTV• Celine Dion• Central Michigan University• City TV-Canada• Cowboy Junkies• Cristiano Pinheiro, Brazil• CTV, Canada• Dave Matthews Band• Dome Productions• Dolby Labs• Drew Carey Show• EA Sports• Eddie Mapp• Elton John• ESPN• Evanescence• Extreme Makeover, Home Edition TV• Fogo Labs• FOX HDTV• Frank Serafine• Genie Awards• George Johnsen - Mortal Kombat III, • London Philharmonic• Hank Neuberger - Third Wave Productions• Hiroshima TV - Japan• Hong Kong TV (ATV)• Iron Maiden• John Cale• Joss Stone• Kansai TV (Osaka, Japan)• Kanye West• King Bolden, film• Kitanihon TV - Japan• Klaus Landsberg• LDS Motion Picture Studio • Lionel Ritchie• Mammoth Sound and Vision• MBC TV - Korea• Mexico Soccer• Mormon Tabernacle Choir• Moscow International House of Music• MTV Canada• MuchMusic Video Awards• NBA Basketball• NBC HDTV• NFL Football• NHL Hockey• NHK Japan• North by NorthEast Music Festival• One Love – Bob Marley Tribute • Paul McCartney• PBS HDTV- USA• Pelissippi State University• RAI, Italy• Real Madrid (Soccer)• Resul Pookutty, India• Robert Margouleff• Sam Roberts• Sandia Labs• Sapporo (TV) - Japan• Shakira• Teatro Municipal do Rio de Janeiro• TELEVISIONE SVIZZERA DI LINGUA ITALIANA• The Kentucky Derby• The Church of Scientology• Three Superbowls• TNT HDTV • TSN HD• TV Asahi -Japan• TV Azteca (Mexico)• Universidad Francisco Marroquin• University of Central Florida• Van Morrison, Grand Ol’ Opry• Warner Music Group, Flaming Lips• Waterman, Andrew• Whitesnake• 47th and 48th Grammy AwardsAnd the list goes on...
H2-PRO Surround Sound Microphone User Guide
Rising Sun Productions Ltd. page ii
Terms and Conditions
1. Rising Sun Productions Limited “Rising Sun” warrants its products to be free of
defects in material and workmanship for a period of one (1) year from the original
date of receipt or retail purchase.
2. During the warranty period, Rising Sun shall, at its sole discretion, either repair or
replace free of charge any product that proves to be defective.
3. This warranty does not cover claims for damage arising out of abuse, neglect,
alteration or attempted repair by any unauthorized personnel, and is limited to failures
arising during the course of normal use for the product.
4. Rising Sun does not authorize any person to create for it any other condition or
liability in connection with this product. Any implied warranty or condition
(including any implied warranty of merchantability or fitness for a particular purpose)
is limited to the duration of this warranty. The performance of repairs and needed
adjustments is the exclusive remedy under this written warranty or any implied
warranty.
5. In the event that your jurisdiction provides rights to you through legislation or law,
which are inconsistent with the rights set out in this warranty, this warranty does not
exclude or limit those rights, but shall run concurrently with any applicable
legislation law.
6. Rising Sun shall in no event be liable for incidentals, economic, consequential or
other losses or damages resulting from the breach of any express or implied
warranty, law or statute, including, but not limited to, damage to property,
damage based on inconvenience or on the loss of use of the product, and to the
extent permitted by law, damages arising out of personal injury or death. In no
event shall Rising Sun be held responsible for an amount exceeding the dollar
value of the product(s) purchased.
7. Some jurisdictions do not allow for the exclusions or limitation of some or all
damages, so the above limitation or exclusion may not apply to you.
8. It is agreed that any dispute or claim arising out of the purchase, sale or use of the
product(s) is to be decided within the exclusive jurisdiction of the courts of the
Province of Ontario, Canada.
H2-PRO Surround Sound Microphone User Guide
Rising Sun Productions Ltd. page iii
Warnings
Failure to heed these warnings could result in an electrical shock hazard, reduced service life or damage to your equipment.
• The Holophone H2-PRO is intended for professional use only.
• All safety and operating instructions should be read before the unit is operated and
retained for future reference.
• While the Holophone H2-PRO is water-resistant to some degree, take care that it does not
become too wet. When used outdoors, a plastic bag placed around it with an elastic band
around the cable will help to protect it against inclement weather.
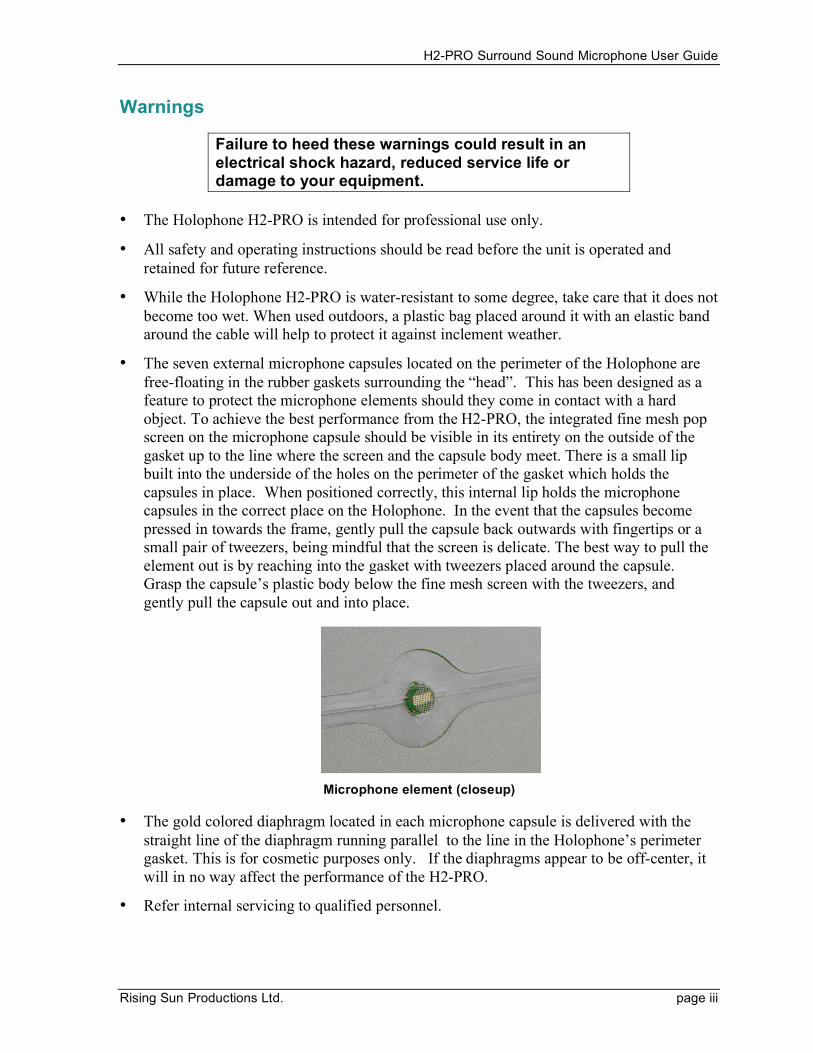
• The seven external microphone capsules located on the perimeter of the Holophone are
free-floating in the rubber gaskets surrounding the “head”. This has been designed as a
feature to protect the microphone elements should they come in contact with a hard
object. To achieve the best performance from the H2-PRO, the integrated fine mesh pop
screen on the microphone capsule should be visible in its entirety on the outside of the
gasket up to the line where the screen and the capsule body meet. There is a small lip
built into the underside of the holes on the perimeter of the gasket which holds the
capsules in place. When positioned correctly, this internal lip holds the microphone
capsules in the correct place on the Holophone. In the event that the capsules become
pressed in towards the frame, gently pull the capsule back outwards with fingertips or a
small pair of tweezers, being mindful that the screen is delicate. The best way to pull the
element out is by reaching into the gasket with tweezers placed around the capsule.
Grasp the capsule’s plastic body below the fine mesh screen with the tweezers, and
gently pull the capsule out and into place.
Microphone element (closeup)
• The gold colored diaphragm located in each microphone capsule is delivered with the
straight line of the diaphragm running parallel to the line in the Holophone’s perimeter
gasket. This is for cosmetic purposes only. If the diaphragms appear to be off-center, it
will in no way affect the performance of the H2-PRO.
• Refer internal servicing to qualified personnel.
H2-PRO Surround Sound Microphone User Guide
Rising Sun Productions Ltd. page iv
Table of Contents Terms and Conditions..............................................................................................ii
Warnings ................................................................................................................iii
Introducing the Holophone H2-PRO........................................................................1
What is the Holophone? ............................................................................................3
A Brief Overview of Surround Sound ......................................................................5
The Holophone H2-PRO ...........................................................................................8
Using the Holophone H2-PRO................................................................................ 11
Cabling Scenarios .................................................................................................. 13
Direct to console................................................................................................ 13
Direct to recording device supplying microphone with phantom power.............. 14
Using the preamplifier ....................................................................................... 14
Optional Equipment........................................................................................... 15
Appendix A: Directivity measurements.................................................................. 16
Directivity measurement of the ellipsoid-mounted microphones ............................ 16
H2-PRO Surround Sound Microphone User Guide
Rising Sun Productions Ltd. page 1
Introducing the Holophone H2-PRO
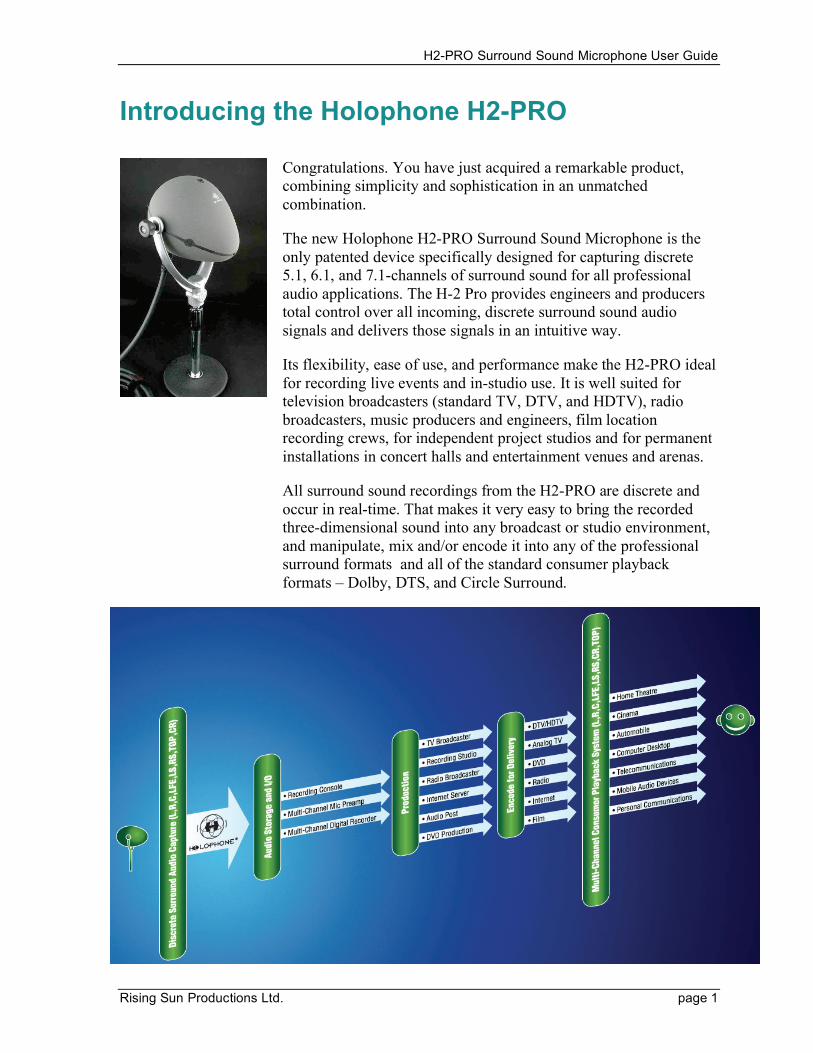
Congratulations. You have just acquired a remarkable product,
combining simplicity and sophistication in an unmatched
combination.
The new Holophone H2-PRO Surround Sound Microphone is the
only patented device specifically designed for capturing discrete
5.1, 6.1, and 7.1-channels of surround sound for all professional
audio applications. The H-2 Pro provides engineers and producers
total control over all incoming, discrete surround sound audio
signals and delivers those signals in an intuitive way.
Its flexibility, ease of use, and performance make the H2-PRO ideal
for recording live events and in-studio use. It is well suited for
television broadcasters (standard TV, DTV, and HDTV), radio
broadcasters, music producers and engineers, film location
recording crews, for independent project studios and for permanent
installations in concert halls and entertainment venues and arenas.
All surround sound recordings from the H2-PRO are discrete and
occur in real-time. That makes it very easy to bring the recorded
three-dimensional sound into any broadcast or studio environment,
and manipulate, mix and/or encode it into any of the professional
surround formats and all of the standard consumer playback
formats – Dolby, DTS, and Circle Surround.
H2-PRO Surround Sound Microphone User Guide
Rising Sun Productions Ltd. page 2
The Holophone H2-PRO Surround Sound Microphone is entirely
compatible with all standard analog and digital I/O devices that
accept up to eight channels and provide internal phantom power,
including hard disc based recorders, multichannel preamplifiers,
standard multichannel I/Os, and all mixing consoles.
The Holophone H2-PRO takes the guesswork out of recording
surround sound.
• Lightweight and inexpensive solution to instantly capture
live surround sound for professional recording or broadcast.
• Direct and discrete signal path from the mic to the monitor,
with no mixing, signal manipulation or processing required.
• Easy set-up, point and shoot operation with plug and play
capability.
• Compatible with all eight-channel mic preamps, location
recorders and recording consoles providing phantom power.
• Compatible with all surround sound encoding/playback
formats (Dolby, DTS, Circle Surround, IMAX etc.)
• Rugged design for outdoor environments
H2-PRO Surround Sound Microphone User Guide
Rising Sun Productions Ltd. page 3
What is the Holophone?
The Holophone is a specially designed microphone system for
capturing sound in three dimensions, while keeping signals
discrete for surround sound playback.
Designed specifically for creating sound tracks for surround sound
playback systems, the Holophone’s superb realism and ease of use
make it the preferred choice for a wide range of other applications.
The 90’s witnessed an explosion of surround sound technology in
the form of motion picture playback systems, home theater, and
Digital Video Discs (DVDs). The recording of natural and
instantaneous surround sound was left behind, until the Holophone.
Three-dimensional sound is based on the brain’s amazing ability to
decode subtle differences in timing and volume of sounds coming
from different directions as the waves bend around our head.
Surround sound has traditionally been created by mixing sounds
recorded from multiple sources. The sound engineer controls the
mix to simulate what a person sitting in a particular space would
hear. The mixing approach is costly and time consuming, and the
results are inconsistent.
The Holophone solution is to place multiple discrete microphones
on the surface of a specially-designed head. Multiple microphones
capture the sounds that come from multiple directions. An internal
microphone captures low frequency sounds.
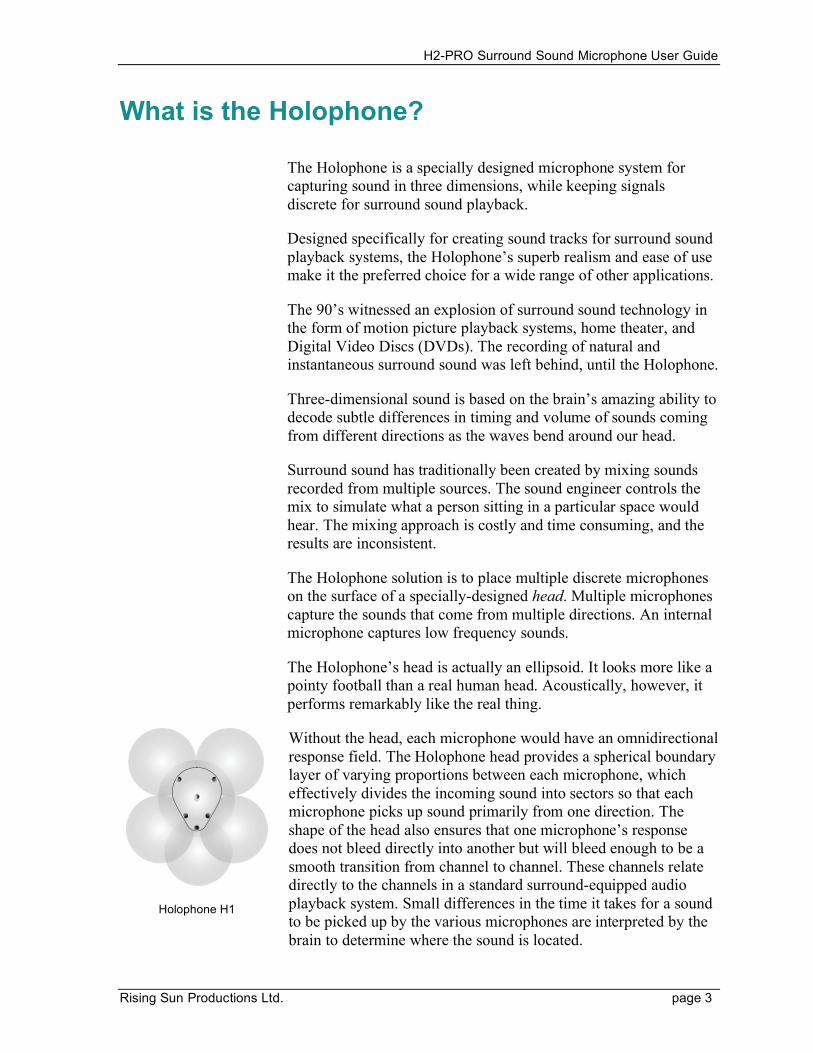
The Holophone’s head is actually an ellipsoid. It looks more like a
pointy football than a real human head. Acoustically, however, it
performs remarkably like the real thing.
Holophone H1
Without the head, each microphone would have an omnidirectional
response field. The Holophone head provides a spherical boundary
layer of varying proportions between each microphone, which
effectively divides the incoming sound into sectors so that each
microphone picks up sound primarily from one direction. The
shape of the head also ensures that one microphone’s response
does not bleed directly into another but will bleed enough to be a
smooth transition from channel to channel. These channels relate
directly to the channels in a standard surround-equipped audio
playback system. Small differences in the time it takes for a sound
to be picked up by the various microphones are interpreted by the
brain to determine where the sound is located.
H2-PRO Surround Sound Microphone User Guide
Rising Sun Productions Ltd. page 4
Our real head performs similarly, shielding each ear from sound
waves that are picked up by the other. Small differences in timing
are interpreted as position. This phenomenon is known as binary
localization. The output from all the speakers arrives at our ears
with the same small differences in timing, and we hear as we
would if our own head was in the same position as the Holophone
when it recorded the sounds.
This simple principle governs the recording process, and
determines where to position the Holophone. Recording is very
subjective. Different positions produce different effects for
different purposes. The best guide is simply to ask yourself "where
does it sound best?" and put the Holophone there.
The primary advantage of the Holophone system over all other
existing approaches is that no signal manipulation is required.
The output of the Holophone itself can be used directly, and in
most situations this will produce the best results.
The initial design was completed and a patent application filed for
the new system in 1994. When it became apparent in late1996 that
the patent would issue, the first prototype was built. The Canadian
government’s National Research Council became interested in the
technology and joined in a collaborative research agreement to
fine-tune the system and build a prototype that was compatible
with industry requirements.
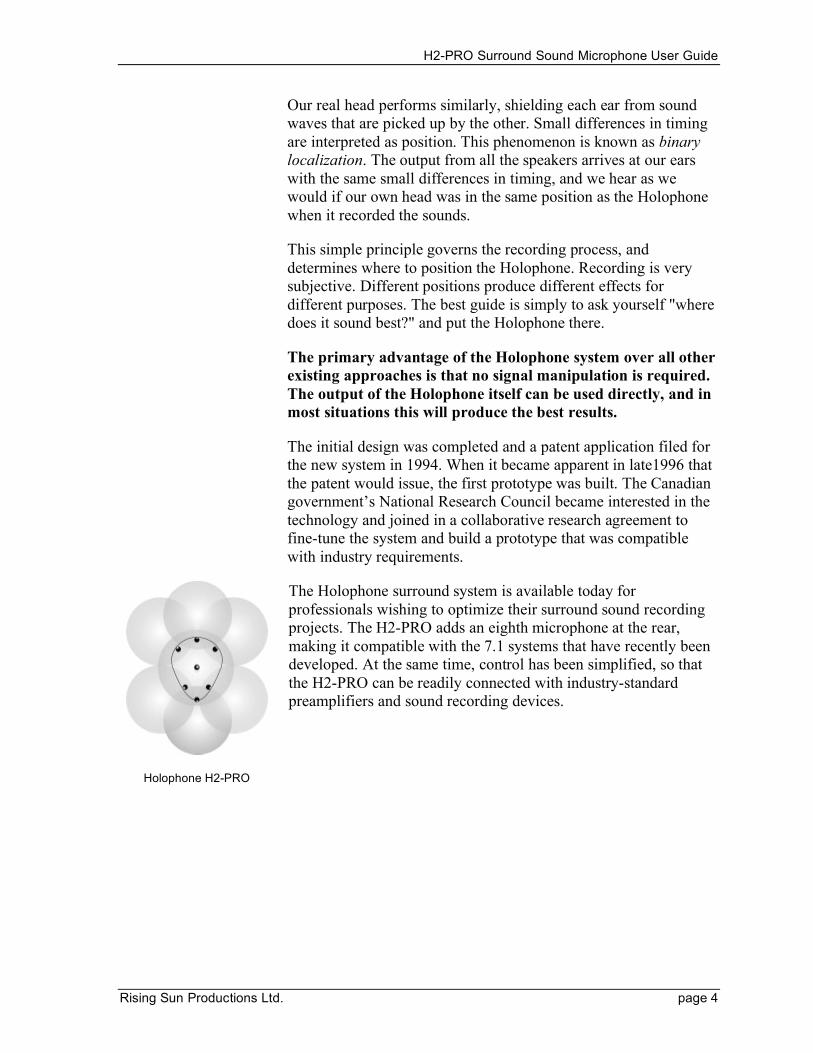
Holophone H2-PRO
The Holophone surround system is available today for
professionals wishing to optimize their surround sound recording
projects. The H2-PRO adds an eighth microphone at the rear,
making it compatible with the 7.1 systems that have recently been
developed. At the same time, control has been simplified, so that
the H2-PRO can be readily connected with industry-standard
preamplifiers and sound recording devices.
H2-PRO Surround Sound Microphone User Guide
Rising Sun Productions Ltd. page 5
A Brief Overview of Surround Sound
In the beginning there was mono. No matter how many speakers
there were, the sound coming from each speaker was the same. In
monaural recording, the effect was as if all the sound was recorded
from the same single location, and for the most part this was how it
was recorded.
In 1940, Disney introduced surround sound to cinemas with the
movie Fantasia, using three channels behind the movie screen,
with additional speakers on either side and at the rear. Implementation was expensive, and the results were demonstrated
in only two theaters — one in New York and one in Los Angeles.
In the 1950s, stereo recording was introduced to the mass
consumer market. Stereo is based on the premise that we have two
ears. If the sound is recorded from two sources, we get a better
image of where the sound is coming from. Through the 1960s,
stereo sound swept monaural out of the marketplace.
Throughout the seventies there were a number of experiments with
quadraphonic sound for the home market. Quad sound failed to
catch on for a variety of reasons — lack of material, high cost of
systems and lack of consumer demand.
In 1970, George Lucas’s Star Wars introduced Dolby Stereo to
movie theaters, and within a few years it became the most common
audio format. Contrary to its name, Dolby Stereo can actually
delivers four sound sources, thanks to an ingenious principle called
matrixing: left, right, center and rear. If the theater was not set up
for four channels, the sound was delivered effectively as
conventional stereo. Dolby Surround and Dolby ProLogic are
home cinema versions of Dolby Stereo. For television home video,
the four signals are compressed into two conventional stereo
tracks, and then decompressed into four if the home equipment
supports surround sound. This compression is referred to as 4-2-4.
Today, surround sound in theaters is delivered most commonly by
Dolby Digital systems (including Dolby Digital 5.1, Dolby AC-3,
Dolby SR-D (Spectral Recording Digital). Dolby Digital employs
six sound sources, as follows:
• Center
• Left
• Right
• Left surround
• Right surround
• LFE (or Low Frequency Effects)
H2-PRO Surround Sound Microphone User Guide
Rising Sun Productions Ltd. page 6
This configuration is known as 5.1, with the “.1” referring to the
LFE source (also known as a subwoofer). Dolby Surround Digital
is the home video version, available on digital video disks (DVDs).
A competing system called DTS (Digital Theater Systems),
introduced with Jurassic Park, also uses the 5.1 configuration.
Circle Surround analog decoding system also supports 5.1.
IMAX uses a 6.1 system, adding a top channel to the 5.1 standard.
This is the configuration that is supported by the Holophone.
Recently, Dolby, DTS and Circle Surround have all come out with
extended systems that use a 6.1 configuration. Dolby Digital ES
adds a Centre Surround channel. DTS ES (Extended Surround)
adds a back centre surround channel, as does Circle Surround II
(CS II).
Sony has introduced a new standard, SDDS (Sony Dynamic Digital
Sound), which has a 7.1 configuration. It adds a left center and a
right center speaker, but omits the top speaker. The Holophone
does not support this standard directly. (However, the two
additional sound sources can be generated in the studio, using the
center channel in combination with the left and right channels.)
The Holophone is compatible with all consumer audio formats,
including:
6.1 IMAX
Dolby Digital EX
DTS ES
Circle Surround II (CS II)
5.1 Dolby Digital
Dolby ProLogic II
DTS
Circle Surround
AAC (Advanced Audio Coding – MPEG 4
WMA (Windows Media Audio)
If you wish, when using the Holophone, you
can add “height” by mixing the top channel
incrementally with the five (L,R,C,LS,RS)
channels after recording.
H2-PRO Surround Sound Microphone User Guide
Rising Sun Productions Ltd. page 7
7.1 SDDS
Generate the two additional sound sources in
the studio, using the center channel in
combination with the left and right channels.
4-2-4 Dolby Stereo
Direct support for center, left and right
channels. Left surround and right surround
are combined into one mono output. Mix the
top incrementally with the four backbone
channels.
Stereo Mix down to stereo.
Note: Dolby, Dolby Stereo, Dolby Surround, Dolby ProLogic, Dolby Digital,
IMAX, DTS (Digital Theater Systems), Circle Surround, AAC, WMA,
SDDS (Sony Dynamic Digital Sound) are trade-marked terms.
H2-PRO Surround Sound Microphone User Guide
Rising Sun Productions Ltd. page 8
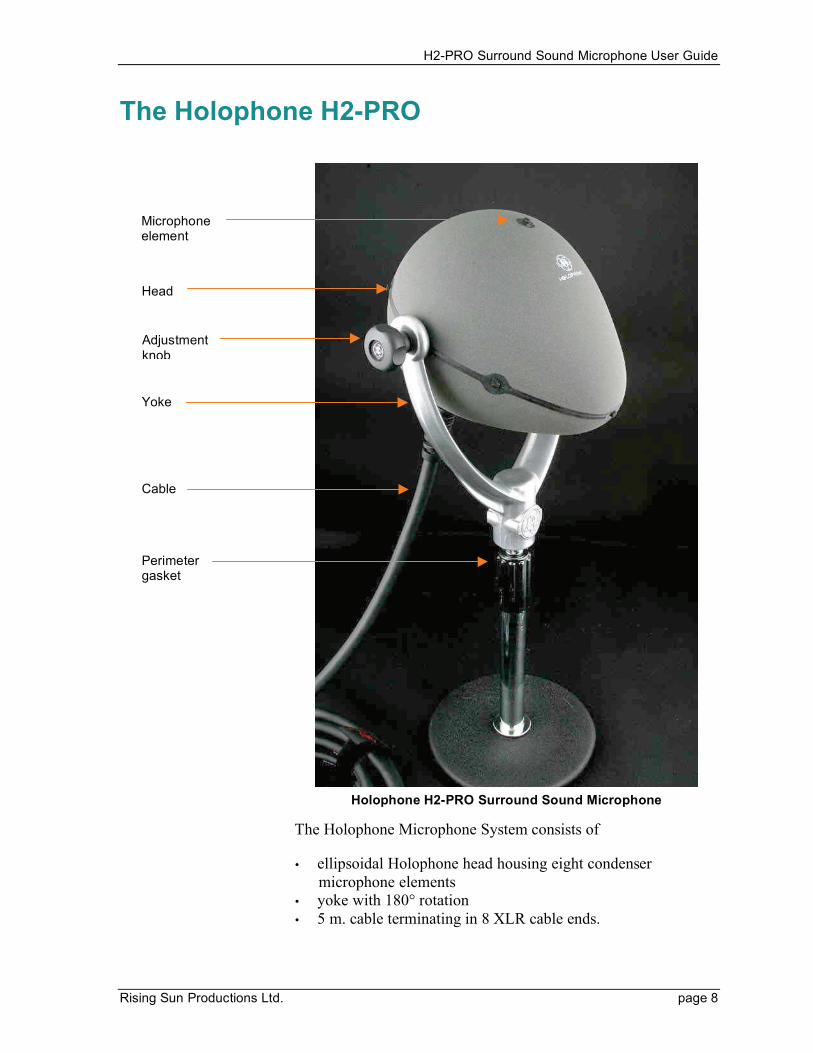
The Holophone H2-PRO
Holophone H2-PRO Surround Sound Microphone
The Holophone Microphone System consists of
• ellipsoidal Holophone head housing eight condenser
microphone elements
• yoke with 180° rotation
• 5 m. cable terminating in 8 XLR cable ends.
Head
Cable
Yoke
Microphone element
Adjustment knob
Perimeter gasket
H2-PRO Surround Sound Microphone User Guide
Rising Sun Productions Ltd. page 9
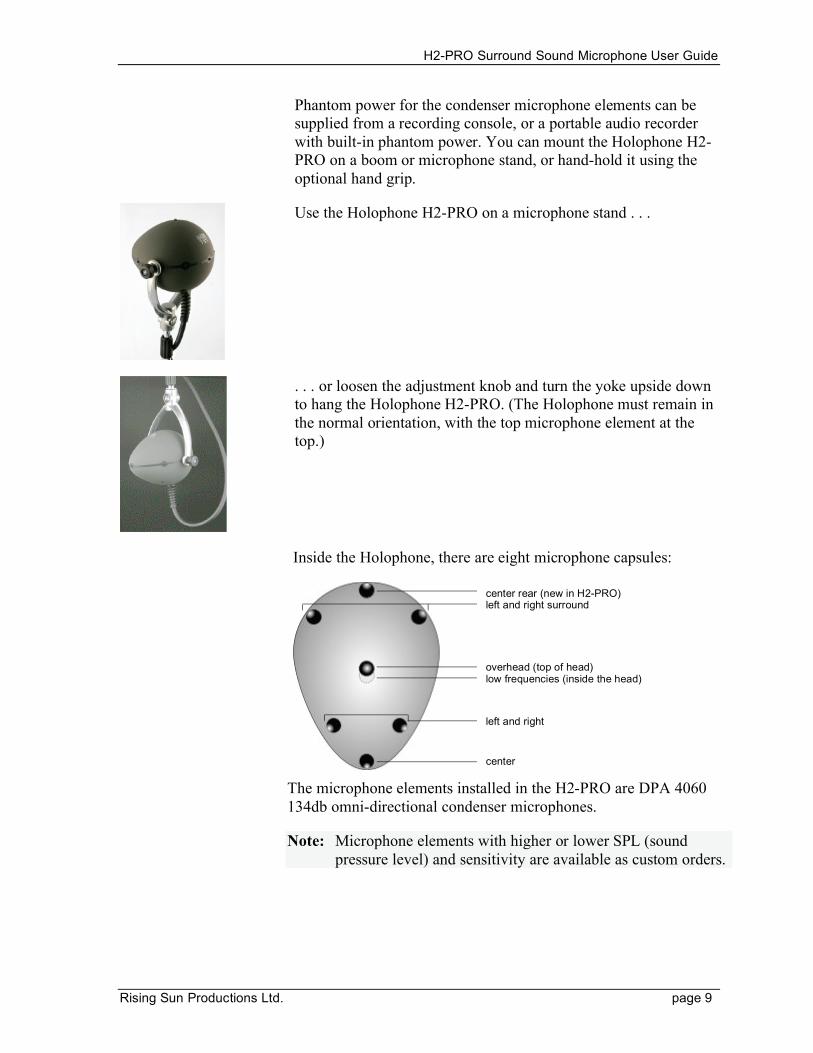
Phantom power for the condenser microphone elements can be
supplied from a recording console, or a portable audio recorder
with built-in phantom power. You can mount the Holophone H2-
PRO on a boom or microphone stand, or hand-hold it using the
optional hand grip.
Use the Holophone H2-PRO on a microphone stand . . .
. . . or loosen the adjustment knob and turn the yoke upside down
to hang the Holophone H2-PRO. (The Holophone must remain in
the normal orientation, with the top microphone element at the
top.)
Inside the Holophone, there are eight microphone capsules:
The microphone elements installed in the H2-PRO are DPA 4060
134db omni-directional condenser microphones.
Note: Microphone elements with higher or lower SPL (sound
pressure level) and sensitivity are available as custom orders.
overhead (top of head) low frequencies (inside the head)
left and right
center
center rear (new in H2-PRO) left and right surround

H2-PRO Surround Sound Microphone User Guide
Rising Sun Productions Ltd. page 10
The cable terminates with eight balanced XLR output connectors.
These are assigned to each of the microphone elements as follows:
Channel Microphone
1 left
2 right
3 center
4 low frequency effects (LFE)
5 left surround
6 right surround
7 top
8 center rear
It is necessary to keep the channel assignments discrete through the
recording and mixing process. For example:
• Channel 1 (left):
• to channel 1 of a mixer
• to channel 1 of a tape deck
• to channel 1 of the final deliverable media
• to left speaker in a surround matrix (5.1, 6.1, 7.1).
H2-PRO Surround Sound Microphone User Guide
Rising Sun Productions Ltd. page 11
Using the Holophone H2-PRO
The Holophone H2-PRO is remarkably simple to use, because it
accurately reproduces in three dimensions what one would hear at
a particular location in space. In most cases, if you have experience
recording sound with traditional microphones, you can rely on
your ear and your intuition as to exact placement for a particular
event.
Here are a few additional suggestions: (please note these are only
suggestions)
1. The simplest method is highly effective. Give the Holophone
the best seat in the house and let it do its work. You will be
amazed at the accuracy of the ambient sound. For a concert
situation with arena-style seating, you might place the
Holophone H2-PRO a little higher than the orchestra, tilting the
nose down towards the performers.
2. Use the Holophone H2-PRO to provide the “base” ambient
surround sound for your mix. Make sure to give the Holophone
tracks “space” in the mix in which to further construct your
mix, bearing in mind that the Holophone will provide a
sonically complete Surround Sound picture to begin with. The
usual approach is to place the Holophone along the center line
of the event to get a sonic capture with proper left/right
balance. Aim the pointed front of the Holophone towards the
front and the round back towards the rear of the venue.
Additional spot microphones can be used to feature specific
areas or instruments in the recording, and to complete the
desired soundscape.
Remember: The Holophone’s microphone configuration
directly relates to a listener’s perspective in a home theater, etc.
Treat the Holophone like a sonic camera, keeping the center
“nose” microphone element forward, the left pointing left and
the right pointing to the right of the performance.
3. If you are used to working with other microphones in a
particular way, you can use the Holophone H2-PRO to provide
the ambient sound of a venue and build the rest of the mix
around it. Place it in a position that will not cause phase or
delay problems when used with the signals captured by the
other microphones. In most cases, in large venues try to
position the Holophone as close to “Front Row Center” as
possible, rather than near the back of the room (as with some
traditional ambient microphone techniques).
H2-PRO Surround Sound Microphone User Guide
Rising Sun Productions Ltd. page 12
4. When mixing Holophone tracks with other audio tracks for
broadcast, including for voice-over or sportscaster talent, try to
mix the dialogue not only into the Center channel, but also
place the dialogue slightly in the Left and Right and to some
degree the Surround channels for increased spatial realism.
When the overall captured sound is three-dimensional, the
Center dialogue channel can become very thin in comparison
to the rest of the sound picture. Spreading the dialogue image
over a wider space seems to rectify the situation. This has
proven to be very effective when combined with Holophone
derived Surround Sound ambience.
5. For Sports broadcasting in most field sporting events, and for
fixed installations such as arenas, it is desirable to place the
Holophone either near the center of the field, or else near a
Main Camera position off to the one side that will work in
conjunction with the main camera angle of the broadcast. For
example, place the Holophone along the sidelines on the 50
yard line of a football game, or facing center ice in an ice
hockey arena. Always keep in mind the perspective of the
television viewer. Mounting the Holophone on a side of a field
or rink opposite to the main camera angle would seem
backwards and unnatural.
6. In situations involving multiple and simultaneous use of two or
more Holophone systems, combining the signals together may
alter the localization characteristics of the main recording,
since two soundscapes and perspectives are being combined.
This can be manipulated into an intriguing effect and can also
be used for multiple perspectives of a venue for DVD, etc.
7. For track sports, including motor sports or running events with
multiple camera angles on corners, hills or jumps, you can
employ multiple Holophone units with an audio switcher from
unit to unit. Use this configuration in conjunction with a
camera switcher to match the changing perspectives of the
cameras.
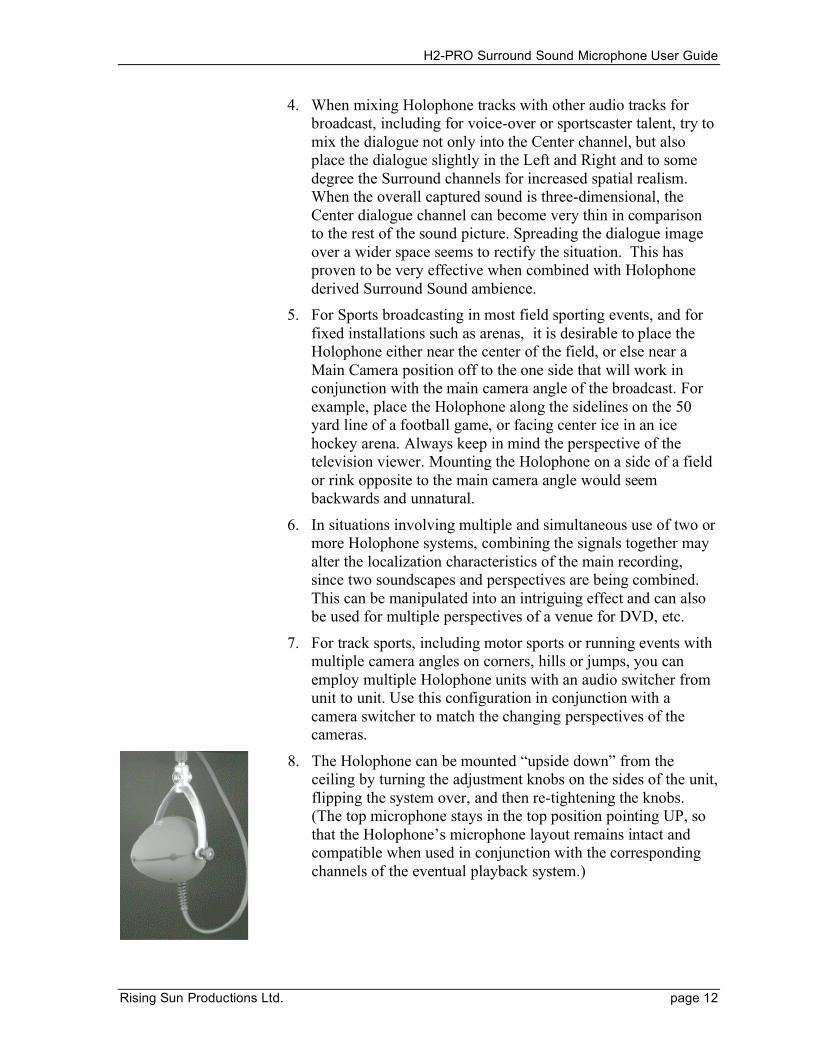
8. The Holophone can be mounted “upside down” from the
ceiling by turning the adjustment knobs on the sides of the unit,
flipping the system over, and then re-tightening the knobs.
(The top microphone stays in the top position pointing UP, so
that the Holophone’s microphone layout remains intact and
compatible when used in conjunction with the corresponding
channels of the eventual playback system.)
H2-PRO Surround Sound Microphone User Guide
Rising Sun Productions Ltd. page 13
9. Audio “zoom” can be achieved by “riding” the faders of a
mixer connected to the Holophone. The front (L,C,R) channels
can be “pushed” in the mix while the rear (LS, RS, CR)
channels can be “dimmed” slightly to increase the fore/ aft bias
of the recording to the front (or vice versa). Side to side
“zoom” can be achieved in a similar fashion.
10. For Holophone Surround Sound recording of acoustic
instruments, including drum kits, pianos and voice at close
range, try placing the Holophone near or above the instrument
that is being recorded. For vocal or choirs, position the singers
around the Holophone and monitor in Surround to hear the
results! The possibilities are limitless. Please e-mail us and let
us know if you find something cool!
For current tips and tricks in using the Holophone, visit our
website: http://www.holophone.com/inaction.html
Cabling Scenarios
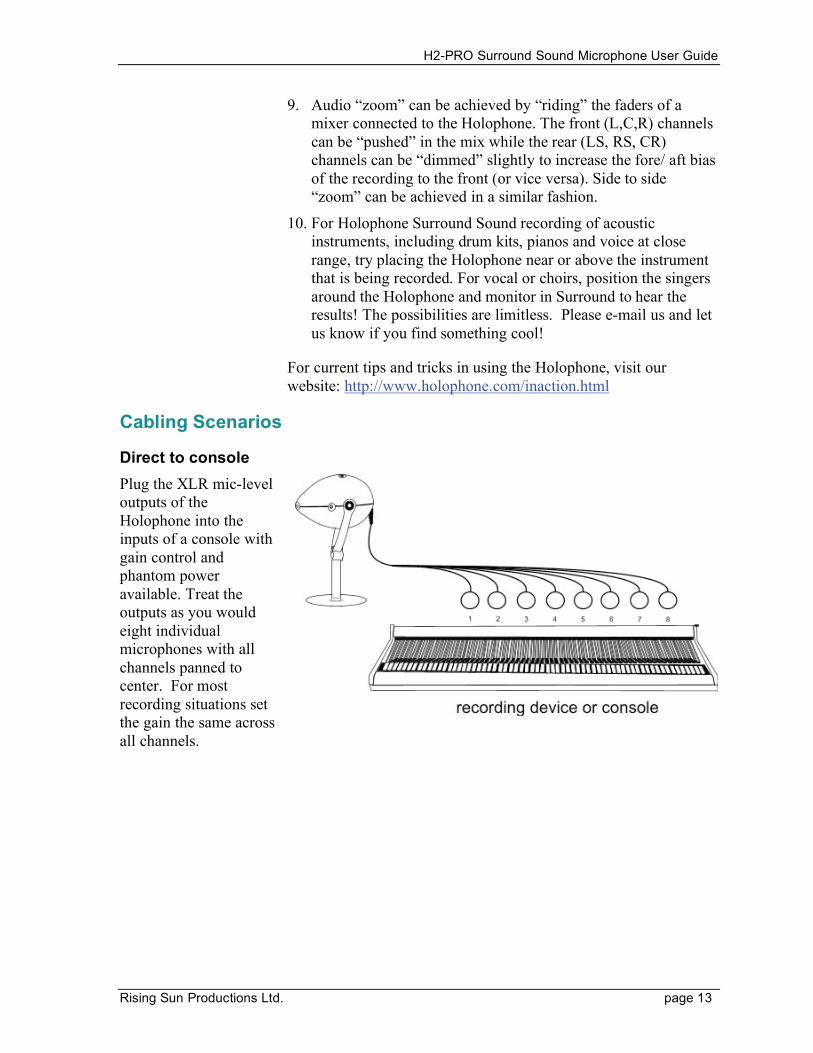
Direct to console
Plug the XLR mic-level
outputs of the
Holophone into the
inputs of a console with
gain control and
phantom power
available. Treat the
outputs as you would
eight individual
microphones with all
channels panned to
center. For most
recording situations set
the gain the same across
all channels.
H2-PRO Surround Sound Microphone User Guide
Rising Sun Productions Ltd. page 14
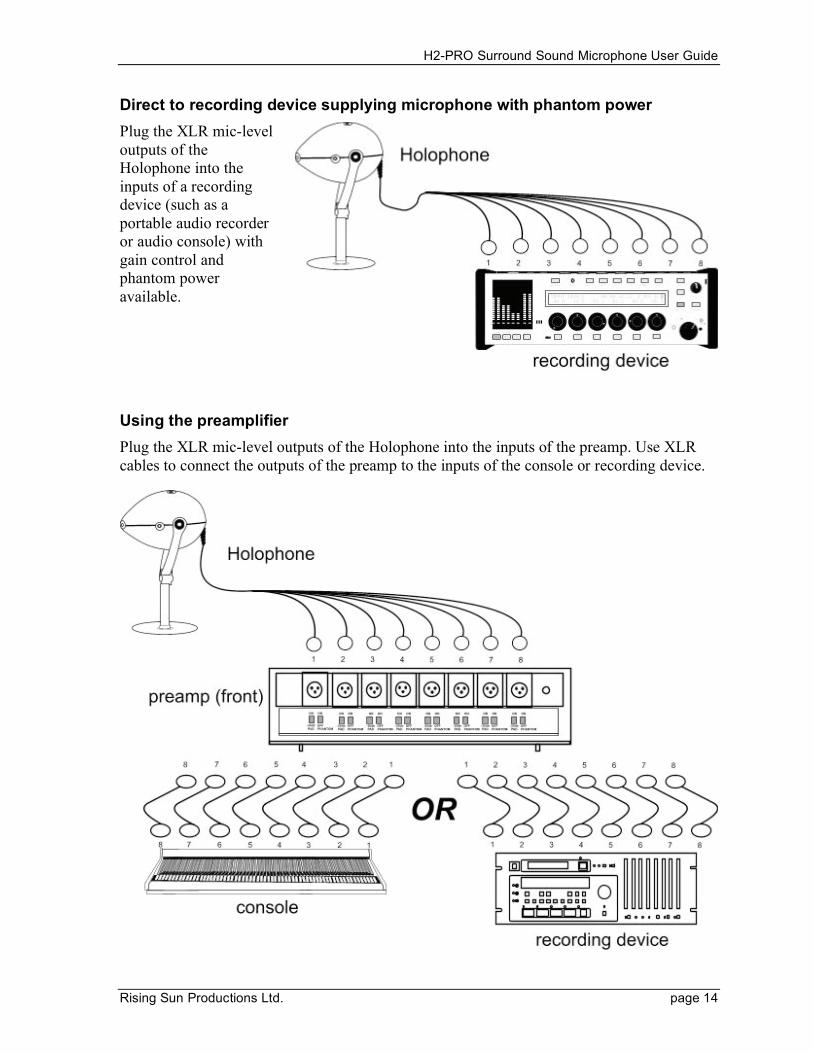
Direct to recording device supplying microphone with phantom power
Plug the XLR mic-level
outputs of the
Holophone into the
inputs of a recording
device (such as a
portable audio recorder
or audio console) with
gain control and
phantom power
available.
Using the preamplifier
Plug the XLR mic-level outputs of the Holophone into the inputs of the preamp. Use XLR
cables to connect the outputs of the preamp to the inputs of the console or recording device.
H2-PRO Surround Sound Microphone User Guide
Rising Sun Productions Ltd. page 15
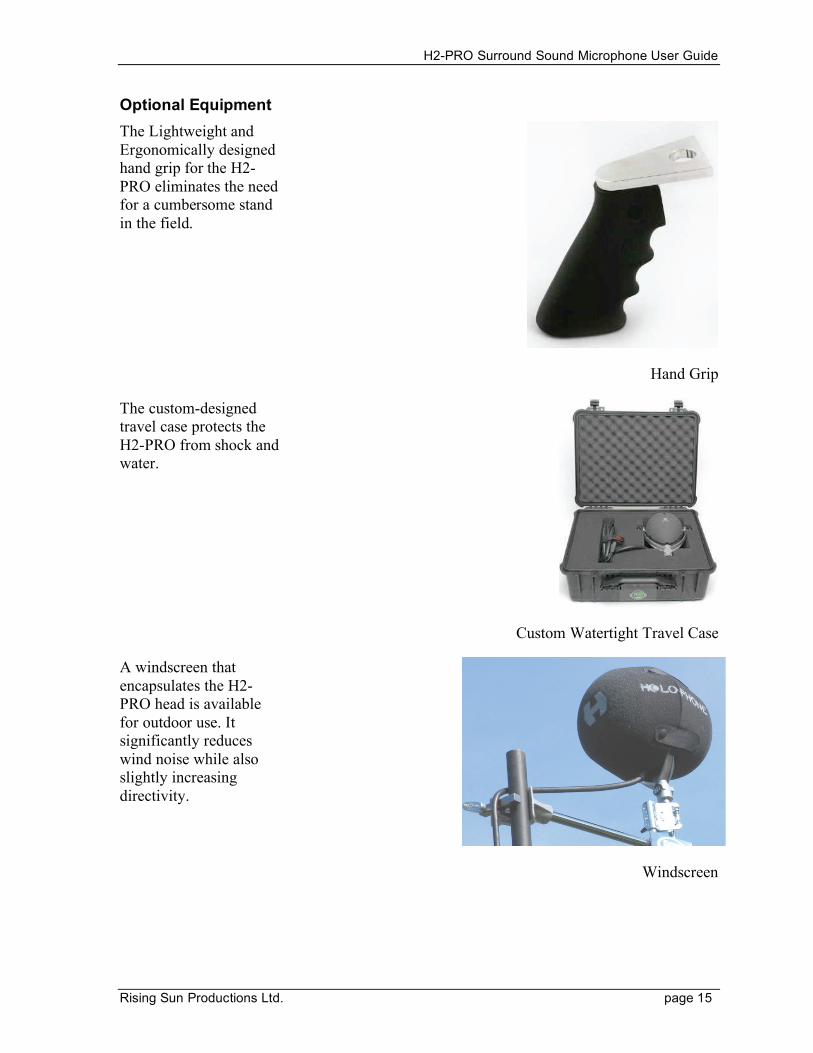
Optional Equipment
The Lightweight and
Ergonomically designed
hand grip for the H2-
PRO eliminates the need
for a cumbersome stand
in the field.
Hand Grip
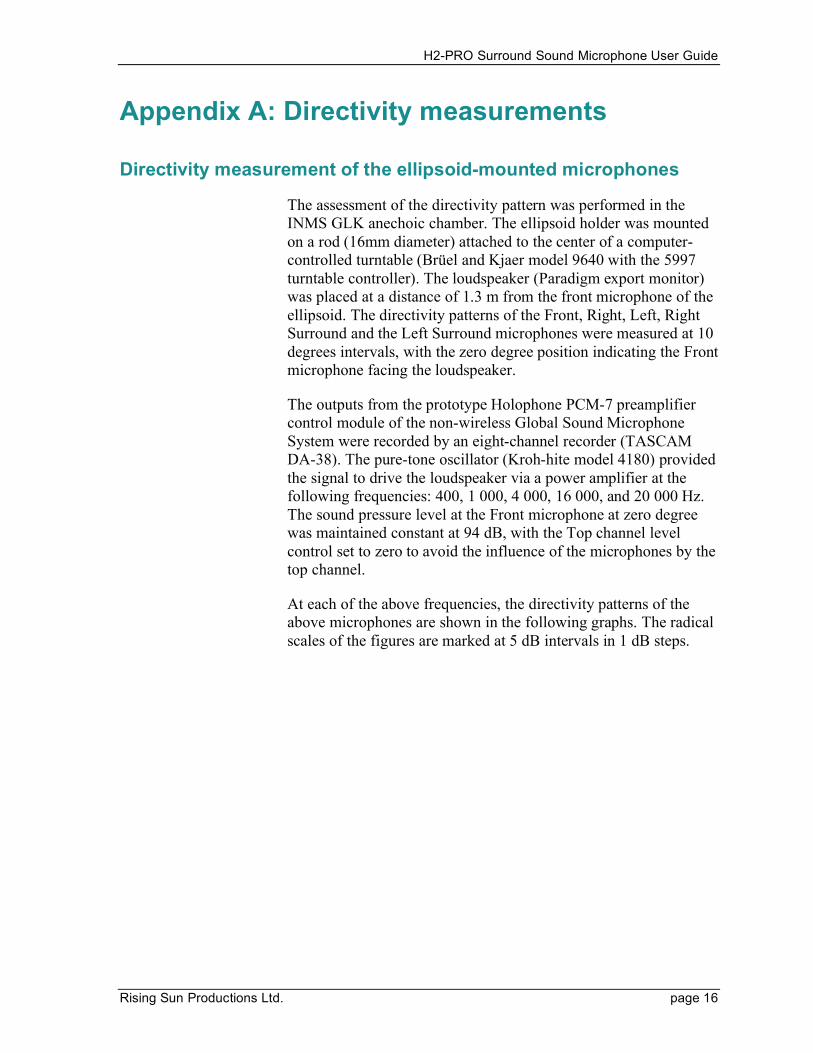
The custom-designed
travel case protects the
H2-PRO from shock and
water.
Custom Watertight Travel Case
A windscreen that
encapsulates the H2-
PRO head is available
for outdoor use. It
significantly reduces
wind noise while also
slightly increasing
directivity.
Windscreen
H2-PRO Surround Sound Microphone User Guide
Rising Sun Productions Ltd. page 16
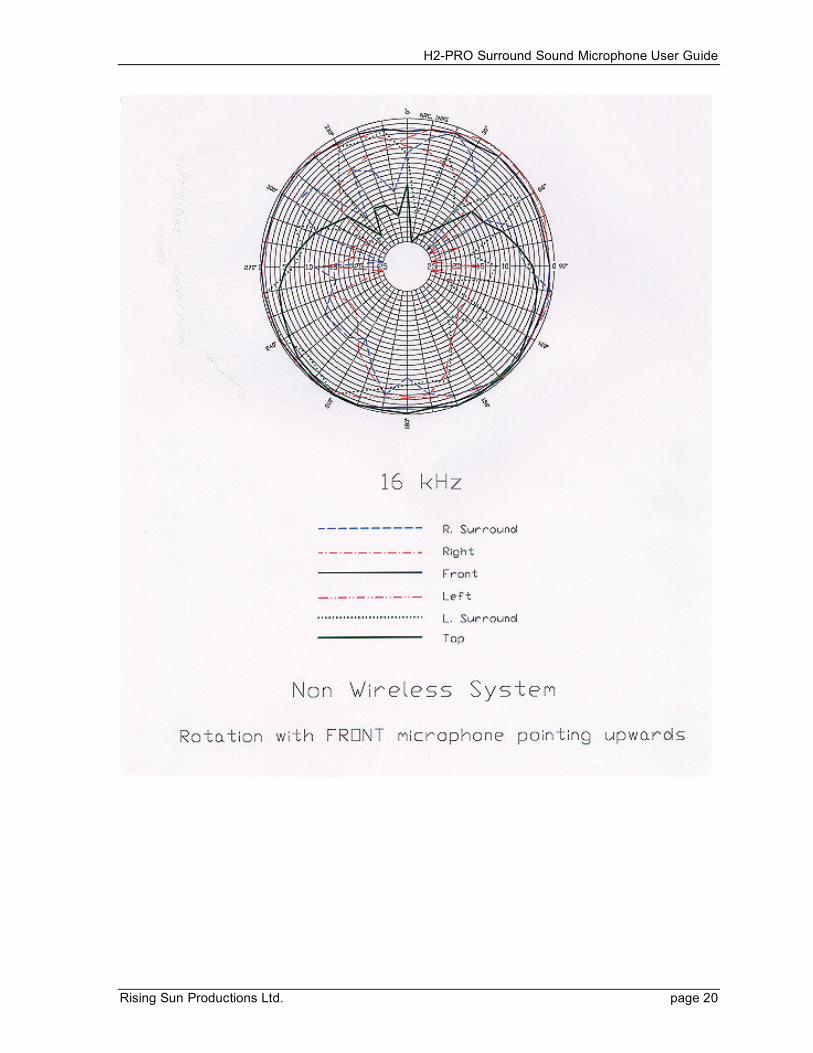
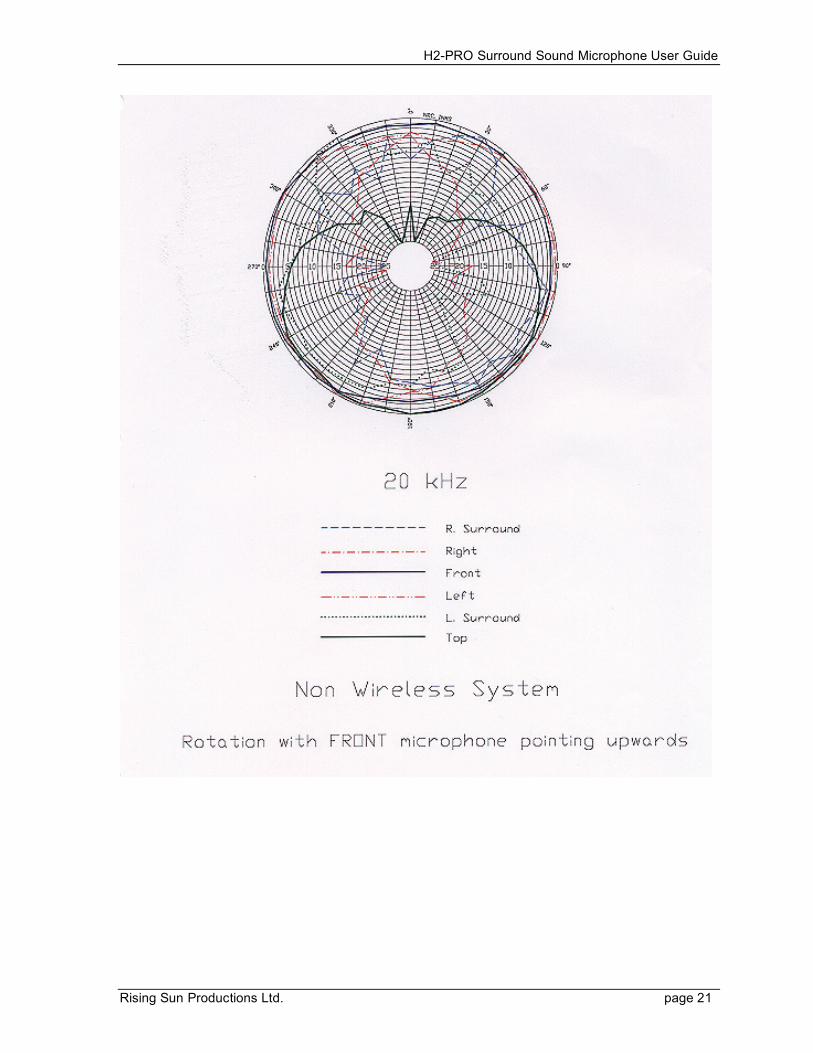
Appendix A: Directivity measurements
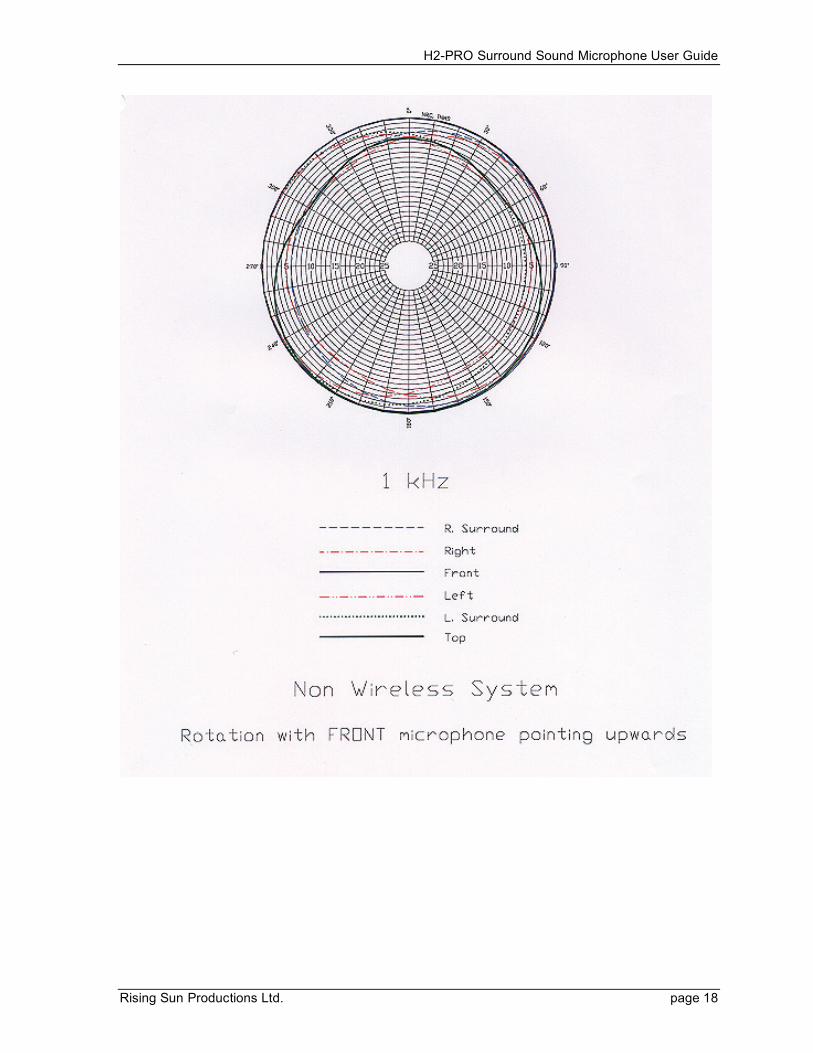
Directivity measurement of the ellipsoid-mounted microphones
The assessment of the directivity pattern was performed in the
INMS GLK anechoic chamber. The ellipsoid holder was mounted
on a rod (16mm diameter) attached to the center of a computer-
controlled turntable (Brüel and Kjaer model 9640 with the 5997
turntable controller). The loudspeaker (Paradigm export monitor)
was placed at a distance of 1.3 m from the front microphone of the
ellipsoid. The directivity patterns of the Front, Right, Left, Right
Surround and the Left Surround microphones were measured at 10
degrees intervals, with the zero degree position indicating the Front
microphone facing the loudspeaker.
The outputs from the prototype Holophone PCM-7 preamplifier
control module of the non-wireless Global Sound Microphone
System were recorded by an eight-channel recorder (TASCAM
DA-38). The pure-tone oscillator (Kroh-hite model 4180) provided
the signal to drive the loudspeaker via a power amplifier at the
following frequencies: 400, 1 000, 4 000, 16 000, and 20 000 Hz.
The sound pressure level at the Front microphone at zero degree
was maintained constant at 94 dB, with the Top channel level
control set to zero to avoid the influence of the microphones by the
top channel.
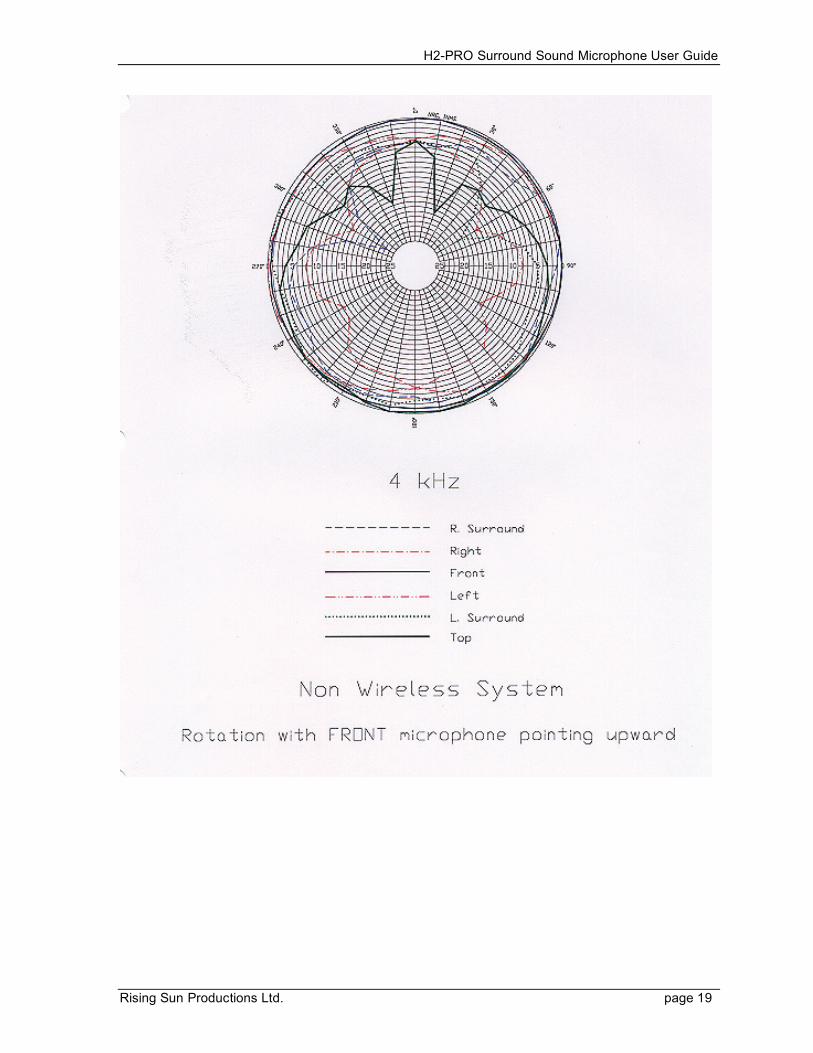
At each of the above frequencies, the directivity patterns of the
above microphones are shown in the following graphs. The radical
scales of the figures are marked at 5 dB intervals in 1 dB steps.

H2-PRO Surround Sound Microphone User Guide
Rising Sun Productions Ltd. page 17
H2-PRO Surround Sound Microphone User Guide
Rising Sun Productions Ltd. page 18
H2-PRO Surround Sound Microphone User Guide
Rising Sun Productions Ltd. page 19
H2-PRO Surround Sound Microphone User Guide
Rising Sun Productions Ltd. page 20
H2-PRO Surround Sound Microphone User Guide
Rising Sun Productions Ltd. page 21
Prin
t by
Alive
ProS
tudi
os.c
om
Rising Sun Productions LimitedTelephone: (416) 362-7790Fax: (416) [email protected]