assets.domyos.comassets.domyos.com/en-cw300.pdf · has a coded transmitter to prevent interference....
18
&:
Transcript of assets.domyos.comassets.domyos.com/en-cw300.pdf · has a coded transmitter to prevent interference....

50 cm*
100 cm**
50 cm* 50 cm*
50 cm*
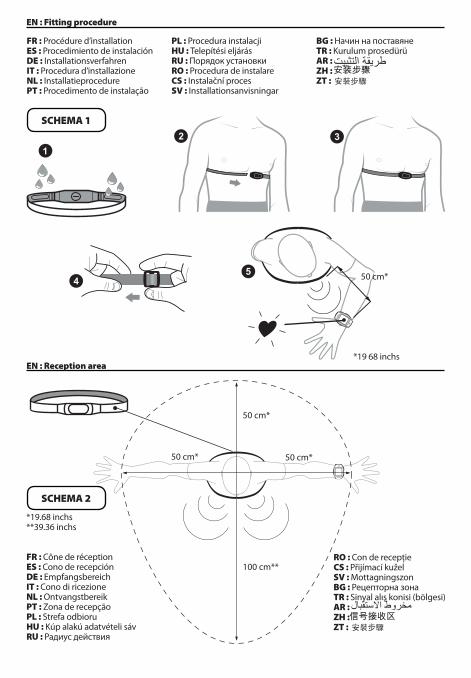
EN : Reception area
FR : Procédure d’installation ES : Procedimiento de instalación DE : InstallationsverfahrenIT : Procedura d’installazioneNL : Installatieprocedure PT : Procedimento de instalação
PL : Procedura instalacjiHU : Telepítési eljárás RU : Порядок установкиRO : Procedura de instalareCS : Instalační procesSV : Installationsanvisningar
BG : Начин на поставянеTR : Kurulum prosedürüAR : ZH : ZT :
EN : Fitting procedure
SCHEMA 1
*19 68 inchs
SCHEMA 2
*19.68 inchs**39.36 inchs
FR : Cône de réceptionES : Cono de recepciónDE : EmpfangsbereichIT : Cono di ricezioneNL : OntvangstbereikPT : Zona de recepçãoPL : Strefa odbioruHU : Kúp alakú adatvételi sávRU : Радиус действия
RO : Con de recepţieCS : Přijímací kuželSV : MottagningszonBG : Рецепторна зонаTR : Sinyal alış konisi (bölgesi)AR : ZH : ZT :

D : LIGHT A : STR / STP
C : MODE B : VIEW
SCHEMA 3
FR : Schéma de navigation ES : Esquema de navegaciónDE : NavigationsschemaIT : Schema di navigazioneNL : NavigatieschemaPT : Esquema de navegação
PL : Strefa odbioruHU : Navigáció vázlata RU : Схема управленияRO : Schema de navigaţieCS : Navigační schémaSV : Navigeringskarta
BG : Схема на навигацияTR : Navigasyon şemasıAR : ZH : ZT :
EN : Navigation diagram
3 sec
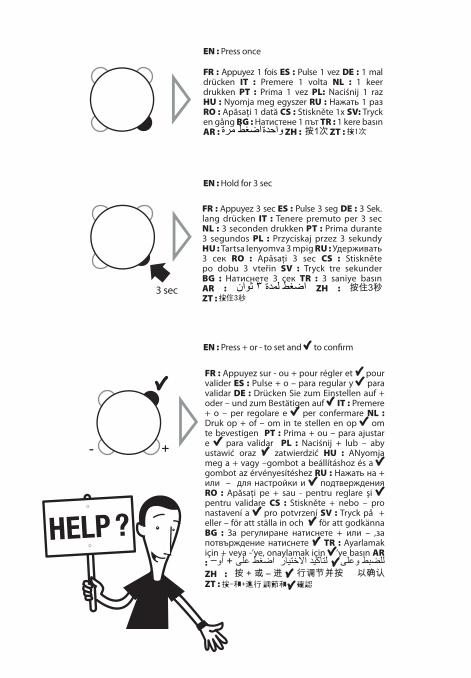
FR : Appuyez 1 fois ES : Pulse 1 vez DE : 1 mal drücken IT : Premere 1 volta NL : 1 keer drukken PT : Prima 1 vez PL: Naciśnij 1 raz HU : Nyomja meg egyszer RU : Нажать 1 раз RO : Apăsaţi 1 dată CS : Stiskněte 1x SV: Tryck en gång BG : Натистене 1 път TR : 1 kere basın AR : ZH : ZT :
EN : Press once
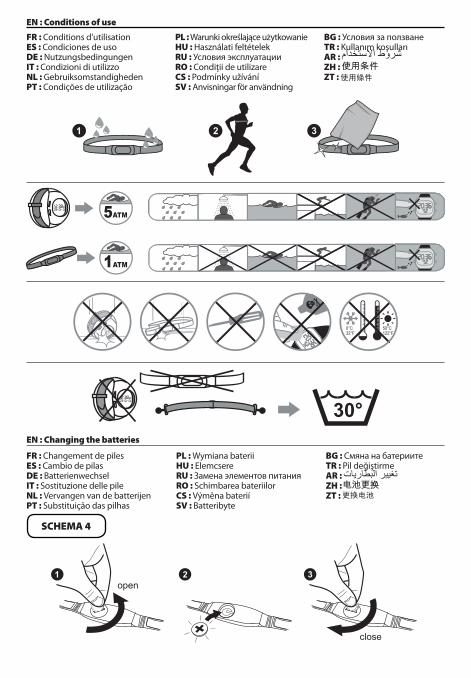
FR : Appuyez 3 sec ES : Pulse 3 seg DE : 3 Sek. lang drücken IT : Tenere premuto per 3 sec NL : 3 seconden drukken PT : Prima durante 3 segundos PL : Przyciskaj przez 3 sekundy HU : Tartsa lenyomva 3 mpig RU : Удерживать 3 сек RO : Apăsaţi 3 sec CS : Stiskněte po dobu 3 vteřin SV : Tryck tre sekunder BG : Натиснете 3 сек TR : 3 saniye basınAR : ZH : ZT :
EN : Hold for 3 sec
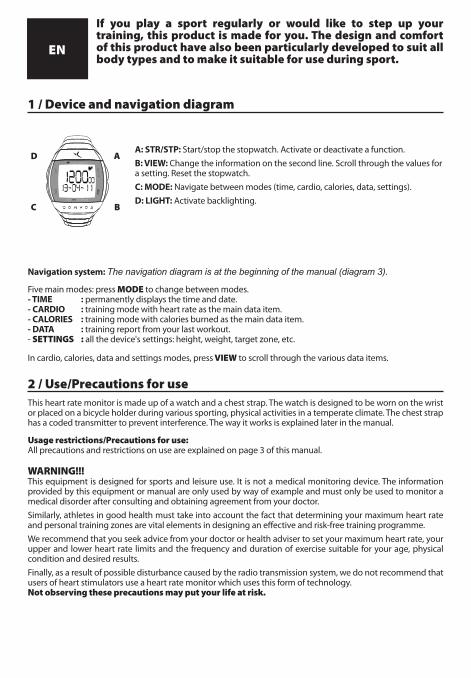
FR : Appuyez sur - ou + pour régler et pour valider ES : Pulse + o – para regular y para validar DE : Drücken Sie zum Einstellen auf + oder – und zum Bestätigen auf IT : Premere + o – per regolare e per confermare NL : Druk op + of – om in te stellen en op om te bevestigen PT : Prima + ou – para ajustar e para validar PL : Naciśnij + lub – aby ustawić oraz zatwierdzić HU : ANyomja meg a + vagy –gombot a beállításhoz és a gombot az érvényesítéshez RU : Нажать на + или – для настройки и подтверждения RO : Apăsaţi pe + sau - pentru reglare şi pentru validare CS : Stiskněte + nebo – pro nastavení a pro potvrzení SV : Tryck på + eller – för att ställa in och för att godkänna BG : За регулиране натиснете + или – ,за потвърждение натиснете TR : Ayarlamak için + veya -’ye, onaylamak için ’ye basın AR : ZH : ZT :
EN : Press + or - to set and to confirm
FR : Conditions d'utilisationES : Condiciones de uso DE : NutzungsbedingungenIT : Condizioni di utilizzoNL : GebruiksomstandighedenPT : Condições de utilização
PL : Warunki określające użytkowanieHU : Használati feltételek RU : Условия эксплуатацииRO : Condiţii de utilizareCS : Podmínky užíváníSV : Anvisningar för användning
BG : Условия за ползванеTR : Kullanım koşullarıAR : ZH : ZT :
EN : Conditions of use
FR : Changement de pilesES : Cambio de pilas DE : BatterienwechselIT : Sostituzione delle pileNL : Vervangen van de batterijenPT : Substituição das pilhas
PL : Wymiana bateriiHU : ElemcsereRU : Замена элементов питанияRO : Schimbarea bateriilorCS : Výměna bateriíSV : Batteribyte
BG : Смяна на батериитеTR : Pil değiştirmeAR : ZH : ZT :
SCHEMA 4
EN : Changing the batteries
D A
C B
EN
If you play a sport regularly or would like to step up your training, this product is made for you. The design and comfort of this product have also been particularly developed to suit all body types and to make it suitable for use during sport.
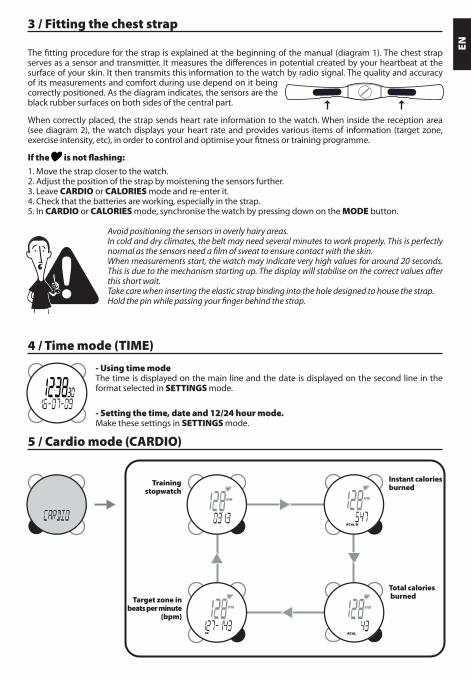
1 / Device and navigation diagram
A: STR/STP: Start/stop the stopwatch. Activate or deactivate a function.B: VIEW: Change the information on the second line. Scroll through the values for a setting. Reset the stopwatch.C: MODE: Navigate between modes (time, cardio, calories, data, settings).D: LIGHT: Activate backlighting.
Navigation system:
Five main modes: press MODE to change between modes.- TIME : permanently displays the time and date.- CARDIO : training mode with heart rate as the main data item.- CALORIES : training mode with calories burned as the main data item.- DATA : training report from your last workout.- SETTINGS : all the device's settings: height, weight, target zone, etc.
In cardio, calories, data and settings modes, press VIEW to scroll through the various data items.
2 / Use/Precautions for useThis heart rate monitor is made up of a watch and a chest strap. The watch is designed to be worn on the wrist or placed on a bicycle holder during various sporting, physical activities in a temperate climate. The chest strap has a coded transmitter to prevent interference. The way it works is explained later in the manual.
Usage restrictions/Precautions for use:All precautions and restrictions on use are explained on page 3 of this manual.
WARNING!!!This equipment is designed for sports and leisure use. It is not a medical monitoring device. The information provided by this equipment or manual are only used by way of example and must only be used to monitor a medical disorder after consulting and obtaining agreement from your doctor. Similarly, athletes in good health must take into account the fact that determining your maximum heart rate and personal training zones are vital elements in designing an effective and risk-free training programme. We recommend that you seek advice from your doctor or health adviser to set your maximum heart rate, your upper and lower heart rate limits and the frequency and duration of exercise suitable for your age, physical condition and desired results.Finally, as a result of possible disturbance caused by the radio transmission system, we do not recommend that users of heart stimulators use a heart rate monitor which uses this form of technology.Not observing these precautions may put your life at risk.
EN
3 / Fitting the chest strap The fitting procedure for the strap is explained at the beginning of the manual (diagram 1). The chest strap serves as a sensor and transmitter. It measures the differences in potential created by your heartbeat at the surface of your skin. It then transmits this information to the watch by radio signal. The quality and accuracy of its measurements and comfort during use depend on it being correctly positioned. As the diagram indicates, the sensors are the black rubber surfaces on both sides of the central part.
When correctly placed, the strap sends heart rate information to the watch. When inside the reception area (see diagram 2), the watch displays your heart rate and provides various items of information (target zone, exercise intensity, etc), in order to control and optimise your fitness or training programme.
If the is not flashing:
1. Move the strap closer to the watch.2. Adjust the position of the strap by moistening the sensors further.3. Leave CARDIO or CALORIES mode and re-enter it.4. Check that the batteries are working, especially in the strap.5. In CARDIO or CALORIES mode, synchronise the watch by pressing down on the MODE button.
Avoid positioning the sensors in overly hairy areas.In cold and dry climates, the belt may need several minutes to work properly. This is perfectly normal as the sensors need a film of sweat to ensure contact with the skin.When measurements start, the watch may indicate very high values for around 20 seconds. This is due to the mechanism starting up. The display will stabilise on the correct values after this short wait.Take care when inserting the elastic strap binding into the hole designed to house the strap. Hold the pin while passing your finger behind the strap.
4 / Time mode (TIME)
- Using time modeThe time is displayed on the main line and the date is displayed on the second line in the format selected in SETTINGS mode.
- Setting the time, date and 12/24 hour mode. Make these settings in SETTINGS mode.
5 / Cardio mode (CARDIO)
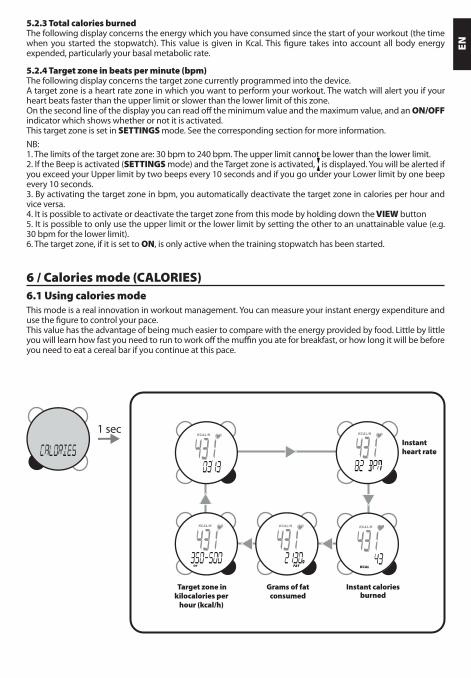
Training stopwatch
Instant calories burned
Target zone in beats per minute
(bpm)
Total calories burned
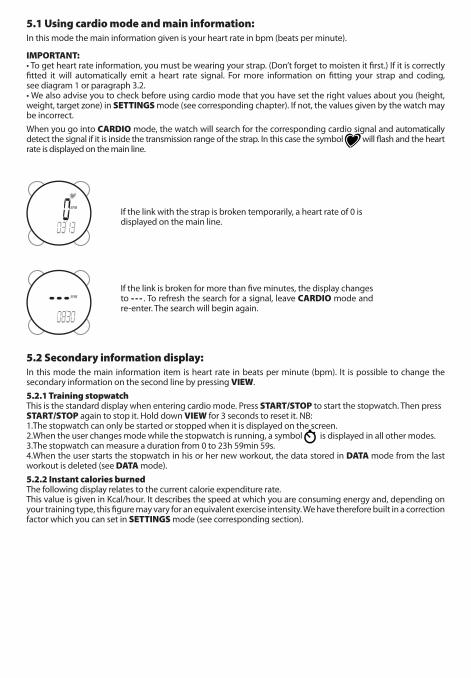
5.1 Using cardio mode and main information: In this mode the main information given is your heart rate in bpm (beats per minute).
IMPORTANT: • To get heart rate information, you must be wearing your strap. (Don’t forget to moisten it first.) If it is correctly fitted it will automatically emit a heart rate signal. For more information on fitting your strap and coding, see diagram 1 or paragraph 3.2.• We also advise you to check before using cardio mode that you have set the right values about you (height, weight, target zone) in SETTINGS mode (see corresponding chapter). If not, the values given by the watch may be incorrect.When you go into CARDIO mode, the watch will search for the corresponding cardio signal and automatically detect the signal if it is inside the transmission range of the strap. In this case the symbol will flash and the heart rate is displayed on the main line.
If the link with the strap is broken temporarily, a heart rate of 0 is displayed on the main line.
If the link is broken for more than five minutes, the display changes to - - - . To refresh the search for a signal, leave CARDIO mode and re-enter. The search will begin again.
5.2 Secondary information display: In this mode the main information item is heart rate in beats per minute (bpm). It is possible to change the secondary information on the second line by pressing VIEW. 5.2.1 Training stopwatchThis is the standard display when entering cardio mode. Press START/STOP to start the stopwatch. Then press START/STOP again to stop it. Hold down VIEW for 3 seconds to reset it. NB: 1.The stopwatch can only be started or stopped when it is displayed on the screen.2.When the user changes mode while the stopwatch is running, a symbol is displayed in all other modes.3.The stopwatch can measure a duration from 0 to 23h 59min 59s.4.When the user starts the stopwatch in his or her new workout, the data stored in DATA mode from the last workout is deleted (see DATA mode).5.2.2 Instant calories burnedThe following display relates to the current calorie expenditure rate.This value is given in Kcal/hour. It describes the speed at which you are consuming energy and, depending on your training type, this figure may vary for an equivalent exercise intensity. We have therefore built in a correction factor which you can set in SETTINGS mode (see corresponding section).
1 sec
5.2.3 Total calories burnedThe following display concerns the energy which you have consumed since the start of your workout (the time when you started the stopwatch). This value is given in Kcal. This figure takes into account all body energy expended, particularly your basal metabolic rate.
5.2.4 Target zone in beats per minute (bpm)The following display concerns the target zone currently programmed into the device.A target zone is a heart rate zone in which you want to perform your workout. The watch will alert you if your heart beats faster than the upper limit or slower than the lower limit of this zone.On the second line of the display you can read off the minimum value and the maximum value, and an ON/OFF indicator which shows whether or not it is activated. This target zone is set in SETTINGS mode. See the corresponding section for more information.NB: 1. The limits of the target zone are: 30 bpm to 240 bpm. The upper limit cannot be lower than the lower limit.2. If the Beep is activated (SETTINGS mode) and the Target zone is activated, is displayed. You will be alerted if you exceed your Upper limit by two beeps every 10 seconds and if you go under your Lower limit by one beep every 10 seconds.3. By activating the target zone in bpm, you automatically deactivate the target zone in calories per hour and vice versa.4. It is possible to activate or deactivate the target zone from this mode by holding down the VIEW button5. It is possible to only use the upper limit or the lower limit by setting the other to an unattainable value (e.g. 30 bpm for the lower limit).6. The target zone, if it is set to ON, is only active when the training stopwatch has been started.
6 / Calories mode (CALORIES) 6.1 Using calories modeThis mode is a real innovation in workout management. You can measure your instant energy expenditure and use the figure to control your pace. This value has the advantage of being much easier to compare with the energy provided by food. Little by little you will learn how fast you need to run to work off the muffin you ate for breakfast, or how long it will be before you need to eat a cereal bar if you continue at this pace.
Instant heart rate
Target zone in kilocalories per
hour (kcal/h)
Grams of fat consumed
Instant calories burned
EN
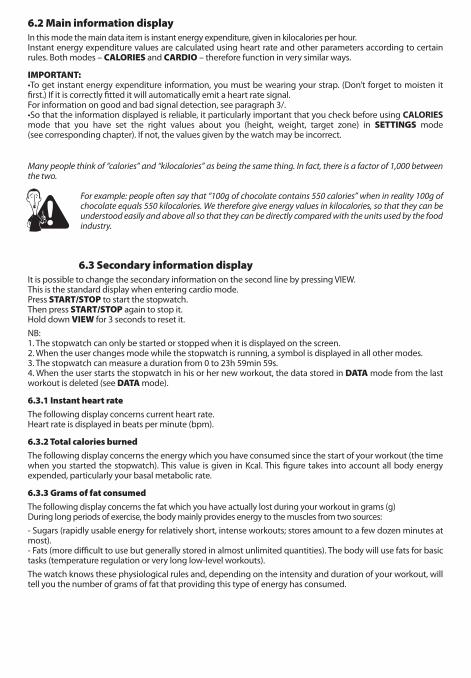
6.2 Main information display In this mode the main data item is instant energy expenditure, given in kilocalories per hour.Instant energy expenditure values are calculated using heart rate and other parameters according to certain rules. Both modes – CALORIES and CARDIO – therefore function in very similar ways.
IMPORTANT: •To get instant energy expenditure information, you must be wearing your strap. (Don’t forget to moisten it first.) If it is correctly fitted it will automatically emit a heart rate signal.For information on good and bad signal detection, see paragraph 3/.•So that the information displayed is reliable, it particularly important that you check before using CALORIES mode that you have set the right values about you (height, weight, target zone) in SETTINGS mode (see corresponding chapter). If not, the values given by the watch may be incorrect.
Many people think of “calories” and “kilocalories” as being the same thing. In fact, there is a factor of 1,000 between the two.
For example: people often say that “100g of chocolate contains 550 calories” when in reality 100g of chocolate equals 550 kilocalories. We therefore give energy values in kilocalories, so that they can be understood easily and above all so that they can be directly compared with the units used by the food industry.
6.3 Secondary information displayIt is possible to change the secondary information on the second line by pressing VIEW. This is the standard display when entering cardio mode.Press START/STOP to start the stopwatch.Then press START/STOP again to stop it.Hold down VIEW for 3 seconds to reset it.NB: 1. The stopwatch can only be started or stopped when it is displayed on the screen.2. When the user changes mode while the stopwatch is running, a symbol is displayed in all other modes.3. The stopwatch can measure a duration from 0 to 23h 59min 59s.4. When the user starts the stopwatch in his or her new workout, the data stored in DATA mode from the last workout is deleted (see DATA mode).
6.3.1 Instant heart rate
The following display concerns current heart rate.Heart rate is displayed in beats per minute (bpm).
6.3.2 Total calories burned
The following display concerns the energy which you have consumed since the start of your workout (the time when you started the stopwatch). This value is given in Kcal. This figure takes into account all body energy expended, particularly your basal metabolic rate.
6.3.3 Grams of fat consumed
The following display concerns the fat which you have actually lost during your workout in grams (g)During long periods of exercise, the body mainly provides energy to the muscles from two sources: - Sugars (rapidly usable energy for relatively short, intense workouts; stores amount to a few dozen minutes at most).- Fats (more difficult to use but generally stored in almost unlimited quantities). The body will use fats for basic tasks (temperature regulation or very long low-level workouts).The watch knows these physiological rules and, depending on the intensity and duration of your workout, will tell you the number of grams of fat that providing this type of energy has consumed.
If you aim to lose weight, we advise you to maximise fat-based energy consumption by performing long-lasting low-level workouts.
6.3.4 Target zone in kilocalories per hour (kcal/h)The following display concerns the target zone currently programmed into the device.This function is also new. It means you can manage your training better, using energy expenditure as the main parameter. A target zone is an energy expenditure zone in which you want to perform your workout.The watch will alert you if your workout is too intense, and you are tiring yourself out by drawing too heavily on your sugar reserves, or, conversely, your workout is too light (to consume fats effectively, for example). On the second line of the display you can read off the desired instant minimum and maximum energy expenditure values, and an ON/OFF indicator which shows whether or not it is activated. This target zone is set in SETTINGS mode. See the corresponding section for more information.NB: 1. If the Beep is activated (SETTINGS mode) and the Target zone is activated, the following symbol is displayed You will be alerted if you exceed your Upper limit by two beeps every 10 seconds and if you go under your
Lower limit by one beep every 10 seconds.2. By activating the target zone in bpm, you automatically deactivate the target zone in calories per hour and vice versa.3. It is possible to activate or deactivate the target zone from this mode by holding down VIEW.4. It is possible to only use the upper limit or the lower limit by setting the other to an unattainable value (e.g. 30 bpm for the lower limit).5. The target zone, if it is set to ON, is only active when the training stopwatch has been started.
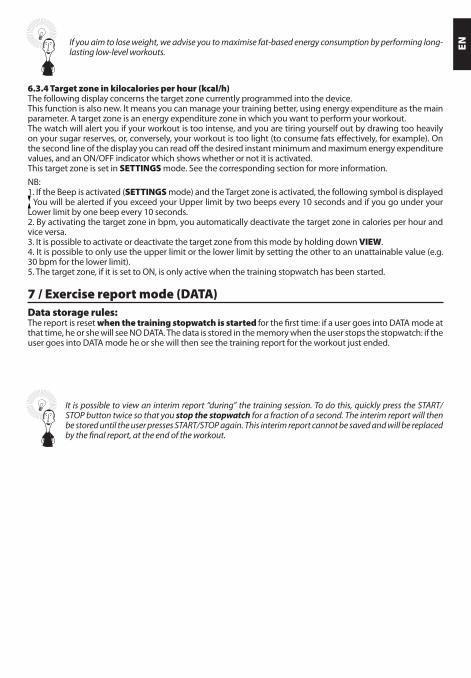
7 / Exercise report mode (DATA)Data storage rules: The report is reset when the training stopwatch is started for the first time: if a user goes into DATA mode at that time, he or she will see NO DATA. The data is stored in the memory when the user stops the stopwatch: if the user goes into DATA mode he or she will then see the training report for the workout just ended.
It is possible to view an interim report “during” the training session. To do this, quickly press the START/STOP button twice so that you stop the stopwatch for a fraction of a second. The interim report will then be stored until the user presses START/STOP again. This interim report cannot be saved and will be replaced by the final report, at the end of the workout.
EN
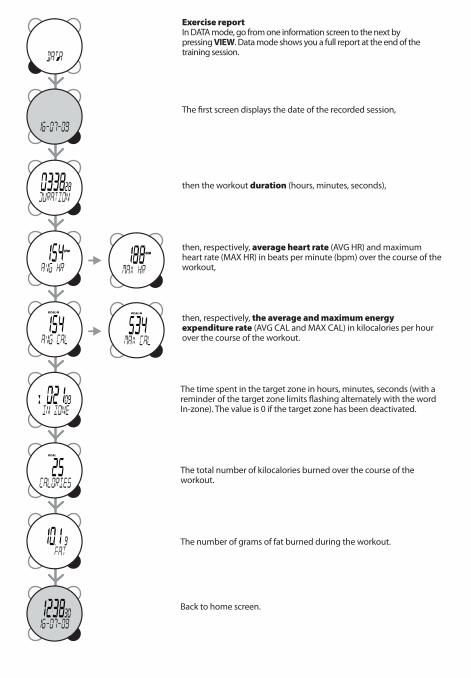
Exercise report In DATA mode, go from one information screen to the next by pressing VIEW. Data mode shows you a full report at the end of the training session.
The first screen displays the date of the recorded session,
then the workout duration (hours, minutes, seconds),
then, respectively, average heart rate (AVG HR) and maximum heart rate (MAX HR) in beats per minute (bpm) over the course of the workout,
then, respectively, the average and maximum energy expenditure rate (AVG CAL and MAX CAL) in kilocalories per hour over the course of the workout.
The time spent in the target zone in hours, minutes, seconds (with a reminder of the target zone limits flashing alternately with the word In-zone). The value is 0 if the target zone has been deactivated.
The total number of kilocalories burned over the course of the workout.
The number of grams of fat burned during the workout.
Back to home screen.

VIEW
VIEW
VIEW
8 / Settings mode (SETTINGS)The main settings principle is to select the parameter you want to set by repeatedly pressing VIEW, then to go into settings mode by pressing START/STOP. You then increase or decrease the value by pressing MODE or VIEW and finally confirm by pressing START/STOP.
Practical information: - When setting, the VIEW button increases values, while the MODE button decreases them.- To go faster when making settings, you can hold VIEW or MODE down: the values scroll quickly.- If no button is pressed for several seconds during settings, the watch automatically exits settings mode.
The different parameters you can set: Setting the system of units
You can use the watch with Anglo-Saxon units (weight in pounds, height in inches, time display in 12 hour mode with AM and PM, and date in YY-MM-DD order) or with European units (weight in kg, height in cm, time in 24 hour display, and date in DD-MM-YY order).
Setting the time
Setting the date
You can’t set the seconds to a precise value, only reset them to 0 when you confirm by pressing STR/STP.
EN
VIEW
VIEW
VIEW ON/OFFON/OFF
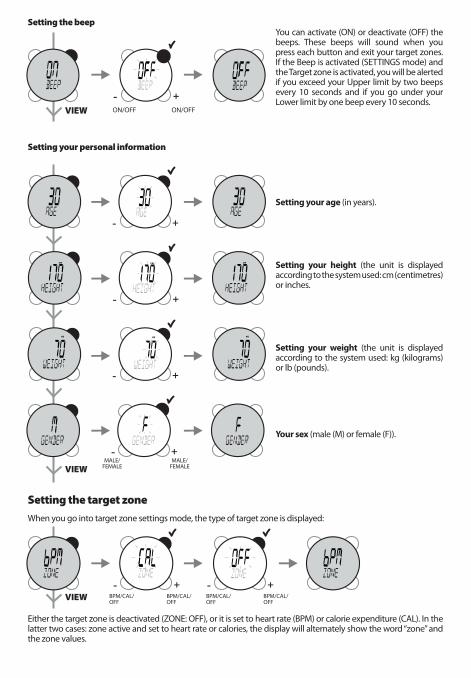
Setting the beepYou can activate (ON) or deactivate (OFF) the beeps. These beeps will sound when you press each button and exit your target zones. If the Beep is activated (SETTINGS mode) and the Target zone is activated, you will be alerted if you exceed your Upper limit by two beeps every 10 seconds and if you go under your Lower limit by one beep every 10 seconds.
Setting your personal information
Setting your age (in years).
Setting your height (the unit is displayed according to the system used: cm (centimetres) or inches.
Setting your weight (the unit is displayed according to the system used: kg (kilograms) or lb (pounds).
Your sex (male (M) or female (F)).
Setting the target zone
When you go into target zone settings mode, the type of target zone is displayed:
Either the target zone is deactivated (ZONE: OFF), or it is set to heart rate (BPM) or calorie expenditure (CAL). In the latter two cases: zone active and set to heart rate or calories, the display will alternately show the word “zone” and the zone values.
BPM/CAL/OFF
MALE/FEMALE
MALE/FEMALE
BPM/CAL/OFF
BPM/CAL/OFF
BPM/CAL/OFF

VIEW
If you want to change the type of zone you are using, select the parameter using STR/STP and then scroll through the possible values using VIEW and MODE.If you choose to activate the heart rate zone, select BPM; and if you decide to select the target zone in Calories per hour, select CAL. Then confirm with STR/STP.The target zone function will then be activated (ON).You can then select the lower limit (LOW ZONE) (scroll through the values using VIEW and MODE and confirm with START/STOP) then the upper limit (HI ZONE).
EN
3 sec 3 sec
3 sec 3 sec
20%
30%
40%
80%
90%
10%
20%
30%
40%
80%
90%
50%50%
0%0%
100%
220
0
60%60%
70%70%
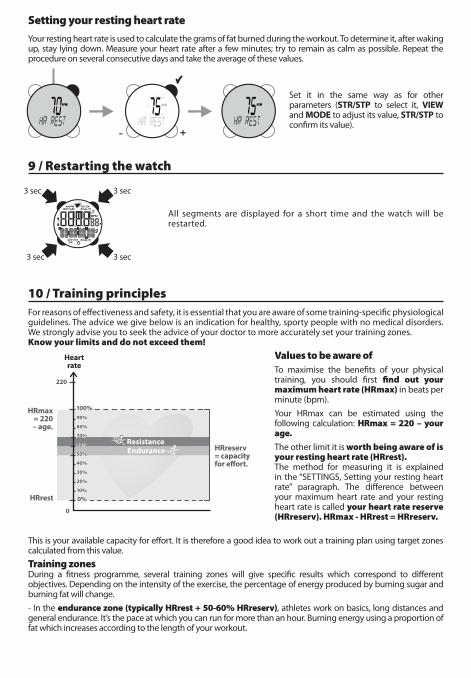
Setting your resting heart rate
Your resting heart rate is used to calculate the grams of fat burned during the workout. To determine it, after waking up, stay lying down. Measure your heart rate after a few minutes; try to remain as calm as possible. Repeat the procedure on several consecutive days and take the average of these values.
Set it in the same way as for other parameters (STR/STP to select it, VIEW and MODE to adjust its value, STR/STP to confirm its value).
9 / Restarting the watch
All segments are displayed for a short time and the watch will be restarted.
10 / Training principlesFor reasons of effectiveness and safety, it is essential that you are aware of some training-specific physiological guidelines. The advice we give below is an indication for healthy, sporty people with no medical disorders. We strongly advise you to seek the advice of your doctor to more accurately set your training zones. Know your limits and do not exceed them!
Values to be aware ofTo maximise the benefits of your physical training, you should first find out your maximum heart rate (HRmax) in beats per minute (bpm).Your HRmax can be estimated using the following calculation: HRmax = 220 – your age.
The other limit it is worth being aware of is your resting heart rate (HRrest).The method for measuring it is explained in the “SETTINGS, Setting your resting heart rate” paragraph. The difference between your maximum heart rate and your resting heart rate is called your heart rate reserve (HRreserv). HRmax - HRrest = HRreserv.
This is your available capacity for effort. It is therefore a good idea to work out a training plan using target zones calculated from this value.Training zonesDuring a fitness programme, several training zones will give specific results which correspond to different objectives. Depending on the intensity of the exercise, the percentage of energy produced by burning sugar and burning fat will change.- In the endurance zone (typically HRrest + 50-60% HRreserv), athletes work on basics, long distances and general endurance. It’s the pace at which you can run for more than an hour. Burning energy using a proportion of fat which increases according to the length of your workout.
Heart rate
HRmax = 220
– age.
HRrest
ResistanceEndurance HRreserv
= capacity for effort.
- In the resistance zone (typically resting HR + 60-70% HR reserv), athletes work on building up heart muscles and general musculature, their average distance speed and their full-effort resistance. It’s the pace at which you run 5 to 10km in competition. This pace is no longer comfortable and you get tired. Energy combustion uses sugars almost exclusively, especially if you can’t keep up this pace for more than half an hour.E.g.: A 30-year-old athlete training using aerobic endurance to increase her resistance to effort and improve her half marathon time. The most effective training area for her objective will be the resistance zone.
11 / Limited warrantyOXYLANE guarantees the initial purchaser of this product that it is free from defects of material or workmanship. This product is guaranteed for two years from the purchase date. Please keep your receipt as proof of purchase. The guarantee does not cover: • damage resulting from misuse, from a failure to respect the precautions for use, from accidents, from improper maintenance or from commercial use of the product. • damage resulting from repairs carried out by persons not authorised by OXYLANE. • batteries or casings which are cracked or broken or which show signs of impacts.• During the warranty period, the item will either be repaired free of charge by an authorised repair service or replaced free of charge (depending on the distributor).• The warranty does not cover the elastic strap, which is subject to wear and tear.
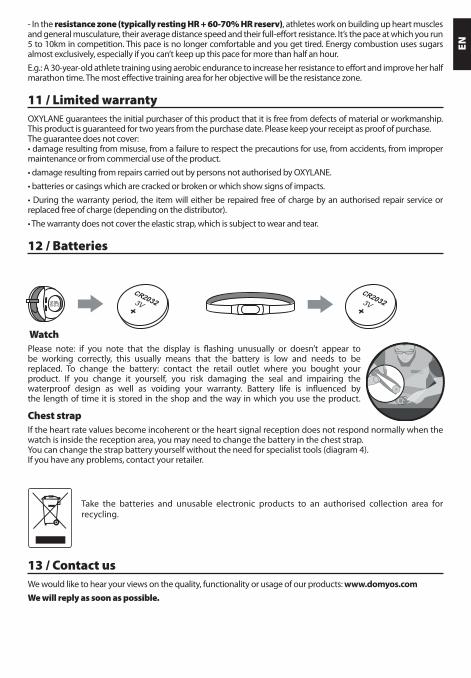
12 / Batteries
WatchPlease note: if you note that the display is flashing unusually or doesn’t appear to be working correctly, this usually means that the battery is low and needs to be replaced. To change the battery: contact the retail outlet where you bought your product. If you change it yourself, you risk damaging the seal and impairing the waterproof design as well as voiding your warranty. Battery life is influenced by the length of time it is stored in the shop and the way in which you use the product.
Chest strapIf the heart rate values become incoherent or the heart signal reception does not respond normally when the watch is inside the reception area, you may need to change the battery in the chest strap.You can change the strap battery yourself without the need for specialist tools (diagram 4).If you have any problems, contact your retailer.
Take the batteries and unusable electronic products to an authorised collection area for recycling.
13 / Contact usWe would like to hear your views on the quality, functionality or usage of our products: www.domyos.comWe will reply as soon as possible.
EN