
A Biology Practical Guide - · PDF file1.2 Preparation of an onion root tip squash to show...
11
1 © FELTHAM PRESS Biology Advanced A Biology Practical Guide Version One Contents 1 1.1 The preparation of temporary mounts, the use of simple staining techniques and the estimation of size 5 1.3 The movement of water down water potential gradients through partially permeable membranes 9 1.4 Biochemical tests for substances of biological importance 11 Chromatography 16 1.5 The effect of temperature on the activity of catalase 20 1.6 Microscopic examination of tissues and organs 24 1.7 Composition of inhaled and exhaled air 27 1.8 The effects of exercise on the pulse rate and breathing rate 29 2 1.1 The action of Immobilised Lactase enzyme on Lactose in milk 34 1.2 Preparation of an onion root tip squash to show stages in mitosis 37 3 1.1 Population growth of yeast using a haemocytometer 39 1.4 Preparation of an onion root tip squash to show stages in mitosis 43
Transcript of A Biology Practical Guide - · PDF file1.2 Preparation of an onion root tip squash to show...

1
© FELTHAM PRESSBiology Advanced
A BiologyPractical Guide
Version One Contents1
1.1 The preparation of temporary mounts, the use of simplestaining techniques and the estimation of size 5
1.3 The movement of water down water potential gradientsthrough partially permeable membranes 9
1.4 Biochemical tests for substances of biological importance 11
Chromatography 16
1.5 The effect of temperature on the activity of catalase 20
1.6 Microscopic examination of tissues and organs 24
1.7 Composition of inhaled and exhaled air 27
1.8 The effects of exercise on the pulse rate and breathing rate 29
2
1.1 The action of Immobilised Lactase enzyme on Lactose in milk 34
1.2 Preparation of an onion root tip squash to show stages in mitosis 37
3
1.1 Population growth of yeast using a haemocytometer 39
1.4 Preparation of an onion root tip squash to show stages in mitosis 43

4
4.1 Simple biochemical tests 3
Chromatography 8
4.2 The observation of animal and plant cellsunder the light microscope 12
Supplementary Practical Work Sheet: Measuringspecimens under the Light Microscope 15
4.3 The water potential of plant cells 19
4.5 The effect of temperature on the activity of Catalase 21
4.6 The action of amylase on starch agar plates 25
5
5.1 Supplementary Practical Work Sheet: Preparation ofroot tip squash to show stages of mitosis 28
6
6.1 Supplementary Practical Work Sheet:Dissection of the Mammalian Heart 31
Supplementary Practical Work Sheet: The observation ofsections of blood vessels under the light microscope 33
6.2 Supplementary Practical Work Sheet:Measuring the pulse rate 35
6.4 Factors affecting the rate of transpirationusing the potometer 40
Supplementary Practical Sheet: Water loss from leaves 43
1
© FELTHAM PRESSBiology Advanced
Practical Guide
Version TWO Contents

Version THREE Contents11.1 Qualitative and quantitative tests for substances of biological importance 3
1.2 The effect of temperature on the activity of the enzyme catalase 7
The action of Immobilised Lactase enzyme on Lactose in milk 11
The effect of pectinase enzyme on the extraction of juice from apples 14
1.3 The setting up and use of a light microscope to view slides of suitable tissues andcells, and the making of accurate drawings of cells and plans of tissues 16
Use of a suitable graticule to make measurements and understand the concept of scale in relation to drawings done from specimens seen using the light microscope 19
1.4 Preparation of an onion root tip squash to demonstrate stages in mitosisusing a light microscope 23
2
2B.1 The rate of respiration of small organisms or living tissues using a simple respirometer 26
2B2 Demonstrations and measurements of transpiration using a potometer 31
Stomatal counts 34
The microscopic examination of stained blood films and the identification of cells 36
2B.4 The factors affecting the growth of pollen grains 38
Observation of slides of slides of insect testis squash 40
Microscopic examination of the histology of ovary and testis 42
2H
2H.1 The estimation of vital capacity using simple apparatus 44
Quantitative comparisons of inspired and expired air 50
2H.2 An investigation of the effects of physical activity on pulse rate 56
The microscopic examination of stained blood films and the identification of cells 61
Microscopic examination of the histology of ovary and testis 63
3
3.3 The estimation of pyramids of number and of fresh biomass using simple techniquesfor the collection and determination of fresh biomass 65
1
© FELTHAM PRESSBiology Advanced
A Biology: Practical Guide
Version FOUR Contents8
8.1
8.2
9
9
10
10
10
10

Practical Work Guide
An Introduction
This guide is designed to provide material for supervisors to use at their discretionfor the practical work..
Practical exercises specifically mentioned in the specifications are included, alongwith those, the need for which, is implied.
Supplementary Practical Sheets cover those exercises which might be considered asoptional in the light of the specifications.
All of the exercises provide opportunities to contribute to fulfilling the Aim that:
AS and A level specifications in biology should encourage students to:
develop an understanding of scientific methods.
Candidates should be able to:
a. devise and plan experimental and investigative activities, selectingappropriate techniques;
b. demonstrate safe and skillful practical techniques;
c. make observation and measurements with appropriate precision andrecord these methodically;
d. interpret, explain, evaluate and communicate the results of theirexperimental and investigative activities clearly and logically usingbiological knowledge and understanding and using appropriatespecialist vocabulary.
They also provide the opportunity forthe assessment of:
A. Method of changing the independent variable.B. Method of measuring the dependent variable.C. Implementation of practical work.D. Collection and presentation of raw data.E. Drawing.F. Analysing.G. Drawing conclusions.H. Evaluating.I. Selecting and retrieving information.J. Communication.
The responsibility for safe and correct practice rests entirely with the designatedsupervisor, to whom the methods are offered as a source of information only.
Hazard Cards as produced by, for example CLEAPS, should bedisplayed wherever necessary.
CLEAPS, School Science Service, Brunel University, Uxbridge, UB8 3PH
2
© FELTHAM PRESSBiology Advanced
A Biology: Practical Guide

1 Molecules, Cells and Systems
The cell as the basic unit of structure in prokaryotic and eukaryotic organismsEukaryotic cellsPractical work to include the preparation of temporary mounts and the use of simple staining.
The preparation of temporary mounts, the use of simple staining techniques
IntroductionPlant and animal cells are to be studied under the light microscope. The plant cells areto be viewed by making a temporary preparation of the inner epidermis of an onion scale,stained with iodine in potassium iodide solution to make the cells more visible. Aprepared slide of human epithelial cells from the lining of the cheek will also be studied.
Method▼ Place 1-2 drops of iodine in KI solution in the middle of the slide.
▼ Take a piece of onion scale and tear it with the fingers. This should leave a verythin epidermis attached to the inside surface of the scale. Carefully remove asmall piece (about 0.5 cm2) of this epidermis with the forceps, and place it in thedrop of iodine solution on the slide.
▼ Use the mounted needle to position the piece of epidermis flat in the iodinesolution, then use the needle again to lower the coverslip carefully onto thespecimen, (trying not to trap too many air bubbles].
▼ Examine the slide under the light microscope, using the medium power (x10)objective lens, and draw 2-3 adjacent cells (at least a few cm across). Label thedrawing to show the structures you can see, e.g. nucleus, cell wall, vacuole, andcytoplasm (they may not all be visible). Annotate the drawing to show thefunctions of the structures you have drawn.
▼ Calculate the magnification of the drawing:
Microscope magnification = eyepiece lens magnification x objective lens magnification
Note this figure on your drawing.
▼ Now correct the magnification for the size of the drawing; that is the number oftimes the drawing is larger than the image seen down the microscope eg, twicethe size [x2]. This gives a final magnification of:
Eyepiece lens x objective lens x 2
Also note this figure on your drawing.
▼ Use the high power (x40) objective lens to check the details you have drawn.
▼ Now examine the prepared slide of human cheek cells under the microscope.Locate the cells using the medium power (x10) objective lens, you will probablyneed a higher power to make the drawing.
▼ Draw 2-3 cells (not too small), label the drawing, annotate, and note the finalmagnification (microscope magnification x size difference).
▼ Make sure the drawings have suitable headings.
3
© FELTHAM PRESSBiology Advanced
A Biology: Practical Guide
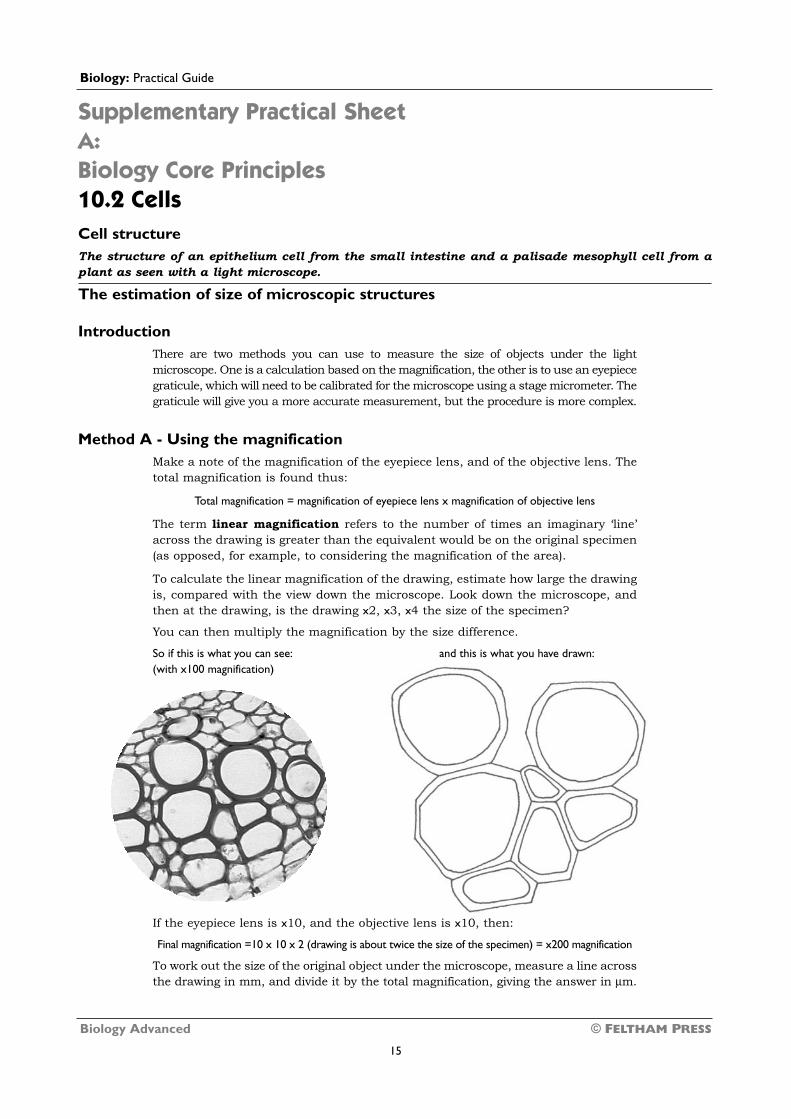
Supplementary Practical SheetA:Biology Core Principles10.2 CellsCell structureThe structure of an epithelium cell from the small intestine and a palisade mesophyll cell from aplant as seen with a light microscope.
The estimation of size of microscopic structures
IntroductionThere are two methods you can use to measure the size of objects under the lightmicroscope. One is a calculation based on the magnification, the other is to use an eyepiecegraticule, which will need to be calibrated for the microscope using a stage micrometer. Thegraticule will give you a more accurate measurement, but the procedure is more complex.
Method A - Using the magnificationMake a note of the magnification of the eyepiece lens, and of the objective lens. Thetotal magnification is found thus:
Total magnification = magnification of eyepiece lens x magnification of objective lens
The term linear magnification refers to the number of times an imaginary ‘line’across the drawing is greater than the equivalent would be on the original specimen(as opposed, for example, to considering the magnification of the area).
To calculate the linear magnification of the drawing, estimate how large the drawingis, compared with the view down the microscope. Look down the microscope, andthen at the drawing, is the drawing x2, x3, x4 the size of the specimen?
You can then multiply the magnification by the size difference.
So if this is what you can see: and this is what you have drawn:(with x100 magnification)
If the eyepiece lens is x10, and the objective lens is x10, then:
Final magnification =10 x 10 x 2 (drawing is about twice the size of the specimen) = x200 magnification
To work out the size of the original object under the microscope, measure a line acrossthe drawing in mm, and divide it by the total magnification, giving the answer in µm.
15
© FELTHAM PRESSBiology Advanced
Biology: Practical Guide

▼ Move the stage micrometer carefully so that the starting units of the two scalescoincide.
▼ Count along the two scales until there is again a coincidence between the twoscales. Note down the number of divisions along each of the two scales that thisrepresents.
▼ As each division along the stage micrometer scale represents 100 µm, then:
1 division on the eyepiece scale = Number of divisions on the stage micrometer scale x 100(in mm) Number of divisions on the eyepiece graticule scale
▼ At x100 and x400 magnification the lines on the scale will have a definitethickness. It is important to measure from one side of one scale mark, to the sameside of the next coinciding mark.
▼ This procedure should be done for all the objective lenses on your microscope, sothat you have a scale calibration for all possible magnifications. Record thisinformation in a table with the following headings.
Power of lens Magnification Eyepiece scale 1 division (in mm)
▼ When you measure another specimen, you will already have the calibrationfigures, so all you have to do is count how many eyepiece scale divisions yourspecimen covers, and multiply that by the calibration factor for that objective lens.
continued . . . . .
20
© FELTHAM PRESSBiology Advanced
A Biology: Practical Guide
More of the object is seen underlow power objective lens
Less of the object is seen underhigh power objective lens
1 2 3 4 5 6 7 8 9cm

2:Exchange, Transport and Reproduction in humans2.1 Exchanges with the environment
BreathingPractical work to include quantitative comparisons of inspired and expired air
Quantitative comparisons of inspired and expired air
Introduction
In the simplest investigation using the ‘Balloon respirometer’ (Method A) thecomposition of inspired air can be taken as known (being the same as thecomposition of the air), and the amount of oxygen consumed at rest can beconsidered to be equal to the amount of carbon dioxide produced:
C6H12O6 + 6O2 6CO2 + 6H2O
The ‘J-tube Method’ (Method B) analyses the oxygen and carbon dioxide content ofboth inspired and expired air, and the process is more complex.
Method A
Figure: Simple apparatus to determine a measure of the CO2 content of air
50
© FELTHAM PRESSBiology Advanced
A Biology: Practical Guide
bung
boiling tube with 25cm3
of Phenolphthaleinindicator solution.
vent
screw clampregulator set to allowa bubbling rate ofabout one bubblea second
on/off clamp clip disposablemouthpiece
long (165mm) balloon inflatedto a mark 50mm from end.Provides reservoir of exhaledair at constant pressure.
attached withelastic band
AB
P

1:
▼
▼
▼

▼