900 Convertible Top Troubleshooting Guide
60
Transcript of 900 Convertible Top Troubleshooting Guide
--_.I--
-_-_. ._-_.
PRODUCT INFORMATION
June 5,1997
Route To: Service Manager
Subject: Convertible Troubleshooting Guide
As part of the new training course, Convertible Top Adjustments and Updates - CNAA - aTroubleshooting Guide was produced. Each technician attending this course received his/herown copy of this document.
Enclosed is the final version of this Troubleshooting Guide for your dealership’s service library.The information contained in this document is the latest and only information that should bereferenced when working on a 1995- 900 Convertible.
In conjunction with the publication of this Guide, several older bulletins have been supersed-ed. Please make certain all superseded bulletins are deleted (crossed out/torn out) of yourPSI Supplements. The list of affected bulletins are:
? PSI 08/94-0495 Programming Top Mechanism(See new PSI 04/97-0758 which gives both ISAT and TECH 2 instructions)
? PSI 09/94-0499 Adjustment of Tonneau Cover Latches
? PSI 03/95-0554 Improvement to Operation of Top Stack Mechanism(See new PSI 04/97-0753)
? PSI 05/95-0570 Correcting Complaint of Water Leakage at Door Mirror(See new PSI 04/97-0760)
? PSI 10/95-0628 Adjustment of 5th Bow Latch Motor
? PSI 02/96-0664 Customer Satisfaction Campaign 428(See new PSI 04/97-0754)
? PSI 02/96-0665 Addressing Customer Complaints of Water Leaks(See new PSI 04/97-0755)
? PSI 07/96-0693 Correcting Customer Complaint that Headliner at First Bowis Loose or Hanging Down(See new PSI 04/97-0756)
? PSI 1 O/96-071 6 Installing New Fifth Bow Latch Motor Racks
All technicians who attended the training class will be receiving updated pages for their bind-ers.
If you require additional copies of this Troubleshooting Guide, please contact a Product In-formation Specialist at 770-279-6484 or 770-279-6324.
97-17

900 Convertible Top Troubleshooting Guide
TOPIC
Table of Contents
PAGE
Table of Contents A
How to determine if Updates & Campaigns have been performed B
Inoperative Top/Operational Problems/Unsatisfactory Performance C-E
Squeaks & Rattles
Water Leaks
SID Messages
Miscellaneous Problems
F
G
G
H
BULLETINS INCLUDED IN THIS GUIDE:
PSI 04/97-0753 Improvement to Operation of Top Stack Mechanism
PSI 04/97-0754 Customer Satisfaction Campaign 428: Top Mechanism QualityImprovement
PSI 04/97-0755 Addressing Customer Complaints of Water Leaks
PSI 04/97-0756 Correcting Customer Complaint that Headliner at First Bow isLoose or Hanging Down
PSI 04/97-0757 New Procedure for Replacement of Convertible Top
PSI 04/97-0758 Programming Top Mechanism (Using ISAT or Tech 2)
MI 811-1758 Customer Satisfaction Campaign 450: Replacement of 5th BowLatch Motor Assembly (issued as PSI 04/97-0759 in early issues of Troubleshoot-ing Guide)
PSI 04/97-0760 Addressing Complaint of Water Leaks from Area Around DoorMirror
A 06/09/97

900 Convertible Top Troubleshooting Guide
How to determine if Updates & Campaigns have been performed
The following chart includes some quick visual checks you can make to determine if aparticular campaign or update has actually been performed on a 900 Convertible. Notethat this is not a guarantee that all of the steps of a particular PSI or campaign havebeen performed.
Old “19 Point” Update, see revised PSI 04/97-0753
I Right hand 5th bow latch motor microswitch should be disconnected (gone)! Check for proper ECM - you SHOULD NOT be able to raise the windows while the top is
being raised. (ECM software version 0402 or higher.)3 Look at header switches through opening in header - silver arm and pure white plastic
arm are early versions. Plastic arm on latest switch is an “off white color”.1 The 5th bow potentiometer should have a “drive bracket” installed, and the potentiometer
arm should be approx. 3/8” long; The 5th bow motor on the passenger’s side of the car should have a protective plate
installed over the gear, so the wiring harness can’t be damaged by the gear.
Service Campaign #428, see revised PSI 04/97-0754
I “2nd bow drive link” installed? 2 holes drilled in bottom of front door pockets. (1997 models have the holes drilled differ-
ently from the Factory.)
Customer Satisfaction Campaign 450,5th Bow Latch Motor Update,see MI 811-1758(The 5th bow latch motor assembly has been updated as from VIN V7010306 in Fac-tory production)
1 Round plug in hole over 5th Bow Latch Motor
How to Determine Which Type of Top is Installed on the Convertible you are goingto work on:
1 Original M95 900 Top is “ASC”: rear window is glued in place2 Later style Top is “CT% rear window is clipped in place.
B 06109197

900 Convertible Top Troubleshooting Guide
Inoperative Top/Operational Problems/Unsatisfactory Performance(Note that problems are listed in order of top operating sequence, beginning with top fully raised)
PROBLEM POSSIBLE CAUSE ACTION1 Nothing happens when attempting a. Top switch on center console See page 1
to lower top (no movement at all, defectiveno noises, etc.)
b. Fuse blown
c. Trunk bag raised?2 First bow raises a few inches and Fifth Bow latch motor stuck or in- See page 1
stops operative3 Fifth bow raises all the way, then a. Header Switches closed by See pages 1 - 3
top stops other movement dowel pin
b. 5th bow potentiometer will notreach high limit
c. Tonneau motor disengaged4 Tonneau cover catches going up - Latch Adjustment See page 4
“snaps” when opening
5 Grinding, ticking when tonneau Tonneau motor not fully engaged See page 4goes up
6 Top stops l/Z way when lowering a. Missing 2nd bow drive link or See pages 5-6the top 2nd bow binding on fabric
b. Programming
c. Main motor or 5th bow poten-tiometer faulty
7 Top hesitates when lowering top a. Programming Seepages6-7
b. 2nd bow catching on fabric8 Rear window hits rear headrest Programming See page 7
when lowering’ top9 5th bow hits Tonneau cover a. Programming See page 7
hinges when lowering topb. Tonneau motor drive shaft
twistedIO First bow hits Tonneau cover a. Programming See page 8
when lowering topb. Twisted Tonneau shaft
c. Bent Tonneau cover hinges11 “Snapping” noise from rear as top Broken or missing stops on rear See page 9
is being lowered into “boot” window
C 06/09/97

900 Convertible Top Troubleshooting Guide
Inoperative Top/Operational Problems/Unsatisfactory Performance(Note that problems are listed in order of top operating sequence, beginning with top fully raised)
PROBLEM POSSIBLE CAUSE ACTION12 Top gets caught on interior trim Early interior trim panel not cut at See page 10
panel on way down rear edge13 Top won’t park low enough a. Main motor low limit See page 11-12
b. Side rail screws loose
c. Side rail laying on main motor -balance link bent
d. B-pillar hinge hitting main mo-tors when top is lowered
14 Tonneau cover does not close all a. Top not down all the way See page 12the way
b. Tonneau latches out ofadjustment
c. Tonneau motor drive shafttwisted
15 SID does not beep when top is ful- a. SID incorrectly programmed See page 12ly lowered
b. Tonneau cover latch micro-switches not closing properly
16 First bow has white mark near First bow rubs on 5th bow latch See page 13“grab handle” motor cover
17 Tonneau cover catches going up - Latch Adjustment See page 13“snaps” when opening
18 Top stops or hesitates when rais- 2nd bow is bent - flat steel piece See page 14ing the top on the side of the drive link is bent
19 Grinding/ticking when raising top Tonneau motor not fully engaged See page 1520 Top does not go up (rise) evenly - Weak main motor See page 15
one side rises quicker than theother
21 First bow slams header when rais- a. Top stops misadjusted See Page 15ing top (pin alignment ok)
b. Loose screws22 First bow header pins do not a. Top stops misadjusted See page 15-l 6
reach guide holes in headerb. Shim adjustment
c. Loose screws
D 06/09/97

900 Convertible Top Troubleshooting Guide
Inoperative Top/Operational Problems/Unsatisfactory Performance(Note that problems are listed in order of top operating sequence, beginning with top fully raised)
23 First bow comes down on header Top out of adjustment See page 16crooked, straightens as 5th bowlatches
24 Access flaps won’t open (raise) 5th bow latcli motor jammed with See page 16when raising top - flaps may be latches closed or inoperativebroken off
25 Tonneau cover slams closed a. Tonneau cover catches onfabric when closing
See pages 17
b. Tonneau cover latches notaligned properly
c. Tonneau motor drive shafttwisted
26 5th Bow won’t close properly a. 5th bow latch motor jammed See page 18
b. Misaligned strikers
c. Incorrect programming?27 SID does not beep when top is a. SID rncorrectly programmed See page 18
fully raisedb. 5th bow latch microswitches or
Tonneau cover latch micro-switches not closing properly
E 06/09/97

900 Convertible Top Troubleshooting Guide
Squeaks & Rattles
PROBLEM POSSIBLE CAUSE ACTION1 Clicking/snapping noise from the Loose bolts at front side rail See page 19
1st bow header? Rattle from “pull down” handle at Incorrect fit See page 19
center of 1 st bow3 Rattle from tonneau cover with 5th 5th bow fabric rubbing on tonneau See page 19
bow latched1 Rattle at 2nd bow (above driver’s a. Incorrect cut at ends of 2nd See page 20
or passenger’s head) bow
b. Round rubber plug not insertedin square rubber stop between 1stand 2nd side rail
c. 2nd bow flipper rod rattling5 Rattle from C-pillar area while Bolts beneath 2nd side rail loose See page 21
driving3 Rattle in rear side trim area by rear Seat belt pretensioner tube con- See page 21
speaker (only 1995 VIN up to tatting sheet metals7003000)
7 Creaking or rattling noise when Improper window rollers (must be See page 21raising front windows lubricated)
3 Creaking or rattling noise while Improper window rollers (must be See page 21driving down road lubricated)
9 Squeaking noise from rear when Access flap lower surface rubbing See page 21driving with the top raised on 5th bow motor
F 06/09/97
900 Convertible Top Troubleshooting Guide
Water Leaks
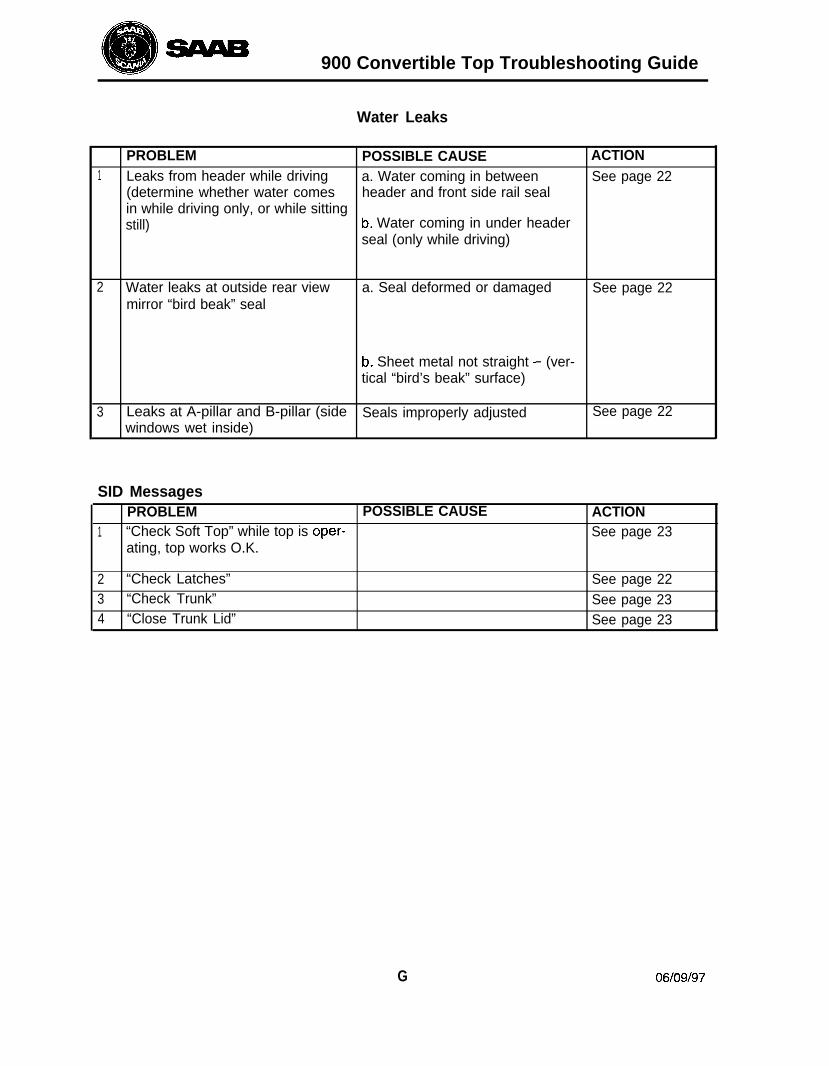
PROBLEM POSSIBLE CAUSE ACTION1 Leaks from header while driving a. Water coming in between See page 22
(determine whether water comes header and front side rail sealin while driving only, or while sittingstill) b. Water coming in under header
seal (only while driving)
2 Water leaks at outside rear view a. Seal deformed or damaged See page 22mirror “bird beak” seal
b. Sheet metal not straight - (ver-tical “bird’s beak” surface)
3 Leaks at A-pillar and B-pillar (side Seals improperly adjusted See page 22windows wet inside)
SID MessagesPROBLEM POSSIBLE CAUSE ACTION
1 “Check Soft Top” while top is oper- See page 23ating, top works O.K.
2 “Check Latches” See page 223 “Check Trunk” See page 234 “Close Trunk Lid” See page 23
G 06/09/97

900 Convertible Top Troubleshooting Guide
Miscellaneous
PROBLEM POSSIBLE CAUSE ACTION1 DTC B1605, top works O.K. See page 242 ACC does not switch to manual SID misprogrammed See page 24
mode when lowering top
3 ACC does not switch to automatic Stuck / defective header switch See page 24mode when raising top
4 No convertible top SID messages SID misprogrammed See page 24
5 Side rail seals drooping Side rail seal not secured Seepage24-25
6 Trunk release button inoperative a. Programming See page 26b. Is fuse 25 blown?
7 DTC B1309 - Potentiometer Fault Variety of reasons See page 26
06/09/97

900 Convertible Top Troubleshooting Guide
Inoperative Top/Operational Problems/Unsatisfactory Performance:(Note that problems are listed in order of top operating sequence, beginning with top fullyraised)
1. Nothing happens when attempting to lower top (no movement at all,no noises, etc.)
a. “ROOF” switch on center console defective?
Monitor switch with Tech 2, “Read Values/Roof Switch”. Tech 2 should re-spond DOWN when you push the ROOF switch backward.
If Tech 2 does not respond correctly, check for power into switch at pin 10 ofthe switch. Check for power at pin 4 of the switch pack and pin 42 of K42when opening, and power at pin 3 of switch pack and pin 28 of K42 when clos-ing. Check for continuity to ground at pin 8 & 12 of the switch pack. Replaceswitch pack or repair wiring as needed.
b. Fuse blown? (If you cannot contact the TSAS system with Tech 2, youmay have a blown fuse.)
Check Maxi fuse #5 (underhood). Check fuse #7 (+15 circuit) and #I7 (+54circuit) in fuse box 22a at the end of the dash.
Replace fuse, determine cause of fuse blowing (short circuit to ground, etc.).
c. Trunk bag raised?
If SID is incorrectly programmed, when you attempt to lower the top with thetrunk stowage bag raised, nothing will happen, and SID will not display anymessages.
2. First bow raises a few inches and stops
- Fifth bow latch motor stuck or inoperative?
If the car has the “older” design 5th bow latch motor, replace 5th bow latchmotor. See Ml 811-l 758. (From V7010306 new latch motor assemblies areFactory installed.)
Use Tech 2 to “Activate/Sth Bow Latch Motor”. If motor does not operate cor-rectly, perform electrical tests - there may be a wiring fault.
3. Fiffh bow raises all the way, then fop stops other movement
a. Header switches closed by dowel pin?
The first bow settles when the fifth bow is released. If the “top stops” are misad-justed too loose, this allows the header pins to re-enter the header switches andstop the top movement. This may happen before the 5th bow is all the way up. Notethat SID will also display “Check Latches” when this occurs. An easy way to checkfor this condition is to raise the first bow with your hand when the top movementstops. If the top movement continues, the stops need adjustment,
Adjust the top stops correctly. See page 130 of Service Manual 8:5 Cabriolet. Re-program according to PSI 04197-0758.
1 06/09/97

900 Convertible Top Troubleshooting Guide
b. 5th bow potentiometer will not reach high limit. “Check Soft Top” ap-pears on SID.
Reprogram top according to PSI 04/97-0758.
c. Tonneau motor disengaged?
Remove the right taillight assembly to inspect the Tonneau motor. Check for properengagement of Tonneau motor. If the dimension shown in the illustration is greaterthan 38mm and the Tonneau gears are making ratcheting noise, the Tonneau motorhousing is bent. If there is insufficient engagement, check for gear damage andcheck emergency release handle cable adjustment (described on next page). Ifdamage to gears or housing is visible, replace the Tonneau motor. See illustrationbelow.
When the motor is properly engaged, note that the motor mounting plate isengaged in the slot and that the latch is parallel to the potentiometer bracket.
Good engagement
If Tonneau gears are ratcheting, mea-sure this dimension. If dimension isgreater than 38mm, Tonneau motorhousing is bent.
Poor engagement
2 06/09/97
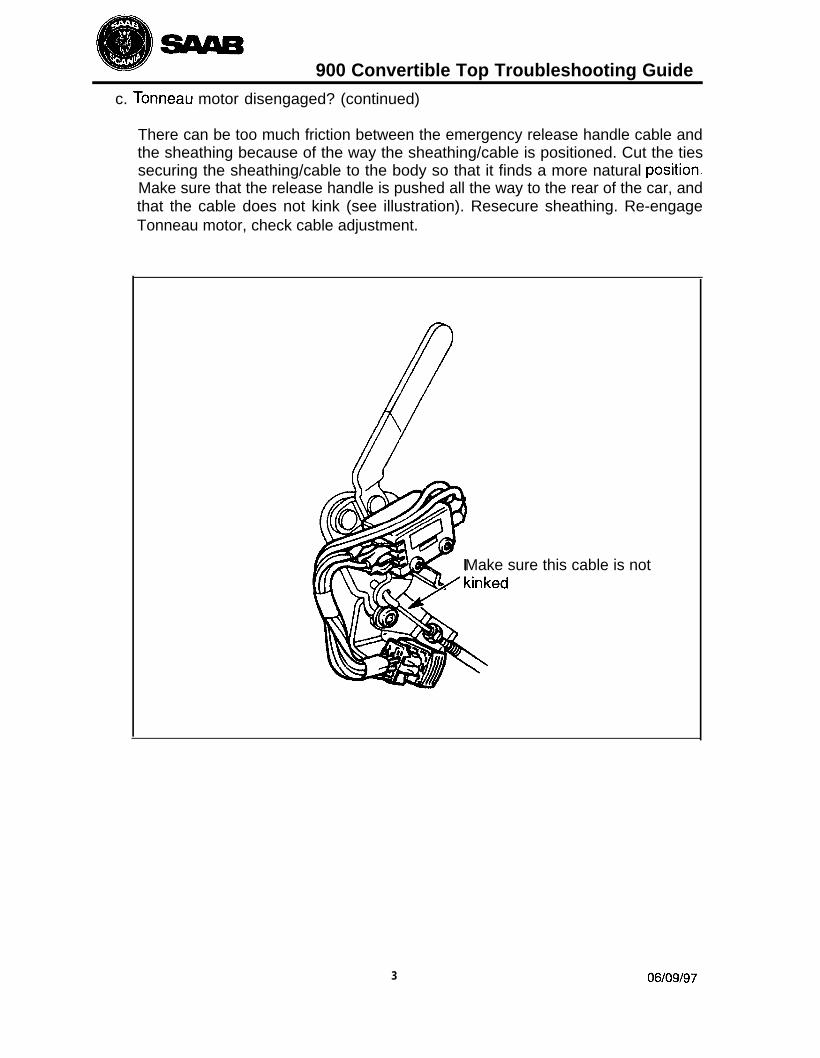
900 Convertible Top Troubleshooting Guidec. Tonneau motor disengaged? (continued)
There can be too much friction between the emergency release handle cable andthe sheathing because of the way the sheathing/cable is positioned. Cut the tiessecuring the sheathing/cable to the body so that it finds a more natural position.’Make sure that the release handle is pushed all the way to the rear of the car, andthat the cable does not kink (see illustration). Resecure sheathing. Re-engageTonneau motor, check cable adjustment.
Make sure this cable is not
3 06/09/97

900 Convertible Top Troubleshooting Guide
4. Tonneau cover catches going up - “‘snaps” when opening
- Tonneau latches misaligned?
Adjust striker and latch as per Service Manual 8:5 Cabriolet, pages 127-l 28.
Make sure to check the Tonneau cover latch adjustment with top fully raised,because the 5th bow pushes the Tonneau cover down when the top is fullyraised.
Make sure that Tonneau latch pindoes not catch or bind in onethese areas /L~.
5. Grinding/ticking when Tonneau goes up
- Tonneau motor not fully engaged?
Replace Tonneau motor assembly. Recheck cable adjustment. See pages224-2 of Service Manual 8:5 Cabriolet.
Check emergency release handle cable adjustment as described in Opera-tional Problem 3C.
4 06/09/97

900 Convertible Top Troubleshooting Guide
6. Top stops l/2 way down when lowering the top
a. Missing 2nd bow drive link or 2nd bow binding on fabric?
Perform Customer Satisfaction Campaign 428 if it has not been completedThis problem can occur if the 2nd bow does not flip back, causing it to contactthe front side rails. This can bend the balance link. If slightly bent, it is OKto straighten it in the car. If balance links are severely bent, they are availableas spare parts:
LH 47 67 398, RH 74 97 506
balance link usually bends here toward center of car
If the balance link is bent, also inspect the control arm on both sides for bend-ing.
check for bending at this area
5 06/09/97

900 Convertible Top Troubleshooting Guide
b. Programming?
Reprogram top according to PSI 04/97-0758.
C . Main motor or 5th bow potentiometer faulty?
Monitor the “Main Motor Potentiometer” and “5 Bow Potentiometer” withTech 2 using the line graph function as you cycle the top completely. Watchfor irregularities in the “Main Motor Potentiometer” and “5 Bow Potentiome-ter”graph display at the point where the top stopped. If the graph “spikes”dramatically, there is an open or a short in the potentiometer.
Tech 2 may not reveal an open circuit in the potentiometer. You can also usea digital multimeter or a ‘scope to measure the potentiometer output voltage.The “Main Motor Potentiometer” voltage can be measured between pins 29and 30 of connector K42 at the TSAS ECM. The “5 Bow Potentiometer” volt-age can be measured between pins 29 and 31 of connector K42 at the TSASECM.
Replace potentiometer if needed. Reprogram top according to PSI04/97-0758.
7. Top hesitates when lowering top
a. Programming?
When the top is about l/2 way back, the main motor stops and the 5th bowmotor starts an upward motion to bring the 5th bow closer to the 4th bow.If this is the problem you are experiencing, reprogram according to PSI04/97-0758. Pay special attention to the measurements used to calculateoverlap values of the main motors and the 5th bow motors.
If you are still experiencing this problem, you can try:
1. lowering main motor overlap values one unit at a time or
2. raising 5th bow overlap values one unit at a time
Do not change overlaps by more than 3 units because this will cause otherproblems, such as the rear window hitting the headrests.
b. 2nd bow catching on fabric?
Perform Customer Satisfaction Campaign 428 if it has not been completed.
The 2nd bow does not flip back, causing it to contact the front side rails. Thiscan bend the balance link. If balance links are bent, they are available asspare parts:
LH 47 67 398, RH 74 97 506
See illustration on following page.
06/09/97

900 Convertible Top Troubleshooting Guide
balance link usually bends here toward center of car
8. Rear window hits rear headrest when lowering top
- Programming problem?
Reprogram top according to PSI 04/97-0758, paying particular attention tooverlap values. If you still experience this problem, you can try lowering the5th bow overlaps one unit at a time until the problem ceases. (Do not lowerthe 5th bow overlaps by more than 3 units, because this will cause otherproblems - such as hesitation of the main motors while lowering the top).
9. 5th bow hits Tonneau cover hinges
a. Programming
Reprogram top according to PSI 04/97-0758. Pay special attention to themeasurements used to calculate main motor overlap values.
b. Tonneau motor drive shaft twisted
If the Tonneau motor drive shaft is twisted, the 5th bow may hit the Tonneaucover hinges. If you think that this situation exisits, you may have to removethe u-joint at the end of the shaft to inspect it for a twist. If the shaft is twisted,you must replace the Tonneau motor assembly and determine the cause ofthe twist. A twisted shaft is usually due to misadjusted Tonneau coverlatches. Make sure the latches are carefully adjusted according to ServiceManual 8:5, pages 127 & 128. Make sure to check the Tonneau latch adjust-ment with top fully raised, because the 5th bow pushes the Tonneau coverdown when the top is fully raised.
See illustration in Step 4 of this guide.
7 06/09/97

900 Convertible Top Troubleshooting Guide
10. First bow hits Tonneau cover when lowering top
a. Programming
Reprogram top according to PSI 04/97-0758. Pay special attention to theTonneau motor high limit,
b. Tonneau motor drive shaft twisted?
If the Tonneau motor drive shaft is twisted, the 5th bow may hit the Tonneaucover hinges. If you think that this situation exisits, you may have to removethe u-joint at the end of the shaft to inspect it for a twist. If the shaft is twisted,you must replace the Tonneau motor assembly and determine the cause ofthe twist. A twisted shaft is usually due to misadjusted Tonneau coverlatches. Make sure the latches are carefully adjusted according to ServiceManual 8:5, pages 127 & 128. Make sure to check the Tonneau latch adjust-ment with top fully raised, because the 5th bow pushes the Tonneau coverdown when the top is fully raised.
c. Bent Tonneau cover hinges?
The Tonneau cover may not open far enough because the Tonneau hingesare bent.
Note that this condition is not very common. If you have determined that theTonneau cover hinges are actually bent, you must replace the hinges. SeeService Manual 83 Cabriolet, pages 218-219.
You must also determine the cause of the bent hinges. Tonneau hinges couldbend due to incorrect Tonneau latch adjustment. See the illustration in Step#4 of this guide.
a 06/09/97

900 Convertible Top Troubleshooting Guide
II. ‘Snapping” noise from rear as top is lowered into boot
- Broken or missing stops on rear window?
The rear window may be catching on the 5th bow latch hooks as the top isbeing lowered. There are 3 different designs of “rear window stops” whichhave been used. ANY ONE OF THESE 3 STYLES IS ACCEPTABLE.
If you are working on a Convertible which has none of these, install coverson 5th bow latches, P/N 45 59 431 LH, 45 59 456 RH.
See PSI 04/97-0753 Subject #9 for further details. Check to be sure that allof the steps in this PSI have been performed.
Top with glued in rear window (ASC)
Top with clipped-inrear window (CTS)
9 06/09/97
900 Convertible Top Troubleshooting Guide
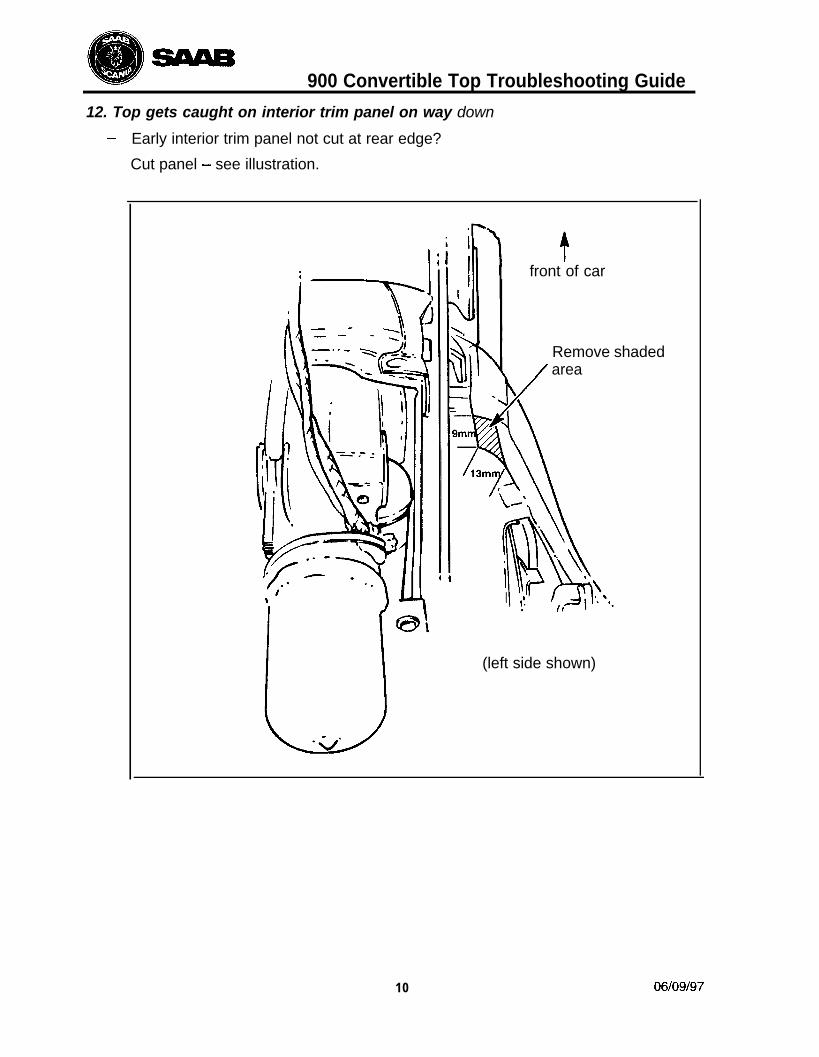
12. Top gets caught on interior trim panel on way down
- Early interior trim panel not cut at rear edge?
Cut panel - see illustration.
( front of car
Remove shaded/ area
(left side shown)
10 06/09/97
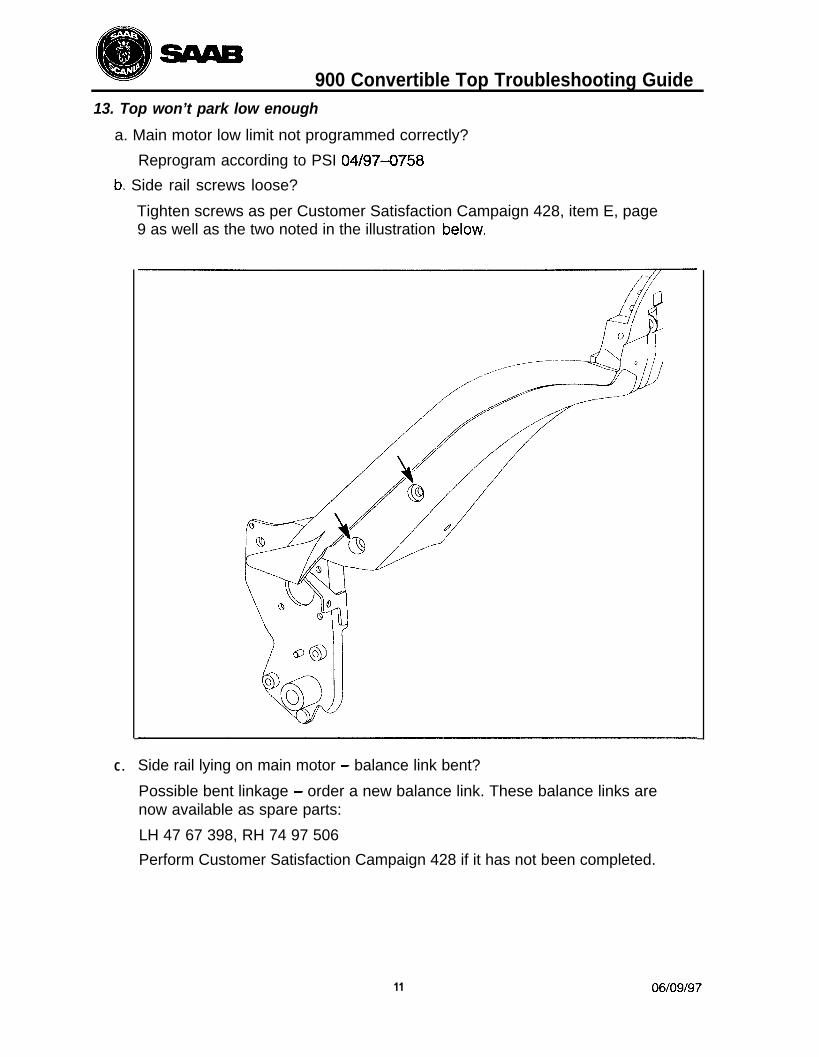
900 Convertible Top Troubleshooting Guide13. Top won’t park low enough
a. Main motor low limit not programmed correctly?
Reprogram according to PSI 04/97-0758
b. Side rail screws loose?
Tighten screws as per Customer Satisfaction Campaign 428, item E, page9 as well as the two noted in the illustration .below.
C. Side rail lying on main motor - balance link bent?
Possible bent linkage - order a new balance link. These balance links arenow available as spare parts:
LH 47 67 398, RH 74 97 506
Perform Customer Satisfaction Campaign 428 if it has not been completed.
11 06/09/97

900 Convertible Top Troubleshooting Guided. “B-pillar” hinge hitting main motors when top is lowered?
1. Determine which side is causing the problem
2. Remove the three 13mm nuts securing the top stack to the chassis
3. Raise the top assembly out of the boot slightly on one side. Sup-port it with a piece of wood. Be careful of sharp edges - don’tdamage the boot liner.
4. Loosen four main motor mounting bolts, rotate motor housingslightly forward.
5. Reassemble.
14. Tonneau cover does not close all the way
a, Top not down all the way?
See #13 above.
b. Tonneau latches out of adjustment?
Adjust Tonneau latches - see Service Manual 8:5, pages 127 & 128. Seeillustration in Step 4 of this guide.
c. Tonneau motor drive shaft twisted?
If the Tonneau motor drive shaft is twisted slightly, the latches may close be-fore the Tonneau cover is completely closed. If you think that this situationexists, you may have to remove the u-joint at the end of the shaft to inspectit for a twist. If the shaft is twisted, you must replace the Tonneau motor as-sembly and determine the cause of the twist. A twisted shaft is usually dueto misadjusted Tonneau cover latches. Make sure the latches are carefullyadjusted according to Service Manual 85, pages 127 & 128. Make sure tocheck the Tonneau latch adjustment with top fully raised, because the 5thbow pushes the Tonneau cover down when the top is fully raised.
15. S/D does not beep when top is fully lowered
a. SID incorrectly programmed?
Program SID for “hood”.
Refer to Service Manual 3:5 Electrical System, SID, page 43 for program-ming procedure.
b. Tonneau cover latch microswitches not closing properly?
Read switches with Tech 2. Adjust or replace as necessary.
1 2 06/09/97

900 Convertible Top Troubleshooting Guide16. First bow has white mark near “grab handle”
- When top is fully lowered, first bow rubs on 5th bow latch motor cover whiledriving
Install foam tape on underside of Tonneau cover. See illustration.
17. Tonneau cover catches going up - “snaps” when opening
- Tonneau cover latch misadjusted?
Adjust Tonneau latches according to Service Manual 8:5 Cabriolet, pages127 & 128. Make sure to check the Tonneau latch adjustment with top fullyraised, because the 5th bow pushes the Tonneau cover down when the topis fully raised.
See illustration in Step 4 of this guide.
Check Tonneau cover hinges for straightness. Check cover motor engage-ment. These may not be the cause but rather the result from the latch beingout of adjustment.
1 3 06109197

900 Convertible Top Troubleshooting Guide18. Top Stops or hesitates when raising the top
- 2nd bow bent? Flat steel piece on the side of the drive link bent (bends out)?
Open the top so that the front side rail is in a near vertical position. Note theangle of the 2nd bow flipper rod and compare it to the angle of the flipper rodon the other side of the car. If the bow is twisted, there will be an obviousdifference in the angles of the rods.
Straighten or replace 2nd bow, and straighten or replace 2nd bow drive link.
this may bend out
14

900 Convertible Top Troubleshooting Guide
19. Grinding, ticking when raising top
- Tonneau motor not fully engaged?
Replace Tonneau motor assembly. Recheck cable adjustment. See pages22-227 of Service Manual 8:5 and also Operational Problem #3 above foradditional illustration.
20. Top does not go up (rise) evenly - one side rises quicker than theother
- Weak main motor?
Replace faulty motor and reprogram top. See page 222 of Service Manual85 Cabriolet.
21. First bow slams header when raising top
a. Top stops misadjusted?
Adjust top stops. See page 130 of Service Manual 85 Cabriolet. Reprogramtop.
If problem persists, when calculating main motor high limit on Line A, subtract4 units rather than 3.
b. Shim adjustment?
Remove shims (if present) to move top stack forward. Add shims to movetop stack rearward.
c. Loose screws
See Step E in Customer Satisfaction Campaign 428, PSI 04/97-0754.
22.lst bow header pins do not reach guide holes in header
a. Top stops misadjusted?
Adjust top stops. See page 130 of Service Manual 85 Cabriolet. Reprogramtop.
b. Shim adjustment?
Remove shims (if present) to move top stack forward. Add shims to movetop stack rearward.
15 06/09/97

900 Convertible Tar, Troubleshooting Guidec. Does first bow need to be moved forward?
There must bea small gap,but no morethan 5mm ,
1. Partially lower the top
2. Remove the front side rail seals on both sides
3. Remove three bolts and pop rivet (one side at a time)
4. Elongate the holes in the side rail 3-4mm
5. Replace bolts
6. Repeat on other side
7. Adjust first bow so that header pins properly enter holes
23.lst bow comes down on header crooked, straightens as 5th bow/a tches
- Top out of adjustment?
See adjustments.
24. Tonneau cover “access flaps” don’t open (raise) when raising top -flaps may be broken off- 5th bow latch motor jammed with latches closed or inoperative?
If the car has the “older” design 5th bow latch motor, replace 5th bow latchmotor. See Ml 81 l-l 758.
Use Tech 2 to “Activate/%h Bow Latch Motor”. If motor does not operate cor-rectly, perform electrical tests -there may be wiring fault.
16 06/09/97

900 Convertible Top Troubleshooting Guide25. Tonneau cover slams closed
a.
b.
C.
Tonneau cover catches on fabric when closing?
Install rivets as per Customer Satisfaction Campaign 428, item F, page 11.Remove any stitching previously installed on the elastic straps per earlier PSI05/95-0572 .
Tonneau cover latches not aligned properly?
Readjust latches according to Service Manual 85, pages 127 & 128 and re-program.
See illustration in Step 4 of this guide,
Tonneau motor drive shaft twisted?
If the Tonneau motor drive shaft is twisted, the Tonneau cover may slamclosed. If you think that this situation exists you may have to remove the u-joint at the end of the shaft to inspect it for a twist. If the shaft is twisted, youmust replace the Tonneau motor assembly and determine the cause of thetwist. A twisted shaft is usually due to misadjusted Tonneau cover latches.Make sure the latches are carefully adjusted according to Service Manual8:5, pages 127 & 128. Make sure to check the Tonneau latch adjustment withtop fully raised, because the 5th bow pushes the Tonneau cover down whenthe top is fully raised.
17 06109/97

900 Convertible Top Troubleshooting Guide
265th bow won’t close proper/y
a. 5th bow latch motor jammed or inoperative?
If the car has the “older” design 5th bow latch motor, replace 5th bow latchmotor. See MI 811-1758.
Use Tech 2 to “Activate&h Bow Latch Motor”. If motor does not operate cor-rectly, perform electrical tests. There may be a wiring fault.
b. Misaligned strikers?
Adjust strikers.
c. Incorrect programming?
Reprogram top according to PSI 04/97-0758.
27. SIR does not beep when top is fully raised
a. SID incorrectly programmed?
Program SID for “hood”.
See Service Manual 3:5 Electrical system, SID for programming procedure.
b. 5th bow latch microswitches or Tonneau cover latch microswitches notclosing properly?
“Check Soft Top” message may appear on SID if one Tonneau switch is openand the other is closed.
Read switches with Tech 2. Adjust or replace as necessary.
1 8 06/09/97
900 Convertible Top Troubleshooting Guide
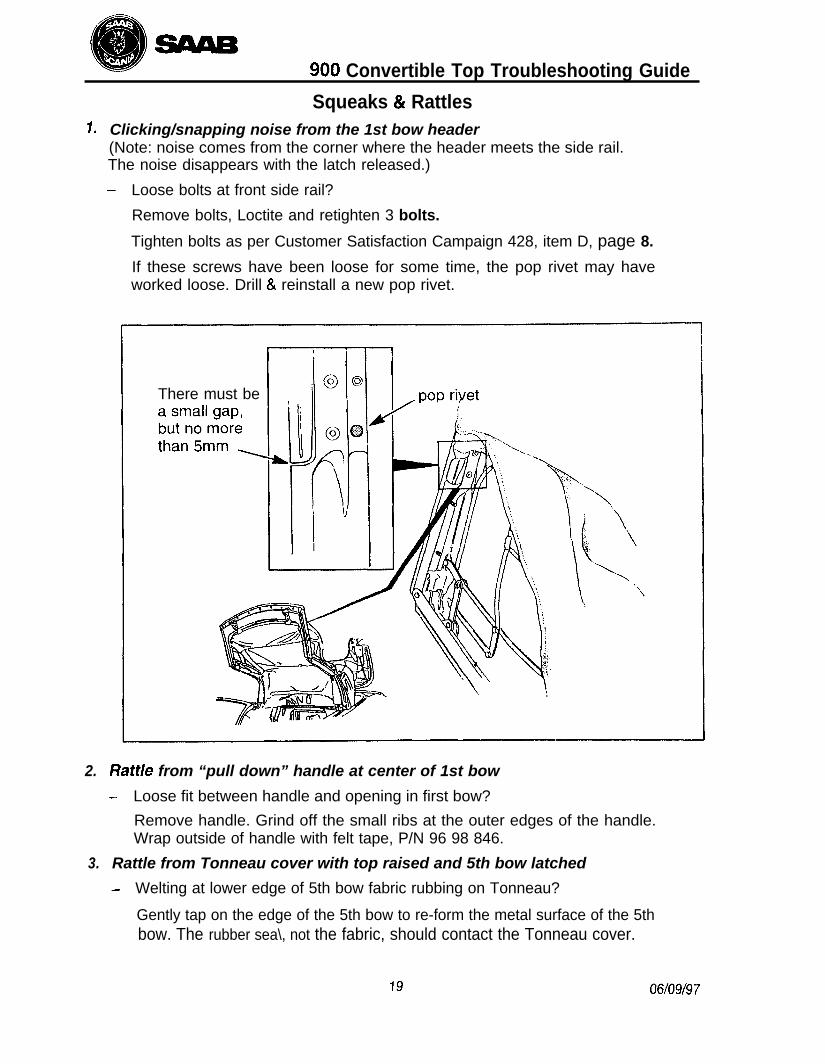
Squeaks & Rattles1. Clicking/snapping noise from the 1st bow header
(Note: noise comes from the corner where the header meets the side rail.The noise disappears with the latch released.)
- Loose bolts at front side rail?
Remove bolts, Loctite and retighten 3 bolts.
Tighten bolts as per Customer Satisfaction Campaign 428, item D, page 8.
If these screws have been loose for some time, the pop rivet may haveworked loose. Drill & reinstall a new pop rivet.
There must be
2. Ratttle from “pull down” handle at center of 1st bow
- Loose fit between handle and opening in first bow?
Remove handle. Grind off the small ribs at the outer edges of the handle.Wrap outside of handle with felt tape, P/N 96 98 846.
3. Rattle from Tonneau cover with top raised and 5th bow latched
- Welting at lower edge of 5th bow fabric rubbing on Tonneau?
Gently tap on the edge of the 5th bow to re-form the metal surface of the 5thbow. The rubber sea\, not the fabric, should contact the Tonneau cover.
19 06/09/97
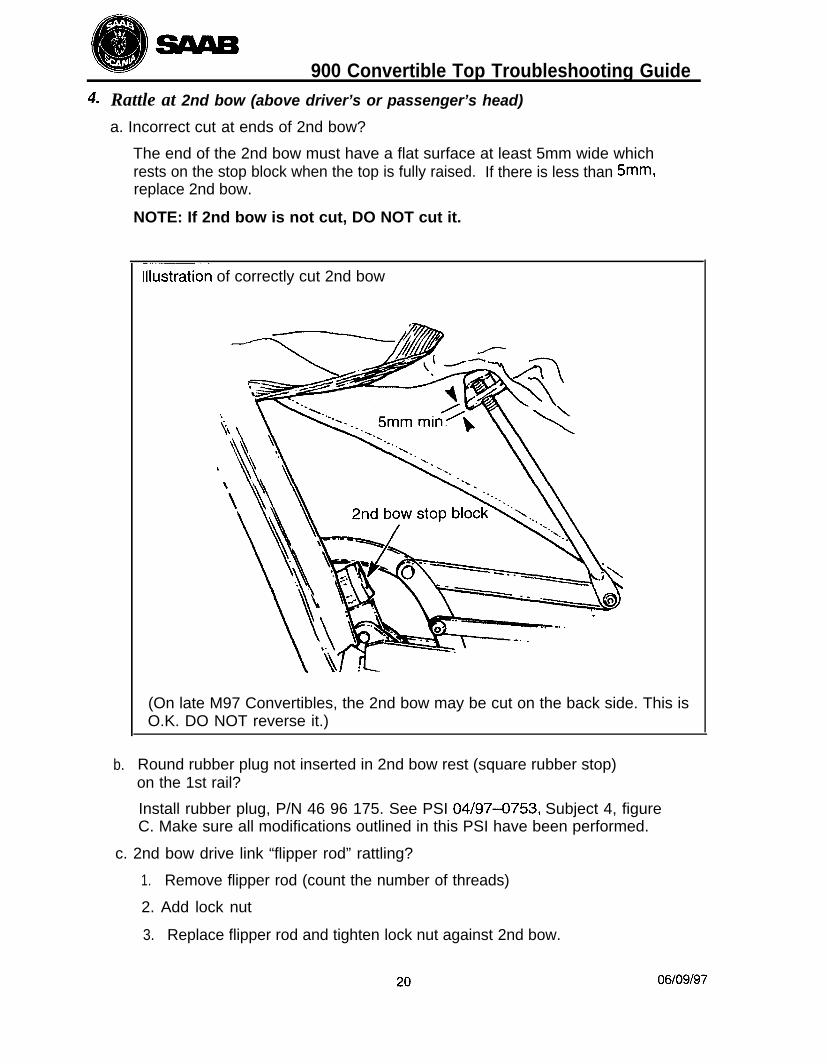
900 Convertible Top Troubleshooting Guide4. Rattle at 2nd bow (above driver’s or passenger’s head)
a. Incorrect cut at ends of 2nd bow?
The end of the 2nd bow must have a flat surface at least 5mm wide whichrests on the stop block when the top is fully raised. If there is less than 5mm,replace 2nd bow.
NOTE: If 2nd bow is not cut, DO NOT cut it.
/ilustration of correctly cut 2nd bow
(On late M97 Convertibles, the 2nd bow may be cut on the back side. This isO.K. DO NOT reverse it.)
b. Round rubber plug not inserted in 2nd bow rest (square rubber stop)on the 1st rail?
Install rubber plug, P/N 46 96 175. See PSI 04/97-0753, Subject 4, figureC. Make sure all modifications outlined in this PSI have been performed.
c. 2nd bow drive link “flipper rod” rattling?
1. Remove flipper rod (count the number of threads)
2. Add lock nut
3. Replace flipper rod and tighten lock nut against 2nd bow.
20 06/09/97

900 Convertible Top Troubleshooting Guide
5. Rattle from C-pillar area while driving
- Bolts beneath 2nd side rail loose?
Remove bolts, Loctite and retighten 2 bolts each side. Tighten bolts as perCustomer Satisfaction Campaign item E, page 9.
6. Rattle in rear side trim area by rear speaker (only 1995 V/N up tos7003000)
- Seat belt pretensioner tube contacting sheet metal?
Wrap pretensioner in felt tape.
7. Creaking or rattling noise when raising front windows
- Have updated window rollers been installed? Are they adequatelylubricated?
See Customer Satisfaction Campaign 428, Item G. Install updated rollersand make sure they are adequately lubed.
Note modified procedure: it is easier to install the modified rollers if you re-move the “rear guide channel” for each front window. You can leave the win-dow in place. Lower it slightly and install the modified rollers without remov-ing the glass from the door. Also: with the guide channel removed, it is easierto properly lubricate the entire channel. Make sure that the entire INSIDEsurface of the channel is lubricated, and be careful that you DO NOT get anylubricant on the OUTSIDE of the channel as it will transfer to the windowglass.
8. Creaking or rattling noise while driving down the road
- Same as #7 above.
9. Squeaking noise from rear when driving with the top raised
- The most forward rib under access flaps may be rubbing on the gearbox ofthe 5th bow motor?
Recheck Tonneau cover latch adjustment. If adjusted properly, grind awayplastic on the forward rib.
21 06109/97

900 Convertible Top Troubleshooting Guide
Water Leaks(Note: Determine whether water comes in while driving only, or while Sit-ting still)
1. Leaks from header while driving
a. Water coming in between header and front side rail seal?
Replace windshield header seal and side rail seals as per Water Leak PSI04/97-0755.
b. Water coming in under header seal (only while driving)?
Seal header seal as per Water leaks PSI 04/97-0755.
2. Water leaks at outside rear view mirror “bird beak” seal
a. Seal deformed or damaged?
Replace seal as per PSI 04/97-0760. Do not try to repair if rolled over ordamaged.
Install new style seal, P/N 46 97 769 LH, P/N 46 97 777 RH. Drill door toinstall rivet, P/N 43 45 872. Use a drill stop when drilling (hole size = 5/16”).
b. Sheet metal not straight (vertical “bird’s beak” surface)?
Straighten sheet metal edge using tool, P/N J42661.
3. Leaks at A-pillar and B-pillar (side windows wet inside)
- Seals improperly adjusted/deformed?
See Water Leaks PSI 04/97-0755. Replace as needed.
22 06/09/97

900 Convertible Top Troubleshooting Guide
SID MessagesAdditional information regarding SID messages can be found in Service Manual 85 Cabri-olet, page 40.
1. “Check Soft Top” while top is operating, top works O.K.
a. Check for DTC’s
Follow appropriate fault tracing procedure in Service Manual 85 Cabriolet.
b. Tonneau latch microswitches not closing at the same time?
Monitor Tonneau latch microswitches with Tech 2.
NOTE: In Tech 2 software version 14.000, the Tonneau latch micro-switch positions are REVERSED.
Adjust striker and latch as per Service Manual 85 Cabriolet, pages 127 &128.
2. “Check Latches”
a. Are the header latches closed?
If the header latches are not properly closed, SID will display the “CheckLatches” message as soon as TSAS receives a wheel speed signal.
Monitor the header switches with Tech 2. Make sure both switches areclosed when the 1 st bow is latched, and open when the 1 st bow is unlatched.
b. Are the 5th bow latches closed?
If the 5th bow latches are not properly closed, SID will display the “CheckLatches” message as soon as TSAS receives a wheel speed signal.
3. “Check Trunk”
- Is the hood stowage bag lowered?
Monitor the trunk bag switches with Tech 2. Make sure both switches areopen with the bag lowered.
4. “Close Trunk Lid”
- Is the trunk closed? Is the trunk light switch operating properly?
Monitor the trunk light switch with Tech 2. Make sure that the trunk lightswitch is open with the trunk closed, and closed with the trunk open.
23 06/09/97

900 Convertible Top Troubleshooting Guide
Miscellaneous1. OTC B1605, top works ok
- Clear DTC’s.
Operate top and recheck for DTC’s. If DTC’s do not reoccur, ignore this DTC.
(Note that this DTC is frequently a “phantom” code and can be ignored if nooperation problems are experienced.)
2. ACC does not switch to manual mode when lowering top
- SID misprogrammed?
Reprogram SID to “hood”.
3. ACC does not switch to automatic mode when raising top
- Stuck/defective header switch?
Replace switch per PSI 04/97-0754. Replace housing if necessary.
4. No Convertible S/D messages
- SID misprogrammed?
Reprogram SID to “hood”.
5. Side rail seal drooping
- Side rail seal not secured?
24 06109197

900 Convertible Top Troubleshooting Guide5. Side rail seal drooping continued
Secure seal to seal retainer with Velcro strips inside seal asshown.
CENTER SIDE RAIL SEAL FRONT SIDE RAIL SEAL
Attach the “softside” of velcro tapeto seal retainers.
Cut pieces1 Omm X 20mm
(3W X 3/4”). Usedimensions shownfor correct spacing
Attach “hard side” of velcro tape to insideof seals. Cut pieces 10mm X 20mm (3/8”
I X 3/4”). Because the seal is “slio coated”,
II it is necessary to use “super gluk toattach velcro to seal - attach horizontally.
25 06109197

900 Convertible Top Troubleshooting Guide
6. Trunk release button inoperative
a. Incorrect programming?
If there is a programming problem, the TSAS ECM will not allow remote Op-eration of the trunk motor because it cannot determine if the trunk lid will WI-lide with the Tonneau cover, The customer usually complains of some othertop operation problem at the same time. Reprogramming can correct bothproblems.
Reprogram top.
b. Check fuse #25.
7. DTC 81309 Potentiometer Fault
This code can set for a variety of reasons:
a. If a potentiometer cannot reach the programmed “high limit” or “lowlimit”
Reprogram system according to PSI 04/97-0758. Pay special attention tothe high limits and the low limits for each motor/potentiometer.
b. If a microswitch signal does not agree with a potentiometer signal.
Monitor the switches and potentiometers with Tech 2.
c. The position of the potentiometer has reached a value outside of theprogrammed limit. When this fault occurs, the top operation may stop,but may continue when the switch is released and engaged again.
Use read values to check potentiometer values at the high and low limits ofeach potentiometer. Check against programmed values. This could becaused by a bad potentiometer or a component that is dimensionally incor-rect.
26 06/09/97

Parts & Service Information
Subject: Improvement to Operation of TopStack Mechanism
1 CATEGORY I
Application: 1995 900 ConvertiblesVIN Serial No. Range: S7000216-S7016595
ISSUE CODE
04l97-0753 812
Supersedes PSI 03195-0554This is a bulletin which outlines provisions to update certain portions of the top stack mechanism on 1995 900 COWer-tibles. The aim is to improve reliability, guard against water leakage and improve appearance. This bulletin covers1995 900 Convertibles within VIN Serial No. Range S7000216S7016595.
Figure 1. 1995 Convertible-
Cars Affected:1995 900 Convertibles within the following VIN Serial No. Ranges: S7000216-S7016595
Parts:g See individual subjects and parts information on page 23.
Saab Cars USA, Inc. Service bulletins are intended for use by prOfeSSiOnal technicians, NOT a “do-it-yourself&‘. They are written to informthese technicians of conditions that may occur on some vehicles, or t0 provide information that could. assist in the proper service of a vehicle,properly trained technicians have the equipment, tools, safety instructlons, and !c-row+ow to do a lob~properfy and safely. If a condition isdescr~bed,~~~~Tassumethatfhebulletinappliestoyourvehicle,orth~tyourvehlclewlll havethecondrtron. Seeyourauthorizedsaab Dealer
Ifor information on whether your vehicle may benefit from the infOrmatIon.
o 1997 Saab Cars USA, Inc. All Rights Reserved
Page 1 of 24

PSI 04/97-0753
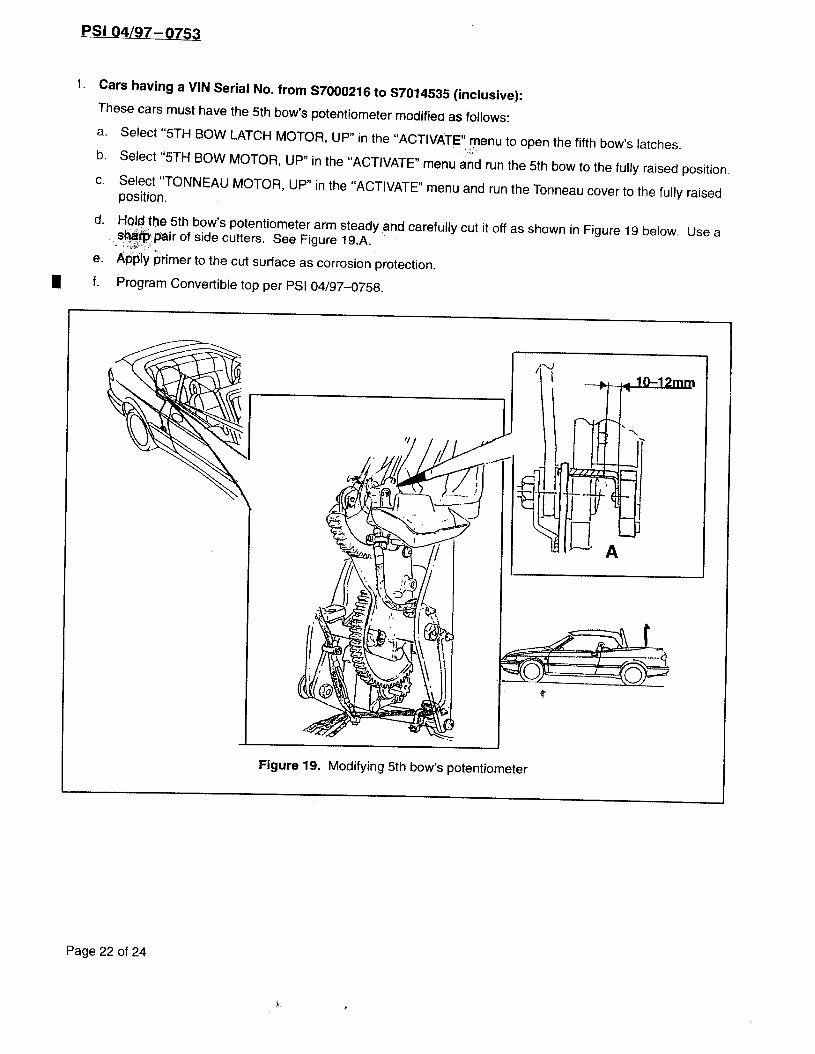
See Page 3 of PSI 04/97-0754: Customer Satisfaction Campaign 428 (Section 8, Pm 135).
See Page 2 of PSI 04/97-0755: Addressing Customer Complaints of Water Leaks (Section8, p. 136).
PSI 04/97 - 0753
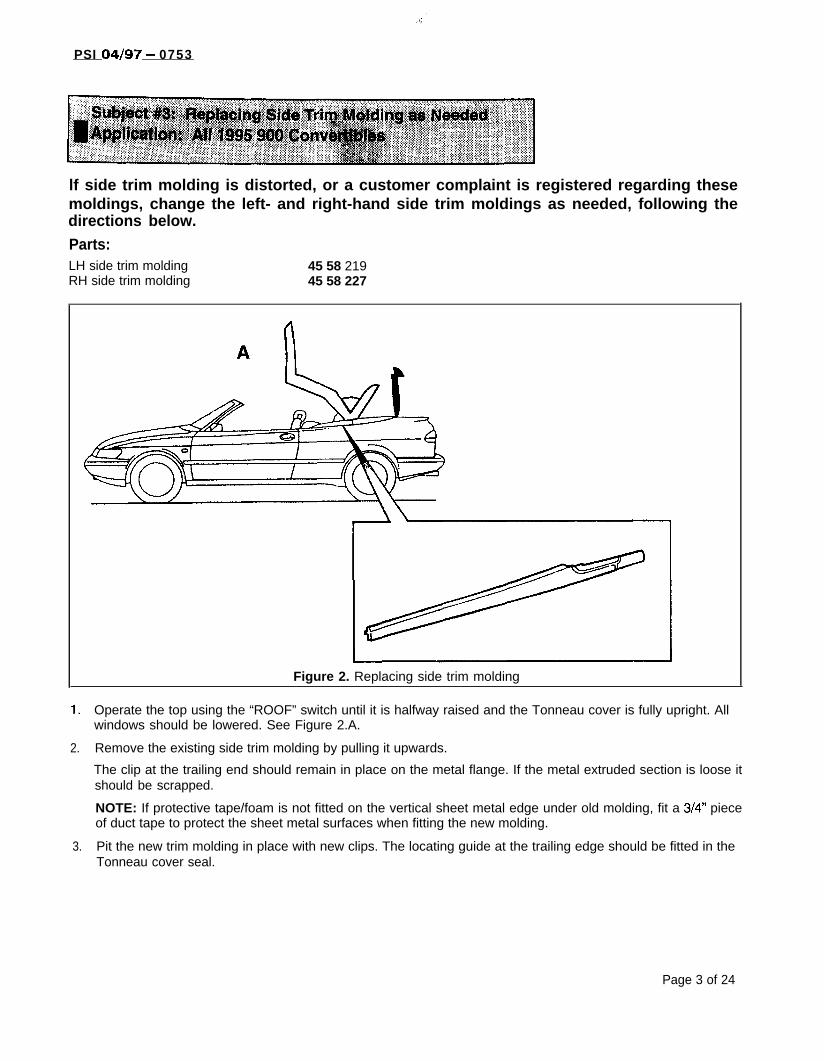
lf side trim molding is distorted, or a customer complaint is registered regarding thesemoldings, change the left- and right-hand side trim moldings as needed, following thedirections below.Parts:LH side trim moldingRH side trim molding
45 58 21945 58 227
Figure 2. Replacing side trim molding
1. Operate the top using the “ROOF” switch until it is halfway raised and the Tonneau cover is fully upright. Allwindows should be lowered. See Figure 2.A.
2. Remove the existing side trim molding by pulling it upwards.
The clip at the trailing end should remain in place on the metal flange. If the metal extruded section is loose itshould be scrapped.
NOTE: If protective tape/foam is not fitted on the vertical sheet metal edge under old molding, fit a 3/4” pieceof duct tape to protect the sheet metal surfaces when fitting the new molding.
3. Pit the new trim molding in place with new clips. The locating guide at the trailing edge should be fitted in theTonneau cover seal.
Page 3 of 24

_-. -.-. .~ -. .- - .-l_---llll--- -.... i. - .- -.- .““..-_-- _ -.---- ___-___ ~_-._--.-___--. . .._.. -... .-..
PSI 04/97 - 0753
., .i ., ,,
I Improving the operation of 2nd Bow. Also see Step C of Customer Satisfaction Campaign420.
Parts:Rubber plug (2) 46 96 175
Figure 3. Gluing rubber plug
1. Glue the rubber plug, P/N 46 96 175, to the head of the pop rivet securing the second bow’s stop. See Fig-ure 3.C.
Page 4 of 24

PSI 04/97 - 0753
Fit a protective plate by the 5th bow motor on the right hand side to eliminate the risk ofthe toothed segment damaging the wiring conriected to the 5th bow’s potentiometer.Parts:Protective plate 45 59 951Loctite Thread-Locking AdhesiveScrew (if necessary) 45 55 710
Figure 4. Fitting protective plate bv 5th bow motor
1. Operate the top using the “ROOF” switch until it is halfway raised and the Tonneau cover is fully upright. Allwindows should be lowered.
2. Remove the two lower screws securing the 5th bow motor. See Figure 4.A.
3. Apply Loctite to the screw threads. See Figure 4.6.
4. Fit the protective plate in position and tighten the screws. See Figure 4.C.
Tightening torque: IONm (84-96in.lbs.).
Page 5 of 24

PSI 04/97 - 0753
Checking whether the cover on the front rail is secureParts:
Flat black paint
Figure 5. Checking front rail cover
1. Remove any loose front rail covers and touch up with flat black paint as needed. The Factory has deter-mined that these covers are not necessary.
Page 6 of 24
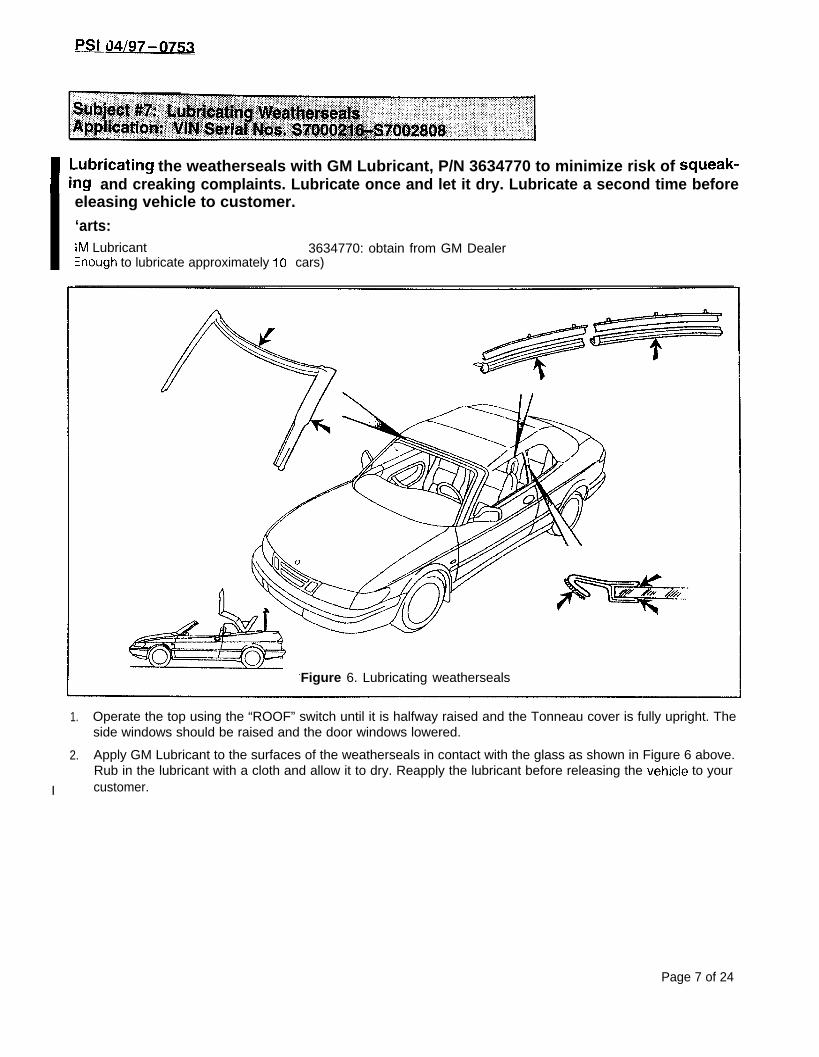
I1iI.ubricating the weatherseals with GM Lubricant, P/N 3634770 to minimize risk of squeak-ng and creaking complaints. Lubricate once and let it dry. Lubricate a second time beforeeleasing vehicle to customer.
‘arts:iM Lubricant 3634770: obtain from GM Dealer%ough to lubricate approximately 10 cars)
Figure 6. Lubricating weatherseals
1. Operate the top using the “ROOF” switch until it is halfway raised and the Tonneau cover is fully upright. Theside windows should be raised and the door windows lowered.
I
2. Apply GM Lubricant to the surfaces of the weatherseals in contact with the glass as shown in Figure 6 above.Rub in the lubricant with a cloth and allow it to dry. Reapply the lubricant before releasing the vehrcle to yourcustomer.
Page 7 of 24

PSI 04/97-0753
Check the wiring connected to the 5th bow’s potentiometer to make certain it is not tootaut or too slack. Adjust as necessary.
Parts:
Cable ties (as required) 79 71 880
a ’
_ (head of Alien boltthat holds the
gear)
Figure 7. Checking 5th bow potentiometer wirinq
1. Operate the top using the ‘ROOF” switch until it is in the position shown in Figure 9 above. The top, 5th bowand the Tonneau cover should be fully raised.
IMPORTANTThe 5th bow must be fully raised for the wiring harness to have the correct amount of slack.
2. Hook your finger around the wiring and move it downwards. The wiring should be tensioned so that it is justpossible to insert the tip of your finger into the hole (Figure 9.A) in the top mechanism.
3. If necessary, adjust as described below:
a. Cut the cable tie. See Figure 9.a.b. Adjust the length of the wiring harness.c. Fasten a new cable tie in place. It should be tightened around the chamfering on the cross-bar so that it
cannot slide sideways. See Figure 9.c above.
Page 8 of 24
PSI 04/97-0753
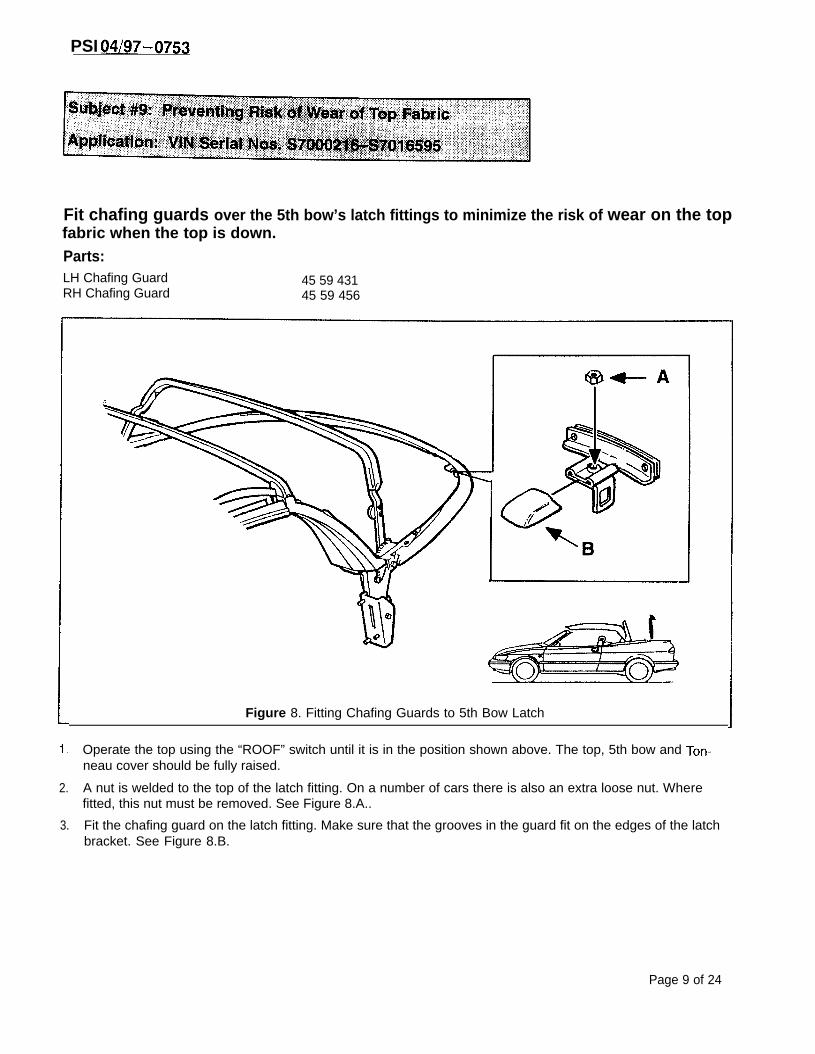
Fit chafing guards over the 5th bow’s latch fittings to minimize the risk of wear on the topfabric when the top is down.Parts:LH Chafing Guard 45 59 431RH Chafing Guard 45 59 456
Figure 8. Fitting Chafing Guards to 5th Bow Latch
1. Operate the top using the “ROOF” switch until it is in the position shown above. The top, 5th bow and Ton-neau cover should be fully raised.
2. A nut is welded to the top of the latch fitting. On a number of cars there is also an extra loose nut. Wherefitted, this nut must be removed. See Figure 8.A..
3. Fit the chafing guard on the latch fitting. Make sure that the grooves in the guard fit on the edges of the latchbracket. See Figure 8.B.
Page 9 of 24
PSI 04/97- 0753
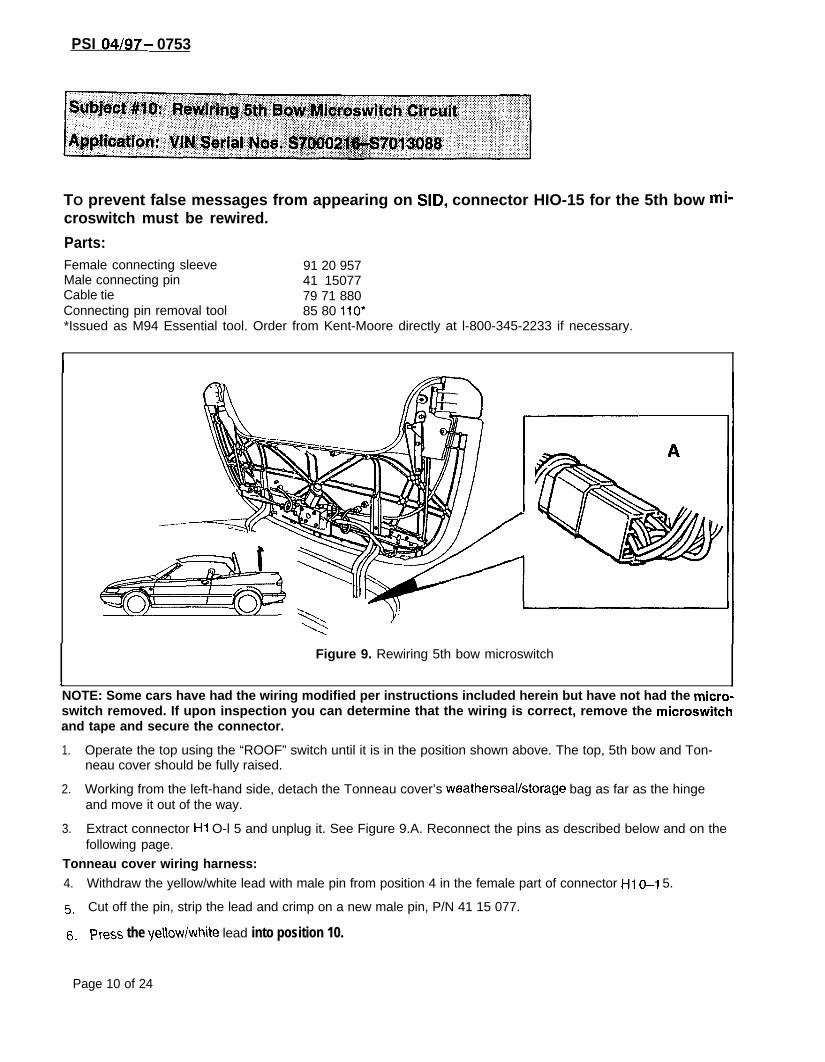
TO prevent false messages from appearing on SID, connector HIO-15 for the 5th bow mi-croswitch must be rewired.
Parts:Female connecting sleeve 91 20 957Male connecting pin 41 15077Cable tie 79 71 880Connecting pin removal tool 85 80 110**Issued as M94 Essential tool. Order from Kent-Moore directly at l-800-345-2233 if necessary.
Figure 9. Rewiring 5th bow microswitch
NOTE: Some cars have had the wiring modified per instructions included herein but have not had the micro-switch removed. If upon inspection you can determine that the wiring is correct, remove the microswitchand tape and secure the connector.
1. Operate the top using the “ROOF” switch until it is in the position shown above. The top, 5th bow and Ton-neau cover should be fully raised.
2. Working from the left-hand side, detach the Tonneau cover’s weatherseal/storage bag as far as the hingeand move it out of the way.
3. Extract connector Hl O-l 5 and unplug it. See Figure 9.A. Reconnect the pins as described below and on thefollowing page.
Tonneau cover wiring harness:4. Withdraw the yellow/white lead with male pin from position 4 in the female part of connector l-l1 O-1 5.
5. Cut off the pin, strip the lead and crimp on a new male pin, P/N 41 15 077.
6. Press the ye\\ow/white lead into position 10.
Page 10 of 24

PSI 04/97-0753
Car’s rear wiring harness:
7. Withdraw the green lead with female pin from position 3 in the male part of connector HlO-15.
8. Withdraw the yellow/white lead with female pin from position 4 in the male part of connector H10-15.
9. Cut Off the pins from both leads and strip them (leave wire as long as possible to avoid strain on harness afterrepair).
10. Place both leads together and crimp a new female sleeve, P/N 91 20 957 onto them.
11. Press the leads into position 10.
12. Plug in connector Hl O-l 5.
13. Fit the top storage bag in place and refit the Tonneau cover weatherseal.
NOTEMake certain top storage bag and Tonneau cover weatherseal are refitted completely to allow for full dow-nard movement of top on left side. Otherwise, top movement restriction will not allow proper programmingto take place.
9
c lGY
6 ‘I I3 4
2
c l
6 7
c l
rA B1
Tonneau cover and car wiring
f-l fl
Tonneau cover wiring harnessharness before repair action after repair action
rjf@-@-fJ
pb-+@j-
CCar’s rear wiring harness after repair action
Figure 10. Modifying wiring
Page 11 of 24

PSI 04/97 - 0753
14. Remove the covering shell as indicated in Figure 11 .A.
15. Remove the screws securing the right-hand microswitch as indicated in Figure 11 .B.
16. Snip the cable tie holding the connector in position
17. Unplug the connector. See Figure 11 .C.
18. Remove and scrap the existing microswitch.
19. Cover open end of connector with a piece of tape to protect end of pins.
20. Fasten the wiring into place using a cable tie. See Figure 11 .D.
21. Refit the covering shell and tighten the bolts.
Figure 11. Removing right-hand microswitch
Page 12 of 24

Check the lock washers located at the main potentiometer for brittleness.
Parts:Lock washer (as necessary) 45 56 098
Figure 12. Checking lock washers
1. Operate the top using the “ROOF” switch until it is in the position shown above. The top, 5th bow and Ton-neau cover should be fully raised.
I
2. Verify that a lock washer is located by the main potentiometer. If not, install one.
3. Lightly tap existing lock washer with a screwdriver to check for brittleness.
4. Change any lock washers that show signs of cracking.
Page 13 of 24
PSI 04/97-0753
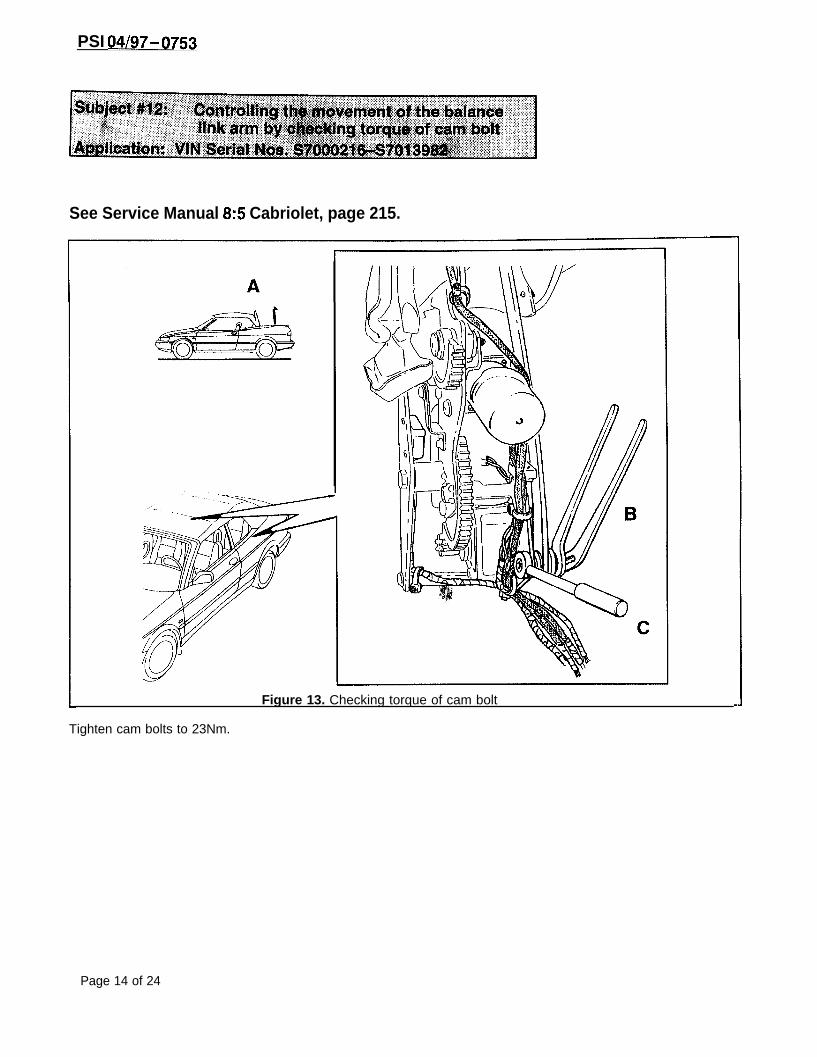
See Service Manual 85 Cabriolet, page 215.
Figure 13. Checking torque of cam bolt
Tighten cam bolts to 23Nm.
Page 14 of 24

PSI 04/97 - 0753
1 See Customer Satisfaction Campaign 428, PSI 04/97-0754, Step B. Replace pins, adjust1 top stops per Service Manual 85 Cabriolet, page 130 and reprogram.
NOTE: On later cars the wiring has been routed behind the antenna bracket.Fit a chafing guard on the antenna bracket to reduce the risk of damage to the wiring.NOTESubjects #14,15 and 16 should be done at the same time in the trunk.
Parts:Chafing guard 82 78 558Duct tape
Figure 14. Fitting guard to antenna bracket
1. Operate the top using the “ROOF” switch until it is in the position shown above. The top should be fullyraised, the first and 5th bows should be locked.
2. Remove the scuff plate from the luggage compartment.
3. Remove the clips securing the luggage compartment trim on the LH side.
4. Detach the luggage compartment weatherseal on the LH side.
Page 15 of 24

PSI 04/97 - 0753
5. Unplug the luggage compartment lighting connectors and fold down the trim.
6. Press the chafing guard in place on the antenna bracket as shown in Figure 14.A above.
7. Wrap duct tape around the tube of the antenna mast to prevent the trunk light from shorting against it.
8. Do not refit the trim and scuff plate until repair steps 14,15 and 16 have been completed.
Change the Tonneau cover potentiometer.
Parts:Potentiometer kit 45 58 771Consists of:
0 Potentiometer?? Bracket?? Adapter0 Screw (2)
Cable tie 79 71 880
Figure 15. Changing the Tonneau cover potentiometer
IMPORTANTWhen this repair has been carried out, it will not be possible to operate the top by means of the ROOF switchuntil the potentiometer resistance readings have been programmed into the ECM. See Step 17.
1. The top should be fully raised, the first and 5th bows should be locked from the previous step.
Page 16 of 24

PSI 04/97-0753
*. Remove the clips securing the luggage compartment trim on the RH side.
3. Detach the luggage compartment weatherseal on the RH side and fold down the trim.
4. Remove the right-hand rear light cluster. This will enable the Tonneau cover drive mechanism to be seenwhile in operation.
5. Remove the existing bracket, potentiometer and white plastic adapter by the Tonneau cover mom-. Scrapthem but retain the bracket retaining screw. See Figure 15.A on previous page. Pry off white plastic Piecewith screwdriver.
6. Remove new potentiometer from new bracket.
7. Fit the new bracket in place without potentiometer installed and secure it by means of the old bracket’s screw.See Figure 15.8 on previous page.
8. Press the new black plastic adapter onto the shaft of the Tonneau cover motor. Fit the key on the inside ofthe adapter in the groove on the shaft. See Figure 15.C.
9. Fit the new potentiometer in place with the electrical leads pointing downwards. See Figure 16.A below. Besure to index “D” shaped slot in potentiometer with adapter.
Figure 16. Fitting new potentiometer
IMPORTANT
Unless the electrical leads point downwards, the ECM will receive incorrect potentiometer readings and thepotentiometer could be damaged beyond repair.
10. Secure the connector by means of a cable tie.
Position the connector as shown in Figure 16.B above.
Page 17 of 24

psr 04/97 - 0753
11. Refit the rear lamp cluster.
12. Refit the luggage compartment trim.
13. Refit the luggage compartment weather-seal on the RH side.
14. Do not refit the trim and scuff plate until repair step 16 has been completed.
Check with Tech 2 or ISAT for the version of the TSAS ECM. If it is a version lower than0402, replace it. If it is a version 0402 or higher, proceed as follows.Since the new ECM can generate an additional SID message, the SID and the owner’s manual should also be Up-,
dated.
Parts:
TSAS ECMOwner’s Manual Label
Tools:m ISAT or Tech 2
46 10 81204 08 948
IMPORTANTWhen these steps have been taken, it will not be possible to operate the top mechanism by means of the ROOFswitch until the potentiometer resistance readings have been programmed into the new ECM.
NOTE: The new ECM will not allow the windows to be raised while operating the top (old ECM did allowfor this).
Figure 17. TSAS ECM and Owner’s Manual Label
Page 18 of 24

PSI 04/97- 0753
1. ‘The top should be fully raised, the first and 5th bows should be locked from previous step.
2. Remove the clip securing the luggage compartment weatherseal on the LH side. See Figure 18.B below.
3. Detach the luggage compartment weatherseal on the LH side. See Figure 18.C below.
4. Unplug the luggage compartment lighting connectors and fold down the trim. See Figure 18.D below.
5. Unplug the three ECM connectors. See Figure 18.E below.
6. Remove the nuts securing the ECM and lift it out. See Figure 18.F below.
7. Fit the new ECM in place and tighten the nuts.
8. Connect the cables to the ECM.
9. Plug in the luggage compartment lighting connectors.
10. Fold the luggage compartment trim back up and refit the luggage compartment weather-seal
11. Press on the clip securing the luggage compartment trim.
12. Refit the scuff plate.
I I
Figure 18. Replacing TSAS ECM
Page 19 of 24

PSI 04/97-0753
Programming the SID:Connect ISAT and program SID as described below. When completed, affix new label to page 72 of 1995900 Owner3Manual or Page 7 in 1995 900 Convertible Owner’s Manual.
lSAT DISPLAY 1
BAT DISPLAY 2
ISAT DISPLAY 3SELECT TYPE OFSID UNIT.
SID 213SELECT
ISAT DISPLAY 4
ISAT DISPLAY 5
yEgF=
ISAT DISPLAY 6
PROGRAMMINGCARRIED OUT
ISAT DISPLAY 7
PROGRAMMINGINTERRUPTED
1. Select PROGRAMMING in ISAT’s SAAB INFODISPLAY menu.
2. Proceed to the programming phase or end.
3. Enter SID type -SID 2/3 .(All U.S. models select SID 2/3.)
4. Specify equipment: HOOD.
5. Program the instrument with the entered data.Press Fl.
6. This menu confirms that programming is com-pleted. ,I:
7. This menu is displayed if programming is inter-rupted with ESC.
8. End communications with SID.
9. Close latches. Attempt to lower top with ROOFswitch. Check that SID displays “CHECKLATCHES” messages.
Page 20 of 24


![Saab 900 Convertible 1994 [Ocr]](https://static.fdocuments.net/doc/165x107/577cb0c01a28aba7118b4bc8/saab-900-convertible-1994-ocr.jpg)