9 Common Wiring Mistakes and Code Violations€¦ · tial of the wires, a bad situation can be made...
5
9 W hether to save time or money, lots of nonelectricians do electrical work. This is espe- cially true during the rough- in phase of new construction: drilling holes, running wire, and nailing up boxes. Remod- elers take on tasks as seemingly mundane as installing a new light fixture. As an electrical contractor, I’ve hired many union and non- union electricians over the years, and most were horribly misinformed about the elec- trical trade and the building codes. If pro- fessionals have a hard time keeping up with important details, I imagine that carpenters and do-it-yourselfers are going to have a harder time. Before tackling electrical work, you should be aware of a few things. First, check with your local or state build- ing department to see what licenses or per- mits are required. The National Electrical Code dictates minimum requirements for safe electrical installation, but local building authorities often impose their own codes. Second, in some areas, homeowners are not allowed to perform electrical work unless they are licensed or certified electricians. It’s a good idea to check with your local or state building authorities before doing any work. In many instances, a homeowner can hire a licensed electrician who can pull a permit and supervise any rough wiring that the homeowner might do. Potential liabilities are involved (sidebar p. 79), but various resources (p. 80) clearly explain the correct methods Some are illegal, some are dangerous, and some are both— but all are simple to avoid BY JOSEPH FRATELLO Common Wiring Mistakes and Code Violations PROBLEM There must be a 1 1 / 4-in. clearance from the edge of a wood-framing member to any wire to keep drywall screws and long trim nails from puncturing the insulation and causing a short. 1. Protect wiring from nails and screws. that make electrical work code-compliant and safe. If you’re ready to go to work, keep reading. The following is a list of mistakes to avoid during electrical installations. Romex needs its jacket whole On more than one occasion, I have seen wires punctured by a long fastener that missed its mark. When using nonmetallic sheathed cable (often referred to as Romex), you must maintain a 1 1 / 4-in. clearance from the edge of a stud to protect the wire from errant drywall screws or long trim nails. It’s hard enough to fix the damage properly, but the risk that the damaged wire could remain unnoticed and start a fire inside the wall cavity is worse. What can you do if you are working on a 2x4 wall and need to bring eight wires into a SOLUTION Wiring passing through holes closer than 1 1 / 4 in. to the framing face must be protected with nail plates. Several runs of wiring can be corralled with inexpensive Cable Stackers, which maintain the distance mandated by code. FINE HOMEBUILDING 76 COPYRIGHT 2007 by The Taunton Press, Inc. Copying and distribution of this article is not permitted.
-
Upload
vuongduong -
Category
Documents
-
view
217 -
download
0
Transcript of 9 Common Wiring Mistakes and Code Violations€¦ · tial of the wires, a bad situation can be made...
9Whether to save time or money,
lots of nonelectricians do electrical work. This is espe-cially true during the rough-
in phase of new construction: drilling holes, running wire, and nailing up boxes. Remod-elers take on tasks as seemingly mundane as installing a new light fixture. As an electrical contractor, I’ve hired many union and non-union electricians over the years, and most were horribly misinformed about the elec-trical trade and the building codes. If pro-fessionals have a hard time keeping up with important details, I imagine that carpenters and do-it-yourselfers are going to have a harder time. Before tackling electrical work, you should be aware of a few things.
First, check with your local or state build-ing department to see what licenses or per-mits are required. The National Electrical Code dictates minimum requirements for safe electrical installation, but local building authorities often impose their own codes. Second, in some areas, homeowners are not allowed to perform electrical work unless they are licensed or certified electricians. It’s a good idea to check with your local or state building authorities before doing any work. In many instances, a homeowner can hire a licensed electrician who can pull a permit and supervise any rough wiring that the homeowner might do. Potential liabilities are involved (sidebar p. 79), but various resources (p. 80) clearly explain the correct methods
Some are illegal, some are dangerous, and some are both—but all are simple to avoid
BY JOSEPH FRATELLO
Common Wiring Mistakes and Code Violations
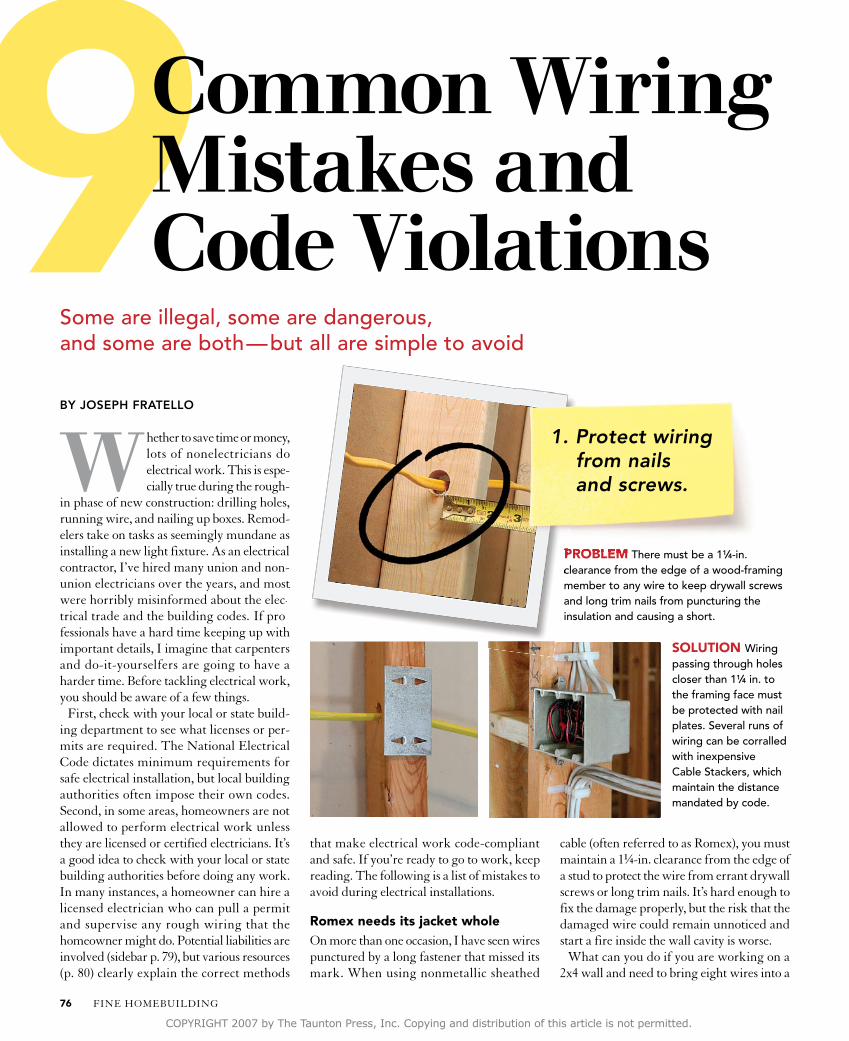
PROBLEM There must be a 11⁄4-in. clearance from the edge of a wood-framing member to any wire to keep drywall screws and long trim nails from puncturing the insulation and causing a short.
union electricians over the years, and most were horribly misinformed about the elec-
If pro-
and some are both—but all are simple to avoid
PROBLEMclearance from the edge of a wood-framing PROBLEMPROBLEM
1. Protect wiring from nails and screws.
that make electrical work code-compliant and safe. If you’re ready to go to work, keep reading. The following is a list of mistakes to avoid during electrical installations.
Romex needs its jacket wholeOn more than one occasion, I have seen wires punctured by a long fastener that missed its mark. When using nonmetallic sheathed
cable (often referred to as Romex), you must maintain a 11⁄4-in. clearance from the edge of a stud to protect the wire from errant drywall screws or long trim nails. It’s hard enough to fix the damage properly, but the risk that the damaged wire could remain unnoticed and start a fire inside the wall cavity is worse.
What can you do if you are working on a 2x4 wall and need to bring eight wires into a
SOLUTION Wiring passing through holes closer than 11⁄4 in. to the framing face must be protected with nail plates. Several runs of wiring can be corralled with inexpensive Cable Stackers, which maintain the distance mandated by code.
FINE HOMEBUILDING76
COPYRIGHT 2007 by The Taunton Press, Inc. Copying and distribution of this article is not permitted.

control boards for the heating and air condi-tioning. Although many people blamed the carpenter for the mishap, the HVAC contrac-tor had violated the code and was responsible for the damage. The HVAC mechanic who ran the wire lost his job.
Overcrowded boxes can start a fireWhen too many wires, outlets, or switches are crammed into a box, the heat generated doesn’t have enough airspace to dissipate and in turn can melt wire insulation and has the potential to cause a fire.
box? Cable Stackers, a 3M product (www.3m.com), hold up to eight wires and make it easy to position them correctly.
In some circumstances, you have no choice but to bore a hole closer than 11⁄4 in. from a framing edge. There, you must install a steel nail plate, either 1⁄16 in. thick or UL-listed for that purpose, to protect the wires from damage.
Keep low and line voltage apartI often see two-gang boxes installed with a cable or phone jack in one half and a 120v outlet in the other. If an exposed conductor of a low-voltage wire comes in contact with 120v, the higher voltage can damage what-ever is at the end of the low-voltage wire. A solid connection between the exposed low-voltage wire and a 120v wire also can cause the insulation to melt and start a fire. You can’t run communication wires (phone, cable, or other low-voltage wires) into a box occupied by 120v or higher unless the communication wire or the box is rated for that use.
A similar situation concerns proximity. Phones, cable boxes, computers, and tele-visions all are susceptible to interference, a condition made worse when line voltage and low voltage are run parallel through the same hole. The extent of the interference depends on the quality of wire you use and the amount of current passing through the line-voltage wires. When I run low-voltage wires parallel to line-voltage wires, I fasten the low-voltage wires at least 6 in. away from the line voltage.
When you run line- and low-voltage wires in the same hole, you risk having the line voltage cross over into the low volt-age, which can also cause a fire. One unfortunate incident I witnessed could have been easily avoided by keeping the wires separated.
A carpenter was adding extra brac-ing for floor joists in the basement of a house we had wired. As he was nailing, he didn’t look to see what was on the other side of the joist. He drove a 16d nail straight through a 120v electrical line and into a thermostat wire that the HVAC contractor had run through the same hole after the rough wiring was complete. When the 120v crossed into the thermostat wire, it destroyed the entire home-automation system, along with all the
The problem is made worse when you add dimmers to a crowded switch box. Dim-mers generate a substantial amount of heat on their own; combined with the heat poten-tial of the wires, a bad situation can be made worse. I’ve never seen a box catch fire as a result of being overfilled with wires, but I have seen a few melted dimmers. The next time you try to cram eight wires into a single-gang box, think about who would be respon-sible if the box caught fire.
The easiest way to learn how to calculate the maximum wire fill of any box is to use
box? Cable Stackers, a 3M product (www.3m.com), hold up to eight wires and
In some circumstances, you have no in.
from a framing edge. There, you must install in. thick or UL-
listed for that purpose, to protect the wires
SOLUTION Maintain a minimum of 6 in. between parallel runs, and you won’t have to shout over the phone. Don’t bring low voltage and line voltage together in the same box. Instead, use separate boxes or a box that has an approved divider.
in the same hole, you risk having the line voltage cross over into the low volt-age, which can also cause a fire. One unfortunate incident I witnessed could have been easily avoided by keeping
A carpenter was adding extra brac-ing for floor joists in the basement of a house we had wired. As he was nailing, he didn’t look to see what was on the other side of the joist. He drove a 16d nail straight through a 120v electrical line and into a thermostat wire that the HVAC contractor had run through the same hole after the rough wiring was complete. When the 120v crossed into
SOLUTION If the box is too small, use a larger box and a plate known as a plaster (or mud) ring.
PROBLEM Parallel runs of line- and low-voltage wires cause interference in electronics and/or communication, such as TVs and telephones. Also, any uninsulated contact between low- and line-voltage wires in a box can damage equipment or cause a fire.
PROBLEM Overcrowded boxes can overheat, cause insulation to melt, and potentially cause a fire.
PROBLEMOvercrowded boxes can overheat, cause insulation to melt, and potentially cause a fire.
3. Don’t stuff too many wires into a switch or outlet box.
PROBLEM Parallel runs of line- and low-
2. Don’t mix line-voltage and low-voltage wires.
www.finehomebuilding.com 77
COPYRIGHT 2007 by The Taunton Press, Inc. Copying and distribution of this article is not permitted.

the NEC Handbook, which has a section dedicated to this subject; you also can read “More Wires Need Bigger Boxes” (FHB #144 or FineHomebuilding.com).
Read labels before installing new light fixtures to old wiresThe last time you put up a new light fixture, did you notice the little tag on the fixture that says, “If your house was built prior to 1987
or has 60°C wiring, consult a qualified elec-trician”? Wire is rated for the safe operating temperature of the conductors. Newer light fixtures are made with 90°C wires, which means the wire inside the fixture is rated to operate safely at temperatures up to 90°C.
Problems occur when you connect the new fixture to old wires in the house. Most homes built before 1987 were wired with 60°C con-ductors; the new fixture can create heat that can overpower the older wires’ capacity and possibly cause a fire.
A couple of solutions exist. The first option is to replace the old wire from the switch to the light with new wire. Unless you are renovating, however, that’s not very attrac-tive. The second option is far more common. If there is access above the light (in an attic
or kneewall space), you can remove the wire from the existing fixture box and install it in a junction box. You can then splice on a new piece of wire (make sure it is the same wire gauge) and run the new piece from the junction box back to the fixture box. You should have at least 3 ft. of new wire from the splice box to the fixture box. By installing the new wire in the fixture box, you will be code-compliant and not have to worry that the new light will cause a fire.
Protect and organize wire runsIn countless basements, I have seen tangles that resemble spaghetti hanging from the ceiling. Code says that you may not staple wires to the bottom of a floor joist unless the wire is 6-2, 8-3, or larger. Smaller wires must be run through bored holes or be attached to a running board. One reason you are not allowed to run wires across the bot-tom of floor joists is to eliminate the temp-tation to use the 12-2 wire for your kitchen GFI as a place to hang laundry. Current-carrying wires are meant to support only their own weight.
If a lot of wires are already hanging from the bottom of the floor joists, you can run the wires through raceways that fasten to the bottom of the joists. You simply mount a small plastic clip to every other joist; after you’ve run the wires through the clips, you snap a plastic cover over the entire assembly. The clips allow easy access if you need to run more wires and cost $40 for every 8 ft. of wire they support. Some people might think that is expensive, but this product is a tremendous time-saver. Pulling wires through the clips is much easier than pulling wires through drilled holes, and you save time because
4. Use a splice box when installing a new fixture to old wire.
PROBLEM Because of compatibility issues related to safe operating temperatures, new fixtures can overload an older wiring system and cause a fire if improperly installed.
5. Don’t use wire runs as a clothesline.
SOLUTION When running wire through a floor system, drill properly sized holes, or use a running board (photo far left) that’s at least a 1x4. Large runs of wire can be organized with raceways, a system of plastic clips (www.speedwayelectricalproducts.com) that support the wires. Removable covers look tidy.
SOLUTION A splice box and a minimum of 3 ft. of new wiring should connect a new light fixture to a circuit wired before 1987. It’s the preferable alternative to rewiring the entire circuit. Here’s a good way to determine the wiring’s age: Insulation jackets made after 1987 are stamped with the date of manufacture (inset photo right); those made prior to 1987 have no date.
PROBLEM Wires are commonly stapled across the undersides of floor joists, where the wires are often used to support hanging objects.
COPYRIGHT 2007 by The Taunton Press, Inc. Copying and distribution of this article is not permitted.
you no longer need to drill all those holes in the floor joists.
Pull wires, but don’t burn themSpecific rules dictate the number of wires you may run through a single hole. Vari-ous calculations are involved, but the NEC Handbook shows you the right way to calcu-late the permissible amount of wires. This
mistake often goes ignored yet can lead to problems, one of which relates directly to a house’s struc-tural integrity.
Sometimes people drill four or five 21⁄2-in. holes through the floor joists across the basement to bring all the circuits back to the panel. They then jam 20 or more wires into each of the holes. Whoever is drilling the holes often doesn’t take the time to read the engineered-lumber literature that outlines the proper locations and maximum sizes of the holes, which in turn can affect the building’s struc-tural integrity.
During the rough-wiring stage, I have seen five wires jammed into a 7⁄8-in. hole. This overcrowding causes burning, a term electricians use to describe the damage that occurs when the insulation of one wire is dragged across the stationary insulation of another wire. This dragging tears the insu-lation off the stationary wire. Subsequent runs can cover the burned wire, which can go unnoticed and leave exposed conductors inside the wall. I install a maximum of three wires per 7⁄8-in. hole, which leaves me plenty of room as I pull.
Insulate over recessed lights the right wayUnless recessed lights are IC-rated (insula-tion contact), you must keep 3 in. of space between the light and the insulation. When non-IC lights have insulation that is pressed up to them or over them, there are usually two outcomes.
The first is that the light works intermit-tently. Most recessed lights have a built-in
Know your liabilityThe biggest risk anyone takes is that their electrical work can cause a fire. In addition to possible injury and property damage, a fire is usually followed by the question of liability. Unless state or local laws dictate otherwise, when you perform an electrical installation of any kind, you are responsible for that installation for as long as it exists. It’s fairly easy for a carpenter or a painter to replace an outlet, but if something goes wrong, the building department or the home-owners’ insurance company will investigate to see who performed the work. Electricians carry liability insurance, but in most cases, a carpenter’s insurance isn’t going to cover your electrical work. If in doubt, have your work checked by a licensed electrician.
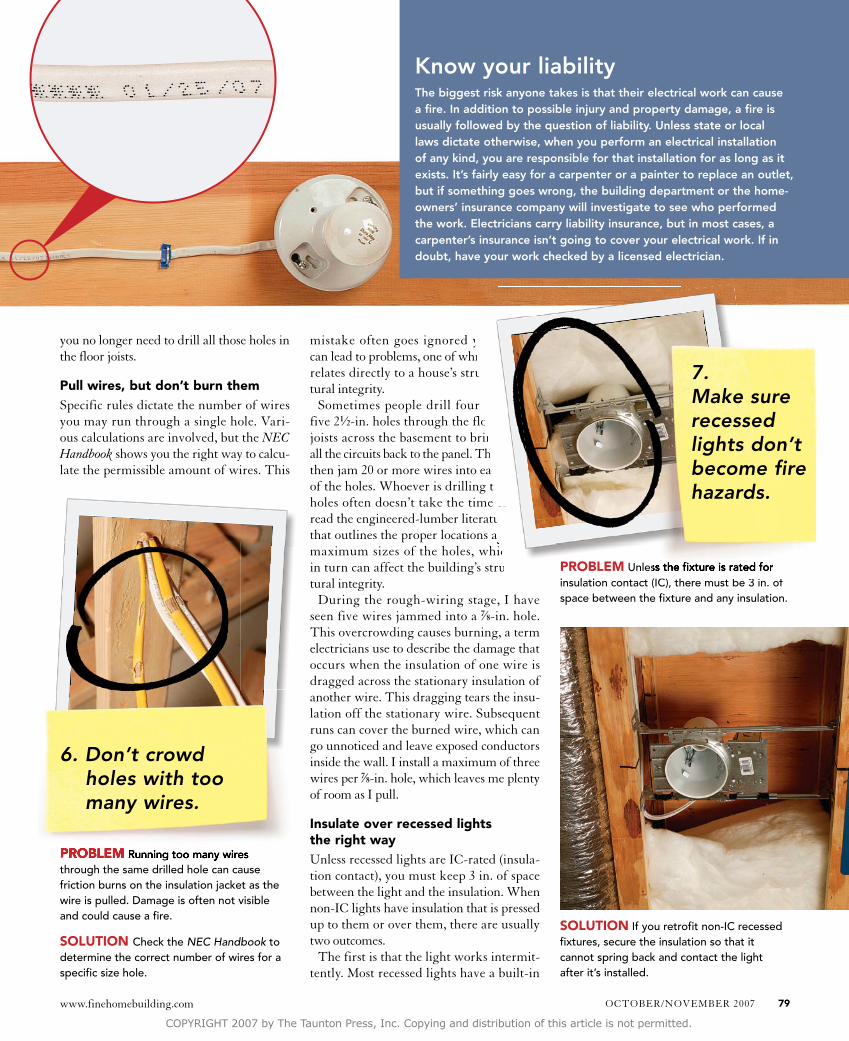
PROBLEM Running too many wires through the same drilled hole can cause friction burns on the insulation jacket as the wire is pulled. Damage is often not visible and could cause a fire.
SOLUTION Check the NEC Handbook to determine the correct number of wires for a specific size hole.
PROBLEM Running too many wires
6. Don’t crowd holes with too many wires.
mistake often goes ignored yet can lead to problems, one of which relates directly to a house’s struc-
Sometimes people drill four or -in. holes through the floor
joists across the basement to bring all the circuits back to the panel. They then jam 20 or more wires into each of the holes. Whoever is drilling the holes often doesn’t take the time to read the engineered-lumber literature
maximum sizes of the holes, which in turn can affect the building’s struc- PROBLEM Unless the fixture is rated for
insulation contact (IC), there must be 3 in. of space between the fixture and any insulation.
Unless the fixture is rated for insulation contact (IC), there must be 3 in. of
7. Make sure recessed lights don’t become fire hazards.
SOLUTION If you retrofit non-IC recessed fixtures, secure the insulation so that it cannot spring back and contact the light after it’s installed.
read the engineered-lumber literature that outlines the proper locations and
-in. holes through the floor joists across the basement to bring all the circuits back to the panel. They then jam 20 or more wires into each of the holes. Whoever is drilling the holes often doesn’t take the time to read the engineered-lumber literature that outlines the proper locations and
OCTOBER/NOVEMBER 2007 79www.finehomebuilding.com
COPYRIGHT 2007 by The Taunton Press, Inc. Copying and distribution of this article is not permitted.
thermal protector. When the thermal protector
becomes too hot, it cuts off power to the light, which allows the fixture to cool down. This feature helps to reduce, but doesn’t eliminate, the risk of fire. The lights blink intermit-tently, generating complaints that the light is wired incorrectly. Instead, there is a good chance that insulation is jammed against the fixture, causing the thermal protector to cycle on and off.
The second outcome is more serious. When thermal protectors fail (and they do), lights can become extremely hot, overheat, and cause a fire. For peace of mind, I buy IC-rated lights for an entire house; they cost only a few dollars more. Many code jurisdictions already require the use of IC-rated lights, so check with your local building department to see what type of lights you should use.
Smoke detectors require their spaceMost builders either pay no attention to this code or don’t even know it exists. Improper installation of a smoke or carbon-monoxide detector can interfere with the proper opera-tion of the detector. Air ducts can push or pull air away from a detector, which can delay the amount of time it takes for the detector to warn a home’s occupants.
When you unpack a smoke or carbon-monoxide detector, it should have a diagram that indicates where you can and cannot locate it. The diagram should indicate the proper distance from the wall, the distance
from air ducts, and the proper locations for installation on sloped ceilings.
Make splice boxes accessible I was once in a house where the previous con-tractor had buried a junction box. It took me hours to find the box, which cost hundreds of dollars. The customer was extremely lucky that the previous electrician used a metal box instead of a plastic box, because all the wires were melted in the box, and the beam that the box was connected to was charred. This house was close to catching fire.
Burying a splice box is a code violation, and is dangerous and inconsiderate to anyone
thermal protector. When the thermal protector
becomes too hot, it cuts off power to the light,
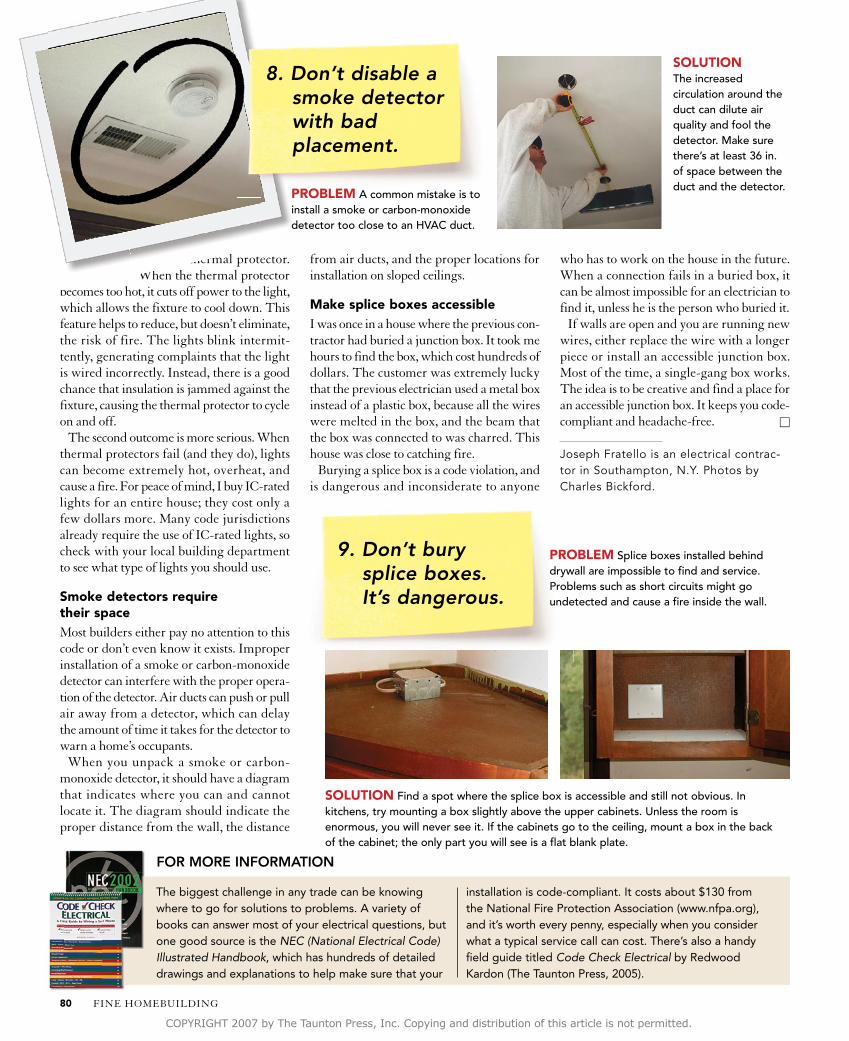
8. Don’t disable a smoke detector with bad placement.
PROBLEM A common mistake is to install a smoke or carbon-monoxide detector too close to an HVAC duct.
9. Don’t bury splice boxes. It’s dangerous.
PROBLEM Splice boxes installed behind drywall are impossible to find and service. Problems such as short circuits might go undetected and cause a fire inside the wall.
The biggest challenge in any trade can be knowing where to go for solutions to problems. A variety of books can answer most of your electrical questions, but one good source is the NEC (National Electrical Code) Illustrated Handbook, which has hundreds of detailed drawings and explanations to help make sure that your
installation is code-compliant. It costs about $130 from the National Fire Protection Association (www.nfpa.org), and it’s worth every penny, especially when you consider what a typical service call can cost. There’s also a handy field guide titled Code Check Electrical by Redwood Kardon (The Taunton Press, 2005).
FOR MORE INFORMATION
SOLUTION Find a spot where the splice box is accessible and still not obvious. In kitchens, try mounting a box slightly above the upper cabinets. Unless the room is enormous, you will never see it. If the cabinets go to the ceiling, mount a box in the back of the cabinet; the only part you will see is a flat blank plate.
SOLUTION The increased circulation around the duct can dilute air quality and fool the detector. Make sure there’s at least 36 in. of space between the duct and the detector.
who has to work on the house in the future. When a connection fails in a buried box, it can be almost impossible for an electrician to find it, unless he is the person who buried it.
If walls are open and you are running new wires, either replace the wire with a longer piece or install an accessible junction box. Most of the time, a single-gang box works. The idea is to be creative and find a place for an accessible junction box. It keeps you code-compliant and headache-free. □
Joseph Fratello is an electrical contrac-tor in Southampton, N.Y. Photos by Charles Bickford.
FINE HOMEBUILDING80
COPYRIGHT 2007 by The Taunton Press, Inc. Copying and distribution of this article is not permitted.