8.2.4.3 Lab - Mobile Device Features - Android and iOS · · 2013-08-21Page 1 of 18 IT Essentials...
18
© 2013 Cisco and/or its affiliates. All rights reserved. This document is Cisco Public. Page 1 of 18 IT Essentials 5.0 8.2.4.3 Lab - Mobile Device Features - Android and iOS Introduction Print and complete this lab. In this lab, you will set the autorotation, brightness, and turn GPS on and off. Recommended Equipment The following equipment is required for this exercise: • Android tablet or smartphone running Android version 4.0 • iOS tablet or smartphone running iOS version 5.0 Part 1 - Android Auto Rotation Step 1 Turn on the device and log in with the password, PIN, or other passcode, if necessary. The main home screen appears. Step 2 Touch the notification and system icons. The “notification” area appears.
Transcript of 8.2.4.3 Lab - Mobile Device Features - Android and iOS · · 2013-08-21Page 1 of 18 IT Essentials...

© 2013 Cisco and/or its affiliates. All rights reserved. This document is Cisco Public. Page 1 of 18
IT Essentials 5.0
8.2.4.3 Lab - Mobile Device Features - Android and iOS
Introduction Print and complete this lab. In this lab, you will set the autorotation, brightness, and turn GPS on and off.
Recommended Equipment The following equipment is required for this exercise: • Android tablet or smartphone running Android version 4.0
• iOS tablet or smartphone running iOS version 5.0
Part 1 - Android Auto Rotation Step 1
Turn on the device and log in with the password, PIN, or other passcode, if necessary. The main home screen appears.
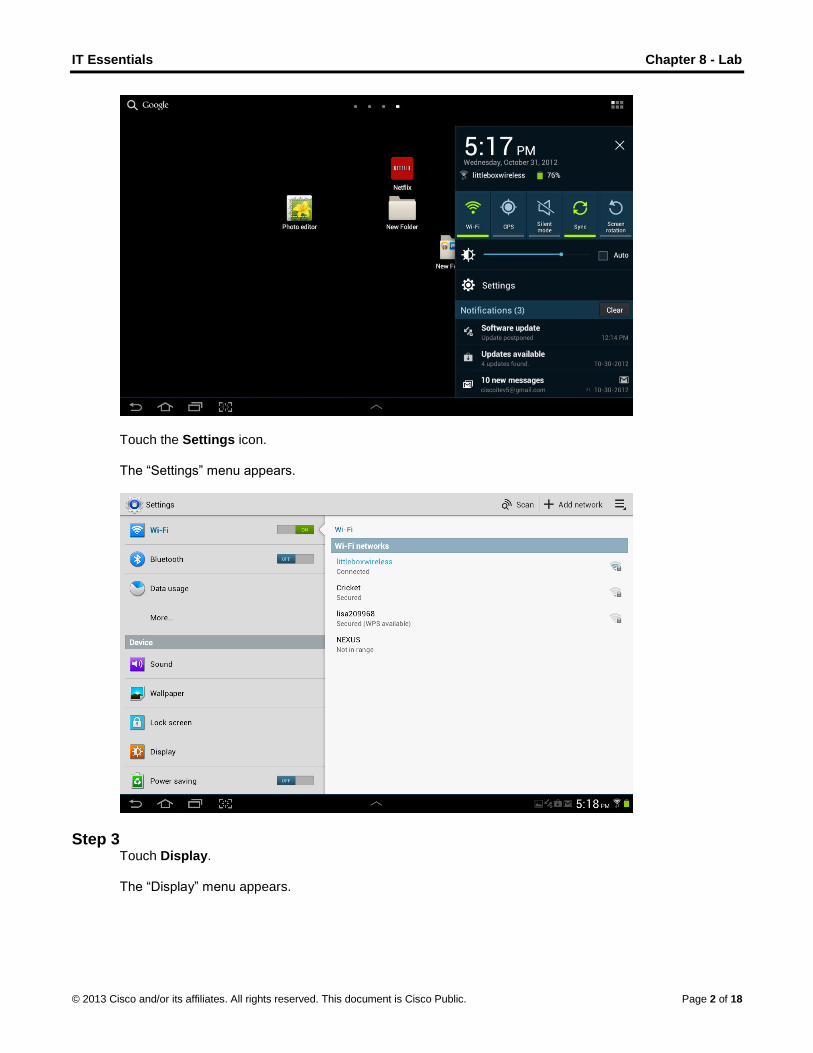
Step 2 Touch the notification and system icons. The “notification” area appears.
IT Essentials Chapter 8 - Lab
© 2013 Cisco and/or its affiliates. All rights reserved. This document is Cisco Public. Page 2 of 18
Touch the Settings icon. The “Settings” menu appears.
Step 3 Touch Display. The “Display” menu appears.

IT Essentials Chapter 8 - Lab
© 2013 Cisco and/or its affiliates. All rights reserved. This document is Cisco Public. Page 3 of 18
Touch the checkbox next to Auto-rotate screen repeatedly until there is no check in the box. Rotate the device 90 degrees clockwise. What happens to the screen?
Rotate the device 90 degrees counter-clockwise. Touch the checkbox next to Auto-rotate screen. Rotate the device 90 degrees clockwise. What happens to the screen?
Touch the Home button to return to the home screen.
Part 2 - iOS Auto Rotation Step 1
Turn on the device and log in with the password, PIN, or other passcode, if necessary. The main home screen appears.

IT Essentials Chapter 8 - Lab
© 2013 Cisco and/or its affiliates. All rights reserved. This document is Cisco Public. Page 4 of 18
Step 2 Double click the Home button. The “Multitasking Bar” appears.
Scroll from left to right until the “Orientation” icon appears.

IT Essentials Chapter 8 - Lab
© 2013 Cisco and/or its affiliates. All rights reserved. This document is Cisco Public. Page 5 of 18
Step 3 Touch the Orientation icon to lock the screen in portrait orientation.
Click the Home button. Touch Calendar. Rotate the device 90 degrees clockwise. What happens to the screen?
Double-click the Home button.

IT Essentials Chapter 8 - Lab
© 2013 Cisco and/or its affiliates. All rights reserved. This document is Cisco Public. Page 6 of 18
Scroll left to right. Touch the Orientation icon to unlock portrait orientation.
Rotate the device 90 degrees clockwise. What happens to the screen?
Click the Home button to return to the home screen.
Part 3 – Android Brightness Step 1
Touch the notification and system icons. The “notification” area appears.

IT Essentials Chapter 8 - Lab
© 2013 Cisco and/or its affiliates. All rights reserved. This document is Cisco Public. Page 7 of 18
Touch the Settings icon. The “Settings” menu appears.
Step 2 Touch Display. The “Display” menu appears.

IT Essentials Chapter 8 - Lab
© 2013 Cisco and/or its affiliates. All rights reserved. This document is Cisco Public. Page 8 of 18
Touch Brightness. The “Brightness” menu appears
Move the slider all the way to the right. What happens?
Touch the Automatic brightness checkbox repeatedly until there is a check in the box.

IT Essentials Chapter 8 - Lab
© 2013 Cisco and/or its affiliates. All rights reserved. This document is Cisco Public. Page 9 of 18
What happens? Touch the Automatic brightness checkbox. Move the slider all the way to the left. What happens? Touch the Automatic brightness checkbox. What happens? Touch the Home button to return to the home screen.
Part 4 – iOS Brightness Step 1
Touch the Settings icon. The “Settings” menu appears.

IT Essentials Chapter 8 - Lab
© 2013 Cisco and/or its affiliates. All rights reserved. This document is Cisco Public. Page 10 of 18
Step 2 Touch Brightness and Wallpaper. The “Brightness and Wallpaper” screen appears.
Turn off Auto-Brightness.

IT Essentials Chapter 8 - Lab
© 2013 Cisco and/or its affiliates. All rights reserved. This document is Cisco Public. Page 11 of 18
Move the slider all the way to the right. What happens? Turn on Auto-Brightness. What happens? Turn off Auto-Brightness. Move the slider all the way to the right. What happens? Turn on Auto-Brightness. What happens?
Part 5 – Android GPS Step 1
Touch the notification and system icons. The “notification” area appears.

IT Essentials Chapter 8 - Lab
© 2013 Cisco and/or its affiliates. All rights reserved. This document is Cisco Public. Page 12 of 18
Touch the Settings icon. The “Settings” menu appears.
Touch Location Services. The “Location Services” menu appears.

IT Essentials Chapter 8 - Lab
© 2013 Cisco and/or its affiliates. All rights reserved. This document is Cisco Public. Page 13 of 18
Make sure that only the Use GPS satellites checkbox is not checked. Touch the Home button.
Step 2 Touch the All Apps button. Touch the Maps app icon. The “Maps” app is opened.

IT Essentials Chapter 8 - Lab
© 2013 Cisco and/or its affiliates. All rights reserved. This document is Cisco Public. Page 14 of 18
What is the accuracy of the location? How is the device able to determine the location?
Step 3 Touch the notification and system icons. Touch the Settings icon. Touch Location Services. Touch the Use GPS satellites checkbox. Touch the Back button. The “Maps” app is displayed.
What is the accuracy of the location? Touch the Home button.
Part 6 – iOS GPS
Step 1 Touch the Settings icon. The “Settings” menu appears.

IT Essentials Chapter 8 - Lab
© 2013 Cisco and/or its affiliates. All rights reserved. This document is Cisco Public. Page 15 of 18
Step 2 Touch Privacy. The “Privacy” menu appears.
Touch Location Services. The “Location Services” menu appears.

IT Essentials Chapter 8 - Lab
© 2013 Cisco and/or its affiliates. All rights reserved. This document is Cisco Public. Page 16 of 18
What apps are using Location Services? Turn Location Services off. Click the Home button.
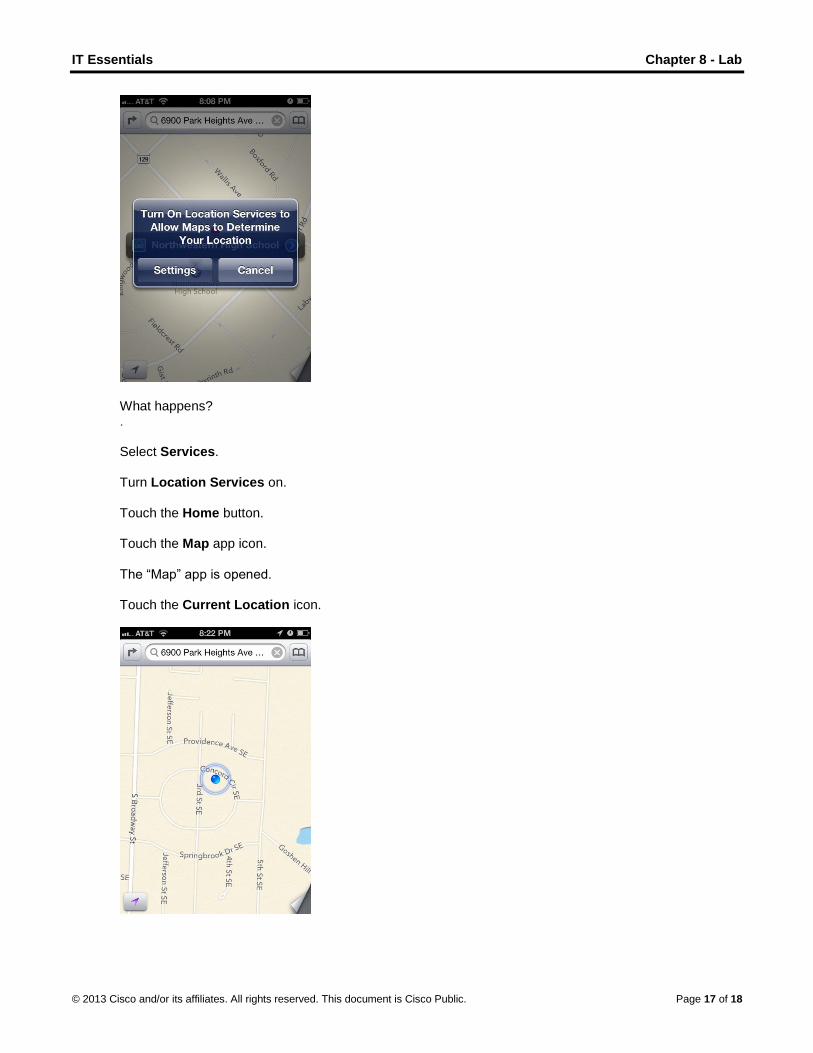
Step 3 Touch the Map app icon. The “Map” app opens.
Touch the Current Location icon.
IT Essentials Chapter 8 - Lab
© 2013 Cisco and/or its affiliates. All rights reserved. This document is Cisco Public. Page 17 of 18
What happens? . Select Services. Turn Location Services on. Touch the Home button. Touch the Map app icon. The “Map” app is opened. Touch the Current Location icon.

IT Essentials Chapter 8 - Lab
© 2013 Cisco and/or its affiliates. All rights reserved. This document is Cisco Public. Page 18 of 18
What is the accuracy of the location? Click the Home button.