800xA History Installation - ABB Ltd Pre-Installation ... HDD 1.4 ... \XXX\YYY\ZZZ\...\DVD....
185
System 800xA 800xA History Installation Manual System Version 6.0
Transcript of 800xA History Installation - ABB Ltd Pre-Installation ... HDD 1.4 ... \XXX\YYY\ZZZ\...\DVD....

System 800xA800xA HistoryInstallation Manual
System Version 6.0


System 800xA800xA History
Installation Manual
System Version 6.0
Document Number: 2PAA107280-600Document Revision: G
Release: September 2017

NOTICE
This document contains information about one or more ABB products and may include a descriptionof or a reference to one or more standards that may be generally relevant to the ABB products. Thepresence of any such description of a standard or reference to a standard is not a representation thatall of the ABB products referenced in this document support all of the features of the described orreferenced standard. In order to determine the specific features supported by a particular ABB product,the reader should consult the product specifications for the particular ABB product.
ABB may have one or more patents or pending patent applications protecting the intellectual propertyin the ABB products described in this document.
The information in this document is subject to change without notice and should not be construed asa commitment by ABB. ABB assumes no responsibility for any errors that may appear in this document.
Products described or referenced in this document are designed to be connected, and to communicateinformation and data via a secure network. It is the sole responsibility of the system/product owner toprovide and continuously ensure a secure connection between the product and the system networkand/or any other networks that may be connected.
The system/product owners must establish and maintain appropriate measures, including, but notlimited to, the installation of firewalls, application of authentication measures, encryption of data, in-stallation of antivirus programs, and so on, to protect the system, its products and networks, againstsecurity breaches, unauthorized access, interference, intrusion, leakage, and/or theft of data or infor-mation.
ABB verifies the function of released products and updates. However system/product owners are ulti-mately responsible to ensure that any system update (including but not limited to code changes,configuration file changes, third-party software updates or patches, hardware change out, and so on)is compatible with the security measures implemented. The system/product owners must verify thatthe system and associated products function as expected in the environment they are deployed.
In no event shall ABB be liable for direct, indirect, special, incidental or consequential damages ofany nature or kind arising from the use of this document, nor shall ABB be liable for incidental orconsequential damages arising from use of any software or hardware described in this document.
This document and parts thereof must not be reproduced or copied without written permission fromABB, and the contents thereof must not be imparted to a third party nor used for any unauthorizedpurpose.
The software or hardware described in this document is furnished under a license and may be used,copied, or disclosed only in accordance with the terms of such license. This product meets the require-ments specified in EMC Directive 2014/30/EU and in Low Voltage Directive 2014/35/EU.
TRADEMARKS
All rights to copyrights, registered trademarks, and trademarks reside with their respective owners.
Copyright © 2004-2017 by ABB.All rights reserved.

Table of Contents
1 About This User Manual91.1 Document Conventions ............................................................................................
91.2 Warning, Caution, Information, and Tip Icons .........................................................
101.3 Terminology .............................................................................................................
111.4 Related Documentation ............................................................................................
2 Introduction132.1 Overview ..................................................................................................................
132.2 System Topology ......................................................................................................
3 Installation Overview153.1 New Installation .......................................................................................................
163.2 Node Installation ......................................................................................................
163.3 Software Installation ................................................................................................
4 System Requirements and Prerequisites174.1 System Requirements ...............................................................................................
174.1.1 800xA History Server - System Requirements ..........................................
214.1.2 800xA History Data Collector ..................................................................
234.2 Prerequisites .............................................................................................................
234.2.1 800xA History Server ................................................................................
244.2.2 800xA History Data Collector ...................................................................
244.2.3 Formatting Drives as 64 KB Allocation Unit Size ....................................
244.2.4 Disabling Indexing for Database Drive .....................................................
5 Automated System Installation255.1 Pre-requisites for Installation ...................................................................................
255.2 Installation of 800xA Core Components using Node Preparation Tool ...................
2PAA107280-600 G 5
Table of Contents
295.3 Installation of 800xA History Software using System Configuration Console .......
295.3.1 Adding the nodes .......................................................................................
305.4 Assigning the System Functions and Node Functions to the Nodes ........................
305.4.1 Standalone 800xA History Server .............................................................
355.4.2 Primary 800xA History Server ..................................................................
385.4.3 Secondary 800xA History Server ..............................................................
415.4.4 Primary Data Collector Node ....................................................................
465.4.5 Secondary Data Collector Node ...............................................................
475.5 800xA History Archive ............................................................................................
6 Manual Installation516.1 Pre-Installation .........................................................................................................
516.1.1 Installing 800xA History Installer .............................................................
526.2 Node Installation ......................................................................................................
526.2.1 Prerequisites ...............................................................................................
546.2.2 800xA History Server Installation .............................................................
766.2.3 800xA History Server High Availability Installation ................................
1186.3 Software Installation ................................................................................................
1186.3.1 Installing 800xA History Data Collector ...................................................
1306.4 Post Installation Procedures .....................................................................................
1316.4.1 Firewall Settings ........................................................................................
1316.4.2 800xA History Server ................................................................................
1326.4.3 800xA History Data Collector Node .........................................................
1406.4.4 Antivirus Exclusions ..................................................................................
1416.4.5 IPSec Exemptions ......................................................................................
7 Update1437.1 800xA History Server ...............................................................................................
1487.2 800xA History Data Collectors ................................................................................
Appendix A Network Load Balancing150A.1 Configuring Network Load Balancing (NLB) .........................................................
150A.1.1 Installation of NLB in 800xA History Server Nodes ................................
156A.1.2 NLB Configuration for Common IP in 800xA History Servers ................
6 2PAA107280-600 G
Table of Contents

Appendix B Adding High Availability Server166B.1 Introduction ..............................................................................................................
Appendix C 800xA History Update/Upgrade Workflows173C.1 Online Update from System 800xA SV 6.0.X to SV 6.0.Y .....................................
175C.2 Online upgrade from System 800xA SV 5.1 to SV 6.0.X .......................................
175C.2.1 Pre-Requisite .............................................................................................
175C.2.2 Procedure ...................................................................................................
177C.3 Replace Node with Windows Operating System Change ........................................
177C.3.1 Pre-requisite ...............................................................................................
178C.3.2 Procedure ...................................................................................................
INDEX
2PAA107280-600 G 7
Table of Contents

8 2PAA107280-600 G
1 About This User Manual
Any security measures described in this UserManual, for example, for user access,password security, network security, firewalls, virus protection, etc., representpossible steps that a user may want to consider based on a risk assessment for aparticular application and installation. This risk assessment, as well as the properimplementation, configuration, installation, operation, administration, and mainte-nance of all relevant security related equipment, software, and procedures, are theresponsibility of the user.
This user manual describes the installation of History components using the HistoryInstaller. It is intended for the application engineers/system administrators responsiblefor installing or configuring the History application.
1.1 Document ConventionsMicrosoft Windows conventions are normally used for the standard presentation ofmaterial when entering text, key sequences, prompts, messages, menu items, screenelements, etc.
1.2 Warning, Caution, Information, and Tip IconsThis publication includesWarning, Caution, and Information where appropriateto point out safety related or other important information. It also includesTip to pointout useful hints to the reader. The corresponding symbols should be interpreted asfollows:
Electrical warning icon indicates the presence of a hazard which could result inelectrical shock.
Warning icon indicates the presence of a hazard which could result in personalinjury.
2PAA107280-600 G 9
1 About This User Manual 1.1 Document Conventions

Caution icon indicates important information or warning related to the conceptdiscussed in the text. It might indicate the presence of a hazard which could resultin corruption of software or damage to equipment/property.
Information icon alerts the reader to pertinent facts and conditions.
Tip icon indicates advice on, for example, how to design the project or how to usea certain function.
AlthoughWarning hazards are related to personal injury, and Caution hazards areassociated with equipment or property damage, it should be understood that operationof damaged equipment could, under certain operational conditions, result in degradedprocess performance leading to personal injury or death. Therefore, fully complywith allWarning and Caution notices.
1.3 TerminologyThis section includes a complete and comprehensive list of terms that apply to theHistory application. Terms that uniquely apply to this instruction are included in thissection.
DescriptionTerm/Acronym
Graphical User InterfaceGUI
Microsoft InstallerMSI
Central Licensing SystemCLS
A computer communicating on a network, for example,the Internet, Plant, Control or I/O network. Each nodetypically has a unique node address with a format depend-ing on the network it is connected to.
Node
Client is a part of the software that subscribes data fromthe server.
Client
A node that runs one or several Afw services. It is a partof the software that supplies data to a subscriber.
Server
A client/server network is used for communication betweenservers and between workplaces and servers.
Client/Server
OPC Data AccessOPC DA
10 2PAA107280-600 G
1 About This User Manual 1.3 Terminology

DescriptionTerm/Acronym
OPC Alarm and EventOPC AE
OPC History Data AccessOPC HDA
Application Programming InterfaceAPI
Digital Versatile Disk. It is an optical disk storage media.DVD
Hard Disk Drive. It is a local online fixed storage drivecomposed on several magnetic disks.
HDD
1.4 Related DocumentationThis section includes a complete list of all documents applicable to the History.
DescriptionTitle
Describes the details for administrating and config-uring History. For more information, refer 800xAHistory Administration and Configuration(2PAA107563*).
Administration and Configura-tion Manual
2PAA107280-600 G 11
1 About This User Manual 1.4 Related Documentation

12 2PAA107280-600 G
2 Introduction
2.1 OverviewThis document indicates software at the time of release. 800xAHistory Release Notesmust be read and understood before performing automated installation, post installationor upgrade procedures.
800xA History Software Components:
1. 800xA History Server
The 800xAHistory Server is theMain Historian Component which seamlessly storesreal time-data (process values, events) from the control system and processes the dataas per user requirement and makes it available for further analysis. This node shouldbe the first node in the 800xA History components installation. This node is requiredon a new Server grade computer. The disk space requirement will depend on the tagson the system. For more information, refer Prerequisites section. Software componentsuch as Data Collector needs 800xAHistory Server details for successful installation.
For more information on installation refer Node Installation.
1. 800xA History Data Collector Node
800xA History Data Collector component is the interface between the control systemand the 800xA History server. 800xA History Data Collector collects, stores, andbuffers the data from control system and forwards it to the 800xA History Server.
1. 800xA History Installer
800xA History Installer provides a capability for performing automated installationof 800xA History software and its various components.
2.2 System TopologyThe 800xA History solution consists of following:
• 800xA History Data Collectors
2PAA107280-600 G 13
2 Introduction 2.1 Overview

• 800xA History servers
One 800xA History Server (either in Standalone or High-Availability) can supportconnectivity frommaximum of 12 data collectors either in single or dual configuration.
A 800xA History server combines the process information from all data collectorsinto the 800xA History database.
800xAHistory supports redundant (High Availability) configuration in 800xAHistoryServers.
A dedicated 1 Gbps network (Consistency Control Network) connection is requiredin High Availability solutions to connect the redundant 800xA History servers fordata synchronization.
Typical scenarios for 800xA History Installation
1. Data collector with 800xA History Server Basic (Non-Redundant)
2. Redundant Data collector with 800xA History Server Basic (Non-Redundant)
3. Redundant 800xA History Server (High Availability)
14 2PAA107280-600 G
2 Introduction 2.2 System Topology

3 Installation Overview
This section includes information for installing and setting up 800xA History usingthe 800xA History Installer.
This document reflects 800xA History software at the time of release. The 800xAHistory Release Notes must be read and understood before performing any auto-mated or manual installation, and post installation procedures.
3.1 New InstallationConsider the following before performing the procedures described in this document:
Do not install any software until the system has been properly designed and configuredfor the software being installed.
Figure 3.1: Graphical Overview of typical 800xA History Configuration
The 800xA History Installer supports the following types of installation:
2PAA107280-600 G 15
3 Installation Overview 3.1 New Installation
• Node Installation
• Software Installation
Before installing ensure that the pre-installation procedures are accomplished. Formore information, refer Pre-Installation section.
3.2 Node InstallationThe node installation involves the installation of 800xA History Server. The 800xAHistory Server is the Main Historian Component which seamlessly stores real time-data (Process values, Events) from the control system and processes the data as peruser requirement and makes it available for further analysis. This node should be thefirst node in the 800xA History components installation. This node is required to beinstalled in a fresh machine. The disk space requirement will depend on the tags inthe system. For more information, refer Table 4.1. Software component such as the800xA History Data Collector requires 800xA History Server details for successfulinstallation.
For more information on Node Installation, refer, Node Installation.
3.3 Software InstallationThe Software installation using 800xA History Installer includes the following:
• 800xA History Data Collector
For more information about Software Installation, refer Software Installation.
800xA History Data Collector component is the interface between the control systemand the 800xA History server. 800xA History Data Collector collects, stores, andbuffers the data from control system and forwards it to the 800xA History Server.
For more information on installing 800xA History Data Collector, refer Installing800xA History Data Collector.
16 2PAA107280-600 G
3 Installation Overview 3.2 Node Installation
4 System Requirements and Prerequisites
This section provides information about system requirements and prerequisites forinstalling 800xA History software.
4.1 System RequirementsThe system requirements are listed in the subsequent topics.
4.1.1 800xA History Server - System RequirementsFor 800xA History Server - System hardware requirements depends on manyfactor like total number of logs configured, update rate of each log, 800xAHistorylog compression, number of events generation in System 800xA etc.
Typical system hardware requirements are mentioned in Table 4.1. However, foractual system hardware requirements user has to select the storage disk size asrecommended by ‘800xA History System Size Estimation’ tool available in theABB Library.
In ‘800xA History System Size Estimation’ tool user has to provide the inputs asper the project configuration which provides the actual disk size required.
A dedicated 800xAHistory data storage disks should be allocated as mentioned below:
• 1st Disk for Windows Operating System
• 2nd Disk for 800xA History database storage
• 3rd Disk for 800xA History Backup storage
Table 4.1 describes the system requirements for 800xA History Server:
2PAA107280-600 G 17
4 System Requirements and Prer 4.1 System Requirements

Table 4.1: 800xA History Server System Requirements
800xA History Server - System Requirements
Disk required for 800xA History Data storage in GB
2 Years1 Year6 MonthsRAM
Backupdisk
Databasedisk
Backupdisk
Databasedisk
Backupdisk
Databasedisk
Size inGB
No. ofEvents /Sec
Updaterate
No. of800xAHistoryLogs
2750275014001400700700325Events /Sec
1 Sec500
3000300015001500760760325Events /Sec
1 Sec1000
3600360018001800900900325Events /Sec
1 Sec2000
530053002650265013301330325Events /Sec
1 Sec5000
815081504075407520402040645Events /Sec
1 Sec10000
11000110005500550027552755645Events /Sec
1 Sec15000
13831138316900690035003500645Events /Sec
1 Sec20000
Specific requirements for the 800xA History Server node are given in Table 4.2.
18 2PAA107280-600 G
4 System Requirements and Prer 4.1 System Requirements

Table 4.2: Recommended hardware for 800xA History Server
SpecificationsSizeItem
Dual-socket (4 pcs) Intel® Xeon® 5600/6500/7500ProcessorSeries or newer(At minimum Quad-core CPU is required)
8 GigabytesMinimumMemory
32 GigabytesMedium
32+ GigabytesLarge
Basic 2D performance of any integral GraphicsAdapter is adequate
Graphics
20" WXGA 1280x800 pixels (maintenance only)MinimumDisplay
24" WUXGA 1920x1200 pixelsRecommended
100 Gigabytes SATAMinimum[HDD 1] OS +Applications
150 Gigabytes SAS, mirrored RAID-1Medium/Large
150 Gigabytes SSD [SATA]Performance
150 Gigabytes SATAMinimum[HDD 2] 800xAHistoryDatabase
600 Gigabytes SAS, min. 4 physical drive spindles,mirrored RAID-10
Medium
1.2 Terabytes SAS, min. 4 physical drive spindles,mirrored RAID-10
Large
2 Terabytes SAS, min. 6 physical drive spindles,mirrored RAID-10, with HotSpare
Enterprise
500 Gigabytes SSD [PCI-E]Performance
500 Gigabytes SATAMinimum[HDD 3] On-linebackup
1000 Gigabytes SAS, fail-safe RAID-5Recommended
1000 Gigabytes SAS, fail-safe RAID-5Enterprise
2PAA107280-600 G 19
4 System Requirements and Prer 4.1 System Requirements

Table 4.2: Recommended hardware for 800xA History Server(Continued)
SpecificationsSizeItem
Redundant Power SupplyRecommendedSpare parts[optional]
Redundant System Cooling FansRecommended
Redundant Network AdaptersRecommended
5 Years, 24/7, 4 hr response [operations critical]RecommendedHW WarrantyExtension
[optional]
Networks Con-nectivity
Enterprise wide connectivity (to ERP systems)Mandatory1. Usage
TCP/IP1. Protocols
Plant wide connectivity (to the Data Collectors)Mandatory2. Usage
TCP/IP + UDP + IP Multicast2. Protocols
SAN Backup connectivity[optional]3. Usage
TPC/IP3. Protocols
Lights-Out Management[optional]4. Usage
TPC/IP4. Protocols
20 2PAA107280-600 G
4 System Requirements and Prer 4.1 System Requirements

4.1.2 800xA History Data CollectorTable 4.3 describes the system requirements for the data collector.
Table 4.3: Data Collector System Requirements
800xA History Data Collector - System Requirements
Disk required for 800xAHisto-ry
Data storage in GB
Backup diskDatabase diskRAM Size inGB
No. of Events/ Sec
Update rateNo. of 800xAHistory Logs
15015045 Events / Sec1 SecMax Supported15,000
Specific requirements for the data collector node are given in Table 4.4.
Table 4.4: Recommended hardware for Data Collector installation
SpecificationsSizeItem
Intel® Xeon® 3000/5600 Series or newer1st choiceProcessor
Intel® Core™ i3/i5/i72nd choice((Recommended to use Quad Core CPU)
4 GigabytesMinimumMemory
Basic 2D performance of any integralGraphics Adapter is adequate
Graphics
20" WXGA 1280x800 pixels (maintenanceonly)
MinimumDisplay
24" WUXGA 1920x1200 pixelsRecommended
100 Gigabytes SATAMinimum[HDD 1] OS + Applica-tions + Data Collector
300 Gigabytes SAS, mirrored RAID-1Recommended
250 Gigabytes SSD [PCI-E]Performance
2PAA107280-600 G 21
4 System Requirements and Prer 4.1 System Requirements
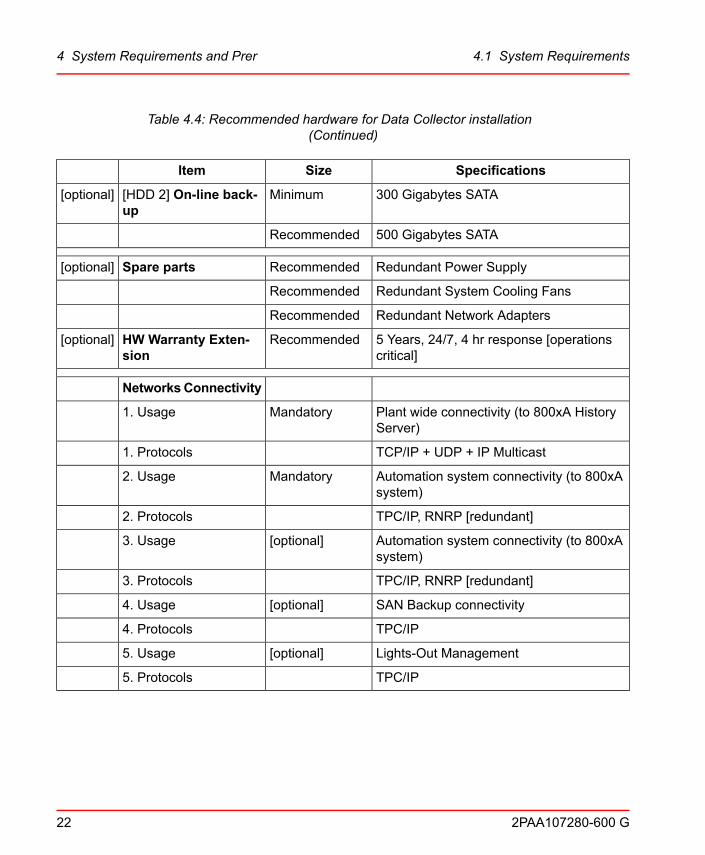
Table 4.4: Recommended hardware for Data Collector installation(Continued)
SpecificationsSizeItem
300 Gigabytes SATAMinimum[HDD 2] On-line back-up
[optional]
500 Gigabytes SATARecommended
Redundant Power SupplyRecommendedSpare parts[optional]
Redundant System Cooling FansRecommended
Redundant Network AdaptersRecommended
5 Years, 24/7, 4 hr response [operationscritical]
RecommendedHW Warranty Exten-sion
[optional]
NetworksConnectivity
Plant wide connectivity (to 800xA HistoryServer)
Mandatory1. Usage
TCP/IP + UDP + IP Multicast1. Protocols
Automation system connectivity (to 800xAsystem)
Mandatory2. Usage
TPC/IP, RNRP [redundant]2. Protocols
Automation system connectivity (to 800xAsystem)
[optional]3. Usage
TPC/IP, RNRP [redundant]3. Protocols
SAN Backup connectivity[optional]4. Usage
TPC/IP4. Protocols
Lights-Out Management[optional]5. Usage
TPC/IP5. Protocols
22 2PAA107280-600 G
4 System Requirements and Prer 4.1 System Requirements
4.2 PrerequisitesThis section includes the prerequisite software required for the installation of:
• 800xA History Server
• 800xA History Data Collector
The user performing the procedure in this section must be proficient in using theWindows Operating System. This section excludes the detailed procedures onhow to perform the installation of each prerequisite. The user should referMicrosoftdocumentation and online help for information on accurately making the setting.
Redundant network configuration between 800xA History Data Collector and800xA History Server is currently not supported. Only one network connectioncan be used for communication between them.
For Standalone 800xA History Server, it is required to have a dedicated 1Gbpsnetwork for communication between 800xA History Data Collectors and 800xAHistory Server. Do not combine this network with any other network.
For High Availability History Server configuration two separate and dedicated 1Gbps network should be configured. The two networks are called as NLB networkand CCN network. These two networks are additional networks other than Controlnetwork and Client Server network.
NLB Network (Network Load Balancing) is for the 800xA History data commu-nication between 800xA History data collectors and 800xA History Server(s).
CCN Network (Consistency Control network) is for the 800xA History datacommunication between the two High Availability 800xA History Server(s).
Do not combine the NLB and CCN in one common network and also do notcombine Client Server network with NLB network or CCN network.
4.2.1 800xA History ServerPrerequisites for installing 800xA History Server is as follows:
• Server Operating system
• MS Office
Refer to System 800xA Third Party Software (3BUA000500*) for information relatedto supported operating systems.
• Network configuration in case of 800xA History High Availability
2PAA107280-600 G 23
4 System Requirements and Prer 4.2 Prerequisites
Configure NLB Network (Network Load Balancing) for the 800xA History datacommunication between 800xA History data collectors and 800xA HistoryServer(s). Refer to Appendix Network Load Balancing.
Configure CCNNetwork (Consistency Control network) between the two 800xAHistory Server. This network is for the 800xA History data communication be-tween the two High Availability 800xA History Server(s).
4.2.2 800xA History Data CollectorPrerequisites for installing 800xA History Data Collector is as follows:
• Server Operating system
• MS Office
Refer to System 800xA Third Party Software (3BUA000500*) for information relatedto supported operating systems.
4.2.3 Formatting Drives as 64 KB Allocation Unit Size800xA History Database drive should be formatted with 64 KB allocation unit size.Formatting History backup drive with 64 KB allocation unit size is not required.Configure a separate Database and Backup drive that does not combine withWindowsOperating system drive.
For more information about formatting a drive with cluster size of 64 KB allocationunit size, refer the Microsoft documentation.
History Database disk & Backup disk should be formatted withNTFS file systemonly ,Installation of 800xA History on FAT file system is not supported.
4.2.4 Disabling Indexing for Database DriveIt is recommended that the database drive should not have indexing allowed. Formore information about disabling indexing, refer Microsoft documentation.
24 2PAA107280-600 G
4 System Requirements and Prer 4.2 Prerequisites

5 Automated System Installation
The section provides the procedure for Automated System Installation of 800xAHistory.
5.1 Pre-requisites for Installation• In Workgroup Installation, Users and Groups must be created manually on all
the planned nodes. For more information on creating users refer System 800xAInstallation and Upgrade Getting Started (2PAA111708*) manual.
• In Domain Installation user has to create theDomain Controller first. For infor-mation how to create domain controller refer System 800xA Installation andUpgrade Getting Started (2PAA111708*) manual.
• Only 800xA History database drive must be formatted with 64 KB allocationunit size.
• Compress the drive for saving disk space option must be enabled for the 800xAHistory database drives.
• Configure the Network adapters with planned IP Address.
• Rename the 800xA History Nodes as per the planned network configurations.
• For High Availability installation NLB must be configured only on 800xA His-tory Servers. For more information refer Network Load Balancing.
• UAC must be enabled and set to default Windows OS configuration.
For further more information on pre-requisites please refer System 800xA Installationand Upgrade Getting Started (2PAA111708*) manual.
5.2 Installation of 800xA Core Components usingNode Preparation Tool1. Run the NPT tool using setup.exe from the 800xA media.
2PAA107280-600 G 25
5 Automated System Installatio 5.1 Pre-requisites for Installation
2. Provide the 800xA Service user account credentials as shown in the Figure 5.2.
800xA History Server / Data Collector installation Support only the followingcharacters in the user account password, make sure the passwordmeets the require-ment as described below:
Installation of 800xA History services may fail if the password of the installationaccount contains certain special characters other than the one described below
Configure the password of the installation account with the following supportedcharacters
Supported Characters:
• Alphabets = A- Z, a - z
• Numeric = 0 - 9
• Special Characters = #, *, - , +, _
26 2PAA107280-600 G
5 Automated System Installatio 5.2 Installation of 800xA Core Components us

Figure 5.1: Node Preparation Tool and User Account Credentials
3. Select the option 800xA History under the Installation Type. Refer Figure 5.2.
Perform Step 3. only on the 800xA History Servers and DCN nodes.
2PAA107280-600 G 27
5 Automated System Installatio 5.2 Installation of 800xA Core Components us

Figure 5.2: Selection of 800xA History Server / 800xA History Data Collector
4. Click OK.
Wait for the installation of core components to complete. Perform Step 1. to Step 4.on all the planned nodes.
28 2PAA107280-600 G
5 Automated System Installatio 5.2 Installation of 800xA Core Components us

5.3 Installation of 800xA History Software using Sys-tem Configuration Console
5.3.1 Adding the nodes1. On planned Aspect Server node, click Start and then type SystemConfiguration
Console.
2. Click on System Setup and then click Configure System. This configures theAspect Server.
3. Under system Functions tab in SCC tool, click on the Edit functions and selectthe 800xA History Functions as shown in Figure 5.3 and click OK.
Figure 5.3: SCC Tool - Edit functions
4. Click on System nodes Tab and ClickAdd Node button as shown in Figure 5.4.
2PAA107280-600 G 29
5 Automated System Installatio 5.3 Installation of 800xA History Software u

Figure 5.4: Nodes Configuration
5. Provide the Node name and select Client or Server as applicable.
Add all the nodes by performing Step 4. and Step 5.. Do not Add 800xA HistorySecondary (Replica) node at this step.
5.4 Assigning the System Functions and Node Func-tions to the Nodes
5.4.1 Standalone 800xA History Server1. Select the Standalone 800xA History server node and click on Edit Node
Functions as shown in Figure 5.5.
30 2PAA107280-600 G
5 Automated System Installatio 5.4 Assigning the System Functions and Node

Figure 5.5: Standalone 800xA History Node - Edit Function
2. Select the option 800xAHistory ServerNon-Redundant and clickOK as shownin Figure 5.6.
2PAA107280-600 G 31
5 Automated System Installatio 5.4 Assigning the System Functions and Node

Figure 5.6: 800xA History Server Non Redundant selection
3. Click on the Edit button under Node Content column as shown in Figure 5.7.
32 2PAA107280-600 G
5 Automated System Installatio 5.4 Assigning the System Functions and Node

Figure 5.7: Node Content - Edit
4. Assign the 800xA History Server Properties as shown in the Figure 5.8.
2PAA107280-600 G 33
5 Automated System Installatio 5.4 Assigning the System Functions and Node

Figure 5.8: 800xA History Server Properties
• Select the corresponding Time zone from the drop down menu.
• Select the database size High, Medium, Low as per the requirement.
• Select the Database and Backup drive planned for the 800xA History Stan-dalone Server.
• Click Ok.
800xA History Server High Availability Installation
34 2PAA107280-600 G
5 Automated System Installatio 5.4 Assigning the System Functions and Node

5.4.2 Primary 800xA History ServerFirst install Primary 800xAHistory Server, perform the Online Copy in the Primary800xA History Server then Install the Secondary 800xA History Server.
Do not deploy both primary & secondary 800xA History Server together. If de-ployed Secondary server installation will fail.
1. Select the Primary 800xAHistory Server node and click onEdit node functionsas shown in Figure 5.4.
2. Select the option 800xA History Server Primary and click OK as shown inFigure 5.9.
Figure 5.9: 800xA History First Server selection
2PAA107280-600 G 35
5 Automated System Installatio 5.4 Assigning the System Functions and Node

3. Click on the Edit button under Node Content column as shown in Figure 5.10.
Figure 5.10: 800xA History First Server Edit
4. Assign the 800xA History Server Properties as shown in the Figure 5.11.
36 2PAA107280-600 G
5 Automated System Installatio 5.4 Assigning the System Functions and Node
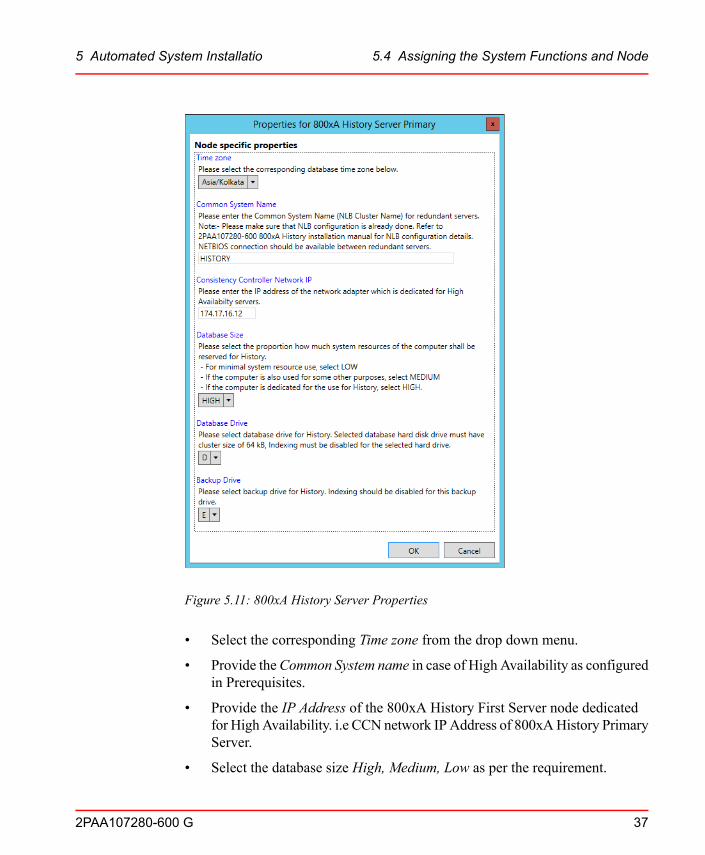
Figure 5.11: 800xA History Server Properties
• Select the corresponding Time zone from the drop down menu.
• Provide theCommon System name in case of High Availability as configuredin Prerequisites.
• Provide the IP Address of the 800xA History First Server node dedicatedfor High Availability. i.e CCN network IP Address of 800xAHistory PrimaryServer.
• Select the database size High, Medium, Low as per the requirement.
2PAA107280-600 G 37
5 Automated System Installatio 5.4 Assigning the System Functions and Node

• Select the Database Drive planned for the 800xA History Primary Server.
• Select the Backup Drive planned for the 800xA History Primary Server.
• Click OK.
5.4.3 Secondary 800xA History Server1. Before installing the Secondary 800xA History server, run the online copy of
the Primary 800xA History Server.
5.4.3.1 Preparing online backup of the first node
• Perform the Online Backup of the First Node of the 800xA History Server.
• In the First node of the 800xA History Server, run the following command fromcommand prompt (run as administrator) from the service account:%app_root%\bin\App_BackupTool /d
• Wait for the command to complete and confirm that online copy is successfullycompleted by verifying in the path <backup_drive>:OnlineCopy\OnlineBackup.okfile is visible.
1. After the Deployment is completed successfully for the planned nodes in thesystem, add the Secondary 800xA History server as shown in Figure 5.12 andclick on the Allocate Functions.
38 2PAA107280-600 G
5 Automated System Installatio 5.4 Assigning the System Functions and Node

Figure 5.12: Adding of Secondary 800xA History server
2. Under Edit node functions select the 800xA History Server Secondary andclick OK as shown in Figure 5.13.
2PAA107280-600 G 39
5 Automated System Installatio 5.4 Assigning the System Functions and Node
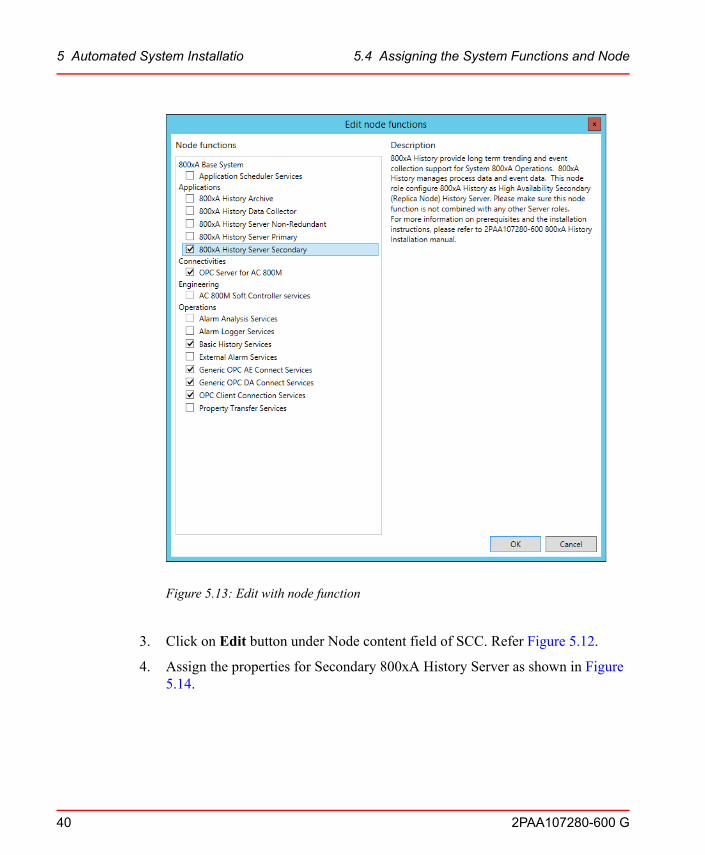
Figure 5.13: Edit with node function
3. Click on Edit button under Node content field of SCC. Refer Figure 5.12.
4. Assign the properties for Secondary 800xA History Server as shown in Figure5.14.
40 2PAA107280-600 G
5 Automated System Installatio 5.4 Assigning the System Functions and Node

Figure 5.14: Secondary 800xA History Server Properties
• Select the corresponding Time zone from the drop down menu.
• Provide the Consistency Controller Network IP of Primary 800xA HistoryServer.
• Select the sameDatabase and Backup Drive letter as selected for the Primary800xA History Server.
5.4.4 Primary Data Collector Node1. Select the Primary DCN node and click on Edit node functions as shown in
Figure 5.15.
2PAA107280-600 G 41
5 Automated System Installatio 5.4 Assigning the System Functions and Node

Figure 5.15: Primary DCN node - Edit node functions selection
2. Select the Node Function 800xA History Data Collector and Basic HistoryServices as shown in Figure 5.16 and click OK.
42 2PAA107280-600 G
5 Automated System Installatio 5.4 Assigning the System Functions and Node

Figure 5.16: Primary DCN node - Edit node functions
3. Click on Edit button under Node content column as shown in Figure 5.17.
2PAA107280-600 G 43
5 Automated System Installatio 5.4 Assigning the System Functions and Node

Figure 5.17: 800xA History Data Collector - Edit
4. Assign the properties of 800xA History Data Collector as shown in Figure 5.18.
44 2PAA107280-600 G
5 Automated System Installatio 5.4 Assigning the System Functions and Node

Figure 5.18: 800xA History Data Collector Properties
• Modify the 800xA History Services Service Group and Service Providersname as required.
• Select the corresponding Time zone from the drop down menu.
• Select the Database Drive and Backup Drive from the drop down menu.
2PAA107280-600 G 45
5 Automated System Installatio 5.4 Assigning the System Functions and Node

• Provide the 800xAHistory Server name in case of Standalone 800xAHistoryServer. In case of HA provide the Common NLB name configured as inPrerequisites.
• Provide the IP Address of the 800xA History Server Node in case of Stan-dalone. In case of HA configuration provide the Common NLB IP addressconfigured as in Prerequisites.
• Click OK.
5.4.5 Secondary Data Collector NodeFor redundant DCN configuration, user has to manually provide the 800xAHistoryServer name and Database Drive selection in the secondary DCN node after per-forming theMake redundant in SCC.
1. Add the Secondary DCN node as shown in Figure 5.19.
Figure 5.19: Secondary DCN Node
2. Select the PrimaryDCN node and click onMakeRedundant as shown in Figure5.17.
46 2PAA107280-600 G
5 Automated System Installatio 5.4 Assigning the System Functions and Node

3. Select the Redundant DCN node from the drop down menu as shown in Figure5.20.
Figure 5.20: Redundant DCN node selection
4. Select the Node functions 800xAHistory Data collector and Basic 800xAHistoryServices and click OK. Refer Figure 5.20
5. Select the Secondary DCN node and click on Edit button under Node contentcolumn as shown in Figure 5.17.
6. Provide the 800xA History Server name, IP Address and Database / BackupDrives as in Primary DCN node. Click OK.
5.5 800xA History Archive1. Add the Node planned for 800xA History Archive.
2. Select the Node created in Step 1..
3. Click on the Edit Node functions options. Select the 800xA History Archiveand click OK as shown in Figure 5.21.
4. 800xAHistoryArchive role should be deployed / installed through system installeronly when System function and Node role function both are selected.
2PAA107280-600 G 47
5 Automated System Installatio 5.5 800xA History Archive
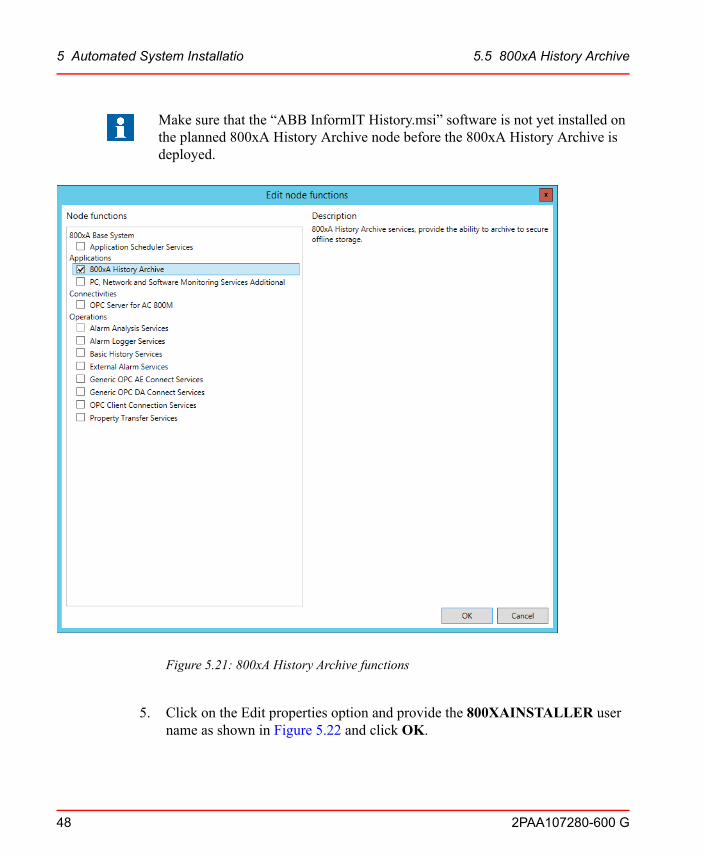
Make sure that the “ABB InformIT History.msi” software is not yet installed onthe planned 800xA History Archive node before the 800xA History Archive isdeployed.
Figure 5.21: 800xA History Archive functions
5. Click on the Edit properties option and provide the 800XAINSTALLER username as shown in Figure 5.22 and click OK.
48 2PAA107280-600 G
5 Automated System Installatio 5.5 800xA History Archive
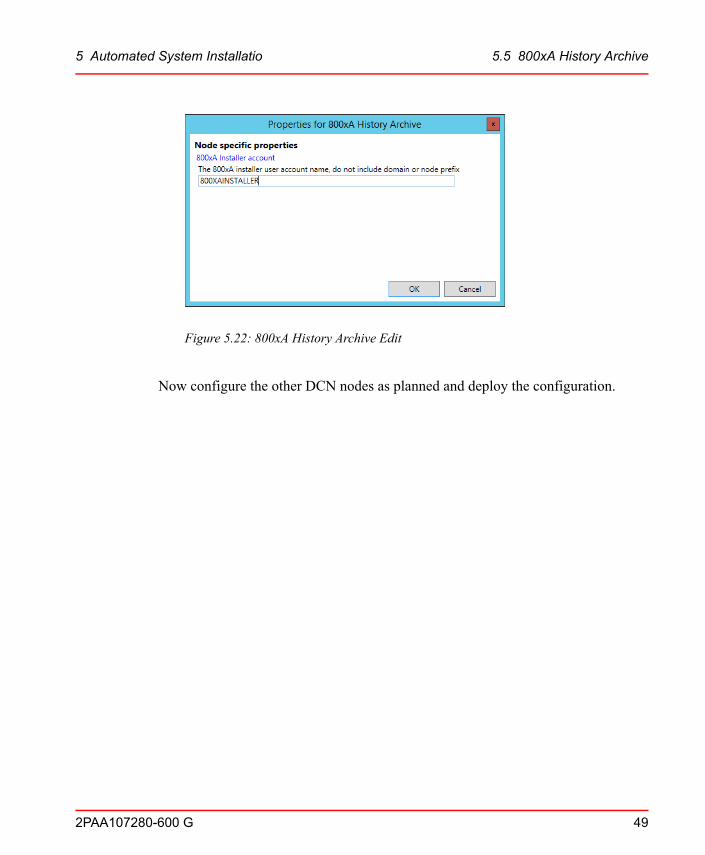
Figure 5.22: 800xA History Archive Edit
Now configure the other DCN nodes as planned and deploy the configuration.
2PAA107280-600 G 49
5 Automated System Installatio 5.5 800xA History Archive

50 2PAA107280-600 G

6 Manual Installation
The 800xAHistory Installer provides a wizard based installation. The 800xAHistoryInstaller also supports the standalone software installation on an existing node. Theinstallation types included in the 800xA History Installer are:
1. Node Installation
2. Software Installation
This section includes the installation of 800xA History Installer, 800xA HistoryServer, and 800xA History Data Collector.
6.1 Pre-InstallationBefore proceeding with the installation of 800xA History:
Perform the pre-requisites as mentioned in Section 4.2 Pre-requisites.
6.1.1 Installing 800xA History InstallerExecute the following steps to install the 800xA History Installer from the 800xAMedia "\Applications\History\History Installer\Setup.exe.
Make sure to run Setup.exe as Run as administrator.
Ensure that the media should be available in the local system and not from amapped drive for installing the software components. However, to make a localcopy of media contents for installing, ensure that the absolute path should beminimum. For example, if the contents are copied to D:\, then make a copy inD:\DVD, instead of D:\XXX\YYY\ZZZ\...\DVD.
If UAC is enabled Click Yes in the User Account Control dialog that appears toallow the program to run.
2PAA107280-600 G 51
6 Manual Installation 6.1 Pre-Installation
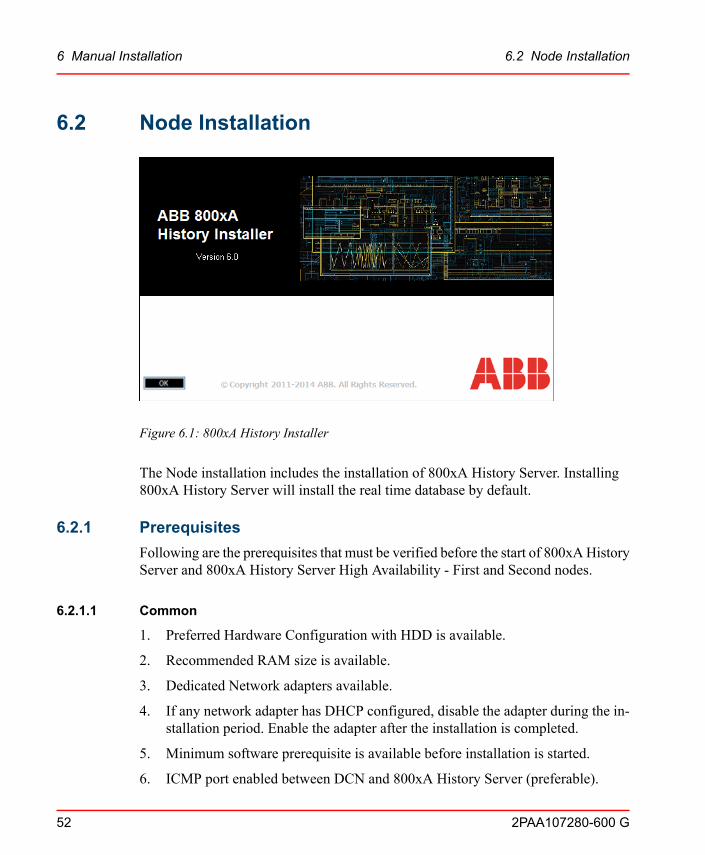
6.2 Node Installation
Figure 6.1: 800xA History Installer
The Node installation includes the installation of 800xA History Server. Installing800xA History Server will install the real time database by default.
6.2.1 PrerequisitesFollowing are the prerequisites that must be verified before the start of 800xAHistoryServer and 800xA History Server High Availability - First and Second nodes.
6.2.1.1 Common
1. Preferred Hardware Configuration with HDD is available.
2. Recommended RAM size is available.
3. Dedicated Network adapters available.
4. If any network adapter has DHCP configured, disable the adapter during the in-stallation period. Enable the adapter after the installation is completed.
5. Minimum software prerequisite is available before installation is started.
6. ICMP port enabled between DCN and 800xA History Server (preferable).
52 2PAA107280-600 G
6 Manual Installation 6.2 Node Installation

7. Only 800xA History database drive must be formatted with 64 KB allocationunit size.
8. Indexing must be disabled for the Disk Drives.
9. Installation must be performed with the user with Administrative privileges.
10. Windows Time Zone must be properly set before starting of installation.
11. Installation of the 800xA History Main Server / 800xA History Data Collectornode must be performed only from the Physical DVD media or when the buildcopied locally. Installation of 800xAHistory software from theMapped networkor shared drive is not supported.
6.2.1.2 Specific for 800xA History Server High Availability - First and Second nodes
Apart from the above listed prerequisites there are certain specific requirements tobe verified for High Availability servers.
First Node
1. Windows Host file must be updated with NLB IPs (refer Configuring NetworkLoad Balancing (NLB)).
2. Time synchronization must be performed between the redundant servers. It ismandatory that High Availability Servers must be synchronized with less thansecond difference. So it is advisable to use common time source.
3. NLB Settings must be performed (refer Configuring Network Load Balancing(NLB)).
Replica Node
1. It is mandatory to have online copy of the first node ready before starting theinstallation (refer Preparing online backup of the first node ).
2PAA107280-600 G 53
6 Manual Installation 6.2 Node Installation
6.2.2 800xA History Server Installation
6.2.2.1 Installing 800xA History Server
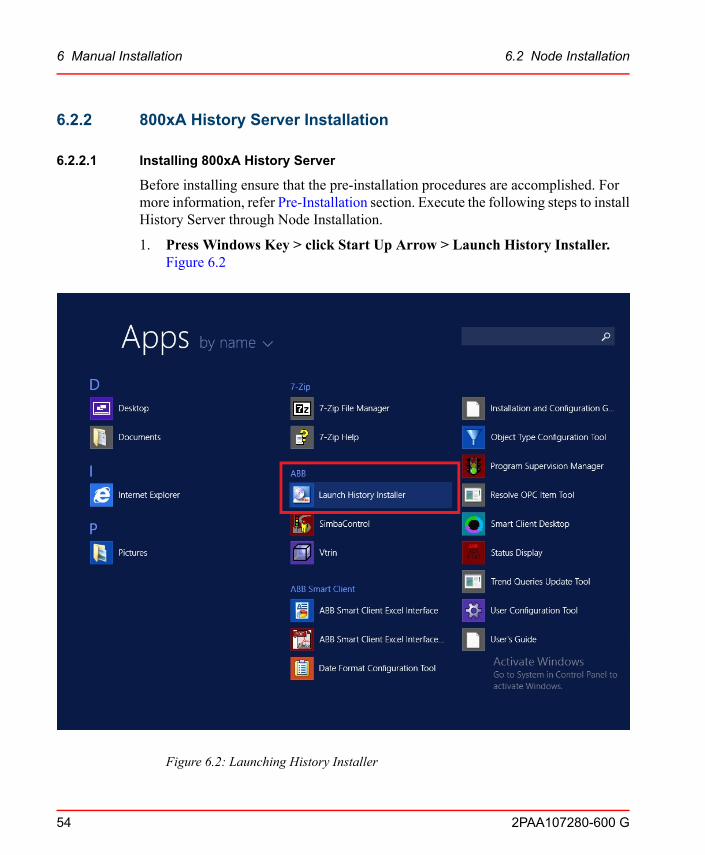
Before installing ensure that the pre-installation procedures are accomplished. Formore information, refer Pre-Installation section. Execute the following steps to installHistory Server through Node Installation.
1. Press Windows Key > click Start Up Arrow > Launch History Installer.Figure 6.2
Figure 6.2: Launching History Installer
54 2PAA107280-600 G
6 Manual Installation 6.2 Node Installation
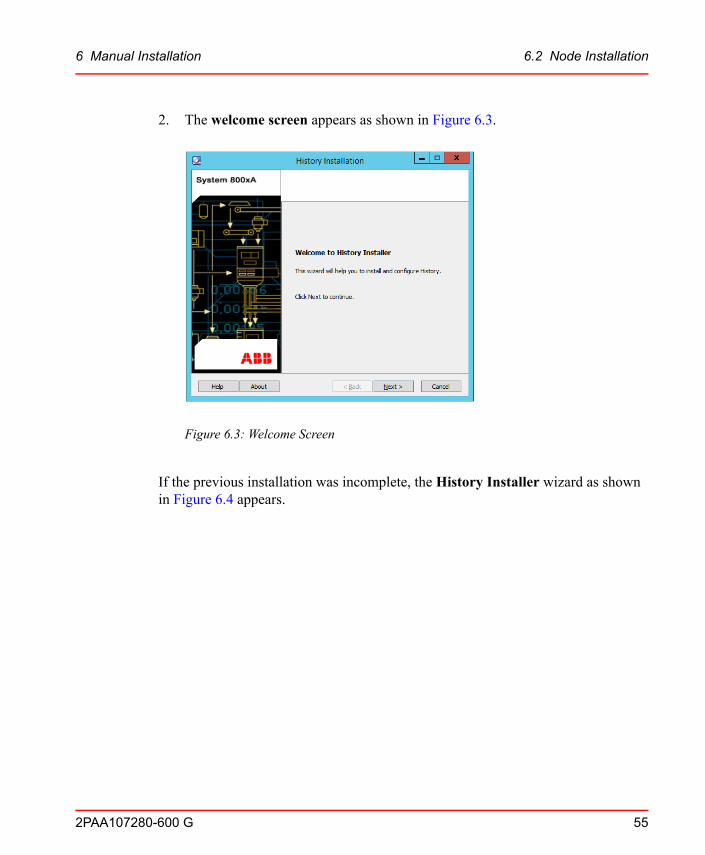
2. The welcome screen appears as shown in Figure 6.3.
Figure 6.3: Welcome Screen
If the previous installation was incomplete, the History Installer wizard as shownin Figure 6.4 appears.
2PAA107280-600 G 55
6 Manual Installation 6.2 Node Installation

Figure 6.4: History Installer Wizard
This wizard inludes the following options:
Continue with the Previous Installation - Select this option to restore the installationfrom the point where the previous installation was cancelled.
Start a Fresh Installation - Select this option to start the fresh installation.
1. Select one of the above options and click Next to continue with the installation.
2. Click Next in theWelcome screen to view Analyze wizard.
TheAnalyzewizard performs the media verification. If the media folder structuredoes not include any folder, sub-folder, or a file, an appropriate error message isdisplayed for locating the missing file or folder. The installation proceeds onlyafter locating files or folders manually.
3. In the Install Option wizard as shown in Figure 6.5, select Fresh Installation
Install Option wizard appears only when the user attempts to re-install the appli-cation using History Installer. If the user is performing the installation for the firsttime, then they are directed to Step 4..
56 2PAA107280-600 G
6 Manual Installation 6.2 Node Installation

Figure 6.5: Install Option wizard
4. In Install Type Selectionwizard as shown in Figure 6.6, select the type of instal-lation.
2PAA107280-600 G 57
6 Manual Installation 6.2 Node Installation

Figure 6.6: Installation Type Selection wizard
a. Select Node Installation option.
b. Select History Server from the drop-down list.
5. Click Next to view System Settings wizard as shown in Figure 6.7 and Figure6.8.
58 2PAA107280-600 G
6 Manual Installation 6.2 Node Installation

Figure 6.7: System Settings Wizard - Join this node to Workgroup is selected
2PAA107280-600 G 59
6 Manual Installation 6.2 Node Installation

Figure 6.8: History Installer-Domain configuration
6. Do the following in the System Settings wizard:
a. In the System Setting section, enter History Server name in the ComputerName field.
A maximum of 15 characters are allowed in the Computer Name field. Thecomputer will be renamed to the name provided in Computer Name field.
Select the Use current computer name check box to use the current computername.
b. In theWindowsWorkgroup / Domain Settings section, do the following:
• Click Join this node to a Workgroup as shown in Figure 6.7, if thenode should belong to a Workgroup. The users displayed in the Inputwizard are automatically created. The completeWorkgroup name shouldbe specified inWorkgroup/Domain name field. By default, theWorkgroup name isWorkgroup and continue with Step 7..
60 2PAA107280-600 G
6 Manual Installation 6.2 Node Installation

Select Use current Workgroup name check box to use the current workgroupname and the workgroup namewill be auto-populated in theWorkgroup/Domainfield.
If the entered Workgroup name does not exist, an error message stating “InvalidWorkgroup Name” appears.
• Click Join this node to an existing domain as shown in Figure 6.8, toinstall History under existing domain and provide the domain name inWorkgroup/Domain name field and continue with Step 7..
If the machine is already added to a domain, then click Join this node to an exist-ing Domain and select Use current Domain check box and the domain namewill be autopopulated in theWorkgroup/Domain field.
If History Server is installed in a Domain Environment, verify the fol-lowing:
• Verify that IPv6 in Network Adapters are disabled.
• Verify that domain user used for installation is existing in DomainController.
• Verify that the domain is in the same network as the History Server.
7. Click Next to view Local Region Settings wizard as shown in Figure 6.9.
2PAA107280-600 G 61
6 Manual Installation 6.2 Node Installation
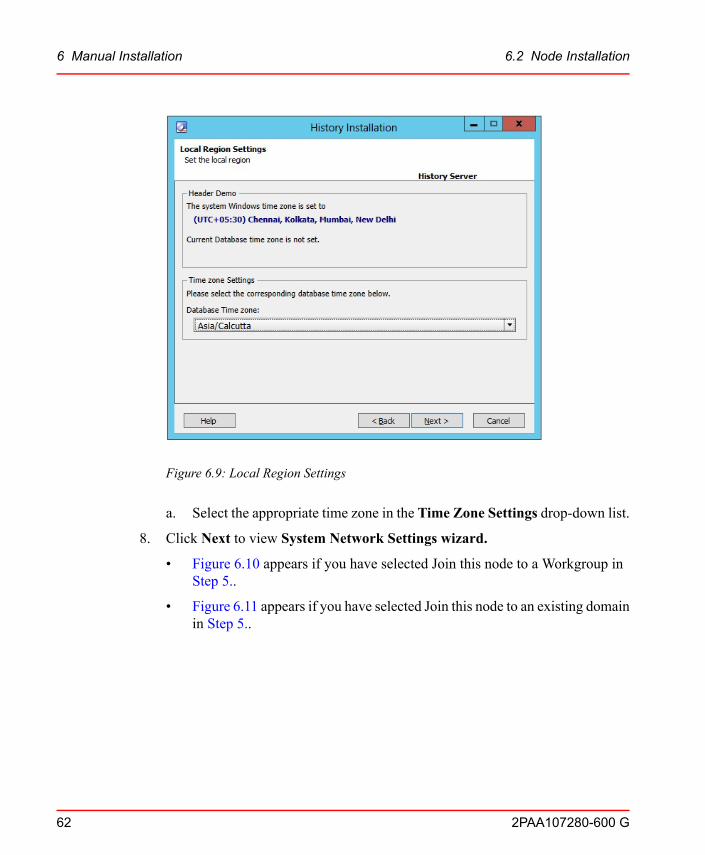
Figure 6.9: Local Region Settings
a. Select the appropriate time zone in the Time Zone Settings drop-down list.
8. Click Next to view System Network Settings wizard.
• Figure 6.10 appears if you have selected Join this node to a Workgroup inStep 5..
• Figure 6.11 appears if you have selected Join this node to an existing domainin Step 5..
62 2PAA107280-600 G
6 Manual Installation 6.2 Node Installation

Figure 6.10: System Network Settings wizard
2PAA107280-600 G 63
6 Manual Installation 6.2 Node Installation

Figure 6.11: System Network Settings wizard
a. Select the appropriate Network Adapter check box to be configured.
To use a different IP address, click the IP Address next to the applicable adapterand then type the appropriate IP address. The entered IP address will be set by theHistory Installer during the installation process.
The network adapter selected here will be used for data communication betweenHistory Server and 800xA History Data Collector.
b. Enter the default gateway in the Default Gateway column.
To ignore the default gateway mentioned, select Ignore Default Gateway IPcheck box.
9. Click Next to view User Account Settings wizard to specify the System Usersdetails as shown in Figure 6.12.
64 2PAA107280-600 G
6 Manual Installation 6.2 Node Installation
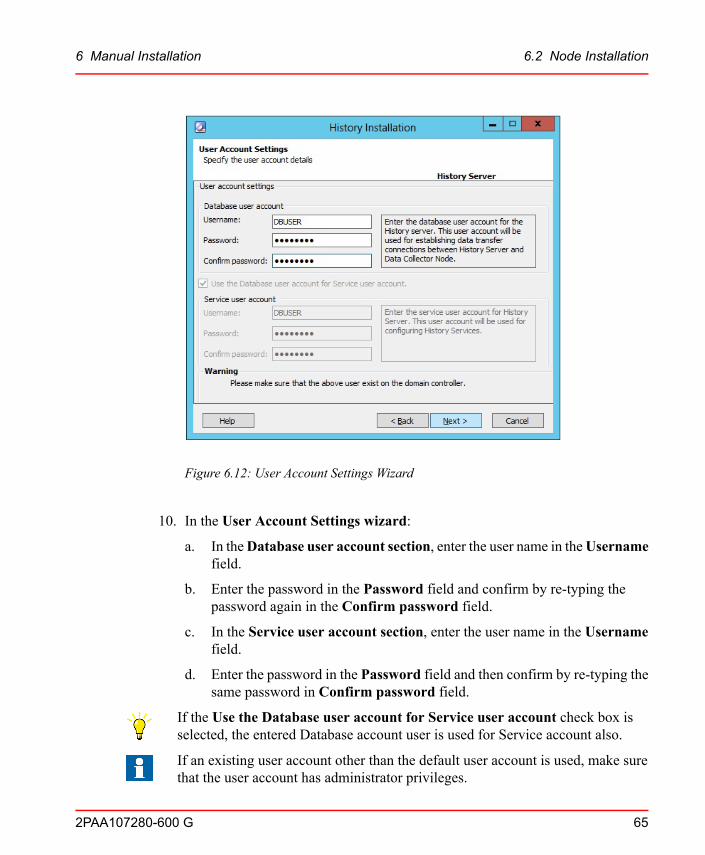
Figure 6.12: User Account Settings Wizard
10. In the User Account Settings wizard:
a. In theDatabase user account section, enter the user name in theUsernamefield.
b. Enter the password in the Password field and confirm by re-typing thepassword again in the Confirm password field.
c. In the Service user account section, enter the user name in the Usernamefield.
d. Enter the password in the Password field and then confirm by re-typing thesame password in Confirm password field.
If the Use the Database user account for Service user account check box isselected, the entered Database account user is used for Service account also.
If an existing user account other than the default user account is used, make surethat the user account has administrator privileges.
2PAA107280-600 G 65
6 Manual Installation 6.2 Node Installation
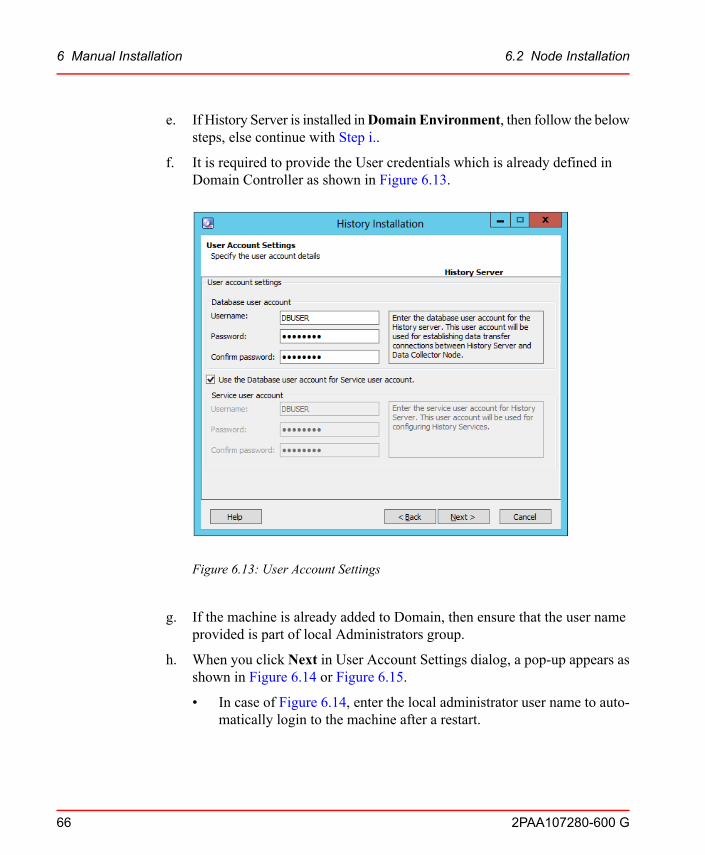
e. If History Server is installed inDomain Environment, then follow the belowsteps, else continue with Step i..
f. It is required to provide the User credentials which is already defined inDomain Controller as shown in Figure 6.13.
Figure 6.13: User Account Settings
g. If the machine is already added to Domain, then ensure that the user nameprovided is part of local Administrators group.
h. When you click Next in User Account Settings dialog, a pop-up appears asshown in Figure 6.14 or Figure 6.15.
• In case of Figure 6.14, enter the local administrator user name to auto-matically login to the machine after a restart.
66 2PAA107280-600 G
6 Manual Installation 6.2 Node Installation

Figure 6.14: Logon Dialog - Administrator
• In case of Figure 6.15, where machine is already added to domain, enterdomain user name that is added to local administrators group to auto-matically login to the machine after a restart.
Figure 6.15: Logon Dialog - Installer
2PAA107280-600 G 67
6 Manual Installation 6.2 Node Installation
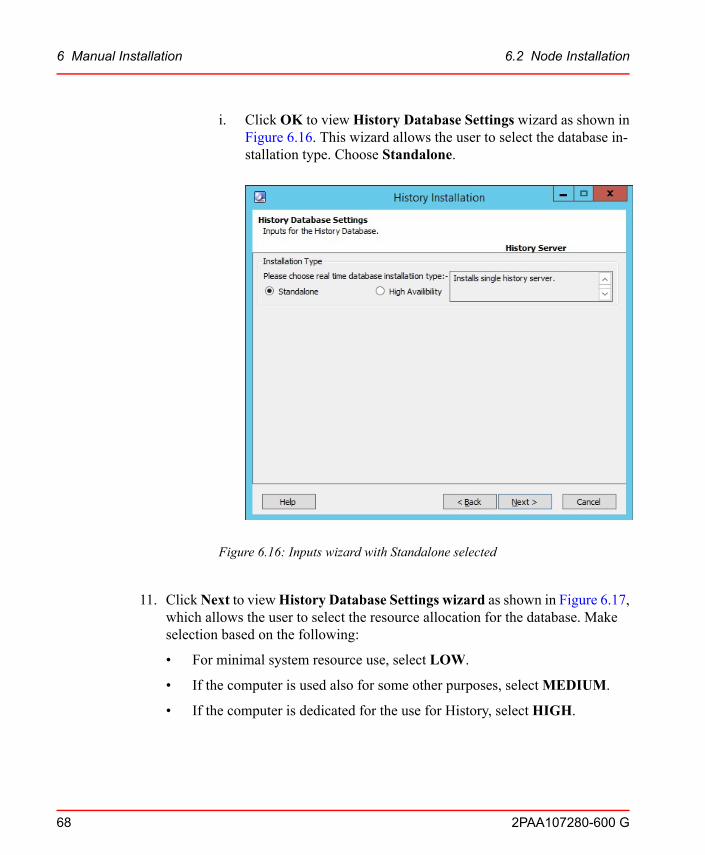
i. ClickOK to view History Database Settings wizard as shown inFigure 6.16. This wizard allows the user to select the database in-stallation type. Choose Standalone.
Figure 6.16: Inputs wizard with Standalone selected
11. ClickNext to viewHistory Database Settings wizard as shown in Figure 6.17,which allows the user to select the resource allocation for the database. Makeselection based on the following:
• For minimal system resource use, select LOW.
• If the computer is used also for some other purposes, selectMEDIUM.
• If the computer is dedicated for the use for History, select HIGH.
68 2PAA107280-600 G
6 Manual Installation 6.2 Node Installation
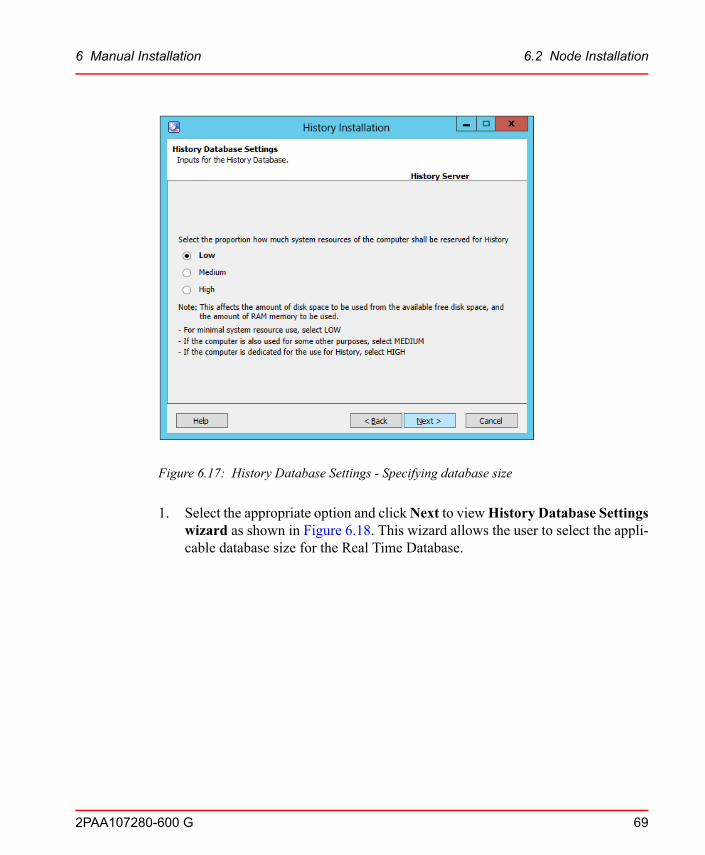
Figure 6.17: History Database Settings - Specifying database size
1. Select the appropriate option and clickNext to viewHistory Database Settingswizard as shown in Figure 6.18. This wizard allows the user to select the appli-cable database size for the Real Time Database.
2PAA107280-600 G 69
6 Manual Installation 6.2 Node Installation

Figure 6.18: History Database Settings - Database and Backup Drive
2. In the History Database Settings wizard:
a. Select the appropriate drive option from Database Drive drop-down list tostore the database.
Make sure that the selected database drive has been initialized using 64 KB allo-cation unit size. If the selected drive does not have the recommended cluster size(Allocation unit size), an error message indicating the same appears. For moreinformation about formatting a drive in 64 KB allocation unit size, referMicrosoftdocumentation.
b. Select the appropriate drive option from Backup Drive drop-down list. Theselected drive will be a backup for the database.
3. Click Next to view History Database Settings wizard, which confirms the 64KB 64 KB allocation unit size on the selected database drive.
4. Click Next to view Software License wizard as shown in Figure 6.19.
70 2PAA107280-600 G
6 Manual Installation 6.2 Node Installation

Figure 6.19: Software License wizard
5. Accept the license agreement and click Next to view Confirm Setup wizard asshown in Figure 6.20.
2PAA107280-600 G 71
6 Manual Installation 6.2 Node Installation

Figure 6.20: Confirm Setup wizard
6. ClickNext to performWindows Configuration and Product Setup automati-cally.After the configuration, and product installation is completed, a Shutdownwarning dialog appears as shown in Figure 6.21.
Figure 6.21: Shutdown Warning
72 2PAA107280-600 G
6 Manual Installation 6.2 Node Installation
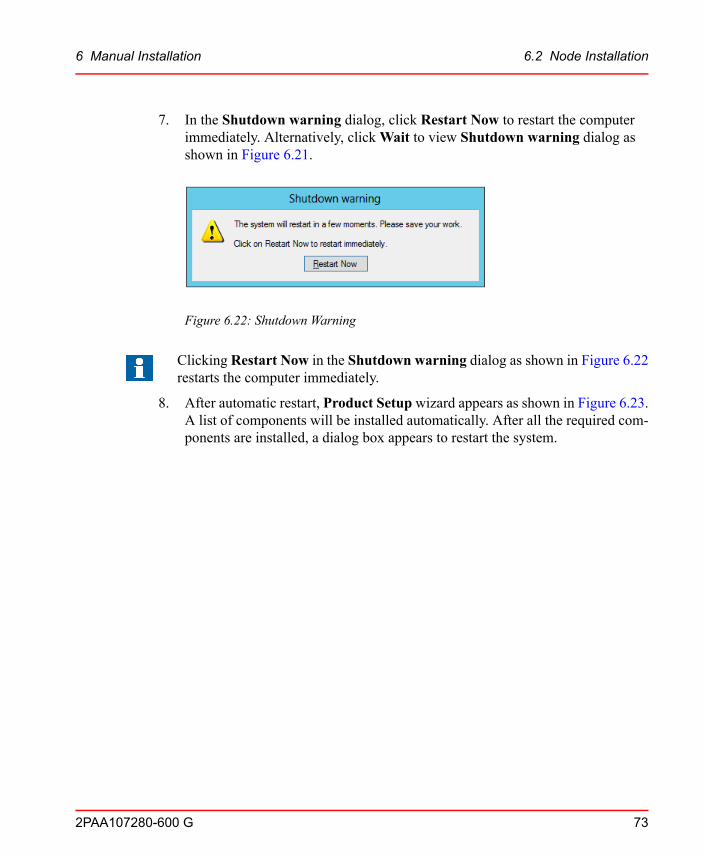
7. In the Shutdown warning dialog, click Restart Now to restart the computerimmediately. Alternatively, clickWait to view Shutdown warning dialog asshown in Figure 6.21.
Figure 6.22: Shutdown Warning
Clicking Restart Now in the Shutdown warning dialog as shown in Figure 6.22restarts the computer immediately.
8. After automatic restart, Product Setup wizard appears as shown in Figure 6.23.A list of components will be installed automatically. After all the required com-ponents are installed, a dialog box appears to restart the system.
2PAA107280-600 G 73
6 Manual Installation 6.2 Node Installation

Figure 6.23: Product Setup wizard
If Windows logged in as a user, user credentials will be changed automatically byHistory Installer.
9. ClickRestart Now to restart the system immediately. After restarting, the instal-lation will continue from this step automatically.
10. After restart is completed, Firewall Exceptions wizard appears as shown inFigure 6.24, which indicates the progress of the firewall configuration.
74 2PAA107280-600 G
6 Manual Installation 6.2 Node Installation
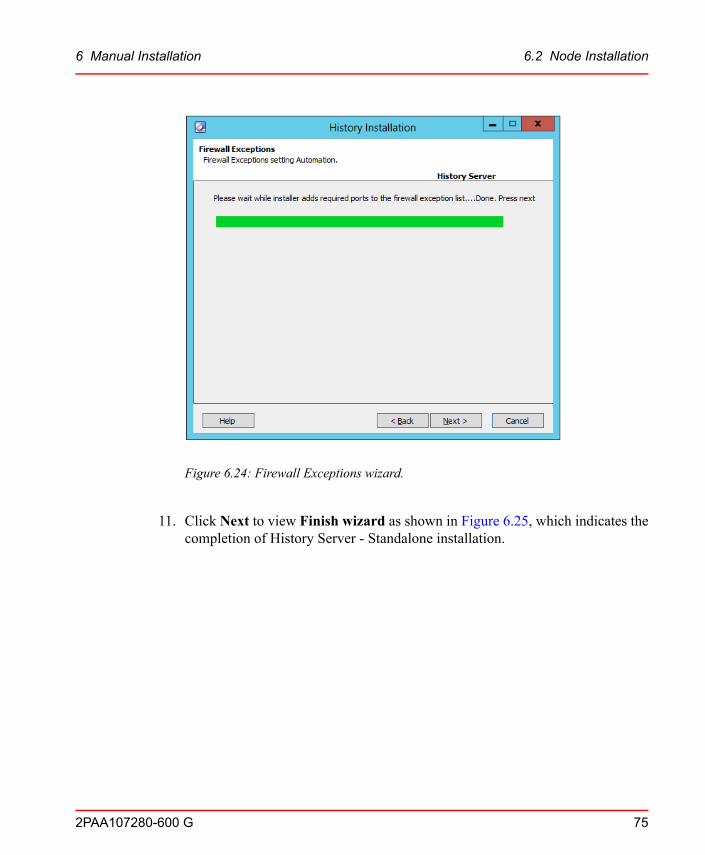
Figure 6.24: Firewall Exceptions wizard.
11. Click Next to view Finish wizard as shown in Figure 6.25, which indicates thecompletion of History Server - Standalone installation.
2PAA107280-600 G 75
6 Manual Installation 6.2 Node Installation
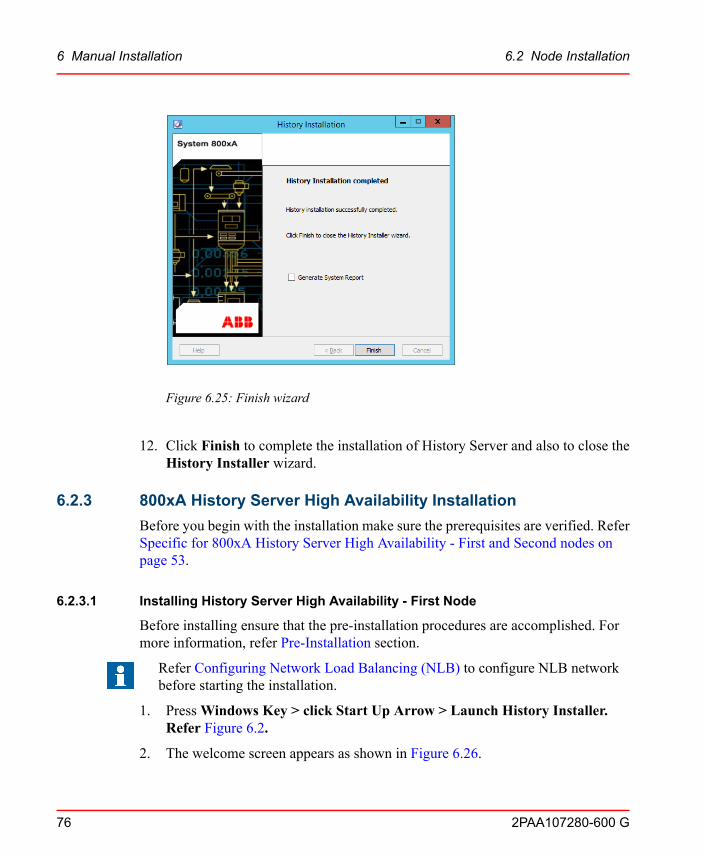
Figure 6.25: Finish wizard
12. Click Finish to complete the installation of History Server and also to close theHistory Installer wizard.
6.2.3 800xA History Server High Availability InstallationBefore you begin with the installation make sure the prerequisites are verified. ReferSpecific for 800xA History Server High Availability - First and Second nodes onpage 53.
6.2.3.1 Installing History Server High Availability - First Node
Before installing ensure that the pre-installation procedures are accomplished. Formore information, refer Pre-Installation section.
Refer Configuring Network Load Balancing (NLB) to configure NLB networkbefore starting the installation.
1. PressWindows Key > click Start Up Arrow > Launch History Installer.Refer Figure 6.2.
2. The welcome screen appears as shown in Figure 6.26.
76 2PAA107280-600 G
6 Manual Installation 6.2 Node Installation
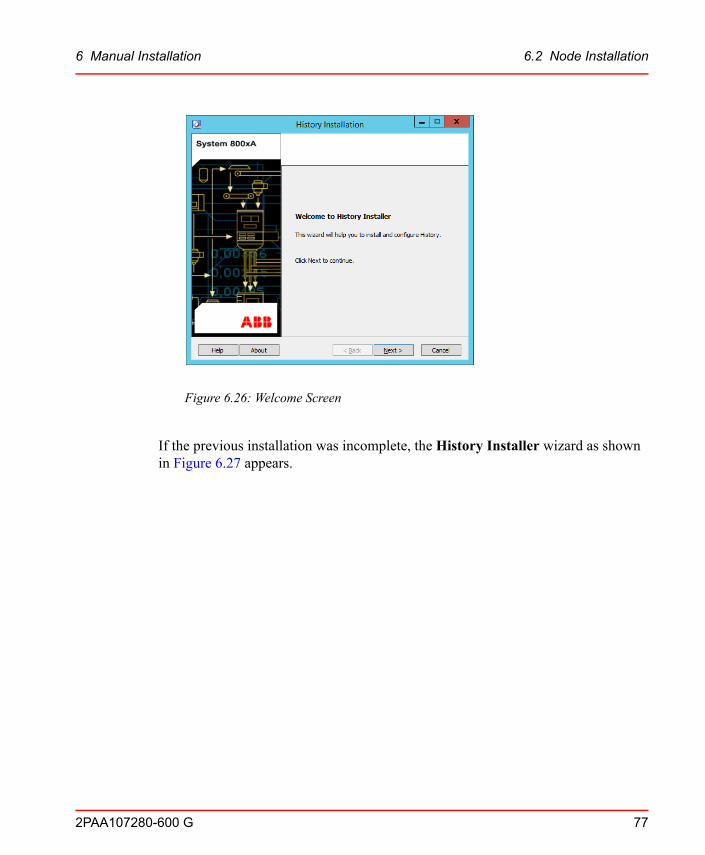
Figure 6.26: Welcome Screen
If the previous installation was incomplete, the History Installer wizard as shownin Figure 6.27 appears.
2PAA107280-600 G 77
6 Manual Installation 6.2 Node Installation
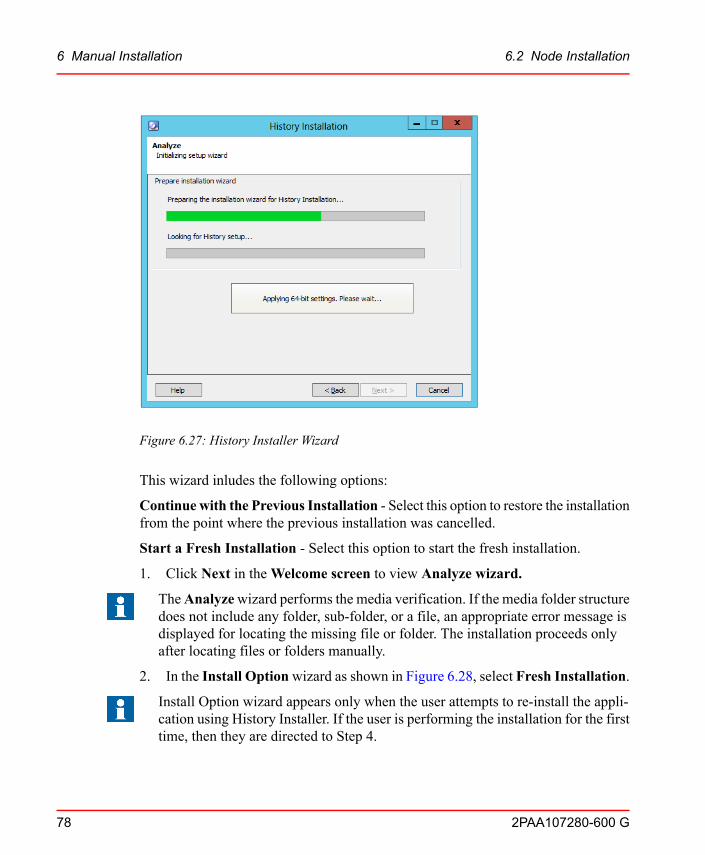
Figure 6.27: History Installer Wizard
This wizard inludes the following options:
Continue with the Previous Installation - Select this option to restore the installationfrom the point where the previous installation was cancelled.
Start a Fresh Installation - Select this option to start the fresh installation.
1. Click Next in theWelcome screen to view Analyze wizard.
TheAnalyzewizard performs the media verification. If the media folder structuredoes not include any folder, sub-folder, or a file, an appropriate error message isdisplayed for locating the missing file or folder. The installation proceeds onlyafter locating files or folders manually.
2. In the Install Optionwizard as shown in Figure 6.28, select Fresh Installation.
Install Option wizard appears only when the user attempts to re-install the appli-cation using History Installer. If the user is performing the installation for the firsttime, then they are directed to Step 4.
78 2PAA107280-600 G
6 Manual Installation 6.2 Node Installation
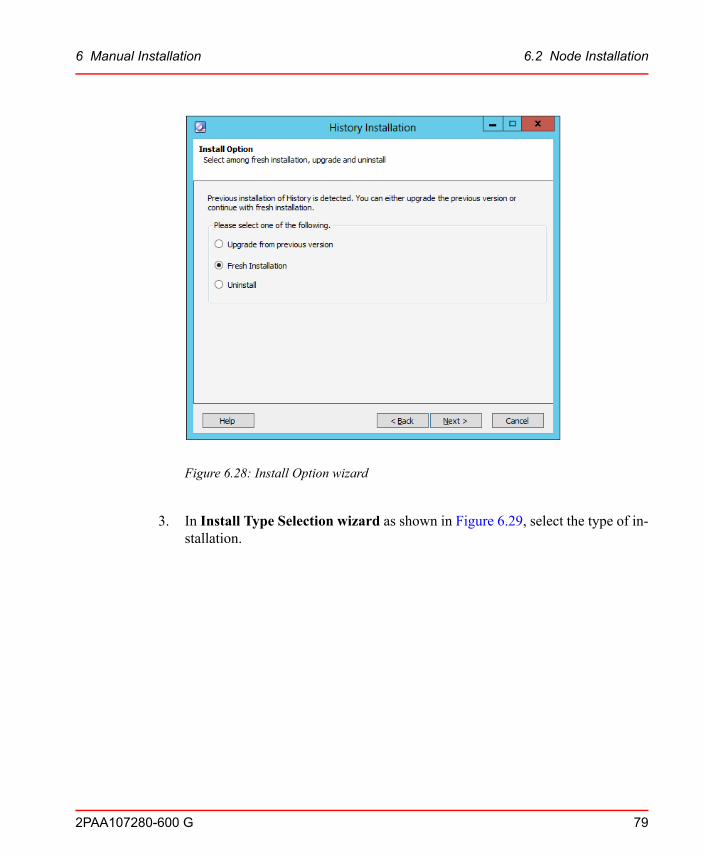
Figure 6.28: Install Option wizard
3. In Install Type Selection wizard as shown in Figure 6.29, select the type of in-stallation.
2PAA107280-600 G 79
6 Manual Installation 6.2 Node Installation
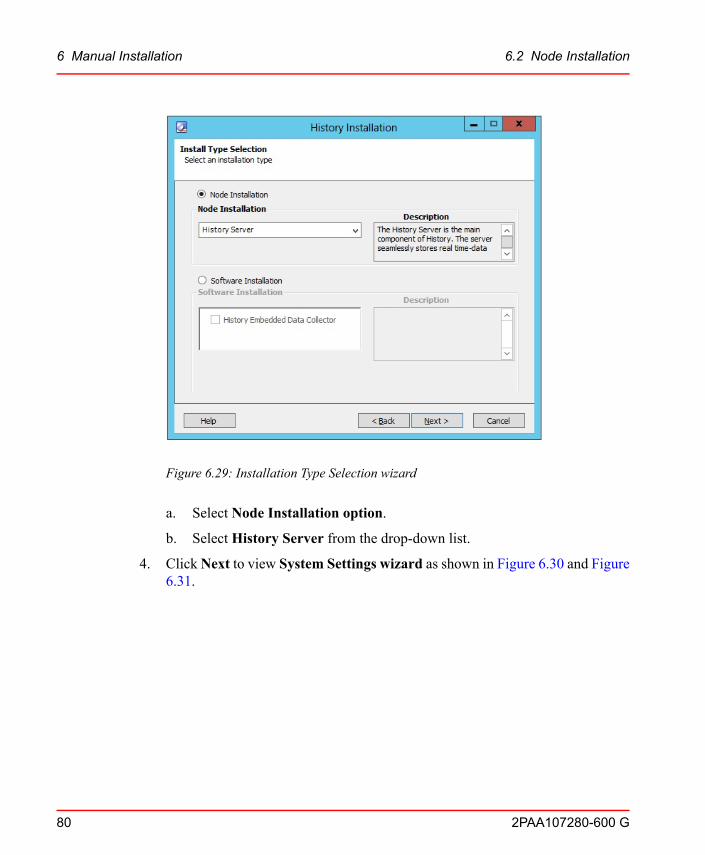
Figure 6.29: Installation Type Selection wizard
a. Select Node Installation option.
b. Select History Server from the drop-down list.
4. ClickNext to view System Settings wizard as shown in Figure 6.30 and Figure6.31.
80 2PAA107280-600 G
6 Manual Installation 6.2 Node Installation

Figure 6.30: System Settings Wizard - Join this node to Workgroup is selected
2PAA107280-600 G 81
6 Manual Installation 6.2 Node Installation

Figure 6.31: History Installer - Domain Configuration
5. Do the following in the System Settings wizard:
a. In the System Setting section, enter History Server name in the ComputerName field.
A maximum of 15 characters are allowed in the Computer Name field. Thecomputer will be renamed to the name provided in Computer Name field.
Select the Use current computer name check box to use the current computername.
b. In theWindowsWorkgroup / Domain Settings section, do the following:
• Click Join this node to a Workgroup as shown in Figure 6.30, if thenode should belong to a Workgroup. The users displayed in the Inputwizard are automatically created. The completeWorkgroup name shouldbe specified inWorkgroup/Domain name field and continue with Step6.. By default, the Workgroup name isWorkgroup.
82 2PAA107280-600 G
6 Manual Installation 6.2 Node Installation

Select Use current Workgroup name check box to use the current workgroupname and the workgroup namewill be auto-populated in theWorkgroup/Domainfield.
If the entered Workgroup name does not exist, an error message stating “InvalidWorkgroup Name” appears.
• Click Join this node to an existing Domain as shown in Figure 6.31,to install History under existing domain and provide the domain namein Workgroup/Domain name field and continue with Step 6..
If the machine is already added to a domain, then click Join this node to an exist-ing Domain and select Use current Domain check box and the domain namewill be autopopulated in theWorkgroup/Domain field.
When installing in a Domain Environment, verify the following:
• Verify that IPv6 in Network Adapters are disabled.
• Verify that domain user used for installation is existing in DomainController.
• Verify that the domain is in the same network as the History Server.
6. Click Next to view Local Region Settings wizard as shown in Figure 6.32.
2PAA107280-600 G 83
6 Manual Installation 6.2 Node Installation

Figure 6.32: Local Region Settings wizard
a. Select the appropriate time zone in the Time Zone Settings drop-down list.
7. Click Next to view System Network Settings wizard.
• Figure 6.33 appears if you have selected Join this node to a Workgroup inStep 4..
• Figure 6.34 appears if you have selected Join this node to an existing domainin Step 4..
84 2PAA107280-600 G
6 Manual Installation 6.2 Node Installation
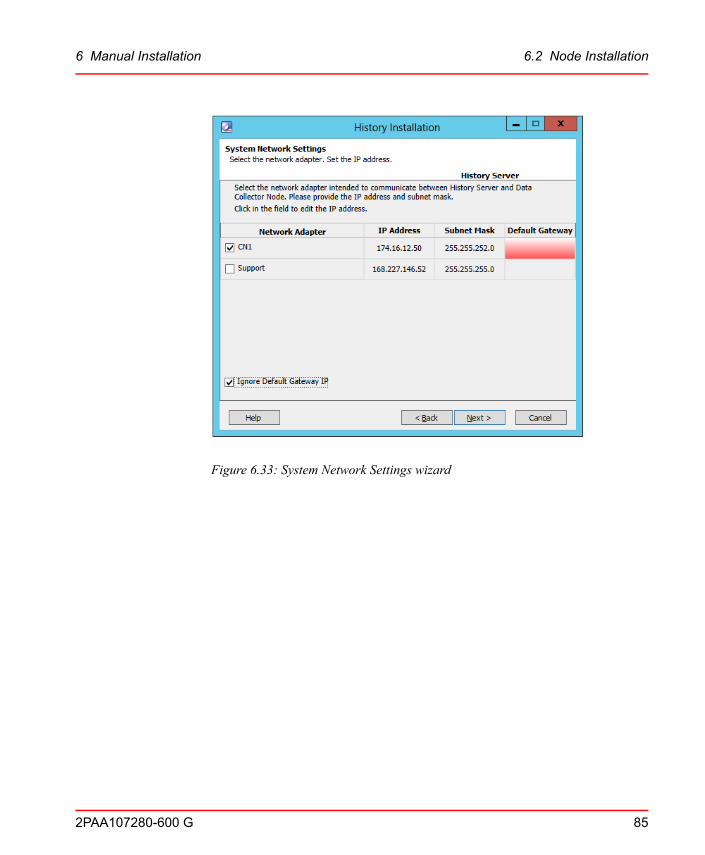
Figure 6.33: System Network Settings wizard
2PAA107280-600 G 85
6 Manual Installation 6.2 Node Installation

Figure 6.34: System Network Settings wizard
Select the NLB network. This network will be used for data communication be-tween History Servers and 800xA History Data Collectors.
a. Select the appropriate Network Adapter check box to be configured.
To use a different IP address, click the IP Address next to the applicable adapterand then type the appropriate IP address. The entered IP address will be set by theHistory Installer during the installation process.
b. Enter the default gateway in the Default Gateway column.
To ignore the default gateway mentioned, select the check box Ignore DefaultGateway IP.
8. Click Next to view User Account Settings wizard to specify the System Usersdetails as shown in Figure 6.35.
86 2PAA107280-600 G
6 Manual Installation 6.2 Node Installation

Figure 6.35: User Account Settings wizard
9. In the User Account Settings wizard:
a. In theDatabase user account section, enter the user name in theUsernamefield. Enter the password in the Password field and confirm by re-typingthe password again in the Confirm password field.
b. In the Service user account section, enter the user name in the Usernamefield.
c. Enter the password in the Password field and then confirm by re-typing thesame password in Confirm password field.
If the Use the Database user account for Service user account check box isselected, the entered Database account user is used for Service account also.
If an existing user account other than the default user account is used, make surethat the user account has administrator privileges.
2PAA107280-600 G 87
6 Manual Installation 6.2 Node Installation

d. If History Server is installed in domain environment, then follow the belowsteps, else continue with Step g..
e. It is required to provide the User credentials which is already defined inDomain Controller as shown in Figure 6.36.
Figure 6.36: User Account Settings
f. If the machine is already added to Domain, then ensure that the user nameprovided is part of local Administrators group.
g. When you click Next in User Account Settings dialog, a pop-up appears asshown in Figure 6.37 or Figure 6.38.
• In case of Figure 6.36, enter the local administrator user name to auto-matically login to the machine after a restart.
88 2PAA107280-600 G
6 Manual Installation 6.2 Node Installation

Figure 6.37: Logon Dialog - Administrator
• In case of Figure 6.38, where machine is already added to domain, enterdomain user name that is added to local administrators group to auto-matically login to the machine after a restart.
Figure 6.38: Logon Dialog - Installer
10. Click OK to view History Database Settings wizard as shown in Figure 6.39.This wizard allows to select the database installation type.
2PAA107280-600 G 89
6 Manual Installation 6.2 Node Installation

a. In Installation Type section, select High Availability.
b. In Inputs for High Availability section, select First Node.
c. Enter the Common System Name, which is the NLB name that is definedduring Configuring Network Load Balancing (NLB).
d. Select the IP address, which is used for High Availability servers.
Select theConsistency Controller Network and not NLB network. This networkis dedicated for data synchronization between High Availability Servers.
Figure 6.39: History Database Settings wizard with High Availability - First Nodeselected
11. ClickNext to viewHistory Database Settings wizard as shown in Figure 6.40,which allows the user to select the resource allocation for the database. Makeselection based on the following:
• For minimal system resource use, select LOW.
90 2PAA107280-600 G
6 Manual Installation 6.2 Node Installation

• If the computer is used also for some other purposes, selectMEDIUM.
• If the computer is dedicated for the use for History, select HIGH.
Figure 6.40: History Database Settings - Specifying database size
12. Select the appropriate option and clickNext to viewHistory Database Settingswizard as shown in Figure 6.41. This wizard allows the user to select the appli-cable database size for the Real Time Database.
2PAA107280-600 G 91
6 Manual Installation 6.2 Node Installation

Figure 6.41: History Database Settings - Database and Backup Drive
a. Select the appropriate drive option from Database Drive drop-down list tostore the database.
Make sure that the selected database drive has been initialized using 64 KB allo-cation unit size. If the selected drive does not have the recommended cluster size(Allocation unit size), an error message indicating the same appears. For moreinformation about formatting a drive in 64 KB allocation unit size , refer Microsoftdocumentation.
b. Select the appropriate drive option from Backup Drive drop-down list. Theselected drive will be a backup for the database.
13. Click Next to view History Database Settings wizard, which confirms the 64KB allocation unit size on the selected database drive.
14. Click Next to view Software License wizard as shown in Figure 6.42.
92 2PAA107280-600 G
6 Manual Installation 6.2 Node Installation

Figure 6.42: Software License wizard
15. Accept the license agreement and click Next to view Confirm Setup wizard asshown in Figure 6.43.
2PAA107280-600 G 93
6 Manual Installation 6.2 Node Installation
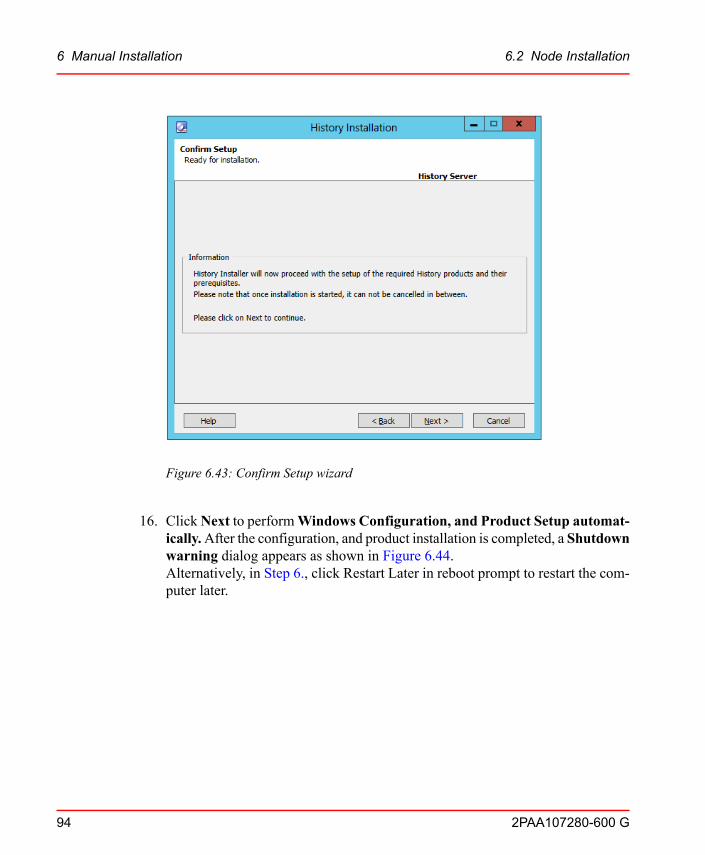
Figure 6.43: Confirm Setup wizard
16. ClickNext to performWindows Configuration, and Product Setup automat-ically.After the configuration, and product installation is completed, a Shutdownwarning dialog appears as shown in Figure 6.44.Alternatively, in Step 6., click Restart Later in reboot prompt to restart the com-puter later.
94 2PAA107280-600 G
6 Manual Installation 6.2 Node Installation

Figure 6.44: Shutdown Warning Progress
17. In the Shutdown warning dialog, click Restart Now to restart the computerimmediately. Alternatively, clickWait to view Shutdown warning dialog asshown in Figure 6.45.
Figure 6.45: Shutdown Warning
Clicking Restart Now in the Shutdown warning dialog as shown in Figure 6.44restarts the computer immediately.
18. After automatic restart, Product Setup wizard appears as shown in Figure 6.46.A list of components will be installed automatically. After all the required com-ponents are installed, a dialog box appears to restart the system.
2PAA107280-600 G 95
6 Manual Installation 6.2 Node Installation
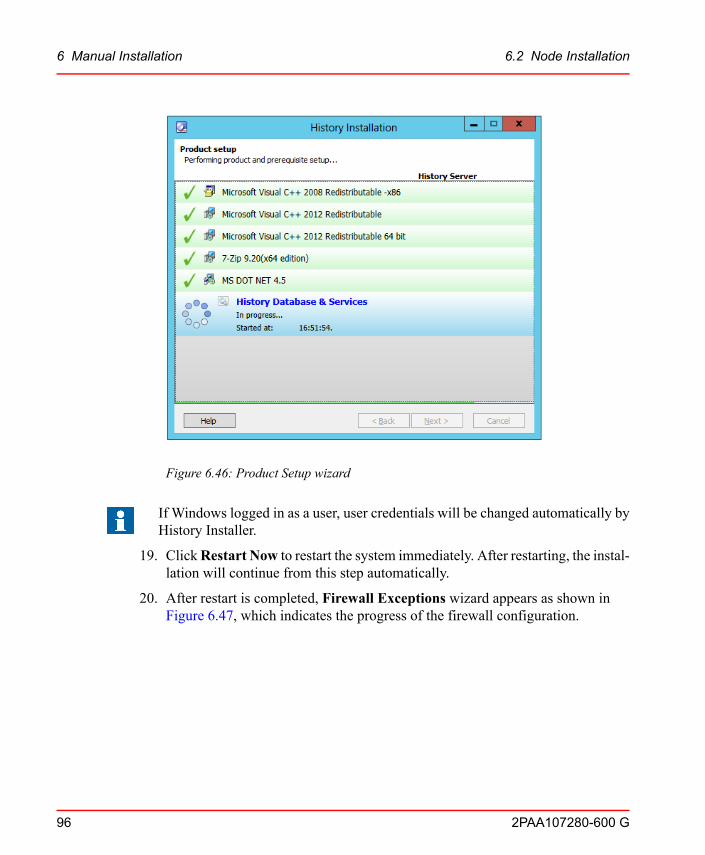
Figure 6.46: Product Setup wizard
If Windows logged in as a user, user credentials will be changed automatically byHistory Installer.
19. ClickRestart Now to restart the system immediately. After restarting, the instal-lation will continue from this step automatically.
20. After restart is completed, Firewall Exceptions wizard appears as shown inFigure 6.47, which indicates the progress of the firewall configuration.
96 2PAA107280-600 G
6 Manual Installation 6.2 Node Installation

Figure 6.47: Firewall Exceptions wizard.
21. Click Next to view Finish wizard as shown in Figure 6.48, which indicates thecompletion of History Server High Availability - first node installation.
2PAA107280-600 G 97
6 Manual Installation 6.2 Node Installation
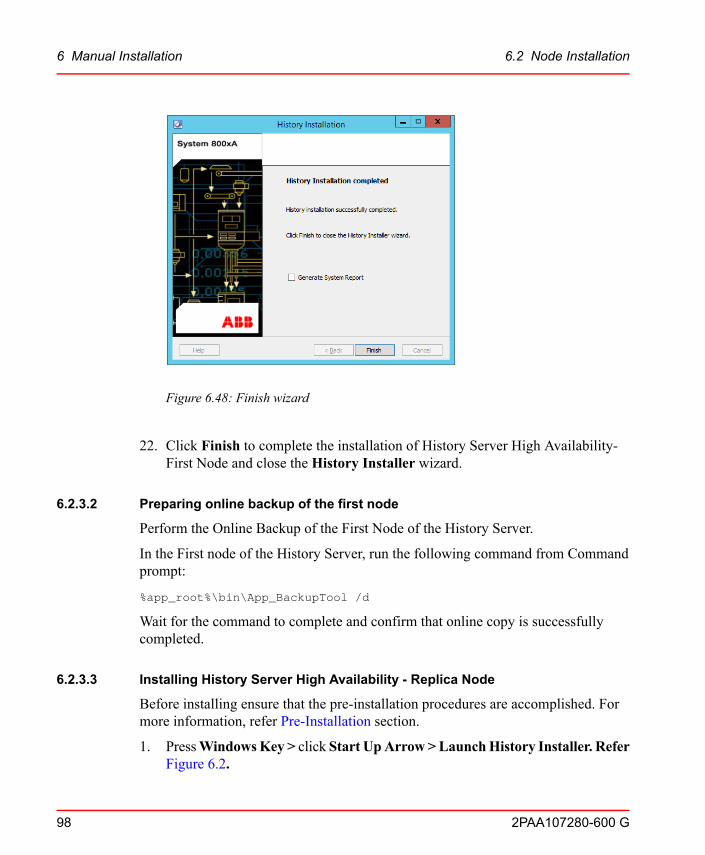
Figure 6.48: Finish wizard
22. Click Finish to complete the installation of History Server High Availability-First Node and close the History Installer wizard.
6.2.3.2 Preparing online backup of the first node
Perform the Online Backup of the First Node of the History Server.
In the First node of the History Server, run the following command from Commandprompt:
%app_root%\bin\App_BackupTool /d
Wait for the command to complete and confirm that online copy is successfullycompleted.
6.2.3.3 Installing History Server High Availability - Replica Node
Before installing ensure that the pre-installation procedures are accomplished. Formore information, refer Pre-Installation section.
1. PressWindowsKey > click Start UpArrow >LaunchHistory Installer. ReferFigure 6.2.
98 2PAA107280-600 G
6 Manual Installation 6.2 Node Installation

2. The welcome screen appears as shown in Figure 6.26
If the previous installation was incomplete, the History Installer wizard as shownin Figure 6.49 appears.
Figure 6.49: History Installer Wizard
This wizard inludes the following options:
Continue with the Previous Installation - Select this option to restore the installationfrom the point where the previous installation was cancelled.
Start a Fresh Installation - Select this option to start the fresh installation.
1. Click Next in theWelcome screen to view Analyze wizard.
TheAnalyzewizard performs the media verification. If the media folder structuredoes not include any folder, sub-folder, or a file, an appropriate error message isdisplayed for locating the missing file or folder. The installation proceeds onlyafter locating files or folders manually.
2. In the Install Option wizard as shown in Figure 6.50, select Fresh Installation
2PAA107280-600 G 99
6 Manual Installation 6.2 Node Installation
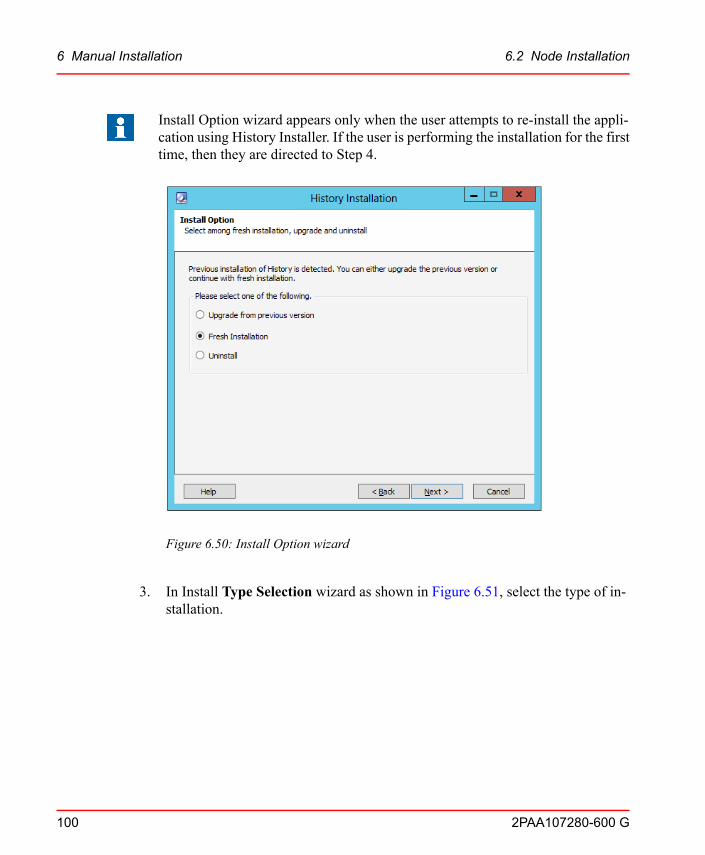
Install Option wizard appears only when the user attempts to re-install the appli-cation using History Installer. If the user is performing the installation for the firsttime, then they are directed to Step 4.
Figure 6.50: Install Option wizard
3. In Install Type Selection wizard as shown in Figure 6.51, select the type of in-stallation.
100 2PAA107280-600 G
6 Manual Installation 6.2 Node Installation
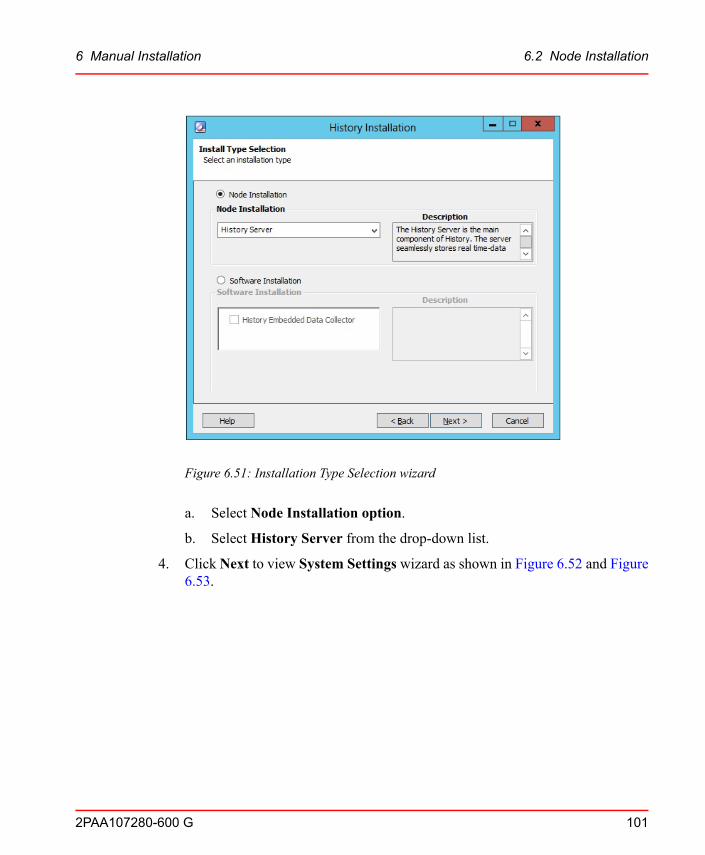
Figure 6.51: Installation Type Selection wizard
a. Select Node Installation option.
b. Select History Server from the drop-down list.
4. Click Next to view System Settings wizard as shown in Figure 6.52 and Figure6.53.
2PAA107280-600 G 101
6 Manual Installation 6.2 Node Installation

Figure 6.52: System Settings Wizard
102 2PAA107280-600 G
6 Manual Installation 6.2 Node Installation
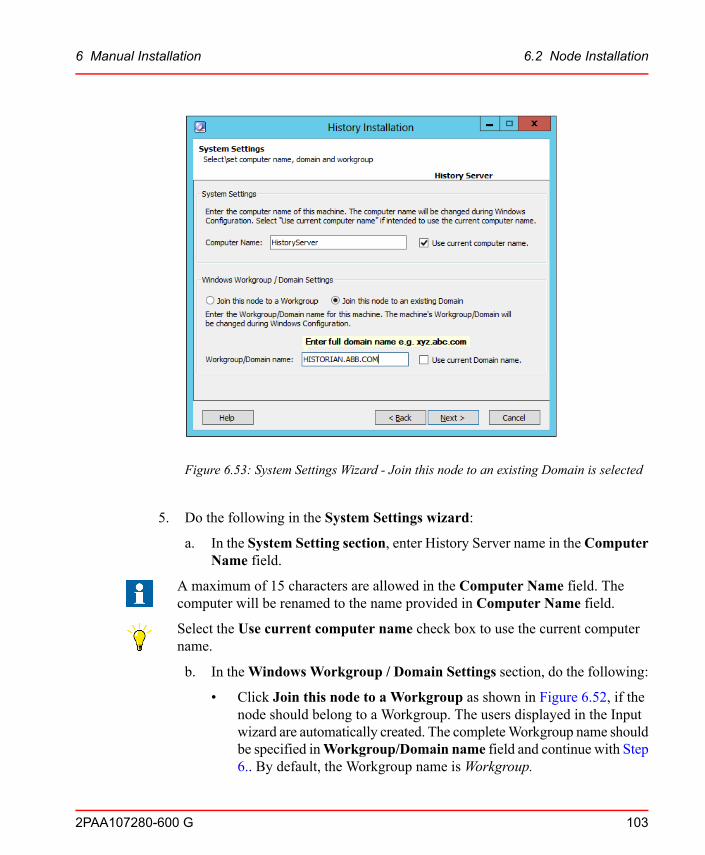
Figure 6.53: System Settings Wizard - Join this node to an existing Domain is selected
5. Do the following in the System Settings wizard:
a. In the System Setting section, enter History Server name in the ComputerName field.
A maximum of 15 characters are allowed in the Computer Name field. Thecomputer will be renamed to the name provided in Computer Name field.
Select the Use current computer name check box to use the current computername.
b. In theWindows Workgroup / Domain Settings section, do the following:
• Click Join this node to a Workgroup as shown in Figure 6.52, if thenode should belong to a Workgroup. The users displayed in the Inputwizard are automatically created. The completeWorkgroup name shouldbe specified inWorkgroup/Domain name field and continue with Step6.. By default, the Workgroup name isWorkgroup.
2PAA107280-600 G 103
6 Manual Installation 6.2 Node Installation
Select Use current Workgroup name check box to use the current workgroupname and the workgroup namewill be auto-populated in theWorkgroup/Domainfield.
If the entered Workgroup name does not exist, an error message stating “InvalidWorkgroup Name” appears.
• Click Join this node to an existing domain as shown in Figure 6.53,to install History under existing domain and provide the domain namein Workgroup/Domain name field and continue with Step 6..
If the machine is already added to a domain, then click Join this node to an exist-ing Domain and select Use current Domain check box and the domain namewill be autopopulated in theWorkgroup/Domain field.
When installing in a Domain Environment, verify the following:
• Verify that IPv6 in Network Adapters are disabled.
• Verify that domain user used for installation is existing in DomainController.
• Verify that the domain is in the same network as the History Server.
6. Click Next to view Local Region Settings wizard as shown in Figure 6.54.
104 2PAA107280-600 G
6 Manual Installation 6.2 Node Installation

Figure 6.54: Local Region Settings wizard
1. Select the appropriate time zone in the Time Zone Settings drop-down list.
a. Click Next to view System Network Settings wizard.
• Figure 6.55 appears if you have selected Join this node to a Workgroupin Step 4..
• Figure 6.56 appears if you have selected Join this node to an existingdomain in Step 4..
2PAA107280-600 G 105
6 Manual Installation 6.2 Node Installation
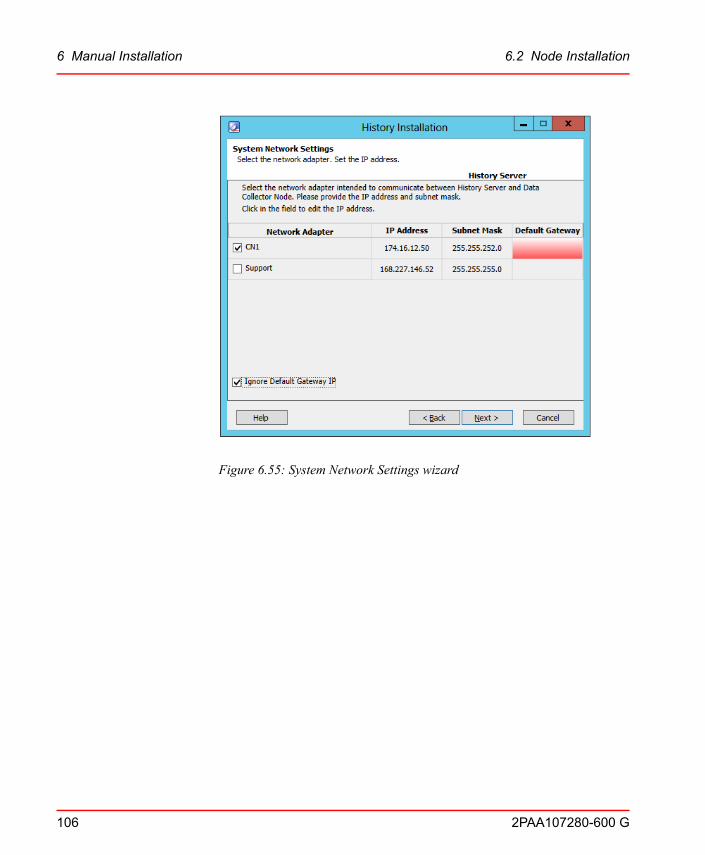
Figure 6.55: System Network Settings wizard
106 2PAA107280-600 G
6 Manual Installation 6.2 Node Installation

Figure 6.56: System Network Settings wizard
Select NLB network. This network will be used for data communication betweenHistory Server and 800xA History Data Collector.
i. Select the appropriate Network Adapter check box to be config-ured.
To use a different IP address, click the IP Address next to the applicable adapterand then type the appropriate IP address. The entered IP address will be set by theHistory Installer during the installation process.
ii. Enter the default gateway in the Default Gateway column.
To ignore the default gateway mentioned, select Ignore Default Gateway IPcheck box.
b. Click Next to view User Account Settings wizard to specify the SystemUsers details as shown in Figure 6.57.
2PAA107280-600 G 107
6 Manual Installation 6.2 Node Installation

Figure 6.57: User Account Settings wizard
i. Provide the exact username and password that was used for HighAvailability First Node. This is mandatory requirement.
ii. Enter the password in thePassword field and then confirm by re-typingthe same password in Confirm password field.
If the Use the Database user account for Service user account check box isselected, the entered Database account user is used for Service account also.
If an existing user account other than the default user account is used, make surethat the user account has administrator privileges.
iii. If History Server is installed inDomain Environment, then follow thebelow steps, else continue with Step vi..
iv. It is required to provide the User credentials which is already definedin Domain Controller as shown in Figure 6.58.
108 2PAA107280-600 G
6 Manual Installation 6.2 Node Installation

Figure 6.58: User Account Settings
v. If the machine is already added to Domain, then ensure that the username provided is part of local Administrators group.
vi. When you clickNext in User Account Settings dialog, a pop-up appearsas shown in Figure 6.59 or Figure 6.60.
• In case of Figure 6.59, enter the local administrator user name toautomatically login to the machine after a restart.
2PAA107280-600 G 109
6 Manual Installation 6.2 Node Installation

Figure 6.59: Logon Dialog - Administrator
• In case of Figure 6.60, where machine is already added to domain,enter domain user name that is added to local administrators groupto automatically login to the machine after a restart.
Figure 6.60: Logon Dialog - Installer
c. ClickOK to view Inputswizard as shown in Figure 6.61. This wizard allowsto select the database installation type.
110 2PAA107280-600 G
6 Manual Installation 6.2 Node Installation
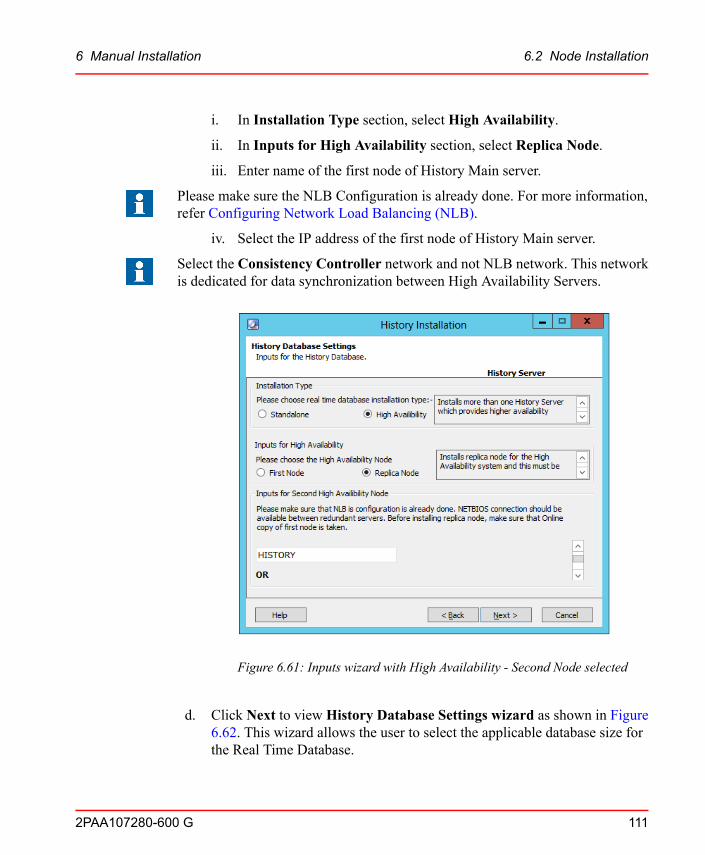
i. In Installation Type section, select High Availability.
ii. In Inputs for High Availability section, select Replica Node.
iii. Enter name of the first node of History Main server.
Please make sure the NLB Configuration is already done. For more information,refer Configuring Network Load Balancing (NLB).
iv. Select the IP address of the first node of History Main server.
Select the Consistency Controller network and not NLB network. This networkis dedicated for data synchronization between High Availability Servers.
Figure 6.61: Inputs wizard with High Availability - Second Node selected
d. Click Next to view History Database Settings wizard as shown in Figure6.62. This wizard allows the user to select the applicable database size forthe Real Time Database.
2PAA107280-600 G 111
6 Manual Installation 6.2 Node Installation
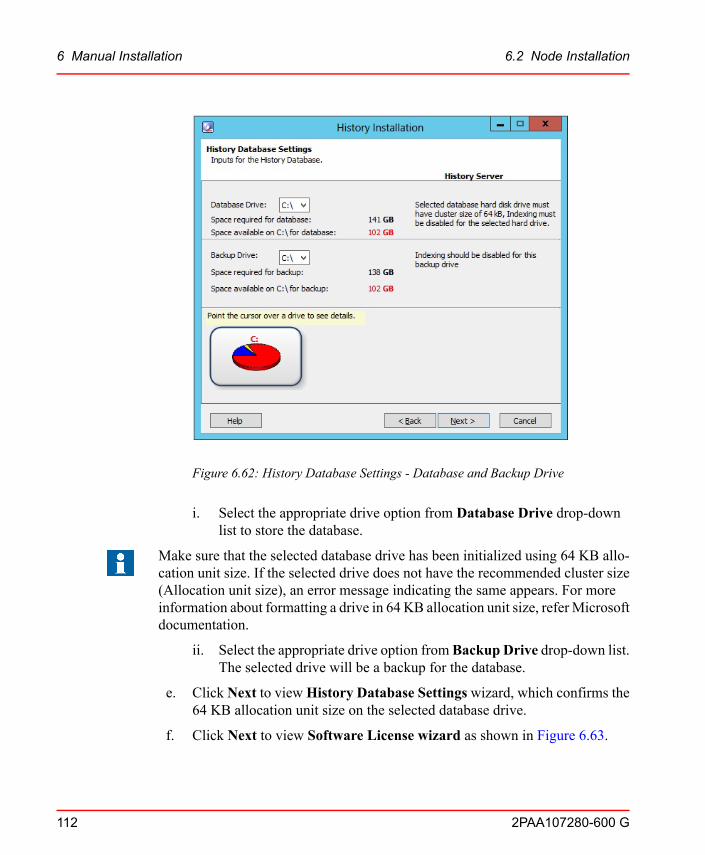
Figure 6.62: History Database Settings - Database and Backup Drive
i. Select the appropriate drive option from Database Drive drop-downlist to store the database.
Make sure that the selected database drive has been initialized using 64 KB allo-cation unit size. If the selected drive does not have the recommended cluster size(Allocation unit size), an error message indicating the same appears. For moreinformation about formatting a drive in 64 KB allocation unit size, referMicrosoftdocumentation.
ii. Select the appropriate drive option from Backup Drive drop-down list.The selected drive will be a backup for the database.
e. Click Next to viewHistory Database Settings wizard, which confirms the64 KB allocation unit size on the selected database drive.
f. Click Next to view Software License wizard as shown in Figure 6.63.
112 2PAA107280-600 G
6 Manual Installation 6.2 Node Installation

Figure 6.63: Software License wizard
g. Accept the license agreement and clickNext to viewConfirm Setupwizardas shown in Figure 6.64.
2PAA107280-600 G 113
6 Manual Installation 6.2 Node Installation

Figure 6.64: Confirm Setup wizard
h. ClickNext to performWindows Configuration, and Product Setup auto-matically. After the configuration, and product installation is completed, aShutdown warning dialog appears as shown in Figure 6.65.Alternatively, in Step 6., click Restart Later in reboot prompt to restart thecomputer later.
114 2PAA107280-600 G
6 Manual Installation 6.2 Node Installation
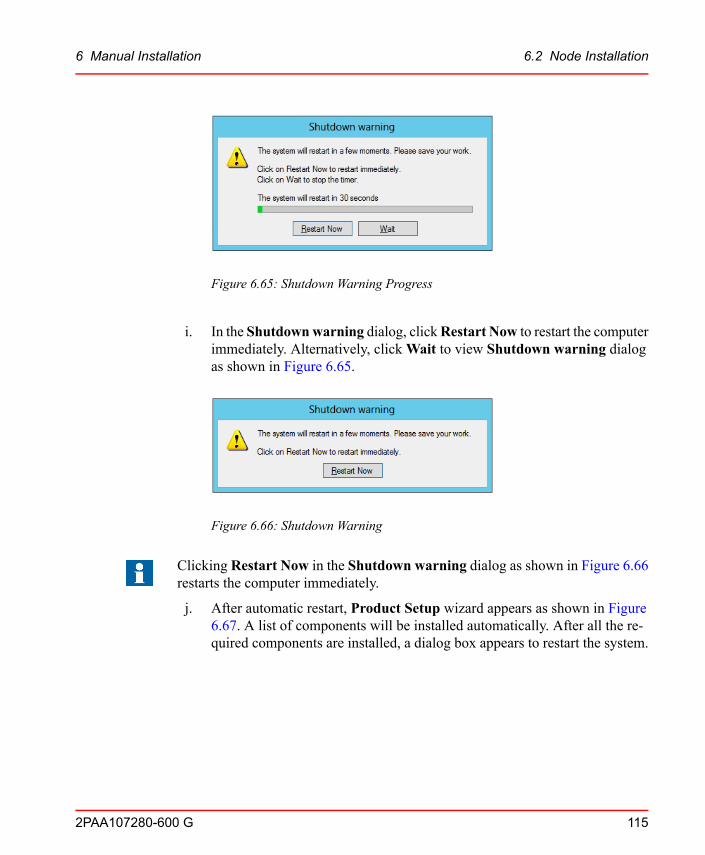
Figure 6.65: Shutdown Warning Progress
i. In the Shutdownwarning dialog, clickRestart Now to restart the computerimmediately. Alternatively, clickWait to view Shutdown warning dialogas shown in Figure 6.65.
Figure 6.66: Shutdown Warning
Clicking Restart Now in the Shutdown warning dialog as shown in Figure 6.66restarts the computer immediately.
j. After automatic restart, Product Setup wizard appears as shown in Figure6.67. A list of components will be installed automatically. After all the re-quired components are installed, a dialog box appears to restart the system.
2PAA107280-600 G 115
6 Manual Installation 6.2 Node Installation

Figure 6.67: Product Setup wizard
If Windows logged in as a user, user credentials will be changed automatically byHistory Installer.
k. Click Restart Now to restart the system. After restarting, the installationwill continue from this step automatically.
l. After restart is completed, Firewall Exceptions wizard appears as shownin Figure 6.68, which indicates the progress of the firewall configuration.
116 2PAA107280-600 G
6 Manual Installation 6.2 Node Installation

Figure 6.68: Firewall Exceptions wizard.
m. ClickNext to view Finish wizard as shown in Figure 6.69, which indicatesthe completion of History Server High Availability - Second Node installa-tion.
2PAA107280-600 G 117
6 Manual Installation 6.2 Node Installation
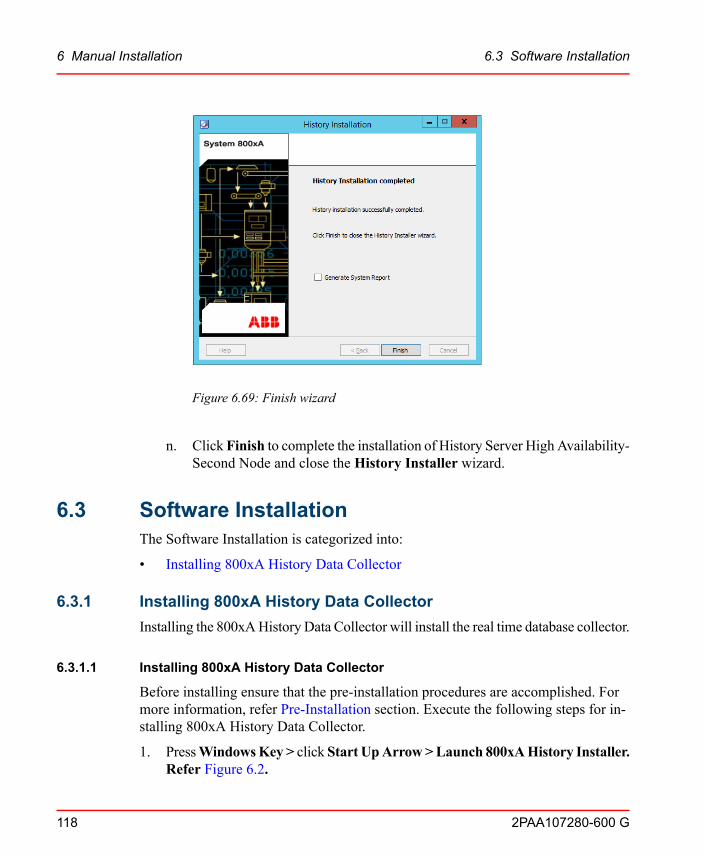
Figure 6.69: Finish wizard
n. Click Finish to complete the installation of History Server High Availability-Second Node and close the History Installer wizard.
6.3 Software InstallationThe Software Installation is categorized into:
• Installing 800xA History Data Collector
6.3.1 Installing 800xA History Data CollectorInstalling the 800xAHistory Data Collector will install the real time database collector.
6.3.1.1 Installing 800xA History Data Collector
Before installing ensure that the pre-installation procedures are accomplished. Formore information, refer Pre-Installation section. Execute the following steps for in-stalling 800xA History Data Collector.
1. PressWindowsKey > click Start UpArrow>Launch 800xAHistory Installer.Refer Figure 6.2.
118 2PAA107280-600 G
6 Manual Installation 6.3 Software Installation

2. The welcome screen appears as shown in Figure 6.26
3. Click Continue to viewWelcome screen.
4. Click Next in theWelcome screen to view Analyze wizard.
5. In Install Type Selection wizard as shown in Figure 6.70, select the type of in-stallation.
Figure 6.70: 800xA History Data Collector - selected
a. Select 800xA History Data Collector check box in the Software Installa-tion pane as shown in Figure 6.70.
6. Click Next to view Local Region Settings wizard as shown in Figure 6.71.
2PAA107280-600 G 119
6 Manual Installation 6.3 Software Installation

Figure 6.71: Local Region Settings
a. Select the applicable time zone in the Time Zone Settings drop-down list.
7. ClickNext to view 800xAHistory Database Settings wizard as shown in Figure6.72.
120 2PAA107280-600 G
6 Manual Installation 6.3 Software Installation

Figure 6.72: 800xA History Database Settings wizard
a. Enter the name of the 800xA History server.
b. Select the IP Address of the main server in the drop-down list. If the IP ad-dress of the 800xAHistory server is not available in the drop-down list, enterthe IP address manually.
In case of high availability main server, enter the common name and enter IP ad-dress manually.
8. ClickNext to view 800xAHistory Database Settingswizard as shown in Figure6.73.
2PAA107280-600 G 121
6 Manual Installation 6.3 Software Installation

Figure 6.73: 800xA History Database Settings wizard
9. In the 800xA History Database Settings wizard:
a. Select the appropriate drive option from Database Drive drop-down list tostore the database.
Make sure that the selected database drive has been initialized using 64 KB allo-cation unit size. If the selected drive does not have the recommended cluster size,an error message indicating the same appears. For more information about format-ting a drive in 64 KB allocation unit size, refer Microsoft documentation.
b. Select the appropriate drive option from Backup Drive drop-down list. Theselected drive will be a backup for the database.
10. Click Next to view 800xA History Database Settings wizard, which confirmsthe 64 KB allocation unit size on the selected database drive.
11. Click Next to view 800xA History Database Settings wizard for entering theuser details as shown in Figure 6.74.
122 2PAA107280-600 G
6 Manual Installation 6.3 Software Installation
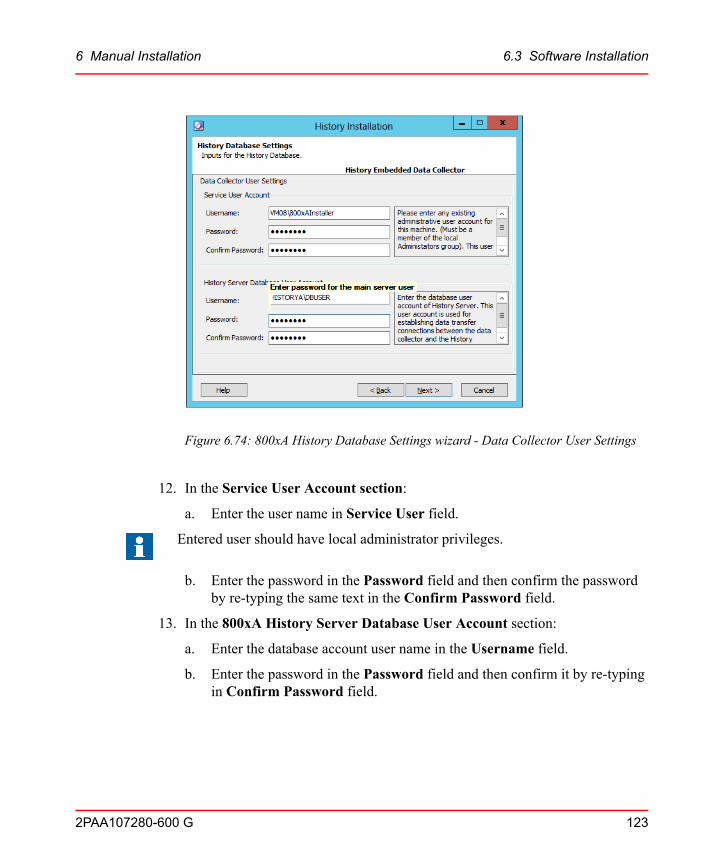
Figure 6.74: 800xA History Database Settings wizard - Data Collector User Settings
12. In the Service User Account section:
a. Enter the user name in Service User field.
Entered user should have local administrator privileges.
b. Enter the password in the Password field and then confirm the passwordby re-typing the same text in the Confirm Password field.
13. In the 800xA History Server Database User Account section:
a. Enter the database account user name in the Username field.
b. Enter the password in the Password field and then confirm it by re-typingin Confirm Password field.
2PAA107280-600 G 123
6 Manual Installation 6.3 Software Installation

Use the following syntax to provide 800xA History Server user credentials, if theStandalone 800xA History Server or High-Availability 800xA History Servers isinstalled inWorkgroup environment:
• For Standalone 800xAHistory Server, usernamemust bemachinename\username
• For High-Availability 800xA History Servers, username must be common-name\username
Use the below syntax to provide 800xA History Server user credentials, if theStandalone 800xA History Server or High-Availability 800xA History Servers isinstalled in Domain environment:
• For Standalone and High-Availability 800xA History Servers, username mustbe domainname\username
14. Click Next to view Software License wizard as shown in Figure 6.75.
Figure 6.75: Software License wizard
124 2PAA107280-600 G
6 Manual Installation 6.3 Software Installation

15. Accept the license agreement, click Next to view Confirm Setup wizard asshown in Figure 6.76.
Figure 6.76: Confirm Setup wizard
16. After automatic restart, Product Setup wizard appears as shown in Figure 6.77.A list of components will be installed automatically. After all the required com-ponents are installed, a dialog box appears to restart the system.
2PAA107280-600 G 125
6 Manual Installation 6.3 Software Installation
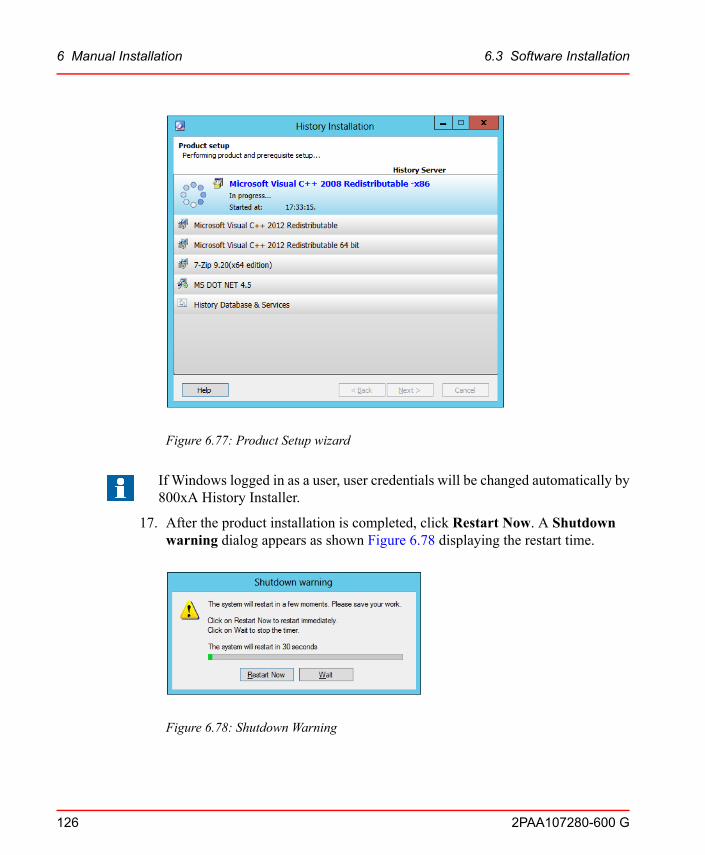
Figure 6.77: Product Setup wizard
If Windows logged in as a user, user credentials will be changed automatically by800xA History Installer.
17. After the product installation is completed, click Restart Now. A Shutdownwarning dialog appears as shown Figure 6.78 displaying the restart time.
Figure 6.78: Shutdown Warning
126 2PAA107280-600 G
6 Manual Installation 6.3 Software Installation

18. In the Shutdown warning dialog, click Restart Now to restart the computerimmediately. Alternatively, clickWait to view Shutdown warning dialog asshown in Figure 6.79.
Figure 6.79: Shutdown Warning
Clicking Restart Now in the Shutdown warning dialog as shown in Figure 6.79restarts the computer immediately.
19. ClickRestart Now to restart the system immediately. After restarting, the instal-lation will continue from this step automatically.
20. After restart is completed, Firewall Exceptions wizard appears as shown inFigure 6.80, which indicates the progress of the firewall configuration.
2PAA107280-600 G 127
6 Manual Installation 6.3 Software Installation

Figure 6.80: Firewall Exceptions wizard
21. Click Next to view Finish wizard as shown in Figure 6.81.
128 2PAA107280-600 G
6 Manual Installation 6.3 Software Installation

Figure 6.81: Finish wizard
22. Click Finish to complete the installation of 800xA History Data Collector andalso to close the 800xA History Installer wizard.
6.3.1.2 Installation - 800xA History Connectivity
Install 800xA History Connectivity using System Installer's System ConfigurationConsole.
In the SystemConfiguration Console, under SystemFunction tab select "Information-Management-800xA History" system function and click Ok.
Now deploy the system nodes, 800xA History Connectivity will be installed on allthe system nodes.
2PAA107280-600 G 129
6 Manual Installation 6.3 Software Installation

Figure 6.82: Selection of 800xA History Server / 800xA History Data Collector
6.4 Post Installation ProceduresThis section describes the post installation procedures.
130 2PAA107280-600 G
6 Manual Installation 6.4 Post Installation Procedures
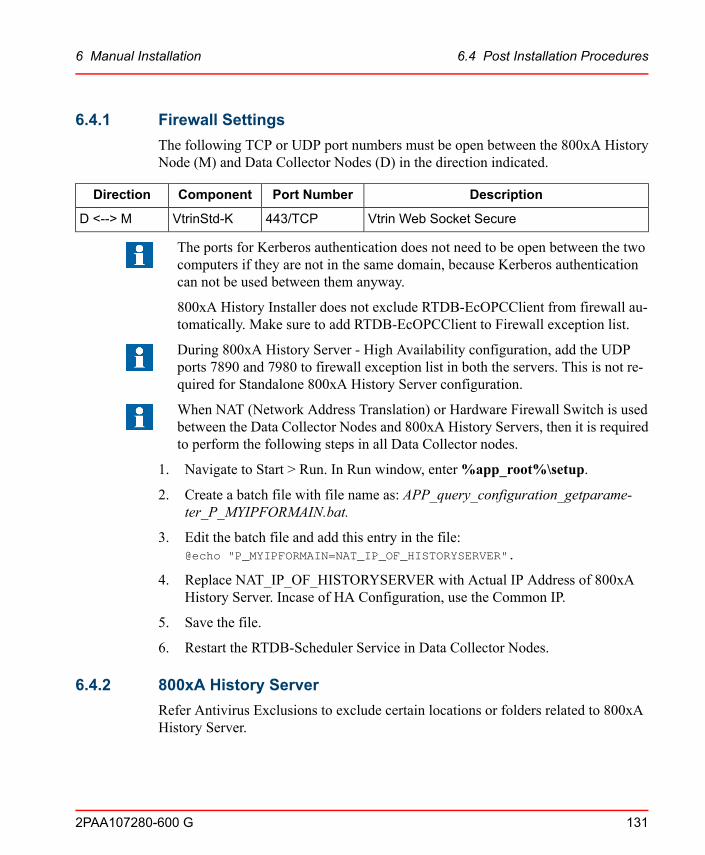
6.4.1 Firewall SettingsThe following TCP or UDP port numbers must be open between the 800xA HistoryNode (M) and Data Collector Nodes (D) in the direction indicated.
DescriptionPort NumberComponentDirection
Vtrin Web Socket Secure443/TCPVtrinStd-KD <--> M
The ports for Kerberos authentication does not need to be open between the twocomputers if they are not in the same domain, because Kerberos authenticationcan not be used between them anyway.
800xA History Installer does not exclude RTDB-EcOPCClient from firewall au-tomatically. Make sure to add RTDB-EcOPCClient to Firewall exception list.
During 800xA History Server - High Availability configuration, add the UDPports 7890 and 7980 to firewall exception list in both the servers. This is not re-quired for Standalone 800xA History Server configuration.
When NAT (Network Address Translation) or Hardware Firewall Switch is usedbetween the Data Collector Nodes and 800xA History Servers, then it is requiredto perform the following steps in all Data Collector nodes.
1. Navigate to Start > Run. In Run window, enter%app_root%\setup.
2. Create a batch file with file name as: APP_query_configuration_getparame-ter_P_MYIPFORMAIN.bat.
3. Edit the batch file and add this entry in the file:@echo "P_MYIPFORMAIN=NAT_IP_OF_HISTORYSERVER".
4. Replace NAT_IP_OF_HISTORYSERVER with Actual IP Address of 800xAHistory Server. Incase of HA Configuration, use the Common IP.
5. Save the file.
6. Restart the RTDB-Scheduler Service in Data Collector Nodes.
6.4.2 800xA History ServerRefer Antivirus Exclusions to exclude certain locations or folders related to 800xAHistory Server.
2PAA107280-600 G 131
6 Manual Installation 6.4 Post Installation Procedures
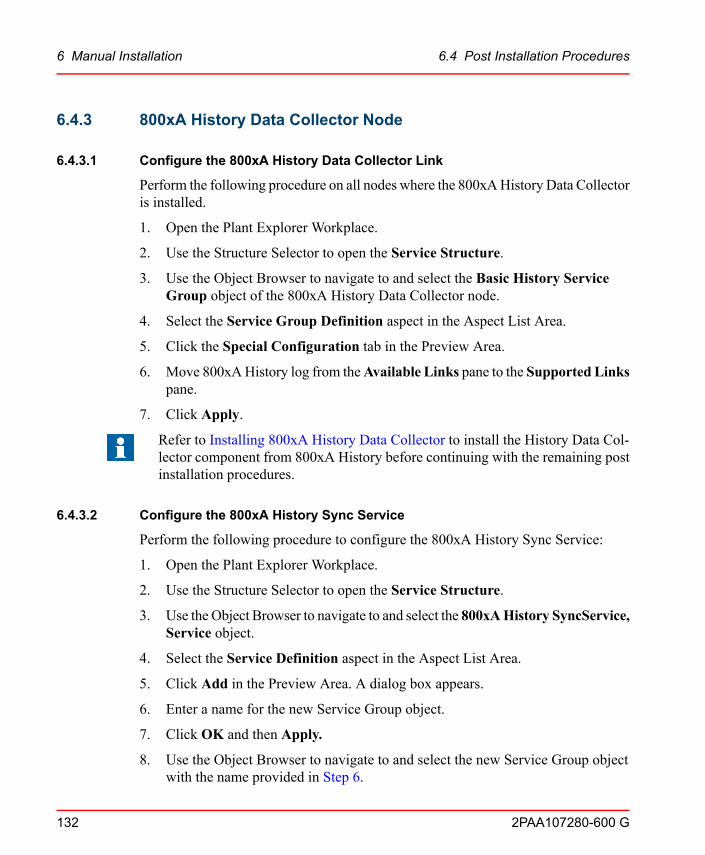
6.4.3 800xA History Data Collector Node
6.4.3.1 Configure the 800xA History Data Collector Link
Perform the following procedure on all nodes where the 800xAHistory Data Collectoris installed.
1. Open the Plant Explorer Workplace.
2. Use the Structure Selector to open the Service Structure.
3. Use the Object Browser to navigate to and select the Basic History ServiceGroup object of the 800xA History Data Collector node.
4. Select the Service Group Definition aspect in the Aspect List Area.
5. Click the Special Configuration tab in the Preview Area.
6. Move 800xAHistory log from theAvailable Links pane to the Supported Linkspane.
7. Click Apply.
Refer to Installing 800xA History Data Collector to install the History Data Col-lector component from 800xA History before continuing with the remaining postinstallation procedures.
6.4.3.2 Configure the 800xA History Sync Service
Perform the following procedure to configure the 800xA History Sync Service:
1. Open the Plant Explorer Workplace.
2. Use the Structure Selector to open the Service Structure.
3. Use the Object Browser to navigate to and select the 800xAHistory SyncService,Service object.
4. Select the Service Definition aspect in the Aspect List Area.
5. Click Add in the Preview Area. A dialog box appears.
6. Enter a name for the new Service Group object.
7. Click OK and then Apply.
8. Use the Object Browser to navigate to and select the new Service Group objectwith the name provided in Step 6.
132 2PAA107280-600 G
6 Manual Installation 6.4 Post Installation Procedures

9. Select the Service Group Definition aspect in the Aspect List Area.
10. Click Add in the Preview Area. A dialog box appears.
11. Enter a name for the new Service Provider object.
12. Click OK and then Apply.
13. Use the Object Browser to navigate to and select the new Service Provider objectwith the name provided in Step 11.
14. Select the Service Provider Definition aspect in the Aspect List Area.
15. Click the Configuration tab.
16. Clear the Enabled check box.
17. Select the 800xA History Data Collector node name from the Node drop-downlist.
18. Click Apply.
19. Click the Special Configuration tab. Provide the inputs for Username andPassword that were used during installation of the History Data Collector com-ponent of 800xA History.
20. Click Apply.
21. Click the Configuration tab.
22. Select the Enabled check box.
23. Click Apply.
24. Perform Step 8 through Step 23 for a redundant 800xA History Data Collectornode.
25. Perform Step 3 through Step 23 for each 800xA History Data Collector node(non-redundant).
6.4.3.3 Configure the 800xA History Event Collector Service Server
1. Open the Plant Explorer Workplace.
2. Use the Structure Selector to open the Service Structure.
3. Use the Object Browser to navigate to and select the 800xA History EventCollector Service, Service object.
4. Select the Service Definition aspect in the Aspect List Area.
2PAA107280-600 G 133
6 Manual Installation 6.4 Post Installation Procedures

5. Click Add in the Preview Area. A dialog box appears.
6. Enter a name for the new Service Group object.
7. Click OK and then Apply.
8. Use the Object Browser to navigate to and select the new Service Group objectwith the name provided in Step 6.
9. Select the Service Group Definition aspect in the Aspect List Area.
10. Click Add in the Preview Area. A dialog box appears.
11. Enter a name for the new Service Provider object.
12. Click OK and then Apply.
13. Use the Object Browser to navigate to and select the new Service Provider objectwith the name provided in Step 11.
14. Select the Service Provider Definition aspect in the Aspect List Area.
15. Click the Configuration tab.
16. Clear the Enabled check box.
17. Select the 800xA History Data Collector node name from the Node drop-downlist.
18. Click Apply.
19. Click the Special Configuration tab. Provide the inputs for Username andPassword that were used during installation of the History Data Collector com-ponent of 800xA History.
20. Click Apply.
21. Click the Configuration tab.
22. Select the Enabled check box.
23. Click Apply.
24. Perform Step 8 through Step 23 for a redundant 800xA History Data Collectornode.
25. Perform Step 3 through Step 23 for each 800xA History Data Collector node(non-redundant).
134 2PAA107280-600 G
6 Manual Installation 6.4 Post Installation Procedures

6.4.3.4 800xA History Event Collection Procedure
800xA History Event Collection procedure is performed based on the following:
• Event Collection based on Vendor Attributes
• Event Collection based on Event Categories
Event Collection based on Vendor Attribute. Perform the following to include thevendor specific attribute information as part of the event collection:
1. Go to Service Structure > Services > 800xAHistory Event Collector, Service> Service Group.
2. In the Aspect List, select Service Group Definition as shown in Figure AspectList with Specific Attribute.
3. In the Special Configuration tab, go to Attribute tab > Attributes & Expres-sions section and select all or required attributes.
2PAA107280-600 G 135
6 Manual Installation 6.4 Post Installation Procedures

Figure 6.83: Aspect List with Specific Attribute
4. Click Add to include them in Attributes - Forwarded to 800xA History pane.
5. Click Apply.
Event Collection based on Event Categories. Perform the following to include theevent categories as part of the event collection:
1. Go to Service Structure > Services > 800xAHistory Event Collector, Service> Service Group.
2. In the Aspect List, select Service Group Definition as shown in Figure AspectList with Event Categories.
136 2PAA107280-600 G
6 Manual Installation 6.4 Post Installation Procedures

Figure 6.84: Aspect List with Event Categories
3. In the Special Configuration tab, underEvent Categories section. All the eventcategories check boxes are cleared by default for event collection.
4. Select the event categories check box to exclude the event categories for eventcollection.
5. Click Apply.
6.4.3.5 Configure the 800xA History Event Server Service
Perform the following procedure to configure the 800xAHistory Event Server Service:
1. Open the Plant Explorer Workplace.
2PAA107280-600 G 137
6 Manual Installation 6.4 Post Installation Procedures
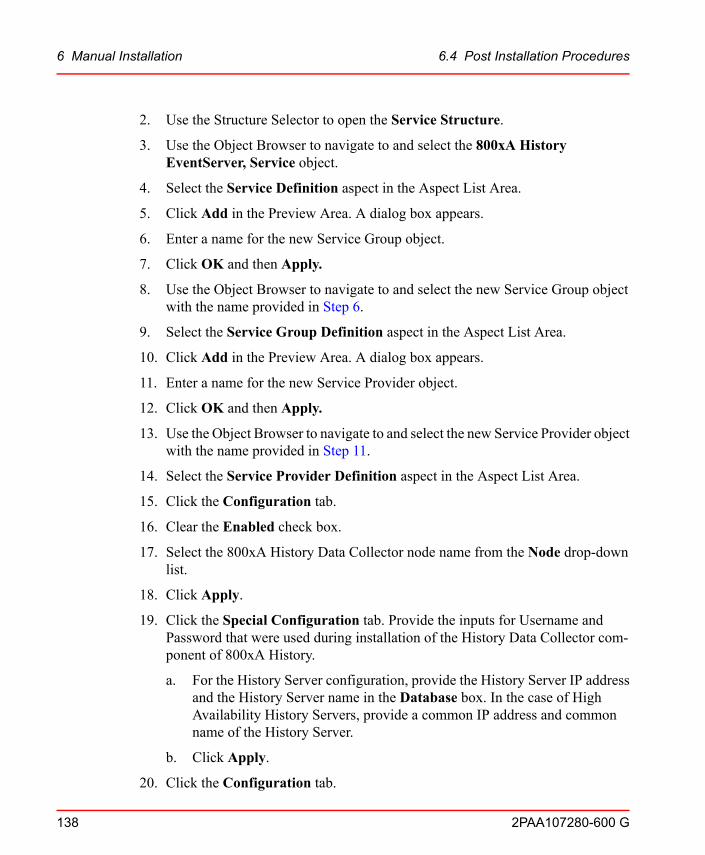
2. Use the Structure Selector to open the Service Structure.
3. Use the Object Browser to navigate to and select the 800xA HistoryEventServer, Service object.
4. Select the Service Definition aspect in the Aspect List Area.
5. Click Add in the Preview Area. A dialog box appears.
6. Enter a name for the new Service Group object.
7. Click OK and then Apply.
8. Use the Object Browser to navigate to and select the new Service Group objectwith the name provided in Step 6.
9. Select the Service Group Definition aspect in the Aspect List Area.
10. Click Add in the Preview Area. A dialog box appears.
11. Enter a name for the new Service Provider object.
12. Click OK and then Apply.
13. Use the Object Browser to navigate to and select the new Service Provider objectwith the name provided in Step 11.
14. Select the Service Provider Definition aspect in the Aspect List Area.
15. Click the Configuration tab.
16. Clear the Enabled check box.
17. Select the 800xA History Data Collector node name from the Node drop-downlist.
18. Click Apply.
19. Click the Special Configuration tab. Provide the inputs for Username andPassword that were used during installation of the History Data Collector com-ponent of 800xA History.
a. For the History Server configuration, provide the History Server IP addressand the History Server name in the Database box. In the case of HighAvailability History Servers, provide a common IP address and commonname of the History Server.
b. Click Apply.
20. Click the Configuration tab.
138 2PAA107280-600 G
6 Manual Installation 6.4 Post Installation Procedures

21. Select the Enabled check box.
22. Click Apply.
23. Perform Step 8 through Step 23 for a redundant 800xA History Data Collectornode.
24. Perform Step 3 through Step 23 for each 800xA History Data Collector node(non-redundant).
6.4.3.6 Configure the 800xA History Archive
This section describes the post install steps to be performed on the node where 800xAHistory Archive is installed.
1. Open ABB Start Menu and select:
ABB Industrial IT 800xA > PAS Management > PAS Control
Refer to the System 800xA Tools (2PAA101888*) manual for more informationon ABB Start Menu.
2. Select Advanced >> from the Process Administration Service.
3. Click Yes if the following warning dialog is displayed:
Advanced commands are for support personnel only. Using them may result inloss of data. Are you sure you want to continue?
4. Select Comm Settings... to open Communications Settings.
If the messageWould you like to revert back to saved settings? appears, thenclick Yes to open Communication Settings dialog.
5. Click OK in the Communication Settings dialog box to save the settings andclose the dialog box.
6. Click OK on Settings Saved dialog.
7. Restart the PAS services.
8. Close the Process Administration Service utility.
9. Perform the remaining steps if the Archive Service Group is not already createdin the Service Structure.
a. Open a Plant Explorer Workplace.
b. Use the Structure Selector to open the Service Structure.
2PAA107280-600 G 139
6 Manual Installation 6.4 Post Installation Procedures

c. Use the Object Browser to navigate to and select the Industrial IT Archive,Service object.
d. Select the Service Definition aspect in the Aspect List.
e. Click Add in the Preview Area. A dialog box will appear.
f. Enter a name for the new Service Group object.
g. Click OK and then Apply.
h. Use the Object Browser to navigate to and select the new Service Groupobject with the name provided in Step 6.
i. Select the Service Group Definition aspect in the Aspect List Area.
j. Click Add in the Preview Area. A dialog box will appear.
k. Enter a name for the new Service Provider object.
l. Click OK and then Apply.
m. Use the Object Browser to navigate to and select the new Service Providerobject with the name provided in Step 11.
n. Select the Service Provider Definition aspect in the Aspect List Area.
o. Click the Configuration tab.
p. Select the 800xAHistory Archive Node name from theNode drop-down list.
q. Click Apply.
Refer Antivirus Exclusions to exclude certain locations or folders related to 800xAHistory Database.
Refer IPSec exemptions to configure in 800xA network for Data Collectors to com-municate with 800xA History Server, if IPSec is configured.
6.4.4 Antivirus ExclusionsExclude the following location related to 800xAHistory from the AntiVirus software.
RTDB:
Exclude the following path for 800xA History Server and 800xA History Data Col-lector:
• For x86 OS versions:<drive>:\Program Files\ABB Oy
140 2PAA107280-600 G
6 Manual Installation 6.4 Post Installation Procedures
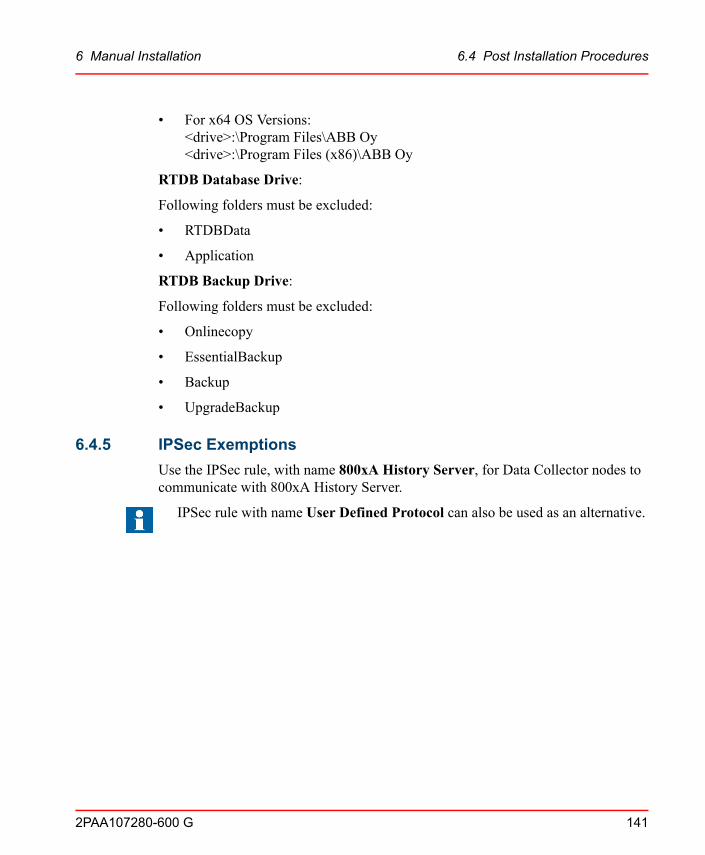
• For x64 OS Versions:<drive>:\Program Files\ABB Oy<drive>:\Program Files (x86)\ABB Oy
RTDB Database Drive:
Following folders must be excluded:
• RTDBData
• Application
RTDB Backup Drive:
Following folders must be excluded:
• Onlinecopy
• EssentialBackup
• Backup
• UpgradeBackup
6.4.5 IPSec ExemptionsUse the IPSec rule, with name 800xA History Server, for Data Collector nodes tocommunicate with 800xA History Server.
IPSec rule with name User Defined Protocol can also be used as an alternative.
2PAA107280-600 G 141
6 Manual Installation 6.4 Post Installation Procedures

142 2PAA107280-600 G
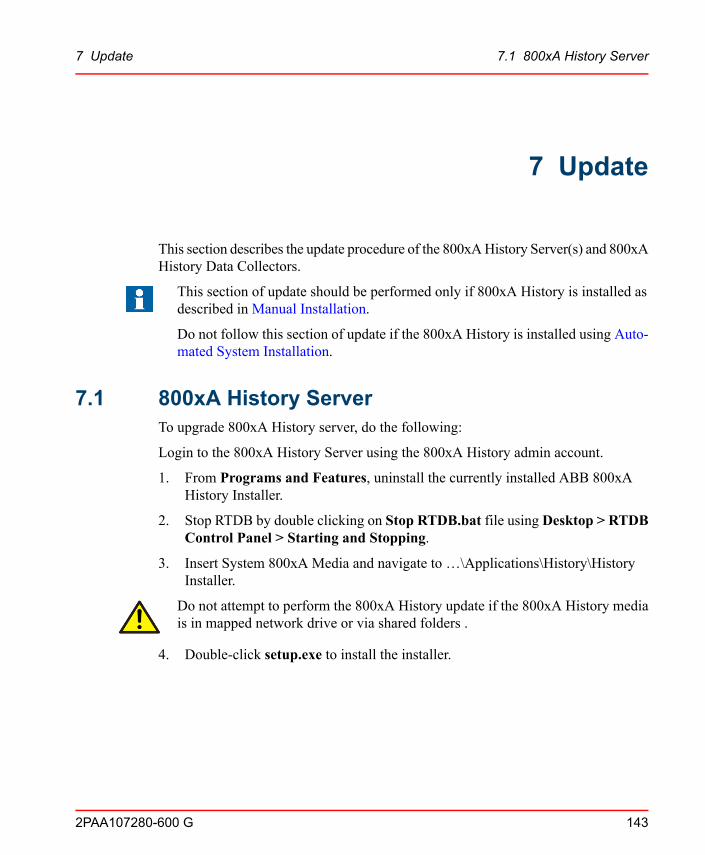
7 Update
This section describes the update procedure of the 800xAHistory Server(s) and 800xAHistory Data Collectors.
This section of update should be performed only if 800xA History is installed asdescribed in Manual Installation.
Do not follow this section of update if the 800xA History is installed using Auto-mated System Installation.
7.1 800xA History ServerTo upgrade 800xA History server, do the following:
Login to the 800xA History Server using the 800xA History admin account.
1. From Programs and Features, uninstall the currently installed ABB 800xAHistory Installer.
2. Stop RTDB by double clicking on Stop RTDB.bat file using Desktop > RTDBControl Panel > Starting and Stopping.
3. Insert System 800xA Media and navigate to …\Applications\History\HistoryInstaller.
Do not attempt to perform the 800xA History update if the 800xA History mediais in mapped network drive or via shared folders .
4. Double-click setup.exe to install the installer.
2PAA107280-600 G 143
7 Update 7.1 800xA History Server

Figure 7.1: 800xA History Installer Screen
5. Click Next to view Install Option dialog.
144 2PAA107280-600 G
7 Update 7.1 800xA History Server

Figure 7.2: Install Option Dialog
6. Select Upgrade from Previous version and click Next to view Prerequisitepage.
2PAA107280-600 G 145
7 Update 7.1 800xA History Server

Figure 7.3: Prerequisite for Upgrade Dialog
7. Stop RTDB Services, if not stopped previously and click Next to see Ready forInstallation dialog.
8. Click Next to start upgrade. Wait for the upgrade to complete.
146 2PAA107280-600 G
7 Update 7.1 800xA History Server

Figure 7.4: 800xA History Real Time Database Upgrade
9. When prompted for restart, please restart the machine and continue with FirewallExceptions.
2PAA107280-600 G 147
7 Update 7.1 800xA History Server

Figure 7.5: Firewall Exceptions setting Automation
10. Click Next to configure Firewall and reach Finish page.
11. Click Finish.
7.2 800xA History Data CollectorsTo upgrade 800xA History Data Collectors, do the following:
Log on to System using the 800xA History admin account.
1. From Programs and Features, uninstall the currently installed ABB 800xAHistory Installer.
2. Perform Maintenance Stop of 800xA in the Data Collector where database isbeing planned for update.
3. Stop RTDB by double clicking on Stop RTDB.bat file using Desktop > RTDBControl Panel > Starting and Stopping.
4. Insert System 800xA Media and navigate to …\Applications\History\HistoryInstaller.
148 2PAA107280-600 G
7 Update 7.2 800xA History Data Collectors
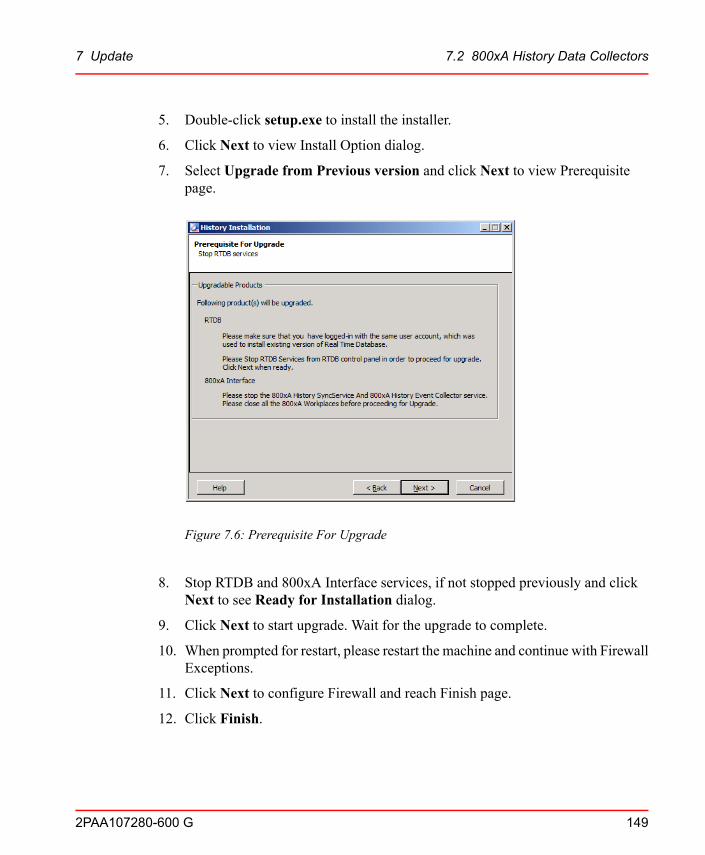
5. Double-click setup.exe to install the installer.
6. Click Next to view Install Option dialog.
7. Select Upgrade from Previous version and click Next to view Prerequisitepage.
Figure 7.6: Prerequisite For Upgrade
8. Stop RTDB and 800xA Interface services, if not stopped previously and clickNext to see Ready for Installation dialog.
9. Click Next to start upgrade. Wait for the upgrade to complete.
10. When prompted for restart, please restart the machine and continue with FirewallExceptions.
11. Click Next to configure Firewall and reach Finish page.
12. Click Finish.
2PAA107280-600 G 149
7 Update 7.2 800xA History Data Collectors

Appendix A Network Load Balancing
A.1 Configuring Network Load Balancing (NLB)TheNLB Settings are required only in case of redundant 800xAHistory Server. Beforeperforming NLB settings, verify the following:
1. Availability of common subnet IPs between 800xA History Servers and DCN.
2. Define the IPs in the hosts file of the 800xAHistory Servers. The path of windowshosts file is:C:\Windows\System32\drivers\etc.
NLB Configuration is not possible if Network Adapter Speed is 100 Mbps. If youtry to configure an error message mis-configured appears.
Network adapter which is chosen for NLB configuration also requires 1 Gbpsspeed.
It is extremely mandatory to have separate network, other than the NLB networkbetween 800xA History Servers and 800xA History Data Collector Nodes, fordata synchronization and consistency between High Availability Servers
The Reliable Multicast Protocol should be Enabled only for NLB network cardin Network Card > Properties.
Is mandatory to use 2 separate networks for 800xA History High Availabilityconfiguration. Do not combine NLB and Consistency Controller Network (CCN)in one common network.
A.1.1 Installation of NLB in 800xA History Server NodesPerform the following steps in both 800xA History Server Node:
1. In Windows screen search for Server Manager and open it.
2. Click Add roles and features.
150 2PAA107280-600 G
A Network Load Balancing A.1 Configuring Network Load Balancing (NLB)
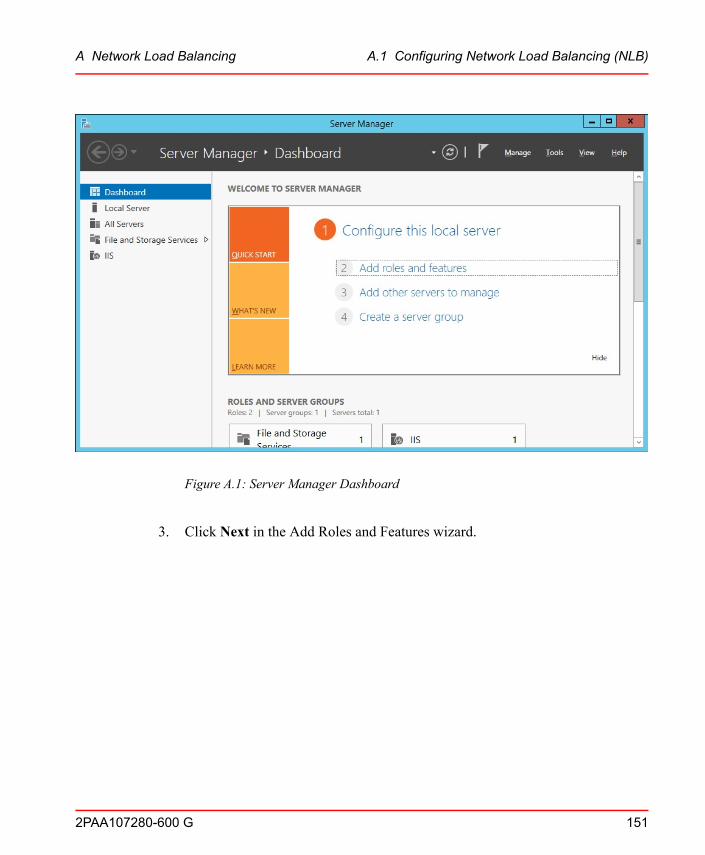
Figure A.1: Server Manager Dashboard
3. Click Next in the Add Roles and Features wizard.
2PAA107280-600 G 151
A Network Load Balancing A.1 Configuring Network Load Balancing (NLB)

Figure A.2: Add Roles and Features Wizard
4. Select the installation type Role-based or feature based installation and clickNext.
152 2PAA107280-600 G
A Network Load Balancing A.1 Configuring Network Load Balancing (NLB)
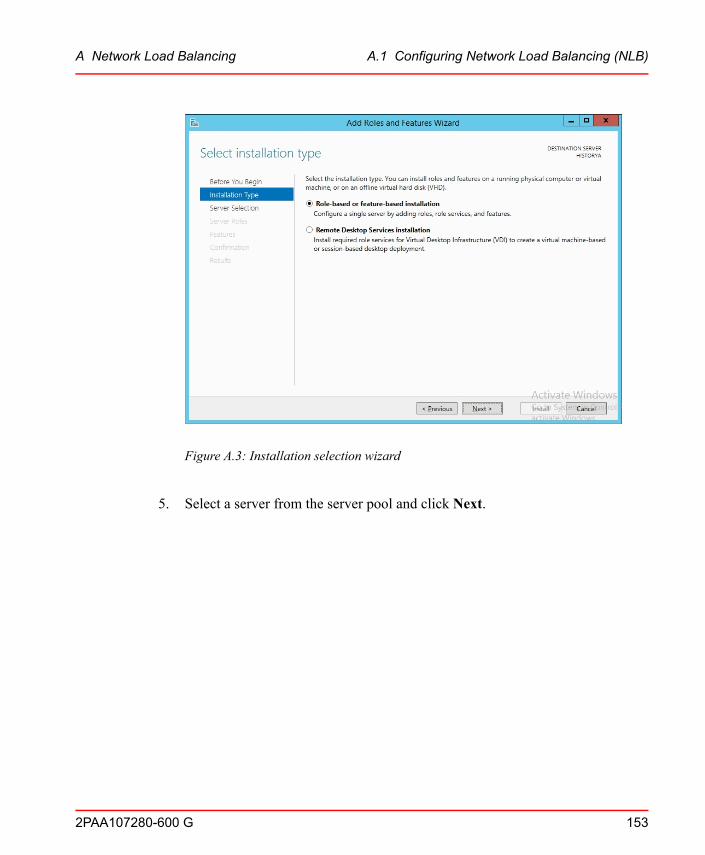
Figure A.3: Installation selection wizard
5. Select a server from the server pool and click Next.
2PAA107280-600 G 153
A Network Load Balancing A.1 Configuring Network Load Balancing (NLB)
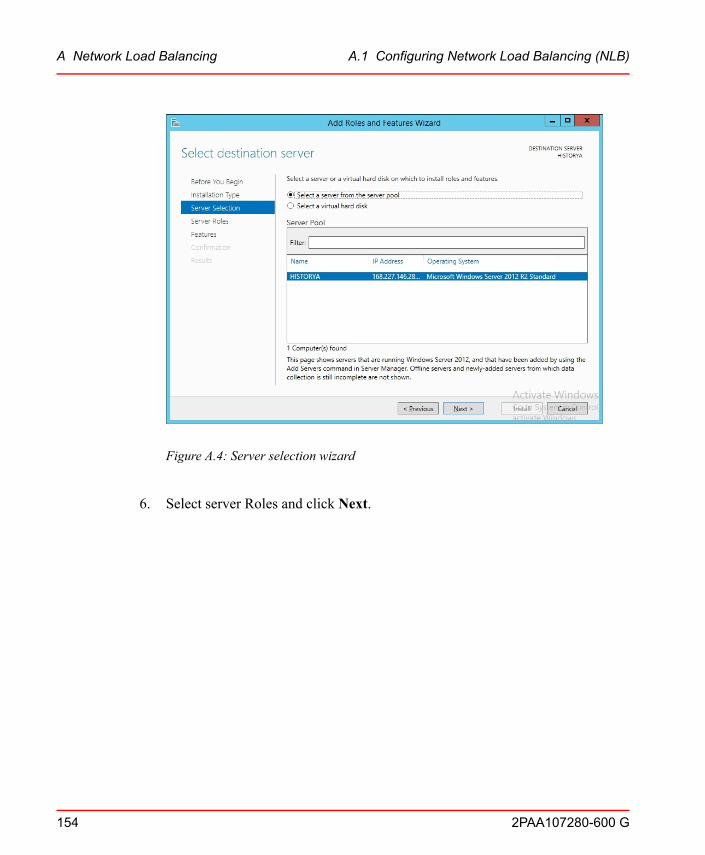
Figure A.4: Server selection wizard
6. Select server Roles and click Next.
154 2PAA107280-600 G
A Network Load Balancing A.1 Configuring Network Load Balancing (NLB)

Figure A.5: Server roles selection wizard
7. Select Network Load Balancing check-box and Click Install.
2PAA107280-600 G 155
A Network Load Balancing A.1 Configuring Network Load Balancing (NLB)

Figure A.6: Server Manager - Select Features
Installation confirmation page appears once NLB is successfully installed. ClickCloseto complete the NLB installation.
A.1.2 NLB Configuration for Common IP in 800xA History ServersPerform the following steps in First (or Primary) node of the 800xA History Server:
1. In the Windows screen, search for NLB Manager. Select and launch NetworkLoad Balancing Manager.
156 2PAA107280-600 G
A Network Load Balancing A.1 Configuring Network Load Balancing (NLB)
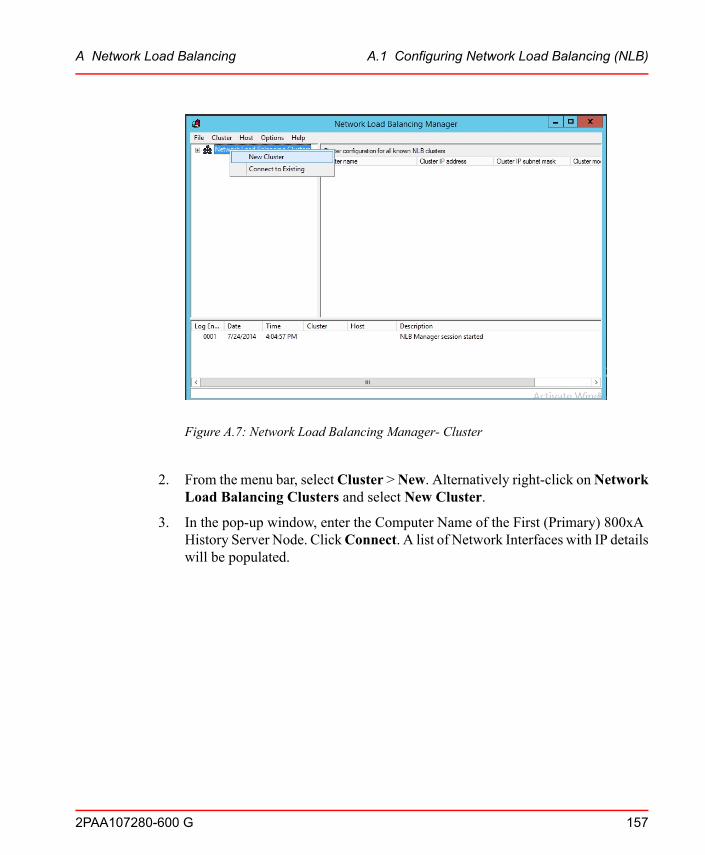
Figure A.7: Network Load Balancing Manager- Cluster
2. From the menu bar, selectCluster >New. Alternatively right-click onNetworkLoad Balancing Clusters and select New Cluster.
3. In the pop-up window, enter the Computer Name of the First (Primary) 800xAHistory Server Node. ClickConnect. A list of Network Interfaces with IP detailswill be populated.
2PAA107280-600 G 157
A Network Load Balancing A.1 Configuring Network Load Balancing (NLB)

Figure A.8: New Cluster - Connect
4. Select the Interface which will be used for NLB.
5. Click Next to view the Cluster IP Addresses dialog.
6. Click Add.. to define the common IP Address.
158 2PAA107280-600 G
A Network Load Balancing A.1 Configuring Network Load Balancing (NLB)
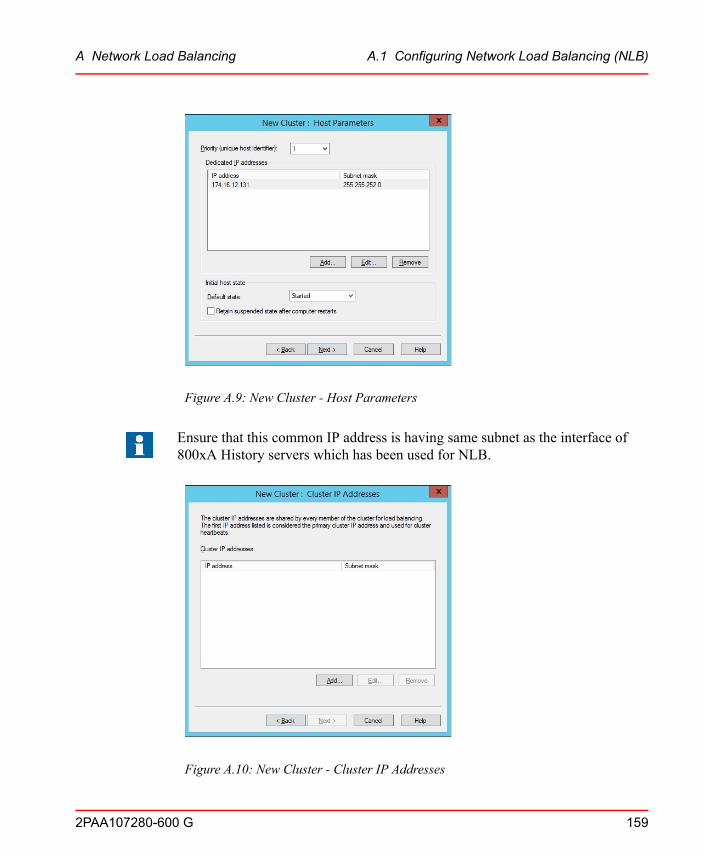
Figure A.9: New Cluster - Host Parameters
Ensure that this common IP address is having same subnet as the interface of800xA History servers which has been used for NLB.
Figure A.10: New Cluster - Cluster IP Addresses
2PAA107280-600 G 159
A Network Load Balancing A.1 Configuring Network Load Balancing (NLB)

Figure A.11: Add IP Address
7. After adding the common IP, click OK and then Next to define the cluster pa-rameters.
8. In the cluster parameters window:
a. Enter the Full Internet name. This will be common name for the HighAvailability for the 800xA History Servers.
b. Select theMulticast option in the Cluster operation mode.
9. Click Next.
160 2PAA107280-600 G
A Network Load Balancing A.1 Configuring Network Load Balancing (NLB)

Figure A.12: New Cluster - Cluster Parameters
10. In the port rules window, define port rules as applicable for the installation. Bydefault, all port range (0-65536) are allowed.
As a minimum following ports should be allowed:
UDP ports: 7890 and 7980
11. After the port rules are added click Edit.
2PAA107280-600 G 161
A Network Load Balancing A.1 Configuring Network Load Balancing (NLB)
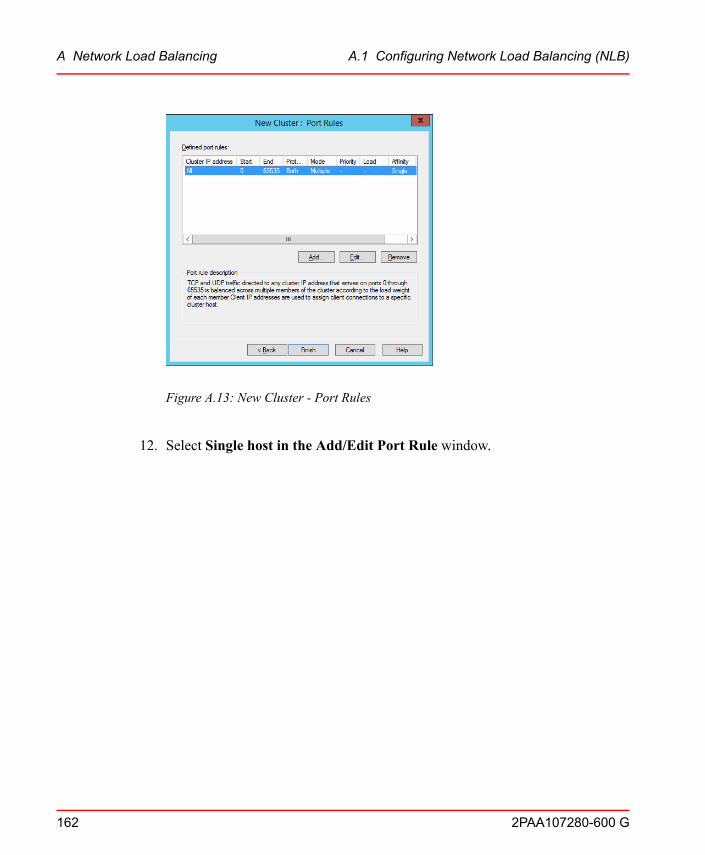
Figure A.13: New Cluster - Port Rules
12. Select Single host in the Add/Edit Port Rule window.
162 2PAA107280-600 G
A Network Load Balancing A.1 Configuring Network Load Balancing (NLB)

Figure A.14: Edit Port Rule Wizard
13. Click OK and then Finish to complete the configuration for First or PrimaryNode.
14. From the Network Load Balancing Manager, select the common name, right-click and select Add Host to Cluster.
15. In the pop-up window, enter the Second (or Secondary) 800xA History ServerNode Name and click Connect.
2PAA107280-600 G 163
A Network Load Balancing A.1 Configuring Network Load Balancing (NLB)

Figure A.15: Add Host to Cluster - Connect
16. Select the appropriate Interface.
Ensure that, the Interface IP is in the same range as of First (or Primary) 800xAHistory Server.
17. Click Next.
164 2PAA107280-600 G
A Network Load Balancing A.1 Configuring Network Load Balancing (NLB)

Figure A.16: Add Host to Cluster - Host Parameters
18. Refer Step 10. above for assigning Port Rules.
Figure A.17: Add Host to Cluster - Port Rules
2PAA107280-600 G 165
A Network Load Balancing A.1 Configuring Network Load Balancing (NLB)

19. Click Finish to complete the NLB Configuration.
Figure A.18: Network Load Balancing Manager
Appendix B Adding High Availability Server
B.1 IntroductionThis section describes the procedure to convert single 800xA History server to HighAvailability servers only when the current 800xA History server is already installedand running.
To convert a single 800xA History server to HA servers, do the following:
1. Login to the current 800xA History server with the installed user name.
166 2PAA107280-600 G
B Adding High Availability Ser B.1 Introduction

2. Install the NLBmentioned in Configuring Network Load Balancing (NLB). Thecurrent 800xA History Server will now be considered as HA1.
3. Prepare another machine to behave as Second 800xA History Server in HAConfiguration i.e., HA2.
4. In HA2, use the same user name and password as that of HA1. Add the newlycreated user name to the local administrators group. In HA2, login to the machinewith the newly created user and configure NLB. Refer Configuring NetworkLoad Balancing (NLB).
Perform the following steps in HA1:
1. Stop the RTDB by running Stop RTDB.bat file.
2. Navigate to<RTDBDatabaseDrive>\RTDBData folder and delete the following:
• RTDB_ConsistencyControlFile*.Table*
• RTDB_ConsistencyControlFolder*.Table*
3. Navigate to the following path available in System 800xA media:...\Applications\History\\History\RealTime_DB\Project CPIMS\
4. Open the command prompt, drag and drop theUpgrade Project CPIMS.bat fromthe above path.
5. Append /CC:ON as follows. This is done to run the upgrade with consistencycontrolled enabled to convert to HA configuration....\Applications\History\History\RealTime_DB\Project CPIMS\Upgrade
Project CPIMS.bat/CC:ON
6. Provide the following inputs:Give Command [] : 1Do you want to configure NLB first ? [Y/N] []: NHave users been notified? <Y/N/Q> [N] : YHave local applications been stopped ? <Y/N/Q> [N] : Y
7. After successful upgrade, following message appears in the command prompt:SUCCESS: "APP_Install_RTDB_Project"/Upgrade Completed success-fully, returning exit code 0
8. Press any key in the command prompt to continue further.
9. Close the command prompt window.
10. Close the ToDo* notepad information file, which opens during the Step 5..
11. Modify DSN:
2PAA107280-600 G 167
B Adding High Availability Ser B.1 Introduction
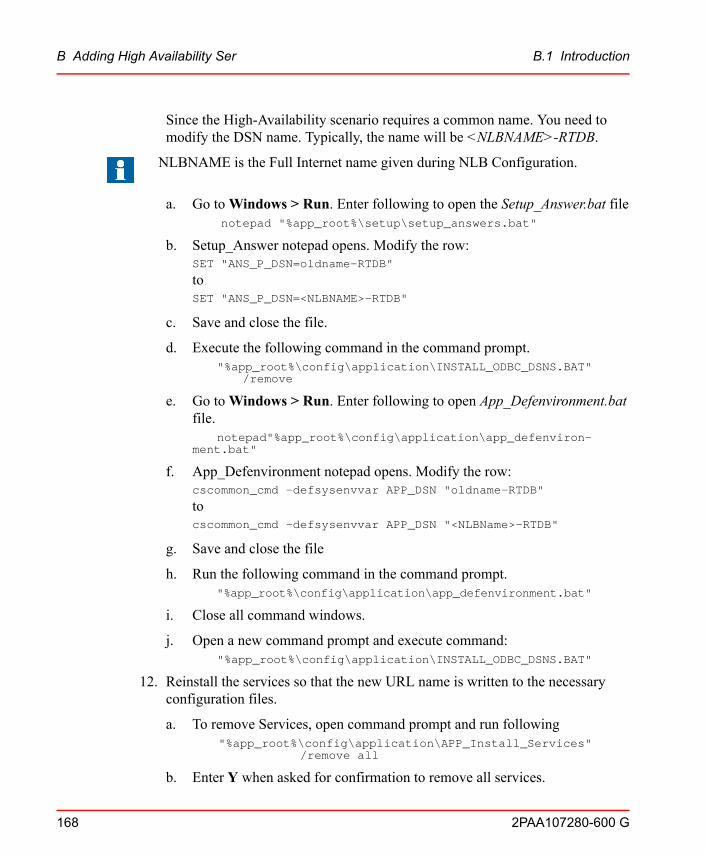
Since the High-Availability scenario requires a common name. You need tomodify the DSN name. Typically, the name will be <NLBNAME>-RTDB.
NLBNAME is the Full Internet name given during NLB Configuration.
a. Go toWindows > Run. Enter following to open the Setup_Answer.bat filenotepad "%app_root%\setup\setup_answers.bat"
b. Setup_Answer notepad opens. Modify the row:SET "ANS_P_DSN=oldname-RTDB"
toSET "ANS_P_DSN=<NLBNAME>-RTDB"
c. Save and close the file.
d. Execute the following command in the command prompt."%app_root%\config\application\INSTALL_ODBC_DSNS.BAT"
/remove
e. Go toWindows > Run. Enter following to open App_Defenvironment.batfile.
notepad"%app_root%\config\application\app_defenviron-ment.bat"
f. App_Defenvironment notepad opens. Modify the row:cscommon_cmd -defsysenvvar APP_DSN "oldname-RTDB"
tocscommon_cmd -defsysenvvar APP_DSN "<NLBName>-RTDB"
g. Save and close the file
h. Run the following command in the command prompt."%app_root%\config\application\app_defenvironment.bat"
i. Close all command windows.
j. Open a new command prompt and execute command:"%app_root%\config\application\INSTALL_ODBC_DSNS.BAT"
12. Reinstall the services so that the new URL name is written to the necessaryconfiguration files.
a. To remove Services, open command prompt and run following"%app_root%\config\application\APP_Install_Services"
/remove all
b. Enter Y when asked for confirmation to remove all services.
168 2PAA107280-600 G
B Adding High Availability Ser B.1 Introduction
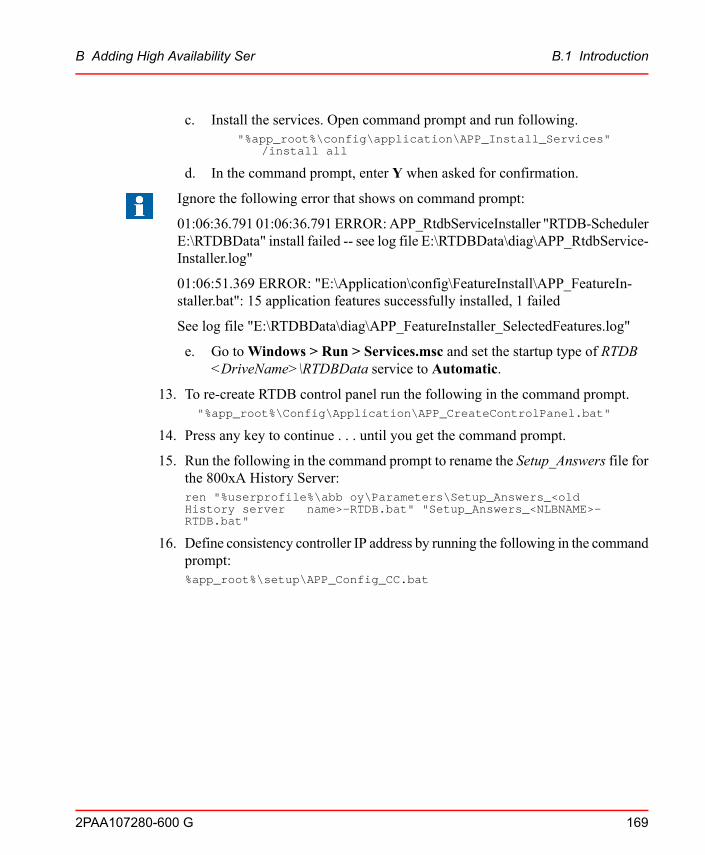
c. Install the services. Open command prompt and run following."%app_root%\config\application\APP_Install_Services"
/install all
d. In the command prompt, enter Y when asked for confirmation.
Ignore the following error that shows on command prompt:
01:06:36.791 01:06:36.791 ERROR:APP_RtdbServiceInstaller "RTDB-SchedulerE:\RTDBData" install failed -- see log file E:\RTDBData\diag\APP_RtdbService-Installer.log"
01:06:51.369 ERROR: "E:\Application\config\FeatureInstall\APP_FeatureIn-staller.bat": 15 application features successfully installed, 1 failed
See log file "E:\RTDBData\diag\APP_FeatureInstaller_SelectedFeatures.log"
e. Go toWindows > Run > Services.msc and set the startup type of RTDB<DriveName>\RTDBData service to Automatic.
13. To re-create RTDB control panel run the following in the command prompt."%app_root%\Config\Application\APP_CreateControlPanel.bat"
14. Press any key to continue . . . until you get the command prompt.
15. Run the following in the command prompt to rename the Setup_Answers file forthe 800xA History Server:ren "%userprofile%\abb oy\Parameters\Setup_Answers_<oldHistory server name>-RTDB.bat" "Setup_Answers_<NLBNAME>-RTDB.bat"
16. Define consistency controller IP address by running the following in the commandprompt:%app_root%\setup\APP_Config_CC.bat
2PAA107280-600 G 169
B Adding High Availability Ser B.1 Introduction
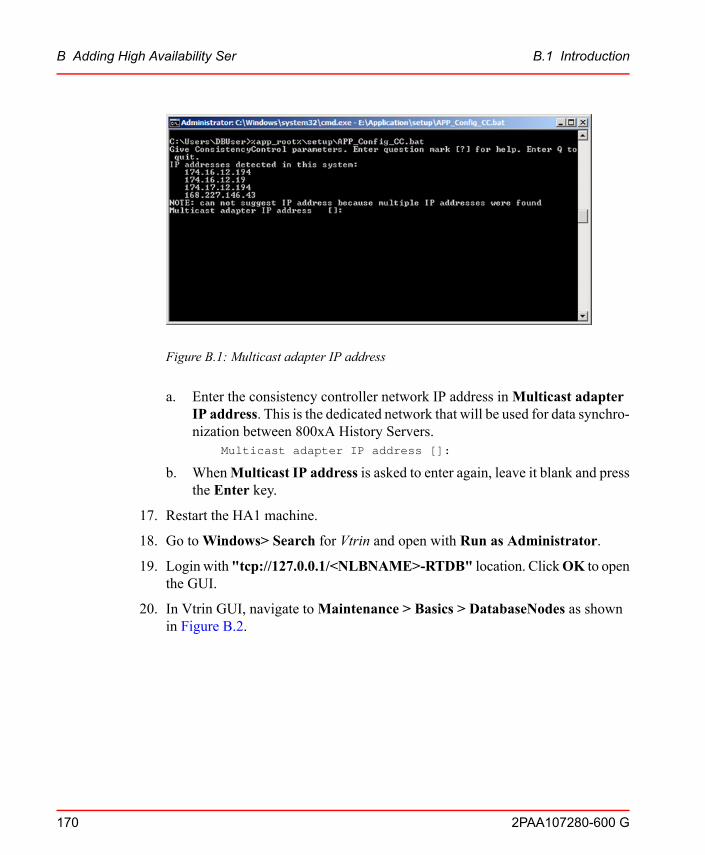
Figure B.1: Multicast adapter IP address
a. Enter the consistency controller network IP address inMulticast adapterIP address. This is the dedicated network that will be used for data synchro-nization between 800xA History Servers.
Multicast adapter IP address []:
b. WhenMulticast IP address is asked to enter again, leave it blank and pressthe Enter key.
17. Restart the HA1 machine.
18. Go toWindows> Search for Vtrin and open with Run as Administrator.
19. Login with "tcp://127.0.0.1/<NLBNAME>-RTDB" location. ClickOK to openthe GUI.
20. In Vtrin GUI, navigate toMaintenance > Basics > DatabaseNodes as shownin Figure B.2.
170 2PAA107280-600 G
B Adding High Availability Ser B.1 Introduction
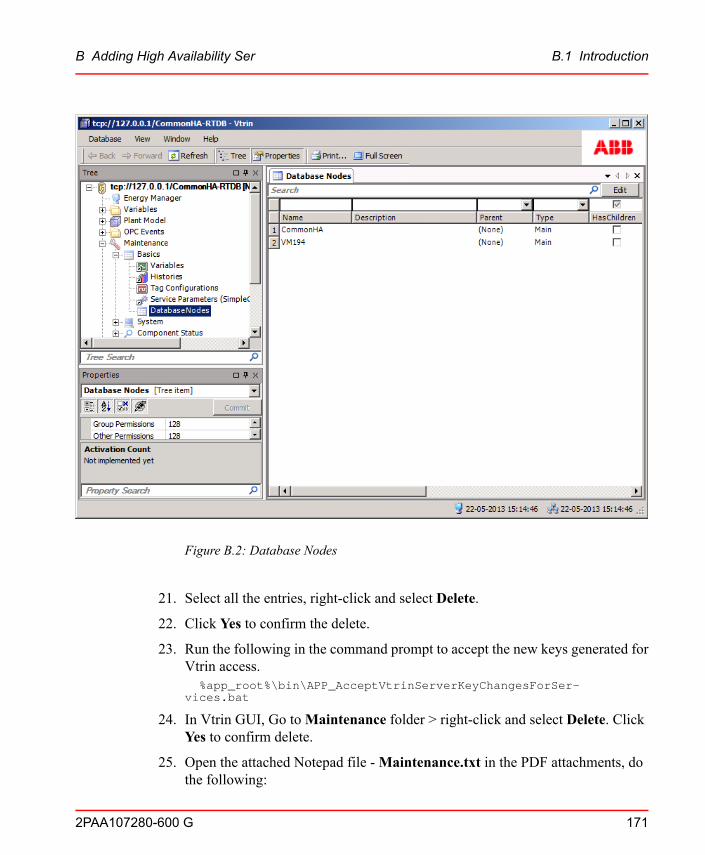
Figure B.2: Database Nodes
21. Select all the entries, right-click and select Delete.
22. Click Yes to confirm the delete.
23. Run the following in the command prompt to accept the new keys generated forVtrin access.
%app_root%\bin\APP_AcceptVtrinServerKeyChangesForSer-vices.bat
24. In Vtrin GUI, Go toMaintenance folder > right-click and select Delete. ClickYes to confirm delete.
25. Open the attached Notepad file -Maintenance.txt in the PDF attachments, dothe following:
2PAA107280-600 G 171
B Adding High Availability Ser B.1 Introduction
a. Go to Edit > Select-All.
b. Copy all the contents.
26. In Vtrin GUI, go to the root node > right-click and select Paste.
27. Navigate toMaintenance > Component Status. Right-click and select Proper-ties. Select the Item type as Virtual Root from the drop-down list.
28. Click OK to save the changes.
29. Take an online copy of this node.
a. Stop RTDB and run following command from command prompt windowto take online backup.
%app_root%\bin\App_BackupTool /d
DO NOT CLOSE THE COMMAND PROMPT WINDOW.
b. Wait for the backup to complete. This can be verified by checking whetherOnlinecopy.ok file is available in the following location:
%app_backup_root%\OnlineCopy
c. Start RTDB.
Perform the following steps in HA2:
1. Install HA2 using 800xA History Installer. Refer Installing History Server HighAvailability - Replica Node.
2. After the successful installation of HA2, run the following in the commandprompt to accept the new keys generated for Vtrin access.
%app_root%\bin\APP_AcceptVtrinServerKeyChangesForSer-vices.bat
3. Perform the following in all DCN:
a. Open Setup_Answers filenotepad "%app_root%\setup\setup_answers.bat"
b. setup_answers opens. Modify the rows:SET "ANS_P_MAINSERVERNAME=<oldname>"
toSET "ANS_P_MAINSERVERNAME=<NLBNAME>"
SET "ANS_P_MAINSERVERIP=<OldIP>"
toSET "ANS_P_MAINSERVERIP=<NLBCommonIP>"
172 2PAA107280-600 G
B Adding High Availability Ser B.1 Introduction

NLBCommonIP is the Cluster IP address that was set during NLB Configuration.
4. Save the file.
5. Run the following in the command prompt to accept the new keys generated forVtrin access.
%app_root%\bin\APP_AcceptVtrinServerKeyChangesForSer-vices.bat
6. Stop RTDB in HA1 and restart HA1 machine. After the restart, verify whetherRTDB Services in HA1 is started.
7. After verifying RTDB services in HA1, Stop RTDB in HA2 and restart HA2machine.
8. Restart RTDB-Scheduler in all DCN nodes.
Appendix C 800xA History Update/UpgradeWorkflows
This appendix provides the instructions for the following Online Update, OnlineUpgrade and Replace node operation:
• Online update SV 6.0.X to SV 6.0.Y
• Online upgrade SV 5.1 to SV 6.0.X
• Replace node
C.1 Online Update from System 800xA SV 6.0.X to SV6.0.YFollow the System recommended online update procedure from SV 6.0.x to SV 6.0.Y
1. If the configuration is High Availability History Servers for online update, it isrecommended to combine both the Primary and Secondary History servers inthe same group for online update.
2PAA107280-600 G 173
C 800xA History Update/Upgrade C.1 Online Update from System 800xA SV 6.0.X
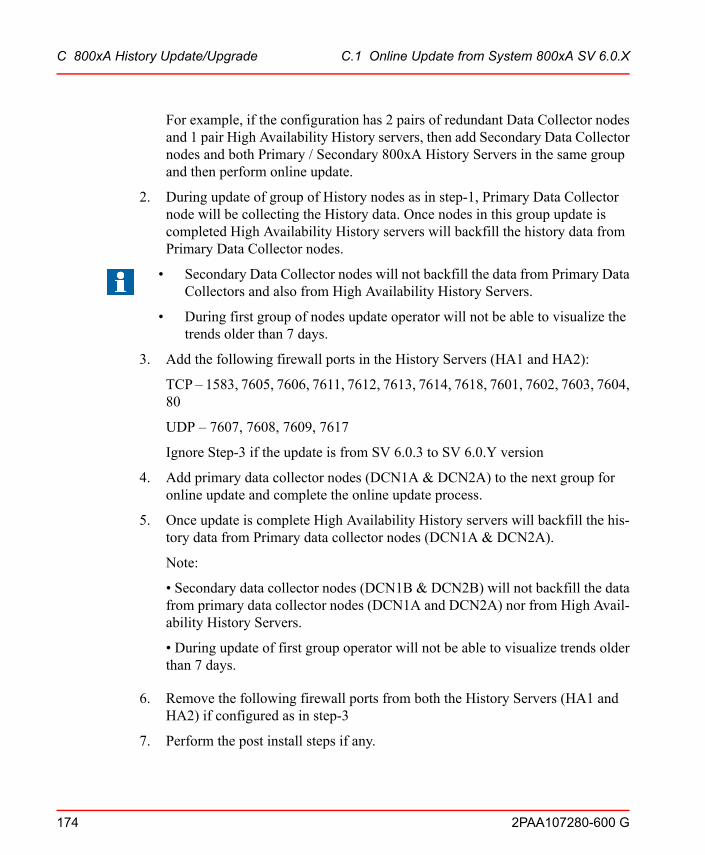
For example, if the configuration has 2 pairs of redundant Data Collector nodesand 1 pair High Availability History servers, then add Secondary Data Collectornodes and both Primary / Secondary 800xA History Servers in the same groupand then perform online update.
2. During update of group of History nodes as in step-1, Primary Data Collectornode will be collecting the History data. Once nodes in this group update iscompleted High Availability History servers will backfill the history data fromPrimary Data Collector nodes.
• Secondary Data Collector nodes will not backfill the data from Primary DataCollectors and also from High Availability History Servers.
• During first group of nodes update operator will not be able to visualize thetrends older than 7 days.
3. Add the following firewall ports in the History Servers (HA1 and HA2):
TCP – 1583, 7605, 7606, 7611, 7612, 7613, 7614, 7618, 7601, 7602, 7603, 7604,80
UDP – 7607, 7608, 7609, 7617
Ignore Step-3 if the update is from SV 6.0.3 to SV 6.0.Y version
4. Add primary data collector nodes (DCN1A & DCN2A) to the next group foronline update and complete the online update process.
5. Once update is complete High Availability History servers will backfill the his-tory data from Primary data collector nodes (DCN1A & DCN2A).
Note:
• Secondary data collector nodes (DCN1B & DCN2B) will not backfill the datafrom primary data collector nodes (DCN1A and DCN2A) nor from High Avail-ability History Servers.
• During update of first group operator will not be able to visualize trends olderthan 7 days.
6. Remove the following firewall ports from both the History Servers (HA1 andHA2) if configured as in step-3
7. Perform the post install steps if any.
174 2PAA107280-600 G
C 800xA History Update/Upgrade C.1 Online Update from System 800xA SV 6.0.X

C.2 Online upgrade from System 800xA SV 5.1 to SV6.0.X
C.2.1 Pre-Requisite1. In SV 6.0.x version 800xA History will be installed with 800xA Service user
account, so if the user account is different in SV 5.1 800xA History installationthen user name has to be changed. Follow the procedure as in Appendix-H ofSystem 800xA History Administration and Configuration (2PAA107563*)manual for changing the user name
2. Upgrade the 800xA History DCN & History Servers nodes from SV 5.1(800xAHistory 2.0) to target SV 6.0.Y version using itsManual History Installer availablein its media. Follow the procedure as described in the update section – 7 of System800xA History Administration and Configuration (2PAA107563*) manual
3. Take the History database backup of “Application” & “RTDBData” folder fromdatabase drives & complete data from backup drive, move these backups to asafe location.
4. In SV6.0.x all 800xA History parameters (Database drive letter, Backup driveletter, Time zone, Database size, IP configuration and machine name) should besame as that of SV5.1. If any change is required, perform the same in SV5.1 beforestarting upgrade by referring the required appendix in the manual (2PAA107563-xxx_en_800xA_History_ Administration_and_Configuration.pdf)
C.2.2 Procedure1. Online upgrade of 800xAHistory node requires green field installation and restore
of backup taken during the pre-requisite stage.
2. Manually upgrade RTDB in 800xA History data collector nodes (DCN1B andDCN2B) and both history servers (HA1 and HA2) to target SV 6.0.Y versionusing its Manual History Installer available in its media. Follow the procedureas described in the update section – 7 of ABBAbilityTM System 800xA HistoryInstallation manual (2PAA107280*).
3. Now perform the greenfield installation of redundant data collector nodes(DCN1B andDCN2B) and primary history server (HA1) only on SV6.0 . Duringprimary history server installation (HA1), secondary history server (HA2) hasto be turned off.
2PAA107280-600 G 175
C 800xA History Update/Upgrade C.2 Online upgrade from System 800xA SV 5.1
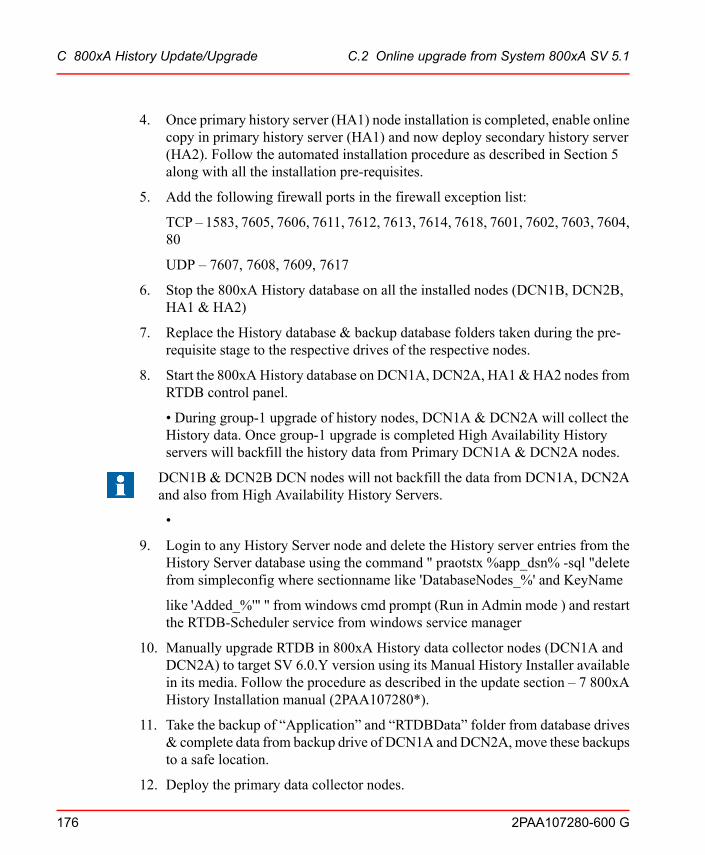
4. Once primary history server (HA1) node installation is completed, enable onlinecopy in primary history server (HA1) and now deploy secondary history server(HA2). Follow the automated installation procedure as described in Section 5along with all the installation pre-requisites.
5. Add the following firewall ports in the firewall exception list:
TCP – 1583, 7605, 7606, 7611, 7612, 7613, 7614, 7618, 7601, 7602, 7603, 7604,80
UDP – 7607, 7608, 7609, 7617
6. Stop the 800xA History database on all the installed nodes (DCN1B, DCN2B,HA1 & HA2)
7. Replace the History database & backup database folders taken during the pre-requisite stage to the respective drives of the respective nodes.
8. Start the 800xAHistory database on DCN1A, DCN2A, HA1&HA2 nodes fromRTDB control panel.
• During group-1 upgrade of history nodes, DCN1A & DCN2A will collect theHistory data. Once group-1 upgrade is completed High Availability Historyservers will backfill the history data from Primary DCN1A & DCN2A nodes.
DCN1B & DCN2B DCN nodes will not backfill the data from DCN1A, DCN2Aand also from High Availability History Servers.
•
9. Login to any History Server node and delete the History server entries from theHistory Server database using the command " praotstx %app_dsn% -sql "deletefrom simpleconfig where sectionname like 'DatabaseNodes_%' and KeyName
like 'Added_%'" " from windows cmd prompt (Run in Admin mode ) and restartthe RTDB-Scheduler service from windows service manager
10. Manually upgrade RTDB in 800xA History data collector nodes (DCN1A andDCN2A) to target SV 6.0.Y version using its Manual History Installer availablein its media. Follow the procedure as described in the update section – 7 800xAHistory Installation manual (2PAA107280*).
11. Take the backup of “Application” and “RTDBData” folder from database drives& complete data from backup drive of DCN1A andDCN2A,move these backupsto a safe location.
12. Deploy the primary data collector nodes.
176 2PAA107280-600 G
C 800xA History Update/Upgrade C.2 Online upgrade from System 800xA SV 5.1

13. Once installation is complete, stop the History database on these nodes (DCN1A& DCN2A) from RTDB control panel.
14. Replace the History database & backup database folders taken in Step-9 to therespective drives from respective nodes.
15. Start the 800xA History database on DCN1A & DCN2A nodes from RTDBcontrol panel.
16. Login to any History Server node and delete the History server entries from theHistory Server database using the command " praotstx %app_dsn% -sql "deletefrom simpleconfig where sectionname like 'DatabaseNodes_%' and KeyName
like 'Added_%'" " from windows cmd prompt (Run in Admin mode ) and restartthe RTDB-Scheduler service from windows service manager
17. Once the upgrade is completed, manually remove the following firewall portsfrom both the History servers:
TCP – 1583, 7605, 7606, 7611,7612, 7613, 7614, 7618, 7601, 7602, 7603, 7604,80
UDP – 7607, 7608, 7609, 7617
C.3 Replace Node with Windows Operating SystemChangeFollowing are the instructions to update the 800xA History Data Collector Node(DCN) and the History Servers nodes from System 800xA SV 6.0.x to SV 6.0.y usingthe System 800xA SV 6.0.y media.
In case of online update procedure, refer to the C.1 section.
C.3.1 Pre-requisiteStop RTDB from RTDB control panel. Take the backup of “Application” & “RTDB-Data” folder from database drive & complete History data from backup drive, movethese backups to a safe location
2PAA107280-600 G 177
C 800xA History Update/Upgrade C.3 Replace Node with Windows Operating Syst
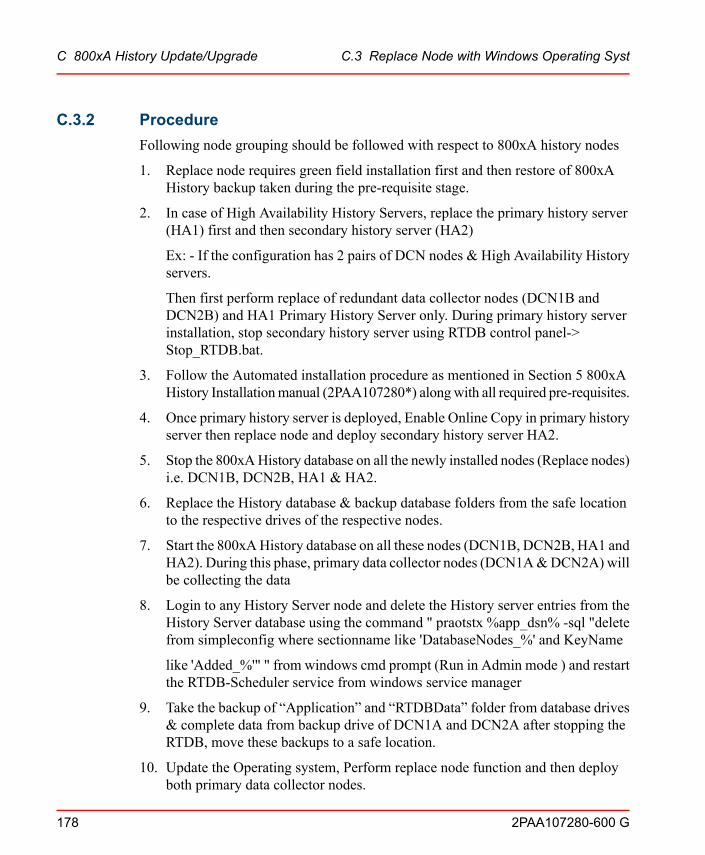
C.3.2 ProcedureFollowing node grouping should be followed with respect to 800xA history nodes
1. Replace node requires green field installation first and then restore of 800xAHistory backup taken during the pre-requisite stage.
2. In case of High Availability History Servers, replace the primary history server(HA1) first and then secondary history server (HA2)
Ex: - If the configuration has 2 pairs of DCN nodes & High Availability Historyservers.
Then first perform replace of redundant data collector nodes (DCN1B andDCN2B) and HA1 Primary History Server only. During primary history serverinstallation, stop secondary history server using RTDB control panel->Stop_RTDB.bat.
3. Follow the Automated installation procedure as mentioned in Section 5 800xAHistory Installationmanual (2PAA107280*) alongwith all required pre-requisites.
4. Once primary history server is deployed, Enable Online Copy in primary historyserver then replace node and deploy secondary history server HA2.
5. Stop the 800xAHistory database on all the newly installed nodes (Replace nodes)i.e. DCN1B, DCN2B, HA1 & HA2.
6. Replace the History database & backup database folders from the safe locationto the respective drives of the respective nodes.
7. Start the 800xAHistory database on all these nodes (DCN1B, DCN2B, HA1 andHA2). During this phase, primary data collector nodes (DCN1A&DCN2A) willbe collecting the data
8. Login to any History Server node and delete the History server entries from theHistory Server database using the command " praotstx %app_dsn% -sql "deletefrom simpleconfig where sectionname like 'DatabaseNodes_%' and KeyName
like 'Added_%'" " from windows cmd prompt (Run in Admin mode ) and restartthe RTDB-Scheduler service from windows service manager
9. Take the backup of “Application” and “RTDBData” folder from database drives& complete data from backup drive of DCN1A and DCN2A after stopping theRTDB, move these backups to a safe location.
10. Update the Operating system, Perform replace node function and then deployboth primary data collector nodes.
178 2PAA107280-600 G
C 800xA History Update/Upgrade C.3 Replace Node with Windows Operating Syst

Once deployed, stop the History database on these nodes (DCN1A & DCN2A).
11. Replace the History database & backup database folders taken in Step-9 to therespective drives of respective nodes.
12. Start the 800xA History database on primary data collector nodes (DCN1A &DCN2A) from the RTDB control panel.
• Once update is completed High Availability History servers will backfill thehistory data from Primary data collector (DCN1A & DCN2A) nodes.
• Redundant data collector nodes (DCN1B & DCN2B) will not backfill the datafrom primary data collector nodes (DCB1A and DCN2A) nor from High Avail-ability History Servers
13. Login to any History Server node and delete the History server entries from theHistory Server database using the command " praotstx %app_dsn% -sql "deletefrom simpleconfig where sectionname like 'DatabaseNodes_%' and KeyName
like 'Added_%'" " from windows cmd prompt (Run in Admin mode ) and restartthe RTDB-Scheduler service from windows service manager
Revision History
The revision index of this User Manual is not related to the 800xA 6.0 SystemRevision.
The following table lists the revision history of this User Manual.
DateDescriptionRevisionIndex
December 2014Published for 800xA System Version 6.0.A
October 2015Published for 800xA System Version 6.0.1.B
April 2016Published for 800xA System Version 6.0.2.C
September 2016Published for 800xA System Version 6.0.3.D
September 2016Published for 800xA System Version 6.0.3.E
2PAA107280-600 G 179
Revision History C.3 Replace Node with Windows Operating Syst

DateDescriptionRevisionIndex
April 2017Published for 800xA System Version 6.0.3 Rollup1.F
September 2017Published for 800xA System Version 6.0.3 Rollup2.G
180 2PAA107280-600 G
Revision History C.3 Replace Node with Windows Operating Syst
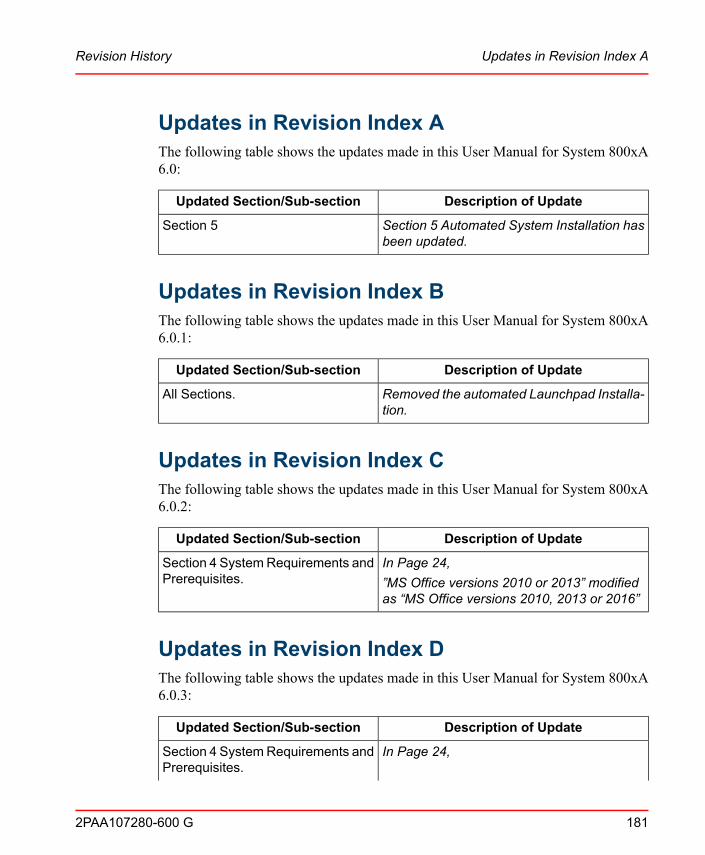
Updates in Revision Index AThe following table shows the updates made in this User Manual for System 800xA6.0:
Description of UpdateUpdated Section/Sub-section
Section 5 Automated System Installation hasbeen updated.
Section 5
Updates in Revision Index BThe following table shows the updates made in this User Manual for System 800xA6.0.1:
Description of UpdateUpdated Section/Sub-section
Removed the automated Launchpad Installa-tion.
All Sections.
Updates in Revision Index CThe following table shows the updates made in this User Manual for System 800xA6.0.2:
Description of UpdateUpdated Section/Sub-section
In Page 24,Section 4 System Requirements andPrerequisites. ”MS Office versions 2010 or 2013” modified
as “MS Office versions 2010, 2013 or 2016”
Updates in Revision Index DThe following table shows the updates made in this User Manual for System 800xA6.0.3:
Description of UpdateUpdated Section/Sub-section
In Page 24,Section 4 System Requirements andPrerequisites.
2PAA107280-600 G 181
Revision History Updates in Revision Index A
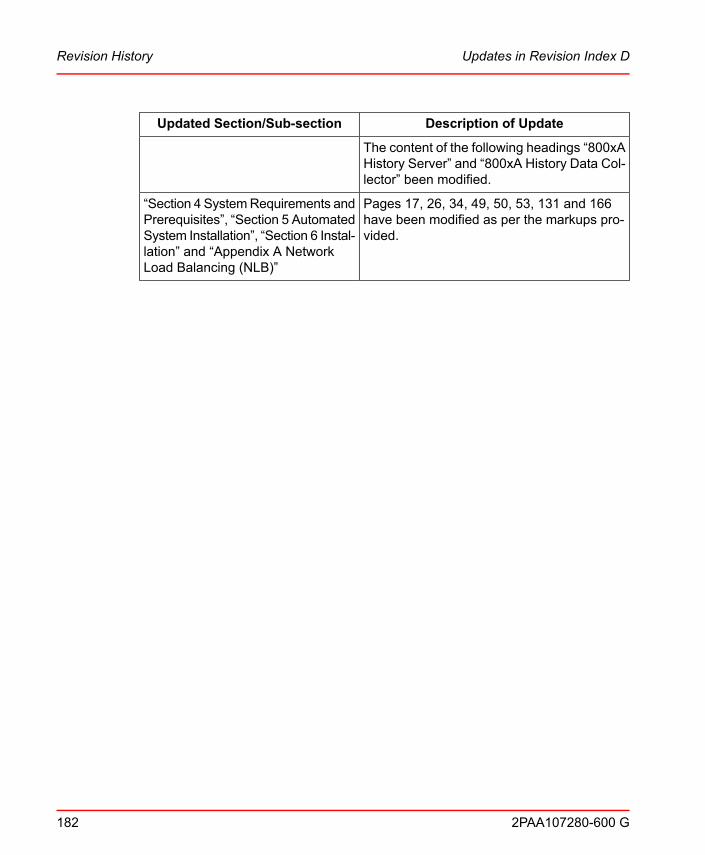
Description of UpdateUpdated Section/Sub-section
The content of the following headings “800xAHistory Server” and “800xA History Data Col-lector” been modified.
Pages 17, 26, 34, 49, 50, 53, 131 and 166have been modified as per the markups pro-vided.
“Section 4 System Requirements andPrerequisites”, “Section 5 AutomatedSystem Installation”, “Section 6 Instal-lation” and “Appendix A NetworkLoad Balancing (NLB)”
182 2PAA107280-600 G
Revision History Updates in Revision Index D
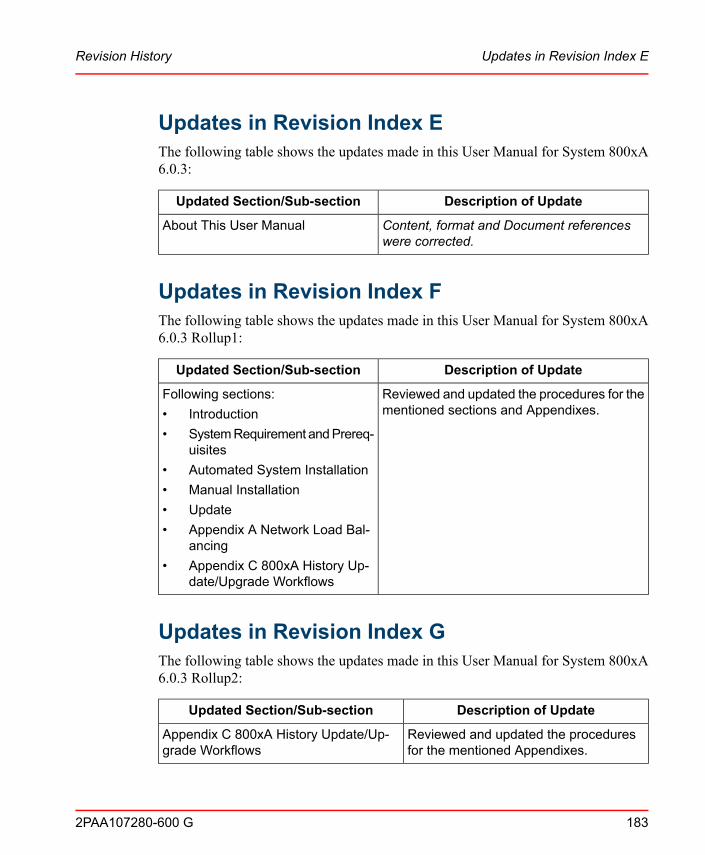
Updates in Revision Index EThe following table shows the updates made in this User Manual for System 800xA6.0.3:
Description of UpdateUpdated Section/Sub-section
Content, format and Document referenceswere corrected.
About This User Manual
Updates in Revision Index FThe following table shows the updates made in this User Manual for System 800xA6.0.3 Rollup1:
Description of UpdateUpdated Section/Sub-section
Reviewed and updated the procedures for thementioned sections and Appendixes.
Following sections:• Introduction• System Requirement and Prereq-
uisites• Automated System Installation• Manual Installation• Update• Appendix A Network Load Bal-
ancing• Appendix C 800xA History Up-
date/Upgrade Workflows
Updates in Revision Index GThe following table shows the updates made in this User Manual for System 800xA6.0.3 Rollup2:
Description of UpdateUpdated Section/Sub-section
Reviewed and updated the proceduresfor the mentioned Appendixes.
Appendix C 800xA History Update/Up-grade Workflows
2PAA107280-600 G 183
Revision History Updates in Revision Index E

IndexNumerics
800xA History Server Basic Installation, 54800xA History Server High Availability Installa-tion, 76
CConfiguring Network Load Balancing(NLB), 150
DDisabling Indexing, 24Disabling UAC, 24
FFormatting Drives, 24
IInstallation, 25, 51
800xA History Data Collector, 118800xA History Installer, 51800xA History Server, 54History Server - First Node, 76
Installing History Server High Availability -Second Node, 98
NNode Installation, 16
PPost-Installation, 130
800xA History Data Collector, 132800xA History Server, 131Firewall Settings, 131
Pre-installation, 51Prerequisites, 23
800xA History Data Collector, 24800xA History Server, 23
SSoftware Installation, 16System Requirements, 17
800xA History Data Collector, 21800xA History Server, 17
UUninstallation
, 143
184 2PAA107280-600 G
Index

Contact us
www.abb.com/800xAwww.abb.com/controlsystems
Copyright © 2017 ABB.All rights reserved.
2PA
A10
7280
-600
G