8 FREE Crochet Hat Patterns
28
i patterns: Crochet Hats with crochet hat 8 FREE
Transcript of 8 FREE Crochet Hat Patterns
i
patterns:Crochet Hats
with
crochet hat8 FREE
iwithCrochet Hats
crochet hat patterns:8 FREE
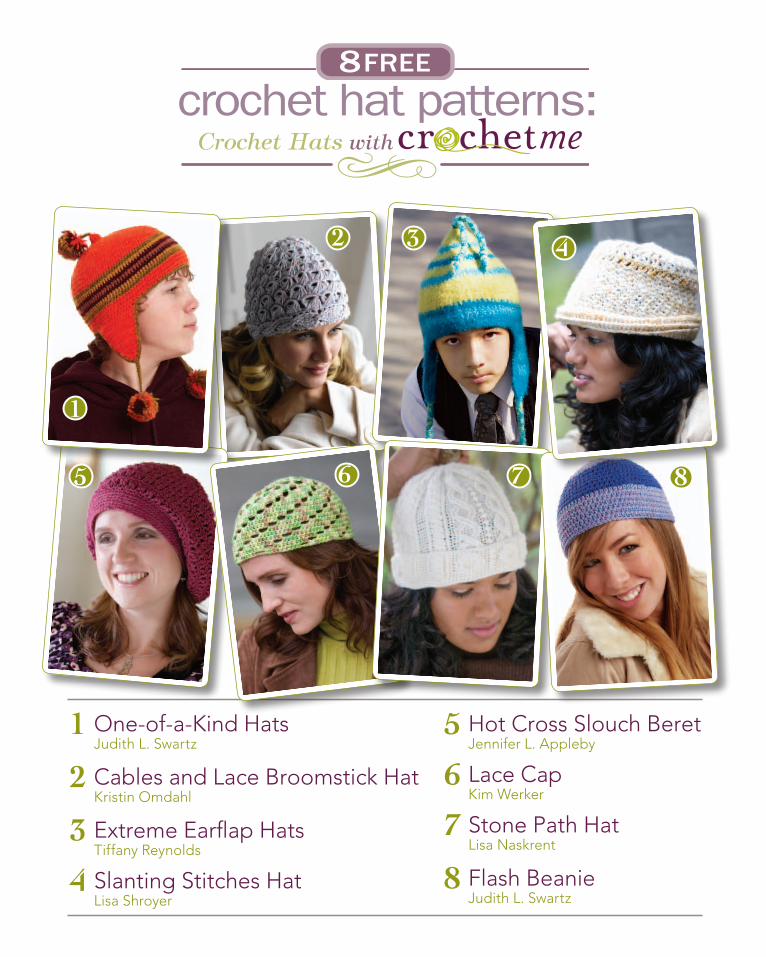
1 One-of-a-Kind Hats Judith L. Swartz
2 Cables and Lace Broomstick Hat Kristin Omdahl
3 Extreme Earflap Hats Tiffany Reynolds
4 Slanting Stitches Hat Lisa Shroyer
5 Hot Cross Slouch Beret Jennifer L. Appleby
6 Lace Cap Kim Werker
7 Stone Path Hat Lisa Naskrent
8 Flash Beanie Judith L. Swartz
5
3
6 87
2
1
4
1presented by crochetmeTable of Contents
5 Hot Cross Slouch Beret Jennifer L. Appleby
6 Lace Cap Kim Werker
7 Stone Path Hat Lisa Naskrent
8 Flash Beanie Judith L. Swartz
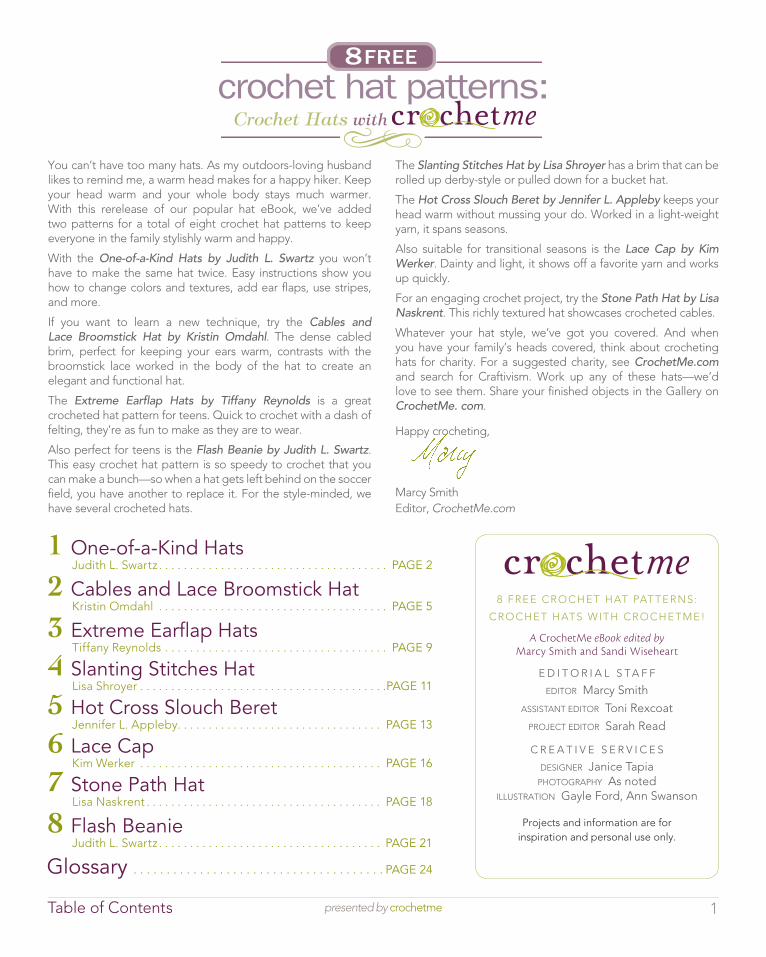
1 One-of-a-Kind Hats Judith L. Swartz . . . . . . . . . . . . . . . . . . . . . . . . . . . . . . . . . . . . . page 2
2 Cables and Lace Broomstick Hat Kristin Omdahl . . . . . . . . . . . . . . . . . . . . . . . . . . . . . . . . . . . . . page 5
3 extreme earflap Hats Tiffany Reynolds . . . . . . . . . . . . . . . . . . . . . . . . . . . . . . . . . . . . page 9
4 Slanting Stitches Hat Lisa Shroyer . . . . . . . . . . . . . . . . . . . . . . . . . . . . . . . . . . . . . . . .page 11
5 Hot Cross Slouch Beret Jennifer L. Appleby . . . . . . . . . . . . . . . . . . . . . . . . . . . . . . . . . page 13
6 Lace Cap Kim Werker . . . . . . . . . . . . . . . . . . . . . . . . . . . . . . . . . . . . . . . page 16
7 Stone path Hat Lisa Naskrent . . . . . . . . . . . . . . . . . . . . . . . . . . . . . . . . . . . . . . page 18
8 Flash Beanie Judith L. Swartz . . . . . . . . . . . . . . . . . . . . . . . . . . . . . . . . . . . . page 21
glossary . . . . . . . . . . . . . . . . . . . . . . . . . . . . . . . . . . . . . . page 24
8 FRee CROCHeT HAT PATTeRNS:
CROCHeT HATS WiTH CROCHeTMe!
A CrochetMe eBook edited by Marcy Smith and Sandi Wiseheart
e d i T O R i A L S T A F F
ediTOR Marcy Smith
ASSiSTANT ediTOR Toni Rexcoat
PROJeCT ediTOR Sarah Read
C R e A T i v e S e R v i C e S
deSigNeR Janice TapiaPHOTOgRAPHy As noted
iLLuSTRATiON gayle Ford, Ann Swanson
Projects and information are for inspiration and personal use only.
iwithCrochet Hats
crochet hat patterns:8 FREE
you can’t have too many hats. As my outdoors-loving husband likes to remind me, a warm head makes for a happy hiker. Keep your head warm and your whole body stays much warmer. With this rerelease of our popular hat eBook, we’ve added two patterns for a total of eight crochet hat patterns to keep everyone in the family stylishly warm and happy.
With the One-of-a-Kind Hats by Judith L. Swartz you won’t have to make the same hat twice. easy instructions show you how to change colors and textures, add ear flaps, use stripes, and more.
if you want to learn a new technique, try the Cables and Lace Broomstick Hat by Kristin Omdahl. The dense cabled brim, perfect for keeping your ears warm, contrasts with the broomstick lace worked in the body of the hat to create an elegant and functional hat.
The Extreme Earflap Hats by Tiffany Reynolds is a great crocheted hat pattern for teens. Quick to crochet with a dash of felting, they’re as fun to make as they are to wear.
Also perfect for teens is the Flash Beanie by Judith L. Swartz. This easy crochet hat pattern is so speedy to crochet that you can make a bunch—so when a hat gets left behind on the soccer field, you have another to replace it. For the style-minded, we have several crocheted hats.
The Slanting Stitches Hat by Lisa Shroyer has a brim that can be rolled up derby-style or pulled down for a bucket hat.
The Hot Cross Slouch Beret by Jennifer L. Appleby keeps your head warm without mussing your do. Worked in a light-weight yarn, it spans seasons.
Also suitable for transitional seasons is the Lace Cap by Kim Werker. dainty and light, it shows off a favorite yarn and works up quickly.
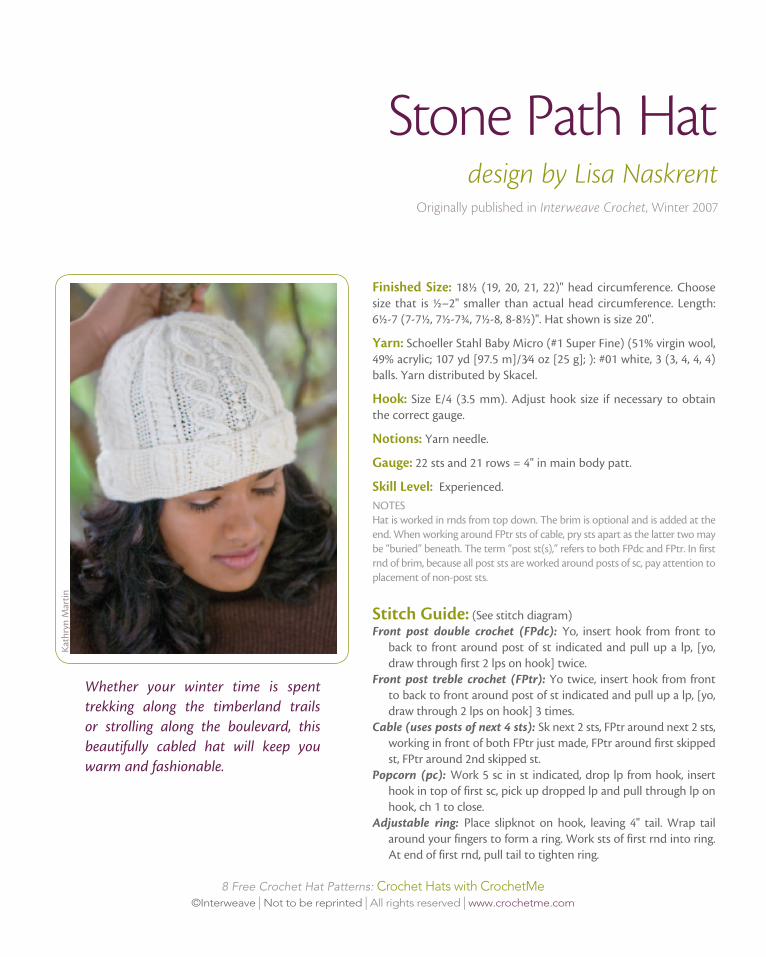
For an engaging crochet project, try the Stone Path Hat by Lisa Naskrent. This richly textured hat showcases crocheted cables.
Whatever your hat style, we’ve got you covered. And when you have your family’s heads covered, think about crocheting hats for charity. For a suggested charity, see CrochetMe.com and search for Craftivism. Work up any of these hats—we’d love to see them. Share your finished objects in the gallery on CrochetMe. com.
Happy crocheting,
Marcy Smith editor, CrochetMe.com
8 Free Crochet Hat Patterns: Crochet Hats with CrochetMe©interweave | Not to be reprinted | All rights reserved | www.crochetme.com
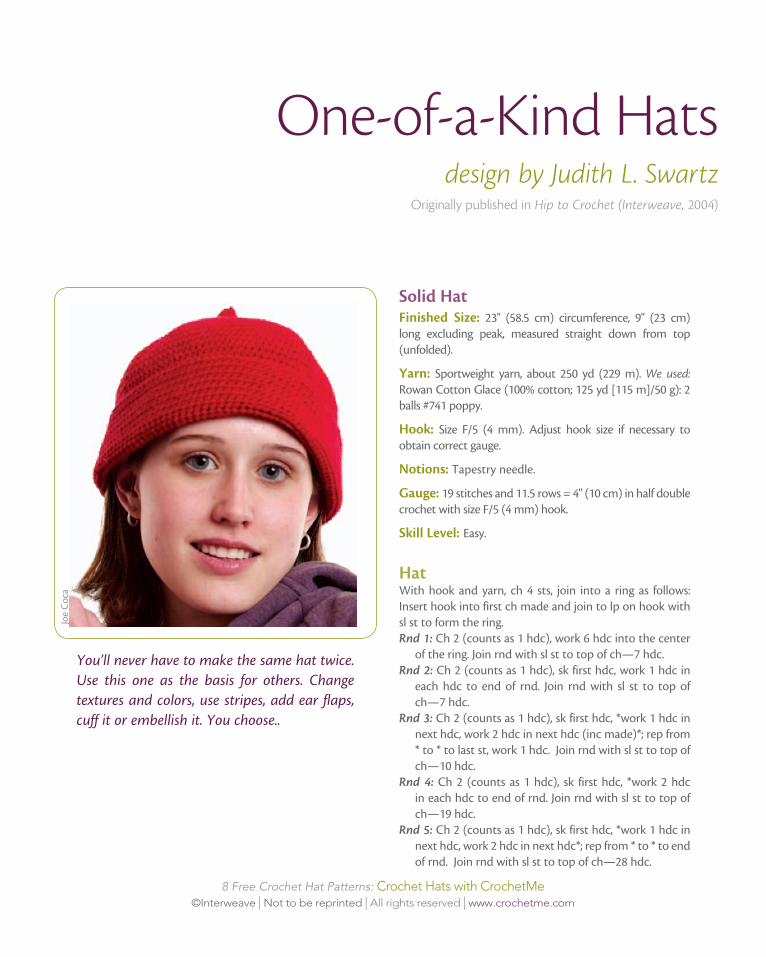
One-of-a-Kind Hats design by Judith L. Swartz
Originally published in Hip to Crochet (Interweave, 2004)
You’ll never have to make the same hat twice. Use this one as the basis for others. Change textures and colors, use stripes, add ear flaps, cuff it or embellish it. You choose..
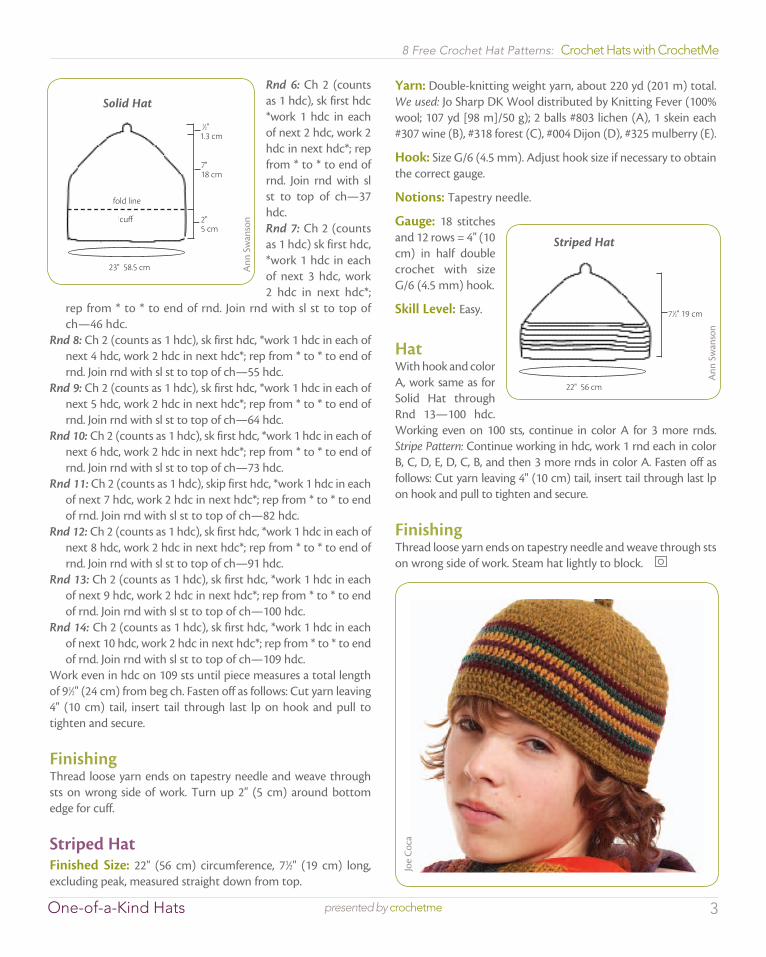
Solid HatFinished Size: 23" (58.5 cm) circumference, 9" (23 cm) long excluding peak, measured straight down from top (unfolded).
Yarn: Sportweight yarn, about 250 yd (229 m). We used: Rowan Cotton Glace (100% cotton; 125 yd [115 m]/50 g): 2 balls #741 poppy.
Hook: Size F/5 (4 mm). Adjust hook size if necessary to obtain correct gauge.
Notions: Tapestry needle.
Gauge: 19 stitches and 11.5 rows = 4" (10 cm) in half double crochet with size F/5 (4 mm) hook.
Skill Level: Easy.
HatWith hook and yarn, ch 4 sts, join into a ring as follows: Insert hook into first ch made and join to lp on hook with sl st to form the ring. Rnd 1: Ch 2 (counts as 1 hdc), work 6 hdc into the center
of the ring. Join rnd with sl st to top of ch—7 hdc.Rnd 2: Ch 2 (counts as 1 hdc), sk first hdc, work 1 hdc in
each hdc to end of rnd. Join rnd with sl st to top of ch—7 hdc.
Rnd 3: Ch 2 (counts as 1 hdc), sk first hdc, *work 1 hdc in next hdc, work 2 hdc in next hdc (inc made)*; rep from * to * to last st, work 1 hdc. Join rnd with sl st to top of ch—10 hdc.
Rnd 4: Ch 2 (counts as 1 hdc), sk first hdc, *work 2 hdc in each hdc to end of rnd. Join rnd with sl st to top of ch—19 hdc.
Rnd 5: Ch 2 (counts as 1 hdc), sk first hdc, *work 1 hdc in next hdc, work 2 hdc in next hdc*; rep from * to * to end of rnd. Join rnd with sl st to top of ch—28 hdc.
Joe
Coca
3presented by crochetme
8 Free Crochet Hat Patterns: Crochet Hats with CrochetMe
One-of-a-Kind Hats
Rnd 6: Ch 2 (counts as 1 hdc), sk first hdc *work 1 hdc in each of next 2 hdc, work 2 hdc in next hdc*; rep from * to * to end of rnd. Join rnd with sl st to top of ch—37 hdc.Rnd 7: Ch 2 (counts as 1 hdc) sk first hdc, *work 1 hdc in each of next 3 hdc, work 2 hdc in next hdc*;
rep from * to * to end of rnd. Join rnd with sl st to top of ch—46 hdc.
Rnd 8: Ch 2 (counts as 1 hdc), sk first hdc, *work 1 hdc in each of next 4 hdc, work 2 hdc in next hdc*; rep from * to * to end of rnd. Join rnd with sl st to top of ch—55 hdc.
Rnd 9: Ch 2 (counts as 1 hdc), sk first hdc, *work 1 hdc in each of next 5 hdc, work 2 hdc in next hdc*; rep from * to * to end of rnd. Join rnd with sl st to top of ch—64 hdc.
Rnd 10: Ch 2 (counts as 1 hdc), sk first hdc, *work 1 hdc in each of next 6 hdc, work 2 hdc in next hdc*; rep from * to * to end of rnd. Join rnd with sl st to top of ch—73 hdc.
Rnd 11: Ch 2 (counts as 1 hdc), skip first hdc, *work 1 hdc in each of next 7 hdc, work 2 hdc in next hdc*; rep from * to * to end of rnd. Join rnd with sl st to top of ch—82 hdc.
Rnd 12: Ch 2 (counts as 1 hdc), sk first hdc, *work 1 hdc in each of next 8 hdc, work 2 hdc in next hdc*; rep from * to * to end of rnd. Join rnd with sl st to top of ch—91 hdc.
Rnd 13: Ch 2 (counts as 1 hdc), sk first hdc, *work 1 hdc in each of next 9 hdc, work 2 hdc in next hdc*; rep from * to * to end of rnd. Join rnd with sl st to top of ch—100 hdc.
Rnd 14: Ch 2 (counts as 1 hdc), sk first hdc, *work 1 hdc in each of next 10 hdc, work 2 hdc in next hdc*; rep from * to * to end of rnd. Join rnd with sl st to top of ch—109 hdc.
Work even in hdc on 109 sts until piece measures a total length of 91⁄2" (24 cm) from beg ch. Fasten off as follows: Cut yarn leaving 4" (10 cm) tail, insert tail through last lp on hook and pull to tighten and secure.
Finishing Thread loose yarn ends on tapestry needle and weave through sts on wrong side of work. Turn up 2" (5 cm) around bottom edge for cuff.
Striped HatFinished Size: 22" (56 cm) circumference, 71⁄2" (19 cm) long, excluding peak, measured straight down from top.
Yarn: Double-knitting weight yarn, about 220 yd (201 m) total. We used: Jo Sharp DK Wool distributed by Knitting Fever (100% wool; 107 yd [98 m]/50 g); 2 balls #803 lichen (A), 1 skein each #307 wine (B), #318 forest (C), #004 Dijon (D), #325 mulberry (E).
Hook: Size G/6 (4.5 mm). Adjust hook size if necessary to obtain the correct gauge.
Notions: Tapestry needle.
Gauge: 18 stitches and 12 rows = 4" (10 cm) in half double crochet with size G/6 (4.5 mm) hook.
Skill Level: Easy.
HatWith hook and color A, work same as for Solid Hat through Rnd 13—100 hdc. Working even on 100 sts, continue in color A for 3 more rnds. Stripe Pattern: Continue working in hdc, work 1 rnd each in color B, C, D, E, D, C, B, and then 3 more rnds in color A. Fasten off as follows: Cut yarn leaving 4" (10 cm) tail, insert tail through last lp on hook and pull to tighten and secure.
FinishingThread loose yarn ends on tapestry needle and weave through sts on wrong side of work. Steam hat lightly to block. o
Solid Hat 1⁄2" 1.3 cm
7" 18 cm
2" 5 cm
23" 58.5 cm
cuff
fold line
Ann
Sw
anso
n
Joe
Coca
Striped Hat
71⁄2" 19 cm
22" 56 cm
Ann
Sw
anso
n
4presented by crochetme
8 Free Crochet Hat Patterns: Crochet Hats with CrochetMe
One-of-a-Kind Hats
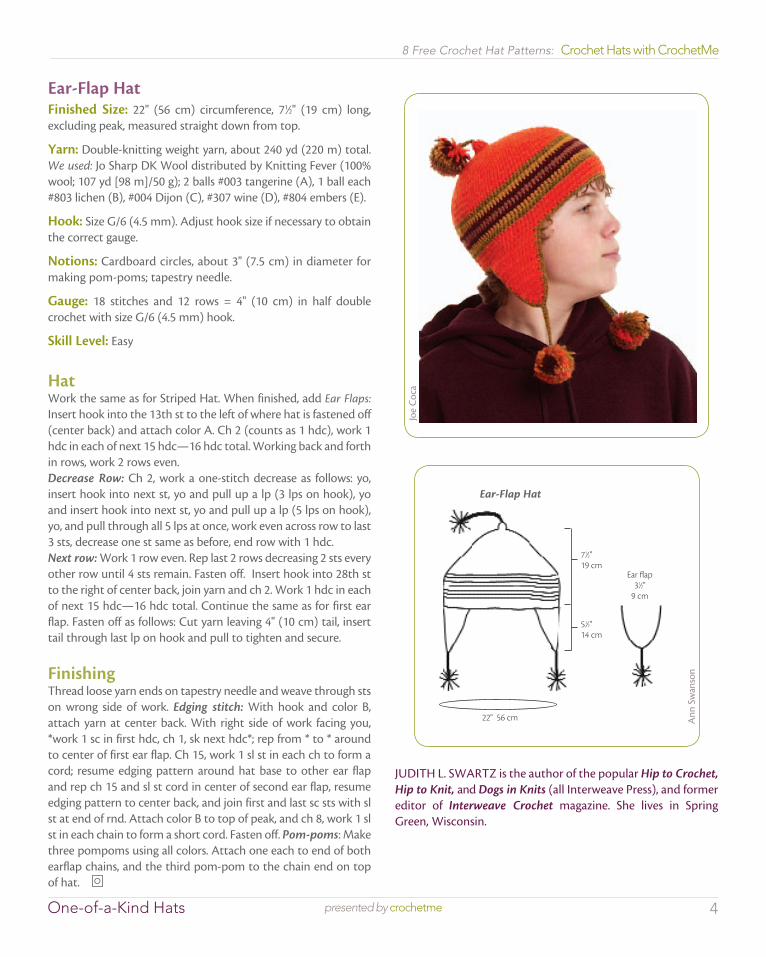
Ear-Flap HatFinished Size: 22" (56 cm) circumference, 71⁄2" (19 cm) long, excluding peak, measured straight down from top.
Yarn: Double-knitting weight yarn, about 240 yd (220 m) total. We used: Jo Sharp DK Wool distributed by Knitting Fever (100% wool; 107 yd [98 m]/50 g); 2 balls #003 tangerine (A), 1 ball each #803 lichen (B), #004 Dijon (C), #307 wine (D), #804 embers (E).
Hook: Size G/6 (4.5 mm). Adjust hook size if necessary to obtain the correct gauge.
Notions: Cardboard circles, about 3" (7.5 cm) in diameter for making pom-poms; tapestry needle.
Gauge: 18 stitches and 12 rows = 4" (10 cm) in half double crochet with size G/6 (4.5 mm) hook.
Skill Level: Easy
HatWork the same as for Striped Hat. When finished, add Ear Flaps: Insert hook into the 13th st to the left of where hat is fastened off (center back) and attach color A. Ch 2 (counts as 1 hdc), work 1 hdc in each of next 15 hdc—16 hdc total. Working back and forth in rows, work 2 rows even. Decrease Row: Ch 2, work a one-stitch decrease as follows: yo, insert hook into next st, yo and pull up a lp (3 lps on hook), yo and insert hook into next st, yo and pull up a lp (5 lps on hook), yo, and pull through all 5 lps at once, work even across row to last 3 sts, decrease one st same as before, end row with 1 hdc. Next row: Work 1 row even. Rep last 2 rows decreasing 2 sts every other row until 4 sts remain. Fasten off. Insert hook into 28th st to the right of center back, join yarn and ch 2. Work 1 hdc in each of next 15 hdc—16 hdc total. Continue the same as for first ear flap. Fasten off as follows: Cut yarn leaving 4" (10 cm) tail, insert tail through last lp on hook and pull to tighten and secure.
FinishingThread loose yarn ends on tapestry needle and weave through sts on wrong side of work. Edging stitch: With hook and color B, attach yarn at center back. With right side of work facing you, *work 1 sc in first hdc, ch 1, sk next hdc*; rep from * to * around to center of first ear flap. Ch 15, work 1 sl st in each ch to form a cord; resume edging pattern around hat base to other ear flap and rep ch 15 and sl st cord in center of second ear flap, resume edging pattern to center back, and join first and last sc sts with sl st at end of rnd. Attach color B to top of peak, and ch 8, work 1 sl st in each chain to form a short cord. Fasten off. Pom-poms: Make three pompoms using all colors. Attach one each to end of both earflap chains, and the third pom-pom to the chain end on top of hat. o
JuDITH L. SWARTz is the author of the popular Hip to Crochet, Hip to Knit, and Dogs in Knits (all Interweave Press), and former editor of Interweave Crochet magazine. She lives in Spring Green, Wisconsin.
Joe
Coca
Ann
Sw
anso
n
Ear-Flap Hat
71⁄2" 19 cm
51⁄2" 14 cm
22" 56 cm
Ear flap31⁄2"
9 cm

8 Free Crochet Hat Patterns: Crochet Hats with CrochetMe©Interweave | Not to be reprinted | All rights reserved | www.crochetme.com
Cables and Lace Broomstick Hatdesign by Kristin Omdahl
Originally published in Crochet So Fine (Interweave, 2010)
This hat is a play on the juxtaposition of cables and lace. The brim’s cable is dense, textured, and thick—great for keeping your ears protected in a blustering storm. The body of the hat is worked in broomstick lace, which is also textured, but light. At first glance, you might think the openwork would not be very warm, but the twisted loops of broomstick lace have little pockets of air in the center, which help trap warmth.
Solid HatFinished Size: 20" (51 cm) in circumference.
Yarn: DK weight (#3 Light); 168 yd (154 m). Shown: Lion Brand Yarn, Microspun (100% microfiber acrylic; 168 yd [154 m]/2.5 oz [70 g]): sterling #910-150, 1 skein.
Hook: Size E/4 (3.5mm) or size needed to obtain gauge.
Notions: 3 straight or 1 circular U.S. 17 (12.75mm) knitting needle(s); tapestry needle.
Gauge: 6 sts = 1" (2.5 cm); 11 rows in Cable Band patt = 4" (10 cm)
Skill Level: Experienced.
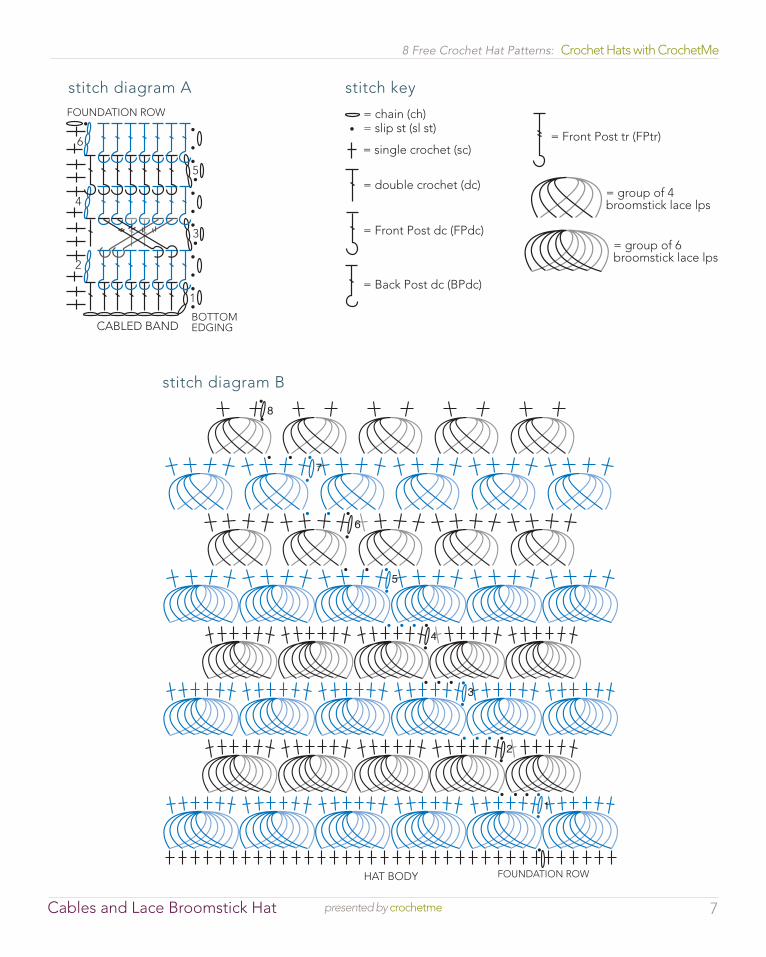
Cabled BandRefer to stitch diagram A on p. 8 for assistance.Ch 10.Row 1: Dc in 4th ch from hook and in each ch across—8 dc.Row 2: Ch 3, skip first st, BPdc (see Glossary) around the post of
each st across—8 sts.Row 3: Ch 3, skip first 5 sts, FPtr (see Glossary) around post of
next st, FPtr around post of next st, working behind last 2 sts made, dc in 4th and 5th sts; working in front of all sts, FPtr in 2nd and 3rd st, dc in last st—8 sts.
Row 4: Ch 3, skip first st, BPdc in each st across—8 sts.Row 5: Ch 3, skip first st, FPdc (see Glossary) in each st across—8 sts.Row 6: Rep Row 4.Rows 7–60: Rep Rows 3–6 thirteen times; rep Rows 3–4. Fasten
off, leaving a 12" (30.5 cm) tail for sewing seam. Sew last row to foundation ch.
Joe
Han
cock
6presented by crochetmeCables and Lace Broomstick Hat
8 Free Crochet Hat Patterns: Crochet Hats with CrochetMe
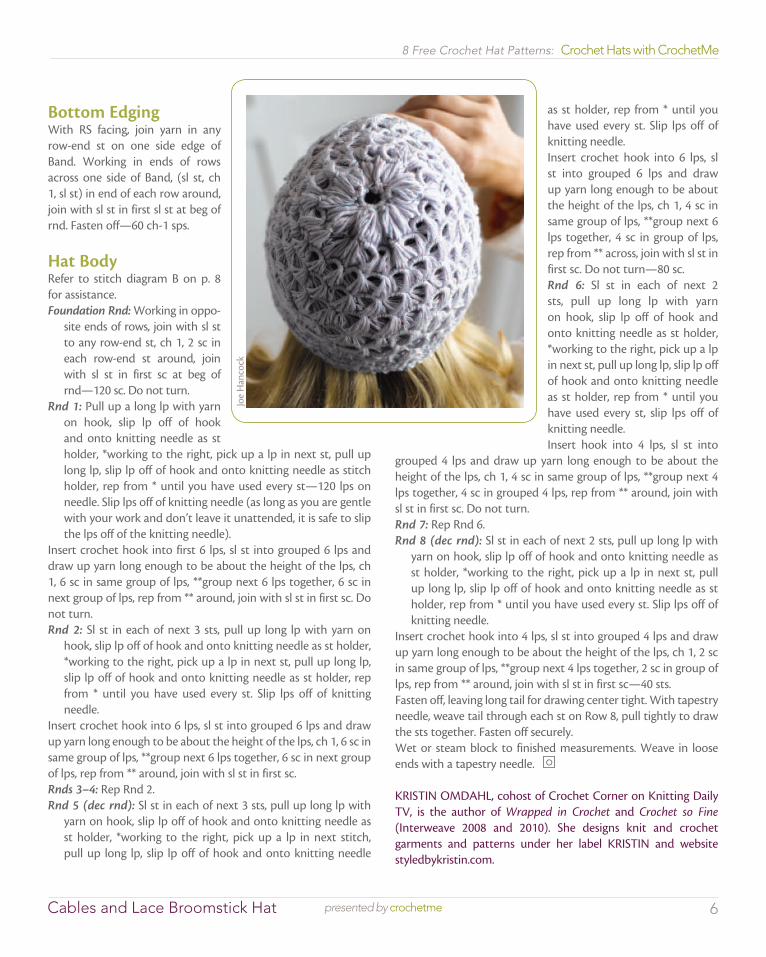
Bottom EdgingWith RS facing, join yarn in any row-end st on one side edge of Band. Working in ends of rows across one side of Band, (sl st, ch 1, sl st) in end of each row around, join with sl st in first sl st at beg of rnd. Fasten off—60 ch-1 sps.
Hat Body Refer to stitch diagram B on p. 8 for assistance.Foundation Rnd: Working in oppo-
site ends of rows, join with sl st to any row-end st, ch 1, 2 sc in each row-end st around, join with sl st in first sc at beg of rnd—120 sc. Do not turn.
Rnd 1: Pull up a long lp with yarn on hook, slip lp off of hook and onto knitting needle as st holder, *working to the right, pick up a lp in next st, pull up long lp, slip lp off of hook and onto knitting needle as stitch holder, rep from * until you have used every st—120 lps on needle. Slip lps off of knitting needle (as long as you are gentle with your work and don’t leave it unattended, it is safe to slip the lps off of the knitting needle).
Insert crochet hook into first 6 lps, sl st into grouped 6 lps and draw up yarn long enough to be about the height of the lps, ch 1, 6 sc in same group of lps, **group next 6 lps together, 6 sc in next group of lps, rep from ** around, join with sl st in first sc. Do not turn.Rnd 2: Sl st in each of next 3 sts, pull up long lp with yarn on
hook, slip lp off of hook and onto knitting needle as st holder, *working to the right, pick up a lp in next st, pull up long lp, slip lp off of hook and onto knitting needle as st holder, rep from * until you have used every st. Slip lps off of knitting needle.
Insert crochet hook into 6 lps, sl st into grouped 6 lps and draw up yarn long enough to be about the height of the lps, ch 1, 6 sc in same group of lps, **group next 6 lps together, 6 sc in next group of lps, rep from ** around, join with sl st in first sc.Rnds 3–4: Rep Rnd 2.Rnd 5 (dec rnd): Sl st in each of next 3 sts, pull up long lp with
yarn on hook, slip lp off of hook and onto knitting needle as st holder, *working to the right, pick up a lp in next stitch, pull up long lp, slip lp off of hook and onto knitting needle
as st holder, rep from * until you have used every st. Slip lps off of knitting needle. Insert crochet hook into 6 lps, sl st into grouped 6 lps and draw up yarn long enough to be about the height of the lps, ch 1, 4 sc in same group of lps, **group next 6 lps together, 4 sc in group of lps, rep from ** across, join with sl st in first sc. Do not turn—80 sc.Rnd 6: Sl st in each of next 2 sts, pull up long lp with yarn on hook, slip lp off of hook and onto knitting needle as st holder, *working to the right, pick up a lp in next st, pull up long lp, slip lp off of hook and onto knitting needle as st holder, rep from * until you have used every st, slip lps off of knitting needle. Insert hook into 4 lps, sl st into
grouped 4 lps and draw up yarn long enough to be about the height of the lps, ch 1, 4 sc in same group of lps, **group next 4 lps together, 4 sc in grouped 4 lps, rep from ** around, join with sl st in first sc. Do not turn.Rnd 7: Rep Rnd 6.Rnd 8 (dec rnd): Sl st in each of next 2 sts, pull up long lp with
yarn on hook, slip lp off of hook and onto knitting needle as st holder, *working to the right, pick up a lp in next st, pull up long lp, slip lp off of hook and onto knitting needle as st holder, rep from * until you have used every st. Slip lps off of knitting needle.
Insert crochet hook into 4 lps, sl st into grouped 4 lps and draw up yarn long enough to be about the height of the lps, ch 1, 2 sc in same group of lps, **group next 4 lps together, 2 sc in group of lps, rep from ** around, join with sl st in first sc—40 sts.Fasten off, leaving long tail for drawing center tight. With tapestry needle, weave tail through each st on Row 8, pull tightly to draw the sts together. Fasten off securely.Wet or steam block to finished measurements. Weave in loose ends with a tapestry needle. o
KRISTIN OMDAHL, cohost of Crochet Corner on Knitting Daily TV, is the author of Wrapped in Crochet and Crochet so Fine (Interweave 2008 and 2010). She designs knit and crochet garments and patterns under her label KRISTIN and website styledbykristin.com.
Joe
Han
cock
7presented by crochetmeCables and Lace Broomstick Hat
8 Free Crochet Hat Patterns: Crochet Hats with CrochetMe
1
BOTTOMEDGING
FOUNDATION ROW
CABLED BAND
3
2
CABLES & LACE BROOMSTICK LACE HATDIAGRAM 1
5
4
6
= chain (ch)STITCH KEY
= slip st (sl st)
= single crochet (sc)
= double crochet (dc)
= group of 4 broomstick lace lps
= group of 6 broomstick lace lps
= Front Post dc (FPdc)
= Front Post tr (FPtr)
= Back Post dc (BPdc)
CABLES & LACE BROOMSTICK LACE HATSTITCH KEY
stitch keystitch diagram A
stitch diagram B
1
FOUNDATION ROWHAT BODY
2
3
4
5
6
7
8
CABLES & LACE BROOMSTICK HATDIAGRAM 2
= chain (ch)STITCH KEY
= slip st (sl st)
= single crochet (sc)
= double crochet (dc)
= group of 4 broomstick lace lps
= group of 6 broomstick lace lps
= Front Post dc (FPdc)
= Front Post tr (FPtr)
= Back Post dc (BPdc)
CABLES & LACE BROOMSTICK LACE HATSTITCH KEY
8presented by crochetmeCables and Lace Broomstick Hat
8 Free Crochet Hat Patterns: Crochet Hats with CrochetMe
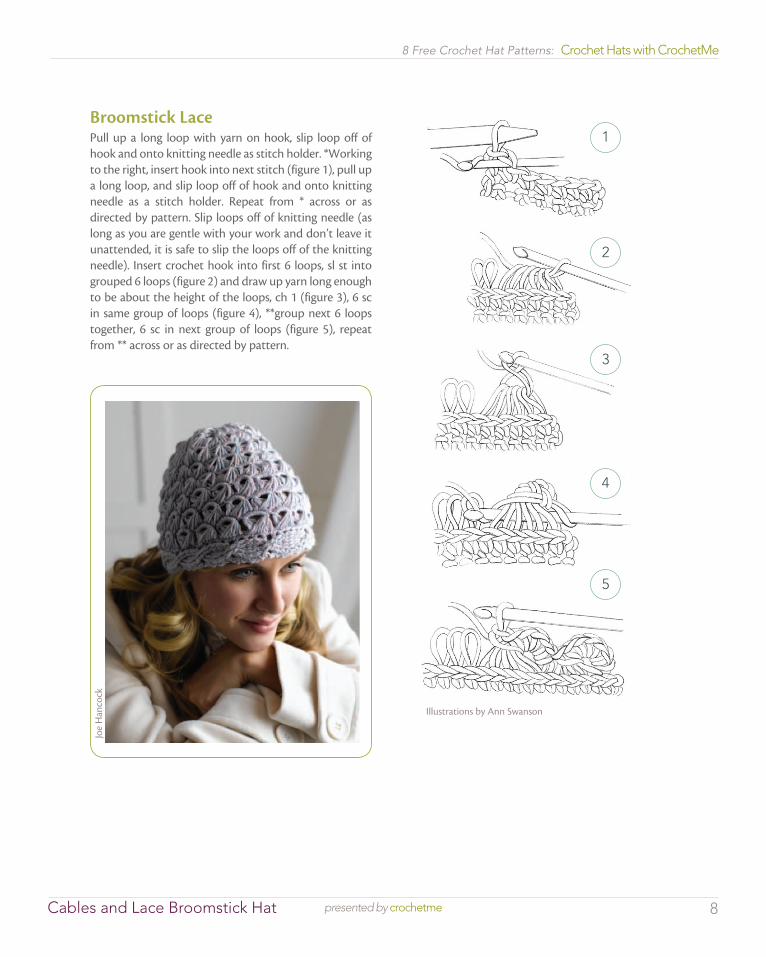
Pull up a long loop with yarn on hook, slip loop off of hook and onto knitting needle as stitch holder. *Working to the right, insert hook into next stitch (figure 1), pull up a long loop, and slip loop off of hook and onto knitting needle as a stitch holder. Repeat from * across or as directed by pattern. Slip loops off of knitting needle (as long as you are gentle with your work and don’t leave it unattended, it is safe to slip the loops off of the knitting needle). Insert crochet hook into first 6 loops, sl st into grouped 6 loops (figure 2) and draw up yarn long enough to be about the height of the loops, ch 1 (figure 3), 6 sc in same group of loops (figure 4), **group next 6 loops together, 6 sc in next group of loops (figure 5), repeat from ** across or as directed by pattern.
1
3
4
5
2
Joe
Han
cock
Broomstick Lace
Illustrations by Ann Swanson
8 Free Crochet Hat Patterns: Crochet Hats with CrochetMe©interweave | Not to be reprinted | All rights reserved | www.crochetme.com
Extreme Earflap Hatsdesign by Tiffany Reynolds
Originally published in Interweave Crochet, Special Issue 2005
Finished Size: 25½ (28)" (65 [71] cm) in circumference, before felting. To fit a child (adult).
Yarn: Black Forest Handspun Naturwolle (#5 Bulky) (100% wool; 110 yd [101 m]/3½ oz [100 g]): For two-color version: #61 Regenbogen (MC) and #u14 teal (B), 1 skein each. For three-color version: #u144 lime (A), #u14 teal (B), and #u15 light turquoise (C), 1 skein each. Yarn distributed by Muench Yarns.
Hook: Size K/10½ (6.5 mm). Adjust hook size as necessary to obtain the correct gauge.
Notions: Tapestry needle.
Gauge: 12 dc and 6 rows = 4" (10 cm), before felting.
Skill Level: Easy.
Two-Color VersionStarting at center top of hat, with MC, ch 4 and join with sl st in first ch.Rnd 1: Ch 3 (counts as first dc), work 13 dc in ring, sl st in
3rd ch of beg ch to join—14 sts.Rnd 2: Ch 3 (counts as first dc), skip first st, 2 dc in next
dc, *dc in next dc, 2 dc in next dc; rep from * around, sl st in 3rd ch of beg ch to join—21 sts.
Rnd 3: Ch 3 (counts as first dc), skip first st, dc in next dc, *2 dc in next dc, dc in each of next 2 dc; rep from * around, sl st in 3rd ch of beg ch to join—28 sts. Fasten off MC, join B.
Rnd 4: With B, ch 3 (counts as first dc), skip first st, dc in each of next 2 dc, *2 dc in next dc, dc in each of next
Chris
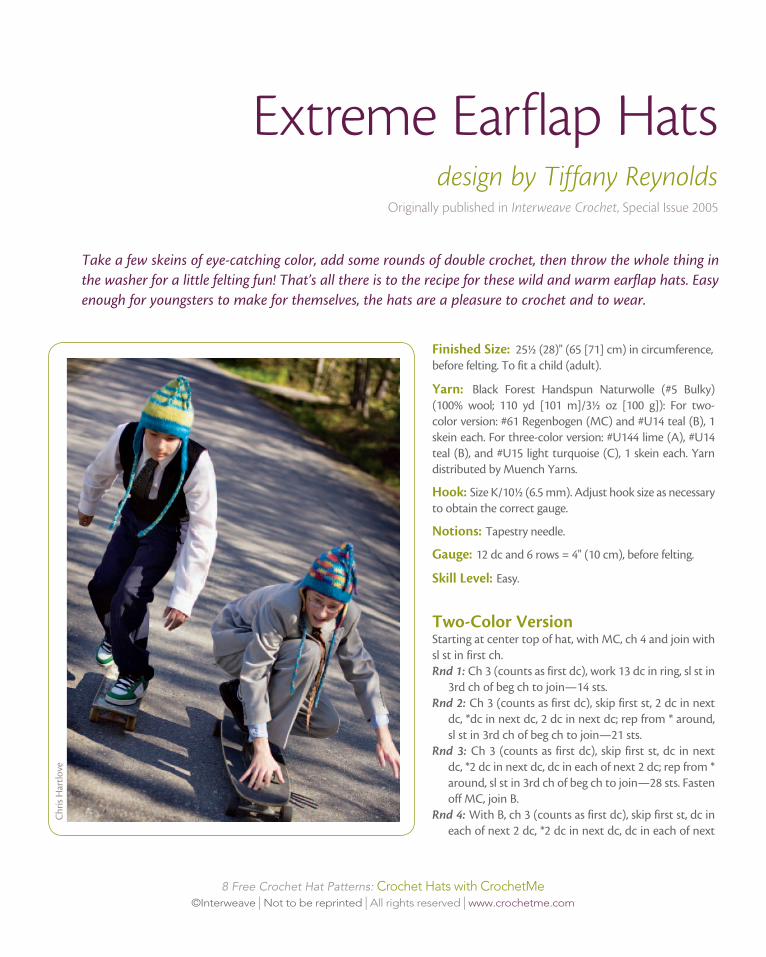
Har
tlove
Take a few skeins of eye-catching color, add some rounds of double crochet, then throw the whole thing in the washer for a little felting fun! That’s all there is to the recipe for these wild and warm earflap hats. Easy enough for youngsters to make for themselves, the hats are a pleasure to crochet and to wear.
10presented by crochetmeExtreme Earflap Hats
8 Free Crochet Hat Patterns: Crochet Hats with CrochetMe
3 dc; rep from * around, sl st in 3rd ch of beg ch to join—35 sts. Fasten off B, join MC.
Rnd 5:With MC, ch 3 (counts as first dc), skip first st, dc in each of next 3 dc, *2 dc in next dc, dc in each of next 4 dc; rep from * around, sl st in 3rd ch of beg ch to join—42 sts.
Rnd 6: Ch 3 (counts as first dc), skip first st, dc in each of next 4 dc, *2 dc in next dc, dc in each of next 5 dc; rep from * around, sl st in 3rd ch of beg ch to join—49 sts. Fasten off MC, join B.
Rnd 7: With B, ch 3 (counts as first dc), skip first st, dc in each of next 5 dc, *2 dc in next dc, dc in each of next 6 dc; rep from * around, sl st in 3rd ch of beg ch to join—56 sts. Fasten off B, join MC.
Rnd 8: With MC, ch 3 (counts as first dc), skip first st, dc in each of next 6 dc, *2 dc in next dc, dc in each of next 7 dc; rep from * around, sl st in 3rd ch of beg ch to join—63 sts.
Rnd 9: Ch 3 (counts as first dc), skip first st, dc in each of next 7 dc, *2 dc in next dc, dc in each of next 8 dc; rep from * around, sl st in 3rd ch of beg ch to join—70 sts. Fasten off MC, join B.
Rnd 10: With B, ch 3 (counts as first dc), skip first st, dc in each of next 8 dc, *2 dc in next dc, dc in each of next 9 dc; rep from * around, sl st in 3rd ch of beg ch to join—77 sts. Fasten off B, join MC.
Child size:Rnds 11–13: With MC, ch 3 (counts as first dc), skip first st, dc
in each dc around, sl st in 3rd ch of beg ch to join. Fasten off MC, join B.
Rnds 14–16: With B, ch 3 (counts as first dc), skip first st, dc in each dc around, sl st in 3rd ch of beg ch to join. Fasten off B. Weave in loose ends.
Adult size:Rnd 11: With MC, ch 3 (counts as first dc), skip first st, dc in each
of next 9 dc, *2 dc in next dc, dc in each of next 10 dc; rep from * around, sl st in 3rd ch of beg ch to join—84 sts.
Rnds 12–14: With MC, ch 3 (counts as first dc), skip first st, dc in each dc around, sl st in 3rd ch of beg ch to join. Fasten off MC, join B.
Rnds 15–17: With B, ch 3 (counts as first dc), skip first st, dc in each dc around, sl st in 3rd ch of beg ch to join. Fasten off B. Weave in loose ends.
First EarflapNote: Lay hat flat with seam edge at fold, this will be back of hat.Row 1: With RS of hat facing, skip first 7 (9) sts from back seam,
join B in next st, ch 3 (counts as first dc), dc in each of next 10 dc, turn—11 sts.Rows 2–9: Ch 3 (counts as first dc), dc in each st across to last st, turn, leaving rem st unworked—3 sts at end of Row 9. Fasten off B.
Second EarflapRow 1: With RS facing, skip 40 (44) sts to the left of last st made in Row 1 of first earflap, join B in next st, ch 3 (counts as first dc), dc in each of next 10 dc, turn—11 sts.Rows 2–9: Rep Rows 2–9 of first earflap. Fasten off B.
EdgingWith RS facing, join MC in any st on outer edge of hat, ch 1, sc evenly around entire edge of hat and earflaps, sl st in first sc to join.
Three-Color VersionWork same as two-color version, using the following color sequence: 3 rnds A, 1 rnd C, 1 rnd A, 1 rnd B, 2 rnds A, 1 rnd C, 3 (4) rnds A, 1 rnd B, 1 rnd C, 1 rnd B. Work earflaps in the following color sequence: *1 row C, 1 row B; rep from * 3 times; work 1 more row B. Do not fasten off at end of Row 9 of second earflap. With B, work edging same as for two-color version.
FinishingBraids: Cut eighteen 40" (101.5-cm) lengths of assorted yarn colors. use 6 strands for each braid. Fold one bundle of 6 strands in half and attach through bottom end of one earflap. Divide strands in thirds and braid strands tog. Tie in an overhand knot 1" (2.5 cm) from the end. Rep on other earflap. Fold 3rd bundle in half. Attach center of bundle to center top of hat, leaving 2 bundles of 12 strands on each side. Braid each side separately and tie each side in an overhand knot 1" (2.5 cm) from the end. Tie 2 braids in an overhand knot, close to top of hat. Felting: Put finished hat in lingerie bag and place in washing machine. Add small amount of mild laundry detergent, set water temp to hot, and use low water level and regular agitation.Do not allow to rinse or spin while felting. Check feltingprogress every 3–5 minutes until felted to desired size. Rinsein cold water, lay flat to dry. o
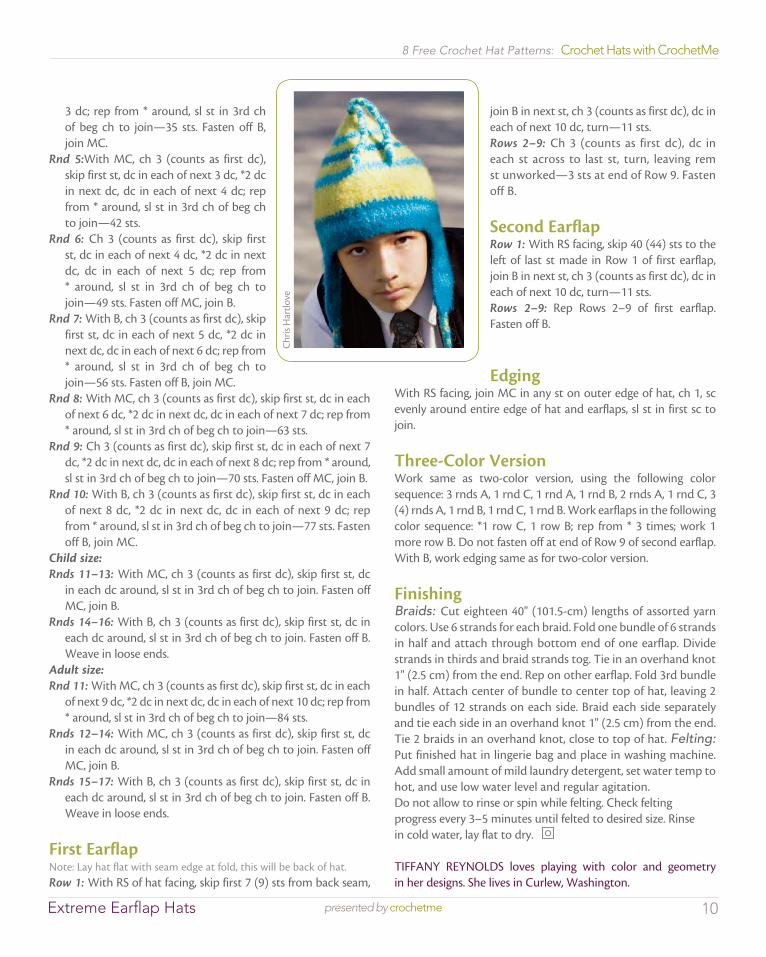
TIFFANY REYNOLDS loves playing with color and geometry in her designs. She lives in Curlew, Washington.
Chris
Har
tlove

8 Free Crochet Hat Patterns: Crochet Hats with CrochetMe©interweave | Not to be reprinted | All rights reserved | www.crochetme.com
Slanting Stitches Hatdesign by Lisa Shroyer
Originally published in Interweave Crochet, Winter 2007
Finished Size: 20" head circumference.
Yarn: La Lana Wools Streakers (# 4 Medium) (100% wool; 200 yd [183 m]/4 oz [28.5 g]): goldie, 1 skein.
Hook: Size G/7 (4.5 mm). Adjust hook size if necessary to obtain the correct gauge.
Notions: Yarn needle.
Gauge: 7 V-sts = 4" in little slanting V-st patt.
Skill Level: Intermediate.
Stitch GuideLittle Slanting V-stitch: (multiple of 3 sts)Row 1: Ch 1, *sk 2 sc, (sc, ch 1, dc) in next sc; rep from * around, sl st
in first sc to join.Rnd 2: Ch 1, (sc, ch 1, dc) in each ch-1 sp around, sl st in first sc to join.Rep Row 2 for patt.Big slanting V-stitch:Row 1: Ch 2, (dc, ch 1, tr) in each ch-1 sp around, sl st in first dc to join.Rep Row 1 for patt.Front post double crochet (FPdc): Yo, insert hook from front to back
to front around the post of next dc, yo and draw up a loop, [yo, draw through 2 loops on hook] twice.
HatBody: Ch 96, sl st in first ch to form ring, being careful not to twist sts.Rnd 1: (RS) Ch 1, sc in first ch and in each ch around, sl st in first sc
to join—96 sts.Rnd 2: Work Rnd 1 of little slanting V-st patt (see Stitch Guide)—32
V sts.Rnds 3–5: Work Rnd 2 of little slanting V-st patt 3 times, turn.Rnds 6–9: (WS) Work Rnd 2 of little slanting V-st patt 4 times, turn.Rnds 10–13: (RS) Work Rnd 2 of little slanting V-st patt 4 times, turn.
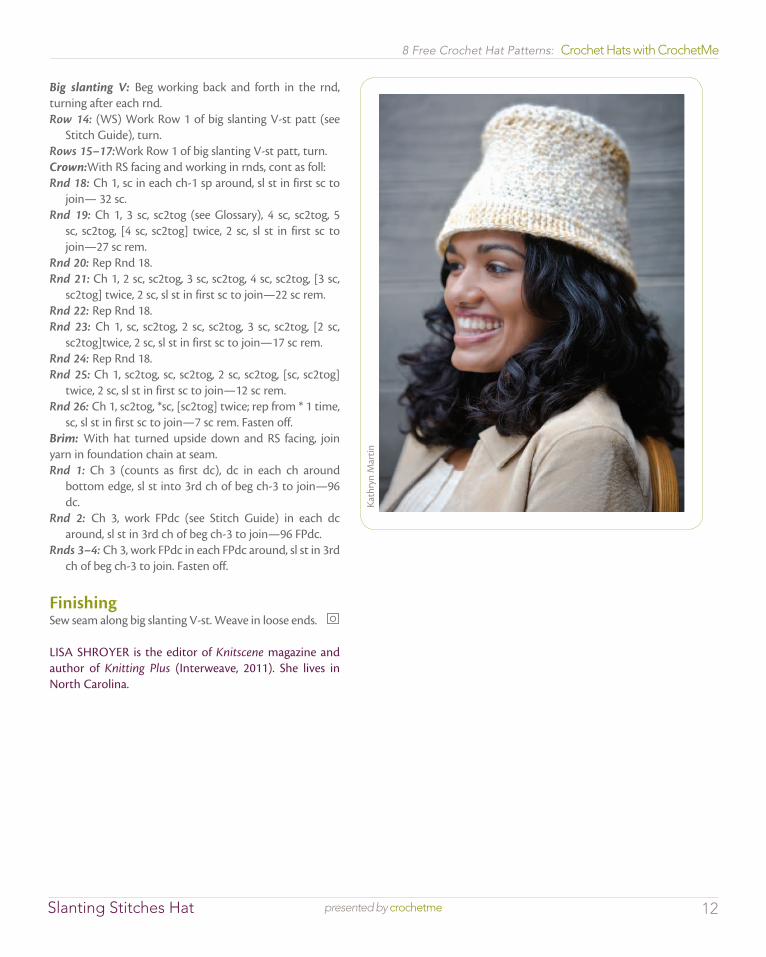
This cute hat in a softly shaded yarn uses a simple repeat of slanting V-stitches, and the flared ribbing can be worn down, creating a bucket-hat look, or rolled up as a cute derby.
Kath
ryn
Mar
tin
12presented by crochetmeSlanting Stitches Hat
8 Free Crochet Hat Patterns: Crochet Hats with CrochetMe
Big slanting V: Beg working back and forth in the rnd, turning after each rnd.Row 14: (WS) Work Row 1 of big slanting V-st patt (see
Stitch Guide), turn.Rows 15–17:Work Row 1 of big slanting V-st patt, turn.Crown:With RS facing and working in rnds, cont as foll:Rnd 18: Ch 1, sc in each ch-1 sp around, sl st in first sc to
join— 32 sc.Rnd 19: Ch 1, 3 sc, sc2tog (see Glossary), 4 sc, sc2tog, 5
sc, sc2tog, [4 sc, sc2tog] twice, 2 sc, sl st in first sc to join—27 sc rem.
Rnd 20: Rep Rnd 18.Rnd 21: Ch 1, 2 sc, sc2tog, 3 sc, sc2tog, 4 sc, sc2tog, [3 sc,
sc2tog] twice, 2 sc, sl st in first sc to join—22 sc rem.Rnd 22: Rep Rnd 18.Rnd 23: Ch 1, sc, sc2tog, 2 sc, sc2tog, 3 sc, sc2tog, [2 sc,
sc2tog]twice, 2 sc, sl st in first sc to join—17 sc rem.Rnd 24: Rep Rnd 18.Rnd 25: Ch 1, sc2tog, sc, sc2tog, 2 sc, sc2tog, [sc, sc2tog]
twice, 2 sc, sl st in first sc to join—12 sc rem.Rnd 26: Ch 1, sc2tog, *sc, [sc2tog] twice; rep from * 1 time,
sc, sl st in first sc to join—7 sc rem. Fasten off.Brim: With hat turned upside down and RS facing, join yarn in foundation chain at seam.Rnd 1: Ch 3 (counts as first dc), dc in each ch around
bottom edge, sl st into 3rd ch of beg ch-3 to join—96 dc.
Rnd 2: Ch 3, work FPdc (see Stitch Guide) in each dc around, sl st in 3rd ch of beg ch-3 to join—96 FPdc.
Rnds 3–4: Ch 3, work FPdc in each FPdc around, sl st in 3rd ch of beg ch-3 to join. Fasten off.
FinishingSew seam along big slanting V-st. Weave in loose ends. o
LiSa ShRoyeR is the editor of Knitscene magazine and author of Knitting Plus (interweave, 2011). She lives in North Carolina.
Kath
ryn
Mar
tin

8 Free Crochet Hat Patterns: Crochet Hats with CrochetMe©interweave | Not to be reprinted | All rights reserved | www.crochetme.com
Hot Cross Slouch Beretdesign by Jennifer L. ApplebyOriginally published in Interweave Crochet, Winter 2007
Finished Size: One size fits most. Beret at brim measures about 22½" around.
Yarn: Naturally Merino et Soie (#3 Light) (70% merino, 30% silk; 136 yd [125 m]/1¾ oz [50 g]; ): #207 berry, 2 skeins. Yarn distributed by Trendsetter.
Hook: Size G/6 (4 mm). Adjust hook size if necessary to obtain the correct gauge.
Notions: Yarn needle; 1" button (optional).
Gauge: 16 sts and 20 rounds = 4" in sc blo.
Skill Level: Intermediate.
NOTESBeret begins at brim and is worked to crown.
Stitch Guide:Treble Cross (TrX): (multiple of 3 sts)Yo twice, insert hook in next st, yo and pull up a lp (4 lps on hook), yo, draw through 2 lps (3 lps on hook), sk next st, yo, insert hook in next st, yo and pull up a lp (5 lps on hook), [yo, draw through 2 lps] 4 times (1 lp on hook), ch 1, yo, insert hook halfway down st just made in sp where lower legs join, yo and pull up a lp, [yo, draw through 2 lps] twice.
Crochet this fun beret in no time flat. The hat is worked in the round from brim to crown in a unique crossed stitch pattern, with almost no finishing required. The soft merino and silk yarn adds a luxurious touch to a simple, engaging project.
Kath
ryn
Mar
tin
14presented by crochetmeHot Cross Slouch Beret
8 Free Crochet Hat Patterns: Crochet Hats with CrochetMe
BeretCh 90, sl st in first ch to form ring, being careful not to twist ch.Rnd 1: Ch 1, sc in next ch and in each ch around (including sl st
from previous rnd), sl st in first sc to join—90 sts.Rnd 2: Ch 1, sc blo in each st around, sl st in first sc to join.Rnds 3–6: Rep Rnd 2.Rnd 7: Ch 1, sc in first sc, *2 sc in next sc, sc in each of next 2 sc,
2 sc in next sc **, sc in next sc; rep from * around ending at **.Rnd 8: Ch 4, TrX (see Stitch Guide) over next 3 sts; rep from *
around ending with last “leg” of TrX in same sc as beg ch-4, sl st in top of beg ch-4 to join—42 TrX.
Rnd 9: Ch 1, sc in each st and ch-sp around, sl st in first sc to join—126 sc. (Rnds 8–9 form patt.)
Rnds 10–19: Rep Rnds 8–9 five times.Rnd 20: Rep Rnd 8.Rnd 21 (dec rnd): Ch 1, *sc4tog (see Glossary), sc in each of next
17 sc; rep from * around, sl st in first st to join—108 sts.Rnd 22: Rep Rnd 8—36 TrX.Rnd 23: (dec rnd) Ch 1, *sc4tog, sc in each of next 14 sc; rep from
* around, sl st in first st to join—90 sts.Rnd 24: Rep Rnd 8—30 TrXs.Rnd 25 (dec rnd): Ch 1, *sc4tog, sc in each of next 11 sc; rep from
* around, sl st in first st to join—72 sts.Rnd 26: Ch 1, *sc3tog blo, sc in each of next 9 sc; rep from *
around, sl st in first st to join—60 sts.Rnd 27: Ch 1, *sc3tog blo, sc in each of next 7 sc; rep from *
around, sl st in first st to join— 48 sts.Rnd 28: Ch 1, *sc3tog blo, sc in each of next 5 sc; rep from *
around, sl st in first st to join—36 sts.Rnd 29: Ch 1, *sc3tog blo, sc in each of next 3 sc; rep from *
around, sl st in first st to join—24 sts.
Rnd 30: Ch 1, *sc3tog blo, sc in next sc; rep from * around, sl st in first st to join—12 sts.
Rnd 31: Ch 1, sc2tog blo around, sl st in first st to join—6 sts. Fasten off.
FinishingWeave in all loose ends. Sew button over hole at crown of hatif desired. o
JENNIFER L. APPLEBY loves to crochet updated vintage fashions from her studio in British Columbia. View her line of knitting and crochet patterns online at www.thewoollenearth.com.
Kath
ryn
Mar
tin
2
1
3
4
5
6
7
8
9
chain (ch)
sc2tog
sc3tog
sc4tog
slip st (sl st)
single crochet (sc)
sc blo
treble cross (TrX)
Rnds 1–9
15presented by crochetmeHot Cross Slouch Beret
8 Free Crochet Hat Patterns: Crochet Hats with CrochetMe
RISK-FREETRIAL OFFER
Interweave Crochet IS A MUST-HAVE FOR THOSE WHO LOVE TO CROCHET! Every issue includes scrumptious yarns, the latest resources, detailed how-tos, new techniques and exclusive contemporary crochet patterns. You’ll �nd lots of exciting new designs you can wear, use in your home, or give as gifts.
interweave.com/kdiwc
20
21
22
23
24
25
26
27
28
29
30
31
chain (ch)
sc2tog
sc3tog
sc4tog
slip st (sl st)
single crochet (sc)
sc blo
treble cross (TrX)
Rnds 20–31
8 Free Crochet Hat Patterns: Crochet Hats with CrochetMe©interweave | Not to be reprinted | All rights reserved | www.crochetme.com
Lace Cap design by Kim Werker
Originally published in Interweave Crochet, Winter 2007
Adapted from a thread doily pattern in a vintage crochet book, this cap is lacy at the crown and spirals down to the lower edge. Perfect for cool winter days, it’s a quick gift that can be stitched up in an afternoon.
Finished Size: Size 19½", to fit most women’s heads.
Yarn: Lorna’s Laces (#4 Medium) Lion & Lamb (50% silk, 50% wool; 205 yd [187 m]/3½ oz [100 g]): #207 envy, 1 skein.
Hook: Size H/8 (5 mm). Adjust hook size if necessary to obtain the correct gauge.
Notions: Yarn needle.
Gauge: 18 sts and 13 rows = 4" in hdc.
Skill Level: Easy.
CapCh 5, sl st in first ch to form a ring.Rnd 1: Ch 5 (counts as first hdc, ch 2), *hdc in center of ring,
ch 2; rep from * 6 more times, sl st in 3rd ch of beg ch-5 to join—8 ch-2 sps.
Rnd 2: Ch 3 (counts as first hdc here and throughout), hdc in same st as join, ch 3, *sk ch-2 sp, 2 hdc in next hdc, ch 3; rep from * around, end with sl st in top of beg ch-3 to join—8 ch-3 sps.
Rnd 3: Sl st in next hdc and in next ch-3 sp, ch 7, *sc in next ch-3 sp, ch 7; rep from * around, end with sl st in first ch of first ch-7—8 ch-7 sps.
Rnd 4: Sl st in next ch-7 sp, ch 3, 4 hdc in same sp, ch 3, *5 hdc in next ch-7 sp, ch 3; rep from * around, end with sl st in 3rd ch of beg ch-3 to join—40 hdc and 8 ch-3 sps.
Rnd 5: Ch 3, hdc in each of next 2 hdc, ch 3, sk next 2 hdc, 4 hdc in next ch-3 sp, *hdc in each of next 3 hdc, ch 3, sk next 2 hdc, 4 hdc in next ch-3 sp; rep from * around, end with sl st in 3rd ch of beg ch-3 to join—56 hdc and 8 ch-3 sps.
Kath
ryn
Mar
tin
17presented by crochetmeLace Cap
8 Free Crochet Hat Patterns: Crochet Hats with CrochetMe
Rnd 6: Ch 6 (counts as first hdc, ch 3), sk next 2 hdc, 4 hdc in next ch-3 sp, *hdc in each of next 5 hdc, ch 3, sk next 2 hdc, 4 hdc in next ch-3 sp; rep from * around, end with hdc in each of next 4 hdc, sl st in 3rd ch of beg ch-6 to join—72 hdc and 8 ch-3 sps.
Rnd 7: Sl st in next ch-3 sp, ch 2, 2 hdc in same sp, hdc in each of next 7 hdc, *ch 2, sk next 2 hdc, 3 hdc in next ch-3 sp, hdc in each of next 7 hdc; rep from * around, end with ch 2, sk 2 hdc, sl st in 3rd ch of beg ch-3 to join—80 hdc and 8 ch-2 sps.
Rnd 8 (dec rnd): Ch 3, hdc in each of next 6 hdc, ch 2, sk next 3 hdc, 2 hdc in next ch-2 sp, *hdc in each of next 7 hdc, ch 2, sk next 3 hdc, 2 hdc in next ch-2 sp; rep from * around, sl st in 3rd ch of beg ch-3 to join—72 hdc.
Rnd 9: Ch 3, hdc in each of next 4 hdc, ch 2, sk next 2 hdc, 2 hdc in next ch-2 sp, *hdc in each of next 7 hdc, ch 2, sk next 2 hdc, 2 hdc in next ch-2 sp; rep from * around, end with hdc in each of next 2 hdc, sl st in top of beg ch-3 to join.
Rnd 10: Ch 3, hdc in each of next 2 hdc, ch 2, sk next 2 hdc, 2 hdc in next ch-2 sp, *hdc in each of next 7 hdc, ch 2, sk 2 hdc, 2 hdc in next ch-2 sp; rep from * around, end with hdc in each of next 4 hdc, sl st in top of beg ch-3 to join.
Rnd 11: Ch 5 (counts as hdc, ch 2), sk next 2 hdc, 2 hdc in next ch-2 sp, *hdc in each of next 7 hdc, ch 2, sk next 2 hdc, 2 hdc in next ch-2 sp; rep from * around, end with hdc in each of next 6 hdc, sl st in 3rd ch of beg ch-5 to join.
Rnd 12: Sl st in next ch-2 sp, ch 3, hdc in same sp, hdc in each of next 7 hdc, ch 2, sk next 2 hdc, *2 hdc in next ch-2 sp, hdc in each of next 7 hdc, ch 2, sk next 2 hdc; rep from * around, end with sl st in top of beg ch-3 to join.
Rnd 13: Ch 3, hdc in each of next 6 hdc, ch 2, sk next 2 hdc, 2 hdc in next ch-2 sp, *hdc in each of next 7 hdc, ch 2, sk next 2 hdc, 2 hdc in next ch-2 sp; rep from * around, sl st in 3rd ch of beg ch-3 to join.
Rnds 14–18: Rep Rnds 9–13. Fasten off.
FinishingWeave in loose ends. o
KIM WERKER is the founder of CrochetMe.com, former editor of Interweave Crochet, and author of numerous crochet books.
Knitting Daily TV
Series 400 is now
available on DVD!
Make Time for Yarn Every DayTM
Knitting Daily TV I S A V A I L A B L E O N D V D !
Watch your favorite episodes at any time. Invite Eunny Jang, Kristin Omdahl,
and Shay Pendray into your home for one-on-one lessons
in knitting, crochet, and even stitching.
Visit KnittingDailyTV.com and purchase your personal DVD of Knitting Daily TV Today!:
8 Free Crochet Hat Patterns: Crochet Hats with CrochetMe©interweave | Not to be reprinted | All rights reserved | www.crochetme.com
Stone Path Hatdesign by Lisa Naskrent
Originally published in Interweave Crochet, Winter 2007
Finished Size: 18½ (19, 20, 21, 22)" head circumference. Choose size that is ½–2" smaller than actual head circumference. Length: 6½-7 (7-7½, 7½-7¾, 7½-8, 8-8½)". Hat shown is size 20".
Yarn: Schoeller Stahl Baby Micro (#1 Super Fine) (51% virgin wool, 49% acrylic; 107 yd [97.5 m]/3⁄4 oz [25 g]; ): #01 white, 3 (3, 4, 4, 4) balls. Yarn distributed by Skacel.
Hook: Size E/4 (3.5 mm). Adjust hook size if necessary to obtain the correct gauge.
Notions: Yarn needle.
Gauge: 22 sts and 21 rows = 4" in main body patt.
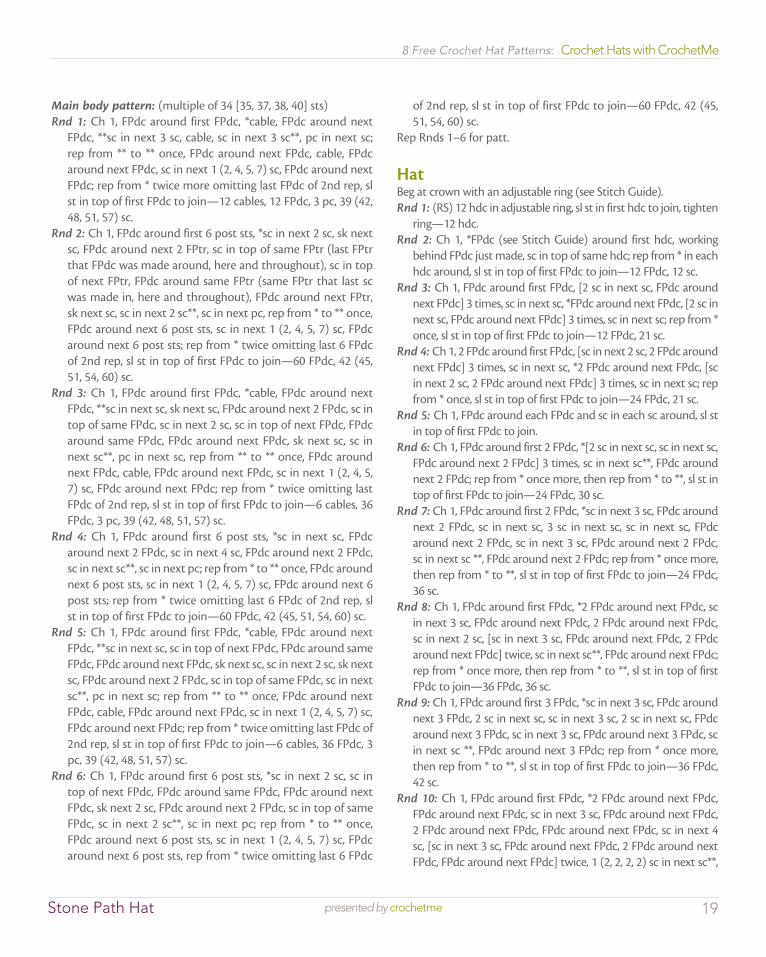
Skill Level: Experienced.NOTESHat is worked in rnds from top down. The brim is optional and is added at the end. When working around FPtr sts of cable, pry sts apart as the latter two may be “buried” beneath. The term “post st(s),” refers to both FPdc and FPtr. In first rnd of brim, because all post sts are worked around posts of sc, pay attention to placement of non-post sts.
Stitch Guide: (See stitch diagram)Front post double crochet (FPdc): Yo, insert hook from front to
back to front around post of st indicated and pull up a lp, [yo, draw through first 2 lps on hook] twice.
Front post treble crochet (FPtr): Yo twice, insert hook from front to back to front around post of st indicated and pull up a lp, [yo, draw through 2 lps on hook] 3 times.
Cable (uses posts of next 4 sts): Sk next 2 sts, FPtr around next 2 sts, working in front of both FPtr just made, FPtr around first skipped st, FPtr around 2nd skipped st.
Popcorn (pc): Work 5 sc in st indicated, drop lp from hook, insert hook in top of first sc, pick up dropped lp and pull through lp on hook, ch 1 to close.
Adjustable ring: Place slipknot on hook, leaving 4" tail. Wrap tail around your fingers to form a ring. Work sts of first rnd into ring. At end of first rnd, pull tail to tighten ring.
Kath
ryn
Mar
tin
Whether your winter time is spent trekking along the timberland trails or strolling along the boulevard, this beautifully cabled hat will keep you warm and fashionable.
19presented by crochetmeStone Path Hat
8 Free Crochet Hat Patterns: Crochet Hats with CrochetMe
Main body pattern: (multiple of 34 [35, 37, 38, 40] sts) Rnd 1: Ch 1, FPdc around first FPdc, *cable, FPdc around next
FPdc, **sc in next 3 sc, cable, sc in next 3 sc**, pc in next sc; rep from ** to ** once, FPdc around next FPdc, cable, FPdc around next FPdc, sc in next 1 (2, 4, 5, 7) sc, FPdc around next FPdc; rep from * twice more omitting last FPdc of 2nd rep, sl st in top of first FPdc to join—12 cables, 12 FPdc, 3 pc, 39 (42, 48, 51, 57) sc.
Rnd 2: Ch 1, FPdc around first 6 post sts, *sc in next 2 sc, sk next sc, FPdc around next 2 FPtr, sc in top of same FPtr (last FPtr that FPdc was made around, here and throughout), sc in top of next FPtr, FPdc around same FPtr (same FPtr that last sc was made in, here and throughout), FPdc around next FPtr, sk next sc, sc in next 2 sc**, sc in next pc, rep from * to ** once, FPdc around next 6 post sts, sc in next 1 (2, 4, 5, 7) sc, FPdc around next 6 post sts; rep from * twice omitting last 6 FPdc of 2nd rep, sl st in top of first FPdc to join—60 FPdc, 42 (45, 51, 54, 60) sc.
Rnd 3: Ch 1, FPdc around first FPdc, *cable, FPdc around next FPdc, **sc in next sc, sk next sc, FPdc around next 2 FPdc, sc in top of same FPdc, sc in next 2 sc, sc in top of next FPdc, FPdc around same FPdc, FPdc around next FPdc, sk next sc, sc in next sc**, pc in next sc, rep from ** to ** once, FPdc around next FPdc, cable, FPdc around next FPdc, sc in next 1 (2, 4, 5, 7) sc, FPdc around next FPdc; rep from * twice omitting last FPdc of 2nd rep, sl st in top of first FPdc to join—6 cables, 36 FPdc, 3 pc, 39 (42, 48, 51, 57) sc.
Rnd 4: Ch 1, FPdc around first 6 post sts, *sc in next sc, FPdc around next 2 FPdc, sc in next 4 sc, FPdc around next 2 FPdc, sc in next sc**, sc in next pc; rep from * to ** once, FPdc around next 6 post sts, sc in next 1 (2, 4, 5, 7) sc, FPdc around next 6 post sts; rep from * twice omitting last 6 FPdc of 2nd rep, sl st in top of first FPdc to join—60 FPdc, 42 (45, 51, 54, 60) sc.
Rnd 5: Ch 1, FPdc around first FPdc, *cable, FPdc around next FPdc, **sc in next sc, sc in top of next FPdc, FPdc around same FPdc, FPdc around next FPdc, sk next sc, sc in next 2 sc, sk next sc, FPdc around next 2 FPdc, sc in top of same FPdc, sc in next sc**, pc in next sc; rep from ** to ** once, FPdc around next FPdc, cable, FPdc around next FPdc, sc in next 1 (2, 4, 5, 7) sc, FPdc around next FPdc; rep from * twice omitting last FPdc of 2nd rep, sl st in top of first FPdc to join—6 cables, 36 FPdc, 3 pc, 39 (42, 48, 51, 57) sc.
Rnd 6: Ch 1, FPdc around first 6 post sts, *sc in next 2 sc, sc in top of next FPdc, FPdc around same FPdc, FPdc around next FPdc, sk next 2 sc, FPdc around next 2 FPdc, sc in top of same FPdc, sc in next 2 sc**, sc in next pc; rep from * to ** once, FPdc around next 6 post sts, sc in next 1 (2, 4, 5, 7) sc, FPdc around next 6 post sts, rep from * twice omitting last 6 FPdc
of 2nd rep, sl st in top of first FPdc to join—60 FPdc, 42 (45, 51, 54, 60) sc.
Rep Rnds 1–6 for patt.
HatBeg at crown with an adjustable ring (see Stitch Guide).Rnd 1: (RS) 12 hdc in adjustable ring, sl st in first hdc to join, tighten
ring—12 hdc.Rnd 2: Ch 1, *FPdc (see Stitch Guide) around first hdc, working
behind FPdc just made, sc in top of same hdc; rep from * in each hdc around, sl st in top of first FPdc to join—12 FPdc, 12 sc.
Rnd 3: Ch 1, FPdc around first FPdc, [2 sc in next sc, FPdc around next FPdc] 3 times, sc in next sc, *FPdc around next FPdc, [2 sc in next sc, FPdc around next FPdc] 3 times, sc in next sc; rep from * once, sl st in top of first FPdc to join—12 FPdc, 21 sc.
Rnd 4: Ch 1, 2 FPdc around first FPdc, [sc in next 2 sc, 2 FPdc around next FPdc] 3 times, sc in next sc, *2 FPdc around next FPdc, [sc in next 2 sc, 2 FPdc around next FPdc] 3 times, sc in next sc; rep from * once, sl st in top of first FPdc to join—24 FPdc, 21 sc.
Rnd 5: Ch 1, FPdc around each FPdc and sc in each sc around, sl st in top of first FPdc to join.
Rnd 6: Ch 1, FPdc around first 2 FPdc, *[2 sc in next sc, sc in next sc, FPdc around next 2 FPdc] 3 times, sc in next sc**, FPdc around next 2 FPdc; rep from * once more, then rep from * to **, sl st in top of first FPdc to join—24 FPdc, 30 sc.
Rnd 7: Ch 1, FPdc around first 2 FPdc, *sc in next 3 sc, FPdc around next 2 FPdc, sc in next sc, 3 sc in next sc, sc in next sc, FPdc around next 2 FPdc, sc in next 3 sc, FPdc around next 2 FPdc, sc in next sc **, FPdc around next 2 FPdc; rep from * once more, then rep from * to **, sl st in top of first FPdc to join—24 FPdc, 36 sc.
Rnd 8: Ch 1, FPdc around first FPdc, *2 FPdc around next FPdc, sc in next 3 sc, FPdc around next FPdc, 2 FPdc around next FPdc, sc in next 2 sc, [sc in next 3 sc, FPdc around next FPdc, 2 FPdc around next FPdc] twice, sc in next sc**, FPdc around next FPdc; rep from * once more, then rep from * to **, sl st in top of first FPdc to join—36 FPdc, 36 sc.
Rnd 9: Ch 1, FPdc around first 3 FPdc, *sc in next 3 sc, FPdc around next 3 FPdc, 2 sc in next sc, sc in next 3 sc, 2 sc in next sc, FPdc around next 3 FPdc, sc in next 3 sc, FPdc around next 3 FPdc, sc in next sc **, FPdc around next 3 FPdc; rep from * once more, then rep from * to **, sl st in top of first FPdc to join—36 FPdc, 42 sc.
Rnd 10: Ch 1, FPdc around first FPdc, *2 FPdc around next FPdc, FPdc around next FPdc, sc in next 3 sc, FPdc around next FPdc, 2 FPdc around next FPdc, FPdc around next FPdc, sc in next 4 sc, [sc in next 3 sc, FPdc around next FPdc, 2 FPdc around next FPdc, FPdc around next FPdc] twice, 1 (2, 2, 2, 2) sc in next sc**,
20presented by crochetmeStone Path Hat
8 Free Crochet Hat Patterns: Crochet Hats with CrochetMe
FPdc around next FPdc; rep from * once more, then rep from * to **, sl st in top of first FPdc to join— 48 FPdc, 42 (45, 45, 45, 45) sc.
Rnd 11: Ch 1, FPdc around first FPdc, *[2 FPdc around next FPdc] twice, FPdc around next FPdc, sc in next 3 sc, FPdc around next 4 FPdc, sc in next 7 sc, FPdc around next 4 FPdc, sc in next 3 sc, FPdc around next FPdc, [2 FPdc around next FPdc] twice, FPdc around next FPdc, sc in next 1 (2, 2, 2, 2) sc**, FPdc around next FPdc; rep from * once more, then rep from * to **, sl st in top of first FPdc to join—60 FPdc, 42 (45, 45, 45, 45) sc.
Sizes 20 (21, 22)" only:Rnd 12: Ch 1, FPdc around first 6 FPdc, *sc in next 3 sc, FPdc around
next 4 FPdc, sc in next 4 sc, [sc in next 3 sc, FPdc around next 4 FPdc] twice, FPdc around next 2 FPdc, [2 sc in next sc] twice**, FPdc around next 6 FPdc; rep from * once more, then rep from * to **, sl st in top of first FPdc to join—60 FPdc, 51 sc.
Sizes 21 (22)" only:Rnd 13: Ch 1, FPdc around first 6 FPdc, *sc in next 3 sc, FPdc around
next 4 FPdc, sc in next 4 sc, [sc in next 3 sc, FPdc around next 4 FPdc] twice, FPdc around next 2 FPdc, work 1 (2) sc in next sc, sc in next 2 sc, work 2 (3) sc in next sc**, FPdc around next 6 FPdc; rep from * once more, then rep from * to **, sl st in top of first FPdc to join—60 FPdc, 54 (60) sc.
All sizes: Rep Rows 1–6 of main body patt (see Stitch Guide)
until hat measures desired length minus 1⁄2" before brim fold,measure for length along string of popcorns. End on any rnd.Next rnd: Ch 1, sc in each st around, sl st flo (see Glossary) in first
sc on last rnd to join, turn. Rep last rnd 2 more times—102 (105, 111, 114, 120) sc. Do not fasten off unless omitting brim.
Brim: (Optional)Rnd 1 (brim fold rnd): (WS) Ch 1, sc blo in each sc around; sl st in
top of first sc to join—102 (105, 111, 114, 120) sc.Rnds 2–3: Ch 1, sc around, sl st in top of first sc to join.Rnds 4–10: Sl st in next 2 (3, 5, 6, 8) sts (maintain alignment with
FPdc from hat). Work Rnds 1–6 of main body patt, then Rnd 1 once more. Work all post sts of first rnd around posts of sc.
Rnd 11: Ch 1, sc around, sl st blo in first sc to join—102 (105, 111, 114, 120) sc.
Rnd 12: Sl st blo around, sl st in first sl st to join—102 (105, 111, 114, 120) sl sts. Fasten off.
FinishingWeave in loose ends. Fold up brim. o
LISA NASKRENT is captivated by class, allure, and beauty. She firmly believes that where there is a will, there is a way to design it. You can see more of her work at www.crochetgarden.com.
end rep size 19"
end rep size 20"
end rep size 21"
end rep size 22"
1
2
3
4
5
6
1
Rep 34 (35, 37, 38, 40) sts inside rep frame 3 times. Rep Rnds 1–6 as necessary according to text instructions.
end rep size 181⁄2"
5 sc popcorn (pc)
single crochet (sc)
front post double crochet (FPdc)
front post treble crochet (FPtr) cable sts 1 and 2
front post treble crochet (FPtr) cable sts 3 and 4
pattern repeat
5 sc popcorn (pc)
single crochet (sc)
front post double crochet (FPdc)
front post treble crochet (FPtr) cable sts 1 and 2
front post treble crochet (FPtr) cable sts 3 and 4
pattern repeat
5 sc popcorn (pc)
single crochet (sc)
front post double crochet (FPdc)
front post treble crochet (FPtr) cable sts 1 and 2
front post treble crochet (FPtr) cable sts 3 and 4
pattern repeat
8 Free Crochet Hat Patterns: Crochet Hats with CrochetMe©interweave | Not to be reprinted | All rights reserved | www.crochetme.com
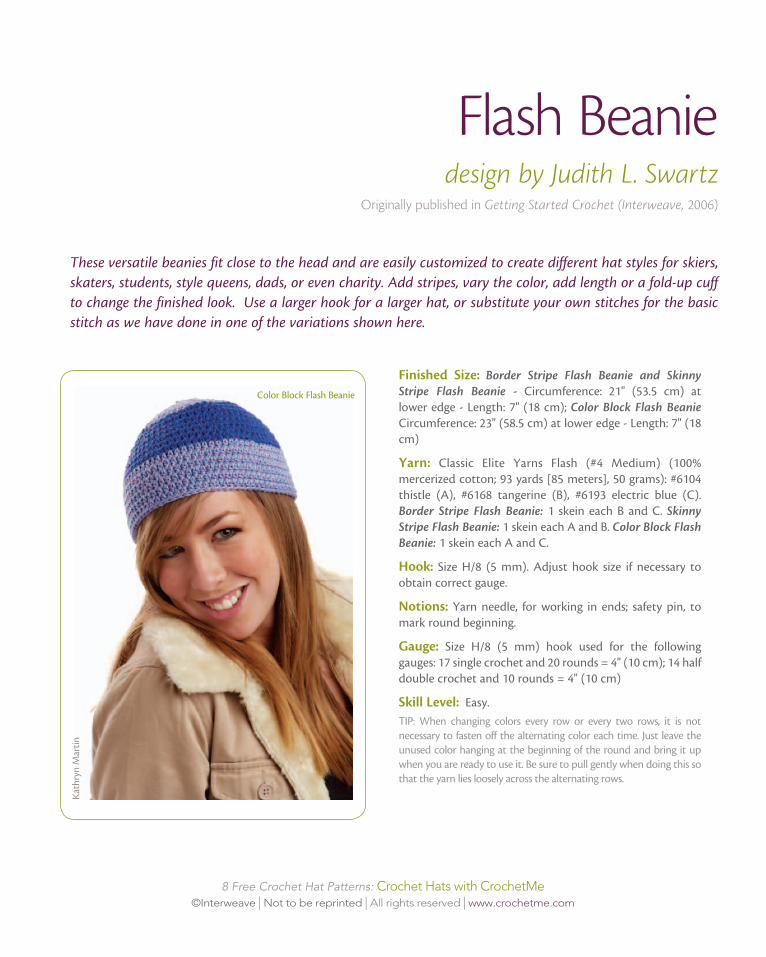
Flash Beanie design by Judith L. Swartz
Originally published in Getting Started Crochet (Interweave, 2006)
Kath
ryn
Mar
tin
These versatile beanies fit close to the head and are easily customized to create different hat styles for skiers, skaters, students, style queens, dads, or even charity. Add stripes, vary the color, add length or a fold-up cuff to change the finished look. Use a larger hook for a larger hat, or substitute your own stitches for the basic stitch as we have done in one of the variations shown here.
Finished Size: Border Stripe Flash Beanie and Skinny Stripe Flash Beanie - Circumference: 21" (53.5 cm) at lower edge - Length: 7" (18 cm); Color Block Flash Beanie Circumference: 23" (58.5 cm) at lower edge - Length: 7" (18 cm)
Yarn: Classic Elite Yarns Flash (#4 Medium) (100% mercerized cotton; 93 yards [85 meters], 50 grams): #6104 thistle (A), #6168 tangerine (B), #6193 electric blue (C). Border Stripe Flash Beanie: 1 skein each B and C. Skinny Stripe Flash Beanie: 1 skein each A and B. Color Block Flash Beanie: 1 skein each A and C.
Hook: Size H/8 (5 mm). Adjust hook size if necessary to obtain correct gauge.
Notions: Yarn needle, for working in ends; safety pin, to mark round beginning.
Gauge: Size H/8 (5 mm) hook used for the following gauges: 17 single crochet and 20 rounds = 4" (10 cm); 14 half double crochet and 10 rounds = 4" (10 cm)
Skill Level: Easy.TIP: When changing colors every row or every two rows, it is not necessary to fasten off the alternating color each time. Just leave the unused color hanging at the beginning of the round and bring it up when you are ready to use it. Be sure to pull gently when doing this so that the yarn lies loosely across the alternating rows.
Color Block Flash Beanie
22presented by crochetmeFlash Beanie
8 Free Crochet Hat Patterns: Crochet Hats with CrochetMe
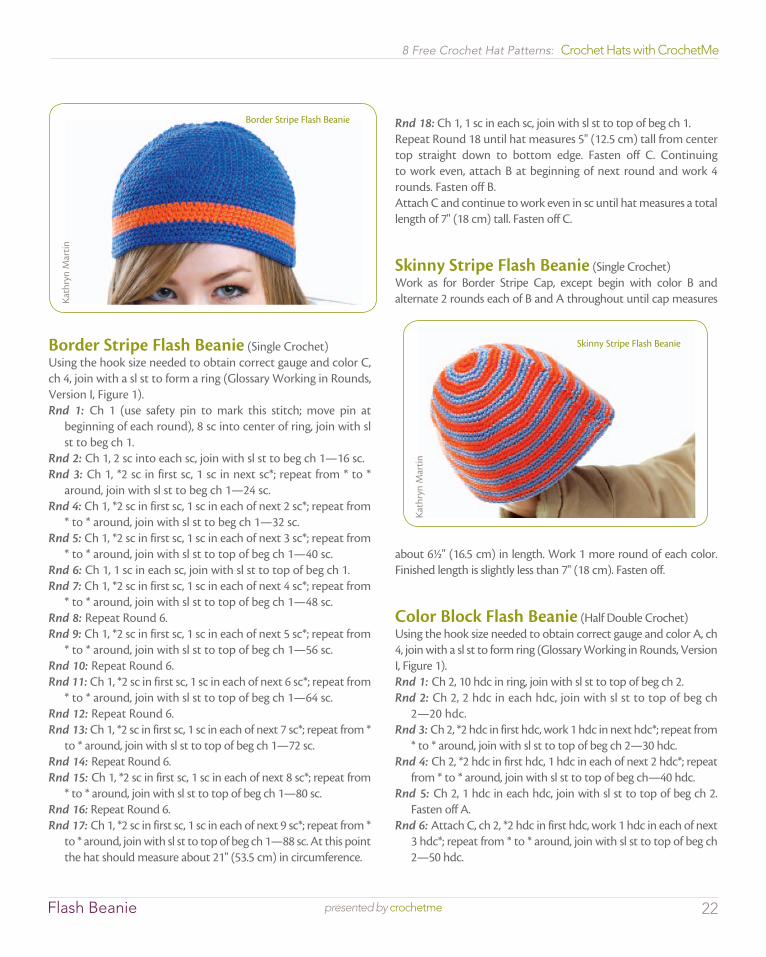
Border Stripe Flash Beanie (Single Crochet)using the hook size needed to obtain correct gauge and color C, ch 4, join with a sl st to form a ring (Glossary Working in Rounds, Version I, Figure 1).Rnd 1: Ch 1 (use safety pin to mark this stitch; move pin at
beginning of each round), 8 sc into center of ring, join with sl st to beg ch 1.
Rnd 2: Ch 1, 2 sc into each sc, join with sl st to beg ch 1—16 sc.Rnd 3: Ch 1, *2 sc in first sc, 1 sc in next sc*; repeat from * to *
around, join with sl st to beg ch 1—24 sc.Rnd 4: Ch 1, *2 sc in first sc, 1 sc in each of next 2 sc*; repeat from
* to * around, join with sl st to beg ch 1—32 sc.Rnd 5: Ch 1, *2 sc in first sc, 1 sc in each of next 3 sc*; repeat from
* to * around, join with sl st to top of beg ch 1—40 sc.Rnd 6: Ch 1, 1 sc in each sc, join with sl st to top of beg ch 1.Rnd 7: Ch 1, *2 sc in first sc, 1 sc in each of next 4 sc*; repeat from
* to * around, join with sl st to top of beg ch 1—48 sc.Rnd 8: Repeat Round 6.Rnd 9: Ch 1, *2 sc in first sc, 1 sc in each of next 5 sc*; repeat from
* to * around, join with sl st to top of beg ch 1—56 sc.Rnd 10: Repeat Round 6.Rnd 11: Ch 1, *2 sc in first sc, 1 sc in each of next 6 sc*; repeat from
* to * around, join with sl st to top of beg ch 1—64 sc.Rnd 12: Repeat Round 6.Rnd 13: Ch 1, *2 sc in first sc, 1 sc in each of next 7 sc*; repeat from *
to * around, join with sl st to top of beg ch 1—72 sc.Rnd 14: Repeat Round 6.Rnd 15: Ch 1, *2 sc in first sc, 1 sc in each of next 8 sc*; repeat from
* to * around, join with sl st to top of beg ch 1—80 sc.Rnd 16: Repeat Round 6.Rnd 17: Ch 1, *2 sc in first sc, 1 sc in each of next 9 sc*; repeat from *
to * around, join with sl st to top of beg ch 1—88 sc. At this point the hat should measure about 21" (53.5 cm) in circumference.
Rnd 18: Ch 1, 1 sc in each sc, join with sl st to top of beg ch 1.Repeat Round 18 until hat measures 5" (12.5 cm) tall from center top straight down to bottom edge. Fasten off C. Continuing to work even, attach B at beginning of next round and work 4 rounds. Fasten off B.Attach C and continue to work even in sc until hat measures a total length of 7" (18 cm) tall. Fasten off C.
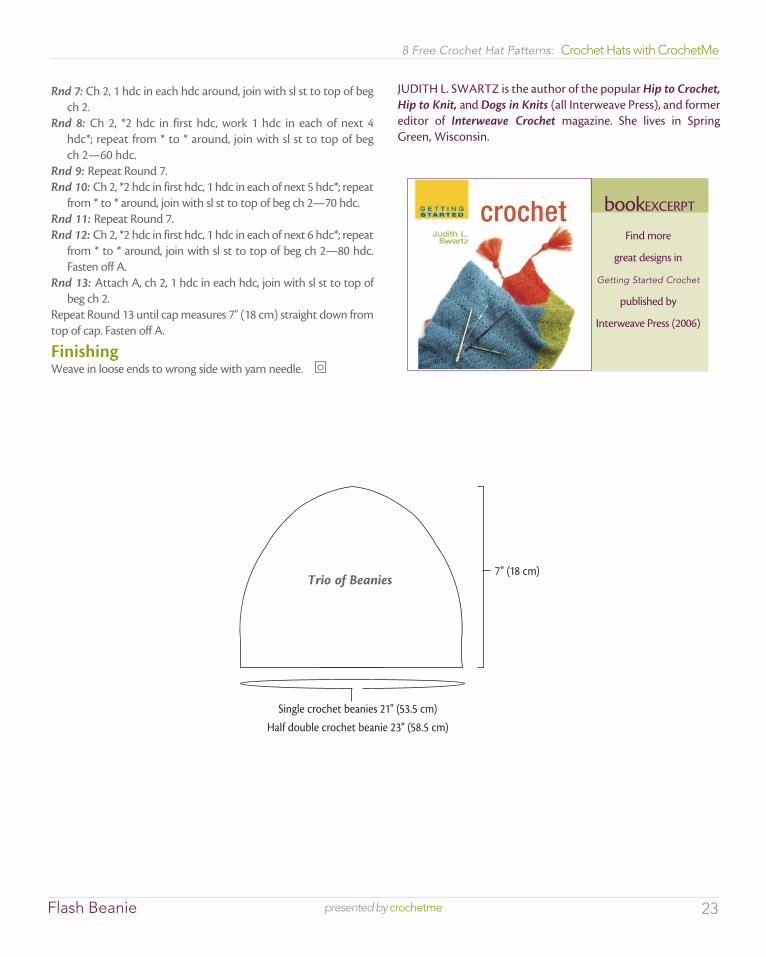
Skinny Stripe Flash Beanie (Single Crochet)Work as for Border Stripe Cap, except begin with color B and alternate 2 rounds each of B and A throughout until cap measures
about 6½" (16.5 cm) in length. Work 1 more round of each color. Finished length is slightly less than 7" (18 cm). Fasten off.
Color Block Flash Beanie (Half Double Crochet)using the hook size needed to obtain correct gauge and color A, ch 4, join with a sl st to form ring (Glossary Working in Rounds, Version I, Figure 1).Rnd 1: Ch 2, 10 hdc in ring, join with sl st to top of beg ch 2.Rnd 2: Ch 2, 2 hdc in each hdc, join with sl st to top of beg ch
2—20 hdc.Rnd 3: Ch 2, *2 hdc in first hdc, work 1 hdc in next hdc*; repeat from
* to * around, join with sl st to top of beg ch 2—30 hdc.Rnd 4: Ch 2, *2 hdc in first hdc, 1 hdc in each of next 2 hdc*; repeat
from * to * around, join with sl st to top of beg ch—40 hdc.Rnd 5: Ch 2, 1 hdc in each hdc, join with sl st to top of beg ch 2.
Fasten off A.Rnd 6: Attach C, ch 2, *2 hdc in first hdc, work 1 hdc in each of next
3 hdc*; repeat from * to * around, join with sl st to top of beg ch 2—50 hdc.
Kath
ryn
Mar
tin
Skinny Stripe Flash Beanie
Kath
ryn
Mar
tin
Border Stripe Flash Beanie
23presented by crochetmeFlash Beanie
8 Free Crochet Hat Patterns: Crochet Hats with CrochetMe
Rnd 7: Ch 2, 1 hdc in each hdc around, join with sl st to top of beg ch 2.
Rnd 8: Ch 2, *2 hdc in first hdc, work 1 hdc in each of next 4 hdc*; repeat from * to * around, join with sl st to top of beg ch 2—60 hdc.
Rnd 9: Repeat Round 7.Rnd 10: Ch 2, *2 hdc in first hdc, 1 hdc in each of next 5 hdc*; repeat
from * to * around, join with sl st to top of beg ch 2—70 hdc.Rnd 11: Repeat Round 7.Rnd 12: Ch 2, *2 hdc in first hdc, 1 hdc in each of next 6 hdc*; repeat
from * to * around, join with sl st to top of beg ch 2—80 hdc. Fasten off A.
Rnd 13: Attach A, ch 2, 1 hdc in each hdc, join with sl st to top of beg ch 2.
Repeat Round 13 until cap measures 7" (18 cm) straight down from top of cap. Fasten off A.
FinishingWeave in loose ends to wrong side with yarn needle. o
JuDITH L. SWARTz is the author of the popular Hip to Crochet, Hip to Knit, and Dogs in Knits (all Interweave Press), and former editor of Interweave Crochet magazine. She lives in Spring Green, Wisconsin.
Find more
great designs in
Getting Started Crochet
published by
Interweave Press (2006)
bookEXCERPT
Trio of Beanies
Single crochet beanies 21" (53.5 cm)Half double crochet beanie 23" (58.5 cm)
7" (18 cm)
24presented by crochetmeglossary
8 Free Crochet Hat Patterns: Crochet Hats with CrochetMe
Glossary beg begin(s); beginning bet between blo back loop only CC contrasting color ch chain cm centimeter(s) cont continue(s); continuing dc double crochet dec(s)(’d) decrease(s); decreasing; decreased est established fdc foundation double crochet flo front loop only foll follows; following fsc foundation single crochet g gram(s) hdc half double crochet inc(s)(’d) increase(s); increasing; increased k knit lp(s) loop(s) MC main color m marker mm millimeter(s) patt(s) pattern(s) pm place marker p purl rem remain(s); remaining rep repeat; repeating rev sc reverse single crochet rnd(s) round(s) RS right side sc single crochet sk skip sl slip sl st slip(ped) stitch sp(s) space(es) st(s) stitch(es) tch turning chain tog together tr treble crochet WS wrong side yd yard yo yarn over hook * repeat starting point * * repeat all instructions between asterisks ( ) alternate measurements and/or instructions [ ] work bracketed instructions a specified number
of times
Abbreviations Crochet GaugeTo check gauge, chain 30 to 40 stitches using recommended hook size. Work in pattern stitch until piece measures at least 4" (10 cm) from foundation chain. Lay swatch on flat surface. Place a ruler over swatch and count number of stitches across and number of rows down (including fractions of stitches and rows) in 4" (10 cm). Repeat two or three times on different areas of swatch to confirm measurements. If you have more stitches and rows than called for in instructions, use a larger hook; if you have fewer, use a smaller hook. Repeat until gauge is correct.
Wraps Per InchIf you substitute or spin a yarn for a project, you can compare the weight of the yarn to the project yarn by comparing wraps per inch. To do this, wrap your yarn around a ruler for one inch and count the number of wraps. If you have more wraps per inch, your yarn is too thin; fewer wraps per inch, your yarn is too thick.
Front Post Double Crochet (FPdc)yarn over, insert hook from front to back to front around the post of the corresponding stitch below, yarn over and pull up a loop [yarn over, draw through two loops on hook] twice.
Front Post Treble Crochet (FPtr)yarn over twice, insert hook from front to back to front around the post of the corresponding stitch below, yarn over and pull up a loop [yarn over, draw through two loops on hook] three times.
Back Post Double Crochet (BPdc)yarn over, insert hook from back to front to back around post of corresponding stitch below, yarn over and pull up loop [yarn over, draw through two loops on hook] twice.
25presented by crochetmeglossary
8 Free Crochet Hat Patterns: Crochet Hats with CrochetMe
Slip Stitch Crochet (sl st)
Insert hook into stitch, yarn over hook and draw loop through stitch and loop on hook.
Crochet Chain (ch) Make a slipknot on hook. Yarn over hook and draw it through loop of slipknot. Repeat, drawing yarn through the last loop formed.
Half Double Crochet (hdc)*Yarn over, insert hook into a stitch, yarn over and pull a loop through stitch (three loops on hook), yarn over (Figure 1) and draw it through all the loops on the hook (Figure 2). Repeat from *. Figure 1
Double Crochet (dc)*Yarn over, insert hook into a stitch, yarn over and pull a loop through stitch (three loops on hook; Figure 1), yarn over and draw it through two loops (Figure 2), yarn over and draw it through the remaining two loops (Figure 3). Repeat from *. Figure 2
Figure 3Figure 1
Treble Crochet (tr)*Wrap yarn around hook two times, insert hook into a stitch, yarn over and pull a loop through (four loops on hook; Figure 1), yarn over and draw it through two loops (Figure 2), yarn over and draw it through the next two loops, yarn over and draw it through the remaining two loops (Figure 3). Repeat from *.
Figure 1
Figure 2
Figure 3
Single Crochet (sc)
Insert hook into a stitch, yarn over hook and draw a loop through stitch, yarn over hook (Figure 1) and draw it through both loops on hook (Figure 2).
Figure 1 Figure 2
Glossary
26presented by crochetmeglossary
8 Free Crochet Hat Patterns: Crochet Hats with CrochetMe
Glossary
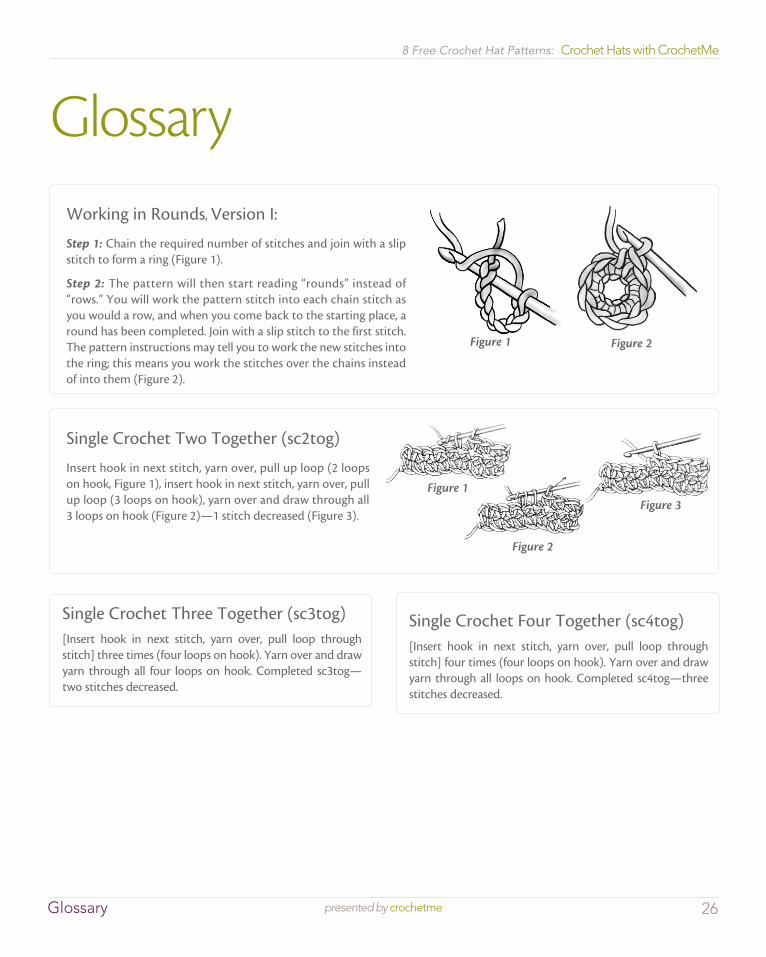
Single Crochet Two Together (sc2tog)
Insert hook in next stitch, yarn over, pull up loop (2 loops on hook, Figure 1), insert hook in next stitch, yarn over, pull up loop (3 loops on hook), yarn over and draw through all 3 loops on hook (Figure 2)—1 stitch decreased (Figure 3).
Figure 2
Figure 3Figure 1
Working in Rounds, Version I:
Step 1: Chain the required number of stitches and join with a slip stitch to form a ring (Figure 1).
Step 2: The pattern will then start reading “rounds” instead of “rows.” You will work the pattern stitch into each chain stitch as you would a row, and when you come back to the starting place, a round has been completed. Join with a slip stitch to the first stitch. The pattern instructions may tell you to work the new stitches into the ring; this means you work the stitches over the chains instead of into them (Figure 2).
Figure 1 Figure 2
Single Crochet Three Together (sc3tog)[Insert hook in next stitch, yarn over, pull loop through stitch] three times (four loops on hook). Yarn over and draw yarn through all four loops on hook. Completed sc3tog—two stitches decreased.
Single Crochet Four Together (sc4tog)[Insert hook in next stitch, yarn over, pull loop through stitch] four times (four loops on hook). Yarn over and draw yarn through all loops on hook. Completed sc4tog—three stitches decreased.