
7” Portable Multitouch Raspberry Pi Tablet · 7” Portable Multitouch Raspberry Pi Tablet ......
26
7” Portable Multitouch Raspberry Pi Tablet Created by Ruiz Brothers Last updated on 2017-02-27 04:13:53 PM UTC
Transcript of 7” Portable Multitouch Raspberry Pi Tablet · 7” Portable Multitouch Raspberry Pi Tablet ......

7” Portable Multitouch Raspberry Pi TabletCreated by Ruiz Brothers
Last updated on 2017-02-27 04:13:53 PM UTC

244445
7788888
1010
111112131414151616171819202021222324242525
Guide Contents
Guide ContentsOverview
Portable Raspberry Pi Tablet7" Multitouch DisplayParts ListTools & Supplies
3D PrintingPrinting SettingsCustomize Original DesignMaterialsTolerancesBed LevelingClean up
Circuit DiagramThe Circuit Diagram
AssemblyMount Case to DisplayMount frame to displaySolder wires to Display DriverConnect wide ribbon cable to Display DriverConnect 200mm ribbon cable to Display Driver.Connect mini ribbon cable to Display DriverMount Display Driver to frameConnect Slide Switch to PowerBoost 1000CSecure PowerBoost 1000C to FrameMount Raspberry Pi to FrameMount lipo to battery frameSecure lipo to battery frameMount battery frame to Raspberry PiConnect wires to Raspberry Pi GPIOConnect 200mm ribbon cable to Raspberry PiMount slide switch to enclosureInsert screws to enclosure coverSecure cover to enclosure casingRemove protective film from DisplayScreen Orientation
© Adafruit Industries https://learn.adafruit.com/7-portable-raspberry-pi-multitouch-tablet Page 2 of 26

2626
Complete!Want a bigger battery?
© Adafruit Industries https://learn.adafruit.com/7-portable-raspberry-pi-multitouch-tablet Page 3 of 26

Overview
Portable Raspberry Pi Tablet
In this project, we'll show you how to build a portable Raspberry Pi 2, using a 7" capacitivemultitouch display, an Adafruit PowerBoost 1000C and a 2500mAh battery. Our 3D printedenclosure fits all of the components making an all-in-one, compact Raspberry Pi tablet.
7" Multitouch Display
In this build, we're using the official 7” multitouch display from the Raspberry Pi foundation.It features a beautiful IPS display and includes the drivers to work on a Raspberry Pi 2.
The 3D printed enclosure gives you access to all of the ports. Instead of stacking all of theboards on top of each other, this design allow the components to be spread out, making aslim package.
Parts List
Below is a list of parts used in this project. You can optionally choose to make it portable by
© Adafruit Industries https://learn.adafruit.com/7-portable-raspberry-pi-multitouch-tablet Page 4 of 26

including an Adafruit PowerBoost 1000c and a 2500mAh lithium polymer battery. You willalso need some hardware screws to mount the components to the enclosure.
Pi Foundation PiTFT - 7" Touchscreen Display (http://adafru.it/2718)Raspberry Pi 2 Model B (http://adafru.it/2358)200mm Flex Cable for Raspberry Pi (http://adafru.it/1647)Adafruit PowerBoost 1000C (http://adafru.it/2465)2500mAh Lithium Ion Polymer Battery (http://adafru.it/enl)SPDT Slide Switch (http://adafru.it/drN)
Tools & Supplies
Here's a list of tool used to get this project completed. If you don't have access to a 3Dprinter, you can send your parts to 3DHubs.com (http://adafru.it/efH) to have them printedand shipped to you.
3D Printer (http://adafru.it/fUw) Filament (http://adafru.it/enm) (ABS, PLA, etc.)Wire Strippers (http://adafru.it/dDI)Screwdriver (http://adafru.it/f76)Soldering Iron (http://adafru.it/ide)26 gauge Silicone stranded-core wire (http://adafru.it/egK)M3 x .5 x 6M screws (http://adafru.it/iNB)#2-56 3/8 machine screws (http://adafru.it/iNC)
© Adafruit Industries https://learn.adafruit.com/7-portable-raspberry-pi-multitouch-tablet Page 5 of 26

© Adafruit Industries https://learn.adafruit.com/7-portable-raspberry-pi-multitouch-tablet Page 6 of 26

3D Printing
Three of four parts are photographed. Use the table below to reference partsDownload STLshttp://adafru.it/iND
Printing Settings
Use the settings below for reference. The parts were test printed on the Ultimaker 2, TypeA Machines Series 1 and the FlashForge Creator Pro. We used Simplify3D to slice theparts using our custom profiles. You can download our profiles for Simplify3D below.
Printer Profileshttp://adafru.it/ikd
7inTouchCase.stl
7inTouchLid.stl
230c Extruder
2mm Retraction
10% infill
2 Shellsabout 6 hours to print allparts.
© Adafruit Industries https://learn.adafruit.com/7-portable-raspberry-pi-multitouch-tablet Page 7 of 26

7inTouchFrame.stl
7inTouchBat.stl
60mm/s print speed
90mm/s travelspeed
Customize Original Design
The parts where designed in Autodesk Fusion 360. The design has been made public, andavailable to download in different formats if you'd like to use a different CAD softwarepackage.
Download Designhttp://adafru.it/uBR
Materials
We recommend using PLA material to reduce wraping while printing. Althought theparts can be printed in different types of filament, such as copperFill, bambooFill, ABS, PETand Nylon.
Tolerances
The parts were tested with common printing settings (listed in the table). With a parameterof 2 shells, theres only a few areas where tolerances really matters - the port cutouts andthe mounting holes.
Test fit the parts by inserting the top enclosure part over the Raspberry Pi. Check to see ifthe cutouts fit over the USB and ethernet ports. If the cutout is too tight, you can loosenit with a filing tool.
The standoffs with counter bores should fit the machine screws listed in the BOM. Thesecan be threaded by fastening in the appropriate sized screw.
Bed Leveling
Any parts with large surface require a well leveled build plate. If you're using a heated bed,you can minimize warping. Blue tapers tape, build tak, and sticky adhesives can help keepyour part flat and adhere to the bed.
Clean up
© Adafruit Industries https://learn.adafruit.com/7-portable-raspberry-pi-multitouch-tablet Page 8 of 26

If there's any string or artifacts left over from retraction and oozing, clean up the part bytrimming them off using a pair of flush snips.
© Adafruit Industries https://learn.adafruit.com/7-portable-raspberry-pi-multitouch-tablet Page 9 of 26

Circuit Diagram
The Circuit Diagram
PowerBoost1000C
The slide switchs connect to the EN and GND pins the Adafruit PowerBoost1000C.
The 2500mAh batteries plugs into the JST connector on the PowerBoost1000C. You cancharge the battery by connecting a microUSB cable.
Raspberry Pi 2:
Positive+ and -Negative pins on the PowerBoost1000C connect to the Pi on GPIO #2 for5V power and GPIO # 6 for ground.
Display Driver:
+Positive and -Negative pins on the Driver Board connect from 5V and GND labeled onthe Display Driver to the Pi on GPIO pins #4 for Power and #9 for Ground
© Adafruit Industries https://learn.adafruit.com/7-portable-raspberry-pi-multitouch-tablet Page 10 of 26

Assembly
Mount Case to Display
The enclosure casing can be mounted to the back of the display by attaching the tabs tothe edge of the screen.
Place the frame over the display and line up the opening with the ribbon cable.Carefully bend the frame to fit the tabs onto the display.
© Adafruit Industries https://learn.adafruit.com/7-portable-raspberry-pi-multitouch-tablet Page 11 of 26

Mount frame to display
The frame bracket is mounted to the back of the display and spreads the boards out tokeep the enclosure compact.
Place the frame over the back of display and line up mounting holes.
Insert and fasten four M3 x .5 x6M flat Phillips screws into the frame to secure it to the backof the display.
© Adafruit Industries https://learn.adafruit.com/7-portable-raspberry-pi-multitouch-tablet Page 12 of 26

Solder wires to Display Driver
Measure and cut two 26AWG silicone-coated stranded wires. Strip and tin the tips of eachwire.
Use a pair of helping-third hands to secure the display drive. Tin the pins labled 5V andGND on the display driver.
Solder one wire to the pin labled 5V for power. Solder the other wire to GND.
© Adafruit Industries https://learn.adafruit.com/7-portable-raspberry-pi-multitouch-tablet Page 13 of 26

Connect wide ribbon cable to Display Driver
Open the latch on the display driver and insert the wide ribbon cable from the display.Close the latch to secure the cable.
Connect 200mm ribbon cable to Display Driver.
Open the latch on the side of the Display Driver and insert the 200mm ribbon cable. Closethe latch to secure it in place.
© Adafruit Industries https://learn.adafruit.com/7-portable-raspberry-pi-multitouch-tablet Page 14 of 26

Connect mini ribbon cable to Display Driver
Open the latch on the small slot and insert the narrow ribbon cable. Ensure the ribboncable is fully seated before closing the latch.
Mount Display Driver to frame© Adafruit Industries https://learn.adafruit.com/7-portable-raspberry-pi-multitouch-tablet Page 15 of 26

Mount Display Driver to frame
Insert two M3 x .5 x 6M flat Phillips machine screws into the two mounting holes on theDisplay Driver PCB (You only need to use two, as shown on the photo).
Connect Slide Switch to PowerBoost 1000C
Cut one of the leads from the slide switch (far left or right, not middle). We only need twoleads.
Secure the slide switch to a set of helping third hands.Tin the two leads by adding a bit ofsolder.
Measure and cut two 26AWG silicone coated stranded wires. Strip and tin tips of each wire.
Solder wires to the leads on the slide switch
Solder one wire from slide switch to EN pin, and the other to GND on the AdafruitPowerBoost 1000C.
Measure and cut another set of 26AWG silicone coated wires. Strip and tin the tips of thewires. Solder one to the positive pin and the other to the negative labled pin on thePowerBoost 1000C.
© Adafruit Industries https://learn.adafruit.com/7-portable-raspberry-pi-multitouch-tablet Page 16 of 26

Secure PowerBoost 1000C to Frame
Insert two M3 x .5 x 6M flat Phillips machine screws into the mount holes on thePowerBoost 1000C. Fasten screws to create threads in the mounting holes and removethem.
Lay the PowerBoost 1000C over the frame and line up the mounting holes. Insert the twoM3 machine screws back and fasten to secure the PCB to the frame.
© Adafruit Industries https://learn.adafruit.com/7-portable-raspberry-pi-multitouch-tablet Page 17 of 26
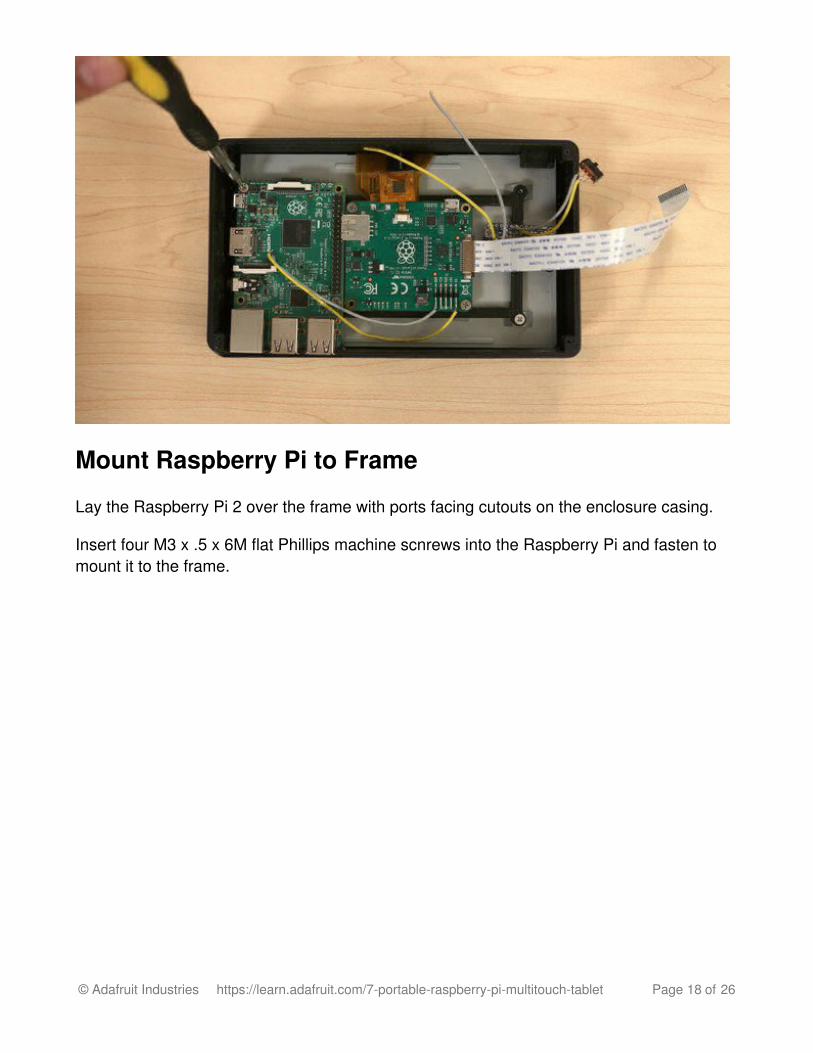
Mount Raspberry Pi to Frame
Lay the Raspberry Pi 2 over the frame with ports facing cutouts on the enclosure casing.
Insert four M3 x .5 x 6M flat Phillips machine scnrews into the Raspberry Pi and fasten tomount it to the frame.
© Adafruit Industries https://learn.adafruit.com/7-portable-raspberry-pi-multitouch-tablet Page 18 of 26

Mount lipo to battery frame
Insert two M3 screws into the battery frame. Lay the battery over the frame. Insert andloop a ziptie through the slits on the battery frame to hold it in place.
Secure lipo to battery frame© Adafruit Industries https://learn.adafruit.com/7-portable-raspberry-pi-multitouch-tablet Page 19 of 26

Secure lipo to battery frame
Tighten the ziptie to securely hold the lipo battery to the battery frame.
Mount battery frame to Raspberry Pi
Place the battery frame over the Raspberry and line up the two screws from the batteryframe with the mounting holes on the Pi. Use a screwdriver to fasten the two screws intothe Pi.
© Adafruit Industries https://learn.adafruit.com/7-portable-raspberry-pi-multitouch-tablet Page 20 of 26

Connect wires to Raspberry Pi GPIO
Solder the wire from the negative pin on the PowerBoost 1000C to GPIO #6 on theRaspberry Pi.
Solder the positive wire from the PowerBoost 1000C to GPIO #2 on the Raspberry Pi.
Solder the wire from the 5V pin on the Display Driver to GPIO #4 on the Raspberry Pi.
Solder the wire from the GND pin on the Display Driver to GPIO #9 on the Raspberry Pi.
© Adafruit Industries https://learn.adafruit.com/7-portable-raspberry-pi-multitouch-tablet Page 21 of 26
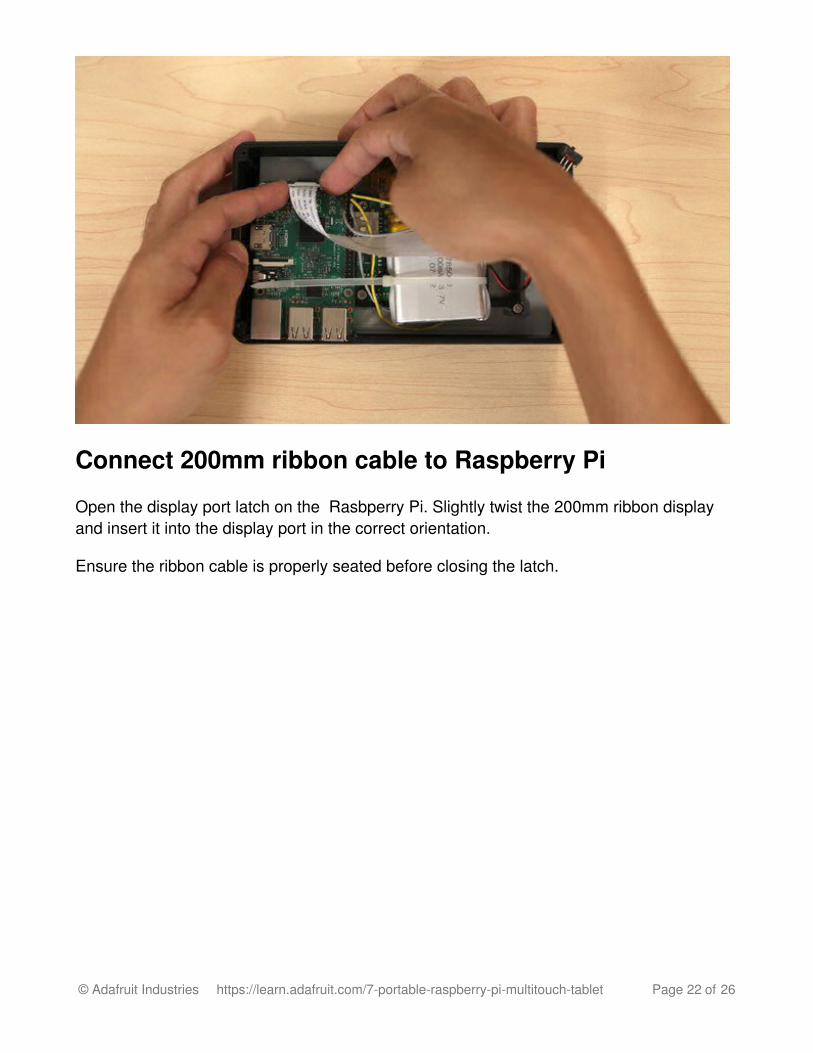
Connect 200mm ribbon cable to Raspberry Pi
Open the display port latch on the Rasbperry Pi. Slightly twist the 200mm ribbon displayand insert it into the display port in the correct orientation.
Ensure the ribbon cable is properly seated before closing the latch.
© Adafruit Industries https://learn.adafruit.com/7-portable-raspberry-pi-multitouch-tablet Page 22 of 26

Mount slide switch to enclosure
Insert the slide switch into the cutout on the enclosure casing.
If the slide switch doesn't fit into the cutout, use a hobby knife to remove some materialfrom the cutout to widen it.
You can use a pair of flat pliers to insert the slide switch through the cutout.
Don't force the slide switch all the way through, just enough to protrude half way throughthe port.
If the slide switch is loose, use hotglue or E6000 to permanently secure it in place.
© Adafruit Industries https://learn.adafruit.com/7-portable-raspberry-pi-multitouch-tablet Page 23 of 26

Insert screws to enclosure cover
Orient the cover so the cutouts on the lip are lined up with the ports.
Secure cover to enclosure casing
© Adafruit Industries https://learn.adafruit.com/7-portable-raspberry-pi-multitouch-tablet Page 24 of 26

Lay the cover over the enclosure casing and press it in. Insert and fasten four #2-56 flatPhillips machine screws into the corners to secure the cover to the casing.
Remove protective film from Display
It's a good idea to keep the film on until your finished with the assembly to prevent anyscratches.
Screen Orientation
To flip the screen 180º we'll need to open /boot/config.txt in your favourite editor and addthe line:
lcd_rotate=1
© Adafruit Industries https://learn.adafruit.com/7-portable-raspberry-pi-multitouch-tablet Page 25 of 26

Complete!
The 2500 mAh battery lasts for a little over two hours. Insert a microUSB cable to themicroUSB port on the PowerBoost 1000C and connect the cable to a power source torecharge the lipo battery. You can optionally leave the microUSB cable connected forextended usage.
Want a bigger battery?
We do offer a large battery, a 6600mAh lithium ion battery (http://adafru.it/353) will give youabout 5+ hours of usage. But, this unfortunately will not fit in the current enclosure design.
You can however, modify the case to be tall (or thicker) to compensate for the spaceneeded to enclose the battery.
© Adafruit Industries Last Updated: 2017-02-27 04:13:52 PM UTC Page 26 of 26