600 600.pdf · Ingresso logico Ri = 4,7KΩ(24V, 5mA) o da contatto libero da tens. Protocollo...
100
600 ISO 9001 SOFTWARE 1.0x cod. 80336 / Edit. 01 - 11/01 Italiano REGOLATORE - Manuale d’uso 2 English CONTROLLER - User’s Manual 18 Deutsch REGLER - Bedienungsanleitung 34 Français RÉGULATEUR - Manuel d’Utilisation 50 Español REGULADOR - Manual de Uso 66 Portuguese CONTROLADOR - Manual do Usuário 82
-
Upload
phungkhuong -
Category
Documents
-
view
239 -
download
0
Transcript of 600 600.pdf · Ingresso logico Ri = 4,7KΩ(24V, 5mA) o da contatto libero da tens. Protocollo...

600
ISO 9001SOFTWARE 1.0xcod. 80336 / Edit. 01 - 11/01
ItalianoREGOLATORE - Manuale d’uso 2
EnglishCONTROLLER - User’s Manual 18
DeutschREGLER - Bedienungsanleitung 34
FrançaisRÉGULATEUR - Manuel d’Utilisation 50
EspañolREGULADOR - Manual de Uso 66
PortugueseCONTROLADOR - Manual do Usuário 82

Ingresso logico Ri = 4,7KΩ (24V, 5mA) o da contatto libero da tens.
Protocollo Gefran CENCAL / MODBUS
Interfaccia seriale (opzione) RS485, isolata
Ritrasmissione analogica 10V/20mA Rcarico max 500Ω risoluzione 12 bitAlimentazione trasmettitore 15/24Vdc, max 30mA protezione cortocircuito
Tipo di contatto relè NO (NC), 5A, 250V cosϕ=1Uscita logica per relè statici 24Vdc, 30mA, Rout = 100Ω
Tempo di ciclo 0...200 secTipo di uscita main relè, logica, continua (0...10V / 4...20mA)
Uscite di controllo on / off, continuaLimitazione Max potenza caldo / freddo 0,0...100,0 %
Selezione gradi C / F configurabile da tastieraRange scale lineari -1999...9999 punto decimale impostabileAzioni di controllo Pid, Autotune, on-offpb - dt - it 0,0...999,9 % - 0,00...99,99 min - 0,00...99,99 minAzione caldo / freddo
Softstart 0,0...500,0 min
Allarmi configurabiliFino a 3 funzioni di allarme associabili ad una uscita e configurabili di tipo: massima, minima, simmetrici, assoluti/relativi, LBA, HB
Impostazione potenza di fault -100,0...100,0 %
Funzione spegnimentoMantiene la visualizzazione di PV,possibilità di esclusione
Mascheratura allarmiesclusione all'accensionememoria, reset da tastiera e/o contatto
Opzione ingresso Amperometrico T.A. 50mAac, 50/60Hz, Ri = 10Ω
Protezione frontale IP65Temperatura di lavoro / stoccaggio 0...50°C / -20...70°CUmidità relativa 20...85% Ur non condensanteInstallazione a pannello, estraibilità frontalePeso 160 g in versione completa
Alimentazione (tipo switching)(standard) 100...240Vac/dc ±10%(opzionale) 20...27Vac/dc ±10%50/60Hz, 6W max.
Sicurezzarilevamento corto circuito o apertura delle sonde,allarme LBA, allarme HB
Tipo RTD (scala impostabile nel campoindicato, con/senza punto decimale) (ITS90)Max. resistenza di linea per RTD
DIN 43760 (Pt100), JPT100
20Ω
Errore comp. giunto freddo 0,1° / °C
Tipo PTC / Tipo NTC 990Ω, 25°C / 1KΩ, 25°C
600REGOLATORE
VERSIONE SOFTWARE 1.0xcodice 80336 / Edizione 0.1 - 11/01
MANUALE D’USO
Per una correttainstallazione leggerele avvertenzecontenute nelmanuale
Tipo TC (Termocoppie)(ITS90)
Display 2x4 digit verde, altezza cifre 10 e 7mmTasti 4 di tipo meccanico (Man/Aut, INC, DEC, F)Accuratezza 0.2% f.s. ±1 digit a temperatura ambiente di 25°C
Ingresso principale(filtro digitale impostabile)
TC, RTD, PTC, NTC60mV,1V Ri≥1MΩ; 5V,10V Ri≥10KΩ; 20mA Ri=50ΩTempo di campionamento 120 msec.
1 • INSTALLAZIONE• Dimensioni di ingombro e di foratura;
inserimento fissaggio a pannello
Montaggio a quadro:Per bloccare gli strumenti inserire l'apposito blocchetto nelle sedi presenti sui lati dellascatola. Per montare due o più strumenti affiancati rispettare per il foro le misure comeda disegno.
MARCATURA CE: Conformità EMC (compatibilità elettromagnetica) nel rispetto dellaDirettiva 89/336/CEE con riferimento alle Norme generiche EN50082-2 (immunità inambiente industriale) ed EN50081-1 (emissione in ambiente residenziale). ConformitàBT (bassa tensione) nel rispetto della Direttiva 73/23/CEE modificata dalla Direttiva93/68.MANUTENZIONE: Le riparazioni devono essere eseguite solamente da personalespecializzato od opportunamente addestrato. Togliere alimentazione allo strumentoprima di accedere alle parti interne. Non pulire la scatola con solventi derivati daidrocarburi (trielina, benzina, etc.). L’uso di tali solventi compromette l’affidabilitàmeccanica dello strumento. Per pulire le parti esterne in plastica utilizzare un pannopulito inumidito con alcool etilico o con acqua.ASSISTENZA TECNICA: In GEFRAN è disponibile un reparto di assistenza tecnica.Sono esclusi da garanzia i difetti causati da un uso non conforme alle istruzioni d'uso.
2 • CARATTERISTICHE TECNICHE
!
2
GEFRAN spa via Sebina, 7425050 Provaglio d'Iseo (BS) ITALIATel. 0309888.1 - Fax 0309839063
Internet: http://www.gefran.com
99
10
45
45
48
70
70
63
48
FUNZIONE TIPO DI CAVO LUNGHEZZA UTILIZZATACavo di alimentazione 1 mm2 1 mtFili uscita relè 1 mm2 3,5 mtCavetto collegamento seriale 0,35 mm2 3,5 mtFili collegamento T.A. 1,5 mm2 3,5 mtSonda ingresso termocoppia 0,8 mm2 compensated 5 mtSonda ingresso termoresistenza “PT100” 1 mm2 3 mt
La conformità EMC è stata verificata con i seguenti collegamenti
J, K, R, S, T, B, E, N(IEC 584-1, CEI EN 60584-1, 60584-2)L GOST, U, G, D, Cè possibile inserire una linearizzazione custom
Uscita Triac24...240Vac ±10%, 1A maxSnubberless, carico induttivo e resistivo I2t = 128A2s
Baude rate 1200, 2400, 4800, 9600, 19200

Cencal Out 4Modbus
-relé 5A/250Vac
Standard:100...240Vac/dc ±10%
Opzionale:20...27Vac/dc ±10%
Potenza max 6W; 50/60Hz
4 • CONNESSIONI• Uscite / Ingresso Amper.
6
5
4
3
2
1
7
8
9
10
11
12
18
17
16
15
14
13
19
20
21
22
23
24
19
21
20
22
-
+Out2
Out1
• Alimentazione
23
24
~
~
TOP
6
5
-
+
Out3 (Al2)Ing. T.A.
!
PWR
3
Pulsanti “Incrementa” e “Decrementa”:Permettono di realizzare un'operazione di incremento (decremento) di un qualsiasi parametro numerico •• La velocità di incremento(decremento) è proporzionale alla durata della pressione del tasto •• L'operazione non è ciclica ovvero una volta raggiunto il max. (min.)di un campo di impostazione, pur mantenendo premuto il tasto, la funzione incremento (decremento) viene bloccata
3 • DESCRIZIONE FRONTALE STRUMENTO
Selezione regolazione Automatica / Manuale:Attivo solo quando il display PV visualizza la variabile
di processo
Display PV: Indicazione della variabile di processo
Pulsante funzione:Permette di accedere alle diverse fasi diconfigurazione •• Conferma la modifica deiparametri impostati con passaggio al successivo oal precedente se il tasto Auto/Man è premuto
Indicatori di funzione:Segnalano il tipo di funzionamento dello strumento
MAN/AUTO = OFF (regolazione automatica)ON (regolazione manuale)
SETPONT1/2 = OFF (IN1=OFF-Setpoint locale 1)ON (IN1= ON - Setpoint locale 2)
SELFTUNING = OFF (Self attivato)ON (Self disattivato)
L1
Display SV: Indicazione Setpoint di regolazione
Indicazione stato delle uscite:OUT 1 (AL 1); OUT 2 (Main); OUT 3 (HB); OUT 4
• Linea seriale / uscita 4
Configurazionestandard
4...20mA
Collegare per ingresso 20mA
Usare filidi sezione adeguata
(min. 1mm2)PT100, JPT100,
PTC, NTC
• Pt100 / PTC / NTC
• Struttura dello strumento • Identificazione schede
3
1
2
Pt100 3 filiPTC / NTC /Pt100 2 fili
Termocoppie disponibili:J, K, R, S, T, B, E, N,
L, U, G, D, C
- Rispettare le polarità- Per estensioni, usarecavo compensato adattoal tipo di TC utilizzata
+
-
• Ingresso TC
2
1
4
2
3
1
+ 24V o 15VVT
-
+
+
S
-Ri =
50Ω
4
2
3
1
+ 24V o 15VVT
-
+
+
-Ri =
50Ω
TT
• Ingresso lineare con trasmettitore 3 fili
• Ingressi
• Ingresso lineare con trasmettitore 2 fili
L2
L3
9
10
11
+
-
TXB
A
RX
-
+
12
9
10
11
12
DISPLAY
POWER
SERIAL INTERFACE/OUT4
Scheda Alimentazione
SelezionetensionealimentazioneTrasmettitore
Selezionesegnale sucontatto 3
Scheda CPU
CPU
24V
15V
10V
5V 1,23
V
PT
100
+V
SIngressolineare incorrentecontinua
20mA,Ri = 50Ω
Ingressolineare intensionecontinua
60mV, 1VRi > 1MΩ5V, 10V
Ri > 10KΩ
2
1 +
-
• Ingresso lineare (I)
4
1
2
-
+
• Ingresso lineare (V)
Linea seriale isolata RS485
Per configurazione Cencal vedi foglio tecnico scheda seriale
- relè 5A/250Vac- logica 10V/30mA- triac 20...240Vac, 1A ±10%
- solo relè 5A/250Vac
- relè 5A/250Vac- logica 10V/30mA- continua 0..10V, 0/4..20mAanalogica 0..10V, 0/4..20mAritrasmessa, risoluzione 12 bit.
- Ingresso da trasformatore ampero-metrico 50mAac, 2Ω 50/60Hz
- ingresso logico 24V, 4mAda contatto libero da tensione
Uscite di uso generico configurabili

4
5 • PROGRAMMAZIONE E CONFIGURAZIONE “EASY”
al.1
P.V. / S.V.Variabile di processo (display PV)Setpoint di lavoro (display SV) o
valore uscita di controllo conregolatore in manuale
InP
Out
PAS = 99
Pro
Impostazioni ingressi
Impostazioni uscite
swconf=ON
PAS
Menù custom
Password
Codice di protezione
Soglia allarme 1 (punti scala)
CFG
VISUALIZZAZIONE LIVELLO 1
• CFG
• InP
h.pb
h.it
h.dt
h.p.x
Xy.i
Banda proporzionaledi riscaldamento
Tempo integraledi riscaldamento
Tempo derivatodi riscaldamento
Limite massimo potenzadi riscaldamento0 ... 999.9% f.s.
0.00 ... 99.99 min
0.00 ... 99.99 min
0.0 ... 100.0%
Isteresi per allarme 10...999 sec.
Se +32 in A1.t0...999 min.
Se +64 in A1.t
±999 Punti scala
typ. Tipo di sonda, segnale, abilitazione linearizzazione custom escala ingresso principale (vedi tabella typ, pag.6)
dp.s
lo.s
xi.s
Posizione punto decimaleper la scala ingresso
Limite minimo di scalaingresso principale
Limite massimo di scalaingresso principale
dP_S Formato0 xxxx1 xxx.x2 xx.xx3 x.xxx
min...max scala dell’ingressoselezionato in tyP
min...max scala dell’ingressoselezionato in tyP
• Out • Prot
xi.l
lo.lLimite inferiore
impostabilità SPe allarmi assoluti
Lo.S ... Hi.S
Limite superioreimpostabilità SPe allarmi assoluti
Lo.S ... Hi.S
Tipoallarme 1
AL.x.t Diretto (di massima) Assoluto NormaleInverso (di minima) Relativo Simetrico
al setpoint attivo (finestra)0 diretto assoluto normale1 inverso assoluto normale2 diretto relativo normale3 inverso relativo normale4 diretto assoluto simmetrico5 inverso assoluto simmetrico6 diretto relativo simmetrico7 inverso relativo simmetrico
AL.1.t, AL.2.t, AL.3.t
a1.t
(t.2Tempo di ciclo
Out2(Heat o Cool)
1...200 sec.
Pro Codice di protezione
Prot Visualizzazione Modifica0 SP, allarmi SP, allarmi1 SP, allarmi SP2 SP
+ 4 disabilitazione InP, Out+ 8 disabilitazione CFG+128 abilta la configurazione estesa
LA CONFIGURAZIONE EASY É ADATTA ALLE VERSIONI CONDUE USCITE ( OUT1, OUT2). PER L’ACCESSO AGLI ULTERIORI
PARAMETRI AGGIUNGERE 128 AL VALORE Pro
+ 8 per disabilitare all'accensione fino alla prima intercettazione+ 16 per abilitare la memoria dell'allarme+ 32 Hys diventa tempo di ritardo all’attivazione dell’allame (0...999 sec.)
(escluso assoluto simmetrico)+ 64 Hys diventa tempo di ritardo all’attivazione dell’allame (0...999 min.)
(escluso assoluto simmetrico)

(*) Per queste visualizzazioni è disabilitato il ritorno a tempo a PV / SV
5
6 • PROGRAMMAZIONE e CONFIGURAZIONE
al.1
al.2
a.xb
0V.P
sp
SP.1
SP.2
in.2
Se i tasti Inc, Dec, F non sono premuti entro 15 sec.la visualizzazione torna al valore P.V.
INF
P.V. / S.V.Variabile di processo (display PV)Setpoint di lavoro (display SV) o
valore uscita di controllo conregolatore in manuale
Soglia allarme 2 (punti scala)
Soglia allarme 3 (punti scala)
Soglia allarme HB(punti scala ingresso amperometrico)
Valore uscite di regolazione(+Heat / -Cool)
Comunicazione serialeSEr
InP
Out
PAS = 99
Pro
Lin
Impostazioni ingressi
Impostazioni uscite
Configurazione hardware
Linearizzazione ingresso
NO
La successione deimenù si ottiene
mantenendopremuto il tasto F.
Rilasciando il tastosi seleziona il menù
visualizzato.
Per accedere aiparametri contenutipremere il tasto F.
Per uscire daqualsiasi menù
mantenere premutoil tasto F
In qualsiasi menùmantenendopremuti i tasti
F + Auto/Man per2sec passaggio
immediato avisualizzazione
livello 1
swconf=ON
Setpoint locale
VISUALIZZAZIONE LIVELLO 1
PAS
NO
Hrd
U.CA
Menù custom
Password
Calibrazione utente
Codice di protezione
Visualizzazione informazioni
Setpoint 1
Setpoint 2
Valore ingresso amperometrico(con ingresso TA presente)
Soglia allarme 1 (punti scala)
Nota: Tutti i parametri che non sono necessari, a seguito della particolare configurazione, non sono visualizzati
-
al.3
upd
(od
(.xd
err
• Visualizzazione InFo
INF
Versionesoftware
Codicestrumento
Codice erroreauto diagnosi
Configurazionehrd
+8 Errore riconoscimento Schedina OUT2+16 Errore riconoscimento Schedina OUT3
Visualizzazioneinformazioni
CFG
(*)
(*)
0 No Error1 Lo2 Hi3 ERR4 SBR
USCITA 20 = Assente1 = Relé2 = Logica3 = Triac
INGRESSO / USCITA 30 = Assente1 = Relé2 = Logica3 = Continua4 = Analogica5 = In TA6 = In Digitale
COMUNICAZIONE DIG. / OUT40 = Assente1 = RS 4852 = Relé
Esempio: 1 1 1 = R + R + RS 485

• CFG
• Ser
parSER.P Protocollo Seriale0 CENCAL GEFRAN1 MODBUS RTU
6
S.tv
h.pb
h.it
h.dt
h.p.x
h.p.l
c.sp
c.pb
c.it
c.dt
c.p.x
c.p.l
rst
P.rs
A.rs
ffd
sof
Xy.i
Xy.2
Xy.3
xb.t
lb.t
lb.p
fa.p
g.sp
Abilitazioneselftuning,autotuning,
softstart
CFG Parametri di regolazione
Banda proporzionaledi riscaldamento
Tempo integraledi riscaldamento
Tempo derivatodi riscaldamento
Limite massimo potenzadi riscaldamento
Setpoint diraffreddamento relativo al
set di riscaldamento
Banda proporzionaledi raffreddamento
Tempo integrale azionedi raffreddamento
Tempo derivativodi raffreddamento
Limite massimo potenzadi raffreddamento
Manual reset
Isteresi per allarme 2
Isteresi per allarme 3
Tempo di attesa perl'intervento allarme HB
Tempo di attesa per l'interventodell'allarme LBA
(impostando 0 l'allarme LBA è disabilitato)
Limitazione della potenza fornita incondizione di allarme LBA
Potenza di Fault Action(fornita in condizioni di sonda guasta)
S.tun Autotuning Selftuning Softstartcontinuo
0 NO NO NO1 SI NO NO2 NO SI NO3 SI SI NO4 NO NO SI5 SI NO SI
0.00 ... 99.99 min
0.00 ... 99.99 min
0.0 ... 100.0%
-999 ... 999punti scala
0 ... 999.9% f.s.
0.00 ... 99.99 min
0.00 ... 99.99 min
0.0 ... 100.0%
Limite minimo potenzadi riscaldamento
(Non disponobile per doppiaazione caldo/freddo)
0.0 ... 100.0%
±25.0% f.s.
0 ... 999.9% f.s.
0...999 sec.Se +32 in A2.t0...999 min.
Se +64 in A2.t
0...999 sec.Se +32 in A3.t0...999 min.
Se +64 in A3.t
0 ... 999 sec
0.0 ... 500.0 min
-100.0 ... 100.0%
-100.0 ... 100.0%ON / OFF
Gradiente di Set(vedere note applicative)
0.0 ... 999.9 digit / min.(digit / sec vedi SP.r)
Antireset
Feedforward
0 ... 9999punti scala
-100.0 ... 100.0%
Potenza di reset -100.0 ... 100.0%
Isteresi per allarme 10...999 sec.
Se +32 in A1.t0...999 min.
Se +64 in A1.t
Tempo di softstart 0.0 ... 500.0 min
(il valore deve essere maggiore del tempo di ciclodell’ uscita, alla quale è associato l’allarme HB)
Fluidodi raffreddamento
0 ... 2
C.MEd Guadagno relativo (rG)(vedere nota applicativa)
0 Aria 11 Olio 0,82 Acqua 0,4
Limite minimo potenza diraffreddamento (non
disponibile per doppiaazione caldo/freddo)
0.0 ... 100.0%
(.ME-
(od
sr.p
Ser
Codice identificazione strumento
Impostazioni seriale
Protocollointerfaccia seriale
0 ... 247
bav SelezioneBaudrate
Selezioneparità
_PAr Parità0 Senza (no parity)1 Dispari (odd)2 Pari (even)
(*)
(*)
(*) Se l’allarme LBA è attivo, si può annullare premendo i tasti ∆ + ∇ quando sul display è visualizzato
il valore dell’uscita di regolazione (OutP), oppure commutando in Manuale.
Nota:I parametri c_Pb, c_it, c_dt sono read only in caso di abilitazione tipo di controllo caldo/freddo conguadagno relativo (Ctr = 14)
bAud Baudrate0 12001 24002 48003 96004 19200
±999 Punti scala
±999 Punti scala
±999 Punti scala

Type Tipo sonda Senza punto dec. Con punto dec.Sensore: TC
0 TC J °C 0/1000 0.0/999.91 TC J °F 32/1832 32.0/999.92 TC K °C 0/1300 0.0/999.93 TC K °F 32/2372 32.0/999.94 TC R °C 0/1750 0.0/999.95 TC R °F 32/3182 32.0/999.96 TC S °C 0/1750 0.0/999.97 TC S ° F 32/3182 32.0/999.98 TC T °C -200/400 -199.9/400.09 TC T °F -328/752 -199.9/752.010 TC B °C 44/1800 44.0/999.911 TC B °F 111/3272 111.0/999.912 TC E °C -100/750 -100.0/750.013 TC E °F -148/1382 -148.0/999.914 TC N °C 0/1300 0.0/999.915 TC N °F 32/2372 32.0/999.916 L-GOST °C 0/600 0.0/600.017 L-GOST °F 32/1112 32.0/999.918 TC U °C -200/400 -199.9/400.019 TC U °F -328/752 -199.9/752.020 TC G °C 0/2300 0.0/999.921 TC G °F 32/4172 32.0/999.922 TC D °C 0/2300 0.0/999.923 TC D °F 32/4172 32.0/999.924 TC C °C 0/2300 0.0/999.925 TC C °F 32/4172 32.0/999.926 Ni-Ni18Mo °C 0/1100 0.0/999.927 Ni-Ni18Mo °F 32/2012 32.0/999.928 TC CUSTOM CUSTOM29 TC CUSTOM CUSTOM30 PT100 °C -200/850 -199.9/850.031 PT100 °F -328/156 2 -199.9/999.932 JPT100 °C -200/600 -199.9/600.033 JPT100 °F -328/1112 -199.9/999.934 PTC °C -55/120 -55.0/120.035 PTC °F -67/248 -67.0/248.036 NTC °C -10/70 -10.0/70.037 NTC °F 14/158 14.0/158.038 0...60 mV -1999/9999 -199.9/999.939 0...60 mV linear custom linear custom40 12...60 mV -1999/9999 -199.9/999.941 12...60 mV linear custom linear custom42 0...20 mA -1999/9999 -199.9/999.943 0...20 mA linear custom linear custom44 4...20 mA -1999/9999 -199.9/999.945 4...20 mA linear custom linear custom46 0...10 V -1999/9999 -199.9/999.947 0...10 V linear custom linear custom48 2...10 V -1999/9999 -199.9/999.949 2...10 V linear custom linear custom50 0...5 V -1999/9999 -199.9/999.951 0...5 V linear custom linear custom52 1...5 V -1999/9999 -199.9/999.953 1...5 V linear custom linear custom54 0...1 V -1999/9999 -199.9/999.955 0...1 V linear custom linear custom56 200mv..1V -1999/9999 -199.9/999.957 200mv..1V linear custom linear custom58 Cust 10V-20mA -1999/9999 -199.9/999.959 Cust 10V-20mA linear custom linear custom60 Cust 60mV -1999/9999 -199.9/999.961 Cust 60mV linear custom linear custom62 PT100-JPT CUSTOM CUSTOM63 PTC CUSTOM CUSTOM64 NTC CUSTOM CUSTOM
• InP
7
typ. Tipo di sonda, segnale, abilitazione linearizzazione custom escala ingresso principale
InP Impostazione ingressi
s.in Ingressi Strumentovirtuale
0 ... 31
Ingressi IN P.V. AL3 AL2 AL1Bit 4 3 2 1 0
Es: 1 1 0 0 0Volendo gestire da linea seriale AN e IN il codiceda impostare in S.in è 24.
s.0v Uscite Strumentovirtuale
0 ... 31
Uscite OUTW OUT4 OUT3 OUT2 OUT1Bit 4 3 2 1 0
Es: 1 0 0 1 1Volendo gestire da linea seriale OUT1, OUT2 e OUTW ilcodice da impostare in S.Ou è 19.
s.U.i Interfaccia utenteStrumento virtuale
0 ... 255
Interf. LED KEYB DISL DISH LED LED LED LED1/2/3 OUT4 OUT3 OUT2 OUT1
Bit 7 6 5 4 3 2 1 0
Es: 0 1 0 1 0 0 0 0Volendo gestire da linea seriale KEYB e DISH il codiceda impostare in S.U.I è 80.
+2 gradiente di set in digit/sec.
flt
fld
dp.s
lo.s
xi.s
ofs.
ft.2
Filtro digitale ingresso(se=0 esclude il filtro di media sul
valore campionato)
(*) Non disponibile per sondeTC, RTD, PTC, NTC.
Filtro digitale sullavisualizzazione
dell’ingresso
Posizione punto decimaleper la scala ingresso
Limite minimo di scalaingresso principale
Limite massimo di scalaingresso principale
Offset di correzioneingresso principale
Filtro digitale ingressoausiliario
0.0 ... 20.0 sec
0 ... 9.9punti scala
dP_S Formato0 xxxx1 xxx.x2 xx.xx (*)3 x.xxx (*)
min...max scala dell’ingressoselezionato in tyP
min...max scala dell’ingressoselezionato in tyP
-999 ... 999punti scala
0.0 ... 20.0 sec
sp.r Def. Set remotoVal. Tipo set remoto Assoluto/Relativo0 Digitale Assoluto
(da linea seriale)1 Digitale Reletivo set
(da linea seriale) locale
Per linearizzazione custom:- La segnalazione LO avviene con variabile a valori inferiori a Lo.S o al valoreminimo di calibrazione
- La segnalazione HI avviene con variabile a valori superiori a Lo.S o al valoremassimo di calibrazione
Errore massimo di non linearitàper temocoppie (Tc),termoresistenza (PT100) etermistori (PTC, NTC)
L’errore è calcolato comescostamento dal valore teoricocon riferimento in % al valore difondo scala espresso in gradicelsius (°C)
S, R scala 0...1750°C; errore < 0,2% f.s. (t > 300°C)per altre scale; errore < 0,5% f.s.
T errore <0,2% f.s. (t> -150°C)B scala 44...1800°C; errore < 0,5% f.s. (t > 300°C)
scala 44,0...999,9; errore f.s.(t>300°C)U scala -200...400; errore < 0,2% f.s. (per t > -100°C)
per altre scale; errore <0,5% f.s.G errore < 0,2% f.s. (t > 300°C)D errore < 0,2% f.s. (t > 200°C)C scala 0...2300; errore < 0,2% f.s.
per altre scale; errore < 0,5% f.s.
NTC errore < 0,5% f.s.
Tc tipo J, K, E, N, L errore < 0,2% f.s.PT100, JPT100 e PTC errore < 0,2% f.s.
8
xi.l
lo.l
of.2
xs.2
l5.2 Limite minimoScala ingresso ausiliario
Offset correzioneingresso ausiliario
0.0 ... 999.9
Limite massimoScala ingresso ausiliario 0.0 ... 999.9
-99.9 ... 99.9punti scala
Limite inferioreimpostabilità SPe allarmi assoluti
Lo.S ... Hi.S
Limite superioreimpostabilità SPe allarmi assoluti
Lo.S ... Hi.S
• Out
Out Impostazioni per uscite
Selezionegrandezzeriferimentoallarme 1
AL.1.r, AL.2.r, AL.3.rSelezionegrandezzeriferimentoallarme 2
Selezionegrandezzeriferimentoallarme 3
AL.x.r Variabile da comparare Soglia di riferimento0 PV (variabile di processo) AL1 SSP (setpoint attivo) AL (solo assoluto)2 PV (variabile di processo) AL [solo relativo e
riferito a SP1(con funzione multiset)]
Tipoallarme 1
Tipoallarme 2
Tipoallarme 3
+ 8 per disabilitare all'accensione fino alla prima intercettazione+ 16 per abilitare la memoria dell'allarme+ 32 Hys diventa tempo di ritardo all’attivazione dell’allame (0...999 sec.) (escluso assoluto simmetrico)+ 64 Hys diventa tempo di ritardo all’attivazione dell’allame (0...999 min.) (escluso assoluto simmetrico)
AL.x.t Diretto (di massima) Assoluto NormaleInverso (di minima) Relativo Simetrico
al setpoint attivo (finestra)0 diretto assoluto normale1 inverso assoluto normale2 diretto relativo normale3 inverso relativo normale4 diretto assoluto simmetrico5 inverso assoluto simmetrico6 diretto relativo simmetrico7 inverso relativo simmetrico
AL.1.t, AL.2.t, AL.3.t
Funzionalitàdell'allarme
HB
Val. Descrizione funzionalità0 Uscita relè, logica: allarme attivo
ad un valore della corrente di caricoinferiore alla soglia impostata neltempo di ON dell'uscita di controllo
1 Uscita relè, logica: allarme attivo ad unvalore della corrente di carico superiore alla soglia impostata nel tempo di OFF dell'uscita di controllo
2 Allarme attivo se una delle funzioni 0 e 1è attiva (OR logico tra le funzioni 0 e 1) (*)
3 Per uscita continua di riscaldamento7 Per uscita continua di raffreddamento
+ 0 associato all’uscita Out1 (solo per Hb_F= 0, 1, 2)+ 4 associato all’uscita Out2 (solo per Hb_F= 0, 1, 2)+ 12 associato all’uscita Out4 (solo per Hb_F= 0, 1, 2)+ 16 allarme HB inverso
(*) la soglia minima è impostata uguale al 12% del f.s. amperometrico
a1.r
a2.r
a3.r
a1.t
xb.f
a2.t
a3.t

9
an.o
rl.1
rl.2
rl.3
rl.4
(t.1
rel
(t.2
(t.3
x.an
l.an
Fault action(definizione stato in caso di
sonda guasta)Err, Sbr
Minimo scala uscitadi ripetizioneanalogica 0
Massimo scala uscitadi ripetizione
analogica
Val Grandezza di riferimento0 PV - variabile di processo1 SSP - setpoint attivo2 SP - setpoint locale3 -4 Deviazione (SSP-PV)5 HEAT (*)6 COOL (*)7 AL1 (soglia)8 AL2 (soglia)9 AL3 (soglia)10 -11 Valore acquisito da linea seriale (*)
Out WAttribuzione segnale o valore di riferimento:
Out 1Attribuzionesegnale diriferimento
_rEL. Allarme Allarme Allarme1 2 3
0 OFF OFF OFF1 ON OFF OFF2 OFF ON OFF3 ON ON OFF4 OFF OFF ON5 ON OFF ON6 OFF ON ON7 ON ON ON
-1999 ... 9999
16 per il codice 0 se l’ingresso é in condizione di errore Err - Sbrl’uscita assume il minimo valore di trimming
(*) - Limiti di scala non impostabili- Uscita ritrasmessa non disponibile con tipo di controllo ON/OFF
Tempo di cicloOut1
(Heat o Cool)
Tempo di cicloOut2
(Heat o Cool)
Tempo di cicloOut3
(Heat o Cool)
1...200 sec.
1...200 sec.
1...200 sec. (0,1 sec. fisso con uscita continua,Ct.3 non compare in configurazione)
Out 2Attribuzionesegnale diriferimento
Out 3Attribuzionesegnale diriferimento
Out 4Attribuzionesegnale diriferimento
-1999 ... 9999
rL.o.1, rL.o.2, rL.o.3, rL.o.4
+ 32 per livello logico negato in uscitaeccetto codici 0 ÷ 1 con uscita continua
Val Funzione0 HEAT (uscita di controllo riscaldamento)1 COOL (uscita di controllo raffreddamento)2 AL1 - allarme 13 AL2 - allarme 24 AL3 - allarme 35 AL.HB - allarme HB6 LBA - allarme LBA7 IN - ripetizione ingresso logico8 Ripetizione tasto but (se but = 8)9 AL1 or AL210 AL1 or AL2 or AL311 AL1 and AL212 AL1 and AL2 and AL313 AL1 or ALHB14 AL1 or AL2 or ALHB15 AL1 and ALHB16 AL1 and AL2 and ALHB
(t.4Tempo di ciclo
Out4(Heat o Cool)
1...200 sec.
64 HEAT uscita continua 2-10V (*)65 COOL uscita continua 2-10V (*)
(*) solo per rL.3
10
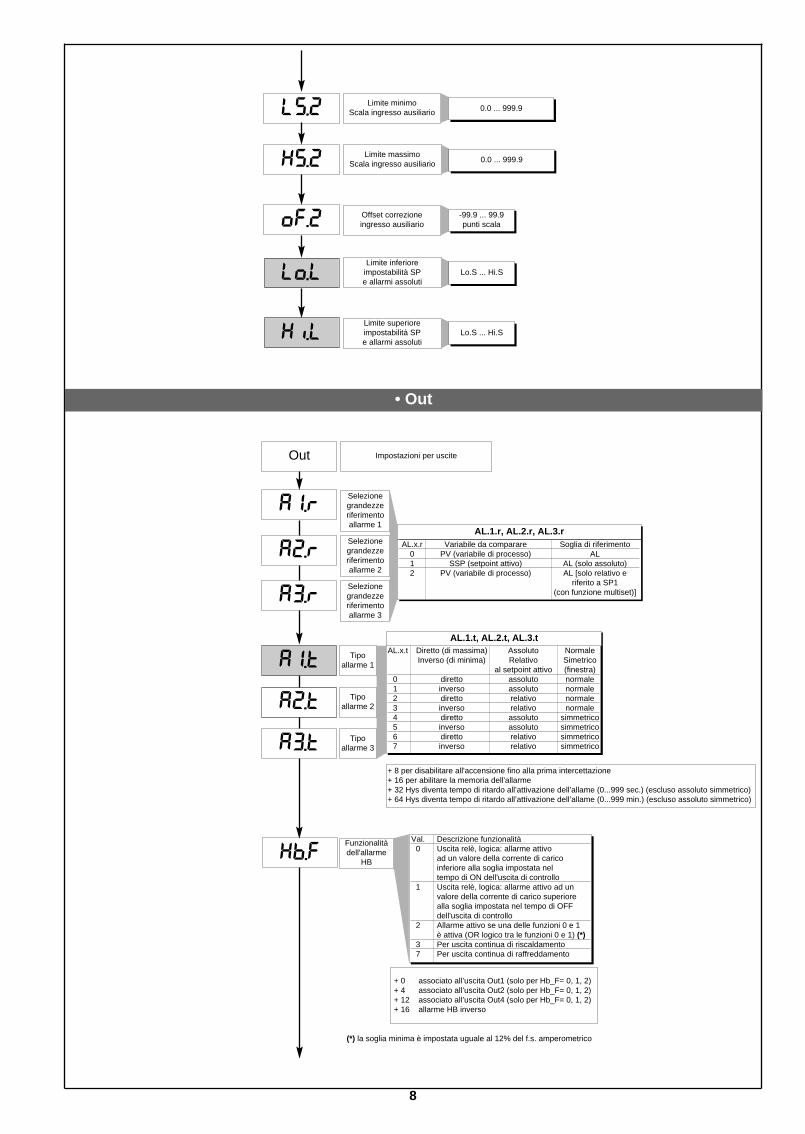
(tr
hd.1
• Hrd
Hrd Configurazione hardware
Abilitazionemultiset gestione
strumenti viaseriale
Val Multiset Stato led Gestione(2 SP) invertiti strumento
via seriale01 x2 x3 x x4 x5 x x6 x x7 x x x
Tipo di controlloVal Tipo di controllo
0 P caldo1 P freddo2 P caldo / freddo3 PI caldo4 PI freddo5 PI caldo / freddo6 PID caldo7 PID freddo8 PID caldo / freddo9 ON-OFF caldo10 ON-OFF freddo11 ON-OFF caldo / freddo12 PID caldo + ON-OFF freddo13 ON-OFF caldo + PID freddo14 PID caldo + freddo con guadagno
relativo (vedi parametro C.MEd)
Selezione tempo di sample dell’azionederivativa:+0 sample 1 sec.+16 sample 4 sec.+32 sample 8 sec.+64 sample 240 msec.
Nota: Nel controllo ON-OFF l’allarme LBAnon è abilitato
• Prot
Pro Codice di protezione
Prot Visualizzazione Modifica0 SP, In2, allarmi, OuP, INF SP, allarmi1 SP, In2, allarmi, OuP, INF SP2 SP, In2, OuP, INF
+ 4 disabilitazione InP, Out+ 8 disabilitazione CFG, Ser+16 disabilitazione “accensione - spegnimento” software+32 disabilita la memorizzazione della potenza manuale+64 disabilita la modifica del valore della potenza manuale+128 abilta la configurazione estesa
N.B: OuP e INF visualizzazione solo in configurazione estesa

dig.
al.n
bvt.
+ 8 per abilitare l'allarme HB+ 16 per abilitare l'allarme LBA
dig.
Funzioneingresso digitale
+ 16 per ingresso in logica negata (NPN)+ 32 per forzare lo stato logico 0 (OFF)+ 48 per forzare lo stato logico 1 (ON)
AL.nr Allarme 1 Allarme 2 Allarme 30 disabilitato disabilitato disabilitato1 abilitato disabilitato disabilitato2 disabilitato abilitato disabilitato3 abilitato abilitato disabilitato4 disabilitato disabilitato abilitato5 abilitato disabilitato abilitato6 disabilitato abilitato abilitato7 abilitato abilitato abilitato
0 nessuna funzione (tasto disabilitato)1 MAN / AUTO controllore2 LOC / REM3 HOLD4 Reset memoria allarmi5 Selezione SP1/SP26 Spegnimento/Accensione Software
Selezione numeroallarmi abilitati
0 nessuna funzione (tasto disabilitato)1 MAN / AUTO controllore2 LOC / REM3 HOLD4 Reset memoria allarmi5 Selezione SP1/SP26 Start/Stop selftuning7 Start/Stop autotuning8 Set / Reset uscite OUT 1 ... OUT 4
+ 16 disabilita la funzione all’interno deimenu di configurazione
b u t t
Funzione tastoM/A
ld.1
ld.2
ld.3
11
Val. Funzione0 nessuna funzione1 MAN/AUTO controllore2 LOC / REM3 HOLD4 Selftuning attivo5 Autotuning attivo6 Ripetizione IN17 Abilitazione colloquio seriale8 Errore presente9 Softstart in esecuzione10 Indicazione SP1...SP2
Funzione led
+ 16 Led lampeggiante se attivo
dspDefinizione
funzione displaySV
diSP Funzione display inferiore (SV)0 SSP - setpoint attivo1 InP.2 - ingresso ausiliario2 Valore uscita di regolazione3 Deviazione (SSP - PV)

Passo 34 mV fondo scalas.34
Passo 33 mV inizio scalas.33
......
s.00
12
• Lin
Lin Linearizzazione customper ingresso principale
Il valore del passo n corrisponde ad ingresso:mV inizio scala + n*∆mV
∆mV = (mV fondo scala - mV inizio scala) / 32
Passo 0valore inizio scala
Passo 32(valore di fondo scala)
Limiti di visualizzazione deldisplay (-1999...9999)
Limiti di visualizzaionedel display (-1999...9999)
• U.CAL
U.CA Calibrazioneutente
s.32
Passo 35mV a temperatura
di 50°Cs.35
Val Funzione1 Uscita analogica (1)2 Ingresso 1 - custom 10V / 20mA3 Ingresso 1 - custom 60mV4 Custom PT100 / J PT1005 Custom PTC6 Custom NTC7 Ingresso 2 - custom TA (2)
Solo per TYP = Tc Custom
(1) L’uscita analogica in 20mA è calibrata con accuratezza migliore del 0,2% f.s.procedere alla calibrazione quando si converte in uscita 10V.
(2) L’accuratezza in assenza di calibrazione è migliore del 1% f.s., procedere alla calibrazionesolo per esigenze di accuratezza superiore
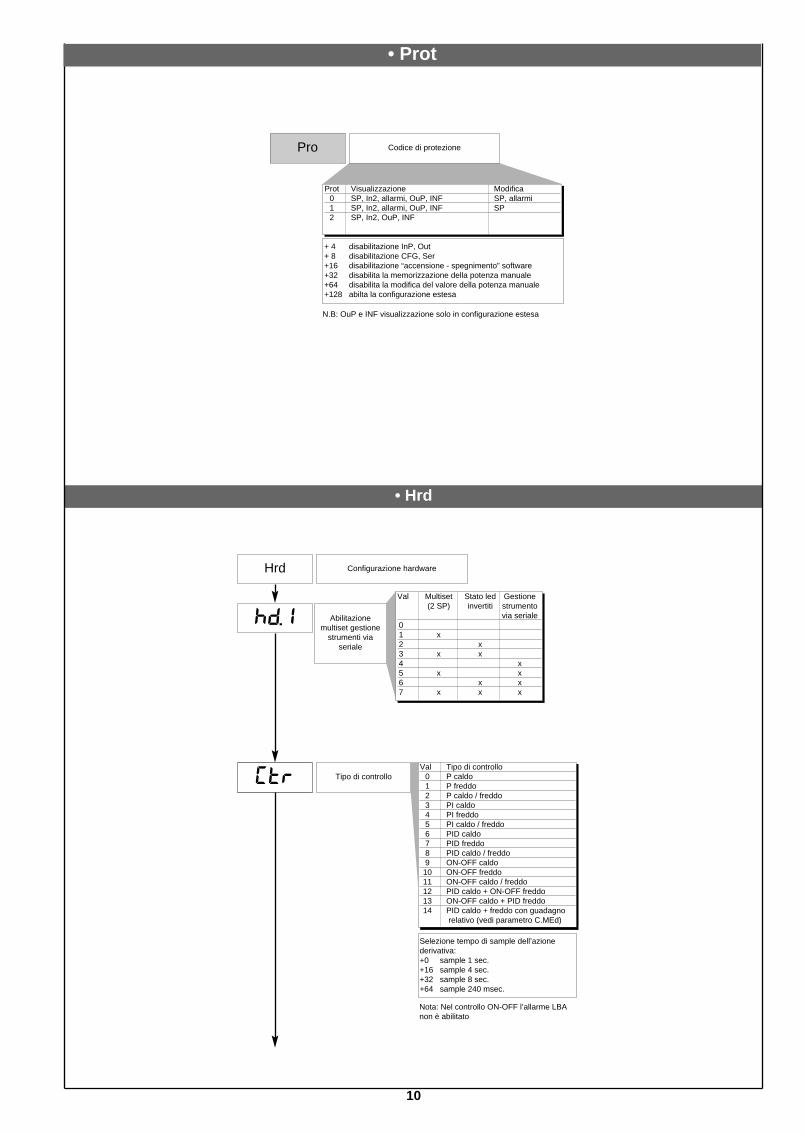
Questo tipo di allarme è condizionato dall’utilizzo dell’ingresso da trasformatore amperometrico (T.A.).Può segnalare variazioni di assorbimento nel carico discriminando il valore della corrente in ingresso amperometrico nel campo(0 ... HS.2). Viene abilitato tramite codice di configurazione (AL.n); in questo caso il valore di intercettazione dell’allarme èespresso in punti scala HB.Tramite il codice Hb.F (fase “Out”) si seleziona il tipo di funzionamento e l’uscita di controllo associata.L’impostazione della soglia d’allarme è A.Hb.L’allarme HB diretto interviene nel caso in cui il valore dell’ingresso amperometrico si trova sotto la soglia impostata per Hb.tsecondi complessivi di tempo di “ON” dell’uscita selezionata.L’allarme HB si può attivare solo con tempi di ON superiori a 0.4 secondi (esclude l’uscita continua).La funzionalità dell’allarme HB prevede il controllo della corrente di carico anche nell’intervallo di OFF del tempo di ciclodell’uscita selezionata: se per Hb.t secondi complessivi di stato di OFF dell’uscita la corrente misurata supera circa il 12,5% delfondo scala impostato (parametro HS.2 in InP), l’allarme HB diventa attivo.Il reset dell’allarme avviene automaticamente se si elimina la condizione che lo ha provocato.Una impostazione della soglia A.Hb = 0 disabilita entrambi i tipi di allarme HB con diseccitazione del relè associato.L’indicazione della corrente di carico è visualizzata selezionando la voce In.2. (livello 1).NOTA: i tempi di ON/OFF si riferiscono al tempo di ciclo impostato dell’uscita selezionata.L’allarme Hb_F = 3 (7) continuo è attivo per un valore della corrente di carico inferiore alla soglia impostata; è disabilitato se ilvalore dell’uscita di riscaldamento (raffreddamento) è minore al 3%.
Il valore d’ingresso e le intercettazioni rimangono “congelate” per il tempo nel quale l’ingresso logico é attivo.Attivando l’ingresso di Hold con la variabile a valore inferiore alla soglia delle intercettazioni, un reset della memoria diintercettazione provoca la diseccitazione di tutti i relé eccitati e il reset della memoria di tutti gli allarmi.
FUNZIONAMENTO ALLARME HB
• Funzionamento tipo HOLD
13
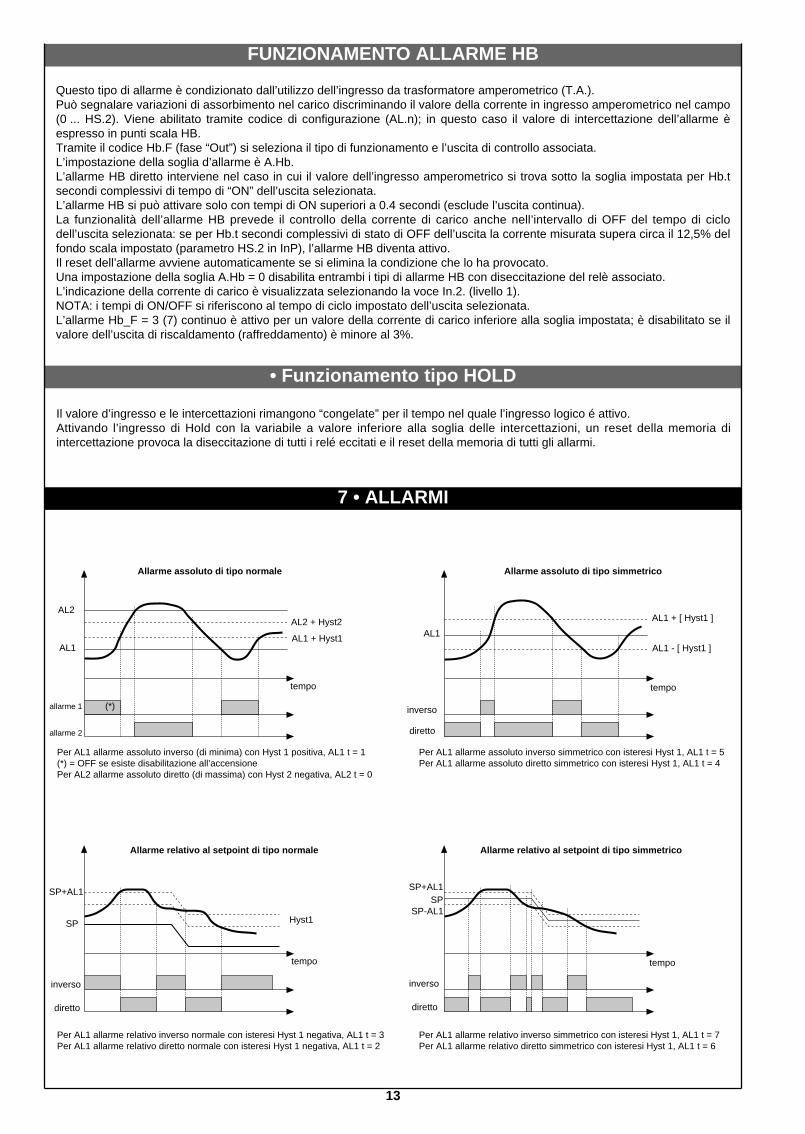
7 • ALLARMI
tempo
AL1 + Hyst1
AL2 + Hyst2AL2
AL1
allarme 1
allarme 2
(*)
Per AL1 allarme assoluto inverso (di minima) con Hyst 1 positiva, AL1 t = 1(*) = OFF se esiste disabilitazione all’accensionePer AL2 allarme assoluto diretto (di massima) con Hyst 2 negativa, AL2 t = 0
Per AL1 allarme assoluto inverso simmetrico con isteresi Hyst 1, AL1 t = 5Per AL1 allarme assoluto diretto simmetrico con isteresi Hyst 1, AL1 t = 4
Allarme assoluto di tipo normale Allarme assoluto di tipo simmetrico
inverso
diretto
AL1
AL1 + [ Hyst1 ]
AL1 - [ Hyst1 ]
tempo
Per AL1 allarme relativo inverso normale con isteresi Hyst 1 negativa, AL1 t = 3Per AL1 allarme relativo diretto normale con isteresi Hyst 1 negativa, AL1 t = 2
Per AL1 allarme relativo inverso simmetrico con isteresi Hyst 1, AL1 t = 7Per AL1 allarme relativo diretto simmetrico con isteresi Hyst 1, AL1 t = 6
tempo
SP+AL1SP
inverso
diretto
SP+AL1
SP
inverso
diretto
tempo
Hyst1
Allarme relativo al setpoint di tipo normale Allarme relativo al setpoint di tipo simmetrico
SP-AL1

14
Azione Proporzionale:azione in cui il contributo sull’uscita è proporzionale alla deviazione in ingresso (Deviazione è lo scostamento fra variabile regolata e valoredesiderato).Azione Derivativa:azione in cui il contributo sull’uscita è proporzionale alla velocità di variazione della deviazione in ingresso.Azione Integrale:azione in cui il contributo sull’uscita è proporzionale all’integrale nel tempo della deviazione di ingresso.
Influenza delle azioni Proporzionale, Derivativa ed Integrale sulla risposta del processo sotto controllo* L’aumento della Banda Proporzionale riduce le oscillazioni ma aumenta la deviazione.* La diminuzione della Banda Proporzionale riduce la deviazione ma provoca oscillazioni della variabile regolata (valori troppo bassi dellaBanda Proporzionale rendono il sistema instabile).* L’aumento dell’Azione Derivativa, corrispondente ad un aumento del Tempo Derivativo, riduce la deviazione ed evita oscillazioni fino ad unvalore critico del Tempo Derivativo oltre il quale aumenta la deviazione e si verificano oscillazioni prolungate.* L’aumento dell’Azione Integrale, corrispondente ad una diminuzione del Tempo Integrale, tende ad annullare la deviazione a regime fravariabile regolata e valore desiderato (set-point).Se il valore del Tempo Integrale è troppo lungo (Azione Integrale debole) è possibile una persistenza della deviazione tra variabile regolata evalore desiderato.Per avere ulteriori informazioni relative alle azioni di controllo contattare GEFRAN.
8 • AZIONI DI CONTROLLO
9 • TECNICA DI TUNE MANUALEA) Impostare il set-point al valore operativo.B) Impostare la banda proporzionale al valore 0,1% (con regolazione di tipo on-off).C) Commutare in automatico ed osservare l’andamento della variabile; si otterrà un comportamento simile a quello di figura:
D) Calcolo dei parametri PID: Valore di banda proporzionale
PiccoP.B.= ---------------------------------------- x 100
V massimo - V minimo
(V massimo - V minimo) è il range di scala.Valore di tempo integrale It = 1,5 x TValore di tempo derivativo dt = It/4E) Commutare in manuale il regolatore, impostare i parametri calcolati, (riabilitare laregolazione PID impostando un eventuale tempo di ciclo per uscita relè), commutarein automatico.F) Se possibile, per valutare l’ottimizzazione dei parametri, cambiare il valore di set-point e controllare il comportamento transitorio; se persiste un’oscillazioneaumentare il valore di banda proporzionale, se invece si dimostra una rispostatroppo lenta diminuirne il valore.
Variabile diprocesso
Tempo
T
Picco
11 • ACCENSIONE / SPEGNIMENTO SOFTWARE
Come spegnere: tramite la combinazione di tasti “ F ” e “ Incrementa ” premuti insieme per 5 secondi è possibile disattivare lo strumento, chesi predispone in stato di “ OFF ” assumendo un comportamento simile allo strumento spento, senza togliere l’alimentazione di rete,mantenendo attiva la visualizzazione della variabile di processo, il display SV è spento.Tutte le uscite (regolazione e allarmi) sono in stato di OFF (livello logico 0, relè diseccitati) e tutte le funzioni dello strumento sono inibiteeccetto la funzione di “ ACCENSIONE ” e il dialogo seriale.Come accendere: premendo il tasto “ F ” per 5 secondi lo strumento passa dallo stato di “ OFF ” in quello di “ ON ”. Se durante lo stato di “OFF ” viene tolta la tensione di rete, alla successiva accensione (power-up) lo strumento si predispone nello stesso stato di “ OFF ”; (lo stato di“ ON/OFF ” viene memorizzato). La funzione è normalmente abilitata; per disabilitarla impostare il parametro Prot = Prot +16. Questa funzionepuò essere associata all’ingresso digitale (d.i.G) ed esclude la disattivazione da tastiera.
La funzione multiset si abilita in hd.1.La funzione gradiente é sempre abilitata.La selezione tra set point 1 e set point 2 può essere effettuata tramitetasto frontale o ingresso digitale.É possibile visualizzare la selezione tra set point1 / 2 tramite led.GRADIENTE DI SET: se impostato ≠ 0, all’accensione e al passaggioauto/man il set point è assunto uguale a PV, con gradiente impostatoraggiunge il set locale o quello selezionato.Ogni variazione di set è soggetta a gradiente.Il gradiente di set è inibito all’accensione quando è abilitato il selftuning.Se il gradiente di set é impostato ≠ 0, questo é attivo anche sullevariazioni di set point locale, impostabile solo nel relativo menù SP.Il set point di regolazione raggiunge il valore impostato con unavelocità definita dal gradiente.
10 • FUNZIONE MULTISET, GRADIENTE DI SET
SP1SP2
SPrem SP1(*)
ON
ON
SP
IN1
LOC/REM
t
t
t
(*) nel caso sia impostatoil gradiante di set

15
La funzione è valida per sistemi di tipo a singola azione (o caldo o freddo).L’attivazione del self-tuning ha come scopo il calcolo dei parametri ottimali di regolazione in fase di avviamento del processo, la variabile(esempio temperatura) deve essere quella assunta a potenza nulla (temperatura ambiente).Il controllore fornisce il massimo di potenza impostata sino al raggiungimento di un valore intermedio tra il valore di partenza e il set-point,quindi azzera la potenza. Dalla valutazione della sovraelongazione e del tempo per raggiungere il picco, vengono calcolati i parametri PID.La funzione così completata si disinserisce automaticamente, la regolazione prosegue nel raggiungimento del set-point.
Come attivare il selftuning:A. Attivazione all’ accensione1. Impostare il setpoint al valore desiderato2. Abilitare il selftuning impostando il parametro Stun al valore 2 (menù CFG)3. Spegnere lo strumento4. Assicurarsi che la temperatura sia prossima alla temperatura ambiente5. Riaccendere lo strumento
B. Attivazione da tastiera 1. Assicurarsi che il tasto M/A sia abilitato per la funzione Start/Stop selftuning
(codice but = 6 menù Hrd)2. Portare la temperatura prossima alla temperatura ambiente3. Impostare il setpoint al valore desiderato4. Premere il tasto M/A per attivare il selftuning. (Attenzione: ad una nuova pressione del tasto il seltuning è interrotto)
La procedura si svolge automaticamente fino all’ esaurimento. Al termine sono memorizzati i nuovi parametri PID: banda proporzionale, tempiintegrale e derivato calcolati per l’ azione attiva (caldo o freddo). In caso di doppia azione (caldo + freddo) i parametri dell’azione opposta sonocalcolati mantenendo il rapporto iniziale tra i rispettivi parametri. (esempio: Cpb = Hpb * K; dove K = Cpb / Hpb al momento dell’ avviamentodel selftuning). Dopo l’ esaurimento il codice Stun è annullato automaticamente.Note:- La procedura si interrompe per il superamento del setpoint durante lo svolgimento. In tale caso il codice Stun non è annullato.- Si consiglia di abilitare uno dei led configurabili per la segnalazione dello stato di selftuning. Impostando nel menù Hrd uno dei parametriLed1, Led2, Led3 = 4 o 20, si ha il rispettivo led acceso o lampeggiante durante la fase di selftuning attivo.
N.B.: Azione non considerata nel tipo di controllo ON/OFF
12 • SELF-TUNING
Picco
T
S.P.
t.a.Tempo
Variabile diprocesso
S.P. - t.a.2
13 • AUTO-TUNINGL’abilitazione della funzione auto-tuning blocca le impostazioni dei parametri PID.L’Autotuning continua a valutare le oscillazioni di un sistema cercando quanto prima possibile i valori dei parametri PID che riduconol’oscillazione in essere; non interviene se le oscillazioni si riducono a valori inferiori allo 1,0% della banda proporzionale.Viene interrotto nel caso di variazione del set-point, riprende automaticamente con set-point costante. I parametri calcolati non vengonomemorizzati; in caso di spegnimento dello strumento il regolatore riprende con i parametri programmati prima di abilitare l’auto-tuning.L’Autotuning con il passaggio in Manuale termina la procedura.
tempo
PV
c_Pb
h_Pb
SP+cSP
SP
+100%Uscita di regolazione
0%
-100%
Uscita di regolazione con sola azione proporzionale nel caso di bandaproporzionale di riscaldamento separata da quella di raffreddamento
Uscita di regolazione con sola azione proporzionale nel caso di bandaproporzionale di riscaldamento sovrapposta a quella di raffreddamento
tempo
PV
c_Pb
h_PbSP+cSP
SP
+100%Uscita di regolazione
0%
-100%
PV = variabile di processo SP = setpoint di riscaldamentoSP+cSP = setpoint di raffreddamento h_Pb = banda proporzionale di riscaldamentoc_Pb = banda proporzionale di raffreddamento
14 • REGOLAZIONI
In questa modalità di regolazione (abilitata con il parametro Ctr = 14) é richiesto di specificare la tipologia del raffreddamento.I parametri PID di raffreddamento sono quindi calcolati a partire da quelli di riscaldamento nel rapporto indicato (es: C.ME = 1 (olio), H_Pb = 10, H_dt =1, H_It = 4 implica: C_Pb = 12,5, C_dt = 1 , C_It = 4)Si consiglia di applicare nell’impostazione dei tempi di ciclo per le uscite i seguenti valori:Aria T Ciclo Cool = 10 sec.Olio T Ciclo Cool = 4 sec.Acqua T Ciclo Cool = 2 sec.
NB.: In questa modalità i parametri di raffreddamento sono non modificabili.
Regolazione Caldo/Freddo con guadagno relativo

25 ±1
Ø 7
±0,
5
5,50m
PTC 7 x 25 5m
• SIGLA DI ORDINAZIONE
DATI TECNICI
Mod. Sonda: Sonda AmbienteMateriale cappuccio: Plastico (Ø 7 x 25mm)Campo di Temperatura: -20...80°CPTC: R 25°C = 1KΩ ±1% (KTY 81-110)Tempo di risposta: 20sec (in aria ferma)Isolamento: 100MΩ, 500Vd.c. tra cappuccio e terminaliMateriale cavo: Unipolare in PVC (12/0,18)Lunghezza cavo: 5,50m
• Cavo Interfaccia RS232 / TTL per configurazione strumenti GEFRAN
COD. 1108200 Cavetto + Floppy
• SIGLA DI ORDINAZIONE
• Trasformatore Amperometrico15 • ACCESSORI
• Applicativo di doppio set (rampa+mantenimento+allarme di termine)16 • APPLICAZIONI
50 / 0.05 A
152050 9640
1 2
1 2
5,5 27 5,5
920
1948
8 838
1
13
20
2
In
44 30
1010
Foro di fissaggioper viti autofilettanti: 2,9 x 9
Questi Trasformatori sono usati per misure di corrente a 50 ÷ 60Hz da 25A a 600A(corrente primaria nominale). La caratteristica peculiare di questi trasformatori è l’altonumero di spire al secondario. Questo permette di avere una corrente secondaria moltobassa, idonea a un circuito elettronico di misura. La corrente secondaria può essererilevata come una tensione su un resistore.
CODICE Ip / Is Ø Secondary n USCITE Ru Vu PRECISIONECODE Wire OUTPUTS ACCURACY
TA/152 025 25 / 0.05A 0.16 mm n1-2 = 500 1 - 2 40 Ω 2 Vac 2.0 %
TA/152 050 50 / 0.05A 0.18 mm n1-2 = 1000 1 - 2 80 Ω 4 Vac 1.0 %
IN = 25AacOUT = 50mAac
COD. 330200IN = 50AacOUT = 50mAac
COD. 330201
• SIGLA DI ORDINAZIONE
N.B.: L’interfaccia RS232 per la configurazione da PC èfornito unitamente al software di programmazioneWINSTRUM. Il collegamento deve essere effettuato construmento alimentato con ingressi e uscite non collegate.
16
• PTC
AL
Riferito alset-point attuale
Profilo di Setpoint
Set
poin
t < A
L
Rita
rdo
all’a
ttiva
zion
e (*
)
Allarme assoluto
Allarme inverso
(*) Tempo settato nelparametro HY.n
Allarme diretto
tempo (min. o sec.)

SIGLA DI ORDINAZIONE
• AVVERTENZE
Prima di installare, collegare od usare lo strumento leggere le seguenti avvertenze:• collegare lo strumento seguendo scrupolosamente le indicazioni del manuale• effettuare le connessioni utilizzando sempre tipi di cavo adeguati ai limiti di tensione e corrente indicati nei dati tecnici• lo strumento NON è dotato di interruttore On/Off, quindi si accende immediatamente all'applicazione dell'alimentazione; per esigenze di sicurezza leapparecchiature collegate permanentemente all’alimentazione richiedono: interruttore sezionatore bifase contrassegnato da apposito marchio; chequesto sia posto in vicinanza all’apparecchio e che possa essere facilmente raggiungibile dall’operatore; un singolo interruttore può comandare piùapparecchi• se lo strumento è collegato ad apparati elettricamente NON isolati (es. termocoppie), si deve effettuare il collegamento di terra con uno specificoconduttore per evitare che questo avvenga direttamente tramite la struttura stessa della macchina• se lo strumento è utilizzato in applicazioni con rischio di danni a persone, macchine o materiali, è indispensabile il suo abbinamento con apparati ausiliaridi allarme. E' consigliabile prevedere inoltre la possibilità di verifica di intervento degli allarmi anche durante il regolare funzionamento• è responsabilità dell'utilizzatore verificare, prima dell'uso, la corretta impostazione dei parametri dello strumento, per evitare danni a persone o cose• lo strumento NON può funzionare in ambienti con atmosfera pericolosa (infiammabile o esplosiva); può essere collegato ad elementi che operano in taleatmosfera solamente tramite appropriati e opportuni tipi di interfaccia, conformi alle locali norme di sicurezza vigenti• lo strumento contiene componenti sensibili alle cariche elettrostatiche, pertanto la manipolazione delle schede elettroniche in esso contenute deveessere effettuata con opportuni accorgimenti, al fine di evitare danni permanenti ai componenti stessiInstallazione: categoria di installazione II, grado di inquinamento 2, doppio isolamento• le linee di alimentazione devono essere separate da quelle di ingresso e uscita degli strumenti; controllare sempre che la tensione di alimentazionecorrisponda a quella indicata nella sigla riportata sull'etichetta dello strumento• raggruppare la strumentazione separatamente dalla parte di potenza e dei relè• evitare che nello stesso quadro coesistano: teleruttori ad alta potenza, contattori, relè; gruppi di potenza a tristori, in particolare " a sfasamento "; motori, etc.• evitare la polvere, l'umidità, i gas corrosivi, le fonti di calore• non occludere le fessure di areazione, la temperatura di lavoro deve rientrare nell’intervallo 0 ... 50°CSe lo strumento è equipaggiato di contatti tipo faston è necessario che questi siano del tipo protetto isolati; se equipaggiato di contatti a vite è necessarioprovvedere all’ancoraggio dei cavi almeno a coppie.• alimentazione: proveniente da un dispositivo di sezionamento con fusibile per la parte strumenti; l'alimentazione degli strumenti deve essere la piùdiretta possibile partendo dal sezionatore ed inoltre: non essere utilizzata per comandare relè, contattori, elettrovalvole, etc.; quando è fortementedisturbata dalla commutazione di gruppi di potenza a tristori o da motori, è opportuno un trasformatore di isolamento solo per gli strumenti, collegandonelo schermo a terra; è importante che l'impianto abbia un buon collegamento di terra, la tensione tra neutro e terra non sia >1V e la resistenza Ohmica sia<6Ohm; se la tensione di rete è fortemente variabile, alimentare con uno stabilizzatore di tensione; in prossimità di generatori ad alta frequenza osaldatrici ad arco, impiegare filtri di rete; le linee di alimentazione devono essere separate da quelle di ingresso e uscita degli strumenti; controllaresempre che la tensione di alimentazione corrisponda a quella indicata nella sigla riportata sull'etichetta dello strumento• collegamento ingressi e uscite: i circuiti esterni collegati devono rispettare il doppio isolamento; per collegare gli ingressi analogici (TC, RTD) ènecessario: separare fisicamente i cavi degli ingressi da quelli di alimentazione, delle uscite e dai collegamenti di potenza; utilizzare cavi intrecciati eschermati, con schermo collegato a terra in un solo punto; per collegare le uscite di regolazione, di allarme (contattori, elettrovalvole, motori, ventilatori,etc.) montare gruppi RC (resistenza e condensatore in serie) in parallelo ai carichi induttivi che lavorano in alternata (Nota: tutti i condensatori devonoessere conformi alle norme VDE (classe x2) e sopportare una tensione di almeno 220Vac. Le resistenze devono essere almeno di 2W); montare un diodo1N4007 in parallelo alla bobina dei carichi induttivi che lavorano in continuaLa GEFRAN spa non si ritiene in alcun caso responsabile per i danni a persone o cose derivati da manomissioni, da un uso errato, improprio ecomunque non conforme alle caratteristiche dello strumento.
! ATTENZIONE: Questo simbolo indica pericolo.E’ visibile in prossimità dell’alimentazione e dei contatti dei relè che possono essere sottoposti a tensione di rete
17
Relè R
600
USCITA 1 (AL)
R
100...240V
20...27V
1
0
2
0 Assente
RS485
R Uscita relé
ALIMENTAZIONE
COMUNICAZIONE DIGITALE / USCITA 4
USCITA 2 (MAIN)
Relè R
Logica D
Triac (1A) T
INGRESSO/USCITA 3
Assente 0
Relé R
Logica D
Uscita controllo continua 10V C
Ritrasmissione analogica 20mA W
Ingresso TA (50mAac) H
Ingresso Digitale N
Si prega di contattare il personale GEFRAN per informazioni sulla disponibilità dei codici.

Logic inputs Ri = 4,7KΩ (24V, 5mA) or no-voltage contact
Protocol Gefran CENCAL / MODBUS
Serial interface (optional) RS485, isolated
Analogue retransmission signal 10V/20mA Rload max 500Ω resolution 12 bitTransmitter power supply 10 / 24Vdc, max 30mA short-circuit protection
Type of relay contact NO (NC), 5A, 250V cosϕ=1Logic output for static relays 24Vdc, 30mA, Rout = 100Ω
Cycle time 0...200 secMain output type relay, logic, continuous (0....10V / 4...20mA)
Control outputs on / off, continuousMaximum power limit heat / cool 0,0...100,0 %
°C / °F selection configurabile da tastieraconfigurable from faceplateLinear scale ranges -1999 to 9999 with configurable decimal point positionControls PID, Self-tuning, on-offpb - dt - it 0,0...999,9 % - 0,00...99,99 min - 0,00...99,99 minAction Heat / Cool
Softstart 0,0...500,0 min
Configurable alarmsUp to 3 alarm functions assignable to an output,configurable as: maximum, minimum, symmetrical,absolute/deviation, LBA, HB
Fault power setting -100,0...100,0 %
Automatic blanking Displays PV value, optional exclusion
Alarm masking- exclusion during warm up- latching reset from faceplate or external contact
Optional ammeter input T.A. 50mAac, 50/60Hz, Ri = 10Ω
Faceplate protection IP65Working / Storage temperature range 0...50°C / -20...70°CRelative humidity 20 ... 85% non-condensingInstallation Panel, plug-in from frontWeight 160g for the complete version
Power supply (switching type)(std) 100 ... 240Vac/dc ±10%(opt.) 20...27Vac/dc ±10%; 50/60Hz, 6W max
Safetydetection of short-circuit or opening of probes, LBAalarm, HB alarm
RTD type (scale configurable within indicatedrange, with or without decimal point) (ITS90)
Max line resistance for RTD
DIN 43760 (Pt100), JPT100
20Ω
Cold junction error 0,1° / °C
PTC type / NTC Type 990Ω, 25°C / 1KΩ, 25°C
600CONTROLLER
SOFTWARE VERSION 1.0xcode 80336 / Edition 0.1 - 11/01
USER’S MANUAL
For correct and safeinstallation, follow theinstructions andobserve the warningscontained in thismanual.
Type TC Thermocouples(ITS90)
Display 2 x 4 digits, green, height 10 and 7mmKeys 4 mechanical keys (Man/Aut, INC, DEC, F)Accuracy 0.2% full scale ± 1 digit at 25°C room temperature
Main input (settable digital filter)TC, RTD, PTC, NTC60mV,1V Ri≥1KΩ; 5V,10V Ri≥10KΩ; 20mA Ri=50ΩSampling time 120 msec.
1 • INSTALLATION
• Dimensions and cut-out; panel mounting
Panel mounting:To fix the unit, insert the brackets provided into the seats on either side of thecase. To mount two or more units side by side, respect the cut-out dimensionsshown in the drawing.
CE MARKING: EMC conformity (electromagnetic compatibility) with EEC Directive89/336/CEE with reference to the generic Standard EN50082-2 (immunity in industrialenvironments) and EN50081-1 (emission in residential environments). BT (low voltage)conformity respecting the Directive 73/23/CEE modified by the Directive 93/68.MAINTENANCE: Repairs must be done only by trained and specialized personnel. Cutpower to the device before accessing internal parts.Do not clean the case with hydrocarbon-based solvents (Petrol, Trichlorethylene, etc.).Use of these solvents can reduce the mechanical reliability of the device. Use a clothdampened in ethyl alcohol or water to clean the external plastic case.SERVICE: GEFRAN has a service department. The warranty excludes defects causedby any use not conforming to these instructions.
2 • TECHNICAL SPECIFICATIONS
!
18
GEFRAN spa via Sebina, 7425050 Provaglio d'Iseo (BS) ITALIATel. 0309888.1 - Fax 0309839063
Internet: http://www.gefran.com
99
10
45
45
48
70
70
63
48
FUNCTION CABLE TYPE LENGTHPower supply cable 1 mm2 1 mRelay output cable 1 mm2 3,5 mDigital communication wire 0,35 mm2 3,5 mC.T. connection cable 1,5 mm2 3,5 mTC input 0,8 mm2 compensated 5 mPt100 input 1 mm2 3 m
EMC conformity has been tested with the following connections
J, K, R, S, T, B, E, N (IEC 584-1, CEI EN 60584-1,60584-2) L GOST, U, G, D, Ccustom linearization is available
Triac output24...240Vac ±10%, 1A maxSnubberless, inductive and resistive load I2t = 128A2s
Baud rate 1200, 2400, 4800, 9600, 19200

Cencal Out 4Modbus
-5A/250Vac relay
Standard:100...240Vac/Vdc ± 10%
Optional:20...27Vac/Vdc ± 10%
Max. power 6W; 50/60 Hz
4 • CONNECTIONS• Ammeter outputs/input
- 5A/250Vac relay- 11Vdc logic,- triac 20...240Vac, 1A ±10%
- 5A/250Vac relay only
- 5A/250Vac relay- 10V/30mA logic- continuous 0…10V, 0/4…20mAanalog 0…10V, 0/4…20mA fortransmission, resolution 12 bit- input from current transformer50mAac, 2 Ω 50/60 Hz
- logic input 24V, 4mA fromno-voltage contac
6
5
4
3
2
1
7
8
9
10
11
12
18
17
16
15
14
13
19
20
21
22
23
24
-
+Out2
Out1
• Power Supply
23
24
~
~
TOP
-
+
Out3 (Al2)Ing. T.A.
!
PWR
19
“Inc” and “Dec” keyPress to increment (decrement) any numerical parameter •• Increment (decrement) speed is proportional to time key stays pressed ••The operation is not cyclic: once the maximum (minimum) value of a field is reached, the value will not change even if the key remainspressed.
3 • DESCRIPTION OF FACEPLATE
Automatic/Manual adjustment selectionActive only when PV display visualises the process
variable
PV Display: Indication of process variable
Function keyGives access to the various configuration phases ••Confirms change of set parameters and browsesnext or previous parameter (if Auto/Man key ispressed)
Function indicatorsIndicates modes of operation
MAN/AUTO = OFF (automatic control)ON (manual control)
SETPONT1/2 = OFF (IN1 = OFF - local Setpoint 1)ON (IN1 = ON – local Setpoint 2)
SELFTUNING = OFF (enabled Self)ON (disabled Self)
L1
SV display: Indication of setpoint
Indication of output statesOUT 1 (AL 1); OUT 2 (Main); OUT 3 (HB); OUT 4
• Serial line / output 4
Standardconfiguration
4...20mA
Connect at 20mA input
Use wires ofadequate diameter
(min. 1mm2)PT100, JPT100,
PTC, NTC
• Pt100 / PTC / NTC
• Device structure • Identification of boards
3
1
2
Pt100 3 wiresPTC / NTC /Pt100 2 wires
Available thermocouples:J, K, R, S, T, B, E, N,
L, U, G, D, C
- Observe polarities- For extensions, use thecorrect compensating cablefor the type of TC used
+
-
• TC Input
2
1
4
2
3
1
+ 24V o 15VVT
-
+
+
S
-Ri =
50Ω
4
2
3
1
+ 24V o 15VVT
-
+
+
-Ri =
50Ω
TT
• Linear input with 3-wire transmitter
• Inputs
• Input 1 linear with transmitter 2 wires
L2
L3
9
10
11
+
-
TXB
A
RX
-
+
12
9
10
11
12
DISPLAY
POWER
SERIAL INTERFACE/OUT4
Power board
Selecttransmittervoltage
Select signal atcontact 3
CPU board
CPU
24V
15V
10V
5V 1,23
V
PT
100
+V
5Linearinput in
dccurrent
20mA,Ri = 50Ω
Linear input indc voltage60mV, 1VRi > 1MΩ5V, 10V
Ri > 10KΩ
2
1 +
-
• Linear input (I)
4
1
2
-
+
• Linear input (V)
RS485 isolated serial line
See serial card data sheet for Cencal configuration
19
21
20
22
6
5
User configurable generic output

20
5 • “EASY” PROGRAMMING and CONFIGURATION
al.1
P.V. / S.V.P.V. / S.V.
Process variable (PV display)Work Setpoint (SV display) or controloutput value with controller in manual
InP
Out
PAS = 99
Pro
Input settings
Output settings
swconf=ON
PAS
Custom menu
Password
Protection code
Alarm point 1 (scale points)
CFG
LEVEL 1 MENU
• CFG
• InP
h.pb
h.it
h.dt
h.p.x
Xy.i
Proportional bandfor heating
Integral timefor heating
Derivative timefor heating
Maximum power limitfor heating
0 ... 999.9%full scale
0.00 ... 99.99 min
0.00 ... 99.99 min
0.0 ... 100.0%
Alarm 1 hysteresis0...999 sec.If +32 in A1.t0...999 min.If +64 in A1.t
±999 scale points
typ. Probe type, signal, enable custom linearization, and main inputscale (See type table, page 6)
dp.s
lo.s
xi.s
Decimal point position formain input scale
Minimum limit of maininput scale
Maximum limit of maininput scale
dP_S Format0 xxxx1 xxx.x2 xx.xx3 x.xxx
min...max input rangeselected in tyP
min...max input rangeselected in tyP
• Out • Prot
xi.l
lo.lLower limit for local
setpoint and absolutealarms
Lo.S ... Hi.S
Upper limit for localsetpoint and absolute
alarmsLo.S ... Hi.S
Alarmtype 1
AL.x.t Direct (high limit) Absolute NormalInverse (low limit) or relative Symmetrical
to active setpoint (window)0 direct absolute normal1 inverse absolute normal2 direct relative normal3 inverse relative normal4 direct absolute symmetrical5 inverse absolute symmetrical6 direct relative symmetrical7 inverse relative symmetrical
AL.1.t, AL.2.t, AL.3.t
a1.t
(t.2Cycle time for
Out2(Heat or Cool)
1...200 sec.
Pro Protection code
Prot Display Modification0 SP, alarms SP, alarms1 SP, alarms SP2 SP
+ 4 to disable InP, Out+ 8 to disable CFG+128 enables full configuration
THE EASY CONFIGURATION IS SUITABLE FOR VERSIONS WITHTWO OUTPUTS (OUT1, OUT2). TO ACCESS THE OTHER
PARAMETERS, ADD 128 TO THE Pro VALUE.
+ 8 to disable at power-on until first alarm + 16 to enable alarm memory + 32 Hys becomes delay time when alarm trips (0...999 sec.)
(excluding symmetrical absolute)+ 64 Hys becomes delay time when alarm trips (0...999 min.)
(excluding symmetrical absolute)

(*) The automatic return PV/SV display is disabled for these displays
21
6 • PROGRAMMING and CONFIGURATION
al.1
al.2
a.xb
0V.P
sp
SP.1
SP.2
in.2
If Inc, Dec, F keys are not pressed within 15 sec, display returnsautomatically to P.V. value.
INF
P.V. / S.V.P.V. / S.V.
Process variable (PV display)Work Setpoint (SV display) or controloutput value with controller in manual
Alarm point 2 (scale points)
Alarm point 3 (scale points)
Heater break alarm point scale points of ammeter input)
Control output value(+Heat / -Cool)
Serial communicationsSEr
InP
Out
PAS = 99
Pro
Lin
Input settings
Output settings
Hardware configuration
Input linearization
NO
Keep the F keypressed to scroll
the menus
Release the F keyto select the
displayed menu
Press the F key toaccess theparameters
Keep the F keypressed to exit any
menu
Keep F + Auto/Mankeys pressed for 2sec. on any menuto go immediatelyto level 1 display
swconf=ON
Local Setpoint
LEVEL 1 MENU
PAS
NO
Hrd
U.CA
Custom menu
Password
User calibration
Protection code
Information display
Setpoint 1
Setpoint 2
Ammeter input value(with CT input present)
Alarm point 1 (scale points)
N.B.: Once a particular configuration is entered, all unnecessary parameters are no longer displayed
-
al.3
upd
(od
(.xd
err
• InFo Display
INF
Softwareversion
Instrumentcode
Self diagnosticerror code
Configurationhrd
+8 error OUT2 card recognition+16 error OUT3 card recognition
Informationdisplay
CFG
(*)
(*)
0 No Error1 Lo2 Hi3 ERR4 SBR
OUTPUT 20 = None1 = Relay2 = Logic3 = Triac
INPUT /OUTPUT 30 = None1 = Relay2 = Logic3 = Continuous4 = Analog5 = In TA6 = In digital
SERIAL COMMUNICATION / OUT40 = None1 = RS 4852 = Relay
Example: 1 1 1 = R + R + RS 485

• CFG
• Ser
parSER.P Serial protocol0 CENCAL GEFRAN1 MODBUS RTU
22
S.tv
h.pb
h.it
h.dt
h.p.x
h.p.l
c.sp
c.pb
c.it
c.dt
c.p.x
c.p.l
rst
P.rs
A.rs
ffd
sof
Xy.i
Xy.2
Xy.3
xb.t
lb.t
lb.p
fa.p
g.sp
Enabling self-tuning,
autotuning,softstart
CFG Control parameters
Proportional band forheating
Integral time for heating
Derivative time forheating
Maximum power limit forheating
Setpoint for coolingrelative to heating
setpoint
Proportional band forcooling
Integral time for cooling
Derivative time forcooling
Maximum power limit forcooling
Manual reset
Alarm 2 hysteresis
Alarm 3 hysteresis
Waiting time for HB alarmintervention
Waiting time for LBA alarm intervention(Set to “0” to disable LBA alarm)
Power limit for LBAalarm condition
Power output in fault condition(when probe is faulty)
S.tun Continuous Sel-ftuning Softstartautotuning
0 NO NO NO1 YES NO NO2 NO YES NO3 YES YES NO4 NO NO YES5 YES NO YES
0.00 ... 99.99 min
0.00 ... 99.99 min
0.0 ... 100.0%
-999 ... 999scale points
0 ... 999.9%full scale
0.00 ... 99.99 min
0.00 ... 99.99 min
0.0 ... 100.0%
Minimum power limitfor heating
(not available for doubleheat/cool action)
0.0 ... 100.0%
± 25.0%full scale
0 ... 999.9% f.s.
0…999 secIf +32 in A1.t0…999 minIf +64 in A1.t
0…999 secIf +32 in A1.t0…999 minIf +64 in A1.t
0 ... 999secondos
0.0 ... 500.0 min
-100.0 ... 100.0%
-100.0 ... 100.0%ON / OFF
Set gradient (see applicable note)
0.0...999.9 digit/min.(digit / sec see SP.r)
Antireset
Feedforward
0 ... 9999scale points
-100.0 ... 100.0%
Reset power -100.0 ... 100.0%
Alarm 1 hysteresis0…999 sec
If +32 in A1.t0…999 minIf +64 in A1.t
Softstart time 0.0 ... 500.0 min
(Value has to be higher than cycle time value ofoutput to which HB alarm is assigned)
Cooling medium 0 ... 2
C.MEd Relative gain (Rg)(see applicable note)
0 Air 11 Oil 0,82 Water 0,4
Minimum power limit forcooling (not available forheating/cooling double
action)
0.0 ... 100.0%
(.ME-
(od
sr.p
Ser
Unit identification code
Serial setting
Serial interfaceprotocol
0 ... 9999
bav SelectBaudrate
Parity selection_PAr Parity
0 No parity1 Odd2 Even
(*)
(*)
(*) LBA alarm may be reset by simultaneously pressing ∆ + ∇ keys when OutP is displayed or by
switching to Manual.
Nota:C_Pb, c_it, c_dt parameters are “read only” if the option “relative gain heat/cool control” (Ctrl = 14) hasbeen selected.
bAud Baudrate0 12001 24002 48003 96004 19200
±999 scale points
±999 scale points
±999 scale points

Type Probe type without decimal point with decimal pointSensore: TC
0 TC J °C 0/1000 0.0/999.91 TC J °F 32/1832 32.0/999.92 TC K °C 0/1300 0.0/999.93 TC K °F 32/2372 32.0/999.94 TC R °C 0/1750 0.0/999.95 TC R °F 32/3182 32.0/999.96 TC S °C 0/1750 0.0/999.97 TC S ° F 32/3182 32.0/999.98 TC T °C -200/400 -199.9/400.09 TC T °F -328/752 -199.9/752.010 TC B °C 44/1800 44.0/999.911 TC B °F 111/3272 111.0/999.912 TC E °C -100/750 -100.0/750.013 TC E °F -148/1382 -148.0/999.914 TC N °C 0/1300 0.0/999.915 TC N °F 32/2372 32.0/999.916 L-GOST °C 0/600 0.0/600.017 L-GOST °F 32/1112 32.0/999.918 TC U °C -200/400 -199.9/400.019 TC U °F -328/752 -199.9/752.020 TC G °C 0/2300 0.0/999.921 TC G °F 32/4172 32.0/999.922 TC D °C 0/2300 0.0/999.923 TC D °F 32/4172 32.0/999.924 TC C °C 0/2300 0.0/999.925 TC C °F 32/4172 32.0/999.926 Ni-Ni18Mo °C 0/1100 0.0/999.927 Ni-Ni18Mo °F 32/2012 32.0/999.928 TC CUSTOM CUSTOM29 TC CUSTOM CUSTOM30 PT100 °C -200/850 -199.9/850.031 PT100 °F -328/156 2 -199.9/999.932 JPT100 °C -200/600 -199.9/600.033 JPT100 °F -328/1112 -199.9/999.934 PTC °C -55/120 -55.0/120.035 PTC °F -67/248 -67.0/248.036 NTC °C -10/70 -10.0/70.037 NTC °F 14/158 14.0/158.038 0...60 mV -1999/9999 -199.9/999.939 0...60 mV Custom scale Custom scale40 12...60 mV -1999/9999 -199.9/999.941 12...60 mV Custom scale Custom scale42 0...20 mA -1999/9999 -199.9/999.943 0...20 mA Custom scale Custom scale44 4...20 mA -1999/9999 -199.9/999.945 4...20 mA Custom scale Custom scale46 0...10 V -1999/9999 -199.9/999.947 0...10 V Custom scale Custom scale48 2...10 V -1999/9999 -199.9/999.949 2...10 V Custom scale Custom scale50 0...5 V -1999/9999 -199.9/999.951 0...5 V Custom scale Custom scale52 1...5 V -1999/9999 -199.9/999.953 1...5 V Custom scale Custom scale54 0...1 V -1999/9999 -199.9/999.955 0...1 V Custom scale Custom scale56 200mv..1V -1999/9999 -199.9/999.957 200mv..1V Custom scale Custom scale58 Cust10 V-20mA -1999/9999 -199.9/999.959 Cust10 V-20mA Custom scale Custom scale60 Cust 60mV -1999/9999 -199.9/999.961 Cust 60mV Custom scale Custom scale62 PT100-JPT CUSTOM CUSTOM63 PTC CUSTOM CUSTOM64 NTC CUSTOM CUSTOM
• InP
23
typ. Probe type, signal, enable custom linearization,and main input scale
InP Input settings
s.in Virtual instrumentinputs
0 ... 31
Inputs IN PV AL3 AL2 AL1Bit 4 3 2 1 0
Ex: 1 1 0 0 0Set code 24 in S.in. to manage serial line AN andIN
s.0v Virtual instrumentoutputs
0 ... 31
Outputs OUTW OUT4 OUT3 OUT2 OUT1Bit 4 3 2 1 0
Ex: 1 0 0 1 1set code 19 in S.Ou. to manage serial line OUT1, OUT2and OUTW.
s.U.i Virtual instrument userinterface
0 ... 63
Interf. LED KEYB DISL DISH LED LED LED LED1/2/3 OUT4 OUT3 OUT2 OUT1
Bit 7 6 5 4 3 2 1 0
Ex: 1 0 1 0 0 0If you want to manage KEYB and DISH from serial line, set code 80 inS.U.I.
+2 set gradient in digit / sec
flt
fld
dp.s
lo.s
xi.s
ofs.
ft.2
Digital filter on input (if = 0 excludes averaging filter on
sample value)
(*) not available for TC, RTD,PTC and NTC scales
Digital filter on inputdisplay
Decimal point position forinput scale
Minimum limit of maininput scale
Maximum limit of maininput scale
Offset correctionof main input
Digital filter aux. input
0.0 ... 20.0 sec
0 ... 9.9scale points
dP_S Format0 xxxx1 xxx.x2 xx.xx (*)3 x.xxx (*)
min...max input rangeselected in tyP
min...max input rangeselected in tyP
-999 ... 999scale points
0.0 ... 20.0 sec
sp.r Def. remote setpointVal. Type of remote setpoint Absolute Relative0 Digital Absolute
(from serial line)1 Digital Reletive to
(from serial line) local setpoint
For custom linearization:- LO signal is generated with variable below Lo.S or at minimum calibrationvalue- HI signal is generated with variable above Lo.S or at maximum calibrationvalue
Max. non-linearity error forthermocouples (TC),resistors (PT100) andthermistors (PTC, NTC).
The error is calculated asdeviation from theoretical valueand is expressed aspercentage of full scale (in °C).
S, R range 0...1750°C; error < 0.2% f.s. (t > 300°C) / for otherrange; error < 0.5% f.s.
T error < 0.2% f.s. (t > -150°C)B range 44...1800°C; error < 0.5% f.s. (t > 300°C) / range
44,0...999,9; error < 1% f.s. (t > 300°C)U range -99,9...99,9 and -99...99°C; error < 0.5% f.s. / for
other range; error < 0.2% f.s. (t > -150°C)G error < 0.2% f.s. (t > 300°C)D error < 0.2% f.s. (t > 200°C)C range 0...2300; error < 0.2% f.s. / for other range;
error < 0.5% f.s.
NTC error < 0.5% f.s.
Tc: J, K, E, N, L error < 0,2% f.s.PT100, JPT100 and PTC error < 0,2% f.s.
24
xi.l
lo.l
of.2
xs.2
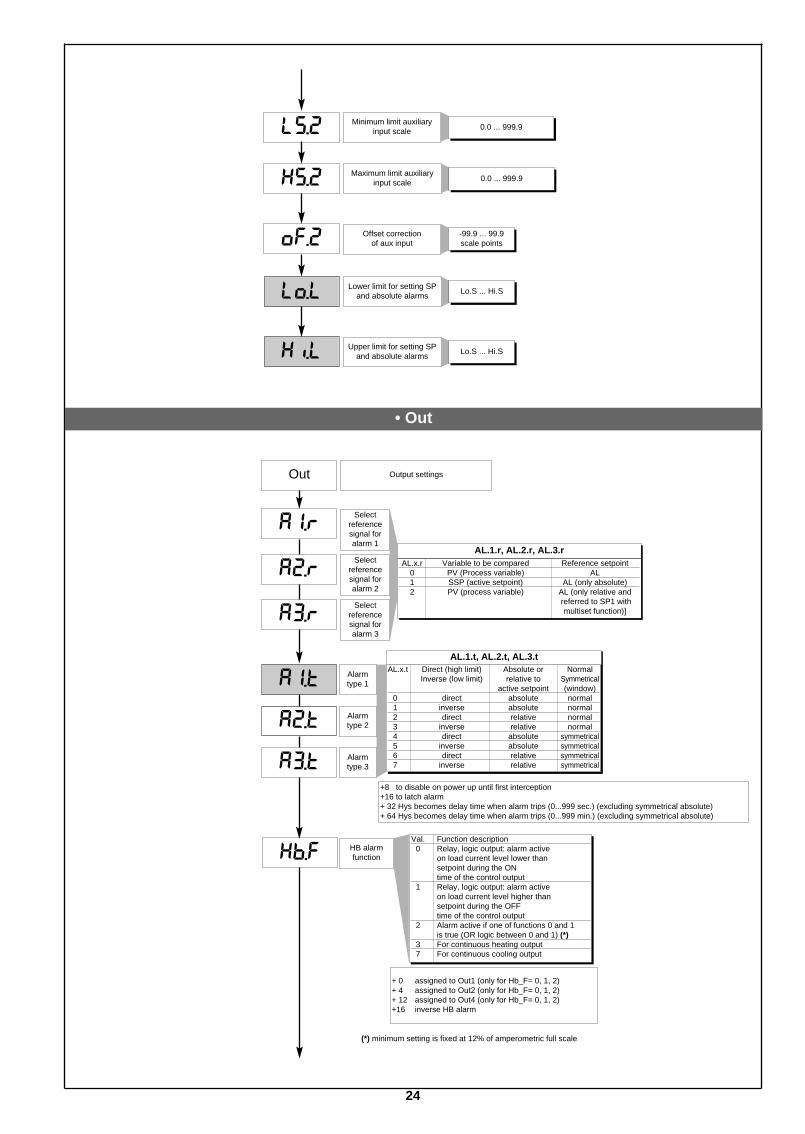
l5.2 Minimum limit auxiliaryinput scale
Offset correctionof aux input
0.0 ... 999.9
Maximum limit auxiliaryinput scale 0.0 ... 999.9
-99.9 ... 99.9scale points
Lower limit for setting SPand absolute alarms
Lo.S ... Hi.S
Upper limit for setting SPand absolute alarms
Lo.S ... Hi.S
• Out
Out Output settings
Selectreferencesignal foralarm 1
AL.1.r, AL.2.r, AL.3.rSelect
referencesignal foralarm 2
Selectreferencesignal foralarm 3
AL.x.r Variable to be compared Reference setpoint0 PV (Process variable) AL1 SSP (active setpoint) AL (only absolute)2 PV (process variable) AL (only relative and
referred to SP1 withmultiset function)]
Alarmtype 1
Alarmtype 2
Alarmtype 3
+8 to disable on power up until first interception+16 to latch alarm+ 32 Hys becomes delay time when alarm trips (0...999 sec.) (excluding symmetrical absolute)+ 64 Hys becomes delay time when alarm trips (0...999 min.) (excluding symmetrical absolute)
AL.x.t Direct (high limit) Absolute or NormalInverse (low limit) relative to Symmetrical
active setpoint (window)0 direct absolute normal1 inverse absolute normal2 direct relative normal3 inverse relative normal4 direct absolute symmetrical5 inverse absolute symmetrical6 direct relative symmetrical7 inverse relative symmetrical
AL.1.t, AL.2.t, AL.3.t
HB alarmfunction
Val. Function description0 Relay, logic output: alarm active
on load current level lower than setpoint during the ON time of the control output
1 Relay, logic output: alarm activeon load current level higher thansetpoint during the OFFtime of the control output
2 Alarm active if one of functions 0 and 1is true (OR logic between 0 and 1) (*)
3 For continuous heating output7 For continuous cooling output
+ 0 assigned to Out1 (only for Hb_F= 0, 1, 2)+ 4 assigned to Out2 (only for Hb_F= 0, 1, 2)+ 12 assigned to Out4 (only for Hb_F= 0, 1, 2)+16 inverse HB alarm
(*) minimum setting is fixed at 12% of amperometric full scale
a1.r
a2.r
a3.r
a1.t
xb.f
a2.t
a3.t

25
an.o
rl.1
rl.2
rl.3
rl.4
(t.1
rel
(t.2
(t.3
x.an
l.an
Fault action (sets state incase of probe fault)
Err, Sbr
Minimum limit ofanalogue repetition
signal output 0
Maximum limit ofanalogue repetition
signal output
Val Reference value0 PV - process variable1 SSP - active setpoint2 SP - local setpoint3 -4 Deviation (SSP-PV)5 HEAT (*)6 COOL (*)7 AL1 (alarm point)8 AL2 (alarm point)9 AL3 (alarm point)10 -11 Value acquired from serial line (*)
Out WAssignment of signal or reference value
Out 1Allocation of
reference signa
_rEL. Alarm Alarm Alarm1 2 3
0 OFF OFF OFF1 ON OFF OFF2 OFF ON OFF3 ON ON OFF4 OFF OFF ON5 ON OFF ON6 OFF ON ON7 ON ON ON
-1999 ... 9999
16 for code 0 if input is in error status Err – Sbr output assumesminimum trimming value.
(*) - Fixed scale limits- Retransmission output not available with ON/OFF control action
Cycle time forOUT1
(Heat or Cool)
Cycle time forOUT2
(Heat or Cool)
Cycle time forOUT3
(Heat or Cool)
1...200 sec.
1...200 sec.
1...200 sec.(0.1 sec. fixed with continuous out,
Ct. 3 does not appear in configuration)
Out 2Allocation of
reference signal
Out 3Allocation of
reference signal
Out 4Allocation of
reference signal
-1999 ... 9999
rL.o.1, rL.o.2, rL.o.3, rL.o.4
+ 32 for inverse logic signal output
Val Function of main output relay/logic (OUT1)0 HEAT (control output for heating)1 COOL (control output for cooling)2 AL1 - alarm 13 AL2 - alarm 24 AL3 - alarm 35 AL.HB - alarm HB6 LBA - alarm LBA7 IN1 - repetition of logic input8 Repeat but key (if but = 8)9 AL1 or AL210 AL1 or AL2 or AL311 AL1 and AL212 AL1 and AL2 and AL313 AL1 or ALHB14 AL1 or AL2 or ALHB15 AL1 and ALHB16 AL1 and AL2 and ALHB
(t.4Cycle time for
OUT4(Heat or Cool)
1...200 sec.
64 HEAT continuous out 2-10V (*)65 COOL continuous out 2-10V (*)
(*) only for rL.3

26
(tr
hd.1
• Hrd
Hrd Hardware configuration
Enable multisetinstrument control
by serial
Val Multiset Reversed Instrument(2 SP) LED control by
state serial01 x2 x3 x x4 x5 x x6 x x7 x x x
Control typeVal Control type
0 P heat1 P cool2 P heat / cool3 PI heat4 PI cool5 PI heat / cool6 PID heat7 PID cool8 PID heat / cool9 ON-OFF heat10 ON-OFF cool11 ON-OFF heat / cool12 PID heat + ON-OFF cool13 ON-OFF heat + PID cool14 PID heat + cool with relative gain
(see C.MEd parameter)
Selection of derivative action sampling time:+ 0 sample 1 sec.+ 16 sample 4 sec.+ 32 sample 8 sec.+ 64 sample 240 msec.
Note: LbA alarm is not enabled withON/OFF type control
• Prot
Pro Protection code
Prot Display Modification0 SP, In2, alarms, OuP, INF SP, alarms1 SP, In2, alarms, OuP, INF SP2 SP, In2, OuP, INF
+ 4 to disable InP, Out + 8 to disable CFG, Ser, + 16 to disable SW “power-up - power down”+ 32 disable manual power latching+ 64 to disable manual power modification+128 enables full configuration

dig.
al.n
bvt.
+ 8 to enable HB alarm+ 16 to enable LBA alarm
dig.
Functionof digital input
+ 16 for input in denied logic (NPN)+ 32 to force logic state 0 (OFF)+ 48 to force logic state 1 (ON)
AL.nr Alarm 1 Alarm 2 Alarm 30 disabled disabled disabled1 enabled disabled disabled2 disabled enabled disabled3 enabled enabled disabled4 disabled disabled enabled5 enabled disabled enabled6 disabled enabled enabled7 enabled enabled enabled
0 No function (key disenabled)1 MAN / AUTO controller2 LOC / REM3 HOLD4 Alarms memory reset5 SP1/SP2 Selection6 Software on/off
Select number ofenabled alarms
0 No function (key disenabled)1 MAN / AUTO controller2 LOC / REM3 HOLD4 Alarms memory reset5 SP1 / SP2 Selection6 Start / Stop selftuning7 Start / Stop autotuning8 Set / Reset outputs Out 1... Out 4
+ 16 disable function in configuration menu
b u t t
Function of M/Akeys
ld.1
ld.2
ld.3
27
Val. Function0 none1 MAN/AUTO controller2 LOC / REM3 HOLD4 self-tuning enabled5 autotuning enabled6 IN1 repetition7 enable serial dialogue8 Error present9 Softstart running10 SP1...SP2 Indication
Function of LEDs
+ 16 LED flashes if active
dsp Defining SVdisplay function
diSP Lower display (SV) function0 SSP - setpoint enabled1 InP.2 - aux input2 Control output value3 Deviation (SSP - PV)

Step 34 mV full scales.34
Step 33 mV beginning scales.33
......
s.00
28
• Lin
Lin Custom linearization for main input
the n step value corresponds to input:mV beginning scale + n*∆mV
∆mV = (mV full scale - mV beginning scale) / 32
Step 0 beginningof scale value
Step 32beginning of scale
value
Display limits(-1999…9999)
Display limits(-1999…9999)
• U.CAL
U.CA Usercalibration
s.32
Step 35 mV at 50°Cs.35
Val Function1 Analogue output (1)2 Input 1 – custom 10V / 20mA3 Input 1 - custom 60mV4 Custom PT100 / J PT1005 Custom PTC6 Custom NTC7 Input 2 - custom TA (2)
Only for TYP = Tc custom
(1) The analog output in 20mA is calibrated with accuracy higher than 0.2 % f.s.; calibrate whenconverting to 10V output.
(2) In the absence of calibration, accuracy is higher than 1% f.s.; calibrate only if higheraccuracy is required.

This type of alarm depends on use of the current transformer (C.T.) input.It can signal variations in load input by identifying the current value in ammeter input in the range (0 ... HS.2). It is enabled bymeans of configuration code (AL.n); in this case, the alarm trip value is expressed in HB scale points.By means of code Hb.F (“Out” phase), select the type of functioning and the assigned control output.The alarm limit setting is A.Hb.The direct HB alarm trips when the ammeter input value is below the limit set for Hb.t seconds of the "ON" time for the selectedoutput.The HB alarm can be activated only with ON times greater than 0.4 seconds (excludes continuous output).The HB alarm also checks load current during the OFF interval of the cycle time for the selected output. The HB alarm trips ifthe measured current exceeds approximately 12.5% of the full scale set for HB.t seconds of OFF status of the output(parameter HS.2 in InP).The alarm is reset automatically if its cause is eliminated.Setting limit A.Hb = 0 disables both types of HB alarms, with de-energizing of the assigned relay.You can display the load current by selecting the item In.2. (level 1).NOTE: ON/OFF times refer to the cycle time set for the selected output.Continuous alarm Hb_F = 3 (7) is active for a load current value below the set limit. It is disabled if the heating (cooling) outputvalue is below 3%.
The input value and alarms are frozen while the logic input is closed.With logic input closed, a reset turns OFF both the relay outputs and the alarms latch.
HB ALARM FUNCTION
• HOLD function
29
7 • ALARMS
time
AL1 + Hyst1
AL2 + Hyst2AL2
AL1
alarm 1
alarm 2
(*)
For AL1 = reverse absolute alarm (low) with positive Hyst1, AL1 t = 1(*) = OFF if disabled on power-upFor AL2 = direct absolute alarm (high) with negative Hyst2, AL2 t = 0
For AL1 = symmetrical Lo absolute alarm with Hyst1, AL1 t = 5For AL1 = symmetrical Hi absolute alarm with Hyst1, AL1 t = 4
Normal absolute alarm Symmetrical absolute alarm
reverse alarm
direct alarm
AL1
AL1 + [ Hyst1 ]
AL1 - [ Hyst1 ]
time
For AL1 = Lo deviation alarm with negative Hyst 1, AL1 t = 3For AL1 = Hi deviation alarm with negative Hyst 1, AL1 t = 2
For AL1 = Symmetrical Lo deviation alarm with Hyst 1, AL1 t = 7For AL1 = Symmetrical Hi deviation alarm with Hyst 1, AL1 t = 6
time
SP+AL1SP
reverse alarm
direct alarm
SP+AL1
SP
reversealarm
directalarm
time
Hyst1
Deviation alarm Symmetrical deviation Alarm
SP-AL1

30
Proportional Action:action in which contribution to output is proportional to deviation at input (deviation = difference between controlled variable and setpoint).Derivative Action:action in which contribution to output is proportional to rate of variation input deviation.Integral Action:action in which contribution to output is proportional to integral of time of input deviation.
Influence of Proportional, Derivative and Integral actions on response of process under control* An increase in P.B. reduces oscillations but increases deviation.* A reduction in P.B. reduces the deviation but provokes oscillations of the controlled variable (the system tends to be unstable if P.B. value istoo low).* An increase in Derivative Action corresponds to an increase in Derivative Time, reduces deviation and prevents oscillation up to a criticalvalue of Derivative Time, beyond which deviation increases and prolonged oscillations occur.* An increase in Integral Action corresponds to a reduction in Integral Time, and tends to eliminate deviation between the controlled variableand the setpoint when the system is running at rated speed.If the Integral Time value is too long (Weak integral action), deviation between the controlled variable and the setpoint may persist.Contact GEFRAN for more information on control actions.
8 • CONTROL ACTIONS
9 • MANUAL TUNINGA) Enter the setpoint at its working value.B) Set the proportional band at 0.1% (with on-off type setting).C) Switch to automatic and observe the behavior of the variable. It will be similar to that in the figure:
D) The PID parameters are calculated s follows: Proportional band
PeakP.B.= ---------------------------------------- x 100
(V max - V min)
(V max - V min) is the scale range.Integral time: It = 1.5 x TDerivative time: dt = It/4E) Switch the unit to manual, set the calculated parameters. Return to PID action by settingthe appropriate relay output cycle time, and switch back to Automatic.F) If possible, to optimize parameters, change the setpoint and check temporary response.If an oscillation persists, increase the proportional band. If the response is too slow, reduceit.
ProcessVariable
Time
T
Peak
11 • SOFTWARE ON / OFF SWITCHING FUNCTIONHow to switch the unit OFF: hold down the “F” and “Raise” keys simultaneously for 5 seconds to deactivate the unit, which will go to the OFFstate while keeping the line supply connected and keeping the process value displayed. The SV display is OFF.All outputs (alarms and controls) are OFF (logic level 0, relays de-energized) and all unit functions are disabled except the switch-on functionand digital communication.How to switch the unit ON: hold down the “F” key for 5 seconds and the unit will switch OFF to ON. If there is a power failure during the OFFstate, the unit will remain in OFF state at the next power-up (ON/OFF state is memorized).The function is normally enabled, but can be disabled by setting the parameter Prot = Prot +16. This function can be assigned to a digital input(d.i.G) and excludes deactivation from the keyboard.
The multiset function is enabled in hd.1.The gradient function is always enabled.You can select between setpoint 1 and setpoint 2 with the faceplate key orwith digital input.You can display the setpoint 1-2 selection by means of LED.SET GRADIENT: if set to ≠0, the setpoint is assumed equal to PV at power-on and auto/man switchover. With gradient set, it reaches the local setpointor the one selected.Every variation in setpoint is subject to a gradient.The set gradient is inhibited at power-on when self-tuning is engaged.If the set gradient is set to ≠0, it is active even with variations of the localsetpoint, settable only on the relative SP menu.The control setpoint reaches the set value at the speed defined by thegradient.
10 • MULTISET FUNCTION, SET GRADIENT
SP1SP2
SPrem SP1(*)
ON
ON
SP
IN1
LOC/REM
t
t
t
(*) if the set gradient isset

31
The function works for single output systems (heating or cooling).The self-tuning action calculates optimum control parameter values during process startup.The variable (for example, temperature) must be that assumed at zero power (room temperature).The controller supplies maximum power until an intermediate value between starting value and setpoint is reached, after which it zeros power.PID parameters are calculated by measuring overshoot and the time needed to reach peak. When calculations are finished, the systemdisables automatically and the control proceeds until the setpoint is reached.
How to activate self-tuning:A. Activation at power-on1. Set the setpoint to the required value 2. Enable selftuning by setting the Stun parameter to 2 (CFG menu)3. Turn off the instrument4. Make sure the temperature is near room temperature5. Turn on the instrument again
B. Activation from keyboard1. Make sure that key M/A is enabled for Start/Stop selftuning
(code but = 6 Hrd menu)2. Bring the temperature near room temperature3. Set the setpoint to the required value4. Press key M/A to activate selftuning (Attention: selftuning interrupts if the key is pressed again)
The procedure runs automatically until finished, when the new PID parameters are stored: proportional band, integral and derivative timescalculated for the active action (heating or cooling). In case of double action (heating or cooling), parameters for the opposite action arecalculated by maintaining the initial ratio between parameters (ex.: CPb = HPb * K; where K = CPb / HPb when self-tuning starts). Whenfinished, the Stun code is automatically cancelled.
Notes:- The procedure interrupts when the setpoint value is exceeded. In this case, the Stun code is not cancelled.- _ It is advisable to enable one of the configurable LEDs to signal selftuning status. By setting one of parameters LED1, LED2, LED3 = 4 or 20on the HRd menu, the respective LED will be on or flashing when selftuning is active.
N.B.: Action not considered in ON/OFF control
12 • SELF-TUNING
Peak
T
S.P.
t.a.Time
ProcessVariable
S.P. - t.a.2
13 • AUTO-TUNINGPID parameters cannot be set if the self-tuning function is enabled.The function can be one of two types: permanent or one-shot.The first continuously measures system oscillations to find the optimum PID values to reduce such oscillations.It does not engage if the oscillations drop below 1.0% of the proportional band.It is interrupted if the setpoint is changed, and is automatically resumed when the setpoint stabilizes.The calculated parameters are not stored.If the unit is switched off, the controller reverts to the values set before self-tuning was enabled.One-shot self-tuning is useful for calculating values around a setpoint. It produces a variation of 10% of current power at the output andexamines the effect of the overshoot over time. These parameters are stored and replace those previously set. After this disturbance, thecontroller resumes control at the setpoint using the new parameters. The parameter activated in CFG is accepted only if the control power isbetween 20 and 80%.
time
PV
c_Pb
h_Pb
SP+cSP
SP
+100%Control output
0%
-100%
Control output with proportional action only if proportional heating bandoverlaps proportional cooling band.
Control output with proportional action only if proportional heating bandoverlaps proportional cooling band.
time
PV
c_Pb
h_PbSP+cSP
SP
+100%Control output
0%
-100%
PV = Process Value SP = Heating SetpointSP+cSP = cooling setpoint h_Pb = proportional heating bandc_Pb = Proportional cooling band
14 • CONTROLS
In this control mode (enabled with Ctr = 14 parameter) the type of cooling has to be specified.Cooling PID parameters are therefore calculated based on heating parameters according to the specified ratio.(for example: C.ME = 1 (oil), H_Pb = 10, H_dt = 1, H_It = 4 implies: C_Pb = 12,5, C_dt = 1, C_It = 4) We advise you to apply the following values when setting output cycle times:Air T Cool Cycle = 10 sec.Oil T Cool Cycle = 4 sec.Water T Cool Cycle = 2 sec.
NB.: Cooling parameters cannot be modified in this mode.
Heating/Cooling control with relative gain

25 ±1
Ø 7
±0,
5
5,50m
PTC 7 x 25 5m
• ORDER CODE
TECHNICAL DATA
Mod. probe: Ambient probeCap material: Plastic (Ø 7 x 25mm)Temperature range: -20...80°CPTC: R 25°C = 1KΩ ±1% (KTY 81-110)Response time: 20sec (in still air)Isolation: 100MΩ, 500Vd.c. between cap and terminalsWire material: Unipolar in PVC (12/0,18)Wire length: 5,50m
• RS232 / TTL interface for GEFRAN instrument configuration
COD. 1108200 Cable + Floppy
• ORDER CODE
• CURRENT TRANSFORMER15 • ACCESSORIES
• Twin setpoint application (ramp + hold + time expiration alarm)16 • APPLICATIONS
50 / 0.05 A
152050 9640
1 2
1 2
5,5 27 5,5
920
1948
8 838
1
13
20
2
In
44 30
1010
Hole for 2.9 x 9self-threading screws
These transformers are used to measure currents of 50 ÷ 60Hz from 25A to 600A(nominal primary current). The peculiar characteristic of these transformers is the highnumber of secondary turns. This provides a very low secondary current, suitable for anelectronic measurement circuit. The secondary current may be detected as voltage on aresistor.
CODE Ip / Is Ø Secondary n OUTPUTS Ru Vu ACCURACYWire
TA/152 025 25 / 0.05A 0.16 mm n1-2 = 500 1 - 2 40 Ω 2 Vac 2.0 %
TA/152 050 50 / 0.05A 0.18 mm n1-2 = 1000 1 - 2 80 Ω 4 Vac 1.0 %
IN = 25AacOUT = 50mAac
COD. 330200IN = 50AacOUT = 50mAac
COD. 330201
• ORDER CODE
N.B. RS232 interface for PC configuration is supplied withthe WINSTRUM programming software. Make connectionwith instrument powered but with inputs and outputsdisconnected.
32
• PTC
AL
Referred to currentsetpoint
Setpoint profile
Set
poin
t < A
L
Del
ay fo
rtr
ippi
ng (*)
Absolute alarm
Reverse alarm
(*) Time set inparameter Hy.n
Direct alarm
Time (min. or sec.)

ORDER CODE
• WARNINGS
Read the following warnings before installing, connecting or using the device:• follow instructions precisely when connecting the device.• always use cables that are suitable for the voltage and current levels indicated in the technical specifications.• the device has no ON/OFF switch: it switches on immediately when power is turned on. For safety reasons, devices permanently connected to the powersupply require a two-phase disconnecting switch with proper marking. Such switch must be located near the device and must be easily reachable by theuser. A single switch can control several units.• if the device is connected to electrically NON-ISOLATED equipment (e.g. thermocouples), a grounding wire must be applied to assure that thisconnection is not made directly through the machine structure.• if the device is used in applications where there is risk of injury to persons and/or damage to machines or materials, it MUST be used with auxiliary alarmunits. You should be able to check the correct operation of such units during normal operation of the device. • before using the device, the user must check that all device parameters are correctly set in order to avoid injury to persons and/or damage to property.• the device must NOT be used in inflammable or explosive environments. It may be connected to units operating in such environments only by means ofsuitable interfaces in conformity to local safety regulations.• the device contains components that are sensitive to static electrical discharges. Therefore, take appropriate precautions when handling electronic circuitboards in order to prevent permanent damage to these components.Installation: installation category II, pollution level 2, double isolation• power supply lines must be separated from device input and output lines; always check that the supply voltage matches the voltage indicated on thedevice label.• install the instrumentation separately from the relays and power switching devices• do not install high-power remote switches, contactors, relays, thyristor power units (particularly if “phase angle” type), motors, etc... in the same cabinet.• avoid dust, humidity, corrosive gases and heat sources.• do not close the ventilation holes; working temperature must be in the range of 0...50°C.If the device has faston terminals, they must be protected and isolated; if the device has screw terminals, wires should be attached at least in pairs.• Power: supplied from a disconnecting switch with fuse for the device section; path of wires from switch to devices should be as straight as possible; thesame supply should not be used to power relays, contactors, solenoid valves, etc.; if the voltage waveform is strongly distorted by thyristor switching unitsor by electric motors, it is recommended that an isolation transformer be used only for the devices, connecting the screen to ground; it is important for theelectrical system to have a good ground connection; voltage between neutral and ground must not exceed 1V and resistance must be less than 6Ohm; ifthe supply voltage is highly variable, use a voltage stabilizer for the device; use line filters in the vicinity of high frequency generators or arc welders;power supply lines must be separated from device input and output lines; always check that the supply voltage matches the voltage indicated on thedevice label.• Input and output connections: external connected circuits must have double insulation; to connect analog inputs (TC, RTD) you have to: physicallyseparate input wiring from power supply wiring, from output wiring, and from power connections; use twisted and screened cables, with screen connectedto ground at only one point; to connect adjustment and alarm outputs (contactors, solenoid valves, motors, fans, etc.), install RC groups (resistor andcapacitor in series) in parallel with inductive loads that work in AC (Note: all capacitors must conform to VDE standards (class x2) and support at least 220VAC. Resistors must be at least 2W); fit a 1N4007 diode in parallel with the coil of inductive loads that operate in DC.GEFRAN spa will not be held liable for any injury to persons and/or damage to property deriving from tampering, from any incorrect orerroneous use, or from any use not conforming to the device specifications.
! WARNING: this symbol indicates danger.It is placed near the power supply circuit and near high-voltage relay contacts.
33
Relay R
600
OUTPUT 1 (AL)
R
100...240V
20...27V
1
0
2
0 None
RS485
R Relay output
POWER SUPPLY
DIGITAL COMMUNICATION / OUTPUT 4
OUTPUT 2 (MAIN)
Relay R
Logic D
Triac (1A) T
INPUT/OUTPUT 3
None 0
Relay R
Logic D
10V continuous control output C
20mA analog retransmission W
TA input (50mAac) H
Digital input N
Please, contact GEFRAN sales people for the codes availability.

Digital-Eingänge Ri = 4,7KΩ (24V, 5mA) oder von potentialfreiem Kontakt
Protokoll Gefran CENCAL / MODBUS
Serielle Schnittstelle RS485, isoliert
Analogausgang 10V/20mA Rlast max 500Ω Auflösung 12 BitSensorspeisung 15/24VDC, max 30mA, kurzschlussfest
Relaiskontakt Schließer 5 A, 5A, 250V cosϕ=1Logik-Ausgang für Halbleiterrelais 24VDC, 30mA, Rout = 100Ω
Zykluszeit 0...200 sRegelungsausgang Relais, Logik, stetig (0....10V / 4...20mA)
Ausgangsfunktionen EIN/AUS, stetigBegrenzung der max. Leistung Heizen/Kühlen 0,0...100,0 %
C° / F° Umschaltung über Tastenfeld konfigurierbarLineare Skalenbereiche -1999 ... 9999, mit konfigurierbarem DezimalpunktRegelungsfunktionen PID, Optimierungen, EIN/AUSpb - dt - it 0,0...999,9 % - 0,00...99,99 min - 0,00...99,99 minRegelungstypen Heizen / Kühlen
Softstart 0,0...500,0 min
3 Konfigurierbare AlarmeBis zu 3 Alarm-Funktionen, die konfiguriert und einem Ausgang zugeordnetwerden können; Typ: Höchstwert, Mindestwert, symmetrische Werte,Absolut-/Relativwerte, Plausibilitätsalarm, Heizstromalarm
Stellgradbegrenzung bei Fehlfunktion des Fühlers -100,0...100,0 %
Standby-Funktion Istwertanzeige, Regelung deaktiviert
Alarmsonderfunktionen- Unterdrückung während der Einschaltphase- Zurücksetzen des Alarmspeichers über Taste oder Digitaleingang
Option Stromwandler-Eingang T.A. 50mAAC, 50/60Hz, Ri = 10Ω
Schutzart Bedienfront IP65Betriebs-/Lagertemperatur 0...50°C / -20...70°CRelative Luftfeuchtigkeit 20...85% nicht kondensierendInstallation Schalttafeleinbau, von vorn herausnehmbarGewicht 160 g in Ausführung mit vollständiger Ausstattung
Spannungsversorgung(Weitbereichsschaltnetzteil)
(Std.) 100 .. 240 V AC/DC ±10%(Opt.) 20 .. 27 V AC/DC ±10%50/60 Hz, max. 6W
SicherheitKurzschluss- und Fühlerbrucherkennung,Plausibilitätsalarm, Heizstromalarm
Typ des RTD. (Skala im angegebenen Bereicheinstellbar, mit und ohne Dezimalpunkt)(ITS90)
Max. Leitungswiderstand für RTD
DIN 43760 (Pt100), JPT100
20Ω
Kompensationsfehler 0,1° / °C
PTC / NTC 990Ω, 25°C / 1KΩ, 25°C
600REGLER
SOFTWARE-VERSION 1.0xCode 80336 / Ausgabe 0.1 - 11/01
BEDIENUNGSANLEITUNG
Für eine einwandfreieInstallation sind dieHinweise derBedienungsanleitungzu befolgen.
TypThermoelemente (ITS90)
Anzeige 2 x 4-stellige 7-Segment-LED Anzeige, Ziffernfarbe grün, Ziffernhöhe 10 und 7 mmTasten 4 Tasten (Man/Auto., Auf, Ab, F)Genauigkeit 0,2% vom Skalenendwert ± 1 digit bei Umgebungstemperatur 25°C
Haupteingang(einstellbarer Digitalfilter)
TC, RTD, PTC, NTC60mV, 1V Ri≥1MΩ; 5V, 10V Ri≥10kΩ; 20mA Ri=50ΩAbtastrate 120 ms
1 • INSTALLATION
• Außen- und Ausschnittmaße; Schalttafeleinbau
SchalttafeleinbauZur Befestigung des Instruments die beiliegenden Befestigungselemente benutzen. ZurBefestigung mehrerer Geräte neben- oder untereinander Ausschnittsmaße aus obererAbbildung entnehmen.
CE-KENNZEICHNUNG: Dieser Regler ist konform zur EMV-Richtlinie 89/336/EWG,ergänzt durch 93/68/EWG und den erforderlichen Schutzanforderungen.Dieses Gerät entspricht der europäischen Niederspannungsrichtlinie 73/23/EWG,ergänzt durch 93/68/EWG, unter Anwendung des Sicherheitsstandards EN 61010.Der Regler ist für Anwendungen im Industriebereich nach EN 50081-1 und EN 50081-2vorgesehen.WARTUNG: Dieses Gerät ist wartungsfrei. Sollte der Regler einen Fehler aufweisen,kontaktieren Sie bitte die nächste GEFRAN Niederlassung. Kundenseitige Reparaturensind nicht zulässig.Das Gehäuse nicht mit Lösemitteln auf Kohlenwasserstoffbasis (Trichlorethylen, Benzinusw.) reinigen, da andernfalls die mechanische Zuverlässigkeit des Gerätsbeeinträchtigt werden könnte. Zum Reinigen der Außenflächen aus Kunststoff einsauberes, mit Ethylalkohol oder Wasser angefeuchtetes Tuch verwenden.TECHNISCHER KUNDENDIENST: GEFRAN bietet mit einer eigenenKundendienstabteilung technische Unterstützung an. Von der Garantie ausgeschlossensind Defekte, die auf Missachtung der Betriebsanleitung zurückzuführen sind.
2 • TECHNISCHE DATEN
!
34
GEFRAN spa via Sebina, 7425050 Provaglio d'Iseo (BS) ITALIATel. 0309888.1 - Fax 0309839063
Internet: http://www.gefran.com
99
10
45
45
48
70
70
63
48
FUNKTION KABELTYP KABELLÄNGEAnschlussleitung 1 mm2 1 mDrähte Relaisausgang 1 mm2 3,5 mSerielle Anschlusskabel 0,35 mm2 3,5 mStromwandler-Anschlusskabel 1,5 mm2 3,5 mFühler Eingang Thermoelement 0,8 mm2 kompensiert 5 mFühler Eingang Widerstandsthermometer PT100 1 mm2 3 m
Die EMV-Konformität wurde mit folgenden Verbindungen geprüft:
J, K, R, S, T, B, E, N (IEC 584-1, CEI EN 60584-1,60584-2) / L GOST, U, G, D, Cdie kundenspezifische Linearisierung ist möglich.
Triac-Ausgang24...240VAC ±10%, 1A maxUngedämpft, induktive und ohmsche Lasten I2t = 128A2s
Baudrate 1200, 2400, 4800, 9600, 19200
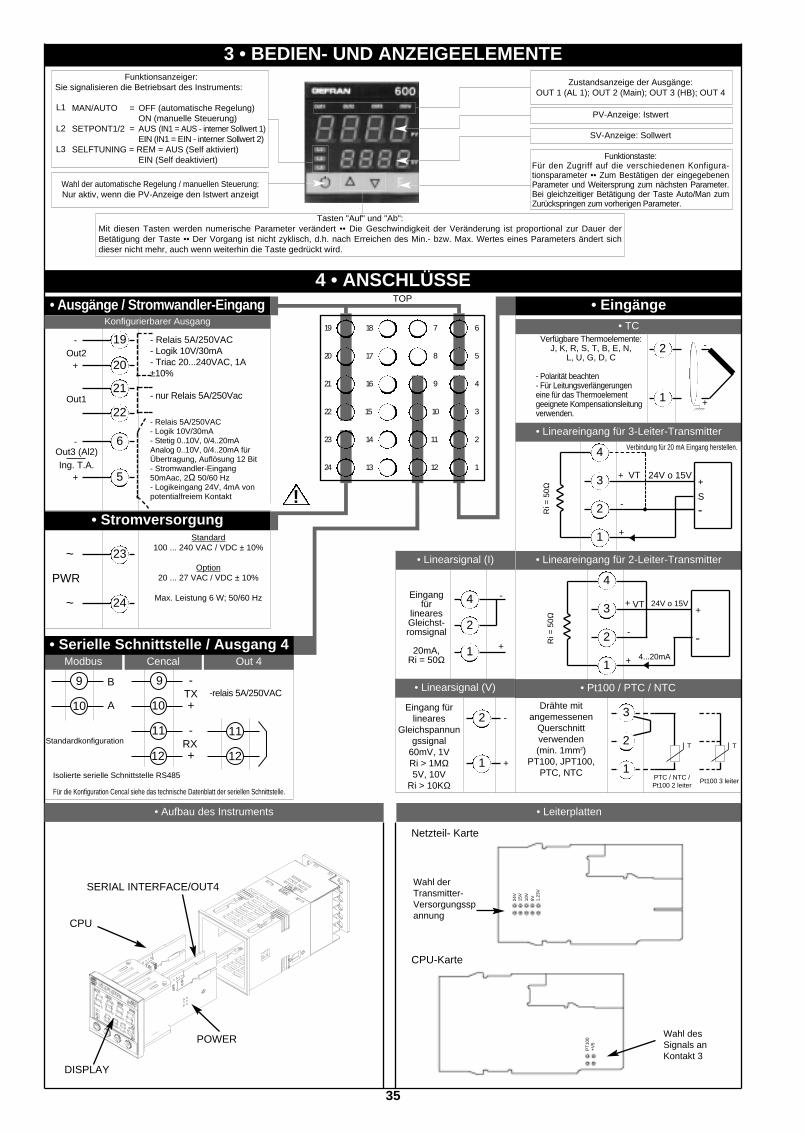
Cencal Out 4Modbus
-relais 5A/250VAC
Standard100 ... 240 VAC / VDC ± 10%
Option20 ... 27 VAC / VDC ± 10%
Max. Leistung 6 W; 50/60 Hz
4 • ANSCHLÜSSE• Ausgänge / Stromwandler-Eingang
- Relais 5A/250VAC- Logik 10V/30mA- Triac 20...240VAC, 1A±10%
- nur Relais 5A/250Vac
- Relais 5A/250VAC- Logik 10V/30mA- Stetig 0..10V, 0/4..20mAAnalog 0..10V, 0/4..20mA fürÜbertragung, Auflösung 12 Bit- Stromwandler-Eingang50mAac, 2Ω 50/60 Hz- Logikeingang 24V, 4mA vonpotentialfreiem Kontakt
6
5
4
3
2
1
7
8
9
10
11
12
18
17
16
15
14
13
19
20
21
22
23
24
-
+Out2
Out1
• Stromversorgung
23
24
~
~
TOP
-
+
Out3 (Al2)Ing. T.A.
!
PWR
35
Tasten "Auf" und "Ab":Mit diesen Tasten werden numerische Parameter verändert •• Die Geschwindigkeit der Veränderung ist proportional zur Dauer derBetätigung der Taste •• Der Vorgang ist nicht zyklisch, d.h. nach Erreichen des Min.- bzw. Max. Wertes eines Parameters ändert sichdieser nicht mehr, auch wenn weiterhin die Taste gedrückt wird.
3 • BEDIEN- UND ANZEIGEELEMENTE
Wahl der automatische Regelung / manuellen Steuerung:Nur aktiv, wenn die PV-Anzeige den Istwert anzeigt
PV-Anzeige: Istwert
Funktionstaste:Für den Zugriff auf die verschiedenen Konfigura-tionsparameter •• Zum Bestätigen der eingegebenenParameter und Weitersprung zum nächsten Parameter.Bei gleichzeitiger Betätigung der Taste Auto/Man zumZurückspringen zum vorherigen Parameter.
Funktionsanzeiger:Sie signalisieren die Betriebsart des Instruments:
MAN/AUTO = OFF (automatische Regelung)ON (manuelle Steuerung)
SETPONT1/2 = AUS (IN1 = AUS - interner Sollwert 1)EIN (IN1 = EIN - interner Sollwert 2)
SELFTUNING = REM = AUS (Self aktiviert)EIN (Self deaktiviert)
L1
SV-Anzeige: Sollwert
Zustandsanzeige der Ausgänge:OUT 1 (AL 1); OUT 2 (Main); OUT 3 (HB); OUT 4
• Serielle Schnittstelle / Ausgang 4
Standardkonfiguration
4...20mA
Verbindung für 20 mA Eingang herstellen.
Drähte mitangemessenen
Querschnittverwenden(min. 1mm2)
PT100, JPT100,PTC, NTC
• Pt100 / PTC / NTC
• Aufbau des Instruments • Leiterplatten
3
1
2
Pt100 3 leiterPTC / NTC /Pt100 2 leiter
Verfügbare Thermoelemente:J, K, R, S, T, B, E, N,
L, U, G, D, C
- Polarität beachten- Für Leitungsverlängerungeneine für das Thermoelementgeeignete Kompensationsleitungverwenden.
+
-
• TC
2
1
4
2
3
1
+ 24V o 15VVT
-
+
+
S
-Ri =
50Ω
4
2
3
1
+ 24V o 15VVT
-
+
+
-Ri =
50Ω
TT
• Lineareingang für 3-Leiter-Transmitter
• Eingänge
• Lineareingang für 2-Leiter-Transmitter
L2
L3
9
10
11
+
-
TXB
A
RX
-
+
12
9
10
11
12
DISPLAY
POWER
SERIAL INTERFACE/OUT4
Netzteil- Karte
Wahl derTransmitter-Versorgungsspannung
Wahl desSignals anKontakt 3
CPU-Karte
CPU
24V
15V
10V
5V 1,23
V
PT
100
+V
5Eingang
fürlinearesGleichst-romsignal
20mA,Ri = 50Ω
Eingang fürlineares
Gleichspannungssignal
60mV, 1VRi > 1MΩ5V, 10V
Ri > 10KΩ
2
1 +
-
• Linearsignal (I)
4
1
2
-
+
• Linearsignal (V)
Isolierte serielle Schnittstelle RS485
Für die Konfiguration Cencal siehe das technische Datenblatt der seriellen Schnittstelle.
19
21
20
22
6
5
Konfigurierbarer Ausgang
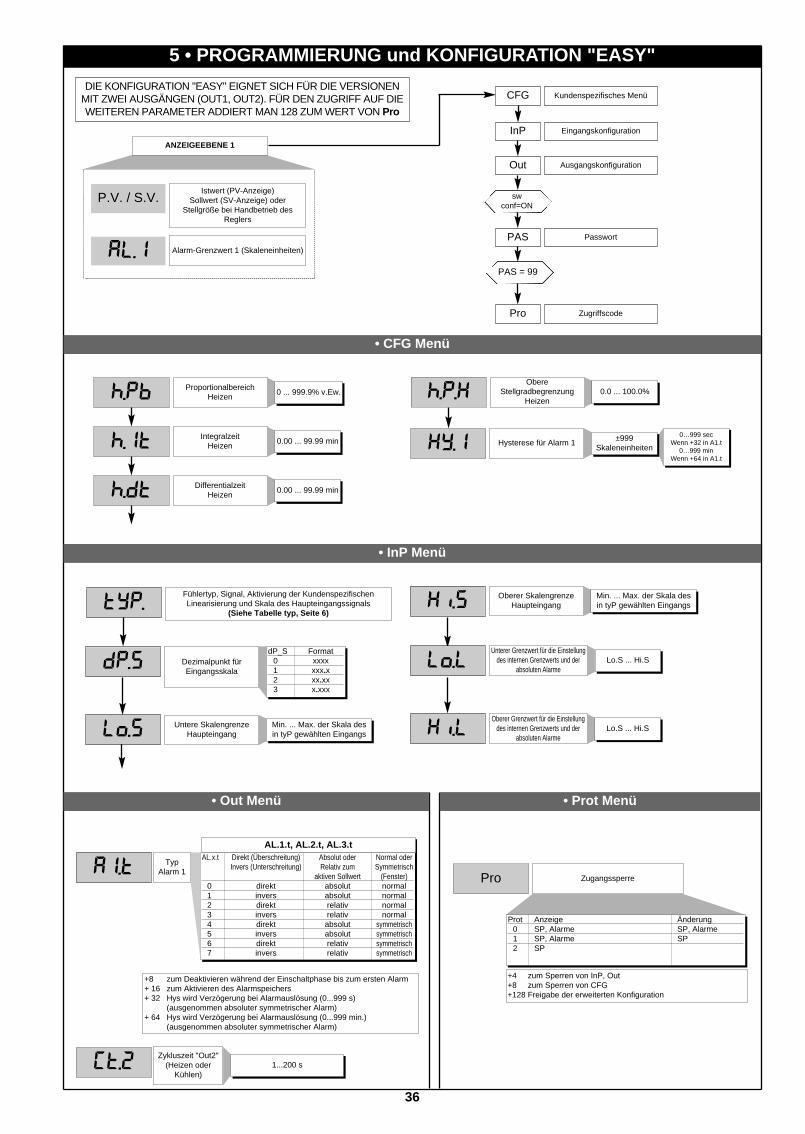
36
5 • PROGRAMMIERUNG und KONFIGURATION "EASY"
al.1
P.V. / S.V.Istwert (PV-Anzeige)
Sollwert (SV-Anzeige) oderStellgröße bei Handbetrieb des
Reglers
InP
Out
PAS = 99
Pro
Eingangskonfiguration
Ausgangskonfiguration
swconf=ON
PAS
Kundenspezifisches Menü
Passwort
Zugriffscode
Alarm-Grenzwert 1 (Skaleneinheiten)
CFG
ANZEIGEEBENE 1
• CFG Menü
• InP Menü
h.pb
h.it
h.dt
h.p.x
Xy.i
ProportionalbereichHeizen
Integralzeit Heizen
DifferentialzeitHeizen
ObereStellgradbegrenzung
Heizen0 ... 999.9% v.Ew.
0.00 ... 99.99 min
0.00 ... 99.99 min
0.0 ... 100.0%
Hysterese für Alarm 10…999 sec
Wenn +32 in A1.t 0…999 min
Wenn +64 in A1.t
±999Skaleneinheiten
typ.Fühlertyp, Signal, Aktivierung der KundenspezifischenLinearisierung und Skala des Haupteingangssignals
(Siehe Tabelle typ, Seite 6)
dp.s
lo.s
xi.s
Dezimalpunkt fürEingangsskala
Untere SkalengrenzeHaupteingang
Oberer SkalengrenzeHaupteingang
dP_S Format0 xxxx1 xxx.x2 xx.xx3 x.xxx
Min. ... Max. der Skala desin tyP gewählten Eingangs
Min. ... Max. der Skala desin tyP gewählten Eingangs
• Out Menü • Prot Menü
xi.l
lo.lUnterer Grenzwert für die Einstellung
des internen Grenzwerts und derabsoluten Alarme
Lo.S ... Hi.S
Oberer Grenzwert für die Einstellungdes internen Grenzwerts und der
absoluten AlarmeLo.S ... Hi.S
TypAlarm 1
AL.x.t Direkt (Überschreitung) Absolut oder Normal oderInvers (Unterschreitung) Relativ zum Symmetrisch
aktiven Sollwert (Fenster)0 direkt absolut normal1 invers absolut normal2 direkt relativ normal3 invers relativ normal4 direkt absolut symmetrisch5 invers absolut symmetrisch6 direkt relativ symmetrisch7 invers relativ symmetrisch
AL.1.t, AL.2.t, AL.3.t
a1.t
(t.2Zykluszeit "Out2"
(Heizen oderKühlen)
1...200 s
Pro Zugangssperre
Prot Anzeige Änderung0 SP, Alarme SP, Alarme1 SP, Alarme SP2 SP
+4 zum Sperren von InP, Out+8 zum Sperren von CFG+128 Freigabe der erweiterten Konfiguration
DIE KONFIGURATION "EASY" EIGNET SICH FÜR DIE VERSIONENMIT ZWEI AUSGÄNGEN (OUT1, OUT2). FÜR DEN ZUGRIFF AUF DIEWEITEREN PARAMETER ADDIERT MAN 128 ZUM WERT VON Pro
+8 zum Deaktivieren während der Einschaltphase bis zum ersten Alarm + 16 zum Aktivieren des Alarmspeichers+ 32 Hys wird Verzögerung bei Alarmauslösung (0...999 s)
(ausgenommen absoluter symmetrischer Alarm)+ 64 Hys wird Verzögerung bei Alarmauslösung (0...999 min.)
(ausgenommen absoluter symmetrischer Alarm)

(*) Bei diesen Anzeigen ist die selbsttätige Rückstellung auf die PV/SV-Anzeige ausgeschaltet.
37
6 • PROGRAMMIERUNG und KONFIGURATION
al.1
al.2
a.xb
0V.P
sp
SP.1
SP.2
in.2
Wenn für die Dauer von 15 s. keine Taste benutzt wird, kehrt dieAnzeige zur PV/SV-Anzeige zurück.
INF
P.V. / S.V.Istwert (PV-Anzeige)
Sollwert (SV-Anzeige) oderStellgröße bei Handbetrieb des
Reglers
Alarm-Grenzwert 2(Skaleneinheiten)
Alarm-Grenzwert 3(Skaleneinheiten)
Alarm-Grenzwert HB(Skaleneinheiten Stromwandler-
Eingang)
Stellgrad (+Heizen/- Kühlen)
Parameter der seriellen SchnittstelleSEr
InP
Out
PAS = 99
Pro
Lin
Eingangskonfiguration
Ausgangskonfiguration
Hardware-Konfiguration
Eingangslinearisierung
NEIN
F-Taste gedrückthalten um die
Menüs zu ereichen.
F-Taste lösen umdas gewünschte
Menü zu aktivieren.
F-Taste tippen umeinzelne Parameter
eines Menüs zuerreichen.
Auto/Man und F-Taste tippen umsich rückwärts im
Menü zu bewegen.
F-Taste gedrückthalten um Menü zu
verlassen.
F-Taste undAuto/Man Taste für
ca. 2s. gedrückthalten, um in die
PV/SV-Anzeige zugelangen.
swconf=ON
Interner Sollwert
ANZEIGEEBENE 1
PAS
NEIN
Hrd
U.CA
Kundenspezifisches Menü
Passwort
Kundenspezifische Kalibration
Zugriffscode
Informationsdisplay
Sollwert 1
Sollwert 2
Wert des Stromwandlereingangs(falls Stromwandlereingang
vorhanden)
Alarm-Grenzwert 1(Skaleneinheiten)
Hinweis: Die für eine spezifische Konfiguration nicht benötigten Parameter, werden in den Menüs ausgeblendet.
-
al.3
upd
(od
(.xd
err
• Informationsmenü
INF
Software-Version
Instrumenten-code
Fehleranzeige
Konfigurationhrd
+8 Fehler Erkennung Karte OUT2+16 Fehler Erkennung Karte OUT3
Informations-menü
CFG
(*)
(*)
0 No Error1 Lo2 Hi3 ERR4 SBR
AUSGANG 20 = nicht vorhanden1 = Relais2 = Logik3 = Triac
EINGANG / AUSGANG 30 = nicht vorhanden1 = Relais2 = Logik3 = Stetig4 = Analog5 = Stromwandler-Eingang6 = Digitaleingang
DIGITALE KOMMUNIKATION / OUT40 = nicht vorhanden1 = RS 4852 = Relais
Beispiel: 1 1 1 = R + R + RD 485

• CFG Menü
• Ser Menü
parSER.P Schnittstellenprotokoll0 CENCAL GEFRAN1 MODBUS RTU
38
S.tv
h.pb
h.it
h.dt
h.p.x
h.p.l
c.sp
c.pb
c.it
c.dt
c.p.x
c.p.l
rst
P.rs
A.rs
ffd
sof
Xy.i
Xy.2
Xy.3
xb.t
lb.t
lb.p
fa.p
g.sp
AktivierungSelbstoptimie-
rung,Autooptimierung,
Softstart
CFG Regelparameter
Proportionalbereich fürHeizen
Integralzeitfür Heizen
Differentialzeitfür Heizen
ObereStellgradbegrenzung für
Heizen
Sollwert Kühlen relativzum Sollwert Heizen
ProportionalbandKühlen.
Integralzeitfür Kühlen
Differentialzeitfür Kühlen
ObereStellgradbegrenzung
für Kühlen
ManuellesZurücksetzen
Hysterese für Alarm 2
Hysterese für Alarm 3
Verzögerungszeit für HB-Alarmauslösung
Verzögerungszeitzeit für LBA-Alarmauslösung
(bei Eingabe von 0 ist der Alarm deaktiviert)
Stellgradbegrenzung bei LBA-Alarm
Stellgradbegrenzung beiFühlerdefekt
S.tun Kont. Selbstoptimierung SoftstartAutooptimierung
0 NEIN NEIN NEIN1 JA NEIN NEIN2 NEIN JA NEIN3 JA JA NEIN4 NEIN NEIN JA5 JA NEIN JA
0.00 ... 99.99 min
0.00 ... 99.99 min
0.0 ... 100.0%
-999 ... 999Skaleneinheiten
0 ... 999.9% v.Ew.
0.00 ... 99.99 min
0.00 ... 99.99 min
0.0 ... 100.0%
Untere Stellgradbegrenzungfür Heizen
(nicht verfügbar für doppelteWirkungsweise Heizen/Kühlen)
0.0 ... 100.0%
± 25.0% v.Ew.
0 ... 999.9% v.Ew.
0…999 secWenn +32 in A2.t
0…999 minWenn +64 in A2.t
0…999 secWenn +32 in A3.t
0…999 minWenn +64 in A3.t
0 ... 999 s
0.0 ... 500.0 min
-100.0 ... 100.0%
-100.0 ... 100.0%ON / OFF
Sollwertgradient(siehe Anwendungshinweise)
0,0...999,9 Skaleneinheiten/min.(Skaleneinheiten / s siehe SP.ty)
Antireset
Vorausregelung
0 ... 9999Skaleneinheiten
-100.0 ... 100.0%
Proportionalbandver-schiebung
-100.0 ... 100.0%
Hysterese für Alarm 10…999 sec
Wenn +32 in A1.t 0…999 min
Wenn +64 in A1.t
Softstart-Zeit 0.0 ... 500.0 min
(Der Wert muss größer sein als die Zykluszeit desAusgangs, dem der HB-Alarm zugeordnet ist.)
Kühlmedium 0 ... 2
C.MEd Relativverstärkung (Rg)(siehe Anwendungshinweis)
0 Luft 11 Öl 0,82 Wasser 0,4
Untere Stellgradbegrenzungfür Kühlen
(nicht verfügbar für doppelteWirkungsweiseHeizen/Kühlen)
0.0 ... 100.0%
(.ME-
(od
sr.p
Ser
Geräteadresse
Einstellung serielleSchnittstelle
Schnittstellen-protokoll
0 ... 9999
bav Baudrate
Parität _PAr Parität
0 keine1 ungerade2 gerade
(*)
(*)
(*) Zum Rücksetzen des LBA Alarms die Tasten ∆ + ∇ gleichzeitig betätigen oder Regler auf
Handfunktion schalten.
AnmerkungDie Parameter c_Pb, c_It und c_dt werden bei Wahl der Option "Regelung Heizen/Kühlen mitRelativverstärkung" (CtrL = 14) im Nur-Lese-Modus angezeigt.
bAud Baudrate0 12001 24002 48003 96004 19200
±999Skaleneinheiten
±999Skaleneinheiten
±999Skaleneinheiten

Type Fühlertyp Ohne Dezimalpunkt Mit DezimalpunktSensore: TC
0 TC J °C 0/1000 0.0/999.91 TC J °F 32/1832 32.0/999.92 TC K °C 0/1300 0.0/999.93 TC K °F 32/2372 32.0/999.94 TC R °C 0/1750 0.0/999.95 TC R °F 32/3182 32.0/999.96 TC S °C 0/1750 0.0/999.97 TC S ° F 32/3182 32.0/999.98 TC T °C -200/400 -199.9/400.09 TC T °F -328/752 -199.9/752.010 TC B °C 44/1800 44.0/999.911 TC B °F 111/3272 111.0/999.912 TC E °C -100/750 -100.0/750.013 TC E °F -148/1382 -148.0/999.914 TC N °C 0/1300 0.0/999.915 TC N °F 32/2372 32,0/999.916 L-GOST °C 0/600 0.0/600.017 L-GOST °F 32/1112 32.0/999.918 TC U °C -200/400 -199.9/400.019 TC U °F -328/752 -199.9/752.020 TC G °C 0/2300 0.0/999.921 TC G °F 32/4172 32,0/999.922 TC D °C 0/2300 0.0/999.923 TC D °F 32/4172 32.0/999.924 TC C °C 0/2300 0.0/999.925 TC C °F 32/4172 32.0/999.926 Ni-Ni18Mo °C 0/1100 0.0/999.927 Ni-Ni18Mo °F 32/2012 32.0/999.928 TC CUSTOM CUSTOM29 TC CUSTOM CUSTOM30 PT100 °C -200/850 -199.9/850.031 PT100 °F -328/156 2 -199.9/999.932 JPT100 °C -200/600 -199.9/600.033 JPT100 °F -328/1112 -199.9/999.934 PTC °C -55/120 -55.0/120.035 PTC °F -67/248 -67.0/248.036 NTC °C -10/70 -10.0/70.037 NTC °F 14/158 14.0/158.038 0...60 mV -1999/9999 -199.9/999.939 0...60 mV kundenspez. Linearisierung kundenspez. Linearisierung40 12...60 mV -1999/9999 -199.9/999.941 12...60 mV kundenspez. Linearisierung kundenspez. Linearisierung42 0...20 mA -1999/9999 -199.9/999.943 0...20 mA kundenspez. Linearisierung kundenspez. Linearisierung44 4...20 mA -1999/9999 -199.9/999.945 4...20 mA kundenspez. Linearisierung kundenspez. Linearisierung46 0...10 V -1999/9999 -199.9/999.947 0...10 V kundenspez. Linearisierung kundenspez. Linearisierung48 2...10 V -1999/9999 -199.9/999.949 2...10 V kundenspez. Linearisierung kundenspez. Linearisierung50 0...5 V -1999/9999 -199.9/999.951 0...5 V kundenspez. Linearisierung kundenspez. Linearisierung52 1...5 V -1999/9999 -199.9/999.953 1...5 V kundenspez. Linearisierung kundenspez. Linearisierung54 0...1 V -1999/9999 -199.9/999.955 0...1 V kundenspez. Linearisierung kundenspez. Linearisierung56 200mv..1V -1999/9999 -199.9/999.957 200mv..1V kundenspez. Linearisierung kundenspez. Linearisierung58 Cust10 V-20mA -1999/9999 -199.9/999.959 Cust10 V-20mA kundenspez. Linearisierung kundenspez. Linearisierung60 Cust 60mV -1999/9999 -199.9/999.961 Cust 60mV kundenspez. Linearisierung kundenspez. Linearisierung62 PT100-JPT CUSTOM CUSTOM63 PTC CUSTOM CUSTOM64 NTC CUSTOM CUSTOM
• InP Menü
39
typ. Fühlertyp, Signal, Aktivierung der KundenspezifischenLinearisierung und Skala des Haupteingangssignals
InP Eingangseinstellungen
s.in Eingänge virtuellesInstrument
0 ... 31
Eingänge IN PV AL3 AL2 AL1Bit 4 3 2 1 0
Es: 1 1 0 0 0Für die Steuerung über die serielle Schnittstelle vonAN und IN muss man in S.in den Wert 24eingeben.
s.0v Ausgänge virtuellesInstrument
0 ... 31
Ausgänge OUTW OUT4 OUT3 OUT2 OUT1Bit 4 3 2 1 0
Es: 1 0 0 1 1Für die Steuerung über die serielle Schnittstelle vonOUT1, OUT2 und OUTW muss bei S.Ou der Kode 19eingegeben werden.
s.U.i Benutzeroberflächevirtuelles Instrument
0 ... 63
Ober. LED KEYB DISL DISH LED LED LED LED1/2/3 OUT4 OUT3 OUT2 OUT1
Bit 7 6 5 4 3 2 1 0
Beispiel: 0 1 0 1 0 0 0 0Zum Steuern über die serielle Schnittstelle von TAST und Anz. PV mussman bei S.U.I den Kode 80 eingeben.
+2 Sollwertgradient in Skaleneinheiten / s
flt
fld
dp.s
lo.s
xi.s
ofs.
ft.2
Digitalfilter Haupteingang(wenn = 0: Mittelwertfilter auf
gelesenem Wert ausgeschaltet)
(*) Bei den Skalen für TC,Widerstandsthermometer,
PTC und RTC nicht verfügbar.
Digitalfilter auf Anzeigedes Eingangs
Dezimalpunkt fürHaupteingangsskala
Untere SkalengrenzeHaupteingang
Oberer SkalengrenzeHaupteingang
KorrekturoffsetHaupteingang
Digitalfilter für denHilfseingang
0.0 ... 20.0 s
0 ... 9.9Skaleneinheiten
dP_S Format0 xxxx1 xxx.x2 xx.xx (*)3 x.xxx (*)
Min. ... Max. der Skala desin tyP gewählten Eingangs
Min. ... Max. der Skala desin tyP gewählten Eingangs
-999 ... 999Skaleneinheiten
0.0 ... 20.0 s
sp.r Def. externer SollwertVal. Typ externer Sollwert Absolut/Relativ0 Digital Absolut
(über serielle Schnittstelle)1 Digital relativ zum
(über serielle Schnittstelle) internen Sollwert
Zur kundenspezifischen Linearisierung:- Die LO - Signalisierung geschieht mit Variablen, deren Werte unterhalb vonLo.S oder des minimalen Kalibrationswerts liegen - Die HI - Signalisierung geschieht mit Variablen, deren Werte oberhalb vonLo.S oder des maximalen Kalibrationswerts liegen
Maximaler Linearitätsfehler fürThermoelemente (Tc),Widerstandsthermometer(PT100) und Thermistoren(PTC, NTC).
Der Fehler wird alsAbweichung vom Sollwert in %vom in Grad Celsius (°C)ausgedrückten Skalenendwertberechnet.
S, R Skala 0...1750°C; Fehler < 0,2% v.Ew.(t > 300°C) / fürandere Skalen; Fehler < 0,5% v.Ew.
T Fehler < 0,2% v.Ew. (t > -150°C)B Skala 44...1800°C; Fehler < 0,5% v.Ew.(t > 300°C) / Skala
44,0...999,9; Fehler < 1% v.Ew. (t > 300°C)U Skala -99,9...99,9 und -99...99°C; Fehler < 0,5% v.Ew./ für
andere Skalen; Fehler < 0,2% v.Ew. (t > -150°C)G Fehler < 0,2% v.Ew. (t > 300°C)D Fehler < 0,2% v.Ew. (t > 200°C)C Skala 0...2300; Fehler < 0,2% v.Ew. / für andere Skalen;
Fehler < 0,5% v.Ew.
NTC Fehler < 0,5% v.Ew.
TC Typ J, K, E, N, L Fehler < 0,2% v.Ew.PT100, JPT100 und PTC Fehler < 0,2% v.Ew.

40
xi.l
lo.l
of.2
xs.2
l5.2 Untere SkalengrenzeHilfseingang
KorrekturoffsetHilfseingang
0.0 ... 999.9
Obere SkalengrenzeHilfseingang 0.0 ... 999.9
-99,9 ... 99,9Skaleneinheiten
Unterer Grenzwert für dieEinstellung des Sollwertsund der absoluten Alarme
Lo.S ... Hi.S
Oberer Grenzwert für dieEinstellung des Sollwertsund der absoluten Alarme
Lo.S ... Hi.S
• Out Menü
Out Ausgangseinstellungen
Wahl derBezugsgrö-ßen Alarm 1
AL.1.r, AL.2.r, AL.3.r
Wahl derBezugsgrö-ßen Alarm 2
Wahl derBezugsgrö-ßen Alarm 3
AL.x.r Zu vergleichende Größe Bezugsschwellwert0 PV (Istwert) AL1 SSP (aktiver Sollwert) AL (nur absolut)2 PV (Istwert) AL (nur relativ und
bezogen auf SP1 mit Multiset-Funktion)]
TypAlarm 1
TypAlarm 2
TypAlarm 3
+8 zur Deaktivierung während der Einschaltphase.+16 zum Aktivieren des Alarmspeichers+ 32 Hys wird Verzögerung bei Alarmauslösung (0...999 s) (ausgenommen absoluter symmetrischer Alarm)+ 64 Hys wird Verzögerung bei Alarmauslösung (0...999 min.) (ausgenommen absoluter symmetrischer Alarm)
AL.x.t Direkt (Überschreitung) Absolut oder Normal oderInvers (Unterschreitung) Relativ zum Symmetrisch
aktiven Sollwert (Fenster)0 direkt absolut normal1 invers absolut normal2 direkt relativ normal3 invers relativ normal4 direkt absolut symmetrisch5 invers absolut symmetrisch6 direkt relativ symmetrisch7 invers relativ symmetrisch
AL.1.t, AL.2.t, AL.3.t
Funktionsweisedes Alarms HB
Val. Funktionsbeschreibung0 Alarm wird aktiviert wenn bei
aktiven Regelausgang dereingestellte Nennstromunterschritten wird.
1 Alarm wird aktiviert wenn beiinaktiven Regelausgang der eingestellte Nennstrom überschritten wird.
2 Alarmauslösung, wenn eine der Funktionen 0 oder 1aktiv ist. (Logische Oder-Verknüpfung zwischen den Funktionen 0 und 1) (*)
3 Heizstromalarm für stetigen Ausgang Heizen7 Heizstromalarm für stetigen Ausgang Kühlen
+ 0 Ausgang Out1 zugeordnet (nur für Hb_F= 0, 1, 2)+ 4 Ausgang Out2 zugeordnet (nur für Hb_F= 0, 1, 2)+ 12 Ausgang Out4 zugeordnet (nur für Hb_F= 0, 1, 2)+16 HB-Alarm, invers
(*) Der untere Schwellenwert wird auf 12,5% des Stromwandler-Skalenendwerts eingestellt.
a1.r
a2.r
a3.r
a1.t
xb.f
a2.t
a3.t

41
an.o
rl.1
rl.2
rl.3
rl.4
(t.1
rel
(t.2
(t.3
x.an
l.an
Ausgangsverhalten im fallevon Fühlerbruch
Fühlerschluss oderFühlerverpolung. Funktionlediglich für Alarme. Err,
Sbr
Untere SkalengrenzeAnalogausgang 0
Obere SkalengrenzeAnalogausgang
Val Bezugsgröße0 PV - Istwert1 SSP - aktiver Sollwert2 SP - interner Sollwert3 -4 Sollwertabweichung (SSP-PV)5 Heizen (*)6 Kühlen (*)7 AL1 (Schwellwert)8 AL2 (Schwellwert)9 AL3 (Schwellwert)10 -11 Über serieller Schnittstelle erfasster Wert (*)
Out WFunktionsvereinbarung für den Analogausgang
Out1Vereinbarung derAusgangsfunktion
_rEL. Alarm Alarm Alarm1 2 3
0 OFF OFF OFF1 ON OFF OFF2 OFF ON OFF3 ON ON OFF4 OFF OFF ON5 ON OFF ON6 OFF ON ON7 ON ON ON
-1999 ... 9999
16 für Kode 0, wenn Eingang im Fehlerzustand Err - Sbr nimmtder Ausgang den niedrigsten Einstellwert an.
(*) - feste Skalengrenzen.- nicht verfügbar bei Ein / Aus Regelung.
Zykluszeit Out1(Heizen oder
Kühlen)
Zykluszeit Out2(Heizen oder
Kühlen)
Zykluszeit Out3(Heizen oder
Kühlen)
1...200 s
1...200 s
1…200 s(0,1 s Festwert bei stetigem Ausgang,
Ct. 3 erscheint nicht bei der Konfiguration)
Out2Vereinbarung derAusgangsfunktion
Out3Vereinbarung derAusgangsfunktion
Out4Vereinbarung derAusgangsfunktion
-1999 ... 9999
rL.o.1, rL.o.2, rL.o.3, rL.o.4
+32 für invertierten Ausgang
Val Funktion0 Heizen (Regelungsausgang Heizen)1 Kühlen (Regelungsausgang Kühlen)2 AL1 - Alarm 13 AL2 - Alarm 24 AL3 - Alarm 35 AL.HB - Alarm HB6 LBA - Alarm LBA7 IN - Zustand logischer Eingang8 Wiederholung Taste but (wenn but = 8)9 AL1 oder AL210 AL1 oder AL2 oder AL311 AL1 und AL212 AL1 und AL2 und AL313 AL1 oder ALHB14 AL1 oder AL2 oder ALHB15 AL1 und ALHB16 AL1 und AL2 und ALHB
(t.4Zykluszeit Out4
(Heizen oderKühlen)
1...200 s
64 HEIZEN stetiger Ausgang 2-10V (*)65 KÜHLEN stetiger Ausgang 2-10V (*)

42
(tr
hd.1
• Hrd Menü
Hrd Hardware-Konfiguration
Freigabe MultisetSteuerung derGeräte über
serielleSchnittstelle
Val Multiset Status LED Gerätesteuerung(2 SP) invertiert über serielle
Schnittstelle01 x2 x3 x x4 x5 x x6 x x7 x x x
RegelungstypVal Regelungstyp
0 P heizen1 P kühlen2 P heizen / kühlen3 PI heizen4 PI kühlen5 PI heizen / kühlen6 PID heizen7 PID kühlen8 PID heizen / kühlen9 ON-OFF heizen10 ON-OFF kühlen11 ON-OFF heizen / kühlen12 PID heizen + ON-OFF kühlen13 ON-OFF heizen + PID kühlen14 PID heizen + kühlen mit Relativver-
stärkung (siehe Parameter C.MEd)
Wahl der Differenzierzeit:+0 Abtastung 1 s+16 Abtastung 4 s+32 Abtastung 8 s+64 Abtastung 240 ms
Anmerkung: Bei der EIN-AUS-Regelung istder LbA-Alarm nicht aktiviert.
• Prot Menü
Pro Zugangssperre
Prot Anzeige Änderung0 SP, In2, alarme, OuP, INF SP, alarme1 SP, In2, alarme, OuP, INF SP2 SP, In2, OuP, INF
+4 zum Sperren von InP, Out+8 zum Sperren von CFG, Ser+16 zum Sperren der Software Geräteabschaltung+32 zum Sperren der Speicherung der manuellen Stellgradvorgabe+64 zum Sperren der Änderung der manuellen Stellgradvorgabe+128 Freigabe der erweiterten Konfiguration

dig.
al.n
bvt.
+8 zum Freigeben von Alarm HB.+16 zum Freigeben von Alarm LBA.
dig.
FunktionDigitaleingang
+ 16 für Eingang mit negativer Logik (NPN)+32 zum Erzwingen des logischen Zustands 0 (OFF) +48 zum Erzwingen des logischen Zustands 1 (ON)
AL.nr Alarm 1 Alarm 2 Alarm 30 gesperrt gesperrt gesperrt1 freigegeben gesperrt gesperrt2 gesperrt freigegeben gesperrt3 freigegeben freigegeben gesperrt4 gesperrt gesperrt freigegeben5 freigegeben gesperrt freigegeben6 gesperrt freigegeben freigegeben7 freigegeben freigegeben freigegeben
0 keine Funktion (Eingang gesperrt)1 MAN / AUTO Umschaltung2 LOC / REM Auswahl3 HOLD4 Alarmspeicher zurücksetzen5 Wahl SP1...SP26 Software-Geräteabschaltung
Wahl der Anzahlder freigegebenen
Alarme
0 Keine Funktion (Taste gesperrt)1 MAN/AUTO Umschaltung2 LOC / REM Auswahl3 HOLD4 Alarmspeicher zurücksetzen5 Wahl SP1 / SP26 Start / Stop Selbstoptimierung7 Start / Stop Autooptimierung8 Set / Reset Ausgänge 1 ... 4
+ 16 zum Deaktivieren der Funktion imKonfigurationsmenü (nur für Parameter butt).
b u t t
Funktion der MAN/ AUTO Taste
ld.1
ld.2
ld.3
43
Val. Funktion0 keine Funktion1 MAN/AUTO (EIN: Handbetrieb, AUS: Automatikbetrieb)2 LOC/REM (EIN: externer Sollwert, AUS: interner Sollwert)3 HOLD4 Selbstoptimierung aktiviert5 Autooptimierung aktiviert6 Digitaleingang IN1 aktiv7 Datenaustausch über serielle Schnittstelle in Betrieb8 Anstehender Fehlerzustand9 Softstart in Betrieb10 Anzeige SP1...SP2
Funktion der LED´s
+ 16 LED blinkt, wenn aktiv
dspDefinition der
AnzeigefunktionSV
diSP Funktion der unteren Anzeige (SV)0 SSP - aktiver Sollwert1 InP.2 - Hilfseingang2 Stellgrad3 Regelabweichung (SSP - PV)

Schritt 34 mV Skalenendwerts.34
Schritt 33 mV Skalenanfangs.33
......
s.00
44
• Lin Menü
Lin Kundenspezifische Linearisierung fürHaupteingang
Der Wert von Schritt n entspricht Eingang mV Skalenanfang + n*∆mV
∆mV = (mV Skalenendwert - mV Skalenanfang) / 32
Schritt 0Skalengrenzwerte
Schritt 32Skalengrenzwerte
Grenzwerte der Anzeige(-1999...9999)
Grenzwerte der Anzeige(-1999...9999)
• U.CAL Menü
U.CAKalibration
durchBenutzer
s.32
Schritt 35mV bei Temperatur von
50°s.35
Val Funktion1 Analoger Ausgang (1)2 Eingang 1 – kundenspezifisch 10V / 20mA3 Haupteingang - Fühler kundenspezifisch 60 mV4 Fühler kundenspezifisch RTD5 Kundenspezifische PT100 / J PT1006 Fühler kundenspezifisch NTC7 Haupteingang 2 - Fühler kundenspezifisch TA (2)
Nur für TYP = kundensp. Thermoelement
(1) Der Analogausgang mit 20mA ist mit einer Genauigkeit besser als 0,2% v. Ew. kalibriert.Bei Umwandlung in Ausgang 10V Kalibration durchführen.
(2) Die Genauigkeit ohne Kalibration ist besser als 1% v. Ew.; die Kalibration nur durchführen,wenn eine höhere Genauigkeit erforderlich ist.

Dieser Alarmtyp erfordert die Verwendung des Stromwandlereingangs (T.A.). Er kann Variationen der Stromaufnahme bei der Last signalisieren, indem er den Strom am Stromwandlereingang im Bereich(0... HS.2) liest. Er wird durch den Konfigurationskode (Al.n) aktiviert; in diesem Fall wird der Auslösewert des Alarms in HB-Skaleneinheiten ausgedrückt.Mit dem Kode Hb.F (Phase "Out") wählt man die Funktionsweise und den zugeordneten Steuerausgang. Die Einstellung des Alarmgrenzwerts ist A.Hb. Der direkte HB-Alarm wird ausgelöst, wenn der Wert am Stromwandlereingang für die in Hb.t eingegebene Gesamtdauerinnerhalb von Zeiträumen, in denen der gewählte Ausgang "ON" ist, unter dem Schwellwert liegt. Der HB-Alarm kann nur bei ON-Zeiten über 0,4 Sekunden aktiviert werden (der stetige Ausgang wird ausgeschaltet). Die Funktionsweise des HB-Alarms sieht die Kontrolle des Laststroms auch im OFF-Zeitraum der Zykluszeit des gewähltenAusgangs vor: Wenn für die in Hb.t eingegebene Gesamtdauer des OFF-Zustands des Ausgangs der gemessene Strom 12%des eingestellten Stromwandler-Skalenendwerts (Parameter HS.2 in InP) überschreitet, wird der HB-Alarm aktiviert. Die Zurücksetzung des Alarms erfolgt automatisch, wenn die Bedingungen, die zu seiner Auslösung führten, beseitigt wurden.Die Einstellung des Schwellwerts A.Hb auf 0 bewirkt die Deaktivierung beider HB-Alarmtypen und das Abfallen deszugehörigen Relais. Die Anzeige des Laststroms erfolgt bei Wahl von Option In.2. (Ebene 1).HINWEIS: Die ON/OFF-Zeiten beziehen sich auf die programmierte Zykluszeit des gewählten Ausgangs. Der Alarm Hb_F = 3 (7) für den kontinuierlichen Ausgang ist aktiviert, wenn der Laststrom unter dem programmiertenSchwellwert liegt; er ist deaktiviert, wenn der Wert des Ausgangs Heizen (Kühlen) kleiner 3% ist.
Der Eingangswert und die Alarmzustände werden während der Dauer der Aktivierung des Digitaleingangs "eingefroren". Bei aktivem Eingang bewirkt die Zurücksetzung des Alarmspeichers das Abfallen aller erregten Relais und die Löschung desSpeichers aller Alarme.
FUNKTIONSWEISE DES HEIZSTROM-ALARMS (HB)
• HOLD Funktion
45
7 • ALARME
Zeit
AL1 + Hyst1
AL2 + Hyst2AL2
AL1
alarm 1
alarm 2
(*)
Für AL1 = inverser absoluter Alarm (Unterschreitung) mit positiver HystereseHyst 1, AL1 t = 1 (*) = Aus, wenn während der Einschaltphase aktiviert.Für AL2 = direkter absoluter Alarm (Überschreitung) mit negativer HystereseHyst 2, AL2 t = 0
Für AL1 = absoluter inverser symmetrischer Alarm mit Hysterese Hyst 1, AL1 t = 5Für AL1 = absoluter direkter symmetrischer Alarm mit Hysterese Hyst 1, AL1 t = 4
Absolutalarm Symmetrischer Absolutalarm
invers
direkt
AL1
AL1 + [ Hyst1 ]
AL1 - [ Hyst1 ]
Zeit
Für AL1 = relativer inverser Alarm mit negativer Hysterese Hyst 1, AL1 t = 3 Für AL1 = relativer direkter Alarm mit negativer Hysterese Hyst 1, AL1 t = 2
Für AL1 = relativer inverser symmetrischer Alarm mit Hysterese Hyst 1, AL1 t = 7 Für AL1 = relativer direkter symmetrischer Alarm mit Hysterese Hyst 1, AL1 t = 6
Zeit
SP+AL1SP
invers
direkt
SP+AL1
SP
invers
direkt
Zeit
Hyst1
Relativalarm Symmetrischer Relativalarm
SP-AL1

46
Proportionale Regelung:ist die Bezeichnung für den Wert, dessen Einfluss auf den Ausgang proportional zum Unterschied zwischen Soll- und Istwert ist.Vorhalteregelung:ist die Bezeichnung für den Wert, dessen Einfluss auf den Ausgang proportional zur Änderungsgeschwindigkeit des Istwertes ist.Integrale Regelung:ist die Bezeichnung für den Wert, dessen Einfluss auf den Ausgang proportional zum Integral der Sollwertdifferenz über die Zeit ist.
Einfluss der Proportionalen, Vorhalte- und Integralen Regelung auf die Regelung* Eine Vergrößerung des Proportionalbandes verringert die Schwingungen, vergrößert aber den durch den I- und den D- Anteil zu korrigierendeRegelabweichung.* Eine Verkleinerung des Proportionalbandes verringert die Regelabweichung, verursacht aber Oszillieren, d.h. Schwankungen der geregeltenVariablen (wenn der Wert des Proportionalbandes zu klein ist, tendiert das System zur Instabilität). Eine* Erhöhung der Vorhaltezeit verringert die Regelabweichung und die Oszillationsneigung, jedoch nur bis zu einem kritischen Wert, bei dessenÜberschreitung die Regelabweichung anwächst und längeres Oszillieren auftritt.* Eine verstärke Integralregelung, die einer Verkürzung der Nachstellzeit entspricht, trägt dazu bei, die Regelabweichung zu beseitigen, wenndas System sich stabilisiert hat.Wenn der Wert der Nachstellzeit zu groß ist (schwaches Integralverhalten), kann sich eine ständige Regelabweichung bilden.Wenn das der Fall ist, sollte das Proportionalband verkleinert und die Vorhalte- und Nachstellzeit zur Erzielung eines besseren Ergebnissenvergrößert werden.
8 • HINWEISE ZU DEN REGELUNGSPARAMETERN
9 • MANUELLES OPTIMIERENA) Sollwert eingeben.B) Wert des Proportionalbandes auf 0,1% vereinbaren, die Zykluszeit auf 0 Stellen, die Regelung auf EIN/AUS Verhalten schalten.C) Strecke automatisch durch den Regler regeln. Dabei das Regelverhalten beobachten. Es wird eine Regelung ähnlich der Illustration stattfinden:
D) Die PID Parameter lassen sich auf folgende Weise bestimmen:
SpitzenwertP.B.= ---------------------------------------- x 100
(vereinbarte Skalengrenze)
Integralzeit: It = 1,5 x TDifferentialzeit: dt = It/4E) Regler auf Handbetrieb schalten und errechnete Parameter übertragen. Umschaltenauf Regelbtrieb und Eingabe des von der Strecke benötigten Ausgangszyklus.F) Die Wirkung der Regelparameter, wenn möglich, an mehreren Sollwerten austesten.Wenn Oszillieren zu beobachten ist, muss das Proportionalband vergrößert werden. Istdie Ansprechzeit zu gering muss das Proportionalband reduziert werden.
Istwert
Zeit
T
Spitzenwert
11 • GERÄTE AKTIVIERUNG DEAKTIVIERUNG MITTELS SOFTWAREAusschalten: Durch gleichzeitige Betätigung der "F" und "Ab" Taste, Betätigungsdauer länger als 5 Sekunden, kann das Instrument deaktiviertwerden. Das Gerät versetzt sich selbst in den Zustand AUS, wobei die Netzversorgung aufrechterhalten wird. Während dieses Phase wird dieuntere Anzeige (SV) deaktiviert. Alle Ausgänge (Alarmausgänge sowie Regelausgänge)nehmen den Zustand AUS an (Logikausgänge auf 0 oder Relais abgefallen). Alle Gerätefunktionen bis auf die Istwerterfassung undDarstellung sowie der Einschaltfunktion sind deaktiviert.Einschalten: Durch Betätigung der "F" Taste, Betätigungsdauer länger als 5 Sekunden. Das Gerät wechselt vom Zustand AUS in den ZustandEIN. Wenn während der Ausschaltphase die Stromversorgung unterbrochen wird, kehrt er beiWiedereinschalten der Regler in den Zustand "AUS" zurück. Bei der Standardauslieferung ist die EIN / AUS Funktion freigegeben. Sie kanndeaktiviert werden, indem der Parameter Pro wie folgt eingestellt wird: Pro = Prot + 16.Diese Funktion kann einem Digitaleingang zugeordnet werden.
Die Multiset-Funktion wird bei hd.1 aktiviert. Die Funktion Gradient ist immer aktiviert. Die Wahl zwischen Sollwert 1 und Sollwert 2 kann mit dem Tastenfeld auf derBedienfront oder über den digitalen Eingang erfolgen. Die Wahl zwischen Sollwert 1 und 2 kann mit LED signalisiert werden. SOLLWERTGRADIENT: Wird ein Sollwertgradient π 0 eingegeben, wird beimEinschalten oder beim Übergang von Automatik auf Handbetrieb zunächst derSollwert gleich dem Istwert gesetzt; anschließend wird der interne odergewählte Sollwert in Abhängigkeit vom eingegebenen Sollwertgradientenangefahren. Bei jeder Sollwertänderung erfolgt die Anpassung mit einemSollwertgradienten. Der Sollwertgradient ist beim Einschalten gesperrt, wenn die Selbstoptimierungaktiviert ist. Wird ein Sollwertgradient π 0 eingegeben, dann hat er auch für die nur imzugehörigen SP-Menü einstellbaren Änderungen des internen SollwertsWirkung. Der Regelsollwert wird mit der durch den Gradienten festgelegtenGeschwindigkeit angefahren.
10 • FUNKTION MULTISET, SOLLWERTGRADIENT
SP1SP2
SPrem SP1(*)
ON
ON
SP
IN1
LOC/REM
t
t
t
(*) wenn der Sollwertgradienteingegeben wurde

47
Die Funktion optimiert nur die Regelparameter für Heizen oder Kühlen. Bei Regelstrecken mit Heizen/Kühlen ist es erforderlich jeweils eineSelbstoptimierung für Heizen und Kühlen durchzuführen. Die Selbstoptimierung dient zum Berechnen der optimalen Werte für die Regelparameterwährend der Anlaufphase des Prozesses. Die Regelstrecke muss sich auf den Wert des Null-Stellgrades befinden (bei TemperaturregelungUmgebungstemperatur). Im ersten Schritt der Optimierung gibt der Regler eine maximale Ausgangleistung ab, bis der Punkt (Solltemperatur -Starttemperatur) / 2 erreicht ist. Im zweiten Schritt wird der Stellgrad auf 0% gesetzt und dadurch eine Schwingung erzeugt. Durch Messung derSchwingungsamplitude und der Schwingungsfrequenz werden die PID-Parameter errechnet und speicherresident abgelegt.Wenn die Selbstoptimierung beendet ist, wird diese automatisch deaktiviert. Die Regelung fährt mit den neu errechneten Parameter ihrenvorgegebenen Sollwert an.
Aktivieren der Selbstoptimierung:A. Aktivierung beim Einschalten 1. Den gewünschten Sollwert eingeben. 2. Zum Aktivieren der Selbstoptimierung den Parameter Stun auf den Wert 2 setzen (Menü CFG).3. Das Gerät ausschalten. 4. Sicherstellen, dass die Temperatur nahe der Umgebungstemperatur ist. 5. Das Gerät wieder einschalten.
B. Aktivierung über Tastenfeld 1. Sicherstellen, dass die Taste M/A für die Funktion Start/Stop Selbstoptimierung
freigegeben ist. (Parameter but = 6 Menü Hrd)2. Die Temperatur in die Nähe der Umgebungstemperatur bringen. 3. Den gewünschten Sollwert eingeben. 4. Die Taste M/A drücken, um die Selbstoptimierung zu aktivieren. (Achtung: Bei erneuter Betätigung der Taste wird die Selbstoptimierung
unterbrochen.)
Der Vorgang läuft automatisch ab. Am Ende werden die neuen PID-Parameter gespeichert: Proportionalband, Integral- und Differentialzeitenfür die aktive Wirkungsweise (Heizen oder Kühlen). Bei zweifacher Wirkungsweise (Heizen und Kühlen) werden die Parameter derentgegengesetzten Wirkungsweise berechnet, indem die anfängliche Beziehung zwischen den jeweiligen Parametern beibehalten wird(Beispiel: Cpb = Hpb * K; wobei gilt: K = Cpb / Hpb zum Zeitpunkt der Aktivierung der Selbstoptimierung). Nach Abschluss wird der Code Stunautomatisch gelöscht. Anmerkungen:- Der Vorgang wird bei Überschreiten des Sollwerts während seines Ablaufs unterbrochen. In diesem Fall wird der Code Stun nicht gelöscht._ Es empfiehlt sich, eine der konfigurierbaren LEDs für die Anzeige des Zustands der Selbstoptimierung zu aktivieren. Setzt man im Menü Hrdeinen der Parameter Led1, Led2, Led3 auf den Wert 4 oder 20, leuchtet oder blinkt die zugehörige LED während der aktivenSelbstoptimierungsphase.
HINWEIS: Dieser Vorgang ist bei der Ein-Aus-Regelung nicht vorgesehen.
12 • SELBSTOPTIMIERUNG
Scheitelwert
T
S.P.
t.a.Zeit
Istwert
S.P. - t.a.2
13 • HINWEISE ZUR AUTOOPTIMIERUNGDie Funktion ist ebenfalls für Systeme mit einem Ausgang geeignet (Heizen oder Kühlen).Wenn diese Funktion aktiv ist, kann keine manuelle Änderung der PID Parameter vorgenommen werden.Die Funktion kann entweder ständig oder nur einmalig die Regelparameter anpassen.Bei der ständigen Optimierung erfolgt die Anpassung der Parameter am Sollwert.Die Systemschwingungen werden untersucht, und dadurch die PID Parameter angepasst. Es werden keine Parameter errechnetwenn die Amplitude der Systemschwingung geringer als ist 1% vom eingestellten Proportionalband.Die Funktion wird unterbrochen, wenn der Sollwert geändert wird. Die berechneten PID Parameter werden nicht gespeichert. Wenn das Gerätausgeschaltet wird, kehrt es zu den vor dem Einschalten der automatischen Regelanpassung geltenden Werten zurück.Die einmalige automatische Regelangpassung erzeugt selbständig eine Schwingung am Sollwert. Die Schwingung wird durch eine 10%Erhöhung des im Einschaltmoment geltenden Stellgrades erzeugt. Es gilt jedoch die Einschränkung, dass der Stellgrad im Einschaltmomentsich im Bereich 20%...80% der Ausgangsleistung befinden muss. Es wird die Überschwingdauer untersucht und daraus die Regelparameterabgeleitet. Diese Parameter werden speicherresident abgelegt.
Zeit
PV
c_Pb
h_Pb
SP+cSP
SP
+100%Regelungsausgang
0%
-100%
Proportionaler Regelausgang mit getrennten Proportionalbänder fürHeizen und Kühlen.
Proportionaler Regelausgang mit überlappenden Proportionalbänder fürHeizen und Kühlen
Zeit
PV
c_Pb
h_PbSP+cSP
SP
+100%Regelungsausgang
0%
-100%
PV = Istwert SP = Sollwert für HeizenSP+cSP = Sollwert für Kühlen h_Pb = Proportionalband für Heizenc_Pb = Proportionalband für Kühlen
14 • REGELUNGSAUSGANG
Bei dieser Art von Regelung (Aktivierung mit Parameter CtrL = 14) muss das Kühlmedium spezifiziert werden.Die PID-Parameter für das Kühlen leiten sich aus den PID-Parametern für das Heizen ab. Je nach Kühlmedium werden diese ins Verhältnisgesetzt. (z.B.: C.ME = 1 (Öl), H_Pb = 10, H_dt =1, H_It = 4 impliziert: C_Pb = 12,5, C_dt = 1 , C_It = 4).Es wird empfohlen, bei der Eingabe der Zykluszeiten für die Ausgänge folgende Werte zu verwenden: Luft T Zyklus Kühlen = 10 sÖl T Zyklus Kühlen = 4 sWasser T Zyklus Kühlen = 2 s
HINWEIS: Bei dieser Betriebsart können die Parameter für das Kühlen nicht geändert werden.
Regelung Heizen/Kühlen mit Relativverstärkung

25 ±1
Ø 7
±0,
5
5,50m
PTC 7 x 25 5m
• BESTELLNUMMER
TECHNISCHE DATEN
Sondenmodell: UmgebungssondeKappenmaterial: Kunststoff (Ø 7 x 25mm)Temperaturbereich: -20...80°CPTC: R 25°C = 1KΩ ±1% (KTY 81-110)Reaktionszeit: 20sec (in stiller Luft)Isolierung: 100MΩ, 500Vd.c. zwischen Kappe und KlemmenKabelmaterial: unipolares PVC - Kabel (12/0,18)Kabellänge: 5,50m
• Schnittstellenkabel RS232 / TTL für GEFRAN Instrumentenkonfiguration
COD. 1108200 Kabel + Floppy
• BESTELLNUMMER
• STROMWANDLER15 • ZUBEHÖR
• Anwendung mit doppeltem Sollwert (Rampe + Halten + Alarm Ende)16 • ANWENDUNGEN
50 / 0.05 A
152050 9640
1 2
1 2
5,5 27 5,5
920
1948
8 838
1
13
20
2
In
44 30
1010
Befestigungsbohrungfür Blechschrauben: 2,9 x 9
Die Stromwandler werden für Strommessung, im Bereich 25 bis 600A, 50 bis 60Hz,eingesetzt.
CODE Ip / Is Ø Draht n AUSGÄNGE Ru Vu GENAUIGKEITSekundärwicklung
TA/152 025 25 / 0.05A 0.16 mm n1-2 = 500 1 - 2 40 Ω 2 Vac 2.0 %
TA/152 050 50 / 0.05A 0.18 mm n1-2 = 1000 1 - 2 80 Ω 4 Vac 1.0 %
IN = 25AacOUT = 50mAac
COD. 330200IN = 50AacOUT = 50mAac
COD. 330201
• BESTELLNUMMER
HINWEIS: Die Schnittstelle RS232 für die PC-Konfigurationwird nur in Verbindung mit der ProgrammiersoftwareWINSTRUM geliefert. Beim Anschluss an den PC muss dasInstrument eingeschaltet sein, doch die Ein- und Ausgängedürfen nicht angeschlossen sein.
48
• PTC
AL
Bezogen auf denaktuellen Sollwert
Sollwertprofil
Sol
lwer
t < A
L
Ver
zöge
rung
bei
Aus
lösu
ng(*
)
Absolutalarm
inverser Alarm
(*) Diese Zeit wird beiParameter Hy.n eingestellt.
direkter Alarm
Zeit (min oder s)

BESTELLKODE
• SICHERHEITSHINWEISE
Folgende Sicherheitshinweise sind vor der Installation, dem Anschließen und dem Gebrauch des Instruments zu beachten:• Beim Anschließen des Gerätes sind die im Handbuch enthaltenen Anweisungen genau zu befolgen. • Für die Anschlüsse sind immer geeignete Kabel zu verwenden, die den geforderten Spannungs- und Stromwerten genügen. • Das Gerät verfügt über KEINEN Hauptschalter und wird daher unmittelbar nach dem Anschluss an die Betriebsspannung aktiviert. AusSicherheitsgründen erfordern permanent ans Netz angeschlossene Geräte einen zweipoligen Trennschalter; dieser Trennschalter muss sich in der Nähedes Geräts befinden und leicht vom Bedienungspersonal zu erreichen sein. Ein einziger Trennschalter kann mehrere Geräte speisen. • Wenn das Gerät an elektrisch NICHT isolierte Apparate angeschlossen wird (z.B. Thermoelemente), muss die Masseverbindung über eineentsprechend ausgelegte Ausgleichsleitung erfolgen, um zu verhindern, dass Masseschleifen über den Fühler entstehen. • Wenn bei bestimmten Anwendungen des Gerätes die Gefahr von Personen-, Maschinen- oder Materialschäden besteht, ist dessen Betrieb nur imZusammenhang mit zusätzlichen Alarmgeräten erlaubt. Es ist ratsam, während des gesamten Betriebs die Zustände der Alarme ständig auszuwerten. • Der Betreiber des Gerätes hat vor der Inbetriebnahme die Korrektheit der ins Gerät eingegebenen Parameter sicherzustellen, um Sach- undPersonenschäden zu vermeiden. • Das Gerät DARF NICHT in einer Umgebung mit gefährlicher Atmosphäre (Feuer- oder Explosionsgefahr) betrieben werden. Es kann an Elemente, die inderartigen Atmosphären arbeiten, nur über geeignete Schnittstellen angeschlossen werden, in Übereinstimmung mit geltenden örtlichenSicherheitsvorschriften. • Das Gerät enthält gegenüber elektrostatischen Entladungen empfindliche Komponenten. Daher muss die Handhabung der darin eingebautenelektronischen Platinen mit entsprechender Vorsicht erfolgen, um dauerhafte Schäden an den betreffenden Komponenten zu vermeiden. Hinweise zur Installation: Installationskategorie II, Verschmutzungsgrad 2, doppelte Isolierung• Netzspannungsleitungen sollen nach Möglichkeit nicht zusammen mit Signalleitungen verlegt werden. Die Versorgungsspannung muss mit denAngaben auf dem Typenschild übereinstimmen. • Die Instrumentierung getrennt vom Leistungsteil und den Relais anordnen. • Die Instrumente nicht in Schaltanlagen einbauen, in denen auch Hochleistungstrennschalter, Schütze, Relais, Thyristorsteller (insbesondere solche mitPhasenanschnitt), Motoren usw. installiert sind. • Das Instrument nicht Staub, Feuchtigkeit, aggressiven Gasen und Wärmequellen aussetzen. • Darauf achten, dass die Lüftungsschlitze nicht abgedeckt werden. Die Betriebstemperatur muss in einem Bereich von 0 bis 50°C liegen. Wenn das Instrument über Faston-Klemmen verfügt, müssen diese isoliert und geschützt sein. Wenn es über Schraubklemmen verfügt, müssen dieKabel mindestens paarweise gesichert werden. • Stromversorgung: über eine Trennvorrichtung mit Sicherung für den Instrumententeil. Die Stromversorgung der Instrumente muss so direkt wie möglichvom Trennschalter abgehen. Sie darf außerdem nicht zur Steuerung von Relais, Schützen, Magnetventilen usw. verwendet werden. Wenn dieVersorgungsspannung durch Thyristorsteller oder Elektromotoren gestört wird, kann die Verwendung eines Trenntransformators für die Stromversorgungder Geräte nützlich sein, wobei der Trafoschirm zu erden ist. Wichtig ist eine gute Erdung der Anlage, ein Spannungswert < 1V zwischen Schutzleiter undNeutralleiter sowie ein Widerstand < 6 Ohm gegenüber Masse. Sollte die Netzspannung breiten Schwankungen unterliegen, empfehlen wir dieAnwendung eines Spannungsstabilisators. In der Nähe von Hochfrequenzgeneratoren oder Bogenschweißanlagen empfehlen wir eine Glättung derVersorgungsspannung über ein Netzfilter. Die Netzspannungsleitungen sollen nach Möglichkeit nicht zusammen mit Signalleitungen verlegt werden. DieVersorgungsspannung muss mit den Angaben auf dem Typenschild übereinstimmen. • Anschluss der Ein- und Ausgänge: die angeschlossenen externen Stromkreise müssen eine doppelte Isolierung haben. Beim Anschließen der analogenEingänge (TC, RTD) ist Folgendes zu beachten: Bei den analogen Eingangsleitungen (Thermoelement, Widerstandsthermometer) raten wir, die Kabelgetrennt von der Versorgung sowie von Ausgangs- und Netzspannung führenden Kabeln zu verlegen. Ist das nicht möglich, empfehlen wir dieVerwendung verdrillter, abgeschirmter Leitungen. Die Abschirmung sollte nur an einem Ende geerdet werden. An Ausgangsleitungen, die unter Lastgeschaltet werden (Schütze, Magnetventile, Motoren, Gebläse usw.), ist ein RC-Glied (Widerstand und Kondensator in Reihe) parallel zur Last zuschalten um eventuelle Störaussendungen zu unterdrücken (Hinweis: alle Kondensatoren müssen der VDE-Standardklasse (Klasse x2) entsprechen undeiner Spannung von mindestens 220VAC standhalten. Der maximale Verlustleistungsfähigkeit des Widerstandes muss mindestens 2W betragen. Beiinduktiver Last muss eine Diode vom Typ 1N4007 parallel zur Last geschaltet werden. Die Firma GEFRAN spa übernimmt in keinem Fall die Haftung für Sach- oder Personenschäden, die auf unbefugte Eingriffe sowieunsachgemäße oder den technischen Eigenschaften des Gerätes nicht angemessene Bedienung oder Anwendung zurückzuführen sind.
! ACHTUNG: Dieses Zeichen symbolisiert Gefahr.Es ist im Inneren des Instruments in der Nähe der Stromversorgung und bei den Relaisanschlüssen angebracht.
49
Relais R
600
AUSGANG 1 (AL)
R
100...240V
20...27V
1
0
2
0 Keine
RS485
R Relais
STROMVERSORGUNG
SERIELLE SCHNITTSTELLE / AUSGANG 4
AUSGANG 2 (MAIN)
Relais R
Logik D
Triac (1A) T
EINGANG / AUSGANG 3
Keiner 0
Relais R
Logik D
Stetiger Regelausgang 10V C
Analogausgang 20mA W
Stromwandler-Eingang (50mAac) H
Digitaleingang N
Für Informationen zur Verfügbarkeit der Kombinationen bitte GEFRAN kontaktieren.
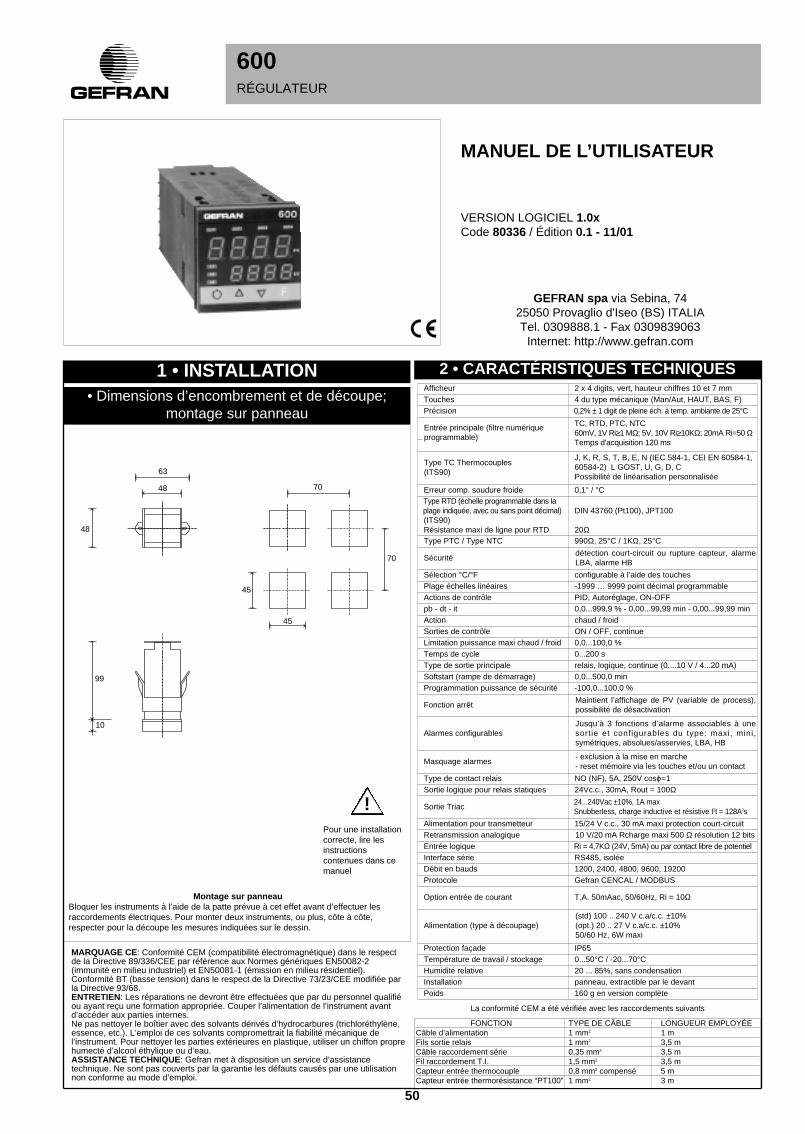
Entrée logique Ri = 4,7KΩ (24V, 5mA) ou par contact libre de potentiel
Protocole Gefran CENCAL / MODBUS
Interface série RS485, isolée
Retransmission analogique 10 V/20 mA Rcharge maxi 500 Ω résolution 12 bitsAlimentation pour transmetteur 15/24 V c.c., 30 mA maxi protection court-circuit
Type de contact relais NO (NF), 5A, 250V cosϕ=1Sortie logique pour relais statiques 24Vc.c., 30mA, Rout = 100Ω
Temps de cycle 0...200 sType de sortie principale relais, logique, continue (0....10 V / 4...20 mA)
Sorties de contrôle ON / OFF, continueLimitation puissance maxi chaud / froid 0,0...100,0 %
Sélection °C/°F configurable à l’aide des touchesPlage échelles linéaires -1999 … 9999 point décimal programmableActions de contrôle PID, Autoréglage, ON-OFFpb - dt - it 0,0...999,9 % - 0,00...99,99 min - 0,00...99,99 minAction chaud / froid
Softstart (rampe de démarrage) 0,0...500,0 min
Alarmes configurablesJusqu’à 3 fonctions d’alarme associables à unesortie et configurables du type: maxi, mini,symétriques, absolues/asservies, LBA, HB
Programmation puissance de sécurité -100,0...100,0 %
Fonction arrêtMaintient l’affichage de PV (variable de process),possibilité de désactivation
Masquage alarmes- exclusion à la mise en marche- reset mémoire via les touches et/ou un contact
Option entrée de courant T.A. 50mAac, 50/60Hz, Ri = 10Ω
Protection façade IP65Température de travail / stockage 0...50°C / -20...70°CHumidité relative 20 ... 85%, sans condensationInstallation panneau, extractible par le devantPoids 160 g en version complète
Alimentation (type à découpage)(std) 100 .. 240 V c.a/c.c. ±10%(opt.) 20 .. 27 V c.a/c.c. ±10%50/60 Hz, 6W maxi
Sécuritédétection court-circuit ou rupture capteur, alarmeLBA, alarme HB
Type RTD (échelle programmable dans laplage indiquée, avec ou sans point décimal)(ITS90)Résistance maxi de ligne pour RTD
DIN 43760 (Pt100), JPT100
20Ω
Erreur comp. soudure froide 0,1° / °C
Type PTC / Type NTC 990Ω, 25°C / 1KΩ, 25°C
600RÉGULATEUR
VERSION LOGICIEL 1.0xCode 80336 / Édition 0.1 - 11/01
MANUEL DE L’UTILISATEUR
Pour une installationcorrecte, lire lesinstructionscontenues dans cemanuel
Type TC Thermocouples(ITS90)
Afficheur 2 x 4 digits, vert, hauteur chiffres 10 et 7 mmTouches 4 du type mécanique (Man/Aut, HAUT, BAS, F)Précision 0,2% ± 1 digit de pleine éch. à temp. ambiante de 25°C
Entrée principale (filtre numériqueprogrammable)
TC, RTD, PTC, NTC60mV, 1V Ri≥1 MΩ; 5V, 10V Ri≥10KΩ; 20mA Ri=50 ΩTemps d'acquisition 120 ms
1 • INSTALLATION• Dimensions d’encombrement et de découpe;
montage sur panneau
Montage sur panneauBloquer les instruments à l’aide de la patte prévue à cet effet avant d’effectuer lesraccordements électriques. Pour monter deux instruments, ou plus, côte à côte,respecter pour la découpe les mesures indiquées sur le dessin.
MARQUAGE CE: Conformité CEM (compatibilité électromagnétique) dans le respectde la Directive 89/336/CEE par référence aux Normes génériques EN50082-2(immunité en milieu industriel) et EN50081-1 (émission en milieu résidentiel).Conformité BT (basse tension) dans le respect de la Directive 73/23/CEE modifiée parla Directive 93/68.ENTRETIEN: Les réparations ne devront être effectuées que par du personnel qualifiéou ayant reçu une formation appropriée. Couper l’alimentation de l’instrument avantd’accéder aux parties internes.Ne pas nettoyer le boîtier avec des solvants dérivés d’hydrocarbures (trichloréthylène,essence, etc.). L’emploi de ces solvants compromettrait la fiabilité mécanique del’instrument. Pour nettoyer les parties extérieures en plastique, utiliser un chiffon proprehumecté d’alcool éthylique ou d’eau.ASSISTANCE TECHNIQUE: Gefran met à disposition un service d’assistancetechnique. Ne sont pas couverts par la garantie les défauts causés par une utilisationnon conforme au mode d’emploi.
2 • CARACTÉRISTIQUES TECHNIQUES
!
50
GEFRAN spa via Sebina, 7425050 Provaglio d'Iseo (BS) ITALIATel. 0309888.1 - Fax 0309839063
Internet: http://www.gefran.com
99
10
45
45
48
70
70
63
48
FONCTION TYPE DE CÂBLE LONGUEUR EMPLOYÉECâble d’alimentation 1 mm2 1 mFils sortie relais 1 mm2 3,5 mCâble raccordement série 0,35 mm2 3,5 mFil raccordement T.I. 1,5 mm2 3,5 mCapteur entrée thermocouple 0,8 mm2 compensé 5 mCapteur entrée thermorésistance “PT100” 1 mm2 3 m
La conformité CEM a été vérifiée avec les raccordements suivants
J, K, R, S, T, B, E, N (IEC 584-1, CEI EN 60584-1,60584-2) L GOST, U, G, D, CPossibilité de linéarisation personnalisée
Sortie Triac24...240Vac ±10%, 1A maxSnubberless, charge inductive et résistive I2t = 128A2s
Débit en bauds 1200, 2400, 4800, 9600, 19200

Cencal Out 4Modbus
-relais 5A/250Vca
Standard:100…240 V c.a./V c.c. ± 10%
Option:20…27 V c.a./V c.c. ± 10%
Puissance maxi 6 W; 50/60 Hz
4 • CONNEXIONS• Sorties / Entrée de courant
- relais 5 A/250 V c.a.- logique 10V/30mA- triac 20…240Va.c., 1A ±10%
- uniquem. relais 5A/250V c.a
- relais 5 A/250 V c.a.- logique 10V/30mA- continue 0…10 V, 0/4…20 mAanalogique 0…10V, 0/4…20mAà usage de transmission, rés. 12 bits- entrée par transformateurd’intensité 50 mA c.a., 2 Ω 50/60 Hz- entrée logique 24V, 4mA parcontact libre de potentiel
6
5
4
3
2
1
7
8
9
10
11
12
18
17
16
15
14
13
19
20
21
22
23
24
-
+Out2
Out1
• Alimentation
23
24
~
~
TOP
-
+
Out3 (Al2)Ing. T.A.
!
PWR
51
Touches «HAUT» et «BAS»Permettent d’incrémenter ou de décrémenter un quelconque paramètre numérique •• La vitesse d’incrémentation ou de décrémentation estproportionnelle à la durée de la pression sur la touche •• L’opération n’est pas cyclique, c’est-à-dire qu’une fois qu’on a atteint le maximum ou leminimum d’une plage de programmation, la fonction incrémentation/décrémentation se bloque même si on maintient la pression sur la touche.
3 • DESCRIPTION FAÇADE INSTRUMENT
Sélection réglage Automatique/Manuel:Active uniquement quand l’afficheur PV
visualise la mesure
Afficheur PV: Indication de la variable de process
Touche fonction:Permet d’accéder aux diverses phases de configuration•• Valide la modification des paramètres programmés etpasse au paramètre suivant ou précédent si on appuieen même temps sur la touche Auto/Man
Indicateurs de fonction:Signalent le type de fonctionnement de l’instrument:
MAN/AUTO = OFF (réglage automatique)ON (réglage manuel)
SETPONT1/2 = OFF (IN1=OFF-Consigne locale 1)ON (IN1=OFF-Consigne locale 2)
SELFTUNING = OFF (Self activé)ON (Self désactivé)
L1
Afficheur SV: indication Consigne de régulation
Indication état des sorties:OUT 1 (AL 1); OUT 2 (Main); OUT 3 (HB); OUT 4
• Ligne série / Sortie 4
Configurationstandard
4...20mA
Raccorder pour entrée 20 mA
Utiliser des filsd’une sectionappropriée(min. 1mm2)
PT100, JPT100,PTC, NTC
• Pt100 / PTC / NTC
• Structure de l’appareil • Identification des cartes
3
1
2
Pt100 3 filsPTC / NTC /Pt100 2 fils
Thermocouples disponibles:J, K, R, S, T, B, E, N,
L, U, G, D, C
- Respecter la polarité.- Pour des extensions, utiliserun câble compensé adaptéau type de TC employé.
+
-
• Entrée TC
2
1
4
2
3
1
+ 24V o 15VVT
-
+
+
S
-Ri =
50Ω
4
2
3
1
+ 24V o 15VVT
-
+
+
-Ri =
50Ω
TT
• Entrée linéaire avec transmetteur 3 fils
• Entrées
• Entrée linéaire avec transmetteur 2 fils
L2
L3
9
10
11
+
-
TXB
A
RX
-
+
12
9
10
11
12
DISPLAY
POWER
SERIAL INTERFACE/OUT4
Carte alimentation
Sélectiontensiond’alimentationtransmetteur
Sélection signalsur contact 3
Carte CPU
CPU
24V
15V
10V
5V 1,23
V
PT
100
+V
5Entrée
linéaire encourantcontinu
20mA,Ri = 50Ω
Entrée linéaireen tensioncontinue
60mV, 1VRi > 1MΩ5V, 10V
Ri > 10KΩ
2
1 +
-
• Entrée linéaire (I)
4
1
2
-
+
• Entrée linéaire (V)
Ligne série isolée RS485
Pour configuration Cencal, voir feuille technique de la carte série
19
21
20
22
6
5
Sorties d’emploi générique configurables par l’utilisateur

52
5 • PROGRAMMATION ET CONFIGURATION “EASY”
al.1
P.V. / S.V.P.V. / S.V. Mesure (afficheur PV)
Consigne de travail (afficheur SV) ouvaleur sortie de régulation avec
régulateur en manuel
InP
Out
PAS = 99
Pro
Configurations entrées
Configurations sorties
swconf=ON
PAS
Menu personnalisé
Mot de passe
Code de protection
Seuil alarme 1 (points d’échelle)
CFG
AFFICHAGE NIVEAU 1
• CFG
• InP
h.pb
h.it
h.dt
h.p.x
Xy.i
Bande proportionnellede chauffage
Temps d’intégralede chauffage
Temps de dérivéede chauffage
Limite maxi puissancede chauffage
0 ... 999.9%pleine échelle
0.00 ... 99.99 min
0.00 ... 99.99 min
0.0 ... 100.0%
Hystérésis pour alarme 10…999 s
Si +32 in A1.t 0…999 min
Si +64 in A1.t
±999points d’échelle
typ. Type de capteur, signal, validation linéarisation personnaliséeet échelle entrée principale (Cf. tableau typ, p. 6)
dp.s
lo.s
xi.s
Position point décimalpour l’échelle entrée
Limite mini d’échelleentrée principale
Limite maxi d’échelleentrée principale
dP_S Format0 xxxx1 xxx.x2 xx.xx3 x.xxx
mini...maxi échelle de l’entréesélectionnée dans tyP
mini...maxi échelle de l’entréesélectionnée dans tyP
• Out • Prot
xi.l
lo.lLimite inférieure de réglagede la consigne locale et des
alarmes absoluesLo.S ... Hi.S
Limite supérieure de réglagede la consigne locale et des
alarmes absoluesLo.S ... Hi.S
Typealarme 1
AL.x.t Directe (détection haute) Absolue NormalInverse (détection basse) Asservie Symétrique
à la consigne active (bande)0 directe absolute normal1 inverse absolute normal2 directe relativo normal3 inverse relativo normal4 directe absolute symétrique5 inverse absolute symétrique6 directe relativo symétrique7 inverse relativo symétrique
AL.1.t, AL.2.t, AL.3.t
a1.t
(t.2Temps de cycle
Out2(Chaud ou Froid)
1...200 s
Pro Code de protection
Prot Affichage Modification0 SP, alarmes SP, alarmes1 SP, alarmes SP2 SP
+4 inhibition InP, Out+8 inhibition CFG+128 valide la configuration étendue
LA CONFIGURATION «EASY» EST ADAPTÉE AUX VERSIONS ÀDEUX SORTIES (OUT1, OUT2). POUR L’ACCÈS AUX AUTRES
PARAMÈTRES, AJOUTER 128 À LA VALEUR Pro
+ 8 pour inhiber à la mise sous tension jusqu'au premier franchissement de seuil + 16 pour valider la mémoire de l'alarme+ 32 Hys devient le temps de retard à l'activation de l'alarme (0...999 s)
(absolue symétrique exclue)+ 64 Hys devient le temps de retard à l'activation de l'alarme (0...999 mn)
(absolue symétrique exclue)

(*) Pour ces affichages, le retour temporisé à PV/SV est désactivé.
53
6 • PROGRAMMATION ET CONFIGURATION
al.1
al.2
a.xb
0V.P
sp
SP.1
SP.2
in.2
Si on n’appuie pas sur les touches HAUT, BAS et F dans les 15 s,l’affichage revient à la valeur P.V./S.V.
INF
P.V. / S.V.P.V. / S.V. Mesure (afficheur PV)
Consigne de travail (afficheur SV) ouvaleur sortie de régulation avec
régulateur en manuel
Seuil alarme 2 (points d’échelle)
Seuil alarme 3 (points d’échelle)
A.Hb Seuil alarme HB(points d’échelle entrée de courant)
Valeurs sorties de régulation(+Chaud / -Froid)
Communication sérieSEr
InP
Out
PAS = 99
Pro
Lin
Configurations entrées
Configurations sorties
Configuration matériel (hardware)
Linéarisation entrée
NON
Pour faire défilerles menus, garder
la touche Fappuyée.
Pour sélectionner lemenu affiché,
lâcher la touche.
Pour accéder auxparamètres,
appuyer sur latouche F.
Pour quittern’importe quel
menu, garder latouche F appuyée.
Dans n’importequel menu, en
gardant les touchesF + Auto/Man
appuyées pendant2 s, on passe
immédiatement àl’affichage de
niveau 1.
swconf=ON
Consigne locale
AFFICHAGE NIVEAU 1
PAS
NON
Hrd
U.CA
Menu personnalisé
Mot de passe
Étalonnage utilisateur
Code de protection
Affichage informations
Consigne 1
Consigne 2
Valeur entrée de courant(avec entrée T.I. présente)
Seuil alarme 1 (points d’échelle)
Nota: Tous les paramètres qui ne sont pas nécessaires, en raison de la configuration particulière, ne sont pas visualisés.
-
al.3
upd
(od
(.xd
err
• Affichage InFo
INF
Version logiciel
Code appareil
Code erreurautodiagnostic
Configurationhardware
+8 erreur reconnaissance carte OUT2+16 erreur reconnaissance carte OUT3
Affichageinformations
CFG
(*)
(*)
0 No Error1 Lo2 Hi3 ERR4 SBR
SORTIE 20 = Aucune1 = Relais2 = Logique3 = Triac
ENTRÉE / SORTIE 30 = Aucune1 = Relais2 = Logique3 = Continue4 = Analogique5 = Ent. T.I.6 = Ent. logique
COMUNICAZIONE DIG. / OUT40 = Aucune1 = RS 4852 = Relais
Example: 1 1 1 = R + R + RS 485

• CFG
• Ser
parSER.P Protocole série0 CENCAL GEFRAN1 MODBUS RTU
54
S.tv
h.pb
h.it
h.dt
h.p.x
h.p.l
c.sp
c.pb
c.it
c.dt
c.p.x
c.p.l
rst
P.rs
A.rs
ffd
sof
Xy.i
Xy.2
Xy.3
xb.t
lb.t
lb.p
fa.p
g.sp
Validationautoadaptativité,
autoréglage,softstart
CFG Paramètres de réglage
Bande proportionnelle dechauffage
Temps d’intégrale dechauffage
Temps de dérivée dechauffage
Limite maxi puissance dechauffage
Consigne derefroidissement relative àla consigne de chauffage
Bande proportionnellede refroidissement
Temps d’intégrale derefroidissement
Temps de dérivée derefroidissement
Limite maxi puissance derefroidissement
Reset manuel
Hystérésis pour alarme 2
Hystérésis pour alarme 3
Temps d’attente pourintervention alarme HB
Temps d’attente pour interventionalarme LBA
(en programmant 0, l’alarme est inhibée)
Limitation de la puissance fournie encondition d’alarme LBA
Puissance de sécurité(fournie dans des conditions de capteur
défectueux)
S.tun autoréglage autoadaptativité Softstartcontinu
0 NON NON NON1 OUI NON NON2 NON OUI NON3 OUI OUI NON4 NON NON OUI5 OUI NON OUI
0.00 ... 99.99 min
0.00 ... 99.99 min
0.0 ... 100.0%
-999 ... 999points d’échelle
0 ... 999.9%pleine échelle
0.00 ... 99.99 min
0.00 ... 99.99 min
0.0 ... 100.0%
Limite mini puissance dechauffage
(non disponible pour doubleaction chaud/froid)
0.0 ... 100.0%
± 25.0% p.e.
0 ... 999.9%pleine échelle
0…999 sSi +32 in A1.t0…999 min
Si +64 in A1.t
0...999 sSe +32 in A3.t0...999 min.
Se +64 in A3.t
0 ... 999 s
0.0 ... 500.0 min
-100.0 ... 100.0%
-100.0 ... 100.0%ON / OFF
Gradient de consigne(cf. remarques d’application)
0.0...999.9 digits/min.(digits/s voir SP.r)
Antireset
Feedforward(régulation avec
action anticipatrice)
0 ... 9999points d’échelle
-100.0 ... 100.0%
Puissance de reset -100.0 ... 100.0%
Hystérésis pour alarme 10…999 s
Si +32 in A1.t0…999 min
Si +64 in A1.t
Temps de softstart(rampe au démarrage)
0.0 ... 500.0 min
(La valeur doit être supérieure au temps de cyclede la sortie à laquelle est associée l’alarme HB)
Fluide derefroidissement
0 ... 2
C.MEd Gain relatif (Rg)(cf. remarque d’application)
0 Air 11 Huile 0,82 Eau 0,4
Limite mini puissance derefroidissement
(non disponible pour doubleaction chaud/froid)
0.0 ... 100.0%
(.ME-
(od
sr.p
Ser
Adresse de l’appareil
Configuration série
Protocoleinterface série:
0 ... 9999
bav Sélection débit enbauds
Sélection parité_PAr Parité
0 Aucune1 Impaire2 Paire
(*)
(*)
(*) Si l’alarme LBA est active, on peut la désactiver en appuyant sur les touches ∆ + ∇ quand OutP
est affiché, ou en commutant en manuel.
NotaLes paramètres c_Pb, c_It et c_dt sont en lecture seule en cas de validation du type de contrôlechaud/froid avec gain relatif (CtrL = 14).
bAud Débit en bauds0 12001 24002 48003 96004 19200
±999points d’échelle
±999points d’échelle
±999points d’échelle

Type Type sonde Sans point décimal Avec point décimalSensore: TC
0 TC J °C 0/1000 0.0/999.91 TC J °F 32/1832 32.0/999.92 TC K °C 0/1300 0.0/999.93 TC K °F 32/2372 32.0/999.94 TC R °C 0/1750 0.0/999.95 TC R °F 32/3182 32.0/999.96 TC S °C 0/1750 0.0/999.97 TC S ° F 32/3182 32.0/999.98 TC T °C -200/400 -199.9/400.09 TC T °F -328/752 -199.9/752.010 TC B °C 44/1800 44.0/999.911 TC B °F 111/3272 111.0/999.912 TC E °C -100/750 -100.0/750.013 TC E °F -148/1382 -148.0/999.914 TC N °C 0/1300 0.0/999.915 TC N °F 32/2372 32.0/999.916 L-GOST °C 0/600 0.0/600.017 L-GOST °F 32/1112 32.0/999.918 TC U °C -200/400 -199.9/400.019 TC U °F -328/752 -199.9/752.020 TC G °C 0/2300 0.0/999.921 TC G °F 32/4172 32.0/999.922 TC D °C 0/2300 0.0/999.923 TC D °F 32/4172 32.0/999.924 TC C °C 0/2300 0.0/999.925 TC C °F 32/4172 32.0/999.926 Ni-Ni18Mo °C 0/1100 0.0/999.927 Ni-Ni18Mo °F 32/2012 32.0/999.928 TC CUSTOM CUSTOM29 TC CUSTOM CUSTOM30 PT100 °C -200/850 -199.9/850.031 PT100 °F -328/156 2 -199.9/999.932 JPT100 °C -200/600 -199.9/600.033 JPT100 °F -328/1112 -199.9/999.934 PTC °C -55/120 -55.0/120.035 PTC °F -67/248 -67.0/248.036 NTC °C -10/70 -10.0/70.037 NTC °F 14/158 14.0/158.038 0...60 mV -1999/9999 -199.9/999.939 0...60 mV linéarisation personnalisée linéarisation personnalisée40 12...60 mV -1999/9999 -199.9/999.941 12...60 mV linéarisation personnalisée linéarisation personnalisée42 0...20 mA -1999/9999 -199.9/999.943 0...20 mA linéarisation personnalisée linéarisation personnalisée44 4...20 mA -1999/9999 -199.9/999.945 4...20 mA linéarisation personnalisée linéarisation personnalisée46 0...10 V -1999/9999 -199.9/999.947 0...10 V linéarisation personnalisée linéarisation personnalisée48 2...10 V -1999/9999 -199.9/999.949 2...10 V linéarisation personnalisée linéarisation personnalisée50 0...5 V -1999/9999 -199.9/999.951 0...5 V linéarisation personnalisée linéarisation personnalisée52 1...5 V -1999/9999 -199.9/999.953 1...5 V linéarisation personnalisée linéarisation personnalisée54 0...1 V -1999/9999 -199.9/999.955 0...1 V linéarisation personnalisée linéarisation personnalisée56 200mv..1V -1999/9999 -199.9/999.957 200mv..1V linéarisation personnalisée linéarisation personnalisée58 Cust10 V-20mA -1999/9999 -199.9/999.959 Cust10 V-20mA linéarisation personnalisée linéarisation personnalisée60 Cust 60mV -1999/9999 -199.9/999.961 Cust 60mV linéarisation personnalisée linéarisation personnalisée62 PT100-JPT CUSTOM CUSTOM63 PTC CUSTOM CUSTOM64 NTC CUSTOM CUSTOM
• InP
55
typ. Type de capteur, signal, validation linéarisation personnaliséeet échelle entrée principale
InP Configurations pour entrées
s.in Entrées appareil virtuel 0 ... 31
Entrées IN PV AL3 AL2 AL1Bit 4 3 2 1 0
Ex: 1 1 0 0 0Si on veut gérer la ligne série AN et IN, le code àrégler dans S.in est 24
s.0v Sorties appareil virtuel 0 ... 31
Sorties OUTW OUT4 OUT3 OUT2 OUT1Bit 4 3 2 1 0
Ex: 1 0 0 1 1Si on veut gérer la ligne série OUT1, OUT2 et OUTW, lavaleur à programmer dans S.Ou est 19.
s.U.i Interface utilisateurappareil virtuel
0 ... 63
Interf. LED KEYB DISL DISH LED LED LED LED1/2/3 OUT4 OUT3 OUT2 OUT1
Bit 7 6 5 4 3 2 1 0
Ex: 1 0 1 0 0 0Si on veut gérer par interface série KEYB et DISH, la valeur à programmerdans S.U.I est 80
+2 gradient de consigne en digits/s
flt
fld
dp.s
lo.s
xi.s
ofs.
ft.2
Filtre numérique sur l’entrée(si = 0, inhibe le filtre de moyenne sur
la valeur échantillonnée)
(*) non disponible pouréchelle TC, RTD et PTC.
Filtre numérique surl’affichage de l’entrée
Position point décimalpour l’échelle entrée
Limite mini d’échelleentrée principale
Limite maxi d’échelleentrée principale
Offset de correctionentrée principale
Filtre numériqueentrée auxiliaire
0.0 ... 20.0 s
0 ... 9.9points d’échelle
dP_S Format0 xxxx1 xxx.x2 xx.xx (*)3 x.xxx (*)
mini...maxi échelle de l’entréesélectionnée dans tyP
mini...maxi échelle de l’entréesélectionnée dans tyP
-999 ... 999points d’échelle
0.0 ... 20.0 s
sp.r Déf. Consigne externe:Val. Type consigne externe Absolue/Asservie0 numérique absolue
(par ligne série)1 numérique asservie à la
(par ligne série) consigne locale
Pour linéarisation personnalisée:- on a l’indication LO avec variable à des valeurs inférieures à Lo.S ou à lavaleur minimale de calibration- on a l’indication HI avec variable à des valeurs supérieures à Lo.S ou à lavaleur maximale de calibration
Erreur maximale de non-linéarité pour thermocouples(TC), thermorésistance(PT100) et thermistances(PTC, NTC)
L’erreur est calculée commeécart par rapport à la valeurthéorique avec référence en %à la valeur depleine échelle exprimée endegrés Celsius (°C)
S, R échelle 0...1750°C; erreur < 0,2% p.e. (t > 300°) / pourd’autres échelles: erreur < 0,5% p.e.
T erreur < 0,2% p.e. (t > -150°C)B échelle 44...1800°C; erreur < 0,5% p.e. (t > 300°) / échelle
44,0...999,9; erreur < 1% p.e. (t > 300°C)U échelle -99,9...99,9 et -99...99°C; erreur < 0,5% p.e. / pour
d’autres échelles: erreur < 0,2% p.e. (t > -150°C)G erreur < 0,2% p.e. (t > 300°C)D erreur < 0,2% p.e. (t > 200°C)C échelle 0...2300; erreur < 0,2% p.e. / pour d’autres
échelles: erreur < 0,5% p.e.
NTC erreur < 0,5% p.e.
TC type J, K, E, N, L erreur < 0,2% p.e.PT100, JPT100 e PTC erreur < 0,2% p.e.

56
xi.l
lo.l
of.2
xs.2
l5.2 Limite mini échelle entréeauxiliaire
Offset correction entréeauxiliaire
0.0 ... 999.9
Limite maxi échelle entréeauxiliaire 0.0 ... 999.9
-99,9 ... 99,9points d'échelle
Limite basse réglage SPet alarmes absolues
Lo.S ... Hi.S
Limite haute réglage SP etalarmes absolues
Lo.S ... Hi.S
• Out
Out Configuration pour sorties
Sélectiongrandeursréférencealarme 1
AL.1.r, AL.2.r, AL.3.rSélectiongrandeursréférencealarme 2
Sélectiongrandeursréférencealarme 3
AL.x.r Variable à comparer Seuil de référence0 PV (variable de process) AL1 SSP (consigne active) AL (absolue uniquement)2 PV (mesure) AL (uniquement asservie
et rapportée à SP1 avecfonction multiset)]
Typealarme 1
Typealarme 2
Typealarme 3
+8 pour inhiber à la mise en marche jusqu’au premier dépassement du seuil+16 pour valider la mémorisation de l’alarme+ 32 Hys devient le temps de retard à l'activation de l'alarme (0...999 s) (absolue symétrique exclue)+ 64 Hys devient le temps de retard à l'activation de l'alarme (0...999 mn) (absolue symétrique exclue)
AL.x.t Directe (détection haute) Absolue NormalInverse (détection basse) Asservie Symétrique
à la consigne active (bande)0 directe absolute normal1 inverse absolute normal2 directe relativo normal3 inverse relativo normal4 directe absolute symétrique5 inverse absolute symétrique6 directe relativo symétrique7 inverse relativo symétrique
AL.1.t, AL.2.t, AL.3.t
Fonctionnalitésde l’alarme
HB
Val. Description fonctionnalités0 Sortie relais, logique: alarme active
à une valeur du courant de chargeinférieure au seuil programmé dans letemps de ON de la sortie de contrôle
1 Sortie relais, logique: alarme activeà une valeur du courant de charge supérieure au seuil programmé dans le temps de OFF de la sortie de contrôle.
2 Alarme active si l’une des fonctions 0 et 1 estactive (OR logique entre les fonctions 0 et 1) (*)
3 Pour sortie continue de chauffage.7 Pour sortie continue de refroidissement.
+ 0 associée à la sortie Out1 (pour Hb_F= 0, 1, 2 uniquement)+ 4 associée à la sortie Out2 (pour Hb_F= 0, 1, 2 uniquement)+ 12 associée à la sortie Out4 (pour Hb_F= 0, 1, 2 uniquement)+16 alarme HB inverse
(*) Le seuil minimal est programmé à 12% pleine échelle d’intensité.
a1.r
a2.r
a3.r
a1.t
xb.f
a2.t
a3.t

57
an.o
rl.1
rl.2
rl.3
rl.4
(t.1
rel
(t.2
(t.3
x.an
l.an
Défaut(définition état en cas de
capteur défectueux)Err, Sbr
Minimum échellesortie de répétition
analogique 0
Maximum échellesortie de répétition
analogique
Val Grandeur de référence0 PV - mesure1 SSP - consigne active2 SP - consigne locale3 -4 Écart (SSP-PV)5 CHAUD (*)6 FROID (*)7 AL1 (seuil)8 AL2 (seuil)9 AL3 (seuil)10 -11 Valeur acquise de la liaison série (*)
Out WAttribution signal ou valeur de référence:
Out 1Attribution signal
de référence
_rEL. Alarme Alarme Alarme1 2 3
0 OFF OFF OFF1 ON OFF OFF2 OFF ON OFF3 ON ON OFF4 OFF OFF ON5 ON OFF ON6 OFF ON ON7 ON ON ON
-1999 ... 9999
16 pour la valeur 0 si l'entrée est en condition d'erreur Err – Sbr la sortie prend la valeur minimale de trimming
(*) - Limites échelle non programmables.- Sortie retransmise non disponible avec type de contrôle ON/OFF.
Temps de cycleOut 1
(Chaud ou Froid)
Temps de cycleOut 2
(Chaud ou Froid)
Temps de cycleOut 3
(Chaud ou Froid)
1...200 s
1...200 s
1...200 s(0,1 s fixe avec sortie continue,
Ct. 3 n'apparaît pas en configuration)
Out 2Attribution signal
de référence
Out 3Attribution signal
de référence
Out 4Attribution signal
de référence
-1999 ... 9999
rL.o.1, rL.o.2, rL.o.3, rL.o.4
+ 32 pour niveau logique inversé en sortie
Val Fonction0 CHAUD (sortie régulation chauffage)1 FROID (sortie régulation refroidissement)2 AL1 - alarme 13 AL2 - alarme 24 AL3 - alarme 35 AL.HB - alarme HB6 LBA - alarme LBA7 IN - Répétition entrée logique8 Répétition touche but (si but = 8)9 AL1 ou AL210 AL1 ou AL2 or AL311 AL1 et AL212 AL1 et AL2 et AL313 AL1 ou ALHB14 AL1 ou AL2 ou ALHB15 AL1 et ALHB16 AL1 et AL2 et ALHB
(t.4Temps de cycle
Out 4(Chaud ou Froid)
1...200 sec.
64 CHAUD sortie continue 2-10V (*)65 FROID sortie continue 2-10V (*)

58
(tr
hd.1
• Hrd
Hrd Configuration matériel (hardware)
Validation multisetgestion appareilspar liaison série
Val Multiset État voyants Gestion(2 SP) inversés appareil par
liaison série01 x2 x3 x x4 x5 x x6 x x7 x x x
Type de régulationVal Type de contrôle
0 P chaud1 P froid2 P chaud / froid3 PI chaud4 PI froid5 PI chaud / froid6 PID chaud7 PID froid8 PID chaud / froid9 ON-OFF chaud10 ON-OFF froid11 ON-OFF chaud / froid12 PID chaud + ON-OFF froid13 ON-OFF chaud + PID froid14 PID chaud + froid avec gain relatif
(cf. paramètre C.MEd)
Sélection temps d’échantillonnage del’action dérivée:+0 échantillonnage 1 s+16 échantillonnage 4 s+32 échantillonnage 8 s+64 échantillonnage 240 ms
Nota: En régulation du type ON-OFF,l’alarme LbA est inhibée.
• Prot
Pro Code de protection
Prot Affichage Modification0 SP, In2, alarmes, OuP, INF SP, alarmes1 SP, In2, alarmes, OuP, INF SP2 SP, In2, OuP, INF
+4 inhibition InP, Out+8 inhibition CFG, Ser+16 inhibition «marche - arrêt» par voie logicielle+32 inhibe la mémorisation de la puissance manuelle+64 inhibe la modification de la valeur de la puissance manuelle+128 valide la configuration étendue

dig.
al.n
bvt.
+8 pour valider l’alarme HB.+16 pour valider l’alarme LBA.
dig.
Fonction entréelogique
+16 16 pour entrée en logique inverse (NPN)+32 pour forcer l’état logique 0 (OFF)+48 pour forcer l’état logique 1 (ON)
AL.nr Alarme 1 Alarme 2 Alarme 30 inhibée inhibée inhibée1 validée inhibée inhibée2 inhibée validée inhibée3 validée validée inhibée4 inhibée inhibée validée5 validée inhibée validée6 inhibée validée validée7 validée validée validée
0 aucune fonction (entrée inhibée)1 MAN / AUTO régulateur2 LOC / REM3 HOLD4 Reset mémorisation alarmes5 Sélection SP1/SP126 Arrêt / marche par voie logicielle
Sélection alarmesvalidées
0 aucune fonction (touche inhibée)1 MAN / AUTO régulateur2 LOC / REM3 HOLD4 Reset mémorisation alarmes5 Sélection SP1 / SP26 Start / Stop autoréglage7 Start / Stop autoadaptativité8 Activation / Désactivation sorties Out 1... Out 4
+16 inhibe la fonction à l’intérieur desmenus de configuration
b u t t
Fonction destouches M/A
ld.1
ld.2
ld.3
59
Val. Fonction0 Aucune fonction1 MAN/AUTO régulateur2 LOC / REM3 HOLD4 Autoréglage actif5 Autoadaptativité active6 Répétition IN17 Validation communication série8 Erreur présente9 Softstart en exécution10 Indication SP1...SP2
Fonction led
+16 Si le voyant est allumé, il clignote
dsp Définition fonctionafficheur SV
diSP Fonction afficheur inférieur (SV)0 SSP - consigne active1 InP.2 - entrée auxiliaire2 Valeur sortie de régulation3 Écart (SSP - PV)

Pas 34 mV fin échelles.34
Pas 33 mV origine échelles.33
......
s.00
60
• Lin
Lin Linéarisation personnaliséepour entrée principale
la valeur du segment n correspond à l’entrée:mV d’origine échelle + n*∆mV
∆mV = (mV fin échelle - mV origine échelle) / 32
Pas 0Valeur origine
échelle
Pas 32Valeur fin échelle
Limites d’affichage(-1999...9999)
Limiti di visualizzaionedel display (-1999...9999)
• U.CAL
U.CA Étalonnageutilisateur
s.32
Pas 35mV à la température de
50°Cs.35
Val Fonction1 Sortie analogique (1)2 Entrée 1 – personnalisée 10V/ 20mA3 Entrée 1 - capteur personnalisé 60 mV4 Personnalisée PT100 / J PT1005 Personnalisé PTC6 Personnalisé NTC7 Entrée 2 - personnalisé TA (2)
Uniquement pourTYP = TC personnalisé
(1) La sortie analogique en 20 mA est calibrée avec une précision meilleure que 0,2% p.e.,procéder à la calibration si on désire la convertir en sortie 10 V.
(2) La précision en l’absence de calibration est meilleure que 1% p.e., procéder à la calibrationuniquement pour des exigences de précision supérieure

Ce type d'alarme nécessite l'utilisation de l'entrée par transformateur d'intensité (T.I.).Elle peut signaler des variations d'absorption dans la charge en discriminant la valeur du courant en entrée de courant dans laplage (0 ... HS.2). Elle est validée au moyen d'un paramètre de configuration (AL.n); dans ce cas la valeur de franchissementdu seuil de l'alarme est exprimée en points d'échelle HB.Par l'intermédiaire du paramètre Hb.F (phase " Out "), on sélectionne le type de fonctionnement et la sortie de régulationassociée.La programmation du seuil d'alarme est A.Hb.L'alarme HB directe intervient dans le cas où la valeur de l'entrée de courant se trouve au-dessous du seuil programmé pourHb.t secondes globales de temps de " ON " de la sortie sélectionnée.L'alarme HB ne peut être activée qu'avec des temps de ON supérieurs à 0.4 secondes (exclut la sortie continue).La fonctionnalité de l'alarme HB prévoit le contrôle du courant de charge même pendant l'intervalle de OFF du temps de cyclede la sortie sélectionnée: si pour Hb.t secondes globales d'état de OFF de la sortie, le courant mesuré dépasse de 12,5% lapleine échelle configurée (paramètres HS.2 dans InP), l'alarme HB devient active.Le reset de l'alarme a lieu automatiquement si on élimine la condition l'ayant générée.Une programmation du seuil A.Hb à 0 inhibe les deux types d'alarme HB avec désexcitation du relais associé.L'indication du courant de charge est affichée si on sélectionne le paramètre In.2. (niveau 1).REMARQUE: les temps de ON/OFF se rapportent au temps de cycle programmé de la sortie sélectionnée.L'alarme Hb_F = 3 (7) continue est active pour une valeur du courant de charge inférieure au seuil programmé; elle est inhibéesi la valeur de la sortie de chauffage (refroidissement) est inférieure à 3%.
La valeur d’entrée et les alarmes restent figées pendant le temps durant lequel l’entrée logique est active.Quand l’entrée est active, une R.À.Z. de la mémoire d’alarme provoque la désexcitation de tous les relais excités et la R.À.Z.de la mémoire de toutes les alarmes.
FONCTIONNEMENT ALARME HB
• Fonctionnement type HOLD
61
7 • ALARMES
temps
AL1 + Hyst1
AL2 + Hyst2AL2
AL1
alarme 1
alarme 2
(*)
Pour AL1 alarme absolue inverse (valeur mini) avec Hyst 1 positive, AL1 t = 1(*) = OFF s’il existe une inhibition à la mise en marche.Pour AL2 alarme absolue directe (valeur maxi) avec Hyst 2 négative, AL2 t = 0
Pour AL1 alarme absolue inverse symétrique avec hystérésis Hyst 1, AL1 t = 5Pour AL1 alarme absolue directe symétrique avec hystérésis Hyst 1, AL1 t = 4
Alarme absolue du type normal Alarme absolue du type symétrique
inverse
directe
AL1
AL1 + [ Hyst1 ]
AL1 - [ Hyst1 ]
temps
Pour AL1 alarme asservie inverse normale avec hystérésis Hyst 1 négative, AL1 t = 3Pour AL1 alarme asservie directe normale avec hystérésis Hyst 1 négative, AL1 t = 2
Pour AL1 alarme asservie inverse symétrique avec hystérésis Hyst 1, AL1 t = 7Pour AL1 alarme asservie directe symétrique avec hystérésis Hyst 1, AL1 t = 6
tempo
SP+AL1SP
inverse
directe
SP+AL1
SP
inverse
directe
temps
Hyst1
Alarme asservie à la consigne du type normal Alarme asservie à la consigne du type symétrique
SP-AL1

62
Action proportionnelle:action dans laquelle la contribution sur la sortie est proportionnelle à l’écart en entrée (à savoir l’écart entre la mesure et laconsigne).Action dérivée:action dans laquelle la contribution sur la sortie est proportionnelle à la vitesse de variation de l’écart en entrée.Action intégrale:action dans laquelle la contribution sur la sortie est proportionnelle à l’intégrale dans le temps de l’écart en entrée.
Influence des actions Proportionnelle, Dérivée et Intégrale sur la réponse du process à réguler* L’augmentation de la Bande Proportionnelle réduit les oscillations mais augmente l’écart.* La diminution de la Bande Proportionnelle réduit l’écart mais provoque des oscillations de la mesure (des valeurs trop bassesde la Bande Proportionnelle rendent le système instable).* L’augmentation de l’Action Dérivée, correspondant à une augmentation du Temps de Dérivée, réduit l’écart et permet d’éviterles oscillations jusqu’à une valeur critique du Temps de Dérivée au-delà de laquelle l’écart augmente et des oscillationsprolongées se produisent.* L’augmentation de l’Action Intégrale, correspondant à une diminution du Temps d’Intégrale, tend à annuler l’écart en régimeentre la mesure et la consigne.Si la valeur du Temps d’Intégrale est trop grande (Action Intégrale faible), on peut avoir une persistance de l’écart entremesure et consigne.Pour d’autres informations relatives aux actions de régulation, contacter GEFRAN.
8 • ACTIONS DE REGULATION
9 • TECHNIQUE DE REGLAGE MANUELLEA) Régler la consigne à la valeur de travail..B) Régler la bande proportionnelle à 0,1% (avec régulation type ON-OFF).C) Commuter en automatique et observer l’évolution de la mesure; on obtiendra un comportement semblable à celui décrit sur la figure:
D) Calcul des paramètres PID: valeur de bande proportionnelle
CrêteP.B.= ---------------------------------------- x 100
V maxi - V mini
(V maxi - V mini) est l’étendue de mesure configurée.Valeur de temps d’intégrale It = 1,5 x T Valeur de temps de dérivée dt = It/4 E) Commuter le régulateur en manuel, régler les paramètres calculés (réactiver larégulation PID en programmant un éventuel temps de cycle pour sortie relais) etcommuter en automatique.F) Si possible, pour évaluer l’optimisation des paramètres, changer la valeur deconsigne et contrôler le comportement transitoire. Si une oscillation persiste, augmenterla valeur de bande proportionnelle. En revanche, en cas de réponse trop lente, endiminuer la valeur.
Mesure
Temps
T
Crête
11 • MARCHE / ARRÊT PAR VOIE LOGICIELLEArrêt: par la combinaison des touches «F» et «Incrémentation» appuyées en même temps pendant 5 secondes, on peut, sans couperl’alimentation secteur, désactiver l’appareil qui se met dans l’état «OFF» et se comporte comme un appareil éteint, l’affichage de la mesurerestant toutefois actif. L’afficheur SV est éteint.Toutes les sorties (régulation et alarmes) sont à l’état OFF (niveau logique 0, relais au repos) et toutes les fonctions de l’appareil sont inhibées,à l’exception de la fonction de «MISE EN MARCHE» et de la communication série.Mise en marche: en appuyant sur la touche «F» pendant 5 secondes, l’ appareil passe de l’état «OFF» à l’état «ON». Si, pendant l’état«OFF», la tension secteur est coupée, à la remise en marche suivante (mise sous tension), l’ appareil se met dans le même état «OFF»; (l’étatde «ON/OFF» est mémorisé). Cette fonction est normalement activée; pour la désactiver, programmer le paramètre Prot = Prot +16. Cettefonction peut être associée à une entrée logique (d.i.G.) et interdit la désactivation par le clavier.
On valide la fonction multiset en hd.1.La fonction gradient est toujours validée.La sélection entre consigne 1 et consigne 2 peut être effectuée par touchefrontale ou entrée logique.On peut visualiser la sélection entre consignes 1 / 2 par LED.GRADIENT DE CONSIGNE: s'il est configuré π 0, à la mise en marche etau passage auto/man, la consigne prend la valeur PV, avec gradientconfiguré elle atteint la consigne locale ou celle sélectionnée.Toute variation de consigne est sujette à un gradient.Le gradient de consigne est inhibé à la mise en marche quandl'autoadaptativité est validée.Si le gradient de consigne est configuré π 0, il est actif même sur lesvariations de consigne locale, programmable uniquement dans le menu SPcorrespondant.La consigne de régulation atteint la valeur configurée avec une vitessedéfinie par le gradient.
10 • FONCTION MULTISET, GRADIENT DE CONSIGNE
SP1SP2
SPrem SP1(*)
ON
ON
SP
IN1
LOC/REM
t
t
t
(*) lorsque le gradient deconsigne est configuré

63
Cette fonction est valable pour des systèmes à action simple (chaud ou froid).L’activation de l’autoadaptativité a pour but de calculer les paramètres optimaux de régulation au moment du démarrage du process; la mesure(par ex. température) doit être celle prise à puissance nulle (température ambiante).Le régulateur fournit le maximum de puissance programmée jusqu’à l’obtention d’une valeur intermédiaire entre la valeur de départ et laconsigne, puis il remet la puissance à zéro. Les paramètres PID sont calculés à partir de l’évaluation de l’overshoot et du temps nécessairepour atteindre la crête.La fonction ainsi achevée se désactive automatiquement, la régulation se poursuit jusqu’à atteindre la consigne.
Comment activer l’autoadaptativité:A. Activation à la mise en marche1. Programmer la consigne à la valeur désirée.2. Activer l'autoadaptativité en configurant le paramètre Stun sur la valeur 2
(menu CFG)3. Arrêter l'appareil.4. S'assurer que la température est proche de la température ambiante.5. Remettre l'appareil en marche.
B. Activation par le clavier1. S'assurer que la touche M/A est validée pour la fonction Start/Stop autoadaptativité
(valeur but = 6 menu Hrd)2. Amener la température à une valeur proche de la température ambiante.3. Programmer la consigne à la valeur désirée.4. Appuyer sur la touche M/A pour activer l'autoadaptativité. (Attention: toute nouvelle pression sur la touche interrompt l'autoadaptativité)
La procédure se déroule automatiquement jusqu’à son terme. À la fin, les nouveaux paramètres PID sont mémorisés: bande proportionnelle,temps d’intégrale et de dérivée calculés pour l’action active (chaud ou froid). En cas d’action double (chaud et froid), les paramètres de l’actionopposée sont calculés en maintenant le rapport initial entre les paramètres respectifs (par ex: Cpb = Hpb * K; où: K = Cpb / Hpb au moment dudémarrage de l’autoadaptativité). Après la fin, le paramètre Stun est automatiquement annulé.Remarques:- La procédure s’interrompt, pendant son déroulement, si la consigne est dépassée. Dans ce cas, le paramètre Stun n’est pas annulé.- Il est conseillé de valider l'un des LEDs configurables pour la signalisation de l'état d'autoadaptativité. En programmant, dans le menu Hrd, undes paramètres Led1, Led2, Led3 = 4 ou 20, le voyant correspondant est allumé ou clignotant pendant la phase d'autoadaptativité active.
N.B.: Action non considérée dans le type de régulation ON/OFF
12 • AUTOADAPTATIVITÉ
Crête
T
S.P.
t.a.Temps
Mesure
S.P. - t.a.2
13 • AUTORÉGLAGEL’activation de la fonction d’autoréglage interdit le réglage manuel des paramètres PID.L’autoréglage peut être de deux types: permanent ou simple.Dans le premier cas, il observe en permanence les oscillations du système en cherchant le plus rapidement possible les valeurs des paramètres PIDqui réduisent l’oscillation en cours. Il n’intervient pas si les oscillations se limitent à des valeurs inférieures à 1,0% de la bande proportionnelle.Il est interrompu en cas de variation de la consigne, et reprend automatiquement avec consigne constante. Les paramètres calculés ne sontpas mémorisés; en cas d’arrêt de l’ appareil, le régulateur reprend avec les paramètres programmés avant l’activation de l’autoréglage.L’autoréglage à action simple est utile pour le calcul dans le voisinage de la consigne. Il produit une variation sur la sortie régulation de 10% dela puissance actuelle et en évalue les effets en overshoot et dans le temps.Ces paramètres sont mémorisés et remplacent ceux précédemment programmés.Après cette perturbation, le régulateur reprend la régulation avec les nouveaux paramètres. Le paramètre activé en CFG n’est accepté quedans la condition dans laquelle la puissance de régulation est comprise entre 20 et 80%.
temps
PV
c_Pb
h_Pb
SP+cSP
SP
+100%Sortie de régulation
0%
-100%
Sortie de régulation Sortie de régulation avec action proportionnelle seulement encas de bande proportionnelle de chauffage séparée de celle de refroidissement
Sortie de régulation avec action proportionnelle seulement en cas de bandeproportionnelle de chauffage superposée à celle de refroidissement
temps
PV
c_Pb
h_PbSP+cSP
SP
+100%Sortie de régulation
0%
-100%
PV = mesure SP = consigne de chauffageSP+cSP = consigne de refroidissement h_Pb = bande proportionnelle de chauffagec_Pb = bande proportionnelle de refroidissement
14 • RÉGLAGES
Dans ce mode de régulation (activé avec le paramètre CtrL = 14), on doit spécifier la typologie de refroidissement.Les paramètres PID de refroidissement sont donc calculés à partir des paramètres de chauffage dans le rapport indiqué (ex.: C.ME = 1 [huile],H_Pb = 10, H_dt =1, H_It = 4 implique: C_Pb = 12,5, C_dt = 1 , C_It = 4).Dans la programmation des temps de cycle pour les sorties, il est conseillé d’appliquer les valeurs suivantes:Air T Cycle Froid = 10 sHuile T Cycle Froid = 4 sEau T Cycle Froid = 2 s
N.B.: dans ce mode, les paramètres de refroidissement ne sont pas modifiables.
Régulation Chaud/Froid avec gain relatif

25 ±1
Ø 7
±0,
5
5,50m
PTC 7 x 25 5m
• REFERENCE DE COMMANDE
CARACTÉRISTIQUES TECHNIQUES
Mod: capteur: Capteur ambianceMatériau capuchon: Plastique (Ø 7 x 25mm)Plage de température: -20...80°CPTC: R 25°C = 1KΩ ±1% (KTY 81-110)Temps de réponse: 20 s (dans l’air au repos)Isolement: 100MΩ, 500Vdc entre capuchon et bornesMatériau câble: Unipolaire en PVC (12/0,18)Longueur câble: 5,50m
• Câble Interface RS232 / TTL pour configuration des appareils GEFRAN
CODE 1108200 Câble + Disquette
• REFERENCE DE COMMANDE
• Transformateur d’intensité15 • ACCESSOIRES
• Exemple d’application de double consigne (rampe + palier + alarme de fin temps)16 • APPLICATIONS
50 / 0.05 A
152050 9640
1 2
1 2
5,5 27 5,5
920
1948
8 838
1
13
20
2
In
44 30
1010
Trou de fixationpour vis auto-perceuse: 2,9 x 9
Ce type de transformateur est utilisé pour des mesures de courant en 50-60 Hz de 25 Aà 600 A (courant primaire nominal). La caractéristique particulière de ce transformateurest le grand nombre de spires au secondaire. Cela permet d’avoir un courantsecondaire très faible, adapté à un circuit électronique de mesure. Le courantsecondaire peut être mesuré comme une tension sur une résistance.
CODE Ip / Is Ø Conducteur n SORTIES Ru Vu PRÉCISIONSecondaire
TA/152 025 25 / 0.05A 0.16 mm n1-2 = 500 1 - 2 40 Ω 2 Vc.a. 2.0 %
TA/152 050 50 / 0.05A 0.18 mm n1-2 = 1000 1 - 2 80 Ω 4 Vc.a. 1.0 %
IN = 25AcaOUT = 50mAca
CODE 330200IN = 50AcaOUT = 50mAca
CODE 330201
• REFERENCE DE COMMANDE
N.B. L’interface RS232 pour la configuration par PC estfournie avec le logiciel de programmation WINSTRUM. Leraccordement doit être effectué avec l’appareil sous tensionet les entrées et sorties non raccordées.
64
• PTC
AL
Rapporté à laconsigne actuelle
Profil de consigne
Con
sign
e <
AL
Ret
ard
àl’a
ctiv
atio
n (*
)
Alarme absolue
Alarme inverse
(*) Temps réglé dans leparamètre Hy.n
Alarme directe
Temps (mn. ou s)

REFERENCE DE COMMANDE
• AVERTISSEMENTS
Avant d’installer, de raccorder ou d’utiliser l’ appareil, lire les instructions suivantes:• Raccorder l’ appareil en suivant scrupuleusement les indications du manuel.• Effectuer les connexions en utilisant toujours des types de câble adaptés aux limites de tension et de courant indiquées dans les caractéristiquestechniques.• L’ appareil N’EST PAS équipé d’un interrupteur M/A, par conséquent il s’allume immédiatement une fois l’alimentation appliquée. Pour des exigences desécurité, les appareillages raccordés en permanence à l’alimentation nécessitent: un disjoncteur sectionneur biphasé marqué du symbole spécifique, quidoit être placé à proximité de l’appareil et pouvoir être facilement atteint par l’opérateur. Un seul disjoncteur peut commander plusieurs appareils.• Si l’ appareil est raccordé à des éléments NON isolés électriquement (par ex. thermocouples), on doit effectuer le raccordement de terre avec unconducteur spécifique afin d’éviter que ce raccordement ne se fasse directement à travers la structure même de la machine.• Si l’ appareil est utilisé dans des applications comportant un risque de dommages pour les personnes, les machines ou les matériels, il est indispensablede l’associer à des appareils auxiliaires d’alarme. Il est également conseillé de prévoir la possibilité de vérifier l’intervention des alarmes même pendant lefonctionnement régulier.• L’utilisateur est tenu de vérifier, avant l’emploi, la programmation correcte des paramètres de l’ appareil, afin d’éviter tout dommage pour les personneset les biens.• L’ appareil NE peut PAS fonctionner dans des milieux dont l’atmosphère est dangereuse (inflammable ou explosive). Il peut être raccordé à deséléments qui travaillent dans une telle atmosphère uniquement par l’intermédiaire d’interfaces appropriés et opportuns, conformes aux normes locales desécurité en vigueur.• L’appareil contient des composants sensibles aux charges électrostatiques, raison pour laquelle la manipulation des cartes électroniques qu’il contientdoit se faire en prenant les précautions nécessaires afin de ne pas endommager de manière permanente lesdits composants.Installation: catégorie d’installation II, degré de pollution 2, double isolement.• Les lignes d’alimentation doivent être séparées de celles d’entrée et de sortie des instruments. Contrôler toujours que la tension d’alimentationcorrespond à celle qui est indiquée dans le sigle figurant sur l’étiquette de l’ appareil.• Regrouper l’instrumentation séparément de la partie de puissance et des relais.• Éviter que ne coexistent dans le même tableau des télérupteurs haute puissance, des contacteurs, des relais; des groupes de puissance à thyristors,notamment «en angle de phase»; des moteurs, etc.• Éviter la poussière, l’humidité, les gaz corrosifs, les sources de chaleur.• Ne pas boucher les fentes d’aération. La température de travail doit se situer dans la plage 0 - 50°C.Si l’ appareil est équipé de cosses type faston, celles-ci doivent être d’un type protégé et isolé; s’il est équipé de contacts à vis, il nécessaire de fixer lescâbles au moins par paires.• Alimentation: provenant d’un dispositif de sectionnement avec fusible pour la partie instruments; l’alimentation des appareils doit être la plus directepossible à partir du sectionneur et de plus elle ne doit pas être utilisée pour commander des relais, des contacteurs, des électrovannes, etc. Quand elleest fortement perturbée par la commutation de groupes de puissance à thyristors ou par des moteurs, il convient d’installer un transformateur d’isolementpour les seuls appareils, en raccordant le blindage à la terre. Il est important que l’installation ait une bonne mise à la terre, que la tension entre neutre etterre ne soit pas supérieure à 1 V et que la résistance ohmique soit inférieure à 6 Ohms. Si la tension de réseau est fortement variable, alimenter avec unstabilisateur de tension. À proximité de générateurs à haute fréquence ou de soudeuses à l’arc, employer des filtres de réseau. Les lignes d’alimentationdoivent être séparées de celles d’entrée et de sortie des appareils. Contrôler toujours que la tension d’alimentation correspond à celle qui est indiquéedans le sigle figurant sur l’étiquette de l’ appareil.• Raccordement entrées et sorties: les circuits extérieurs raccordés doivent respecter le double isolement. Pour raccorder les entrées analogiques (TC,RTD), il est nécessaire de séparer physiquement les câbles des entrées des câbles d’alimentation, des sorties et des raccordements de puissance etd’utiliser des câbles torsadés et blindés, avec blindage raccordé à la terre en un seul point. Pour raccorder les sorties de régulation, d’alarme(contacteurs, électrovannes, moteurs, ventilateurs, etc.), monter des circuits RC (résistance et condensateur en série) en parallèle avec les chargesinductives qui travaillent en courant alternatif (Nota: tous les condensateurs doivent être conformes aux normes VDE [classe x2] et supporter une tensiond’au moins 220 V c.a. Les résistances doivent être d’au moins 2 W). Monter une diode 1N4007 en parallèle avec la bobine des charges inductives quitravaillent en continu.GEFRAN spa ne pourra en aucun cas être tenue pour responsable des dommages causés à des personnes ou des biens dus à des déréglages,une utilisation incorrecte, anormale ou dans tous les cas non conforme aux caractéristiques de l’ appareil.
! ATTENTION: ce symbole signale un danger.Il est visible à proximité de l’alimentation et des contacts des relais qui peuvent être soumis à la tension du réseau.
65
Relè R
600
SORTIE 1 (AL)
R
100...240V
20...27V
1
0
2
0 Aucune
RS485
R Sortie relais
ALIMENTATION
COMMUNICATION NUMÉRIQUE/SORTIE 4
SORTIE 2 (PRINCIPALE)
Relais R
Logique D
Triac (1A) T
SORTIE/ENTRÉE 3
Aucune 0
Relais R
Logique D
Sortie de régulation continue 10 V C
Retransmission analogique 20 mA W
Entrée TA (20mAc.a.) H
Entrée logique N
Attention certaines fonctions ne sont pas cumulables ou dissociables, nous contacter pour connaître les modèles réalisables
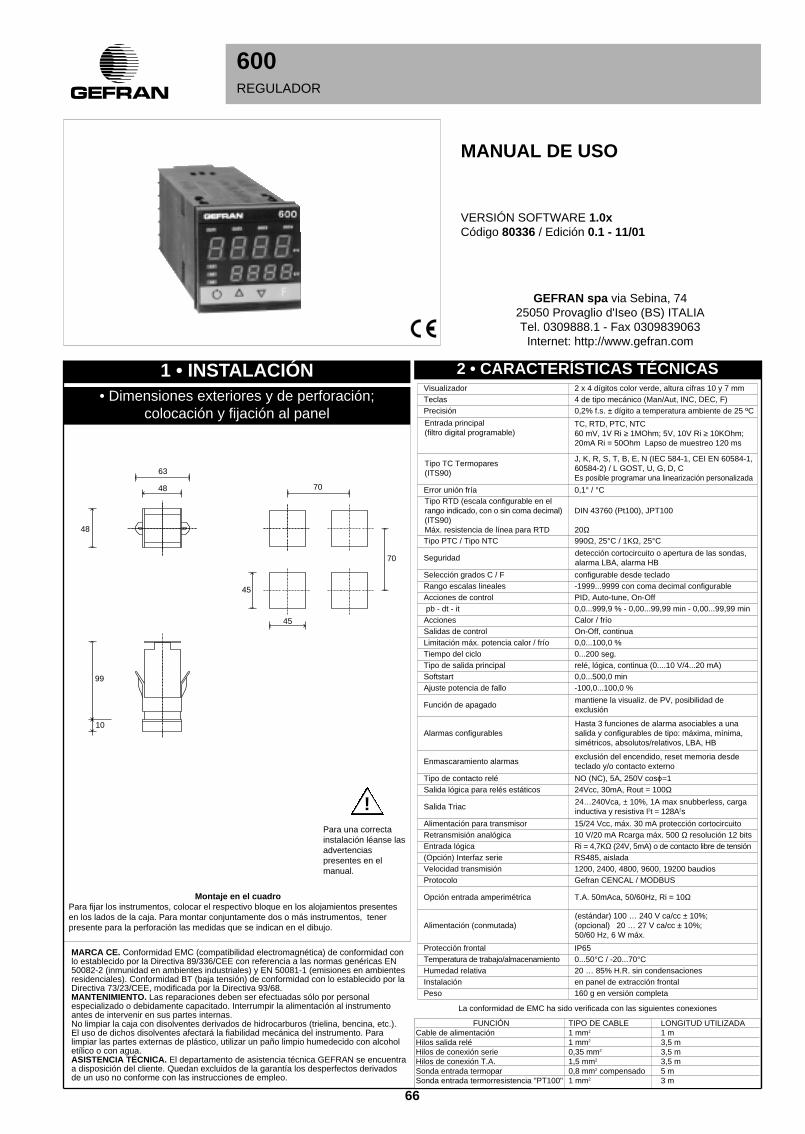
Entrada lógica Ri = 4,7KΩ (24V, 5mA) o de contacto libre de tensión
Protocolo Gefran CENCAL / MODBUS
(Opción) Interfaz serie RS485, aislada
Retransmisión analógica 10 V/20 mA Rcarga máx. 500 Ω resolución 12 bitsAlimentación para transmisor 15/24 Vcc, máx. 30 mA protección cortocircuito
Tipo de contacto relé NO (NC), 5A, 250V cosϕ=1Salida lógica para relés estáticos 24Vcc, 30mA, Rout = 100Ω
Tiempo del ciclo 0...200 seg.Tipo de salida principal relé, lógica, continua (0....10 V/4...20 mA)
Salidas de control On-Off, continuaLimitación máx. potencia calor / frío 0,0...100,0 %
Selección grados C / F configurable desde tecladoRango escalas lineales -1999...9999 con coma decimal configurableAcciones de control PID, Auto-tune, On-Offpb - dt - it 0,0...999,9 % - 0,00...99,99 min - 0,00...99,99 minAcciones Calor / frío
Softstart 0,0...500,0 min
Alarmas configurablesHasta 3 funciones de alarma asociables a unasalida y configurables de tipo: máxima, mínima,simétricos, absolutos/relativos, LBA, HB
Ajuste potencia de fallo -100,0...100,0 %
Función de apagadomantiene la visualiz. de PV, posibilidad deexclusión
Enmascaramiento alarmasexclusión del encendido, reset memoria desdeteclado y/o contacto externo
Opción entrada amperimétrica T.A. 50mAca, 50/60Hz, Ri = 10Ω
Protección frontal IP65Temperatura de trabajo/almacenamiento 0...50°C / -20...70°CHumedad relativa 20 … 85% H.R. sin condensacionesInstalación en panel de extracción frontalPeso 160 g en versión completa
Alimentación (conmutada)(estándar) 100 … 240 V ca/cc ± 10%;(opcional) 20 … 27 V ca/cc ± 10%;50/60 Hz, 6 W máx.
Seguridaddetección cortocircuito o apertura de las sondas,alarma LBA, alarma HB
Tipo RTD (escala configurable en elrango indicado, con o sin coma decimal)(ITS90)Máx. resistencia de línea para RTD
DIN 43760 (Pt100), JPT100
20Ω
Error unión fría 0,1° / °C
Tipo PTC / Tipo NTC 990Ω, 25°C / 1KΩ, 25°C
600REGULADOR
VERSIÓN SOFTWARE 1.0xCódigo 80336 / Edición 0.1 - 11/01
MANUAL DE USO
Para una correctainstalación léanse lasadvertenciaspresentes en elmanual.
Tipo TC Termopares(ITS90)
Visualizador 2 x 4 dígitos color verde, altura cifras 10 y 7 mmTeclas 4 de tipo mecánico (Man/Aut, INC, DEC, F)Precisión 0,2% f.s. ± dígito a temperatura ambiente de 25 ºC
Entrada principal(filtro digital programable)
TC, RTD, PTC, NTC60 mV, 1V Ri ≥ 1MOhm; 5V, 10V Ri ≥ 10KOhm;20mA Ri = 50Ohm Lapso de muestreo 120 ms
1 • INSTALACIÓN• Dimensiones exteriores y de perforación;
colocación y fijación al panel
Montaje en el cuadroPara fijar los instrumentos, colocar el respectivo bloque en los alojamientos presentesen los lados de la caja. Para montar conjuntamente dos o más instrumentos, tenerpresente para la perforación las medidas que se indican en el dibujo.
MARCA CE. Conformidad EMC (compatibilidad electromagnética) de conformidad conlo establecido por la Directiva 89/336/CEE con referencia a las normas genéricas EN50082-2 (inmunidad en ambientes industriales) y EN 50081-1 (emisiones en ambientesresidenciales). Conformidad BT (baja tensión) de conformidad con lo establecido por laDirectiva 73/23/CEE, modificada por la Directiva 93/68.MANTENIMIENTO. Las reparaciones deben ser efectuadas sólo por personalespecializado o debidamente capacitado. Interrumpir la alimentación al instrumentoantes de intervenir en sus partes internas.No limpiar la caja con disolventes derivados de hidrocarburos (trielina, bencina, etc.).El uso de dichos disolventes afectará la fiabilidad mecánica del instrumento. Paralimpiar las partes externas de plástico, utilizar un paño limpio humedecido con alcoholetílico o con agua.ASISTENCIA TÉCNICA. El departamento de asistencia técnica GEFRAN se encuentraa disposición del cliente. Quedan excluidos de la garantía los desperfectos derivadosde un uso no conforme con las instrucciones de empleo.
2 • CARACTERÍSTICAS TÉCNICAS
!
66
GEFRAN spa via Sebina, 7425050 Provaglio d'Iseo (BS) ITALIATel. 0309888.1 - Fax 0309839063
Internet: http://www.gefran.com
99
10
45
45
48
70
70
63
48
FUNCIÓN TIPO DE CABLE LONGITUD UTILIZADACable de alimentación 1 mm2 1 mHilos salida relé 1 mm2 3,5 mHilos de conexión serie 0,35 mm2 3,5 mHilos de conexión T.A. 1,5 mm2 3,5 mSonda entrada termopar 0,8 mm2 compensado 5 mSonda entrada termorresistencia "PT100" 1 mm2 3 m
La conformidad de EMC ha sido verificada con las siguientes conexiones
J, K, R, S, T, B, E, N (IEC 584-1, CEI EN 60584-1,60584-2) / L GOST, U, G, D, CEs posible programar una linearización personalizada
Salida Triac24…240Vca, ± 10%, 1A max snubberless, cargainductiva y resistiva I2t = 128A2s
Velocidad transmisión 1200, 2400, 4800, 9600, 19200 baudios
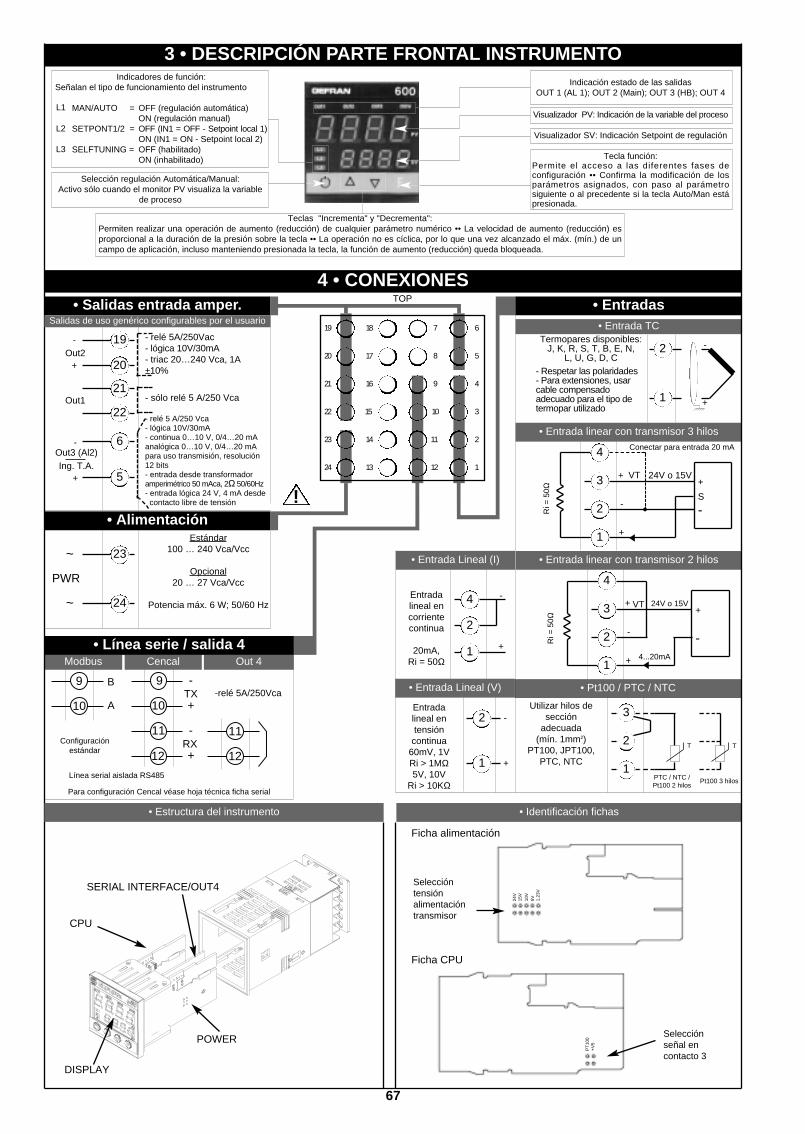
Cencal Out 4Modbus
-relé 5A/250Vca
Estándar100 … 240 Vca/Vcc
Opcional20 … 27 Vca/Vcc
Potencia máx. 6 W; 50/60 Hz
4 • CONEXIONES• Salidas entrada amper.
- relé 5A/250Vac- lógica 10V/30mA- triac 20…240 Vca, 1A±10%
- sólo relé 5 A/250 Vca
- relé 5 A/250 Vca- lógica 10V/30mA- continua 0…10 V, 0/4…20 mAanalógica 0…10 V, 0/4…20 mApara uso transmisión, resolución12 bits- entrada desde transformadoramperimétrico 50 mAca, 2Ω 50/60Hz- entrada lógica 24 V, 4 mA desdecontacto libre de tensión
6
5
4
3
2
1
7
8
9
10
11
12
18
17
16
15
14
13
19
20
21
22
23
24
-
+Out2
Out1
• Alimentación
23
24
~
~
TOP
-
+
Out3 (Al2)Ing. T.A.
!
PWR
67
Teclas "Incrementa" y "Decrementa":Permiten realizar una operación de aumento (reducción) de cualquier parámetro numérico •• La velocidad de aumento (reducción) esproporcional a la duración de la presión sobre la tecla •• La operación no es cíclica, por lo que una vez alcanzado el máx. (mín.) de uncampo de aplicación, incluso manteniendo presionada la tecla, la función de aumento (reducción) queda bloqueada.
3 • DESCRIPCIÓN PARTE FRONTAL INSTRUMENTO
Selección regulación Automática/Manual:Activo sólo cuando el monitor PV visualiza la variable
de proceso
Visualizador PV: Indicación de la variable del proceso
Tecla función:Permite el acceso a las diferentes fases deconfiguración •• Confirma la modificación de losparámetros asignados, con paso al parámetrosiguiente o al precedente si la tecla Auto/Man estápresionada.
Indicadores de función:Señalan el tipo de funcionamiento del instrumento
MAN/AUTO = OFF (regulación automática)ON (regulación manual)
SETPONT1/2 = OFF (IN1 = OFF - Setpoint local 1)ON (IN1 = ON - Setpoint local 2)
SELFTUNING = OFF (habilitado)ON (inhabilitado)
L1
Visualizador SV: Indicación Setpoint de regulación
Indicación estado de las salidasOUT 1 (AL 1); OUT 2 (Main); OUT 3 (HB); OUT 4
• Línea serie / salida 4
Configuraciónestándar
4...20mA
Conectar para entrada 20 mA
Utilizar hilos desección
adecuada(mín. 1mm2)
PT100, JPT100,PTC, NTC
• Pt100 / PTC / NTC
• Estructura del instrumento • Identificación fichas
3
1
2
Pt100 3 hilosPTC / NTC /Pt100 2 hilos
Termopares disponibles:J, K, R, S, T, B, E, N,
L, U, G, D, C- Respetar las polaridades- Para extensiones, usar cable compensadoadecuado para el tipo determopar utilizado
+
-
• Entrada TC
2
1
4
2
3
1
+ 24V o 15VVT
-
+
+
S
-Ri =
50Ω
4
2
3
1
+ 24V o 15VVT
-
+
+
-Ri =
50Ω
TT
• Entrada linear con transmisor 3 hilos
• Entradas
• Entrada linear con transmisor 2 hilos
L2
L3
9
10
11
+
-
TXB
A
RX
-
+
12
9
10
11
12
DISPLAY
POWER
SERIAL INTERFACE/OUT4
Ficha alimentación
Seleccióntensiónalimentacióntransmisor
Selecciónseñal encontacto 3
Ficha CPU
CPU
24V
15V
10V
5V 1,23
V
PT
100
+V
5Entradalineal en corrientecontinua
20mA,Ri = 50Ω
Entradalineal entensióncontinua
60mV, 1VRi > 1MΩ5V, 10V
Ri > 10KΩ
2
1 +
-
• Entrada Lineal (I)
4
1
2
-
+
• Entrada Lineal (V)
Línea serial aislada RS485
Para configuración Cencal véase hoja técnica ficha serial
19
21
20
22
6
5
Salidas de uso genérico configurables por el usuario

68
5 • PROGRAMACIÓN Y CONFIGURACIÓN "EASY"
al.1
P.V. / S.V.Variable de proceso (Visualizador PV)Setpoint de trabajo (Visualizador SV)
o valor salida de regulación conregulador en manual
InP
Out
PAS = 99
Pro
Preparación entradas
Preparación salidas
swconf=ON
PAS
Menú personalizado
Contraseña
Código de protección
Umbral alarma 1 (puntos escala)
CFG
VISUALIZACIÓN NIVEL 1
• CFG
• InP
h.pb
h.it
h.dt
h.p.x
Xy.i
Banda proporcionalde calentamiento
Tiempo integrade calentamientol
Tiempo derivativode calentamiento
Límite máximo potenciade calentamiento0 ... 999.9% f.s.
0.00 ... 99.99 min
0.00 ... 99.99 min
0.0 ... 100.0%
Histéresis para alarma 10…999 seg.
Si +32 in A1.t 0…999 min
Si +64 in A1.t
±999puntos escala
typ. Tipo de sonda, señal, habilitación linealización personalizaday escala entrada principal (véase tabla typ, pág. 6)
dp.s
lo.s
xi.s
Posición coma decimalpara la escala entrada
Límite mínimo de escalaentrada principal
Límite máximo de escalaentrada principal
dP_S Formato0 xxxx1 xxx.x2 xx.xx3 x.xxx
mín. … máx. escala de laentrada seleccionada en tyP
mín. … máx. escala de laentrada seleccionada en tyP
• Out • Prot
xi.l
lo.lLímite inferior de ajuste
del setpoint y de lasalarmas absolutas
Lo.S ... Hi.S
Límite superior de ajustedel setpoint y de lasalarmas absolutas
Lo.S ... Hi.S
Tipoalarma 1
AL.x.t Directa (de máxima) Absoluta NormalInversa (de mínima) Relativa al Simétrica
setpoint activado (ventana)0 directa absoluta normal1 inversa absoluta normal2 directa relativa normal3 inversa relativa normal4 directa absoluta simétrico5 inversa absoluta simétrico6 directa relativa simétrico7 inversa relativa simétrico
AL.1.t, AL.2.t, AL.3.t
a1.t
(t.2Tiempo del ciclo
Out2(Heat o Cool)
1...200 seg.
Pro Código de protección
Prot Visualización Modificación0 SP, alarmas SP, alarmas1 SP, alarmas SP2 SP
+4 Inhabilitación InP, Out+8 Inhabilitación CFG+128 habilita la configuración amplia
LA CONFIGURACIÓN EASY ES ADECUADA PARA LAS VERSIONES CON DOS SALIDAS(OUT1, OUT2). PARA EL ACCESO A LOS SUCESIVOS PARÁMETROS AGREGAR 128
AL VALOR Pro
+ 8 para inhabilitar junto con el encendido hasta la primera interceptación+ 16 para habilitar la memoria de la alarma+ 32 Hys se convierte en lapso de retardo para la activación de la alarma
(0...999 s) (excluido absoluto simétrico)+ 64 Hys se convierte en lapso de retardo para la activación de la alarma
(0...999 min) (excluido absoluto simétrico)

(*) Para estas visualizaciones queda inhabilitado el retorno de tiempo P.V./S.V.
69
6 • PROGRAMACIÓN Y CONFIGURACIÓN
al.1
al.2
a.xb
0V.P
sp
SP.1
SP.2
in.2
Si en el plazo de 15 seg.no se presionan las teclas Inc, Dec, F,la visualización retorna al valor P.V.
INF
P.V. / S.V.Variable de proceso (Visualizador PV)Setpoint de trabajo (Visualizador SV)
o valor salida de regulación conregulador en manual
Umbral alarma 2 (puntos escala)
Umbral alarma 3 (puntos escala)
Umbral alarma HB (puntos escalaentrada transformador corriente)
Valor salidas de regulación(+Heat / -Cool)
Comunicación serieSEr
InP
Out
PAS = 99
Pro
Lin
Preparación entradas
Preparación salidas
Configuración hardware
Lin Linealización entrada
NO
La sucesión delmenú se obtiene
manteniendopresionada la tecla F
Soltando la tecla seselecciona el menú
visualizado
Para obteneracceso a losparámetrospresentes,
presionar la tecla F.
Para salir decualquier menú,
mantenerpresionada la tecla
F
En cualquier menú,manteniendo
presionadas lasteclas F +
Auto/Man durante 2seg. se obtiene
paso inmediato avisualización nivel 1
swconf=ON
Setpoint local
VISUALIZACIÓN NIVEL 1
PAS
NO
Hrd
U.CA
Menú personalizado
Contraseña
Calibración usuario
Código de protección
Visualización informaciones
Setpoint 1
Setpoint 2
Valor entrada amperimétrica(con entrada TA presente)
Umbral alarma 1 (puntos escala)
Nota. Los parámetros innecesarios respecto de una configuración específica no serán visualizados.
-
al.3
upd
(od
(.xd
err
• Visualización InFo
INF
Versiónsoftware
Códigoinstrumento
Código errorautodiagnóstico
Configuraciónhrd
+8 error reconocimiento ficha OUT2+16 error reconocimiento ficha OUT3
Visualizacióninformaciones
CFG
(*)
(*)
0 No Error1 Lo2 Hi3 ERR4 SBR
SALIDA 20 = Ausente1 = Relé2 = Lógica3 = Triac
ENTRADA /SALIDA 30 = Ausente1 = Relé2 = Lógica3 = Continua4 = Analógica5 = En TA6 = En digital
COMUNICACIÓN DIG. / OUT40 = Ausente1 = RS 4852 = Relé
Ejemplo: 1 1 1 = R + R + RS 485

• CFG
• Ser
parSER.P Protocolo serie0 CENCAL GEFRAN1 MODBUS RTU
70
S.tv
h.pb
h.it
h.dt
h.p.x
h.p.l
c.sp
c.pb
c.it
c.dt
c.p.x
c.p.l
rst
P.rs
A.rs
ffd
sof
Xy.i
Xy.2
Xy.3
xb.t
lb.t
lb.p
fa.p
g.sp
Habilitaciónselftuning,autotuning,
softstart
CFG Parámetros de regulación
Banda proporcional decalentamiento
Tiempo integral decalentamiento
Tiempo derivativo decalentamiento
Límite máximo potenciade calentamiento
Setpoint de enfriamientorelativo al setpoint de
calentamiento
Banda proporcional deenfriamiento
Tiempo integral acciónde enfriamiento
Tiempo derivativo deenfriamiento
Límite máximo potenciade enfriamiento
Reset Manual
Histéresis para alarma 2
Histéresis para alarma 3
Tiempo de espera paraintervención de alarma
HB
Tiempo de espera para la intervenciónde la alarma LBA
(ajustando a 0, la alarma LBA queda inhabilitada)
Limitación de la potenciasuministrada en condiciones de
alarma LBA
Potencia de Fault Action (Acción en Fallo)(suministrada en situación de sonda
averiada)
S.tun Autotuning Selftuning Softstartcontinuo
0 NO NO NO1 SÍ NO NO2 NO SÍ NO3 SÍ SÍ NO4 NO NO SÍ5 SÍ NO SÍ
0.00 ... 99.99 min
0.00 ... 99.99 min
0.0 ... 100.0%
-999 ... 999puntos escala
0 ... 999.9% f.s.
0.00 ... 99.99 min
0.00 ... 99.99 min
0.0 ... 100.0%
Límite mínimo potenciade calentamiento
(no disponible para dobleacción calor/frío)
0.0 ... 100.0%
± 25,0 % f.s.
0 ... 999.9% f.s.
0…999 seg.Si +32 in A2.t 0…999 min
Si +64 in A2.t
0…999 seg.Si +32 in A3.t 0…999 min
Si +64 in A3.t
0 ... 999 seg.
0.0 ... 500.0 min
-100.0 ... 100.0%
-100.0 ... 100.0%ON / OFF
Gradiente de set(véanse las notas aplicativas)
0.0...999.9 digit/min.(digit / seg. véase SP.r)
Anti-reset
Feedforward
0 ... 9999puntos escala
-100.0 ... 100.0%
Potencia de reset -100.0 ... 100.0%
Histéresis para alarma 10…999 seg.
Si +32 in A1.t 0…999 min
Si +64 in A1.t
Tiempo de softstart 0.0 ... 500.0 min
(el valor debe ser superior al tiempo de ciclo dela salida a la que está asociada la alarma HB)
Fluido de enfriamiento 0 ... 2
C.MEd Ganancia relativa (rG)(véase la nota aplicativa)
0 Aire 11 Aceite 0,82 Agua 0,4
Límite mínimo potenciade enfriamiento
(no disponible para dobleacción calor/frío)
0.0 ... 100.0%
(.ME-
(od
sr.p
Ser
Código identificación instrumento
Predisposición serial
Protocolo interfazserie
0 ... 9999
bavSelección velocidad de
transmisión (enbaudios)
Selecciónparidad
_PAr Paridad0 Sin paridad 1 Impares 2 Pares
(*)
(*)
(*) Si la alarma LBA está activada podrá ser anulada presionando las teclas ∆ + ∇ cuando está
visualizado OutP o conmutando a control Manual
NotaLos parámetros c_Pb, c_It, c_dt son sólo de lectura en caso de habilitación del tipo de control calor/fríocon ganancia relativa (Ctrl. = 14).
bAud Veloc. de transm.0 12001 24002 48003 96004 19200
±999puntos escala
±999puntos escala
±999puntos escala

Type Tipo sonda Sin coma decimal Con coma decimalSensore: TC
0 TC J °C 0/1000 0.0/999.91 TC J °F 32/1832 32.0/999.92 TC K °C 0/1300 0.0/999.93 TC K °F 32/2372 32.0/999.94 TC R °C 0/1750 0.0/999.95 TC R °F 32/3182 32.0/999.96 TC S °C 0/1750 0.0/999.97 TC S ° F 32/3182 32.0/999.98 TC T °C -200/400 -199.9/400.09 TC T °F -328/752 -199.9/752.010 TC B °C 44/1800 44.0/999.911 TC B °F 111/3272 111.0/999.912 TC E °C -100/750 -100.0/750.013 TC E °F -148/1382 -148.0/999.914 TC N °C 0/1300 0.0/999.915 TC N °F 32/2372 32,0/999.916 L-GOST °C 0/600 0.0/600.017 L-GOST °F 32/1112 32.0/999.918 TC U °C -200/400 -199.9/400.019 TC U °F -328/752 -199.9/752.020 TC G °C 0/2300 0.0/999.921 TC G °F 32/4172 32,0/999.922 TC D °C 0/2300 0.0/999.923 TC D °F 32/4172 32.0/999.924 TC C °C 0/2300 0.0/999.925 TC C °F 32/4172 32.0/999.926 Ni-Ni18Mo °C 0/1100 0.0/999.927 Ni-Ni18Mo °F 32/2012 32.0/999.928 TC PERSONALIZADA PERSONALIZADA29 TC PERSONALIZADA PERSONALIZADA30 PT100 °C -200/850 -199.9/850.031 PT100 °F -328/156 2 -199.9/999.932 JPT100 °C -200/600 -199.9/600.033 JPT100 °F -328/1112 -199.9/999.934 PTC °C -55/120 -55.0/120.035 PTC °F -67/248 -67.0/248.036 NTC °C -10/70 -10.0/70.037 NTC °F 14/158 14.0/158.038 0...60 mV -1999/9999 -199.9/999.939 0...60 mV lineal personalizada lineal personalizada40 12...60 mV -1999/9999 -199.9/999.941 12...60 mV linear custom lineal personalizada42 0...20 mA -1999/9999 -199.9/999.943 0...20 mA lineal personalizada lineal personalizada44 4...20 mA -1999/9999 -199.9/999.945 4...20 mA lineal personalizada lineal personalizada46 0...10 V -1999/9999 -199.9/999.947 0...10 V lineal personalizada lineal personalizada48 2...10 V -1999/9999 -199.9/999.949 2...10 V lineal personalizada lineal personalizada50 0...5 V -1999/9999 -199.9/999.951 0...5 V lineal personalizada lineal personalizada52 1...5 V -1999/9999 -199.9/999.953 1...5 V lineal personalizada lineal personalizada54 0...1 V -1999/9999 -199.9/999.955 0...1 V lineal personalizada lineal personalizada56 200mv..1V -1999/9999 -199.9/999.957 200mv..1V lineal personalizada lineal personalizada58 Cust10 V-20mA -1999/9999 -199.9/999.959 Cust10 V-20mA lineal personalizada lineal personalizada60 Cust 60mV -1999/9999 -199.9/999.961 Cust 60mV lineal personalizada lineal personalizada62 PT100-JPT PERSONALIZADA PERSONALIZADA63 PTC PERSONALIZADA PERSONALIZADA64 NTC PERSONALIZADA PERSONALIZADA
• InP
71
typ. Tipo de sonda, señal, habilitación linealización personalizaday escala entrada principal
InP Preparaciones para entradas
s.in Entrada instrumentovirtual
0 ... 31
Entradas IN PV AL3 AL2 AL1Bits 4 3 2 1 0
Es: 1 1 0 0 0Deseando gestionar la línea serial AN e IN elcódigo a predisponer en S.in es 24
s.0v Salidas instrumentovirtual
0 ... 31
Salidas OUTW OUT4 OUT3 OUT2 OUT1Bits 4 3 2 1 0
Es: 1 0 0 1 1Deseando gestionar la línea serial OUT1, OUT2 y OUT3el código a programar en S.Ou es 19
s.U.i Interfaz usuarioinstrumento virtual
0 ... 63
Interf. LED KEYB DISL DISH LED LED LED LED1/2/3 OUT4 OUT3 OUT2 OUT1
Bits 7 6 5 4 3 2 1 0
Es: 0 1 0 1 0 0 0 0Deseando gestionar desde línea serie KEYB y DISH el código aprogramar en S.U.I. es 80.
+2 gradiente de set en digit / seg.
flt
fld
dp.s
lo.s
xi.s
ofs.
ft.2
Filtro digital en la entrada(si = 0 excluye el filtro de media en el
valor muestreado)
(*) no disponible para escalasTC, RTD, PTC, NTC
Filtro digital en lavisualización de la
entrada
Posición coma decimalpara la escala entrada
Límite mínimo de escalaentrada principal
Límite máximo de escalaentrada principal
Offset de correcciónentrada principal
Filtro digital entradaauxiliar
0.0 ... 20.0 seg.
0 ... 9.9puntos escala
dP_S Formato0 xxxx1 xxx.x2 xx.xx (*)3 x.xxx (*)
mín. … máx. escala de laentrada seleccionada en tyP
mín. … máx. escala de laentrada seleccionada en tyP
-999 ... 999puntos escala
0.0 ... 20.0 seg.
sp.r Def. Set remotoVal. Tipo set remoto Absoluto/Relativo0 Digital Absoluto
(desde línea serie)1 Digital Reletivo al
(desde línea serie) set locale
Para linearización personalizada:- la señal LO se presenta con variable con valores inferiores a Lo.S o al valormínimo de calibración- la señal HI se presenta con variable con valores superiores a Lo.S o al valormáximo de calibración
Error máximo de no linearidadpara termopares (Tc),termorresistencias (PT100)y termistores (PTC, NTC)
El error es calculado comodesviación respecto del valorteórico, con referencia en % alvalor de plena escalaexpresado en gradosCelsius (°C)
S, R escala 0...1750 °C; error < 0,2 % f.s. (t > 300 °C) / para otras escalas; error < 0,5 % f.s.
T error < 0,2 % f.s. (t > -150 °C)B escala 44...1800 °C; error < 0,5 % f.s. (t > 300 °C) / escala
44,0...999,9; error < 1 % f.s. (t > 300 °C)U escala -99,9...99,9 y -99...99 °C; error < 0,5 % f.s. / para
otras escalas; error < 0,2 % f.s. (t > -150 °C)G error < 0,2 % f.s. (t > 300 °C)D error < 0,2 % f.s. (t > 200 °C)C escala 0...2300; error < 0,2 % f.s. / para otras escalas;
error < 0,5 % f.s.
NTC error < 0,5 % f.s.
Tc tipo J, K, E, N, L error < 0,2 % f.s.PT100, JPT100 y PTC error < 0,2 % f.

72
xi.l
lo.l
of.2
xs.2
l5.2 Límite mínimo escalaentrada auxiliar
Offset corrección entradaauxiliar
0.0 ... 999.9
Límite máximo escalaentrada auxiliar 0.0 ... 999.9
-99,9 ... 99,9puntos escala
Límite inferiorpredisponibilidad SP y
alarmas absolutasLo.S ... Hi.S
Límite superiorpredisponibilidad SP y
alarmas absolutasLo.S ... Hi.S
• Out
Out Preparación para las salidas
Selecciónmagnitudesreferenciaalarma 1
AL.1.r, AL.2.r, AL.3.rSelección
magnitudesreferenciaalarma 2
Selecciónmagnitudesreferenciaalarma 3
AL.x.r Variable a comparar Umbral de referencia0 PV (variable del proceso) AL1 SS.P (setpoint activado) AL (sólo absoluto)2 PV (variable de proceso) AL (sólo relativo y
referido a SP1 con función multiset)]
Tipoalarma 1
Tipoalarma 2
Tipoalarma 3
+ 8 para inhabilitar el encendido hasta la primera interceptación+16 para habilitar la memoria de la alarma+ 32 Hys se convierte en lapso de retardo para la activación de la alarma (0...999 s) (excluido absoluto simétrico)+ 64 Hys se convierte en lapso de retardo para la activación de la alarma (0...999 min) (excluido absoluto simétrico)
AL.x.t Directa (de máxima) Absoluta NormalInversa (de mínima) Relativa al Simétrica
setpoint activado (ventana)0 directa absoluta normal1 inversa absoluta normal2 directa relativa normal3 inversa relativa normal4 directa absoluta simétrica5 inversa absoluta simétrica6 directa relativa simétrica7 inversa relativa simétrica
AL.1.t, AL.2.t, AL.3.t
Funciona-miento de laalarma HB
Val. Descripción del funcionamiento0 Salida relé, lógica: alarma activada
con un valor de la corriente de cargainferior al setpoint, durante el tiempo enON de la salida de control
1 Salida relé, lógica: alarma activadacon un valor de la corriente de carga superior al setpoint, durante el tiempo en OFF de la salida de control
2 Alarma activada si una de las funciones 0 y 1está activada (OR lógico entre las funciones 0 y 1) (*)
3 Para salida analógica de calentamiento7 Para salida analógica de enfriamiento
+ 0 asociado a la salida Out1 (sólo para Hb_F = 0, 1, 2)+ 4 asociado a la salida Out2 (sólo para Hb_F = 0, 1, 2)+ 12 asociado a la salida Out4 (sólo para Hb_F = 0, 1, 2)+16 alarma HB inversa
(*) el umbral mínimo está ajustado al 12% de plena escala amperimétrica
a1.r
a2.r
a3.r
a1.t
xb.f
a2.t
a3.t

73
an.o
rl.1
rl.2
rl.3
rl.4
(t.1
rel
(t.2
(t.3
x.an
l.an
"Fault action" (definición estado en caso
de sonda averiada)Err, Sbr
Mínimo escala salidade repeticiónanalógica 0
Máximo escala salidade repetición
analógica
Val Magnitud de referencia0 PV - variable del proceso1 SSP - setpoint activado2 SP - setpoint local3 -4 Desviación (SSP-PV)5 HEAT (*)6 COOL (*)7 AL1 (umbral)8 AL2 (umbral)9 AL3 (umbral)10 -11 Valor adquirido desde línea serie (*)
Out WAsignación señal o valor de referencia:
Out 1Asignaciónseñal de
referencia
_rEL. Alarma Alarma Alarma1 2 3
0 OFF OFF OFF1 ON OFF OFF2 OFF ON OFF3 ON ON OFF4 OFF OFF ON5 ON OFF ON6 OFF ON ON7 ON ON ON
-1999 ... 9999
16 para el código 0 si la entrada está en situación de error Err – Sbr la salida asume el valor mínimo de trimming
(*) - Límites escala no programables- Salida retransmitida no disponible con tipo de control ON/OFF
Tiempodel ciclo Out1Heat o Cool
Tiempodel ciclo Out2Heat o Cool
Tiempodel ciclo Out3Heat o Cool
1...200 seg.
1...200 seg.
1...200 seg.(0,1 s fijo con salida continua,
Ct. 3 no aparece en configuración)
Out 2Asignaciónseñal de
referencia
Out 3Asignaciónseñal de
referencia
Out 4Asignaciónseñal de
referencia
-1999 ... 9999
rL.o.1, rL.o.2, rL.o.3, rL.o.4
+ 32 para nivel lógico inverso en salida
Val Función salida lógica, relé (OUT1)0 HEAT (salida de control calentamiento)1 COOL (salida de control enfriamiento)2 AL1 - alarma 13 AL2 - alarma 24 AL3 - alarma 35 AL.HB - alarma HB6 LBA - alarma LBA7 IN1 - repetición entrada lógica8 Repetición tecla but (si but = 8)9 AL1 O AL210 AL1 O AL2 O AL311 AL1 Y AL212 AL1 Y AL2 Y AL313 AL1 O ALHB14 AL1 O AL2 or ALHB15 AL1 Y ALHB16 AL1 Y AL2 Y ALHB
(t.4Tiempo
del ciclo saOut4Heat o Cool
1...200 seg.
64 HEAT salida continua 2-10 V (*)65 COOL salida continua 2-10V (*)
(*) para rL.3
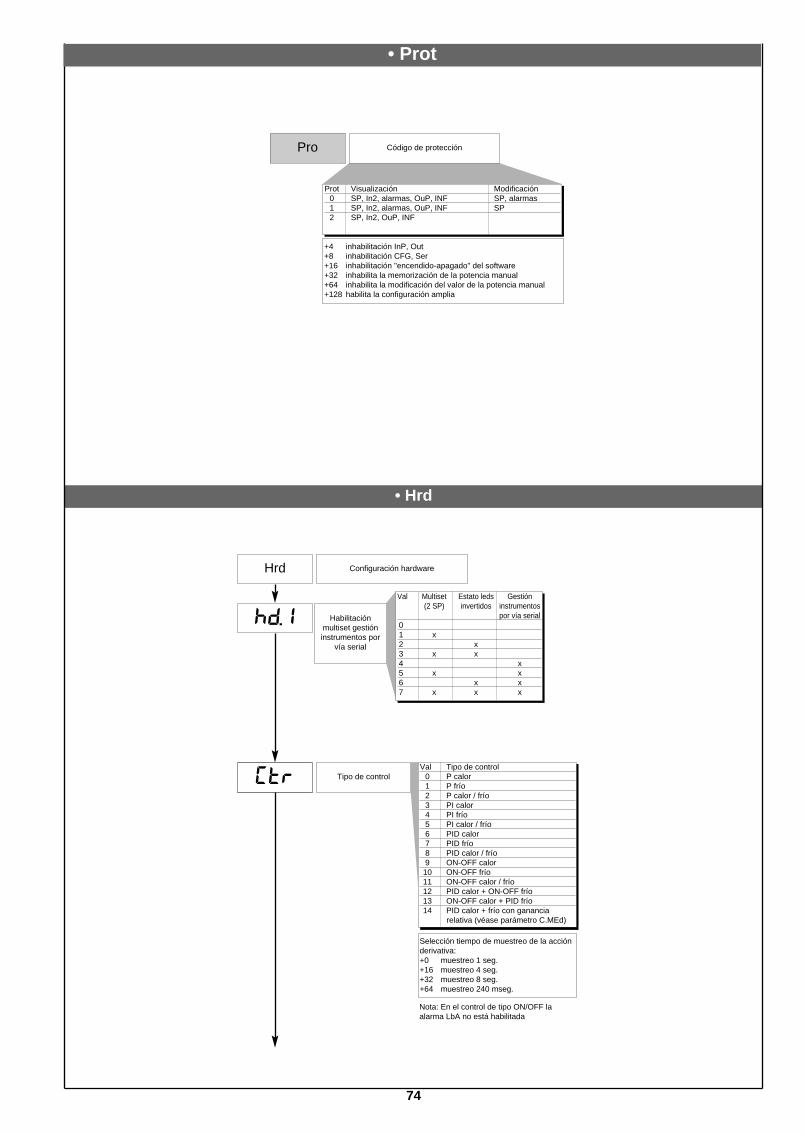
74
(tr
hd.1
• Hrd
Hrd Configuración hardware
Habilitaciónmultiset gestióninstrumentos por
vía serial
Val Multiset Estato leds Gestión(2 SP) invertidos instrumentos
por vía serial01 x2 x3 x x4 x5 x x6 x x7 x x x
Tipo de controlVal Tipo de control
0 P calor1 P frío2 P calor / frío3 PI calor4 PI frío5 PI calor / frío6 PID calor7 PID frío8 PID calor / frío9 ON-OFF calor10 ON-OFF frío11 ON-OFF calor / frío12 PID calor + ON-OFF frío13 ON-OFF calor + PID frío14 PID calor + frío con ganancia
relativa (véase parámetro C.MEd)
Selección tiempo de muestreo de la acciónderivativa:+0 muestreo 1 seg.+16 muestreo 4 seg.+32 muestreo 8 seg.+64 muestreo 240 mseg.
Nota: En el control de tipo ON/OFF laalarma LbA no está habilitada
• Prot
Pro Código de protección
Prot Visualización Modificación0 SP, In2, alarmas, OuP, INF SP, alarmas1 SP, In2, alarmas, OuP, INF SP2 SP, In2, OuP, INF
+4 inhabilitación InP, Out+8 inhabilitación CFG, Ser+16 inhabilitación "encendido-apagado" del software+32 inhabilita la memorización de la potencia manual+64 inhabilita la modificación del valor de la potencia manual+128 habilita la configuración amplia

dig.
al.n
bvt.
+8 para habilitar la alarma HB+16 para habilitar la alarma LBA
dig.
Función entradadigital
+ 16 para entrada en lógica negada (NPN)+32 para forzar el estado lógico 0 (OFF)+48 para forzar el estado lógico 1 (ON)
AL.nr Alarma 1 Alarma 2 Alarma 30 inhabilitada inhabilitada inhabilitada1 habilitada inhabilitada inhabilitada2 inhabilitada habilitada inhabilitada3 habilitada habilitada inhabilitada4 inhabilitada inhabilitada habilitada5 habilitada inhabilitada habilitada6 inhabilitada habilitada habilitada7 habilitada habilitada habilitada
0 ninguna función (tecla inhabil.)1 MAN / AUTO controlador2 LOC / REM3 HOLD4 Reset memoria alarmas5 Selección SP1 / SP26 Apagado / encendido software
Selección númeroalarmas
habilitadas
0 ninguna función (tecla inhabilitada)1 MAN / AUTO controlador2 LOC / REM3 HOLD4 Reset memoria alarmas5 Selección SP1 / SP26 Start / Stop selftuning7 Start / Stop autotuning8 Set / Reset salidas Out 1... Out 4
+16 inhabilita la función en el interior de losmenús de configuración
b u t t
Función teclasM/A
ld.1
ld.2
ld.3
75
Val. Función0 Ninguna función1 MAN/AUTO controlador2 LOC / REM3 HOLD4 Selftuning activado5 Autotuning activado6 Repetición IN17 Habilitación diálogo serie8 Error presente9 Softstart en ejecución
10 Indicación SP1 / SP2
Función LED
+ 16 Led centelleante durante activación
dsp Definición funciónvisualizador SV
diSP Función visualizador inferior (SV)0 SSP setpoint activado1 InP.2 entrada auxiliar2 Valor salida de regulación3 Desviación (SSP-PV)

Paso 34 mV plena escalas.34
Paso 33 mV inicio escalas.33
......
s.00
76
• Lin
Lin Linearización personalizada paraentrada principal
el valor del paso n corresponde a entrada:mV inicio escala + n*∆mV
∆mV = (mV plena escala - mV inicio escala) / 32
Paso 0 valor deinicio escala
Paso 32(valor de plena escala)
Límites de visualización delvisualizador (-1999...9999)
Límites de visualización delvisualizador (-1999...9999)
• U.CAL
U.CA Calibraciónusuario
s.32
Paso 35mV a temperatura
de 50 °Cs.35
Val Función1 Salida analógica (1)2 Entrada 1 personalizada 10V/20 mA3 Entr. 1- sensor personalizado 60 mV4 Personalizado PT100/J PT1005 Personalizado PTC6 Personalizado NTC7 Entrada 2 - sensor personalizado TA (2)
Sólo para TYP = Tc personalizado
(1) La salida analógica en 20 mA ha sido calibrada con precisión superior a 0,2 % f.s.; efectuarla calibración cuando se convierte en salida 10 V.
(2) La precisión en ausencia de calibración es superior al 1% f.s.; efectuar la calibración sóloen caso de requerirse mayor precisión.

Este tipo de alarma está condicionada por el uso de la entrada desde transformador amperimétrico (T.A.).Puede indicar variaciones de consumo en la carga, discriminando el valor de la corriente en entrada amperimétrica en elcampo (0 ... HS.2). Es habilitada mediante código de configuración (AL.n); en este caso el valor de interceptación de la alarmaes expresado en puntos escala HB.Mediante el código Hb.F (fase “Out”) se selecciona el tipo de funcionamiento y la salida de control asociada.La programación de la consigna de alarma es A.Hb.La alarma HB directa se activa en caso de que el valor de la entrada amperimétrica quede por debajo de la consignaprogramada para Hb.t segundos en total de lapso de “ON” de la salida seleccionada.La alarma HB puede activarse sólo con lapsos de ON superiores a 0,4 segundos (excluye la salida continua).El funcionamiento de la alarma HB requiere el control de la corriente de carga incluso en el intervalo de OFF del lapso de ciclode la salida seleccionada: si para Hb.t segundos totales de estado de OFF de la salida la corriente medida superaaproximadamente el 12,5 % de la plena escala programada (parámetro HS.2 en InP), se activa la alarma HB.La reinicialización de la alarma se verifica de modo automático al eliminarse la situación que la ha provocado.Una programación de la consigna A.Hb = 0 inhabilita ambos tipos de alarma HB, con desexcitación del relé asociado.La indicación de la corriente de carga se visualiza seleccionando la opción In.2. (nivel 1).NOTA. Los lapsos de ON/OFF se refieren al tiempo de ciclo programado en la salida seleccionada.La alarma Hb_F = 3 (7) continua es activada para un valor de la corriente de carga inferior a la consigna programada; quedainhabilitada si el valor de la salida de calentamiento (enfriamiento) es inferior al 3 %.
El valor de entrada y las alarmas permanecen "congeladas" por el tiempo durante el cual la entrada lógica permanece activa.Con la entrada activa, un reset de la memoria de alarma provoca la desexcitación de todos los relés excitados y el reset de lamemoria de todas las alarmas.
FUNCIONAMIENTO ALARMA HB
• Funcionamiento tipo HOLD
77
7 • ALARMAS
tiempo
AL1 + Hyst1
AL2 + Hyst2AL2
AL1
alarma 1
alarma 2
(*)
Para AL1 alarma absoluta inversa (de mínima) con Hyst 1 positiva, AL1 t = 1(*) = OFF en caso de inhabilitación para el encendidoPara AL2 alarma absoluta directa (de máxima) con Hyst 2 negativa, AL2 t = 0
Para AL1 alarma absoluta inversa simétrica con histéresis Hyst 1, AL1 t = 5Para AL1 alarma absoluta directa simétrica con histéresis Hyst 1, AL1 t = 4
Alarma absoluta de tipo normal Alarma absoluta de tipo simétrico
inversa
directa
AL1
AL1 + [ Hyst1 ]
AL1 - [ Hyst1 ]
tiempo
Para AL1 alarma relativa inversa normal con histéresis Hyst 1 negativa, AL1 t = 3Para AL1 alarma relativa directa normal con histéresis Hyst 1 negativa, AL1 t = 2
Para AL1 alarma relativa inversa simétrica con histéresis Hyst 1, AL1 t = 7Para AL1 alarma relativa directa simétrica con histéresis Hyst 1, AL1 t = 6
tiempo
SP+AL1SP
inversa
directa
SP+AL1
SP
inversa
directa
tiempo
Hyst1
Alarma relativa al setpoint de tipo normal Alarma relativa al setpoint de tipo simétrico
SP-AL1

78
Acción Proporcional:acción según la cual la aportación en la salida es proporcional a la desviación en la entrada (la desviación es la diferencia entre variableregulada y valor requerido).Acción Derivativa:acción según la cual la aportación en la salida es proporcional a la velocidad de variación de la desviación en la entrada.Acción Integral:acción según la cual la aportación en la salida es proporcional a la integral en el tiempo de la desviación de entrada.
Influencia de las acciones Proporcional, Derivativa e Integral en la respuesta del proceso que se está controlando* El aumento de la Banda Proporcional reduce las oscilaciones pero aumenta la desviación.* La disminución de la Banda Proporcional reduce la desviación pero provoca oscilaciones de la variable regulada (valores demasiado bajosde la Banda Proporcional confieren inestabilidad al sistema).* El aumento de la Acción Derivativa, correspondiente a un aumento del Tiempo Derivativo, reduce la desviación y evita oscilaciones hastaalcanzarse un valor crítico del Tiempo Derivativo, más allá del cual aumenta la desviación y se verifican oscilaciones prolongadas.* El aumento de la Acción Integral, correspondiente a una reducción del Tiempo Integral, tiende a anular la desviación a régimen entre lavariable regulada y el valor requerido (setpoint).Si el valor del Tiempo Integral es demasiado largo (Acción Integral débil), es posible que persista la desviación entre la variable regulada y elvalor requerido.Para mayor información sobre las acciones de control, sírvase contactar con GEFRAN.
8 • ACCIONES DE CONTROL
9 • TÉCNICA DE SINTONIA MANUALA) Ajustar el setpoint a su valor de trabajo.B) Ajustar la banda proporcional a 0,1% (con regulación de tipo On/Off).C) Conmutar a Automático y observar la evolución de la variable; se obtendrá un comportamiento similar al de la siguiente figura:
D) Cálculo de los parámetros PID: Valor de la banda proporcional (P.B.).
PicoP.B.= ---------------------------------------- x 100
V máximo - V mínimo
(V máximo - V mínimo) es el rango de escala.Valor del tiempo integral It = 1,5 x TValor del tiempo derivativo dt = lt/4E) Conmutar el regulador a Manual, entrar los valores calculados, (rehabilitar laregulación PID ajustando a un tiempo posible del ciclo para salida relé) y volver aconmutar a Automático.F) De ser posible, para evaluar la optimización de los parámetros, cambiar el valor desetpoint y controlar el comportamiento transitorio; si persiste una oscilación, aumentarel valor de banda proporcional; en cambio, si la respuesta es demasiado lenta, sedeberá reducir este valor.
Variable delproceso
Tiempo
T
Pico
11 • ENCENDIDO/APAGADO DEL SOFTWARE
Cómo apagar: mediante la combinación de teclas "F" e "Incrementa" presionadas conjuntamente durante 5 segundos, es posible desactivar elinstrumento, que queda en estado de "OFF", asumiendo un comportamiento similar al del instrumento apagado, sin interrumpir la alimentaciónde red; mantiene activada la visualización de la variable del proceso, con el visualizador SV apagado.Todas las salidas (regulación y alarmas) quedan en estado de OFF (nivel lógico 0, relés desexcitados) y todas las funciones del instrumentoquedan inhibidas, con excepción de la función de "ENCENDIDO" y el diálogo serie.Cómo encender: presionando la tecla "F" durante 5 segundos, el instrumento pasa del estado de "OFF" al de "ON". Si durante el estado de"OFF" se interrumpe la alimentación de red, en el siguiente encendido (power-up) el instrumento se predispone en el mismo estado de "OFF";(el estado de "ON/OFF" está memorizado). La función queda normalmente habilitada; para inhabilitarla se debe entrar el parámetro Prot = Prot+ 16. Esta función puede ser asociada a una entrada digital (di.i.G) y excluye la desactivación desde teclado.
La función multiset se habilita en hd.1.La función gradiente está siempre habilitada.La selección entre set point 1 y set point 2 puede efectuarse mediantetecla frontal o entrada digital.Es posible visualizar la selección entre set point 1 y 2 mediante led.GRADIENTE DE SET: si está predispuesto ≠ 0, con el encendido ycon el paso auto/man el set point es asumido como igual a PV; congradiente predispuesto alcanza el set local o aquel seleccionado.Toda variación de set está sujeta a gradiente.El gradiente de set queda inhabilitado con el encendido cuando estáhabilitado el self tuning.S el gradiente de set está predispuesto ≠ 0, permanece activadoincluso con las variaciones de set point local, que es posibleprogramar sólo en el respectivo menú SP.El set point de regulación alcanza el valor programado con unavelocidad definida por el gradiente.
10 • FUNCIÓN MULTISET, GRADIENTE DE SET
SP1SP2
SPrem SP1(*)
ON
ON
SP
IN1
LOC/REM
t
t
t
(*) en caso de encontrarseprogramado el gradiente de set

79
Esta función es válida para sistemas de tipo de acción simple ( calor o frío).La activación del selftuning tiene como objeto el cálculo de los parámetros óptimos de regulación en la fase de inicio del proceso. La variable(por ejemplo, la temperatura) debe ser aquélla considerada como a potencia nula (temperatura ambiente).El regulador suministra el máximo de potencia de salida hasta alcanzarse un valor intermedio entre el valor de inicio y el setpoint, después de lo cualvuelve a cero la potencia. De la evaluación del sobreimpulso y del tiempo necesario para alcanzar el valor de pico se calculan los parámetros PID.La función completada de este modo se desactiva automáticamente y la regulación continúa aproximándose al setpoint.
Cómo activar el selftuning:A. Activación junto con el encendido1. Programar el setpoint según el valor preferido2. Habilitar el selftuning programando el parámetro Stun con valor 2 (menú CFG)3. Apagar el instrumento4. Controlar que la temperatura sea próxima a la temperatura ambiente5. Reencender el instrumento
B. Activación desde el teclado1. Controlar que la tecla M/A esté habilitada para la función Start/Stop selftuning(código but = 6 menú Hrd)2. Aproximar la temperatura a la temperatura ambiente3. Programar el setpoint según el valor preferido4. Presionar la tecla M/A para activar el selftuning (Atención: presionando nuevamente la tecla el selftuning se interrumpe)
El procedimiento opera de modo automático hasta su finalización. Al final son memorizados los nuevos parámetros PID: banda proporcional,tiempos integral y derivativo calculados para la acción activada (calor o frío). En el caso de doble acción (calor y frío), los parámetros de laacción opuesta son calculados manteniendo la relación inicial entre los respectivos parámetros (ejemplo: Cpb = Hpb * K; donde K = Cpb / Hpben el momento del arranque del selftuning). Al finalizar, el código Stun queda anulado automáticamente.Notas:- El procedimiento se interrumpe al superarse el setpoint durante su ejecución. En tal caso el código Stun no es anulado.- Se aconseja habilitar uno de los leds configurables para la indicación del estado de selftuning. Predisponiendo en el menú Hrd uno de losparámetros Led1, Led2, Led3 = 4 ó 20, se obtiene el encendido del respectivo led con luz fija o intermitente durante la fase de selftuningactivo.NOTA. Acción no considerada en el tipo de control ON/OFF
12 • SELF-TUNING
Pico
T
S.P.
t.a.Tiempo
Variable deproceso
S.P. - t.a.2
13 • AUTO-TUNINGLa habilitación de la función autotuning bloquea la entrada manual de los parámetros PID.Puede ser de dos tipos: permanente y de un sólo impulso.El primero continúa evaluando las oscilaciones de un sistema buscando lo antes posible los valores de los parámetros PID que reducen laoscilación presente. No interviene si las oscilaciones se reducen a valores inferiores al 1,0 % de la banda proporcional.Se interrumpe en el caso de variación del setpoint y se reactiva automáticamente con un setpoint constante. Los parámetros calculados noson memorizados; en caso de apagado del instrumento, el regulador se reactiva con los parámetros que han sido programados antes dehabilitar el autotuning.El autotuning de acción de un solo impulso es útil para efectuar el cálculo en el entorno del setpoint; produce una variación en la salida decontrol correspondiente al 10% de la potencia de la corriente de regulación y evalúa los efectos del sobreimpulso en función del tiempo.Estos parámetros son memorizados y reemplazan a los programados anteriormente.Después de esta perturbación el regulador reanuda el control en el setpoint con los nuevos parámetros. El parámetro activado en CFG esaceptado sólo en el caso de que la potencia de regulación esté comprendida entre 20 y 80%.
tiempo
PV
c_Pb
h_Pb
SP+cSP
SP
+100%Salida de regulación
0%
-100%
Salida de regulación sólo con acción proporcional en el caso de bandaproporcional de calentamiento separada de la de enfriamiento.
Salida de regulación sólo con acción proporcional en el caso de bandaproporcional de calentamiento superpuesta a la de enfriamiento.
tiempo
PV
c_Pb
h_PbSP+cSP
SP
+100%Salida de regulación
0%
-100%
PV = variable del proceso SP = setpoint de calentamientoSP+cSP = setpoint de enfriamiento h_Pb = banda proporcional de calentamientoc_Pb = banda proporcional de enfriamiento
14 • REGULACIONES
En esta modalidad de regulación (habilitada con el parámetro CtrL = 14) es necesario especificar el tipo del enfriamiento.Los parámetros PID de enfriamiento se calculan a partir de los de calentamiento, de acuerdo a la relación indicada (por ej.: C.MEd = 1 (aceite); H_Pb = 10; H_dt = 1; H_It = 4, implican: C_Pb = 12,5; C_dt = 1; C_It = 4).Se aconseja aplicar en la programación de los tiempos de ciclo para las salidas los siguientes valores:Aire T Ciclo Enfriamiento = 10 seg.Aceite T Ciclo Enfriamiento = 4 seg.Agua T Ciclo Enfriamiento = 2 seg.
Nota. En esta modalidad los parámetros de enfriamiento no son modificables.
Regulación Calor/Frío con Ganancia Relativa

25 ±1
Ø 7
±0,
5
5,50m
PTC 7 x 25 5m
• CODIGO PARA EFECTUAR EL PEDIDO
DATOS TÉCNICOS
Mod. Sonda: sonda ambienteMaterial capuchón: plástico (Ø 7 x 25mm)Campo de temperatura: -20...80°CPTC: R 25°C = 1KΩ ±1% (KTY 81-110)Tiempo de respuesta: 20 seg (en aire parado)Aislamiento: 100MΩ, 500Vc.c. entre capuchón y terminalesMaterial cable: unipolar en PVC (12/0,18)Longitud cable: 5,50m
• Cable Interfaz RS232 / TTL para configuración instrumentos GEFRAN
CÓD. 1108200 Cable + floppy
• CODIGO PARA EFECTUAR EL PEDIDO
• Transformador amperométrico15 • ACCESORIOS
• Aplicación de doble set (rampa + mantenimiento + alarma de conclusión)16 • APLICACIONES
50 / 0.05 A
152050 9640
1 2
1 2
5,5 27 5,5
920
1948
8 838
1
13
20
2
In
44 30
1010
Agujero de fijación paratornillos autorroscantes 2,9 x 9
Estos transformadores se usan para medidas de corriente de 50 ÷ 60 Hz entre25A y 600A (corriente primaria nominal). La característica peculiar de estostransformadores es el alto número de espiras del secundario. Esto permiteobtener una corriente secundaria muy baja, adecuada para un circuito electrónicode medida. La corriente secundaria puede ser medida como una tensión sobreuna resistencia.
CÓDIGO Ip / Is Ø cable n SALIDAS Ru Vu PRECISIÓNsecundario
TA/152 025 25 / 0.05A 0.16 mm n1-2 = 500 1 - 2 40 Ω 2 Vca 2.0 %
TA/152 050 50 / 0.05A 0.18 mm n1-2 = 1000 1 - 2 80 Ω 4 Vca 1.0 %
IN = 25AcaOUT = 50mAca
CÓD. 330200IN = 50AcaOUT = 50mAca
CÓD. 330201
• CODIGO PARA EFECTUAR EL PEDIDO
NOTA: La interfaz RS232 para la configuración desde PC sesuministra junto con el software de programaciónWINSTRUM. La conexión debe efectuarse con instrumentoalimentado con entradas y salidas no conectadas.
80
• PTC
AL
Con referencia alsetpoint actual
Perfil de setpoint
Set
poin
t < A
L
Ret
ardo
de
activ
ació
n(*
)
Alarma absoluta
Alarma inversa
(*) Tiempo programadoen el parámetro Hy.n
Alarma directa
Tiempo (min o s)

CODIGO PARA EFECTUAR EL PEDIDO
• ADVERTENCIAS
Antes de instalar, conectar o usar el instrumento se deberán leer las siguientes advertencias:• Conectar el instrumento aplicando escrupulosamente las instrucciones del manual.• Efectuar las conexiones utilizando siempre tipos de cables adecuados para los límites de tensión y corriente indicados en los datos técnicos.• El instrumento NO está provisto de interruptor ON/OFF, por lo que se enciende inmediatamente al aplicar la alimentación; por motivos de seguridad, losaparatos conectados permanentemente a la alimentación requieren un interruptor seccionador bifásico identificado con la marca correspondiente; debeestar situado en la proximidad del aparato, en posición de fácil acceso para el operador; un sólo interruptor puede controlar varios aparatos.• Si el instrumento está conectado a aparatos NO aislados eléctricamente (por ejemplo termopares) se debe efectuar la conexión de tierra con unconductor específico, para evitar que ésta se efectúe directamente a través de la propia estructura de la máquina.• Si el instrumento se utiliza en aplicaciones con riesgo de daños a personas, máquinas o materiales, es indispensable conectarlo a aparatos auxiliaresde alarma. Se recomienda prever además la posibilidad de verificar la correcta intervención de las alarmas incluso durante el funcionamiento normal.• A fin de evitar lesiones y/ó daños a las personas ó cosas, es responsabilidad del usuario comprobar antes del uso la correcta predisposición de losparámetros del instrumento.• El instrumento NO puede funcionar en ambientes con atmósferas peligrosas (inflamables ó explosivas); puede conectarse a dispositivos que actúen endichos ambientes sólo a través de tipos apropiados de interfaz, que cumplan con lo establecido por las normas locales de seguridad vigentes.• El instrumento contiene componentes sensibles a las cargas electrostáticas, por lo que la manipulación de sus fichas electrónicas debe efectuarse conlas debidas precauciones, a fin de evitar daños permanentes a dichos componentes.Instalación: categoría de instalación II, grado de contaminación 2, aislamiento doble.• Las líneas de alimentación deben estar separadas de las de entrada y salida de los instrumentos; verificar siempre que la tensión de alimentacióncorresponda a la indicada en la respectiva etiqueta del instrumento.• Reagrupar la instrumentación por separado de los dispositivos de la parte de potencia y de los relés.• Evitar que en el mismo cuadro coexistan telerruptores de alta potencia, contactores, relés, grupos de potencia de tiristores en particular "de desfase",motores, etc.• Evítense el polvo, la humedad, los gases corrosivos y las fuentes de calor.• No obstruir las aberturas de ventilación; la temperatura de servicio debe mantenerse dentro del rango de 0 … 50 ºC. Si el instrumento está equipado con contactos de tipo "faston", es necesario que éstos sean del tipo protegido aislado; en caso de utilizar contactos contornillo, efectuar la fijación de los cables por pares, como mínimo.• Alimentación. Debe provenir de un dispositivo de seccionamiento con fusible para la parte de instrumentos; la alimentación de los instrumentos debeser lo más directa posible, partiendo del seccionador y además: no debe utilizarse para gobernar relés, contactores, electroválvulas, etc.; en caso defuertes perturbaciones debidas a la conmutación de grupos de potencia a tiristores o de motores, será conveniente disponer un transformador deaislamiento sólo para los instrumentos, conectando su pantalla a tierra. Es importante que la instalación tenga una adecuada conexión de tierra, que latensión entre neutro y tierra no sea > 1 V y que la resistencia óhmica sea < 6 Ohmios; si la tensión de red es muy variable se deberá utilizar unestabilizador de tensión; en proximidad de generadores de alta frecuencia o soldadoras de arco deben utilizarse filtros de red; las líneas de alimentacióndeben estar separadas de las de entrada y salida de los instrumentos; verificar siempre que la tensión de alimentación corresponda a la indicada en larespectiva etiqueta del instrumento.• Conexión de las entradas y salidas. Los circuitos exteriores conectados deben respetar el doble aislamiento; para conectar las entradas analógicas (TC,RTD) es necesario: separar físicamente los cables de las entradas de los de alimentación, de las salidas y de las conexiones de potencia; utilizar cablestrenzados y apantallados, con la pantalla conectada a tierra en un único punto; para conectar las salidas de regulación, de alarma (contactores,electroválvulas, motores, ventiladores, etc.) deben montarse grupos RC (resistencia y condensador en serie), en paralelo con las cargas inductivas queactúan en corriente alterna. (Nota. Todos los condensadores deben reunir los requisitos establecidos por las normas VDE (clase x2) y soportar unatensión de al menos 220 Vca. Las resistencias deben ser de 2 W., como mínimo); montar un diodo 1N4007 en paralelo con la bobina de las cargasinductivas que actúan con corriente contínua.GEFRAN spa declina toda responsabilidad por los daños a personas ó cosas, originados por alteraciones, uso erróneo, impropio o noconforme con las características del instrumento.
! ATENCIÓN. Este símbolo indica peligro.Es visible en proximidad de la alimentación y de los contactos de los relés que pueden estar sometidos a tensión de red.
81
Relé R
600
SALIDA 1 (AL)
R
100...240V
20...27V
1
0
2
0 Ninguna
RS485
R Salida relé
ALIMENTACIÓN
COMUNICACIÓN DIGITAL / SALIDA
SALIDA 2 (MAIN)
Relé R
Lógica D
Triac (1A) T
ENTRADA / SALIDA 3
Ninguna 0
Relé R
Lógica D
Salida control continua 10 V C
Retransmisión analógica 20 mA W
Entrada TA (50mAca) H
Entrada digital N
Se ruega contactar con el personal GEFRAN para solicitar informaciones sobre disponibilidad de los códigos.

Entrada lógica Ri = 4,7KΩ (24V, 5mA) ou de contato livre de tensão
Protocolo Gefran CENCAL / MODBUS
Interface serial RS485, isolada
Sinal de retransmissão analógica 10V/20mA Rcarga máx 500 Ω resolução 12 bitAlimentação para transmissor 15 / 24Vcc, máx 30mA proteção de curto-circuito
Tipo de contato do relé NO (NC), 5A, 250V cosϕ=1Saída lógica para relés estáticos 24Vcc, 30mA, Rout = 100Ω
Tempo de ciclo 0...200 segTipos de saída principal relé, lógica, contínua (0....10V / 4...20mA)
Saídas de controle on / off, contínuaLimite máx. de potência de aquecimento / resfriamento 0,0...100,0 %
Seleção de graus C / F configurável com tecladoIntervalo das escalas lineares -1999...9999 com posição do decimal configurávelTipos de controle PID, Auto-tune, on-offpb - dt - it 0,0...999,9 % - 0,00...99,99 min - 0,00...99,99 minAções de controle aquecimento / resfriamento
Softstart 0,0...500,0 min
Alarmes configuráveisAté 3 funções de alarme associáveis a uma saídae configuráveis do tipo: máximo, mínimo, desvio,absolutos/relativos, LBA, HB
Definição de falha de potência -100,0...100,0 %
Função desligamentoMantém visualiz. de PV,possibilidade de exclusão
Funcionamento dos alarmesexclusão durante a partida- Reset de memória apartir de teclado e/ou de contato
Opção entrada amperométrica T.A. 50mAca, 50/60Hz, Ri = 10Ω
Proteção frontal IP65Temperatura de trabalho / armazenamento 0...50°C / -20...70°CUmidade relativa 20 ... 85% Ur não condensanteInstalação painel extração frontalPeso 160 g na versão completa
Alimentação (tipo switching)(padrão) 100 ... 240Vca/cc ±10%(op.) 20...27Vca/cc ±10%;50/60Hz, 8VA máx
Segurançadetecção de curto-circuito ou abertura das sondas,alarme LBA, alarme HB
Tipo RTD (escala configurável dentro docampo indicado, com ou sem ponto decimal)(ITS90) Resistência de linha máx. para RTD
DIN 43760 (Pt100), JPT100
20Ω
Erro na junta fria 0,1° / °C
Tipo PTC / Tipo NTC 990Ω, 25°C / 1KΩ, 25°C
600CONTROLADOR
VERSÃO DE SOFTWARE 1.0xcódigo 80336 / Edição 0.1 - 11/01
MANUAL DO USUÁRIO
Para uma instalaçãocorreta, leia asadvertências contidasneste manual
Tipo TC Termopares(ITS90)
Display 2 x 4 dígitos verdes, altura dos algarismos: 10 e 7mmTeclas 4 do tipo mecânico (Man/Aut, INC, DEC, F)Exactidão 0,2% do fundo de escala ± 1 digito a temperatura ambiente de 25°C
Entrada principal(filtro digital configurável)
TC, RTD, PTC, NTC60mV, 1V Ri≥1MΩ; 5V, 10V Ri≥10KΩ; 20mA Ri=50ΩTempo de amostragem 120 mseg.
1 • INSTALAÇÃO• Dimensões externas máximas e medidas para
furação e montagem em painel
Montagem em quadroPara fixar os instrumentos, introduza as presilhas apropriadas nas sedes existentes nasparedes laterais da caixa. Para montar dois ou mais instrumentos dispondo-os lado alado, faça os furos respeitando as medidas indicadas na figura.
MARCA DA CE: Conformidade EMC (compatibilidade eletromagnética) de acordo coma Diretiva 89/336/CEE com referência às Normas genéricas EN50082-2 (imunidade emambiente industrial) e EN50081-1 (emissão em ambiente residencial). ConformidadeBT (baixa tensão) de acordo com a Diretiva 73/23/CEE, modificada pela Diretiva 93/68. MANUTENÇÃO: Reparos devem ser realizados somente por técnicos especializadosou por pessoas devidamente treinadas neste tipo de trabalho. Antes de acessar àspartes internas do instrumento, desligue-o da alimentação.Não limpe a caixa com solventes derivados de hidrocarbonetos (tricloroetileno,gasolina, etc.). O emprego dos referidos solventes compromete a confiabilidademecânica do instrumento. Para limpar as partes externas de plástico use um panolimpo umedecido com álcool etílico ou com água.ASSISTÊNCIA TÉCNICA: A GEFRAN tem um departamento de assistência técnicanas próprias instalações, que está à disposição do cliente.Os defeitos provocados por uso inadequado e não conforme as instruções deutilização não estão cobertos pela garantia.
2 • CARACTERÍSTICAS TÉCNICAS
!
82
GEFRAN spa via Sebina, 7425050 Provaglio d'Iseo (BS) ITALIATel. 0309888.1 - Fax 0309839063
Internet: http://www.gefran.com
99
10
45
45
48
70
70
63
48
FUNÇÃO TIPO DE CABO COMPRIMENTO UTILIZADOCabo de alimentação 1 mm2 1 mtCabo de saída do relé 1 mm2 3,5 mtFios de ligação serial 0,35 mm2 3,5 mtFios de ligação T.A. 1,5 mm2 3,5 mtEntrada do termopar 0,8 mm2 compensado 5 mtEntrada da termorresistência "PT100" 1 mm2 3 mt
A conformidade com a EMC foi verificada usando as seguintes ligações
J, K, R, S, T, B, E, N (IEC 584-1, CEI EN 60584-1,60584-2) / L GOST, U, G, D, CÉ possível configurar uma linearização personalizada
Saída Triac24…240Vca, ± 10%, 1A max Snubberless, cargaindutiva e resistiva I2t = 128A2s
Baud rate 1200, 2400, 4800, 9600, 19200

Cencal Out 4Modbus
-relé 5A/250Vca
Padrão:100 ...240Vca/cc ± 10%
Opcional:20 ...27Vca/cc ± 10%
Potência máx 6W; 50/60 Hz
4 • CONEXÕES• Saídas entrada amper.
- relé 5A/250Vca- lógica 10V/30mA- triac 20...240Vca, 1A ±10%
- só relé 5A/250Vca
- relé 5A/250Vca- lógica 10V/30mA- contínua 0…10V, 0/4…20mAanalógica 0…10V, 0/4…20mApara uso transmissão, resol.12 bit- entrada de transformadoramperométrico 50mAac, 2Ω50/60Hz- entrada lógica 24V, 4mA decontato livre de tensão
6
5
4
3
2
1
7
8
9
10
11
12
18
17
16
15
14
13
19
20
21
22
23
24
-
+Out2
Out1
• Alimentação
23
24
~
~
TOP
-
+
Out3 (Al2)Ing. T.A.
!
PWR
83
Botões "Incrementa" e "Decrementa":Permitem aumentar (diminuir) qualquer parâmetro numérico •• A velocidade de aumento (diminuição) é proporcional ao tempo que duraa pressão sobre a tecla •• A operação não é cíclica. Isto quer dizer que, mesmo que o operador continue a pressionar a tecla depois deatingir o máx (mín) de um determinado campo de definição, o sistema bloqueia a função de aumento (diminuição).
3 • DESCRIÇÃO FRONTAL DO INSTRUMENTO
Seleção da regulagem Automática/ManualAtivo apenas quando o display PV visualiza a variável
de processo
Display PV: Indicação da variável de processo
Botão função:Permite o acesso às várias fases de configuração•• Confirma a alteração dos parâmetros definidos,passando ao seguinte ou ao anterior mediantepressão na tecla Auto/Man.
Indicadores de função:Indicam o modo de operação
MAN/AUTO = OFF (controle automático)ON (controle manual)
SETPONT1/2 = OFF (IN1 = OFF - Setpoint local 1)(IN1 = ON - Setpoint local 2)
SELFTUNING = OFF (habilitado)ON (desabilitado)
L1
Display SV: Indicação do Setpoint
Indicação do estado das saídas:OUT 1 (AL 1); OUT 2 (Principal); OUT 3 (HB); OUT 4
• Linha serial / saída 4
Configuraçãopadrão
4...20mA
Conectar para entrada de 20mA
Utilize fios de seçãoadequada
(mín. 1mm2)PT100, JPT100,
PTC, NTC
• Pt100 / PTC / NTC
• Estrutura do instrumento • Identificação das placas
3
1
2
Pt100 3 fiosPTC / NTC /Pt100 2 fios
Termopares disponíveis:J, K, R, S, T, B, E, N,
L, U, G, D, C
- Respeite as polaridades- Para extensões, use o cabocompensado adequado aotipo de TC utilizado.
+
-
• Entrada TC
2
1
4
2
3
1
+ 24V o 15VVT
-
+
+
S
-Ri =
50Ω
4
2
3
1
+ 24V o 15VVT
-
+
+
-Ri =
50Ω
TT
• Entrada linear com transmissor de 3 fios
• Entradas
• Entrada linear com transmissor de 2 fios
L2
L3
9
10
11
+
-
TXB
A
RX
-
+
12
9
10
11
12
DISPLAY
POWER
SERIAL INTERFACE/OUT4
Placa de alimentação
Seleção datensão dealimentação dotransmissor
Seleção de sinalno contato 3
Placa CPU
CPU
24V
15V
10V
5V 1,23
V
PT
100
+V
5Entrada
linear emcorrentecontínua
20mA,Ri = 50Ω
Entrada linearem tensãocontínua60mV, 1VRi > 1MΩ5V, 10V
Ri > 10KΩ
2
1 +
-
• Linear (I)
4
1
2
-
+
• Linear (V)
Linha serial isolada RS485
Para a configuração Cencal consulte a página técnica da placa serial
19
21
20
22
6
5
Saída de uso genérico configurável pelo usuário

84
5 • PROGRAMAÇÃO E CONFIGURAÇÃO "EASY"
al.1
P.V. / S.V.Variável de processo (display PV)
Setpoint de trabalho (display SV) ouvalor de saída de regulagem com o
controlador em manual
InP
Out
PAS = 99
Pro
Definições das entradas
Definições das saídas
swconf=ON
PAS
Menu custom (personalização)
Password (Senha)
Código de proteção
Limite de alarme 1(pontos de escala)
CFG
MENU NÍVEL 1
• CFG
• InP
h.pb
h.it
h.dt
h.p.x
Xy.i
Banda proporcionalde aquecimento
Tempo integralde aquecimento
Tempo derivativode aquecimento
Limite máximo dapotência
de aquecimento 0 ... 999.9% f.e.
0.00 ... 99.99 min
0.00 ... 99.99 min
0.0 ... 100.0%
Histerese para alarme 10…999 seg.
Se +32 in A1.t 0…999 min
Se +64 in A1.t
±999pontos de escala
typ. Tipo de sonda, sinal, habilitação da linearização personalizada(custom) e escala da entrada principal (Ver tabela typ, pág. 6)
dp.s
lo.s
xi.s
Posição do pontodecimal para a escala da
entrada
Limite mínimo de escalada entrada principal
Limite máximo de escalada entrada principal
dP_S Formato0 xxxx1 xxx.x2 xx.xx3 x.xxx
mín ... máx. da escala daentrada selecionada em tyP
mín ... máx. da escala daentrada selecionada em tyP
• Out • Prot
xi.l
lo.lLimite inferior de definiçãodo setpoint e dos alarmes
absolutosLo.S ... Hi.S
Limite superior, dedefinição, do setpoint edos alarmes absolutos
Lo.S ... Hi.S
Tipo dealarme 1
AL.x.t Direto (de máximo) Absoluto NormalInverso (de mínimo) Relativo ao Simétrico
setpoint ativo (janela)0 direto absoluto normal1 inverso absoluto normal2 direto relativo normal3 inverso relativo normal4 direto absoluto simétrico5 inverso absoluto simétrico6 direto relativo simétrico7 inverso relativo simétrico
AL.1.t, AL.2.t, AL.3.t
a1.t
(t.2Tempo de ciclo
Out2(Heat ou Cool)
1...200 seg.
Pro Código de proteção
Prot Visualização Modificação0 SP, alarmes SP, alarmes1 SP, alarmes SP2 SP
+4 desabilitação InP, Out+8 desabilitação CFG+128 habilita a configuração extensa
A CONFIGURAÇÃO EASY É INDICADA PARA AS VERSÕES COMDUAS SAÍDAS (OUT1, OUT2). PARA ACESSO AOS OUTROS
PARÂMETROS ADICIONE 128 AO VALOR Pro
+ 8 para desabilitar no momento da partida até o primeiro alarme + 16 para habilitar a memória do alarme+ 32 Hys passa a tempo de atraso no momento de ativação do alarme (0...999 seg.)
(excluído o absoluto simétrico)+ 64 Hys passa a tempo de atraso no momento de ativação do alarme (0...999 min.)
(excluído o absoluto simétrico)

(*) Para estes parâmetros, o retorno automático a PV/SV está desabilitado.
85
6 • PROGRAMAÇÃO E CONFIGURAÇÃO
al.1
al.2
a.xb
0V.P
sp
SP.1
SP.2
in.2
Se as teclas Inc, Dec, F não forem pressionados no prazo de 15segundos, a visualização regresa ao valor P.V.
INF
P.V. / S.V.Variável de processo (display PV)
Setpoint de trabalho (display SV) ouvalor de saída de regulagem com o
controlador em manual
Limite de alarme 2(pontos de escala)
Limite de alarme 3(pontos de escala)
Limite de alarme HB(pontos de escala da entrada
amperométrica)
Valor das saídas de controle(+aquecimento / -resfriamento)
Comunicação serialSEr
InP
Out
PAS = 99
Pro
Lin
Definições das entradas
Definições das saídas
Configuração do hardware
Linearização da entrada
NÃO
A sucessão demenus pode ser
obtida mantendo atecla F
pressionada.
Liberando o botãoseleciona-se o
menu visualizado.
Para o acesso aosparâmetros
pressione a tecla F.
Para sair dequalquer menu,
mantenha a tecla Fpressionada
Em qualquer menu,mantendo
pressionadas asteclas F +
Auto/Man durante 2segundos, o
sistema passaimediatamente àvisualização de
nível 1.
swconf=ON
Setpoint local
MENU NÍVEL 1
PAS
NÃO
Hrd
U.CA
Menu custom (personalização)
Password (Senha)
Calibração do usuário
Código de proteção
Visualização de informações
Setpoint 1
Setpoint 2
Valor da entrada amperométrica(com entrada TA presente)
Limite de alarme 1(pontos de escala)
Nota: Uma vez que se entra em uma determinada configuração, todos os parâmetros não necessários deixam de ser visualizados.
-
al.3
upd
(od
(.xd
err
• Visualização InFo
INF
Versão dosoftware
Códigoinstrumento
Código de errode
autodiagnóstico
Configuraçãohrd
+8 erro de reconhecimento placa OUT2+16 erro de reconhecimento placa OUT3
Visualização deinformações
CFG
(*)
(*)
0 No Error1 Lo2 Hi3 ERR4 SBR
SAÍDA 20 = Ausente1 = Relé2 = Lógica3 = Triac
ENTRADA /SAÍDA 30 = Ausente1 = Relé2 = Lógica3 = Contínua4 = Analógica 5 = In TA6 = In Digital
COMUNICAÇÃO DIG. / OUT40 = Ausente1 = RS 4852 = Relé
Exemplo: 1 1 1 = R + R + RS 485

• CFG
• Ser
parSER.P Protocolo serial0 CENCAL GEFRAN1 MODBUS RTU
86
S.tv
h.pb
h.it
h.dt
h.p.x
h.p.l
c.sp
c.pb
c.it
c.dt
c.p.x
c.p.l
rst
P.rs
A.rs
ffd
sof
Xy.i
Xy.2
Xy.3
xb.t
lb.t
lb.p
fa.p
g.sp
Habilitaçãode self-
tuning, auto-tuning,softstart
CFG Parâmetros de controle
Banda proporcional paraaquecimento
Tempo integral paraaquecimento
Tempo derivativo paraaquecimento
Limite máximo dapotência paraaquecimento
Setpoint pararesfriamento relativo aosetpoint de aquecimento
Banda proporcional pararesfriamento
Tempo integral de açãopara resfriamento
Tempo derivado pararesfriamento
Limite máximo dapotência pararesfriamento
Reset manual
Histerese para alarme 2
Histerese para alarme 3
Tempo de espera paradisparo do alarme HB
Tempo de espera para disparo doalarme LBA
(introduzindo 0, o alarme LBA é desabilitado)
Limite da potência para condição dealarme LBA
Saída de potência emcondição de falha
(em condições de avaria da sonda)
S.tun Auto-tuning Self-tuning Softstartcontínuo
0 NÃO NÃO NÃO1 SIM NÃO NÃO2 NÃO SIM NÃO3 SIM SIM NÃO4 NÃO NÃO SIM5 SIM NÃO SIM
0.00 ... 99.99 min
0.00 ... 99.99 min
0.0 ... 100.0%
-999 ... 999pontos de escala
0 ... 999.9% f.e.
0.00 ... 99.99 min
0.00 ... 99.99 min
0.0 ... 100.0%
Limite mínimo dapotência paraaquecimento
(não disponível para ação duplaaquecimento/resfriamento)
0.0 ... 100.0%
± 25,0% f.e.
0 ... 999.9% f.e.
0…999 seg.Se +32 in A2.t
0…999 minSe +64 in A2.t
0…999 seg.Se +32 in A3.t
0…999 minSe +64 in A3.t
0 ... 999 seg.
0.0 ... 500.0 min
-100.0 ... 100.0%
-100.0 ... 100.0%ON / OFF
Gradiente de set(ver nota de aplicação)
0,0...999,9 dígitos/min.(dígitos / seg ver SP.r)
Antireset
Feedforward
0 ... 9999pontos de escala
-100.0 ... 100.0%
Potência de reset -100.0 ... 100.0%
Histerese para alarme 10…999 seg.
Se +32 in A1.t 0…999 min
Se +64 in A1.t
Tempo de softstart 0.0 ... 500.0 min
(o valor deve ser maior do que o valor do tempo deciclo da saída a que está associado o alarme HB)
Fluido de refrigeração 0 ... 2
C.MEd Ganho relativo (rG)(ver nota de aplicação)
0 Ar 11 Óleo 0,82 Água 0,4
Limite mínimo da potênciapara resfriamento (não
disponível para ação duplaaquecimento/resfriamento)
0.0 ... 100.0%
(.ME-
(od
sr.p
Ser
Código de identificaçãodo instrumento
Configuração serial
Protocolo dainterface serial
0 ... 9999
bav Seleção daBaudrate
Seleção deparidade
_PAr Paridade0 Sem1 Ímpares2 Pares
(*)
(*)
(*) O alarme LBA pode ser reinicializado pressionando-se simultaneamente as teclas ∆ + ∇ quando
se visualiza OutP, ou passando-se para o controle Manual
NotaOs parâmetros c_Pb, c_it, c_dt são somente para leitura (read only) se a opção "controle de ganhorelativo de aquecimento/resfriamento" (CtrL = 14) tiver sido selecionada.
bAud Baudrate0 12001 24002 48003 96004 19200
±999pontos de escala
±999pontos de escala
±999pontos de escala

Type Tipo de sonda Sem ponto decimal Com ponto decimalSensore: TC
0 TC J °C 0/1000 0.0/999.91 TC J °F 32/1832 32.0/999.92 TC K °C 0/1300 0.0/999.93 TC K °F 32/2372 32.0/999.94 TC R °C 0/1750 0.0/999.95 TC R °F 32/3182 32.0/999.96 TC S °C 0/1750 0.0/999.97 TC S ° F 32/3182 32.0/999.98 TC T °C -200/400 -199.9/400.09 TC T °F -328/752 -199.9/752.010 TC B °C 44/1800 44.0/999.911 TC B °F 111/3272 111.0/999.912 TC E °C -100/750 -100.0/750.013 TC E °F -148/1382 -148.0/999.914 TC N °C 0/1300 0.0/999.915 TC N °F 32/2372 32,0/999.916 L-GOST °C 0/600 0.0/600.017 L-GOST °F 32/1112 32.0/999.918 TC U °C -200/400 -199.9/400.019 TC U °F -328/752 -199.9/752.020 TC G °C 0/2300 0.0/999.921 TC G °F 32/4172 32,0/999.922 TC D °C 0/2300 0.0/999.923 TC D °F 32/4172 32.0/999.924 TC C °C 0/2300 0.0/999.925 TC C °F 32/4172 32.0/999.926 Ni-Ni18Mo °C 0/1100 0.0/999.927 Ni-Ni18Mo °F 32/2012 32.0/999.928 TC CUSTOM CUSTOM29 TC CUSTOM CUSTOM30 PT100 °C -200/850 -199.9/850.031 PT100 °F -328/156 2 -199.9/999.932 JPT100 °C -200/600 -199.9/600.033 JPT100 °F -328/1112 -199.9/999.934 PTC °C -55/120 -55.0/120.035 PTC °F -67/248 -67.0/248.036 NTC °C -10/70 -10.0/70.037 NTC °F 14/158 14.0/158.038 0...60 mV -1999/9999 -199.9/999.939 0...60 mV linear custom linear custom40 12...60 mV -1999/9999 -199.9/999.941 12...60 mV linear custom linear custom42 0...20 mA -1999/9999 -199.9/999.943 0...20 mA linear custom linear custom44 4...20 mA -1999/9999 -199.9/999.945 4...20 mA linear custom linear custom46 0...10 V -1999/9999 -199.9/999.947 0...10 V linear custom linear custom48 2...10 V -1999/9999 -199.9/999.949 2...10 V linear custom linear custom50 0...5 V -1999/9999 -199.9/999.951 0...5 V linear custom linear custom52 1...5 V -1999/9999 -199.9/999.953 1...5 V linear custom linear custom54 0...1 V -1999/9999 -199.9/999.955 0...1 V linear custom linear custom56 200mv..1V -1999/9999 -199.9/999.957 200mv..1V linear custom linear custom58 Cust10 V-20mA -1999/9999 -199.9/999.959 Cust10 V-20mA linear custom linear custom60 Cust 60mV -1999/9999 -199.9/999.961 Cust 60mV linear custom linear custom62 PT100-JPT CUSTOM CUSTOM63 PTC CUSTOM CUSTOM64 NTC CUSTOM CUSTOM
• InP
87
typ. Tipo de sonda, sinal, habilitação da linearização personalizada(custom) e escala da entrada principal
InP Definições para as entradas
s.in Entradas doinstrumento virtual
0 ... 31
Entradas IN PV AL3 AL2 AL1Bits 4 3 2 1 0
Ex: 1 1 0 0 0Desejando gerenciar a linha serial AN e IN, ocódigo a definir para S.in é 24
s.0v Saídas do instrumentovirtual
0 ... 31
Saídas OUTW OUT4 OUT3 OUT2 OUT1Bits 4 3 2 1 0
Ex: 1 0 0 1 1Desejando gerenciar a linha serial OUT1, OUT2 e OUT3,o código a definir para S.Ou é 19
s.U.i Interface do usuário doinstrumento virtual
0 ... 63
Interf. LED KEYB DISL DISH LED LED LED LED1/2/3 OUT4 OUT3 OUT2 OUT1
Bits 7 6 5 4 3 2 1 0
Ex: 0 1 0 1 0 0 0 0Desejando gerenciar a linha serial KEYB e DISH, o código a definir paraS.U.I é 80.
+2 gradiente de set em dígitos / seg
flt
fld
dp.s
lo.s
xi.s
ofs.
ft.2
Filtro digital na entrada(se = 0 exclui o filtro da média no valor
de amostragem)
(*) não disponível para asescalas TC, RTD, PTC
Filtro digital navisualização da entrada
Posição do pontodecimal para a escala
da entrada
Limite mínimo de escalada entrada principal
Limite máximo de escalada entrada principal
Offset de correção daentrada principal
Filtro digital daentrada auxiliar
0.0 ... 20.0 seg.
0 ... 9.9pontos de escala
dP_S Formato0 xxxx1 xxx.x2 xx.xx (*)3 x.xxx (*)
mín ... máx. da escala daentrada selecionada em tyP
mín ... máx. da escala daentrada selecionada em tyP
-999 ... 999pontos de escala
0.0 ... 20.0 seg.
sp.r Def. Set remotoVal. Tipo de set remoto Absoluto/Relativo0 Digital Absoluto
(da linha serial)1 Digital Relativo ao
(da linha serial) set local
Para linearização personalizada (custom):- a sinalização LO é feita quando a variável toma valores inferioresa Lo.S ou é menor do que o valor mínimo de calibração- a sinalização HI é feita quando a variável toma valores superiores a Lo.S ou é maior do que o valor máximo de calibração
Erro máximo de nãolinearidade paratermopares (Tc),termorresistência (PT100)e termistores (PTC, NTC).
O erro é calculado comodesvio em relação aovalor teórico comreferência em % ao valorde fundo de escalaexpresso em grausCelsius (°C).
S, R escala 0...1750°C; erro < 0,2% do fundo de escala (t > 300°C)/ para as outras escalas; erro < 0,5% do fundo de escala
T erro < 0,2% do fundo de escala (t > -150°C)B escala 44...1800°C; erro < 0,5% do fundo de escala (t >
300°C) / escala 44,0...999,9; erro < 1% do fundo de escala(t > 300°C)
U escala -99,9...99,9 e -99...99°C; erro < 0,5% do fundo deescala / para as outras escalas; erro < 0,2% do fundo deescala (t > -150°C)
G erro < 0,2% do fundo de escala (t > 300°C)D erro < 0,2% do fundo de escala (t > 200°C)C escala 0...2300; erro < 0,2% do fundo de escala / para as
outras escalas; erro < 0,5% do fundo de escala
NTC erro < 0,5% do fundo de escala
Tc tipo J, K, E, N, L erro < 0,2% do fundo de escalaPT100, JPT100 e PTC erro < 0,2% do fundo de escala

88
xi.l
lo.l
of.2
xs.2
l5.2 Limite mínimo de escalada entrada auxiliar
Offset de correção daentrada auxiliar
0.0 ... 999.9
Limite máximo de escalada entrada auxiliar 0.0 ... 999.9
-99,9 ... 99,9pontos de escala
Limite inferior deconfiguração de SP e dos
alarmes absolutosLo.S ... Hi.S
Limite superior deconfiguração de SP e dos
alarmes absolutosLo.S ... Hi.S
• Out
Out Definições para as saídas
Seleção dosvalores dereferência
do alarme 1AL.1.r, AL.2.r, AL.3.r
Seleção dosvalores dereferência
do alarme 2
Seleção dosvalores dereferência
do alarme 3
AL.x.r Variável a comparar Limite de referência0 PV (variável de processo) AL1 SSP (setpoint ativo) AL (só absoluto)2 PV (variável de processo) AL (só relativo e referido
a SP1 com funçãomultiset)]
Tipo dealarme 1
Tipo dealarme 2
Tipo dealarme 3
+8 para desabilitar no momento da partida até a primeira interseção+16 para habilitar a memória do alarme+ 32 Hys passa a tempo de atraso no momento de ativação do alarme (0...999 seg.) (excluído o absoluto simétrico)+ 64 Hys passa a tempo de atraso no momento de ativação do alarme (0...999 min.) (excluído o absoluto simétrico)
AL.x.t Direto (de máximo) Absoluto NormalInverso (de mínimo) Relativo ao Simétrico
setpoint ativo (janela)0 direto absoluto normal1 inverso absoluto normal2 direto relativo normal3 inverso relativo normal4 direto absoluto simétrico5 inverso absoluto simétrico6 direto relativo simétrico7 inverso relativo simétrico
AL.1.t, AL.2.t, AL.3.t
Funcionalidadedo alarme HB
Val. Descrição da funcionalidade0 Saída de relé, lógica: alarme ativo
com um valor de corrente de cargainferior ao limite definido para o tempo deON da saída de controle.
1 Saída de relé, lógica: alarme ativocom um valor de corrente de carga superior ao limite definido para o tempo de OFF da saída de controle.
2 Alarme ativo se uma das funções 0 ou 1 estiverativa (OR lógico entre as funções 0 e 1) (*)
3 Para saída contínua de aquecimento7 Para saída contínua de resfriamento
+ 0 associado à saída Out1 (só para Hb_F= 0, 1, 2)+ 4 associado à saída Out2 (só para Hb_F= 0, 1, 2)+ 12 associado à saída Out4 (só para Hb_F= 0, 1, 2)+16 alarme HB inverso
(*) o limite inferior é definido igual a 12% do f.e. amperométrico
a1.r
a2.r
a3.r
a1.t
xb.f
a2.t
a3.t

89
an.o
rl.1
rl.2
rl.3
rl.4
(t.1
rel
(t.2
(t.3
x.an
l.an
Ação de falha(definição do estado emcaso de sonda avariada)
Err, Sbr
Mínimo da escala desaída de repetição
analógica 0
Máximo da escala desaída de repetição
analógica
Val Valor de referência0 PV - variável de processo1 SSP - setpoint ativo2 SP - setpoint local3 -4 Desvio (SSP-PV)5 HEAT (*)6 COOL (*)7 AL1 (limite)8 AL2 (limite)9 AL3 (limite)10 -11 Valor adquirido da linha serial (*)
Out WAtribuição do sinal ou valor de referência
Out1Atribuição do
sinal dereferência
_rEL. Alarme Alarme Alarme1 2 3
0 OFF OFF OFF1 ON OFF OFF2 OFF ON OFF3 ON ON OFF4 OFF OFF ON5 ON OFF ON6 OFF ON ON7 ON ON ON
-1999 ... 9999
16 para o código 0, se a entrada estiver em condição de erro Err – Sbr a saída toma ovalor mínimo de trimming
(*) - Limites de escala não definíveis pelo usuário- Saída retransmitida não disponível com controle do tipo ON/OFF
Tempo de cicloOut1
(Heat ou Cool)
Tempo de cicloOut2
(Heat ou Cool)
Tempo de cicloOut3
(Heat ou Cool)
1...200 seg.
1...200 seg.
1.... 200 seg(0,1 seg. fixo com saída contínua,
Ct. 3 não aparece na configuração)
Out2Atribuição do
sinal dereferência
Out3Atribuição do
sinal dereferência
Out4Atribuição do
sinal dereferência
-1999 ... 9999
rL.o.1, rL.o.2, rL.o.3, rL.o.4
+ 32 para nível lógico negado à saída
Val Função0 HEAT (saída de controle aquecimento)1 COOL (saída de controle resfriamento)2 AL1 - alarme 13 AL2 - alarme 24 AL3 - alarme 35 AL.HB - alarme HB6 LBA - alarme LBA7 IN - repetição da entrada lógica8 Repetição tecla but (se but = 8)9 AL1 OU AL210 AL1 OU AL2 OU AL311 AL1 E AL212 AL1 E AL2 E AL313 AL1 OU ALHB14 AL1 OU AL2 or ALHB15 AL1 E ALHB16 AL1 E AL2 E ALHB
(t.4Tempo de ciclo
Out4(Heat ou Cool)
1...200 seg.
64 AQUECIMENTO saída contínua 2-10V (*)65 RESFRIAMENTO saída contínua 2-10V (*)
(*) para rL.3

90
(tr
hd.1
• Hrd
Hrd Configuração do hardware
Habilitação domultiset de gestãodos instrumentospor meio de serial
Val Multiset Estado dos Gestão do(2 SP) leds invertidos instrumento por
meio de serial01 x2 x3 x x4 x5 x x6 x x7 x x x
Tipo de controleVal Tipo de controle
0 P quente1 P frio2 P quente / frio3 PI quente4 PI frio5 PI quente / frio6 PID quente7 PID frio8 PID quente / frio9 ON-OFF quente10 ON-OFF frio11 ON-OFF quente / frio12 PID quente + ON-OFF frio13 ON-OFF quente + PID frio14 PID quente + frio com ganho
relativo (ver parâmetro C.Med)
Seleção do tempo de amostragem da açãoderivativa:+0 amostragem 1 seg.+16 amostragem 4 seg.+32 amostragem 8 seg.+64 amostragem 240 mseg.
Nota: No controle de tipo ON/OFF o alarmeLbA está desativado.
• Prot
Pro Código de proteção
Prot Visualização Modificação0 SP, In2, alarmes, OuP, INF SP, alarmes1 SP, In2, alarmes, OuP, INF SP2 SP, In2, OuP, INF
+4 desabilitação InP, Out+8 desabilitação CFG, Ser+16 desabilitação do "ligar-desligar" através de software+32 desabilita a memorização da potência manual+64 desabilita a modificação do valor da potência manual+128 habilita a configuração extensa

dig.
al.n
bvt.
+8 para habilitar o alarme HB+16 para habilitar o alarme LBA
dig.
Função daentrada digital
+ 16 para entrada em lógica negada (NPN)+32 para forçar o estado lógico 0 (OFF)+48 para forçar o estado lógico 1 (ON)
AL.nr Alarme 1 Alarme 2 Alarme 30 desabilitado desabilitado desabilitado1 habilitado desabilitado desabilitado2 desabilitado habilitado desabilitado3 habilitado habilitado desabilitado4 desabilitado desabilitado habilitado5 habilitado desabilitado habilitado6 desabilitado habilitado habilitado7 habilitado habilitado habilitado
0 nenhuma função (tecla desabilitada)1 MAN / AUTO controlador2 LOC / REM3 HOLD4 Reset da memória dos alarmes5 Seleção SP1 / SP26 Desligamento / ligação através do software
Seleção do númerode alarmeshabilitados
0 nenhuma função (tecla desabilitada)1 MAN / AUTO controlador2 LOC / REM3 HOLD4 Reset memória dos alarmes5 Seleção SP1 / SP26 Start /Stop self-tuning7 Start /Stop auto-tuning8 Set / Reset saídas OUT1 ......OUT4
+ 16 desabilita a função dentro dos menusde configuração (butt)
b u t t
Função da teclaM/A
ld.1
ld.2
ld.3
91
Val. Função0 Nenhuma função1 MAN / AUTO (ligado em manual, desligado em automático)2 LOC / REM (ligado em remoto, desligado em local)3 HOLD4 Self-tuning ativo5 Auto-tuning ativo6 Repetição IN17 Habilitação da comunicação serial8 Presença de erro9 Softstart em execução10 Indicação SP1...SP2
Função led
+ 16 Led intermitente, se ativo
dsp Definição dafunção display SV
diSP Função do display inferior (SV)0 SSP - setpoint ativo1 InP.2 - entrada auxiliar2 Valor da saída de controle3 Desvio (SSP - PV)

Passo 34 mV fundo de escalas.34
Passo 33 mV início de escalas.33
......
s.00
92
• Lin
Lin Linearização Custom para a entradaprincipal
o valor do passo n corresponde na entrada a:mV início de escala + n*∆mV
∆mV = (mV fundo de escala - mV início de escala) / 32
Passo 0(valor de início
de escala)
Passo 32(valor de fundo
de escala)
Limites de visualização dodisplay (de -1999...9999)
Limites de visualização dodisplay (de -1999...9999)
• U.CAL
U.CA Calibraçãodo usuário
s.32
Passo 35mV à temperatura de
50°Cs.35
Val Função1 Saída analógica (1)2 Entrada 1 - personalizada 10V/ 20mA3 Entrada 1 - sensor custom 50mV4 Custom PT100 / J PT1005 Custom PTC6 Custom NTC7 Entrada 2 - custom TA (2)
Só para TYP = Tc personalizada
(1) A saída analógica em 20mA está calibrada com grau de precisão inferior a 0,2 % f.e.Fazer a calibração quando se converte em saída de 10V.
(2) A precisão na ausência de calibração é inferior a 1% f.e.. Fazer a calibração somente emcaso de necessidade de maior precisão.

Este tipo de alarme é condicionado à utilização da entrada de transformador amperométrico (T.A.). Pode sinalizar variações de absorção na carga, descriminado o valor da corrente na entrada amperométrica no campo (0 ...HS.2). É habilitado através do código de configuração (AL.n). Neste caso o valor de interceptação do alarme é expresso empontos da escala HB.Por meio do código Hb.F (fase “Out”) seleciona-se o tipo de funcionamento e a saída de controle associada.O valor definido para o limite de alarme é A.Hb.O alarme direto HB intervém no caso do valor da entrada amperométrica estar abaixo do limite definido durante um total deHb_t segundos de tempo de “ON” da saída selecionada.O alarme Hb só se pode ativar com tempos de ON superiores a 0,4 segundos (exclui a saída contínua).A funcionalidade do alarme HB prevê o controle da corrente de carga mesmo no intervalo de OFF do tempo de ciclo da saídaselecionada: Se durante um total de Hb_t segundos de estado de OFF da saída, a corrente medida for superior a 12,5% dofundo de escala definido (parâmetro HS.2 em InP), o alarme HB dispara.O reset do alarme é feito automaticamente quando se elimina a condição que o provocou.A definição do limite A.Hb = 0 desabilita ambos os tipos de alarme HB, desexcitando o relé associado.A indicação da corrente de carga é visualizada selecionando o item In.2. (nível 1).NOTA: os tempos de ON/OFF referem-se ao tempo de ciclo definido para a saída selecionada.O alarme Hb_F = 3 (7) contínuo está ativo para um valor de corrente de carga inferior ao limite definido e está desabilitado seo valor da saída de aquecimento (resfriamento) for inferior a 3%.
O valor de entrada e os alarmes ficam "congelados" pelo tempo no qual a entrada lógica permanece ativa.Com a entrada ativa, um reset da memória de interseção provoca a desexcitação de todos os relés excitados e o reset damemória de todos os alarmes.
FUNCIONAMENTO DO ALARME HB
• Funcionamento tipo HOLD
93
7 • ALARMES
tempo
AL1 + Hyst1
AL2 + Hyst2AL2
AL1
alarme 1
alarme 2
(*)
Para AL1 alarme absoluto inverso (mínimo) com Hyst 1 positiva, AL1 t=1(*) = OFF se existir desablitação a partida do equipamento.Para AL2 alarme absoluto direto (máximo) com Hyst 2 negativa, AL2 t=0
Para AL1 alarme absoluto inverso simétrico com histerese Hyst 1, AL1 t=5Para AL1 alarme absoluto direto simétrico com histerese Hyst 1, AL1 t=4
Alarme absoluto do tipo normal Alarme absoluto do tipo simétrico
inverso
direto
AL1
AL1 + [ Hyst1 ]
AL1 - [ Hyst1 ]
tempo
Para AL1 alarme relativo inverso normal com histerese Hyst 1 negativa, AL1 t=3Para AL1 alarme relativo direto normal com histerese Hyst 1 negativa, AL1 t=2
Para AL1 alarme relativo inverso simétrico com histerese Hyst 1, AL1 t=7Para AL1 alarme relativo direto simétrico com histerese Hyst 1, AL1 t=6
tempo
SP+AL1SP
inverso
direto
SP+AL1
SP
inverso
direto
tempo
Hyst1
Alarme relativo ao setpoint do tipo normal Alarme relativo ao setpoint do tipo simétrico
SP-AL1

94
Ação Proporcional:ação em que a atuação sobre a saída é proporcional ao desvio à entrada (Desvio é a diferença entre o valor da variável controlada e o valordesejado).Ação Derivativa:ação em que a atuação sobre a saída é proporcional à velocidade de variação do desvio à entrada.Ação Integral:ação em que a atuação sobre a saída é proporcional à integral no tempo do desvio da entrada.
Influência das ações Proporcional, Derivativa e Integral sobre a resposta do processo sob controle*O aumento da Banda Proporcional reduz as oscilações mas aumenta o desvio.* A diminuição da Banda Proporcional reduz o desvio mas provoca oscilações da variável regulada (valores de Banda Proporcionalexcessivamente baixos provocam instabilidade no sistema)* O aumento da Ação Derivativa, correspondente a um aumento do Tempo Derivativo, reduz o desvio e evita oscilações até um valor crítico deTempo Derivativo superior ao qual aumenta o desvio e se verificam oscilações prolongadas.* O aumento da Ação Integral correspondente a uma diminuição do Tempo Integral, tende a anular, em condições de regime, o desvio entre avariável controlada e o valor desejado (setpoint).Se o valor do Tempo Integral for excessivo (Ação Integral fraca) é possível uma persistência do desvio entre a variável controlada e o valordesejado.Para mais informações relativas às ações de controle contate a GEFRAN.
8 • AÇÕES DE CONTROLE
9 • TÉCNICA DE AJUSTE MANUALA) Defina o setpoint com o valor operativoB) Defina a banda proporcional ao valor 0,1% (com regulagem do tipo on-off).C) Comute para automático e observe o comportamento da variável; obter-se-á um comportamento análogo ao da figura:
D) Cálculo dos parâmetros PID: Valor de banda proporcional
PicoP.B.= ---------------------------------------- x 100
V. máximo - V mínimo
(V. máximo - V mínimo) é a amplitude da escala.Valor de tempo integral It = 1,5 x TValor de tempo derivativo dt = It/4E) Comute o regulador para manual, introduza o valor dos parâmetros calculados(reabilite a regulagem PID definindo um tempo eventual de ciclo para a saída de relé),comute para automático.F) Sendo possível, para avaliar a otimização dos parâmetros, mude o valor do setpoint everifique o comportamento transitório; se persistir alguma oscilação aumente o valor dabanda proporcional. Se, pelo contrário, se demonstrar uma resposta demasiado lenta,diminua o seu valor.
Variável deprocesso
Tempo
T
Pico
11 • LIGAÇÃO / DESLIGAMENTO ATRAVÉS DO SOFTWAREComo desligar: usando a combinação de teclas "F" e "Incrementa", pressionando-as ao mesmo tempo, durante 5 segundos, é possíveldesativar o instrumento que se coloca no estado de "OFF", assumindo assim um comportamento análogo ao do instrumento desligado massem cortar a alimentação de rede e mantendo ativa a visualização da variável de processo. O display SV desliga-se.Todas as saídas (controle e alarmes) estão no estado de OFF (nível lógico 0, relés desexcitados) e todas as funções do instrumento estãoinibidas, salvo a função de "LIGAÇÃO" e a comunicação serial.Como ligar: pressionando a tecla "F" durante 5 segundos, o instrumento passa do estado de "OFF" para "ON". Se houver suspensão datensão de rede durante o estado de "OFF" do aparelho, quando este voltar a ser ligado (power-up) se colocará no estado de "OFF" anterior;(o estado de "ON/OFF" é memorizado). A função está normalmente habilitada; para a desabilitar defina o parâmetro Prot = Prot +16. Estafunção pode ser associada a uma entrada digital (d.i.G) e exclui a desativação mediante teclado.
A função multiset habilita-se em hd.1.A função gradiente está sempre habilitada.A seleção entre setpoint 1 e setpoint 2 pode ser feita com a teclafrontal ou através da entrada digital.É possível visualizar a seleção entre os setpoints 1 / 2 por meio doled.GRADIENTE DE SET: se definido ≠ 0, no momento da partida e naaltura de passagem de auto/man o setpoint toma o valor de PV, comgradiente configurado atinge o set local ou o set selecionado.Qualquer variação de set está sujeita a gradiente.O gradiente de set é inibido à partida quando o self-tuning estiverhabilitado.Se o gradiente de set for definido ≠ 0, também estará ativo nasvariações de setpoint local, configurável apenas no menu SPrespectivo.O setpoint de controle atinge o valor configurado com a velocidadedefinida pelo gradiente.
10 • FUNÇÃO MULTISET, GRADIENTE DE SET
SP1SP2
SPrem SP1(*)
ON
ON
SP
IN1
LOC/REM
t
t
t
(*) se o gradiente de setestiver configurado
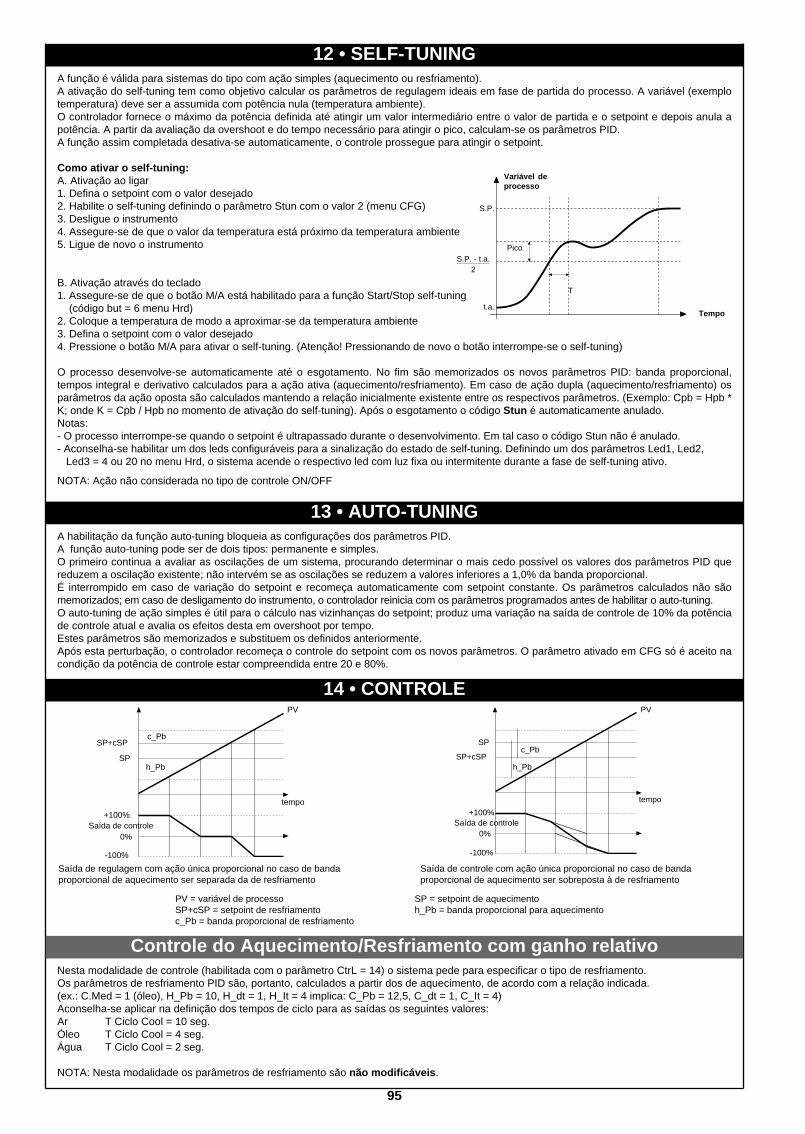
95
A função é válida para sistemas do tipo com ação simples (aquecimento ou resfriamento).A ativação do self-tuning tem como objetivo calcular os parâmetros de regulagem ideais em fase de partida do processo. A variável (exemplotemperatura) deve ser a assumida com potência nula (temperatura ambiente).O controlador fornece o máximo da potência definida até atingir um valor intermediário entre o valor de partida e o setpoint e depois anula apotência. A partir da avaliação da overshoot e do tempo necessário para atingir o pico, calculam-se os parâmetros PID.A função assim completada desativa-se automaticamente, o controle prossegue para atingir o setpoint.
Como ativar o self-tuning:A. Ativação ao ligar1. Defina o setpoint com o valor desejado2. Habilite o self-tuning definindo o parâmetro Stun com o valor 2 (menu CFG)3. Desligue o instrumento4. Assegure-se de que o valor da temperatura está próximo da temperatura ambiente5. Ligue de novo o instrumento
B. Ativação através do teclado1. Assegure-se de que o botão M/A está habilitado para a função Start/Stop self-tuning
(código but = 6 menu Hrd)2. Coloque a temperatura de modo a aproximar-se da temperatura ambiente 3. Defina o setpoint com o valor desejado4. Pressione o botão M/A para ativar o self-tuning. (Atenção! Pressionando de novo o botão interrompe-se o self-tuning)
O processo desenvolve-se automaticamente até o esgotamento. No fim são memorizados os novos parâmetros PID: banda proporcional,tempos integral e derivativo calculados para a ação ativa (aquecimento/resfriamento). Em caso de ação dupla (aquecimento/resfriamento) osparâmetros da ação oposta são calculados mantendo a relação inicialmente existente entre os respectivos parâmetros. (Exemplo: Cpb = Hpb *K; onde K = Cpb / Hpb no momento de ativação do self-tuning). Após o esgotamento o código Stun é automaticamente anulado.Notas:- O processo interrompe-se quando o setpoint é ultrapassado durante o desenvolvimento. Em tal caso o código Stun não é anulado.- Aconselha-se habilitar um dos leds configuráveis para a sinalização do estado de self-tuning. Definindo um dos parâmetros Led1, Led2,
Led3 = 4 ou 20 no menu Hrd, o sistema acende o respectivo led com luz fixa ou intermitente durante a fase de self-tuning ativo.
NOTA: Ação não considerada no tipo de controle ON/OFF
12 • SELF-TUNING
Pico
T
S.P.
t.a.Tempo
Variável deprocesso
S.P. - t.a.2
13 • AUTO-TUNINGA habilitação da função auto-tuning bloqueia as configurações dos parâmetros PID.A função auto-tuning pode ser de dois tipos: permanente e simples.O primeiro continua a avaliar as oscilações de um sistema, procurando determinar o mais cedo possível os valores dos parâmetros PID quereduzem a oscilação existente; não intervém se as oscilações se reduzem a valores inferiores a 1,0% da banda proporcional.É interrompido em caso de variação do setpoint e recomeça automaticamente com setpoint constante. Os parâmetros calculados não sãomemorizados; em caso de desligamento do instrumento, o controlador reinicia com os parâmetros programados antes de habilitar o auto-tuning.O auto-tuning de ação simples é útil para o cálculo nas vizinhanças do setpoint; produz uma variação na saída de controle de 10% da potênciade controle atual e avalia os efeitos desta em overshoot por tempo.Estes parâmetros são memorizados e substituem os definidos anteriormente.Após esta perturbação, o controlador recomeça o controle do setpoint com os novos parâmetros. O parâmetro ativado em CFG só é aceito nacondição da potência de controle estar compreendida entre 20 e 80%.
tempo
PV
c_Pb
h_Pb
SP+cSP
SP
+100%Saída de controle
0%
-100%
Saída de regulagem com ação única proporcional no caso de bandaproporcional de aquecimento ser separada da de resfriamento
Saída de controle com ação única proporcional no caso de bandaproporcional de aquecimento ser sobreposta à de resfriamento
tempo
PV
c_Pb
h_PbSP+cSP
SP
+100%Saída de controle
0%
-100%
PV = variável de processo SP = setpoint de aquecimentoSP+cSP = setpoint de resfriamento h_Pb = banda proporcional para aquecimentoc_Pb = banda proporcional de resfriamento
14 • CONTROLE
Nesta modalidade de controle (habilitada com o parâmetro CtrL = 14) o sistema pede para especificar o tipo de resfriamento.Os parâmetros de resfriamento PID são, portanto, calculados a partir dos de aquecimento, de acordo com a relação indicada.(ex.: C.Med = 1 (óleo), H_Pb = 10, H_dt = 1, H_It = 4 implica: C_Pb = 12,5, C_dt = 1, C_It = 4)Aconselha-se aplicar na definição dos tempos de ciclo para as saídas os seguintes valores:Ar T Ciclo Cool = 10 seg.Óleo T Ciclo Cool = 4 seg.Água T Ciclo Cool = 2 seg.
NOTA: Nesta modalidade os parâmetros de resfriamento são não modificáveis.
Controle do Aquecimento/Resfriamento com ganho relativo

25 ±1
Ø 7
±0,
5
5,50m
PTC 7 x 25 5m
• CÓDIGO DE PEDIDO
DADOS TÉCNICOS
Mod. Sonda: Sonda AmbienteMaterial da tampa: Plástico (Ø 7 x 25mm)Campo de temperatura: -20...80°CPTC: R 25°C = 1KΩ ±1% (KTY 81-110)Tempo de resposta: 20 seg. (em ar parado)Isolamento: 100MΩ, 500Vd.c. entre a tampa e os terminaisMaterial do cabo: Unipolar em PVC (12/0,18)Comprimento do cabo: 5,50m
• Cabo Interface RS232 / TTL para configuração de instrumentos GEFRAN
CÓD. 1108200 Cabo + Disquete
• CÓDIGO DE PEDIDO
• TRANSFORMADOR AMPEROMÉTRICO15 • ACESSÓRIOS
• Aplicação de set duplo (rampa + manutenção + alarme de fim)16 • APLICAÇÕES
50 / 0.05 A
152050 9640
1 2
1 2
5,5 27 5,5
920
1948
8 838
1
13
20
2
In
44 30
1010
Orifício de fixação para parafusosauto-roscantes: 2,9 x 9
Estes transformadores são usados para medidas de corrente a 50 ÷ 60 Hz de 25A a600A (corrente nominal primária). A característica peculiar destes transformadores é onúmero elevado de espiras no secundário. Esta particularidade permite uma correntesecundária muito baixa, aceitável para um circuito eletrônico de medição. A correntesecundária pode ser determinada como uma tensão sobre uma resistência.
CÓDIGO Ip / Is Ø Cabo n SAÍDAS Ru Vu PRECISÃOsecundário
TA/152 025 25 / 0.05A 0.16 mm n1-2 = 500 1 - 2 40 Ω 2 Vca 2.0 %
TA/152 050 50 / 0.05A 0.18 mm n1-2 = 1000 1 - 2 80 Ω 4 Vca 1.0 %
IN = 25AcaOUT = 50mAca
CÓD. 330200IN = 50AcaOUT = 50mAca
CÓD. 330201
• CÓDIGO DE PEDIDO
NOTA: A interface RS232 para configuração usando o PC éfornecida junto com o software de programaçãoWINSTRUM. A conexão deve ser feita com o instrumentoligado e com as entradas e saídas não conectadas.
96
• PTC
AL
Referido ao setpointatual
Perfil de setpoint
Set
poin
t < A
L
Ret
ardo
na
ativ
ação
(*)
Alarme absoluto
Alarme inverso
(*) Tempo definido noparâmetro Hy.n
Alarme direto
Tempo (min. ou seg.)

CÓDIGO DE PEDIDO
• ADVERTÊNCIAS
Antes de instalar, ligar ou usar o instrumento, leia as advertências abaixo:• ligue o instrumento seguindo rigorosamente as indicações do manual• faças as conexões utilizando sempre os tipos de cabos adequados aos limites de tensão e corrente indicados nos dados técnicos• o instrumento NÃO possui interruptor On/Off. Deste modo, assim que se liga à corrente acende imediatamente. Por motivo de segurança, todos osdispositivos conectados permanentemente à alimentação necessitam de: um interruptor selecionador bifásico marcado com a marca apropriada,colocado nas imediações do aparelho e facilmente acessível ao operador; um único interruptor pode comandar vários aparelhos.• se o instrumento estiver ligado a aparelhos eletricamente NÃO isolados (ex. termopares), deve-se fazer a ligação ao terra com um condutor específicopara evitar que esta ocorra diretamente através da própria estrutura da máquina.• se o instrumento for utilizado em aplicações onde há risco de ferimento de pessoas, danos para máquinas ou materiais, é indispensável que seja usadocom aparelhos de alarme auxiliares. É aconselhável contemplar a possibilidade de verificar a intervenção dos alarmes mesmo durante o funcionamentonormal do equipamento• antes de usar o instrumento, cabe ao usuário verificar se os seus parâmetros estão definidos corretamente, para evitar ferimentos nas pessoas oudanos a objetos• o instrumento NÃO pode funcionar em ambientes onde a atmosfera seja perigosa (inflamável ou explosiva); só pode ser ligado a elementos queoperem neste tipo de atmosfera através de interfaces de tipo apropriado que estejam em conformidade com as normas de segurança vigentes locais• o instrumento contém componentes sensíveis às cargas eletrostáticas; assim, é necessário que o manuseio das placas eletrônicas nele contidas sejafeito com as devidas precauções a fim de evitar danos permanentes aos próprios componentes• Instalação: categoria de instalação II, grau de poluição 2, isolamento duplo• as linhas de alimentação devem ser separadas das de entrada e saída dos instrumentos; certifique-se sempre de que a tensão de alimentaçãocorresponde à indicada na sigla indicada na etiqueta do instrumento• reuna a instrumentação da parte de potência e de relés, separadamente• não instale no mesmo quadro contatores de alta potência, contatores, relés, grupos de potência com tiristores, sobretudo "com defasagem", motores, etc..• evite pó, umidade, gases corrosivos, fontes de calor• não feche as entradas de ventilação; a temperatura de trabalho deve estar compreendida entre 0 ... 50°CSe o instrumento estiver equipado com contatos tipo faston, é necessário que estes sejam do tipo protegido e isolados; se estiver equipado com contatosde parafuso, é necessário fixar os cabos solidamente e, pelo menos, dois a dois.• alimentação: proveniente de um dispositivo de secionamento com fusível para a parte de instrumentos; a alimentação dos instrumentos deve ser o maisdireta possível, partindo do selecionador e, além disso, não deve ser utilizada para comandar relés, contatores, válvulas de solenóide, etc.. Quando forfortemente disturbada pela comutação de grupos de potência com tiristores ou por motores, é conveniente usar um transformador de isolamento só parainstrumentos, ligando a blindagem destes à terra. É importante que a instalação elétrica tenha uma boa conexão à terra, que a tensão entre o neutro e aterra não seja >1V e que a resistência Ohmica seja <6 Ohms. Se a tensão de rede for muito variável, use um estabilizador de tensão para alimentar oinstrumento. Nas imediações de geradores de alta frequência ou de arcos de solda, use filtros de rede. As linhas de alimentação devem ser separadasdas de entrada e saída dos instrumentos. Certifique-se sempre de que a tensão de alimentação corresponde à indicada na sigla indicada na placa deidentificação do instrumento• conexão das entradas e saídas: os circuitos externos conectados devem respeitar o duplo isolamento. Para conectar as entradas analógicas (TC,RTD), é necessário separar, fisicamente, os cabos de entrada dos de alimentação, de saída e de ligação de potência. Utilize cabos trançados eblindados, com blindagem ligada à terra num único ponto. Para conectar as saídas de controle, de alarme (contatores, válvulas de solenóide,motores, ventoinhas, etc.) monte grupos RC (resistência e condensador em série) em paralelo com as cargas indutivas que trabalham em correntealternada (Nota: todos os condensadores devem estar em conformidade com as normas VDE (classe x2) e suportar uma tensão de, pelo menos,220Vca. As resistências devem ser, pelo menos, de 2W). Monte um díodo 1N4007 em paralelo com a bobina das cargas indutivas que trabalham emcorrente contínua.A GEFRAN spa não se considera, de modo nenhum, responsável por ferimento de pessoas ou danos de objetos provocados por adulteração,uso errado, inadequado e não conforme as características do instrumento.
! ATENÇÃO! Este símbolo indica perigo.Você irá encontrá-lo próximo da alimentação e dos contatos dos relés que podem ser conectados a tensão de rede.
97
Relé R
600
SAÍDA 1 (AL)
R
100...240V
20...27V
1
0
2
0 Nenhuma
RS485
R Saída relé
ALIMENTAÇÃO
COMUNICAÇÃO DIGITAL / SAÍDA 4
SAÍDA 2 (MAIN)
Relé R
Lógica D2 D
Triac (1A) T
ENTRADA / SAÍDA 3
Nenhuma 0
Relé R
Lógica D2 D
Saída de controle contínua de 10V C
Retransmissão analógica 20mA W
Entrada TA (50mAca) H
Entrada digital N
Entre em contato com os técnicos da GEFRAN para maiores informações acerca da disponibilidade dos códigos

98
NOTES

99
NOTES

GEFRAN spavia Sebina, 74 - 25050 Provaglio d'Iseo (BS) - ITALIA
Tel. +39 0309888.1 - Fax +39 0309839063www.gefran.com
www.gefranonline.com