6: The Programs Tab: WIOA - NCWorks Online Guide... · 6: The Programs Tab: WIOA ... starting with...
118
Virtual OneStop – Staff Services User Guide 6-1 V18 – 05/2018 6: The Programs Tab: WIOA Chapter Contents WIOA Program Overview ............................................................................................................................ 6-1 The WIOA Application Form .............................................................................................................................. 6-4 Summary of WIOA Eligibility Types and Requirements ................................................................................................................... 6-4 Summary of WIOA Tabs per Eligibility Type ..................................................................................................................................... 6-7 Starting a WIOA Application ................................................................................................................................................................ 6-8 The WIOA Application (for Adult) ...................................................................................................................................................... 6-9 The WIOA Application (for Dislocated Worker) .............................................................................................................................. 6-29 The WIOA Application (for Youth) ................................................................................................................................................... 6-46 The WIOA Application (for Incumbent Worker) .............................................................................................................................. 6-61 Seeing WIA Legacy Data (via the Eligibility Tab)............................................................................................................................ 6-66 Printing the WIOA Application .......................................................................................................................................................... 6-67 The WIOA Participation Form ........................................................................................................................... 6-68 The WIOA Service/Activity Enrollments .......................................................................................................... 6-69 Creating a Non-Fundable Activity (Initial Assessment) ................................................................................................................... 6-70 Creating a Fundable Activity (Support Service) ................................................................................................................................ 6-74 Creating a Fundable Activity (Individualized Training Account - ITA Service) ............................................................................ 6-81 Measurable Skills Gain ...................................................................................................................................... 6-90 Partner Programs ................................................................................................................................................ 6-92 Literacy & Numeracy Scores ............................................................................................................................. 6-94 Create Credentials .............................................................................................................................................. 6-98 Create Entered Employment ............................................................................................................................ 6-100 Enrollment Closure .......................................................................................................................................... 6-102 WIOA Enrollment – Reset Options.................................................................................................................. 6-104 The WIOA Case Closure.................................................................................................................................. 6-106 WIOA Follow-Up Services .............................................................................................................................. 6-109 Follow-Up Services and Soft Exits ................................................................................................................................................... 6-109 The WIOA Outcome (Hard Exit) ..................................................................................................................... 6-111 Deleting WIOA Outcomes ............................................................................................................................... 6-112 WIOA Follow-Up Forms ................................................................................................................................. 6-114 WIOA Outcome Form (Youth) ........................................................................................................................ 6-116 WIOA Follow-Up Form for Youth .................................................................................................................. 6-118 WIOA Program Overview Individuals who enroll in the Workforce Innovation & Opportunity Act (WIOA) program will undergo a process similar to the one outlined in the Wagner-Peyser topic – this includes creation of a WIOA Application, a Participation record, and then enrollment in activities and services that have WIOA-associated activity codes. Virtual OneStop wizards help staff progress step-by-step through tabs to enter WIOA data, starting with tabs for a WIOA application, based on the individual’s date of birth, and selection of eligibility type and date in the first step of the application (e.g., Adult, Dislocated, and Youth). The WIOA program focuses on workers whose eligibility determination is similar to the previous WIA requirements, but WIOA eligibility has been streamlined for the new, approved WIOA legislation. Individuals who enroll in WIOA must undergo a process of creating an application and a participation record, and enrolling in activities. Staff will identify the eligibility type for which they are helping the individual to apply. The system will determine eligibility at the end of the application process.
-
Upload
nguyenthuy -
Category
Documents
-
view
218 -
download
0
Transcript of 6: The Programs Tab: WIOA - NCWorks Online Guide... · 6: The Programs Tab: WIOA ... starting with...

Virtual OneStop – Staff Services User Guide 6-1 V18 – 05/2018
6: The Programs Tab: WIOA Chapter Contents
WIOA Program Overview ............................................................................................................................ 6-1 The WIOA Application Form .............................................................................................................................. 6-4
Summary of WIOA Eligibility Types and Requirements ................................................................................................................... 6-4 Summary of WIOA Tabs per Eligibility Type ..................................................................................................................................... 6-7 Starting a WIOA Application ................................................................................................................................................................ 6-8 The WIOA Application (for Adult) ...................................................................................................................................................... 6-9 The WIOA Application (for Dislocated Worker) .............................................................................................................................. 6-29 The WIOA Application (for Youth) ................................................................................................................................................... 6-46 The WIOA Application (for Incumbent Worker) .............................................................................................................................. 6-61 Seeing WIA Legacy Data (via the Eligibility Tab)............................................................................................................................ 6-66 Printing the WIOA Application .......................................................................................................................................................... 6-67
The WIOA Participation Form ........................................................................................................................... 6-68 The WIOA Service/Activity Enrollments .......................................................................................................... 6-69
Creating a Non-Fundable Activity (Initial Assessment) ................................................................................................................... 6-70 Creating a Fundable Activity (Support Service) ................................................................................................................................ 6-74 Creating a Fundable Activity (Individualized Training Account - ITA Service) ............................................................................ 6-81
Measurable Skills Gain ...................................................................................................................................... 6-90 Partner Programs ................................................................................................................................................ 6-92 Literacy & Numeracy Scores ............................................................................................................................. 6-94 Create Credentials .............................................................................................................................................. 6-98 Create Entered Employment ............................................................................................................................ 6-100 Enrollment Closure .......................................................................................................................................... 6-102 WIOA Enrollment – Reset Options .................................................................................................................. 6-104 The WIOA Case Closure .................................................................................................................................. 6-106 WIOA Follow-Up Services .............................................................................................................................. 6-109
Follow-Up Services and Soft Exits ................................................................................................................................................... 6-109 The WIOA Outcome (Hard Exit) ..................................................................................................................... 6-111 Deleting WIOA Outcomes ............................................................................................................................... 6-112 WIOA Follow-Up Forms ................................................................................................................................. 6-114 WIOA Outcome Form (Youth) ........................................................................................................................ 6-116 WIOA Follow-Up Form for Youth .................................................................................................................. 6-118
WIOA Program Overview Individuals who enroll in the Workforce Innovation & Opportunity Act (WIOA) program will undergo a process similar to the one outlined in the Wagner-Peyser topic – this includes creation of a WIOA Application, a Participation record, and then enrollment in activities and services that have WIOA-associated activity codes. Virtual OneStop wizards help staff progress step-by-step through tabs to enter WIOA data, starting with tabs for a WIOA application, based on the individual’s date of birth, and selection of eligibility type and date in the first step of the application (e.g., Adult, Dislocated, and Youth). The WIOA program focuses on workers whose eligibility determination is similar to the previous WIA requirements, but WIOA eligibility has been streamlined for the new, approved WIOA legislation. Individuals who enroll in WIOA must undergo a process of creating an application and a participation record, and enrolling in activities. Staff will identify the eligibility type for which they are helping the individual to apply. The system will determine eligibility at the end of the application process.

The Programs Tab: WIOA
Virtual OneStop – Staff Services User Guide 6-2 V18 – 05/2018
The applications, participations, and enrollments, as well as any additional entered employment, closures, outcomes, or follow up activities, are all available to staff members assisting individuals. (Some access may depend on staff’s specific Admin privileges.) Staff can expand the WIOA Program line to start the WIOA Application (for a new applicant), and determine their eligibility for WIOA enrollment. For active participants, staff can expand additional lines to access all enrollments, activities, and other details. An overview of each form and related stages of WIOA program participation is indicated in the table below, followed by topics and steps for each related form.
Note: The forms are listed in a suggested sequence. Your internal policies or customer business rules may require using the forms in a different sequence than listed below.
Form & Section Name Reason for Use
WIOA #16034170–Complete
LWIA: Sample County LWIA Onestop: Sample ABC Ones top Total Activities: Sample County LWIA
For completed applications, this bar includes the Application wizard, Print and Validation icons, followed by the App # and status (e.g., WIOA # 12345678 – Complete).
expands the section to show basic App data, and section headings for the other forms.
WIOA Application Form - The form initially displays segments of a progress bar (versus tabs) to help you see your progress as you step through the application, gather data, and determine customer eligibility for WIOA. Each segment is a separate page that helps to determine the individual’s eligibility. Once the application form is complete: • Segments change to tabs. • Staff can start participation/enrollments for the individual. • Wizard, Validation, and Print icons ( ) display on the bar for easily maintaining the application.
Staff enter data in each segment/tab (e.g., contact, demographics, veteran, employment, education). They begin data entry at the Start tab/segment. In WIOA, this includes selecting the Eligibility Type (and date), which is used for the rest of the application, and the individual’s WIOA eligibility determination.
Each link will open any entries and a link for the related form.
Activities can be an extended listing.

The Programs Tab: WIOA
Virtual OneStop – Staff Services User Guide 6-3 V18 – 05/2018
Form & Section Name Reason for Use
Participation This bar expands to show the basic data for the Participation Record created at the end of eligibility determination, which is part of the program application. An Edit Participation link will open the full screen for managing the Case Participation Record.
WIOA Participation Form - This form is used to gather final details of participant status (e.g., verifying employment and UI claim status) before staff enroll a participant in WIOA activities or services. Completing this form will begin the screen for enrolling in the first service.
Activities / Enrollments / Services
This bar expands to show a table for the activities/enrollments for the individual. A Create Activity/Service/Enrollment link above the table lets you create new enrollments (which are added to the table). See page 6-69 for details.
WIOA Service/Activity Enrollments - WIOA enrollment is a series of tabs used to supply details of the activity in the WIOA participant’s service record. The enrollment form will display tabs to enter/maintain groups of data (e.g., general, service provider, cost, financial aid, budget, and closure). Each entered service displays in a table below the WIOA Activity link, including the completion status, begin and end dates, and a link to modify the activity. For WIOA, activity records can be assessments of abilities, approved training activities, support services, etc.
Closure See Enrollment Closure on page 6-102 for details.
Case Closure Form -This lets staff collect and record some program outcome data (for federal and local performance measures), after all activities have actual end dates, but before the program exited, through standard soft exit or through a necessary hard exit for exclusion reasons.
Exit / Outcome See The WIOA Outcome (Hard Exit) on page 6-111 for details.
Outcome (Hard Exit) Form -This form lets staff officially terminate the participant involvement in WIOA for unpredicted reasons, such as death or hospitalization (known as global exclusions).
Follow-Ups See WIOA Follow-Up Services on page 6-109 for details.
Follow-Up Forms -This provides links for gathering additional details of the participant’s status at quarterly points after program exit (for Common Measures reporting).
Topics that follow the brief description of Eligibility Types (below) will describe the application tabs for each eligibility type, followed by the procedures for managing a WIOA participant – from their WIOA application, through participation form, and enrollment in WIOA activities (using example enrollments for non-funded and funded support services, and funded training activities). This all starts with topics for WIOA application for each eligibility type: Adult, Dislocated Worker, Youth, and Incumbent Worker.
You can view a full webinar introducing the WIOA Application (and the Enrollment, Case Closure, and Outcome functions).
Click to open the Community Forum site, which introduces this video: Training Resources from WIOA Webinars (via Community Forum)

The Programs Tab: WIOA
Virtual OneStop – Staff Services User Guide 6-4 V18 – 05/2018
The WIOA Application Form Staff begin the WIOA Application for an individual just as they begin an application for any other program. They expand the WIOA Program link, click a Create Application link, and work through each of the program tabs, as major steps of the application. The first screen displayed is the Start tab, which displays as a segment of the WIOA application progress bar. In WIOA, this Start tab/segment includes identifying the program application date, as well as selecting the application type/group and the date for which the staff member is determining the eligibility for that type. There are four eligibility type selections on the Start tab:
• Adult • Dislocated Worker • Youth • Incumbent Worker Eligibility
In WIOA, the core and intensive activities are essentially combined into a ‘career services’ category in which workforce staff will have the flexibility to better meet the unique needs of individual job seekers. The sequencing of services is eliminated, as well as the determination of core or intensive before picking and eligibility type and moving past the first tab. The only rules controlling which of the four eligibility types staff can select are the age of the individual (when setting the date for the eligibility type), and any admin privileges set for the staff member. The layout of this chapter on WIOA presents:
• A brief summary of WIOA eligibility types (below) and rules incorporated into the WIOA application tabs/segments – which staff progress through to complete eligibility determination (shows on the last tab)
• A table of the WIOA application tabs per eligibility type • Full, detailed topics and descriptions for application tabs (for each eligibility type) • Full, detailed topics for creating participation, activity enrollments, and other areas of managing
the WIOA application through to its closure.
You can click on Eligibility Type (in both tables below) to skip to a section for that type. But, the subtopics for Adult contain complete descriptions for all application tabs. Descriptions in other topics focus on only the differences for those eligibility types. Enrollment tabs and forms are discussed after each application type, starting on page 6-69.
Summary of WIOA Eligibility Types and Requirements Eligibility Type
Brief Description of Eligibility Requirements
Adult 18 or older
To be eligible to receive WIOA services as an adult (in the Adult and Dislocated Worker programs), an individual must:
• Be 18 years of age or older; • Be a citizen or noncitizen authorized to work in the United States; and • Meet Military Selective Service registration requirements (males only).
As mentioned earlier, in WIOA the sequencing of services is eliminated. Both the WIOA career services and Intensive services are available to all adults and dislocated workers. Staff have the flexibility in determine services to better meet the unique needs of the individual job seeker, including all types of career services (career services, individualized career services, and follow-up services). However, individualized career services and training services must be given on a priority-of-service basis, regardless of funding levels, to:
• Veterans
Quick Tip

The Programs Tab: WIOA
Virtual OneStop – Staff Services User Guide 6-5 V18 – 05/2018
• Individuals who are basic skills deficient • Public assistance recipients • Low-income adults • Other special priorities (e.g., other criteria defined by workforce boards)
As staff progresses through the tabs, data is collected to determine eligibility as well as to identify priority levels, including factors such as family and family income. On the last tab, staff can consider other priorities. Workforce boards can establish criteria for other priorities, including resources and funds for providing career and training-related services in the workforce area, as well as the needs of specific groups in the workforce area and other factors the Board determines appropriate.
Dislocated Worker 18 or older
To be eligible to receive WIOA services as a dislocated worker (in the Adult and Dislocated Worker programs), an individual must:
• Be 18 years of age or older; • Be a citizen or noncitizen authorized to work in the United States • Meet Military Selective Service registration requirements (males only); and • Meet the definition of dislocated worker
The requirements are identical to those for Adults, with the addition of meeting one of the criteria for dislocated worker, which are:
• Has been terminated or laid off, or has received a notice of termination or layoff, from employment;
• Is eligible for or has exhausted entitlement to unemployment compensation, or has been employed for a duration sufficient to demonstrate attachment to the workforce, but is not eligible for unemployment compensation due to insufficient earnings or having performed services for an employer that were not covered under a state’s UI law; and
• Is unlikely to return to a previous industry or occupation (permanent layoff with no recall date).
On the Employment tab, staff will see an additional Dislocated Workers section, including questions for six categories (that may can qualify the individual as dislocated) along with other Layoff and Dislocation Event fields.
Youth 14-24 In School Youth (14-21) Out of School Youth (16-24)
To be eligible to receive WIOA services as a youth, an individual must:
• Be a citizen or noncitizen authorized to work in the United States • Meet Military Selective Service registration requirements (if male and 18); and • Meet the ISY or OSY youth definition
An Eligible Youth in WIOA means an in In-School Youth (ISY) or an Out of School Youth (OSY). Staff can check the Youth Eligibility box for any individual under 24. However, the tabs which staff must complete for eligibility will include data used to make an In School Youth (ISY) or an Out of School Youth (OSY) eligibility determination. In School Youth An In-School Youth (OSY) must be aged 14-21, attending school (as defined by State law), low income, and meet one or more additional conditions, which could include:
• Basic skills deficient • An English language learner • An offender • A homeless child or youth, a runaway, in foster care, or has aged out of the
foster care system, a child eligible for assistance under §477 of the Social Security Act
• Pregnant or parenting

The Programs Tab: WIOA
Virtual OneStop – Staff Services User Guide 6-6 V18 – 05/2018
• Disabled; or • Requires additional assistance to enter or complete an educational program or
to secure or hold employment
Note: The emphasis in WIOA is on employment for OSY. Per the U.S. DOLETA, WIOA Youth Program Fact Sheet, “WIOA requires a minimum of 75 percent of State and Local youth funding to be used for Out-of-School Youth.” No more than 5 percent of ISY served in the workforce area may be deemed eligible because of the “additional assistance” criteria described in the last bullet, above.
On the Education tab, in Youth applications, staff will see specific questions if the individual is attending school, along with additional questions that will identify if they are ISY or OSY. Out of School Youth Out-of-school youth must be aged 16-24, not attending any school (as defined under State law), and meet one or more additional conditions, such as:
• School dropout • Within age of compulsory attendance but has not attended for at least the most
recent complete school year calendar quarter • Holds a secondary school diploma or recognized equivalent and is low-income
and is basic skills deficient or an English language learner; subject to the juvenile or adult justice system
• A homeless child or youth, a runaway, in foster care, or has aged out of the foster care system, a child eligible for assistance under §477 of the Social Security Act
• Pregnant or parenting • An individual with a disability; or • Low income person who requires additional assistance to enter or complete an
educational program or to secure and hold employment As mentioned previously, the emphasis in WIOA funding for youth is on employment of Out of School Youth (OSY). WIOA requires that 75 percent of youth funds to go to OSY. On the Education tab, staff will see specific questions that will identify if the individual is ISY or OSY. Depending on the answers on the Education tab, and on other tabs, the eligibility matrix which displays on the last tab may include Exception/Limita-tion indicators. Depending on staff privileges, staff may be able to select to service the individual under the 5% exception.
Incumbent Worker
In WIOA, any Incumbent Worker Services which may be handled through separate Grant funds for Incumbent Worker require staff to apply for this eligibility type. There are fewer application tabs, and the information is shared in the tabs (as it is for the other WIOA Eligibility Types). In other words, if the individual is already an eligible Adult for WIOA, all tabs may be filled in, but staff must still identify the Incumbent Worker Eligibility Start Date and walk through the minimum tabs to confirm they are complete.
Note on ABC Adult: ABC Adult is not a selectable Eligibility Type. In WIOA, old core and intensive
activities are combined into overall career services; sequencing of services was eliminated. In version 16, the WIOA application included an ABC enrollment type for certain states/sites that previously used an Integrated Services Co-enrollment business model. In this model, staff enrolled individuals in one or more WIOA services, and then also enrolled them in Wagner-Peyser services. Any individual previously enrolled this way will still be indicated as an ABC Adult Eligibility Type, but staff cannot start new enrollments via this type.

The Programs Tab: WIOA
Virtual OneStop – Staff Services User Guide 6-7 V18 – 05/2018
Summary of WIOA Tabs per Eligibility Type The same number of tabs will display for a WIOA application for each of the three main eligibility types (Adult, Dislocated and Youth), as indicated in the table below. However, the eligibility type will determine differences for data on some of the tabs. The table is a quick list of the tabs, and how they differ for each eligibility type.
Tab Adult Dislocated Worker Youth Incumbent Worker
Start Yes Yes Yes Yes
Contact Yes Yes Yes Yes
Demographics Yes Yes Yes Yes
Veteran Yes Yes Yes (1) Yes
Employment Yes (2) Yes (3) Yes (4) Yes
Education Yes Yes Yes (5) Yes
Public Assistance Yes Yes Yes (6) No
Barriers Yes Yes Yes (7) No
Family Income Yes Yes Yes No
Miscellaneous Yes (8) Yes (8) Yes (8) No
Eligibility and Grants Yes Yes Yes Yes
(1) For Youth, response is only required if a male veteran (otherwise can click Next>> immediately).
(2) For Adult, no dislocation/termination category question displays on the Employment tab.
(3) For DW, a Dislocated Worker area displays (bottom of tab) with 9 category questions, plus Layoff and Rapid Response fields.
(4) For Youth, only the first drop-down field is required, if “not Employed” is selected. (5) For Youth, additional questions exist for In-School vs. Out-Of-School Youth. (6) For Youth, additional questions exist for child care, high-poverty area, lunch program. (7) For Youth, additional questions exist under Individual Barriers for drop-out, runaway, foster care, parenting, and others. (8) This tab only displays if site-specific fields are configured for your system.
The Programs Tab: WIOA
Virtual OneStop – Staff Services User Guide 6-8 V18 – 05/2018
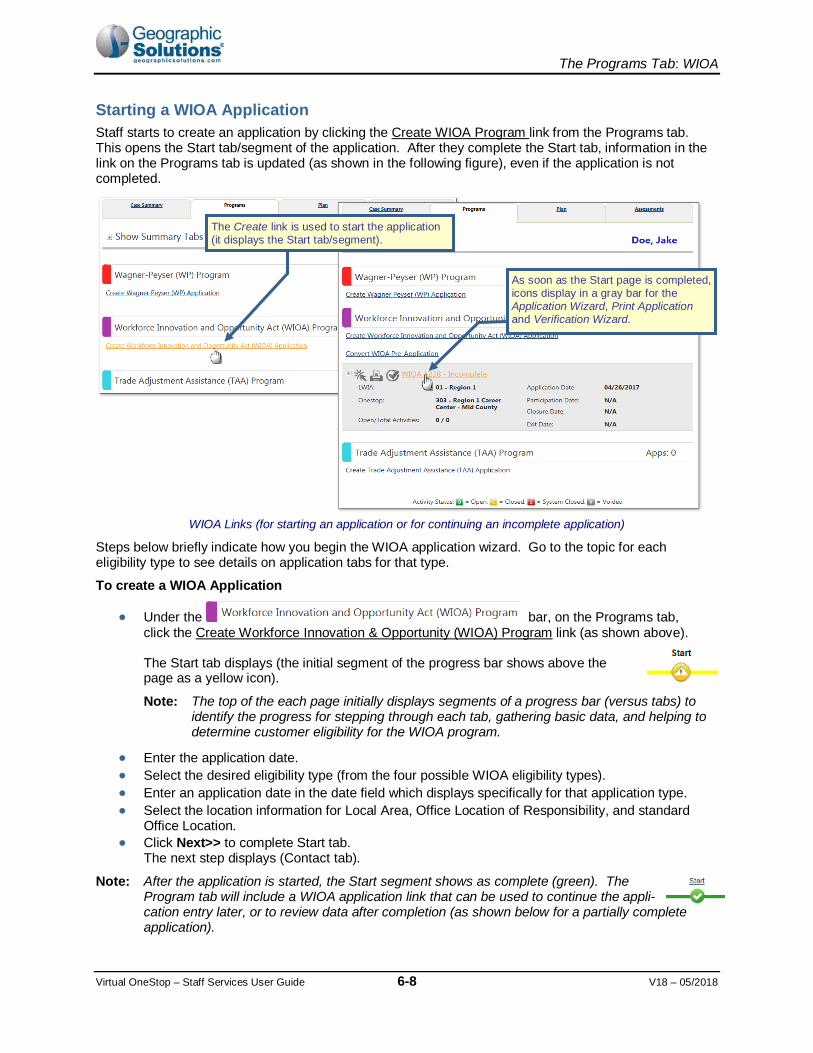
Starting a WIOA Application Staff starts to create an application by clicking the Create WIOA Program link from the Programs tab. This opens the Start tab/segment of the application. After they complete the Start tab, information in the link on the Programs tab is updated (as shown in the following figure), even if the application is not completed.
WIOA Links (for starting an application or for continuing an incomplete application)
Steps below briefly indicate how you begin the WIOA application wizard. Go to the topic for each eligibility type to see details on application tabs for that type.
To create a WIOA Application
• Under the bar, on the Programs tab, click the Create Workforce Innovation & Opportunity (WIOA) Program link (as shown above). The Start tab displays (the initial segment of the progress bar shows above the page as a yellow icon).
Note: The top of the each page initially displays segments of a progress bar (versus tabs) to identify the progress for stepping through each tab, gathering basic data, and helping to determine customer eligibility for the WIOA program.
• Enter the application date. • Select the desired eligibility type (from the four possible WIOA eligibility types). • Enter an application date in the date field which displays specifically for that application type. • Select the location information for Local Area, Office Location of Responsibility, and standard
Office Location. • Click Next>> to complete Start tab.
The next step displays (Contact tab).
Note: After the application is started, the Start segment shows as complete (green). The Program tab will include a WIOA application link that can be used to continue the appli-cation entry later, or to review data after completion (as shown below for a partially complete application).
The Create link is used to start the application (it displays the Start tab/segment).
As soon as the Start page is completed, icons display in a gray bar for the Application Wizard, Print Application and Verification Wizard.
The Programs Tab: WIOA
Virtual OneStop – Staff Services User Guide 6-9 V18 – 05/2018
After completing the Start tab, you will continue through the other tabs/segments of the application whose fields and requirements are adjusted based on your selected WIOA eligibility type(s). The Start tab and the other application tabs are described in the following major topics, for each eligibility type. Each topic has subtopics that are specific to the tabs for that eligibility type.
The topic for WIOA Adult application has the most details on the tabs that are common to all eligibility types. Other topics will describe the main differences in the tabs for that eligibility type, and reference the Adult application for details. E.g., Dislocated Worker includes details on the bottom of the Employment tab (for DW categories and layoff fields), but references the Adult topic for details on the top part of the Employment tab.
For managing dislocated workers, you may want to skip to the Dislocated Workers Eligibility topic on page 6-29. For managing youth (both in-school and out of school), you may want to skip to the Youth Eligibility topic on page 6-46.
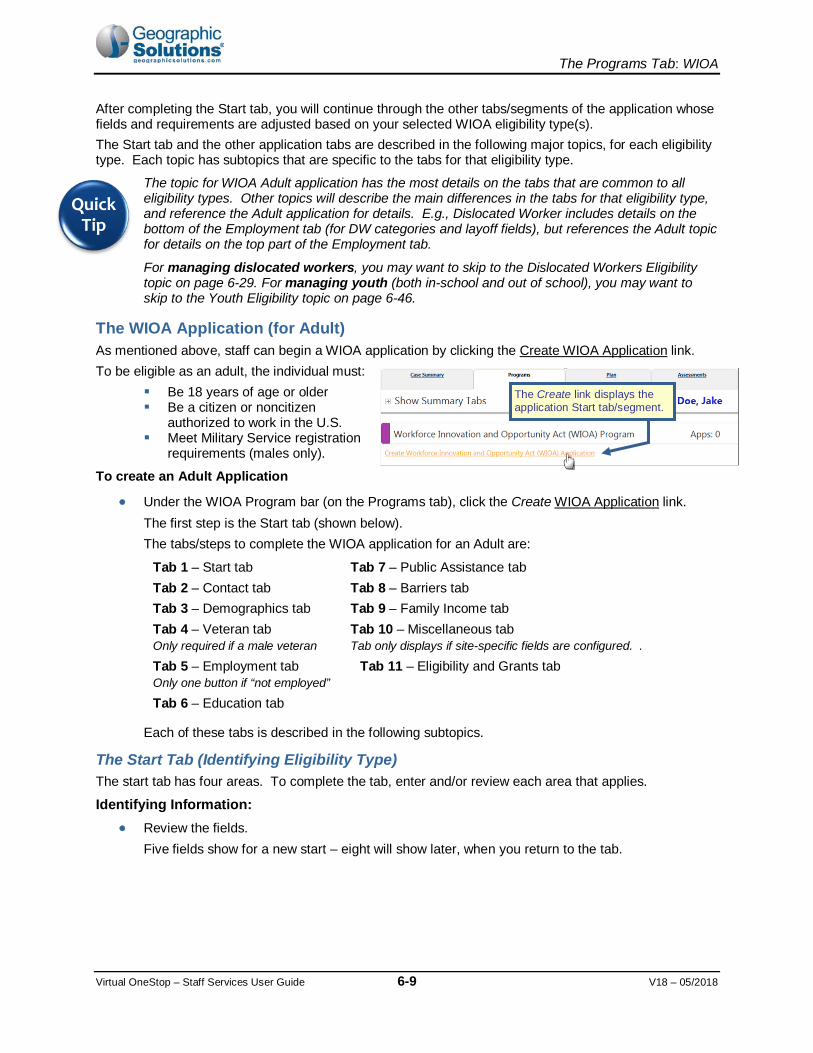
The WIOA Application (for Adult) As mentioned above, staff can begin a WIOA application by clicking the Create WIOA Application link. To be eligible as an adult, the individual must:
Be 18 years of age or older Be a citizen or noncitizen
authorized to work in the U.S. Meet Military Service registration
requirements (males only).
To create an Adult Application
• Under the WIOA Program bar (on the Programs tab), click the Create WIOA Application link.
The first step is the Start tab (shown below). The tabs/steps to complete the WIOA application for an Adult are:
Tab 1 – Start tab Tab 7 – Public Assistance tab Tab 2 – Contact tab Tab 8 – Barriers tab Tab 3 – Demographics tab Tab 9 – Family Income tab Tab 4 – Veteran tab Only required if a male veteran
Tab 10 – Miscellaneous tab Tab only displays if site-specific fields are configured. .
Tab 5 – Employment tab Only one button if “not employed”
Tab 11 – Eligibility and Grants tab
Tab 6 – Education tab
Each of these tabs is described in the following subtopics.
The Start Tab (Identifying Eligibility Type) The start tab has four areas. To complete the tab, enter and/or review each area that applies.
Identifying Information: • Review the fields.
Five fields show for a new start – eight will show later, when you return to the tab.
The Create link displays the application Start tab/segment.
Quick Tip

The Programs Tab: WIOA
Virtual OneStop – Staff Services User Guide 6-10 V18 – 05/2018
Note: The last field, WIA Converted Application ID only displays an ID for converted records (i.e., those that have no Exit date OR Exit dates ≥ 7/1/2010). These will also have a “WIA Legacy Data” link on the last the Eligibility & Grants tab. See the topic, Seeing WIA Legacy Data (via the Eligibility Tab) on page 6-66 for more.
Currently Participating In: • Review the fields.
You can see other programs that may also be available for funding needed activities or services for the individual.
Note: This area does not display if the individual is not already participating in any other programs (e.g., TAA).
Application/Registration Information: • Enter the Application Date. • Select desired eligibility type (from
four possibilities).
Note: In WIOA, this is not predetermined by Formula Program Eligibility, only by the individual’s age at application.
• Enter the Adult Eligibility Date (displayed just for the selected application type).
Location Information: • Select the location information for Local Area, Office Location of Responsibility, and standard
Office Location. • Click Next>> to save your edits and complete the Start tab.
If all required data is entered, the next step displays (the Contact tab).
General items to note for this tab:
• You can expand the Individual Details area at the top of the screen, if the information may be helpful (e.g., if you want to be reminded of the user’s Login Name or Date of Birth).
• The Application Date cannot be greater than X days ago (the lockdown date), nor can it be greater than today’s date.
• The Eligibility Date for the selected eligibility type (i.e., Adult) cannot precede the Application Date, nor can it be greater than today’s date.
WIOA Application, Start Page for Adult
The number of tabs or “Progress Bar” segments changes as soon as this tab is saved.
When staff picks Eligibility type, a date control displays (other types may be disabled (due to age).

The Programs Tab: WIOA
Virtual OneStop – Staff Services User Guide 6-11 V18 – 05/2018
Note: Certain staff may have permissions set so that they can only apply for certain eligibility types (e.g., Adult or Dislocated Worker, but not Youth). Some may have permissions for which the eligibility date is editable, even for exited/closed cases.
Note: If you click Exit Wizard, your data entry will NOT be saved. You must click Next at the Start tab to save a partial application.
• If your data entry violates a business rule or is incomplete, the system will notify you via red text message upon clicking Next (see following sample). Fix the error and re-click Next to proceed.
Note: To be eligible to receive WIOA services as an adult and/or dislocated worker, an
individual must be 18. For individuals younger than 18, the Adult and Dislocated Worker eligibility selection boxes will be disabled.
The Contact Information Tab The Contact tab includes four areas: Contact Information, Current Address, Mailing Address and Alternate Contacts. Many of the fields are prefilled from registration. Staff must:
• Ensure that all required fields are entered.
• Verify the SSN (identify verification document).
Note: The Edit SSN link is available only to staff with proper privileges.
• Verify the Current Address (identify verification document).
• Make additions or changes to Alternate Contacts, using the Mange Alternate Contacts link, if appropriate.
• Click Next to save your edits and continue to the Demographics tab.
General items to note for this tab: Note: Depending on your system configuration, you may be required to click the Manage Alternate
Contacts link and supply an alternate contact before the next step in the WIOA application. You can also click the checkbox (at the bottom of the screen) that allows you to save a partially completed program enrollment.
WIOA Application, Contact Information (with Verifications)

The Programs Tab: WIOA
Virtual OneStop – Staff Services User Guide 6-12 V18 – 05/2018
Note: The address used on the initial application date will be included below the mailing address (disabled) when you return to this tab. You can click a link to change the address (if you have permissions set for this).
Note – The Partial Save Feature Starting with step 2 of the WIOA application, you have the option to click a box that says “Check here to allow saving of partial application,” as well as to select Exit Wizard (located at the bottom of each step).
• When staff members check the Partial Save box, the system will bypass all business rules and lock-down rules (including the requirement to identify verification for certain fields). However, there are still minimum data requirements to successfully save the application as “partial” that include: LWIA, Name, Address, Phone Number, SSN, and Date of Birth. A partially saved application is considered not complete and no enrollment records can be created against this application. This feature is available and useful in the instances where individuals have forgotten to bring necessary paperwork/documentation (although it is a defined requirement). Instead of canceling the application and exiting the wizard at the current step, all data available can be entered and saved, and can be recalled when the individual returns with the necessary paperwork/documentation. When the Partial Save check box is selected, staff will encounter different behavior for the steps (employ business rules vs. suspend business rules). That is, they may complete the entire application by clicking the checkbox, although no eligibility determination will be made. Once the box is checked, validations are not required, but the application will not be completed, and eligibility will not be determined until you return to the application and complete all validation requirements.
• When staff members click the Exit Wizard link, they obviously cannot continue entering data beyond this point. They exit the application, saving only data up to the step they are in at exit.
The link on the Programs tab for the WIOA Application will indicate the status, based on the selection or completion of the WIOA Application, in parentheses: (Partially Complete), (Incomplete), or (Complete).

The Programs Tab: WIOA
Virtual OneStop – Staff Services User Guide 6-13 V18 – 05/2018
The Demographics Tab The Demographics tab contains several fields for demographic information. Some of the available options on this application are dependent upon your system's configuration. To complete the tab, enter and/or verify:
• The date of birth • Gender • The individual’s Selective
Service registration status, if applicable
• Citizenship or Authorization to work in US.
• Heritage and ethnicity questions.
Note: Selective Service registration and citizenship can play key roles in determining WIOA eligibility. If no customer program groups are selected at enrollment, you may need to confirm that these items were completed (and verified, if applicable).
• The individual’s disability if they consider themselves to have one.
Selecting Yes will activate the Disability Category check boxes, and also display additional questions (as shown at right).
• Click Next to save your edits and proceed, or click to save a partial application and pick Exit Wizard.
General items to note:
• Farmworker Status is no longer collected on the Demographics tab. • If any custom Demographic fields were created specifically for your site (e.g., USCIS - Alien
Registration number and expiration date), they will display when the configuration switch is turned on. • The question, “Considered to be of Haitian Heritage?,” is an additional required field in WIOA. • Many verification lists (such as the Citizenship Verification list connected to Authorization to Work in
U.S.), may display different items depending on your site’s configuration.

The Programs Tab: WIOA
Virtual OneStop – Staff Services User Guide 6-14 V18 – 05/2018
WIOA Application, Demographics Tab
With the Document Management module, you can upload the documents (as shown in the figure above), or if you have a scanner set up, you can scan images for the documents you use in verification. For details about acquiring document images, refer to Chapter 30 - Manage Documents and the topic, In-Context Scanning, Linking, and Viewing.
If you have the ability to Scan or Upload documents, you still need to identify verification type first. This helps tag the attached document.

The Programs Tab: WIOA
Virtual OneStop – Staff Services User Guide 6-15 V18 – 05/2018
The Veteran Tab The tab has two areas. If the individual is a transitioning service member or existing veteran, complete and verify information in each area that applies.
Transitioning Service Member (TSM): If the individual is a TSM:
• Select Yes. • Then select TSM type, and enter Estimated Discharge Date.
Veteran Information: If the individual is an eligible veteran:
• Select type of the Eligible Veteran Status.
• Verify the Eligible Veteran Status (with an appropriate type of documentation).
Note: You can click Obtain DD214 to access the federal veterans’ service records site. From a Campaign/ Expedition link, you can find their list of campaigns and expeditions that qualifies them for veterans’ preference.
• If the veteran served more than one tour of duty, select Yes. (Yes will display dates for up to three separate date ranges.)
• Enter dates for the tour(s) of duty.
• Select the disabled type, if individual is a Disabled or Special Disabled veteran
• If the veteran is homeless, click Yes for that question. • If they received services from Veterans Vocational Rehabilitation, click Yes for that question.
Note: If the application is one that was started before WIOA, you may also see the following questions for WIA and WIASRD. This will normally be for closed applications, or applications opened before July 2015 (and now having an eligibility type added (e.g., an old Adult eligibility that now is having Dislocated Worker eligibility added).
Indicate if a Campaign Veteran Indicate if separated with the last 48 months. Indicate if the individual attended a Transition Assistance Program (TAP) within the last 3
years. • Click Next to save your edits and proceed or Exit Wizard to save a partial application.
For any Veteran, these fields must be answered.
WIOA Veteran Tab
The Programs Tab: WIOA
Virtual OneStop – Staff Services User Guide 6-16 V18 – 05/2018
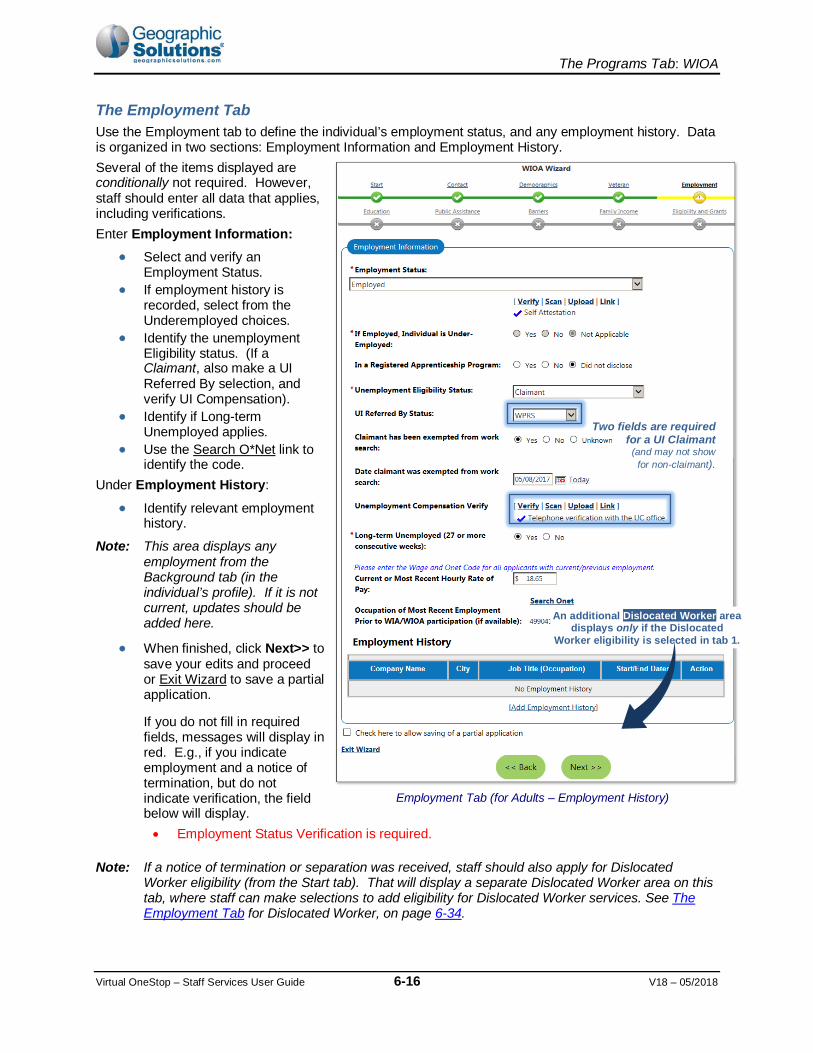
The Employment Tab Use the Employment tab to define the individual’s employment status, and any employment history. Data is organized in two sections: Employment Information and Employment History. Several of the items displayed are conditionally not required. However, staff should enter all data that applies, including verifications. Enter Employment Information:
• Select and verify an Employment Status.
• If employment history is recorded, select from the Underemployed choices.
• Identify the unemployment Eligibility status. (If a Claimant, also make a UI Referred By selection, and verify UI Compensation).
• Identify if Long-term Unemployed applies.
• Use the Search O*Net link to identify the code.
Under Employment History:
• Identify relevant employment history.
Note: This area displays any employment from the Background tab (in the individual’s profile). If it is not current, updates should be added here.
• When finished, click Next>> to save your edits and proceed or Exit Wizard to save a partial application.
If you do not fill in required fields, messages will display in red. E.g., if you indicate employment and a notice of termination, but do not indicate verification, the field below will display. • Employment Status Verification is required.
Note: If a notice of termination or separation was received, staff should also apply for Dislocated Worker eligibility (from the Start tab). That will display a separate Dislocated Worker area on this tab, where staff can make selections to add eligibility for Dislocated Worker services. See The Employment Tab for Dislocated Worker, on page 6-34.
Two fields are required for a UI Claimant
(and may not show for non-claimant).
Employment Tab (for Adults – Employment History)
An additional Dislocated Worker area displays only if the Dislocated
Worker eligibility is selected in tab 1.
Employment Tab (for Adults – Employment History)

The Programs Tab: WIOA
Virtual OneStop – Staff Services User Guide 6-17 V18 – 05/2018
The Education Tab Use this tab to define the individual’s education, including high school level and highest education level, as well as any partner services for education. For Adult eligibility, this may include verifying fields already populated based on educational information gathered at registration. Data is organized in two sections: WIOA Education Information and Education Partner Services. Enter WIOA Education Information:
• Select the highest secondary school grade completed, and indicate if a diploma or equivalent was received.
• Select current highest school grade completed. • Select and verify the federally reported Highest Education Level Completed. • Select and verify the current School Status.
Enter Educational Partner Services (if applicable):
• Identify if the individual is receiving services from: Adult Education YouthBuild (if so, include
Grant Number) Job Corps Vocation Education
• Identify if the individual is, or was, an Individualized Education Program (IEP) participant.
• When finished, click Next>> to save your edits and proceed or Exit Wizard to save a partial application.
Note: You can click the icon for more help on each section.
Note: Applications for a “Youth” eligibility will have a Youth Eligibility Education Information section above the other two. It identifies education leading to GED or High School equivalency, last secondary school attended, and whether individual is compulsory school age and not attending school during recent quarter. See The Education Tab (for Youth), on page 6-50, for more.
Note: A WIASRD Data area may also display at the bottom of the page if data was recorded in a WIA application (prior to WIOA) on highest school grade and enrollment in education leading to GED/HSE.
WIOA Application – Educational Information Tab

The Programs Tab: WIOA
Virtual OneStop – Staff Services User Guide 6-18 V18 – 05/2018
The Public Assistance Tab On the Public Assistance tab, answer each of the statements about assistance that the individual receives. For an Adult application, the Public Assistance fields listed are mainly Yes/No fields for each type of assistance, and require an indication of validation if the response is Yes.
• Blue text at the top of assistance questions helps clarify time periods for each assistance question asked.
To complete the tab: • Indicate Yes on each of the assistance options that apply, and verify the assistance accordingly. • Click Next>> to save your edits and proceed or Exit Wizard to save a partial application.
WIOA Application – Public Assistance Tab
Note: Applications for “Youth” eligibility will have additional questions, and may ask if assistance is for the applicant or a family member. See The Public Assistance Tab (for Youth) on page 6-52, for more.
Each of the areas are introduced with blue text for the related timeframes that apply.

The Programs Tab: WIOA
Virtual OneStop – Staff Services User Guide 6-19 V18 – 05/2018
The Barriers Tab The Barriers tab for the WIOA application is similar to the Barriers tab for WIA; however, the data fields have been organized into two areas:
Individual Barriers: The section includes the individual’s abilities and history barriers (e.g., English language learner, High School Drop Out, Basic Skills Deficient, plus Homeless and Offender retained.
• Select any individual barriers that apply. • Use the Verify link to identify the document, record, scores, etc., used to verify the barrier.
WIOA Application – Barriers Tab (Individual Barriers Area)
Note: Most Individual Barriers require a verification (such as documents, records, test scores). A basic skills deficiency may include Basic Skills Assessments which can be recorded, using the same assessment controls that are also used for skills assessments in initial program assessment (e.g., Wagner-Peyser).
Note: Some items that were configured fields for specific customers/sites (e.g., Gang Status, Parolee Number, Substance Abuse) have been moved to a Barriers section on the miscellaneous tab, which contains all configurable data elements.
Note: The barriers displayed under Individual Barriers are more extensive when staff are applying for Youth eligibility type. See the topic The Barriers Tab, starting on page 6-53 , for a sample figure indicating those barriers.
Barriers to Employment: The section includes barriers for displaced homemaker, cultural barriers, and farmworker identification.
Most Individual Barriers require verification.

The Programs Tab: WIOA
Virtual OneStop – Staff Services User Guide 6-20 V18 – 05/2018
• Select any employment barriers that apply. • Use the Verify link if it applies. (E.g., if you select Yes for Displaced Homemaker status)
WIOA Application – Barriers Tab (Employment Barriers area)
• Click Next to save your edits and proceed or Exit Wizard to save a partial application.
The Family Income Tab The Family Income tab for the WIOA application is very similar to the Family Income tab for WIA. It may help identify or establish low income for the individual if it has not been established. Note the following:
• The tab will indicate, in red text, whether family size and income information are optional in determining Low Income Status (i.e., if Low Income is already established).
• Other items (e.g., data from Public Assistance or Barriers) may establish that Low Income is met so that entering data on this screen may not be required, and it will only contain a statement confirming the status met.
• If staff select Adult Basic Career Services (ABC) eligibility from the Start tab, this tab will display a minimal status of Low Income on this screen (e.g., income is strictly a “Self-Attestation” validation when staff picks Low Income for ABC eligibility).
To complete the tab (family size and income are required):
• Identify Family Size (using the drop-down list) and use the Verify link to indicate documentation used to verify the size.
• Enter the Annualized Family Income.
Note: You can click the link at the bottom of the screen to see a table for low income, if needed.
Some barrier selections may be predetermined from previous responses, or registration information.

The Programs Tab: WIOA
Virtual OneStop – Staff Services User Guide 6-21 V18 – 05/2018
WIOA Application – Family Income Tab
• Click Next>> to save your edits and proceed or Exit Wizard to save a partial application.
Family Income Worksheet An Income Worksheet tab is being prepared for deployment in a later release. However, depending on your site/configuration, this may soon display as a tab after Barriers, but before the Family Income tab. If it displays, the data entered in the worksheet will create a total which will carry over to the Annualized Family Income field on the Family Income Tab.
The Miscellaneous Tab (Configurable) The Miscellaneous tab for the WIOA Application handles specific, custom fields, each of which can be configured for a specific customer’s site. The possible data on this tab is organized into three areas (Adult Priority, Barriers, and Employment).
Note: All data fields on this tab are configurable per site; the tab only displays if data items are configured to display on it. Some data fields were moved from their previous locations on the Barriers tab and Employment tab in the WIA application.
Low Income may already be established, making selections on this screen optional.
This will carry through to the Annualized Family Income field on the next tab.

The Programs Tab: WIOA
Virtual OneStop – Staff Services User Guide 6-22 V18 – 05/2018
To complete the Miscellaneous tab: • Select Yes or No in the appropriate fields. • Enter data in remaining fields as necessary.
WIOA Application – Miscellaneous Tab
• Click Next>> to save your edits and proceed or Exit Wizard to save a partial application.
The Eligibility & Grants Tab (Adults Example) The Eligibility & Grants tab for WIOA includes the information which was previously displayed on two separate tabs for WIA (the Application Eligibility tab and the Grants tab). This combined Eligibility & Grants tab includes four sections:
• Applicant Eligibility – displays an eligibility matrix summarizing which customer program groups (eligibility-types) the individual is eligible for, as well as priority of service conditions, and any reasons for not being eligible. If the row is green (eligibility = Yes), and if no grants are applicable, you can skip to Staff Eligibility Information (bottom of the page), and click Next>> or Finish.
• WIOA Grant Eligibility – displays state and national WIOA grant eligibility, which controls access to Grant funding streams in the Activity/Enrollment record.
• Grants –lists specific state or local grants that can be associated with the individual. E.g., if grant types are clicked Yes in WIOA Grant Eligibility, staff can review and select specific grants from a table, which controls access to the grant funding streams in activity/enrollment records.
• Staff Eligibility Information – contains the Case Manager assignment, staff comments, and staff case notes, as well as a link to access any WIA Legacy Application Data, if applicable.
The Miscellaneous tab will not display if on your site is not configured for any of its fields.
Quick Tip
The Programs Tab: WIOA
Virtual OneStop – Staff Services User Guide 6-23 V18 – 05/2018
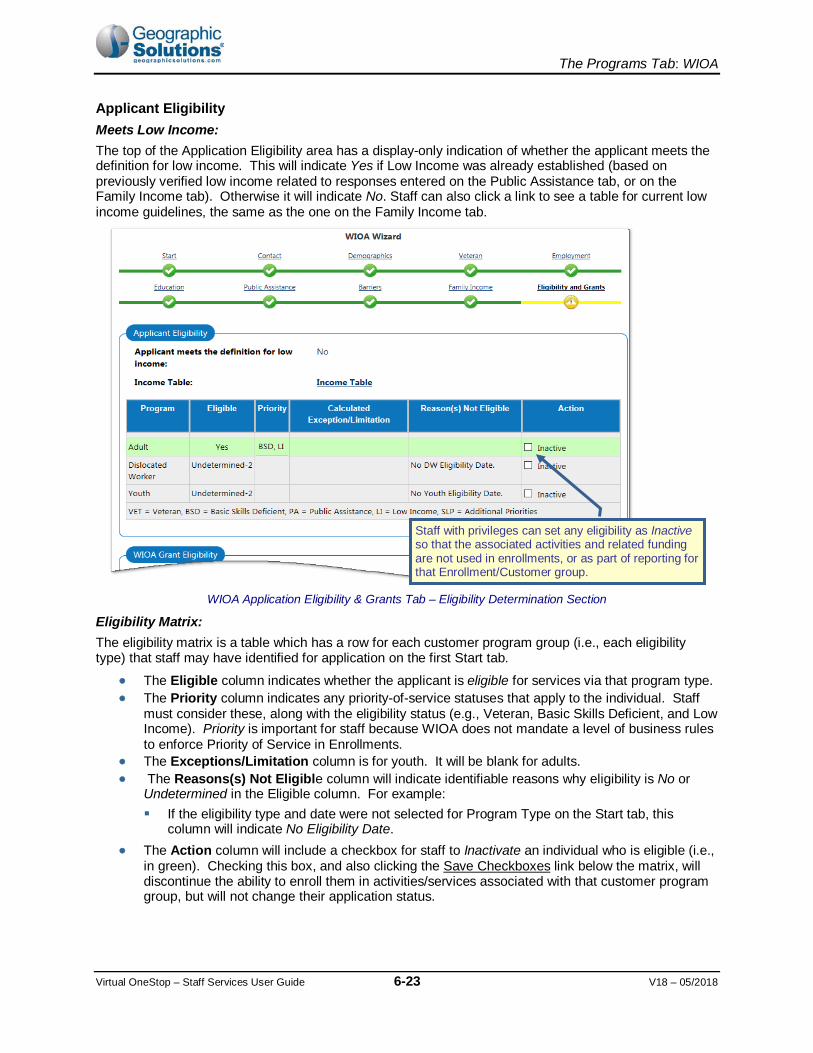
Applicant Eligibility Meets Low Income: The top of the Application Eligibility area has a display-only indication of whether the applicant meets the definition for low income. This will indicate Yes if Low Income was already established (based on previously verified low income related to responses entered on the Public Assistance tab, or on the Family Income tab). Otherwise it will indicate No. Staff can also click a link to see a table for current low income guidelines, the same as the one on the Family Income tab.
WIOA Application Eligibility & Grants Tab – Eligibility Determination Section
Eligibility Matrix: The eligibility matrix is a table which has a row for each customer program group (i.e., each eligibility type) that staff may have identified for application on the first Start tab.
• The Eligible column indicates whether the applicant is eligible for services via that program type. • The Priority column indicates any priority-of-service statuses that apply to the individual. Staff
must consider these, along with the eligibility status (e.g., Veteran, Basic Skills Deficient, and Low Income). Priority is important for staff because WIOA does not mandate a level of business rules to enforce Priority of Service in Enrollments.
• The Exceptions/Limitation column is for youth. It will be blank for adults. • The Reasons(s) Not Eligible column will indicate identifiable reasons why eligibility is No or
Undetermined in the Eligible column. For example: If the eligibility type and date were not selected for Program Type on the Start tab, this
column will indicate No Eligibility Date. • The Action column will include a checkbox for staff to Inactivate an individual who is eligible (i.e.,
in green). Checking this box, and also clicking the Save Checkboxes link below the matrix, will discontinue the ability to enroll them in activities/services associated with that customer program group, but will not change their application status.
Staff with privileges can set any eligibility as Inactive so that the associated activities and related funding are not used in enrollments, or as part of reporting for that Enrollment/Customer group.

The Programs Tab: WIOA
Virtual OneStop – Staff Services User Guide 6-24 V18 – 05/2018
WIOA Grant Eligibility: For possible WIOA grant eligibilities (based on the eligible program type), the buttons and checkboxes are active and optional. They are defaulted to Not Applicable — staff can select Yes. Grants are special programs, each specific grant having separate eligibility requirements. When a staff user selects Yes, and then adds a grant to the application record (using the table indicated in the following Grants area), it indicates staff have reviewed the eligibility requirements for the grant that are typically beyond formula eligibility requirements – typically requirements are specific barriers or characteristics based upon the Grant requirements.
Not Applicable – is the default value when the tab/screen loads, and indicates staff have done nothing to evaluate the applicant for eligibility.
No – means a staff user has set the value to No, and grants for the particular grant type (funding) are not available to add to the application, which keeps enrollments from being created for those grants.
Yes – a staff user has set the value to Yes because they have determined specific grants may apply for this type. This enables the ability to View Available Grants (a link the next Grants section on the tab).
The Inactive checkbox can be selected (or deselected) during the course of the application until the creation of the Outcome record. This selection controls access to funding streams in the Activity/Enrollment record(s).
Eligible Grants: For Adult eligibility, the active grant selections include:
Statewide Incumbent Worker Eligibility Staff must have access to the Adult Basic Career Services Eligibility group or the Adult Eligibility group. This field can be modified only when Adult Basic Career Services Eligibility is set to 'Yes', or when Adult Eligibility is set to 'Yes'.
National Dislocated Worker Grant NDWG (formerly NEG) Staff must have access to the Adult or the Dislocated Worker Eligibility group. This field can be modified when Adult Eligibility is set to 'Yes', or when Dislocated Worker Eligibility is set to 'Yes''. "
Statewide Adult Eligibility Staff must have access to the Adult Basic Career Services Eligibility group or the Adult Eligibility group. This field can be modified only Adult Basic Career Services Eligibility is set to 'Yes', or when Adult Eligibility is set to 'Yes'. This field is disabled when Adult Basic Career Services Eligibility is 'No' or null and when Adult Eligibility is 'No or is null. The system will display a message when this field is disabled: "Applicant does not meet the requirements for Statewide Incumbent Worker eligibility."
Non-Eligible Grants: For Adult eligibility, the disabled selections include:
Statewide Dislocated Worker Eligibility - Staff must have access to Dislocated Worker Eligibility. Statewide Youth Eligibility - Staff must have access to the Youth Eligibility.

The Programs Tab: WIOA
Virtual OneStop – Staff Services User Guide 6-25 V18 – 05/2018
Statewide Rapid Response Additional Assistance Eligibility - Staff must have access to the Dislocated Worker Eligibility.
Non-WIOA Grant Eligibility: The possible Non-WIOA Grant eligibility entries that apply are not based on eligible program type. This section’s specific grants display when the switch for either Non-WIOA Special Grants or Local Funded Grants is turned on. When turned on, the entries display as described below:
Non-WIOA Special Grants - When the switch for Non-WIOA Special Grants is turned on, this field can be edited at any time, until an exit record exists for the application.
• Checkbox for Non-WIA Special Grants Inactive - This checkbox can be selected or deselected during the course of the application, until the creation of the Exit record. This selection controls access to funding streams in the Activity/Enrollment record(s).
Local Funded Grants - When the switch for Local Funded Grants is turned on, this field can be edited at any time, until an exit record exists for the application.
• Checkbox for Local Funded Grants Inactive - This checkbox can be selected or deselected during the course of the application, until the creation of the Exit record. This selection controls access to funding streams in the Activity/Enrollment record(s), based on grant funding availability.
Grants: Once types of grants are selected in the two sections above, staff can click the View Available Grants link to see all of the possible grants. This will display a table of grants. Clicking the Yes radio buttons in above sections activates the View Available Grants link, which staff can then click to activate/display a tables of Grant types/IDs.
The table displays all grants - active or inactive - for which the individual has been determined to be eligible.
Note: The system will indicate when there are no grants associated to the application by displaying a "no records found" message. In the example below (where only Statewide Adult Eligibility was selected), five grants were displayed in the black and white “list of available grants” (Grant IDs), and 83 was added (which moved it to the table above the list, as the added grant id 83).

The Programs Tab: WIOA
Virtual OneStop – Staff Services User Guide 6-26 V18 – 05/2018
The Grants sections lets staff display available grants and add specific Grant IDs
They can then click the Add link to add the specific Grant Types for the individual. The columns in the Grant table include:
• ETA/Local Grant Code - The system will display either the Local Grant Code or ETA Grant Code, depending on the record. If neither exists, the system displays "Not Defined.”
• Date Added - The date the grant record was added to the application.
Note: Because this involves new functionality, WIA-converted grants will not have an accurate date of entry.
From the Action column, the Delete link is not enabled until an enrollment record has an Actual Begin Date associated to the grant. When clicked, the system will prompt staff to confirm their selection before deleting.
Staff Eligibility Information: This area contains controls/fields for case assignment, comments, and case notes:

The Programs Tab: WIOA
Virtual OneStop – Staff Services User Guide 6-27 V18 – 05/2018
Current Case Manager – This displays the case assignment data, including:
• Group: Case Assignment Group Name of the Case Manager, if applicable.
• Case Manager: The assigned manager’s last and first name.
• Temporary Case Manager Name. Only displays a name if applicable.
Assignment can be made/modified by the links:
• Assign Case Manager - Clicking this link allows staff to assign a case manager to this application (create/edit).
• Assign Me - Clicking this link allows staff to assign this application to his/her own case load.
• Remove Case Manager Assignment - Clicking this link allows staff to remove the Case Manager assigned to this application.
Note: Depending on your site’s configuration, the system may require case assignment to finish an application, or it may auto-assign a manager (based on defined management groups). For such configurations, you may see a message at the top of the tab when you click Next>> or Finish, and an assignment is not made. • You must assign as Case Manager to this application. • The system cannot automatically assign this Case. The Staff user is not assigned to
a compatible group. • Comments This optional field lets staff add text (associate one of the Eligibility groups). A Spell
Check link will check spelling for the entered text. • Add a new Case Note - Opens the case note interface in a new window, and lets staff add a
case note to the system. • Show Filter Criteria – Lets staff perform a new case note search according to the filter criteria
entered. Click the Filter link to refresh the current page to display your results. • Case Notes - From the case notes table, click a link under the Subject column to view/edit an
individual case note, or click Edit from the Action column. Click the envelope icon to send a message to the user.
• WIA Legacy Application Data - This link (new in WIOA) only displays below Case Notes if a WIA application was converted for WIOA. See the topic, Seeing WIA Legacy Data (via the Eligibility Tab) on page 6-66 for an example of legacy data.
Finishing the Application: Staff can click Finish or Next>> at the bottom of the screen:
• Finish will complete and close the application, and return staff to the Programs tab. The Application will display as Complete for the Adult eligibility type.
• Next>> will complete and close the application, and open the first tab for creating an enrollment in WIOA.
Note: Finish will not create the Participation. When staff returns to the Programs tab to enroll the individual in services, they must create a participation record. Next>> automatically generates the participation record, before it opens Enrollment tabs.

The Programs Tab: WIOA
Virtual OneStop – Staff Services User Guide 6-28 V18 – 05/2018
See the steps under the topic The WIOA Service/Activity Enrollments starting on page 6-69 for more on the steps for enrollment, after completion of an application. See the topic The WIOA Participation Form on page 6-68, if Finish was selected, and the form must be completed before starting enrollments.
A completed WIO Application displays the Participation link, after Finish is pressed

The Programs Tab: WIOA
Virtual OneStop – Staff Services User Guide 6-29 V18 – 05/2018
The WIOA Application (for Dislocated Worker) To be eligible as a Dislocated Worker, the individual must:
• Be 18 years of age or older • Be a citizen or non-citizen authorized
to work in the U.S. • Meet Military Service registration
requirements (males only) • Meet criteria for Dislocated Worker
Requirements are the same as for Adults, plus that the individual: Has been terminated or laid off, or received notice of termination or layoff Is eligible for or has exhausted unemployment Has been employed long enough to demonstrate attachment to workforce, but is not eligible for UI due to
insufficient earnings or having performed services not covered under state UI laws Is unlikely to return to a previous industry / occupation (permanent layoff with no recall)
For meeting these criteria, staff will see an additional Dislocated Workers section on the Employment tab, including questions for six categories (that can qualify the individual as dislocated) along with other Layoff and Dislocation Event fields. The following subtopics indicate the minimal information required for each tab, for Dislocated Worker eligibility. For more details on any of the fields on these tabs (other than the Employment tab), you can also refer to their descriptions in the topic, “The WIOA Application (for Adult)” (starting on page 6-9).
To create a Dislocated Worker Application
• Under the bar, on the Programs tab, click the Create Workforce Innovation & Opportunity (WIOA) Program link (as shown above).
The Start tab displays, with the initial segment of the progress bar in yellow. The tabs/steps to complete the WIOA application for a Dislocated Worker are:
Tab 1 – Start tab Tab 7 – Public Assistance tab Tab 2 – Contact tab Tab 8 – Barriers tab (incl. Layoff & Dislocation Event
fields Tab 3 – Demographics tab Tab 9 – Family Income tab Tab 4 – Veteran tab Tab 10 – Miscellaneous tab Tab 5 – Employment tab Note: The Misc. tab will only display if site-specific fields
are configured for the tab. Tab 6 – Education tab Tab 11 – Eligibility and Grants tab
Each of these tabs is described in the following subtopics.
The Start Tab (Identifying Eligibility Type) The start tab has four areas. To complete the tab, enter and/or review each area that applies.
Identifying Information: • Review the fields.
Five fields show when start the new application– eight will show later, when you return to the tab.
Quick Tip
The Create link displays the application Start tab/segment.

The Programs Tab: WIOA
Virtual OneStop – Staff Services User Guide 6-30 V18 – 05/2018
Note: The last field, “WIA Converted Application ID”, only shows an ID for converted records. These also have a “WIA Legacy Data” link on the last Eligibility & Grants tab. See the topic, “Seeing WIA Legacy Data (via the Eligibility Tab) on page 6-66 for more.
Currently Participating In: • Review the fields.
You can see other programs that may also fund needed activities or services. The area does not display if other programs do not exist.
Application/Registration Information: • Enter the Application Date. • Select Adult Eligibility. • Enter the Adult Eligibility Date.
Location Information: • Select the correct Local Area, Office
of Responsibility, and standard Office Location.
• Click Next>> to save your edits and complete the tab. If all required data is entered, the next step displays (the Contact tab).
General items to note for this tab:
• You can expand + Individual Details to see the user’s ID, Name and Date of Birth. • The Eligibility Date for the selected eligibility type (i.e., Dislocated Worker) cannot precede the
Application Date, nor can it be greater than today’s date.
Note: If you click Exit Wizard, your data entry will NOT be saved. You must click Next at the Start tab to save a partial application.
• If your data entry violates a business rule or is incomplete, the system will notify you via red text message upon clicking Next (see following sample). Fix the error and re-click Next to proceed.
Note: For individuals younger than 18, the Adult and Dislocated Worker eligibility selection
boxes are disabled.
WIOA Application, Start Page for Dislocated Worker
The number of tabs or “Progress Bar” segments changes as soon as this tab is saved.
When staff picks Eligibility type, a date control displays (other types may be disabled (due to age).

The Programs Tab: WIOA
Virtual OneStop – Staff Services User Guide 6-31 V18 – 05/2018
The Contact Information Tab The Contact tab includes four areas: Contact Information, Current Address, Mailing Address and Alternate Contacts. Many of the fields are prefilled from registration. Staff must:
• Ensure that all required fields are entered. • Verify the SSN (identify verification document).
Note: The Edit SSN link is available only to staff with proper privileges.
• Verify the Current Address (identify verification document).
Note: This address used at Application, will display in a separate Address at Date of Application area if you return to the Contact tab after you save the initial data; that area is included (disabled) when you return to this tab. Staff can click a link to change this Address at Date of Application (if they have permissions).
• Make additions or changes to Alternate Contacts, using the Mange Alternate Contacts link, if appropriate.
• Click Next to save your edits and continue to the next part of the enrollment application.
Note: Depending on your system
configuration, you may be required to click the Manage Alternate Contacts link and supply an alternate contact before the next step in the WIOA application. You can also click the checkbox (at the bottom of the screen) that allows you to save a partially completed program enrollment.
The Demographics Tab The Demographics tab includes contains several fields for demographic information. Some of the available options on this application are dependent upon your system's configuration. To complete the tab, minimally, enter and/or verify:
• The date of birth • Gender • The individual’s Selective Service registration status, if applicable • Citizenship or Authorization to work in US

The Programs Tab: WIOA
Virtual OneStop – Staff Services User Guide 6-32 V18 – 05/2018
• Heritage and ethnicity questions • The individual’s disability if they consider themselves to have one
Note: Selective Service registration and citizenship can play a key role in determining WIOA eligibility later in WIOA enrollment. If no customer program groups may be selected, confirm these items have been completed (and verified, if applicable).
• Click Next to save your edits and proceed, or to click to save a partial application and pick Exit Wizard.
General items to note:
• Farmworker Status is no longer collected on the Demographics tab. • If any custom Demographic fields were created for a specific customer site (e.g., USCIS - Alien
Registration number), they will display if the configuration switch is turned on. • The question, “Considered to be of Haitian Heritage?,” is an additional required field in WIOA. • Many verification lists, such as the Citizenship Verification list connected to Authorization to Work in
U.S., may have different items in the list, depending on your site’s configuration.
WIOA Application, Demographics Tab
If you have the ability to Scan or Upload documents, you still need to identify verification type first. This helps tag the attached document.

The Programs Tab: WIOA
Virtual OneStop – Staff Services User Guide 6-33 V18 – 05/2018
With the Document Management module, you can upload the documents (as shown in the figure above), or if you have a scanner set up, you can scan images for the documents you use in verification. For details about acquiring document images, refer to Chapter 30 - Manage Documents and the topic, In-Context Scanning, Linking, and Viewing.
The Veteran Tab The tab has two areas. If the individual is a transitioning service member or existing veteran, complete and verify information in each area that applies.
Transitioning Service Member (TSM): If the individual is a TSM:
• Select Yes. • Then select TSM type, and enter Estimated Discharge Date.
WIOA Veteran Tab
Veteran Information: If the individual is an eligible veteran:
• Select type of the Eligible Veteran Status. • Verify the Eligible Veteran Status (with an appropriate type of documentation).

The Programs Tab: WIOA
Virtual OneStop – Staff Services User Guide 6-34 V18 – 05/2018
Note: You can click Obtain DD214 to access the federal veterans’ service records site. From a Campaign/Expedition link to the Office of Personnel Management site, you can use their list of campaigns and expeditions that qualify for veterans’ preference.
• If the veteran served more than one tour of duty, select Yes. (Yes will display dates for up to three separate date ranges.)
• Enter dates for the tour(s) of duty. • Select the disabled type, if individual is a Disabled or Special Disabled veteran. • If the veteran is homeless, click Yes for that question. • If they received services from Veterans Vocational Rehabilitation, click Yes for that question.
Note: If application is one that was started before WIOA, you may also see the following questions. This will normally be for closed applications, or applications opened before July 2015 (and now having an eligibility type added, e.g., an old Adult eligibility that now is having Dislocated Worker eligibility added).
Indicate if a Campaign Veteran Indicate if separated with the last 48 months. Indicate if the individual attended a Transition Assistance Program (TAP) within the last 3
years. • Click Next to save your edits and proceed or Exit Wizard to save a partial application.
The Employment Tab Use the Employment Information section to help define the individual’s employment status, employment history, and any related layoff/dislocation events which may help determine dislocated worker eligibility. The data is organized into three sections: Employment Information, Employment History, and Dislocated Worker. The last section only displays when Dislocated Worker eligibility was selected on the Start tab. When you are completing the application for the Dislocated Worker eligibility type, all sections will display. Many items displayed are conditionally not required. However, for Dislocated Worker eligibility, you should enter all data that applies. At a minimum:
Under Employment Information:
• Select and verify employment status. • Identify if underemployed (if individual is employed). • Identify if in a registered Apprenticeship Program. • Identify if receiving unemployment. • Select Unemployment Eligibility Status.
If a Claimant, select: UI Referred By Status Claimant has been exempted from work search (Yes, No, or Unknown) Date claimant was exempted (if Yes to previous)
Note: The three controls above will not show for older applications with an eligibility date that is previous to WIOA and PIRL data. Old applications will display a Farmworker Status (WIASRD) field.
• Verify Unemployment Compensation (if a Claimant) • Indicate Longer Term Unemployed (if applicable). • Indicate the most recent hourly rate of pay (current or last job). • Use the Search O*Net link to identify the occupation code for most recent employment.

The Programs Tab: WIOA
Virtual OneStop – Staff Services User Guide 6-35 V18 – 05/2018
Under Employment History:
• Identify/enter the most recent, or current employer for the dislocated employment (if not already entered and displayed in table).
Employment Tab (including Dislocated Worker Categories)
Under Dislocated Worker: • Identify the correct category (select from category 1 to 8, or 12). • Verify the layoff reason. • If you identified a termination/layoff status, fill in all relevant data for the Layoff and Dislocation
Event fields that apply in the bottom portion of the screens (shown on the next page).
This additional “Dislocated Worker” area only displays for Dislocated
Worker eligibility. In WIOA, Dislocated Worker Categories include 2 options for Spouse of Armed Forces, and 1 for DWG Grant eligibility. A Verify must be done for any category (at the bottom of the categories)

The Programs Tab: WIOA
Virtual OneStop – Staff Services User Guide 6-36 V18 – 05/2018
Employment Tab (Dislocated Worker - Layoff and Dislocation Event Fields)
• Click Next>> to save your edits and proceed or Exit Wizard to save a partial application.
Note: The fields at the bottom of the screen have requirements depending on the category selected. If you do not fill in required fields when you click Next>>, messages will display in red to indicate any field entries required. For example, if you select category 1 but do not enter any data below the category, all the fields below will display.
• The Current Rate of Pay must be greater than $0.00. • Dislocation Reason requires you to provide either a Projected Layoff Date or an Actual Layoff Date. • Dislocation Employer is required. • Dislocation Employer Address 1 is required. • Dislocation Employer City is required. • Dislocation Employer State is required. • Dislocation Employer Zip/Postal Code is required. • Dislocation Employer Hourly Wage is required.
Note: Additional fields may also display at the bottom of the screen for Layoff Industry, Occupation Code, and Declining Industry, depending on the site configuration and selections.
The “Dislocated Worker” area also includes fields for any layoff and layoff-related dislocation events.
Entry of a Projected or Actual Layoff Date fields may be required.

The Programs Tab: WIOA
Virtual OneStop – Staff Services User Guide 6-37 V18 – 05/2018
The Education Tab Use the Education tab to define the individual’s education information related to education for high school equivalency and federally report high school grade completed. For Dislocated Worker eligibility, this may involve simply verifying fields already populated, based on educational information gathered at registration (or for a previous Adult Eligibility). At a minimum: Enter WIOA Education Information:
• Select the highest secondary school grade completed, and indicate if a diploma or equivalent was received.
• Select current highest school grade completed.
• Select and verify the federally reported Highest Education Level Completed.
• Select and verify the current School Status.
Enter Educational Partner Services (if applicable):
• Identify if the individual is receiving services from: Adult Education YouthBuild (if so, include
Grant Number) Job Corps Vocation Education
• When finished, click Next>> to save your edits and proceed.
Note: You can click the icon for more help on each section. Or, see The Education Tab, for Adults, on page 6-17.
WIOA Application – Educational Information Tab

The Programs Tab: WIOA
Virtual OneStop – Staff Services User Guide 6-38 V18 – 05/2018
The Public Assistance Tab For a Dislocated Worker application, the Public Assistance fields listed are mainly Yes/No fields for each type of assistance, and require an indication of validation if the response is Yes.
• Blue text at the top of assistance questions, helps clarify time periods for each assistance questions asked.
To complete the tab: • Indicate Yes on each of the
assistance options that apply, and verify the assistance accordingly.
• Click Next>> to save your edits and proceed or Exit Wizard to save a partial application.
Note: Applications for “Youth” eligibility will have additional questions, and may ask if assistance is for the applicant or a family member. See The Public Assistance Tab (for Youth) on page 6-52, for more.
The Barriers Tab The Barriers tab for the WIOA application is similar to the WIA Barriers tab. However, the data fields have been organized into two areas:
Individual Barriers: The section includes the individual’s abilities and history barriers (e.g., English language learner, High School Drop Out, Basic Skills Deficient, plus Homeless and Offender retained.
• Select any individual barriers that apply.
• Use the Verify link to identify the document, record, scores, etc., used to verify the barrier. Barriers to Employment: The section includes barriers for displaced homemaker, cultural barriers, and farmworker identification for barriers.
• Select any employment barriers that apply. • Use the Verify link if it applies (e.g., if you select Yes for Displaced Homemaker status).
Public Assistance Tab, for Dislocated Worker
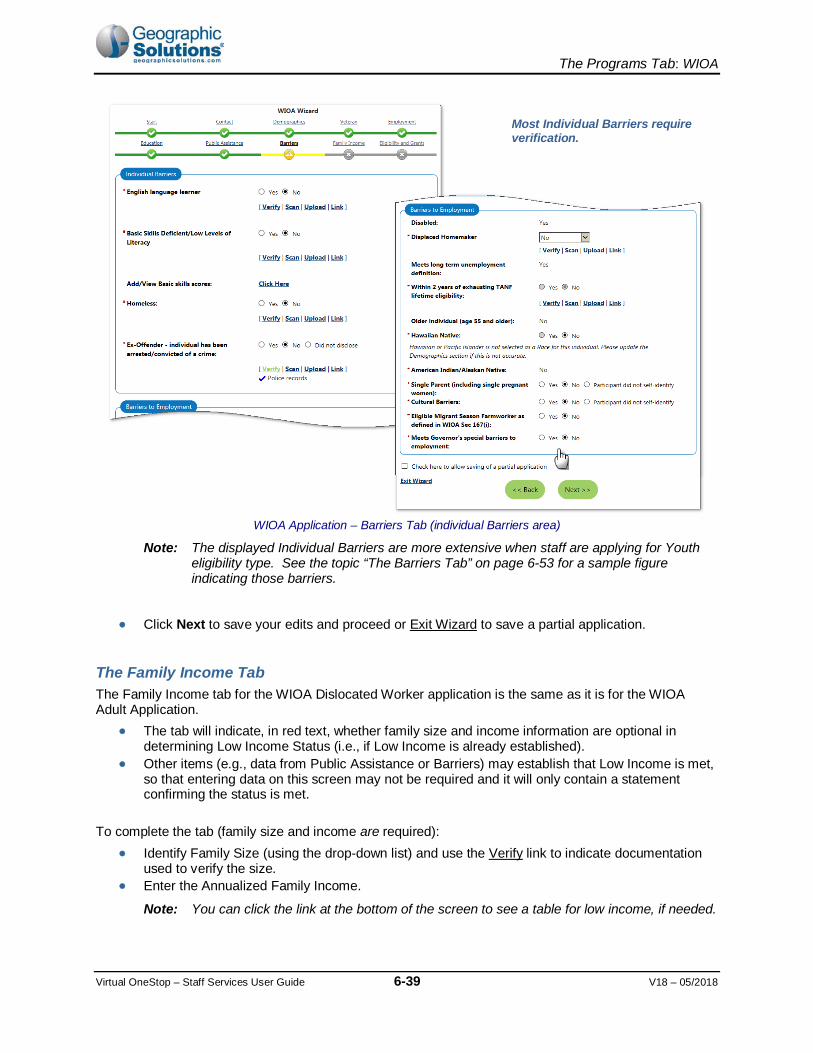
The Programs Tab: WIOA
Virtual OneStop – Staff Services User Guide 6-39 V18 – 05/2018
WIOA Application – Barriers Tab (individual Barriers area)
Note: The displayed Individual Barriers are more extensive when staff are applying for Youth eligibility type. See the topic “The Barriers Tab” on page 6-53 for a sample figure indicating those barriers.
• Click Next to save your edits and proceed or Exit Wizard to save a partial application.
The Family Income Tab The Family Income tab for the WIOA Dislocated Worker application is the same as it is for the WIOA Adult Application.
• The tab will indicate, in red text, whether family size and income information are optional in determining Low Income Status (i.e., if Low Income is already established).
• Other items (e.g., data from Public Assistance or Barriers) may establish that Low Income is met, so that entering data on this screen may not be required and it will only contain a statement confirming the status is met.
To complete the tab (family size and income are required):
• Identify Family Size (using the drop-down list) and use the Verify link to indicate documentation used to verify the size.
• Enter the Annualized Family Income.
Note: You can click the link at the bottom of the screen to see a table for low income, if needed.
Most Individual Barriers require verification.

The Programs Tab: WIOA
Virtual OneStop – Staff Services User Guide 6-40 V18 – 05/2018
WIOA Application – Family Income Tab
• Click Next>> to save your edits and proceed or Exit Wizard to save a partial application.
The Miscellaneous Tab (Configurable) The Miscellaneous tab for the WIOA Application handles specific custom fields, each of which can be configured for a specific customer’s site. The possible data on this tab is organized into three areas (Adult Priority, Barriers, and Employment).
Note: All data fields on this tab are configurable per site; the tab only displays if data items are configured to display on it. Some data fields were moved from their previous locations on the Barriers tab and Employment tab in the WIA application.
To complete the Miscellaneous tab: • Select Yes or No in the
appropriate fields. • Enter data in remaining fields as
necessary. • Click Next>> to save your edits and proceed or Exit Wizard to save a partial application.
Low Income may already be established, making selections on this screen optional.
WIOA Application – Miscellaneous Tab
The Miscellaneous tab will not display if your site is not configured for any of its fields.

The Programs Tab: WIOA
Virtual OneStop – Staff Services User Guide 6-41 V18 – 05/2018
The Eligibility & Grants Tab (Dislocated Workers) The Eligibility & Grants tab for WIOA includes the information which was previously displayed on two separate tabs for WIA (the Application Eligibility tab and the Grants tab). This combined Eligibility & Grants tab includes four sections:
• Applicant Eligibility – displays an eligibility matrix summarizing which customer program groups (eligibility types) the individual is eligible for, as well as priority of service conditions, and any reasons for not being eligible.
If the row is green (eligibility = Yes), and if no grants are applicable, you can skip to Staff Eligibility Information (bottom of the page), and click Next or Finish.
• WIOA Grant Eligibility – displays state and national WIOA grant types for which the individuals may be eligible, based on their WIOA applicant eligibility. Staff can click Yes for a grant type that applies to the individual.
• Grants – lists specific state or local grants that can be associated with the individual. E.g., if grant types are clicked Yes in WIOA Grant Eligibility, staff can review and select specific grants from a table, which controls access to the grant funding streams in activity/enrollment records.
• Staff Eligibility Information – contains the Case Manager assignment, staff comments, and staff case notes, as well as a link to access any WIA Legacy Application Data, if applicable.
Applicant Eligibility Meets Low Income: The top of the Application Eligibility area has a display-only indication of whether the applicant meets the definition for low income. This will indicate Yes, if Low Income was already established (based on previously-verified low income related to responses entered on the Public Assistance tab, or on the Family Income tab). Otherwise it will indicate No. Staff can also click a link to see a table for current low income guidelines, the same as the one on the Family Income tab.
WIOA Application Eligibility & Grants Tab – Eligibility Determination Section
Staff with privileges can set any eligibility as Inactive, so that the associated activities and related funding are not used in enrollments, or as part of reporting for that Enrollment/Customer group.
Quick Tip

The Programs Tab: WIOA
Virtual OneStop – Staff Services User Guide 6-42 V18 – 05/2018
Eligibility Matrix: The eligibility matrix is a table which has a row for each customer program group (i.e., each eligibility type) that staff may have identified for application on the first Start tab.
• The Eligible column indicates whether the applicant is eligible for services via that program type. • The Priority column indicates the different priority statuses that apply to the individual (which
staff must consider in addition to the basic eligibility status). Examples include Veteran (VET), Basic Skills Deficient (BSD), and Low Income (LI). Priority is important for staff who need to be aware of Priority of Service, because WIOA does not mandate the same level of business rules to enforce Priority of Service in Enrollments.
• The Exceptions/Limitation column is a column for youth. It will be blanks for dislocated workers.
• The Reasons(s) Not Eligible column will indicate identifiable reasons why eligibility is No or Undetermined in the Eligible column. For example: If the eligibility type and date were not selected for Program Type on the Start tab, this
column will indicate No Eligibility Date. If the No Dislocated Worker Category was selected on Employment tab.
• The Action column will include a checkbox for staff to Inactivate an individual who is eligible (i.e., in green). Checking this box, and also clicking the Save Checkboxes link below the matrix, will discontinue the ability to enroll the individual in activities/services associated with that customer program group, but will not change their application status.
WIOA Grant Eligibility: For possible WIOA grant eligibilities (based on the eligible program type), the buttons and checkbox are active and optional. They are defaulted to Not Applicable — staff can select Yes. Grants are special programs, each specific grant having separate eligibility requirements. When a staff user selects Yes, and then adds a grant to the application record (using the table indicated in the following Grants area), it indicates staff have reviewed the eligibility requirements for the grant that are typically beyond formula eligibility requirements – typically requirements are specific barriers or characteristics based upon the Grant requirements.
Not Applicable – is the default value when the tab/screen loads, and indicates staff have done nothing to evaluate the applicant for eligibility.
No – means a staff user has set the value to No, and grants for the particular grant type (funding) are not available to add to the application, which keeps enrollments from being created for those grants.
Yes – a staff user has set the value to Yes, because they have determined specific grants may apply for this type. This enables the ability to View Available Grants (a link the next Grants section on the tab).
The Inactive checkbox can be selected (or deselected) during the course of the application, until the creation of the Outcome record. This selection controls access to funding streams in the Activity/Enrollment record(s).

The Programs Tab: WIOA
Virtual OneStop – Staff Services User Guide 6-43 V18 – 05/2018
Eligible Grants: For Dislocated Worker eligibility, the active grant selections include:
National Dislocated Worker Grant NDWG (formerly NEG)
Staff must have access to the Adult or the Dislocated Worker Eligibility group. This field can be modified when Adult Eligibility is set to 'Yes', or when Dislocated Worker Eligibility is set to 'Yes'.
Statewide Dislocated Worker Eligibility - Staff must have access to the Dislocated Worker Eligibility group. This field can be modified only when Dislocated Worker Eligibility is set to 'Yes'. Non-Eligible Grants: For Dislocated Worker eligibility, the disabled selections include:
Statewide Incumbent Worker Eligibility - Staff must have access to the Adult Basic Career Services Eligibility group or the Adult Eligibility group. Statewide Youth Eligibility - Staff must have access to the Youth Eligibility. Statewide Rapid Response Additional Assistance Eligibility - Staff must have access to the Dislocated Worker Eligibility.
Non-WIOA Grant Eligibility: The possible Non-WIOA Grant eligibility entries that apply are not based on eligible program type. This section’s specific grants display when the switch for either Non-WIOA Special Grants or Local Funded Grants is turned on. When on, the entries display as described below:
Non-WIOA Special Grants - When the switch for Non-WIOA Special Grants is turned on, this field can be edited at any time, until an exit record exists for the application.
• Checkbox for Non-WIA Special Grants Inactive - This checkbox can be selected or deselected during the course of the application, until the creation of the Exit record. This selection controls access to funding streams in the Activity/Enrollment record(s).
Local Funded Grants - When the switch for Local Funded Grants is turned on, this field can be edited at any time, until an exit record exists for the application.
• Checkbox for Local Funded Grants Inactive - This checkbox can be selected or deselected during the course of the application, until the creation of the Exit record. This selection controls access to funding streams in the Activity/Enrollment record(s), based on grant funding availability.
Grants: Clicking the Yes radio buttons in above sections activates the View Available Grants link, which staff can then select to generate a listing of all of the possible grants as a plain table of Grant types/IDs (along with the ERA/Local Grant Code, date added, and an Add link).

The Programs Tab: WIOA
Virtual OneStop – Staff Services User Guide 6-44 V18 – 05/2018
The table displays all grants - active or inactive - for which the individual has been determined to be eligible. Note: The system will indicate when there are no grants associated to the application by displaying a
"no records found" message. In the example below (where only National Dislocated Worker Grant NDWG was selected), two grants were displayed in the black and white “list of available grants” (Grant IDs 423 and 469), and 423 was added (which moved it to the table above the list, as the added grant id 423).
The Grants sections let staff display all available grants and add specific grant IDs for the Individual.
Staff can click the Add link to add the specific Grant Types for the Individual. The columns in the Grant table include:
• ETA/Local Grant Code - The system will display either the Local Grant Code or ETA Grant Code, depending on the record. If neither exists, the system display "Not Defined".
• Date Added - The date the grant record was added to the application.
Note: Because this involves new functionality, WIA-converted grants will not have an accurate date of entry.
From the Action column, the Delete link is not enabled until an enrollment record has an Actual Begin Date associated to the grant. When clicked, the system will prompt staff to confirm their selection before deleting.
Staff Eligibility Information: This area contains controls/fields for case assignment, comments, and case notes: Current Case Manager – This displays the case assignment data, including:
• Group: Case Assignment Group Name of the Case Manager, if applicable.
• Case Manager: The assigned manager’s last and first name.
• Temporary Case Manager Name. Only displays a name if applicable.
Assignment can be made/modified by the links:
• Assign Case Manager - Clicking this link allows staff to assign a case manager to this application (create/edit).
• Assign Me - Clicking this link allows staff to assign this application to his/her own case load.

The Programs Tab: WIOA
Virtual OneStop – Staff Services User Guide 6-45 V18 – 05/2018
• Remove Case Manager Assignment - Clicking this link allows staff to remove the Case Manager assigned to this application.
Note: Depending on your site’s configuration, the system may require case assignment to finish an application, or it may auto-assign a manager (based on defined management groups). For such configurations, you may see a message at the top of the tab, when you click Next>> or Finish, and an assignment is not made. • You must assign as Case Manager to this application. • The system cannot automatically assign this Case. The Staff user is not assigned to
a compatible group. • Comments This optional field lets staff add text (associate one of the Eligibility groups). A Spell
Check link will check spelling for the entered text. • Add a new Case Note - Opens the case note interface in a new window, and lets staff add a
case note to the system. • Show Filter Criteria – Lets staff perform a new case note search according to the filter criteria
entered. Click the Filter link to refresh the current page to display your results. • Case Notes - From the case notes table, click a link under the Subject column to view/edit an
individual case note, or click Edit from the Action column. Click the envelope icon to send a message to the user.
• WIA Legacy Application Data - This link (new in WIOA) only displays below Case Notes if a WIA application was converted for WIOA. See the topic, Seeing WIA Legacy Data (via the Eligibility Tab) on page 6-66 for an example of legacy data.
Finishing the Application: Staff can click Finish or Next>> at the bottom of the screen:
• Finish will complete and close the application, and return staff to the Programs tab. The Application will display as Complete for the Adult eligibility type.
• Next>> will complete and close the application, and open the first tab for creating an enrollment in WIOA.
Note: Finish will not create the Participation. When staff returns to the Programs tab to enroll the individual in services, they must create a participation record. Next>> automatically generates the participation record, before it opens Enrollment tabs.
See the steps under the topic The WIOA Service/Activity Enrollments starting on page 6-69 for more on the steps for enrollment, after completion of an application. See the topic The WIOA Participation Form on page 6-68, if Finish was selected, and the form must be completed before starting enrollments.

The Programs Tab: WIOA
Virtual OneStop – Staff Services User Guide 6-46 V18 – 05/2018
The WIOA Application (for Youth) To be eligible as a youth, the individual must:
Be 14 to 24 years of age or older Be a citizen or noncitizen
authorized to work in the U.S. Meet Military Service registration
requirements (if male and 18) An Eligible Youth in WIOA means an in In-School Youth (ISY) who is 14 to 21, or an Out of School Youth (OSY) who is 16 to 24. Staff can check the Youth Eligibility box for any individual 24 or under. However, the tabs which staff must complete for eligibility will include data used to make an In School Youth (ISY) or an Out of School Youth (OSY) eligibility determination.
To create an Adult Application
• Under the bar, on the Programs tab, click the Create Workforce Innovation & Opportunity (WIOA) Program link (as shown above).
The Start tab displays, with the initial segment of the progress bar in yellow. The tabs/steps to complete the WIOA application for an Adult are:
Tab 1 – Start tab Tab 7 – Public Assistance tab Tab 2 – Contact tab Added questions for child care, high-poverty
area, lunch program Tab 3 – Demographics tab Tab 8 – Barriers tab Tab 4 – Veteran tab Can skip unless an 18-24 male veteran
Added questions for drop-out, runaway, foster care, parenting
Tab 5 – Employment tab Tab 9 – Family Income tab Only one field if “not employed” Tab 10 – Miscellaneous tab Tab 6 – Education tab Only displays fields are configured for the tab Several added questions for In-School vs. Out-Of-School Youth
Tab 11 – Eligibility and Grants tab
Each of these tabs is described in the following subtopics:
The Start Tab (Identifying Eligibility Type) The Start tab has four areas. To complete the tab, enter and/or review each area that applies.
Identifying Information: • Review the fields.
Five fields show for a new start – eight will show later, when you return to the tab.
Note: The last field, “WIA Converted Application ID”, only shows an ID for converted records. These also have a “WIA Legacy Data” link on the last Eligibility & Grants tab. See the topic, “Seeing WIA Legacy Data (via the Eligibility Tab)” on page 6-66 for more.
Currently Participating In: • Review the fields.
You can see other programs that may also be available for funding needed activities or services for the individual.
The Create link displays the application Start tab/segment.

The Programs Tab: WIOA
Virtual OneStop – Staff Services User Guide 6-47 V18 – 05/2018
Note: This area does not display if the individual is not participating in any programs.
Application/Registration Information: • Enter the Application Date. • Select desired eligibility type (from
four possibilities).
Note: This is not predetermined by Formula Program Eligibility, only by the individual’s age. An individual must be 14 to 21 (In School), or 16-24 (Out of School). For individuals older than 24, the Youth eligibility selection box will be disabled.
• Enter the Youth Eligibility Date (displayed just for the selected application type).
Location Information: • Select the location information for
Local Area, Office Location of Responsibility, and standard Office Location.
• Click Next>> to save your edits and complete the Start tab.
If all required data is entered, the next step displays (the Contact tab).
General items to note for this tab:
• You can expand the Individual Details area at the top of the screen, if the information may be helpful (e.g., if you want to be reminded of the user’s Login Name or Date of Birth).
• The Application Date cannot be greater than X days ago (the lockdown date), nor can it be greater than today’s date.
• The Eligibility Date for the selected eligibility type (i.e., Adult) cannot precede the Application Date, nor can it be greater than today’s date.
Note: If you click Exit Wizard, your data entry will NOT be saved. You must click Next at the Start tab to save a partial application.
• If your data entry violates a business rule or is incomplete, the system will notify you via red text message upon clicking Next (see the above example). Fix the error and re-click Next to proceed.
WIOA Application, Start Page for Youth
The number of tabs or “Progress Bar” segments changes as soon as this tab is saved.
When staff picks Eligibility type, a date control displays (other types may be disabled (due to age).

The Programs Tab: WIOA
Virtual OneStop – Staff Services User Guide 6-48 V18 – 05/2018
The Contact Information Tab The Contact tab includes four areas: Contact Information, Current Address, Mailing Address and Alternate Contacts. Many of the fields are prefilled from registration. Staff must:
• Ensure that all required fields are entered.
• Verify the SSN.
Note: Edit SSN is only available to staff with privileges.
• Verify the Current Address.
Note: This address used at Application will display in a separate Address at Date of Application area if you return to the Contact tab after you save the initial data.
• Make additions or changes to Alternate Contacts, using the Mange Alternate Contacts link, if appropriate.
• Click Next to save your edits and continue to the next part of the enrollment application.
Note: Depending on site’s configuration, you may need to click the Manage Alternate Contacts link and supply alternate contacts before the next step. You can also click a checkbox to save a partially completed application.
The Demographics Tab The Demographics tab includes contains several fields for demographic information. Some of the available options on this application are dependent upon your system's configuration. To complete the tab, minimally, enter and/or verify:
• Date of birth • Gender • Individual’s Selective Service registration status, if applicable • Citizenship or Authorization to work in U.S. • Heritage and ethnicity • Individual’s disability (if they consider themselves to have one) • Click Next to save your edits and proceed, or to click save a partial application and pick Exit
Wizard
General items to note:
• Farmworker Status is no longer collected on the Demographics tab.

The Programs Tab: WIOA
Virtual OneStop – Staff Services User Guide 6-49 V18 – 05/2018
• If any custom Demographic fields were created for your site, they should display for your site’s configuration.
• Many verification lists, (like Citizenship Verifi-cation for Authorization to Work in U.S.), may have different items, depending on your site’s configuration.
• You can also upload documents (as shown at right), or scan images for documents used in verification, if your sites include a Document Management module. For details, see Chapter 30 - Manage Documents and the topic, In-Context Scanning, Linking, and Viewing.
See the description of The Demographics Tab on page 6-13, for an Adult application, for any questions on the Demographics fields.
The Veteran Tab If the youth is not a veteran:
• Click Next>> to move past this tab.
You will go directly to the next tab.
Note: You are only required to enter data on this tab for youth if the youth is a male, over 18, and a veteran still eligible as a youth.
See the description of “The Veteran Tab” on page 6-15, for an Adult application, for any questions on the Veteran fields.
The Employment Tab Employment information is not as common for youth as for adults or dislocated workers; however, it still has required fields that must be completed for a Youth application. If they are not employed, only selecting Not Employed from the first field is required. The data is organized into two sections: Employment Information and Employment History. At a minimum:
Under Employment Information:
• Select and verify employment status. • If this is Not Employed, you can click Next>> and move to the next screen. • If any other answer, finish the remaining fields that apply: Identify if underemployed (if individual is employed). Identify if receiving unemployment. Identify if individual is a farmworker.
Note: If the individual received a notice of termination or military separation, consider applying with the eligibility type Dislocated Worker.

The Programs Tab: WIOA
Virtual OneStop – Staff Services User Guide 6-50 V18 – 05/2018
Under Employment History:
• Identify any relevant employment history, if it applies for the youth applicant. See the description for this tab under “The WIOA Application (for Adult),” on page 6-16, for any questions on the Employment fields.
The Education Tab (for Youth) As mentioned in the eligibility summary, the youth emphasis is on employment for Out of School Youth (OSY). “WIOA requires a minimum of 75 percent of State and Local youth funding to be used for OSY.” Therefore, additional fields are displayed for youth education data, particularly to document school status for youth of compulsory age. Data is organized into three sections – the first section is Youth Eligibility Information. Use this tab to define the individual’s education, including high school level and highest education level, as well as any partner services for education. For Youth eligibility, this includes verifying education fields related to the highest school grade completed, current school status, and whether currently attending any school. This may include verifying fields that are already populated based on educational information gathered at registration. Enter Youth Eligibility Education Information:
• If the youth’s age is within compulsory range: Enter the last date
they last attended secondary school.
Indicate if they failed to attend during recent complete calendar quarter.
Select a verification if they did not attend during the recent quarter (Yes on previous question)
• Indicate if they have GED or HSE (at Youth Program eligibility).
• Select their School Status (at Youth Program eligibility).
Note: The last field, “Attending any School” is related to In School Youth determinations, and the system normally sets this to Yes or No based on the previous School Status selection.
The next two sections are briefly described below. They are identical to The Education Tab, previously described under “The WIOA Application (for Adult),” on page 6-17.
WIOA Application – Youth Eligibility Education Tab (for Youth)
These fields are active if youth is within age for compulsory attendance.

The Programs Tab: WIOA
Virtual OneStop – Staff Services User Guide 6-51 V18 – 05/2018
Enter WIOA Education Information: • Select the highest secondary school grade completed, and indicate if a diploma
or equivalent was received. • Select current highest school grade completed. • Select and verify the federally reported Highest Education Level Completed.
Note: Education Level for secondary school is High School Equivalent / GED. If youth is still in secondary school, the selection would be “No education level completed.”
• Select and verify the current School Status.
Enter Educational Partner Services (if applicable):
• Identify if the individual is receiving services from: Adult Education YouthBuild (if so include
Grant Number) Job Corps Vocation Education Individualized Education
Program • Identify if the individual is, or
was, an Individualized Education Program (IEP) participant.
• When finished, click Next>> to save your edits and proceed or Exit Wizard to save a partial application.
WIOA Application – Educational Info (Sections 2 and 3)

The Programs Tab: WIOA
Virtual OneStop – Staff Services User Guide 6-52 V18 – 05/2018
The Public Assistance Tab (for Youth) On the Public Assistance tab, answer each of the statements about assistance that the youth applicant receives. For a Youth application, there are some differences:
• Additional Public Assistance fields (as shown in the figure below).
• Most assistance types require both a Yes/No selection, and also ask if assistance is for the applicant, for a family member, or if recipient in the household is not applicable/unknown.
Similar to the tab for Adult applications: • Fields for most type of assistance
will require an indication of validation if the response is Yes.
• Blue text at the top of groups of assistance questions helps clarify time periods for each assistance question asked.
To complete the Public Assistance tab: • Indicate Yes on each of the
assistance options that apply. • Where possible, indicate if
assistance is for the applicant, or for a family member.
• Verify the assistance accordingly.
In the last section, “Individual currently meets the following:
• Carefully consider each additional question, for youth, in this area. These include meeting assistance considerations for items such as: Foster child, High-poverty area, Lunch program, SNAP, etc.
• Click Next>> to save your edits
and proceed or Exit Wizard to save a partial application.
WIOA Application – Public Assistance Tab, for Youth

The Programs Tab: WIOA
Virtual OneStop – Staff Services User Guide 6-53 V18 – 05/2018
The Barriers Tab (for Youth) The Barriers tab for the WIOA application is similar to the WIA Barriers tab. However, the data fields have been organized into two areas: Individual Barriers and Barriers to Employment.
Individual Barriers: This area includes the individual’s abilities and history barriers (e.g., English language learner, basic skills deficient, homeless, ex-offender), as well as several additional barriers specific to youth applicants (e.g., high school runaway, foster care, parenting, and others).
• Select any individual barriers that apply.
• Use the Verify link to identify the document, score, etc., used to verify the barrier.
Note: Yes selections require verification. A basic skills deficiency may include Basic Skills Assessments, which can be recorded on this screen, using the same assessment screen that is also used for skills assessments in initial program assessment (e.g., Wagner-Peyser).
Note: Custom items that were configured fields for specific customer sites previously (e.g., Gang Status, Parolee Number) will display as a Barriers section on the Miscellaneous tab, which is exclusively for all configurable data elements.
Barriers to Employment: The section includes barriers for displaced homemaker, cultural barriers, and farmworker identification for barriers.
• Select any employment barriers that apply. • Use the Verify link if it applies (e.g., if you select Yes for Displaced Homemaker status.)
These fields only show in a Youth application.
WIOA Application – Barriers Tab (individual Barriers area)

The Programs Tab: WIOA
Virtual OneStop – Staff Services User Guide 6-54 V18 – 05/2018
WIOA Application – Barriers Tab (Employment Barriers area)
• Click Next>> to save your edits and proceed or Exit Wizard to save a partial application.
Note: It the applicant is an In-School Youth, they may not be eligible for any WIOA services unless barriers are indicated.
The Family Income Tab The Family Income tab for youth is the same as for Adult or Dislocated application. It may help identify low income for the individual if not already established.
Note: The tab will indicate whether family size and income are optional (i.e., if Low Income is already established).
To complete the tab (if family size and income are required): • Identify Family Size (using the drop-down list) and use Verify to indicate documentation used. • Enter the Annualized Family Income.
Some barrier selections may be predetermined from previous responses, or registration information.

The Programs Tab: WIOA
Virtual OneStop – Staff Services User Guide 6-55 V18 – 05/2018
WIOA Application – Family Income Tab
• Click Next>> to save your edits and proceed or Exit Wizard to save a partial application.
Note: You can click a link at the bottom of the screen to see a table for low income amounts.
If a Family Income Worksheet displays, or you need more information on this tab, refer to the topic on the Family Income tab under the Adult application.
The Miscellaneous Tab (configurable) The Miscellaneous tab will display only if custom fields were configured for your specific site. The possible data on this Miscellaneous tab may include fields such as Gang Status or Substance Abuse.
For most customers, this field will not display. For more on how this tab may display, if your site is configured for it, see the topic The Miscellaneous Tab (Configurable) on page 6-21, described under the Adult Application details.
The Eligibility & Grants Tab (Youth Example) The Eligibility & Grants tab for WIOA includes the information which was previously displayed on two separate tabs for WIA (Application Eligibility tab and Grant tab). This combined Eligibility & Grants tab includes four sections:
• Applicant Eligibility – displays an eligibility matrix summarizing which customer program groups (eligibility types) the individual is eligible for, as well as priority of service conditions, and any reasons for not being eligible.
If the row is green (eligibility = Yes), and if no grants are applicable and no exceptions need to be selected, you can skip to Staff Eligibility Information (bottom of the page), and click Next>>.
Low Income may already be established, making selections on this screen optional.
Quick Tip

The Programs Tab: WIOA
Virtual OneStop – Staff Services User Guide 6-56 V18 – 05/2018
• WIOA Grant Eligibility – displays state and national WIOA grant eligibility, which controls access to Grant funding streams in the Activity/Enrollment record.
• Grants – displays listings for ET/Local grant that are associated, or can be associated, with the individual.
• Staff Eligibility Information – contains the Case Manager assignment, staff comments, and staff case notes, as well as a link to access any WIA Legacy Application Data, if applicable.
Applicant Eligibility Meets Low Income: The top of the Application Eligibility area has a display-only indication of whether the applicant meets the definition for low income. This will indicate Yes, if Low Income was already established (based on previously-verified low income related to responses entered on the Public Assistance tab, or on the Family Income tab). Otherwise it will indicate No. Staff can also click a link to see a table for current low income guidelines, the same as the one on the Family Income tab.
WIOA Application Eligibility & Grants Tab – Eligibility Determination Section
Eligibility Matrix: The eligibility matrix is a table which has a row for each customer program group (i.e., each eligibility type) that staff may have identified for the application on the first Start tab.
• The Eligible column indicates whether the applicant is eligible for services via that program type. • The Priority column will indicate the different priority statuses that apply to the individual, which
staff must consider for priority of services, in addition to the basic eligibility status (e.g., Basic Skills Deficient, and Low Income).
• The Exceptions/Limitation column is primarily for exceptions/limitations that are determining possible eligibility, which staff must consider. For example, a 5% Exception for youth who are in school and ineligible may display in this column, or an indication for 5% Limitation.
Staff with privileges can set any eligibility as Inactive, or serve certain youth via an exception. Associated activities and related funding are available in enrollments, accordingly.

The Programs Tab: WIOA
Virtual OneStop – Staff Services User Guide 6-57 V18 – 05/2018
• The Reason(s) Not Eligible column will indicate identifiable reasons why eligibility is No or Undetermined in the Eligible column. For example: If the eligibility type and date were not selected for Program Type on the Start tab, this
column will indicate No Eligibility Date. If the Exception column indicated 5% Exception, this column may indicate 5% Exception
Checkbox Required. • The Action column will include a checkbox for staff to Inactivate an individual who is eligible (i.e.,
in green). This will discontinue the ability to enroll them in activities/services associated with that customer program group, but will not change their application status. The column may include other checkboxes, if any other scenario allows for a staff action (e.g., identifiable reasons why eligibility is No or Undetermined in the Eligible column). For example, if a 5% Exception is required of the individual, as in-school youth, and staff is allowed to grant that exception, then a “Service under 5% exception” checkbox will display. To apply an indicated action, staff must click a checkbox, and also click the Save Checkboxes link below the matrix. This will update the exception indicator and green shading if the eligibility is enabled or deactivated.
WIOA Grant Eligibility: For possible WIOA grant eligibilities (based on the eligible program type), the buttons and checkbox are active and optional. They are defaulted to Not Applicable — staff can select Yes. Grants are special programs, each specific grant having separate eligibility requirements. When a staff user selects Yes, and then adds a grant to the application record (using the table shown in the following Grants area), it indicates staff have reviewed the eligibility requirements for the grant that are usually beyond formula eligibility requirements – typically requirements are specific barriers or characteristics based upon the Grant requirements.
Not Applicable – is the default value when the tab/screen loads, and indicates staff have done nothing to evaluate the applicant for eligibility.
No – means a staff user has set the value to No, and grants for the particular grant type (funding) are not available to add to the application, which keeps enrollments from being created for those grants.
Yes – a staff user has set the value to Yes, because they have determined specific grants may apply for this type. This enables the ability to View Available Grants (a link the next Grants section on the tab).
The Inactive checkbox can be selected (or deselected) during the course of the application, until the creation of the Outcome record. This selection controls access to funding streams in the Activity/Enrollment record(s).
Eligible Grants: For Youth eligibility, the active grant selection typically includes one grant type:
Statewide Youth Eligibility Staff must have access to the Youth Eligibility group. This field can be modified only if Youth Eligibility is set to 'Yes'.

The Programs Tab: WIOA
Virtual OneStop – Staff Services User Guide 6-58 V18 – 05/2018
Non-WIOA Grant Eligibility: The possible Non-WIOA Grant eligibility entries that apply are not based on eligible program type. This section’s specific grants display when the switch for either Non-WIOA Special Grants or Local Funded Grants is turned on. When on, the entries display as described below:
Non-WIOA Special Grants - When the switch for Non-WIOA Special Grants is turned on, this field can be edited at any time, until an exit record exists for the application.
• Checkbox for Non-WIA Special Grants Inactive - This checkbox can be selected or deselected during the course of the application, until the creation of the Exit record. This selection controls access to funding streams in the Activity/Enrollment record(s).
Local Funded Grants - When the switch for Local Funded Grants is turned on, this field can be edited at any time, until an exit record exists for the application.
• Checkbox for Local Funded Grants Inactive - This checkbox can be selected or deselected during the course of the application, until the creation of the Exit record. This selection controls access to funding streams in the Activity/Enrollment record(s), based on grant funding availability.
Grants: Once types of grants are selected in the two sections above, staff can click the View Available Grants link to see all of the possible grants. This will display a table of grants. Clicking the Yes radio buttons in above sections activates the View Available Grants link, which staff can then click to activate/display a tables of Grant types/IDs.
The table displays all grants - active or inactive - for which the individual has been determined to be eligible. Note: The system will indicate when there are no grants associated to the application by displaying a
"no records found" message. In the example below (where only Youth Eligibility was selected), one grant was displayed in the black and white “list of available grants” (Grant IDs), which was added (and moved to the table above the list, as the added grant id 433).
The Grants sections lets staff display available grants and add specific grant IDs

The Programs Tab: WIOA
Virtual OneStop – Staff Services User Guide 6-59 V18 – 05/2018
Staff can then click the Add link to add the specific Grant Types for the Individual. The columns in the Grant table include:
• ETA/Local Grant Code - The system will display either the Local Grant Code or ETA Grant Code, depending on the record. If neither exists, the system displays "Not Defined".
• Date Added - The date the grant record was added to the application.
Note: Because this involves new functionality, WIA-converted grants will not have an accurate date of entry.
From the Action column, the Delete link is not enabled until an enrollment record has an Actual Begin Date associated to the grant. When clicked, the system will prompt staff to confirm their selection before deleting.
Staff Eligibility Information: This area contains controls/fields for case assignment, comments, and case notes: Current Case Manager – This displays the case assignment data, including:
• Group: Case Assignment Group Name of the Case Manager, if applicable.
• Case Manager: The assigned manager’s last and first name.
• Temporary Case Manager Name. Only displays a name, if applicable.
Assignment can be made/modified by the links: • Assign Case Manager - Clicking this
link allows staff to assign a case manager to this application (create/edit).
• Assign Me - Clicking this link allows staff to assign this application to his/her own case load. • Remove Case Manager Assignment - Clicking this link allows staff to remove the Case
Manager assigned to this application.
Note: Depending on your site’s configuration, the system may require case assignment to finish an application, or it may auto-assign a manager (based on defined management groups). For such configurations, you may see a message at the top of the tab when you click Next>> or Finish, and an assignment is not made. • You must assign as Case Manager to this application. • The system cannot automatically assign this case. The Staff user is not assigned to
a compatible group. • Comments This optional field lets staff add text (associate one of the Eligibility groups). A Spell
Check link will check spelling for the entered text. • Add a new Case Note - Opens the case note interface in a new window, and lets staff add a
case note to the system. • Show Filter Criteria – Lets staff perform a new case note search according to the filter criteria
entered. Click the Filter link to refresh the current page to display your results. • Case Notes - From the case notes table, click a link under the Subject column to view/edit an
individual case note, or click Edit from the Action column. Click the envelope icon to send a message to the user.
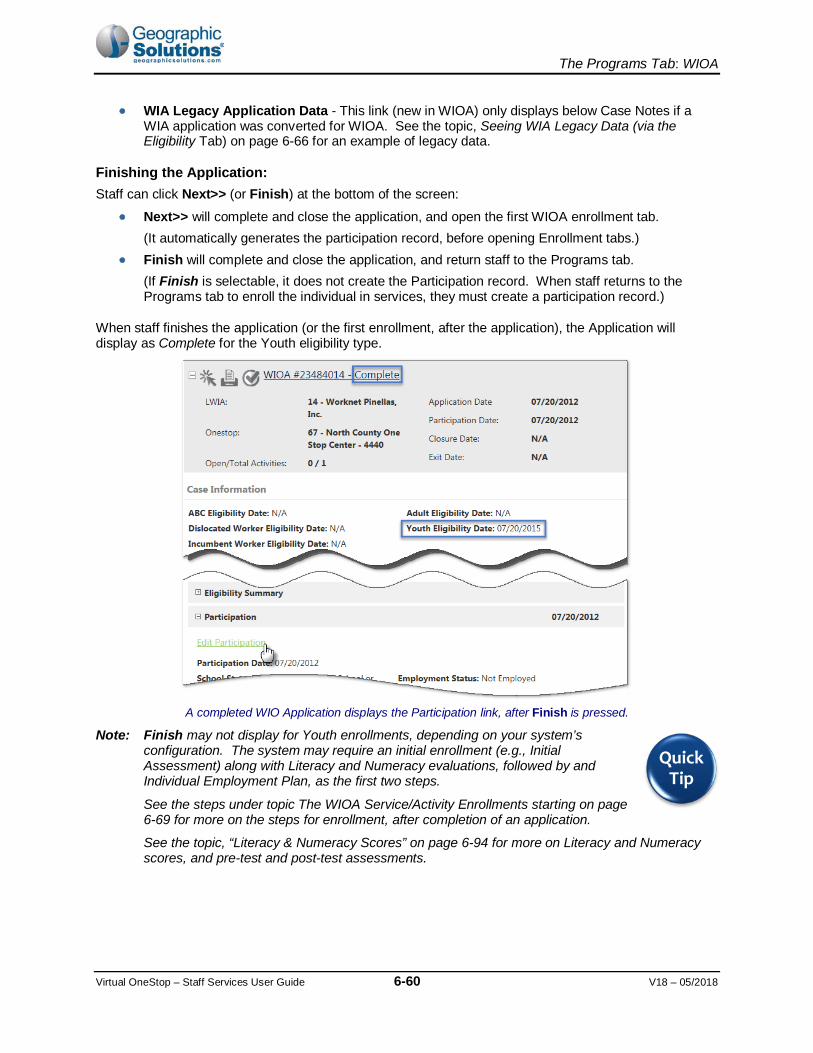
The Programs Tab: WIOA
Virtual OneStop – Staff Services User Guide 6-60 V18 – 05/2018
• WIA Legacy Application Data - This link (new in WIOA) only displays below Case Notes if a WIA application was converted for WIOA. See the topic, Seeing WIA Legacy Data (via the Eligibility Tab) on page 6-66 for an example of legacy data.
Finishing the Application: Staff can click Next>> (or Finish) at the bottom of the screen:
• Next>> will complete and close the application, and open the first WIOA enrollment tab.
(It automatically generates the participation record, before opening Enrollment tabs.) • Finish will complete and close the application, and return staff to the Programs tab.
(If Finish is selectable, it does not create the Participation record. When staff returns to the Programs tab to enroll the individual in services, they must create a participation record.)
When staff finishes the application (or the first enrollment, after the application), the Application will display as Complete for the Youth eligibility type.
A completed WIO Application displays the Participation link, after Finish is pressed.
Note: Finish may not display for Youth enrollments, depending on your system’s configuration. The system may require an initial enrollment (e.g., Initial Assessment) along with Literacy and Numeracy evaluations, followed by and Individual Employment Plan, as the first two steps.
See the steps under topic The WIOA Service/Activity Enrollments starting on page 6-69 for more on the steps for enrollment, after completion of an application.
See the topic, “Literacy & Numeracy Scores” on page 6-94 for more on Literacy and Numeracy scores, and pre-test and post-test assessments.
Quick Tip
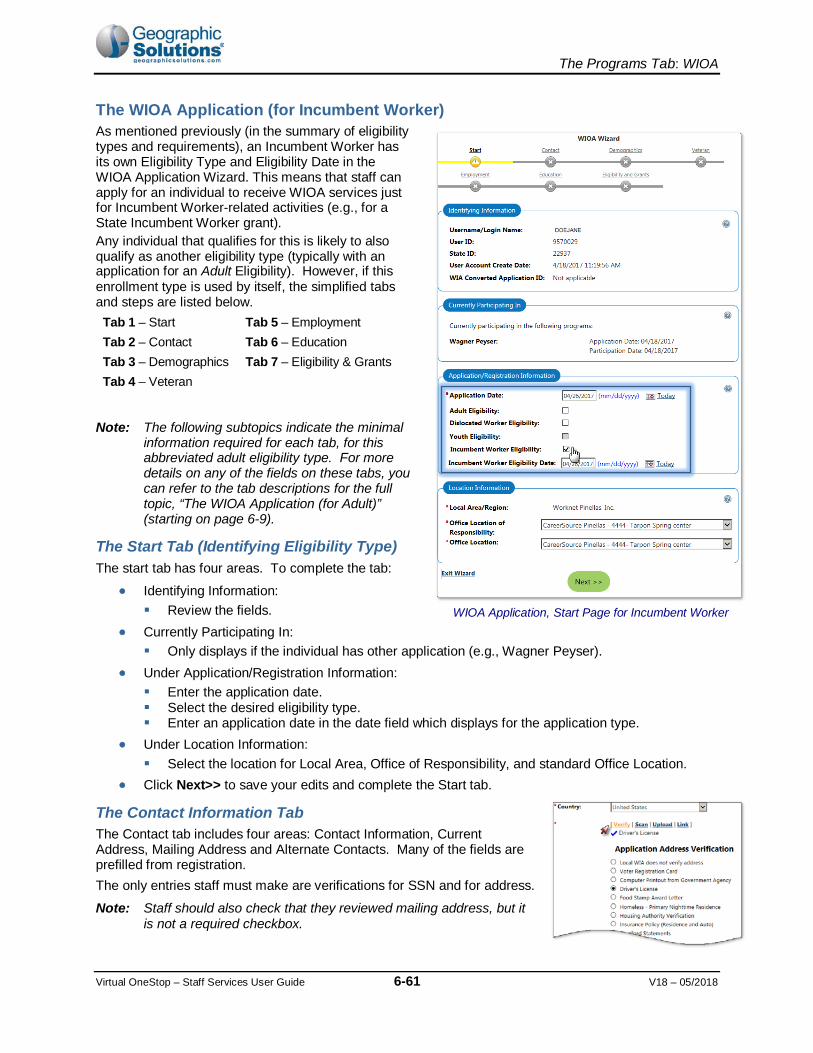
The Programs Tab: WIOA
Virtual OneStop – Staff Services User Guide 6-61 V18 – 05/2018
The WIOA Application (for Incumbent Worker) As mentioned previously (in the summary of eligibility types and requirements), an Incumbent Worker has its own Eligibility Type and Eligibility Date in the WIOA Application Wizard. This means that staff can apply for an individual to receive WIOA services just for Incumbent Worker-related activities (e.g., for a State Incumbent Worker grant). Any individual that qualifies for this is likely to also qualify as another eligibility type (typically with an application for an Adult Eligibility). However, if this enrollment type is used by itself, the simplified tabs and steps are listed below. Tab 1 – Start Tab 5 – Employment Tab 2 – Contact Tab 6 – Education Tab 3 – Demographics Tab 7 – Eligibility & Grants Tab 4 – Veteran
Note: The following subtopics indicate the minimal
information required for each tab, for this abbreviated adult eligibility type. For more details on any of the fields on these tabs, you can refer to the tab descriptions for the full topic, “The WIOA Application (for Adult)” (starting on page 6-9).
The Start Tab (Identifying Eligibility Type) The start tab has four areas. To complete the tab:
• Identifying Information: Review the fields.
• Currently Participating In: Only displays if the individual has other application (e.g., Wagner Peyser).
• Under Application/Registration Information: Enter the application date. Select the desired eligibility type. Enter an application date in the date field which displays for the application type.
• Under Location Information: Select the location for Local Area, Office of Responsibility, and standard Office Location.
• Click Next>> to save your edits and complete the Start tab.
The Contact Information Tab The Contact tab includes four areas: Contact Information, Current Address, Mailing Address and Alternate Contacts. Many of the fields are prefilled from registration. The only entries staff must make are verifications for SSN and for address. Note: Staff should also check that they reviewed mailing address, but it
is not a required checkbox.
WIOA Application, Start Page for Incumbent Worker

The Programs Tab: WIOA
Virtual OneStop – Staff Services User Guide 6-62 V18 – 05/2018
The Demographics Tab The Demographics tab includes several fields for demographic information, many of which are prepopulated from registration information. To complete the tab, minimally, enter and/or verify:
• The date of birth • Gender • The individual’s Selective Service registration
status (if applicable) • Citizenship or Authorization to work in the
U.S. • Heritage and ethnicity questions • The individual’s disability if they consider
themselves to have one • Click Next.
Note: If your site has, and you will use, the Document Management features for this application for documents used in verification, see details about acquiring document images in Chapter 30 - Manage Documents and the topic, In-Context Scanning, Linking, and Viewing.
The Veteran Tab Minimally, enter and/or verify the following veteran data:
• If the individual has indicated Transitioning Service Member status
If Yes, you must complete type and Estimated Discharge Date.
• If the individual has indicated Eligible Veteran Status. If yes, you must complete and verify information in this section.
• If the individual has NOT indicated veteran status, you must indicate “No” where appropriate for the required questions.
• Click Next>> to save your edits and proceed or Exit Wizard to save a partial application.
Note: For a sample of this tab, see the longer description of The Veteran Tab on page 6-15, under the topic, The WIOA Application for Adult.

The Programs Tab: WIOA
Virtual OneStop – Staff Services User Guide 6-63 V18 – 05/2018
The Employment Tab Use the Employment Information section to verify the individual’s employment status and employment history. The data is organized into two sections – Employment Information and Employment History. At a minimum, Under Employment Information:
• Select employment status (and verify, even if No).
• Identify unemployment eligibility status.
If a Claimant: Select exempted from
work search radio button
Verify UI compensation Under Employment History:
• Consider checking any listed employment that displays in the employment history table.
• Click Next>> to save your edits and proceed or Exit Wizard to save a partial application.
The Education Tab (for Incumbent Worker) Use the Education tab to define the individual’s education information related to education for high school equivalency and federally report high school grade completed. The data is organized into two sections for WIOA Educational Information, and for Education Partner Services. At a minimum, Under WIOA Education Information:
• Select current highest school grade completed. • Select and/or verify the Highest Grade and Education Level completed. • Select current school status, if you are attending any school (excluding Adult Education), based
on a state-specific definition. At a minimum:
• Select current highest school grade completed. • Select and/or verify the Highest Grade and Education Level completed. • Select current school status, if you are attending any school (excluding Adult Education), based
on a state-specific definition. Under Education Partner Services:
• Review the defaults “Did not self-identify” radio-button selections, and make changes if any of the services apply.
If a Claimant, you must select the Referred by, and a radio button.
Employment Tab (for Incumbent Worker)
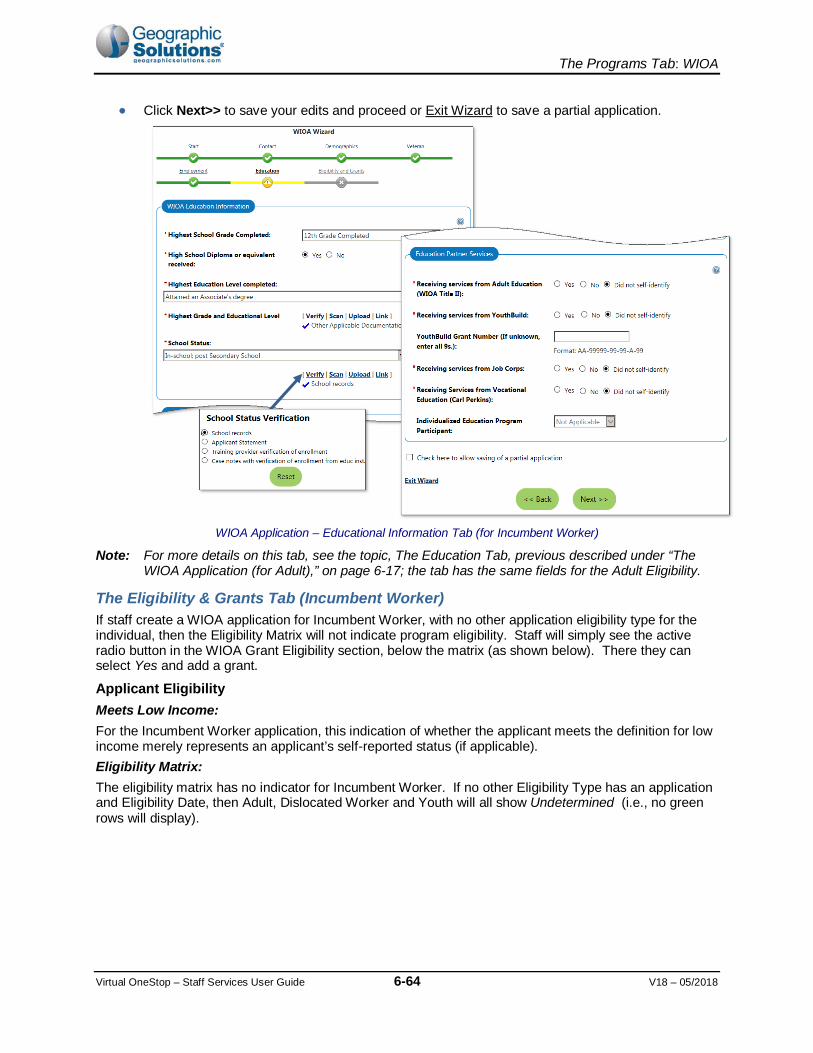
The Programs Tab: WIOA
Virtual OneStop – Staff Services User Guide 6-64 V18 – 05/2018
• Click Next>> to save your edits and proceed or Exit Wizard to save a partial application.
WIOA Application – Educational Information Tab (for Incumbent Worker)
Note: For more details on this tab, see the topic, The Education Tab, previous described under “The WIOA Application (for Adult),” on page 6-17; the tab has the same fields for the Adult Eligibility.
The Eligibility & Grants Tab (Incumbent Worker) If staff create a WIOA application for Incumbent Worker, with no other application eligibility type for the individual, then the Eligibility Matrix will not indicate program eligibility. Staff will simply see the active radio button in the WIOA Grant Eligibility section, below the matrix (as shown below). There they can select Yes and add a grant.
Applicant Eligibility Meets Low Income: For the Incumbent Worker application, this indication of whether the applicant meets the definition for low income merely represents an applicant’s self-reported status (if applicable). Eligibility Matrix: The eligibility matrix has no indicator for Incumbent Worker. If no other Eligibility Type has an application and Eligibility Date, then Adult, Dislocated Worker and Youth will all show Undetermined (i.e., no green rows will display).

The Programs Tab: WIOA
Virtual OneStop – Staff Services User Guide 6-65 V18 – 05/2018
WIOA Application Eligibility & Grants Tab – for Incumbent Worker Eligibility Type
WIOA Grant Eligibility: The first radio button under this section is for Incumbent Worker Eligibility. In WIOA, local boards can identify acceptable IWT and reserve up to 20 percent of funds for IWT.
• Click the Yes radio button. This will activate the lines in the Grant section for adding any available State Incumbent Worker Grants.
Grants: Once types of grants are added to this section, such as the indicated Incumbent Worker Grants, staff can click the Add link to add a related grant (as shown in the figure above). They can also click a Remove link to remove the grant, if at a later date it no longer applies for the individual.
Finishing the Application: Staff can click Finish or Next>> at the bottom of the screen:
• Finish will complete and close the application, and return staff to the Programs tab. The Application will display as Complete for the WIOA application when staff expands the links for the WIOA application.
• Next>> will complete and close the application, and open the first tab for creating an enrollment in WIOA.
Note: Finish will not create the Participation. When staff returns to the Programs tab to enroll the individual in services, they must create a participation record. Next>> automatically generates the participation record, before it opens Enrollment tabs.
See the steps under the topic The WIOA Service/Activity Enrollments starting on page 6-69 for more on the steps for enrollment, after completion of an application. See the topic
Selecting Yes will enable available Grant IDs for Incumbent Worker.
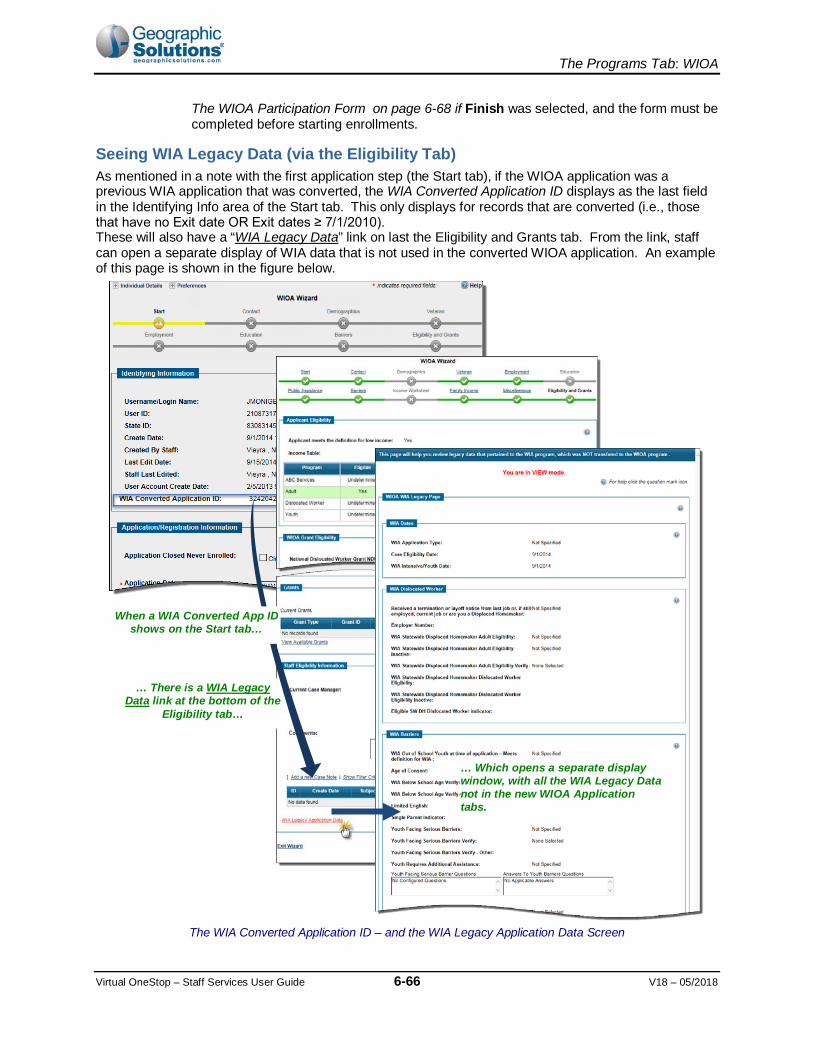
The Programs Tab: WIOA
Virtual OneStop – Staff Services User Guide 6-66 V18 – 05/2018
The WIOA Participation Form on page 6-68 if Finish was selected, and the form must be completed before starting enrollments.
Seeing WIA Legacy Data (via the Eligibility Tab) As mentioned in a note with the first application step (the Start tab), if the WIOA application was a previous WIA application that was converted, the WIA Converted Application ID displays as the last field in the Identifying Info area of the Start tab. This only displays for records that are converted (i.e., those that have no Exit date OR Exit dates ≥ 7/1/2010). These will also have a “WIA Legacy Data” link on last the Eligibility and Grants tab. From the link, staff can open a separate display of WIA data that is not used in the converted WIOA application. An example of this page is shown in the figure below.
The WIA Converted Application ID – and the WIA Legacy Application Data Screen
… There is a WIA Legacy Data link at the bottom of the
Eligibility tab…
… Which opens a separate display window, with all the WIA Legacy Data not in the new WIOA Application tabs.
When a WIA Converted App ID shows on the Start tab…

The Programs Tab: WIOA
Virtual OneStop – Staff Services User Guide 6-67 V18 – 05/2018
Printing the WIOA Application From the moment staff completes the first step (the Start tab) for a WIOA application, the icons next to the Application link, on the Programs tab, will include a Print button, along with the with the wizard and the verification buttons. Staff can print the full application, or print only the application eligibility sections, at any point. When staff selects the Print button, , to print the application, the system will display a separate window to choose printing of a Full Application or an Eligibility Only Application. After the selection is made, the separate window will resize and display a printable WIOA application form, as a full, printable PDF copy of the application, with areas at the bottom for appropriate signatures (as shown below).
Printable PDF Copy of WIOA Application (Eligibility Only Application)
Printing an Application is Available from a link on the Programs tab.

The Programs Tab: WIOA
Virtual OneStop – Staff Services User Guide 6-68 V18 – 05/2018
Note: For systems configured to include the digital signature pad, the bottom of the screen from which staff can print the WIOA application will include an area for the Individual Signature. The keypad will allow an individual applicant to sign, and staff can identify if their staff signature is included, as well as whether the WIOA Application (with signatures) is only printed, or is saved with the signature as part of the created PDF for the WIOA application. Staff can check a box to include their staff signature (if they have already saved their signature from their My Staff Account page).
The WIOA Participation Form Staff must complete a program participation form before registering the individual in their initial program activity. The participation form provides details of the participant’s status before enrolling in the program, and ultimately offers a “before and after” starting point for Common Measures reporting. If staff clicked Next>> as the final action in the application, the system automatically generated a participation record and opened the Enrollment tab. If they clicked Finish, staff must create a Participation record before they can enroll the individual in services.
To create a Participation record:
• Click the Create Participation link on the Programs tab.
The system displays a screen similar to the following figure:
• Review the pre-filled data • Make any required selections or
verifications. • Click Next>>. • The system will display a WIOA
Registration/Activity (“Enrollment”) Record form. (See the next topic.)
Note: Most of the required data on this form is pre-filled, based on previously entered information. Enter the individual’s participation date using either the calendar icon or free-text entry. Be sure to use the proper date format, as shown in the sample blue text.
This date becomes locked down upon save, so the date entered should represent the participant’s initial activity service that you will manually enter in the next step.
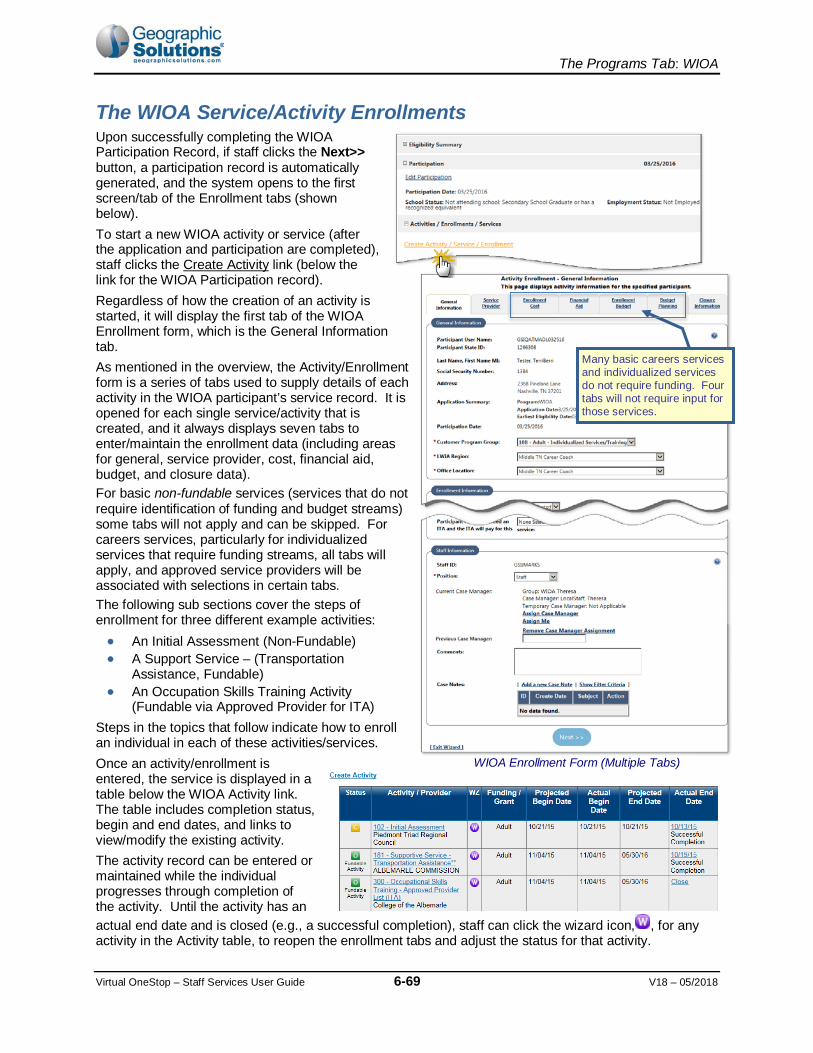
The Programs Tab: WIOA
Virtual OneStop – Staff Services User Guide 6-69 V18 – 05/2018
The WIOA Service/Activity Enrollments Upon successfully completing the WIOA Participation Record, if staff clicks the Next>> button, a participation record is automatically generated, and the system opens to the first screen/tab of the Enrollment tabs (shown below). To start a new WIOA activity or service (after the application and participation are completed), staff clicks the Create Activity link (below the link for the WIOA Participation record). Regardless of how the creation of an activity is started, it will display the first tab of the WIOA Enrollment form, which is the General Information tab. As mentioned in the overview, the Activity/Enrollment form is a series of tabs used to supply details of each activity in the WIOA participant’s service record. It is opened for each single service/activity that is created, and it always displays seven tabs to enter/maintain the enrollment data (including areas for general, service provider, cost, financial aid, budget, and closure data). For basic non-fundable services (services that do not require identification of funding and budget streams) some tabs will not apply and can be skipped. For careers services, particularly for individualized services that require funding streams, all tabs will apply, and approved service providers will be associated with selections in certain tabs. The following sub sections cover the steps of enrollment for three different example activities: • An Initial Assessment (Non-Fundable) • A Support Service – (Transportation
Assistance, Fundable) • An Occupation Skills Training Activity
(Fundable via Approved Provider for ITA) Steps in the topics that follow indicate how to enroll an individual in each of these activities/services. Once an activity/enrollment is entered, the service is displayed in a table below the WIOA Activity link. The table includes completion status, begin and end dates, and links to view/modify the existing activity. The activity record can be entered or maintained while the individual progresses through completion of the activity. Until the activity has an actual end date and is closed (e.g., a successful completion), staff can click the wizard icon, , for any activity in the Activity table, to reopen the enrollment tabs and adjust the status for that activity.
WIOA Enrollment Form (Multiple Tabs)
Many basic careers services and individualized services do not require funding. Four tabs will not require input for those services.

The Programs Tab: WIOA
Virtual OneStop – Staff Services User Guide 6-70 V18 – 05/2018
Creating a Non-Fundable Activity (Initial Assessment) Enrolling an individual in a simple not fundable activity, such as an Initial Assessment, will normally involve entry in only three of the seven tabs of the Enrollment Wizard.
To enroll an individual in an Initial Assessment
• Click the Create Activity link (below Participation on the Programs tab).
On the General Information tab: In the General Information area:
• Select the appropriate customer program group.
Choices displayed result from program eligibility determined during the WIOA application process.
• Select the staff member region, if applicable.
WIOA Activity Enrollment Form – General Info Tab (Youth, Objective Assessment Example)
• Select the staff member one-stop office, if applicable. • In the Enrollment Information area: • Select the appropriate grant code, if applicable.
The displayed values result from the Statewide Program Eligibility Information section and the NEG/SAA/Statewide Grants section of the WIOA Application.
• Select whether this activity service falls under a Partner Program.
If Yes, the page will refresh with a drop-down list for Select Partner. Select from the drop-down list to identify a desired program name (as shown below).

The Programs Tab: WIOA
Virtual OneStop – Staff Services User Guide 6-71 V18 – 05/2018
• Click Select Activity Code and choose the desired program or service from the list displayed. .
Note: The system relies on critical data relationships (customer program group, LWIA, provider type) to determine which service activities staff may select – see the sample, on the previous page, and the same below, which indicate the range of services that may be shown.). Depending on the WIOA Application type, and the location of staff and general information, such as LWIA region, the system will determine which services may be displayed. If no providers and/or programs exist for a particular activity service code, its name will NOT display as a hot link, and may not be selected for WIOA enrollment purposes.
Sample Activity Code List (for Customer Group and/or Region)
• Record the activity’s Actual Start Date or Projected (future) Start Date. • Record the activity’s Projected End Date. • In the Staff Information area: • Select the staff member position, if applicable. • To perform case assignment, click Assign Staff, Assign Group, or Assign Me. • Type comments, if necessary.
Note: Partner Program agencies fund activity services; therefore, no fund tracking will occur in the system.
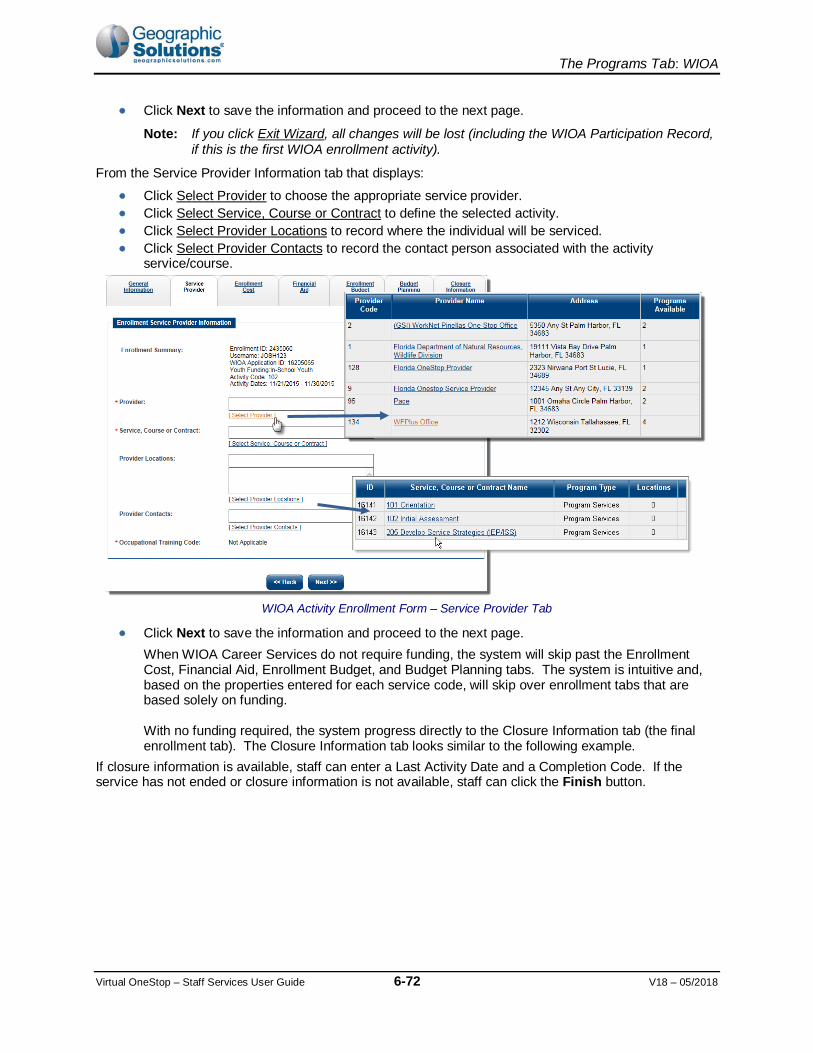
The Programs Tab: WIOA
Virtual OneStop – Staff Services User Guide 6-72 V18 – 05/2018
• Click Next to save the information and proceed to the next page.
Note: If you click Exit Wizard, all changes will be lost (including the WIOA Participation Record, if this is the first WIOA enrollment activity).
From the Service Provider Information tab that displays: • Click Select Provider to choose the appropriate service provider. • Click Select Service, Course or Contract to define the selected activity. • Click Select Provider Locations to record where the individual will be serviced. • Click Select Provider Contacts to record the contact person associated with the activity
service/course.
WIOA Activity Enrollment Form – Service Provider Tab
• Click Next to save the information and proceed to the next page. When WIOA Career Services do not require funding, the system will skip past the Enrollment Cost, Financial Aid, Enrollment Budget, and Budget Planning tabs. The system is intuitive and, based on the properties entered for each service code, will skip over enrollment tabs that are based solely on funding. With no funding required, the system progress directly to the Closure Information tab (the final enrollment tab). The Closure Information tab looks similar to the following example.
If closure information is available, staff can enter a Last Activity Date and a Completion Code. If the service has not ended or closure information is not available, staff can click the Finish button.

The Programs Tab: WIOA
Virtual OneStop – Staff Services User Guide 6-73 V18 – 05/2018
Note: If several services are being entered, staff can also click the Finish and Start a New Enrollment link, at the bottom of the page, which will take staff back to the General Information tab.
If information must be changed, staff can click the Back button to return to a previous tab.
When staff clicks the Finish button, the system re-displays the Programs tab screen (as shown in the figure below) with a WIOA Registration/Activity Record table that lists the first enrollment activity. Note: In this example, the
individual is officially a WIOA customer because they have their first WIOA activity service with a definitive start and end date.
Updated Programs Tab Screen
Staff may perform the following tasks from this screen:
• Click Create Activity to record additional enrollment activity. Staff may continue to create core WIOA activities as previously documented until they complete the WIOA Intensive/Training Application. For details on the intensive application, see the next topic.
• Click the Activity/Provider link (115 – Resume Preparation Assistance in the screen example) to access the long view format for activity details.
• Click the edit wizard icon to access the wizard view format for activity details. • Click the Close link to officially close the activity service. For details, see page 6-102.
Closure Information Tab
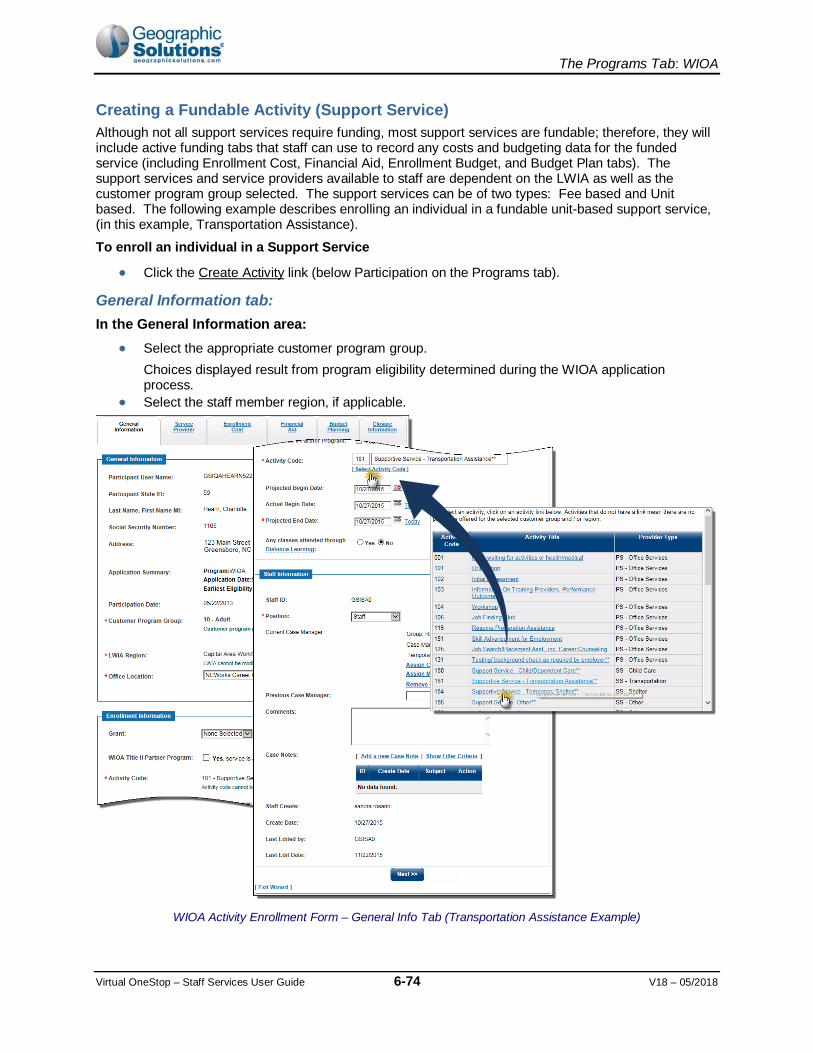
The Programs Tab: WIOA
Virtual OneStop – Staff Services User Guide 6-74 V18 – 05/2018
Creating a Fundable Activity (Support Service) Although not all support services require funding, most support services are fundable; therefore, they will include active funding tabs that staff can use to record any costs and budgeting data for the funded service (including Enrollment Cost, Financial Aid, Enrollment Budget, and Budget Plan tabs). The support services and service providers available to staff are dependent on the LWIA as well as the customer program group selected. The support services can be of two types: Fee based and Unit based. The following example describes enrolling an individual in a fundable unit-based support service, (in this example, Transportation Assistance). To enroll an individual in a Support Service
• Click the Create Activity link (below Participation on the Programs tab).
General Information tab: In the General Information area:
• Select the appropriate customer program group.
Choices displayed result from program eligibility determined during the WIOA application process.
• Select the staff member region, if applicable.
WIOA Activity Enrollment Form – General Info Tab (Transportation Assistance Example)
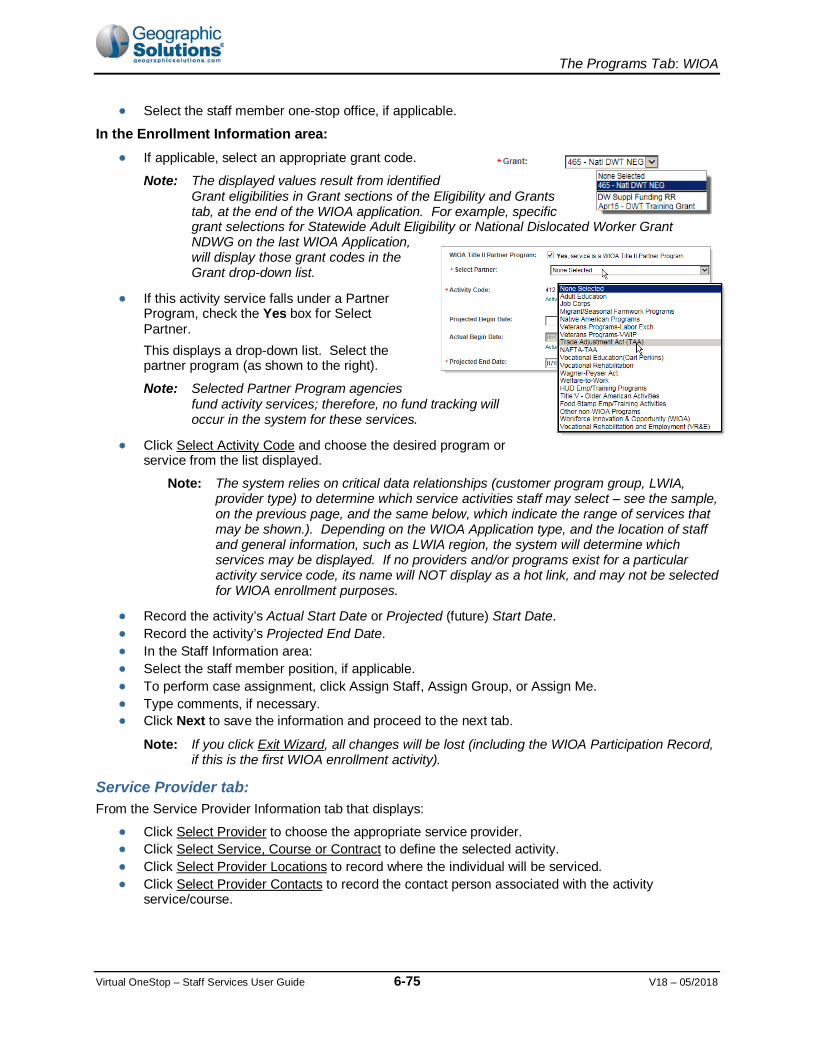
The Programs Tab: WIOA
Virtual OneStop – Staff Services User Guide 6-75 V18 – 05/2018
• Select the staff member one-stop office, if applicable.
In the Enrollment Information area: • If applicable, select an appropriate grant code.
Note: The displayed values result from identified Grant eligibilities in Grant sections of the Eligibility and Grants tab, at the end of the WIOA application. For example, specific grant selections for Statewide Adult Eligibility or National Dislocated Worker Grant NDWG on the last WIOA Application, will display those grant codes in the Grant drop-down list.
• If this activity service falls under a Partner Program, check the Yes box for Select Partner.
This displays a drop-down list. Select the partner program (as shown to the right).
Note: Selected Partner Program agencies fund activity services; therefore, no fund tracking will occur in the system for these services.
• Click Select Activity Code and choose the desired program or service from the list displayed.
Note: The system relies on critical data relationships (customer program group, LWIA, provider type) to determine which service activities staff may select – see the sample, on the previous page, and the same below, which indicate the range of services that may be shown.). Depending on the WIOA Application type, and the location of staff and general information, such as LWIA region, the system will determine which services may be displayed. If no providers and/or programs exist for a particular activity service code, its name will NOT display as a hot link, and may not be selected for WIOA enrollment purposes.
• Record the activity’s Actual Start Date or Projected (future) Start Date. • Record the activity’s Projected End Date. • In the Staff Information area: • Select the staff member position, if applicable. • To perform case assignment, click Assign Staff, Assign Group, or Assign Me. • Type comments, if necessary. • Click Next to save the information and proceed to the next tab.
Note: If you click Exit Wizard, all changes will be lost (including the WIOA Participation Record, if this is the first WIOA enrollment activity).
Service Provider tab: From the Service Provider Information tab that displays:
• Click Select Provider to choose the appropriate service provider. • Click Select Service, Course or Contract to define the selected activity. • Click Select Provider Locations to record where the individual will be serviced. • Click Select Provider Contacts to record the contact person associated with the activity
service/course.

The Programs Tab: WIOA
Virtual OneStop – Staff Services User Guide 6-76 V18 – 05/2018
WIOA Activity Enrollment Form – Service Provider Tab
• Click Next to save the information and proceed to the next tab/page.
Enrollment Cost tab: When a Support Service requires funding, the Enrollment Cost tab opens next. If it has pre-determined fee based or unit based service costs, they display as starting costs on the tab. For Unit Based Service Costs (as in the following example), staff can change the Unit Cost add the number of units.
WIOA Enrollment Form, Enrollment Cost Tab with Line Item Costs
For Support Services, the tab will indicate whether it is Unit Based or Fee Based.

The Programs Tab: WIOA
Virtual OneStop – Staff Services User Guide 6-77 V18 – 05/2018
• Review the Unit Cost and the # of Units values, and make any needed changes. • Click the Add button to add other support costs, if needed.
This lets you pick a line item type, and the add a separate line item cost for the item needed, which is added in the “Additional Costs” area the bottom of the page. The Add button lets staff enter additional miscellaneous support costs beyond the units and unit cost, in an additional area for additional cost entry as shown below, and adds the entry to the Total Enrollment Cost.
Enrollment Cost Tab, Additional Costs Line Item Control
• Click Next to save the costs and any changes, and proceed (to the Financial Aid tab).
Financial Aid tab: • If any financial aid applies, related to the cost for support services, click Yes at the top of the tab.
This expands the tab to show the current planned cost and includes a link to add financial aid. • Click the link To Add Financial Aid.
This will open a dialog box from which you can select the type of Financial Aid. • Select the type of financial aid from the list. An additional Financial Aid contribution area will
display (as shown below).
WIOA Enrollment Financial Aid Screen, Adding Financial Aid

The Programs Tab: WIOA
Virtual OneStop – Staff Services User Guide 6-78 V18 – 05/2018
Note: Staff click the Calculate link to compute the amount of financial aid applicable, as shown in the screen sample above. The system automatically recalculates the new planning cost based on these staff actions.
• Click Next to save any Financial Aid being applied to costs, or to simply proceed without, and financial aid changes (to the Enrollment Budget tab).
Enrollment Budget tab: • From the Enrollment Budget tab, staff click the Click Here to Select a Budget link.
The system will display all applicable fund streams based on the following: LWIA, customer program group, activity code, service dates, service costs, fund stream setup.
• Click the desired Item link, as shown in the figure below, to Select a Budget. • Then click Edit link to see the current funded cost allocations for the selected budget, and enter
the “Funded Amount.” (This will usually be the total service cost, if such funding is available.)
WIOA Enrollment Budget Information, Selecting a Budget
• Click Next to save the changes and proceed (to the Enrollment Budget tab).
Budget Planning tab: The Budget Planning tab displays enrollment cost summary information, based on data entry in the preceding tabs. It may also be used to create a voucher for funded amounts, depending on the provider and associated budget planning or contracts.
If no record is initially displayed, you can click the link to select a budget from a list of available budget.
You can click Edit to see the Budget amount and the full funded amount (if available) or a portion of it.

The Programs Tab: WIOA
Virtual OneStop – Staff Services User Guide 6-79 V18 – 05/2018
WIOA Enrollment Form – Enrollment Budget Plan Tab
• Staff can enter allocated amounts for this service, or accept the defaults, and click Next. The system will display the Closure Information tab last.
Note: The system may display a confirmation window when it successfully allocates the service amount. If so, the system calculates new planned amounts when staff members click Next from the confirmation.
Depending on the type of service, the Staff may create a voucher at a later time. See the Individual Fund Tracking User Guide for details on adding a voucher.
Closure Information tab: From the Closure Information tab, staff can:
• Enter a Last Activity Date. • Enter a Completion Code. • Enter an optional Case Note.

The Programs Tab: WIOA
Virtual OneStop – Staff Services User Guide 6-80 V18 – 05/2018
Closure Information Tab
• Click Finish.
Note: If the service has not ended or closure information is not available, staff can click the Finish button. However, if the service has ended, and several services are being entered, staff can also click the Finish and Start a New Activity link at the bottom of the page, which will take staff back to the General Information tab for another activity.
If information must be changed, staff can click the Back button to return to a previous tab.
When staff clicks the Finish button, the system re-displays the Programs tab screen (as shown in the figure below) with a WIOA Registration/Activity Record table that lists the first enrollment activity.

The Programs Tab: WIOA
Virtual OneStop – Staff Services User Guide 6-81 V18 – 05/2018
Updated Programs Tab Screen
Staff may perform the following tasks from this screen: • Click Create Activity to record an additional enrollment activity. Staff may continue to create
WIOA activities until they complete the WIOA Application, including individualized training activities. For details of the enrollment in these training services, also see the next topic.
• Click the edit wizard icon to access the wizard view format for activity details. • Click the Close link to officially close the activity service. For details, see page 6-102.
Creating a Fundable Activity (Individualized Training Account - ITA Service) ITA services normally require funding, and they will include the active funding tabs (i.e., Enrollment Cost, Financial Aid, Enrollment Budget, and Budget Plan tabs). These fundable services and service providers available to staff are dependent on the LWIA as well as the customer program group selected. The cost areas for ITA services are similar to Fee based support services in how different lines for cost are displayed for staff to enter separate costs such as books, labs, or other fees. The following example describes enrolling an individual in a fundable ITA service (in this example, Occupational Skills Training - Approved Provider for ITA). To enroll an individual in a Fundable ITA Service
• Click the Create Activity link (below Participation on the Programs tab).
The system displays the General Information tab, a sample of which follows:
General Information tab: In the General Information area:
• Select the appropriate customer program group.
Choices displayed result from program eligibility determined during the WIOA application process.
• Select the LWIA region and the office location, as applicable.
Note: If Agency Codes apply to your system, enter your agency code. This is not a required field.

The Programs Tab: WIOA
Virtual OneStop – Staff Services User Guide 6-82 V18 – 05/2018
WIOA Activity Enrollment Form – General Info Tab (Occupation Skills Training – Approved Provider Example)
In the Enrollment Information area: • If applicable, select an appropriate grant code.
Note: The displayed values result from the selected Customer Group and related Grant eligibilities define in sections of the Eligibility and Grants tab, at the end of the WIOA application. For example, specific grants identified as available for Statewide Dislocated NEG Eligibility on the last Application tab, will display those grant codes in the Grant drop-down list (as shown at right).
• If this activity service falls under a Partner Program, check the Yes box for Select Partner.
This displays a drop-down list. Select the partner program (as shown at right).
Note: Selected Partner Program agencies fund activity services; therefore, no fund tracking will occur in the system for these services.
• Click Select Activity Code and choose the desired program or service from the list displayed.

The Programs Tab: WIOA
Virtual OneStop – Staff Services User Guide 6-83 V18 – 05/2018
Note: The system relies on critical data relationships (Customer Program Group, LWIA, Provider Type) to determine which services or activities staff may select – sample activities (shown on previous page), and training courses (shown below), indicate the range that may display. Depending on the Customer Program Group, location, and provider selected, the system will determine which services may be displayed. If no providers or programs exist for a particular service code, its name will display.
• Record the activity’s Actual Start Date or Projected (future) Start Date. • Record the activity’s Projected End Date.
In the Staff Information area: • Select or change the staff member position, if appropriate. • To perform case assignment, click Assign Case Manager, Assign Group, or Assign Me.
Note: Depending on the current assignment, Assign Group or Assign Me may not display, and Remove Case Manger may display.
• Type comments, if necessary. • Click Next to save the information and proceed to the next tab.
Note: If you click Exit Wizard, all changes will be lost (including the WIOA Participation Record, if this is the first WIOA enrollment activity).
Service Provider tab: From the Service Provider Information tab that displays:
• Click Select Provider to choose the appropriate service provider (required). • Click Select Service, Course or Contract to define the selected activity (required). • Click Select Provider Locations to record where the individual will receive the service or training. • Click Select Provider Contacts to record the contact person associated with the activity
service/course.
WIOA Activity Enrollment Form – Service Provider Tab

The Programs Tab: WIOA
Virtual OneStop – Staff Services User Guide 6-84 V18 – 05/2018
• Click Occupational Training Code to select the occupation associated with the training the individual is receiving (required).
Note: The occupations listed are tied to the provider's service record.
• Click Next to save the information and proceed to the next tab/page.
Enrollment Cost tab: For an Individualized Training Account (ITA) activity, which typically requires funding, the Enrollment Cost tab opens with the detailed training costs listed (as shown below). For these fee-based training costs staff can change the cost amounts each for line item, and add additional costs.
• Review each of the Training Cost line items (e.g., Tuition, Books) and make changes as needed.
WIOA Enrollment Form, Enrollment Cost Tab with Line Item Costs Added
• Click the Add button to add other training costs, if needed. This lets you pick a line item type, and add a separate line item cost for the item needed, which is added in the “Additional Costs” area the bottom of the page.
• Click Next to save the costs and any changes, and proceed (to the Financial Aid tab).
Financial Aid tab: The Financial Aid tab lets staff identify any financial aid that may also apply (e.g., Pell grants, school scholarship, student loans), and lets staff define how amounts from the grants are used as part of the budget for enrollment in the activity.
• Click Yes at the top of the tab, if financial aid applies, related to the funded training/service costs.
This expands the tab to show the current planned cost, and includes a link to add financial aid.
Note: If no financial aid applies, click Next to proceed to the Enrollment Budget tab.
If additional costs apply, staff can click Add to define those costs (which are added to the Total).

The Programs Tab: WIOA
Virtual OneStop – Staff Services User Guide 6-85 V18 – 05/2018
• Click the link To Add Financial Aid.
This will open a dialog box from which you can select the type of Financial Aid. • Select the type of financial aid from the list. An additional Financial Aid contribution area will
display (as shown below).
WIOA Enrollment Financial Aid Screen, Adding Financial Aid
Note: Staff can click the Calculate link to compute the amount of financial aid applicable, as shown in the screen sample above. The system automatically recalculates the new planning cost based on these staff actions.
• Click Next to save any Financial Aid being applied to costs, and proceed to the Enrollment Budget tab.
Enrollment Budget tab: The Enrollment Budget tab lets staff identify the budget stream from which this funding will be allocated. The configuration of your site’s Individual Fund Track (IFT) and fund stream management may display the default fund stream (as show in the Budget Allocation area in the following figure). If there are several fund streams available you will be able to pick a fund stream for budgeting, or change the displayed fund stream used for the budget.
• Review the displayed budget stream and budget allocation, and make any needed changes.
• To select or change the funding stream: Click the Select a Budget link.
The system displays all applicable fund
If there is no Financial Aid, you can leave this No, click Next>> and continue.

The Programs Tab: WIOA
Virtual OneStop – Staff Services User Guide 6-86 V18 – 05/2018
streams based on the following: LWIA, customer program group, activity code, service dates, service costs, fund stream setup.
Click the desired Item link under the Available Budgets column, as shown in the figure above.
The fund stream and funded amount is displayed in the Budget Allocation area.
Note: If staff is allowed to edit fund amounts, an Edit link displays in the action column. Staff may want to change the funded amount. E.g., if several funding streams are possible, they may use two funding streams and split the enrollment funding by adding and editing amounts for two different budget fund streams. The “Funded Amount” is usually the total service cost, if such funding is available.)
• To edit the funded amount: Click the Edit link to see the current funded cost allocations for the selected budget (in an Edit
Funded Cost window).
Edit the funded amount and click Save.
The funded amount change is reflected on the screen (i.e., the Current Balance is adjusted).
WIOA Enrollment Budget Information, Selecting a Budget
• Click Next to save the changes and proceed (to the Enrollment Budget tab).
Budget Planning tab: The Budget Planning tab displays the final funded amount, obligated amount, current balance, as well as any payment and refunds related to the budget for this enrollment. If staff has advanced abilities for fund tracking, they can click an Add a Voucher link (shown in the following figure) to create a voucher for this funded activity. The system will display a popup window that allows staff to enter information about the voucher (related to the cost details and service information for the enrollment).
If no budget is initially displayed, or if multiple fund streams are available, you can click the link to select a budget fund stream form a list of those available.
You can click Edit to see the Budget amount and the full funded amount (if available) or a portion of it.

The Programs Tab: WIOA
Virtual OneStop – Staff Services User Guide 6-87 V18 – 05/2018
To add as voucher:
• Click the Add a Voucher link.
The separate Voucher screen displays with areas for defining the voucher information. Make any appropriate changes in Manage Voucher and Service Provided Between sections. Make any adjustment for the Voucher to be created in the Cost Details (the available and
planned amounts are shown).
Enrollment Budget Plan Tab (Entering a Voucher)
• Click Save at the bottom of the Voucher screen, after entries/changes are made. The Budget Planning tab will redisplay with the planned voucher (and pending approval) shown via a link at the bottom of the screen.
Note: If you want to review the voucher, click the added Voucher link to expand or collapse the record details for payments or refunds related to the voucher (as shown below).
• Click Save, after making any changes to the planned budget, for vouchers, payments, or refunds.
The Closure Information tab will display.
Certain staff may have abilities to complete detailed vouchers.

The Programs Tab: WIOA
Virtual OneStop – Staff Services User Guide 6-88 V18 – 05/2018
Enrollment Budget Plan Tab (Completing and Reviewing a Voucher)
Closure Information tab: The Closure Information tab is used to enter the final activity date and the completion of the enrollment activity. It can also be used to record any received credential data, or case notes, leading up to the closure of the activity. To close the activity, staff must:
• Enter a Last Activity Date. • Enter a Completion Code. • Indicate if a credential was received If a credential was received, staff may also need to enter: Credential Type Verification Credential Date
• Enter an optional Case Note Note: The bottom of the tab will include a Delete button until the activity is closed. This ability to
delete the enrollment will depend on privileges set for staff as well as the status, vouchers and funding associated with the enrollment. The top of the screen will note status that prevents the deletion, if a status exists. For example, the top of the screen may display:
• The 'isfirst' enrollment record can only be deleted by clicking Delete on the Participation Record. • Please void all vouchers and reduce funding to zero on the Enrollment Budget tab before deleting.
Added vouchers display as expandable links.

The Programs Tab: WIOA
Virtual OneStop – Staff Services User Guide 6-89 V18 – 05/2018
Closure Information tab
• Click Finish.
Note: If the service has not ended or closure information is not available, staff can click the Finish button. However, if the service has ended and several services are being entered, staff can also click the Finish and Start a New Activity link at the bottom of the page, which will take staff back to the General Information tab for another activity.
If information must be changed, staff can click a Back button to return to a previous tab.
When staff clicks the Finish button, the system re-displays the Programs tab screen (as shown in the figure below) with a WIOA Registration/Activity Record table that lists the first enrollment activity.

The Programs Tab: WIOA
Virtual OneStop – Staff Services User Guide 6-90 V18 – 05/2018
Updated Programs Tab Screen
Staff may perform the following tasks from the Programs tab (after activities are created): • Click Create Activity to record an additional enrollment activity. Staff may continue to create
WIOA activities until they complete the WIOA Application, including individualized training activities. For details of the enrollment in these training services, also see the next topic.
• Click the edit wizard icon to access the wizard view format for activity details. • Click the Close link to officially close the activity service. For details, see page 6-102.
Measurable Skills Gain The purpose of the Skills Achievement screen is to record data necessary for WIOA PIRL extracts and to calculate performance for the WIOA Measurable Skill Gains performance measure. When staff clicks Create Measurable Skills Gain, Virtual OneStop displays a screen that consists of multiple sections, descriptions of which follow. General Information Section Based on staff’s region and office affiliation, the system will autofill this data for staff. If staff belongs to multiple workforce regions and/or offices, they must select the appropriate value(s) as they pertain to the customer they currently manage.

The Programs Tab: WIOA
Virtual OneStop – Staff Services User Guide 6-91 V18 – 05/2018
Skill Attainment Information Section Staff completes this section to document the customer’s progress based on measurable skills gained.
To complete this section, staff performs the following:
• Select the desired skill type. • Enter the date the customer attained the skill. • Select the desired achievement type. • Click Verify to access a list of approved verification documents and click to select one.
Note: In some instances, staff enters the name of the verification document manually.
The following table displays the combination of skill types and achievement types available:
Skill Type Achievement Type
Post-secondary Transcript/Report Card
Completed minimum of 12 hours in semester and meets academic standard
Part-time student and completed at least 12 credit hours over the course of two completed consecutive semesters and meets academic standards
Secondary Transcript/Report Card
Report card/transcript for one semester and meets academic standards
Training Milestone Achieved satisfactory or better progress reports towards an established OJT training milestone – not previously recorded
Completed 1 year of Registered Apprenticeship program and achieved satisfactory or better progress report

The Programs Tab: WIOA
Virtual OneStop – Staff Services User Guide 6-92 V18 – 05/2018
Skill Type Achievement Type
Other training milestone
Skills Progression Successfully completed a required exam for a particular occupation
Satisfactory progress in attaining technical or occupational skills as evidenced by trade-related benchmarks such as knowledge-based exams
Other skills progression achievement
Staff Information Section Staff may click Add a new Case Note to create a case note that will be maintained in two locations of the customer’s account:
• Here, in the Measurable Skills Gain record • In the Case Notes Tab screen of staff’s General Profile
Note: For systems configured to include the digital signature pad, there is an area for the
Individual Signature. The keypad will allow an individual applicant to sign, and staff can identify if their staff signature is included, as well as whether the application is saved with the signature as a PDF. Staff can check the box to include their staff signature if they have already saved their signature from their My Staff Account page.
• Click Save to secure the data entry.
Partner Programs The Partner Program link is used to simply indicate if the individual received services from and known partner programs during program participation in WIOA. To complete the Partner Programs form:
• Click the Add/Edit Partner Programs link.

The Programs Tab: WIOA
Virtual OneStop – Staff Services User Guide 6-93 V18 – 05/2018
This will open a form listing known partner programs (based on the Customer Group and other data supplied at the beginning of the WIOA Application.
Partner Programs Form
• Answer all fields, based on participant input. • Click the Save button.
The Programs tab is redisplayed.
Note: You can click the Add/Edit Partner Programs link, to return and edit the form, but there is
no table under the Partner Programs bar. However, you will see the number “1” display, which indicates that the form has a completed entry.
If participant does not supply identify program participation as Yes or No, you can select “did not self-identify” to complete the form.

The Programs Tab: WIOA
Virtual OneStop – Staff Services User Guide 6-94 V18 – 05/2018
Literacy & Numeracy Scores As mentioned at the end of a WIOA Youth application (page 6-60), upon successfully completing a WIOA Application for an In-School Youth (ISY) or an Out-of-School Youth (OSY), the first two enrollments will usually be for recording an Objective Assessment (e.g., Youth Service 412), followed by developing an IEP/ISS Service Strategy (e.g., Youth Service 413). The creation of the initial, pre-test record for a Literacy & Numeracy score (before any Objective Assessment Tests and related services occur), as well as recording additional post-test scores, are done from a link under the Literacy & Numeracy bar. Clicking the Create Literacy & Numeracy Records link, opens an interface designed to meet WIOA Youth Literacy and Numeracy data collection and reporting requirements. Literacy and Numeracy gains are reported for all youth participants (both ISY and OSY). Sites are required to document participant functional areas of deficiency, provide services to improve areas of deficiency, and to track progress toward improving functional area deficiencies through post testing for all youth who are determined Basic Skills Deficient and who are not enrolled in secondary education. This interface provides a data collection method to record pre-test data, and allows entry of multiple progress assessments for each participation year that allows staff to flag the progress assessment as the participation year’s posttest, for federal reporting purposes. Note: The Create Literacy & Numeracy Records link is mainly used for WIOA youth, although WIOA
adults and dislocated workers may also be included by request. While federal requirements involve only youth, the system has been designed with a switch to allow sites to collect data for all customer program groups if desired.
Although your site/organization may require that both an Objective Assessment and an IEP/ISS Service Strategy be the first two activities for a WIOA youth application, the system does not automatically enforce this for the youth application.
Literacy & Numeracy Pre-Test Assessment To record a literacy and numeracy pre-test assessment:
• Click the Create Literacy & Numeracy Records link (under the expanded grey bar).
The WIOA Literacy & Numeracy Information screen displays (with fields empty). • Enter the appropriate information for each displayed field:
In General Information:
• Make required selections: Customer Group - This drop-down is defaulted to a group (e.g., to Youth), and may have no
other selections. If multiple selections are possible, pick the appropriate customer group. LWIA/Region – Select the LWIA associated with the assessment. One Stop – Select the specific, One-Stop location associated with the LWIA.
Note: As you select required items from drop-down lists, the page will “refresh” or “redraw”, and display additional items based on your selections. It is important to let system fully refresh the page each time, before attempting to record additional information.
In Assessment Information and Pre-Test sections:
• Enter the appropriate values as you gather data for a specific pretest assessment (e.g., Language).

The Programs Tab: WIOA
Virtual OneStop – Staff Services User Guide 6-95 V18 – 05/2018
Note: When a staff member make assessment entries for the first time, the field, Test Type, is prefilled with Pre-Test.
In Staff Information:
• Make any changes to Position, Current Case Manager, and or add/edit Case Notes, as appropriate.
Create Literacy & Numeracy Records Screen
• Click the Save button (after all data is entered). This records the data entries in each section, and show the record on the redisplayed Literacy and Numeracy area of the Programs tab (as shown below).
Literacy & Numeracy Records – List Area (on Programs Tab)
Staff can click on the name of the test area (the Assessment Category) to open and edit the saved record. The name in the left column is a link – e.g., clicking on Language (as shown in the figure above).
Note: To record additional progress assessments for Literacy and Numeracy (such as pretest assessment for Reading, Writing, Math, or Speaking), repeat the previous steps, selecting the different Assessment Category and/or Type of Assessment. The selection at right shows a range of assessment selections that might display the Category, ESL.
Click the link again to add other assessments (e.g., Reading, Math, and Speaking.
Click the Name of existing assessment to edit the record.

The Programs Tab: WIOA
Virtual OneStop – Staff Services User Guide 6-96 V18 – 05/2018
Note: The interface will not limit pretest entries, but for federal reporting, only those pretests for youth that are within 60 days of the application’s participation date will be reported.
Note: Only one post-test may be used per participation year.
Literacy & Numeracy Progress Assessment Once you create a pretest assessment to record the individual’s skill level, you can monitor any improvement made by recording progress assessments since the initial pretest.
• Click an existing assessment link within the Literacy & Numeracy Record table to access the screen for the Pretest Assessment to be updated (a sample of which is shown below). Data in the General Information section will already be largely prefilled. Select your office.
Updated Pre-Test Assessment Record (Progress Test Entry)
• Click the Create Progress/Post Assessment Record link in the Progress/Assessments area of the screen. The system expands to display a Progress/Post Assessment area similar to one above.
• In the expanded Progress/Post Assessments area, select Progress Test (or Post Test if applicable) as the type of test.
• Then enter the updated Progress Test Functional Score.
The system will complete the Educational Functioning Level. The system also completes the checkbox indicating if the participant remains deficient in basic skills, based on the score.
• Enter the date of the assessment. • Then click Save to secure your edits. The system will display the updated Pre-Test Assessment
screen, as shown in the following example:

The Programs Tab: WIOA
Virtual OneStop – Staff Services User Guide 6-97 V18 – 05/2018
Updated Pre-Test Assessment Record (Progress Tests Listed)
To obtain details about a progress assessment, click the assessment Edit link. You can create multiple progress assessments on the individual’s behalf for each participation year. Use the Create Progress Assessment Record link again to create a new progress assessment record. You may also use this screen to record a posttest assessment for reporting purposes, with the same steps. For details, refer to the next topic.
Literacy & Numeracy Post-Test Assessment You will use the same steps for Post-Test Assessment, as indicated above for the Progress Test Assessment. In other words:
• Click the Create Progress Assessment Record link in the Progress/Assessments area of the screen. The system expands to display a Progress/Post Assessment area similar to one above.
• In the expanded Progress/Post Assessments area, select Post Test as the type of test.
• Then enter the updated Post Test Functional Score.
The system will complete the Educational Functioning Level. The system also completes the checkbox indicating if the participant remains deficient in basic skills, based on the score.
• Enter the date of the assessment, and any other need changes (e.g. Assessment Form/Version, or Position).
Progress/Post Assessments Area (for Post-Test) Record

The Programs Tab: WIOA
Virtual OneStop – Staff Services User Guide 6-98 V18 – 05/2018
• Then click Save to secure your edits.
The system display the Post-Test Assessment (along with any other Pre-Test and Post-Test scores) in the updated Literacy Numeracy table on the Programs tab (as shown below).
Excerpt of Updated Programs Tab Screen
Note: If you click on an assessment category, you will see the listing of both the Progress Test(s) and Poste Test(s) in the Progress /Post Assessments area – the area form which you can click edit, to make changes to this tests. The Test Type column indicates whether the test is a Progress of Post text in this area.
Progress Assessments Section, with Pre- and Post-Test Assessment Records
Create Credentials When staff clicks the Create Credential link within the WIOA section of the Programs Tab screen, they will manage two sections (as shown below) to document the customer’s attainment of a training- or schooling-related credential. System configuration settings control whether (and where) Virtual OneStop displays this link. Note: Staff may enter credential attainment data up to 1 year from the individual’s program exit date.
General Information Section To complete this section of the credential record, staff simply confirms/selects their office location. Virtual OneStop prefills the other information and displays it as “read only.”

The Programs Tab: WIOA
Virtual OneStop – Staff Services User Guide 6-99 V18 – 05/2018
Credential Information Section Staff performs data entry in the Credential Information section to be used for federal reporting requirements.
Staff performs the following step to complete this credential attainment record:
• Select the credential achieved by the individual. • (Optional) Enter the credential name if staff selected “Other” as the credential received. • Click Verify to select a desired verification document. • Enter the date the individual received the credential.

The Programs Tab: WIOA
Virtual OneStop – Staff Services User Guide 6-100 V18 – 05/2018
Create Entered Employment If an individual enters employment while still receiving WIOA services, staff may click the Add/Edit Entered Employment link (see sample, below) from the Programs tab screen to record details. Staff use this form to record employment details which may be used for a variety of reasons, including federal reporting and provider contract performance review.
Note: Your system’s configuration settings may not include this service option.
To record employment details for the individual, staff click the Add/Edit Entered Employment link from the Programs tab screen. The form is divided into two sections: an Employer Information section, and a Job Information section (as shown in the following figure).
Entered Employment Screen
Perform the following steps to complete employment details:
Known employer data will display for autofill selections as you type the employer name.

The Programs Tab: WIOA
Virtual OneStop – Staff Services User Guide 6-101 V18 – 05/2018
1 In the Employer Information section, enter the Employer Name. A verify link to the right of the field box, Verify Employer Name, will require the staff member to choose the correct type of documentation for verifying the employment. Note: If the employer is system-registered, staff may click the Employer Search link to search for and select the desired employer. The system will pre-fill most of the Employer Information section.
2 Enter the Address and City of the employer, and choose the correct State and County from a drop-down list.
3 Enter the ZIP code of the employer. Two help links are available if the ZIP code is not readily known: Search for ZIP, and the USPS website URL.
4 Select the correct Country from a list of drop-down choices. 5 Enter the employer contact name, phone number, and email address (if available). 6 In the Job Information section, enter the job title in the field provided. 7 Select the occupation of the job by clicking the Select Occupation link. This will take staff to an
O*NET search screen which allows the staff four different search options to locate the job occupation classification.
8 Enter the Hours Worked, Hourly Wage at Exit, and Job Start Date information. 9 If for some reason the individual has already left the employer for relevant employment, enter the
Job End Date and select the appropriate Reason for Leaving from the drop-down choices. If the individual is still working for this employer, check the Currently Employed checkbox.
10 Enter the job duties in the free-form textbox. Staff can either enter this information manually, or click the Insert Occupational Description link, and an O*NET occupational description will pre-fill the textbox. Staff can edit this O*NET description, use the Spell Check link to review any spelling errors, or click the Clear Text link to start over.
11 Staff must click the appropriate radio buttons to denote if the individual is receiving fringe benefits, if the job is covered by unemployment compensation, and if the job is considered non-traditional employment. Based on the occupation entered in this section, some of this information may already be pre-determined by the system.
12 Select the correct answer pertaining to whether this is considered non-traditional employment. In some systems, this information will be pre-determined based on answers already given.
13 Confirm if this job is considered Training Related Employment. Staff permissions determine if this pre-filled information can be overridden.
14 Click the Save button to save the information, or Cancel to start over. When the screen refreshes, a record of the job will appear in a table, similar to the following figure. Here staff can click the Delete link in the Action column to delete the job information, or Edit to make any changes.
Completed Entered Employment Form
Note: The information entered here can also carry over to the employment history section of the Background Wizard and the WIOA Case Closure form.

The Programs Tab: WIOA
Virtual OneStop – Staff Services User Guide 6-102 V18 – 05/2018
Enrollment Closure Although the primary means for WIOA program exit relies on the soft exit process, staff may complete a WIOA Case Closure or a WIOA program outcome. For details of each, see the topics that follow. In order to do so, however, the system requires that all open WIOA enrollment activities be closed. If staff attempt to complete either form with open activities, the system prompts staff by displaying pop-up alerts similar to the following:
To close any open WIOA activities, staff members perform the following steps from the Programs tab screen:
• Click the Close link for the desired activity. The system will display the Enrollment Closure Information screen, whose display items differ based on services that could lead to credential attainment.
Activity Enrollment Closure Information Screen
From the enrollment Closure Information tab: • Record the activity’s last (actual end) date. Do not use future dates. • Click Select Completion Code to record the status of the activity. • Click the Add a New Case Note link, if desired. • Click Finish to secure your edits. The system will display the updated Programs tab screen.
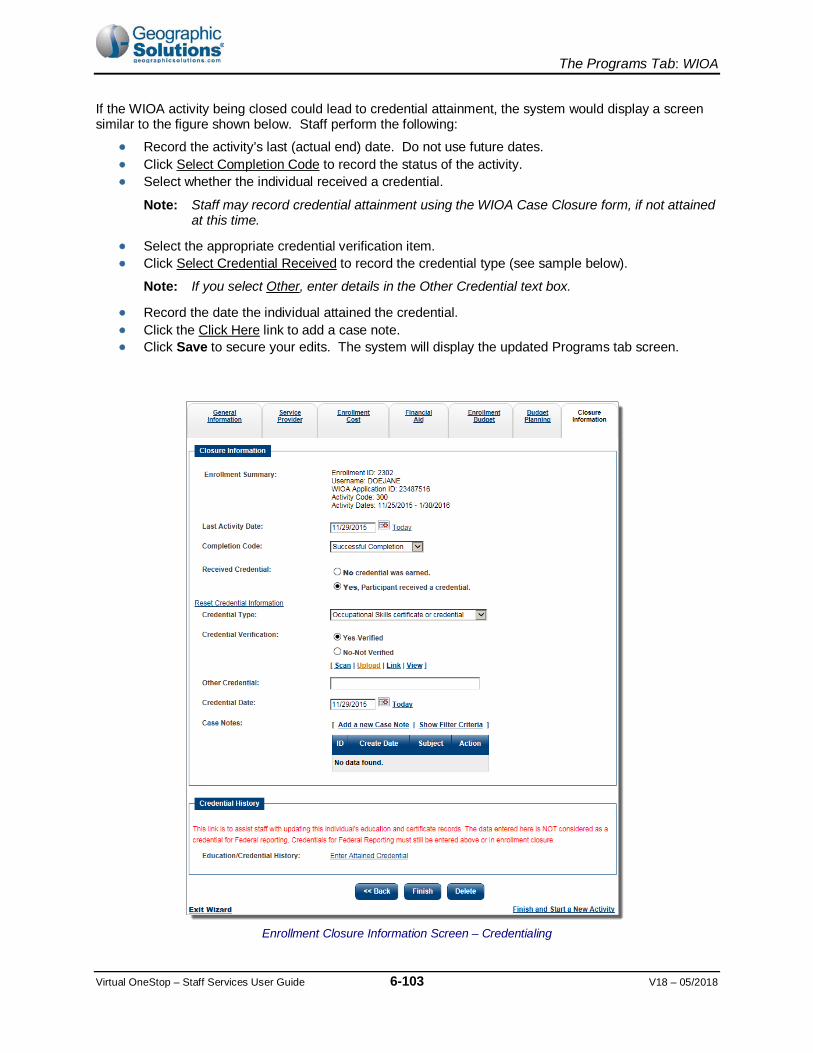
The Programs Tab: WIOA
Virtual OneStop – Staff Services User Guide 6-103 V18 – 05/2018
If the WIOA activity being closed could lead to credential attainment, the system would display a screen similar to the figure shown below. Staff perform the following:
• Record the activity’s last (actual end) date. Do not use future dates. • Click Select Completion Code to record the status of the activity. • Select whether the individual received a credential.
Note: Staff may record credential attainment using the WIOA Case Closure form, if not attained at this time.
• Select the appropriate credential verification item. • Click Select Credential Received to record the credential type (see sample below).
Note: If you select Other, enter details in the Other Credential text box.
• Record the date the individual attained the credential. • Click the Click Here link to add a case note. • Click Save to secure your edits. The system will display the updated Programs tab screen.
Enrollment Closure Information Screen – Credentialing

The Programs Tab: WIOA
Virtual OneStop – Staff Services User Guide 6-104 V18 – 05/2018
Enrollment Closure Information Screen – Credentialing (Continued)
WIOA Enrollment – Reset Options Some members may have editing options allowing them to edit WIOA activity records (if they have the line-item privileges set from the Admin system). If staff has these privileges, they may perform the following:
• Re-open a closed WIOA activity record • Reset an activity’s actual end date • Reset the completion status • Reset credential attainment status • Reset Youth diploma and certificate status • Reset Youth school status • Void an activity (except the first federal program enrollment)

The Programs Tab: WIOA
Virtual OneStop – Staff Services User Guide 6-105 V18 – 05/2018
Note: Your system may not have the configuration settings in place for these reset options.
To complete all or any of these edits, staff perform the following steps: 1 From the individual’s Program’s tab screen, click the Close link for the desired WIOA enrollment
record.
Program Enrollment Record, Selecting Activity to Close
Resetting Activity Closure Status
2 To re-open the activity (and thus reset the last activity date, completion code, and/or credential
attainment status), staff: Enter the last activity date.
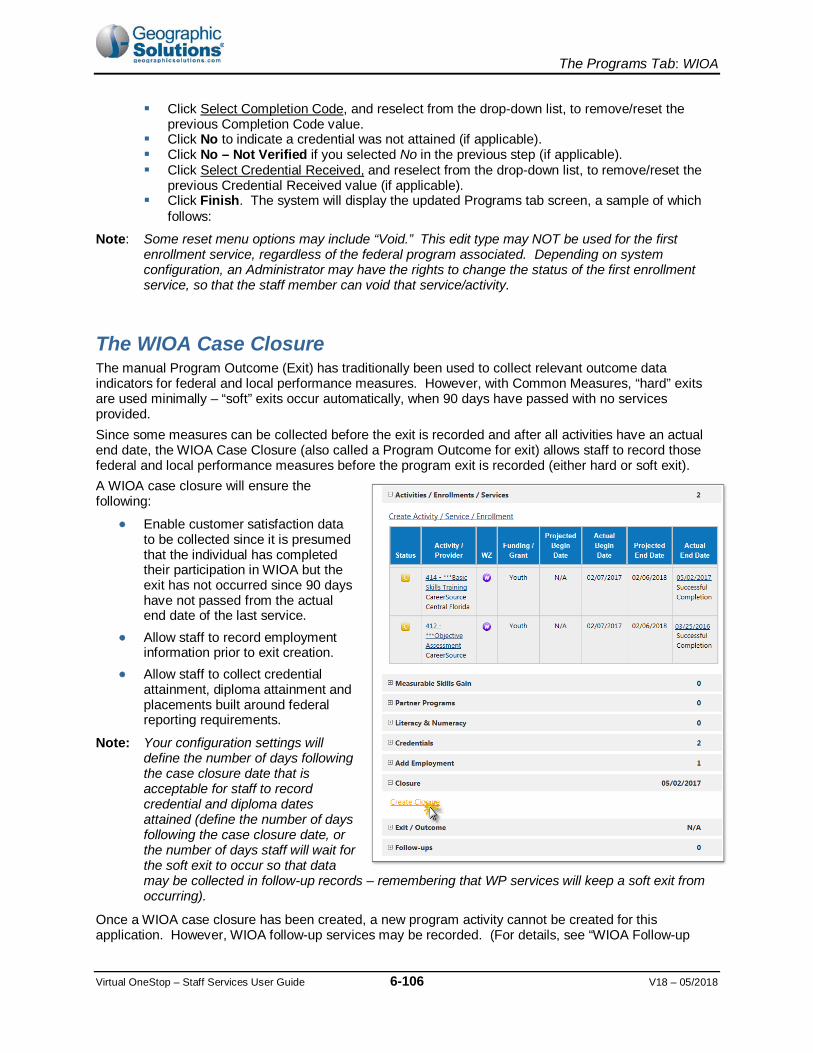
The Programs Tab: WIOA
Virtual OneStop – Staff Services User Guide 6-106 V18 – 05/2018
Click Select Completion Code, and reselect from the drop-down list, to remove/reset the previous Completion Code value.
Click No to indicate a credential was not attained (if applicable). Click No – Not Verified if you selected No in the previous step (if applicable). Click Select Credential Received, and reselect from the drop-down list, to remove/reset the
previous Credential Received value (if applicable). Click Finish. The system will display the updated Programs tab screen, a sample of which
follows: Note: Some reset menu options may include “Void.” This edit type may NOT be used for the first
enrollment service, regardless of the federal program associated. Depending on system configuration, an Administrator may have the rights to change the status of the first enrollment service, so that the staff member can void that service/activity.
The WIOA Case Closure The manual Program Outcome (Exit) has traditionally been used to collect relevant outcome data indicators for federal and local performance measures. However, with Common Measures, “hard” exits are used minimally – “soft” exits occur automatically, when 90 days have passed with no services provided. Since some measures can be collected before the exit is recorded and after all activities have an actual end date, the WIOA Case Closure (also called a Program Outcome for exit) allows staff to record those federal and local performance measures before the program exit is recorded (either hard or soft exit). A WIOA case closure will ensure the following:
• Enable customer satisfaction data to be collected since it is presumed that the individual has completed their participation in WIOA but the exit has not occurred since 90 days have not passed from the actual end date of the last service.
• Allow staff to record employment information prior to exit creation.
• Allow staff to collect credential attainment, diploma attainment and placements built around federal reporting requirements.
Note: Your configuration settings will define the number of days following the case closure date that is acceptable for staff to record credential and diploma dates attained (define the number of days following the case closure date, or the number of days staff will wait for the soft exit to occur so that data may be collected in follow-up records – remembering that WP services will keep a soft exit from occurring).
Once a WIOA case closure has been created, a new program activity cannot be created for this application. However, WIOA follow-up services may be recorded. (For details, see “WIOA Follow-up

The Programs Tab: WIOA
Virtual OneStop – Staff Services User Guide 6-107 V18 – 05/2018
Services” on page 6-109.) The WIOA case closure must be deleted before a new program activity (non-follow-up activity) may be created, and follow-up service codes will no longer be available. The WIOA case closure interface will become available when each valid activity has an actual end date. If there are activities with no actual start date, the WIOA case closure CANNOT be created. Since credential and diploma information can also be recorded in enrollment records, the WIOA case closure interface will not be available for data entry when there is an open activity (defined as a valid activity with an actual start date but no actual end date). It will not be available for an open, projected activity (defined as having a projected start date, a projected end date, no actual start date, and no actual end date). A voided activity will have an actual end date, but no actual start date. A voided activity will not prevent a case closure from being created. To create a case closure (exit):
• Click Create Closure from the Programs tab.
The WIOA Closure form displays (unless activities or goals are still open).
Note: If activities remain open, pop-up alerts display the need to first close activities. If open Youth Goals exist, an alert will also indicate that all Youth Goals must be closed. Click OK to clear alert, and manually close each open activity. (For details, refer to the “Enrollment Closure” topic on page 6-102.)
• In the General Information area, record or confirm your one-stop office location. • In the Outcome Information area, record appropriate school status at exit, placement data, and/or
credential attainment information. (This may be necessary if no credential/placement was previously identified when closing the WIOA enrollment activity.)
Note: If credential information was recorded when staff closed the activity, the system will display details in a separate Credentials Received or Outcome Information area of this form.
Create Closure Prompts for Review and Entry of Additional Data

The Programs Tab: WIOA
Virtual OneStop – Staff Services User Guide 6-108 V18 – 05/2018
WIOA Case Closure Form
• In the Employment Information area, click the Add Employer link to open/expand an Add/Edit Employer area (if you need to add a new employer). Record all required information in the displayed Employer Information area. Record all required information in the displayed Job Information area. Click the Save button.
The new employment is displayed in the Employer table. Note: This is identical to employment entry in WIOA Follow-Up on page 6-114, and in the
topic “Create Entered Employment” on page 6-100.
• In the Staff Information area, use controls to add case notes or assign a case manager, if applicable. Click the Add a Case Note link to add a case note, if applicable. Use the Case Manager link to identify the appropriate staff person with this case closure.
(Click Assign Staff, Assign Group, or Assign Me to conduct case assignment.) • Click Save to save your edits and complete the closure.
Upon successfully completing the WIOA Case Closure form, the system displays the Closure as a link in the updated Programs tab screen (as shown below).
Updated Programs Tab Showing WIOA Case Closure
The link expands an area to add Employer and Job data, identical to the expanded area indicated in the topic for WIOA Follow-up.

The Programs Tab: WIOA
Virtual OneStop – Staff Services User Guide 6-109 V18 – 05/2018
Completing the WIOA Case Closure form also enables staff to record WIOA follow up services (‘F’ codes), as described in the next topic. Note: You can reopen the Closure form by clicking the link, and use the Delete button to cancel
and delete the closure. The Delete button is available only after you save the form and the Staff Information tab. By deleting the closure, the individual may continue to receive WIOA services. The Delete button is disabled when an Outcome/Exit record exists.
WIOA Follow-Up Services As a result of successfully completing the individual’s WIOA Case Closure, the system will allow staff to record WIOA follow-up services. The process by which staff members record these service activities is the same as documented previously in these two topics:
• “WIOA Core Service Enrollment” on page 6-69. • “Enrolling in WIOA intensive/Training Services” on page 6-81.
The difference is that the only available type of services (i.e., the only activity codes) is Follow services (“F” codes).
Follow-Up Services and Soft Exits If a WIOA customer requires follow-up services, staff must first complete the WIOA Case Closure form. By doing so, they stop planned service delivery, and may only record WIOA follow-up services (those that begin with the letter “F”). Follow-up services are not reported federally, and will not prevent the individual from completing program soft exit.
Note: If the customer must resume planned service delivery before soft exit occurs, authorized staff can delete the WIOA Case Closure. Check to ensure whether your program policy supports this behavior.
Although WIOA follow-up services might have a limited duration (most cannot exceed 90 days), fund tracking capabilities exist for fundable follow-up services (for example, support service delivery). Staff documents fundable follow-up services using the Enrollment form the same way they document fundable training services. Because WIOA customers can receive follow-up services for up to one year, it is not uncommon for program exit to occur before the completion of WIOA follow-up services.
WIOA Follow Up Activity Code Selection List

The Programs Tab: WIOA
Virtual OneStop – Staff Services User Guide 6-110 V18 – 05/2018
Virtual OneStop’s system configuration settings control the soft exit process for client records, and may occur as a single or combined event. The single soft exit process applies to one program at a time, regardless of the number of federal programs the system supports, by automatically closing the client’s enrollment record when the customer has not received a planned service in that program for at least 90 consecutive days. The combined soft exit process occurs when an individual fails to receive planned services for at least 90 consecutive days for all federal programs maintained within Virtual OneStop. In each instance (whether the system executed the single or combined soft exit procedure), Virtual OneStop will display as the client’s exit date the most recent end date for all relevant program services within the current enrollment period. This date might be the service’s actual end date (if recorded), or the service’s projected end date (if the actual end date is not recorded). The system’s ability to perform the soft exit process can be hampered, however, when the client receives a program service (either staff- or self-assisted) that re-calculates the 90-day countdown. For example, if the WIOA customer conducts a job search using Virtual OneStop when WIOA planned service delivery has ended, and if the customer has an active, open Wagner-Peyser (WP) enrollment record, the system will restart the 90-day countdown required to conduct program soft exit. This situation can account for a prolonged WIOA enrollment for the customer (who will remain open and active in WIOA and WP, minimally), simply because they received a Wagner-Peyser program service that extends the soft exit event. Staff should check with their supervisors/managers to know which WP program services will postpone the soft exit procedure in Virtual OneStop.

The Programs Tab: WIOA
Virtual OneStop – Staff Services User Guide 6-111 V18 – 05/2018
The WIOA Outcome (Hard Exit) According to provisions established by the federal government, staff need only create a WIOA outcome (or hard exit) if the individual satisfies one of the established global exclusions. Those global exclusions are: death, institutionalization, reservist called to active duty, medical need, family care needs, or, for youth, sent to a group home facility. Note: Completing a program exit and
citing one of these global exclusions as the reason will NOT count such participants in Common Measures for performance tracking purposes.
If an individual does NOT satisfy one of these global exclusions, and if custom exit reasons are not configured for your system, federal policy requires the individual undergoes a planned soft exit from the WIOA program. That is, if the individual has not received a WIOA program service for at least 90 consecutive days, the system will automatically create a soft exit form. Note: Your business rules may extend
the minimum non-service period required for soft exit beyond 90 consecutive days.
When staff completes the WIOA Outcome form, the individual’s participation in the WIOA program has terminated, and planned services will no longer be delivered. As a result, Virtual OneStop will not display the quarterly follow-up schedule for WIOA, because participants who exit the program due to a global exclusion will not be reported federally. To manually terminate participation in 1 WIOA program (create a hard exit):
• Click the Create Outcome link on the Programs tab (shown above). The system will check to ensure that all WIOA activities have been closed properly. If any remain open, the system will display an alert. To continue, staff must manually close out open WIOA activity services. For assistance, refer to the “Enrollment Closure” topic on page 6-102.
Note: It the youth goals were included, a message will also indicate that those must be closed.
Otherwise, the system will display the Outcome form. This page will help you gather WIOA Exit/Outcome information (as shown in the following sample figure).
• Use the General Information area to make selections from the drop-downs. LWIA (region) One-stop office Staff position (Staff, DVOP, LVER)

The Programs Tab: WIOA
Virtual OneStop – Staff Services User Guide 6-112 V18 – 05/2018
WIOA Outcome Form with General, Exit, and Staff Sections
Use the Exit Information section to record details of the individual’s program termination.
• Enter the individual’s date of exit. • Select an exit reason. • Click the Click Here link to update the individual’s list of alternate contact people. • In Comments, type a brief description to further explain the exit reason. Note: The comment you type will automatically become a system-generated case note.
Use the Staff Information section to perform staff-related functions. • Click the Click Here link to add a case note. • Click Assign Staff, Assign Group, or Assign Me to perform case assignment. • Click Save to secure your edits, or Cancel to escape.
Deleting WIOA Outcomes After creation of an outcome record, it is possible to delete a WIOA Outcome record (depending on your permissions). To Delete the WIOA Outcome Record: If a WIOA outcome needs to be removed, after initial creation, the bottom of the outcome screen includes a Delete button.
• Click Delete at the bottom of the Outcome screen. A confirmation button warns you that any other program outcome records will also be deleted (e.g., WIOA, TAA, and Wagner-Peyser).
Using the Delete button depends on staff permissions

The Programs Tab: WIOA
Virtual OneStop – Staff Services User Guide 6-113 V18 – 05/2018
Delete Button on WIOA Outcome Screen
• Click OK on the displayed confirmation box. If open applications or soft exit windows exist, the screen will displays messages. Otherwise… The Programs tab is redisplayed with the WIOA Outcome record deleted. The WIOA Closure record will remain.
If the individual is co-enrolled in this program along with others (e.g., WIOA, TAA, Wagner-Peyser), you will received error messages on the screen indicating that an open application will prevent any deletes from occurring. If the staff member has permissions to confirm Outcome deletion, when there are equivalent Outcome records in the other programs as well, their Case Closure records will remain.
You may also receive a message if the last valid activity date is within a “Soft Exit” window. Sample messages that may display in red are shown below.
• No program exits were deleted. The system found open applications or future applications that prevented any deletes from occurring.
• Soft Exit is not available as a selection until at least 91 days have passed since the last valid activity date.

The Programs Tab: WIOA
Virtual OneStop – Staff Services User Guide 6-114 V18 – 05/2018
WIOA Follow-Up Forms The primary purpose for the WIOA Follow-Up form is to assist staff in predicting federal performance and to collect data that may be used as supplemental sources for federal reporting. The system will not provide access to this tool until the individual has been officially exited from the WIOA program, either through the hard or soft exit process.
Note: A follow-up is NOT required for any individual who exited from the program due to one of the global exclusions.
Using the Programs tab screen – as shown in the following figure – you may create two types of WIOA follow-ups for the individual:
• Local (optional) follow-up by clicking Create a Follow-Up • Federal (required) follow-up by clicking the appropriate
Follow-Up Type link Case managers can record follow-ups only in the current quarter for federal reporting requirements. The system does not allow federal follow-ups to be recorded outside the designated quarterly time periods. If you click a follow-up link prematurely, the system will display an alert (similar to the one shown at right). The positive goal measurement is to have the individual employed by the 2nd quarter after exit and still employed at the 3rd quarter follow-up. Another positive measurement is attainment of educational credentials, which can be recorded up to three quarters after exit. Each state sets its own threshold for the number of failed contact attempts that are required before attempts are discontinued. As you work through the Follow-up form:
• Complete entries in each section. • Scroll and proceed to the next section. • When you have completed all sections,
click Save at the bottom of the screen.
General, Alternate Contact, Exit & Closure General Information should be complete and prefilled. You might want to update the individual’s alternate contact list. Alternate Contact Information is the same Contact control used elsewhere. It lets staff add an alternate contact, if one needs to be identified as part of performing the follow up. Exit and Closure Information is system-set based on data recorded in the WIOA Case Closure and/or WIOA Outcome (exit). If staff failed to record employment information when they completed a case closure, the system displays “No Exit Employment Information.” Otherwise the system displays employer details as recorded.
System-set data based on WIOA Case Closure and/or WIOA Outcome
This indicates the WIOA follow-up type (local vs. required).
If staff clicks the Create Follow Up link (instead of the link for a quarter) a Local Follow-up is created, and indicated here.

The Programs Tab: WIOA
Virtual OneStop – Staff Services User Guide 6-115 V18 – 05/2018
Contact Attempts, and Follow-up Employment Information Areas Adding Contact Attempts or adding Follow-up Employment Information requires clicking on a link to expand the area for the data entry fields. When data is entered, and saved, it appears in a table (within that area of the screen). Create New Contact Attempts
• Click the Attempt Contact link to open/expand a Create New Contact Attempt area. • Record any contact attempts (failed or successful). • Click the Add New Contact Attempt button.
The new contact attempt is displayed in the Attempts table.
Note: Your site’s business rules determine how many failed attempts must be recorded before the system automatically assigns “Cannot locate” as the Other Status at Follow Up.
Create Follow-up Employment Information
• Answer if individual worked in this quarter. Check Yes box if individual worked for employer from previous quarter. If Yes, verify employer name.
• Click the Add Employer link to open/expand an Add/Edit Employer area (if you need to add new employer).
• Record all required information in the displayed Employer Information area. • Record all required information in the displayed Job Information area. • Click the Save button.
The new employment is displayed in the Employer table. • Continue to the next section for Credential Information.
Note: If this is followed for a Youth application, you may first see areas for Youth Placement, Diploma/Certificate, and Youth Follow-up Services.
This link will open a Create New Contact Attempt area to enter the attempted or successful contact.
This link will open an Add/Edit Employer area to enter the employer and job information for the updated employment.

The Programs Tab: WIOA
Virtual OneStop – Staff Services User Guide 6-116 V18 – 05/2018
Credential Information area:
• Use the Credential Information section to record credential attainment information. Select the credential type
from the drop-down (or enter the type if it is another type of credential).
Enter/select the date. Click Verify to confirm the
information. • Use the Update
Education/Certificate History link if you need to update the history for the credential.
Current Status at Follow-up
• If previous data entry options are not performance indicators (e.g., closing the program because of transfer to other funding), use the drop-down or description field here to identify the type of status.
Note: A required WIOA follow-up schedule does not appear if the individual exited from WIOA due to a global exclusion. However, they can still select the link to Create a Follow-up, and the selection matching the exclusion could be selected here.
Contact Information area:
• Select the actual follow-up date. • Select the contact type. • Enter and comments of case
notes.
Staff Information area:
• Select or confirm your one-stop office location.
• Click the Click Here link to add a case note. • Click Save to secure your edits and complete the follow-up.
WIOA Outcome Form (Youth) The process by which WIOA youth leave the WIOA program is quite similar to that for WIOA adults and dislocated workers. For a process overview of the entire Outcome Form, see the topic, “WIOA Outcome Form (Hard Exit)” on page 6-111.

The Programs Tab: WIOA
Virtual OneStop – Staff Services User Guide 6-117 V18 – 05/2018
In addition to open activities, the system ensures that any younger youth goals have also been closed before allowing program exit. If you click the Create Program Outcome link on the Programs tab, and at least one younger youth goal remains open, the system will display an alert similar to the following: To manually close out any open goals, perform the following steps:
1 Click the open goal link(s). 2 Enter the actual end date, which cannot be greater than the system date. 3 Select the desired Attainment of Goal code. Choices include: Attained Set, but not attained
4 Enter the close date for the goal. 5 Click Save to secure your edits.
Once you have closed all open WIOA activities (and goals for younger youth), you can manually exit the individual from the program. For details, refer to the “WIOA Outcome Form (Hard Exit)” topic on page 6-111.
Note: When a case is closed for youth, you should also close all goals, objectives, and plans. This includes literacy and numeracy records (full pretest/progress test/ posttest).

The Programs Tab: WIOA
Virtual OneStop – Staff Services User Guide 6-118 V18 – 05/2018
WIOA Follow-Up Form for Youth The process by which you complete WIOA follow-ups for youth is quite similar to that for WIOA adults and dislocated workers. The only addition for youth is that it contains three additional sections (between Follow-up Employment Information, and Credential Information sections). These three sections are the Youth Placement, Diploma/Certificate, and Youth Follow-up Services sections shown at right. For details on all the other sections of the follow-up, refer to the topic “WIOA Follow-Up” section on page 6-114. This will include the sections in follow-up for:
• General • Alternate Contact • Exit & Closure • Contact Attempts • Follow-up Employment Information • Credential Information • Staff Information