6-in-1 Multi-Cooker Instruction Manual - Kogan.com · PDF filenewwaveka.com.au We hope that...
52
6-in-1 Multi-Cooker Instruction Manual
Transcript of 6-in-1 Multi-Cooker Instruction Manual - Kogan.com · PDF filenewwaveka.com.au We hope that...
6-in-1 Multi-CookerInstruction Manual
newwaveka.com.au
Introduction
Important Safeguards
Using your Multi-Cooker
Product Structure
Assembling Instructions
Quick Guide to Using your 6-in-1 Multi-Cooker
Beginners Guide to Slow Cooking
Beginners Guide to Pressure Cooking
Beginners Guide to Soup Making
Beginners Guide to Steaming
Beginners Guide to Rice Cooking
Beginners Guide to Deep Frying
Warranty
Care and Cleaning Instructions
Recipes
After Sales Service
New Wave Contact Details
Contents

newwaveka.com.au
We hope that you enjoy your new 6-in-1 Multi-Cooker. Please find below
important information about your new appliance.
Characteristics
• 6 in 1 Multi-Cooker
• NW 800
• Voltage: 220-240V 50Hz
• Power consumption:1100W
Description
• 6 cooking appliances in 1 :
Deep Fry
Pressure Cooker
Slow Cooker
Rice Cooker
Steamer
Saute/Brown
• 12 Safety Protection measures
• 6L capacity
• 2 pressure levels, high and low
• Black gloss finish
• Non-stick removable inner bowl
• Stainless steel inner bowl (optional)
• Digital timer with countdown
• Pre-set timer
• Automatic keep warm function
• 12 month warranty
Introduction
Other items in the Newwave Kitchen Appliances range
newwaveka.com.au
When using electrical appliances, basic safety precautions should always be followed. Please read the safeguards below before using your Multi-Cooker.
• Read all instructions before operating and keep them for future reference.
• Remove any promotional stickers or labels before using the appliance for the first time.
• Always make sure your appliance is assembled before use.
• Do not touch hot surfaces. Use the handles to move the appliance.
• Do not place the appliance near the edge of a bench or table during operation. Ensure the surface is level, clean and free of water.
• The appliance is not to be used by children or persons with reduced physical, sensory or mental capabilities, or lack of experience and knowledge, unless they have been given supervision or instruction
• Children being supervised should not to play with the appliance
• Close supervision is necessary when any appliance is used by or near children.
• Do not place the appliance on or near a hot gas or electric burner, or where it can touch a heated oven. Keep away from walls.
• Always provide adequate space above and on all sides for air circulation.
• Always switch the appliance off at the wall, then unplug and allow to cool before cleaning and attempting to move the appliance for storage.
• This appliance requires cleaning after use and not to be immersed in water for cleaning.
• Unwind the cord before use.• Do not immerse cord, plug or appliance in
water or any other liquid.• Do not let the cord hang over the edge of a
table or counter, touch hot surfaces, or become knotted.
• Do not use the appliance if the power supply cord, plug or appliance becomes damaged in anyway. Return the appliance to an authorised service centre for examination and or repair.
• Any maintenance, other than cleaning, should be performed at an authorised service centre.
• This appliance is intended to be used in households and similar applications such as: - staff kitchen areas in shops, offices and other working environments - farm houses
- by clients in hotels, motels and other residential type environments - bed and breakfast type environments
• This appliance is for household use only. Do not use this appliance for anything other than its intended use.
• Do not use in moving vehicles or boats.• Do not damage the seal belt and do not replace
it with any other rubber belly or tensile belt.• Please ensure that the ducts in the pressure
regulator allowing the escape of steam are checked regularly to ensure that there are no blockages
• The lid must not be opened until the pressure has decreased sufficiently .
• Please turn the lid left after the pressure has released to ensure safety when opening the lid.
• Do not move the seal ring in the lid with any tools or external forces. If the ring breaks off the lid, stop using the cooker and replace the whole lid with a new one.
• Clean the filter regularly to keep the cooker clean.
• Do not open the lid with external force when the floating valve has not sunk.
• Never add any additional weight on the Pressure Limiting valve or replace the Pressure Limiting valve with another object.
• Never use the inner bowl if damaged as this will cause air leakage.
• Food should not be kept warm for more than 12 hours.
• If steam is released around the lid during the cooking process, please stop using the device and contact an authorised repair centre.
• Never plug in or switch on your appliance without the inner bowl placed inside the cooker.
• Only use the removable inner bowl supplied. Do not use any other bowl inside the cooker.
• Never operate the cooker without food or water in the inner bowl.
• Do not place the removable inner bowl when hot on any surface that may be affected by heat.
• Avoid scalding from escaping steam when opening the lid.
• Do not place the inner bowl in the dishwasher.
Important Safeguards

newwaveka.com.au
First time use
When using your Multi-Cooker for the first time, please read the instructions contained in this manual.
Make sure you remove all promotional stickers and labels and that the outside of the inner bowl is clean and is not damaged.
Check to see if the outer pot is free from any objects prior to inserting the inner pot. When adding any food into the inner pot make sure that the food is spread evenly across the bottom of the bowl and not heaped on one side.Select the required cooking function and revert to the appropriate recipe guide.
When preparing meat and poultry, try to select the leaner cuts of meat and trim off any visible fat as this will reduce any excess liquid. Vegetables should be cut into small, even-sized pieces to ensure even cooking. When cooking meat and vegetables together, it is important to remember that meat cooks at a slower rate than vegetables.
Please be careful if you have cooked with the lid closed to avoid any scalding from escaping steam. Lift the lid carefully and keep your face clear when opening.
Extreme caution must be used when the appliance is filled with hot oil. Always allow the appliance to cool before removing the oil.
Using Your Multi-Cooker
• Do not move the deep fryer during cooking or whilst hot.
• When deep frying, ensure no water comes in contact with hot oil as this will cause splattering. Ensure that the deep fryer is dry before adding any oil.
• Never lean over the deep fryer when lifting the lid.
• Excess trapped steam created during the cooking process will be released when the lid is opened.
• Never pour oil out of the deep fryer when either the unit or oil is hot. Allow both the unit and contents to cool completely before removing oil.
• It is not recommended to add extra oil when hot as splashing may occur.
• Always ensure the heater element and controller are correctly positioned onto the bowl assembly and filled to min/max before connecting to a power outlet.
• Do not use the deep fryer on metal surfaces, for example, a sink drain board.
• At no time should the deep fryer be left unattended when in use.
• Do not place anything on top of the deep fryer when the lid is closed, when in use and when stored.
• The installation of a residual current device (safety switch) is recommended to provide additional safety protection when using electrical appliances. It is advisable that a safety switch with a rated residual operating current not exceeding 30mA be installedin the electrical circuit supplying the appliance. See your electrician for professional advice.
newwaveka.com.au
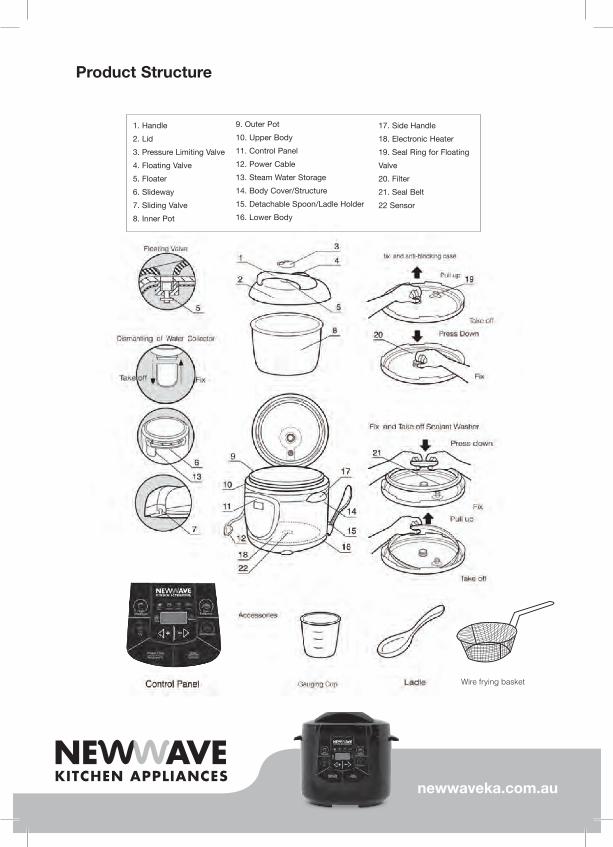
Product Structure
1. Handle
2. Lid
3. Pressure Limiting Valve
4. Floating Valve
5. Floater
6. Slideway
7. Sliding Valve
8. Inner Pot
9. Outer Pot
10. Upper Body
11. Control Panel
12. Power Cable
13. Steam Water Storage
14. Body Cover/Structure
15. Detachable Spoon/Ladle Holder
16. Lower Body
17. Side Handle
18. Electronic Heater
19. Seal Ring for Floating
Valve
20. Filter
21. Seal Belt
22 Sensor
Wire frying basket

newwaveka.com.au
Assembling Instructions
newwaveka.com.au
Assembling Instructions
newwaveka.com.au
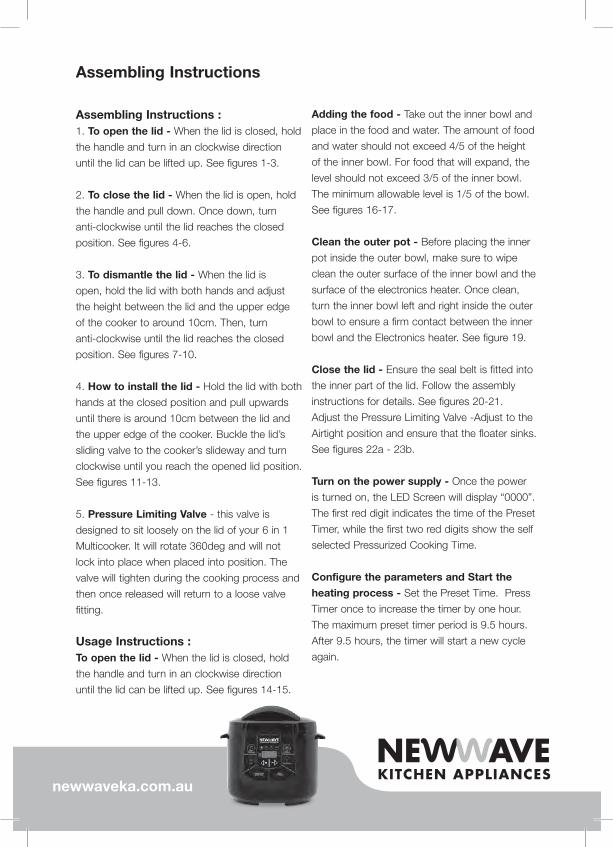
Assembling Instructions : 1. To open the lid - When the lid is closed, hold
the handle and turn in an clockwise direction
until the lid can be lifted up. See figures 1-3.
2. To close the lid - When the lid is open, hold
the handle and pull down. Once down, turn
anti-clockwise until the lid reaches the closed
position. See figures 4-6.
3. To dismantle the lid - When the lid is
open, hold the lid with both hands and adjust
the height between the lid and the upper edge
of the cooker to around 10cm. Then, turn
anti-clockwise until the lid reaches the closed
position. See figures 7-10.
4. How to install the lid - Hold the lid with both
hands at the closed position and pull upwards
until there is around 10cm between the lid and
the upper edge of the cooker. Buckle the lid’s
sliding valve to the cooker’s slideway and turn
clockwise until you reach the opened lid position.
See figures 11-13.
5. Pressure Limiting Valve - this valve is
designed to sit loosely on the lid of your 6 in 1
Multicooker. It will rotate 360deg and will not
lock into place when placed into position. The
valve will tighten during the cooking process and
then once released will return to a loose valve
fitting.
Usage Instructions : To open the lid - When the lid is closed, hold
the handle and turn in an clockwise direction
until the lid can be lifted up. See figures 14-15.
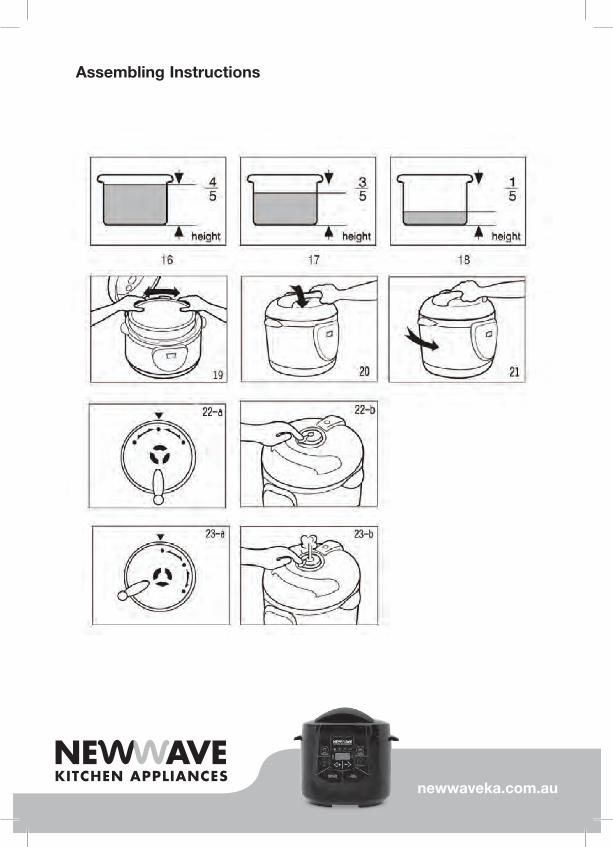
Adding the food - Take out the inner bowl and
place in the food and water. The amount of food
and water should not exceed 4/5 of the height
of the inner bowl. For food that will expand, the
level should not exceed 3/5 of the inner bowl.
The minimum allowable level is 1/5 of the bowl.
See figures 16-17.
Clean the outer pot - Before placing the inner
pot inside the outer bowl, make sure to wipe
clean the outer surface of the inner bowl and the
surface of the electronics heater. Once clean,
turn the inner bowl left and right inside the outer
bowl to ensure a firm contact between the inner
bowl and the Electronics heater. See figure 19.
Close the lid - Ensure the seal belt is fitted into
the inner part of the lid. Follow the assembly
instructions for details. See figures 20-21.
Adjust the Pressure Limiting Valve -Adjust to the
Airtight position and ensure that the floater sinks.
See figures 22a - 23b.
Turn on the power supply - Once the power
is turned on, the LED Screen will display “0000”.
The first red digit indicates the time of the Preset
Timer, while the first two red digits show the self
selected Pressurized Cooking Time.
Configure the parameters and Start the
heating process - Set the Preset Time. Press
Timer once to increase the timer by one hour.
The maximum preset timer period is 9.5 hours.
After 9.5 hours, the timer will start a new cycle
again.
Assembling Instructions

newwaveka.com.au
Quick User Guide To Using Your 6-In-1 Multi-Cooker
Brown
This function defaults to 30 minutes (you adjust the time according to your requirements) and is
ideal for starting your recipes when sautéing, browning or shallow frying is required. For example,
when making a Bolognese sauce you can sauté your onion, celery and carrot as well as brown your
meat. Once ready you can then choose your Slow Cook or Pressure cook function.
- Always Brown with the lid open.
- The temperature range for this function is 110°C to 130°C.
- The Browning function will turn off if there is too little food in the bowl.
• Plug the unit in
• Press the Multifunction Button once, the Brown function will light up on the control panel
• Press the Start button
• The unit will start heating to the desired temperature range
• When Browning is complete, press cancel
Slow Cook
The Slow cook function defaults to 120 minutes has a delayed timing start of up to 9.5 hours and a
slow cooking time of up to 9.5 hours. The temperature range for this feature is 95°C to 100°C. As a
safety precaution, when cooking with the lid closed, you will need to lower the heat once the food is
cooked before the lid can open.
• Plug the unit in
• Select the Delay cooking time if required
• Select the Brown button if required
• Press Cancel once the Browning has finished
• Press the Multifunction button twice until the Slow Cook function lights up on the control panel
• Adjust the slow cooking time in 30 minute intervals by pressing the + and - buttons
• Press the Start button
• Cook with the lid closed but keep the Pressure Limiting Valve set to exhaust
• The Keep Warm function will automatically activate once the allotted
cooking time is completed
newwaveka.com.au
Rice
The Rice function has a timer that will default to 12 minutes. It is ideal for cooking steam rice or
risottos. You can adjust you cooking time to suite your recipie. For example when steaming rice,
add 2 cups of rice and fill with water to level 2 in the inner bowl and cook for 7 minutes (lid closed
and air tight) or Risotto can be cooked in 8 minutes.
• Plug the unit in
• Select the Delay cooking time if required
• Press the Multifunction button three times until the Rice function lights up on the control panel
• Adjust the cooking time in minutes by pressing the + and - buttons
• Press the Start button
• Cook with the lid closed and keep the Pressure Limiting Valve set to Sealed
• The Keep Warm function will automatically activate once the allotted
cooking time is completed
Steam
The Steam function time defaults to 20 minutes, you may set the working time ranged from 0 – 99
minutes according to your flavour and the amount of food. Add your desired liquid then add you
steam rack and steam you favourite food.
• Plug unit in
• Select the Delay cooking time if required
• Press the Multifunction button four times until the Steam function lights up on the control panel
• Adjust the cooking time in minutes by pressing the + and - buttons
• Press the Start button
• Cook with the lid closed and keep the Pressure Limiting Valve set to exhaust
• The Keep Warm function will automatically activate once the
allotted cooking time is completed
Quick User Guide To Using Your 6-In-1 Multi-Cooker
newwaveka.com.au
Quick User Guide To Using Your 5-In-1 Multi-Cooker
Pressure CookingWith the Pressure feature on your new Multi-Cooker, you are able to use low and high pressure
cooking. The psi for low pressure cooking is 7psi and 13psi for High pressure cooking. If you
decide to cook using the Pressure Cooker function it is recommended that you use one of the other
functions first e.g. Brown to start off your recipe, as this will allow the Multi-Cooker to heat the food
throughout and will speed up the pressure cooking time. Before using this function make sure you
have read the pressure valve function. Please refer to the food and cooking chart.
• Plug the unit in
• Use Brown function to start off your recipe.
• Once the recipe is ready to be pressure cooked, close the lid
• Turn the pressure valve on top of the lid to sealed
• Press the desired Pressure cooking button
• Adjust the cooking time in minutes
• Press the Start button
• When the machine is warming up, the first double-digit marquee will flash on the screen. When
it comes to pressure maintaining, the screen will display 00: and the cooking time will begin to
count down
• Once timer has finished turn valve to Exhaust, this will release pressure.
• This will take a few minutes for the pressure to reduce.
• Once pressure is fully released you may open the lid.
• The Keep Warm function will activate once cooking time is completed
• Please note, as a safety precaution the lid will not open until the pressure
is fully released
Deep FryingThe Deep fry function allows you to deep fry your favourite food and has default time of 25 minutes.
The temperature range for this function is 170°C - 190°C. It will take 15 minutes heating time
to reach 170°C and 25 minutes heating time to reach 190°C. Plug the unit in. Insert the deep
fry basket. Fill the oil to the desired level (to the top of the basket). Press the deep fry button.
Press start. Cook with the lid open. The LED will show 00; cook time once it has reached max
temperature.
Setting the Keep Warm Function• Plug unit in
• Press the keep warm but
• Press the start button
newwaveka.com.au
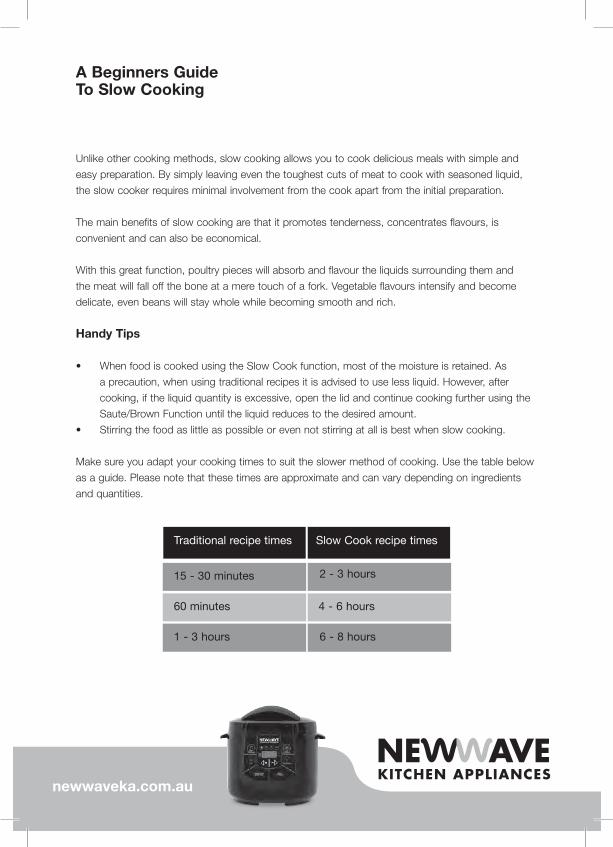
Unlike other cooking methods, slow cooking allows you to cook delicious meals with simple and
easy preparation. By simply leaving even the toughest cuts of meat to cook with seasoned liquid,
the slow cooker requires minimal involvement from the cook apart from the initial preparation.
The main benefits of slow cooking are that it promotes tenderness, concentrates flavours, is
convenient and can also be economical.
With this great function, poultry pieces will absorb and flavour the liquids surrounding them and
the meat will fall off the bone at a mere touch of a fork. Vegetable flavours intensify and become
delicate, even beans will stay whole while becoming smooth and rich.
Handy Tips
• When food is cooked using the Slow Cook function, most of the moisture is retained. As
a precaution, when using traditional recipes it is advised to use less liquid. However, after
cooking, if the liquid quantity is excessive, open the lid and continue cooking further using the
Saute/Brown Function until the liquid reduces to the desired amount.
• Stirring the food as little as possible or even not stirring at all is best when slow cooking.
Make sure you adapt your cooking times to suit the slower method of cooking. Use the table below
as a guide. Please note that these times are approximate and can vary depending on ingredients
and quantities.
A Beginners Guide To Slow Cooking
Traditional recipe times
15 - 30 minutes
60 minutes
1 - 3 hours
Slow Cook recipe times
2 - 3 hours
4 - 6 hours
6 - 8 hours
newwaveka.com.au
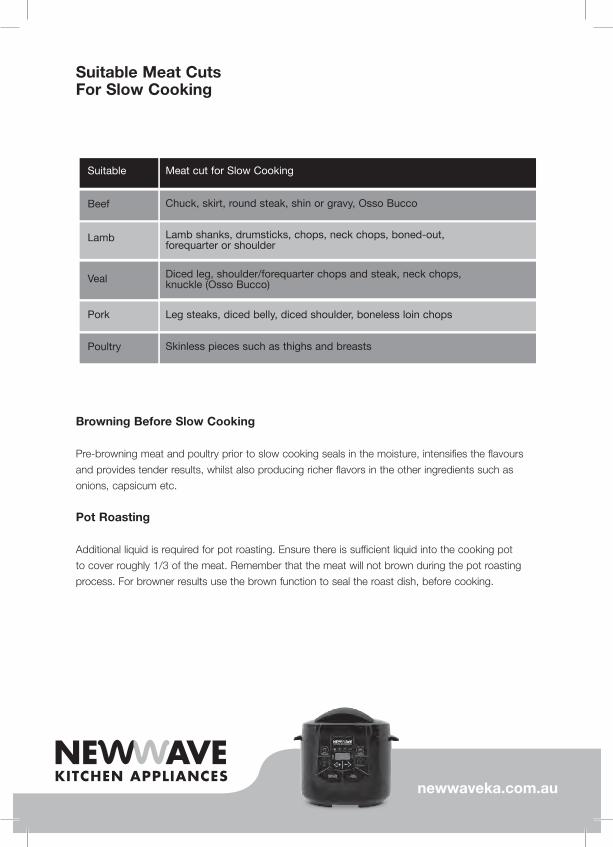
Suitable Meat Cuts For Slow Cooking
Browning Before Slow Cooking
Pre-browning meat and poultry prior to slow cooking seals in the moisture, intensifies the flavours
and provides tender results, whilst also producing richer flavors in the other ingredients such as
onions, capsicum etc.
Pot Roasting
Additional liquid is required for pot roasting. Ensure there is sufficient liquid into the cooking pot
to cover roughly 1/3 of the meat. Remember that the meat will not brown during the pot roasting
process. For browner results use the brown function to seal the roast dish, before cooking.
Suitable
Beef
Lamb
Veal
Pork
Poultry
Meat cut for Slow Cooking
Chuck, skirt, round steak, shin or gravy, Osso Bucco
Leg steaks, diced belly, diced shoulder, boneless loin chops
Skinless pieces such as thighs and breasts
Lamb shanks, drumsticks, chops, neck chops, boned-out, forequarter or shoulder
Diced leg, shoulder/forequarter chops and steak, neck chops, knuckle (Osso Bucco)
newwaveka.com.au
A Beginners Guide To Pressure Cooking
Pressure Cookers have been around for years and have become popular again due to greater work commitments and busier schedules. By using steam under pressure, temperature is produced which is considerably greater than a conventional oven. This ensures decreased cooking times without sacrificing the great taste and flavour. Aside from these great benefits, Pressure Cookers also ensure vegetables retain more vitamins and minerals.
Handy Tips
• Far less liquid is needed than for traditional cooking methods.• Never exceed the maximum fill amount of the pressure cooker 4/5 high on your pot.• If starting with cold food, it will take longer for the pressure count down
timer to start.• When the cooking time is complete and quick pressure release is required, make sure
you turn the valve to exhaust immediately, otherwise foods will continue to cook and may overcook.
• Use the High Pressure setting when cooking meat. • When cooking just vegetables or beans use the Low Pressure setting.
The general rule is that you use half the liquid used in slow cooking recipes. You may need to play with your recipe to get it right.
Cooking Times
Cooking times may vary slightly due to your cut of meat and whether you have either chunks, slices etc,. Use the table on the next page as a guide. Please note that these times are approximations and can vary depending on ingredients and quantities.

newwaveka.com.au
Suitable Meat Cuts For Pressure Cooking
Cooking Time in Minutes Pressure Function
24-28 / 5-6 / 9-12 / 8-10
35-40 / 25-30 / 10-14
25-30 / 20-25
10 per shoulder / 40
9-11 / 18-22 / 40
Food
Chicken - whole / breast / thighs / leg
Beef - pot roast / shanks / stew
Lamb - shanks / shoulder
Veal - shoulder / osso bucco
Pork - chops / ribs / roast
Vegetables - broccoli / potatoes / beans / carrots
Rice - arborio / white / soaked beans / lentils
Traditional recipe times
15 - 30 minutes
60 minutes
1 - 3 hours
Pressure recipe times
7 - 15 minutes
15 - 25 minutes
25 - 40 minutes
3-4 / 6-8 / 2-3 / 4-5
6-8 / 7-8 / 28-35 / 6-8
High pressure
High pressure
High pressure
High pressure
High pressure
High pressure
High pressure
newwaveka.com.au
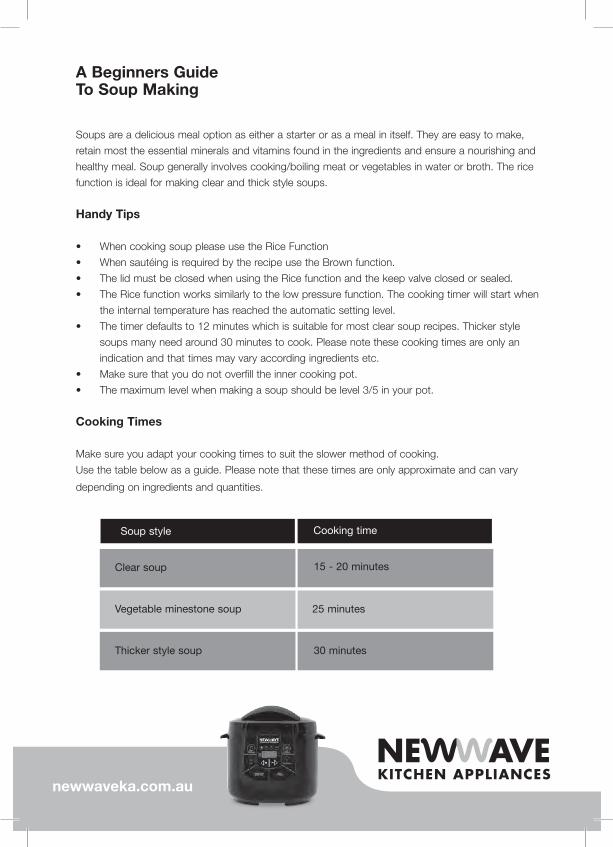
A Beginners Guide To Soup Making
Soups are a delicious meal option as either a starter or as a meal in itself. They are easy to make,
retain most the essential minerals and vitamins found in the ingredients and ensure a nourishing and
healthy meal. Soup generally involves cooking/boiling meat or vegetables in water or broth. The rice
function is ideal for making clear and thick style soups.
Handy Tips
• When cooking soup please use the Rice Function
• When sautéing is required by the recipe use the Brown function.
• The lid must be closed when using the Rice function and the keep valve closed or sealed.
• The Rice function works similarly to the low pressure function. The cooking timer will start when
the internal temperature has reached the automatic setting level.
• The timer defaults to 12 minutes which is suitable for most clear soup recipes. Thicker style
soups many need around 30 minutes to cook. Please note these cooking times are only an
indication and that times may vary according ingredients etc.
• Make sure that you do not overfill the inner cooking pot.
• The maximum level when making a soup should be level 3/5 in your pot.
Cooking Times
Make sure you adapt your cooking times to suit the slower method of cooking.
Use the table below as a guide. Please note that these times are only approximate and can vary
depending on ingredients and quantities.
Soup style
Clear soup
Vegetable minestone soup
Thicker style soup
Cooking time
15 - 20 minutes
25 minutes
30 minutes
newwaveka.com.au
A Beginners Guide To Steaming
Steaming can be used for most foods and a surprising variety of recipes, and has great advantages
over other cooking methods. Steaming does not immerse foods in water into which nutrients,
particularly in vegetables, can escape. Therefore a far higher level of nutrients, vitamins and minerals
are retained than by other cooking methods. Steaming reduces Vitamin C in vegetables by 40%
whereas boiling reduces it by 70% because of the loss in the cooking water.
There are two main methods of steaming :
1. By suspending the exposed food over boiling water in a closed container.
2. A longer method of wrapping the food in a parcel e.g. foil and placed over boiling water.
Handy Tips
• Cut across the grain for extra tenderness.
• Never allow the liquid to touch the food or the food will boil and not steam.
• Liquid levels in the base should be maintained for constant cooking.
• Arrange food in a single layer or adjust cooking times accordingly.
• Arrange food on the steaming rack and/or steaming basket with space in between to allow
steam to circulate and cook more efficiently.
• Always defrost frozen meats, fish and poultry before steaming.
• When serving, steamed vegetables they can be drizzled with a light sauce of butter or olive oil
to compliment the tender nature of the vegetables. They can also be sprinkled with lemon juice
or balsamic vinegar for a tangy twist.
newwaveka.com.au
Slicing Cooking TimeFood Weight
Whole
35-50mm floweretts half lengthwise
6mm slices
Whole
Whole
Season as desired
Quarter
Wrapped in a parcel
Similar size pieces
Wrapped in a parcel
9-11 minutesAsparagus 240g
15 minutesCarrots 240g
11 minutes
10-15 minutes
Snow peas
Scallops
120g
Up to 500g
11 minutesBroccoli/zucchini 240g
8-9 minutesGreen beans 120g
24 minutes
10-15 minutes
Potatoes
Fish fillets
240g
Up to 500g
15-20 minutes
15-25 minutes
Chicken
Whole fish
240-450g
Up to 500g
A Beginners Guide To Steaming
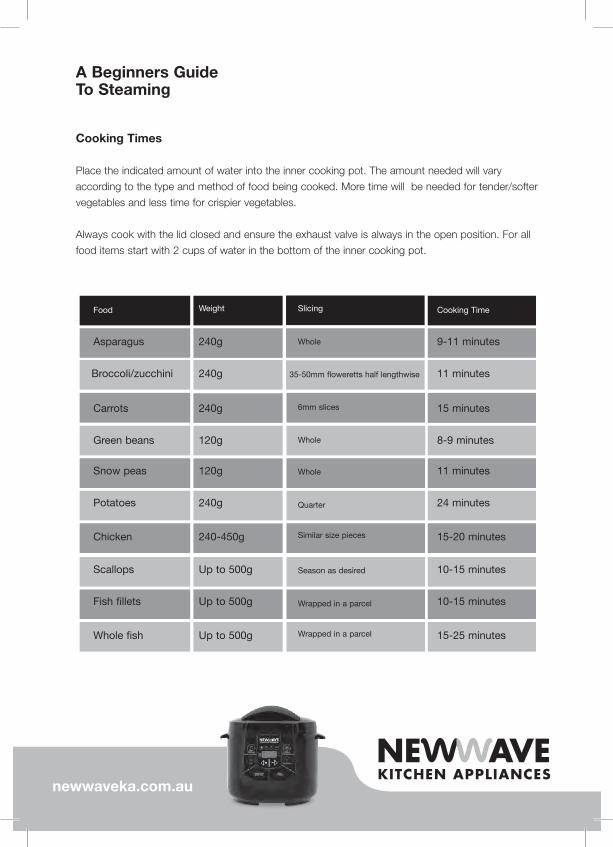
Cooking Times
Place the indicated amount of water into the inner cooking pot. The amount needed will vary
according to the type and method of food being cooked. More time will be needed for tender/softer
vegetables and less time for crispier vegetables.
Always cook with the lid closed and ensure the exhaust valve is always in the open position. For all
food items start with 2 cups of water in the bottom of the inner cooking pot.

newwaveka.com.au
A Beginners Guide To Rice Cooking
Handy Tips
• Measure out the rice and rinse it thoroughly under running water in a sieve until the run off
water becomes clear. (Do not rinse Arborio rice).
• Always add the rice first then add in the water.
• Then place the rice into the bowl before adding cold water.
• Make sure the rice is distributed around the whole surface of the bowl, in order to allow even
cooking.
• Add salt if required. Allow about half a teaspoon of salt for 4 cups of rice.
• Stock may be substituted for water if desired.
• Make sure the lid is closed and valve on air tight.
• Press the Rice button.
• On completion of cooking, select the Keep Warm function, open the lid and stir the rice and
leave it for a few minutes longer in order to get perfect rice.
Measuring And Maximum Capacity
The graduated markings on the inside of the inner bowl are given in litres and cups and are used for
measuring the amount of water when cooking rice.
• The plastic cup provided can also be used to measure rice.
• The table above states the approximate quantity of rice required for the number of servings.
(1 cup is approximately 150g)
• For 1 cup of rice add 1 measuring cup of water.
• Make sure that the total rice and water level does not exceed the 3/5 level.
* For smaller quantities of rice (for example 2 cups or less) white rice can be cooked under
High Pressure for 7-8 minutes.
For white rice - Long grain, basmati, thai
2 300g 2 cup mark 3-4 7 minutes
10 minutes
13 minutes
16 minutes
20-25 minutes
28 minutes
8 minutes
5-6
8-10
11-14
5-6
4-5
4
4 cup mark
6 cup mark
8 cup mark
4.5 cup mark
3.5 cup mark
4 cup mark
600g
600g
400g
600g
900g
1200g
Cups Weight Water level (+rice) Serves Cooking Time
4
4
6
Brown Rice
4
Wild Rice
4
Risotto rice/ arborio
4
newwaveka.com.au
Cooking TimeFood
5-7 minutes
4-6 minutes
12-15 minutes
3-4 minutes
7-10 minutes
Fish (in batter)
Chicken pieces (crumbed)
Potato wedges (pre cooked)
Fish cocktail pieces (in batter)
Prawn cutlets (raw, crumbed)
A Beginners Guide To Deep Frying
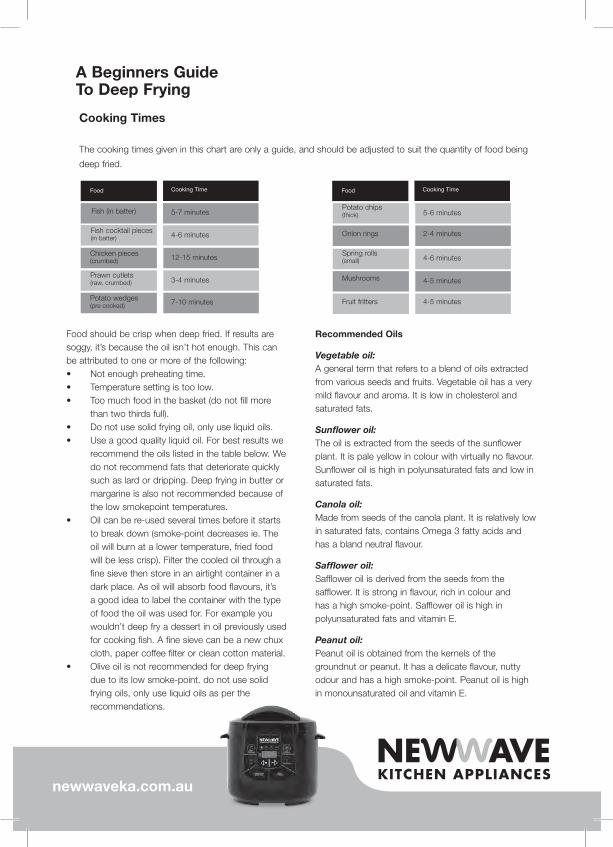
Cooking Times
The cooking times given in this chart are only a guide, and should be adjusted to suit the quantity of food being
deep fried.
5-6 minutesPotato chips (thick)
4-6 minutes
4-5 minutes
2-4 minutes
4-5 minutes
Spring rolls (small)
Mushrooms
Onion rings
Fruit fritters
Cooking TimeFood
Food should be crisp when deep fried. If results are soggy, it’s because the oil isn’t hot enough. This can be attributed to one or more of the following:• Not enough preheating time.• Temperature setting is too low.• Too much food in the basket (do not fill more
than two thirds full).• Do not use solid frying oil, only use liquid oils.• Use a good quality liquid oil. For best results we
recommend the oils listed in the table below. We do not recommend fats that deteriorate quickly such as lard or dripping. Deep frying in butter or margarine is also not recommended because of the low smokepoint temperatures.
• Oil can be re-used several times before it starts to break down (smoke-point decreases ie. The oil will burn at a lower temperature, fried food will be less crisp). Filter the cooled oil through a fine sieve then store in an airtight container in a dark place. As oil will absorb food flavours, it’s a good idea to label the container with the type of food the oil was used for. For example you wouldn’t deep fry a dessert in oil previously used for cooking fish. A fine sieve can be a new chux cloth, paper coffee filter or clean cotton material.
• Olive oil is not recommended for deep frying due to its low smoke-point. do not use solid frying oils, only use liquid oils as per the recommendations.
Recommended Oils
Vegetable oil:A general term that refers to a blend of oils extracted from various seeds and fruits. Vegetable oil has a very mild flavour and aroma. It is low in cholesterol and saturated fats.
Sunflower oil:The oil is extracted from the seeds of the sunflower plant. It is pale yellow in colour with virtually no flavour.Sunflower oil is high in polyunsaturated fats and low insaturated fats.
Canola oil:Made from seeds of the canola plant. It is relatively lowin saturated fats, contains Omega 3 fatty acids and has a bland neutral flavour.
Safflower oil:Safflower oil is derived from the seeds from thesafflower. It is strong in flavour, rich in colour andhas a high smoke-point. Safflower oil is high inpolyunsaturated fats and vitamin E.
Peanut oil:Peanut oil is obtained from the kernels of the groundnut or peanut. It has a delicate flavour, nutty odour and has a high smoke-point. Peanut oil is high in monounsaturated oil and vitamin E.
newwaveka.com.au
• Before cleaning, switch off the Multi-Cooker at the power outlet and then unplug.
• Always allow the appliance to cool before cleaning.
• Clean the outer black housing with a soft damp cloth and then dry thoroughly.
• Remove the inner bowl and clean the inside of the cooker, including the sealant washer,
pressure discharging valve, anti-blocking case, steam relief pipe, floating valve with water and
a damp cloth.
• Clean the pressure release valve and the water drain hole with a small brush,
so that water can freely discharge.
• For normal washing of the inner bowl use warm soapy water and
rinse thoroughly.
• To remove stubborn, cooked on foods in the removable inner bowl, soften by filling it with
warm soapy water and allow to soak for 1 hour. Remove by scrubbing with a soft nylon non-
scratch kitchen brush.
• Do not put any part of your 5-in-1 Multi-Cooker in the dishwasher.
• Never use abrasive cleaners, steel wool or metal scouring pads as they
can damage the surface of your cooker.
• Do not use metal utensils for stirring in the bowl as they will cause damage.
• Empty the Steam Water Storage cup at the rear of the unit.
Care And Cleaning

newwaveka.com.au
Date of Purchase
Name of Retail Outlet
Address of Retail Outlet
Multi-Cooker Serial No.
Customer Name
Customer Address
Email Address
Please return this copy to Newwave to receive a 12 month limited warranty on your oven or log onto newwaveka.com.au and fill out your warranty on line.
Newwave Kitchen Appliances PO BOX 421 Moorabbin BC Moorabbin VIC 3189 Telephone +61 3 9553 7211 Facsimile +61 3 9553 7233
Warranty Conditions
1. Warranty void if unit tampered with 2. Warranty does not cover any broken parts 3. Warranty does not cover postage returned cookers
Please retain a copy of the Warranty and the purchase receipt as proof of purchase. We will guarantee this product against defects caused by faulty workmanship and materials for twelve months domestic use. During this Warranty period NEWWAVE will REPLACE any defective product. However, if the product includes a number of accessories, only the defective part of the accessory will be replaced. NEWWAVE reserves the right to make minor adjustments instead of replacing the product or accessory. Packaging instructions will not be replaced unless faulty.
Subject to your statutory rights as to the merchantable quality of the product or accessory. In the event of a product or accessory being replaced during the Warranty, the Warranty on the replacement will expire at the original date i.e. 12 months from the original purchase date. This Warranty excludes defects caused by the product not being used in accordance with the instructions, accident damage, misuse or being tampered with by unauthorised persons. The replacement Warranty also excludes breakages and consumable items. This Warranty covers only units sold in Australia.
12 Month Limited Warranty

newwaveka.com.au
Newwave Appliance Range
Newwave Kitchen Appliances PO BOX 421
Moorabbin BC Moorabbin VIC 3189
Telephone +61 3 9553 7211 Facsimile +61 3 9553 7233
newwaveka.com.au
Multi Cooker Vegetarian Recipes
Savoy Cabbage with PancettaMethod - Slow Cook
Open the lid and press the Brown button and Start.
Sauté the pancetta until fat is rendered. Add the onions
and sauté until soft and then add the garlic. Add the
cabbage 1 handful at a time until it has cooked down.
Pour in the white wine and caraway seeds and cook
for around 5 minutes until the cabbage has completely
wilted. Add salt and pepper to taste and press the
Cancel button once done.
Next, press the Slow Cook button, set 2 hours on the
timer and then press Start.
Close the lid and make sure that the pressure limiting
valve is set on Exhaust. Once finished open the lid
and add the cabbage which should now be soft and
creamy. Ready to serve.
Ingredients (serves 4)
- 1 large savoy cabbage, thinly shredded
-185g pancetta, diced
- 1 brown onion, sliced
- 1 garlic clove, chopped
- 60ml dry white wine
- 2tsp caraway seeds
- Salt and fresh ground pepper
Method- Pressure Cook
Apply the same method as with the Slow Cooking
until the cabbage has completely wilted and you
have pressed cancel on the Multi-Cooker. Close
the lid and lock.
Press the High Pressure button, then set the timer
to 10 minutes, then press Start. Make sure that
the pressure limiting valve is set on Airtight. To
open the lid, turn the pressure limiting valve to
Exhaust. Wait until the pressure has reduced and
the safety release function allows you to open the
lid. Ready to serve.
newwaveka.com.au
Multi Cooker Vegetarian Recipes
Mushroom RisottoMethod - Pressure Cook
To begin using the Pressure Cooking method, press the
Browning Function on your Multi-Cooker. Firstly, heat the oil,
add the onion and cook until the onion becomes soft and
changes colour. This should take around 4 minutes. Next, add
the garlic and cook for a minute. Add the Arborio rice and mix
together with the onions until the rice is covered in oil. Cook
for a further 2 minutes before adding the wine. After cooking
for another 2 minutes, press the Cancel button to turn off the
Browning function.Add the mushrooms and stock and stir
through. Press the High Pressure function and set the time
for 7 minutes. Close the lid and press start. Make sure the
pressure limiting valve is set on Sealed. After the 7 minutes
is up, open the lid and stir through half the Parmesan cheese
and parsley. Serve with fresh Parmesan cheese. Please note
that you can substitute the mushrooms with your favorite
ingredients and follow the process accordingly.
Ingredients (serves 4)
- 60ml olive oil
- 1 brown onion, finely chopped
- 1 garlic clove, finely chopped
- 600ml chicken stock
- 300g arborio rice
- 200ml dry white wine
- 200g mushroom of your
choice, thinly sliced
- 100g fresh parsle
- 200g fresh grated Parmesan cheese
- Salt and pepper
Asparagus With Lemon ButterMethod - Steam
Open the lid and add the steam rack. Add water to just under
the level of the steam rack. Press the Steam button, enter in
10 minutes and Start. Place the Asparagus in the foil and add
the butter, pepper, lemon juice and fresh parsley. Close the
foil to resemble a packet or pouch. You can add some other
vegetables if you like. Place the sealed asparagus on the rack.
Close the lid making sure the Pressure limiting valve is set on
Exhaust. Press the Cancel button once done. Serve with rice.
Ingredients (serves 2-3)
- 4 bunches fresh asparagus
(about 25 spears)
- 90g butter, chopped
- Freshly ground white pepper
- 2tbsp lemon juice
- 1tsp fresh parsley, chopped
newwaveka.com.au
Multi Cooker Vegetarian Recipes
Curried Pumpkin with SpinachMethod - Slow Cook
Open the lid and press the Brown button and Start. Sauté the onions
in the oil until they become golden brown. Stir in the garlic, ginger,
chilies, coriander, cumin, mustard seeds and turmeric and cook for a
minute. Add the pumpkin and coconut milk and gently mix through.
Press the Cancel button once done. Next, press the Slow Cook
button, set the timer to 31/2 hours and press Start. Close the lid and
make sure that the pressure limiting valve is set to Exhaust. Once
finished, open the lid and add the spinach, curry leaves and kaffir lime
leaves and then cook on for a further ½ hour before closing the lid.
Ready to serve with flaked almonds.
Method - Pressure Cook
Open the lid and press the Brown button and Start. Sauté the onions
in the oil until they become golden brown. Stir in the garlic, ginger,
chilies, coriander, cumin, mustard seeds and turmeric and cook for a
minute. Add the pumpkin and coconut milk and gently mix through.
Add the spinach, curry leaves and kaffir lime leaves. Press the Cancel
button once done. Close the lid and lock. Press the High Pressure
button, then set the timer to 18 minutes, then Start. Make sure that
the pressure limiting valve is set on Sealed. To open the lid, turn the
pressure limiting valve to Exhaust. Wait until the pressure has reduced
and the safety release function allows you to open the lid.
Ready to serve.
Ingredients (serves 4)
- 2tbsp olive oil
- 2 medium onions, sliced
- 4 garlic cloves, crushed
- 3tsp fresh ginger, grated
- 3 small chilies, finely sliced
- 11/2 tsp ground coriander
- 11/2 tsp ground cumin
-11/2 tsp brown mustard seeds
- 11/2 tsp ground turmeric
- 2 cups coconut milk
- 1kg pumpkin, peeled and chopped
- 10 English spinach leaves, shredded
- 10 curry leaves, torn
- Toasted almond flakes
- Kaffir lime leaves
newwaveka.com.au
Multi Cooker Seafood Recipes
Mussels in White WineMethod - Pressure Cook
Open the lid and press the Brown button and Start. Allow
to heat. Add the oil, garlic and chilli for about 3-4 minutes.
Add the mussels, white wine, fresh parsley. Press the
Cancel button once done.
Close the lid and lock. Press the High Pressure button,
then set the timer for 4 minutes, then press Start. Make
sure that the pressure limiting valve is set on Sealed.
To open the lid, turn the pressure limiting valve to Exhaust.
Wait until the pressure has reduced and the safety release
function allows you to open the lid. Ready to serve.
Ingredients (serves 4)
- 2kg black Mussels, cleaned and de-boned
- 80ml olive oil
- 3 garlic cloves, chopped
- 1 fresh chilli, chopped
- 3tbs fresh parsley, chopped
- 1/2 cup dry white wine
- Salt and pepper
Fish StockPreperation
Wash the fish heads and bones of any blood and drain.
Method - Soup (Rice Function)
Open the lid and add the fish heads and bones,
onion, carrot, celery, wine, water, bay leaf, parsley and
peppercorns all together and season. Close the lid and
press the Rice function. The default time is 12 minutes.
Increase the time to 25 minutes. Press Start and make sure
the pressure limiting valve is set on Sealed. Open the lid
and strain the liquid through a strainer and disregard bones
and vegetables. Note: This recipe can be substituted with
chicken to make chicken stock and beef for beef stock and
just vegetables for vegetables stock. Triple the vegetable
quantity.
Ingredients (Makes 1 litre of stock)
- 500g fish bones and head
- 1 brown onion, sliced
- 1 carrot, sliced
- 1 celery stick, sliced
- 250ml white wine
- 1L water
- 1 bay leaf
- 3 parsley stalks
- 3 black peppercorns
- Salt and pepper

newwaveka.com.au
Multi Cooker Seafood Recipes
Ginger and Shallot Fish with Coconut Rice
Method - Steam1. Combine the sherry, sugar, oil and half the soy sauce in
a small bowl
2. Place the fish in a parcel of foil with baking paper
underneath, top with the ginger and pour over the
sherry mixture.
3. Using your multi coooker measuring cup, measure 2
cups of basmati rice, rinse well. Add this to the bottom
of your multi cooker, add in small can of coconut
cream. Add extra hot water to your rice until it reaches
above the level 2 mark inside your multi cooker bowl
4. Add the rack into the cooker, place the fish parcels into
your steamer basket. Add the Asian greens on the sides
of the parcel or onto top.
5. Close the lid, press steam function and 10 minutes.
Make sure your valve is on exhaust. Once fish is done
drizzle over the remaining soy sauce and any juices
from the bowl. Top with the shallots and chilli, if desired.
Ingredients (serves 4)
- 1 tbs dry sherry
- 1 tsp caster sugar
- 1 tsp sesame oil
- 1 tbs light soy sauce
- 2 (about 150g each) firm white fish fillets
- 2cm piece of fresh ginger, peeled, cut into
matchsticks
- Steamed Asian greens, to serve
- 1 shallot, trimmed, thinly sliced diagonally
- 1 long fresh red chilli (optional), halved,
deseeded, thinly sliced
- 2 cups of basmati rice washed
- 1 small can of coconut cream
newwaveka.com.au
Multi Cooker Deep Fried Recipes
Salt and pepper calamariMethod - Deep Fry
1. Fill deep fryer with 4 litres of oil. Preheat for 20 minutes.
2. Combine flour, salt, pepper, egg white and water. Add
to calamari in a large plastic bag. Shake bag to coat
calamari evenly with flour mixture.
3. Deep fry in two batches for approximately 3-4
minutes allowing oil to reheat between each
batch. Drain.
Serving suggestion: Serve with chilli sauce and
salad as an entrée or light meal.
Ingredients (serves 4)
-4 litres oil for deep frying
-1 cup corn flour
- 1 teaspoon salt
- 1 teaspoon finely ground pepper
- 500g calamari rings
- 1 egg white
- 2 tablespoons water
- Sweet Thai Chilli Sauce
newwaveka.com.au
Multi Cooker Recipes
Penne Matriciana Method - Pressure Cook
Press the Brown function. Pour oil into the bowl and add
the onion and garlic and cook for 3-5 minutes until onion
softens. Add the bacon and cook until it has some colour.
Add the passata sauce fresh basil and season. Press the
saute/brown function and select 8 minutes.
Add the dried penne pasta and 2 1/2 cups of water.
press the cancel button. Close the lid and put the air valve
onto Sealed. Press the low pressure cook function and
select 8 minutes.
Once completed de-pressurise the unit. Allow a few
minutes for liquid to reduce once open. If too much liquid
then reduce using the brown function for a further 2-3
minutes. Serve.
Ingredients (serves 2)
- 1 onion Chopped
- 1 garlic clove
- 30g fresh basil
- 500ml Passata tomato (1 full jar)
- 100g diced bacon
- 250g of Penne
- ¼ cup olive oil
- 2½ cups water
- Salt and pepper

newwaveka.com.au
Multi Cooker Deep Fried Recipes
Southern style chickenMethod - Deep Fry
1. Fill deep fryer with 3 litres of oil. Preheat to 170°C.
2. Sift flour, pepper and paprika into a bowl. Coat
chicken pieces in combined beaten egg and milk
then flour mixture.
3. Deep fry in two batches until cooked and golden,
approximately 15 minutes allowing oil to reheat
between each batch. Drain.
Serving suggestion: Serve with corn and salad
Ingredients (serves 4)
-3 litres oil for deep frying
-1 cup flour
- 1 teaspoon salt
- 1 teaspoon ground black pepper
- 1 teaspoon paprika
- 8 chicken pieces (drumsticks, wings)
- 2 eggs, beaten
- 2 tablespoons milk

newwaveka.com.au
Multi Cooker Soup and Stock Recipes
Vegetable, Bacon and Risoni Soup
Method - Soup (Rice Function)
1. Press brown on your multi cooker, heat oil add onion,
bacon and garlic. Cook, stirring, for 5 minutes or until
soft. Add carrot, parsnip, celery and zucchini. Cook,
stirring, for 5 minutes.
2. Add hot stock and tomatoes and risoni.
3. Press cancel close the lid then press your rice
function, your cooker will automatically default to a
12 minutes. Increase to 25 minutes cooking time.
Keeping the valve on Sealed.
4. When your cooker in done season with salt and
pepper and ladle soup into bowls. Serve.
Ingredients (serves 4)
- 1 tablespoon olive oil
- 1 brown onion, finely chopped
- 125g bacon, chopped
- 2 garlic cloves, crushed
- 2 carrots, peeled, chopped
- 1 parsnip, peeled, chopped
- 1 celery stick, chopped
- 2 small zucchini, chopped
- 6 cups reduced-salt beef stock
- 400g can diced roma tomatoes
- 1/3 cup dried risoni pasta
- 1/3 cup flat-leaf parsley leaves,
roughly chopped
newwaveka.com.au
Multi Cooker Soup and Stock Recipes
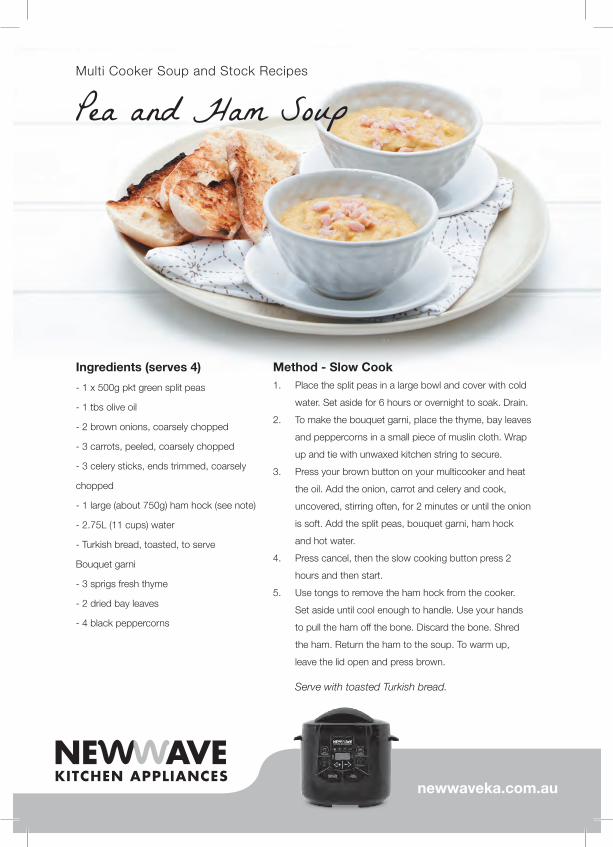
Pea and Ham Soup
Method - Slow Cook1. Place the split peas in a large bowl and cover with cold
water. Set aside for 6 hours or overnight to soak. Drain.
2. To make the bouquet garni, place the thyme, bay leaves
and peppercorns in a small piece of muslin cloth. Wrap
up and tie with unwaxed kitchen string to secure.
3. Press your brown button on your multicooker and heat
the oil. Add the onion, carrot and celery and cook,
uncovered, stirring often, for 2 minutes or until the onion
is soft. Add the split peas, bouquet garni, ham hock
and hot water.
4. Press cancel, then the slow cooking button press 2
hours and then start.
5. Use tongs to remove the ham hock from the cooker.
Set aside until cool enough to handle. Use your hands
to pull the ham off the bone. Discard the bone. Shred
the ham. Return the ham to the soup. To warm up,
leave the lid open and press brown.
Serve with toasted Turkish bread.
Ingredients (serves 4)
- 1 x 500g pkt green split peas
- 1 tbs olive oil
- 2 brown onions, coarsely chopped
- 3 carrots, peeled, coarsely chopped
- 3 celery sticks, ends trimmed, coarsely
chopped
- 1 large (about 750g) ham hock (see note)
- 2.75L (11 cups) water
- Turkish bread, toasted, to serve
Bouquet garni
- 3 sprigs fresh thyme
- 2 dried bay leaves
- 4 black peppercorns

newwaveka.com.au
Multi Cooker Soup and Stock Recipes
Minestrone SoupMethod - Soup (Rice Function)
Press the Brown Function.Heat the oil and add the onion and
garlic and cook for 2 minutes. Add the carrots, celery and broad
beans and cook for a further 3-4 minutes. Press the Cancel
button and add the tomatoes, bay leaf, parsley, water and
season. Close the lid and press the Rice function. The default
time is 12 minutes. Increase the cooking time to 15 minutes
and press Start. Make sure the pressure limiting valve is set on
Sealed. Open the lid and add the zucchini and canned beans.
Stir through and close the lid. Cook for a further 10 minutes
on the Rice function. Serve with fresh parmesan cheese and
crunchy bread.
Ingredients
- 125ml olive oil
- 1 brown onion, diced
- 1 carrot, diced
- 1 celery stick, diced
- 2 garlic cloves, chopped
- 1.5L water
- 1 bay leaf
- 1 medium zucchini, diced
- 200g canned tomatoes, chopped
- 100g broad beans, pre-soaked
- 150g canned cannellini beans, washed
- 2 fresh parsley stalks
- Salt and pepper
Pumpkin SoupMethod - Soup (Rice Function)
Press the Brown function. Heat the oil and add the leeks,
pumpkin, celery and potatoes and cook for 3-4 minutes. Add
the water, black peppercorns and season. Press the Cancel
button. Close the lid and press the Rice function. The default
time is 12 minutes, increase time to 25 minutes and press Start.
Make sure the pressure limiting valve is set on Sealed.
Once done open the lid and pour the contents into a blender
and process until smooth. You can return the soup to the Multi-
Cooker and press the Keep Warm Function. Add the butter and
allow it to melt and stir through the soup. You can substitute the
Pumpkin with another vegetable like zucchini or Asparagus to
make your favourite soup following the same process.
Ingredients (serves 4)
- 125ml olive oil
- 2 medium leeks, cleaned and halved
- 1 celery stick, diced
- 500g pumpkin, peeled chopped
- 1 small potato, peeled and chopped
- 100ml water
- 400ml chicken stock
- 3 black peppercorns
- 1tbsp butter
- Salt and pepper
newwaveka.com.au
Multi Cooker Poultry Recipes
Duck RaguMethod – Slow Cook
Open the lid and press the Brown button and then Start. Season the
duck breasts and heat the olive oil. Add the duck breast skin side down
and cook until well browned for 4-5 minutes per side. Remove and set
aside. Sauté the onions, shallots and garlic for about 3 minutes and
then add the chili flakes and sauté for a further 30 seconds. Add the
carrot, celery, tomato paste, stir and combine and continue to cook for
a further 30 minutes. Add the red wine and deglaze the pot, stirring and
scraping up the brown bits on the bottom of the pan with a wooden
spoon. Stir in the tomatoes, sugar, porcini mushrooms, thyme and fennel
seeds, season and bring to boil. Add a little water from rinsing the tinned
tomatoes. Press the Cancel button once done. Next press the Slow Cook
button, set 7/2 hours on the timer and then Start. Add the duck breasts
and cover with the sauce. Close the lid and make sure that the pressure
limiting valve is set on Exhaust. Once finished open the lid. Transfer the
duck breast to a cutting board and shred the meat into bite size pieces.
Return the duck to the sauce. Press the Brown button and start. Cook
for a further 10 minutes until the sauce is very thick. Serve with fresh egg
pasta e.g. Parpadelle, fettuccine.
Method – Pressure Cook
Open the lid and press the Brown button and then Start. Season the
duck breasts. Heat the olive oil. Add the duck breast skin side down and
cook until well browned, 4-5 minutes per side. Remove and set aside.
Sauté the onions, shallots and garlic for about 3 minutes. Add the chilli
flakes and sauté for a further 30 seconds. Add the carrot, celery, tomato
paste, stir and combine and continue to cook for a further 32 minutes.
Add the red wine and deglaze the pot, stirring and scraping up the brown
bits on the bottom of the pan with a wooden spoon. Stir in the tomatoes,
sugar, porcini mushrooms, thyme and fennel seeds, season and bring
to boil on the brown function. Add a little water from rinsing the tinned
tomatoes. Chop the duck breasts into varied size pieces and add them to
the sauce. Press the Cancel button when done.
Ingredients ( Serves 6-8)
- 3tbsp olive oil
- 11/2kg boneless duck breast
with skin off
- 1 red onion, finely chopped
- 2 garlic cloves, chopped
- 1tsp chilli flakes
- 1 carrot, diced
- 1 shallot
- 1 celery stalk, diced
- 2 tbsp tomato paste
- 11/2cups dry red wine
- 875ml tinned tomato
- 1tbsp sugar
- 30g dried porcini mushrooms
- 1tsp dried thyme
- 1/2tsp fennel seeds
- Salt and pepper

newwaveka.com.au
Multi Cooker Poultry Recipes
Method - Slow Cook
Open the lid and press the Brown button and Start. Season the duck
breasts and heat the canola oil. Add the duck breast, skin side down
and cook until well browned for 4 to 5 minutes per side. Remove and
set aside. Saute the onions, garlic, ginger, allspice, cinnamon and star
anise until onion softens around 3 minutes. Add the stock and deglaze
the pot, stirring and scraping up the brown bits on the bottom of the
pan with a wooden spoon. Stir in the sugar, soy sauce, and hoi sin
sauce and bring to the boil. Press the Cancel button once browning
is completed. Next, press the Slow Cook button, set 41/2 hours on
the timer and Start. Add the duck breasts and cover with the sauce.
Close the lid and ensure the pressure limiting valve is set on Exhaust.
Once finished open the lid. Arrange the bok choy quarters around the
duck breast, pushing them slightly into the cooking liquid. Press the
Brown button and start. Cook with the lid open for a further 10 minutes
until the sauce is very thick. Slice the duck breasts on a diagonal and
arrange the slices on top of the bok choy. Pour on the remaining sauce.
Method – Pressure Cook
Follow the Slow Cook instructions but stop after bringing the hoi sin
sauce to the boil. Add the duck breasts. Press the Cancel button
once browning is completed and close the lid and lock. Press the High
Pressure button, and then set the timer for 22 minutes and Start. Make
sure that the pressure limiting valve is set on Sealed. To open the lid,
turn the pressure limiting valve to Exhaust. Wait until the pressure has
reduced and the safety release function allows you to open the lid.
Arrange the bok choy quarters around the duck breast, pushing them
slightly into the cooking liquid. Press the Brown button and start. Cook
with the lid open for a further 10 minutes until the sauce is very thick.
Slice the duck breasts on a diagonal and arrange the slices on top of
the bok choy. Pour on the remaining sauce. Ready to serve.
Ingredients ( Serves 6-8)
- 2tbsp Canola oil
- 2kg boneless duck breast with
skin on
- 2 yellow onions, finely chopped
- 2 garlic cloves, chopped
- 3tsp fresh ginger, grated
- 11/2 tbsp ground allspice
- 1 cinnamon stick, 7.5 cm
- 1 star anise, broken in pieces
- 375ml chicken stock
- 60g dark brown sugar
- 60ml soy sauce
- 1tbsp hoi sin sauce
- 6 baby bok choy, cut into quarters
- Salt and pepper
Preparation
Trim excess fat from the duck
breasts.
Allspice Duck With Braised Bok Choy
newwaveka.com.au
Multi Cooker Poultry Recipes
Method – Slow Cook
Open the lid and press the Brown button and then Start. Season the
chicken pieces and melt the butter and oil. Add the chicken in batches,
cook until browned around 5 minutes then set aside. Add the shallots
until lightly browned. Then add the wine, stock and vinegar and bring
to the boil making sure to get the brown bits off the bottom of the pot
using a wooden spoon. Press the Cancel button once done. Next press
the Slow Cook button, set 5 hours on the timer and then Start. Add the
chicken. Close the lid and make sure that the pressure limiting valve is
set on Exhaust. Once finished open the lid. If there is still a lot of liquid
press the Brown button and cook until the liquid thickens. Ready to
serve.
Method – Pressure Cook
Open the lid and press the Brown button and then Start. Season the
Chicken pieces. Melt the butter and oil. Add the chicken in batches,
cook until browned or around
5 minutes and set aside. Add the shallots until lightly browned. Then
add the wine, stock and vinegar and bring to the boil making sure to
get the brown bits off the bottom of the pot using a wooden spoon.
Add the chicken pieces. Press the Cancel button once done. Close the
lid and lock. Press the High Pressure button, then set the Timer of 25
minutes, then Start. Make sure that the pressure limiting valve is set on
Sealed. To open the lid, turn the pressure limiting valve to Exhaust. Wait
until the pressure has reduced and the safety release function allows
you to open the lid. Ready to serve.
Ingredients ( Serves 3)
- 500g shallots, peeled
- 500g Maryland chicken
- 2tbsp unsalted butter
- 2tbsp olive oil
- 30ml dry red wine
- 125ml chicken stock
- 30ml balsamic vinegar
- Salt and pepper
Preparation
Using a paring knife, cut a shallow
X in the root end of each shallot.
Chicken with Shallots and Balsamic Vinegar
newwaveka.com.au
Multi Cooker Poultry Recipes
Spanish Chicken StewMethod – Slow Cook
Open the lid and press the Brown button and then Start. Season the
chicken pieces. Heat the butter and olive oil. Add the chicken pieces and
cook until well browned all over, which should be around 10 minutes.
Remove and set aside. Sauté the capsicums, onions, until soft, this
should take around 3 minutes. Add the garlic and cook for 1 minute. Stir
in the tomatoes and paprika and cook for a further 2 minutes. Add the
chicken pieces and season. Press the Cancel button once done. Next,
press the Slow Cook button, set 51/2 hours on the timer and then press
Start. Close the lid and make sure that the pressure limiting valve is set on
Exhaust. Once finished open the lid. Add the chickpeas, olives, cover and
cook for a further 20 minutes until the sauce is very thick. Once done, top
with the toasted almond flakes.
Method – Pressure Cook
Open the lid and press the Brown button and then Start. Season the
chicken pieces and heat the butter and olive oil. Add the chicken pieces
and cook for around 10 minutes until well browned all over. Remove and
set aside. Sauté the capsicum, onions, until soft or for around 3 minutes.
Add the garlic and cook for 1 minute. Stir in the tomatoes and Paprika
and cook for a further 2 minutes. Add the chicken pieces, chickpeas
and olives. Season and stir through. Press the Cancel button once done.
Close the lid and lock. Press the High Pressure button, then set the timer
of 28 minutes, then Start. Make sure that the pressure limiting valve is set
on Airtight. To open the lid, turn the pressure limiting valve to Exhaust.
Wait until the pressure has reduced and the safety release function allows
you to open the lid. Once done, top with the toasted almond flakes.
Ingredients ( Serves 4)
- 1tbsp olive oil
- 1tbsp unsalted butter
- 1kg or 4-6 chicken pieces with
skin off
- 1 small white onion, finely
chopped
- 1 garlic clove, chopped
- 1 red and yellow capsicum,
seeded and chopped.
- 400g tin tomatoes
- 400g chic peas
- 80g olives
- 1 cup chicken stock
newwaveka.com.au
Multi Cooker Poultry Recipes
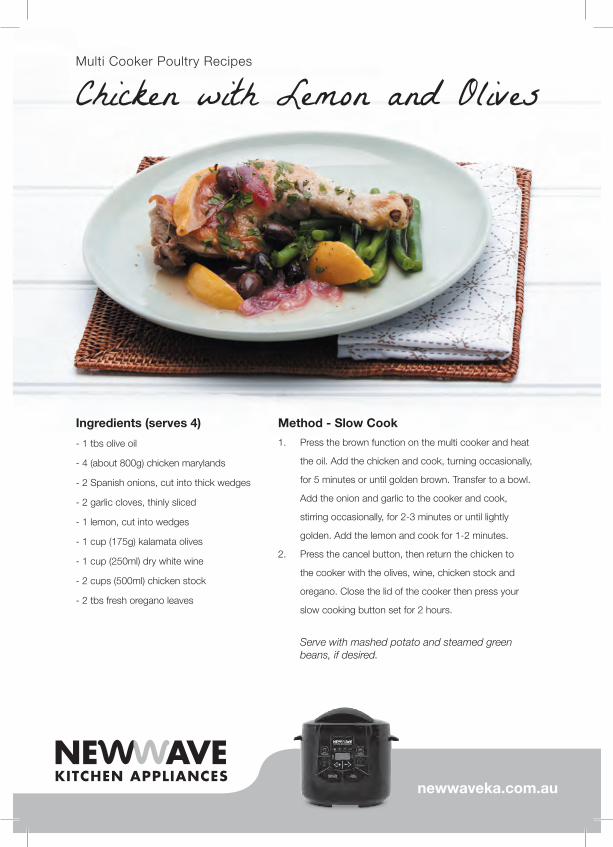
Chicken with Lemon and Olives
Method - Slow Cook
1. Press the brown function on the multi cooker and heat
the oil. Add the chicken and cook, turning occasionally,
for 5 minutes or until golden brown. Transfer to a bowl.
Add the onion and garlic to the cooker and cook,
stirring occasionally, for 2-3 minutes or until lightly
golden. Add the lemon and cook for 1-2 minutes.
2. Press the cancel button, then return the chicken to
the cooker with the olives, wine, chicken stock and
oregano. Close the lid of the cooker then press your
slow cooking button set for 2 hours.
Serve with mashed potato and steamed green beans, if desired.
Ingredients (serves 4)
- 1 tbs olive oil
- 4 (about 800g) chicken marylands
- 2 Spanish onions, cut into thick wedges
- 2 garlic cloves, thinly sliced
- 1 lemon, cut into wedges
- 1 cup (175g) kalamata olives
- 1 cup (250ml) dry white wine
- 2 cups (500ml) chicken stock
- 2 tbs fresh oregano leaves

newwaveka.com.au
Multi Cooker Steamed Recipes
Chicken with Saffron Rice
Method - Steam
1. Finely chop 1 shallot and then slice the remaining shallots thinly on
the diagonal. In a small bowl combine the lime juice, fish sauce,
oyster sauce, sesame oil, grated ginger and the chopped shallot.
2. Pour over the chicken and marinate for 30 minutes. Place chicken
and marinade into parcels using foil and baking paper.
3. Using your multi cooker measuring cup, put 2 cups of basmati rice
well rinsed into your cooker, add a pinch of saffron and hot water
to cover the rice up to above the level 2 mark inside the bowl
4. Pop you rack into the cooker and place the chicken parcels in the
steamer basket. Close the lid, press steam and 10 minutes and
press start. Make sure your valve is on exhaust.
5. Slice the chicken on the diagonal and pour over the cooking
juices. Top with sliced shallots and toasted sesame seeds.
Serve with steamed rice on a banana leaf if desired.
Ingredients (serves 4)
- 3 shallots
- 1 1/2 tbs lime juice
- 1 tbs fish sauce
- 1 tbs oyster sauce
- 1 tsp sesame oil
- 1 tbs grated ginger
- 2 small chicken breasts trimmed
or one large sliced in half
- 1 tbs toasted sesame seeds
- Basmati rice
- Pinch of Saffron

newwaveka.com.au
Multi Cooker Poultry Recipes
Chicken cacciatoreMethod – Slow Cook
Open the lid and press the Brown button and then Start. Melt the butter
and oil. Add the chicken in batches, cook until browned 5 minutes then
set aside. Sauté the onions in oil until softened. Add the anchovies
until they dissipate. Add the mushrooms, capers, tomatoes and stock.
Bring to boil and mix thoroughly and make sure you scrape the bottom
of the pot with a wooden spoon. Add the chicken pieces and press
the Cancel button once done. Next, press the Slow Cook button, set
the timer to 6 hours and then Start. Close the lid and make sure that
the pressure limiting valve is set on Exhaust. Once finished open the lid
and remove the chicken pieces. Set aside and cover. Press the Brown
Function and cook off the remaining sauce uncovered until thickened.
Plate up the chicken and spoon on the thickened sauce.
Method – Pressure Cook
Open the lid and press the Brown button and then Start. Melt the butter
and oil. Add the chicken in batches, cook until browned 5 minutes then
set aside. Sauté the onions in oil until softened. Add the anchovies until
they dissipate. Add the mushrooms, capers, tomatoes and stock. Bring
to boil. Mix thoroughly and make sure you scrape the bottom of the
pot with a wooden spoon. Add the chicken pieces. Close the lid and
lock. Press the High Pressure button, then set the timer to 30 minutes,
then Start. Make sure that the pressure limiting valve is set on Airtight.
To open the lid, turn the pressure limiting valve to Sealed. Wait until
the pressure has reduced and the safety release function allows you to
open the lid.
Ingredients ( Serves 4)
- 8 chicken varied pieces
- 3 tbsp olive oil
- 1tbsp fresh lemon juice
- 2 garlic cloves, chopped
- 1tbsp thyme, chopped
- 2tbsp unsalted butter
- 1 white onion, sliced thinly
- 250g button mushrooms,
quartered
- 875ml canned roma tomatoes
- 3tsp mini capers, rinsed
- 1tsp anchovy paste or chop 2-3
anchovies
- 60ml chicken stock
- Salt and pepper
Preparation
Combine and season the chicken
pieces with the salt, pepper, olive
oil, lemon juice, garlic and thyme.
Cover and place in the refrigerator
for at least 1 hour or even
overnight.
newwaveka.com.au
Multi Cooker Pork Recipes
Chilli VerdeMethod – Slow Cook
Open the lid and press the Brown button and then Start. Season the
pork pieces. Heat the canola oil. Add the pork pieces and cook for 2
minutes. Add the mild green chilies, tomatillos, onion, garlic, jalapeno,
stock, tomatoes, oregano and cumin and stir briefly to combine. Cook
for a further 4 minutes. Press cancel when finished browning. Next
press the Slow Cook button, set 4 hours on the timer and then Start.
Close the lid and make sure that the pressure limiting valve is set on
Exhaust. Garnish and serve with corn Tortillas.
Method – Pressure Cook
Open the lid and press the Brown button and then Start. Season the
pork pieces. Heat the canola oil. Add the pork pieces and cook for 2
minutes. Add the mild green chilies, tomatillos, onion, garlic, jalapeno,
stock, tomatoes, oregano and cumin and stir briefly to combine. Cook
for a further 4 minutes. Press the cancel when finished browning.
Close the lid and lock. Press the High Pressure button, and then set
the timer to 20 minutes and press Start. Make sure that the pressure
limiting valve is set on Airtight. To open the lid, turn the pressure
limiting valve to Sealed. Wait until the pressure has reduced and the
safety release function allows you to open the lid. Garnish and serve
with corn Tortillas.
Ingredients ( Serves 6)
- 2tbsp olive oil
- 1kg boneless pork shoulder, cut
into -cubes
- 1 small white onion, finely
chopped
- 2 garlic cloves, chopped
- 1tsp ground cumin
- 1tbsp dried oregano
- 1 large jalapeno chili
- 400g cans of diced, roasted
mild chillies
newwaveka.com.au
Multi Cooker Pork Recipes
Roasted Pork With ApricotsMethod – Slow Cook
Open the lid and press the Brown button and then Start. Heat the oil add the pork loin until browned and sealed for 5 minutes then set aside. Sauté the onions until softened- 2-3 minutes. Add the garlic and sauté for 1 minute. Pour in the stock and mix thoroughly and make sure you scrape the bottom of the pot. (Do not use any metal utensils). Add the pork loin, apricots, orange juice and thyme. Press the Cancel button when browning is complete. Next press the Slow cook button, set 5-6 hours on the timer and then press Start. Close the lid and make sure that the pressure limiting valve is set on Exhaust. Once finished open the lid and remove the pork and cover with foil and set aside. Remove the apricots and set aside. Press the Brown function. Bring the remaining sauce to the boil uncovered until thickened. Stir in the mustard and add the apricots. Slice the pork loin
across the loin and arrange. Serve with the sauce.
Method – Pressure Cook
Open the lid and press the Brown button and then Start. Heat the oil add the pork loin until browned and sealed for 5 minutes then set aside. Sauté the onions until softened- 2-3 minutes. Add the garlic and sauté or 1 minute. Pour in the stock and mix thoroughly and make sure you scrape the bottom of the pot. (Do not use any metal utensils). Add the pork loin, apricots, orange juice and thyme. Close the lid and lock. Press the High Pressure button, and then set the timer to 20 minutes and press Start. Make sure that the pressure limiting valve is set on Sealed. To open the lid, turn the pressure limiting valve to Exhaust. Wait until the pressure has reduced and the safety release function allows you to open the lid. Remove the pork and cover with foil and set aside. Remove the apricots and set aside. Press the Brown function. Bring the remaining sauce to the boil uncovered until thickened. Stir in the mustard and add the apricots.
Slice the pork loin across the loin and arrange. Serve with the sauce.
Ingredients ( Serves 4-6)
- 1/4 cup plain flour
- 11/4 kg boneless pork loin roast
- 2tbsp olive oil
- 1 garlic clove, chopped
- 1 white onion, sliced thinly
- 250ml chicken stock
- 450g dried apricots
- 125ml fresh orange juice
- 2tsp fresh chopped thyme
- 2tbsp dijon mustard
- Salt and pepper
Preparation
Season and flour the pork loin and
shake off any excess flour.

newwaveka.com.au
Multi Cooker Veal,Beef and Lamb Recipes
Osso BucoMethod – Slow Cook
Open the lid and press the Brown button and then press Start. Season
the shank pieces. Heat the oil and add the veal in batches, cook until
browned or around 5 minutes then remove and set aside. Add the
onion and garlic and sauté for 2-3 minutes. Then add the carrots, celery
and prosciutto and cook for a further 5 minutes. Add the wine and stir,
making sure to get the brown bits off the bottom of the pot. (Do not use
any metal utensils when cooking). Add the canned tomato and heat for
another 5 minutes. Add the shank pieces, stock, thyme and oregano and
stir gently. Bring to boil and press the Slow Cook button, set 6 hours on
the timer and then Start. Close the lid and make sure that the pressure
limiting valve is set on Exhaust. Once finished open the lid. Let the food
sit in the cooking pot for another 15 minutes to cool. Ready to serve.
Method – Pressure Cook
Open the lid and press the Brown button and then press Start. Season
the shank pieces. Heat the oil and add the veal in batches, cook until
browned 5 minutes then remove and set aside. Add the onion and garlic
and sauté for 2-3 minutes. Add the carrots, celery and prosciutto and
cook for a further 5 minutes. Add the wine and stir making sure to get
the brown bits off the bottom of the pot. (Do not use any metal utensils
when cooking). Add the canned tomato and heat for another 5 minutes.
Add the shank pieces, stock, thyme and oregano and stir gently. Bring to
boil. Close the lid and lock. Press the High Pressure button, then set the
Timer of 30 minutes, and press Start. Make sure that the pressure limiting
valve is set to Sealed. To open the lid, turn the pressure limiting valve
to Exhaust. Wait until the pressure has reduced and the safety release
function allows you to open the lid. Ready to serve.
Ingredients ( Serves 4)
- 4 veal shanks (approx. 11/2kg)
- 1tbsp olive oil
- 60g prosciutto
- 125ml dry white wine
- 250ml chicken stock
- 2 sprigs of fresh thyme
- 1 large carrot, diced
- 1 onion
- 2 garlic cloves
- 1 celery, diced
- 375g canned roma tomato
- 2tsp dried oregano
- Salt and pepper

newwaveka.com.au
Multi Cooker Veal,Beef and Lamb Recipes
Springtime Veal StewMethod – Slow Cook
Open the lid and press the Brown button and then press Start. Season
the veal pieces. Melt the butter and oil and add the veal in batches, cook
until browned then set aside. Add the shallots and prosciutto and sauté
for 2 minutes. Then add the wine and bring to the boil making sure to get
the brown bits off the bottom of the pot using a wooden spoon. Add the
veal pieces, stock, thyme springs and stir gently and bring to boil. Press
the Cancel button once done. Next, press the Slow Cook button, set 51/2
hours on the timer and then press Start. Close the lid and make sure that
the pressure limiting valve is set on Exhaust. Once finished open the lid
and add the carrots and cook for a further 20 minutes.Then add the peas
and asparagus and cook for a further 10 minutes. Finally add the cream
and cook for a further 5 minutes. Ready to serve.
Method – Pressure Cook
Open the lid and press the Brown button and then press Start. Season
the veal pieces. Melt the butter and oil. Add the veal in batches, cook
until browned 5 minutes then set aside. Add the shallots and prosciutto
and sauté for 2 minutes. Then add the wine and bring to the boil making
sure to get the brown bits off the bottom of the pot using a wooden
spoon. Add the veal pieces, stock, thyme sprigs, peas, asparagus and
cream and stir gently and bring to boil. Press the Cancel button once
done. Close the lid and lock. Press the High Pressure button, then set the
Timer to 25 minutes, and press Start. Make sure that the pressure limiting
valve is set on Sealed. To open the lid, turn the pressure limiting valve
to Exhaust. Wait until the pressure has reduced and the safety release
function allows you to open the lid. Ready to serve.
Ingredients (Serves 8-12)
- 3kg boneless veal shoulder,
cut into cubes
- 2tbsp unsalted butter
- 1tbsp olive oil
- 6 shallots, minced
- 60g prosciutto
- 125ml dry white wine
- 250ml chicken broth/stock
- 3 sprigs fresh thyme
- 2 large carrots, diced
- 1 bunch asparagus, cut into 21/2
cm pieces
- 185g frozen baby peas
- 250ml thickened cream
- Salt and pepper

newwaveka.com.au
Multi Cooker Veal,Beef and Lamb Recipes
Thai Red Curry BeefMethod – Slow Cook
Open the lid and press the Brown button and then press Start. Season the beef pieces and heat the oil. Add the beef pieces in batches, cook until browned or around 5 minutes then set aside. Add the onion and garlic and sauté for 2-3 minutes. Then add the curry paste and stir until fragrant and the onion and garlic are coated, about 30 seconds. Add the coconut milk and stir, making sure to get the brown bits off the bottom of the pot using a wooden spoon. Add the fish sauce, lime juice and brown sugar and heat for another 5 minutes before adding the beef. After the beef has been added, press the Slow Cook button, set 6 hours on the timer and then press Start. Close the lid and make sure that the pressure limiting valve is set on Exhaust. Once finished open the lid and add the bamboo shoots and stir trough and allow to sit for 10 minutes. Ready to serve with toasted flaked almonds and chopped fresh mint. Method – Pressure Cook
Open the lid and press the Brown button and then press Start. Season the beef pieces and heat the oil. Add the beef pieces in batches, cook until browned or around 5 minutes then set aside. Add the onion and garlic and sauté for 2-3 minutes. Then add the curry paste and stir until fragrant and the onion and garlic are coated, about 30 seconds. Add the coconut milk and stir, making sure to get the brown bits off the bottom of the pot using a wooden spoon. Add the fish sauce, lime juice and brown sugar and heat for another 5 minutes before adding the beef. Close the lid and lock. Press the High Pressure button, and then set the timer to 30 minutes, then press Start. Make sure that the pressure limiting valve is set to Sealed. To open the lid, turn the pressure limiting valve to Exhaust. Wait until the pressure has reduced and the safety release function allows you to open the lid. Add the bamboo shoots and stir through. Ready to serve with toasted flaked almonds and chopped fresh mint.
Ingredients (Serves 6-8)
* 11/4kg lean stewing beef
* 3tbsp oil
* 1 white onion, chopped
* 4 garlic cloves, crushed
* 60g thai red curry paste
* 420ml coconut milk
* 2tbsp fish sauce
* 2tbsp fresh lime juice
* 2tbsp dark brown sugar
* 250ml sliced bamboo shoots
* 3tbsp chopped fresh mint
* 60g Toasted flaked almonds
newwaveka.com.au
Multi Cooker Veal,Beef and Lamb Recipes
Hungarian Beef GoulashMethod – Slow Cook
Open the lid and press the Brown button and then press Start. Cook the
bacon remove and set aside. Season the beef pieces and heat the oil.
Add the beef pieces in batches, cook until browned for around 5 minutes
then remove and set aside. Add the onion and garlic and sauté for 2-3
minutes. Then add paprika, caraway seeds, oregano, tomato paste,
wine and stock and bring to boil before adding the beef. After the beef
has been added, press the Slow Cook button and set the timer for 6
hours and then press Start. Close the lid and make sure that the pressure
limiting valve is set on Exhaust. Once finished open the lid and add the
chopped bacon, capsicum and potatoes and stir through. Cook on slow
cook for a further 11/2 hour. Ready to serve with sour cream.
Method – Pressure Cook
Open the lid and press the Brown button and then press Start. Follow
the slow cook instructions until you have added beef. Cook the bacon
remove and set aside. Season the beef pieces and heat the oil. Add the
beef pieces in batches, cook until browned, or around 5 minutes then
remove set aside. Add the onion and garlic and sauté for 2-3 minutes.
Then add paprika, caraway seeds, oregano, tomato paste, wine and
stock and bring to boil. Add the beef, chopped bacon, capsicum and
potatoes and stir through. Close the lid and lock. Press the High Press
button, then set the timer to 30 minutes, then press Start. Make sure
that the pressure limiting valve is set on Airtight. To open the lid, turn the
pressure limiting valve to Sealed. Wait until the pressure has reduced and
the safety release function allows you to open the lid. Ready to serve.
Ingredients (Serves 4-6)
- 11/4kg lean stewing beef or
chuck
- 125g bacon
- 1tbsp oil
- 2 white onions, chopped
- 2 garlic cloves, crushed
- 1tbsp paprika
- 1tsp caraway seeds
- 5 sprigs fresh oregano
- 1tbsp tomato paste
- 250ml dry white wine
- 250ml chicken stock
- 1 red capsicum, seeded and
chopped
- 1kg potatoes, quartered
- 125g sour cream
- Salt and pepper
newwaveka.com.au
Multi Cooker Veal,Beef and Lamb Recipes
Bolognese SauceMethod – Slow CookOpen the lid and press the Brown button and then press Start. Sauté the
onions, celery and carrots in oil until soft, which should take around 5-6
minutes. Add the garlic and cook for a further 2 minutes. Add the three
types of mince and cook until all dark in colour, or around 10-12 minutes.
Add the red wine and stir through until evaporated about 5 minutes. Stir
in the tomato paste, add the passata, water, bay leaves, herbs and stir
once again. Bring to the boil. Press the Cancel button once done. Make
sure you do not use any metal utensils when cooking. Next press the
Slow Cook button, set 6 hours on the timer and then press Start. Close
the lid and make sure that the pressure limiting valve is set on Exhaust.
Once finished open the lid. Serve with fresh egg pasta e.g. Parpadelle or
Fettuccine.
Method – Pressure CookOpen the lid and press the Brown button and then press Start. Sauté
the onions, celery and carrots in oil until soft, which should take around
5-6 minutes. Add the garlic and cook for a further 2 minutes. Add all the
mince and cook until dark in colour or around 10-12 minutes. Add the
red wine and stir through until evaporated, or about 5 minutes. Stir in the
tomato paste, add the passata, water, bay leaves, herbs and stir once
again. Bring to the boil. Press the Cancel button once done. Close the lid
and lock. Press the High Pressure button, and then set the Timer of 25
minutes, then press Start. Make sure that the pressure limiting valve is
set on Sealed. To open the lid, turn the pressure limiting valve to Exhaust.
Wait until the pressure has reduced and the safety release function allows
you to open the lid. Ready to serve..
Ingredients (Serves 6-8)- 2tbsp olive oil
- 250g minced beef
- 250g minced veal
- 250g minced pork
- 1 white onion, finely chopped
- 1 garlic clove, chopped
- 1 carrot, diced
- 1 celery stalk, diced
- 300g tomato paste
- 750ml passata
- 300ml water
- 1 cup dry red wine
- 2-3 bay leaves
- 1tsp mixed Italian herbs
- Salt and pepper

newwaveka.com.au
Multi Cooker Veal,Beef and Lamb Recipes
Lamb Curry
Method - Slow Cook
1. Place flour and lamb in a snap-lock bag.
Season with salt and pepper. Seal. Shake to coat.
Press brown on your multi cooker and heat oil. Cook lamb,
in batches, for 3 to 4 minutes or until browned and remove.
2. Add onion, garlic and ginger to the multi cooker and cook,
stirring, for 4 to 5 minutes or until tender. Add chilli and
curry paste. Cook, stirring, for 1 minute or until fragrant.
Add coconut milk, stock powder and 3/4 cup cold water.
Add cinnamon stick and bay leaf. Return lamb and any
juices stir to combine.
3. Press cancel, close the lid then press the slow cook button,
press 4 hours and start. Make sure your valve is on exhaust.
Once done remove and discard cinnamon stick and bay leaf.
Serve with rice, yoghurt, naan and coriander.
Ingredients (serves 4)
- 1/4 cup plain flour
- 800g diced lamb shoulder
- 2 tablespoons olive oil
- 1 large brown onion, chopped
- 2 garlic cloves, crushed
- 4cm piece fresh ginger, peeled, grated
- 1 long red chilli, finely chopped
- 1/4 cup Indian madras curry paste
- 270ml light coconut milk
- 1 teaspoon stock powder
- 1 cinnamon stick
- 1 dried bay leaf

newwaveka.com.au
AFTER SALES SERVICE
This appliance is built to the very highest of standards. There are no user-serviceableparts. Follow these steps if the unit fails to operate – 1. Check instructions have been followed correctly2. Check fuse has not blown3. Check the mains supply is functional If the appliace will not operate, please call Customer Service on 1800 337 211. If the appliance is outside the warranty period please return to the Customer Service Department, following the steps below : 1. Pack it carefully (preferably in the original carton) and ensure the unit is clean2. Enclose your name and address on all correspondence3. Give the reason why you are returning it4. Send it to our Customer Service Department at the address below:
Customer Service DepartmentNewWave Kitchen AppliancesPO BOX 421 Moorabbin BC Moorabbin VIC 3189 Telephone +61 3 9553 7211 Facsimile +61 3 9553 7233 Email: [email protected]

newwaveka.com.au
Newwave Kitchen Appliances PO BOX 421 Moorabbin BC Moorabbin VIC 3189
Phone: 1800 337 211 Email: [email protected] newwaveka.com.au
Newwave Kitchen Appliances PO BOX 421
Moorabbin BC Moorabbin VIC 3189
Telephone +61 3 9553 7211 Facsimile +61 3 9553 7233