
5. Control Panel Information
38
Alarm Control Programming R2.0 Compass 2.0 User Guide 39 07/10 5. Control Panel Information 5.1 Alarm Control Programming Control panels belonging to Ademco, FBII, and Apex protocols are available for use with the Compass commserver. Most of the panels that legacy Compass 16-bit supports, are supported in Compass 2.0. To access the Alarm Control Programming (Panel Edit) screens: • Double-click the highlighted customer account row in the Customer screen of the Downloader. • Alternatively, highlight the customer account row and click Modify in Panel Options. Figure 6-1 Compass 2.0 [Customers] Based on the panel supported, the panel application for Compass 16, or the panel application for Compass 2.0 is displayed. REFERENCE- INTERNAL For more information on panels supported by the different versions of Compass, refer to 1.4 Viewing a List of Panels Supported by Compass 2.0.
Transcript of 5. Control Panel Information

Alarm Control Programming
R2.0 Compass 2.0 User Guide 3907/10
5. Control Panel Information
5.1 Alarm Control ProgrammingControl panels belonging to Ademco, FBII, and Apex protocols are available for use with the Compass commserver. Most of the panels that legacy Compass 16-bit supports, are supported in Compass 2.0.
To access the Alarm Control Programming (Panel Edit) screens:
• Double-click the highlighted customer account row in the Customer screen of the Downloader.
• Alternatively, highlight the customer account row and click Modify in Panel Options.
Figure 6-1 Compass 2.0 [Customers]
Based on the panel supported, the panel application for Compass 16, or the panel application for Compass 2.0 is displayed.
REFERENCE- INTERNAL
For more information on panels supported by the different versions of Compass, refer to 1.4 Viewing a List of Panels Supported by Compass 2.0.

40 Compass 2.0 User Guide R2.007/10
Panel Application for Compass 16
5.2 Panel Application for Compass 16
OverviewA 16-bit panel screen, in general, includes the following layout:
Figure 6-2 Control Panel
At the top of the screen is the title bar. It identifies the control panel type and revision, and the receiver/account number of the customer you selected. Under this is the menu bar. The options in the menu bar are not control panel-specific as they are Downloader operations.
Menu Bar options
File
Option Allows you to…
Save Save the alarm control settings.
Print Setup Select and set up the printer.
Print Programming form Print a programming form that reflects the account’s current Edit data.
Exit Exit the application.

Panel Application for Compass 16
R2.0 Compass 2.0 User Guide 4107/10
CommunicationsClicking Communications in the Panel menu bar takes you to the Compass Communications screen. It allows you to upload or download information to the panel, providing the ability to arm, disarm, retrieve status, bypass zones, and send messages.
ViewThe View modes enable you to see different versions of a control panel’s E2 data. You can view the values saved in the Downloader, values uploaded from the control, default values, or an unsaved current Edit value. The screen in view is indicated in the upper-right corner of the title bar.
Search This option allows you to search for a specific programming option by field number or name. To do this, select Search from the Panel Edit screen. The following screen is displayed:
ATTENTION
The availability of these options is dependent on the panel being connected to, and the panel programming options.
Option Allows you to…
Current Edit View the changes just made (not saved yet) to the control programming.
Upload View the data last uploaded from the alarm control.
Saved View the previously saved data.
Defaults View the programming defaults for a control panel. (Some, like the Lynx family panels, have multiple default options available.)

42 Compass 2.0 User Guide R2.007/10
Panel Application for Compass 16
Figure 6-3 Panel Feature Search
To search for a particular option, perform the following steps:
Features This menu displays the same options as those on the button bar, with the hot key details.
Step Action
1 Type the programming field number or part of the field name that you are looking for.
2 Click the Find First button. If you want to go to the field in the programming screens, click the Go To button. Compass takes you to the appropriate screen and indicates the field with a red arrow.
3 If Find First did not bring you to the option you wanted, press Find Next to go to the next option matching the criteria. Use Find Previous to go back to an earlier option.
TIP
Double-clicking the programming field also takes you directly to the appropriate screen.

Panel Application for Compass 2.0
R2.0 Compass 2.0 User Guide 4307/10
Window Presents normal Windows features, such as cascading and arranging screens, and displays screens currently open.
Help Select About to view the version and release date of the Compass Database and of the Panel Edit module for the panel you are modifying.
Programming an Alarm ControlFrom the Downloader customer screen get to the panel screen as explained in the Alarm Control Programming overview. The Panel screen varies according to the features of the control panel selected.
To program the panel, perform the following steps:
5.3 Panel Application for Compass 2.0The panel application designed for Compass 2.0 is a new and improved version of the earlier 16-bit panel applications. Feedback and comments from users were used for designing the screens.
As against the functionality-centric navigation of the earlier panels, the new design offers a partition-centric navigation, besides a more logical approach to configuration.
Step Action
1 Select the section (Partition, Dialer, Zones) to program from the button bar (refer to Figure 6-2 Control Panel).
2 Type the control panel programming information.
3 When you complete programming, select Close.
The Save Changes screen is displayed:
4 To save the programming information, click Save. To close without saving, click Undo. To return to the Panel Edit screen without saving, select Cancel.

44 Compass 2.0 User Guide R2.007/10
Panel Application for Compass 2.0
Overview of the panelThe panel application designed for Vista250FBP is taken as an example in this user guide. The design of all other panel applications follows similar lines.
The panel application has a left navigation bar and a right pane that shows the corresponding user interface controls.
The left navigation bar contains the listing of different configuration groups. Click the required group to display the screen in the right pane.
The partition screen is displayed in Figure 6-4. The application enables you to configure all the attributes related to a partition on a single page while with the previous panel you had to navigate to different tabs to program a single partition.
You can also configure the zones, devices, users, and schedules for that partition without navigating outside of the Partition tab.
Figure 6-4 Panel Application for Compass 2.0
Navigation
The left pane is the navigation bar to the different configuration groups. To configure partitions, globals, dialer properties and so on, click the relevant tab on the pane.
Sub-menus under the tabs for the different configurable screens for the particular group facilitate easy navigation.
You can configure associated zones, devices, users, and schedules by selecting the configuration group under each partition. For example, to configure the zones for partition 1, click the Zones tab under Partition 1 in the left navigation bar. The configurations that you select in this tab are applicable exclusively to partition 1.

Panel Application for Compass 2.0
R2.0 Compass 2.0 User Guide 4507/10
Figure 6-5 Left Navigation Bar

46 Compass 2.0 User Guide R2.007/10
Panel Application for Compass 2.0
The Menu bar
Figure 6-6 Menu
Menu Option Purpose
File The File menu offers the following submenu options:
• Save – To save changes todata.
The toolbar includes the shortcut.
• Print Programming Form - To launch the Print dialogwhich can be used to Printthe account’s currentconfiguration data
• Exit – To exit theapplication
View You can view the following from the View menu:
• The Toolbar below themenu bar
• The Status Bar at thebottom of the screen
• The Task List on the leftpane
• The Currently edited data(onscreen data)
• The Uploaded data
• The Saved data
• The Default data
Tools The Tools menu offers the following sub-menu options:
• Communication
• Search

Panel Application for Compass 2.0
R2.0 Compass 2.0 User Guide 4707/10
Communication This option launches the communication screen.
Search The Search feature allows you to quickly find a feature and its configuration details in the application. Search from the existing list of features by selecting the Browse through the features option, and select the feature group name from the Search In dropdown. To search through all the groups at once using keywords, select the Search option, select ‘All’ in Search In, and type the feature in Search for. Click Find. The results are displayed in the Results pane below. To go to the feature, double-click the searched feature, or select the feature and click Goto. Click Close to close the Search dialog box.
Menu Option Purpose

48 Compass 2.0 User Guide R2.007/10
Panel Application for Compass 2.0
Save Changes DialogThe Save Changes window is displayed when Compass is closed by clicking the ‘X’ button. Other functions can be performed by clicking the following buttons.
• Save’ - Modified values in PA will be saved and return back to the edit view.
• ‘Save and Exit’ –Modified values will be saved and exit.
• ‘Undo and Exit’ – Modified values in PA will not be saved and the following message box willbe popped up.
If you select ‘Yes’, Undo operation will occur and the application will exit.
Help The Help menu launches the Compass Help file. You can search by Index,
Contents, or search keywords.
It also launches the About box which gives the version details of the Compass Downloader application.
Menu Option Purpose

Panel Application for Compass 2.0
R2.0 Compass 2.0 User Guide 4907/10
If you select ‘No’, the application will come back to the edit view.
Configuration GroupsFollowing are the configuration groups to be programmed in the panel:
• Partitions
• Globals
• Dialer
• Device
• Users
• Relays
• Zones
• Access
• Schedules
A brief description for each of these groups follows.
PartitionsPartitions allow you to break up a large area into smaller sections. This feature is useful to disarm certain areas while leaving other areas armed, or to limit access to certain areas to specific individuals.

50 Compass 2.0 User Guide R2.007/10
Panel Application for Compass 2.0
Adding and Removing partitionsTo add or remove partitions, perform the following steps:
Step Action
1 Click the Partition tab in the left navigation bar.
The different tabs under Partition are displayed.
2 Click +Add Partition to add a new partition.
3 Click -Remove Partition to remove the last added partition.

Panel Application for Compass 2.0
R2.0 Compass 2.0 User Guide 5107/10
Configuring Common DataInformation regarding common lobby, and the description and definition of macro commands is common across the partitions. Configure these from the Common Data tab.
Figure 6-7 All Partition Common Data

52 Compass 2.0 User Guide R2.007/10
Panel Application for Compass 2.0
Configuring Partition Specific DataConfigure the data specific to each partition in the individual partition screen.
Figure 6-8 Partition Specific Data
You have to configure the following for each partition:
Data Allows you to…
General information Specify a description, name, the primary and secondary subscriber Ids, and the Alpha descriptors.
System Options Specify system options including the Entry and Exit delays allowed by the system, the display characteristics, the general rules for arm, disarm, and bypass, and enabling of certain specialized features and rules.

Panel Application for Compass 2.0
R2.0 Compass 2.0 User Guide 5307/10
Macro Key Assignment Select Macro Key Assignments from the drop-downs. A Macro or Speed Key command is a series of keystrokes stored in the system memory and activated when a programmed lettered key is pressed. Each Speed Key command can include 32 keystrokes. Generally four macro commands (A, B, C, and D) are supported. However, this varies from panel to panel.
Typical macro functions include:
• Arming sequences that involve firstbypassing certain zones beforearming
• Seldom-used but repeatablesequences
• Relay activation sequences
Lettered keys A, B, C, and D are assigned a specific macro definition by entering a Speed Key number.
Sounder Options Indicate the sound settings for the bells and auxiliary relay.
Communication Specify the communication delays and swing suppression count.
Dialer Reports Indicate the zones for which the reports are to be sent.
54 Compass 2.0 User Guide R2.007/10
Panel Application for Compass 2.0
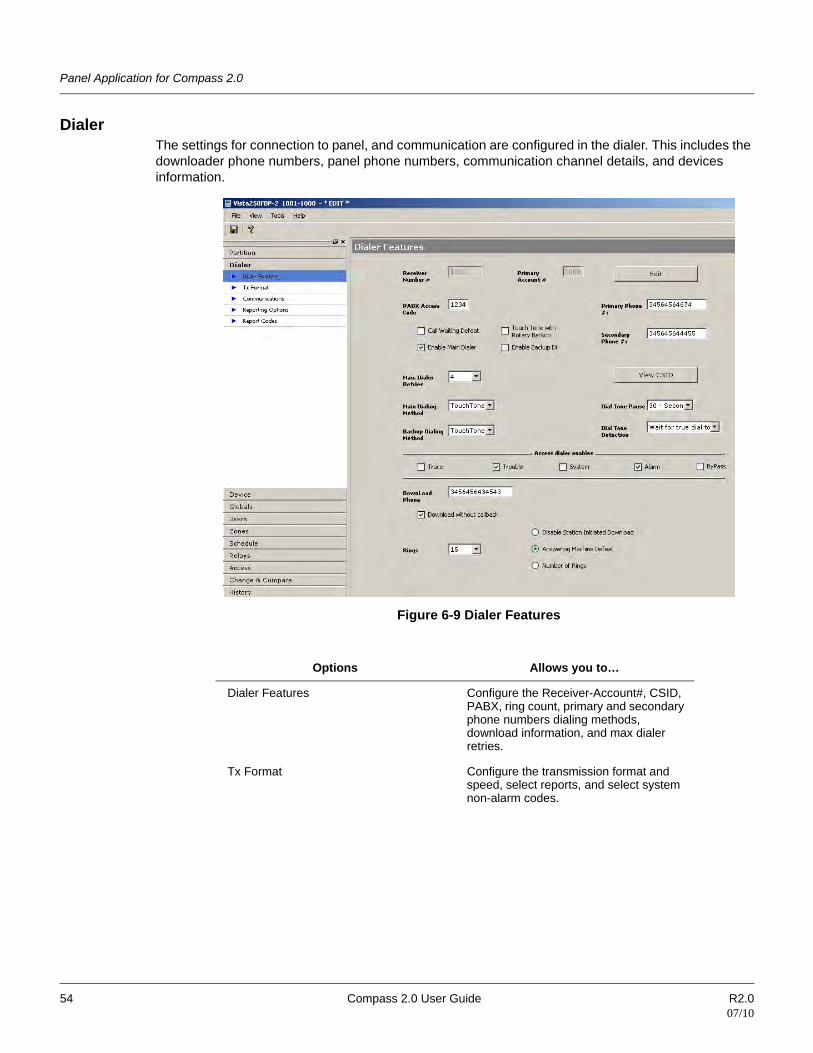
DialerThe settings for connection to panel, and communication are configured in the dialer. This includes the downloader phone numbers, panel phone numbers, communication channel details, and devices information.
Figure 6-9 Dialer Features
Options Allows you to…
Dialer Features Configure the Receiver-Account#, CSID, PABX, ring count, primary and secondary phone numbers dialing methods, download information, and max dialer retries.
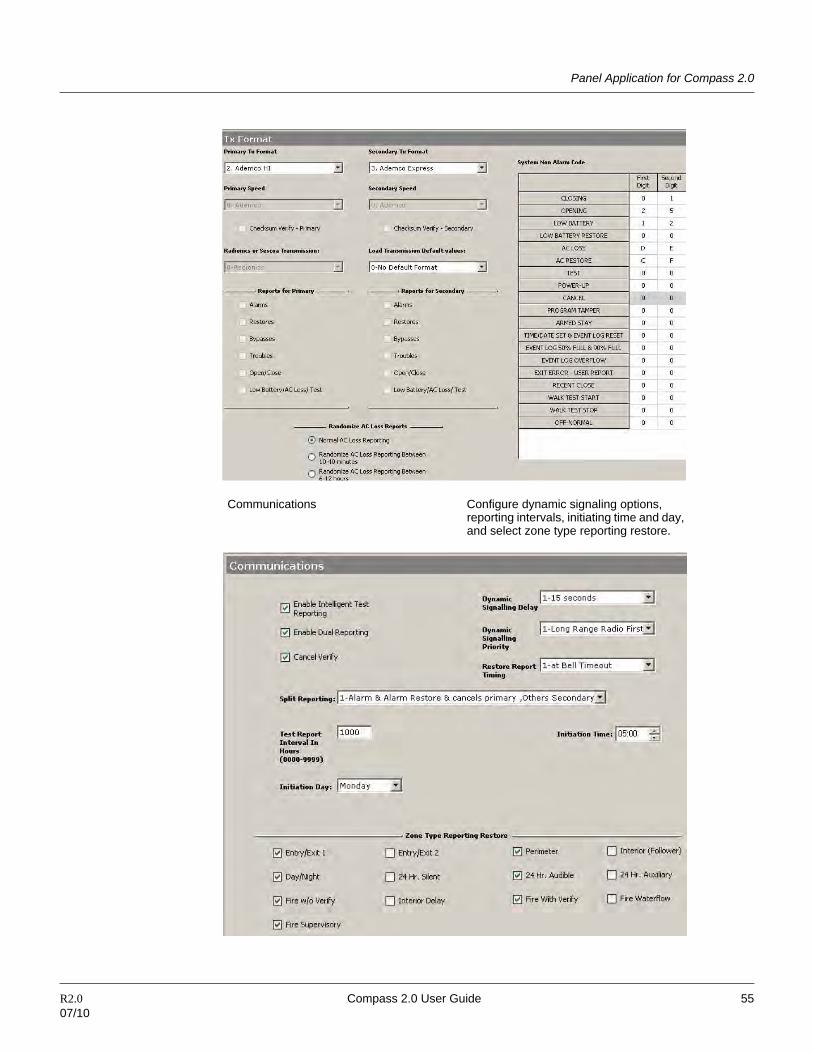
Tx Format Configure the transmission format and speed, select reports, and select system non-alarm codes.
Panel Application for Compass 2.0
R2.0 Compass 2.0 User Guide 5507/10
Communications Configure dynamic signaling options, reporting intervals, initiating time and day, and select zone type reporting restore.

56 Compass 2.0 User Guide R2.007/10
Panel Application for Compass 2.0
Report Codes Enable and disable the alarm, troubles, and bypasses for a set of zones. The options configured for a group of zones in the top pane are displayed for individual zones in the bottom pane. In the bottom pane only the report code (Rpt) column is editable. The report code field takes values from A-F and 1-9.
TIP: The Find Zones feature helps you find a zone quickly. Type the zone number that you are looking for, and press Enter. The row corresponding to the zone number is highlighted.
Reporting Options Configure the pager details and the reports that go out from specified partitions to specified pager numbers.

Panel Application for Compass 2.0
R2.0 Compass 2.0 User Guide 5707/10
DeviceThe details of all devices connected to the panel are configured here.
Figure 6-10 Device Configuration
GlobalsSet the global System options, RF Options, Event Log options, Fire options, Sounder options and Remote access options in this screen.

58 Compass 2.0 User Guide R2.007/10
Panel Application for Compass 2.0
Figure 6-11 Globals - System Options
The settings you select here are common across the panel.
Options Allows you to…
System Options Set some common system options.
RF Options Set RF options.
Use an RF button-type transmitter to provide entry or exit for several doors. One button controls one door. A button can be used to provide access or egress due to a panic or duress condition. An RF transmitter is used with a remote switch to provide exit in case of a fire alarm.

Panel Application for Compass 2.0
R2.0 Compass 2.0 User Guide 5907/10
Event Log Options Set Event log options – options for LRR, time format, and printer.
Fire Options Set fire options – bypass fire zones, options for waterflow supervisory zones, fire display lock, and so on.

60 Compass 2.0 User Guide R2.007/10
Panel Application for Compass 2.0
Sounder Options Specify the sounder options for different situations.
Remote Access Options Set remote access options. The Read Only Panel Remote Access Enables gives you an indication of the commands that you are allowed to execute through the communication server.

Panel Application for Compass 2.0
R2.0 Compass 2.0 User Guide 6107/10
UsersIn this screen you can record details of the panel users such as user name, code, access group, and partitions that the user can access.
ATTENTION: The enabling and disabling of the commands are done at the panel end. The user can only view the status here.

62 Compass 2.0 User Guide R2.007/10
Panel Application for Compass 2.0
Figure 6-12 Users
ZonesZones, in the context of an alarm system, are individual sensors. If the alarm gets triggered, the system records the zones that were tripped, allowing you to know the exact point of action. Zones also help the monitoring station to know whether they should call the police or fire department upon an alarm. Each zone must be assigned to a partition.
Zone ConfigurationIn this interface you can configure all details related to each zone, such as the response type, report codes, input type, partition, loop and serial numbers, associated devices, relays, access points, bypasses, tamper options, vent options, faults and so on.

Panel Application for Compass 2.0
R2.0 Compass 2.0 User Guide 6307/10
Figure 6-13 Zone Configuration
Click Activate Reporting Zones to initiate zone reporting.
Cross-Zoning PairsThe Cross-Zoning feature allows an alarm condition on any of the zones only when a combination of two zones is faulted within a specified period of each other. This prevents momentary faults from one of the zones causing an alarm condition. You can select a maximum of four pairs of cross-zones.
For example, for Vista250FBP Panel, you need to select a maximum of four pairs of cross-zones as shown in the following figure:
Figure 6-14 Cross-Zoning pairs

64 Compass 2.0 User Guide R2.007/10
Panel Application for Compass 2.0
ScheduleUnder Schedule, you can configure the different time windows and schedules (weekly, holiday, temporary, limitation of access, and check-in), time-driven events, output device timers, and reports.
A time window is a period of time during which an event is permitted, or a specific time used to trigger an event.
Time windows are summarized as follows:
• Scheduled events are based on time windows, which are periods of time during which an eventmay take place.
• A time window is defined by a “Start” time and a “Stop” time.
The windows are shared by all partitions, and are used when programming time-driven events.
TIP
Temporary schedule and Weekly Schedule can be configured through the partition screen also.
Parameter Allows you to…
Time Windows Configure the time windows.
TIP: There are two methods of configuring the time windows. One is through the time controls, where you specify the Start time and End time. The other newly introduced feature allows you to set your start and end times by clicking your mouse in the graphical control chart and dragging it to specify the time.
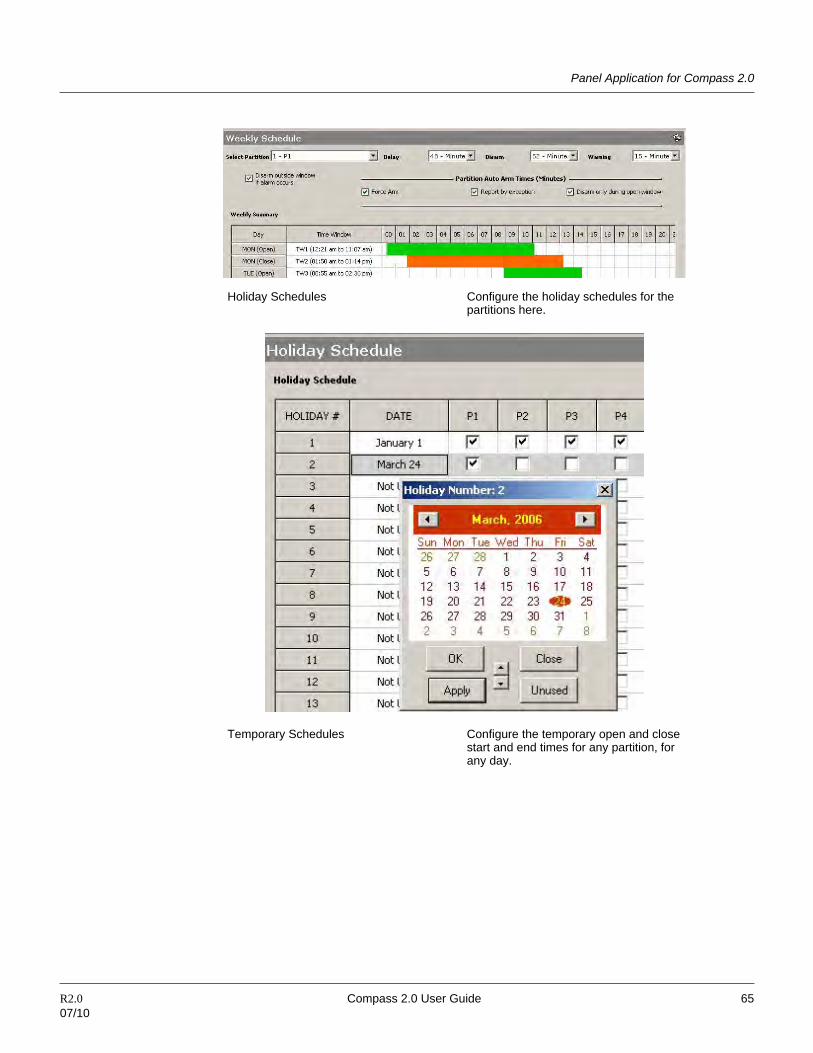
Weekly Schedules Configure the delay, disarm, and warning periods, and auto arm times for each partition.
Each schedule for Open/close scheduling consists of one time window for openings and one time window for closings.
These time windows are represented graphically in the graphic control.
Panel Application for Compass 2.0
R2.0 Compass 2.0 User Guide 6507/10
Holiday Schedules Configure the holiday schedules for the partitions here.
Temporary Schedules Configure the temporary open and close start and end times for any partition, for any day.

66 Compass 2.0 User Guide R2.007/10
Panel Application for Compass 2.0
Limitation of Access Schedules Configure the times at which certain windows are not accessible to certain groups.
Time Driven Events Configure time driven events here.
Time-Driven Events are time-based triggers for certain actions. Note that Time-Driven Events are optional and are not required to operate the system.

Panel Application for Compass 2.0
R2.0 Compass 2.0 User Guide 6707/10
Output Device Timer Configure the on and off times for the different days for all the output devices used with the panel.
Check-in Schedules Schedule check-in.
Example: If a quarterly check-in is scheduled, select the day of the month, and check-in time for each quarter.

68 Compass 2.0 User Guide R2.007/10
Panel Application for Compass 2.0
RelayRelays, used in conjunction with the control panel, are programmable switches that can be used for performing many different functions. They can be used for turning the lights ON and OFF, control sounders and doors, or for status indications. In this system, each device must be programmed as to how to act (ACTION), when to activate (START), and when to deactivate (STOP).
This control supports up to eight 4204 or sixteen 4204CF Relay Modules. Each 4204 Module provides four relays with Form C (normally-open and normally-closed) contacts. This means you can program up to thirty-two relays to activate and de-activate, as required. Each 4204CF Module adds two
Scheduling Reports Select the reports that you want to activate.

Panel Application for Compass 2.0
R2.0 Compass 2.0 User Guide 6907/10
additional style-Y supervised bell outputs to the system. If 4204CF Modules are used, only relays 1 and 3 on each module can be programmed. The other two relays (2 and 4) on each module are used for supervision purposes.
Configure the following under Relay:
Options Allows you to…
Relay Timeout options Configure the long and short timeout for each of the access control relays. The relay timeout function is an alarm feature that disables the relay after a specified time.
Relay Zone List Assign a zone to a zone list. Select the zone, and the list that you would like to assign it to, and click Associate. The association is displayed in the grid. To dissociate, click DisAssociate.

70 Compass 2.0 User Guide R2.007/10
Panel Application for Compass 2.0
Output devices Configure output relay devices.
Voice Description Configure the descriptions for panels supporting voice alarms. The ‘Old Word’ columns are non-editable, and they take the existing value of the descriptions. Change the ‘New Word’ columns to the most recent description.

Panel Application for Compass 2.0
R2.0 Compass 2.0 User Guide 7107/10
AccessThe configuration of the access groups, access points, and card data is done in this section of the panel application.
Parameter Allows you to…
Access Group Define the access group configuration.
An access group provides a means of defining which access points can be used, when, and by whom. Any, all, or no access points may be assigned to an access group. Schedules, when assigned to an access group, define the times at which the access points will allow access. The access group can be assigned to a particular cardholder, thereby defining who will be granted access through specified access points during specified periods of time.
A special 'executive privilege' attribute allows access anywhere, anytime to the cardholder assigned to the access group.

72 Compass 2.0 User Guide R2.007/10
Panel Application for Compass 2.0
Access Point Configure access points.
An access point is a particular point of passage over which we have control. There are a number of components that can be associated with the access point, which helps to reinforce the desired level of security.
Event Action Configure actions corresponding to certain events.

Panel Application for Compass 2.0
R2.0 Compass 2.0 User Guide 7307/10
Change and Compare The Change and Compare screen has options to view changes made to Saved, Default, Uploaded and CurrentEdit data and at the same time compare data between any two E2 images.
ChangeChange allows you to see the changes you have made to a view after the last ‘Save’ operation. To see the changes made to any view select the View from the Menu bar. You may select Current Edit, Saved, Default, or Uploaded View. The grid displays the changes that were made to the particular view after the last ‘Save’ operation. You can select to overwrite the new value with the old value of the features by selecting the appropriate checkbox, or for all features at once by selecting Select All. Then click Merge Selected to overwrite the values.
The number of changes to the view is displayed at the bottom of the screen.
Note that the Compare and With fields are disabled when the Change option is selected.
Card Data Configure the access card.
The details of privileges, access group to which the card belongs, event types and actions, number of usages, and the expiration date recorded in this screen.
Click Add Card and enter Enrollment number to begin access configuration.

74 Compass 2.0 User Guide R2.007/10
Panel Application for Compass 2.0
Figure 6-15 Change
Compare Use the Compare option to compare your Saved, Default, Uploaded or Current Edit values for each feature with any of the values in the other three E2 views. For example, the Saved value of a feature can be compared with the Default, Uploaded or Current Edit value for the feature.
To compare, select the values to be compared from the drop-downs for Compare and With. Click Go. The features and the comparison of values are displayed in the grid.
The number of differences between the compared values is displayed at the bottom of the screen.
You can overwrite the values for each feature by selecting the Overwrite… option in the last column of the grid. To replace all the values with the modified value, select Select All above the grid. Click Merge Selected to replace the values.

Panel Application for Compass 2.0
R2.0 Compass 2.0 User Guide 7507/10
Figure 6-16 Compare
HistoryThe ShowLog screen shows the history of the changed data. The previous and changed values of the feature are displayed. You can specify the date range between which you want the history data. The data in the grid can also be sorted based on the date/ feature description / Operator name. Click Refresh Data to refresh the screen.

76 Compass 2.0 User Guide R2.007/10
Using Templates
Figure 6-17 History


