4D Ajax for Dreamweaver Manualdownload.4d.com/.../4D_Web_20_Pack/4D_Ajax_for_Dreamweaver.pdf ·...
10
4D Ajax for Dreamweaver Introduction The 4D Ajax for Dreamweaver extension allows 4D developers to create custom HTML pages with 4D Ajax embedded objects. Furthermore, the biggest benefit is that 4D developers can create these pages without having to write a single line of Javascript or HTML code. Thanks to the 4D Ajax for Dreamweaver extension, developers only need to be concerned with appearance and customizable functionality. Examples of custom web pages with embedded 4D Ajax Objects Contacts Demo on Demo.4d.com 4DAF Video Player Technical Note A 4D Ajax for Dreamweaver Demo Note: The 4D Ajax objects (ie. Tables, Views, DDWs, DCSs, Dashboards, and Charts) that will be embedded must already exist in the 4D Ajax Framework client. This manual assumes that the 4D developer is familiar with creating and modifying such objects in the 4D Ajax Framework client environment.
Transcript of 4D Ajax for Dreamweaver Manualdownload.4d.com/.../4D_Web_20_Pack/4D_Ajax_for_Dreamweaver.pdf ·...

4D Ajax for Dreamweaver Introduction The 4D Ajax for Dreamweaver extension allows 4D developers to create custom HTML pages with 4D Ajax embedded objects. Furthermore, the biggest benefit is that 4D developers can create these pages without having to write a single line of Javascript or HTML code. Thanks to the 4D Ajax for Dreamweaver extension, developers only need to be concerned with appearance and customizable functionality.
Examples of custom web pages with embedded 4D Ajax Objects
Contacts Demo on Demo.4d.com
4DAF Video Player Technical Note
A 4D Ajax for Dreamweaver Demo
Note: The 4D Ajax objects (ie. Tables, Views, DDWs, DCSs, Dashboards, and Charts) that will be embedded must already exist in the 4D Ajax Framework client. This manual assumes that the 4D developer is familiar with creating and modifying such objects in the 4D Ajax Framework client environment.

Installation Installation will be covered in three sections:
• Requirements • Install Steps • Verify Installation
Requirements
Install Steps
1. Launch the Adobe Extension Manager.
The Adobe Extension Manager
Make sure Dreamweaver CS3 is selected.
2. Click the Install icon.
3. Browse and select the “4D Ajax.mxp” file. 4. Accept the License Agreement. 5. The successful installation dialog appears. Click OK.
6. The 4D Ajax for Dreamweaver extension is now listed in the Adobe Extensions Manager.
Note: Dreamweaver CS3 must be closed in order to install the 4D Ajax for Dreamweaver extension.
Note: The 4D Ajax for Dreamweaver extension is only compatible with Dreamweaver CS3.
7. Quit the Adobe Extensions Manager.
Verify Installation 1. Launch Adobe Dreamweaver CS3.
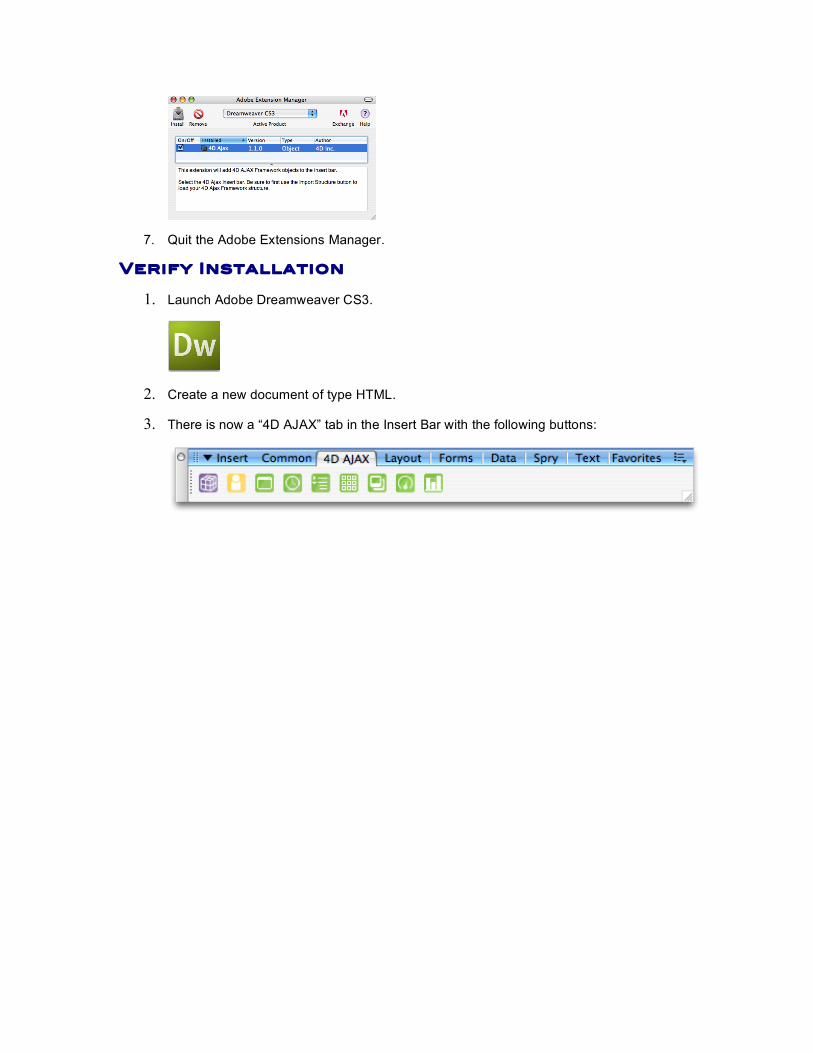
2. Create a new document of type HTML.
3. There is now a “4D AJAX” tab in the Insert Bar with the following buttons:

Using the Extension
The 4D developer is now able to embed 4D Ajax objects into HTML pages using the extension. We will begin with a quick introduction to the buttons in the insert bar. Meet The Buttons Here is a quick introduction to the buttons of the 4D Ajax Insert Bar in Dreamweaver CS3:
Import Structure button Import the XML structure of the 4D database.
Insert Login button Specify login information as users access the page.
Data Grid button Embed a Data Grid object to the HTML page.
Calendar button Embed a Calendar object to the HTML page.
Data Tree button Embed a Data Tree object to the HTML page.
Data Matrix button Embed a Data Matrix object to the HTML page.
Image Matrix button Embed an Image Matrix object to the HTML page.
Dashboard button Embed a Dashboard object to the HTML page.
Chart button Embed a Chart object to the HTML page.
Setting Up Before we embed 4D Ajax objects into custom HTML pages, some preparations are in order.
1. Start up the 4D web server (if it is not running already). To start it up: • In 4D, go to Design mode. • Select Run->Start Web Server.
2. Make sure that the 4D Ajax objects (ie. Tables, Views, DCSs) that will be embedded
already exist in the client side of the 4D Ajax Framework.
3. Launch Dreamweaver CS3. Make sure to create/modify an HTML document. Getting Started It is now time to start using the 4D Ajax for Dreamweaver extension. Two quick steps follow:
• Importing the structure • Entering login information
Note: Now would be a good time to test the connection (ie. connecting to http://localhost:8080 via web browser). It should load the 4D Ajax Framework Welcome Page.
Note: The objects that can be embedded are listed in the Portal of the 4D Ajax Framework client.

Step 1: Click the Import Structure button.
Select the Support folder in the Extras folder next to the 4D database.
Select the Support folder.
Import success dialog.
This will parse your current settings and retrieve the 4D Ajax objects.
Step 2: Click the Insert Login button.
More information on user authentication can be found here: http://daxipedia.4d.com/index.php/Developer_Hooks#User_Authentication Page Style can also be customized in this window like the corresponding themes in the 4D Ajax Framework client environment.
Embedding 4D Ajax Objects Now it is time to pick and choose 4D Ajax objects to embed. What follows are summaries of each type of 4D Ajax object.
Step 3: Choose a 4D Ajax object to embed.
Note: 4D 2004 users can find the Support folder in /Extras/Support next to the 4D database. 4D v11 users can find the Support folder in /Components/4DAF v11 Unicode.4dbase/Extras/Support.
Note for Mac users using 4D v11 SQL: Make an alias of the Support folder and place it outside the 4D database. Since 4D v11 SQL databases on Mac OS X are packages you cannot navigate within them using the Finder dialog window when you hit the “Import Structure” button. Thus, an alias must be placed outside the database that you can point to. Also, note that you must right click the database and select “Show Package Contents” to be able to navigate within the database and the component file in the normal Finder.

The Data Grid
Basic Settings
Advanced Settings Basic Settings:
• Choose the Selection to be displayed in the Data Grid object. • Check “Anchor Window” to have the object anchored in the HTML page. Uncheck if you
want the object in its own window. • Specifying a width and height can modify size of the Data Grid.
Advanced Settings:
• These options are actually parameters in the Datawindow and .customize functions as described in the online documentation: http://daxipedia.4d.com/index.php/Data_Window
The Calendar
Basic Settings
Advanced Settings
Basic Settings:
• Choose the Selection to be displayed in the Calendar object. • Check “Anchor Window” to have the object anchored in the HTML page. Uncheck if you
want the object in its own window. • Specifying a width and height can modify size of the Calendar.
Advanced Settings:
• These options are actually parameters in the calendarView, .setWeekStart, .setBlankValue and .customize functions as described in the online documentation: http://daxipedia.4d.com/index.php/Calendar_View

The Data Tree
Basic Settings
Advanced Settings Basic Settings:
• Choose the Selection to be displayed in the Data Tree object. • Check “Anchor Window” to have the object anchored in the HTML page. Uncheck if you
want the object in its own window. • Specifying a width and height can modify size of the Data Tree.
Advanced Settings:
• These options are actually parameters in the HGrid, .showBreakCount and .customize functions as described in the online documentation: http://daxipedia.4d.com/index.php/Data_Tree
The Data Matrix
Basic Settings
Data Output
Display
Toolbar

Basic Settings:
• Choose the Selection to be displayed in the Data Matrix object. • Check “Anchor Window” to have the object anchored in the HTML page. Uncheck if you
want the object in its own window. • Specifying a width and height can modify size of the Data Matrix.
Data Output, Display, and Toolbar:
• These options are actually parameters in dataMatrix and .customize functions as described in the online documentation: http://daxipedia.4d.com/index.php/Image_Browser
The Image Matrix
Basic Settings
Data Output
Display
Toolbar
Basic Settings:
• Choose the Selection to be displayed in the Data Matrix object. • Check “Anchor Window” to have the object anchored in the HTML page. Uncheck if you
want the object in its own window. • Specifying a width and height can modify size of the Data Matrix.
Data Output, Display, and Toolbar:
• These options are actually parameters in dataMatrix and .customize functions as described in the online documentation: http://daxipedia.4d.com/index.php/Image_Browser

Dashboards
Dashboard Settings Dashboard Settings:
• Choose the Dashboard to be displayed. • Specifying a width and height can modify size of the Dashboard. • Check “Embed Object” to have the object anchored in the HTML page. Uncheck if you
want the object in its own window. • “Show” or “Hide” the vertical scrollbar • Set the refresh rate of the Dashboard (in seconds).
For more information go to: http://daxipedia.4d.com/index.php/Dashboard
Charts
Chart Settings
Chart Settings:
• Choose the Dashboard that had the “Use Chart” checkbox selected in the Dashboard Editor.
• Specifying a width and height can modify size of the Chart. • Check “Embed Object” to have the object anchored in the HTML page. Uncheck if you
want the object in its own window. • Set the refresh rate of the Chart (in seconds).
For more information go to: http://daxipedia.4d.com/index.php/Chart

Deleting/Editing 4D Ajax Objects 4D Ajax objects can be modified and/or deleted by clicking within the <div> attribute of the specific object. The <div> attributes are within the <body> element of the HTML page. The option to delete or modify appears within the Properties window of Dreamweaver CS3.
Saving and Previewing the HTML Page It is best to save the HTML page in the dax folder next to the 4D structure. That way, the 4D developer can append the name of the HTML file after the address of the 4D web server. For example (if the file is named custom_page.html): http://localhost:8080/custom_page.html Note: In 4D, go to Preferences->Web to modify settings such as TCP port and Default HTML root folder.