40 - 3P Analsysis and · PDF fileI n 2006, a long-time void in motorcycle modeling was finally...
3
I n 2006, a long-time void in motorcycle modeling was finally filled when Revell released their line of motorcycle chopper kits. With the recent em- phasis on GP bikes, street motorcycles–particularly V-twin based custom bikes–have had no new releas- es in a couple of decades. The new Revell kits have spurred a great deal of interest, and a lot of building of custom motorcycle models. I’m sure you’ve seen one or two at any contest over the last few years. There are two basic kits in the series: 1) Hard Tail: which has a rigid rear frame and no rear wheel suspension (Gambler, Torch, Wicked, and Crusader). 2) Soft Tail: which looks like a Hard Tail, but the rear frame is designed to pivot just under the seat (although this feature doesn’t operate on the model), and there are two hidden horizontal shocks under the transmission (Bone Daddy, High Roller, Fireball, and Aces Wild). The kits come with extra wheel options, custom exhaust pipes, etc., and parts can be mixed and matched among the kits, allowing for a lot of cus- tomizing. As refreshing as these kits are, based on the price (between $10–$16 each) they lack detail and accu- racy. We are going to address some of these issues as we build a stripped down street bike based on the work of Russell Mitchell of Exile Cycles, using one of the Hard Tail kits as the basis. Revell’s line of 1/12 scale chopper kits includes four “Hard Tail” bikes: Gambler, Torch, Wicked and Crusader (above), and four “Soft Tail” bikes: Bone Daddy, High Roller, Fireball and Aces Wild (below). Before we get started, a word about the chrome parts: The plating on many Revell kits often covers up a lot of molded detail. It’s not the plating so much as the thick clear varnish that is applied under it. All of these kits suffer from a lot of thick plating, and unfortunately, many of the plated parts have mold seams on them–the front forks and exhaust pipes in particular. You have two main options: 1) leave the parts as is and learn to live with it. 2) strip the plating, sand down the seams, and either have the parts re-plated, apply Alclad II chrome finish, or apply some other finish. For this build I decided to strip the plating using Castrol SuperClean, then to apply Alclad Aluminum to match the brushed-finish on many of the Exile Cycle bikes. One aspect of these kits that I don’t like is the fact that the frame is designed to be assembled around the one-piece front fork. This makes if very difficult to finish the seam on the steering tube, and almost impossible to paint. The remedy is pretty simple: Remove the steering shaft, drill two holes in the up- per and lower triple clamp, and replace the steering shaft with styrene rod or aftermarket bolts. There is a lot of cleanup to be done on the mold seams on these frames. I cut about 6 mm (1/4”) out of the down tubes and modified the top tube. This was done to give the bike a less radical stance and to allow the mounting of a Replicas and Miniatures Co. of Maryland (R&M) resin gas tank, using epoxy. I wanted to make the rear fender longer, so I added a section cut from the fender of another kit and glued the pieces together. A .38 mm (.15”) strip of styrene was added under the joints for strength. Some styrene mounting tabs and some aluminum wire, flattened at both ends, completed the fender mounts. You need to assemble the rear fender to the frame before painting. 40 Model Cars #169 • July 2012 41 July 2012 • Model Cars #169
-
Upload
phungduong -
Category
Documents
-
view
215 -
download
2
Transcript of 40 - 3P Analsysis and · PDF fileI n 2006, a long-time void in motorcycle modeling was finally...

In 2006, a long-time void in motorcycle modeling was finally filled when Revell released their line of motorcycle chopper kits. With the recent em-
phasis on GP bikes, street motorcycles–particularly V-twin based custom bikes–have had no new releas-es in a couple of decades. The new Revell kits have spurred a great deal of interest, and a lot of building of custom motorcycle models. I’m sure you’ve seen one or two at any contest over the last few years.
There are two basic kits in the series:
1) Hard Tail: which has a rigid rear frame and no rear wheel suspension (Gambler, Torch, Wicked, and Crusader).
2) Soft Tail: which looks like a Hard Tail, but the rear frame is designed to pivot just under the seat (although this feature doesn’t operate on the model), and there are two hidden horizontal shocks under the transmission (Bone Daddy, High Roller, Fireball, and Aces Wild).
The kits come with extra wheel options, custom exhaust pipes, etc., and parts can be mixed and matched among the kits, allowing for a lot of cus-tomizing.
As refreshing as these kits are, based on the price (between $10–$16 each) they lack detail and accu-racy. We are going to address some of these issues as we build a stripped down street bike based on the work of Russell Mitchell of Exile Cycles, using one of the Hard Tail kits as the basis.
Revell’s line of 1/12 scale chopper kits includes four “Hard Tail” bikes: Gambler, Torch, Wicked and Crusader (above), and four “Soft Tail” bikes: Bone Daddy, High Roller, Fireball and Aces Wild (below).
Before we get started, a word about the chrome parts:
The plating on many Revell kits often covers up a lot of molded detail. It’s not the plating so much as the thick clear varnish that is applied under it. All of these kits suffer from a lot of thick plating, and unfortunately, many of the plated parts have mold seams on them–the front forks and exhaust pipes in particular. You have two main options:
1) leave the parts as is and learn to live with it.
2) strip the plating, sand down the seams, and either have the parts re-plated, apply Alclad II chrome finish, or apply some other finish.
For this build I decided to strip the plating using Castrol SuperClean, then to apply Alclad Aluminum to match the brushed-finish on many of the Exile Cycle bikes.
One aspect of these kits that I don’t like is the fact that the frame is designed to be assembled around the one-piece front fork. This makes if very difficult to finish the seam on the steering tube, and almost impossible to paint. The remedy is pretty simple: Remove the steering shaft, drill two holes in the up-per and lower triple clamp, and replace the steering shaft with styrene rod or aftermarket bolts. There is a lot of cleanup to be done on the mold seams on these frames. I cut about 6 mm (1/4”) out of the down tubes and modified the top tube. This was done to give the bike a less radical stance and to allow the mounting of a Replicas and Miniatures Co. of Maryland (R&M) resin gas tank, using epoxy.
I wanted to make the rear fender longer, so I added a section cut from the fender of another kit and glued the pieces together. A .38 mm (.15”) strip of styrene was added under the joints for strength. Some styrene mounting tabs and some aluminum wire, flattened at both ends, completed the fender mounts. You need to assemble the rear fender to the frame before painting.
40 Model Cars #169 • July 2012 41July 2012 • Model Cars #169
To further detail the forks, I separated the triple clamps from the fork tubes. This allowed me to replace the fork tubes with polished aluminum rod, 3.2 mm (1/8”) in diameter. (see the article in the July 2008 issue of Model Cars for an article on how to do this). Since I’m shortening the wheelbase and reducing the rake and fork offset, this allowed me to shorten the forks by about 3 mm.
The engine is a pretty good rendition of a modern V-twin. On some builds I have replaced the push rod tubes with 1.62 mm (1/16”) diameter and 3.24 mm (3/32”) diameter aluminum tubing. A black wash will bring out the cooling fins quite nicely. I added a Replicas & Miniatures Co. of Maryland resin air cleaner that had the molded-in letters filled in.
There are no spark plugs or wires in the kits, and this is a detail that really stands out. You can take spark plugs from other 1/12 scale kits, scratchbuild your own, or use aftermarket items. I used a pair of R&M 90° spark plugs for this model, with the plug wires taken from the vinyl tubing supplied in most other 1/12 scale kits. You can also dress up this area with a coil cover and even an ignition key.
There are typically four oil lines on a V-twin engine like this. I added only the three that come from the oil tank, because the second line from the oil filter is almost completely hidden on most bikes, and there really isn’t enough room for it, based on the design of the model kit engine.
The lines were made from the larger vinyl tubing that is often supplied in mo-torcycle kits. I added 0.8 mm (0.030”) diameter solder inside the tubing so that they would hold their shape better. The joints were made from beading crimping tubes that you can find at craft stores.
The primary drive belt from the kit is adequate, especially if you use the kit supplied cover. On this model, I decided to sand off all the detail on the cover for a smooth, clean look. The belt was airbrushed with Tamiya Nato black. If you want to leave the cover off, or modify it to make it smaller, you will need to detail the pulleys and belt. The belt and pulleys are typically toothed, and would be a challenge to scratchbuild. There is at least one aftermarket supplier of a replacement belt/pulley system done in resin.
Since the battery is exposed on these kits, it can really use a bit of detailing. I added a tray of thin aluminum cut from the lid of a powdered iced tea can, a hold-down clamp of pop can aluminum, styrene nuts, and battery cables. Instead of creating the cable terminals, bits of styrene represent plastic terminal covers, and holes were drilled for the wires. One wire attaches to the frame, and the other runs past the starter, and disappears into the vertical frame tube.
There are a variety of wheel styles available for these kits, and all are up to the task. They could do with a valve stem, and excellent ones are available from aftermarket suppliers. I used the spoked wheels on this build. Once the chrome was stripped off, they looked pretty good, although the thickness of the spokes is a bit too big for an in-scale look.
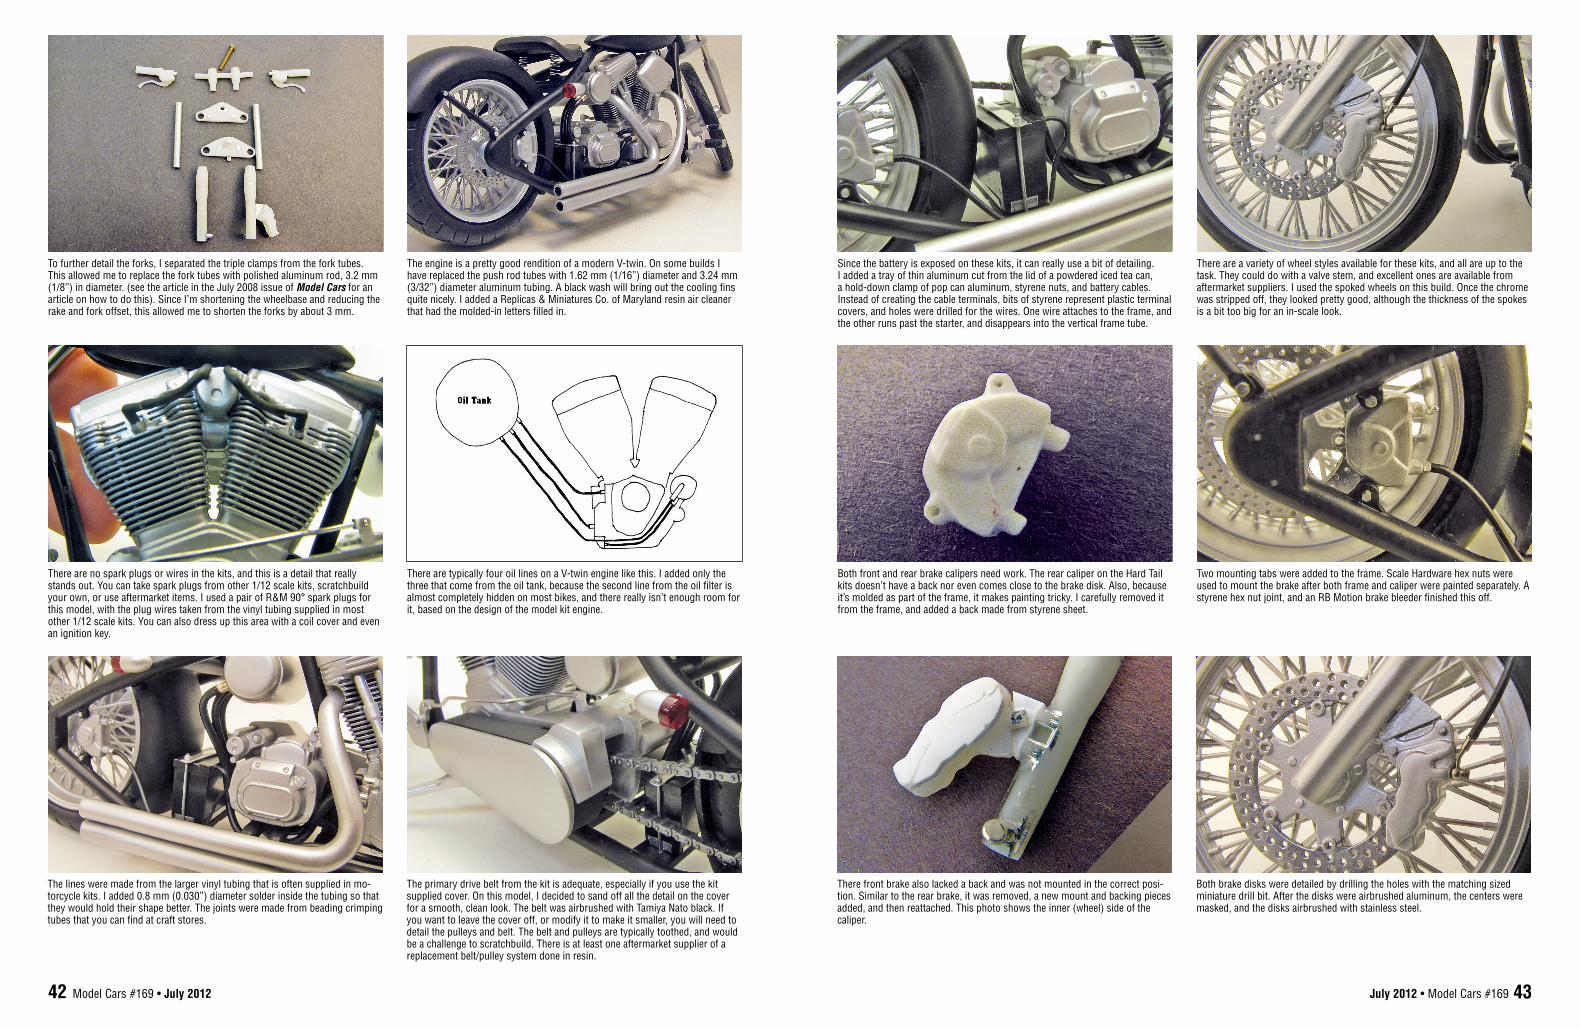
Both front and rear brake calipers need work. The rear caliper on the Hard Tail kits doesn’t have a back nor even comes close to the brake disk. Also, because it’s molded as part of the frame, it makes painting tricky. I carefully removed it from the frame, and added a back made from styrene sheet.
Two mounting tabs were added to the frame. Scale Hardware hex nuts were used to mount the brake after both frame and caliper were painted separately. A styrene hex nut joint, and an RB Motion brake bleeder finished this off.
There front brake also lacked a back and was not mounted in the correct posi-tion. Similar to the rear brake, it was removed, a new mount and backing pieces added, and then reattached. This photo shows the inner (wheel) side of the caliper.
Both brake disks were detailed by drilling the holes with the matching sized miniature drill bit. After the disks were airbrushed aluminum, the centers were masked, and the disks airbrushed with stainless steel.
42 Model Cars #169 • July 2012 43July 2012 • Model Cars #169

There are two types of handlebar levers that come in the kits. The first is a pair of hydraulic levers for brake and clutch (top). The second set has only a hydraulic brake lever (center). This model utilizes the hydraulic pair so that the handlebar is symmetrical. You could also use an aftermarket set (bottom), or raid your parts box for a pair from another kit.
The hydraulic lines are the standard vinyl tubing supplied in most other kits, finished with some Tuner Model Manufactory (T2M) fittings. The brake line uses their new hydraulic fitting, and is very realistic. The hydraulic clutch line runs through some beading crimping tubes that were superglued to the frame. A throttle line was made with some styrene hex rod, craft wire, and thin wire.
The foot controls (clutch and rear brake) are both one-piece moldings on the two different types of kits, and do not have a lot of detail (top). The pegs and levers were replaced with scratchbuilt sheet styrene versions. (bottom).
For the brake, I separated the brake reservoir from the kit supplied footpeg piece, cleaned it up, glued it a piece of styrene strip, and mounted it on the frame with Scale Hardware simulated bolts. A piece of 0.8 mm (0.030”) wire and a pop can aluminum U-bracket finished the brake.
For the clutch actuating rod, a 0.8 mm (.030”) wire was bent to shape. Some pop can aluminum U-brackets on each end, and a lever at the clutch made from sheet styrene completed the clutch mechanism.
Tailight lenses were made of polished clear sprue, painted with clear red.
There are a few aftermarket items available specifically for these kits. Aardvark Models has a super wide rear tire kit with frame widening pieces and a new fender. They also make the springer front fork seen in this photo.
A supercharger kit (above) is also available from Aardvark. Replicas and Miniatures Co. or Maryland has the resin gas tank I used on this build, plus spark plugs, carbs, and air cleaner. R&M also made a replacement set of hand controls. I don’t see these items in the current catalog; contact Norm Veber to see if they are still available. A replacement primary drive belt and pulleys and wide rear tire and wheels are some of the items available from Argentinian resin caster Minituning.
The license plate was made on a color laser printer, and the seat springs were formed with craft wire.
A shorter fork and down tubes give a less radical look to the stance. Handlebars are uncluttered.
To add more detail to these kits, Scale Hardware has a wide variety of scale simulated and threaded nuts, bolts and rivets. RB Motion has a variety of 1/12 scale aluminum items that can be used on these kits (brake bleeders, valve stems, Heim joints, and nuts and bolts). Tuner Model Manufactory has a line of nuts, bolts and brake line connectors.
44 Model Cars #169 • July 2012 45July 2012 • Model Cars #169