3rd Grade Recorder Book -...
11
Recorder Karate! First Year • Tan Belt – “Hot Cross Buns” • Pink Belt – “Merrily We Roll Along” • Teal Belt – “Lucy Locket” • Lavender Belt – “Who Has Seen The Wind” • Navy Belt – “Go Tell Aunt Rhody” • Grey Belt – “Fish Pole Song” • Silver Belt – Excellent Recorder Attendance! (12 Pts.) NAME: _____________________________________
Transcript of 3rd Grade Recorder Book -...

Recorder Karate!
First Year
• Tan Belt – “Hot Cross Buns” • Pink Belt – “Merrily We Roll Along” • Teal Belt – “Lucy Locket” • Lavender Belt – “Who Has Seen The Wind” • Navy Belt – “Go Tell Aunt Rhody” • Grey Belt – “Fish Pole Song” • Silver Belt – Excellent Recorder Attendance! (12 Pts.)
NAME: _____________________________________

The recorder is one of the oldest woodwind instruments. It was first popular back in the 16th and 17th centuries and many famous composers of that time (including Bach, Handel, and Telemann) wrote beautiful music for it. Recorders are made in six common sizes. The smallest is a Descant, or Sopranino recorder. The recorder we’re going to learn to play is the Soprano recorder and it is a little larger than the Sopranino. There are also Alto, Tenor, Bass, and Contra Bass recorders – each one gets a little bit bigger and lower. When all the recorders play together it’s called a Recorder Consort. The recorder has eight holes. Your LEFT hand plays the top three holes on the front of the instrument (and the back thumb hole as well). There are several reasons why the LEFT hand must go on top, but the most important reason is that the bottom holes of the recorder are slightly out of line in order to accommodate for a shorter right hand pinky finger. If you get into the bad habit of using the wrong hand, those low notes will be impossible to play!
We make sound on the recorder by blowing softly and gently into the mouthpiece. It’s VERY easy to over blow the recorder and get a bad sound. Unlike other instruments in the woodwind family, the recorder barely takes any air at all! Blowing warm, gentle, slow air makes the best sound. Think about the “Steamy Window Trick” and you’ll be all set! Once you have a good, steady, pleasant sound it’s time to talk about using your tongue to start each note! Tonguing is EASY once you make it a habit, so the earlier you practice and learn to do it, the better off you’ll be! Think about whispering the syllable “Tu” into your recorder. The “t” sound will start the note. (Be sure to make the “t” VERY light and delicate or the recorder will squeak on you!)
1. Keep your recorder in its case! Recorders often look alike. Your name is on your recorder case, so make sure you keep your recorder in it’s case at all times unless you are playing it! The case will protect it, help it get back to you if you leave it somewhere accidentally, and it will keep your recorder from getting mixed up with someone else’s instrument.
2. Be careful not to bang your recorder against anything. Recorders can chip or crack.
3. Give your recorder a bath once and a while! Plastic recorders should be washed in warm soapy water occasionally to get rid of germs – especially after you’ve been sick or your recorder has become dirty. Just be sure to let it dry completely before you put it away!
4. If your recorder becomes difficult to put together, use just the TINIEST bit of Joint Grease on the joint. You probably will never have to do this if you keep your recorder nice and clean!
All About The Recorder!
How to Take Care of Your Instrument

Reading Music Review Fill in the letters of the Musical Alphabet:
The SPACES on the Treble Clef spell the WORD: (F, A, C, E)
_________ _________ _________ _________
The LINES on the Treble Clef use the SENTENCE: (E, G, B, D, F) __________________ _______________ ______________ ________________ ________________.
This is the Treble Clef Staff:

Rhythm Reading:
The table below shows you the different types of notes you will be using in Recorder Karate.
What it’s Called What it Looks Like How We Read it How Many Beats
Quarter Note
“Ta”
1 Beat
Eighth Notes
“Ti-Ti”
1 Beat (together)
Half Note
“Two-oo”
2 Beats
Dotted Half Note
“Three-ee-ee”
3 Beats
Whole Note
“Four-rr-rr-rr”
4 Beats
Quarter Note Rest
“Shh”
1 Beat of Silence
Half Note Rest
“Shh-shh”
2 Beats of Silence
Musical Symbols:
There are many different musical symbols found in Recorder Karate. The table below shows you how to read and interpret some of those musical symbols you’ll find in your music.
What it Looks Like
What It Means
What You Do With It
This is a Time Signature. You will find this at the beginning of a
song. Time signatures give you information about the music.
You would say this time signature: “Four, Four Time.” The top number tells you how many beats are going to be in each measure of the song. In this case, there are 4 beats in every measure.
This is a Time Signature. The “C” stands for “Common Time” – the most ‘common’ time signature.
Time signatures give you information about the music.
“Common Time” is another way of saying 4/4 time – as 4/4 time is the most common time
signature. As they mean the same thing, common time means there will be 4 beats in each
measure of the song.
This is a Double Bar Line. You will find it at the end of many
songs. It gives you information about the song’s end.
The double bar line shows where the end of the song is. It is like a period at the end of a
sentence. It tells you to stop playing because the song is finished.
This is a Repeat Sign. You will occasionally find repeat signs in the middle or at the end of songs. They give you directions as to how to
play the song.
The repeat sign tells you to play part or all of the song again. When you find a repeat sign, you either go back to the beginning OR if there was a repeat sign earlier in the song, you go back to
it and play that section of the song again.
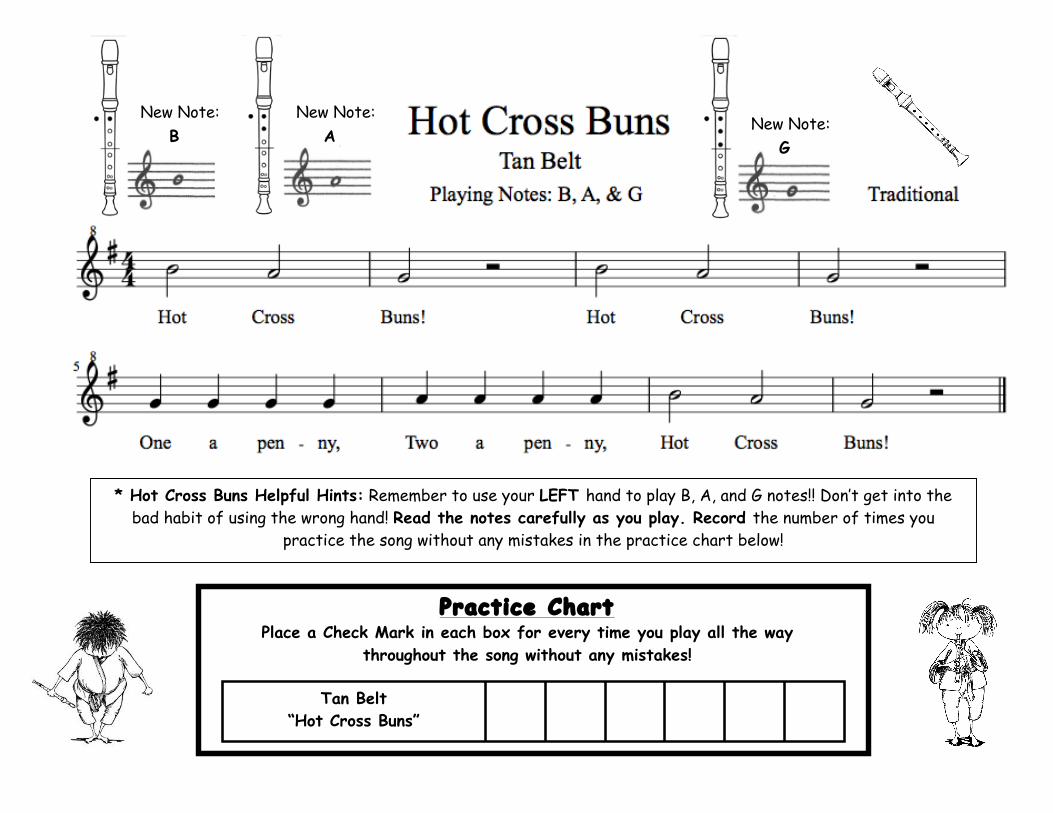
Practice Chart Place a Check Mark in each box for every time you play all the way
throughout the song without any mistakes!
Tan Belt “Hot Cross Buns”
* Hot Cross Buns Helpful Hints: Remember to use your LEFT hand to play B, A, and G notes!! Don’t get into the bad habit of using the wrong hand! Read the notes carefully as you play. Record the number of times you
practice the song without any mistakes in the practice chart below!
New Note: New Note: New Note:
A B G

Practice Chart Place a Check Mark in each box for every time you play all the way
throughout the song without any mistakes!
Pink Belt “Merrily We Roll Along”
* Merrily We Roll Along Helpful Hints: Practice SLOWLY at first. Once you can play the song slowly, speed it up gradually. Remember, it is more important to play it correctly than fast! Keep a good steady beat! Record the
number of times you practice the song without any mistakes in the practice chart below!

Practice Chart Place a Check Mark in each box for every time you play all the way
throughout the song without any mistakes!
Teal Belt “Lucy Locket”
* Lucy Locket Helpful Hints: Remember to use your tongue (whispering “tu”) to start every single note. The sooner you make this a habit, the better you’ll sound! This song is very repetitive. Make sure you learn it correctly so that you don’t repeat mistakes! Finally, as always, practice SLOWLY with your left hand on top! Keep a good steady beat!
E New Note:

Practice Chart Place a Check Mark in each box for every time you play all the way
throughout the song without any mistakes!
Lavender Belt “Who Has Seen The Wind?”
* Who Has Seen The Wind Helpful Hints: This song has eighth notes in it ( ). You play these the same way you play any other notes. Read the rhythms carefully (using “ti-ti” and “two-oo”) then play exactly the way you read the
rhythms! It’s that easy! Also, watch out for those low E notes! Remember, if you squeak, check that your fingers are covering the holes completely and that you’re blowing very gently into the recorder. Don’t forget to use your tongue!

Practice Chart Place a Check Mark in each box for every time you play all the way
throughout the song without any mistakes!
Navy Belt “Go Tell Aunt Rhody”
* Go Tell Aunt Rhody Helpful Hints: Get comfortable with the new C and D notes before trying them out in the song. Practice this song SLOWLY with a good steady beat. Watch out for half notes ( ) which gets 2 beats! Don’t forget to play with your left hand on top and use your tongue to start each note. This song is more challenging than
the others we’ve played so far, so don’t be afraid to take some extra time to practice, practice, practice!
C New Note:
High D New Note:

Practice Chart Place a Check Mark in each box for every time you play all the way
throughout the song without any mistakes!
Grey Belt “The Fishpole Song”
* The Fishpole Song Helpful Hints: This song uses two different “D” notes! High D ( ) – like we used in “Go Tell Aunt Rhody”, and a new note – Low D ( ). Pay attention to which D you are supposed to play in this song! Also,
watch out for the more complicated rhythms in this song! Check your Rhythms Page if you’re not sure how many beats a note gets. As always, practice SLOWLY with your left hand on top, and always use your tongue!
Low D New Note:
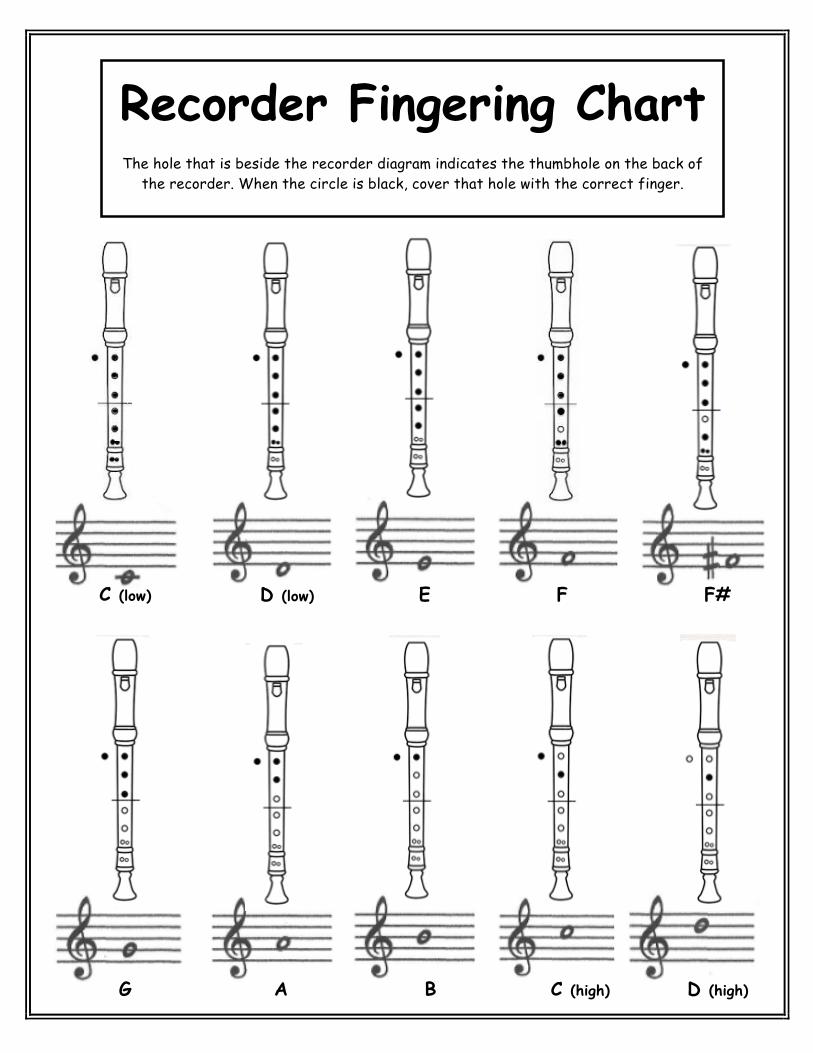
Recorder Fingering Chart
The hole that is beside the recorder diagram indicates the thumbhole on the back of the recorder. When the circle is black, cover that hole with the correct finger.
C (low)
C (high) B A G
F# F E D (low)
D (high)