3M Coban 2 Compression System Application for …„¢ Coban™ 2 Compression System Application for...
2
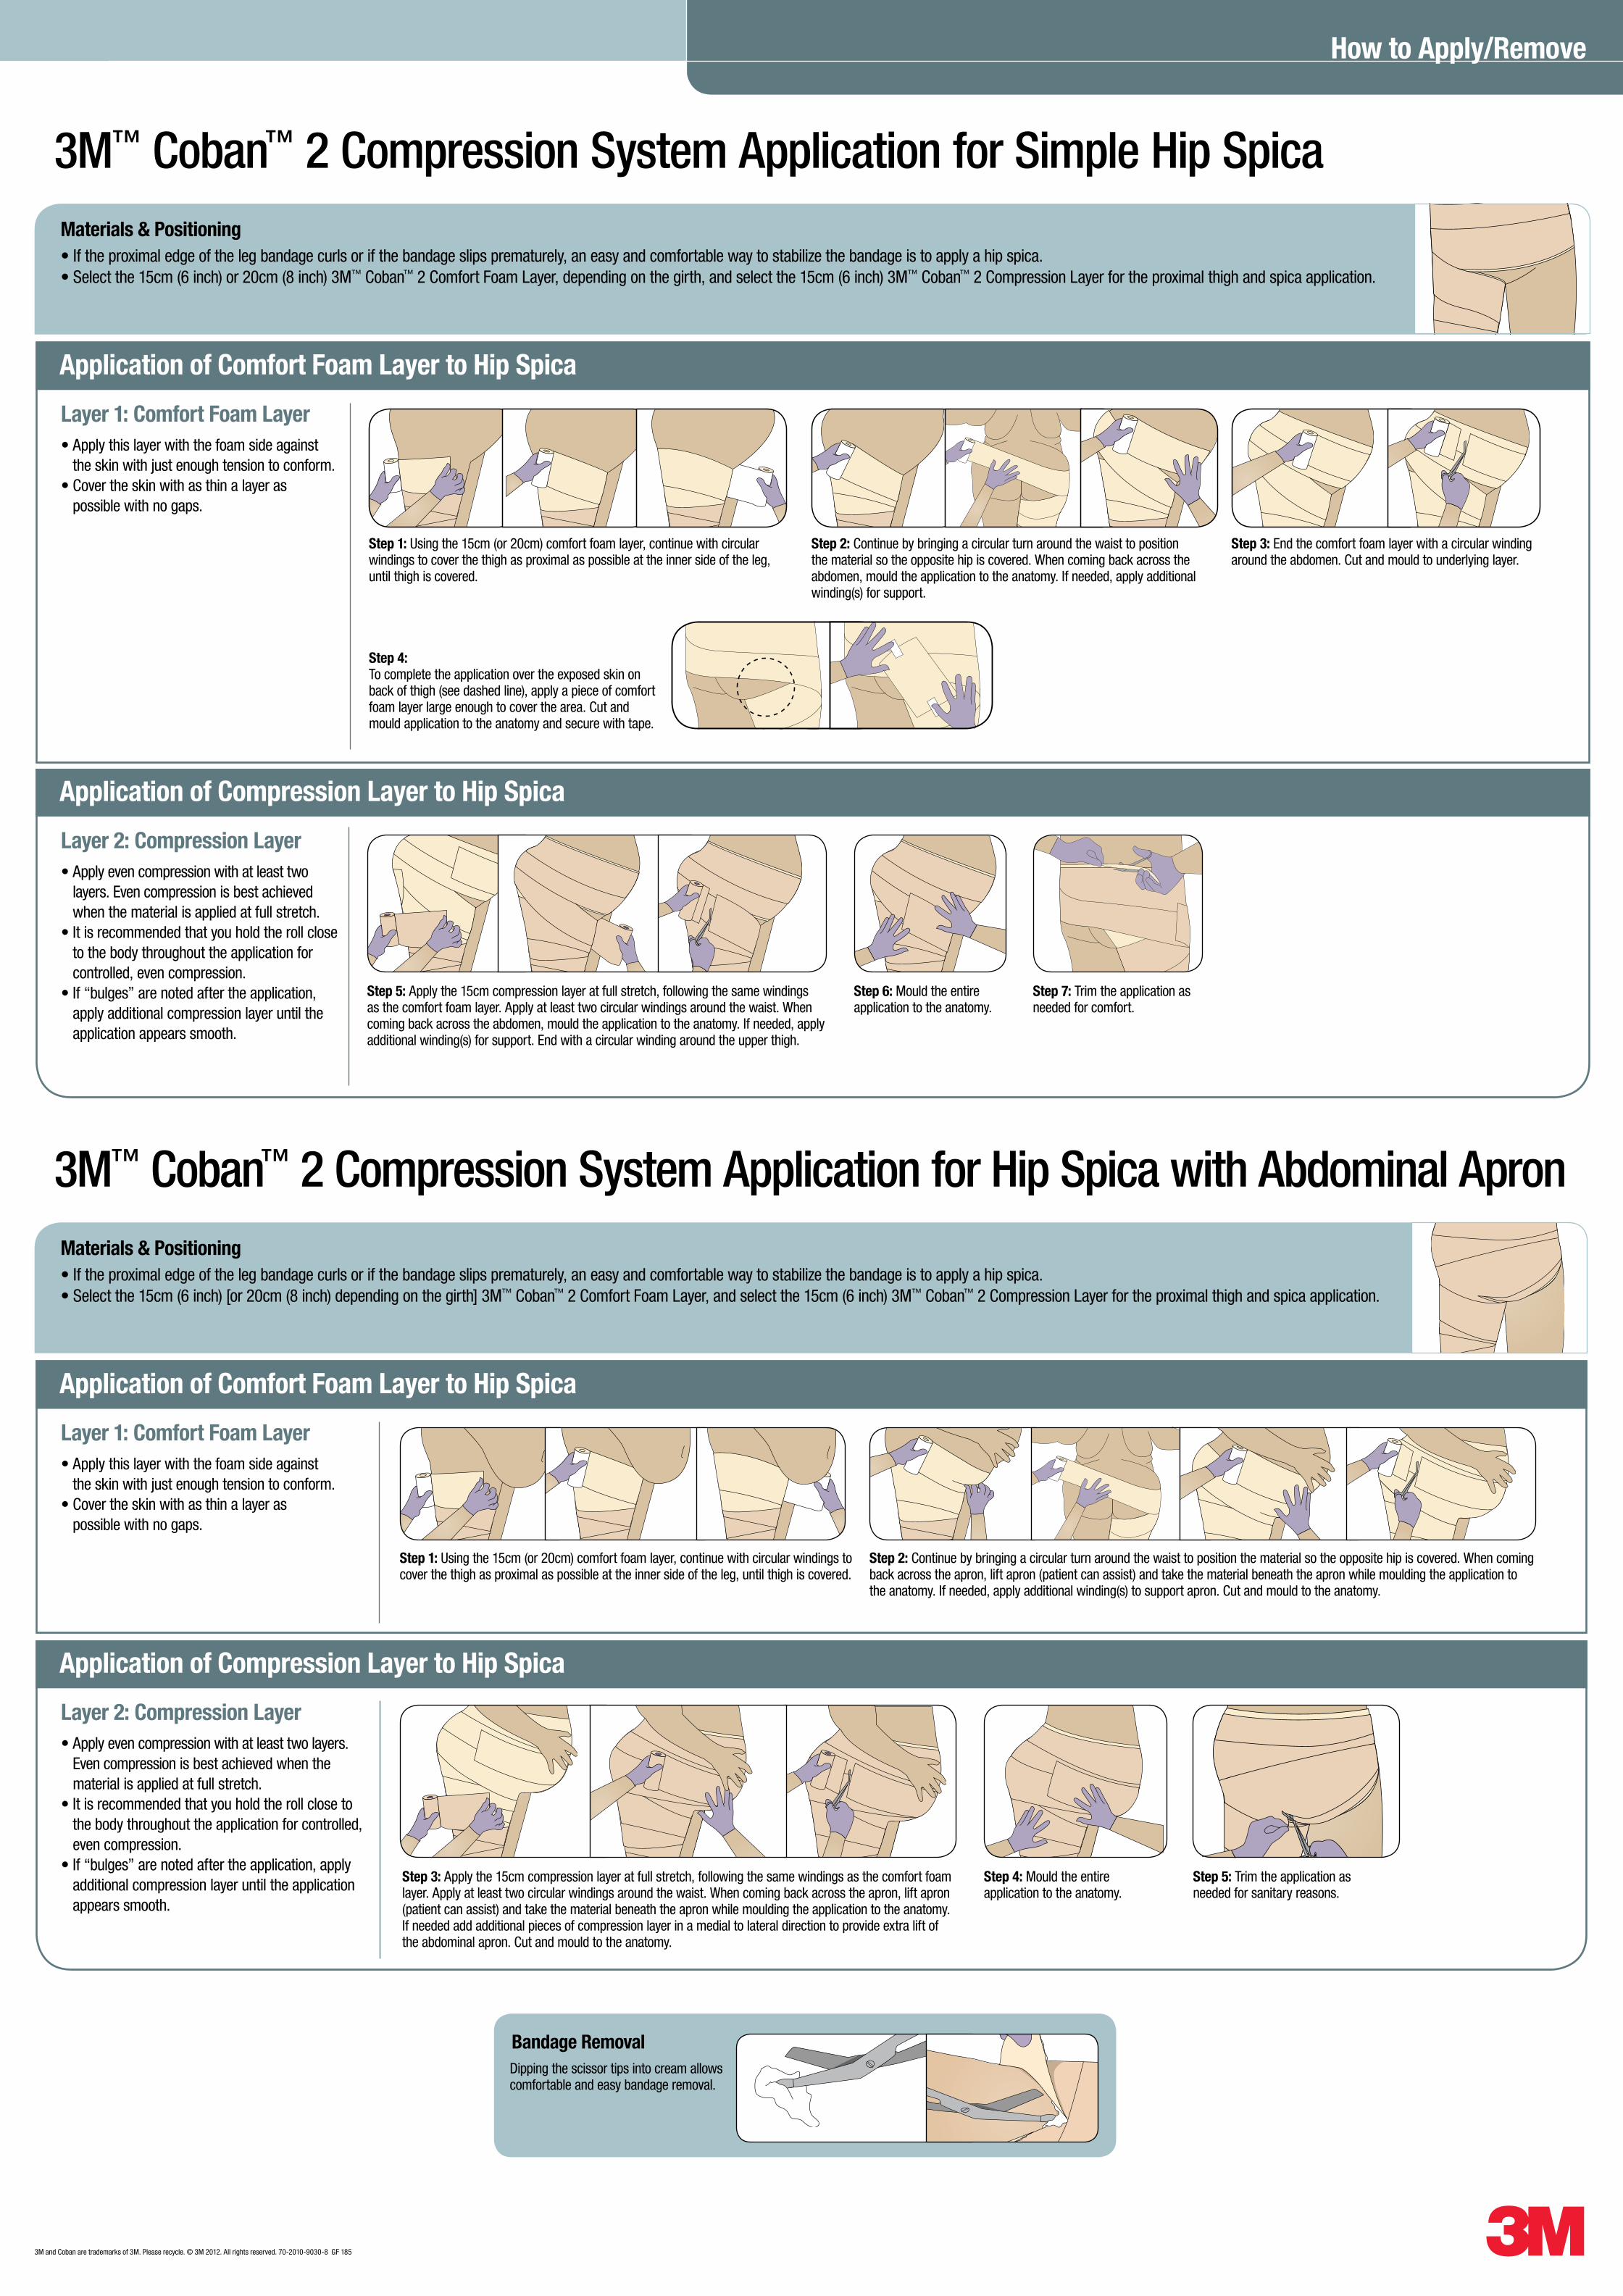
How to Apply/Remove 3M and Coban are trademarks of 3M. Please recycle. © 3M 2012. All rights reserved. 70-2010-9030-8 GF 185 Dipping the scissor tips into cream allows comfortable and easy bandage removal. Bandage Removal 3M ™ Coban ™ 2 Compression System Application for Simple Hip Spica Materials & Positioning • If the proximal edge of the leg bandage curls or if the bandage slips prematurely, an easy and comfortable way to stabilize the bandage is to apply a hip spica. • Select the 15cm (6 inch) or 20cm (8 inch) 3M ™ Coban ™ 2 Comfort Foam Layer, depending on the girth, and select the 15cm (6 inch) 3M ™ Coban ™ 2 Compression Layer for the proximal thigh and spica application. Application of Compression Layer to Hip Spica Layer 2: Compression Layer • Apply even compression with at least two layers. Even compression is best achieved when the material is applied at full stretch. • It is recommended that you hold the roll close to the body throughout the application for controlled, even compression. • If “bulges” are noted after the application, apply additional compression layer until the application appears smooth. Step 5: Apply the 15cm compression layer at full stretch, following the same windings as the comfort foam layer. Apply at least two circular windings around the waist. When coming back across the abdomen, mould the application to the anatomy. If needed, apply additional winding(s) for support. End with a circular winding around the upper thigh. Step 6: Mould the entire application to the anatomy. Step 7: Trim the application as needed for comfort. Application of Comfort Foam Layer to Hip Spica Layer 1: Comfort Foam Layer • Apply this layer with the foam side against the skin with just enough tension to conform. • Cover the skin with as thin a layer as possible with no gaps. Step 1: Using the 15cm (or 20cm) comfort foam layer, continue with circular windings to cover the thigh as proximal as possible at the inner side of the leg, until thigh is covered. Step 3: End the comfort foam layer with a circular winding around the abdomen. Cut and mould to underlying layer. Step 2: Continue by bringing a circular turn around the waist to position the material so the opposite hip is covered. When coming back across the abdomen, mould the application to the anatomy. If needed, apply additional winding(s) for support. 3M ™ Coban ™ 2 Compression System Application for Hip Spica with Abdominal Apron Materials & Positioning • If the proximal edge of the leg bandage curls or if the bandage slips prematurely, an easy and comfortable way to stabilize the bandage is to apply a hip spica. • Select the 15cm (6 inch) [or 20cm (8 inch) depending on the girth] 3M ™ Coban ™ 2 Comfort Foam Layer, and select the 15cm (6 inch) 3M ™ Coban ™ 2 Compression Layer for the proximal thigh and spica application. Application of Compression Layer to Hip Spica Layer 2: Compression Layer • Apply even compression with at least two layers. Even compression is best achieved when the material is applied at full stretch. • It is recommended that you hold the roll close to the body throughout the application for controlled, even compression. • If “bulges” are noted after the application, apply additional compression layer until the application appears smooth. Step 3: Apply the 15cm compression layer at full stretch, following the same windings as the comfort foam layer. Apply at least two circular windings around the waist. When coming back across the apron, lift apron (patient can assist) and take the material beneath the apron while moulding the application to the anatomy. If needed add additional pieces of compression layer in a medial to lateral direction to provide extra lift of the abdominal apron. Cut and mould to the anatomy. Step 4: Mould the entire application to the anatomy. Step 5: Trim the application as needed for sanitary reasons. Application of Comfort Foam Layer to Hip Spica Layer 1: Comfort Foam Layer • Apply this layer with the foam side against the skin with just enough tension to conform. • Cover the skin with as thin a layer as possible with no gaps. Step 1: Using the 15cm (or 20cm) comfort foam layer, continue with circular windings to cover the thigh as proximal as possible at the inner side of the leg, until thigh is covered. Step 4: To complete the application over the exposed skin on back of thigh (see dashed line), apply a piece of comfort foam layer large enough to cover the area. Cut and mould application to the anatomy and secure with tape. Step 2: Continue by bringing a circular turn around the waist to position the material so the opposite hip is covered. When coming back across the apron, lift apron (patient can assist) and take the material beneath the apron while moulding the application to the anatomy. If needed, apply additional winding(s) to support apron. Cut and mould to the anatomy.
Transcript of 3M Coban 2 Compression System Application for …„¢ Coban™ 2 Compression System Application for...
How to Apply/Remove
3M and Coban are trademarks of 3M. Please recycle. © 3M 2012. All rights reserved. 70-2010-9030-8 GF 185
Dipping the scissor tips into cream allows comfortable and easy bandage removal.
Bandage Removal
3M™ Coban™ 2 Compression System Application for Simple Hip SpicaMaterials & Positioning• If the proximal edge of the leg bandage curls or if the bandage slips prematurely, an easy and comfortable way to stabilize the bandage is to apply a hip spica. • Select the 15cm (6 inch) or 20cm (8 inch) 3M™ Coban™ 2 Comfort Foam Layer, depending on the girth, and select the 15cm (6 inch) 3M™ Coban™ 2 Compression Layer for the proximal thigh and spica application.
Application of Compression Layer to Hip Spica
Layer 2: Compression Layer • Apply even compression with at least two
layers. Even compression is best achieved when the material is applied at full stretch.
• It is recommended that you hold the roll close to the body throughout the application for controlled, even compression.
• If “bulges” are noted after the application, apply additional compression layer until the application appears smooth.
Step 5: Apply the 15cm compression layer at full stretch, following the same windings as the comfort foam layer. Apply at least two circular windings around the waist. When coming back across the abdomen, mould the application to the anatomy. If needed, apply additional winding(s) for support. End with a circular winding around the upper thigh.
Step 6: Mould the entire application to the anatomy.
Step 7: Trim the application as needed for comfort.
Application of Comfort Foam Layer to Hip Spica
Layer 1: Comfort Foam Layer • Apply this layer with the foam side against
the skin with just enough tension to conform.• Cover the skin with as thin a layer as
possible with no gaps.
Step 1: Using the 15cm (or 20cm) comfort foam layer, continue with circular windings to cover the thigh as proximal as possible at the inner side of the leg, until thigh is covered.
Step 3: End the comfort foam layer with a circular winding around the abdomen. Cut and mould to underlying layer.
Step 2: Continue by bringing a circular turn around the waist to position the material so the opposite hip is covered. When coming back across the abdomen, mould the application to the anatomy. If needed, apply additional winding(s) for support.
3M™ Coban™ 2 Compression System Application for Hip Spica with Abdominal ApronMaterials & Positioning• If the proximal edge of the leg bandage curls or if the bandage slips prematurely, an easy and comfortable way to stabilize the bandage is to apply a hip spica. • Select the 15cm (6 inch) [or 20cm (8 inch) depending on the girth] 3M™ Coban™ 2 Comfort Foam Layer, and select the 15cm (6 inch) 3M™ Coban™ 2 Compression Layer for the proximal thigh and spica application.
Application of Compression Layer to Hip Spica
Layer 2: Compression Layer • Apply even compression with at least two layers.
Even compression is best achieved when the material is applied at full stretch.
• It is recommended that you hold the roll close to the body throughout the application for controlled, even compression.
• If “bulges” are noted after the application, apply additional compression layer until the application appears smooth.
Step 3: Apply the 15cm compression layer at full stretch, following the same windings as the comfort foam layer. Apply at least two circular windings around the waist. When coming back across the apron, lift apron (patient can assist) and take the material beneath the apron while moulding the application to the anatomy. If needed add additional pieces of compression layer in a medial to lateral direction to provide extra lift of the abdominal apron. Cut and mould to the anatomy.
Step 4: Mould the entire application to the anatomy.
Step 5: Trim the application as needed for sanitary reasons.
Application of Comfort Foam Layer to Hip Spica
Layer 1: Comfort Foam Layer • Apply this layer with the foam side against
the skin with just enough tension to conform.• Cover the skin with as thin a layer as
possible with no gaps.
Step 1: Using the 15cm (or 20cm) comfort foam layer, continue with circular windings to cover the thigh as proximal as possible at the inner side of the leg, until thigh is covered.
Step 4: To complete the application over the exposed skin on back of thigh (see dashed line), apply a piece of comfort foam layer large enough to cover the area. Cut and mould application to the anatomy and secure with tape.
Step 2: Continue by bringing a circular turn around the waist to position the material so the opposite hip is covered. When coming back across the apron, lift apron (patient can assist) and take the material beneath the apron while moulding the application to the anatomy. If needed, apply additional winding(s) to support apron. Cut and mould to the anatomy.

3M Canada CompanyP.O. Box 5757London, Ontario N6A 4T1Canada1-800-364-3577www.3M.ca/coban2layer
3
3M Deutschland GmbHHealth Care BusinessCarl-Schurz-Str.141453 Neuss Germany
3M and Coban are trademarks of 3M. Used under license in Canada. © 2012, 3M. All rights reserved. Printed in Canada. Please recycle. 1208-02243