
3DCreative Magazine Issue 034 June 2008
206
dominance A r t icles Dominance War III, 3D Printing, Headcases, plus more! Interviews A n t onio Jo s e G o nzal e z, Jelmer Boskma and Fo x 3D S t u d ios Galleries Jonas Thörnqvist, RomanStyle, Jesse Sandifer, plus more! Making Of’s Ford Mustang Fastback ‘65 by Pâ ş lea Paul, plus more! Tutorials Part 6 of our Bugatti Veyron Car Modelling Tutorial Series, plus more! Issue034 June 2008 $4.50 / €3.25 / £2.25 The war has ended and the winners announce d. Read our Do minance War III a rticle inside!! We also chat with Antonio Jose Gonzalez (cover image) about his passion for 3D... w ar iii
-
Upload
acatrineis1532 -
Category
Documents
-
view
224 -
download
1
Transcript of 3DCreative Magazine Issue 034 June 2008

8/10/2019 3DCreative Magazine Issue 034 June 2008
http://slidepdf.com/reader/full/3dcreative-magazine-issue-034-june-2008 1/206
dominance
ArticlesDominance War III, 3D Printing, Headcases, plus more!
Interviews Antonio Jose Gonzalez, Jelmer Boskma and Fox3D Studios
GalleriesJonas Thörnqvist, RomanStyle, Jesse Sandifer, plus more!
Making Of’sFord Mustang Fastback ‘65 by Pâşlea Paul, plus more!
TutorialsPart 6 of our Bugatti Veyron Car Modelling Tutorial Series, plus more!
Issue034 June 2008 $4.50 / €3.25 / £2.25
The war has ended and the winnersannounced. Read our DominanceWar III article inside!! We also chat
with Antonio Jose Gonzalez (coverimage) about his passion for 3D...
war iii

8/10/2019 3DCreative Magazine Issue 034 June 2008
http://slidepdf.com/reader/full/3dcreative-magazine-issue-034-june-2008 2/206
page 2www.3dcreativemag.com Issue 034 June 2008
Contents
ContentsWhat’s in this month?
Fox3D StudiosGame Art Development Studio
Jelmer BoskmaCreature Designer and Digital Modeller
Antonio Jose GonzalezCharacter Modeller for Mercury Steam
Dominance War IIIThe War has Ended and the Results are in!
3D Printing: GROWitYour Own Model in the Palm of Your Hand!
HeadcasesThe New Spitting Image!
The ChaseNew Action-Filled CG/HD Spot from Shilo
Galleries10 of the Best 3D Artworks
Stylised ChallengeThis Month’s Finalists & Last Month’s Making Ofs
Sculpting ChallengeThe Threedy Forums Newest Challenge
ZBrushBeginner’s Guide to ZBrush: Part Five of Seven
Alfa RomeoProject Overview by Arturo Garcia
Ford MustangProject Overview by Pâşlea Paul
Surprise!Project Overview by Guido Zatti
Digital Art Masters:v2Free Chapter Book Promotion
RecruitmentJob Vacancies
About usZoo Publishing Information & Contacts
Bugatti VeyronFor 3ds Max, Maya, C4D & XSi
EditorialWelcome to a
celebratory issue
this month: issue034 of 3DCreative
Magazine. Why are we
celebrating? Well, it
was but 12 months ago
that we were quietly
basking in the glory
of victory served to
us in the Dominance
War II Challenge,
and well, what can
we say this year...?
We’ve only gone and
done it again, can you
believe?!! That’s right:
3DTotal saw victory again this month when the results ooded over to our
twitching eyes direct from the man himself, Mr. Fredrik Hultqvist (founder
of the Dominance War). Last year’s DWII article was simply fantastic,
but this year we decided to go one step further and, as well as featuring
the Dominance War III Story and Winners’ Galleries, we bring to you a
3DCreative-exclusive interview with Fredrik, just for you guys! Check
out page 034 for the complete story – beginning to end, and I dare
you not to be impressed with the sheer quality of work produced in this
year’s War!! This issue is pretty jam-packed and I’ve been told by the
designers not to wafe this month, so I’ll quickly point out a few of this
month’s highlights... Check out our interviews with the up-and-coming
talents of Concept Artist and Digital Sculptor, Jelmer Boskma (page015), and with the fantastic Antonio Jose Gonzalez (page 026), whose
skill set includes pretty much every 3D package under our glorious Sun!
You’ll nd plenty of talent and skill in this month’s interview pages, not
to mention our catch up with Fox3D Studios, who, with over 11 years’
experience, have knocked up an impressive list of work on titles such as
Hellgate: London, Fallout 3, Killzone 2 plus plenty more (page 008)!Our Making Ofs this month include the humorous works of Guido Zatti,
along with the car modelling and rendering skills of Pâşlea Paul and Arturo Garcia in our three fantastic Making Ofs. Our good friend Wayne
is still going strong in Part 5 of his ZBrush series, and our car modelling
tutorial series reaches the materials section in the penultimate episode of
the 7-part series! And if you’ve ever longingly looked at your 3D models
and wished they would spring to life... turn to page 063 to nd out how
your wishes could very well come true, in our 3D Printing special article!
So go on, enjoy another fun-lled issue from 3DCreative!! *winks* Ed.
001
008
015
026
034
063
077
084
089
098
119
124
131
140
151
160
164
169
171Editor Lynette Clee
LeadDesigner Chris Perrins
LayoutLayla Khani
Bobby Brown
MarketingLynette Clee
Free Stuff!Wherever you see this symbol, click it to
download resources, extras and even movies!!
ContentLynette Clee
Tom Greenway
Richard Tilbury
Chris Perrins
Proofing
Lynette Clee
Jo Hargreaves
8/10/2019 3DCreative Magazine Issue 034 June 2008
http://slidepdf.com/reader/full/3dcreative-magazine-issue-034-june-2008 3/206
Setting up your PDF reader For optimum viewing of the magazine, it is
recommended that you have the latest Acrobat
Reader installed. You can download it for free,
here: DOWNLOAD!
To view the many double-page spreads featured in 2DArtist magazine,
you can set the reader to di splay ‘two-up’, which will show double-
page spreads as one large landscape image:
1. Open the magazine in Reader;
2. Go to the View menu, then Page display ;3. Select Two-up Continuous, making sure that
Show Cover Page is also selected.
That’s i t!
Get the most out of your
Magazine!If you’re having problems viewing the double-page spreads that we
feature in this magazine, follow this handy l ittle guide on how to set
up you r PDF reader!

8/10/2019 3DCreative Magazine Issue 034 June 2008
http://slidepdf.com/reader/full/3dcreative-magazine-issue-034-june-2008 4/206
page 4www.3dcreativemag.com Issue 034 June 2008
Contributors
Contributing artistsEvery month, many creative and talented artists from around the world
contribute to 3DCreative Magazine. Here you can read all about them. If
you would like to be a part of 3DCreative or 2DArtist Magazines, please
contact [email protected].
Our new car modelling tutorial series,
Bugatti Veryon, brings a group of
new talented artists to 3DCreative
Magazine. These wonderful people
are responsible for creating our 3ds
Max, Cinema 4D, LightWave, Maya &
Softimage XSi content this month!
Ali Ismailis a 3D artist who
has worked on
everything from
Hollywood movies to
TV commercials to
games. He started out
by doing the rst 3D
games in Jordan, then freelanced to clients such
as Microsoft and VW, and has also worked for
ILM on projects such as Indiana Jones and the
Kingdom of the Crystal Skull whilst at Lucaslm
Animation Singapore.
http://www.aliismail.com/ [email protected]
EmlynDaviesis a 27 year old
freelance 3D artist,
based in Birmingham,
UK. He has four years
experience in Cinema
4D and has freelanced
mainly at Cadbury as a 3D consultant for most
of his professional career. Passionate about all
things 3D, he constantly strives to develop his
expertise and blur the boundaries between the
real and the digital world.
http://www.cr8ivity.co.uk [email protected]
Krisztián
Szeiboldis a 3D Artist living in
Budapest, Hungary.
In 2000, he started
using 3D software
such as 3D Studio
R4, and later 3ds
Max and Maya. He’s currently working as a 3D
Artist on post-productions and commercials with
Softimage XSI and Fusion. He hopes that he’s
going to be able to work on feature lms in the
future.
http://www.oryon.extra.hu/
Vojislav
Milanovicis a 27-year old
3D generalist from
Banjaluka, northern
Bosnia. After a great
time in Australia he
went back to his
homeland to pursue his career as a 3D artist
and lecturer in a Multimedia Design College.
As much as he likes learning new things, he
also loves teaching others. Amongst other stuff,
he enjoys photography, drawing, painting and
sculpting. http://www.vojislavmilanovic.com/
BrendanMcCaffrey
is a digital artist
and designer who
does a variety of
work, ranging from
presentation and
promotional art for the
games, automotive and product industries, to
lighting and rendering for animation and FMVs.
He is currently based in Las Palmas, Gran
Canaria, Spain.
http://www.bmcaff.com

8/10/2019 3DCreative Magazine Issue 034 June 2008
http://slidepdf.com/reader/full/3dcreative-magazine-issue-034-june-2008 5/206
page 5www.3dcreativemag.com Issue 034 June 2008
Contributors
Guido
Zattiis a 3D Artist from
Treviso, but now
works in Parma for
the post-production
society, TaxFreeFilm,
where he works for
national and international commercial TV. He
specialises in modelling, texturing & lighting.
He’s 29 and uses lots of software, but principally
3ds Max and ZBrush. He studied at art school
and loves drawing and modelling with clay.
http://www.guidozatti.com
JelmerBoskma
is a Creature Designer
and 3D Modeller,specialising in
the development
of creatures and
characters for lm and
TV. After his graduation from the Vancouver
Film School, Jelmer has worked on various
feature lms and creature related projects. His
recent work can be seen in the rst 3D Live
Action Adventure lm, ‘Journey to the Center of
the Earth 3D’. http://www.jelmerboskma.com/ [email protected]
Guy
Zingeris 27 years old and
lives in Petach-Tikva,
in Israel. He’s worked
as a Graphic Designer
at an advertising
company, since
learning 3ds Max 2 years ago as part of his
animation studies. He is still mostly self-taught
and is still learning today. He’s also nished his
nal project for school – a short animation that
has got a lot of good feedback, and these days
he is working on his showreel.
ArturoGarciais a freelancer living
in Mexico, with 2
years experience
in modelling cars.
He uses 3ds Max
software, and his goalis to make models become as real as possible –
even confusing them with what is real!
http://dessga.cgsociety.org/gallery
CarlosOrtegais a 26-year old
graphic designer andhas been working
in 3D for about 4
years. He’s currently
working in the TV
department of Guanajuato University doing
graphic design and 3D animation for TV spots
and documentaries. He’s also a multimedia
freelancer and a shortlm hobbyist with a
production house called TG Productions.
http://[email protected]
WayneRobson
is a very successful
freelance digital
sculptor living in
Durham, England.
Wayne is currently
dividing his timebetween work on an upcoming creature
documentary and his upcoming extensive book
on ZBrush for Wordware publishing. Wayne’s
best selling DVDs on ZBrush and Mudbox are
available through Kurv Studios.
http://www.dashdotslash.net

8/10/2019 3DCreative Magazine Issue 034 June 2008
http://slidepdf.com/reader/full/3dcreative-magazine-issue-034-june-2008 6/206
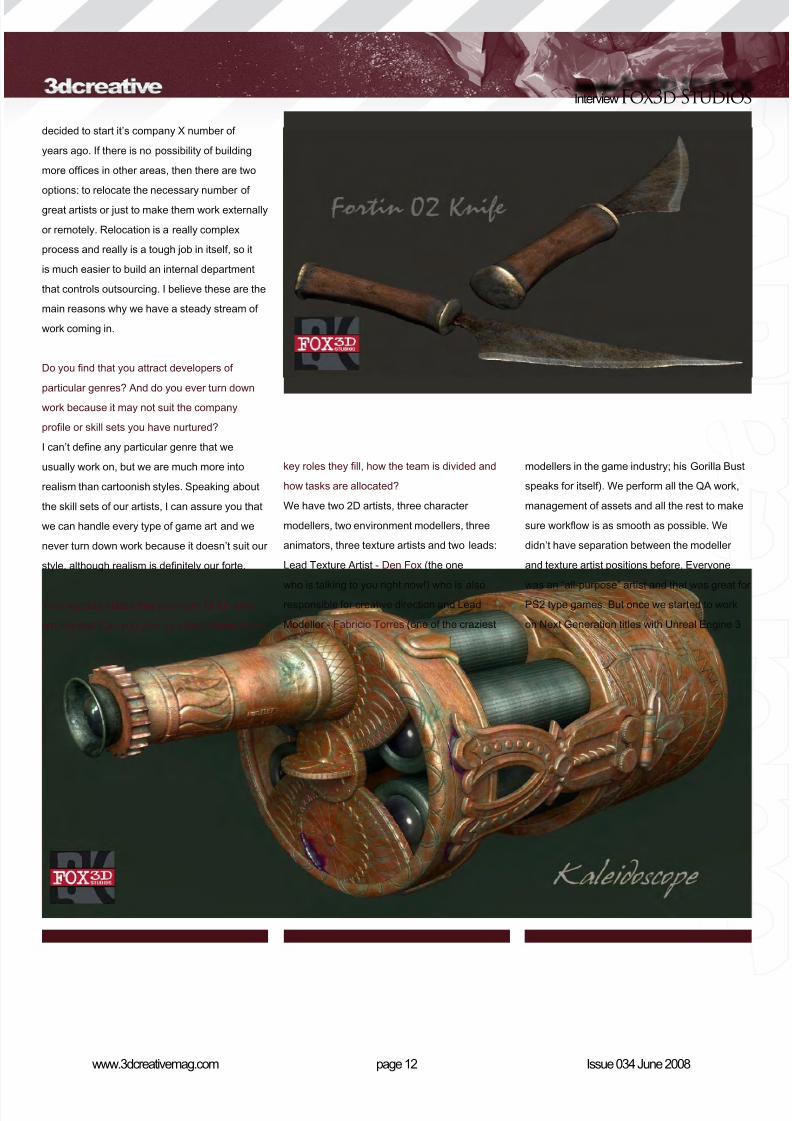
InterviewFox3d Studios
Fox3D Studios is a game art development
studio based in Estonia. The small team
consists of a diverse group of experienced
professionals, who are dedicated to creating
high quality artwork for the games sector.
Previous credits include Fallout 3, Brothers In
Arms: Hell’s Highway, Hellgate: London and
Mass Effect ...
“Finding the resourcesto create a specificelement of a game canoften take longer thanthe task itself”

8/10/2019 3DCreative Magazine Issue 034 June 2008
http://slidepdf.com/reader/full/3dcreative-magazine-issue-034-june-2008 7/206

8/10/2019 3DCreative Magazine Issue 034 June 2008
http://slidepdf.com/reader/full/3dcreative-magazine-issue-034-june-2008 8/206
page 10www.3dcreativemag.com Issue 034 June 2008
InterviewFox3d Studios
People believed in my skills while I was a
freelance artist and I think I’ve further proved
that I can guarantee them quality, even if work is
not made by me personally.
Having all the experience and contacts in the
game industry, I had the perfect foundation to
start my new company and I was lucky enough
to be able to do it smoothly. I’m now working
with really talented artists, providing QA and
creative directorial services at my own studios
and it’s just amazing... It wasn’t my aim to make
a company; it just formed by itself. I guess luck
prevailed.
Your job seems has shifted from that of an artist
to more of a managerial role. Do you ever nd
that you miss the creative aspects of freelancing
and do you think you would like to work on your
own game ideas? Or does the whole notion of
a long incubation period of development sound
daunting?
Actually I work on some of my own projects from
time to time too. To put myself into the role ofthe artist really helps me to communicate and
understand the needs of the other artists that
I work with. It’s also great fun to have minimal
or no communication sometimes, and to feel
myself in the calm artistic universe while being backed by some hardcore
music. I love variety in my work, so being only a manager would kill me for
sure... As to the second part of your question, yes, I think about my own
games from time to time and I do have one really nice idea in mind... butit’s a bit too soon to let people know about that!
It would seem as though your company is essentially an “Art Department”
for hire. What do you feel are the main reasons why there are demands
for such a niche market nowadays?
We mostly work in game industry, so I will be talking about that market
mainly. We know that there are tons of games that are being developed
at this very moment and there is always an opportunity that some game
developer would like to speed up the process of development for some
reason. No matter what the developer’s objective or aim - whether to
achieve the best results possible for some investor or publisher - we
are always ready to help. We have the artists, the knowledge and we’re
always ready to start immediately.

8/10/2019 3DCreative Magazine Issue 034 June 2008
http://slidepdf.com/reader/full/3dcreative-magazine-issue-034-june-2008 9/206
page 11www.3dcreativemag.com Issue 034 June 2008
Fox3d Studios Interview
You don’t need to increase the number of
full-time workers for the short-term goal and
we know how it can be really difcult to nd
the right candidate for immediate work. Findingthe resources to create a specic element of a
game can often take longer than the task itself.
When you sub-contract some part of your work
to a studio like Fox3D, you can be sure that
we are motivated to provide amazing results
because we’re aware that there’s such strong
competition in the shape of other such “Art
Departments for hire”. We also make sure that
we complete projects quickly and efciently so
that we can receive compensation. There is noother way to full the client’s objective but to
produce a high-quality piece of work within the
given time-frame.
If we are talking about small clients, there are
some studios that do not have a stable art sub-
division in their structure and they hire workers
from project to project to save money, trying
to occupy their time in between projects. It is
much easier and faster to hire someone who
can provide everything in one bottle: a team of
artists that can provide every type of artwork.
Then the client keeps this contact until the next
project and there are is a greater chance that
they will have the same team and quality again.
If we are talking about big clients and huge
projects, the game art becomes more and
more complex and the demands and quality
are higher. Standards have risen dramatically
lately, so sometimes it is just impossible to nd
the required number of great artists in the same
area of the world where the game developer
8/10/2019 3DCreative Magazine Issue 034 June 2008
http://slidepdf.com/reader/full/3dcreative-magazine-issue-034-june-2008 10/206
page 12www.3dcreativemag.com Issue 034 June 2008
InterviewFox3d Studios
key roles they ll, how the team is divided and
how tasks are allocated?
We have two 2D artists, three character
modellers, two environment modellers, three
animators, three texture artists and two leads:
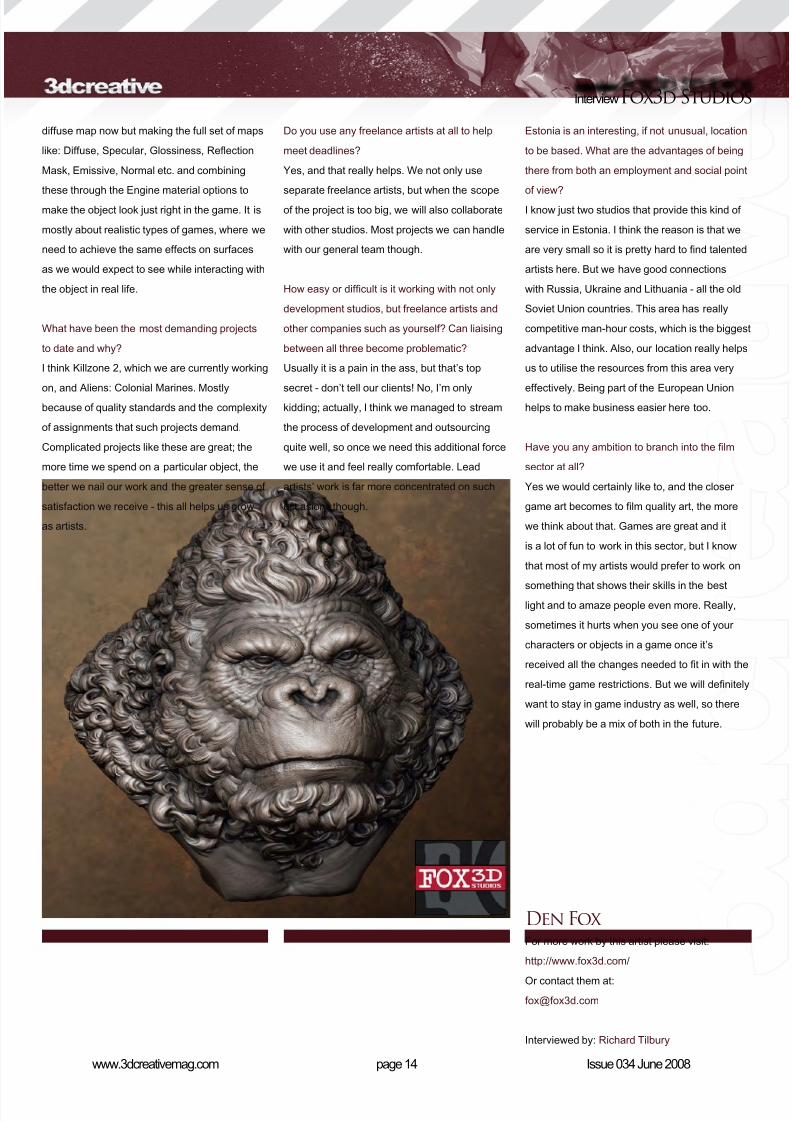
Lead Texture Artist - Den Fox (the one
who is talking to you right now!) who is alsoresponsible for creative direction and Lead
Modeller - Fabricio Torres (one of the craziest
modellers in the game industry; his Gorilla Bust
speaks for itself). We perform all the QA work,
management of assets and all the rest to make
sure workow is as smooth as possible. We
didn’t have separation between the modeller
and texture artist positions before. Everyone
was an “all-purpose” artist and that was great forPS2 type games. But once we started to work
on Next Generation titles with Unreal Engine 3
decided to start it’s company X number of
years ago. If there is no possibility of building
more ofces in other areas, then there are two
options: to relocate the necessary number ofgreat artists or just to make them work externally
or remotely. Relocation is a really complex
process and really is a tough job in itself, so it
is much easier to build an internal department
that controls outsourcing. I believe these are the
main reasons why we have a steady stream of
work coming in.
Do you nd that you attract developers of
particular genres? And do you ever turn downwork because it may not suit the company
prole or skill sets you have nurtured?
I can’t dene any particular genre that we
usually work on, but we are much more into
realism than cartoonish styles. Speaking about
the skill sets of our artists, I can assure you that
we can handle every type of game art and we
never turn down work because it doesn’t suit our
style, although realism is denitely our forte.
Your website states that you have 15 full-time
employees. Can you give us a breakdown of the

8/10/2019 3DCreative Magazine Issue 034 June 2008
http://slidepdf.com/reader/full/3dcreative-magazine-issue-034-june-2008 11/206
page 13www.3dcreativemag.com Issue 034 June 2008
Fox3d Studios Interview
technology we felt that it was the right time to
change this common organisation model. The
amount of work that every object required gave
us a great opportunity to separate tasks further.We really feel now that this kind of separation
increases the quality and speed of the work on
complex assignments - I would say by 30%. So
that really adds to our competitive prices!
Once we receive the task from the client it goes
to one of the lead artists and he prepares the
task for the specic artist so that everything is
as clear as possible. Then it goes through all
the necessary stages of development, beingreviewed and approved with every stage
before it goes further. At the very nal stage of
development we review it one last time and thenit goes to client with the Seal of Approval.
Depending on the client’s needs, they may also
review our work at every stage, which is good as
well, and guarantees the fastest and best result.
What proportion of your work is dedicated to 2D
artwork?
Clients usually like to prepare reference material
and sketches at their end and use our services
purely as a 3D development resource. So we
usually use our 2D artists to help out in the
texturing process. I would say that 2D artwork is
about 5% of our everyday tasks.
In the list of projects you have worked on I
notice that there are quite a number in which
you mention “material setup”. Can you explain
what this involves?
That is what I would call a texture artist now - a
material artist. Some objects that we develop
for the Unreal Engine 3 have a really complex
material setup, so it is not only about making the
8/10/2019 3DCreative Magazine Issue 034 June 2008
http://slidepdf.com/reader/full/3dcreative-magazine-issue-034-june-2008 12/206
page 14www.3dcreativemag.com Issue 034 June 2008
InterviewFox3d Studios
diffuse map now but making the full set of maps
like: Diffuse, Specular, Glossiness, Reection
Mask, Emissive, Normal etc. and combining
these through the Engine material options tomake the object look just right in the game. It is
mostly about realistic types of games, where we
need to achieve the same effects on surfaces
as we would expect to see while interacting with
the object in real life.
What have been the most demanding projects
to date and why?
I think Killzone 2, which we are currently working
on, and Aliens: Colonial Marines. Mostlybecause of quality standards and the complexity
of assignments that such projects demand.
Complicated projects like these are great; the
more time we spend on a particular object, the
better we nail our work and the greater sense of
satisfaction we receive - this all helps us grow
as artists.
Do you use any freelance artists at all to help
meet deadlines?
Yes, and that really helps. We not only use
separate freelance artists, but when the scopeof the project is too big, we will also collaborate
with other studios. Most projects we can handle
with our general team though.
How easy or difcult is it working with not only
development studios, but freelance artists and
other companies such as yourself? Can liaising
between all three become problematic?
Usually it is a pain in the ass, but that’s top
secret - don’t tell our clients! No, I’m onlykidding; actually, I think we managed to stream
the process of development and outsourcing
quite well, so once we need this additional force
we use it and feel really comfortable. Lead
artists’ work is far more concentrated on such
occasions though.
Estonia is an interesting, if not unusual, location
to be based. What are the advantages of being
there from both an employment and social point
of view?I know just two studios that provide this kind of
service in Estonia. I think the reason is that we
are very small so it is pretty hard to nd talented
artists here. But we have good connections
with Russia, Ukraine and Lithuania - all the old
Soviet Union countries. This area has really
competitive man-hour costs, which is the biggest
advantage I think. Also, our location really helps
us to utilise the resources from this area very
effectively. Being part of the European Unionhelps to make business easier here too.
Have you any ambition to branch into the lm
sector at all?
Yes we would certainly like to, and the closer
game art becomes to lm quality art, the more
we think about that. Games are great and it
is a lot of fun to work in this sector, but I know
that most of my artists would prefer to work on
something that shows their skills in the bestlight and to amaze people even more. Really,
sometimes it hurts when you see one of your
characters or objects in a game once it’s
received all the changes needed to t in with the
real-time game restrictions. But we will denitely
want to stay in game industry as well, so there
will probably be a mix of both in the future.
Den FoxFor more work by this artist please visit:
http://www.fox3d.com/
Or contact them at:
Interviewed by: Richard Tilbury

8/10/2019 3DCreative Magazine Issue 034 June 2008
http://slidepdf.com/reader/full/3dcreative-magazine-issue-034-june-2008 13/206
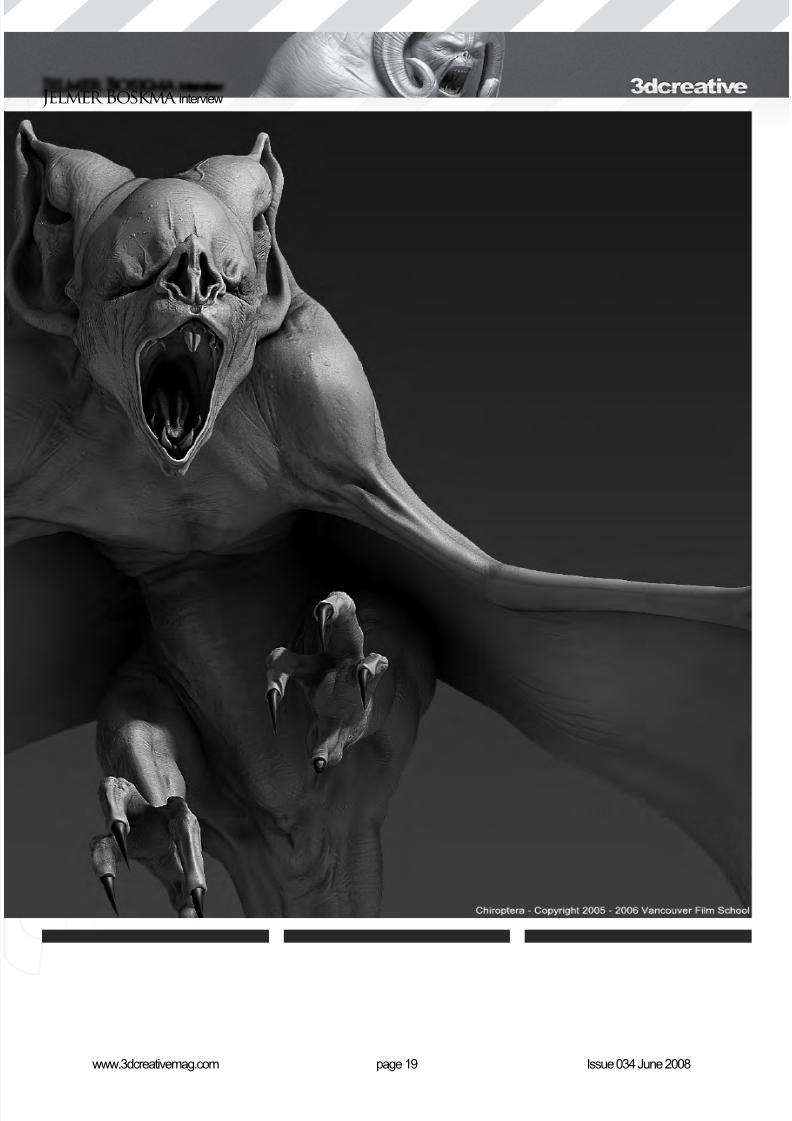
Being one of the many talented artist to have graduated from the
Vancouver Film School, Jelmer Boskma has the skills and dedication to
become one of the best in the business. We nd out a bit more about this
young artist and also explore his fascination with creature design.
“One of my main
criteria is that I wantto enjoy doing my work and try to avoidthe unnecessary stress and annoyances that
come with doing work, you don’t really enjoy
doing. Life is way tooshort for that”

8/10/2019 3DCreative Magazine Issue 034 June 2008
http://slidepdf.com/reader/full/3dcreative-magazine-issue-034-june-2008 14/206
page 16www.3dcreativemag.com Issue 034 June 2008
InterviewJelmer Boskma
Hi Jelmer, could you introduce yourself to our
readers and tell us a bit about yourself please?
Hey Chris, thanks for having me! My name is
Jelmer, born and raised in the Netherlands and
now working as a creature designer and digital
modeller in the entertainment industry. Since my
graduation at the Vancouver Film School, I have
been involved in several lm projects, working
both as a designer and as a 3D modeller.
Looking over you portfolio, you have created some amazing looking
creatures. How did this fascination with this type of creature start, andwhat sort of research do you do when you’re creating them?
I am afraid I have no clue who or what is to blame for my fascination
with creatures. I have been drawing Ninja Turtles and monsters since
I was a kid really. When I started learning about the true art of creating
creatures on lm I got sucked into it right away. I really enjoy the feeling
I get when I can call something done and there’s a creature there. A
creature that people can look at, and hopefully enjoy looking at, that
came from my mind and started from a blank piece of paper. To keep
myself inspired, I constantly look at the work of my creature art heroes
and the lms in which their work appears. Their work excites me, but also
puts my feet rmly on the ground by making sure I realise there’s still a
long road ahead for me! [Laughs]. Once the main idea is there, I look for
photographs as reference points. Bats, lizards, horses, seals, humans,
snakes… etc. There’s a lot of reference material available on the Internet,
but I also hold a fair collection of books lled with all kinds of curious
creatures on this planet.
Is there any creature that you would like to recreate and add your own
twist to?
Not specically. But since I love making scrawny, gnarly creatures for
some reason, I think I would enjoy doing a version of the evil house elf
“Kreacher” from Harry Potter and the Order of the Phoenix. Simply
because the character has so many of the characteristics I like to put
8/10/2019 3DCreative Magazine Issue 034 June 2008
http://slidepdf.com/reader/full/3dcreative-magazine-issue-034-june-2008 15/206

8/10/2019 3DCreative Magazine Issue 034 June 2008
http://slidepdf.com/reader/full/3dcreative-magazine-issue-034-june-2008 16/206
page 18www.3dcreativemag.com Issue 034 June 2008
InterviewJelmer Boskma
in my own work. He is a rather mysterious
creature. He’s not completely evil, but denitely
not friendly. Slightly twisted and a bit dark-sided.
Very little amount of body fat, so there’s a lot ofinteresting shapes to play with in his physique.
Perfect ingredients!
You’ve worked on a few big named lms in
your short career, but one stands out more than
most: Watchmen. Could you tell how what your
involvement was on the production of this lm
and how did you land this position?
Watchmen is a project I hold very dear.
Although my involvement on the project wasvery minimal, it truly opened my eyes to where I
wanted to go. For Watchmen I worked on early-
look development tests and pre-vis modelling.
The cool thing about the whole experience was
that we got to work in the hectic environment
of the production ofce in Vancouver, where
the sets were built and the art department was
located as well. The work I was doing myself
was nothing to write home about, but seeing the
work coming out of the art department did exciteme. I realised there that the work I was doing
wasn’t what I wanted to do for the rest of my
life. I wanted to design and sculpt creatures as
much as I could. There’s plenty of cool work out
there for a select few fortunate artists. I wanted
to see if I could get myself into such a position.
That’s the goal I set for myself, right there on the
Watchmen set.
Are you a big fan of these superhero-type lms
and if so, which one would you like to have
worked on?
I am by no means the biggest fan of superhero
lms, but I did very much enjoy Batman Begins.
I guess if you’d let me make Hugo Weaving’s
character “V” from V for Vendetta a superhero,
then those are two of the superhero lms I liked
best. Both lms lack creatures though, booh!
If I had to pick a superhero project that I would
liked to have worked on, it probably would be
Guillermo Del Toro’s Hellboy. Amazing creature
design work in there.
8/10/2019 3DCreative Magazine Issue 034 June 2008
http://slidepdf.com/reader/full/3dcreative-magazine-issue-034-june-2008 17/206
page 19www.3dcreativemag.com Issue 034 June 2008
Jelmer Boskma Interview

8/10/2019 3DCreative Magazine Issue 034 June 2008
http://slidepdf.com/reader/full/3dcreative-magazine-issue-034-june-2008 18/206
page 20www.3dcreativemag.com Issue 034 June 2008
InterviewJelmer Boskma
I noticed you mentioned you’re starting work on The Hobbit. Could you
give us any insight into how this is progressing or is it all “Top Secret”?
I’m afraid you’ve been reading my website a little over-hastily! The Hobbit
is one of my favourite books and I am just very excited to see it gettingmade right now. My involvement at the moment is absolute none though.
The last rumour I picked up was that sadly production had stalled because
of the writer’s strike in California.
Okay, so I must have misread it! But if the opportunity arose, would you
like to work on it?
[Laughs]. Obviously! Though now I’ve said that out loud it won’t happen!
So what are your plans for the future?
To work on as many cool projects as I possibly can and hopefully growas an artist. I’ve certainly got a much better idea of the things I enjoy
doing, and the things I don’t enjoy doing as much. Pushing my design
work and getting my name further out there as someone who can help to
develop new creatures for lms is the main goal for now. Whether I will
work from my home studio or have to travel somewhere to work inhouse is
something I will leave open. I enjoy the fact that I can’t plan anything three
weeks ahead, because opportunities come and go constantly. One of
my main criteria is that I want to enjoy doing my work and try to avoid theunnecessary stress and annoyances that come with doing work, you don’t
really enjoy doing. Life is way too short for that.
Which artists inspire you?
The artists that I get inspiration from are very well known and have been
exciting me with their work since long before I knew their names. Crash
McCreery, who was most recently responsible for designing the character
of “Davy Jones”, who you’ve probably seen in the last two Pirates of the
Caribbean lms. [Laughs]. He’s one of heroes - mainly because he works
in pencil so much still. I think that’s great, particularly in this era where
almost everyone is mainly working digitally. Also on top of the list are
Carlos Huante, Aaron Sims, Steve Wang, Christian Alzmann, Rick Baker,
Neville Page, and Miles Teves. All of these guys share one thing and

8/10/2019 3DCreative Magazine Issue 034 June 2008
http://slidepdf.com/reader/full/3dcreative-magazine-issue-034-june-2008 19/206
page 21www.3dcreativemag.com Issue 034 June 2008
Jelmer Boskma Interview
that’s a great eye for great shapes. I get excited
just by looking at their work. The forms, the
rhythms and the creativity that I nd in the work
of these guys is something truly inspiring andhard for me to explain in words.
How do you normal spend your time away from
the computer screen?
When I am not at a computer screen I am
either sketching or hanging out with friends
and family. Even then I tend to go out and get
them to watch movies with me! [Laughs]. Most
of my friends can be very critical when it comes
to watching lms. I found myself on numerousoccasions, defending Peter Jackson’s King
Kong against the general opinion that it was an
improbable story lled with unlikely creatures.
The lm’s a masterpiece and the creatures in it
have the leading roles for me. But I digress…
I’ll praise the day when I will be able to work on
something my friends will like. Because then I
am sure I did a good job!
It has been a really cool talking with you, butone last question before we wrap things up.
What has been the most inuential piece of
advice that you have been given and who or
where did it come from?
I see you’ve saved your hardest question for
last. I don’t think I can call up one particular
word of advice that has inuenced me the most.
It’s a combination of thoughts, images and
advice which are inuential for me. It can range
from eye-opening conversations with fellow
students at school, to studying the work of some
of the artists I named earlier. It’s hard for me to
forget something if I nd it useful or interesting.
On the other hand I’ve got a horrible memory for
almost everything else! [Laughs].
Jelmer Boskma For more work by this artist please visit:
http://www.jelmerboskma.com/
Or contact them at:
Interviewed by: Chris Perrins

8/10/2019 3DCreative Magazine Issue 034 June 2008
http://slidepdf.com/reader/full/3dcreative-magazine-issue-034-june-2008 20/206

8/10/2019 3DCreative Magazine Issue 034 June 2008
http://slidepdf.com/reader/full/3dcreative-magazine-issue-034-june-2008 21/206
8/10/2019 3DCreative Magazine Issue 034 June 2008
http://slidepdf.com/reader/full/3dcreative-magazine-issue-034-june-2008 22/206
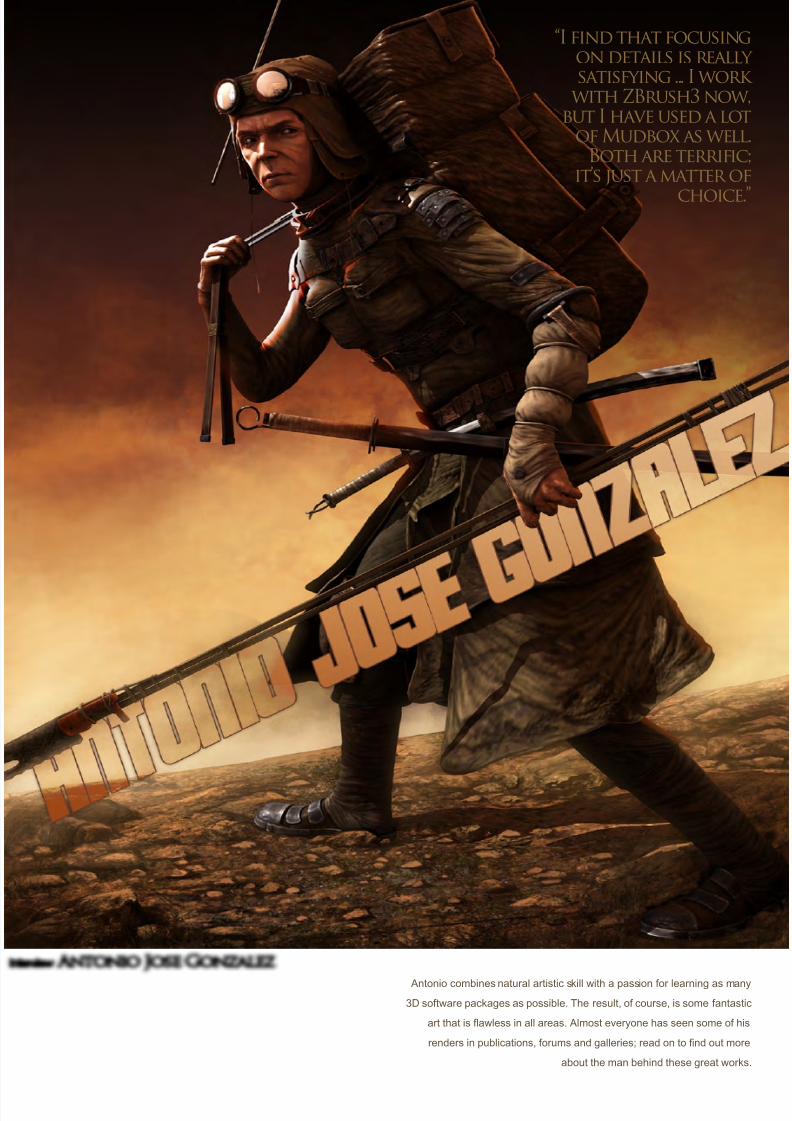
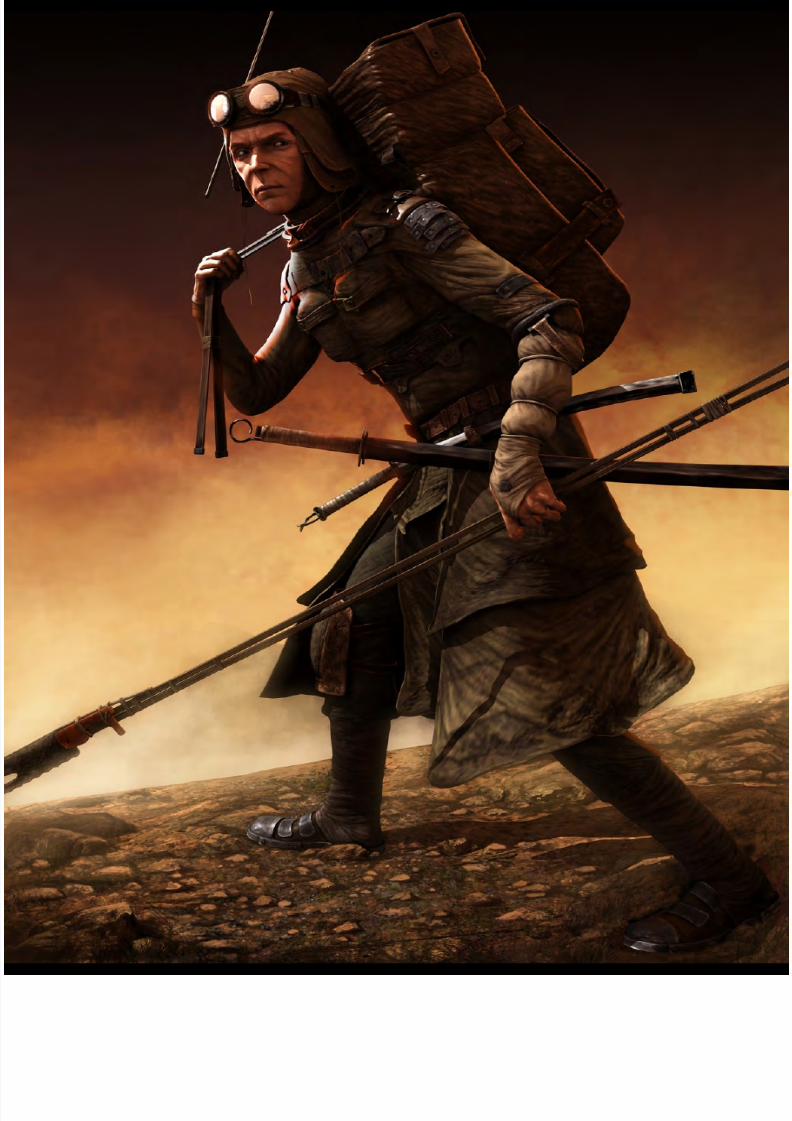
Interview Antonio Jose Gonzalez
Antonio combines natural artistic skill with a passion for learning as many
3D software packages as possible. The result, of course, is some fantastic
art that is awless in all areas. Almost everyone has seen some of his
renders in publications, forums and galleries; read on to nd out more
about the man behind these great works.
“I find that focusingon details is reallysatisfying ... I work
with ZBrush3 now,but I have used a lot
of Mudbox as well.Both are terrific;
it’s just a matter of
choice.”

8/10/2019 3DCreative Magazine Issue 034 June 2008
http://slidepdf.com/reader/full/3dcreative-magazine-issue-034-june-2008 23/206
page 27www.3dcreativemag.com Issue 034 June 2008
Antonio Jose Gonzalez Interview
Hey Antonio! I’ve just been whiling away some
time on your site http://www.budathome.com/ ,
and I can see a lot of amazing images but not
much detail about the creator! So can you tell us
a bit about yourself please?
Well, I was born in Cádiz (a very nice place in
the south of Spain) 33 years ago. My growth
as an artist is very similar to many other artists;
I started to draw at a very early age and soon
after I was playing with my father’s oil colours
(he’s a traditional painter). My relationship
with digital art - specially with the game
industry - was late and, in fact, accidental.
In 1999, I created a company called Nebula
Entertainment, together with a few friends. We
developed a game called Resurrection: The
Return of the Black Dragon for the Spanish
company Dinamic Multimedia.
Some years later, I moved to Madrid and joined
Pyro Studios, where I worked on Commandos
Strike Force with my friend Daniel Moreno (who
was interviewed in issue 30 of this magazine).
Currently I’m working as a character modeller
for the company Mercury Steam, creators of
Clive Baker’s Jericho game.
So you created a company and made you
own game! That’s an impressive start to a CG
career, was it a success?
Well, beginnings are always difcult, specially
in countries like Spain where the video game
industry is not as consolidated as it is in the
United Kingdom or other European countries.
Besides, we began developing video games
with a very modest budget and with very few
staff (just note that the associates were all
artists and business administrators at the same
time ...) So to sum up, we were quite far away
from the AAA productions.
If you take this into account, it was not bad at
all: especially in the graphic aspect. The most

8/10/2019 3DCreative Magazine Issue 034 June 2008
http://slidepdf.com/reader/full/3dcreative-magazine-issue-034-june-2008 24/206
page 28www.3dcreativemag.com Issue 034 June 2008
Interview Antonio Jose Gonzalez
positive part for me, apart from the experience
itself, was the chance to introduce myself to
the video game industry (as well as the chance
to train myself as a professional). It was a veryhard road to run, because most of my training
was self-taught. I can remember in those days,
we had no access to the huge quantity of useful
information we have now (i.e. video tutorials or
forums, where many issues can be solved). You
could say that I learned the hard way and in that
sense, it was a total success.
You list a lot of software packages in your
skill set. Why have you mastered so manyapplications (XSI, Maya, 3ds Max, Silo and
Modo) when some would say they can all
achieve a similar result?
Well, the rst reason is fun. I love testing 3D
software packages. To be honest, I’m not an
expert in all of them. In my work I used 3ds Max,
Photoshop and Zbrush as combo programs.
On the other hand, my personal works are
made, mainly, with XSI or Maya. I do this as a
way to learn, as well. I think the use of several
programs opens your mind. It gives you the chance to nd new tricks or
general solutions that can improve your artistic and technical skills.
Do you nd yourself saying all the time “I wish this package could do this”
or “This feature is nowhere near as good as in another”?
Yes of course, but those defects are compensated for by some other
virtue of the software. While it would be great to nd it, the “denitive”
program simply doesn’t exist. There will always be certain features that
one program will do better than another. However, if you’re determined
then you can learn how to use lots of different programs and therefore be
able to access all of their best features.

8/10/2019 3DCreative Magazine Issue 034 June 2008
http://slidepdf.com/reader/full/3dcreative-magazine-issue-034-june-2008 25/206
page 29www.3dcreativemag.com Issue 034 June 2008
Antonio Jose Gonzalez Interview
If you don’t have good loops or topology right
from the start, what problems can an artist run
into later on?
Well, that’s a difcult question; normally you
experience the problems when you’re shaping,
and each person has a different way of working.
That’s a personal choice. I believe the biggest
problems that you can experience are related
to triangles. When you subdivide the mesh,
you can nd peaks and tensions hard to solve,
which can effect the nal mesh aspect. Another
common issue is to nd that a mesh is too
dense before being exported to ZBrush or
Mudbox. Personally, I prefer to work with very
simple mesh bases because they are much
more handy, especially when you have to
modify the pose of the model.
You can also encounter problems if your mesh
has areas with a high density of polygons, while
some other areas in the same object have little
density. When subdividing, you are going to
nd zones where a greater concentration of
polygons is going to be needed. And it’s likely
that your machine is not going to be able to
make a new subdivision; that makes it obvious
that zones without denition exist, impoverishing
the nal result. Time to subdivide the mesh.
All of your characters look like they have had
sculpting details added, which must be where
ZBrush and Mudbox come into your toolset. Can
you tell us more about this part of the process?I nd that focusing on details, in a baroque or
preciosist way of working, is really satisfying.
Most of the time that I invest in the whole
process is spent on the detailing and I also
consider it the most important aspect as I don’t
elaborate the base mesh too much. I work with
ZBrush3 now, but I have used a lot of Mudbox
as well. Both are terric; it’s just a matter of
choice. As I have said before, I normally start
with as basic a mesh as possible, includinggood loops, topology and distribution. Next, I
centre on subdivisions and details, using every
subdivision up and working from least to most
until I nish the model.
8/10/2019 3DCreative Magazine Issue 034 June 2008
http://slidepdf.com/reader/full/3dcreative-magazine-issue-034-june-2008 26/206
Interview Antonio Jose Gonzalez

8/10/2019 3DCreative Magazine Issue 034 June 2008
http://slidepdf.com/reader/full/3dcreative-magazine-issue-034-june-2008 27/206

8/10/2019 3DCreative Magazine Issue 034 June 2008
http://slidepdf.com/reader/full/3dcreative-magazine-issue-034-june-2008 28/206
the modelling of a friend: the bass guitarist
of a Mexican punk group. A lot of tattoos and
piercings and other stuff. Funny!
I want to start working towards a more naturalist
line, intending to go one step beyond the
present digital works, especially 3D ones.
That character sounds brilliant - I can’t wait to
see your render. Are you aiming for realism or
stylisation in any way?
Realism, denitely. All my work presents a
realistic constant; I’m not very interested in the
more stylised trends right now.
In fact, in the work I’m dealing with now,
I’ve pulled together a thorough collection of
references in order to achieve higher levels of
accuracy within this realistic aspect. I’m also
studying the motor of a render, so that I can get
a wider photorealistic aspect.
One nal quirky question: if your hand became
disconnected from your brain and grew a mind
of its own, what do you think it would do?
I have no idea; it would be a different mind,
thus it’s not my problem [Laughs].
Thank you very much and all the best!
Antonio José GonzálezFor more work by this artist please visit:
http://www.budathome.com
Or contact them at:
Interviewed by: Tom Greenway

8/10/2019 3DCreative Magazine Issue 034 June 2008
http://slidepdf.com/reader/full/3dcreative-magazine-issue-034-june-2008 29/206
The Dominance War
Well, Dominance War III has now come to an end for this year, and we
can but anticipate what next year’s battle will have in stall for us all. But
let’s take some time out from it all, after a long and furious ght, to step
back and immerse ourselves in the simply amazing work that has come
out of this year’s war – a real feast for our tired and hungry eyes!
In this article you will nd the Dominance War III story, followed by a 3D
Winners’ Gallery, as well as a 2D Winners’ Gallery, and we nish up with
an interview with the man himself: Mr. Fredrik Hultqvist. So grab yourself
a cup of tea (or something a little stronger!), and let’s enjoy the offerings
from this year’s talented artists that battled it out in Dominance War III...
Enjoy!
“After witnessing the effect this largechallenge had on artists, my goalsquickly changed into making theevent into a form of Olympics forgame artists. Forums would act likecountries and artists could choose
which forum they would like torepresent during the war. Now, afterDominance War III in 2008, I am excitedto say that this event is one stepcloser to this vision. With 9 teams in5 different languages, the Dominance
War series is shaping up to become anunprecedented game art event of itskind.”

8/10/2019 3DCreative Magazine Issue 034 June 2008
http://slidepdf.com/reader/full/3dcreative-magazine-issue-034-june-2008 30/206
page 35www.3dcreativemag.com Issue 034 June 2008
The Dominance War
Dominance War III:The Story...
The machines’ victory did not last... In a nal
desperate effort, the remnants of the opposing
forces united against the machines and created
an ultimate weapon that would temporarily
disrupt all electrical functions within the galaxy.
Unfortunately, something went horribly wrong...
It has been 1,000 years since the
disappearance of machines. All electrical and
mechanical systems continue to malfunction
and every planet has been cut off from each
other, leaving planetary wormholes as the only
means of travelling between planets. Only
myths remain of how life with technology once
was, until recently...
Bizarre creatures have been emerging from
wormholes; creatures made entirely of metal!
The ultimate weapons’ effects are apparently
fading. Everyone must put a stop to this rising
menace before it’s too late, but unfortunately
everyone in the system is already at war!
For the past century, an inter-galactic war
has been raging between 9 rival planets. Asa result, sending massive armies to a new
awakening machine world is impossible, and so
in their place, single powerful units have been
summoned...
Your mission, with the help of a powerful
magical artefact, is to enter an ancient,forgotten world via wormholes, destroy all rival
enemy forces sent by other planets, crush the
awakening machines, and bring back the secret
of technology in order to dominate all opposing
forces, their planets and their wretched citizens
– once and for all!
What were this year’srules?
Topic: Create a Powerful Artefact User!
Time Period: Post-apocalyptic futuristic
fantasy where magic exists. With technology
unable to function due to the remnant effects of
an ultimate weapon launched 1000 years ago, a
new science has emerged. Formed by residual
effects of an ancient ultimate weapon, or maybe
an evolutionary step in the universe – whatever
it is, this mystical force can now be harnessed
by a few talented individuals, or can be infused
into items to make simple magical items or
immensely powerful magical artefacts. As a
8/10/2019 3DCreative Magazine Issue 034 June 2008
http://slidepdf.com/reader/full/3dcreative-magazine-issue-034-june-2008 31/206
page 36www.3dcreativemag.com Issue 034 June 2008
The Dominance War
result, a new age of life has come forth: an age
of magic!
Race: You can create any organic, demonic or
un-dead race: alien, vampire, angel, succubus,
skeleton, mutant, elf, human, sh, pixie, giant –
anything! The only exceptions are: no robots,
metal constructions, magical golums, cyborgs,
steam engines, steam equipment or anything
with electronics!
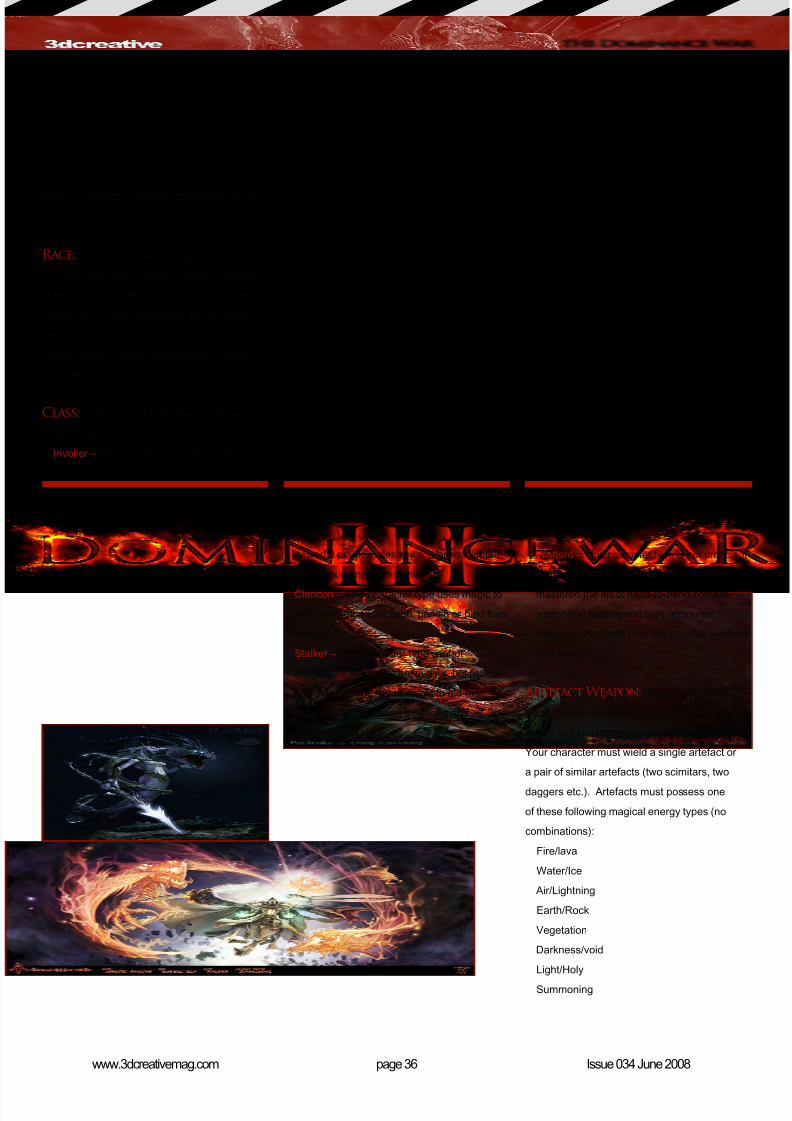
Class: Select one of the following classes (no
combinations):
Invoker – This character type harvests
powerful magic to destroy and/or manipulate
his surroundings or enemies
Clericon – This character type uses magic to
heal, strengthen, weaken, banish or bind foes
or allies
Stalker – This character type cannot
manipulate magic like an invoker, but rather
has mastered the art of magic to aid his/
her stealth, information gathering and
assassination skills
Warlord – This character type is not procient
in manipulating magic, rather he/she has
mastered the art of hand-to-hand combat,
weapon(s) ghting and high-armoured
defence. Warlords may use magical weapons
and armour
Artefact Weapon: Powerful artefact
weapons are needed to defeat all opposing rival
forces and to destroy the awakening machines.
Your character must wield a single artefact or
a pair of similar artefacts (two scimitars, two
daggers etc.). Artefacts must possess one
of these following magical energy types (no
combinations):
Fire/lava
Water/Ice
Air/Lightning
Earth/Rock
Vegetation
Darkness/void
Light/Holy
Summoning

8/10/2019 3DCreative Magazine Issue 034 June 2008
http://slidepdf.com/reader/full/3dcreative-magazine-issue-034-june-2008 32/206
page 37www.3dcreativemag.com Issue 034 June 2008
The Dominance War
Special notes: If you choose to give your
character two similar artefacts, you can only
have one magical power type. For example,
you cannot have one ice dagger and one re
dagger. They must both use re or both use ice.
Insignia and Colours: Your character
must possess your team’s colours and/or your
team’s insignia (if your team has one). If you
don’t have the colours or the insignia located
somewhere on your character, your entry will
not make it into the top 50. Please represent
your team properly. This is a team event so
make your team proud!
What Were the 3DRequirements this year?9,000 tris max for everything (everything =
characters, glows, effects, artefact, weapons
and their effects, steeds, pets, twins, multiple
characters, summoned monsters and personal
equipment)
1 x 2048 Colour Map
*1 x 2048 Reection Map
*1 x 2048 Specular Map
*1 x 2048 Specular Colour Map
*1 x 2048 Normal Map
*1 x 2048 Bump Map
*1 x 2048 Opacity (transparency) Map
*1 x 2048 Glow map
*1 x 2048 Glossiness map
(*Optional)
Important: You cannot break your 2,048 sheets
into smaller sheets; 2-sided polys are permitted;
for all nal images, all shaders that ship with
UT3, HL2, Crysis, idTech4 and Xnormal areallowed; standard, non node-based shaders
within Max, Maya, and XSI are allowed; no
manual HLSL editing via code, and no node-
based shader creation.
Lighting: For the winning pose image,
enhanced lighting solutions like VRay, MentalRay, Brazil etc., are prohibited. You may only
use standard lights together with standard
shadows. For beauty and construction shots,
the above lighting restrictions do not apply.

8/10/2019 3DCreative Magazine Issue 034 June 2008
http://slidepdf.com/reader/full/3dcreative-magazine-issue-034-june-2008 33/206
page 38www.3dcreativemag.com Issue 034 June 2008
The Dominance War
Your Pedestal’s Budget: Create a
small pedestal with unrestricted polygons and
textures. You cannot put anything on this
pedestal that your creation can use or pick up.
And What Were The 2DRequirements?The Deliverables:
A nal illustrated concept of your glorious
Dominance War III Character. You can use
any 2d software package and/or any traditional
mediums like acrylics, colour pencils and oil
paints to create this image.
A black and white or single colour (for example
light to dark blue etc.) modelling sheet that
shows at least 3 angles of your character.
Choices include: front, right, left, perspective,
close-up(s) and/or back view.
A minimum of 6 black and white or single colour
(for example light to dark blue etc.) initial, rough
draft thumbnail sketches.
Were There AnyRestrictions in This
Year’s War?- No vehicles allowed!
- Your character cannot possess digital
technology. A simple pistol is allowed, but a
laser gun with circuitry is not allowed.- Organic living pets and steeds are allowed.
- No teams or groups. Everything must be
made by one person.
- All sketches, ideas, concepts, models, 3D
meshes etc. must be made specically for this
competition.
- Keep gore and nudity to a decent level, please!
- Artists wishing to enter 3D and concept art
categories must create a new idea for each
category. No 3D entry and concept entry can
look the same.
- Creating a forum thread and showing your
work in progress is mandatory. Entries
submitted without showing their work in
progress will be disqualied. Entries who keep
their work a secret until the last few days can
potentially be disqualied.

8/10/2019 3DCreative Magazine Issue 034 June 2008
http://slidepdf.com/reader/full/3dcreative-magazine-issue-034-june-2008 34/206
page 39www.3dcreativemag.com Issue 034 June 2008
The Dominance War
Dominance War III:The End of the War...
Machines grew stronger!!
Entire cities across the galaxy began to fall,
until nally, two powerful entities shifted the tide
of war. Equipped with vast amounts of magic,
a powerful warlord from planet 3DTotal and a
powerful sorceress from planet CGLand single-
handily defended their home worlds from severe
destruction. Through their inspiring actions,
more warriors from 3DTotal and CGLand began
to join them, and soon they were able to bring
the war to the machines’ home world itself...
until one day, when everything simply stopped.
All machine activities immediately ceased and
all wormholes instantly closed. It was a great
victory for the two surviving planets, 3DTotal
and CGLand. However, both heroes were lost
when the wormholes suddenly closed. Nobody
is sure what happened to these heroes, but forthe time being everyone was content to enjoy
the victory and time for recovery while it lasted...
Five years later, everything changed for the
worse...
To be continued in 2009!
The War of 2008
This chapter of the Dominance War series
has now ended. So let’s take a look at those
who reigned victorious in our Dominance War
Winners’ Galleries...
8/10/2019 3DCreative Magazine Issue 034 June 2008
http://slidepdf.com/reader/full/3dcreative-magazine-issue-034-june-2008 35/206
The Dominance War

8/10/2019 3DCreative Magazine Issue 034 June 2008
http://slidepdf.com/reader/full/3dcreative-magazine-issue-034-june-2008 36/206
page 41www.3dcreativemag.com Issue 034 June 2008
The Dominance War
1st:Parkparkin
Dmitry Parkin
http://www.parkparkin.com
“For me, DWIII is a great
event, like the Olympic games. I leave my base
work to take part in DWIII. I believe it is a very
important event for all those people whose
combine their own lives with game dev. It’s
a chance to show your own skills (ideas and
execution) and declare yourself as an artist. I
would like to say that I really enjoy this event,
and this year I have seen many artists from
different lands and forums making it very, very
good. Year in, year out, DW stands to become
better and better, and I hope next year to see
many more people as participants! I like to
see the art and ideas of other artists, it’s very
interesting.
“I would like to thank my friends and my wife for
their support. I also want to thank ID software
for Quake1, as it was after this game that
I decided to become an artist in game dev.Thanks to Trent Reznor for the soundtrack for
Quake, I listen to it when I work. And, of course,
thank you, Fred, for the Dominance War!”
3D Winners’ Gallery

8/10/2019 3DCreative Magazine Issue 034 June 2008
http://slidepdf.com/reader/full/3dcreative-magazine-issue-034-june-2008 37/206
page 42www.3dcreativemag.com Issue 034 June 2008
The Dominance War
2nd:gun1280
Chang Gun Nam
http://www.gunbbang7680.com
”I didn’t know about
Dominance War until my co-worker suggested
that I should join this event. At the time, I
thought that a competition involving teamwork
sounded really interesting, and I liked the way
that artists created one subject altogether. I
was really happy to be a part of CGLand’s team
– we did our best for victory! During the event,
I found that DW gave me lots of opportunity to
develop my skills, and it taught me a lot. It was
my pleasure to compete with artists from all over
the world. There are no other competitions like
Dominance War and so, for me, it’s now the only
one.
“I’d like to thank my teacher, Terada Katsuya,
and Takeya Takayuki for helping me to become
who I am today. I’d also like to thank my wife
who gave me lots of advice and support, and
I’d like to say thanks to my daughter and my co-
workers. Thanks!”
8/10/2019 3DCreative Magazine Issue 034 June 2008
http://slidepdf.com/reader/full/3dcreative-magazine-issue-034-june-2008 38/206
page 43www.3dcreativemag.com Issue 034 June 2008
The Dominance War
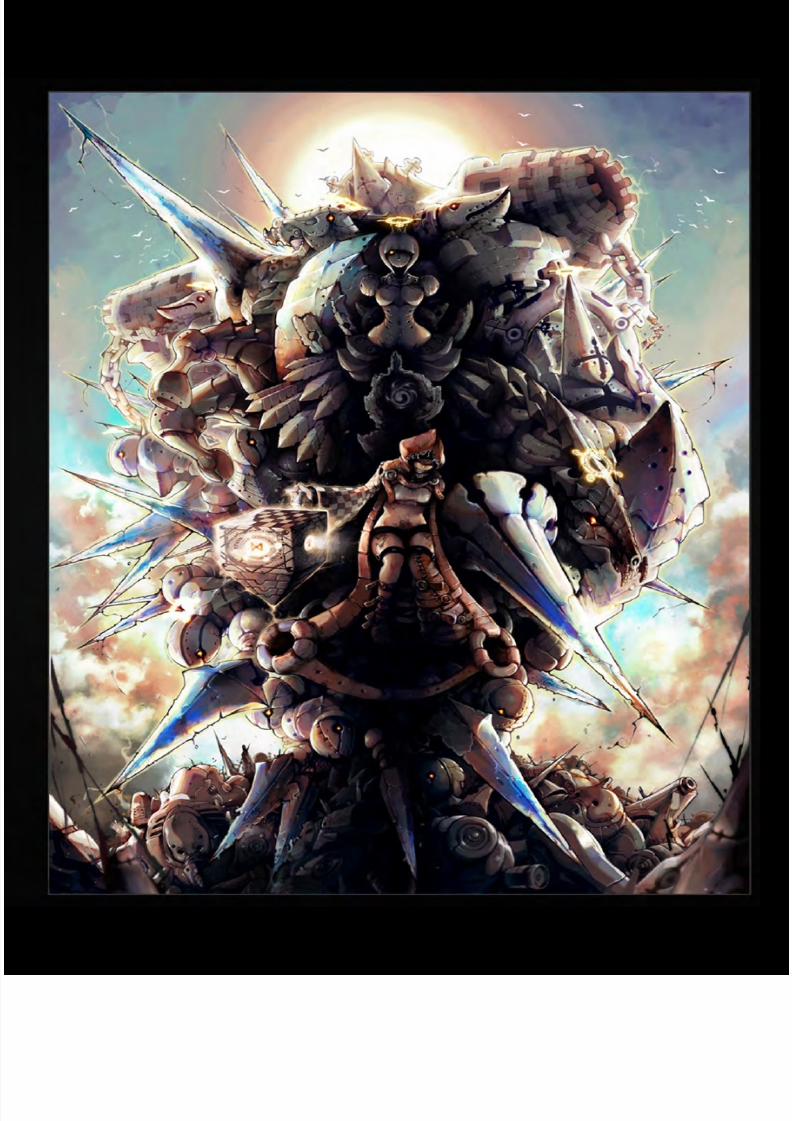
3rd:Goldo_O
Adrien Debos
http://adriendebos.cgsociety.org/gallery/
“Having followed
Dominance War since its very beginning I had
always wanted to join, but for schedule reasons,
or simply a lack of inspiration, I had stayed a
spectator in the two previous editions. This year
I decided to quit nding excuses – I had to enter
the war!
“I consider DW as the marathon for “in-game”
character artists. Joining this exciting event,
that attracts some of the most talented 3D
artists from all over the world, was such a
“Whatever the results, like in every marathon,
the sweetest victory was to cross the nish line,
and reading the message of congratulations
after submitting my nal renders was truly one
of the most rewarding moments of my artistic
career!
“I’d like to thank my girlfriend, my mates at
Relic and all the 3DVF team for all the support
and advice that gave me the strength to reach
the end. Thanks a tonne folks, and long live
Dominance War!”
great adventure! I knew that the long road to
the nish line would be exhausting and rocky,
but somehow, when I was missing out on
my weekends or my regular nights of sleep,
knowing that thousands of other artists were
living the same thing in order to create the mostbeautiful characters, was quite exhilarating.
During the competition, I only browsed sparingly
through the different forums – seeing all this
talent was often very humbling, and would make
you doubt your work. At the same time, the
feeling to be ghting as a team, along with the
members of your chosen forum and not as an
individual, really made a difference to me. I met
awesome people at 3DVF, and even if we werenot the biggest army we did our very best to
defend our colours with pride.

8/10/2019 3DCreative Magazine Issue 034 June 2008
http://slidepdf.com/reader/full/3dcreative-magazine-issue-034-june-2008 39/206
page 44www.3dcreativemag.com Issue 034 June 2008
The Dominance War
4th:brutikong
Alex Velazquez
http://www.brutikong.com
“This year’s competition
was incredibly tough. All the veterans from last
year really upped their games, and a whole slew
of newcomers had me looking over my shoulder
the whole way. It pushed me creatively,
technically, and probably most of all physically.
But it was a lot of fun and I’m very happy with
the result, and that’s a rare thing for me.
“CHUDD evolved from that vague, crappy
thumbnail to what it is, due in large part to
the feedback I got on the forums and from my
Starbucks crew at Raven. So I need to thank
those guys, but most of all I must thank my wife,
Mari, who fended off our marauding babies long
enough for me to nish in time. Good on ya
girl!”

8/10/2019 3DCreative Magazine Issue 034 June 2008
http://slidepdf.com/reader/full/3dcreative-magazine-issue-034-june-2008 40/206
page 45www.3dcreativemag.com Issue 034 June 2008
The Dominance War
me back every year. The competition itself is
organic and grows and changes, which keeps
it fresh and contemporary. It is great to see the
process of the competition from beginning to
end each year, and to also be there as it grows
over the continuing years into something nigh
ritualistic.
“I would like to thank, of course, Fredrik
Hultqvist and Game Artisans proper, as well as
its community. I would also like to thank Adrian
Majkrzak for being a positive motivator, and Tris
Baybayan. I look forward to next year!”
5th:rv_el
Michael Ryan Kime
http://www.pseudo-pod.com
“Dominance War is a fun
and challenging time of year that any artist
can look forward to. It is a competition that
provides all of the constraints to spring creativity
and all of the community to bring it to life. The
backdrop of the Dominance War is ultimately
creative, both in its own world and in the online
game-art social community. With facets like
forums warring other forums and so forth,
stories are created in tangent to the backdrop.
This whole immersive air about it is what brings

8/10/2019 3DCreative Magazine Issue 034 June 2008
http://slidepdf.com/reader/full/3dcreative-magazine-issue-034-june-2008 41/206
page 46www.3dcreativemag.com Issue 034 June 2008
The Dominance War
6th:Bulgarov
http://www.bulgarov.com/

8/10/2019 3DCreative Magazine Issue 034 June 2008
http://slidepdf.com/reader/full/3dcreative-magazine-issue-034-june-2008 42/206
page 47www.3dcreativemag.com Issue 034 June 2008
The Dominance War
7th:Josh Singh
Josh Singh
http://www.joshsingh.net
“Wow! What a competition!
There was just so much talent this year, I kind
of felt overwhelmed. But I found that one of the
keys to help me stay competitive was to not get
too preoccupied with what others were doing.
I had an idea that I was excited about, and I
really was competing with my own ideals and
aesthetics.
“I had always wanted to make a “Monkey King”
type character. With my father being Indian, I
had always grown up with images of Ganesh
and Hanuman in my Auntie’s and Uncle’s
houses. I always thought they were so cool. So
I got it in me to sort of make this new incarnation
of a Monkey King. I never went into detail with
anyone as to why the Monkey King would be
in a post-apocalyptic world, ghting robots; in
my head, I just sort of imagined this war-torn
world calling forth its ancient heroes to ght this
mechanised menace... Like all the air monks
combined their chi energy and summoned Sun
Wu Kong. And after the eons spent in peace,
he’s just really p*ssed and ready to take it out
on some Robots – ha ha ha ha ha!
“I learned a lot of stuff this time around, too.
No artist is an island, or at least I’m not. I am
constantly showing and being shown artwork
from all my buddies at work and online. I
received a lot of helpful critiques from the guys
at work, namely Billy Ahlswede, Minoh Kim and
Jeff Murchie. I also want to say a special thanks
to Chad Hamlett for taking the time to discuss
displacement techniques with me. And to Gavin
Goulden for giving pointers on lighting on the
forums. And, of course, a very, very special
thank you to my beautiful wife, Autumn, who
took care of the real life details, such as having
dinner on the table and the kids bathed and in
bed every night without complaint, while I toiled
away at my computer with a monkey god.”

8/10/2019 3DCreative Magazine Issue 034 June 2008
http://slidepdf.com/reader/full/3dcreative-magazine-issue-034-june-2008 43/206
page 48www.3dcreativemag.com Issue 034 June 2008
The Dominance War
8th:clueme
Clueme Ain
http://clueme.egloos.com
”Because the Dominance
War is open for every level, I could join, even
though I’m not that great an artist. When I
started the concept of Clericon I wanted to make
more of a cosy character, like a mother. So I
chose the Milk concept (actually, the name of
“ILK” is a word which removes “M” from “Milk”).
Milk symbolises the cosiness of a mother.
Dominance War is lled with many different
pleasures. I could see many great artworks and
I could talk with many artists. It was a really
cool competition!
“I can say that “GPZANG” is the most inspiring
artist in my life. He gave me the secret
techniques of texturing. Also, I’d like to thank
Neophensiline and Deto from Gameartisans.”

8/10/2019 3DCreative Magazine Issue 034 June 2008
http://slidepdf.com/reader/full/3dcreative-magazine-issue-034-june-2008 44/206
page 49www.3dcreativemag.com Issue 034 June 2008
The Dominance War
9th:SquirrelyJones
Michael Voeller
http://www.squirrelyjones.com
“This was my rst time competing in the
Dominance War; I followed the last two but was
busy with other projects, and this is really the
rst year that I was probably able to seriously
compete. It was a total blast; rarely do you get
the opportunity to go completely outside the box
and push an idea to completion – you usually
have someone else calling the shots, whether
you’re employed or a student or whatever. I
think it’s great how much this event has grown,
and hopefully next year it will be even bigger,
with more art drama!
“I’d like to thank all the old school Polycount
legends, like Bobo, Hyper and Pior, for inspiring
me to make crazy sh*t. Can’t wait till next year,
I’m gonna make a cow with a Samurai sword
and call him Moosashi!!”

8/10/2019 3DCreative Magazine Issue 034 June 2008
http://slidepdf.com/reader/full/3dcreative-magazine-issue-034-june-2008 45/206
page 50www.3dcreativemag.com Issue 034 June 2008
The Dominance War
rocks! She also came up with the twisted idea
of the little creatures. Go gure?!
“Throughout the competition I was so inspired
by all the amazing entries out there, it really
pushed me to revisit some of the design
elements of my character. I was never really
sure how it would measure up to all the entries
out there. I feel very lucky and happy with the
outcome.
Thanks to Fred, the judges and anyone else
involved in putting together such an amazing
competition – it was such a blast!”
process. It’s good to get fresh eyes on your
stuff. The deadline also pushed me to manage
my time more wisely and forced me to take a lot
of shortcuts. I have a much faster workow now
but there are still better ways of doing things
that I need to learn. I was fortunate enough to
have some time off to work on this, but I don’t
think I could have nished in my free time on top
of working and taking care of my family – the
stress just about killed me!
“I would like to thank my wife. I promised her
I wouldn’t enter this year, and when I did she
was very supportive. She knew how excited I
was about it and encouraged me to enter. She
10th:muppet man
Chris Moftt
http://www.chrismoftt.com
“It was so great to have
the freedom to create whatever, so I tried to
go way outside of my comfort zone. It was fun
brainstorming and gathering references for this
guy. Creatures are always satisfying to work on.
I think the best part though was the sculpting
phase. I love traditional sculpting and ZBrush is
as close as it gets to the real thing!
“This event was such a great way to grow
as an artist. I really appreciated the forums
and having constant feedback throughout the

8/10/2019 3DCreative Magazine Issue 034 June 2008
http://slidepdf.com/reader/full/3dcreative-magazine-issue-034-june-2008 46/206

8/10/2019 3DCreative Magazine Issue 034 June 2008
http://slidepdf.com/reader/full/3dcreative-magazine-issue-034-june-2008 47/206
page 52www.3dcreativemag.com Issue 034 June 2008
The Dominance War
1st:JerryJ
Joongmin Park
http://jerryj.egloos.com/
2nd:
enozria
Yountaek Oh
http://blog.naver.com/enozria.do
2D Winners’ Gallery

8/10/2019 3DCreative Magazine Issue 034 June 2008
http://slidepdf.com/reader/full/3dcreative-magazine-issue-034-june-2008 48/206
page 53www.3dcreativemag.com Issue 034 June 2008
The Dominance War
3rd:Hellstern
Elena Bespalova
http://www.hellstern.ru
4th:
Persona
Jeongsil Lee
http://person-a.org
8/10/2019 3DCreative Magazine Issue 034 June 2008
http://slidepdf.com/reader/full/3dcreative-magazine-issue-034-june-2008 49/206
page 54www.3dcreativemag.com Issue 034 June 2008
The Dominance War
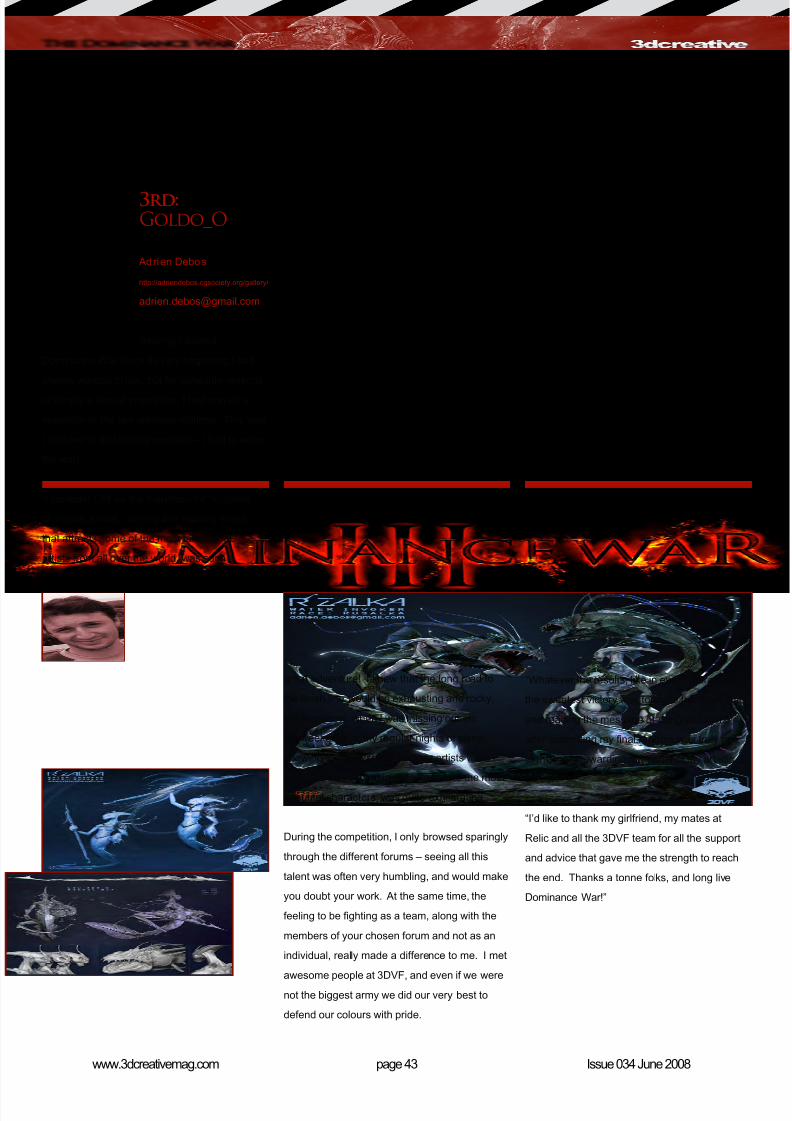
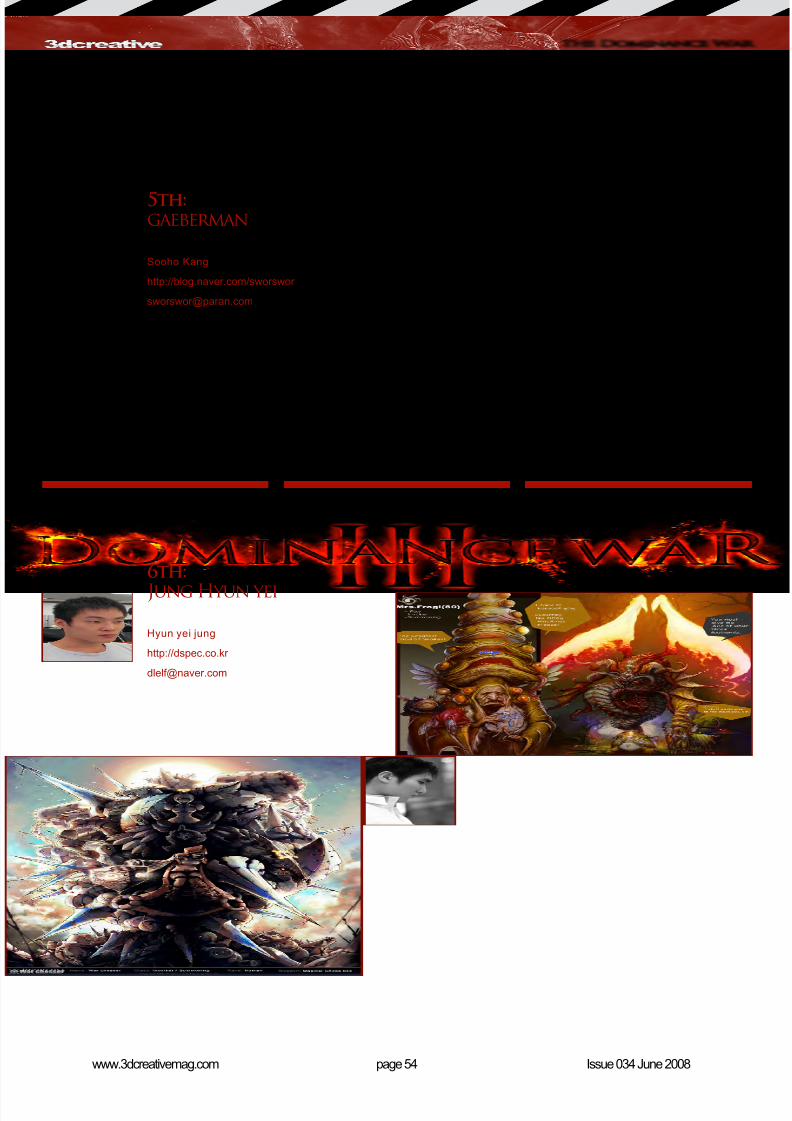
5th:gaeberman
Sooho Kang
http://blog.naver.com/sworswor
6th:
Jung Hyun yei
Hyun yei jung
http://dspec.co.kr

8/10/2019 3DCreative Magazine Issue 034 June 2008
http://slidepdf.com/reader/full/3dcreative-magazine-issue-034-june-2008 50/206
page 55www.3dcreativemag.com Issue 034 June 2008
The Dominance War
7th: Albers
Justin Albers
http://www.justinalbers.com
8th:fillsupply
http://cafe.naver.com/llsupply

8/10/2019 3DCreative Magazine Issue 034 June 2008
http://slidepdf.com/reader/full/3dcreative-magazine-issue-034-june-2008 51/206
page 56www.3dcreativemag.com Issue 034 June 2008
The Dominance War
9th: OZingan
Won Jang
http://blog.naver.com/ozin302
10th:
managa
Daehoon Lee
http://managa.name

8/10/2019 3DCreative Magazine Issue 034 June 2008
http://slidepdf.com/reader/full/3dcreative-magazine-issue-034-june-2008 52/206

8/10/2019 3DCreative Magazine Issue 034 June 2008
http://slidepdf.com/reader/full/3dcreative-magazine-issue-034-june-2008 53/206
page 58www.3dcreativemag.com Issue 034 June 2008
The Dominance War
Dominance War III: An Interview withFredrik Hultqvist.
We are very pleased to
be able to speak with
Fredrik Hultqvist, founder
of the Dominance War
annual inter-forum
competition. So Fred,
can you tell us a little bit about yourself and what
gave you the idea to start DW in 2006?
After last year’s 18-paged article about
Dominance War II in 3DCreative magazine, I am
pleased this year to be here in person to shed
some light on Dominance War’s past, present,
and future. But rst, I would like to congratulate
3DTotal on their 2nd Dominance War victory!
This year was particularly tough, but 3DTotal
prevailed once again!
Now, about your question... There is not much
to say about myself. I am just an enthusiastic
game artist who wishes to bring artists together
in a fun environment where we can keep
in touch and have fun with a few monthly
challenges. This whole network of sites,
Dominancewar.com, GameArtisans.org, and
UnearthlyChallenge.com, are a series of sites
that focus on game art challenges. I suppose Iam committed to these sites because I, myself,
started competing in game competitions in
2003. Since then, I got my rst job in the games
industry, and at the time I was frantically happy.
Four years down the road and now here, I am
trying to give others the same benets that I,
myself, have received. Dominance War is an
extension of this thought, but on an international
scale.
How the Dominance War series started? Well,
I began to wonder which site could kick which
other site’s butt in a competition. In 2006, I

8/10/2019 3DCreative Magazine Issue 034 June 2008
http://slidepdf.com/reader/full/3dcreative-magazine-issue-034-june-2008 54/206
page 59www.3dcreativemag.com Issue 034 June 2008
The Dominance War
nally took action and combined two sites I
admired into one larger challenge – and so
began Dominance War I. After witnessing the
effect this large challenge had on artists, my
goals quickly changed into making the event into
a form of Olympics for game artists. Forums
would act like countries and artists could choose
which forum they would like to represent during
the war. Now, after Dominance War III in 2008,
I am excited to say that this event is one step
closer to this vision. With 9 teams in 5 different
languages, the Dominance War series is
shaping up to become an unprecedented game
art event of its kind.
Everyone can see the fantastic response to this
competition you have created, but can you tell
us a bit about what goes on behind the scenes?
How much work really is this to organise and who else helps you out?
Wow, you are right, the response has been awesome! OK, what goes
on behind the scenes? In DWI, it was just myself who created everything
manually: html pages, design layouts, thumbnail/nal image submissions
via emails, story writing, conducting interviews, sponsors correspondence
etc., etc. It was a lot of work, but at the time I believed I touched on
something great. So, the following year, preparations were made for a
much larger event. This time I had a few programmers create a system
that allowed artists to submit their own thumbnails and nal images, and
artists from multiple forums could join as well. Things improved a great
deal and the task of maintenance was considerably reduced... until 2008’s
Dominance War III. To kick-start a competition in 5 different languages
was almost a disaster! Translating every page on Dominancewar.com
was a humongous task and, once the war started, I got 40 help-request
emails per day in various languages. Because of this, I had to abandon
my beloved home forum, Gameartisans.org, to keep Dominance War III
running. Now that Dominance War III is over, if you asked me, “Would
you do it all again?”, I’d simply say, “Yes, and then some!” After this
year’s success, we now have a multi-lingual foundation that can make
future events so much more!
I was not alone in Dominance War III. I would like to thank this year’s
translators and DW activists for helping me bring DW to other countries:
Taehoon Oh for his legendary commitment to Koreans on CGLand.com;
Vincent Ganachaud for his inspired work on the French forums, 3dvf.com;

8/10/2019 3DCreative Magazine Issue 034 June 2008
http://slidepdf.com/reader/full/3dcreative-magazine-issue-034-june-2008 55/206
page 60www.3dcreativemag.com Issue 034 June 2008
The Dominance War
and Maxim (Maxx) Miheyenko for his fanatic role on the Russian forums,
CGTalk.ru. I would also like to thank Taehoon and Maxim for showcasing
Dominance War in CG Events, universities and presentations in their
respective countries. Finally, I would like to thank Joseph Mirabello for
being this year’s publicity manager. He wrote many inspired articles for
the event and now he is taking things a step further by securing sponsors
and handling relations with various companies. Without these 4 important
people, Dominance War III would never have happened. In 2008, I will be
looking into expanding this devoted team that I have come to admire.
It seems that this annual event is going to grow into something quite
spectacular and attract a lot more attention as the years pass. With this in
mind, what will you be able to offer future sponsors of the event?
I believe that, as Dominance War grows, so too will its features. Various
new gimmicks and ideas are being added to an already stable and trusted
base system, so you can expect the best of the past with even more cool
features in the future. Sponsors will also benet from DW’s expansion.
In Dominance War III, for the rst time, the event has (for lack of a better
term) “left the building”. It made it into a Game Developers conference
and into another major CG event in Moscow. It
also made it into Korean universities and was
broadcasted in an award ceremony on Korean
Television. Wherever the Dominance War logogoes, so too will its supporting sponsors. For
game company sponsors, Dominance War
is becoming a site where artists of all levels
join. Because of this, an employment system
that has been tested by Blizzard Entertainment
in Dominance War III will be taken a step
further. More details on this will be released on
Dominancewar.com before DWIV in 2009.
Should anyone wish to advertise on DW or
sponsor the event, I am always open to newadvertising methods, sponsorship signups and
ideas.

8/10/2019 3DCreative Magazine Issue 034 June 2008
http://slidepdf.com/reader/full/3dcreative-magazine-issue-034-june-2008 56/206
page 61www.3dcreativemag.com Issue 034 June 2008
The Dominance War
Can you tell us a little about the judging panel
and process?
This year, the judges’ panel consisted of 3 judge
types: Tie-Breakers, Initial Judges, and Final
Judges. Tie Breakers, usually famous artists
like Brom, Kenneth Scott and Nicolas (Sparth)
Bouvier, were responsible for breaking ties
between entries. Initial judges were responsible
for cropping entries down to 50. And last but
not least, nal judges were each responsible
for choosing 10 favourites from the remaining
50 nalists. Like everyone else, I believe it is
important to have fair judging. Therefore, I try to
nd successful artists who do not participate in
the challenge themselves and who are familiar
with the great wheel that makes up the game industry. Naturally, each
judge has his/her preferences and this will always be a factor, but usually
good artistic ability and technical skill always stands out amongst other
entries. If there is too much emphasis on originality and less thought on
the Dominance War theme and/or story line, I sometimes have to step
in and correct the situation... which is always a painful experience. For
additional info, the judging process is described in more detail here: www.
gameartisans.org/contests/events/3/judges/index.php
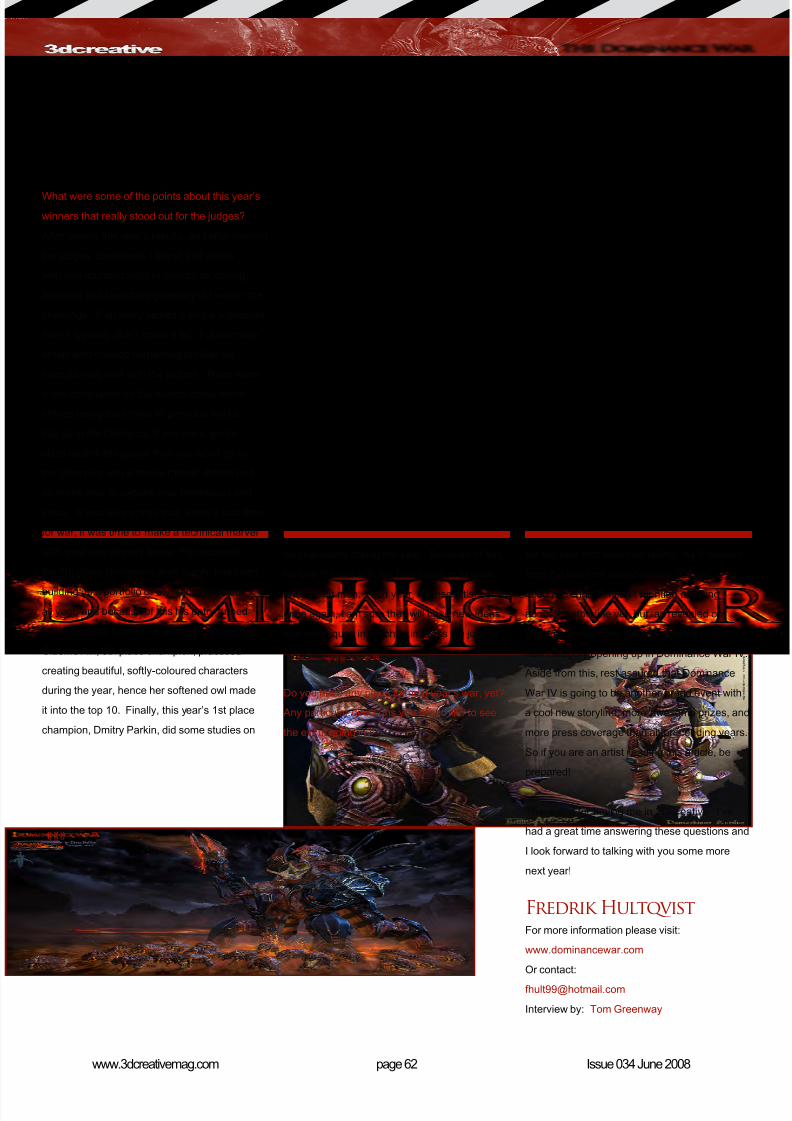
8/10/2019 3DCreative Magazine Issue 034 June 2008
http://slidepdf.com/reader/full/3dcreative-magazine-issue-034-june-2008 57/206
page 62www.3dcreativemag.com Issue 034 June 2008
The Dominance War
What were some of the points about this year’s
winners that really stood out for the judges?
After seeing this year’s results, and after reading
the judges’ comments, I found that artists
with well-rounded skills in design, modelling,
texturing and sketching generally did well in the
challenge. If an entry lacked a single ingredient,
then it typically didn’t make it far. Furthermore,
artists who created something familiar did
exceptionally well with the judges. There were
a few complaints on the boards about some
entries being too similar to previous works...
but, as in the Olympics, if you are a world-
class badminton player then you won’t go to
the Olympics with a tennis racket! Artists had
an entire year to explore new techniques and
ideas. It was no surprise that, when it was time
for war, it was time to make a technical marvel
with what one already knew. For example,
the 7th place champion, Josh Singh, has been
building up a portfolio of stylised characters
all year, and because of this his entry turned
into a superior form of his acquired knowledge.
Clueme Ain, 8th place champion, practiced
creating beautiful, softly-coloured characters
during the year, hence her softened owl made
it into the top 10. Finally, this year’s 1st place
champion, Dmitry Parkin, did some studies on
fat characters during the year. Because of this,
he won the war with his best creation to date:
another fat man. Next year, if these artists enter
once again, I am sure they will have new ideas
and techniques in which to impress the judges
yet again.
Do you have any plans for next year’s war, yet?
Any particular directions you would like to see
the event going in?
Ha ha, now that would be telling! As if readers
from the two-time award-wining 3DTotal
need an “edge”? I can’t mention anything
about the storyline yet, but, as revealed on
Dominancewar.com, there is another brand
new category opening up in Dominance War IV.
Aside from this, rest assured that Dominance
War IV is going to be another grand event with
a cool new storyline, more awesome prizes, and
more press coverage than all proceeding years.
So if you are an artist reading this article, be
prepared!
Thank you for having me in 3DCreative. I’ve
had a great time answering these questions and
I look forward to talking with you some more
next year!
Fredrik HultqvistFor more information please visit:
www.dominancewar.com
Or contact:
Interview by: Tom Greenway

8/10/2019 3DCreative Magazine Issue 034 June 2008
http://slidepdf.com/reader/full/3dcreative-magazine-issue-034-june-2008 58/206
Your model in the palm of your hand! We chat
with David Gurrola from GROWit LLC about this
remarkable company that can bring every 3D
modeller’s dream to life.
“The most unusual jobthat I can share is an
architectural model.The challenges
derived from itslarge size and unique
features. It wouldhave taken weeks
to create usingcardboard, foam,
glue and othercrafting materials, yet we were able togrow this model in
just two days”

8/10/2019 3DCreative Magazine Issue 034 June 2008
http://slidepdf.com/reader/full/3dcreative-magazine-issue-034-june-2008 59/206
page 64www.3dcreativemag.com Issue 034 June 2008
GROWit LLC 3D Printing
Hi David, when did you get started in the 3D
printing business and what were your main
reasons for starting a company?
I was rst introduced to Rapid Prototyping (RP)
/ 3D printing when I started working for a large
aerospace company called Northrop Grumman.
I worked in their wind tunnel research and
development group and we used the technology
to quickly and accurately produce scaled models
of new ghter aircraft for aerodynamic testing.
Since then, I have worked for a company called
Parker Aerospace, in their R&D group, called SpiritWorks. In my role
there, I was the lead director for all RP efforts, as well as the resident
expert for other divisions of the larger Parker Hannin Corporation.
Recently, a college friend of mine, Carl Kasalek, and I decided to start our
own company. I was starting up my own design rm when clients began
requesting physical models of the product I was developing for them. I
was able to provide it to them through the network of companies with RP
machines that I had developed. Before long, Carl and I conceived many
new uses for the technology, some of which we will be releasing this
summer (2008). As a result, in order to satisfy all of our customer’s needs,

8/10/2019 3DCreative Magazine Issue 034 June 2008
http://slidepdf.com/reader/full/3dcreative-magazine-issue-034-june-2008 60/206
we decided to purchase our own machines. We
now offer eight different technologies that make
up some of the most advanced capabilities in
RP / 3D printing.
We at GROWit are developing our capabilities
at a healthy rate that will allow us to stay on
the leading edge of the available technologies.
Although we are a startup company, members
of our team have more than fty years of
combined experience in Aerospace, Medical
Equipment, Consumer Electronics, and
Automotive design, as well as business
development. With this broad experience,
our team can provide our customers with the
best advice available. Our Sales Team is
complimented by our Engineering and Design
Team, all of whom are expert CAD operators.
With two Mechanical Engineers, one Electrical
Engineer, and one Manufacturing Engineer, our
ability to provide a superior product, as well as
expert advice has been acknowledged within
the industry as an outstanding asset.
For our readers, can you briey explain the
process of printing a 3D model?
Rapid Prototyping (RP), Additive Fabrication,
and 3D Printing are three of the many names
given to a host of related technologies that are
used to fabricate physical objects, within hours,
directly from 3D computer-generated les, better
know as Computer-Aided Design (CAD) les.
These methods are unique in that they add and
bond materials in layers to form objects, unlike
traditional manufacturing methods, such as
machining, that are considered to be subtractive
manufacturing methods. For many objects,
subtractive methods are time consuming and
material wasting, as cutters “whittle” away at
a block of material to create the nal product.
With Rapid Prototyping, the operating software
takes the 3D computer model and graphically
slices it into thousands of layers; one of our
systems slices these layers as thin as 16
microns (.0006 in), smaller than a human hair
and produces unmatched detail and quality.
The machine then solidies material in only the
cross-section (shape) that is needed to make up
each layer. It then moves on to the next layer
until you have a nished part.

8/10/2019 3DCreative Magazine Issue 034 June 2008
http://slidepdf.com/reader/full/3dcreative-magazine-issue-034-june-2008 61/206
page 66www.3dcreativemag.com Issue 034 June 2008
GROWit LLC 3D Printing
Another unique aspect of this process is that
it allows the production of designs that are
impossible to machine. For example, internal
voids can be created to make lighter objectsand/or complete assemblies can be formed
all in one process, thus alleviating the need
for manual assembly. Essentially, all additive
fabrication technologies provide the ability to
fabricate with unbounded geometric freedom.
It is the most important advantage of additive
technologies over subtractive methods. Additive
fabrication systems reduce the construction
of complex objects to a manageable,
straightforward, and relatively fast process. These advantages have
resulted in widespread use of RP as a way to reduce “time to market” in
manufacturing.
Due to the additive, layer-by-layer, nature of RP, the parts often look
like they are growing out of the machine, just like a plant grows fromthe ground. Thus, the term “growing” a part is commonly used, rather
than building or fabricating a part; thus the origin of our company name,
GROWit.

8/10/2019 3DCreative Magazine Issue 034 June 2008
http://slidepdf.com/reader/full/3dcreative-magazine-issue-034-june-2008 62/206
What are the latest and most exciting new
developments in this eld?
GROWit’s new developments include multiple
materials being integrated into one part, full
colour parts, metal parts, and functional end use
items (not just prototypes anymore).
Additive fabrication offers the potential to use
multiple materials as well as to control the local
geometric meso- and micro-structure of a part.
This means that the functionality of a part can
be optimised in ways that are impossible with
previously existing manufacturing methods.
Materials can be selected for their mechanical,
thermal, optical, or other properties, and then
can be physically deposited in a manner that
optimises or changes those properties beyond
the capability of the intrinsic material itself.

8/10/2019 3DCreative Magazine Issue 034 June 2008
http://slidepdf.com/reader/full/3dcreative-magazine-issue-034-june-2008 63/206
page 68www.3dcreativemag.com Issue 034 June 2008
GROWit LLC 3D Printing
This optimisation is becoming reality though
a machine that has just been released. From
February 2008, GROWit will be one of the few
public companies in the United States using it.
This machine is Objet’s new Connex 500 and
the new capability that it provides is the “Digital
Materials” that it can create. We can select
different portions of the part in the computer and
dene the material properties that are needed.
The machine then has the option of applying a
hard or exible material in the designated areas,
or can even mix the two materials together on-the-y to produce a variety
of materials with varying properties and strengths (Digital Materials). One
of the key benets of this technology is the broad range of products that
can be processed in one run.
Specs: Connex 500. Net Build size (X, Y, Z): 500 x 400 x 200mm
(19.7 x 15.7 x 7.9 inches) Layer thickness (z-axis): As small as 16 microns
(.0006 inch).
Materials: Over seven different kinds of build materials, including
transparent, exible and medical hearing aid materials. Dozens of “digital
materials” can be created on-the-y by mixing any of the two standard
materials together.

8/10/2019 3DCreative Magazine Issue 034 June 2008
http://slidepdf.com/reader/full/3dcreative-magazine-issue-034-june-2008 64/206
page 69www.3dcreativemag.com Issue 034 June 2008
3D Printing GROWit LLC
Our unique Objet Connex 500 machine won
rst place for best innovation at the EuroMold
2007 show. This award is recognised as one
of the most prestigious industry awards and is
often referred to as the “Oscar of the product
development scene”.
Before the new Objet machine was available,
the only way to produce parts with multiple
colours all in the same build was to use the
Z-corp Spectrum Z510 or 450. At GROWit, we
operate the Spectrum Z510, Z-corps largest and
most advanced system available. It can take a
model and grow it in full 24-bit colour. It gives
our customers the ability to produce inexpensive
marketing, and visually pleasing, models, with
custom labels and markings, much faster than
any other system on the market. Although the
material options are limited, it has the ability
to make models that appear to be made of
different materials just by “painting” them
different colours (See pictures above).
Specs: Spectrum Z510. Net Build size (X, Y, Z):
254 x 356 x 203 mm (10 x 14 x 8 inches)
Layer thickness (z-axis): .0035 inches
Materials: High performance composite
Elastomeric Direct casting (used to replace non-
ferrous castings).

8/10/2019 3DCreative Magazine Issue 034 June 2008
http://slidepdf.com/reader/full/3dcreative-magazine-issue-034-june-2008 65/206
8/10/2019 3DCreative Magazine Issue 034 June 2008
http://slidepdf.com/reader/full/3dcreative-magazine-issue-034-june-2008 66/206

8/10/2019 3DCreative Magazine Issue 034 June 2008
http://slidepdf.com/reader/full/3dcreative-magazine-issue-034-june-2008 67/206
page 72www.3dcreativemag.com Issue 034 June 2008
GROWit LLC 3D Printing
Another recent area of development is an RP
machine that allows us to “grow” parts directly
out of fully dense metals. Until now, producing
a metal part required a subtractive method of
manufacturing, or growing a plastic part that
would be used for one or more secondary
processes, like investment casting, to produce
the metal part. Now, we can build directly from
the CAD data and produce parts out of stainless
steel 17-4, Cobalt Chrome, and a tool steel. We
will have more materials available later this year(See pictures to the right).
Specs: EOSINT M 270. Net Build size (X, Y, Z):
250 x 250 x 215mm (9.85 x 9.85 x 8.5 inches)
Materials: Stainless Steel 17-4 Cobalt Chrome
Direct Metal 20 (tool steel). Many more
materials will be available later this year,
including iconel.
GROWit’s acquisition of this metal process,
combined with our engineering team and other
advanced processes, have been inuential in
our development of Rapid Manufacturing (RM),
also known as Direct Digital Manufacturing
(DDM). DDM refers to parts that have been
specially designed and optimised to better t
their intended use through additive fabrication.
These parts are taken directly off of our
machines, and, with little to no post processing,
used directly for their intended application.

8/10/2019 3DCreative Magazine Issue 034 June 2008
http://slidepdf.com/reader/full/3dcreative-magazine-issue-034-june-2008 68/206
page 73www.3dcreativemag.com Issue 034 June 2008
3D Printing GROWit LLC
Traditionally, items tend to loose functionality
because they can not be manufactured, or it
would be too costly, using typical manufacturing
methods, so compromises have to be made to
make them “manufacturable”. In some cases, by
designing for DDM from the beginning, we are
not only able to produce parts that have much
more function than their earlier counterparts,
but we are also able to produce them at a lower
cost. For example, electronic housings can be
designed with integrated buttons (fewer part
count) and better ergonomics, or toys can be
created with moving parts already assembled.
Another area that is beneting tremendously
from DDM is tooling (Direct Tooling). Most
manufacturing processes require tooling of
some sort to aid in the process. Tooling can be
anything from a xture to hold parts in a desired
orientation to molds used for casting or injection
molding. Both of these can be very costly to
produce and sometimes take weeks to develop.
By using Additive Fabrication, we are able to
produce these parts in days, not weeks, saving
valuable time and money to get a product to
market faster.
What do you see happening in the future in this
business?
The industry is slowly shifting from producing
prototypes to the mass manufacture of end use
items. A few RP systems specically aimed at
rapid manufacturing applications are beginning

8/10/2019 3DCreative Magazine Issue 034 June 2008
http://slidepdf.com/reader/full/3dcreative-magazine-issue-034-june-2008 69/206
page 74www.3dcreativemag.com Issue 034 June 2008
GROWit LLC 3D Printing
to appear commercially. Although RM is not
widespread at this time, many experiments
that adapt existing RP systems to specic RM
applications, like I have explained above, are
underway. As technology, materials, and other
barriers are overcome, additive fabrication will
nd its way into the mainstream across a broad
spectrum of applications. RM will be the branch
of the RP technology that has the most direct
impact on people’s lives.
Some observers have likened it to a second
industrial revolution. That may be a bit of an
exaggeration, but it’s a good bet that nearly
all facets of life will be impacted in some way
by RM - in many ways that are not apparent
today. Today, unless there is an overwhelming
need for a specic advantage that RM provides,
a conventional manufacturing approach,
enhanced through the use of Direct Tooling, is
typically chosen. However, as the benets of
RM become more recognised, the balance can
be expected to tip in favour of RM.
What has been your most unusual 3D printing
job to-date?
GROWit has produced a variety of unusual
and creative projects for our clients, including
intricate gurines and toys for product
development, as well as items that I cannot
describe here because they are proprietary.
The most unusual job that I can share is an
architectural model. The challenges derived
from its large size and unique features. It would
have taken weeks to create using cardboard,
foam, glue and other crafting materials, yet we
were able to grow this model in just two days.
The most difcult aspect of this project was its
requirements for thin cross sections and fragile
connections (See pictures to the left).
GROWit LLCFor more information please visit:
http://www.3dtotal.com/3dprinting/
Or contact David Gurrola from GROWit LLC:
FAQ about this service can be found here!

8/10/2019 3DCreative Magazine Issue 034 June 2008
http://slidepdf.com/reader/full/3dcreative-magazine-issue-034-june-2008 70/206
Autodesk software
helps Red Vision
breathe life into
Headcases
“Creatingcaricatures offamous peoplethat are bothfunny andrecognisable is a
very demandingprocess. But thecharacter design
and modellingteam did an
amazing job ofhandling that,even thoughthey were always
working to verytight timeframes”

8/10/2019 3DCreative Magazine Issue 034 June 2008
http://slidepdf.com/reader/full/3dcreative-magazine-issue-034-june-2008 71/206
page 78www.3dcreativemag.com Issue 034 June 2008
Autodesk software helps Red Vision breathe life into HeadcasesHeadcases
Satirical puppet show Spitting Image was a
huge hit when it aired on ITV between 1984
and 1996, running to more than 100 episodes.
Millions tuned in to watch as celebrities and
politicians were lampooned by latex puppets.
Characters included Margaret Thatcher,
members of the Royal Family, a “crying” Gazza
and boxer Frank Bruno.
12 years since the show was axed, Spitting
Image has at last been reinvented for the 21st
century in the shape of Headcases. Airing
from 6 April 2008 for eight weeks, the idea of
Headcases wasn’t to re-launch Spitting Image,
but to create a new show that would be a natural
progression from the use of puppets.
A creative challengeTaking the concept of a show like Spitting
Image and updating it for an audience of
today was always going to be a challenge.
ITV Granada commissioned Red Vision, an
award-winning CG and visual effects company,
to design and produce the new comedy. They

8/10/2019 3DCreative Magazine Issue 034 June 2008
http://slidepdf.com/reader/full/3dcreative-magazine-issue-034-june-2008 72/206
page 79www.3dcreativemag.com Issue 034 June 2008
Headcases Autodesk software helps Red Vision breathe life into Headcases
were tasked with creating a pilot series of 8 x
30min sketches, in which all characters and
environments would be created using CGI.
With a team of 65 - including everyone from
the executive producer to the tape operators
- work began on the series in June 2007.
From the beginning, it was clear that more
than 50 hero characters, dozens of supporting
characters and sets, and hundreds of props
would need to be created. “This was going to be
a highly challenging task, both technically and
creatively, especially while trying to maintain
a high standard,” says Antony Carysforth, CG
supervisor at Red Vision. “In some cases, each
sketch had to be treated as a mini short, so
almost all of the creative work had to be done
from scratch each time.”
Model products3D modelling and character animation for
Headcases began in August 2007. Red Vision
has used Autodesk 3ds Max 3D modelling and
animation software since the company was
founded. They started using Autodesk Maya
3D modelling and animation software in 2000

8/10/2019 3DCreative Magazine Issue 034 June 2008
http://slidepdf.com/reader/full/3dcreative-magazine-issue-034-june-2008 73/206
and also Autodesk MotionBuilder character
animation software for motion capture work.
“Autodesk’s Maya is a great tool. We’ve
used it on a number of major projects and are
always pleased with the results,” says Antony
Carysforth. “That’s why we decided that it would
be fundamental in the creation of Headcases.”
Some of the motion capture data was processed
in MotionBuilder but the team developed rigs
in Maya to enable the layering of keyframe
animation over the top of the motion capture
data. For modelling some of the team also used
3ds Max: “Because of the integration between
Autodesk products, it was easy to transfer
models from one application to another,” says
Carysforth.
A topical issueTo meet the brief, each episode had to include
topical storylines, which involved working
closely with the editorial and writing team,
and setting up CGI casts and sets to allow for
maximum exibility of re-voicing and animation
at short notice. A huge challenge was creating
a production pipeline to deliver high quality
CGI-based animations within a tight time frame
that would allow the comedy writing team and
creator Henry Naylor, to present material within
48 hours of broadcast.
Every possible method was used to make sure
that episodes were timely, such as motion
capture and the use of a skilled key-frame
animation team. A big part of the show involves
characters telling jokes to camera. Red Vision
used motion capture for these scenes and left
the key-frame animators to handle some of the
trickier, more action oriented animation.
And a number of techniques and processes
were developed to enhance the speed of
delivery without compromising the quality and

8/10/2019 3DCreative Magazine Issue 034 June 2008
http://slidepdf.com/reader/full/3dcreative-magazine-issue-034-june-2008 74/206
pace of the on-screen content. “A fair amount
of R&D went into the ‘blocking’ phase of the
show,” says Stephen Corren, VFX supervisor.
“We wanted this phase of production to be
exible, but as fast as possible. To achieve this,
we ended up using a virtual ‘take’ system in
Maya, driven by Maya’s non-linear animation
system TRAX. All the underlying complexities
of non-linear animation tools were hidden
behind a UI that allowed the blocking artists
to create new performances for a character
based on a particular camera. They could cut
between cameras in Maya and the appropriate
performance would kick in. This allowed us to
work quickly and cheat on things just as you
would on a typical live action shoot.”
Carysforth believes the introduction of the
smooth mesh preview to Maya 2008 had a big
impact on the team’s workow: “Sometimes
the smallest improvement can make a huge
difference to artists’ workow and with the
preview it allows you to smooth a polygon
with just one keystroke. Before this, we’d
have needed to add new nodes to Maya’s
dependency graph to see the smoothed version
and would quite often forget to remove the node
before the model was frozen. Even though it
seems such a simple feature, it relieved us of so
many headaches. The UV tools have come on
over the last few releases so texturing was nice
and straightforward.”
The team also used Maya nCloth on a handful
of shots that needed cloth simulations. “The
referencing is nice and solid now which
is essential on a production of this size,”
Carysforth continues.
Test of characterOne of the biggest challenges was developing
a facial rig that was powerful enough to do what
the team needed, but also exible enough to
work with so many different characters.

8/10/2019 3DCreative Magazine Issue 034 June 2008
http://slidepdf.com/reader/full/3dcreative-magazine-issue-034-june-2008 75/206
Autodesk software helps Red Vision breathe life into HeadcasesHeadcases
“Graham Collier and Tom Pullan, two of
the character leads, did an amazing job
developing the face rig over several months,”
says Carysforth. “We had a default ‘generic’face that was set up to hit the various shapes
we wanted mostly using blend shapes and
then we used Maya’s wrap deformer to apply
the generic face to any particular character.
This worked very well and saved lots of time
although occasionally we would still have to
create custom targets for some characters if
their proportions were signicantly different to
the generic face. With 50 plus characters, it’s
easy for even the simplest of tasks to spiralout of control, but Maya’s character setup tools
provided the team with a really solid platform to
work from.
“Creating caricatures of famous people that
are both funny and recognisable is a very
demanding process. But the character design
and modelling team did an amazing job of
handling that even though they were always
working to very tight time frames.”
Seeing the light All the lighting work was completed over the
course of 15 weeks, meaning an incredible
amount of rendering in a short space of time.
“To help with that, we developed a reasonably
streamlined pipeline that allowed the lighting
team to concentrate on the creative aspects of
the show,” says Carysforth. “And all animation
was baked before it made it to the lighting team,
which tends to make everyone’s life easier.”
“Maya’s geometry caching feature was used
heavily and worked really well right out the box,”
Carysforth continues. “Prior to lighting, each
animation scene was split into various pieces
and cached separately on the renderfarm. Then
the individual caches would typically be re-
merged dynamically as the lighting scenes were
being automatically constructed. The ability to
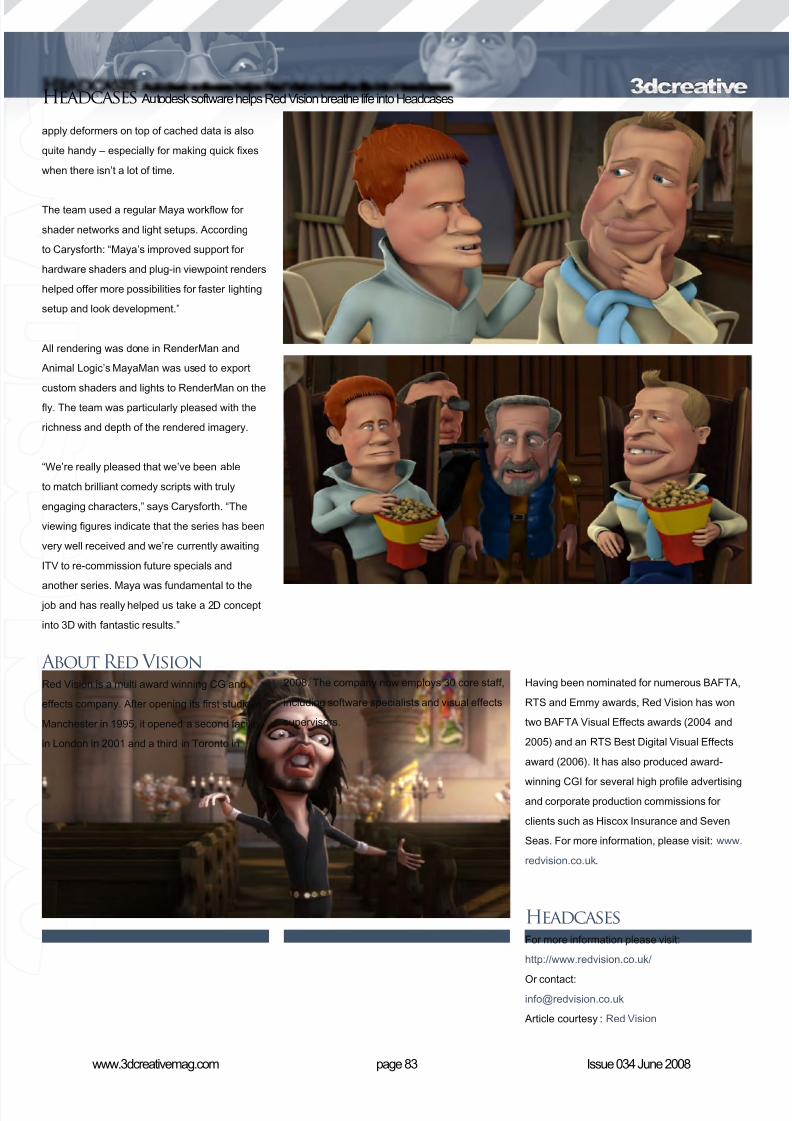
8/10/2019 3DCreative Magazine Issue 034 June 2008
http://slidepdf.com/reader/full/3dcreative-magazine-issue-034-june-2008 76/206

8/10/2019 3DCreative Magazine Issue 034 June 2008
http://slidepdf.com/reader/full/3dcreative-magazine-issue-034-june-2008 77/206

8/10/2019 3DCreative Magazine Issue 034 June 2008
http://slidepdf.com/reader/full/3dcreative-magazine-issue-034-june-2008 78/206

8/10/2019 3DCreative Magazine Issue 034 June 2008
http://slidepdf.com/reader/full/3dcreative-magazine-issue-034-june-2008 79/206

8/10/2019 3DCreative Magazine Issue 034 June 2008
http://slidepdf.com/reader/full/3dcreative-magazine-issue-034-june-2008 80/206
page 87www.3dcreativemag.com Issue 034 June 2008
The Chase Good guys use Hankook Tires in the new action-filled CG/HD spot from Shilo
services representatives Daniel Choi, Christina
Kim, and SangHo Lee.
Along with Jose Gomez and Tom Green, Shilo’s
team included executive producer Santino
Sladavic, producer Jake Hibler, editors Green
and Andre Stringer, 2D animators Green,
Gomez, Nate Davies, and Eugene Gauran, 3D
designers/modellers Ethan Summers, Cody
Smith, Trentity DeWitt, Nate Davies, Matt Foley,
and Blake Guest, additional 3D modellers
George Longo and Joey Struve, matte painter
Dylan Cole, and 3D animators Kiel Figgins,
DeWitt, Foley, and David Weinstein.
Music, sound design and nal mix were all
courtesy of Christophe Eagleton.
About Shilo
Shilo is an Emmy Award-winning creative
production company representing a group
of lmmakers led by directors Jose Gomez
and Andre Stringer. Internationally known for
creating original and commissioned work that is
powerful, provocative and visually extraordinary,
Shilo’s deeply held passions for design-infused
storytelling and their innovative applications of
live-action, design, and animation techniques
deliver breakthrough experiences for screens
large and small. From its studios in New York
and Del Mar, California, where recent projects
have spanned short lms, commercials and
music videos, Shilo has the capacity and
experience to originate ideas and handle all
aspects of production. Shilo published its rst
book, We Make It Good, in 2007, and also
curates the site www.WeMakeItGood.com. For
more information, or to request a reel, please
contact Tracy Chandler at +1.212.352.2044, or
visit Shilo online at www.Shilo.tv.
The ChaseFor more information please visit:
http://www.shilo.tv
Or contact:
Article courtesy: Shilo

8/10/2019 3DCreative Magazine Issue 034 June 2008
http://slidepdf.com/reader/full/3dcreative-magazine-issue-034-june-2008 81/206
This month we feature:
Jesse Sandifer
Arif Pribadi
Sebastien Sonet
Pricop Alexandru
Lionel Verlinden
Malanjo
Cristian Patrasciuc
Jonas Thörnqvist
Richard Clark
RomanStyle

8/10/2019 3DCreative Magazine Issue 034 June 2008
http://slidepdf.com/reader/full/3dcreative-magazine-issue-034-june-2008 82/206
page 90www.3dcreativemag.com Issue 034 June 2008
10 of the Best The Galleries
Underground Escalator Lionel Verlinden
www.adc-studio.eu
MansardaPricop Alexandru
www.pricop.as.ro/

8/10/2019 3DCreative Magazine Issue 034 June 2008
http://slidepdf.com/reader/full/3dcreative-magazine-issue-034-june-2008 83/206
page 91www.3dcreativemag.com Issue 034 June 2008
The Galleries 10 of the Best
Uplift UniverseMalanjo
www.malanjo.com
Skater Boi - ‘the Poser’RomanStyle
http://www.romanstyle.com

8/10/2019 3DCreative Magazine Issue 034 June 2008
http://slidepdf.com/reader/full/3dcreative-magazine-issue-034-june-2008 84/206

8/10/2019 3DCreative Magazine Issue 034 June 2008
http://slidepdf.com/reader/full/3dcreative-magazine-issue-034-june-2008 85/206
page 93www.3dcreativemag.com Issue 034 June 2008
The Galleries 10 of the Best
Deep Water Marine Ar if Pribadi
http://arifcreations.com/
Old ManCristian Patrasciuc
http://calligrapha.cgsociety.org
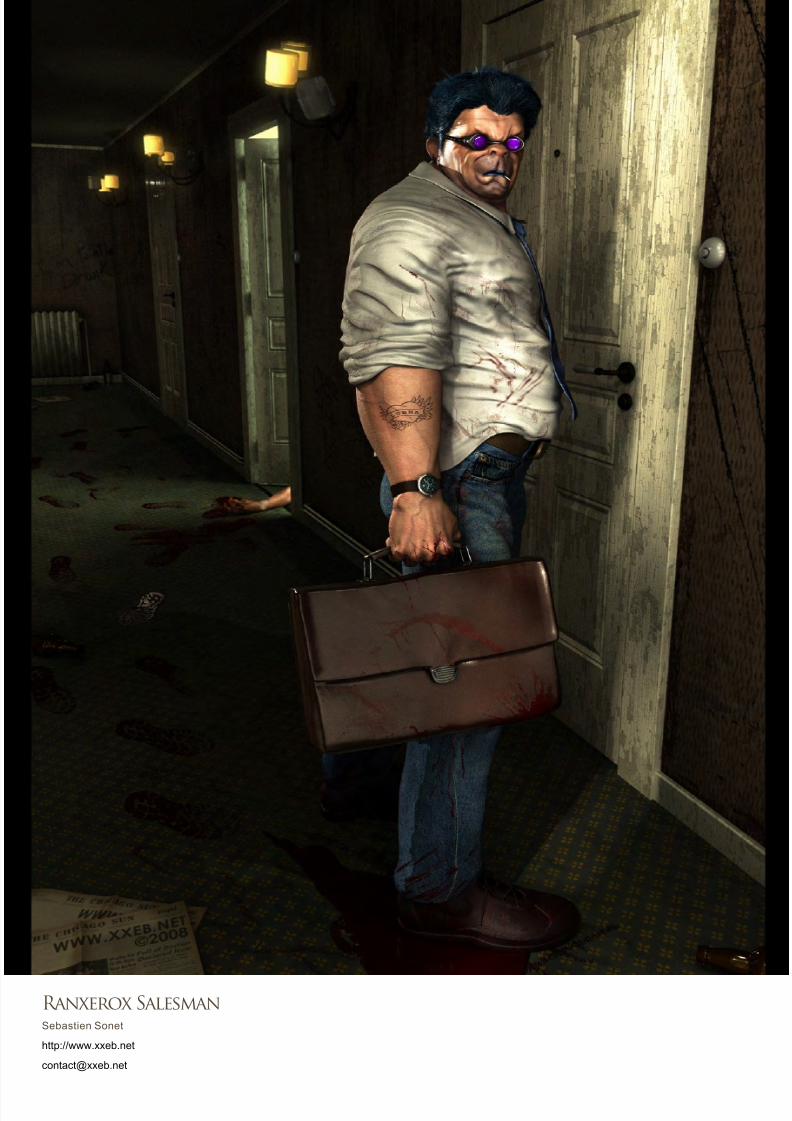
8/10/2019 3DCreative Magazine Issue 034 June 2008
http://slidepdf.com/reader/full/3dcreative-magazine-issue-034-june-2008 86/206

8/10/2019 3DCreative Magazine Issue 034 June 2008
http://slidepdf.com/reader/full/3dcreative-magazine-issue-034-june-2008 87/206
page 95www.3dcreativemag.com Issue 034 June 2008
The Galleries 10 of the Best
1936 Auburn Speedster 03
Richard [email protected]
Pursuit of PerfectionJesse Sandifer
http://www.jessesandifer.com [email protected]

8/10/2019 3DCreative Magazine Issue 034 June 2008
http://slidepdf.com/reader/full/3dcreative-magazine-issue-034-june-2008 88/206
Stylised ChallengeCaveman
In Association with
3DCreative Magazine introduces the
“Challenge” Section of the mag. Every
month we will run the challenges, available
for anyone to enter, for prizes and goodies
from www.3dtotal.com shop and to also
get featured in this very magazine! The
2D challenge runs in the conceptart.org
forums and the 3D challenge, runs in the
threedy.com forums. Here we will display
the winners from the previous months’
challenges and the “Making Ofs” from the
month before that.
CavemanStylised Challenge
In Association with

8/10/2019 3DCreative Magazine Issue 034 June 2008
http://slidepdf.com/reader/full/3dcreative-magazine-issue-034-june-2008 89/206
page 99www.3dcreativemag.com Issue 034 June 2008
Caveman Stylised Challenge
The ChallengeWelcome to the Stylised Monthly Challenge. Each month we will select
a character and post some images in the f orum thread as references.
All you have to do is to create a 3D image of this character in a stylised/
abstract/cartoon style, whilst keeping your entry instantly recognisable.
We wanted to publish some content in 3DCreative Magazine on how
to create stylised animals and characters, such as you see in the many
feature lms and cartoon galleries. We thought this regular competition
might bring in just the images and “Making Of”s that we need, whilst giving
away great prizes and exposure. If it’s successful, we will try to boost the
prizes up as much as possible! This month’s character was ‘Caveman’;
here you can see the top nine entries, as voted for by the public.
What are we looking for?Funny and humorous entries that break the character down into its most
recognisable components. Emphasise these in whichever ways you wish
and render your stylised/abstract/cartoon masterpiece. The rules are
pretty laid back: please submit 1 x 3D render (minor post work is okay).
It’s up to you if you want to have a background or if you want includesome graphical elements or text on your image. Renders of the 800
pixel dimension sound about right, but the winners will be featured in
3DCreative Magazine, so if you can create some higher resolution images
too, all the better!
There will be one competition per month, with the deadline being the end
of the month (GMT). For a valid entry, just make sure your nal image is
Stylised Challenge Caveman
5th Darkmatter
5th Miles
4th Shahin FJ
posted in the main competition thread before the deadline. We require
the top three winners to submit “Making Of” overview articles that will be
shown on either 3DTotal.com or in 3DCreative Magazine. These need
to show the stages of your creation, different elements, and some brief
explanation text of why, and how, you did what you did. We will format this
into some nice-looking pages to give you some great exposure, and us
some quality content.4th Mythman 451

8/10/2019 3DCreative Magazine Issue 034 June 2008
http://slidepdf.com/reader/full/3dcreative-magazine-issue-034-june-2008 90/206

8/10/2019 3DCreative Magazine Issue 034 June 2008
http://slidepdf.com/reader/full/3dcreative-magazine-issue-034-june-2008 91/206
page 101www.3dcreativemag.com Issue 034 June 2008
Caveman Stylised Challenge
2D ChallengeHere are last month’s top entries from the 2D
competition ...
3rd Loztvampir3
2nd Tommoy
1st Chuck, Mate [email protected]
www.chuckmate.blogspot.com
http://www.thecartoonfactory.nl
http://www.loztvampir3.deviantart.com

8/10/2019 3DCreative Magazine Issue 034 June 2008
http://slidepdf.com/reader/full/3dcreative-magazine-issue-034-june-2008 92/206
page 102www.3dcreativemag.com Issue 034 June 2008
Stylised ChallengeCaveman
Making Of’sHere are the “Making Ofs” from last month’s top
three winning entries...
3rd Chubu
In this “Making Of”, I am going to show youthe basic process I went through to create my
image: “Golden eggs are witch craft”, which
was made for the 3DTotal Stylised Challenge
- “The Executioner”. I will take you through the
sketching, modelling, texturing, posing, render
and post production in Photoshop.
Concept SketchThe concept I wanted to go for was a weak,
funny, kind of a “loser” executioner. I actually
didn’t spent a lot of time sketching since I knew
what I want him to look like (Fig.01). A quick
Google search gave me a rough idea of what
makes an executioner; things such as a mask,
gloves, big leather boots, etc.
Modelling, Texturing &RiggingThe modelling was the easy part. As an
animator I always build my characters in a
“T-pose” because maybe I will use the image
again later in life. I didn’t sketch a front and
side view though. Instead I wanted to ow
with my original idea and make things on the
spot without limiting myself to anything. There
is an upside and a downside to this method:
the upside is that I can invent things as I go
along (such as the suspenders I added when
someone from work came with a pair). The
downside is that when you go into the details of
the character, if you haven’t thought it through
then you can get “stuck” (for example: what will
the arm pit area look like or the height of the
pants). I usually do a sketch of the views I need,
but this time I decided to take a chance.
I used a simple box modelling (in 3ds Max 8),

8/10/2019 3DCreative Magazine Issue 034 June 2008
http://slidepdf.com/reader/full/3dcreative-magazine-issue-034-june-2008 93/206
page 103www.3dcreativemag.com Issue 034 June 2008
Caveman Stylised Challenge
detailed. I textured every plank with a slightly
different material to give some variety to the
texture.
The chicken actually came in at a very late
stage of the work (Fig.10). It was modelled after
a good friend of mine drew a quick reference
image of the front perspective for me (Fig.11).
The rigging and the skinning is my weakest
point, that’s why I use the Genius free rig made
by Brad Noble (http://www.bradnoble.net/
rigging/index.html). It’s unbelievably easy to use!
starting from the body, down to the legs and
eventually the head (Fig.02 and Fig.03). The
clothes were modelled using the push modier.
For the boot I took the part I wanted from theleg, cloned it as an independent object and used
the push modier to make the basic mesh for
the boot (Fig.04). The same technique was then
used for the pants (Fig.05) and gloves (Fig.06).
Details were then added such as the folds in the
gloves and boots (Fig.07). I also added the belts
on the boots and the suspenders to the pants.
All the textures for the character came from:
www.vray-materials.de. The rst test render
looked like this (Fig.08).
After that I adjusted the head to make it look
more like a sack on his head (Fig.09) and
made the eyes from three spheres in an FFD
box. Before I started the BG modelling, I did
some R&D on the subject. A quick search in
Google gave me the things I needed to make
the platform. The trees and wall on the far
side of the background were modelled after
nding some references of cartoony trees etc.
on various image sites. The platform itself
was made of individual planks to make it more

8/10/2019 3DCreative Magazine Issue 034 June 2008
http://slidepdf.com/reader/full/3dcreative-magazine-issue-034-june-2008 94/206
page 104www.3dcreativemag.com Issue 034 June 2008
Stylised ChallengeCaveman
StagingThe pose was the longest part of this piece, I spent almost two weeks
trying to nd the best pose possible. The most important thing you have
to do when you’re creating the pose of a character (and the layout of the
scene) is make sure that the silhouette of the character is clean. As you
can see in Fig.12, the character’s left leg is behind the axe which results
in an unclear silhouette. In Fig.13, all of the body parts are combined in
the centre of the character and once again, the silhouette isn’t very clear -
it’s difcult to distinguish between the details. Also the line of action is hard
to follow. In Fig.14 the line of action is quite good, but the problem with
this particular staging is that the right arm of the character and the axe
are too close to the head, which again makes the silhouette unclear. My
nal staging is shown in Fig.15. As you can see, all body parts are visible
to the eye, the axe is clear and the line of action cannot be mistaken
(Fig.16).

8/10/2019 3DCreative Magazine Issue 034 June 2008
http://slidepdf.com/reader/full/3dcreative-magazine-issue-034-june-2008 95/206
page 105www.3dcreativemag.com Issue 034 June 2008
Caveman Stylised Challenge
look (Fig.18). The nal image was complete.
I hope you’ve enjoyed reading my short “Making
Of”. I hope to see you all again next time. If youhave any more questions you can send me an
email and I will be happy to answer.
Guy Zinger For more work by this artist please contact
them at:
The nal render looks like this (Fig.17). Now it’s
time to Photoshop it a little!
Post ProductionThe nal image was rendered in layers: the BG
in a separate layer, the character and chicken in
another and the platform as a third layer. I had
some problems with the lights and shadows.
For the render I used two Vray lights but it didn’t
give me the solution I needed. I didn’t think I
would make the deadline, so I compromised
and did all the lighting in Photoshop. The BG
was blurred, then I added clouds and lens are.
The dark shadows are a separate layer, as arethe highlights on the character and platform.
The platform got a gradient overlay to liven up
the colours and on top of all the layers I did
a gradient in overlay mode and lowered the
opacity to give the nal image a homogeneous

8/10/2019 3DCreative Magazine Issue 034 June 2008
http://slidepdf.com/reader/full/3dcreative-magazine-issue-034-june-2008 96/206
page 106www.3dcreativemag.com Issue 034 June 2008
Stylised ChallengeCaveman
2nd DaddyDoomMaking Of: “Headsman O’Malley”. It was a real
surprise for me to get a second place in this
challenge. This one was particularly crowded
with such amazing entries and characters, and
again, it’s an honour and a privilege to stand
among such talented artists! My compliments to
them all!
ConceptMy main inspiration for this character was the
egg-shaped Humpty Dumpty from Alice in
Wonderland. I don’t know why, but when I rst
thought of it the immediate image that popped
into my head was Humpty Dumpty holding an
axe and eating a watermelon. Go gure!
So, using Photoshop, I drew this really crappy
concept sketch. I can draw better than this,
I assure you, but this was just a ve minute
brainstorm doodle to get things rolling (Fig.01).
Modelling The
Character With this concept as my primary directive goal,
I started from a primitive sphere. After reducing
the number of segments to 14 and rotating it
90 degrees on the X-axis, I deleted the lower
hemisphere of polys to get the head starting
point ready. Next, selecting the main edge loop,
I applied the Extrude tool to create a new row of
polygons for the neck area (Fig.02 and Fig.03).
The next step basically consisted of selecting
faces and extruding them outwards or inwards,
until the basic shapes of the head, eye sockets,
nose and mouth were dened (Fig.04).
A similar method was used for the body. After
truncating a primitive 14-segment sphere in half
(inverse to the head), faces were extruded to
create the legs. For the collar, I used a simple
loop of polygons duplicated from the headobject, and then closed the polygon hole to get
a solid object (Fig.05).
Since the model was to be textured in separate
parts, I had to build up the several elements
separately. At this point, my knowledge of 3D
modelling and texturing is still very limited,
so I have to improvise to get things done.
Thus, hands and feet for this character were
box modelled separately from a primitive
cube. Again, I used the extrude tool to create
new faces to work with, subdividing it withHyperNurbs objects, until the desired shape was
reached (Fig.06 and Fig.07).
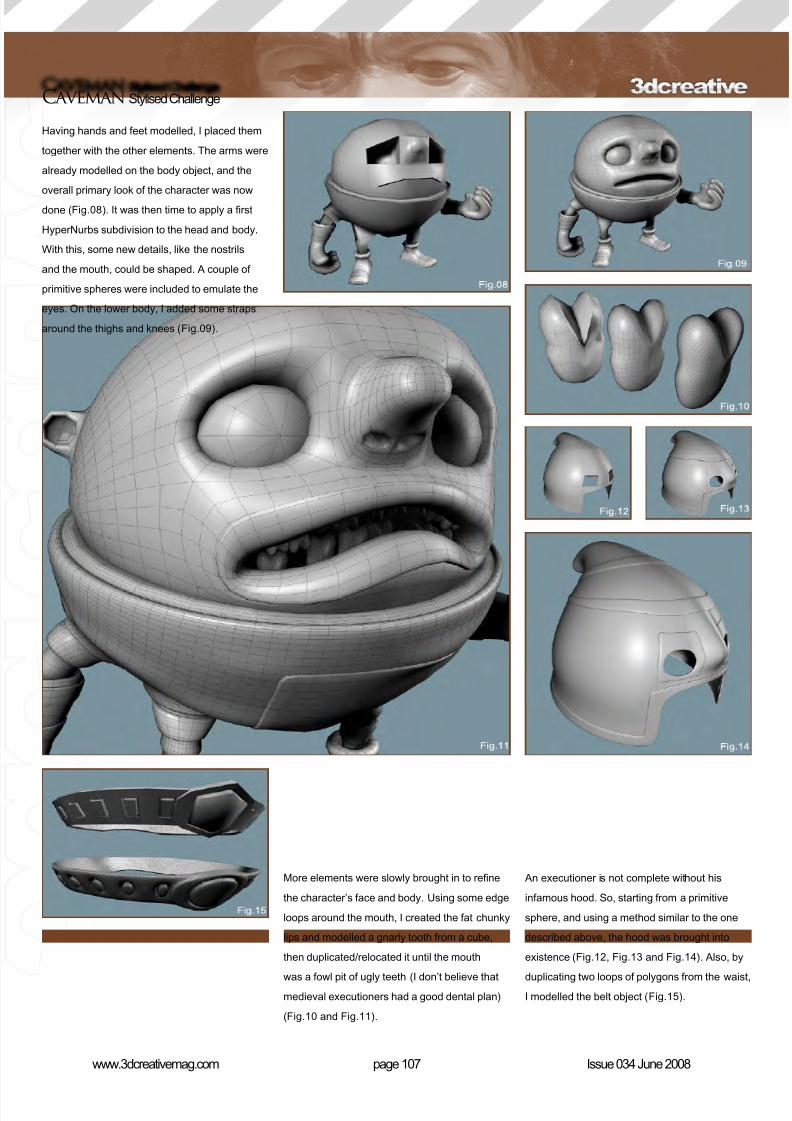
8/10/2019 3DCreative Magazine Issue 034 June 2008
http://slidepdf.com/reader/full/3dcreative-magazine-issue-034-june-2008 97/206
page 107www.3dcreativemag.com Issue 034 June 2008
Caveman Stylised Challenge
More elements were slowly brought in to rene
the character’s face and body. Using some edge
loops around the mouth, I created the fat chunky
lips and modelled a gnarly tooth from a cube,
then duplicated/relocated it until the mouth
was a fowl pit of ugly teeth (I don’t believe thatmedieval executioners had a good dental plan)
(Fig.10 and Fig.11).
Having hands and feet modelled, I placed them
together with the other elements. The arms were
already modelled on the body object, and the
overall primary look of the character was nowdone (Fig.08). It was then time to apply a rst
HyperNurbs subdivision to the head and body.
With this, some new details, like the nostrils
and the mouth, could be shaped. A couple of
primitive spheres were included to emulate the
eyes. On the lower body, I added some straps
around the thighs and knees (Fig.09).
An executioner is not complete without his
infamous hood. So, starting from a primitive
sphere, and using a method similar to the one
described above, the hood was brought into
existence (Fig.12, Fig.13 and Fig.14). Also, by
duplicating two loops of polygons from the waist,I modelled the belt object (Fig.15).

8/10/2019 3DCreative Magazine Issue 034 June 2008
http://slidepdf.com/reader/full/3dcreative-magazine-issue-034-june-2008 98/206
page 108www.3dcreativemag.com Issue 034 June 2008
Stylised ChallengeCaveman
object and then extruded and smoothed. Really
simple and fast (Fig.18)!
Texturing TheCharacter The rst thing I decided about the texturing was
that the character’s clothes would be a sort of
suede material. Therefore, they would have
a tiny scaled bumpiness, to give that subtle
peach skin feel. For the several cloth elements
(including the hood, shoes and leg straps)
the same texture settings were used, but with
different colours applied (Fig.19).
Concerning the organic textures, such as the
skin, lips, teeth, juice drool and the watermelon,
there’s not much to say… I used really simple
settings for these because I like to keep things
simple when it comes to cartoon-like texturing
(Fig.20)!
The chains in the belt were textured using a
Brushed Metal shader from the C4D library.
And thus, the nal textured Executioner (Fig.21)!
Nearly complete, I added a couple of last
details: the watermelon juice drooling out of his
mouth and the chains attached to the belt. Alas,
the un-smoothed/smoothed clay character in allhis glory (Fig.16 and Fig.17)!
The nal element to be added to the character
was the watermelon slice in his hand. To
build it up, I created two vector splines using
Macromedia Freehand, exported them as
EPS and then extruded them in C4D. The
watermelon seeds consisted of selected polys
from the mesh, which were duplicated to a new

8/10/2019 3DCreative Magazine Issue 034 June 2008
http://slidepdf.com/reader/full/3dcreative-magazine-issue-034-june-2008 99/206
page 109www.3dcreativemag.com Issue 034 June 2008
Caveman Stylised Challenge
I was to create three different passes for this image: one for the main GI
render, a second one for Ambient Occlusion (some shadows had to be
retouched in Photoshop) and a third for the Cel Render outline. These
were later composed in Photoshop, along with the blood splatters, the
glow in the axe, and the titles (Fig.24).
Finally, after a long month of modelling, experimenting and tweaking, Icompleted “Headsman O’Malley: Separating Heads from Bodies Since
1345”.
Setting Up The SceneI had a hard time nding the right mood for
the scene. The execution stage featuring the
“Executions Served” sign, along with the tree
trunk, axe and the watermelon (see Stage.jpg)
were dened and modelled pretty fast, but the
surrounding scene went through dead ends
before I managed to get it right.
Some props were devised to ll up the scenario,
such as the barrels, castle walls and towers
- mostly from simple primitives like cubes,
cylinders and cones. All the texturing for this
array of objects was custom made.
I couldn’t nish this without the typical extra pet
character. It seemed quite obvious that, due to
context, it had to be a rat. Since it would be so
small I wasn’t too concerned about details, so it
ended up as pretty generic and simple (Fig.22) .
The background landscape was made from
a Plane object and then smoothed. The trees
were actually duplicated polys from the plane
object – extruded and smoothed. Finally, a very
generic castle was created and nested on the
landscape. The sky was another Plane object
with a Gradient texture applied, and the clouds
were an Alpha Map made in Photoshop.
I used a Scene Camera, instead of the default
editor camera, because I required Depth Of
Field for the nal render. The lighting consisted
of two light sources and a Sky object (Fig.23).

8/10/2019 3DCreative Magazine Issue 034 June 2008
http://slidepdf.com/reader/full/3dcreative-magazine-issue-034-june-2008 100/206
I hope you have enjoyed this Making Of.
It’s really weird for me to go back and try to
structure my steps in a way that makes sense,
mostly because this is not a very structured
process for me at all. I keep experimenting and
adjusting things until the very end of the project,
rening little details, retouching the textures and
trying to get the best lighting setup possible. It’s
all about intuition and self-improvement, for me!
Again, it’s a pleasure to see my work featured
amongst such amazing artists, and for me, that’s
enough! See you next time!
Pedro DanielFor more work by this artist please contact
them at:

8/10/2019 3DCreative Magazine Issue 034 June 2008
http://slidepdf.com/reader/full/3dcreative-magazine-issue-034-june-2008 101/206

8/10/2019 3DCreative Magazine Issue 034 June 2008
http://slidepdf.com/reader/full/3dcreative-magazine-issue-034-june-2008 102/206
page 112www.3dcreativemag.com Issue 034 June 2008
Stylised ChallengeCaveman
1st Stroggtank
ConceptI found this month’s theme very interesting, so I
tried several concepts during the “dead time” at
the ofce (those boring render times!). I wasn’t
totally convinced with the ones I came up with
(Fig.01). Almost all of my sketches were similar
to each other, so in the end I decided to go for
a mix of several ones and ended up with the
classic dumb, fat and ugly executioner.
ModellingUsing Maya, I started the model with the box
technique, dening the essential loops for
the face before making the mesh too dense
(Fig.02). I then started to add edge loops and
extruding faces where needed, always trying
to achieve a nice ow of geometry to prevent
issues when adding denition to muscles. It
wasn’t always perfect, but I was satised with
the results (Fig.03).
The mask and the gloves were made by
extracting the necessary faces from the head
and the arms, and then I moved the vertices to
match them to the desired size (Fig.04). For the
nal touches I added many spheres to work as
rivets for the mask and the gloves. The teeth
were made from polygon cubes and the eyes
were just a couple of NURBS spheres (Fig.05).

8/10/2019 3DCreative Magazine Issue 034 June 2008
http://slidepdf.com/reader/full/3dcreative-magazine-issue-034-june-2008 103/206
page 113www.3dcreativemag.com Issue 034 June 2008
Caveman Stylised Challenge
The axe has a very common design: it was
modelled using the same technique, starting
with a default cylinder, and then I just scaled
and deformed it to match the character style
(Fig.06).
Due to the lack of free time, I wasn’t able tocreate a more complex scenario, so I just
modelled a wooden board and then arranged
and scaled it in a random order to create the
oor and the background (Fig.07).
TexturingI unwrapped the character, along with the axe,
to save texture space. I then decided to export
the result to ZBrush for detailing (Fig.08). The
main details I added to the model were the
wrinkles in the skin and pores on the face;
the stitches and wrinkles for the clothes and
the wooden texture for the axe. I used only
the standard brush and a few custom-made

8/10/2019 3DCreative Magazine Issue 034 June 2008
http://slidepdf.com/reader/full/3dcreative-magazine-issue-034-june-2008 104/206

8/10/2019 3DCreative Magazine Issue 034 June 2008
http://slidepdf.com/reader/full/3dcreative-magazine-issue-034-june-2008 105/206
page 115www.3dcreativemag.com Issue 034 June 2008
Caveman Stylised Challenge
I decided to work with the expression of the character - something more
along the lines of the previous sketches I’d made. Although the character
was already skinned, it was easy to add some blend shapes to his
face. I ended up with three blends and then mixed them to get the nalexpression: a mad-looking face (Fig.14). For the materials, I used the
Misss Fast Simple for the body, a Lambert for the clothes and the wood,
and a mia_material for the metal parts (Fig.15). The lighting setup only
consists of one directional light and one HDRI. Then, in the rendering
settings, I just turned on FinalGather in the MentalRay options (Fig.16).
Post-productionFor the nal render I simply used some stock
images to create the background sky in
Photoshop. Then, with a depth pass from Maya,
I created a subtle depth of eld blur. For the
nal touches I added an orange photo-lter
in Photoshop and a little glow to add a more
unied atmosphere to the scene (Fig.17 and
Fig.18). The whole scene took me around ve
or six days to complete (Fig.19). I learned a lot
and I fought with my computer a lot, but (most
importantly) I had a lot of fun and enjoyed
watching all the competitors’ progress in the
forums. There is a lot of talent spread around
the world!
Thanks for all the votes, thanks for reading, and
thanks to 3DTotal for these amazing challenges!
Carlos Ortega For more work by this artist please visit:
www.zigrafus.com.mx
Or contact them at:
8/10/2019 3DCreative Magazine Issue 034 June 2008
http://slidepdf.com/reader/full/3dcreative-magazine-issue-034-june-2008 106/206
page 116www.3dcreativemag.com Issue 034 June 2008
Stylised ChallengeCaveman

8/10/2019 3DCreative Magazine Issue 034 June 2008
http://slidepdf.com/reader/full/3dcreative-magazine-issue-034-june-2008 107/206
page 117www.3dcreativemag.com Issue 034 June 2008
Caveman Stylised Challenge

8/10/2019 3DCreative Magazine Issue 034 June 2008
http://slidepdf.com/reader/full/3dcreative-magazine-issue-034-june-2008 108/206
In Association with
Due to popular demand, a Sculpting Challenge
has been introduced in the Threedy Forums,
over at 3DTotal.com, which has taken us all
by storm! With such great entries and talent
involved, we couldn’t help including a small
feature in this month’s 3DCreative on the top
ve winners of The Sculpting Challenge – 001 –
“Orc’s Head”. These challenges have gathered
interest from far and wide and are resulting in
some truly awesome nal submissions (80+
entries for this rst challenge – an amazing start
for such a young competition!), so let’s check
out the best of the rst challenge here, and look
out for more to come from these in future issues
of 3DCreative magazine!

8/10/2019 3DCreative Magazine Issue 034 June 2008
http://slidepdf.com/reader/full/3dcreative-magazine-issue-034-june-2008 109/206
page 120www.3dcreativemag.com Issue 034 June 2008
The Sculpting Challenge Orcs Head
So, what’s the Speed SculptingChallenge All About?The Rules: Entrants can use any software with sculpting tools, such as
ZBrush, Mudbox, Blender, Silo, and so on.
1. Each competition lasts two weeks: one week is allocated to creating
and submitting the entries and the second week is allocated to judging
and voting for the entries.
2. The moderators supply a base mesh for each competition from which
everyone starts sculpting. This is so everyone gets an equal start and it
also helps to keep everyone on topic!
3. There is a time limit for each sculpting challenge: entrants must spend
no longer than the allocated time limit, and then post a screengrab of their
model. There must be no cheating and the challenge relies on honesty
from all!
4. Entrants must not add extra meshes to the base mesh. However,
entrants are free to add any accessories or details, as long as they’rewithin the base mesh, to give their characters personality.
5. There is no rendering, texturing, lighting or rigging – it’s all about the
high-res sculpt! What we are looking for is the quality of sculpts that can
be produced “under pressure”. If entries are not complete, they can still be
posted as long as they’re recognisable as per the brief and on topic!
6. For each nal entry, a screengrab from the entrant’s software must be
posted with their nished work in it. These images must be uploaded to
the Threedy servers (using the “manage attachments” button on the forumreply page). Images should not be linked to external images les. Any
images that are larger than the maximum size, or posts containing links to
external images (other than for reference materials), will be removed and
the poster disqualied.
Sculpting Challenge Orcs Head
5th: Freesupra
4th: Kazmamurat
3rd: MonteChristo
7. Entrants can post multiple entries, but they can have only one nal
entry for each competition!
8. Entrants are asked not to create their own WIP threads. Everyone
should simply post all WIP screengrabs in the main forum thread, and
their FINAL entries in the special Submissions thread.
These rules apply to everybody taking part and there are no exceptions!
What can I win?The winner can choose any two 3DTotal products from the 3DTotal
webshop. Please note that a few products in the shop are not made by
3DTotal, but 12 month magazine subscriptions are ne!
So what were the requirements of
the first challenge?Subject – Orc’s Head
Time limit – 3 hours
Deadline – 12/05/2008, 10:00 AM GMT +0 [email protected]
http://kazmamurat.cgsociety.org

8/10/2019 3DCreative Magazine Issue 034 June 2008
http://slidepdf.com/reader/full/3dcreative-magazine-issue-034-june-2008 110/206
page 121www.3dcreativemag.com Issue 034 June 2008
Orcs Head The Sculpting Challenge
“The orc. Everyone’s favourite bad guy. Check
them out in Warcraft, in LotR, in any fantasy
setting. We want you to sculpt an orc’s head
(no body this time), in any way or fashion youdeem t. Realistic, fantasy, stylized, anything
goes! Good luck! I’m feeling all green with
anticipation.”
Is there a challenge atthe voting stage now?Sure is!Subject – “Manimal”: Half-Human, Half-Animal
Time limit - 4 hours
Deadline - 27/05/2008, 10:00 AM GMT +0
“We’ve all been there; it’s a normal night at the
cinema, the movie’s in full swing and you’re
just about to reach your arm around the neck
of your main squeeze, when all of a sudden
you transform into an anthropomorphic vision
of frenzied destruction and kill everyone in the
room. In this comp we want you to take the base
mesh provided and sculpt your visualisation of
such a transformation, in any way or fashion youdeem t. Realistic, fantasy, stylised, anything
goes. Pick whatever animal you like too, wolf,
horse, puma, slender loris...
“We’ve also given you the option of having eyes
this time around, there’s a separate .obj le
provided or you can add eyes yourself as sub-
tools (or software equivalent) but you have to
pick one or the other of these options, not both.
“Manimals assemble!” 2nd: Emeth003
1st: Crimson King
So what do I do ifI want to join the3rd Official ThreedySculpting Challenge?It’s simple! Head on over to the Threedy
forums, http://forums.3dtotal.com , sign
yourself up with a Threedy forums user account,
grab the mesh that’s supplied with the challengeand go subdivide yourself silly! We’ll see you
in the forums and perhaps even in next month’s
issue of 3DCreative! Good [email protected]

8/10/2019 3DCreative Magazine Issue 034 June 2008
http://slidepdf.com/reader/full/3dcreative-magazine-issue-034-june-2008 111/206
Over the course of the next seven months
we shall be running an in depth tutorial on
how to go about creating the amazing BugattiVeyron. The series will cover an in depth and
comprehensive guide to modelling the car
from start to nish and will focus on the key
techniques and stages invloved in building the
chassis as well as details such as the windows,
lights, vents, petrol caps and engine parts etc.
We will then move on to creating the wheels
including tyres and hubcaps before going on to
building and incorporating an interior, namely
the dashboard and seating. The series willproceed with a section on creating and applying
materials for the numerous parts of the car
such as the paintwork, chrome, rubber and
glass before concluding with a tutorial devoted
to setting the scene for a nished render. This
nal part will cover the importance of a good
lighting rig and light parameters, as well as the
importance of a camera and the integral part
that the rendering settings play in showcasing
the model for a portfolio.
3DSMax Version
Page 171
Cinema4D Version
Page 177
Lightwave Versions
Page 191
Maya Version
Page 219
Softimage XSi Version
Page 229
This Month :
PArt 6 - The Materials &Finishes
Bugatti Veyron car modelling series

8/10/2019 3DCreative Magazine Issue 034 June 2008
http://slidepdf.com/reader/full/3dcreative-magazine-issue-034-june-2008 112/206
The Total Beginner’s Guide to ZBrush
“…the better you know your anatomy themore you can use it tobend and shape it to
your will and createbelievable-lookingmodels!”
For all of you out there
who have heard of
but are unfamiliar with
ZBrush, then this new
7-part tutorial series
by Wayne Robson is
perfect for you!
This complete
Beginner’s Guide to
ZBrush is an excellent
starting point to get
you stuck into the
world of ZBrush-ing.
This month Wayne
brings us Part Five –
enjoy!!

8/10/2019 3DCreative Magazine Issue 034 June 2008
http://slidepdf.com/reader/full/3dcreative-magazine-issue-034-june-2008 113/206
page 125www.3dcreativemag.com Issue 000 Month 2007
ZBrush The Total Beginner’s Guide to
Created In:ZBrush
IntroductionNow that we have our forms blocked out from
the previous articles, we can now move onto
adding some ner details to help bring this bust
to life! Load up the model that we’ve been
working on so far and set the Slash2 brush as
your active brush, with the dots stroke selected.
A Short AnatomicalDiversionIt’s time to start taking into account human
anatomy now, especially now that we are in the
detailing stage. While you can use a selection
of alphas on your model to give it some skin
detail, the problem I personally have with this
is that anyone with the same set of alphas as
yourself will have a similar look to their models.
So I prefer to detail by hand and use only default
alphas available in ZBrush itself, for a couple of
jobs here and there. The plus points of this are
that you end up with a unique look to your skin
texture, and it’s also very good practice (Fig.01)!
One area of anatomy that I do want to cover,
at least in passing for those of you unaware
of it, is the pectoral muscles that fan out in 5
sections from the clavicle (collar bone), all the
way down the sternum. In our model we will be
exaggerating these quite a bit to give a more
interesting look to the chest area. As mentioned
before in this series, the better you know your
anatomy the more you can use it to bend and
shape it to your will and create believable-
looking models (Fig.02)!
Abreast of theSituationWith your Slash2 brush active, start to make
some very light lines where these 5 sections
join to the sternum. Once done, wash them
out again about 70% by smoothing out, holding
down the Shift key. We need to start taking into
account where the skin will fold and be under
stress so that we can add folds in these areas.
This isn’t a simple concept to grab at rst and
comes with practice and observation. There’s
no “short cut” to be totally honest and it’s
something every organic artist is always striving
to improve (Fig.03)!
So start to hunt out areas where the skin will
stretch from one area to another, or be under
stress, and use your Slash2 brush to add some
stress wrinkles to denote stretching skin. Areas
that I added these wrinkles to include the area
where the 2 sections of the clavicle come
together, where the skin stretches near the
sternocladomastoid, and the centre of the neck.
Now make some deeper slashes to show the
different sections of the deltoid muscle. In most
humans this isn’t very visible, unless they’ve
done some quite heavy training. But in this
case, as it’s a creature we’re making up, we
are allowed to go as nuts as we like! After
essentially ‘dividing up’ the deltoid, smooth
things out again a little to help the forms to work
together (Fig.04).
Add now some slashes on the back of the neck
to help us give the impression of folding skin
under compression. We can work on these
further, although in the case of this model, as
it’s meant to be seen front on, we’d be doing
this only for practice. Add more light slashes to
denote the stretching and movement of the skin
down the spine area and around the shoulder

8/10/2019 3DCreative Magazine Issue 034 June 2008
http://slidepdf.com/reader/full/3dcreative-magazine-issue-034-june-2008 114/206
page 126www.3dcreativemag.com Issue 000 Month 2007
The Total Beginner’s Guide to ZBrush
blades. Try to imagine where the skin will be compressed or stretched.
Feel free to stand in front of a mirror and see how your own skin moves
as your body is in different poses. You may feel strange doing it at rst,
but it’s surprising how often your own body can give you more informationthan any anatomy book. You are your own ‘life model’ that’s available 24
hours a day, 7 days a week (Fig.05)!
Continue to work your way around the entire torso and neck area adding
these stress wrinkles until you’re happy that they look ‘right’. Take special
care in the area where the pectoral feeds under the deltoid, as you can
add some nice wrinkles and folds in this area.
Heads Up!
Now we’ve started to add some early details to the torso (and are by nomeans nished with it yet!), we can also make sure that the head area is
just as detailed to keep things in balance. I personally prefer many times
to “nail” the head area – personality and looks-wise – as it gives me lots
of ideas and information as to what sort of look the body area needs. But
keep in mind that every artist works their own way to achieve the look that
they personally want as part of their style (Fig.06).
The rst area I want to address to give the
character… well, more character, is the eyes.
At the moment they are a bit too wide open and
surprised, so use masks (as detailed earlier inthe series) close the eyes a bit to give him more
of a mean look.
One of my “secret tips” is to not only take
inspiration for eyes and ‘eye poses’ from
humans, but to also be sure to look at animals...
You’ll be surprised how much more ‘human’
an animalistic eye pose can make a character!
Hold down Shift + Ctrl and left-click on the head
area to isolate it (thus making things easier
for us to work with). Right now the face is still
effectively just a number of sections that do not
meld into one another at all and needs a fair bit
of work to tighten it up. So take your clay brush
with alpha 01 and start to melt the lower eyelid
into the cheekbones area a little more. Far too
often, sculpts (including my own) can end up
looking as a collection of facial parts taken from
a shelf, and not like a living breathing being.
This is often due to them not working in unison
and no effort being made to working out how
one part would affect the skin in another part.
So in this case the cheek bones have rather

8/10/2019 3DCreative Magazine Issue 034 June 2008
http://slidepdf.com/reader/full/3dcreative-magazine-issue-034-june-2008 115/206
page 127www.3dcreativemag.com Issue 000 Month 2007
ZBrush The Total Beginner’s Guide to
taught skin, so this will naturally pull the skin a
little tighter over the bottom lids. This way we
won’t have as big a chance of large, droopy eye
bags (Fig.07)!
Switch to your elastic brush with alpha 27
selected and switch on “lazy mouse” by hitting
your ‘L’ key. Start to draw a line (while holding
down the Alt key) around the insides of the
upper and lower eyelid. We do this as a sort of
an illusion, to add some shadows and highlights
to simulate the look that you get by the many
complex forms in the eyelids. As this is a
beginners guide to ZBrush (added to which anin-depth study of the eyes and eyelids would
take a long time and a lot more space!), on this
occasion we’ll use a number of optical illusions
and shortcuts. As you learn more about ZBrush
and digital sculpting, you’ll use these less often,
unless you are speed sculpting (Fig.08).
Drag some lines out from each corner of the eye
as this is always an area where skin is under
stress. We blink and move our eyes a lot in asingle day, so as a result the area is one of the
rst to form wrinkles. Add a few lines above the
eye to let us make them into skin folds later on
in the sculpting process.
This time we’re going to use an alpha to help
us – it’s one we’ll be using a lot in the rest of
these tutorials and one I nd very useful for skin
detailing! Alpha 58 is simply a number of wavy
vertical lines, but combined with the Freehand
stroke type and any of a number of the brushes,
and you have some instant ne wrinkles! So set
your ZSub to about 54 on your elastic brush and
start to drag out some ne wrinkles. Start with the eyes before moving on
to the area where the brow meets the nasal area (Fig.09).
Please make sure that you follow the direction of the skin. Skin, like a
tree, has a “grain” – go against it and it will give you nothing but badness!
However, work with the ow of the skin and the anatomy and you’ll get
mush better results each time. Work between the brow on the ne folds
there, as well as the main folds on the brow itself.
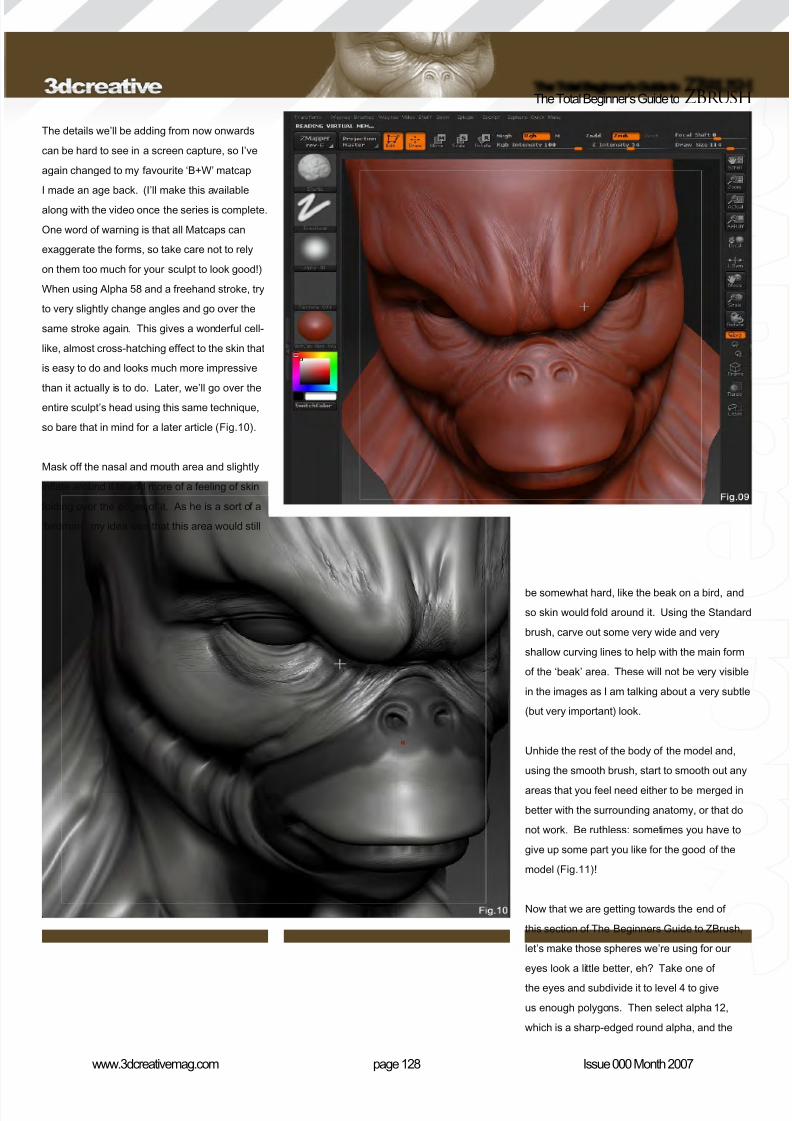
8/10/2019 3DCreative Magazine Issue 034 June 2008
http://slidepdf.com/reader/full/3dcreative-magazine-issue-034-june-2008 116/206
page 128www.3dcreativemag.com Issue 000 Month 2007
The Total Beginner’s Guide to ZBrush
The details we’ll be adding from now onwards
can be hard to see in a screen capture, so I’ve
again changed to my favourite ‘B+W’ matcap
I made an age back. (I’ll make this availablealong with the video once the series is complete.
One word of warning is that all Matcaps can
exaggerate the forms, so take care not to rely
on them too much for your sculpt to look good!)
When using Alpha 58 and a freehand stroke, try
to very slightly change angles and go over the
same stroke again. This gives a wonderful cell-
like, almost cross-hatching effect to the skin that
is easy to do and looks much more impressive
than it actually is to do. Later, we’ll go over theentire sculpt’s head using this same technique,
so bare that in mind for a later article (Fig.10).
Mask off the nasal and mouth area and slightly
inate around it to add more of a feeling of skin
folding over the edges of it. As he is a sort of a
‘birdman’, my idea was that this area would still
be somewhat hard, like the beak on a bird, and
so skin would fold around it. Using the Standard
brush, carve out some very wide and very
shallow curving lines to help with the main form
of the ‘beak’ area. These will not be very visible
in the images as I am talking about a very subtle
(but very important) look.
Unhide the rest of the body of the model and,
using the smooth brush, start to smooth out any
areas that you feel need either to be merged in
better with the surrounding anatomy, or that do
not work. Be ruthless: sometimes you have to
give up some part you like for the good of the
model (Fig.11)!
Now that we are getting towards the end of
this section of The Beginners Guide to ZBrush,
let’s make those spheres we’re using for our
eyes look a little better, eh? Take one of
the eyes and subdivide it to level 4 to give
us enough polygons. Then select alpha 12,
which is a sharp-edged round alpha, and the
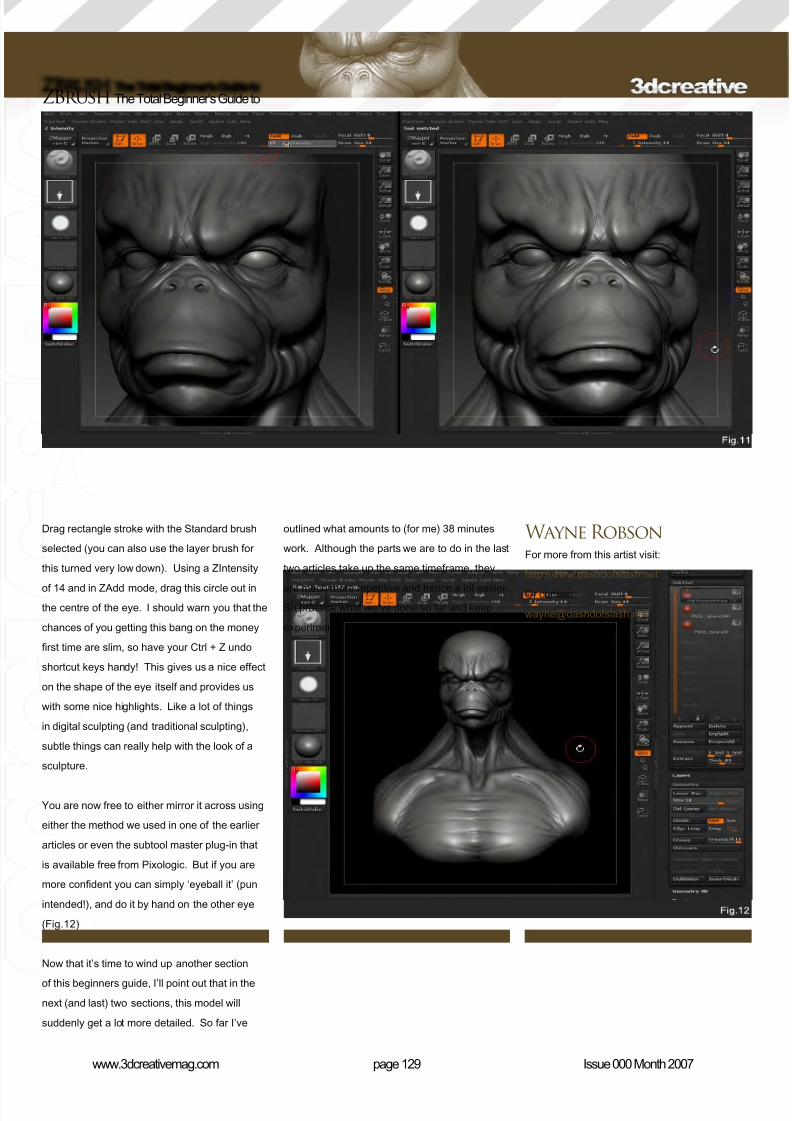
8/10/2019 3DCreative Magazine Issue 034 June 2008
http://slidepdf.com/reader/full/3dcreative-magazine-issue-034-june-2008 117/206
page 129www.3dcreativemag.com Issue 000 Month 2007
ZBrush The Total Beginner’s Guide to
Drag rectangle stroke with the Standard brush
selected (you can also use the layer brush for
this turned very low down). Using a ZIntensity
of 14 and in ZAdd mode, drag this circle out in
the centre of the eye. I should warn you that the
chances of you getting this bang on the money
rst time are slim, so have your Ctrl + Z undo
shortcut keys handy! This gives us a nice effect
on the shape of the eye itself and provides us
with some nice highlights. Like a lot of things
in digital sculpting (and traditional sculpting),
subtle things can really help with the look of a
sculpture.
You are now free to either mirror it across using
either the method we used in one of the earlier
articles or even the subtool master plug-in that
is available free from Pixologic. But if you are
more condent you can simply ‘eyeball it’ (pun
intended!), and do it by hand on the other eye
(Fig.12)
Now that it’s time to wind up another section
of this beginners guide, I’ll point out that in the
next (and last) two sections, this model will
suddenly get a lot more detailed. So far I’ve
outlined what amounts to (for me) 38 minutes
work. Although the parts we are to do in the last
two articles take up the same timeframe, they
are much more repetitive and hence a lot easier.
So practice what we’ve done so far and keep
experimenting!
Wayne RobsonFor more from this artist visit:
http://www.dashdotslash.net
Or contact:

8/10/2019 3DCreative Magazine Issue 034 June 2008
http://slidepdf.com/reader/full/3dcreative-magazine-issue-034-june-2008 118/206
Arturo Garcia shows
us how he created this
wonderful car using
3ds Max ...
“The idea was to create a kindof studio environment, likesome brands of cars do inorder to shoot their cars”

8/10/2019 3DCreative Magazine Issue 034 June 2008
http://slidepdf.com/reader/full/3dcreative-magazine-issue-034-june-2008 119/206
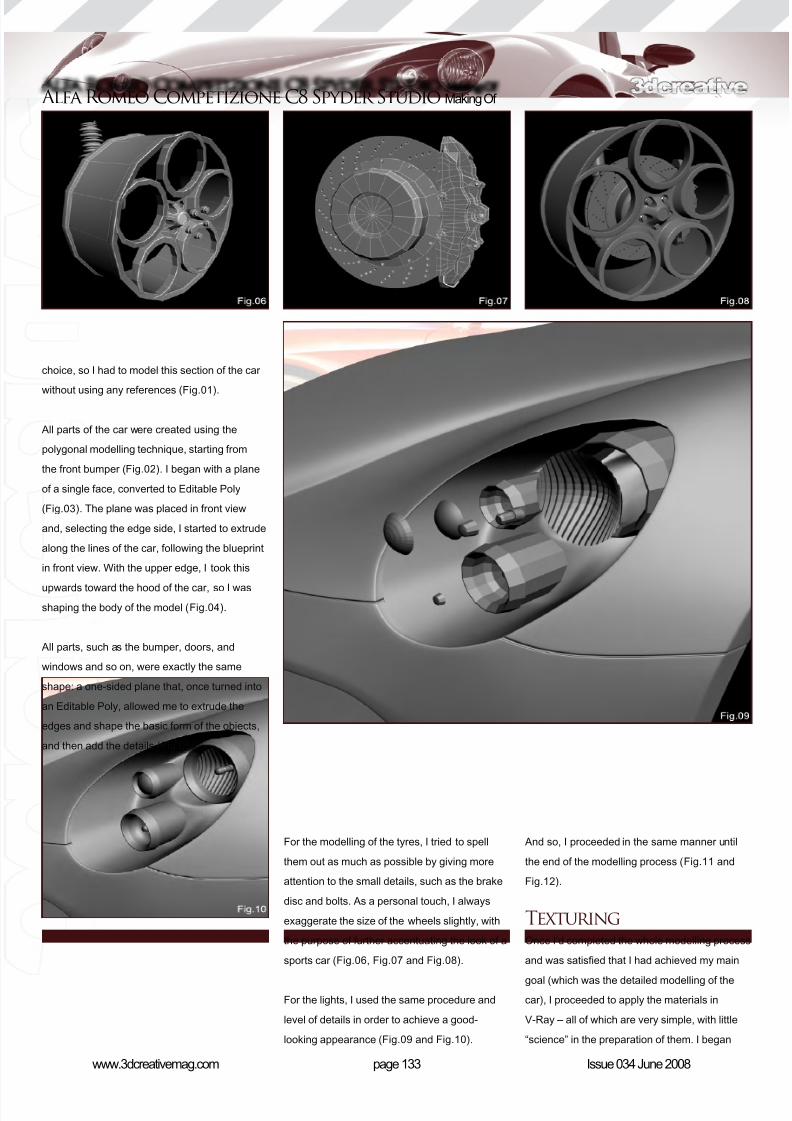
8/10/2019 3DCreative Magazine Issue 034 June 2008
http://slidepdf.com/reader/full/3dcreative-magazine-issue-034-june-2008 120/206
page 133www.3dcreativemag.com Issue 034 June 2008
Alfa Romeo Competizione C8 Spyder Studio Making Of
choice, so I had to model this section of the car
without using any references (Fig.01).
All parts of the car were created using the
polygonal modelling technique, starting from
the front bumper (Fig.02). I began with a plane
of a single face, converted to Editable Poly
(Fig.03). The plane was placed in front view
and, selecting the edge side, I started to extrude
along the lines of the car, following the blueprint
in front view. With the upper edge, I took this
upwards toward the hood of the car, so I was
shaping the body of the model (Fig.04).
All parts, such as the bumper, doors, and
windows and so on, were exactly the same
shape: a one-sided plane that, once turned into
an Editable Poly, allowed me to extrude the
edges and shape the basic form of the objects,
and then add the details (Fig.05).
For the modelling of the tyres, I tried to spell
them out as much as possible by giving more
attention to the small details, such as the brake
disc and bolts. As a personal touch, I always
exaggerate the size of the wheels slightly, with
the purpose of further accentuating the look of a
sports car (Fig.06, Fig.07 and Fig.08).
For the lights, I used the same procedure and
level of details in order to achieve a good-
looking appearance (Fig.09 and Fig.10).
And so, I proceeded in the same manner until
the end of the modelling process (Fig.11 and
Fig.12).
TexturingOnce I’d completed the whole modelling process
and was satised that I had achieved my main
goal (which was the detailed modelling of the
car), I proceeded to apply the materials in
V-Ray – all of which are very simple, with little
“science” in the preparation of them. I began

8/10/2019 3DCreative Magazine Issue 034 June 2008
http://slidepdf.com/reader/full/3dcreative-magazine-issue-034-june-2008 121/206
page 134www.3dcreativemag.com Issue 034 June 2008
Making Of Alfa Romeo Competizione C8 Spyder Studio
with the car paint - the values that I used can
be seen in Fig.13. For the rims, the values are
shown here: Fig.14. The brake calipers have
an image on the diffuse as well, as shown inFig.15. For the sidewall, I generated a map
drawing in the bump (Fig.16).
The material for the chrome headlights had
to be very reective, with values in the Re.
glossiness box at 1.0, and Subdivs at 50
(Fig.17).
For the mesh of the front air intakes, I used a
standard Max material with the following values,plus an opacity bitmap to create holes (Fig.18).
Another relevant material present in the scene
was the oor, which was easy to make with a
standard Max material, these values: diffuse
white specular level 0, glossiness 10, and a
reection VrayMap.
So as you can see, the texturing is very easy
to do. Any other materials that I used werestandard Max and modied in the diffuse and
glossiness levels.
RenderingLet’s now turn to the nal part of the preparation
process and render the scene! The idea was to
create a kind of studio environment, like some
brands of cars do in order to shoot their cars.
To generate the environment I used a ramp
gradient. In the Materials Editor I applied the
degrading ramp and gave it an angle of W90
degrees in the co-ordinates. In the Gradient

8/10/2019 3DCreative Magazine Issue 034 June 2008
http://slidepdf.com/reader/full/3dcreative-magazine-issue-034-june-2008 122/206
page 135www.3dcreativemag.com Issue 034 June 2008
Alfa Romeo Competizione C8 Spyder Studio Making Of
Ramp Parameters I set the colour from blue to
white, as shown in the image (Fig.19).
The placement of the camera in a low position,with a small angle of inclination of the box with
depth of eld, achieves the blurring that we
can see in the nal render (the target distance
depends on the amount of blurring that we
need) (Fig.20).
I added a V-Ray light to help with the lighting setup; I set the value in the
multiplier to 2.7 and sampling subdivs with a value of 256.
For the rendering process, I chose V-Ray as my rendering engine
because it’s very fast and yields excellent results! For the anti-aliasing
lter I used a combination of adaptive subdivision and Ron Catmull, but
this depends on each according to the GI. I selected a combination of
Irradiance Map for the Primary Light bounces, and Secondary Cache
bounces, which I used to obtain correct results with Global Lighting.
The post production for the nal render was done entirely in Photoshop.
Basically, it consisted of a small colour correction and that was all!
I wish you all good health and good luck with your own 3D projects.
Thanks for reading!

8/10/2019 3DCreative Magazine Issue 034 June 2008
http://slidepdf.com/reader/full/3dcreative-magazine-issue-034-june-2008 123/206
Arturo Garcia For more from this artist visit:
http://dessga.cgsociety.org/gallery
Or contact:

8/10/2019 3DCreative Magazine Issue 034 June 2008
http://slidepdf.com/reader/full/3dcreative-magazine-issue-034-june-2008 124/206

8/10/2019 3DCreative Magazine Issue 034 June 2008
http://slidepdf.com/reader/full/3dcreative-magazine-issue-034-june-2008 125/206
Making OfFord Mustang Fastback ‘65
Pâşlea Paul has
modelled one of
America’s iconic
muscle cars. Read on
to see how he used
3ds Max to create it ...
“I approached the modellingof the interior in the same
way as for the exterior,starting with the basicobject and then addingdetails like nuts, gauges,rims...”

8/10/2019 3DCreative Magazine Issue 034 June 2008
http://slidepdf.com/reader/full/3dcreative-magazine-issue-034-june-2008 126/206
page 141www.3dcreativemag.com Issue 034 June 2008
Ford Mustang Fastback ‘65 Making Of
The search for good reference photos can take a long time, but believe
me it really pays off in the end.
ModellingWhen it came to modelling this car, I used a classic approach: polygon
modelling. I started from the exterior of the car and worked through to
Created In:3ds Max, V-Ray & Photoshop
IntroductionI decided to work on the Ford Fastback because
I love the classic look of the car, and that is what
I wanted to achieve – a feeling of class and
style. I had a rough idea in my mind of the nal
image, the colours, and a studio render with
maybe some different camera angles. But it was
really the process of creating the car and trying
out different things that led to the nal result that
I am talking about today.
I hope you will like this making of, and perhaps
you’ll nd something interesting in it for yourself.
Getting Ready!The most important thing when doing a car
model is to collect as many reference photos as
possible (Fig.01). Finding the correct blueprints
is very helpful and setting them up is pretty
straightforward (Fig.02). Someone once asked
me about good image reference sites. There are
many good reference sites, but for this particular
project I used photos found on the web just by
searching on the different car selling sites, and
searching on Google. These photos helped me
a lot in my modelling and texturing, because of
some great perspectives and close-up shots
(Fig.03) that cannot be found on reference sites.

8/10/2019 3DCreative Magazine Issue 034 June 2008
http://slidepdf.com/reader/full/3dcreative-magazine-issue-034-june-2008 127/206
page 142www.3dcreativemag.com Issue 034 June 2008
Making OfFord Mustang Fastback ‘65
the interior. Most of the objects and elements
of the model were mesh smoothed, and I used
symmetry for most of the elements of the car,
with some exceptions for a few of the interiorelements.
For the body of the car, I started with a plane
from the side and worked my way from there
(Fig.04), always checking my reference images
(I think there were about 400 in total!). My
approach was incremental; making a basic
model (Fig.05) and then adding details. After
nishing the basic body I moved on to the tyres
(Fig.06), which I modelled separately (startingwith a part of a cylinder for the rim, and an array
of tyre segments with a bend modier applied
to them for the tyre), and then merged into the
scene. Then I added the side vents and the front
and rear bumpers (Fig.07). The front and rear
lights followed (Fig.08), which I modelled from
a box and then applied extrude, insert, connect
etc. In Fig.09 you can see the rear emblem,
along with the front and side emblems, which
were made using a basic mesh from Max, with
some features of the emblems added in ZBrush.
At this point I added the underside for the main
body and I also started to add details to the
body and doors, and to the exterior of the car in
general (Fig.10).

8/10/2019 3DCreative Magazine Issue 034 June 2008
http://slidepdf.com/reader/full/3dcreative-magazine-issue-034-june-2008 128/206
page 143www.3dcreativemag.com Issue 034 June 2008
Ford Mustang Fastback ‘65 Making Of
The interior was fun to do, and having the
different reference images really helped me to
understand how the interior actually looked. I
approached the modelling of the interior in thesame way as the exterior, starting with the
basic object and then adding details like nuts,
gauges, rims, interior lights, vents, brakes, a
radio, and so on, and adding pieces like the
wheel, main console and the door’s interior.
Because the seats are the dominant element
of the interior, I decided to detail them a little
in ZBrush. Finally, I added some brakes,
suspension and some general elements under
the car, and then made some tweaks here andthere. I was then nished with the modelling at
last (Fig.11 and Fig.12).
LightingFor the lighting I used a basic setup of three
V-Ray lights, two plane lights and a dome light
(Fig.13). I used a circular environment because
it offers good bouncing light and can be very
useful for certain camera angles!
The settings that I usually use for previewing the
different light conditions, reections and textures
can be seen in Fig.14 and Fig.15. I usually use
an irradiance map for the primary GI, and light
cache for the secondary bounces. Using low
settings for the light cache, and high or medium

8/10/2019 3DCreative Magazine Issue 034 June 2008
http://slidepdf.com/reader/full/3dcreative-magazine-issue-034-june-2008 129/206
page 144www.3dcreativemag.com Issue 034 June 2008
Making OfFord Mustang Fastback ‘65
presets for the irradiance map, usually yields a quick and decent preview.
This method is good for static images, but not so good for animations
because of the ickering that might appear in at surfaces due to the way
the irradiance map works.
TexturingThe texturing part was interesting because I had the opportunity to use
the UVLayout program to do the UVs. I like this program a lot because it
is easy to use (although at rst it might seem a bit weird), and has a lot of
great features. I strongly recommend you try it out!
Most of the objects in the scene have normal V-Ray textures, and the
different texture maps that I used were edited in Photoshop. I used plane,
box and cylinder UV-mappings. The seats, were exported into ZBrush fordetailing, piece by piece.
I had to export the mesh from Max as an .obj le to import it into
UVLayout. I edited the UVs, exported the model to an .obj, imported it into
ZBrush and, after putting in some folds, I nally exported the model backto 3ds Max with the appropriate normal maps. The texturing was not that
special on the seats; I used the normal maps from ZBrush and normal
mapped horses (Fig.16), which I took from a reference photo and created
a normal map with CrazyBump. I was planning to use a texture map for
the seats, but after some test renderings I realised that the differences
between using a texture map and just using a diffuse colour were close to
none.
Rendering
Rendering was a pretty straightforward process. The important thing tonote here is that in V-Ray gamma correction is useful because of the
way that V-Ray outputs images in non RGB colour. For this project I
used these settings (Fig.18) for the colour correction. For most projects,
however, a colour correction of 2.2 in the colour mapping rollout should
do, or setting the colour correction curve like this should x it equally as
well (Fig.19).
The hard part was nding a good camera angle. After spending some time
going around the scene I found some camera angles that I liked, but the
ones from Fig.20 and Fig.21 are my favourites. After I found the camera
angles that I wanted to render, I just pumped up some settings in V-Ray
and set up the anti-aliasing and lter settings (Fig.22). And that was it!
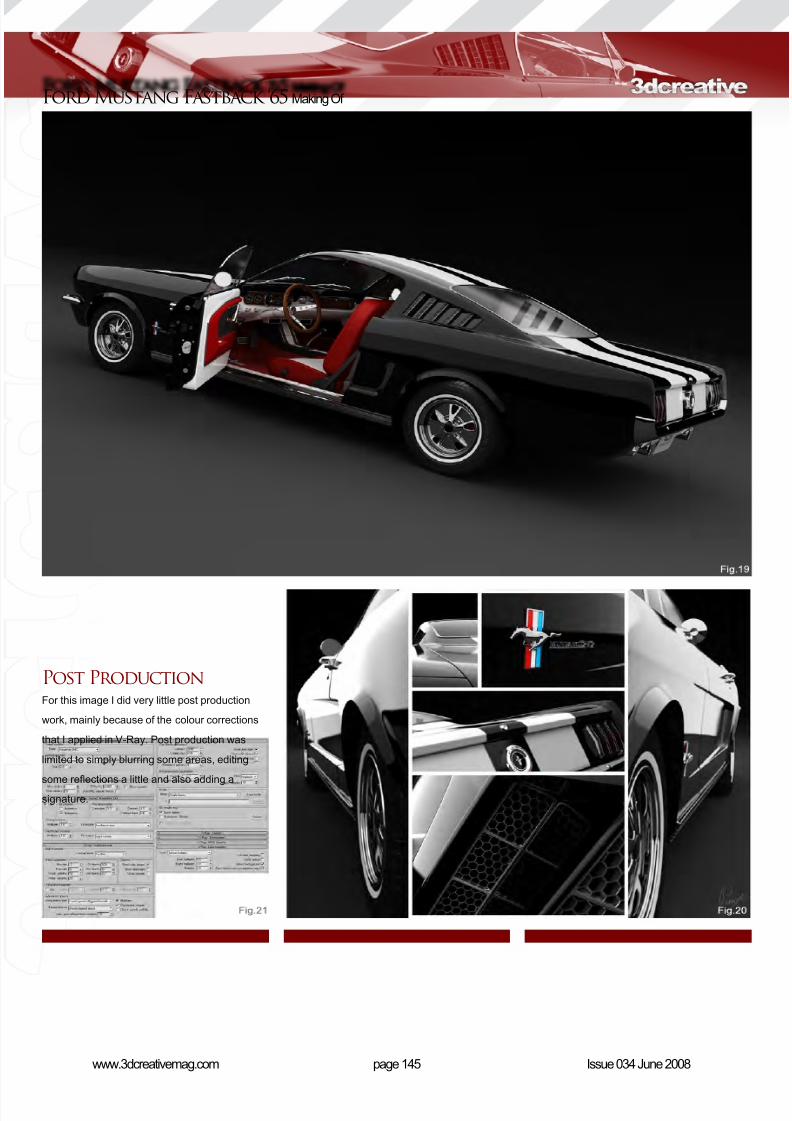
8/10/2019 3DCreative Magazine Issue 034 June 2008
http://slidepdf.com/reader/full/3dcreative-magazine-issue-034-june-2008 130/206
page 145www.3dcreativemag.com Issue 034 June 2008
Ford Mustang Fastback ‘65 Making Of
Post ProductionFor this image I did very little post production
work, mainly because of the colour corrections
that I applied in V-Ray. Post production was
limited to simply blurring some areas, editing
some reections a little and also adding asignature.

8/10/2019 3DCreative Magazine Issue 034 June 2008
http://slidepdf.com/reader/full/3dcreative-magazine-issue-034-june-2008 131/206
To nish, I would like to say that I really loved
working on this model, and hope that you have
enjoyed this “Making Of”. Thank you for taking
the time to read it.
Pâşlea PaulFor more about this artist please contact
them at:

8/10/2019 3DCreative Magazine Issue 034 June 2008
http://slidepdf.com/reader/full/3dcreative-magazine-issue-034-june-2008 132/206

8/10/2019 3DCreative Magazine Issue 034 June 2008
http://slidepdf.com/reader/full/3dcreative-magazine-issue-034-june-2008 133/206
page 148www.3dcreativemag.com Issue 034 June 2008
Making OfFord Mustang Fastback ‘65

8/10/2019 3DCreative Magazine Issue 034 June 2008
http://slidepdf.com/reader/full/3dcreative-magazine-issue-034-june-2008 134/206
Read how Guido Zatti used 3ds
Max and ZBrush to create his
image Surprise!
“I prefer an environment tobe rich in details, instead of a classic, clean, 3D interior.I looked for references for
bathrooms and tiles and as I was able to find ones
that I was happy with, Ichose to model them rather
than use a simple bump ordisplacement map. This gaveme better control over the
reflections. . ”
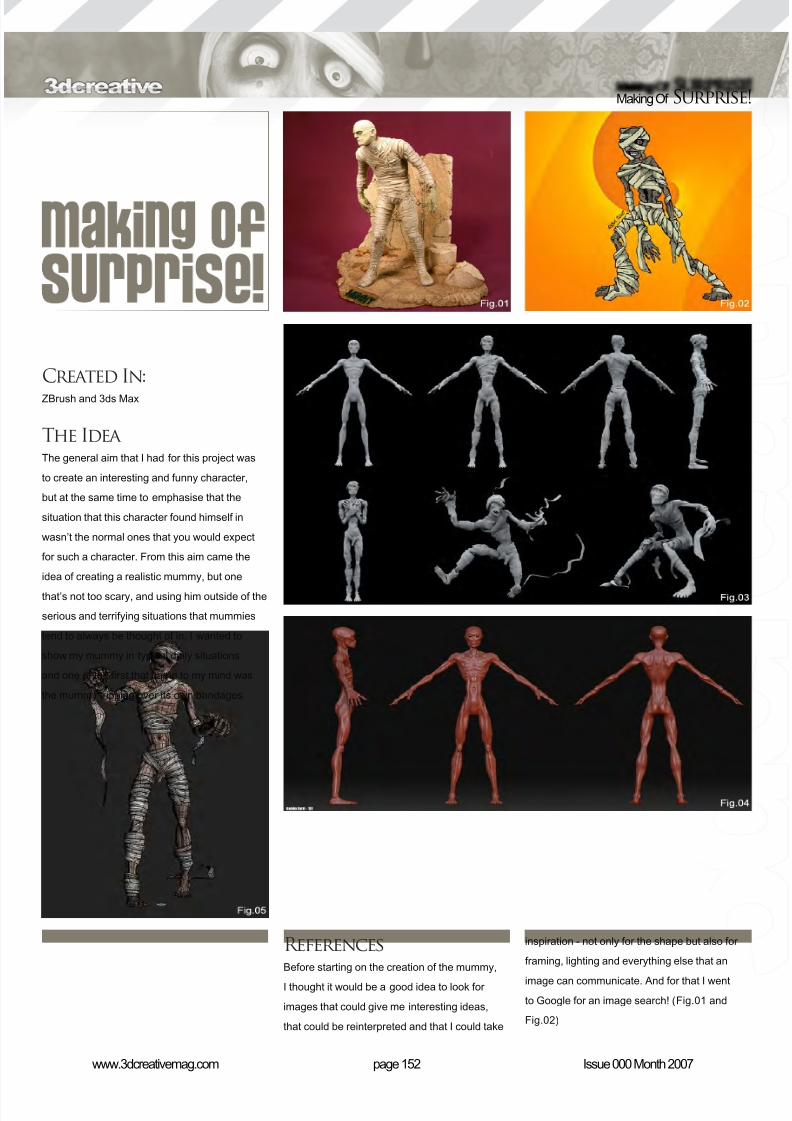
8/10/2019 3DCreative Magazine Issue 034 June 2008
http://slidepdf.com/reader/full/3dcreative-magazine-issue-034-june-2008 135/206
page 152www.3dcreativemag.com Issue 000 Month 2007
Making Of Surprise!
References
Before starting on the creation of the mummy,
I thought it would be a good idea to look for
images that could give me interesting ideas,
that could be reinterpreted and that I could take
inspiration - not only for the shape but also for
framing, lighting and everything else that an
image can communicate. And for that I went
to Google for an image search! (Fig.01 and
Fig.02)
Created In:ZBrush and 3ds Max
The Idea The general aim that I had for this project was
to create an interesting and funny character,
but at the same time to emphasise that the
situation that this character found himself in
wasn’t the normal ones that you would expect
for such a character. From this aim came the
idea of creating a realistic mummy, but one
that’s not too scary, and using him outside of the
serious and terrifying situations that mummies
tend to always be thought of in. I wanted to
show my mummy in typical daily situations
and one of the rst that came to my mind was
the mummy tripping over its own bandages.

8/10/2019 3DCreative Magazine Issue 034 June 2008
http://slidepdf.com/reader/full/3dcreative-magazine-issue-034-june-2008 136/206
page 153www.3dcreativemag.com Issue 000 Month 2007
Surprise! Making Of
ModellingFor the modelling I started with very simple
forms and added the details later on. Usually I’ll
start with a cube or from a single face in order to
create the base geometry with as few polygons
as possible. In this way you can keep the mesh
of the model in order (Fig.03 and Fig.04).
Little by little, I was working towards a low poly
humanoid gure. I then had to dene the points
at which it was going to be deformed, once it
had been rigged. For this, the edge loops are
very important (for example: in order to arrange
an elbow to react correctly at every point once
it has been bent). Another very important thing
is that you have to maintain your model as “all
quads”, meaning that all of the polygons of the
model have to have four sides. This is useful
for the better handling of the rig and for a better
compatibility between the various sculpting
programs.
Once I had nished my model I exported it as an
.obj le so that I could handle it in ZBrush, and
so I could paint all the veins and muscles and all
those other things that would be very difcult to
create in polygons.
After getting to the level I desired, I then
exported a displacement map and applied it
to the mesh which I had modelled earlier. In
this way you can obtain a light model in the
rigging and animation phase, but at the same
time you can get a very high detailed render.
Another advantage is that you can modify it very
easily with the photo editing programme of your
choice.
Rigging As far as the rig was concerned, I used biped by
Max, which is really good for humanoid forms.
The big difculty was creating the bends in
such a way that they could follow the model
without going crazy. Therefore, in the rig, I had
to spend a lot of time weighing all the single
unmanageable vertexes, using lots of skin
morphs to handle difcult situations (Fig.05).
TexturingThanks to Unwrap (which is made to manage
the sculpting programme), I changed to a
photo editing programme to paint the textures
that I needed, at the same time always being
in Multiply to correctly follow the shape of the
model which had been developed (Fig.06).
Useful textures are: “diffuse”, “specular”, “bump”
and the one obtained from the sculpting of the
“displacement”. The “diffuse” is the level that
is going to draw the skin of the character; the
“specular” is useful to dene the points in which
the shader of the model will reect more or less,
based on a grey scale – even if one sometimes
uses a lightly blue-tinted gradation to give a
major reection effect. The “bump” is the map
which forms, always with a W/B scale, a little
roughness on the shader, which was very useful
in order for me to give the impression of skin
that was aged.
Shader The shader of the skin was realised by trying to
maintain certain features, like the dryness of the
mummy’s skin, but also the funny and cartoon-
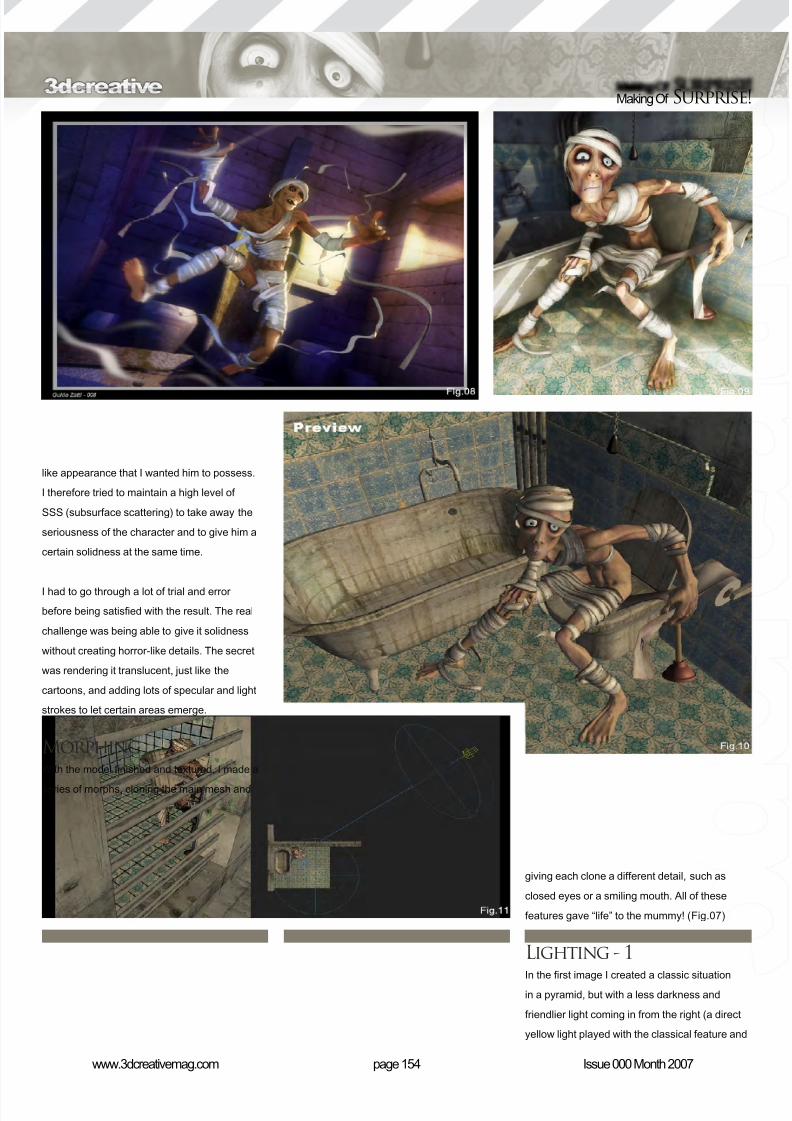
8/10/2019 3DCreative Magazine Issue 034 June 2008
http://slidepdf.com/reader/full/3dcreative-magazine-issue-034-june-2008 137/206

8/10/2019 3DCreative Magazine Issue 034 June 2008
http://slidepdf.com/reader/full/3dcreative-magazine-issue-034-june-2008 138/206
page 155www.3dcreativemag.com Issue 000 Month 2007
Surprise! Making Of
the less well-lit area was blue). Of course, I also
tried to give the entire scene an orange tone
in order to communicate some cheerfulness
through the situation (Fig.08 and Fig.09).
Sitting & FramingIn the second image I wanted to create another
“impossible” situation! I wanted to show an
embarrassed mummy in the bathroom as if
being spied on by a person at the door, which is
why I used a wide-angle framed shot.
Fortunately, the rig managed very well, even in
this scene in which the model tended to haveproblems with the pelvis and legs in particular.
I think it is very important to try to avoid
symmetry. The eyes have to be able to roam
around the scene, always nding new things
(like the crooked feet or his bent back) (Fig.10).
Lighting - 2I put some planks in front of the light coming
into the bathroom as I wanted to break the light
up to create a shadowed effect and create amore interesting composition. I also added a
blue light, with decay activated, to light up just
a point and not the entire area (which was very
difcult!) I then added more brightness close
to the observer, just to create a snapshot-type
effect (Fig.11).

8/10/2019 3DCreative Magazine Issue 034 June 2008
http://slidepdf.com/reader/full/3dcreative-magazine-issue-034-june-2008 139/206
page 156www.3dcreativemag.com Issue 000 Month 2007
Making Of Surprise!
EnvironmentI prefer an environment to be r ich in details,
instead of a classic, clean 3D interior. I looked
for references for bathrooms and tiles and as
I was able to nd ones that I was happy with, I
chose to model them rather than use a simple
bump or displacement map. This gave me better
control over the reections.
Also, in this case, I wanted to take a tile away
or dirty another one with various textures, so
that I didn’t end up with too much symmetry (as
explained before). I later added some water, just
to have more reections and strokes of light.
Render I did the render in many steps, starting with a
beauty pass of the environment. Next came
a beauty pass of the mummy, then ambient
occlusion, specular, Z-depth (to simulate the
depth of eld), and then many further steps in
which I stressed or decreased reections and
strokes of light.
The ambient occlusion was very useful in the
environment and was vital to the character
because it stressed the model and created
all the little shadowed areas which would get
lost in the main context. I used a 2000 x 1600
resolution but, thanks to the various phases,
every step was shorter than ve minutes to
render (Fig.12, Fig.13, Fig.14, Fig.15, Fig.16
and Fig.17).
Compositing
After all the rendering it was time to start
compositing the image with photo editing
programmes, such as Photoshop, unifying all
the levels and weighing them out as I liked.
The ambient occlusion had to be rendered in
Multiply, and I kept it to a percentage of 60% so
as not to weigh the shadows down too much.
I then duplicated the beauty pass and inserted
it blurred in Screen mode, distressing it a little
to light up some areas up in order to give a
“burned lm” effect (Fig.18).
The compositing can change an image very
deeply, and it’s up to every single person to use
it in the best possible way!

8/10/2019 3DCreative Magazine Issue 034 June 2008
http://slidepdf.com/reader/full/3dcreative-magazine-issue-034-june-2008 140/206
I nished by nalising the image in Photoshop,
trying to x any minor problems and stressing
the parts that I wanted the viewer to focus on.
About the Author:Guido Zatti was born in Treviso on the 29th of
August 1978. He currently lives in Parma, where
he works for TaxFree Film (www.taxfreelm.it),
a company that specialises in commercial 3D for
national and international television. He is also a
Moderator of Treddi.com
Guido ZattiFor more from this artist visit:
http://www.guidozatti.com
Or contact:

8/10/2019 3DCreative Magazine Issue 034 June 2008
http://slidepdf.com/reader/full/3dcreative-magazine-issue-034-june-2008 141/206
The series will cover an in-depth and comprehensive guide to
modelling the amazing Bugatti Veyron car, from start to nish.
We will focus on the key techniques and stages involved in
building the chassis, as well as details such as the windows,
lights, vents, petrol caps, engine parts and so on. The series
will then move on to creating the wheels, including tyres
and hubcaps, before going on to building and incorporating
an interior, namely the dashboard and seating. This will be
followed by a section on creating and applying materials for
the numerous parts of the car, such as the paint work, chrome,
rubber and glass, before concluding with a tutorial devoted to
setting the scene for a nished render. The nal part will cover
the importance of a good lighting rig and light parameters, as
well as the importance of a camera and the integral part that the
rendering settings play in showcasing the model for a portfolio.
This series aims to offer a comprehensive guide for creating a
nished car to people who are new to this type of exercise, but
is not suitable for beginners who are not familiar with using 3D
software. The tutorials do not detail every single step of adding
individual edge loops and vertices, but they do endeavour to
outline each important stage and explain the crucial techniques
necessary to following the exercise.
The schedule is as follows:
Issue 029 January 2008
Modelling the Chassis - Basics
Issue 031 March 2008Modelling the Chassis - Details
Issue 032 April 2008
Wheels, Tyres & Rims
Issue 033 May 2008
Interior
Issue 034 June 2008
The Materials & Finishes
Issue 035 July 2008
Lighting Set up & Render
Enjoy ...
Bugatti Veyron car modelling series
www.the-blueprints.com
Blueprints are available here:
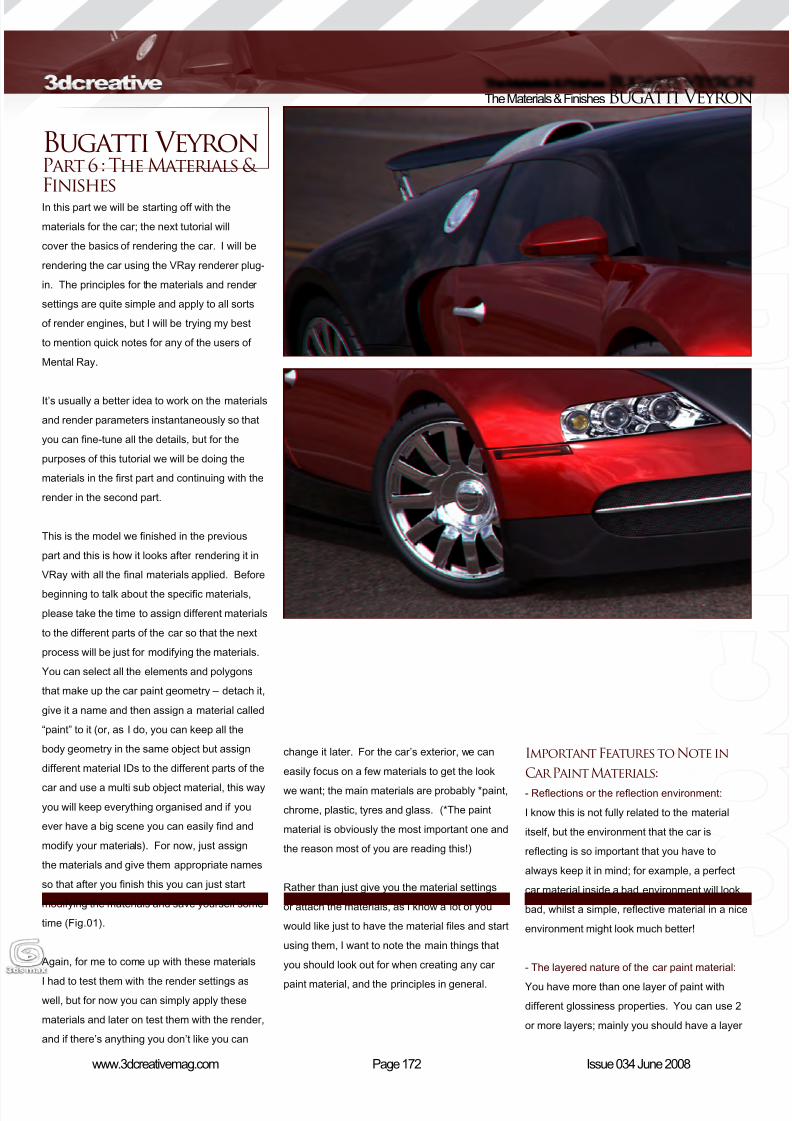
8/10/2019 3DCreative Magazine Issue 034 June 2008
http://slidepdf.com/reader/full/3dcreative-magazine-issue-034-june-2008 142/206
Page 172www.3dcreativemag.com Issue 034 June 2008
The Materials & Finishes Bugatti Veyron
change it later. For the car’s exterior, we can
easily focus on a few materials to get the look
we want; the main materials are probably *paint,
chrome, plastic, tyres and glass. (*The paint
material is obviously the most important one and
the reason most of you are reading this!)
Rather than just give you the material settings
or attach the materials, as I know a lot of you
would like just to have the material les and start
using them, I want to note the main things that
you should look out for when creating any car
paint material, and the principles in general.
Important Features to Note in
Car Paint Materials:
- Reections or the reection environment:
I know this is not fully related to the material
itself, but the environment that the car is
reecting is so important that you have to
always keep it in mind; for example, a perfect
car material inside a bad environment will look
bad, whilst a simple, reective material in a nice
environment might look much better!
- The layered nature of the car paint material:
You have more than one layer of paint with
different glossiness properties. You can use 2
or more layers; mainly you should have a layer
Bugatti Veyron Part 6 : The Materials &
FinishesIn this part we will be starting off with the
materials for the car; the next tutorial will
cover the basics of rendering the car. I will be
rendering the car using the VRay renderer plug-
in. The principles for the materials and render
settings are quite simple and apply to all sorts
of render engines, but I will be trying my best
to mention quick notes for any of the users of
Mental Ray.
It’s usually a better idea to work on the materials
and render parameters instantaneously so that
you can ne-tune all the details, but for the
purposes of this tutorial we will be doing the
materials in the rst part and continuing with the
render in the second part.
This is the model we nished in the previous
part and this is how it looks after rendering it in
VRay with all the nal materials applied. Before
beginning to talk about the specic materials,
please take the time to assign different materials
to the different parts of the car so that the next
process will be just for modifying the materials.
You can select all the elements and polygons
that make up the car paint geometry – detach it,
give it a name and then assign a material called
“paint” to it (or, as I do, you can keep all the
body geometry in the same object but assign
different material IDs to the different parts of the
car and use a multi sub object material, this way
you will keep everything organised and if you
ever have a big scene you can easily nd and
modify your materials). For now, just assign
the materials and give them appropriate names
so that after you nish this you can just start
modifying the materials and save yourself some
time (Fig.01).
Again, for me to come up with these materials
I had to test them with the render settings as
well, but for now you can simply apply these
materials and later on test them with the render,
and if there’s anything you don’t like you can

8/10/2019 3DCreative Magazine Issue 034 June 2008
http://slidepdf.com/reader/full/3dcreative-magazine-issue-034-june-2008 143/206
Page 173www.3dcreativemag.com Issue 034 June 2008
Bugatti Veyron The Materials & Finishes
Fig 01
Fig 02
Fig 03
reecting shiny reections (clear reections
which aren’t blurred with a glossiness value of 1,
or very close to 1), and another layer reecting
some blurred reections or diffuse reections
(with glossiness less than 1) (Fig.02).
- The fresnel nature of reections:
You can observe the difference when
looking at Fig.03: all car paints, and actually
a lot of different materials, have the same
characteristics.
- Paint speckle:
We will not cover this one in the tutorial so
that we don’t over-complicate things, but when
looking at car paints very closely you will notice
tiny paint speckles. You can add these by
using a subtle bump map. A handy trick in
VRay would also be to lower the settings of the
reection glossiness subdivs, which makes the
reections a bit distorted and speckled-like, and
you get faster render times as well! However,
it’s not exactly accurate and it doesn’t work out
the way you want it to every time, so I wouldn’t
exactly recommend it, but it’s good to know.
Here are the material settings I used for this
render; sometimes I even add more layers to
the material, but I just want to cover the basics
for now. You can modify things as you go, I
just want to emphasise that you need at least 2
layers which reect things differently. It’s really
very simple, just create 2 materials: one which
reects almost perfect reections and another
which reects things blurred, and try to combine
them together any way you like (Fig.04).
If you were doing the material in Mental Ray you
can simply use its standard car paint material –
the settings are straight forward.
Chrome Material
The chrome material main recipe is very simple
as well: a black material (no diffuse colour)
which reects everything (100% reective), so
it’s almost like a mirror. Many of you may be
wondering since it’s so simple, why sometimes
when you use it, it doesn’t look so chrome-like...

8/10/2019 3DCreative Magazine Issue 034 June 2008
http://slidepdf.com/reader/full/3dcreative-magazine-issue-034-june-2008 144/206
Page 174www.3dcreativemag.com Issue 034 June 2008
The Materials & Finishes Bugatti Veyron
Well, the reason is that, as in most reective
material cases, it is the reection environment.
If you put a chrome ball in a dark environment it
will of course reect the dark environment and
will look dull and boring. Put the same material
in an HDRI environment, which shows the sky at
day time, and it will look very much like chrome,
since our perception and memory of a chrome
material is similar to it.
A very good resource which I encourage you to
check is Neil Blevins’ website – check his CG
education section and the tutorials he has, as
he has an amazing way of explaining the details
and theories behind some of the phenomena we
observe. His website is www.neilblevins.com –
please do visit it (Thanks Neil!).
Just to note: chrome materials, or materials that
look very similar to chrome, might be slightly
different sometimes. You can try making the
material diffuse colour slightly greyish and
reduce the reectivity; if it’s not polished then
you can try to make its reection blurred or add
a subtle bump map, or maybe a fresnel map in
the reection slot with a very small effect. Just
look at the references you have for the material
you are creating and try to replicate its qualities.
In general, most of the time, for doing chrome or
similar materials you can get away with a black
material and full reectivity. For Mental Ray or
the standard Max materials you can just use a
raytrace material with the same qualities: black
diffuse, 100% reectivity (Fig.05).
Of course, plastic and rubber materials vary a
lot and not all plastics are exactly the same,
but the differences in the material properties
between them isn’t always that huge. You can
sometimes give a huge variance by simply
playing with the values of reectivity and
glossiness. As you can see here, I used very
simple settings, but they were enough to get
the look I wanted. For Mental Ray you can test
using the arch and design materials, or you can
use one of the ready templates or simply use a
standard material with some specular highlights
on it (Fig.06).
Fig 04
Fig 05
Fig 06

8/10/2019 3DCreative Magazine Issue 034 June 2008
http://slidepdf.com/reader/full/3dcreative-magazine-issue-034-june-2008 145/206
Page 175www.3dcreativemag.com Issue 034 June 2008
Bugatti Veyron The Materials & Finishes
The glass material can be done in many ways –
again, the details and rules for it are very simple
and you just need a refractive (transparent
material) with some reectivity. If you are using
Mental Ray or the standard material you can
just use a standard material with transparency
value (just play with the spinner of the opacity),
or raytrace materials with the same simple
qualities: transparency with a bit of reection.
You can use the arch and design materials for
Mental Ray, but unfortunately explaining all of
the exact properties of the Mental Ray arch and
design materials would need another tutorial,
so for getting the most part out of them you can
use the templates and see the difference and
variation between different templates. You can
also observe how the settings of the arch and
design materials resemble, in one sense, the
VRay materials, and how the main properties of
glossiness and reectivity determine how your
material looks (Fig.07).
For the tyre, it’s not very hard – same as
everything else. The only thing to remember
here is that, although tyres seem to be at, they
aren’t quite at and they do reect. A clean tyre
might even look close to a shiny plastic material
in some cases, but most of the time you’ll want
to avoid that, so just give it a little reectivity and
make it very diffused (meaning that you’ll make
the glossiness value low so that the reection is
very blurred so that you won’t even notice it).
It’s essential to add a bump map as well,
to show the details. You can experiment
with using the bump map you created in the
reection slot, or the glossiness map slot, and
see how it affects the reections. For Mental
Ray or a Max standard render just use a
standard material with a texture for the diffuse
and a bump map; in the reection map put a
falloff map with fresnel and raytrace in the white
map slot, but make sure it’s reecting very little
and that you have an appropriate bump because
you don’t want the wheel reecting off as plastic.
To make the reections a bit blurry in Max
standard materials you can always experiment
by adding a noise map to the bump slot, but it’s
Fig 07
Fig 08
Fig 09

8/10/2019 3DCreative Magazine Issue 034 June 2008
http://slidepdf.com/reader/full/3dcreative-magazine-issue-034-june-2008 146/206
Page 176www.3dcreativemag.com Issue 034 June 2008
The Materials & Finishes Bugatti Veyron
not too easy to get nicely blurred reections in
Max scanline renderer, so it’s not a bad idea to
try out either Mental Ray or VRay (Fig.08 and
Fig.09).
For the rims, you can use the same material for
the chrome, except that it’s better to give it some
sort of a grainy map in the reection, glossiness,
and maybe bump slots as well, just to make it
look more detailed. For the diffuse map you
can try to put any map that you think can give
it some variance – maybe a falloff map with
a perpendicular/parallel type can do the trick,
or anything that you think might give it some
variance (Fig.10).
I create different materials quite often because,
in reality, rims can have a lot of different
materials and nishings. I sometimes composite
materials and mix 2 different materials together.
There are no correct material settings, just test
and see if it looks right in the scene you have.
I know you might have expected long material
trees with complicated maps linked together
for every material in the car in this tutorial part,
but the truth is that you can achieve quite a
lot with simple settings, like glossiness and
reectivity. Once you have the basics correct
you can move on and complicate your material
if you absolutely need to, but if you can get your
render looking nice with a simple material – why
not?
This is the render of the car in VRay after
applying these materials (Fig.11).
Bugatti Veyron Part 6 : The Materials &Finishes
Tutorial by:
Ali IsmailFor more from this artist visit:
www.aliismail.com
Or contact them:
Fig 10
Fig 11

8/10/2019 3DCreative Magazine Issue 034 June 2008
http://slidepdf.com/reader/full/3dcreative-magazine-issue-034-june-2008 147/206
/issue_034_jun_2008The series will cover an in-depth and comprehensive guide to
modelling the amazing Bugatti Veyron car, from start to nish,
and will focus on the key techniques and stages involved in
building the chassis, as well as details such as the windows,
lights, vents, petrol caps, engine parts and so on. We will then
move on to creating the wheels, including tyres and hubcaps,
before going on to building and incorporating an interior, namely
the dashboard and seating. The series will proceed with a
section on creating and applying materials for the numerous
parts of the car, such as the paint work, chrome, rubber and
glass, before concluding with a tutorial devoted to setting
the scene for a nished render. The nal part will cover the
importance of a good lighting rig and light parameters, as well
as the importance of a camera and the integral part that the
rendering settings play in showcasing the model for a portfolio.
This series aims to show a comprehensive guide to creating
a nished car for people new to this type of exercise, but is
not suitable for beginners who are not familiar with using 3D
software. The tutorials do not detail every single step of adding
individual edge loops and vertices, but does endeavour to
outline each important stage and explain the crucial techniques
necessary to following the exercise.
The schedule is as follows:
Issue 029 January 2008
Modelling the Chassis - Basics
Issue 031 March 2008Modelling the Chassis - Details
Issue 031 March 2008
Lights, Radiator Grill & Vents
Issue 032 April 2008
Wheels, Tyres & Rims
Issue 033 May 2008
Interior
Issue 034 June 2008
The Materials & Finishes
Issue 035 July 2008
Lighting Set up & Render
Enjoy ...
Bugatti Veyron car modelling series
www.the-blueprints.com
Blueprints available here:
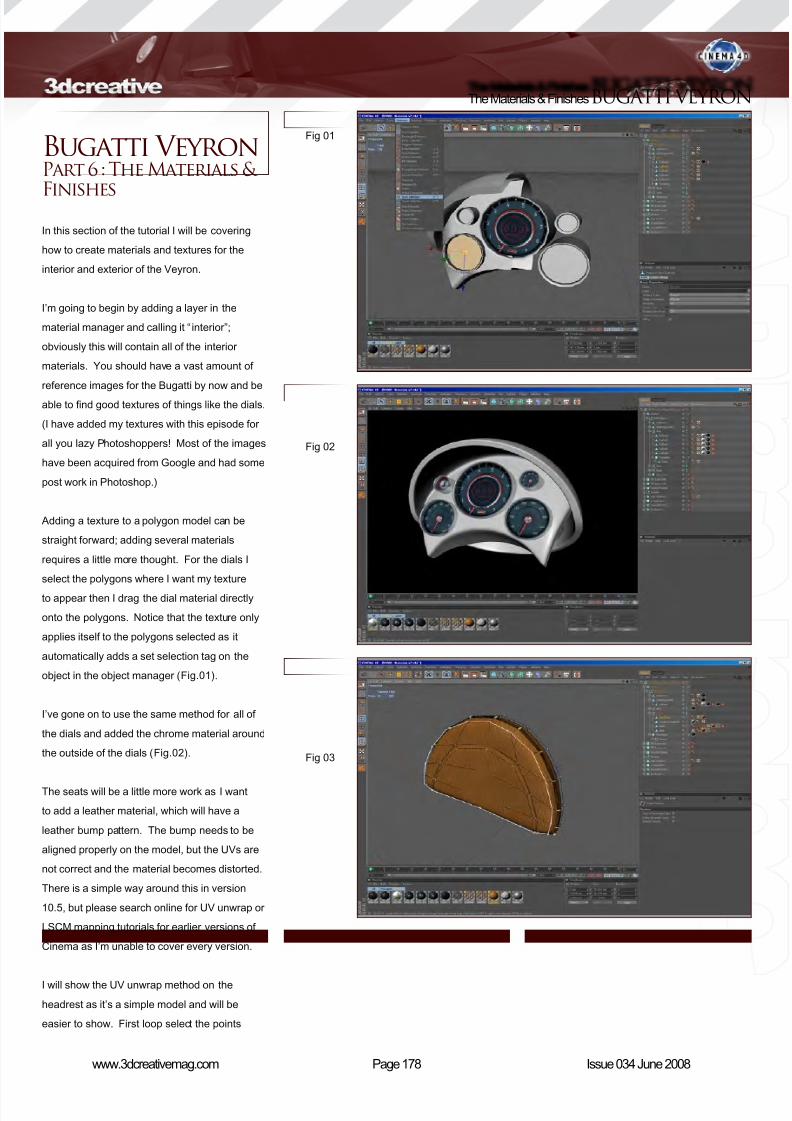
8/10/2019 3DCreative Magazine Issue 034 June 2008
http://slidepdf.com/reader/full/3dcreative-magazine-issue-034-june-2008 148/206
Page 178www.3dcreativemag.com Issue 034 June 2008
The Materials & FinishesBUGATTI VEYRON
Fig 01
Fig 02
Fig 03
Bugatti Veyron Part 6 : The Materials &
Finishes
In this section of the tutorial I will be covering
how to create materials and textures for the
interior and exterior of the Veyron.
I’m going to begin by adding a layer in the
material manager and calling it “ interior”;
obviously this will contain all of the interior
materials. You should have a vast amount of
reference images for the Bugatti by now and be
able to nd good textures of things like the dials.
(I have added my textures with this episode for
all you lazy Photoshoppers! Most of the images
have been acquired from Google and had some
post work in Photoshop.)
Adding a texture to a polygon model can be
straight forward; adding several materials
requires a little more thought. For the dials I
select the polygons where I want my texture
to appear then I drag the dial material directly
onto the polygons. Notice that the texture only
applies itself to the polygons selected as it
automatically adds a set selection tag on the
object in the object manager (Fig.01).
I’ve gone on to use the same method for all of
the dials and added the chrome material around
the outside of the dials (Fig.02).
The seats will be a little more work as I want
to add a leather material, which will have a
leather bump pattern. The bump needs to be
aligned properly on the model, but the UVs are
not correct and the material becomes distorted.
There is a simple way around this in version
10.5, but please search online for UV unwrap or
LSCM mapping tutorials for earlier versions of
Cinema as I’m unable to cover every version.
I will show the UV unwrap method on the
headrest as it’s a simple model and will be
easier to show. First loop select the points

8/10/2019 3DCreative Magazine Issue 034 June 2008
http://slidepdf.com/reader/full/3dcreative-magazine-issue-034-june-2008 149/206
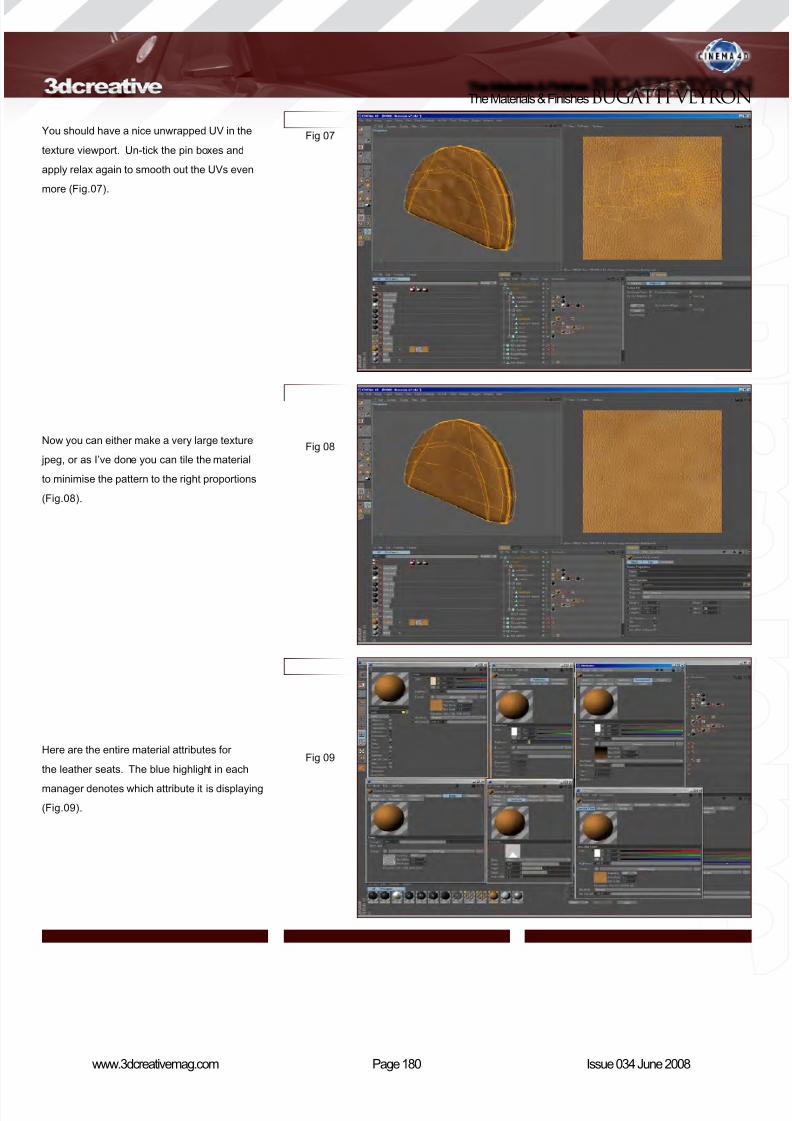
8/10/2019 3DCreative Magazine Issue 034 June 2008
http://slidepdf.com/reader/full/3dcreative-magazine-issue-034-june-2008 150/206
Page 180www.3dcreativemag.com Issue 034 June 2008
The Materials & FinishesBUGATTI VEYRON
You should have a nice unwrapped UV in the
texture viewport. Un-tick the pin boxes and
apply relax again to smooth out the UVs even
more (Fig.07).
Now you can either make a very large texture
jpeg, or as I’ve done you can tile the material
to minimise the pattern to the right proportions
(Fig.08).
Here are the entire material attributes for
the leather seats. The blue highlight in each
manager denotes which attribute it is displaying
(Fig.09).
Fig 07
Fig 08
Fig 09

8/10/2019 3DCreative Magazine Issue 034 June 2008
http://slidepdf.com/reader/full/3dcreative-magazine-issue-034-june-2008 151/206
Page 181www.3dcreativemag.com Issue 034 June 2008
BUGATTI VEYRON The Materials & Finishes
I have used the same method of unwrapping
the UVs as the headrest and I have added
additional details. There are ne grooves and
the Bugatti Veyron symbol on the back of the
seat is in the same leather nish. I have created
this by simply making a few lines in Photoshop
and adding the emblem in the centre. You
must add a little Gaussian blur to soften the
bump map to make it look realistic. I have
used the same texture in the alpha channel and
applied the material with a at projection. The
material is a copy of the leather material with
the additional bump and alpha channel amends
(Fig.10).
Hopefully your seat should look something like
this (Fig.11).
I’ve decided I want the dashboard and interior
panels to be black premium leather, which I’ve
referenced from a photograph of a Veyron. The
Veyron has two different materials in the dash;
one is soft and with low reection and the other
is glossy with a high reection. Both are shown
in Fig.12 and Fig.13.
Fig 10
Fig 11
Fig 12

8/10/2019 3DCreative Magazine Issue 034 June 2008
http://slidepdf.com/reader/full/3dcreative-magazine-issue-034-june-2008 152/206
Page 182www.3dcreativemag.com Issue 034 June 2008
The Materials & FinishesBUGATTI VEYRON
Apply the matt black to the interior then select
the polygons shown and drag the shiny black
material onto the polygons. This will give a
great effect when animating as the light will
reect differently across the two materials
(Fig.14).
In my haste I’ve forgotten to model the centre
console (ah well, we all make mistakes). This is
a good opportunity to try and model the console
on your own. I will show you how to create the
brushed pattern for the console by adding a new
Nukei shader to the material manager. Once
the material is created, add it to the console by
set selecting the consoles polygons (Fig.15).
Fig 13
Fig 14
Fig 15

8/10/2019 3DCreative Magazine Issue 034 June 2008
http://slidepdf.com/reader/full/3dcreative-magazine-issue-034-june-2008 153/206
Page 183www.3dcreativemag.com Issue 034 June 2008
BUGATTI VEYRON The Materials & Finishes
For the door I have simply set selected the matt
leather and a newly created chrome material
for the door latch. The chrome is a copy of
the centre console material with the anisotropy
turned off. I have used the same method for all
of the chrome pieces on the steering wheel and
vents (Fig.16).
The interior is now complete so it’s time to move
on to the exterior. First I begin by set selecting
the vents and adding the vent material. The
vent material has an alpha channel so we
will need to place a dark material beneath it,
otherwise it will show the internals of the car.
This dark material with the vent material above
is used in every vent instance (Fig.17).
Here are the attributes of the vent material
(Fig.18).
Fig 16
Fig 17
Fig 18

8/10/2019 3DCreative Magazine Issue 034 June 2008
http://slidepdf.com/reader/full/3dcreative-magazine-issue-034-june-2008 154/206
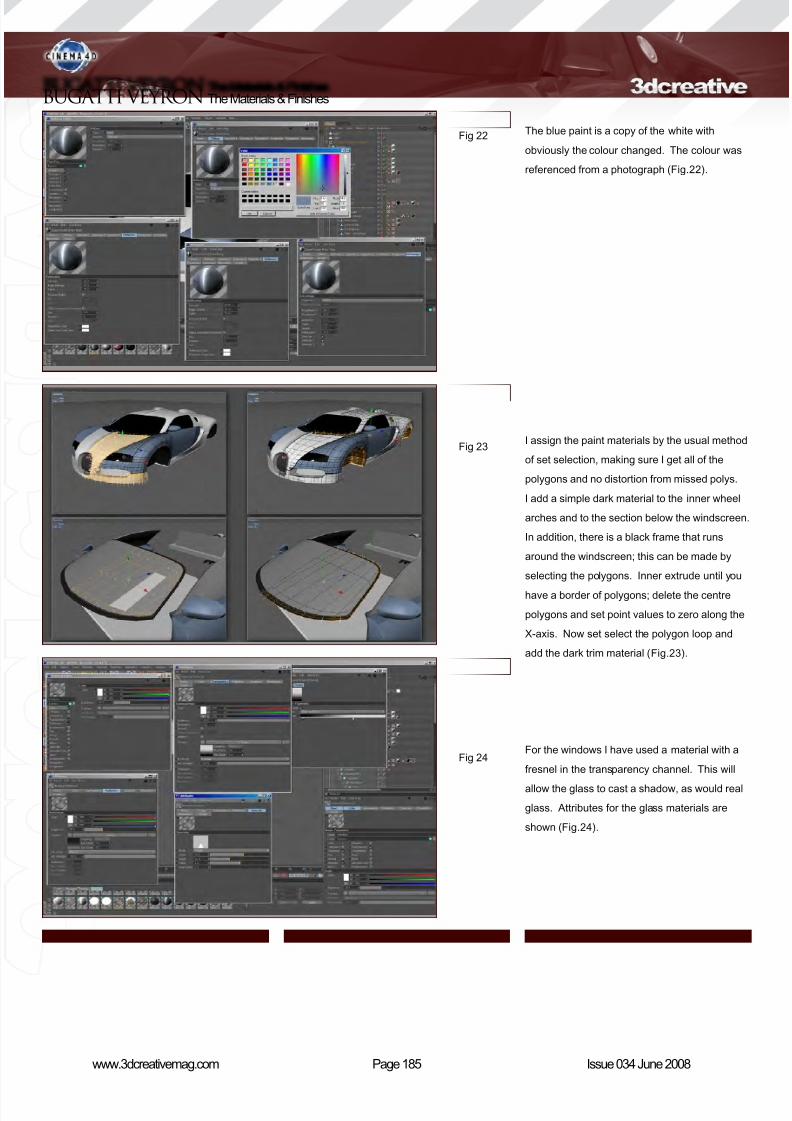
8/10/2019 3DCreative Magazine Issue 034 June 2008
http://slidepdf.com/reader/full/3dcreative-magazine-issue-034-june-2008 155/206
Page 185www.3dcreativemag.com Issue 034 June 2008
BUGATTI VEYRON The Materials & Finishes
The blue paint is a copy of the white with
obviously the colour changed. The colour was
referenced from a photograph (Fig.22).
I assign the paint materials by the usual method
of set selection, making sure I get all of the
polygons and no distortion from missed polys.
I add a simple dark material to the inner wheel
arches and to the section below the windscreen.
In addition, there is a black frame that runs
around the windscreen; this can be made by
selecting the polygons. Inner extrude until you
have a border of polygons; delete the centre
polygons and set point values to zero along the
X-axis. Now set select the polygon loop and
add the dark trim material (Fig.23).
For the windows I have used a material with a
fresnel in the transparency channel. This will
allow the glass to cast a shadow, as would real
glass. Attributes for the glass materials are
shown (Fig.24).
Fig 22
Fig 23
Fig 24

8/10/2019 3DCreative Magazine Issue 034 June 2008
http://slidepdf.com/reader/full/3dcreative-magazine-issue-034-june-2008 156/206

8/10/2019 3DCreative Magazine Issue 034 June 2008
http://slidepdf.com/reader/full/3dcreative-magazine-issue-034-june-2008 157/206
Page 187www.3dcreativemag.com Issue 034 June 2008
BUGATTI VEYRON The Materials & Finishes
Now for the bling wheels and rims. I’ve used
another instance of the shiny metal with some
differences in colour and reection for the rims.
The logo is pillow embossed with a texture, with
considerable blur to achieve the soft emboss.
The base material is applied and the copy
with the logo is applied over the top with a at
projection (Fig.28).
For the callipers I’ve gone for a bright, but
simple, red material (Fig.29).
The brake disc will be difcult to see for 80%
of the shots, but it’s still worth investing the
time in as a close-up might just show the lack
of detail. The material attributes are as shown;
the mapped projection is at and t to object
(Fig.30).
Fig 28
Fig 29
Fig 30

8/10/2019 3DCreative Magazine Issue 034 June 2008
http://slidepdf.com/reader/full/3dcreative-magazine-issue-034-june-2008 158/206
Page 188www.3dcreativemag.com Issue 034 June 2008
The Materials & FinishesBUGATTI VEYRON
The Veyron uses Michelin pilot sports tyres
and I’ve been lucky enough to stumble upon a
high resolution texture for this exact tyre. I’ve
used the graphic as a bump map on a material
with soft specular levels to reproduce a rubber
appearance. There are two rubber materials,
a simple base, and the material with the bump
map set selected to the sidewall of the tyre, as
shown (Fig.31).
Here is how your wheels should look (Fig.32).
The rear light can be difcult as they are very
intricate; I begin by applying the basic glass
material to the rear light glass object and then
hide it from the viewport. Now copy the glass
material and give it a red appearance, as shown
(Fig.33).
Fig 31
Fig 32
Fig 33

8/10/2019 3DCreative Magazine Issue 034 June 2008
http://slidepdf.com/reader/full/3dcreative-magazine-issue-034-june-2008 159/206
Page 189www.3dcreativemag.com Issue 034 June 2008
BUGATTI VEYRON The Materials & Finishes
Now apply the red glass to the selected
polygons (Fig.34).
Apply a glass material to the centre section and
complete the lights by adding chrome to the
centre ring (Fig.35).
For the engine I’ve used different shades of the
chrome material and the white paint to give a
realistic look (Fig.36).
Fig 34
Fig 35
Fig 36

8/10/2019 3DCreative Magazine Issue 034 June 2008
http://slidepdf.com/reader/full/3dcreative-magazine-issue-034-june-2008 160/206
Page 190www.3dcreativemag.com Issue 034 June 2008
The Materials & FinishesBUGATTI VEYRON
For the engine vent I’ve used the same dark
material as a base layer and the vent material
above, making sure to restrict them to the set
polygons. In this case I have changed the vent
holes from the previous tiled version (Fig.37).
Your Bugatti Veyron should now be complete,
minus the centre console if you haven’t done it.
You could possibly add windscreen wipers and
other minor details to really push the realism
(Fig.38 – Fig.39)!
That now completes the materials of the car and
in the next issue we’ll be covering how to add
the Veyron to a backdrop and create a studio
setup.
Bugatti Veyron Part 6 : The Materials &Finishes
Tutorial by:
Emlyn DaviesFor more from this artist visit:
www.cr8ivity.co.uk
Or contact them:
Fig 37
Fig 38
Fig 39
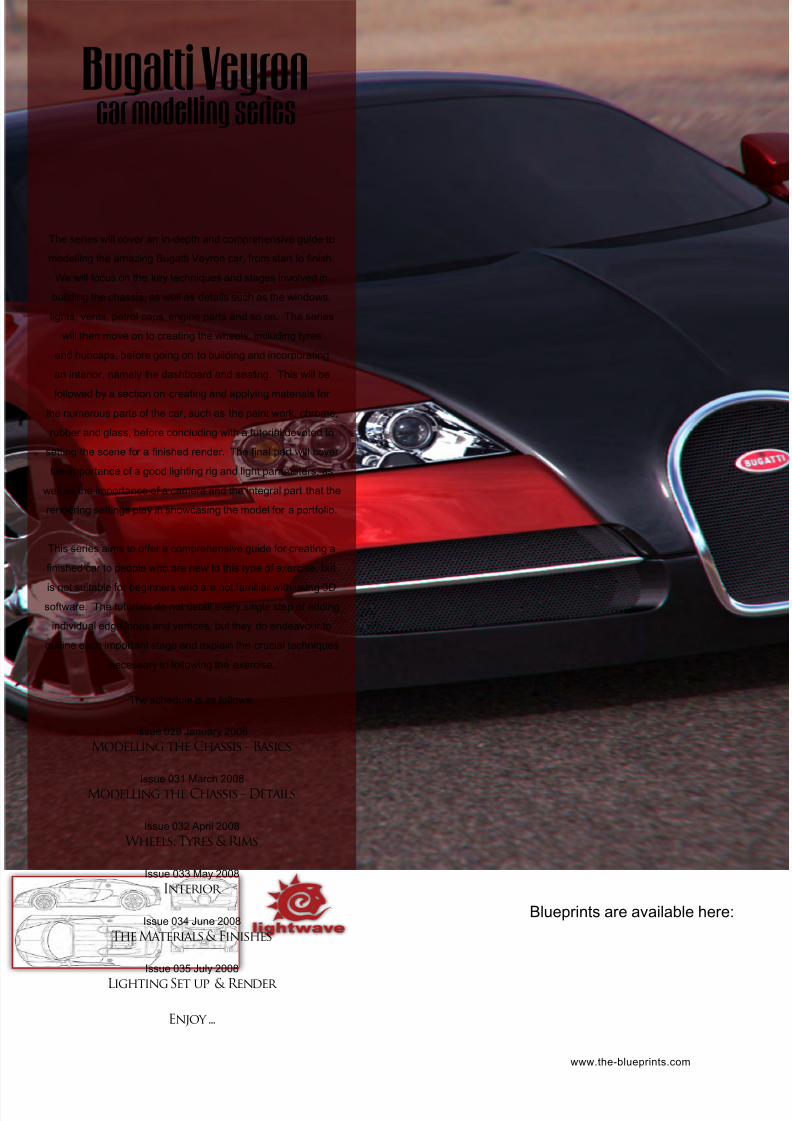
8/10/2019 3DCreative Magazine Issue 034 June 2008
http://slidepdf.com/reader/full/3dcreative-magazine-issue-034-june-2008 161/206
The series will cover an in-depth and comprehensive guide to
modelling the amazing Bugatti Veyron car, from start to nish.
We will focus on the key techniques and stages involved in
building the chassis, as well as details such as the windows,
lights, vents, petrol caps, engine parts and so on. The series
will then move on to creating the wheels, including tyres
and hubcaps, before going on to building and incorporating
an interior, namely the dashboard and seating. This will be
followed by a section on creating and applying materials for
the numerous parts of the car, such as the paint work, chrome,
rubber and glass, before concluding with a tutorial devoted to
setting the scene for a nished render. The nal part will cover
the importance of a good lighting rig and light parameters, as
well as the importance of a camera and the integral part that the
rendering settings play in showcasing the model for a portfolio.
This series aims to offer a comprehensive guide for creating a
nished car to people who are new to this type of exercise, but
is not suitable for beginners who are not familiar with using 3D
software. The tutorials do not detail every single step of adding
individual edge loops and vertices, but they do endeavour to
outline each important stage and explain the crucial techniques
necessary to following the exercise.
The schedule is as follows:
Issue 029 January 2008
Modelling the Chassis - Basics
Issue 031 March 2008Modelling the Chassis - Details
Issue 032 April 2008
Wheels, Tyres & Rims
Issue 033 May 2008
Interior
Issue 034 June 2008
The Materials & Finishes
Issue 035 July 2008
Lighting Set up & Render
Enjoy ...
Bugatti Veyron car modelling series
www.the-blueprints.com
Blueprints are available here:

8/10/2019 3DCreative Magazine Issue 034 June 2008
http://slidepdf.com/reader/full/3dcreative-magazine-issue-034-june-2008 162/206
Page 192www.3dcreativemag.com Issue 034 June 2008
The Materials & Finishes Bugatti Veyron
Fig 01
Fig 02
Fig 03
Bugatti Veyron Part 6 : The Materials &
FinishesHello and welcome to the sixth part of the
Bugatti Veyron series. I hope you have enjoyed
last month’s issue with the 3 parts featured
on modelling (Parts 3, 4 and 5). Since we are
pretty much done with that now, we’ll move on
and assign surfaces and textures to the model.
So, let’s begin!
You’ll probably nd the text part of this month’s
tutorial a bit boring, but we’ll go on and assign
surfaces for each part. Our goal is to end up
with as few surface names as possible, for the
sake of simplicity. Let’s start with the main
body, which is divided into two areas with
different colours. Select the polygons shown
in the image, hit “Q” to bring up the Change
Surface dialogue box, name it “Veyron-body”,
give it a reddish colour, and then hit OK
(Fig.01).
Select the polygons of the other body work, as
shown, and name them “Veyron-body2” in the
Change Surface options. As you have probably
noticed, I’m putting the name of the model in
front of the surface name. This technique is
quite handy if you have several car models in
the same scene and you have a lot of the same
surface names! (Fig.02)
Now select the glass parts and assign the
surface name, “Veyron-glass”, for them, as
you’ve done for the previous two parts. As
you can see, I’m not selecting the whole front
windshield here because we have the shaded
glass at the very front (Fig.03).

8/10/2019 3DCreative Magazine Issue 034 June 2008
http://slidepdf.com/reader/full/3dcreative-magazine-issue-034-june-2008 163/206
Page 193www.3dcreativemag.com Issue 034 June 2008
Bugatti Veyron The Materials & Finishes
Fig 04
Fig 05
Fig 06
For the shaded part of the glass that I just
mentioned, I have given the name “Veyron-
glass_black” (Fig.04).
I initially named the front air duct holes simply
as “black”. Later on though, I gured that these
parts were covered with a metallic grid which
protects it from dirt and such. It is therefore a
good idea to disregard the name shown in the
image and name these parts “Veyron_grid”, or
something similar (Fig.05).
Select all the polygons in the image and name
them “Veyron-_bulb”. Then select the inner
polygons and name them “Veyron-_lens” (“”
stands for front lights) (Fig.06).

8/10/2019 3DCreative Magazine Issue 034 June 2008
http://slidepdf.com/reader/full/3dcreative-magazine-issue-034-june-2008 164/206
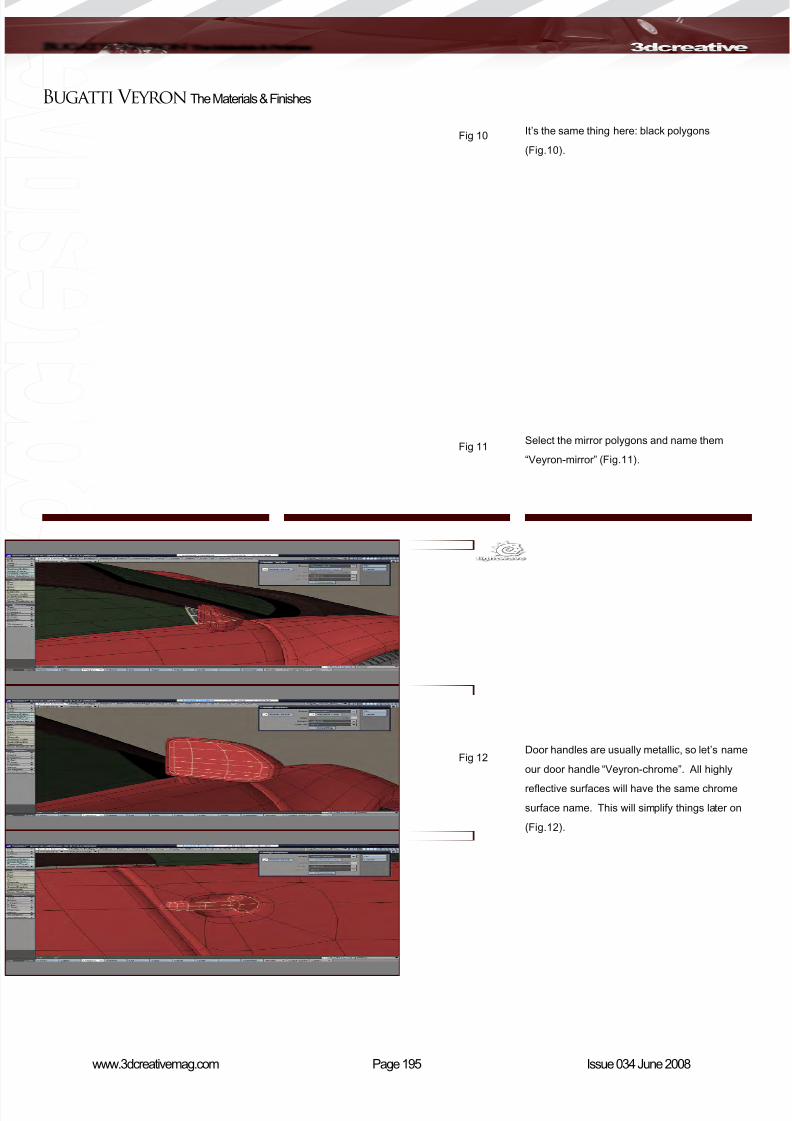
8/10/2019 3DCreative Magazine Issue 034 June 2008
http://slidepdf.com/reader/full/3dcreative-magazine-issue-034-june-2008 165/206
Page 195www.3dcreativemag.com Issue 034 June 2008
Bugatti Veyron The Materials & Finishes
It’s the same thing here: black polygons
(Fig.10).
Select the mirror polygons and name them
“Veyron-mirror” (Fig.11).
Door handles are usually metallic, so let’s name
our door handle “Veyron-chrome”. All highly
reective surfaces will have the same chrome
surface name. This will simplify things later on
(Fig.12).
Fig 10
Fig 11
Fig 12

8/10/2019 3DCreative Magazine Issue 034 June 2008
http://slidepdf.com/reader/full/3dcreative-magazine-issue-034-june-2008 166/206
Page 196www.3dcreativemag.com Issue 034 June 2008
The Materials & Finishes Bugatti Veyron
The fuel cap also has a “chrome” surface
(Fig.13).
As do our rear air ducts (Fig.14).
And the logo at the back of the car (Fig.15).
Fig 13
Fig 14
Fig 15
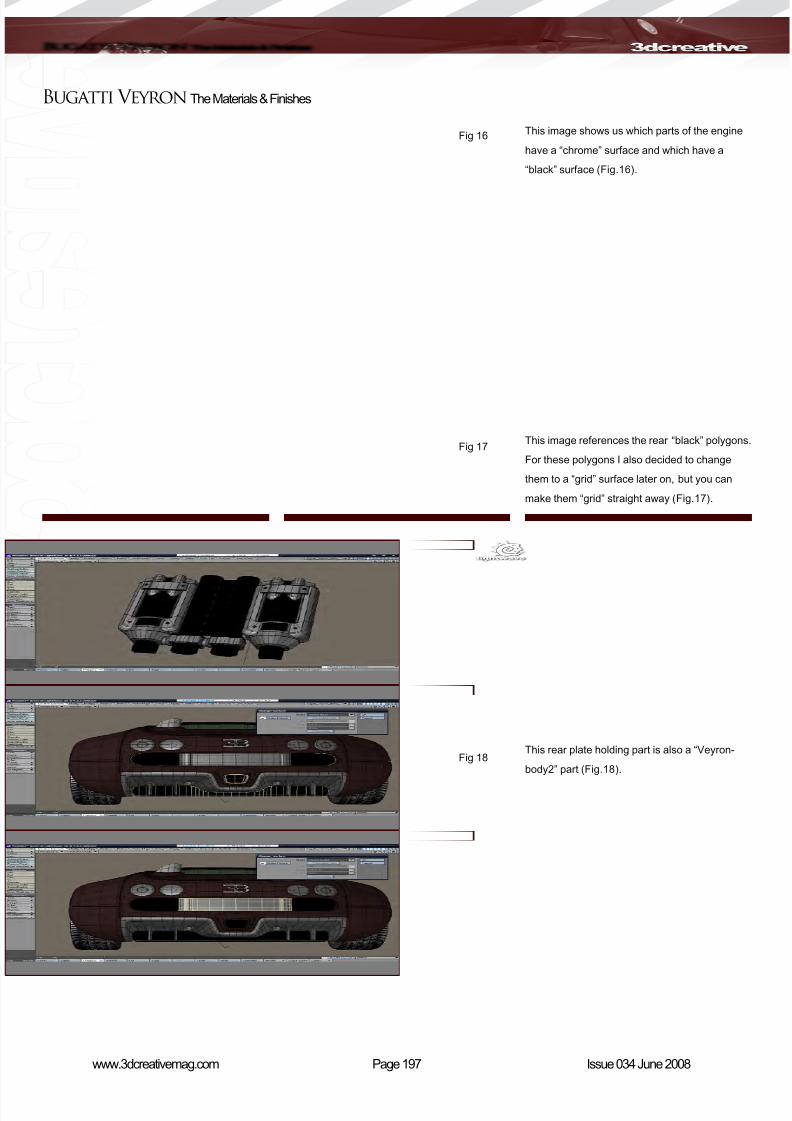
8/10/2019 3DCreative Magazine Issue 034 June 2008
http://slidepdf.com/reader/full/3dcreative-magazine-issue-034-june-2008 167/206
Page 197www.3dcreativemag.com Issue 034 June 2008
Bugatti Veyron The Materials & Finishes
This image shows us which parts of the engine
have a “chrome” surface and which have a
“black” surface (Fig.16).
This image references the rear “black” polygons.
For these polygons I also decided to change
them to a “grid” surface later on, but you can
make them “grid” straight away (Fig.17).
This rear plate holding part is also a “Veyron-
body2” part (Fig.18).
Fig 16
Fig 17
Fig 18

8/10/2019 3DCreative Magazine Issue 034 June 2008
http://slidepdf.com/reader/full/3dcreative-magazine-issue-034-june-2008 168/206
Page 198www.3dcreativemag.com Issue 034 June 2008
The Materials & Finishes Bugatti Veyron
Name the bottom back part with an appropriate
name, such as “Veyron_bottom_black” (Fig.19).
This part of the rear exhaust has a “chrome”
surface (Fig.20).
Similar to the front lights, name the surface
“Veyron-bl_glass” (Fig.21).
Fig 19
Fig 20
Fig 21

8/10/2019 3DCreative Magazine Issue 034 June 2008
http://slidepdf.com/reader/full/3dcreative-magazine-issue-034-june-2008 169/206
Page 199www.3dcreativemag.com Issue 034 June 2008
Bugatti Veyron The Materials & Finishes
This is the area covered by red LED lights
(“Veyron-bl-red_LED”) (Fig.22).
And white LEDs, too (“Veyron-bl-white_LED”)
(Fig.23).
Finally, name the in-between polygons “Veyron-
_mirror”, as they are quite similar to them
(Fig.24).
Fig 22
Fig 23
Fig 24

8/10/2019 3DCreative Magazine Issue 034 June 2008
http://slidepdf.com/reader/full/3dcreative-magazine-issue-034-june-2008 170/206
Page 200www.3dcreativemag.com Issue 034 June 2008
The Materials & Finishes Bugatti Veyron
Give the third brake light the same red LED
surface, as before (Fig.25).
I initially named the rim polygons as “chrome”.
However, later on in the texturing phase
I gured that I wanted to have them less
reectivity, so it wouldn’t be a bad idea to name
them “rims” instead (Fig.26).
Name these polygons “Veyron-discs” (Fig.27).
Fig 25
Fig 26
Fig 27

8/10/2019 3DCreative Magazine Issue 034 June 2008
http://slidepdf.com/reader/full/3dcreative-magazine-issue-034-june-2008 171/206
Page 201www.3dcreativemag.com Issue 034 June 2008
Bugatti Veyron The Materials & Finishes
Give the tyre polygons a name, also (“Veyron-
tyre”) (Fig.28).
Select all the interior polygons and name them
“Veyron-int_leather” (Fig.29).
The steering wheel parts are also made of
leather (Fig.30).
Fig 28
Fig 29
Fig 30
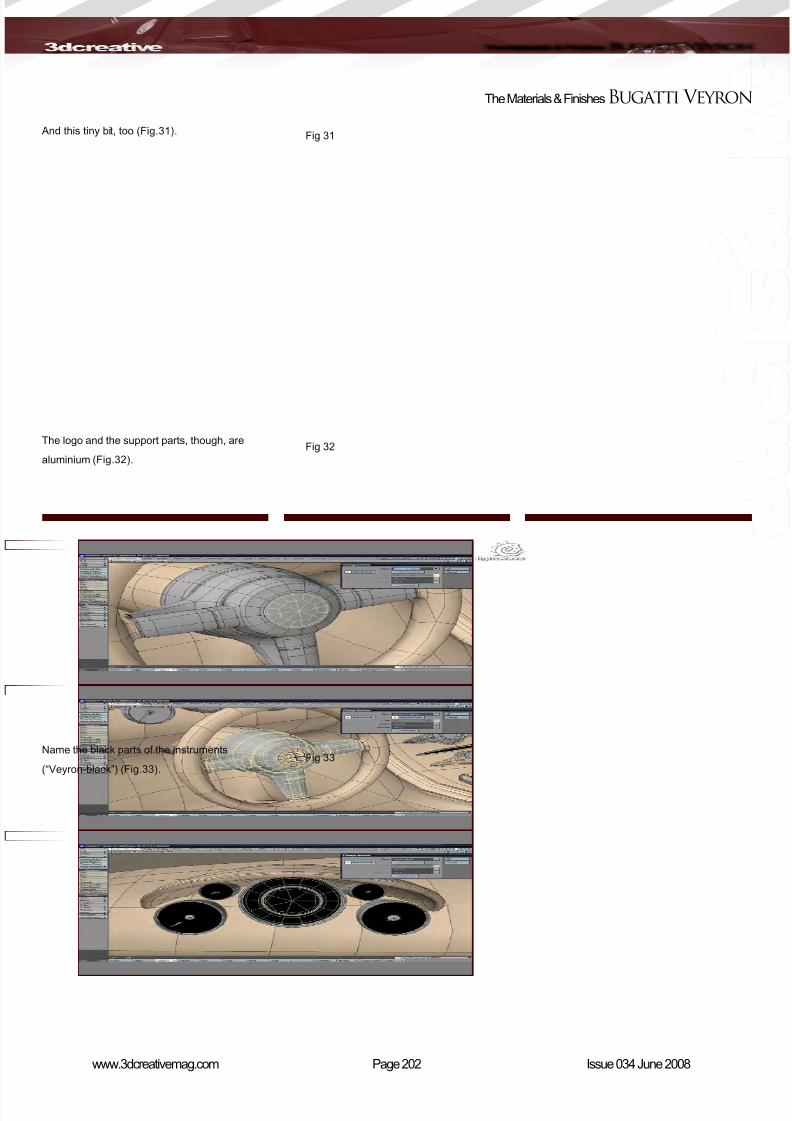
8/10/2019 3DCreative Magazine Issue 034 June 2008
http://slidepdf.com/reader/full/3dcreative-magazine-issue-034-june-2008 172/206
Page 202www.3dcreativemag.com Issue 034 June 2008
The Materials & Finishes Bugatti Veyron
And this tiny bit, too (Fig.31).
The logo and the support parts, though, are
aluminium (Fig.32).
Name the black parts of the instruments
(“Veyron-black”) (Fig.33).
Fig 31
Fig 32
Fig 33

8/10/2019 3DCreative Magazine Issue 034 June 2008
http://slidepdf.com/reader/full/3dcreative-magazine-issue-034-june-2008 173/206
Page 203www.3dcreativemag.com Issue 034 June 2008
Bugatti Veyron The Materials & Finishes
And the aluminium edges (“Veyron-alumin”)
(Fig.34).
Name these polygons “Veyron-aluminum_mid”
(Fig.35).
And the surrounding ones “Veyron-aluminum
rim” (Fig.36).
Fig 34
Fig 35
Fig 36
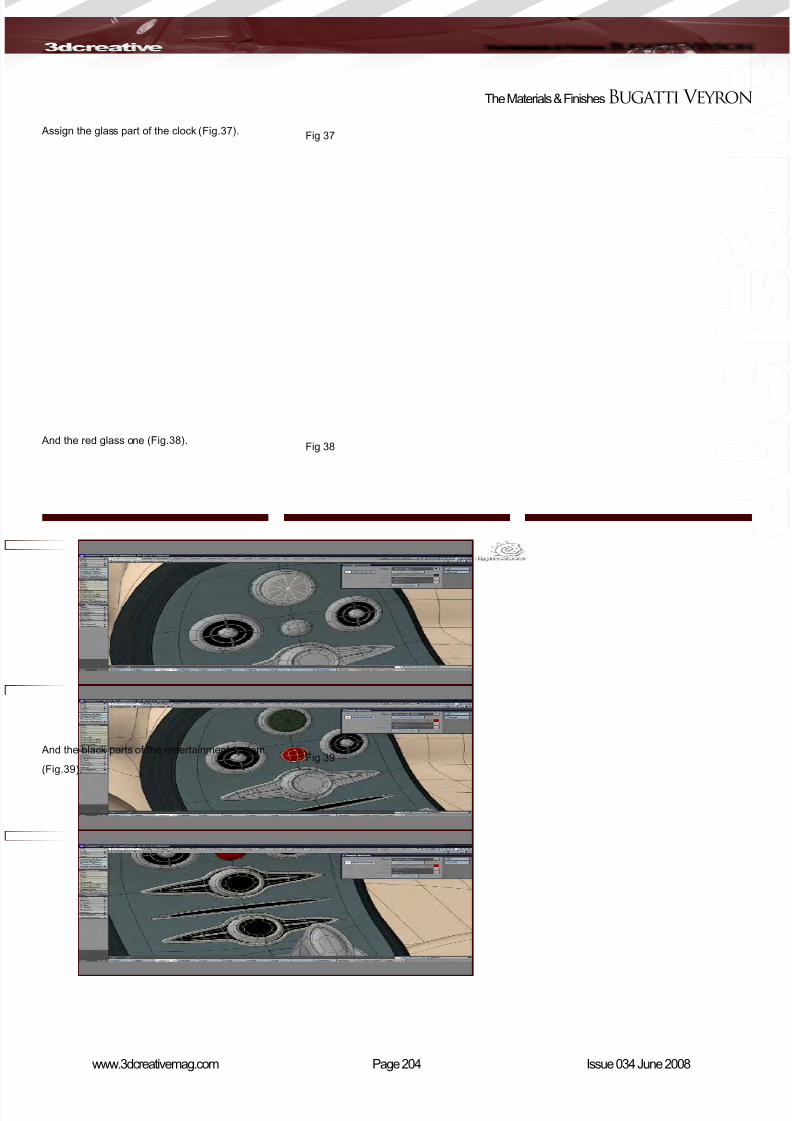
8/10/2019 3DCreative Magazine Issue 034 June 2008
http://slidepdf.com/reader/full/3dcreative-magazine-issue-034-june-2008 174/206
Page 204www.3dcreativemag.com Issue 034 June 2008
The Materials & Finishes Bugatti Veyron
Assign the glass part of the clock (Fig.37).
And the red glass one (Fig.38).
And the black parts of the entertainment system
(Fig.39).
Fig 37
Fig 38
Fig 39

8/10/2019 3DCreative Magazine Issue 034 June 2008
http://slidepdf.com/reader/full/3dcreative-magazine-issue-034-june-2008 175/206
Page 205www.3dcreativemag.com Issue 034 June 2008
Bugatti Veyron The Materials & Finishes
And the leather part of the gear shift (“Veyron-
int_leather”) (Fig.40).
All the other bits are aluminium, as well (Fig.41).
We want a mirror surface for the mirror, here
(Fig.42).
Fig 40
Fig 41
Fig 42

8/10/2019 3DCreative Magazine Issue 034 June 2008
http://slidepdf.com/reader/full/3dcreative-magazine-issue-034-june-2008 176/206
Page 206www.3dcreativemag.com Issue 034 June 2008
The Materials & Finishes Bugatti Veyron
And an aluminium rim for the rim (Fig.43).
For the front logo we can use the “chrome”
surface (Fig.44).
With red dots and the centre part (Fig.45).
Fig 43
Fig 44
Fig 45

8/10/2019 3DCreative Magazine Issue 034 June 2008
http://slidepdf.com/reader/full/3dcreative-magazine-issue-034-june-2008 177/206
Page 207www.3dcreativemag.com Issue 034 June 2008
Bugatti Veyron The Materials & Finishes
Fig 46
Fig 47
Fig 48
We end up with 23 surfaces (plus 2 for the grid
and the rim). Not bad if you know how many
parts there are! (Fig.46).
Assign the UV map for the tyre side (Fig.47).
And for the rim logo, too (Fig.48).
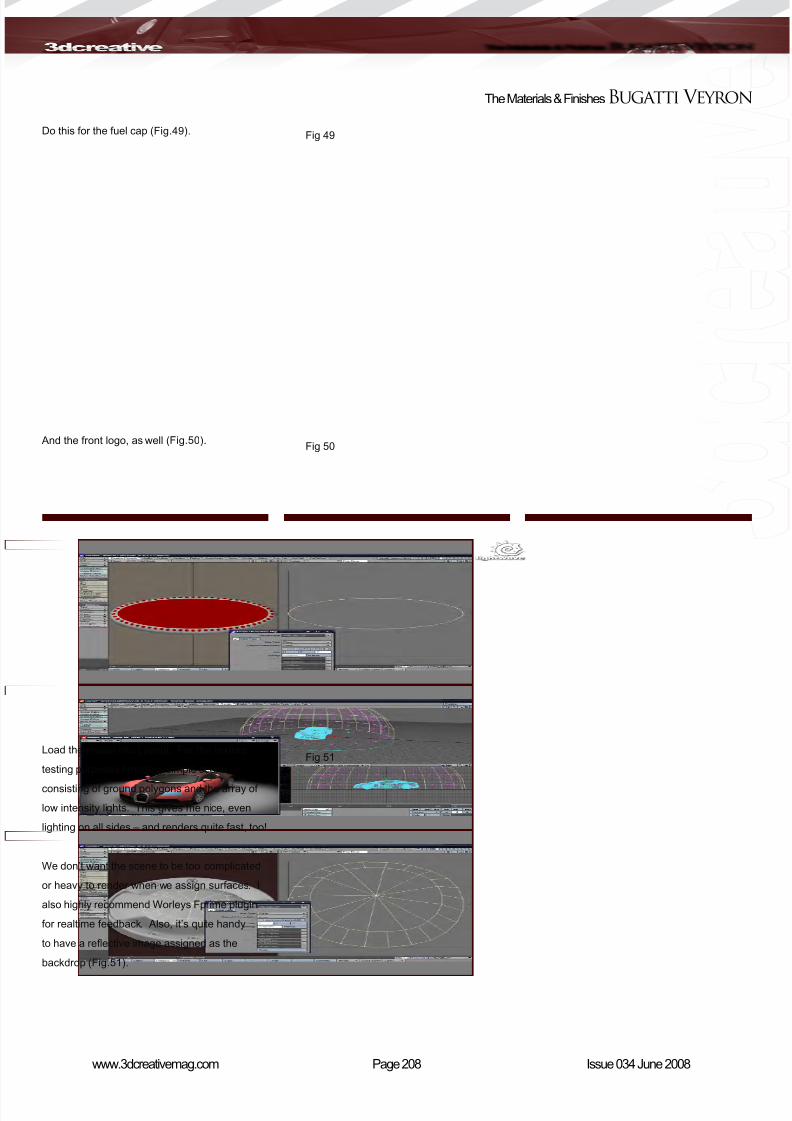
8/10/2019 3DCreative Magazine Issue 034 June 2008
http://slidepdf.com/reader/full/3dcreative-magazine-issue-034-june-2008 178/206
Page 208www.3dcreativemag.com Issue 034 June 2008
The Materials & Finishes Bugatti Veyron
Fig 49
Fig 50
Fig 51
Do this for the fuel cap (Fig.49).
And the front logo, as well (Fig.50).
Load the model into Layout. For the texture
testing purposes I made a simple scene
consisting of ground polygons and the array of
low intensity lights. This gives me nice, even
lighting on all sides – and renders quite fast, too!
We don’t want the scene to be too complicated
or heavy to render when we assign surfaces. I
also highly recommend Worleys Fprime plugin
for realtime feedback. Also, it’s quite handy
to have a reective image assigned as the
backdrop (Fig.51).

8/10/2019 3DCreative Magazine Issue 034 June 2008
http://slidepdf.com/reader/full/3dcreative-magazine-issue-034-june-2008 179/206
Page 209www.3dcreativemag.com Issue 034 June 2008
Bugatti Veyron The Materials & Finishes
Fig 52
Fig 53
Fig 54
We’ll start the texturing with the body surface
now. The essential thing on reective surfaces
is to get the Fresnel effect right. This image
shows the settings I typically use for reective
materials on diffuse and reection channels.
Add a small amount of noise to the body colour
to break it up a bit (Fig.52).
Once you’re done, copy the settings to the
body2 surface and alter the colours (Fig.53).
Copy these settings to the chrome surface and
change the colour of it (Fig.54).

8/10/2019 3DCreative Magazine Issue 034 June 2008
http://slidepdf.com/reader/full/3dcreative-magazine-issue-034-june-2008 180/206
Page 210www.3dcreativemag.com Issue 034 June 2008
The Materials & Finishes Bugatti Veyron
Fig 55
Fig 56
Fig 57
Give the black surface a deep grey colour and a
low diffuse level (Fig.55).
The front light glass has pretty much the same
settings for transparency, following the Fresnel
effect (Fig.56).
Here we have the settings for the front light lens
surface (Fig.57).
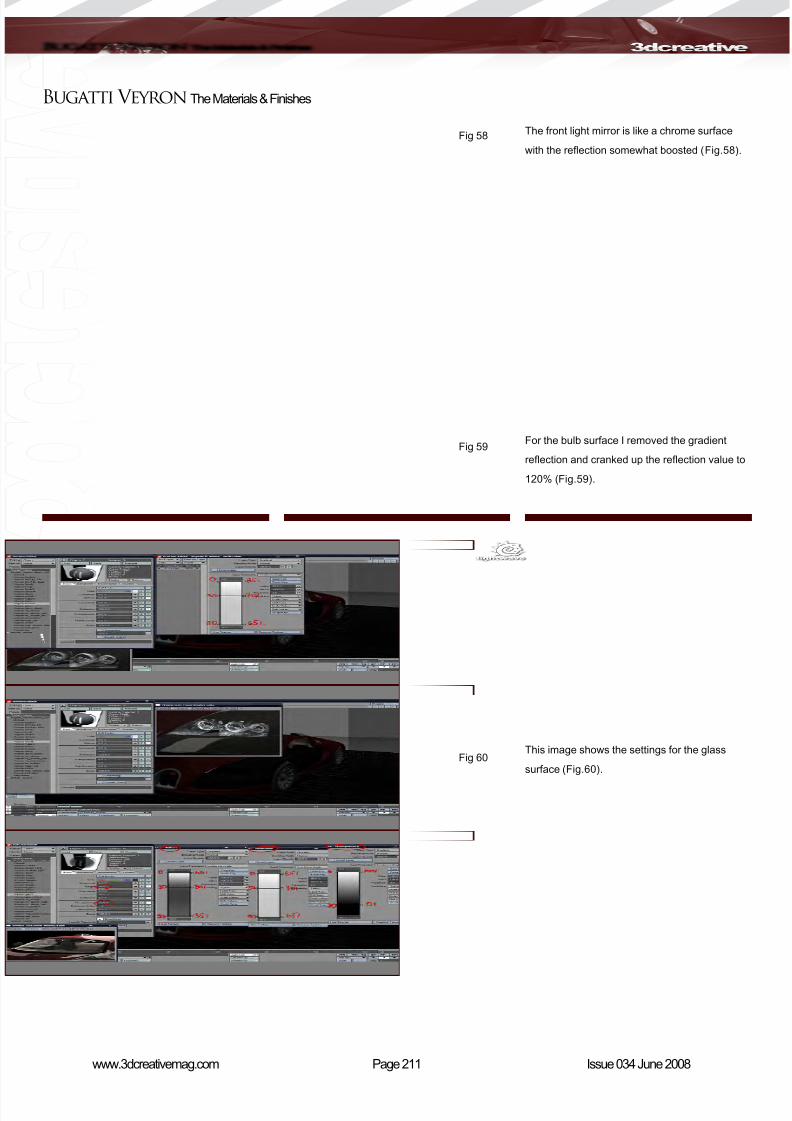
8/10/2019 3DCreative Magazine Issue 034 June 2008
http://slidepdf.com/reader/full/3dcreative-magazine-issue-034-june-2008 181/206
Page 211www.3dcreativemag.com Issue 034 June 2008
Bugatti Veyron The Materials & Finishes
Fig 58
Fig 59
Fig 60
The front light mirror is like a chrome surface
with the reection somewhat boosted (Fig.58).
For the bulb surface I removed the gradient
reection and cranked up the reection value to
120% (Fig.59).
This image shows the settings for the glass
surface (Fig.60).

8/10/2019 3DCreative Magazine Issue 034 June 2008
http://slidepdf.com/reader/full/3dcreative-magazine-issue-034-june-2008 182/206
Page 212www.3dcreativemag.com Issue 034 June 2008
The Materials & Finishes Bugatti Veyron
Fig 61
Fig 62
Fig 63
Glass_black has the same settings, just without
the transparency (Fig.61).
The mirror surface is without anything, except
really high reection (Fig.62).
The back light glass surface has the same
settings as the front light glass (Fig.63).

8/10/2019 3DCreative Magazine Issue 034 June 2008
http://slidepdf.com/reader/full/3dcreative-magazine-issue-034-june-2008 183/206
Page 213www.3dcreativemag.com Issue 034 June 2008
Bugatti Veyron The Materials & Finishes
Fig 64
Fig 65
Fig 66
I used procedurals for the back light LED lights.
I made two procedurals, grid and dots, for the
cross section and LED bulbs (Fig.64).
I applied them on the colour, luminosity and
bump map channels (Fig.65).
Copy the same surface, remove the grid
procedural and make it white for the inner LEDs
(Fig.66).

8/10/2019 3DCreative Magazine Issue 034 June 2008
http://slidepdf.com/reader/full/3dcreative-magazine-issue-034-june-2008 184/206
Page 214www.3dcreativemag.com Issue 034 June 2008
The Materials & Finishes Bugatti Veyron
Fig 67
Fig 68
Fig 69
The rear bottom black surface has the same
settings with the reection lowered (Fig.67).
For the interior leather I used quite simple
settings, as we don’t see any leather details
(Fig.68).
Here we have our interior aluminium settings
(Fig.69).

8/10/2019 3DCreative Magazine Issue 034 June 2008
http://slidepdf.com/reader/full/3dcreative-magazine-issue-034-june-2008 185/206
Page 215www.3dcreativemag.com Issue 034 June 2008
Bugatti Veyron The Materials & Finishes
Fig 70
Fig 71
Fig 72
The middle aluminium part (Fig.70).
And the aluminium rim (Fig.71).
Here are our tyre surface settings (Fig.72).

8/10/2019 3DCreative Magazine Issue 034 June 2008
http://slidepdf.com/reader/full/3dcreative-magazine-issue-034-june-2008 186/206
Page 216www.3dcreativemag.com Issue 034 June 2008
The Materials & Finishes Bugatti Veyron
Fig 73
Fig 74
Fig 75
And here is our rim surface with the EB logo
applied on the colour and bump maps (Fig.73).
Here is our fuel cap with the logo (Fig.74).
And the front logo.
I decided to use planar mapping instead of UV
for the red Bugatti logo (Fig.75).

8/10/2019 3DCreative Magazine Issue 034 June 2008
http://slidepdf.com/reader/full/3dcreative-magazine-issue-034-june-2008 187/206
Page 217www.3dcreativemag.com Issue 034 June 2008
Bugatti Veyron The Materials & Finishes
Fig 76
Fig 77
Finally, for the front grid, I used the photo of
the Veyron’s metallic grid, made it tileable
in Photoshop and then applied it as a colour
(Fig.76).
This nishes the surfacing and texturing part.
In the next (and last) part we are going to drive
our Veyron out of the garage and into a decent
environment. We’ll tackle rendering passes and
compositing in Photoshop. I hope you have
enjoyed this instalment! (Fig.77).
Bugatti Veyron Part 6 : The Materials &Finishes
Tutorial by:
Vojislav MilanovicFor more from this artist visit:
http://www.vojislavmilanovic.com/
Or contact them:
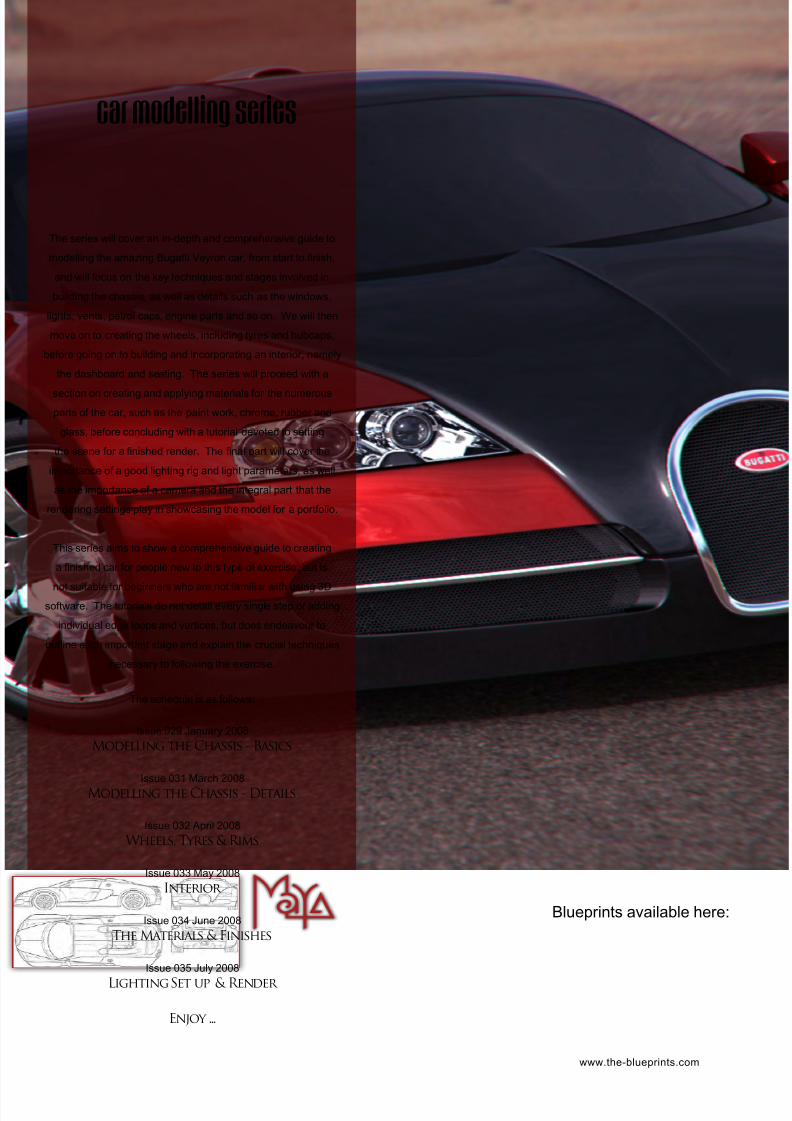
8/10/2019 3DCreative Magazine Issue 034 June 2008
http://slidepdf.com/reader/full/3dcreative-magazine-issue-034-june-2008 188/206
The series will cover an in-depth and comprehensive guide to
modelling the amazing Bugatti Veyron car, from start to nish,
and will focus on the key techniques and stages involved in
building the chassis, as well as details such as the windows,
lights, vents, petrol caps, engine parts and so on. We will then
move on to creating the wheels, including tyres and hubcaps,
before going on to building and incorporating an interior, namely
the dashboard and seating. The series will proceed with a
section on creating and applying materials for the numerous
parts of the car, such as the paint work, chrome, rubber and
glass, before concluding with a tutorial devoted to setting
the scene for a nished render. The nal part will cover the
importance of a good lighting rig and light parameters, as well
as the importance of a camera and the integral part that the
rendering settings play in showcasing the model for a portfolio.
This series aims to show a comprehensive guide to creating
a nished car for people new to this type of exercise, but is
not suitable for beginners who are not familiar with using 3D
software. The tutorials do not detail every single step of adding
individual edge loops and vertices, but does endeavour to
outline each important stage and explain the crucial techniques
necessary to following the exercise.
The schedule is as follows:
Issue 029 January 2008
Modelling the Chassis - Basics
Issue 031 March 2008Modelling the Chassis - Details
Issue 032 April 2008
Wheels, Tyres & Rims
Issue 033 May 2008
Interior
Issue 034 June 2008
The Materials & Finishes
Issue 035 July 2008
Lighting Set up & Render
Enjoy ...
car modelling series
www.the-blueprints.com
Blueprints available here:

8/10/2019 3DCreative Magazine Issue 034 June 2008
http://slidepdf.com/reader/full/3dcreative-magazine-issue-034-june-2008 189/206
Page 220www.3dcreativemag.com Issue 034 June 2008
The Materials & FinishesBugatti Veyron
Fig 01
Fig 02
Fig 03
Bugatti Veyron Part 6 : The Materials &
FinishesWelcome to the materials and nishes section
of this tutorial series. As with the modelling
section, it is essential to gather proper
references for the various materials that we are
going to try to represent. There are a number of
good reference sites that have high resolution
images of cars. One of my personal favourites
is www.seriouswheels.com. As always, rst
hand experience and observation is always
the best and it is always a good exercise to
examine real world materials and consider how
they translate into CG materials. You will need
to know how CG materials work and how the
various properties can be adjusted to create an
approximation of the real life equivalent.
In this tutorial we’ll look at the principle materials
or shaders that are commonly found on cars.
We will create each of these shaders step by
step and create a library of shaders that can
be reused for future car projects. Although this
section covers materials I will be touching on
lighting at the start, as materials are useless
on their own without some form of illumination
to bring them to life. Lighting and materials
work together to further model the car and
communicate form. It is important to use
light and materials appropriately to properly
communicate the shape of the object you are
rendering. A curved panel may seem completely
at if it is shaded and lit badly, and can result in
the image being a failure. Materials obviously
can confuse the shape and result in a poor
understanding of the form.
Before starting out on a project such as this, it
is very important to understand the purpose of
the nal image. Is it a design visualisation? Is
it an advertising image? Is it a photomontage
and needs to match other objects in the scene?
Is it for animation? Each purpose may have a
slightly different approach. Design visualisation
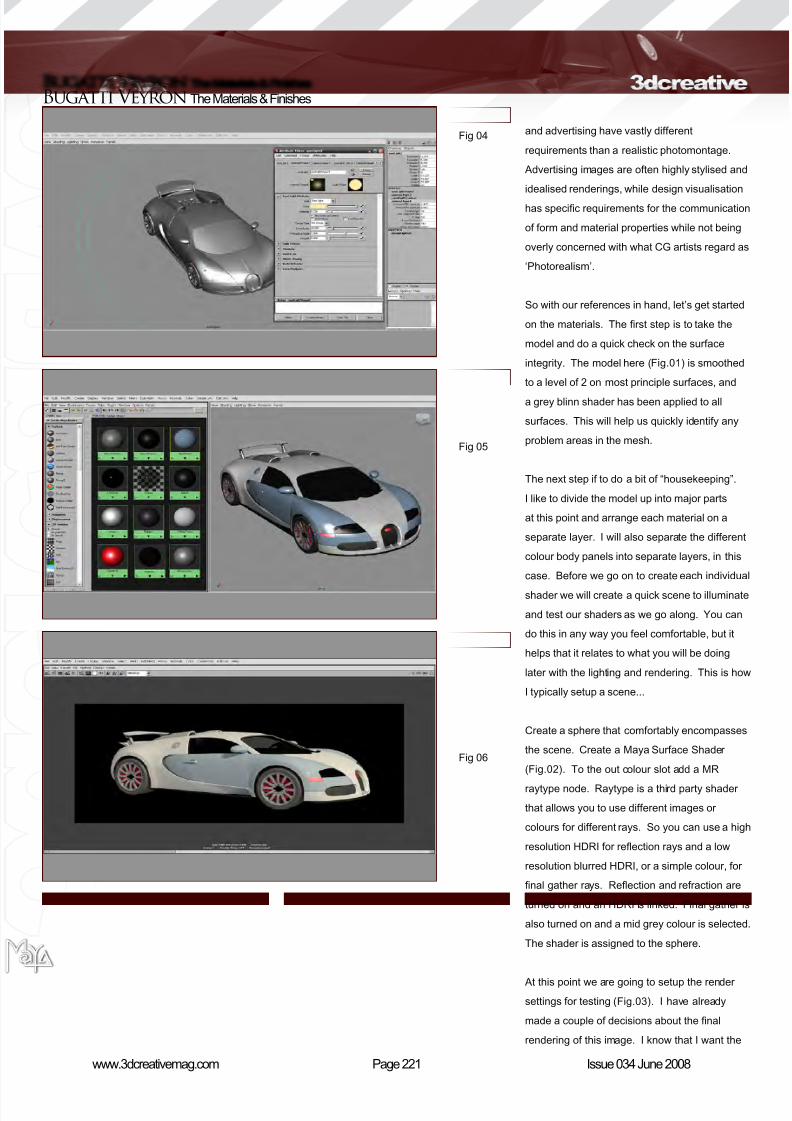
8/10/2019 3DCreative Magazine Issue 034 June 2008
http://slidepdf.com/reader/full/3dcreative-magazine-issue-034-june-2008 190/206
Page 221www.3dcreativemag.com Issue 034 June 2008
Bugatti Veyron The Materials & Finishes
Fig 04
Fig 05
Fig 06
and advertising have vastly different
requirements than a realistic photomontage.
Advertising images are often highly stylised and
idealised renderings, while design visualisation
has specic requirements for the communication
of form and material properties while not being
overly concerned with what CG artists regard as
‘Photorealism’.
So with our references in hand, let’s get started
on the materials. The rst step is to take the
model and do a quick check on the surface
integrity. The model here (Fig.01) is smoothed
to a level of 2 on most principle surfaces, and
a grey blinn shader has been applied to all
surfaces. This will help us quickly identify any
problem areas in the mesh.
The next step if to do a bit of “housekeeping”.
I like to divide the model up into major parts
at this point and arrange each material on a
separate layer. I will also separate the different
colour body panels into separate layers, in this
case. Before we go on to create each individual
shader we will create a quick scene to illuminate
and test our shaders as we go along. You can
do this in any way you feel comfortable, but it
helps that it relates to what you will be doing
later with the lighting and rendering. This is how
I typically setup a scene...
Create a sphere that comfortably encompasses
the scene. Create a Maya Surface Shader
(Fig.02). To the out colour slot add a MR
raytype node. Raytype is a third party shader
that allows you to use different images or
colours for different rays. So you can use a high
resolution HDRI for reection rays and a low
resolution blurred HDRI, or a simple colour, for
nal gather rays. Reection and refraction are
turned on and an HDRI is linked. Final gather is
also turned on and a mid grey colour is selected.
The shader is assigned to the sphere.
At this point we are going to setup the render
settings for testing (Fig.03). I have already
made a couple of decisions about the nal
rendering of this image. I know that I want the

8/10/2019 3DCreative Magazine Issue 034 June 2008
http://slidepdf.com/reader/full/3dcreative-magazine-issue-034-june-2008 191/206
Page 222www.3dcreativemag.com Issue 034 June 2008
The Materials & FinishesBugatti Veyron
colour scheme of the car to be the white and
metallic light blue and the car will be rendered in
bright daylight, and I want a fairly realistic result.
So with that in mind I am going to create a
testing scene. One of the important decisions is
to use a gamma of 2.2, or what is called ‘Linear
Workow’. I am not going into the technicalities
on this subject except for to say that the image
will benet from the additional range of mid-
tones that you get from linear rendering. In
the framebuffer tab of the render settings the
gamma is set to 0.4545 (inverse of 2.2), in
order for MR to produce an image in gamma
2.2. Final gather is turned on and left at default
setting, except for scale which is set to about 0.6
to prevent the ll light becoming too washed out.
Anitaliasing is set to -1 1 to balance quality with
speed for testing.
We can add a simple spot light to the scene as a
key light. The Intensity is set to .75 in this case
and the colour is lightly warm (Fig.04).
To get started we can create a set of blinn
shaders and name them according to the
main materials in the scene. So we create
two body paint shaders, a glass shader, metal
(for the roof intakes, door handles, grill etc.),
alloy wheel shader, rubber tyre, chrome, mesh,
black plastic and a general shader for all the
small parts. The shaders are assigned to the
corresponding surfaces. The individual settings
are not important now and this can be viewed
as a sketch or layout for further development.
The main idea is to have shaders assigned to
everything so that very early in the process you
can get a good idea of how the whole model
is working with regards to colour scheme and
material distribution. You don’t need to worry
about reections initially, so we’ll just start with
them all off (Fig.05).
A quick render in our test environment shows a
good starting point (Fig.06).
To get things started we are going to look rstly
at the two paint shaders. The colour scheme,
as I mentioned, will be gloss white and metallic
Fig 07
Fig 08
Fig 09

8/10/2019 3DCreative Magazine Issue 034 June 2008
http://slidepdf.com/reader/full/3dcreative-magazine-issue-034-june-2008 192/206
Page 223www.3dcreativemag.com Issue 034 June 2008
Bugatti Veyron The Materials & Finishes
light blue. Let’s start with the simpler of the two:
the gloss white paint. In general, I tend to treat
car paint as a layered shader because car paint
is in fact layered. Even in non-metallic paint
there is a base layer of colour with a clear coat
or lacquer layer. However, with simple gloss
paint this is not really necessary and a blinn
shader will do just ne. MR has a built-in paint
shader and also some great shaders that you
can use equally well for this type of project, but
to keep things simple I will be using mainly blinn
shaders in this tutorial.
White paint is sometimes quite hard to get
right because, when using traditional rendering
methods (gamma 1), it gets burned out very
easily. Using linear workow and the extra mid-
tone range it provides should result in a much
more realistic and more controlled look. We
start with the existing blinn already assigned to
the white panels and set the properties, as in
the image (Fig.07).
Then, to the reection slot we add a black-to-
white ramp. Change the ramp interpolation
to exponential (Fig.08) to give a rough
approximation of fresnel falloff. Create a
sampler info node (you can nd this in the
Hypershade under Create Maya Nodes >
General Utilities). Connect samplerinfo.
facingRatio to ramp.vCoord. This adjusts
the level of reection based on the viewing
angle. This is an old trick but we’ll be reusing it
throughout this tutorial so it’s good to know it!
Note: I generally don’t like the fake hotspot that
the non-physical shaders such as Blinn produce,
so I tend to turn the eccentricity down to 0 to
remove that. The specular level and specular
colour are then used to control the level of
proper reectivity.
This is how that shader looks rendered in our
scene (Fig.09).
The blue paint is a little more complex as it is
metallic. In order to achieve this look we are
going to use a layered shader. We are going to
Fig 10
Fig 11
Fig 12

8/10/2019 3DCreative Magazine Issue 034 June 2008
http://slidepdf.com/reader/full/3dcreative-magazine-issue-034-june-2008 193/206
Page 224www.3dcreativemag.com Issue 034 June 2008
The Materials & FinishesBugatti Veyron
build it as it would be applied to a real car, i.e.
a metallic base coat and a lacquer clear coat
layer on top. Since Maya’s native layer shader
is not suitable for using in Mental Ray, we’ll use
the Mix8Layer shader (third party shader by
CTRL). Once the Mix8Layer node is created
we connect it to the BluePaint shader. The
connection is made to the ‘material shader’ slot
of the BluePaint shader SG node, under the
‘mental ray’ tab.
The layered shader (Fig.10) consists of 2
separate shaders. The rst gives the colour and
glossy (blurry) reection of the base layer, and
the second gives the high gloss lacquered layer.
The base shader is the original Blinn shader
(Fig.11) and it is connected to the Mix8Layer
shader in the ‘base colour’ slot. As this is a
metallic shader the diffuse colour is set to a
fairly dark blue with low saturation. The look
of the shader is primarily determined by the
specular colour and glossy reection. The
Specular colour is, therefore, light blue. A ramp
has been connected to the reectivity to give a
small amount of falloff to the shader. A value
of 0.3 (front facing) and 0.6 (glancing) has been
used here, and a sampler info node was added,
as described above. An MIB_glossy_reection
node was added to reection, and under
raytrace options the reection limit was changed
to 0 (this prevents the shader adding its own
raytraced reection). The values changed were:
reection colour – 100% white, reection base
weight – 1, reection edge weight – 0, samples
– 16, and UV spread – 0.15.
The Clearcoat layer (Fig.12) is a Blinn shader
with a black-to-white exponential ramp in the
reectivity slot. Because two reections are
being added on top of each other here, it is
important to balance them so they are not too
washed out. The level of reection is controlled
here using the specular falloff to avoid having to
tweak the ramp. The Clearcoat shader is then
connected to the Layered shader in the Layer 1
‘colour 1’ slot, and the blending mode is set to
add.
Fig 13
Fig 14
Fig 15

8/10/2019 3DCreative Magazine Issue 034 June 2008
http://slidepdf.com/reader/full/3dcreative-magazine-issue-034-june-2008 194/206

8/10/2019 3DCreative Magazine Issue 034 June 2008
http://slidepdf.com/reader/full/3dcreative-magazine-issue-034-june-2008 195/206
Page 226www.3dcreativemag.com Issue 034 June 2008
The Materials & FinishesBugatti Veyron
0, specular falloff of 1 and a reectivity of .95.
This is how the car looks with all the metal parts
added (Fig.17).
For the alloy wheels an MIA shader is also used
(Fig.18). Alloy wheels can be treated like car
paint and can have a clear coat layer applied
if needed. This can be useful if a close-up is
required. In this case I want to have a more
matt look, only a single MIA layer is used. The
hubs have the metal shader from the intakes
applied.
The tyres need a texture and I try to use
photographic textures for tyres wherever
possible. The same texture is used to add some
bump mapping to the tyre (Fig.19).
As the tread detail is modelled (this is really
the best method!) then there is no need to
worry about displacements. The shader has a
MIB_glossy_reection node connected to the
reected colour (as described above). The
reection is set quite low and the UV spread of
the glossy node is set to 0.25 with 2 samples
initially (Fig.20).
The black plastic parts also have a MIA shader
applied. The diffuse colour is set to 0.015 just
to prevent it from looking pure black. The BRDP
value for 0 deg reection is set to 0.6 for some
falloff. Under the advanced tab the specular
balance is set to 0 to prevent any articial
highlight being added.
The shader for the mesh parts is a Blinn
(Fig.21) and has one black and white texture
map connected to transparency and specular
colour. A duplicate of the same map is
connected to bump mapping with a bump depth
of 0.1 and a lter value of 3, to soften the edges.
There is a falloff ramp (as above but values
of 0.3 to 0.7 for the ramp colours) connected
to reectivity and a MIB_glossy_reection
connected to reected colour. It’s a good idea
to reuse existing nodes for these connections if
the values are the same, or similar.
Fig 19
Fig 20
Fig 21

8/10/2019 3DCreative Magazine Issue 034 June 2008
http://slidepdf.com/reader/full/3dcreative-magazine-issue-034-june-2008 196/206
Page 227www.3dcreativemag.com Issue 034 June 2008
Bugatti Veyron The Materials & Finishes
The nal shader to set up is the general
shader, which covers all the small parts such as
indicators, badges, brake lights etc. This is a
Blinn shader (Fig.22) ...
...with a texture map for the various elements
and a falloff map in reectivity (Fig.23).
That wraps up the Materials section of this
tutorial. Join me next time for a look at lighting
and rendering (Fig.24).
Bugatti Veyron Part 6 : The Materials &Finishes
Tutorial by:
Brendan McCaffrey For more from this artist visit:
http://www.bmcaff.com
Or contact them:
Fig 22
Fig 23
Fig 24

8/10/2019 3DCreative Magazine Issue 034 June 2008
http://slidepdf.com/reader/full/3dcreative-magazine-issue-034-june-2008 197/206
The series will cover an in-depth and comprehensive guide to
modelling the amazing Bugatti Veyron car, from start to nish,
and will focus on the key techniques and stages involved in
building the chassis, as well as details such as the windows,
lights, vents, petrol caps, engine parts and so on. We will then
move on to creating the wheels, including tyres and hubcaps,
before going on to building and incorporating an interior, namely
the dashboard and seating. The series will proceed with a
section on creating and applying materials for the numerous
parts of the car, such as the paint work, chrome, rubber and
glass, before concluding with a tutorial devoted to setting
the scene for a nished render. The nal part will cover the
importance of a good lighting rig and light parameters, as well
as the importance of a camera and the integral part that the
rendering settings play in showcasing the model for a portfolio.
This series aims to show a comprehensive guide to creating
a nished car for people new to this type of exercise, but is
not suitable for beginners who are not familiar with using 3D
software. The tutorials do not detail every single step of adding
individual edge loops and vertices, but does endeavour to
outline each important stage and explain the crucial techniques
necessary to following the exercise.
The schedule is as follows:
Issue 029 January 2008
Modelling the Chassis - Basics
Issue 030 February 2008Modelling the Chassis - Details
Issue 031 March 2008
Lights, Radiator Grill & Vents
Issue 032 April 2008
Wheels, Tyres & Rims
Issue 033 May 2008
Interior
Issue 034 June 2008
The Materials & Finishes
Issue 035 July 2008
Lighting Set up & Render
Enjoy ...
Bugatti Veyron car modelling series
www.the-blueprints.com
Blueprints available here:
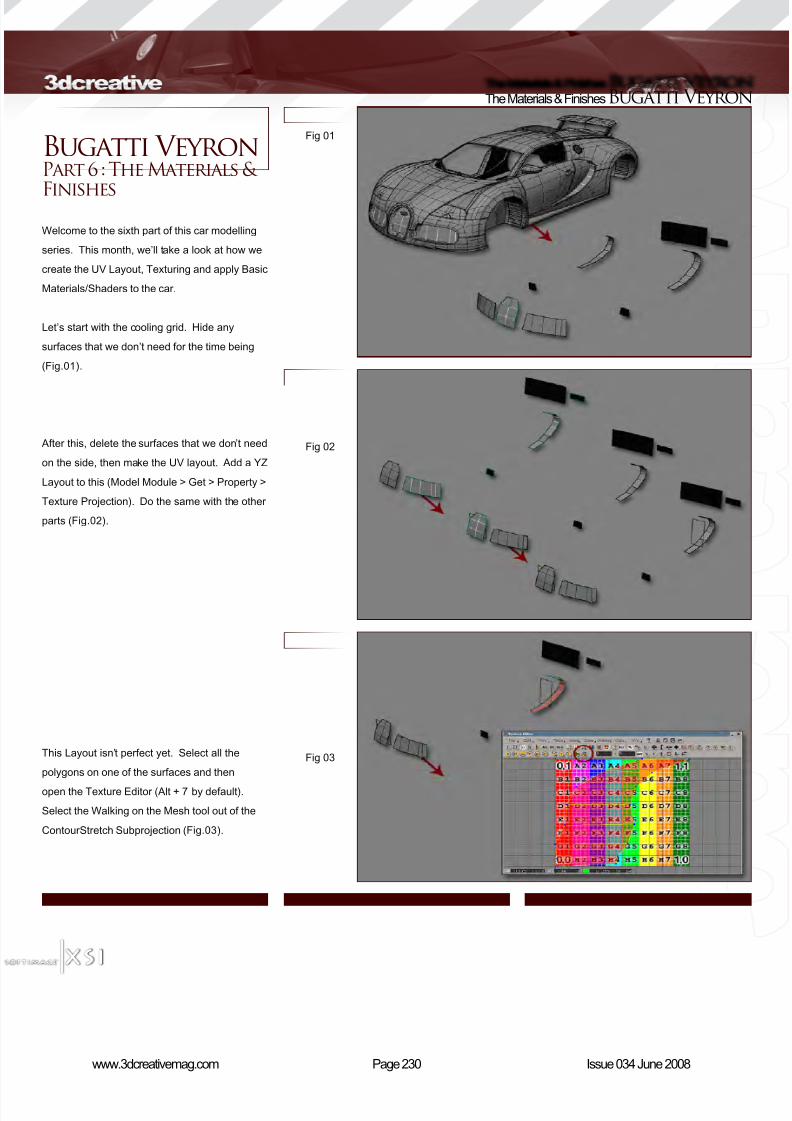
8/10/2019 3DCreative Magazine Issue 034 June 2008
http://slidepdf.com/reader/full/3dcreative-magazine-issue-034-june-2008 198/206

8/10/2019 3DCreative Magazine Issue 034 June 2008
http://slidepdf.com/reader/full/3dcreative-magazine-issue-034-june-2008 199/206
Page 231www.3dcreativemag.com Issue 034 June 2008
Bugatti Veyron The Materials & Finishes
Fig 04
Fig 05
Fig 06
With the same tool, select the 4 corners of the
surface and apply it with a right-click of the
mouse (Fig.04). The Layout will be correct
after this. Do the same with the other surfaces.
However, the Planar Subprojection/Best Fit tool
will be the most effective.
Let’s now make this simple texture for the grid
that can be seen on the picture. Select the rst
grid and add a new Phong material to it. Go
to Model Module > Get Material and click the
connector in the colour slot, and then select
Image (Fig.05).
In the window that appears, click on New (New
from File) and add the texture that we made
for the grid. In the settings of the viewport,
switch on the Texture Decal so that we can
see the texture in the viewport, too. Under the
Advanced tab switch the Alternate U and V
button to the right side so that, when making
copies of the texture, it will be mirrored. In the
Repeats section, set that to how many times
you want to copy your texture and in what scale
(Fig.06).

8/10/2019 3DCreative Magazine Issue 034 June 2008
http://slidepdf.com/reader/full/3dcreative-magazine-issue-034-june-2008 200/206
Page 232www.3dcreativemag.com Issue 034 June 2008
The Materials & FinishesBugatti Veyron
Now open the Render Tree to change the
shader network (press 7 by default). Hold onto
the red arrow that goes into the diffuse slot and
connect it to the transparency (Fig.07). It will
now become Transparent where it should be.
Click twice on the Phong and, on the appearing
window’s two tabs, set the parameters shown in
the picture (Fig.08). These parameters decide
the material type – this time the material type
of the grid. These are highly dependent on the
environment and the lights of course, so when
setting the lights we might need to change it a
little.
Add this material to every grid type surface.
To do this, select the surfaces and open the
Material Manager (Ctrl + 7 by default). Right-
click on your mouse and, with Assign and
Selection, add the material to the grids. After
this will come the Symmetrize Polygons
(Fig.09).
Fig 07
Fig 08
Fig 09

8/10/2019 3DCreative Magazine Issue 034 June 2008
http://slidepdf.com/reader/full/3dcreative-magazine-issue-034-june-2008 201/206
Page 233www.3dcreativemag.com Issue 034 June 2008
Bugatti Veyron The Materials & Finishes
Next up is the tyre. Hide everything else and
add Cylindrical Layout to it, and then adjust it
with the help of scale and rotate (Fig.10).
Open the Texture Editor and, from the Clip
menu, click on the Import Clip. In this menu
add a tyre texture to the tyre. We can download
some of these from the Internet or you can
simply make your own (Fig.11).
While adjusting the points in the Texture Editor,
transform the texture’s UV Layout into the right
form (Fig.12). The Layout is ready with this.
Fig 10
Fig 11
Fig 12

8/10/2019 3DCreative Magazine Issue 034 June 2008
http://slidepdf.com/reader/full/3dcreative-magazine-issue-034-june-2008 202/206
Page 234www.3dcreativemag.com Issue 034 June 2008
The Materials & FinishesBugatti Veyron
Add a Phong material type to it and open the
Render Tree. Pull in the tyre texture(s) from
a le browser. For me, it’s built up from three
parts: a Colour map which is responsible for
the colours, a Bump map which is setting the
roughness, and a Reection map which gives a
battered feeling for the material (Fig.13).
In the Render Tree, connect the colour map into
the diffuse slot (hold onto the little blue point at
the end of it and pull the end of the arrow onto
the point of the diffuse), and pull the reection
map into the reectivity slot. In the toolbar,
under the Nodes/Bump menu, look for the
Bumpmap node and click on it. Connect your
bump map to the node bump slot here (Fig.14).
Some parameters of the Phong material have
to be adjusted to the light, just like the bump
strength, etc.
You can add the texture and the material in the
same way to the other surfaces. Let me show
you how to make some of the main materials,
starting with the Cap’s material. Select the cap
and add a Phong material type to it. Open
the Render Tree. From the Nodes/Illuminaton
menu, add an Architectural and an Ambient
Occlusion node to it (Fig.15).
Fig 13
Fig 14
Fig 15

8/10/2019 3DCreative Magazine Issue 034 June 2008
http://slidepdf.com/reader/full/3dcreative-magazine-issue-034-june-2008 203/206
Page 235www.3dcreativemag.com Issue 034 June 2008
Bugatti Veyron The Materials & Finishes
Add a Mix_2colors node to it, too (Nodes/
Mixers), and then connect them as shown in the
picture (Fig.16).
Double-click on the node to set the values seen
in the image, and you’re going to get a cap
material like the one shown (Fig.17).
Add this cap material to every surface that has
a similar material. For the break system we can
use this cap material as well. Open the Material
Manager, select the material of the cap and click
on the Duplicate Material button (Fig.18).
Fig 16
Fig 17
Fig 18

8/10/2019 3DCreative Magazine Issue 034 June 2008
http://slidepdf.com/reader/full/3dcreative-magazine-issue-034-june-2008 204/206
Page 236www.3dcreativemag.com Issue 034 June 2008
The Materials & FinishesBugatti Veyron
Double-click on the new material’s Architectural
node and set its colour a little darker. Setting
the lights and the Render is going to be shown
in the next part of the tutorial; however, I made
a simple lighting rig so you can see the shaders
here. Of course, this isn’t the nal version as it’s
going to need ne-tuning when the light settings
are going to be nished (Fig.19).
Next up is the Car Paint. The Veyron’s body
has 2 main colours, usually. Let’s start with the
metal-car-paint. Add a Phong material to one of
the surfaces and replace it with Car Paint in the
Render Tree (Nodes/Illumination) (Fig.20).
Set the values shown in the image for the Car
Paint shader (Fig.21).
Fig 19
Fig 20
Fig 21

8/10/2019 3DCreative Magazine Issue 034 June 2008
http://slidepdf.com/reader/full/3dcreative-magazine-issue-034-june-2008 205/206
Page 237www.3dcreativemag.com Issue 034 June 2008
Bugatti Veyron The Materials & Finishes
Copy this material. You only need to change its
colour and the 2nd metal-car-paint is nished for
the other surfaces (Fig.22).
Let’s make the glass material now. It’s enough
if you change the settings of a simple Phong
material (Fig.23).
Set a plastic material, also (Fig.24).
Fig 22
Fig 23
Fig 24

8/10/2019 3DCreative Magazine Issue 034 June 2008
http://slidepdf.com/reader/full/3dcreative-magazine-issue-034-june-2008 206/206
The Materials & FinishesBugatti Veyron
To get a simple Chrome material it’s enough to
use a Phong and the parameters shown in the
image (Fig.25).
Fig 25


