345020 - 345021 Iryde Touch Phone
52
345020 - 345021 Iryde Touch Phone User Manual 10/11-01 PC
Transcript of 345020 - 345021 Iryde Touch Phone

345020 - 345021
Iryde Touch PhoneUser Manual
10/11-01 PC

2

Iryde Touch Phone
3
Use
r Man
ual
1 Introduction and basic functions 61.1 General information 6
1.2 Your Iryde Touch Phone: use it immediately! 6
1.2.1 Telephone function keys 7
1.2.2 Video door entry system function keys 7
1.3 Navigating through the menus ? 8
1.4 Answering a video door entry system call? 8
1.5 Answering a telephone call? 9
1.6 Making a telephone call? 10
1.7 Managing simultaneous calls 11
1.8 Menu functions 12
1.8.1 Volume adjustment 13
1.8.2 Monitor adjustment (day/night) 14
1.8.3 Date and time 15
1.8.4 Clean screen 15
1.8.5 Bell setup 16
2 Troubleshooting 18
3 Telephone functions 223.1 Putting a call on hold 22
3.2 Transferring a call 22
3.3 Address book 22
3.3.1 Calling and searching for a contact 23
3.3.2 Entering a new contact 24
3.3.3 Deleting or updating a contact 26
3.4 Call log 27
4 Video door entry system functions 304.1 Camera 31
4.2 Cycle Cameras 32
4.3 Intercom 32
4.4 Door lock 33
4.5 Paging 34
5 Home automation functions 365.1 Scenarios 36
5.2 Temperature Control 37
5.3 Burglar alarm 39
5.4 Sound system 41
6 Settings 446.1 The “Settings” menu 44
6.2 Services 45
6.2.1 Professional studio 46
6.2.2 Handsfree 46
6.2.3 Door status 47
6.2.4 Alarms 47
6.3 Messages 48

4

Iryde Touch Phone
5
Use
r Man
ual
Introduction and basic functions1.1 General information 6
1.2 Your Iryde Touch Phone: use it immediately! 6
1.3 Navigating through the menus ? 8
1.4 Answering a video door entry system call? 8
1.5 Answering a telephone call? 9
1.6 Making a telephone call? 10
1.7 Managing simultaneous calls 11
1.8 Menu functions 12

6
1 Introduction and basic functions
1.1 General information 1.2 Your Iryde Touch Phone: use it immediately!
Note about the LCD screenThe LCD screen has been produced using state of the art high precision technology. It is however possible that up to 5 small black and/or red, blue, or green light dots may appear on the LCD screen. This is normal and does not indicate wrong and/or faulty operations.
Improper use of Iryde Touch Phone and all connected devices will void all warranties.Only clean the unit using a damp or antistatic cloth. Do not use alcohol or detergents.
Iryde Touch Phone BTicino is a modern, simple and elegant device that provides integration of video door entry system functions and telephone function, as well as giving the possibility of interacting with the home automation functions of your system.
This handsfree video door entry system handset and telephone has a colour 4.3” LCD Touch Screen display, backlit keypad, and a navigation menu that can be customised using the PC.
It will therefore provide integrated management of all home functions: from the comfort offered by lighting and automation scenarios, to the well-being of temperature control, used to set the temperature inside the individual rooms of your home, to the entertainment provided by the sound and multimedia systems, to the safety of the burglar-alarm system.
1 - Handset.
2 - Loudspeaker (handsfree).
3 - LCD colour touchscreen display: it displays the user menus and shows the im-ages recorded from the en-trance panel and from other cameras.
4 - Microphone (handsfree)
5 - Telephone function keys.
6 - Video door entry system func-tion keys.
7 - Alphanumeric keypad: Keys "*" and "#", dedicated to tel-ephone services.
8 - Mini-USB connector for con-nection to the PC.
1
. , ?
3 4
8 7
6
52

Iryde Touch Phone
7
Use
r Man
ual
1.2.2 Video door entry system function keys1.2.1 Telephone function keys
. , ?
Alphanumeric keypadKeys "0" to "9", embossed with letters, can be used to dial telephone numbers or enter contacts in the address book.
Keys "*" and "#" “#”, to be used for certain tel-ephone functions.
# To enter special characters and punctuation marks.
Space bar.
. , ? To enter special characters and punctuation
marks.
Press the keys several times to move from one function to another.
R key
This key is use to put a call on or off hold, to transfer an exter-nal call, or a door entry system call (only if the system includes a telephone switchboard).
RP keyThis key is used for automatic redial of the last dialled number.
Address book Use this key to go to the address book.The operations that may be performed from this menu are: add, update, or delete a contact. Each single contact may be associated to three telephone numbers maximum.
Entrance Panel/ Cycle mode activationIt switches the associated Entrance Panel on, and enables cycling through any other Entrance Panels or cameras present
Staircase light activationKey used for switching on the staircase lights or the entrance hall lights.
Call exclusionUsed to disable/enable the bells for both telephone and video door entry system calls. If the bell is disabled, the cor-responding LED turns red. If the bell is disabled, in case of incoming call the corresponding LED flashes red.
Handsfree keyThis key activates the handsfree mode, for both video door entry system and telephone calls. When the function is active, the corresponding LED turns green.
Door lock keyWhen the connection is activated, the lock of the connected Entrance Panel opens. When idle, the lock of the associated Entrance Panel opens.

8
1.3 Navigating through the menus ? 1.4 Answering a video door entry system call?
Each page displays up to eight icons (8 for the homepage, 6 for each subpage), to which the various functions are associated.
Use the arrow to go back to the previous menu, use the home key to go back to the main page.
The call may be answered both by lifting the handset, and by using the handsfree function. During the conversation the user can also at any time switch from handset communication to handsfree mode, and vice versa.
During a handset conversation press and put the handset down to switch to handsfree mode; during a handsfree conversation, simply lifting the handset will disable handsfree mode, and the conversation will continue through the handset. The call is terminated when the handset is replaced. The display shows the icons for performing video and audio adjustments, the microphone disabling icon (MUTE), and the camera swinging bracket arrows. The swing bracket icon is only present if a swinging camera is connected.
28/06/201109:00
Touch the screen of your Iryde Touch Phone at any time to access the menu. Use the navigation icons to navigate through the pages.
When Iryde Touch Phone receives a call, the screen activates, the LED of the handsfree key becomes green and starts flashing; the display shows the image recorded by the external camera..
1 Introduction and basic functions

Iryde Touch Phone
9
Use
r Man
ual
“Mute” function, both for the telephone and the video door entry system, disables the handset and handsfree microphones.
It provides access to the camera angle adjustment function.
It provide access to image colour, contrast, and brightness adjustments, and to the volume settings of your Iryde Touch Phone.
Switch from Day to Night mode (see the “adjustments” section).
1.5 Answering a telephone call?
When a telephone call is received, the caller number, name, and photo are displayed, provided that they have been previously saved in the address book. The caller ID function must be activated with the telephone line provider.
Incoming calls may be answered using the handset, or in handsfree mode by pressing , or touching the corresponding icon on the display.
As for video door entry system calls, it will be possible to switch from one mode to the other at any time.
Touch the icon to answer a telephone call.
Ada

10
1.6 Making a telephone call?To make a call, dial the number using the keypad, and touch the
icon to send.
If you enter the wrong number, touch the icon to delete.
To terminate the call touch the icon.
At any time during the conversation, you can switch from handsfree to handset mode.
The call can also be made by lifting the handset, or by pressing the handsfree key and entering the number..
It is also possible to make a call through the address book: in this case, simply touch the telephone number saved in the contact, and the call is sent automatically.
The call can be terminated in several ways: replacing the handset, pressing the handset key, or touching the corresponding icon.
1 Introduction and basic functions
During the call the volume adjustment and the mute function icons appear.
Iryde Touch Phone
11
Use
r Man
ual
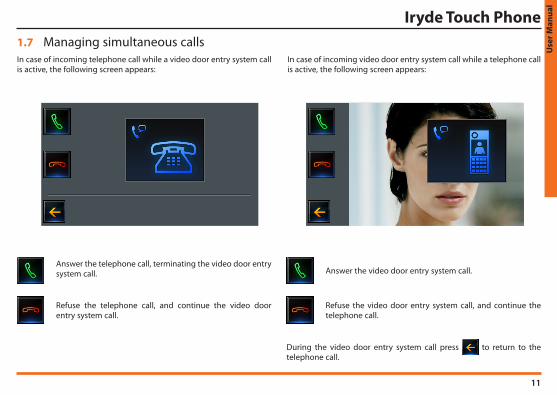
In case of incoming telephone call while a video door entry system call is active, the following screen appears:
1.7 Managing simultaneous calls
Answer the telephone call, terminating the video door entry system call.
Refuse the telephone call, and continue the video door entry system call.
In case of incoming video door entry system call while a telephone call is active, the following screen appears:
Answer the video door entry system call.
Refuse the video door entry system call, and continue the telephone call.
During the video door entry system call press to return to the telephone call.

12
ADVANCED CONFIGURATION
For systems including BTicino home automation functions, the main screen of the Iryde Touch Phone menu will also include the icons for access to the pages used for these functions.
1 Introduction and basic functions
28/06/201109:00
1.8 Menu functionsSTANDARD CONFIGURATION
In case of standard configuration, the main menu screen shows a main page with the “Video door entry system” and the “Telephony” icons, and the “Settings” menu icon; The “Settings” menu icon is always available for access to the product adjustment and configuration functions.
28/06/201109:00

Iryde Touch Phone
13
Use
r Man
ual
SETTINGS MENU
This menu provides access to a range of adjustments and services, including: volume adjustment, monitor adjustment (day/night), date and time setup and screen clean.
Adjustment. Services Messages
Info Config.Bells
28/06/201109:00
Volume LCD Night
Clean Scr.
LCD Day
Date&Time
Int. Handsfree
EP Handsfree
Int. Handset
EP Handset
01/02
1.8.1 Volume adjustment
The “Volume” application gives the possibility of adjusting the loud-speaker level of your Iryde Touch Phone.
Touch the or icons to decrease or increase volume levels.

14
Volume LCD Night
Clean Scr.
LCD Day
Date&Time
Bells
Ph. Handsfree Ph. Handset
02/02
Adjust the volume of intercom calls in handset mode.
Adjust the volume of intercom calls in handsfree mode.
Adjust the volume of internal unit calls in handset mode.
Adjust the volume of the entrance panel call in handsfree mode.
Adjust the volume of bells.
Adjust the volume of telephone calls in handsfree mode.
Adjust the volume of telephone calls in handset mode.
NOTE: During a video door entry system call it is possible to directly access the display adjustment menu..
1.8.2 Monitor adjustment (day/night)
It is possible to have two separate display settings for colour, contrast, and brightness: one for daytime and one for the night.
Brightness
Colour Contrast
1 Introduction and basic functions1 Introduction and basic functions

Iryde Touch Phone
15
Use
r Man
ual
Volume LCD Night
Clean Scr.
LCD Day
Date&Time
1.8.3 Date and time
Change the date and time displayed on your Iryde Touch Phone using the “Date/time” menu.
To increase the date and time values touch the icons; to decrease them touch the icons. Press and hold down for fast increase or decrease of the values.
01/07/2011 10 : 00
1.8.4 Clean screen
The “Clean” application disables the display, so that it can be cleaned without the risk of sending any commands
The display will automatically reactivate 30 seconds from the last time it was touched.
Never clean using solvents, thinners etc., or abrasive products.Only use the cloth provided.
Volume LCD Night
Clean Scr.
LCD Day
Date&Time

16
Adjustment. Services Messages
Info Config.Bells
The “Bell” gives the possibility of choosing among 8 ringtones, which can be associated to any possible event. Use the software to create customised ringtones.
1.8.5 Bell setup
EP Call S0 EP Call S1 Int. Interc.
Floor CallExt. Interc. Telephony 01/02
CALL FROM EP= call from entrance panel (S=0 or S=1).
INTERNAL INTERCOM= call from an intercom within the same apartment.
TELEPHONE CALL= call from an external phone.
FLOOR CALL= call from the pushbutton at the side of your entrance door.
KEY BEEP= enable/disable sound when keys are pressed.
EXTERNAL INTERCOM= call from an intercom belonging to another apartment.
Beep
02/02
1 Introduction and basic functions

Iryde Touch Phone
17
Use
r Man
ual
01
Volume
Touch or to listen, change, adjust the volume of the bell of each
individual message. Select the icon to save the selection and
return to the previous page.
EP Call S0 EP Call S1 Int. Interc.
Floor CallExt. Interc. Telephony 01/02

18
2 Troubleshooting

Iryde Touch Phone
19
Use
r Man
ual
Troubleshooting

20
PROBLEM SOLUTION
No image appears when the Entrance Panel/Cycling activation key( ) is pressed
– Check that the handset and the entrance panel are correctly wired and configured (they must have the same P address).
No control is performed when the Door Lock key ( ) is pressed – Check that the handset and the entrance panel are correctly wired and configured (they must have the same P address).
The handset does not ring when a call is received
– Check that the handset and the entrance panel are correctly wired and configured;
– Check that the “call exclusion” function is not active and that the bell volume is not set to zero.
With an incoming call the handset rings but the display stays off - Check that the handset is not set as “Slave”.
From the entrance panel it is difficult to hear who is talking
– Make sure you are talking at a maximum distance of 40 cm from the microphone of your Iryde Touch Phone;
- Reduce the volume of the microphone of your entrance panel.- Communicate using the Iryde Touch Phone handset.
From the handset it is difficult to hear who is talking
– Check the volume adjustment on the Iryde Touch Phone;– Check that there are no strong noise sources nearby your Iryde
Touch Phone. - Communicate using the Iryde Touch Phone handset.
Faulty operation when used with telephone switchboard - Check the configuration of the telephone switchboard;- Check that the correct telephone model has been set.
2 Troubleshooting

Iryde Touch Phone
21
Use
r Man
ual
3.1 Putting a call on hold 22
3.2 Transferring a call 22
3.3 Address book 22
3.4 Call log 27
Telephone functions

22
3 Telephone functions
3.2 Transferring a callTo transfer an active telephone call press the “R” key on the keypad of your Iryde Touch Phone and enter the number of the extension the call must be transferred to. If the extension called does not answer, you can take the call back by pressing the “R” key again. If when you transfer a call you put the handset down and the extension called does not answer, after a certain period of time the call will return to your handset.
NOTE: this function is only active when a telephone switchboard is installed.
If no telephone switchboard is installed, it will be possible to use the Paging function during the telephone call. This will make it possible for another person to take the telephone call from another telephone unit.
3.1 Putting a call on holdAn active call can be put on hold pressing the “R” key. While the call is on hold you can: activate an allowed service, or put the call off hold and re-establish contact by pressing the “R” key.
. , ?
3.3 Address bookYour Iryde Touch Phone gives you the possibility of saving your contact in a telephone address book. To open the address book press the dedi-cated key, or the corresponding icon of the telephone menu. A menu will be displaying, which can be used to:
- Call or look for a contact- Enter a new contact- Delete an existing contact- Change the name or the number of the
saved contact.. , ?
Search for a contact saved in the address book.
Add a new contact to the address book.
Ada
Adelaide
Adelle

Iryde Touch Phone
23
Use
r Man
ual
Ada
Adelaide
Adelle
Ada
0332123456
3331234567
3391234567
3.3.1 Calling and searching for a contact
To call a contact of the address book, select the desired contact and touch one of the suggested telephone number. The call will be sent automatically.
You can also search for the contact to call using the search function:
Ada
Adelaide
Adelle

24
B
Beatrix
Bethany
Blanche
Enter one or more letters of the name being searched.
. , ?
3.3.2 Entering a new contact
To enter a new contact in the address book touch the “add contact” icon. It is possible to enter up to 200 telephone numbers and 50 photos (to associate photos to contacts use the software supplied with the product).
Adelaide
Adelle
Ada
3 Telephone functions

Iryde Touch Phone
25
Use
r Man
ual
Enter the contact name using the keypad.
Delete character
Upper/lower case
Touch the field to enter the tel-ephone number.
. , ?
Agatha
Enter the telephone number using the keypad in the screen that appears.Select if the telephone is internal or external, and press OK to confirm.
# Change the internal/external telephone mode, when a PABX telephone switchboard is installed.
Agatha
3331234567
Ext. Phone
3331234567

26
3 Telephone functions3.3.3 Deleting or updating a contact
To delete a contact, once in the address book select the desired contact and touch the icon.
When the “Command performed” message appears, the contact has been deleted.
Adelaide
Adelle
Ada
Ada
0332123456
3331234567
3391234567
To change a contact touch the icon.
Change the name and/or the telephone numbers and press OK to confirm.
Ada
0332123456
3331234567
3391234567
Ada
0332123456
3331234567

Iryde Touch Phone
27
Use
r Man
ual
3.4 Call logYour Iryde Touch Phone also includes a telephone call log, both for incoming and outgoing calls.
28/06/201109:00
Call Log Addr. Book
Touch the corresponding icon to display the call log.
This screen shows the call status (missed, received, or made), and the call date and time. The device can record up to 24 calls.
01/08
Ada28/06/2011 10 : 15 : 42
Adelaide28/06/2011 11 : 20 : 59
Adelaide28/06/2011 15 : 10 : 34
To call the number listed touch the corresponding field.

28
3 Telephone functions

Iryde Touch Phone
29
Use
r Man
ual
4.1 Camera 31
4.2 Cycle Cameras 32
4.3 Intercom 32
4.4 Door lock 33
4.5 Paging 34
Video door entry system functions

30
4 Video door entry system functions
Depending on the actual video door entry system installed, it is pos-sible, for each entrance panel, to control the door lock release, com-municate with the handsets, with a switchboard associated, and use the video monitoring function on the cameras associated to your My Home system.
NOTE: some of these functions are also available in the “favourites” screen (which can be set as Homepage using the software).
28/06/201109:00
If an entrance panel call is received while in “Video monitoring” mode, the system complies with the priorities, and interrupts the current connection.
Video monitoringThis sections includes the applications for managing the video monitor-ing system:- Camera- Cycle cameras
Paging
Control Intercom Door Lock

Iryde Touch Phone
31
Use
r Man
ual
It gives you the possibility of monitoring your home by activating one of the cameras in the apartments or in the common areas (e.g. garage, garden).
Touch the icon to display the image recorded by the selected camera.
4.1 Camera
For camera controls and adjustments see the paragraph: “Answering a video door entry system call”
Camera 2
Cycle Cameras
Camera 1
Camera 4 Camera 5
Camera 3
If the audio/video channel is occupied by another user, the control is not performed. Wait for the channel to become free, and try again.

32
4 Video door entry system functions
4.3 IntercomThis function enables communicating with the other audio-video-telephone/door entry system handsets installed in your home, or in other apartments.
The selection of the extension to call can be made in two ways:
- by lifting the receiver and entering the number of the extension to call on the keypad (with PABX switchboard: From 401 to 408);
- by selecting the extension to contact from the menu.
If an entrance panel call is received while in “Intercom” mode, the system complies with the priorities and interrupts the cur-rent call.
Paging
Control Intercom DoorLock
This function gives the possibility of displaying the images from all the cameras installed in succession. When activated, Iryde Touch Phone displays the image from the first camera for 3 seconds (set using the software), and then moves to the others. Once the cycle is completed, the screen switches off.To keep displaying the image from one particular camera press . The Current camera remains active. If this camera belongs to an entrance panel, also the audio communication will be established.
4.2 Cycle Cameras
Camera 2
Cycle Cameras
Camera 1
Camera 4 Camera 5
Camera 3

Iryde Touch Phone
33
Use
r Man
ual
4.4 Door lockThis function enables activating an actuator or relay of an entrance panel. For example, it is possible to activate the opening of a second-ary gate.
Paging
Control Intercom DoorLock
DoorLock 1 DoorLock 2 DoorLock 3
DoorLock 4 DoorLock 5 DoorLock 6
The screen briefly shows the “Command performed” icon, the screen switches off and the LED of the “Handsfree” key turns green.If the audio/video channel is occupied by another user, the device emits a sound, and the control is not performed. Wait for the channel to become free, and try again.
Intercom 1 Intercom 2 Intercom 3
Intercom 4 Intercom 5 Intercom 6
After selecting the icon of the door lock to open, the screen briefly shows the “Command Performed” icon.

34
4 Video door entry system functions
This section gives the possibility of activating the “paging” function in the various modes.
Paging
Control Intercom DoorLock
4.5 Paging
If a video door entry system call is received while in “Paging” mode, the system complies with the priorities and interrupts the current call.
Advanced
PointPoint Room General
PointPoint: it activates the communication towards a specific amplifier.
Room: it activates the communication towards a specific room.
General: it activates the communication towards the whole sound system.
Advanced: it activates the communication towards the handsets, and the sound system.
Select the function mode.
The screen briefly shows the icon “Command Performed”.
The LED of the “handsfree” key becomes green to indicate the you are in communication.

Iryde Touch Phone
35
Use
r Man
ual
5.1 Scenarios 36
5.2 Temperature Control 37
5.3 Burglar alarm 39
5.4 Sound system 41
Home automation functions

36
This function gives the possibility of activating the scenarios saved by the devices connected to your home automation system.
5.1 Scenarios
5 Home automation functions
28/06/201109:00 Perform a scenario of a scenario programmer.
Activate a scenario of a scenario module.
Activate a scenario of a scenario central unit.
Stop a scenario of a scenario programmer.
Module Unit Stop
Start
Select the scenario to activate.
The screen briefly shows the icon “Command Performed”.

Iryde Touch Phone
37
Use
r Man
ual
Unit Zone 2Zone 1
Zone 3 Zone 5Zone 4
This function gives the possibility of interacting with the temperature control system devices.
5.2 Temperature Control
28/06/201109:00
Touch the icon to display the management screen.
4 Zones
Unit
If the system is fitted with a 99 zone central unit, in addition to the cen-tral unit icon, also the icons for the individual zones will be shown.
Zones 2 07 . 0
22 . 0 + 026 . 5
99 Zone
Unit Zone 2Zone 1
Zone 3 Zone 5Zone 4
38
5 Home automation functions
Zones 2 07 . 0
22 . 0 + 026 . 5
1 4
10 8 79
2 3 65
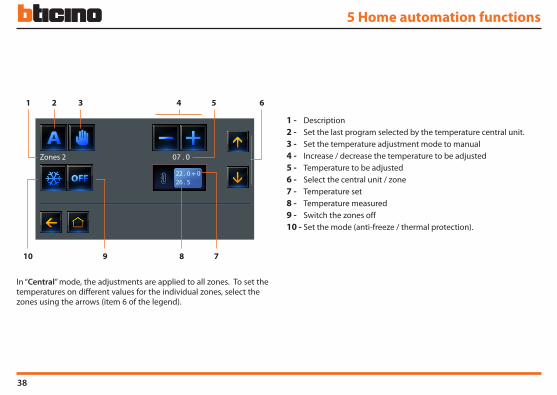
1 - Description2 - Set the last program selected by the temperature central unit.3 - Set the temperature adjustment mode to manual4 - Increase / decrease the temperature to be adjusted5 - Temperature to be adjusted6 - Select the central unit / zone7 - Temperature set8 - Temperature measured9 - Switch the zones off10 - Set the mode (anti-freeze / thermal protection).
In “Central” mode, the adjustments are applied to all zones. To set the temperatures on different values for the individual zones, select the zones using the arrows (item 6 of the legend).

Iryde Touch Phone
39
Use
r Man
ual
This function provides communication with your burglar alarm system. In particular, it is possible to view the status of the burglar-alarm central unit and of the various zones, and be notified in case of alarm.
5.3 Burglar alarm
28/06/201109:00
Touch the icon to display the details of the last 4 alarms.
1 - Alarm log2 - Display the status of the zones3 - Display the status of the system: disarmed / armed.
1 2
3
The information screen appears.

40
zones 113 : 40 30 / 06
5 Home automation functions
Legend - alarm icons:
INTRUSION TAMPERING
REMOTE ASSISTANCE
FLOODING
E M E R G E N C Y CALL GAS LEAK
FREEZER FIRE
DISARMED TECHNICAL
ARMED ANTIPANIC
Following an alarm detected by the central unit, the 3 LEDs flash in suc-cession. The display shows a screen with the type of alarm, the relevant zone, and the date and time of the alarm.
01/04
13 : 40 30 / 06Zones 1

Iryde Touch Phone
41
Use
r Man
ual
This functions provides control of the devices of the sound system.
5.4 Sound system
28/06/201109:00
If the sound system is a multichannel system, a screen appears, showing the different rooms making up your system.
It is possible to select a different sound source for each room (in a single channel system, only one source can be selected for the whole system).
In case of multichannel setup, the system can be managed using the controls: “amplifier” and “room amplifier”.
In case of single channel setup, in addition to the amplifier, also the control for activating all the amplifiers of the system (general), or of the individual room is present.
Room 1 Room 3Room 2
Room 4 Room 6Room 5

42
5 Home automation functions
Amplifier
Room Amplifier
Source
1 2 3 4
1 - Select the radio station or select a CD track. 2 - Change source.3 - Switches a specific amplifier on or off or adjusts the volume. 4 - Switches on all the room amplifiers.

Iryde Touch Phone
43
Use
r Man
ual
6.1 The “Settings” menu 44
6.2 Services 45
6.3 Messages 48
Settings

44
The main menu always includes the “settings” menu icon.Select this icon to access a wide range of customisations that give you the possibility of making the most of your Iryde Touch Phone
6.1 The “Settings” menu
6 Settings
1 - Adjustments (see chapter “Introduction and basic functions”)2 - Bells3 - Services4 - Information5 - Messages6 - Configuration
28/06/201109:00
Adjustments Services Messages
Info Config.Bells
1 3 52 4 6

Iryde Touch Phone
45
Use
r Man
ual
WARNINGThe access to the “Configuration” menu is limited to the installer; wrong operation may jeopardise the operation of the Iryde Touch Screen.
CONFIGURATION
ADJUSTMENTS
SETTINGS
SERVICES
MESSAGES
BELLS
HD / SW INFORMATION
PROF. STUDIOHANDSFREEDOOR STATUSALARM MSG
VOLUMELCD DAY /NIGHTDATE/TIMECLEAN SCR.
6.2 ServicesThis section includes the following functions: “Professional Studio – Handsfree – Door status – Alarms”.
NOTE: some of these functions are also available in the “Favourites” screen (which can be set as Homepage using the software).
Adjustments. Services Messages
Info Config.Bells
Studio HandsFree DoorState
Alarms

46
6 Settings
This function enables automatic activation of the microphone and the speaker when a call is received, without the need for pressing “”Connection”” to answer (the connection is automatically established when the call is received).
6.2.2 Handsfree
Touch the icon to enable or disable the function.
Studio HandsFree DoorState
Alarms
This function enables setting the automatic release of the door lock when an Entrance Panel call is received.The activation is not possible at the same time as the “Door Status” function.
6.2.1 Professional studio
Touch the icon to enable or disable the function.When this function is enabled, the door lock LED of your Iryde Touch Phone will flash as a reminder.
Studio HandsFree DoorState
Alarms

Iryde Touch Phone
47
Use
r Man
ual
6.2.3 Door statusThis function notifies the status of the door lock. If open, the “”LED door lock”” is on, if closed, the LED is off.
Touch the icon to enable or disable the function.
NOTE: the possibility of enabling this function depends on the system (for more information ask the installer). It cannot be activated at the same time as the “Professional Studio” function.
This function sends a notification when the burglar-alarm system detects an alarm condition. The three LEDs flash in succession until a key is pressed to display the message (in case of local power supply, the message is displayed automatically).
6.2.4 Alarms
Studio HandsFree DoorState
Alarms
Studio HandsFree DoorState
Alarms
Touch the icon to enable or disable the function.

48
When a message is received, the 3 LEDs flash in succession.Touch the screen to display the message.
Scroll the messages to be displayed.
Messages
01
6 Settings
6.3 Messages
Adjustments Services Messages
Info Config.Bells
This function enables displaying the text messages sent from a switch-board.
The “Message” icon indicates that messages are present.Touch the icon to display them.
A screen appears, where the message text and sender are displayed.

Iryde Touch Phone
49
Use
r Man
ual
Notes

50
Notes


BTicino SpA reserves at any time the right to modify the contents of this booklet and to communicate, in any form and modality, the changes brought to the same.
BTicino SpAVia Messina, 3820154 Milano - Italywww.bticino.com