
3 Easy Steps To A Professional Swing...
139
Transcript of 3 Easy Steps To A Professional Swing...


3 Easy Steps To A Professional Swing Plane
Page 2 of 139
Table of Contents Introduction ..................................................................................... 3 What Is The Swing Plane? .................................................................. 4 One Plane / Two Plane Golf Swing Explained ........................................ 8 The Consistent (Easy) Golf Swing Plane ............................................. 25 Professional Swing Plane - Step 1 ..................................................... 37 Professional Swing Plane - Step 2 ..................................................... 54 Professional Swing Plane - Step 3 ..................................................... 63 The Final Swing Plane Test ............................................................... 85 Conclusion ..................................................................................... 88 Setup Bonus Lessons ...................................................................... 89
Lesson 1 – Take The Golf Grip Out Of Play ....................................... 89 Lesson 2 - Perfect Grip Pressure For You ........................................ 94 Lesson 3 - Consistent Grip Routine ................................................ 97 Lesson 4 - Consistent Waggle And Clubface Alignment ................... 101 Lesson 5 - Consistent Stance Width And Feet Positioning ................ 105 Lesson 6 - Consistent Ball Position ............................................... 108 Lesson 7 - Consistent Golf Swing Posture ..................................... 111 Lesson 8 - Consistent Alignment .................................................. 117 Lesson 9 - Consistent Physical Pre-Shot Routine ............................ 122 Lesson 10 - Consistent Mental Pre-Shot Routine ............................ 127 Lesson 11 – Consistent Setup: Putting It All Together ..................... 131

3 Easy Steps To A Professional Swing Plane
Page 3 of 139
Introduction The swing plane is the engine of the golf swing I believe. If you get it more like a pro then your ball striking will improve, and in return you’ll lower your scores. I’ve done extensive analysis on the swing plane comparing pros and amateurs, and I’ve found that amateurs on average do the complete opposite of what pros do with the swing plane as they are swinging. I will explain more on this in the lessons that follow. And speaking of the lessons, I’m going to be blunt… You may read what I say to do and say that it’s too easy. You may see it and think that it’s too basic. You may read what I say and think you’ve seen it before. But that’s irrelevant. What is relevant is whether you’re actually doing what I’m saying to do. If you’re doing what I say a pro does as far as the swing plane is concerned, and you’ve confirmed this by way of swing video analysis as I instruct, then by all means ask for a refund on this program. But if you’re not doing what I say pros do and you’ve confirmed that by way of video analysis, then you need to make changes to your swing like what I’m saying. When you do you’ll improve your ball striking and get all the great benefits of doing that. BUT…. Knowing what to do and then doing it are two completely different things. Because I’ll be honest, making a change to a swing is time consuming. If you’re doing the opposite of what most pros do with the swing plane then it’s going to take time to change that. But in the instructions that follow I give you the quickest way I know of to make a change. In this program I’m going to first explain the concepts of the swing plane. You may have seen this information before and if you have, give it a quick read over again. Then after that I will get into the 3 Easy Steps To A Professional Swing Plane. I don’t include information on the setup, in this program but naturally the setup is very important. That’s why I have included bonus material at the end of this program to help you with the setup. There’s some great information there so implement that when you can. Ok, with all that being said, let’s start the process of you having a swing plane like a pro…

3 Easy Steps To A Professional Swing Plane
Page 4 of 139
What Is The Swing Plane? When you start looking at the swing plane you can get confused - FAST!
It's an area where the more scientific/engineer types seem to have a field day. And if you're not that way inclined you can read and watch some stuff on the swing plane that will just give you a headache!
But in this first lesson, I'm going to try to keep this nice and simple so we can all be on the same page for the rest of this swing plane improvement program.
Now, the swing plane first became popular thanks to Ben Hogan and his image of a pane of glass.
When Ben Hogan was talking about the swing plane in terms of the pane of glass, he wanted the left arm, hands, club etc. to stay below that pane of glass on the backswing and downswing.
But when Ben Hogan's famous five lessons book was published in 1957, they didn't have the technology like we do today to dissect the golf swing to the nth degree. And so the concepts of the swing plane have evolved a lot from the simple illustration that Ben Hogan gave us.
So what is the golf swing plane?
Well, the golf swing plane is an imaginary flat service that is used to determine what path certain parts of the body and club are traveling on throughout the golf swing.
This may sound stupid, but it has to be said.... the golf club cannot move itself. A lot of times when people look at the swing plane they only look at

3 Easy Steps To A Professional Swing Plane
Page 5 of 139
the shaft. But the shaft is only moving as a result of the body movements. So you need to look very carefully at the plane your body is moving on when looking at swing plane.
There are three swing planes in the golf swing, and they are:
1. The backswing plane
2. The downswing plane, and
3. The follow-through plane
It's important to note that I said above "certain parts of the body and club", because when you swing your shoulders move on a plane. Your elbows move on a plane. Your hands move on a plane, your club moves on a plane etc, etc.
That's why if you see someone analyzing a golf swing, they'll draw a lot of lines to try to analyze what plane different parts of the body and club are moving on.
When you swing you're obviously swinging in a circular pattern. And because you're bent over when swinging your swing plane is tilted. How much it is tilted depends on the player's height, how they stand to the ball, the club being used etc. etc. There's a number of different variables.

3 Easy Steps To A Professional Swing Plane
Page 6 of 139
So everyone will not have the same swing plane because of this. And so there's no one exact swing plane for everyone. When I say that, I'm talking about absolute degrees of swing plane. But there are good reference points every golfer can use, and I'm going to discuss these later.
Now when you hear about swing plane you often hear people saying that "so and so" has a flat swing plane, or this golfer has a steep swing plane.
When people say that, what are they referring too?
Most of the time they are referring to the shaft angle. And a good checkpoint is halfway into the backswing. A famous golf pro who is said to have a flat swing plane is Zach Johnson. Here is a picture of Zach at the half-way point in his golf swing.
Zach uses a one plane swing to hit the golf ball. So anyone that is a fan of the one plane golf swing will not say that Zach's swing is flat. They'll say it's on plane. That's where golf instructors get into arguments. In the next lesson I'm going to talk more about the one plane swing, two plane swing etc. But for now, notice that at the half way point in his backswing the club shaft is pointing outside the ball.
Now compare that to probably the most extreme case of a two plane swing, and that is Jim Furyk. Look where the shaft is pointing at the half way point in his backswing.

3 Easy Steps To A Professional Swing Plane
Page 7 of 139
If you compare those two swing planes, is there any wonder amateur golfers are confused about the swing plane?! I imagine you're the same as me, in that you would swap your playing record with either of those two players given the choice! :-)
So the swing plane is a combination of the movement (arc) of the shoulders, arms, hands and club predominantly. And this is measured and analyzed with straight lines... so it's 2d. I have seen 3d swing plane software and analysis, but because I want to keep this as simple as possible I'm not even going there!
I hope that's a simple explanation of the swing plane. If you’re still confused don’t worry because as this program goes on things will become clearer.
Next I'm going to show you be looking at the different types of swing planes, e.g. the one swing plane swing, the two swing plane swing etc.
I will be giving you examples of each type of player, so hopefully you should find that interesting and informative.

3 Easy Steps To A Professional Swing Plane
Page 8 of 139
One Plane / Two Plane Golf Swing Explained
In this lesson I'm going to explain what a one plane swing is, and what a two plane swing is... in simple language... hopefully! :-)
The differences between a one plane swing and a two plane swing are quite obvious... when you know what to look for. So let's start this discussion off with a look at the one plane golf swing.
Two of the most famous one plane swingers were Ben Hogan and Moe Norman.
Moe Norman is more extreme than Ben Hogan, so we'll look at him first.
When you see Moe Norman setup it looks very odd. Here is a picture of his setup and I have drawn a line through the shaft, which is going through the middle of his back (that's important, so keep this in mind as we move through this):
As you'll notice... Moe's hands are very high and his club is set back a foot or so from the ball.

3 Easy Steps To A Professional Swing Plane
Page 9 of 139
Now the key to a one plane swing, is to keep the club shaft parallel to the line that is created at setup. Then the goal is to get the club shaft back onto the same plane line that was created at setup once you reach impact. I will show you some images from a video of Moe Norman doing this.
Backswing
Downswing

3 Easy Steps To A Professional Swing Plane
Page 10 of 139
Impact
Follow-Through
At crucial parts in the swing Moe's clubshaft is parallel with the shaft line that he started with at setup. Moe has a pretty unusual looking swing

3 Easy Steps To A Professional Swing Plane
Page 11 of 139
though. I don't know who came up with the term 'Natural Golf' but that doesn't look too natural to me!
So let's look at the more "normal" setup and swing of golf legend, Ben Hogan.
Setup
Backswing

3 Easy Steps To A Professional Swing Plane
Page 12 of 139
Downswing
Impact

3 Easy Steps To A Professional Swing Plane
Page 13 of 139
Follow-Through
So that's a look at a couple of famous one plane swings. There is a measurement you can use to help determine if a golfer has a one plane or two plane swing. I'll give that to you later in this lesson.
But before we move onto two plane swings, I just want to make a very important point about one plane swings.
As well as Ben Hogan and Moe Norman hit the ball with their one plane swings... they hit an awful lot of balls (i.e. MILLIONS)! And that leads nicely into my next point, which may explain why they needed to do that...
Pretty much every golfer who starts playing the game of golf, swings with a two plane golf swing. Jack Nicklaus has a classic two plane golf swing, so let's look at his swing plane...

3 Easy Steps To A Professional Swing Plane
Page 14 of 139
Setup
Backswing

3 Easy Steps To A Professional Swing Plane
Page 15 of 139
Downswing
Impact

3 Easy Steps To A Professional Swing Plane
Page 16 of 139
Follow-Through
Now here is an extreme opposite of Moe Norman. Jim Furyk and his two plane golf swing.

3 Easy Steps To A Professional Swing Plane
Page 17 of 139
Setup
Backswing

3 Easy Steps To A Professional Swing Plane
Page 18 of 139
Downswing
Impact

3 Easy Steps To A Professional Swing Plane
Page 19 of 139
Follow-Through
Wow... Jim's got a lot going on with his swing plane! But he's a great golfer who proves you can play great golf with a two plane swing, just like you can with a one plane swing.
My personal opinion, based on the golfers that are great with the one plane swing, is you need to hit a lot of balls for it to work. If you don't want to be a range rat, then a two plane swing or hybrid swing plane is what you should be looking to do. In the next lesson I'm going to be talking about a hybrid swing plane, because I believe that's the way to go - and I'll explain why in the next lesson.
Before the end of this lesson however, I just want to point out an easy way to measure whether a swing is a one plane swing or a two plane swing. Because at the half way point in the backswing and downswing, a person can have what looks like a one plane swing and yet be a two plane golf swing.
You can measure this yourself (for your own swing) if you have a video and some golf swing video analysis software.
What you do is get to the top of the golfer's swing and measure the angle of the left arm and the angle of the shoulders. If the angle difference is less than 12 degrees then it's a one plane swing. If it's more than 12 degrees then it's a two plane swing. Here's some examples of one plane swings:

3 Easy Steps To A Professional Swing Plane
Page 20 of 139
Ben Hogan - 2 Degrees Difference
Moe Norman - 0 Degrees Difference

3 Easy Steps To A Professional Swing Plane
Page 21 of 139
Zach Johnson - 7 Degrees Difference
Matt Kucher - 1 Degree Difference

3 Easy Steps To A Professional Swing Plane
Page 22 of 139
Ok, let's look at the differences between some famous two plane swingers:
Jack Nicklaus - 28 Degrees Difference
Jim Furyk - 48 Degrees Difference

3 Easy Steps To A Professional Swing Plane
Page 23 of 139
David Toms - 35 Degrees Difference
Fred Couples - 39 Degrees Difference

3 Easy Steps To A Professional Swing Plane
Page 24 of 139
So hopefully now you have a clear understanding of the main differences between a one plane swing and a two plane swing. As I've already said, I don't think any extreme version is right.
I would never teach a person to swing like Moe Norman. Equally, I would never teach a person to swing like Jim Furyk.
I like the middle ground and both swing plane theories have their good points that I think can be melded into a great golf swing. So next I'm going to show you a great Major winning golf swing that puts my theory into practice.

3 Easy Steps To A Professional Swing Plane
Page 25 of 139
The Consistent (Easy) Golf Swing Plane
A big tenant of the one plane golf swing is to return the golf club back to the same position it was at (in terms of the shaft plane line) address. That's what Moe Norman and Ben Hogan did.
But let's see how some of top golfers in the world fear as far as that is concerned. Here’s pictures of some of the top golfers in the game in the last 10 years below with their setup positions, compared to their impact positions.
Tiger Woods
2. Adam Scott

3 Easy Steps To A Professional Swing Plane
Page 26 of 139
3. Phil Mickelson
4. Rory McIlroy
5. Justin Rose

3 Easy Steps To A Professional Swing Plane
Page 27 of 139
6. Henrik Stenson
7. Matt Kucher
8. Brandt Snedeker

3 Easy Steps To A Professional Swing Plane
Page 28 of 139
9. Steve Stricker
10. Jason Duffner
So 9 of those 10 golfers (Steve Stricker does) DO NOT return the clubface to the same plane line that they started at address.
Why did I show you that?
Because I believe the plane line should be more vertical than a one plane swing, and not as vertical as a two plane swing. Somewhere in the middle. A great model I'm going to show you in a minute for this, is Louis Oosthuizen.
But these impact pictures begs the question... are they trying to do that?
The answer is no!
Because it's been proven that the golf swing is moving way too fast at impact to consciously do anything. So what is happening at impact is this...

3 Easy Steps To A Professional Swing Plane
Page 29 of 139
The forces are so great at impact that the hands are being pulled up. That's just a natural occurrence of the modern, powerful golf swing.
So that got me thinking how it would be good to swing on a plane that is similar to what happens at impact. Because you can talk all you want about one plane and two plane swings (in terms of the backswing and shoulder plane, left arm angle etc.). But at the end of the day, it's what happens at impact that matters.
So my Consistent Golf Swing Plane theory, is to swing back so that at the half-way point in the golf swing the club shaft points down at the ball. Then at the half-way point in the downswing, the clubshaft again points at the ball. I'm now going to show you this theory in action in one of the best swings on the planet.
Louis Oosthuizen is the 2010 Open Champion and has a golf swing that many believe is one of the best among professional golfers. So let's put my swing plane theory to the test, and I'm going to draw a line through his setup at address right through the middle of his back.
Setup

3 Easy Steps To A Professional Swing Plane
Page 30 of 139
Half-Way Back
Half-Way Down

3 Easy Steps To A Professional Swing Plane
Page 31 of 139
Impact
Follow-Through

3 Easy Steps To A Professional Swing Plane
Page 32 of 139
Pretty damn good swing, with a very consistent shaft swing plane!
If you remember in the last lesson I said a way to see if a person swings on a one plane swing, is to measure at the top of their swing the angle of the left arm and the shoulders. And if there's less than 12 degrees difference then they have a one plane swing. Let's see what the difference is for Louis:
Louis Oosthuizen - 22 Degrees Difference
Compare that to Moe Norman and Jim Furyk. Extremes of a one plane and two plane swing:

3 Easy Steps To A Professional Swing Plane
Page 33 of 139
Moe Norman (One Plane Swinger) - 0 Degrees Difference
Jim Furyk (Two Plane Swinger) - 48 Degrees Difference

3 Easy Steps To A Professional Swing Plane
Page 34 of 139
If you split the difference between those extremes you get 24 degrees. Louis Oosthuizen at 22 degrees difference is almost bang in the middle.
This swing plane that Louis uses is what I term "the Consistent Golf Swing Plane". And that’s what I’m going to tech you in this Easy Swing Plane program.
When I say that however, I am referring more to the shaft plane Louis uses through the swing. Because that, I believe, should be the first thing you focus on. Once you have that correct then you can look at your shoulder plane and arm plane at the top of the backswing etc.
The reason I say you should work on the shaft plane first is because in my research on the swing plane, I have found that amateurs generally do the exact opposite of what pro’s do in the swing plane in terms of the shaft plane.
For example, amateur golfers generally have the club pointing outside the golf ball on the backswing like this….
…and then in the downswing they have the club pointing inside the golf ball like this….
This swing plane is much too flat and will cause a lot of problems later in the downswing. Notice how much to the right of the ball the plane is pointing.
Golf Ball

3 Easy Steps To A Professional Swing Plane
Page 35 of 139
That’s called a flat to steep shaft plane and it’s the exact opposite of what most pros do, because pros take the club back steeper like this…
….and then flatten the shaft on the downswing like this.

3 Easy Steps To A Professional Swing Plane
Page 36 of 139
Now do you know the quickest way to change a golf swing habit?
It’s simply to exaggerate the opposite of what you’re currently doing.
Although Louis Oosthuizen has the model swing plane you should be aiming for, with this program I’m actually going to use Nick Price as the swing plane model you should be trying to emulate. Those last two pictures were of Nick Price and there’s a couple of good reasons why I’m using him as YOUR model for this, which are:
1. If you exaggerate the opposite of what you’re doing currently you’ll get faster results.
2. Nick performs a key move in the transition that will serve you well in your golf swing, no matter what swing plane you end up having at the end of this.
So I hope you’re clear as to what we’re trying to accomplish here, now let’s get started…

3 Easy Steps To A Professional Swing Plane
Page 37 of 139
Professional Swing Plane - Step 1 As far as your swing plane is concerned, the first place you need to start improving so you become more like a pro is your take away. And to do this you need to learn how to take the club away on plane and with a one-piece motion. So that's what we're going to cover first. Now the take-away should really be named the move-away because “take-away” gives connotations of “snatching”. And all golfers that suffer from swing plane problems take the club away with their hands and move the club off plane very early in the backswing, i.e. snatching the club away and generally to the inside. Naturally, this causes many problems later in the swing. So to help fix this you need to understand that the club should be moved away with your big muscles, and here's how to do it. When you setup to any long shot, your arms and shoulders will form a triangle like this….
Notice the triangle that is formed at address. This triangle should stay intact for the first 3-4 feet of the backswing.

3 Easy Steps To A Professional Swing Plane
Page 38 of 139
As I've said, lots of golfers start the backswing with the hands only and instantly lose this setup relationship along with getting the club off plane early. Doing this causes many inconsistencies in the swing and this translates into inconsistent ball striking. So here's what you need to know about the take away…
When moving the club away from the ball you should do so with the arms and shoulders as a unit. This way the
triangle formed at address will remain intact for the first 3 feet or so of the backswing and the club will remain very
close to the plane line that it was at during the setup. Here is a picture that shows you how you should take the club away with this triangle staying in tact…
See how the triangle has stayed intact from the start of the swing to the first 3-4 feet. Also note that the hands have not changed much from the address position, but that the clubface appears to be open. This clubface is actually neutral and this is achieved by starting the backswing with the shoulders and arms while the hands remain passive.

3 Easy Steps To A Professional Swing Plane
Page 39 of 139
You can clearly see from the pictures on the previous page that the triangle formed at the address position remains as the club is moved away for the first 3-4 feet of the backswing. And to help you to keep the triangle intact in your take away I have three very simple exercises that you can work on to both improve your take-away and to check to see that you're doing it properly. In this first drill I want you to experience the feeling of turning to start your backswing rather than using your hands and here's what you should do… Drill 1: Setup to a ball as normal and then slide the club up through your
hands and place the butt end of the club in your navel. Once you've achieved this position simply turn your navel to start the backswing and keep turning so the club goes about 3-4 feet. Do this over and over again. This is how you should start your backswing (see the pictures below of a student golfer that show you what you need to do in more detail).
Club In Navel Turn Navel To Start Backswing
Once you're used to this new take-away move, the next step is to integrate it into your real backswing. And there are a couple of ways that you can check to see if you are doing this right, and here they are:

3 Easy Steps To A Professional Swing Plane
Page 40 of 139
Drill 2: Place a club behind your left foot on an angle so it goes through to the front of your right foot. Incidentally, when doing this exercise do it with a square stance (all parts of your body aligned parallel left to the target).
Once you're setup like the golfer is demonstrating above, the next step is to move the club away using your big muscles. Do this until your hands are over your right foot and then stop your take-away. Now look down on your club and notice whether or not the club is pointing along the same parallel lines as the club on the ground. If you’ve taken the club away with the big muscles, the two clubs should be parallel.
Place a club running from the back of your left foot through to the front of your right foot as this picture demonstrates.
Important Note: When doing this exercise don't make the mistake of thinking that the club has to appear directly over the club on the ground, but instead it should appear along the same parallel lines and quite a bit on the inside of the club on the ground. If your club is not along the same parallel lines at this point in the take-away then keep practicing the previous exercise and check your progress by doing this exercise. It's critically important that you do not move on until you can successfully do this exercise.

3 Easy Steps To A Professional Swing Plane
Page 41 of 139
Drill 3: Now here is a great exercise to check that you've taken the club away with a one piece take away. To do this address a ball as normal, and once again do this exercise with your feet square to the target (all parts of your body aligned parallel left of your target). Once setup similar to picture 1 below, simply move the club back using your big muscles and stop when your hands are over your back foot (see picture 2 below).
1. 2. From this stationary position simply move your entire body (yes, feet as well!) so you're facing the clubhead. This will put you in a similar position as if you were setting up to a shot.
Setup in a normal type of setup. Then from this position start your backswing with the big muscles and stop when your hands are over your right foot.
Move the club away until this point in your backswing and check that your club is pointing along the same parallel lines as the club on the ground.

3 Easy Steps To A Professional Swing Plane
Page 42 of 139
While doing this keep your shoulders, arms, wrists and club in exactly the same position as they were in when you stopped your backswing (see picture 3 below).
Now lower the club to the ground and notice if your clubface is open, square or closed. If you've taken the club away correctly with your big muscles you should be in exactly the same setup position as you were to start with (see picture 4) only turned well to the right. 3. 4.
If at the completion of this exercise the clubface is either open or closed then that means you've manipulated the club with your hands during your take-away. So keep practicing these drills to help you NOT
do this. Plus here is something extra that may really help you.
The drills and exercises I've given you so far are good for learning a one-piece take away but they don't teach you how to take the club away on the correct swing path or plane. So here is the best drill to help you do that. Now when you take the club away it should move on an arc just inside the target line NOT straight back along the target line. Why? Because a straight back takeaway gets the club travelling too much outside (off plane) and causes your arms to become separated from the body. All of this will require compensations later in the swing which will result in inconsistent ball striking.
3. Turn to face the club and then, 4. Lower the club to the ground. If the take-away has been correct then you should be in exactly the same setup position as you were at address (see picture 1), only turned well to the right (see picture 4).
Important Note: This drill requires a few things. So have a quick read through it and then at the end of it there is a list of everything you need to complete it.

3 Easy Steps To A Professional Swing Plane
Page 43 of 139
Obviously we don't want that, so here is a great drill that will help you to start taking the club on the correct path and with repetition this will fast become a habit. But to do this drill you will need a couple of things. The first is a small torch (or a laser pointer with an on/off button – search ebay for them if you want. You’d need two however) The second thing you'll need is a golf shaft (you can also do this with a driver) with a grip on it. Once you have these two things then simply tape the torch (or laser pointer) to the bottom of the shaft, as shown below… Then find a straight line to do this drill. And where the wall and floor meets is perfect.
This is a driver golf shaft.
Tape the torch to the bottom of the shaft like this.

3 Easy Steps To A Professional Swing Plane
Page 44 of 139
Now, it's a good idea to do this drill at night time if you’re using torches because you'll be able to see the torch light easier. If you’re using laser pointers it doesn’t matter when you do this. So to do this drill turn the torch on and then setup as normal and make sure the torch is about 2-3 inches away from the line you're going to use as a plane reference line. And make sure the torch's main light is pointing directly at the line like the picture on the next page shows.
For this drill find a straight line and where the wall and floor meets is perfect.

3 Easy Steps To A Professional Swing Plane
Page 45 of 139
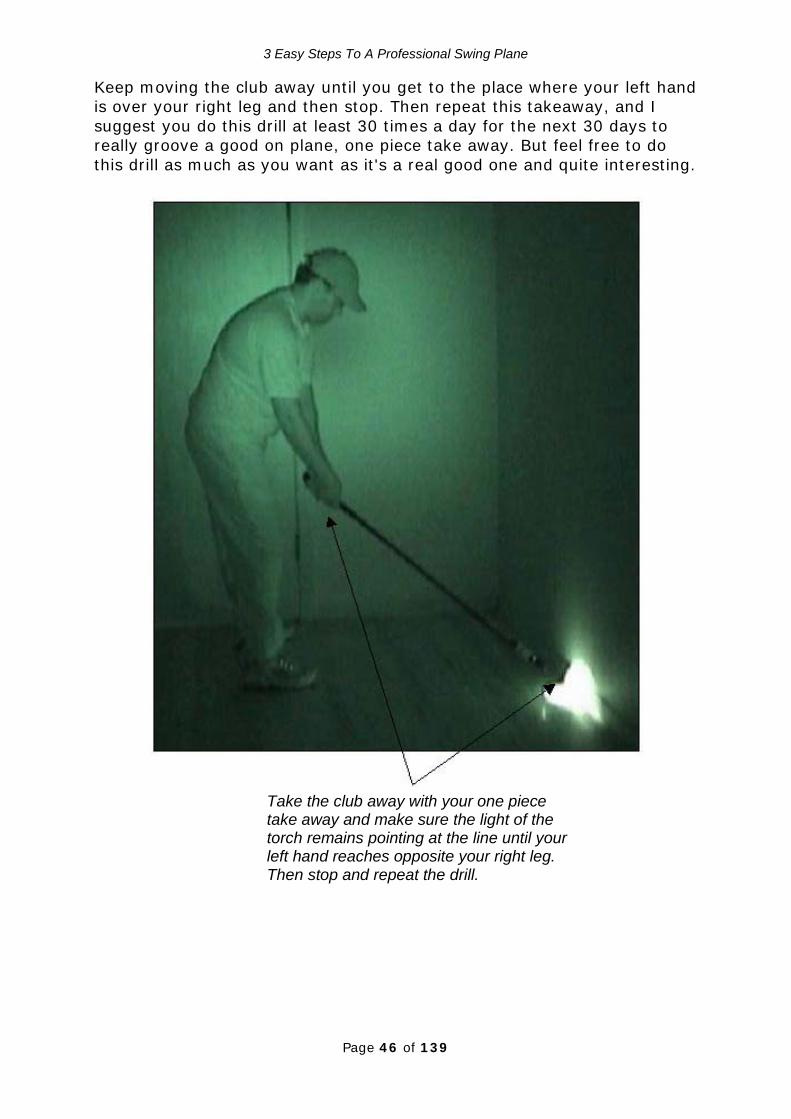
From this position simply take the club away with your one piece takeaway (concentrating on turning your left shoulder to the right and keeping your arms, wrists and hands passive) and make sure the light remains pointing at the line as you're taking the club away.
Turn the torch on, setup as normal and point the torch at the line, so it's about 2-3 inches away like this.
Important Note: As you're taking the club away the torch will move further away from the plane reference line. And so it should as you need to take the club to the inside. But the light should also point at the plane reference line at all times in the take-away.
3 Easy Steps To A Professional Swing Plane
Page 46 of 139
Keep moving the club away until you get to the place where your left hand is over your right leg and then stop. Then repeat this takeaway, and I suggest you do this drill at least 30 times a day for the next 30 days to really groove a good on plane, one piece take away. But feel free to do this drill as much as you want as it's a real good one and quite interesting.
Take the club away with your one piece take away and make sure the light of the torch remains pointing at the line until your left hand reaches opposite your right leg. Then stop and repeat the drill.

3 Easy Steps To A Professional Swing Plane
Page 47 of 139
To view a video of this drill simply click here. Now if you don’t want to make your own swing plane light device there are plenty that you can purchase like this:
Bill Harmon Plane EZ Golf Swing Trainer
Plane EZ Golf Swing Trainer
Swing Perfect Golf Swing Trainer (Right/Left Hand)
Swing Perfect Trainer
Things You Need To Complete This Drill 1. One small torch (or laser pointer with an on/off switch – but get two pointes if you do this). 2. One golf shaft with a grip on it. A driver shaft is the best for this.
S

3 Easy Steps To A Professional Swing Plane
Page 48 of 139
It doesn’t worry me what you use to train your take-away swing plane, but getting it right is so important to getting your swing plane to be like that of a pro. You may think it’s easy what I’m getting you to do and you’ve seen it before, but here’s the deal… If you can’t get your take-away to be like this by the time your hands are opposite your right leg, then you should not continue this program until you can. To check this you must get a video of your driver swing from the down the line view. Then you need to either get me to analyze your swing or do it yourself. If you do it yourself then you draw a line in your swing analysis program along the shaft when you're setup like this:

3 Easy Steps To A Professional Swing Plane
Page 49 of 139
Then when you take the club away your hands and club should move very close to this plane line like the picture below demonstrates. This will happen naturally if you take the club away with a one-piece take away and along the correct plane. It’s very important to note that as you take the club away the clubhead remains on the shaft plane line. Also the clubshaft is on the shaft plane, line and so are the hands. Again, you might think that’s easy. But check yourself to see if you’re doing it correctly. The reason I’m harping on about this is because take-aways like the ones pictured on the next page lead to a flat backswing. A flat backswing then leads to the over the top move. The over the top move then leads to a golfer coming down on a too steep plane. And by doing this a golfer then cuts across the ball, which not only costs them lots of distance, but also a lot of accuracy as well. So take a look at what NOT
to do in the backswing….

3 Easy Steps To A Professional Swing Plane
Page 50 of 139
Examples Of Bad, Off Plane Take-Aways So if you want to hit the ball longer and straighter DO NOT continue this program until you can take the club away on plane like this….

3 Easy Steps To A Professional Swing Plane
Page 51 of 139
Can You Take The Club Away On Plane Like This?
Or This (Nick Price)…

3 Easy Steps To A Professional Swing Plane
Page 52 of 139
Now here is how I want you to check this. Get out your smart phone or video camera and set it up to record your driver golf swing. It’s very important when videoing your golf swing that you place the video camera in the right spot. It’s also very helpful to place your recording device on a tripod. When you do this I want you to record your swing from the down the line view. Position the camera at hand height and place the camera so the middle of your camera is on a line directly pointing at your hands. Once you have this all setup then I want you to record yourself hitting 5 shots without trying to manipulate your swing. Just swing normally. After you’ve done that you can either analyze your swing yourself with some video analysis software like V1 Sports or cSwing, or send it in for me to analyze. But for this first step you need to get 5 take-aways (until your hands are opposite your right thigh) to be pretty close to the original shaft plane at address. To do this simply draw a line along your shaft plane at address with your driver like this…
Position your camera along this line and at hand height on a tripod.

3 Easy Steps To A Professional Swing Plane
Page 53 of 139
Then in your software analysis program take the club away frame by frame until your hands are about opposite your right thigh like this: See how the club head, shaft and hands are still on the original shaft plane line? If you can’t do that for 5 shots in a row without “trying” to do that, then don’t move on to Step 2. This might sound simple, and it is. But if this is not a habit making a change like this is not easy. It will take time. But keep at it and when you complete this first step then move onto…

3 Easy Steps To A Professional Swing Plane
Page 54 of 139
Professional Swing Plane - Step 2 OK, we've covered the take away in Step 1. And to start this step you need to have mastered that with the 5 driver swing test I gave you at the end of Step 1. If you did not complete that then don’t do this step until you can. So assuming you have completed Step 1, we're now going to look at the swing plane half way into the backswing. Because this is another crucial check point in the backswing to see if your swing plane is like a pro or not. And if it's not it will cause big problems in the downswing and at impact, so you need to know about it, fix it and then check it. There's 3 main possibilities at the half-way point in your backswing, as far as swing plane is concerned. You're either in a perfect swing plane position like this:
This is the backswing plane you should ultimately be aiming for. One where the shaft is pointing directly at the ball when your left arm is parallel with the ground. But if you do what most amateurs do in the backswing you should be trying to swing like Nick Price.

3 Easy Steps To A Professional Swing Plane
Page 55 of 139
Or your swing plane is much too flat (i.e. pointing to the right of the ball) like this: Or your swing plane is upright like this (Nick Price):
This swing plane is way too flat and will cause a lot of problems later in the downswing. Notice how much to the right of the ball the plane is pointing.
Golf Ball

3 Easy Steps To A Professional Swing Plane
Page 56 of 139
Now to get a real accurate picture (no pun intended) as to which swing backswing plane category you fall into you need to get a video done of your driver swing. Get 5 driver swings just like I showed you how to do in Step 1. Once you've got the video, then at the halfway point in your backswing (when your left arm is parallel with the ground) draw a line in your swing analysis software (or get me to do it) along the shaft towards the ground like this….

3 Easy Steps To A Professional Swing Plane
Page 57 of 139
Now for over 90% of golfers that do this, the line will be pointing to the right of the ball. This means the backswing plane is too flat, which then causes an over the top move and then that causes the swing plane to come down too steep. All of this results in ball striking problems. Here are examples of this swing plane problem…
Important Note: The blue line represents the backswing plane. The red line represents the downswing plane.

3 Easy Steps To A Professional Swing Plane
Page 58 of 139
So after seeing this please understand this about the golf swing. The reason most golfers do the disastrous over the top move is because they…
1) Take the club away off plane, generally to the inside and they… 2) Continue taking the club back too flat.
Look, you’re not dumb. If you take the club back too much to the inside in your backswing the only way you’re going to even hit the ball is to come down steep. Sadly however, this causes an out to in swing path (i.e. the divots pointing to the left of the target) and a slice, along with lots of other problems, e.g. fat shots, pulls, shanks etc. Not to mention a great lack of distance. Ben Hogan famously said about the golf swing that if you reversed every natural instinct in the golf swing then you would have a pretty good golf swing. So I think a natural instinct for the average golfer is to swing back too flat and then consequently that causes a golfer to come down too steep on the ball. If you find that you’re doing that then you need to reverse it. If you don’t then you won’t improve your ball striking...ever! It’s as simple as that. So here’s what I want you to do. Practice taking the club away so it’s on plane like I’ve shown you in step 1 and complete that step. Then I want you to practice moving the club away so that by the time your left arm is parallel to the ground in the backswing (halfway) then your club shaft MUST be pointing at the ball or inside the ball. In fact, if you found that your backswing plane was too flat then you should aim to have the shaft pointing inside the ball like Nick Price does...

3 Easy Steps To A Professional Swing Plane
Page 59 of 139
Step 2 Success
If you want to make a swing change in the quickest possible time then the best way of doing that is to exaggerate the opposite of what you currently do. I’m going to talk more about that in step 3, but for now I want you to focus on taking the club away on plane (step 1), and then moving the club up the plane so that by the time your left arm is parallel with the ground the shaft is pointing at the ball or inside the ball. If you’re a golfer that has traditionally taken the club away too flat, then I don’t want you to move to step 3 until you can take the club away on plane, and then move the club up the plane line so that at the half way point in your backswing the shaft is pointing inside the ball like Nick Price is doing above. When I say you can’t go to step 3 before you can do this, here’s what I mean. You must be able to get to this step 2 success position with a full swing with your driver at full speed. And you must be able to do this for at least 5 shots in a row WITHOUT trying to think your way through the swing. Just like you did when you completed Step 1.

3 Easy Steps To A Professional Swing Plane
Page 60 of 139
You see, in the past when I’ve given golfers these instructions they have completed these moves slowly and think they can move onto the next step. Doing a move slowly is a good way to groove a new habit but it doesn’t mean you’ve made a swing change. Ok, so how should you practice making Step 1 and 2 into a habit? Well, I think the torch drill is a great way of doing this. But of course you’ll need two torches (or laser pointers). One taped on the bottom and the other taped to the top. Or you can use a training aid like I’ve shown you. The goal of course is to take the club away on plane and then move the club up so that the shaft half-way into your backswing is pointing at a line inside where a ball is. So that’s a drill you can do at home anytime.
Attach a small torch to the top of your grip like this.

3 Easy Steps To A Professional Swing Plane
Page 61 of 139
But when you’re practicing hitting balls you’re going to have to exaggerate swinging the club on an upright swing plane. To do this you will have to feel like you’re swinging the club back like Jim Furyk…. If you have been swinging back too flat and you then feel like you’re swinging like Jim I bet it won’t be anywhere close to that. Because feel and real often aren’t close. So here’s your task so complete Step 2. Don’t move onto step 3 until you can complete 5 driver swings and getting the shaft to point either at the ball like this half way into your backswing…

3 Easy Steps To A Professional Swing Plane
Page 62 of 139
Or inside the ball like this…. When you can do this then move onto the final swing plane step…

3 Easy Steps To A Professional Swing Plane
Page 63 of 139
Professional Swing Plane - Step 3 All right, to be up to this step in this program you need to have a good one piece, on plane take away and at the half way point in your backswing the shaft plane either has to point at the ball or just inside the ball like Nick Price does. So as long as you can do that then you should look at the position you get into at the half way point in the downswing. Because at that point the club's plane should be pointing at the ball or to the right of the ball like this (the red line indicates the downswing plane)….

3 Easy Steps To A Professional Swing Plane
Page 64 of 139
These pictures are all from the downswing positions of pro golfer's swings. Now I've never seen anyone have a downswing plane too flat. So I'm NOT going to address that issue. Every golfer I've ever seen with swing plane issues has swung down too steep like this:

3 Easy Steps To A Professional Swing Plane
Page 65 of 139
So in this final step I'm going to explain how you can swing down with a flatter swing plane. And understand the goal here, at the halfway point in the downswing the plane of your swing should be pointing at the ball or to the right of it. It's important you know what we're working towards. But that is not so much as a position as a checkpoint. Because getting your backswing plane correct is relatively easy with a lot of repetitions. But this Step 3 position is really the result of the transition from your backswing to the downswing. And it’s in the transition from the backswing to downswing where almost all amateurs go wrong. You see, when you're changing directions from your backswing to downswing your club should move to the left. This is a critical move. Nick Price performs this move perfectly. Here is the key move I’m talking about. This is Nick Price at the top of his driver swing. You watch the club move to the left, away from the ball as he starts his downswing.

3 Easy Steps To A Professional Swing Plane
Page 66 of 139
See how the club moves to the left. That’s the critical
move that will allow you to get
and complete Step 3 successfully.
Notice how the club is moving to the left. This is a
critical move that you need to master to complete step 3
successfully.

3 Easy Steps To A Professional Swing Plane
Page 67 of 139
The club is still moving to the left, which means that by the time his left arm is parallel with
the ground the shaft plane is
pointing outside the ball.

3 Easy Steps To A Professional Swing Plane
Page 68 of 139
So why am I showing you Nick Price’s swing when the model Easy Swing Plane is Louis Oosthuizen? It’s simply because Nick Price does the exact opposite of what most amateur golfers do in terms of the swing plane. Here is the average amateur’s swing plane compared with Nick Price’s. The blue line is the backswing plane and the red line is the downswing plane.
Nick Price’s Swing Plane Typical Amateur Swing Plane
See how that’s the exact opposite? So if you’ve found that your swing plane is like the typical amateur golfer’s, e.g. swing back too flat and come down too steep, then you’d be best to try and emulate Nick Price’s swing plane rather than Louis Oosthuizen swing plane. Why? Because when a golfer tries to make a change with their swing plane they generally don’t go far enough in terms of really making a change. So by exaggerating the opposite of what they do it will help to make that change quicker. Before I tell you how to do that, after the next two pages I have an interesting discovery I made about Ben Hogan’s swing to share with you.

3 Easy Steps To A Professional Swing Plane
Page 69 of 139
Ben Hogan also performs this ‘moving the club to the left’ move perfectly. Take a look. I have put a red circle on the club head so you can see it move to the left from the top of the backswing until half way down.

3 Easy Steps To A Professional Swing Plane
Page 70 of 139

3 Easy Steps To A Professional Swing Plane
Page 71 of 139
Now here's an interesting discovery I made about Ben Hogan. You see, one day I was doing some slow motion swings in front of a mirror from the face on view, and I was doing this move where you feel like the club falls behind you and I was bringing my hands down to the position where the left arm is parallel with the ground. This position here….
I have marked on there it looks like Hogan had 26 degrees of lag at that point in his swing, which is incredible as most pro golfers have about 45-50 degrees at that point. But that’s an optical illusion of him having that much lag, and here’s why. When you do that move of letting the club fall behind you and moving your body down normally in the downswing until that left arm is parallel with the ground, you’ll see it’s easy to get into a position like Hogan. And it has nothing to do with lag, but it has everything to do with the club moving to the left in the downswing (left when looking down the line). I always wondered about this because later in the downswing it appears as though Hogan did not have that much lag when his hands where opposite his right leg, as you can see from the picture on the next page.

3 Easy Steps To A Professional Swing Plane
Page 72 of 139
So I don’t believe he was throwing away his enormous lag in his downswing. He never had great lag in the first place. Anyway, that’s something interesting you’ll see will happen in your golf swing when you get this transition move correct. But understand this, a lot of that will depend on whether you swing more upright with the arms like Nick Price or flatter with the arms like Ben Hogan. I favor the middle ground like Louis Oosthuizen, but you should not be concerned about that for now. What you should be concerned about is that your shaft swing plane on the backswing points at the ball or inside it (Step 2), and then your shaft points at the ball or outside it half way into your downswing (Step 3). Naturally getting Step 1 correct will help you do all that. Alright, so how are you going to train yourself to flatten the shaft on the way down? Well, here’s 3 ways I recommend you do this…

3 Easy Steps To A Professional Swing Plane
Page 73 of 139
1. Slow motion swings isolating the transition move. 2. The torch drill. 3. The Jim Furyk drill.
The first thing I want you to do so you get this transition sequence to become natural is to get your driver and work on the positioning from the Step 2 position to the Step 3 position. I have created a video that shows you the move you should be doing over and over again. Go here to see this video. It’s under the heading: Step 3: The Nick Price Isolation Drill But here in word is what you need to do. You can do this move at home without a ball. This is not about hitting a ball. It’s all about isolating this transition move so it becomes a habit when you swing normally. So get out your driver and get into your normal setup position. Then move the club until the Step 2 position.

3 Easy Steps To A Professional Swing Plane
Page 74 of 139
Then move the club up to the top of your backswing. From that position exaggerate letting the club move to the left and fall away from the ball, and swing down until your left arm is parallel with the ground in the downswing.

3 Easy Steps To A Professional Swing Plane
Page 75 of 139
Then once you’ve done that simply adjust the club so that it’s back to a more upright plane (Step 2) and repeat the loop sequence.

3 Easy Steps To A Professional Swing Plane
Page 76 of 139
That’s what this should feel like… a loop sequence. You’re going from an upright shaft plane in the backswing to a flat swing plane in the downswing. And that happens as a result of the club moving to the left, away from the ball after you have reached the top of the backswing position. This is a critical move that will greatly improve your ball striking, and so that begs the question…. How often would you have to do this move to make it natural? Well, here’s a rough guide. It’s been touted that it takes about 10,000 repetitions to make a new move a habit. So if you did this isolation move 100 times a day then it would take about 3 months for you to make this flattening the shaft move habitually. But here’s a way to speed this up. Exaggerate this move. If you’ve found that your swing plane is like that of the average amateur, then to get a swing plane like a pro it’s the exact opposite of what you do. Then the quickest way to change is to feel like you do the exact opposite of what you do in a stupid manner. You need to do the exact opposite so much you feel like it looks ridiculous. And here’s a couple of ways to help you do this…

3 Easy Steps To A Professional Swing Plane
Page 77 of 139
The Torch Transition Drill
Before you try this drill you should be doing the isolation drill to get used to the correct transition movement of the club moving to the left at the start of your downswing. After you’re used to that move then you need to progress to doing that move in the swing as a whole. However, don’t stop doing the isolation drill. This torch drill is in addition to that isolation drill so you start to get the feel of how you’re going to be swinging while implementing the key transition move. So to do this drill get a driver shaft and attach either a torch to both ends like this or I like to use laser pointers with switches on them so you can just turn them on and leave them on. Naturally if you use laser pointers you have to be very careful that you don’t point them in someone’s eyes. No matter what you use (even if it’s one of the training gadgets I mentioned) you need a light at both ends like this.
Driver Shaft
Attach a small torch or laser pointer to the top of the shaft like this.

3 Easy Steps To A Professional Swing Plane
Page 78 of 139
Then find a darkish place where you'll be able to see the light from your torches easily and setup like the golfer is demonstrating below. And take the away so the club is on plane.
Then from that point move the club up so the light points inside a line where the ball would be.
Attach a small torch or laser pointer to the bottom of the shaft like this.

3 Easy Steps To A Professional Swing Plane
Page 79 of 139
Then swing to the top of your swing and start down. And to do this make sure your club goes to the left at the top of your swing, like I showed you Nick Price and Ben Hogan do. Then stop your swing when your left arm reaches a point where it's parallel with the ground.
Now at this point the light from your torch should be pointing well to the right of the imaginary ball like the golfer is demonstrating above. And when you get good at doing this drill simply start to increase the speed so you do it almost as fast as a real swing. Once you learn and perfect this move it will make a HUGE difference to your golf swing. This move is what really separates a great ball striker from an average one as it's the complete opposite of what an average ball striker generally does. To view a video of this drill simply click here. It’s under the heading: Step 3: The Torch Transition Drill

3 Easy Steps To A Professional Swing Plane
Page 80 of 139
So if you want to improve your ball striking you've got to master this. And once you've got the feeling of what you need to do in the transition to get the plane flatter on the downswing….then you should try it out in a real golf swing. To do this you need to setup to an imaginary ball with a driver. Then swing, and once you reach the top of your backswing move the club to the left so it's very flat, and then simply swing down and through. Again, you need to exaggerate this move to make a real change in your swing and here’s the final great drill to help you do this when you swing “normally” at a golf ball.
The Jim Furyk Drill Now before I give you this drill I have a word of warning. This drill that I'm going to give you SHOULD feel so strange that you may not want to do it. But please do it anyway because the strange feeling you get from doing this drill is a good thing, as it's the total opposite of what you have probably been doing for your entire golf career thus far. And by far the quickest way of fixing any swing problem is to do the exact opposite. Also remember this, the results of repeatedly doing this drill will be well worth any temporary feeling of being uncomfortable. OK, now the purpose of this drill is simply to give you the feeling of swinging back more upright and then flatter on the downswing than you're swinging back. This is the complete reverse of what over 90% of golfers do. And that's why it's going to feel so weird when you do this drill. What I want you to do this swing like Jim Furyk. Take a look at his positions for Step 2 and Step 3….

3 Easy Steps To A Professional Swing Plane
Page 81 of 139
Step 2 – Exaggerated
Step 3 - Exaggerated

3 Easy Steps To A Professional Swing Plane
Page 82 of 139
So to do this drill setup an imaginary ball and then start your backswing in a one-piece, on plane movement as I've shown you. Do this for about the first two to three feet of your backswing. But from then on move the shaft of the club on a very, very exaggerated upright plane as the pictures on below clearly demonstrate and then continue to the top of your backswing.
Important Note: I don't want you to try and do what I'm suggesting in this drill when you're swinging normally out on the golf course. The idea of doing drills like this is to do them so much that when you go to swing normally the changes we want just happen automatically.

3 Easy Steps To A Professional Swing Plane
Page 83 of 139
After completing your backswing I then want you to feel as though the club is doing a big loop and coming way down behind you on a very flat plane as the pictures below also clearly demonstrate. Then swing through and finish your swing… Now I want to reiterate this because it's so important. Doing this drill will feel very, very strange indeed. But remember, that's good. Also, you should do this very, very exaggerated loop swing everyday for at least 5 minutes. This compliments the other two drills because it’s a full out swing.

3 Easy Steps To A Professional Swing Plane
Page 84 of 139
You don’t want to hit balls with this drill because the results would and should be terrible. This is all about grooving a radically new swing plane in your golf swing. To view a video of this drill simply click here. It’s under the heading: Step 3: The Jim Furyk Drill So here’s a plan for completing Step 3 successfully. Every day…
• Do 100 reps of The Nick Price Isolation Drill. • Spend 5 minutes practicing with the torches/laser pointers (or
training aid), • Spend 5 minutes doing The Jim Furyk Drill.
All up this should take you about 20 minutes per day. You should do this on a week by week basis and every week you should video your swing to check your swing plane. And each time you video your swing I want you to check your take away plane (Step 1) and then your backswing plane position (Step 2) and then finally your downswing plane position (Step 3).
Important Note: If after a week of doing this drill your take away plane is not as good as it was I suggest you keep doing 'The Loop' drill, but also keep doing the take away drills. When going through this process you've got to keep an eye on your take away as well as your backswing plane to make sure you're still on the right track.

3 Easy Steps To A Professional Swing Plane
Page 85 of 139
The Final Swing Plane Test All throughout this process you should have been videoing your swing to make sure it’s correct for each step.
You’ve completed this program when you can do the following at full speed with at least 10 driver swings consecutively, NOT actually trying to manipulate the club as you’re swinging. In other words, your natural, on-plane golf swing.
1. Take the club away on plane like this:
2. Half-way in your backswing when your left arm is parallel with the ground then your club shaft should be either pointing at the ball or inside the ball like this:

3 Easy Steps To A Professional Swing Plane
Page 86 of 139
3. This is by far the hardest of the 3 positions to get into as you’re swinging at full speed. But as you’ll find, this is largely the result of what you do in the transition from the backswing to the downswing. If you don’t move the club to the left in the transition then you won’t be able to achieve this final swing plane position of the club shaft pointing at the ball or to the outside like this:
If you have gone from the swing plane of the average amateur golfer to a swing plane of a pro then WOW, your ball striking will be much, much improved. As I’ve said many times before, the swing plane is the engine of the golf swing in my humble opinion. Now if you can’t complete all 3 steps yet then don’t panic. Just keep trying and keep videoing your swing to check your progress. My best piece of advice for making a swing is to exaggerate what you want. So if you’re struggling with Step 3 then exaggerate flattening the shaft on the downswing so much it feels ridiculous. But when you do that you must start off slow and build up speed. Because as you’ve no doubt already found when trying to make these swing plane changes, doing things perfectly at slow speed is relatively easy. But when you add in the golf ball and try to hit the ball as hard as you can, that’s when old habits come back in. So that’s why you have to check how you’re doing regularly.

3 Easy Steps To A Professional Swing Plane
Page 87 of 139
A lot of what I've been getting you to do is drill based. Not hitting any balls. And this final test relies on you hitting shots normally. But what should you do after that to maintain a good swing plane? Because it's so easy to slip back into bad habits. Well, a great way that you can hit balls while working on your swing plane is to setup to a ball, then place an alignment rod about 3-4 feet behind your ball on the line to your target. Setup the rod on a similar angle to your club or slightly more upright. Here's an example of this from this youtube video: Once you have something like this setup then make some slow swings and hit balls. Make sure you don't take the club too far inside on the backswing and then come down too steep in the downswing. That's the most common swing plane problem amateur golfers make in the golf swing. It's better to err on having a swing plane that is too steep in the backswing and too shallow in the downswing. Jim Furyk is an extreme example of that swing plane. If he did the reverse you would have never

3 Easy Steps To A Professional Swing Plane
Page 88 of 139
heard of him. So always err on the side of steeper on the backswing and shallower on the downswing and regularly check your swing plane with video. I've given you everything you need to know how to analyze your swing so now there's no excuse.
Conclusion If you've successfully completed the 3 steps of this program then you would have noticed a big improvement in your ball striking. But you shouldn't stop trying to improve. The best golfers don’t. So to help you keep on improving I will be sending you information and advice along with great resources that will enable you to take your golf game to even higher levels. If you're keen to do this, look out for my future emails. All the best,
Jeff Richmond Director of Instruction ConsistentGolf.com P.S. Here now are the bonus lessons on the setup. The setup is very important as you’d know. There’s some great stuff in these lessons, so implement the instructions when you can.

3 Easy Steps To A Professional Swing Plane
Page 89 of 139
Setup Bonus Lessons
Lesson 1 – Take The Golf Grip Out Of Play There’s no doubt about it....the golf grip is incredibly important to playing good golf. Here’s some quotes from some of the greatest golfers that have ever lived, talking about the golf grip.
“The grip is the most important thing in the game of golf.” Jack Nicklaus "GOOD GOLF BEGINS WITH A GOOD GRIP" Ben Hogan “If your grip is sound, you don't have to think about your hands at all during the swing. You're free to concentrate on the other aspects of good ball striking.” Tiger Woods
So if you want to play the best golf you can then you need to have a consistent, well formed grip. Because when you do, it will help you to bring the club back square into the ball, so you hit straight golf shots, consistently. And it will also help you to swing powerfully through the ball so you hit nice long shots. We can all agree that a good golf grip is vital to your golf game but I believe you need to take the golf grip out of play. And I’m going to explain why and show you how to do that. First of all, there are no secrets to the golf grip. In fact, there are products available that will help you to form a perfect golf grip time after time. I’ll have more on that in a minute. Look, you could watch a million videos on how to form a grip perfectly. And there’s some great videos out there, with professionals showing you where exactly to place the club in your hand, for both the left hand and the right hand; and where the pressure needs to be in your hands etc. But in my experience when golfers are shown how to form the grip correctly, they start with a good grip - and then end up with a poor grip by the time they hit the golf ball.

3 Easy Steps To A Professional Swing Plane
Page 90 of 139
Why does this happen? Simply because, bad habits are hard to break. So here is what I suggest you do to take the golf grip out of play, so you can not only have a consistent golf grip, but also go on to build a great, consistent golf swing. The first thing you need to do, is get one of the many products available to help you form a perfect grip. Here’s pictures of some golf grip training aids...
1. Grip Coach
Click here to purchase this from Amazon.com
2. GripIt Rite
Click here to purchase this from Amazon.com
3. Golf Pride David Leadbetter Training Grip If you get this training aid you will need a golf club to put it on that is not your normal “in play” golf club. I recommend a 5-iron for this.

3 Easy Steps To A Professional Swing Plane
Page 91 of 139
It’s important, however, when you get a golf grip training aid, that you can actually hit balls with it. You need to be able to feel what it’s like to, not only setup to a shot with a perfect grip, but also to swing and hit a ball with a perfect grip. In this lesson I have listed a number of different products you could choose from to do this. So you need to get something that will help you to form a perfect grip, and after you’ve done that...guess what you need to do? Practice making a perfect grip over and over again! And if you want to own your grip so you can take it out of play, then here’s a quick plan for you. Every day for 30 days, practice forming your grip perfectly 100 times. Each time after you do this, start your swing. You don’t need to swing fully doing this, but you must get used to starting your swing with your perfect grip. If you do this for 30 days, that would be 3000 repetitions! That would be well and truly enough to make your new, great grip a habit. It might feel awkward at first, but after a while it will be second nature for you to grip the club perfectly, AND to start your swing with your perfect golf grip.

3 Easy Steps To A Professional Swing Plane
Page 92 of 139
And that’s taking the golf grip out of play! Doing that will mean you’ll never have to worry about your golf grip again. You’ll know that your golf grip is helping you to hit good, consistent golf shots. And if you’re not hitting good shots, you can rule out your grip as a possible reason. But don’t just follow that plan for 30 days and then stop doing it. After you’ve completed this 30 day plan then once or twice a week you should practice gripping a club with your new, consistent golf grip – just to make sure you maintain it. Doing what I’ve explained in this video is critical if you’re ever going to build a consistent golf swing! This is so easy to do, because you can do it at home while you’re watching T.V. if you can’t get out to hit shots. So there’s no excuses to not having a perfect golf grip just like a pro. Start right now and use the form on the next page to keep track of your progress on taking the golf grip out of play!
Click Here To View The Video For This Lesson

3 Easy Steps To A Professional Swing Plane
Page 93 of 139
Day 1 – 100 Repetitions (Tick When Completed)
Day 2 – 100 Repetitions (Tick When Completed)
Day 3 – 100 Repetitions (Tick When Completed)
Day 4 – 100 Repetitions (Tick When Completed)
Day 5 – 100 Repetitions (Tick When Completed)
Day 6 – 100 Repetitions (Tick When Completed)
Day 7 – 100 Repetitions (Tick When Completed)
Day 8 – 100 Repetitions (Tick When Completed)
Day 9 – 100 Repetitions (Tick When Completed)
Day 10 – 100 Repetitions (Tick When Completed)
Day 11 – 100 Repetitions (Tick When Completed)
Day 12 – 100 Repetitions (Tick When Completed)
Day 13 – 100 Repetitions (Tick When Completed)
Day 14 – 100 Repetitions (Tick When Completed)
Day 15 – 100 Repetitions (Tick When Completed)
Day 16 – 100 Repetitions (Tick When Completed)
Day 17 – 100 Repetitions (Tick When Completed)
Day 18 – 100 Repetitions (Tick When Completed)
Day 19 – 100 Repetitions (Tick When Completed)
Day 20 – 100 Repetitions (Tick When Completed)
Day 21 – 100 Repetitions (Tick When Completed)
Day 22 – 100 Repetitions (Tick When Completed)
Day 23 – 100 Repetitions (Tick When Completed)
Day 24 – 100 Repetitions (Tick When Completed)
Day 25 – 100 Repetitions (Tick When Completed)
Day 26 – 100 Repetitions (Tick When Completed)
Day 27 – 100 Repetitions (Tick When Completed)
Day 28 – 100 Repetitions (Tick When Completed)
Day 29 – 100 Repetitions (Tick When Completed)
Day 30 - 100 Repetitions (Tick When Completed)

3 Easy Steps To A Professional Swing Plane
Page 94 of 139
Lesson 2 - Perfect Grip Pressure For You How hard should you grip the golf club? There’s a lot of different answers you could be given to this question. But obviously you don’t want to hold the club so tight that you restrict your golf swing, and you don’t want to hold the club so loose that you lose control of the club. So you need a grip pressure in-between the two extremes. And I’m sure you’ve heard analogies like... “grip the club as though you’re holding a baby bird”. Or, “grip the club like you would if it were a loaf of bread” etc. But I’m helping you to build a consistent golf swing here. So we need something more concrete than that! So there are two aspects to grip pressure that you need to focus on. The first is your grip pressure as you address the ball, and the second is your grip pressure as you’re swinging. In this lesson, I’m only going to cover grip pressure as you’re setting up to a shot, and the initial take-away. When you’re swinging, as long as you don’t consciously manipulate your hands, the grip pressure will be perfect for you throughout the swing. Now, when you’re setting up to the ball, you want to hold the club in such a manner that it’s not too hard, and not too light. As I’ve already said, you want something in-between. In my ‘Take The Golf Grip Out Of Play’ lesson, I instructed you to practice forming the grip 100 times each day perfectly, with a formed grip training aid. When you do that, you can also incorporate the perfect grip pressure into your routine. So how can you form a grip with perfect grip pressure and make it consistent? Well, when you grip the club you will instinctively know what a “firm” grip is for you; and you will also know what a “light” grip is for you. So after forming your perfect grip, then give the club a firm squeeze and hold that for 2 seconds.

3 Easy Steps To A Professional Swing Plane
Page 95 of 139
Then after doing that, let your grip relax so that you’re holding the club loosely for 2 seconds and notice that feeling. Now find the perfect grip pressure for you that will be roughly in-between those two extremes. If you were to number 1 as an extremely light grip, and 10 as an extremely hard grip, then I want you to number your perfect grip pressure. It might be a 6 for you. It doesn’t need to be 5. You may prefer a slightly firmer grip or a slightly softer grip. But when you find that perfect grip pressure, I want you to say inside your head “perfect grip pressure” followed by your number. And then start your swing.
Firm (10)
Light (1)

3 Easy Steps To A Professional Swing Plane
Page 96 of 139
“Perfect Grip Pressure” So that’s how you can create perfect grip pressure for you, and have it be consistent. I want you to add that process to what you’re already doing to take the golf grip out of play. You may, however, be wondering about having more pressure in certain parts of your hands. The places commonly instructed for this, are the last two fingers on the top hand, and the middle two fingers of the bottom hand. Personally I think that’s making grip pressure too complicated; but you should experiment to see if it helps you. And if it does, you should assign numbers to different fingers. So you may grip the club with a 6, but you may grip with an 8 with the last two fingers of your top hand. Again, experiment with this to find out what works best for you. When you follow these instructions; it’s going to greatly help you to build a consistent golf swing - so don’t take this for granted. And if you can find the time, you should test out your new grip and grip pressure when you’re hitting golf balls, to make sure it’s right for you.
Click Here To View The Video For This Lesson
6

3 Easy Steps To A Professional Swing Plane
Page 97 of 139
Lesson 3 - Consistent Grip Routine Do you want to build a consistent, perfect golf swing? I’m sure you do, otherwise you wouldn’t be reading this. But a big part of being able to do that, is to not only have a perfect golf grip with perfect grip pressure; BUT... you must be able to form the grip in the same way, time after time. So to help you do that so you become a consistent ball striker, you need to have a routine to form your grip. All great golfers do. And I have a consistent golf grip routine that I’m going to give you in a minute, but you can most certainly modify it to suit so it’s perfect for you. And whether you use the routine I give you, or come up with your own, the bottom line is - you need one. The grip routine you use, should start as you’re standing behind your ball. For every golf shot you should stand directly behind your ball on a line to your target. When you do this you need to pick a hand in which you hold your club with. Again, you can modify this consistent golf grip routine, but I think you should hold the club with your left hand as you’re standing behind the ball. And you should do this with the same grip that you’re going to use as you swing. So grip the club perfectly with your left hand as you’re standing behind your ball, like this...

3 Easy Steps To A Professional Swing Plane
Page 98 of 139
I believe it will help your consistency if you have already formed your grip before you put the club down behind the golf ball. In my opinion, the best way of making that happen, is to put your right hand on the grip as you’re walking to the ball. And because we’re building you a consistent, perfect golf swing here, you need a precise time when you do this. To make this easy, as soon as you take your first step towards your ball you should put your right hand on your grip. You should also start your walk towards the ball with a certain foot. I suggest you start with your right foot, and put your right hand on the golf grip at the same time. So here is a golfer putting this consistent golf grip procedure into action.

3 Easy Steps To A Professional Swing Plane
Page 99 of 139
The Consistent Golf Grip Routine
Ok, so today’s task for you is to come up with a consistent procedure for gripping the club. And the best way of doing this, is to simply copy the one I’ve shown you, and either leave it as is or make changes to it to suit yourself. But if you make changes to it, you must keep certain things in place. The first is that you must hold the club in the same hand every time when you’re holding the club behind the ball. The second thing is, you must form your grip at a certain place in your pre-shot routine every time. I’ve seen professional golfers form the grip as they’re standing directly behind the ball. So you could try that if you like.
Grip the club with your perfect left hand grip as you’re standing behind your ball.
Start walking to the ball with your right foot and place your right hand on the grip at the same time.

3 Easy Steps To A Professional Swing Plane
Page 100 of 139
I do, however, recommend that you don’t form the grip when you’re putting the club down behind the ball; because at that point, your main concern should be aligning the clubface to where you want your golf ball to start.
Click Here To View The Video For This Lesson

3 Easy Steps To A Professional Swing Plane
Page 101 of 139
Lesson 4 - Consistent Waggle And Clubface Alignment One of the worst things a golfer can do when setting up to the golf ball is to remain perfectly still. You always need to be moving when setting up to the golf ball. And an important part of that is to waggle the golf club, because if your hands get tight then, most likely, so will the rest of your body. A waggle is generally a small movement of the hands when addressing the ball. The benefits of a waggle are as follows:
1. It helps you to keep moving, which will help your rhythm when swinging.
2. It helps you to stay relaxed – particularly your hands.
3. It helps you to mentally and physically prepare for the upcoming shot.
There’s a million and one different ways you can waggle the golf club, and there is no one ‘right’ way. But I’m going to show you what I call the consistent golf swing waggle. To do this, you simply need to setup to a ball, and then you need to rotate your hands so that the club comes up to be almost parallel with the ground. It’s important that when you do this that the club is near 90 degree’s to your arms like the picture on the next page shows.

3 Easy Steps To A Professional Swing Plane
Page 102 of 139
Another important part of this waggle is, you should look directly at where you want your ball to finish when you waggle.

3 Easy Steps To A Professional Swing Plane
Page 103 of 139
When you do this, you should waggle for a set amount of times. I suggest two, but you can vary this to suit yourself and what is comfortable for you. I wouldn’t suggest any more than 5 however, as that’s getting too long and will hold up play too much. It’s also very important to remember your grip pressure when you’re doing this. It must be constant. Like in the grip pressure lesson... not too hard and not too light. Your consistent golf swing waggle is like a dance. It needs to have rhythm. It needs to have grace. You want to be setting yourself up to swing with fluidity. Next up today, I’m going to cover clubface alignment at address. When you setup to the golf ball, you naturally want your clubface square to where you want your ball to start. But that’s tricky when the golf ball is round. Setting up to the golf ball with a square clubface is a habit which needs to be created. And here is how you can do that better, more consistently. Instead of a setting up to just a golf ball by itself, I suggest you practice setting up to something with a square edge. In this example, I’m getting my student to practice setting up to a ball with a credit card behind the ball. You can also do this with any straight surface you have around your home. So simply practice setting up over and over again, with your clubface square. By doing this, you’re training yourself to setup with the clubface square to your target. That’s how you build square clubface alignment into your consistent setup.

3 Easy Steps To A Professional Swing Plane
Page 104 of 139
So in this lesson I have covered the consistent golf swing waggle, and how to setup with your clubface square to your target. Now you need to practice and perfect this -- so go to it!
Click Here To View The Video For This Lesson
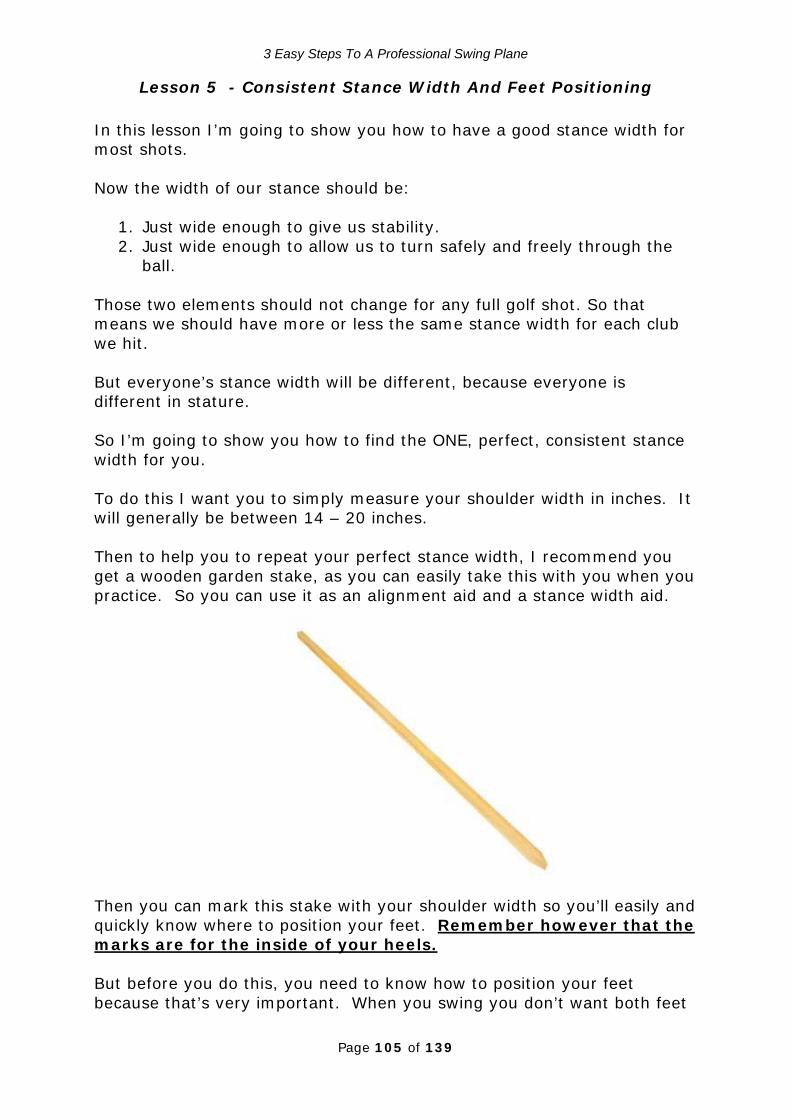
3 Easy Steps To A Professional Swing Plane
Page 105 of 139
Lesson 5 - Consistent Stance Width And Feet Positioning In this lesson I’m going to show you how to have a good stance width for most shots. Now the width of our stance should be:
1. Just wide enough to give us stability. 2. Just wide enough to allow us to turn safely and freely through the
ball. Those two elements should not change for any full golf shot. So that means we should have more or less the same stance width for each club we hit. But everyone’s stance width will be different, because everyone is different in stature. So I’m going to show you how to find the ONE, perfect, consistent stance width for you. To do this I want you to simply measure your shoulder width in inches. It will generally be between 14 – 20 inches. Then to help you to repeat your perfect stance width, I recommend you get a wooden garden stake, as you can easily take this with you when you practice. So you can use it as an alignment aid and a stance width aid. Then you can mark this stake with your shoulder width so you’ll easily and quickly know where to position your feet.
Remember however that the marks are for the inside of your heels.
But before you do this, you need to know how to position your feet because that’s very important. When you swing you don’t want both feet

3 Easy Steps To A Professional Swing Plane
Page 106 of 139
pointing forward. Your back foot should point straight ahead, but your lead foot should be turned out about 30 degrees towards your target. Doing this will allow you to get through the ball better. So do that, and then mark on your garden stake (or something similar) your shoulder width.
After you’ve done this, you now have the stance width you should use for a 5 iron. Then your longer clubs should be a fraction wider than this. And your shorter clubs should be a fraction closer together than this. Because the driver is the longest club in the bag, and you have the ball teed up pretty high, you can have your stance a bit wider to support a more sweeping motion. So I recommend you add an extra inch in width for each foot, for the driver. On the next page you can see a golfer setup to a ball with a driver. You wouldn’t want your feet any closer together than that. And a fraction wider would be better.

3 Easy Steps To A Professional Swing Plane
Page 107 of 139
Ok, so that’s the important lesson on stance width and feet positioning. Put these instructions into action, and start to reap the rewards of longer, straighter and more consistent golf shots!
Click Here To View The Video For This Lesson

3 Easy Steps To A Professional Swing Plane
Page 108 of 139
Lesson 6 - Consistent Ball Position When it comes to ball position there are two choices. You have one ball position for all clubs. Or you have a different ball position depending on what club you’re using. And depending on the golfer you select to emulate in the swing section part of this program it will largely determine which option you choose. But I’m going to show you how to create one ball position that is will help you to strike the ball consistently well, and this one ball position is easy to achieve. For every shot apart from your driver, you want to strike the ball with a descending blow. To achieve this, you must place the ball back from a place where the club and left arm would form a straight line. A good reference point to check if the ball is positioned correctly for all your shots, apart from your driver, is to draw a line directly down from your left ear at setup. Obviously when you’re setting up to a ball, it’s impossible to tell if you’ve positioned the ball perfectly so it’s off your left ear. But here is how you can do this time after time.

3 Easy Steps To A Professional Swing Plane
Page 109 of 139
It’s what I call the “consistent ball position procedure”. And you should incorporate this into your physical consistent pre-shot routine. Now what you do when setting up to your golf shots, is point your right foot directly at your golf ball and then bring your left foot up to your right foot, so that it’s together with your right foot - like this... Now you simply place your right foot at the stance width that you’ve determined to be optimal for you. When you do this you’ll find that your ball is positioned perfectly just off your left ear.

3 Easy Steps To A Professional Swing Plane
Page 110 of 139
That ball position is pretty much perfect for every shot you hit. With your shorter irons you may want the ball a fraction further back and for your driver you may want the ball a fraction further up. But this ball position procedure is a great starting point. So that’s the important details of how to get into a good ball position consistently for your driver and all other clubs. Keep practicing that to form a new good ball position habit and reap the rewards of longer, straighter and more consistent golf shots.
Click Here To View The Video For This Lesson

3 Easy Steps To A Professional Swing Plane
Page 111 of 139
Lesson 7 - Consistent Golf Swing Posture The posture you have when you’re setting up to the golf ball has a HUGE impact on the quality of your golf swing, as well as helping with injury prevention. For example, if you have proper posture when you setup to your ball, it allows you to rotate more easily - which will help you to hit longer drives, with much less risk of injury. And posture is one area of golf where you can look just like the best ball strikers in the world. It really is easy to have great posture when setting up to the golf ball. But equally, it’s just as easy to have bad posture. So you’ll have to practice often what I’m giving you to do in this lesson, to make good posture a habit. But the benefits of great posture are numerous, so it’s well worth a little bit of effort to practice and perfect it. So I’m now going to show you exactly how to do that. To do this consistent posture exercise, I want you to get your driver and stand up straight. Before beginning I want you to rock forward so your weight is on your toes and then rock back so your weight is on your heels. Then find a spot where your weight is pretty much in the middle of your feet.
Rock Forward Rock Back
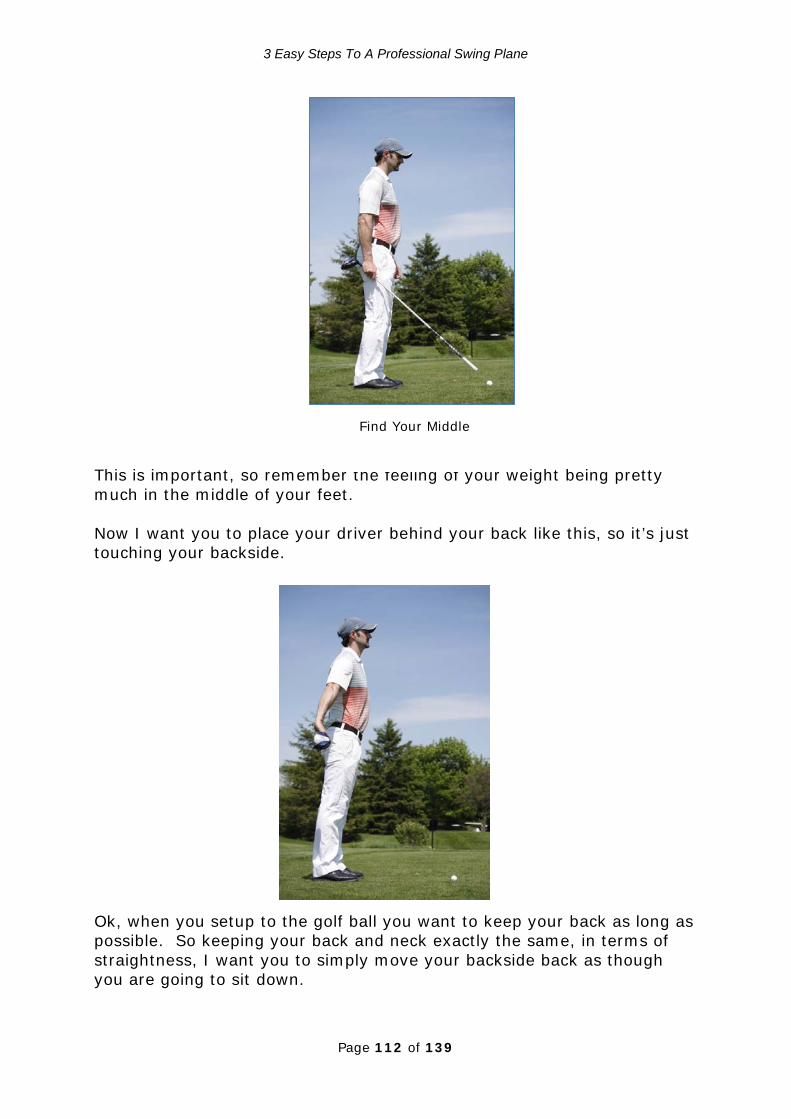
3 Easy Steps To A Professional Swing Plane
Page 112 of 139
This is important, so remember the feeling of your weight being pretty much in the middle of your feet. Now I want you to place your driver behind your back like this, so it’s just touching your backside. Ok, when you setup to the golf ball you want to keep your back as long as possible. So keeping your back and neck exactly the same, in terms of straightness, I want you to simply move your backside back as though you are going to sit down.
Find Your Middle

3 Easy Steps To A Professional Swing Plane
Page 113 of 139
Keep moving your backside back like this until you start to feel your weight move back to the heels of your feet, and your toes will feel very light - like they want to come up off the ground. Once you get to that position then simply take the straightness out of your knees and adjust your weight if you need to, so that your weight is in the middle of your feet. This should feel the same when you were just standing up straight with your weight in the middle of your feet.
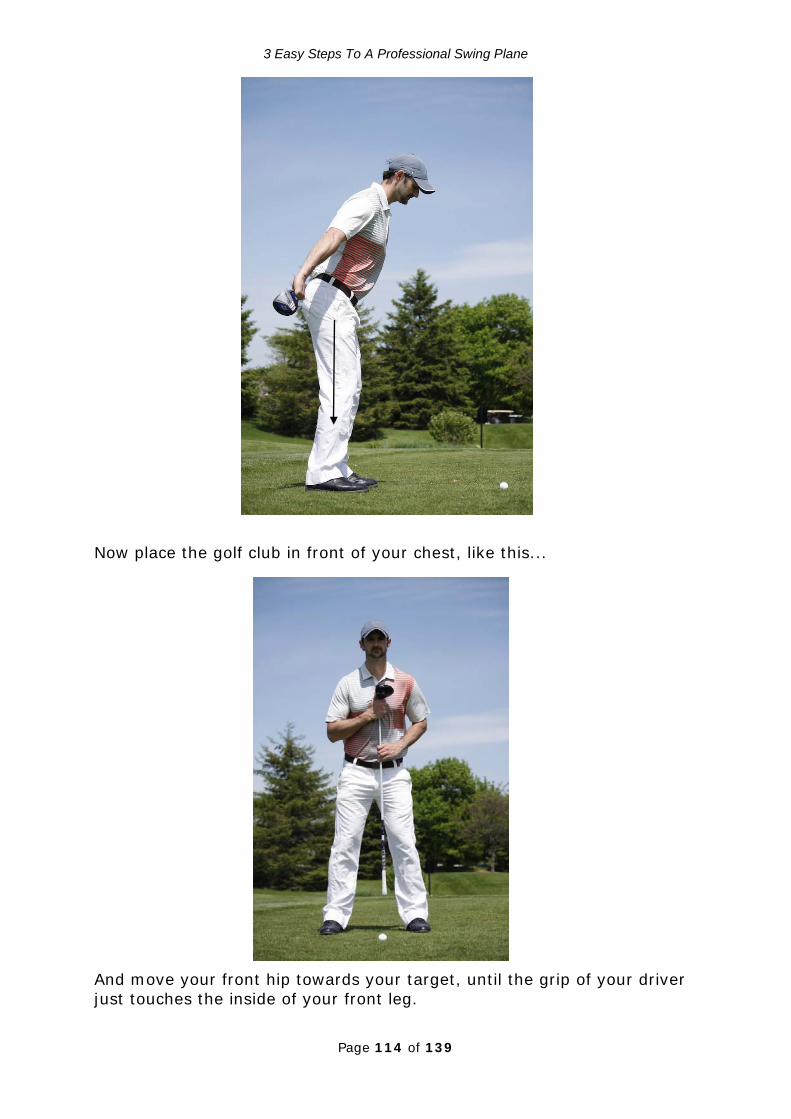
3 Easy Steps To A Professional Swing Plane
Page 114 of 139
Now place the golf club in front of your chest, like this... And move your front hip towards your target, until the grip of your driver just touches the inside of your front leg.

3 Easy Steps To A Professional Swing Plane
Page 115 of 139
This tilts your spine away from the target, and gets you into a very powerful position to hit long, straight and consistent golf shots. From that position, now get your driver and just let your hands naturally hang down from your shoulders, and place your hands on the club so you have your perfect grip and setup.

3 Easy Steps To A Professional Swing Plane
Page 116 of 139
It’s important when you get the golf club into your hands that you don’t round your shoulders. To make sure you don’t do that perform this exercise in front of a mirror over and over again, making sure your back remains long as you bend over, and particularly as you grip the golf club. By letting your arms just hang without rounding your shoulders, it will put you at a perfect distance away from the ball. Now you may be wondering why you shouldn’t have your weight on the balls of your feet. Well, it’s simply because the forces are so great when you’re swinging, that you’ll have much better balance to hit the ball as long as possible if you have your weight more centered in your stance. So practice this posture exercise over and over again to get used to setting up to a ball with perfect posture. And you can combine this with practicing your perfect grip to kill two birds with one stone. Do this and reap the rewards of longer, straighter and more consistent golf shots.
Click Here To View The Video For This Lesson

3 Easy Steps To A Professional Swing Plane
Page 117 of 139
Lesson 8 - Consistent Alignment Conceptually, having correct alignment is very, very easy for golfers. But having correct alignment, consistently is another matter. To define consistent golf alignment, all major parts of your body should be aligned parallel to the target line of your golf shot. So imagine railroad tracks when you’re setting up. Your ball is on one track and your feet are on the other. But it’s not just your feet that should be parallel to your target line. Your knees, hips, shoulders and arms should all be parallel to your target line. What I’ve found, however, is that if you can get your feet correctly aligned and your shoulders correctly aligned, then everything else pretty much follows suite. So that’s what we’re going to focus on in this lesson, starting with your feet. I just need to say though, that setting up with the correct alignment is a habit. Anyone can setup with perfect alignment if they make it a habit. So starting with your feet; you need to have a setup station, that will give you reference as to whether or not your feet are parallel with your target line. If you’re indoors you can simply find some lines around your home, for example tiles on the floor.

3 Easy Steps To A Professional Swing Plane
Page 118 of 139
If you’re outside practicing, then you can simply lay down golf clubs like this. Once you have your practice station setup, you then simply need to setup to your shot with your feet aligned perfectly.

3 Easy Steps To A Professional Swing Plane
Page 119 of 139
Then practice doing this over and over again, to form your new alignment habit. So that’s the feet alignment sorted – which is pretty easy because it’s just forming a good habit. Let’s now turn our attention to shoulder alignment. To help you determine whether your shoulders are aligned correctly or not, you simply have to setup to your shot, once setup keep everything exactly the same. Then lift up your club and lay it across your shoulders to see where the shaft is pointing. A better way than that however, is to setup to a shot and have someone place a club across your shoulders, so they can see where your shoulders are pointing.

3 Easy Steps To A Professional Swing Plane
Page 120 of 139
The trouble is, more often than not you won’t have anyone around to help you do that. So back to the idea of placing a club across your shoulders. The easiest way to check this is to open your shoulders up a lot, like this. Then close your shoulders. Like this...

3 Easy Steps To A Professional Swing Plane
Page 121 of 139
So doing that will make it much easier for you to find the middle, which should be parallel with your target. As I said, setting up to your shots with great alignment is a habit. It’s nothing you should really think about when you’re playing golf because you should have done it so many times that you do it automatically. The problem is that golfers get into a bad habit and setup lazily, and their alignment becomes poor over time. Please make sure that doesn’t happen to you. Regularly practice setting up with correct alignment, and make perfect alignment second nature for you.
Click Here To View The Video For This Lesson

3 Easy Steps To A Professional Swing Plane
Page 122 of 139
Lesson 9 - Consistent Physical Pre-Shot Routine If you want to become a consistent ball striker, then you absolutely must setup in the same, consistent way, every single golf shot – to give yourself the most chance of success. This, of course, is called a pre-shot routine. You often hear of a pre-shot routine being talked about. But rarely is it shown in detail, how to create one that will help you to get into a good position for good alignment and ball position. So that’s what I’m going to show you. The very first thing you must do when playing any long shot, is to determine the starting line of your shot. Then pick out an intermediate target that is on that line, and about 2 feet in front of your ball. This is assuming that all of your shot decisions have been made. I will discuss how you go about coming up with the best shot decisions in another lesson. In this lesson, I’m just talking about the physical actions you should make when preparing to swing. So, you have your intermediate target in your sight. You are standing directly behind your ball on a line parallel to your target. You’re holding the club in your left hand with the grip you’re going to use.... Then you start walking to the left side of your ball with your right foot, and at the same time you place your right hand on the grip.

3 Easy Steps To A Professional Swing Plane
Page 123 of 139
Near your ball you place your right foot down so it’s pointing directly at the ball, and at the same time you put the club down behind the ball. Now move your left foot up so it’s together with your right foot.

3 Easy Steps To A Professional Swing Plane
Page 124 of 139
Then move your right foot to the right so your feet width is optimal for you. This is essentially the setup complete. But you’re not ready to hit your ball yet. Before we continue with this routine, I just want to say that pretty much everything up to this point is just habits. It takes no skill whatsoever.

3 Easy Steps To A Professional Swing Plane
Page 125 of 139
For example, the golf grip. If you’ve followed my instructions on the grip, then you should have practiced a perfect grip over and over again so that’s a habit. You should have practiced the correct posture position over and over again, so you just do it naturally when you setup to the ball. You should have practiced setting up with correct alignment. You should have practiced getting your feet into the correct feet width position for you. So all of these things should not require much thinking on your part. They’re just habits. All the pre-shot routine should be is a sequence of movements that you perform over and over again. And a big part of that is your waggle. When you setup to the ball, initially you don’t want to remain perfectly still. So you must waggle the golf club like I’ve already shown you. When you do this you need to look at where you want your ball to finish. It’s important that you’re moving your weight around when you’re setting up to the ball, so that you’re feeling dynamic. You don’t want to ever be still when you’re setting up to the ball.... Not perfectly still anyway. So let’s say you’ve had your two waggles, and you’re ready to start your swing. How should you do it? Well, I strongly believe that the best way of doing it is to bump the right knee in towards the target. What this does is give you a rebound effect, which makes it easier to take the club away smoother.

3 Easy Steps To A Professional Swing Plane
Page 126 of 139
So add that to your physical pre-shot routine. Now there’s one final, critical piece of this pre-shot routine, that will GREATLY help you to become a great, consistent ball striker - and that’s this. You must take about the same amount of time every time you setup to a shot. So you need to practice this by counting as you’re setting up. Once you have your physical pre-shot routine organized, you need to start counting from the time you walk to the ball until the time you’re just about to take the club away from the ball. Again, this should take the same amount of time, every time. This is very important. And as you’ll see in the next lesson on the mental pre-shot routine, this counting is not only going to help you get the setup attributes the same, in terms of timing. It’s going to help you automate your entire golf game. So make a start at forming your own consistent, physical pre-shot routine, so you can hit longer, straighter and more consistent golf shots.
Click Here To View The Video For This Lesson

3 Easy Steps To A Professional Swing Plane
Page 127 of 139
Lesson 10 - Consistent Mental Pre-Shot Routine In this lesson, I’m going to show you a mental pre-shot routine that is going to help you have the best chance of success on each golf shot you play. Now, keep in mind however, this mental pre-shot routine is not inclusive of everything you can do mentally before each shot. For example, I’m not going to cover in detail how you select the appropriate club, how to visualize your shots, or anything like that. Those topics are quite vast and I cover that in other products. So I am going to assume that you’re standing behind your ball, and you know what club you’re going to use, you’ve got an idea of the type of shot you’re going to hit, and so you’re about ready to walk to the ball. Before you hit any golf shot, I firmly believe that you need to open yourself up to the possibility of hitting a great shot. You shouldn’t lie to yourself and say “I’m going to hit a great shot”, because you have no idea whether you will or not. But every golf shot you face, you need to be in the frame of mind of good possibilities. To do this, you should ask the following question as you’re standing behind your shot:
“Is it possible for me to hit a good shot?” You can personalize that to be something like “Is it possible for me to hit a good drive, or a good iron shot,” etc. Now of course it’s possible that you’re going to hit a good shot, and that’s the attitude you need to approach your ball with. But you need that possibility to be connected with completing your physical and mental pre-shot routine. You need to be committed to the process. Ok, so you’re standing behind your ball. You’re open to the possibility of hitting a good shot. Next you need to take a deep breath in, and then breathe out while asking this very important question:
“Where do I want my ball to finish?” Then visualize your ball sitting there. Look at the spot you want your ball to finish for a couple of seconds.

3 Easy Steps To A Professional Swing Plane
Page 128 of 139
Ok, now you’re ready to walk to the ball. It’s important when you do this that you take the same amount of time for every shot you hit. The best way of doing this is to count as you’re walking to your ball and setting up. Before you start that however, I want you to say the word “start”. This signifies that you are starting your shot. After saying this then start your counting and physical pre-shot routine. So the first step you take is 1, then take your 2nd step as you count 2, and so on as you’re setting up to the ball. Each count should be about a second. It’s also important that you should have a set amount of waggles, and with each waggle you should be looking at the spot you want your ball to finish. Then when you have the club behind the ball, you need to stop counting and say “record”.
Record
1... 2....

3 Easy Steps To A Professional Swing Plane
Page 129 of 139
Why “record”? Well, you play your best golf when you have a blank mind, you’re not trying to control your swing. You just swing automatically. And with the word ‘record’ I want you then to simply observe the shot as though your eyes are a video camera. You are simply recording what is happening. There is no judgement or opinions. You’re going to swing, and simply be in the present and see everything that happens. Sounds easy, right? When you do this you’ll find out how tough it actually is to be in the present over every shot. But you absolutely must try to do this if you’re ever going to play your best golf. So you swing observing your swing and the ball being hit. Then at the end of your swing you say, “stop record”. You have finished the shot. And to signify that, you then need to say “finish”. It’s good to practice these statements out loud at home at first. But then on the course you simply say them to yourself inside your head. After you say “finish” that shot you just hit is done and dusted. You can’t do anything about it. So getting upset if you hit a bad shot is very bad for your long term enjoyment as a golfer.
Stop Record

3 Easy Steps To A Professional Swing Plane
Page 130 of 139
If you hit a good shot, by all means celebrate. I think it’s a great idea to also take a breath at the end of your shots, after you’ve said finish. A great way to clear your head is to do a 4 to 8 breathe. Breathe in for 4 seconds, hold for a couple of seconds and then breathe out for 8 seconds. Ok, so that, in a nutshell, is the consistent golf swing mental pre-shot routine. The goal is to do that mental pre-shot routine for every long game shot you play. If you can do that, you won’t believe how good you’ll play. But until you’ve tried to do a routine like this for every golf shot you play, you won’t believe how difficult it will be. The rewards are well worth the effort though. This is one major thing that sets the pros apart from amateurs. This is a crucial lesson, so make a start at forming your own consistent, mental pre-shot routine, so you can hit longer, straighter and more consistent golf shots.
Click Here To View The Video For This Lesson

3 Easy Steps To A Professional Swing Plane
Page 131 of 139
Lesson 11 – Consistent Setup: Putting It All Together We’ve covered a lot in the setup part of this program and it’s now time to put it all together. Let’s start with the grip first of all. As I’ve instructed you, you just need to practice your perfect grip over and over again so that when you setup to a shot it’s second nature to grip the club perfectly. And remember, you need to do this with good grip pressure for you. Also when you setup to your shots you must have a consistent grip routine. You have to practice this over and over again so you can just repeat the routine when you’re playing and having a perfect grip. This is part of the pre-shot routine. But the actual perfect grip part comes about from you practicing forming the perfect grip over and over again. Next we covered the waggle and clubface alignment. You need to have a set amount of waggles each shot. And you should practice setting up with the clubface square to where you want your ball to start. That is something you need to practice over and over again to perfect. In your pre-shot routine you will select an intermediate target a couple of

3 Easy Steps To A Professional Swing Plane
Page 132 of 139
feet in front of your ball. But setting up with the clubface square to that intermediate target is really a habit. Next up we covered feet width and positioning. You should have already determined the correct feet width for you. And your feet width is a habit that you need to create. You should not be trying to figure out the feet width when you setup to a shot. You should have done it so many times that it’s second nature. The same goes with your feet positioning. That needs to be second nature.

3 Easy Steps To A Professional Swing Plane
Page 133 of 139
The same is true with ball position. I have given you a procedure to get the ball into a great position every shot. This is something you just need to practice and do.
After ball position we covered posture. When you setup to a golf shot you should not be thinking about your posture. It should just be second nature to have perfect posture. The only way that is going to happen is if you practice your posture over and over again. As you’ll notice with a lot to do with the way you setup to the ball...it has very little to do with skill or natural talent. It’s all about forming good habits. And you can setup to the golf ball as well as the best golfers in the world. That’s what I’m trying to get you to do...and it’s doable. Next we covered alignment. Again, this is just a habit. I’ve shown you how to check your alignment so you just need to practice that over and over again. And alignment is one area that is very easy to slowly get wrong. So your alignment needs constant checking and monitoring.

3 Easy Steps To A Professional Swing Plane
Page 134 of 139
Ok, so that’s all the elements needed to setup successfully. I then instructed you to form a physical and mental pre-shot routine. And I’m going to walk through that with you. Now assuming you’ve selected the correct club and shot option the first thing you need to do is stand behind your ball and hold the club with your left hand as you are going to when you swing. At this point you need to ask yourself if it’s possible to hit a good shot. Doing this helps you to get your mind into a positive state.

3 Easy Steps To A Professional Swing Plane
Page 135 of 139
Next you need to breathe in and out and ask yourself “where do I want my ball to finish?” Then you need to visualize your ball sitting there.
“Is it possible that I can hit a good shot?”
“Where do I want my ball to finish?”

3 Easy Steps To A Professional Swing Plane
Page 136 of 139
You then need to pick out an intermediate target between your ball and your target. This intermediate target needs to be about 2 feet in front of your golf ball. After doing that you then need to say “start” and walk to your ball while counting. And when you walk to the ball you need to start with the same foot and put your right hand on your grip. When you get to your ball you then need to point your right foot at the ball and place the club down behind the ball so it’s pointing directly at your intermediate target. All the while you’re doing this you need to keep counting.
1... 2....
11... 12....

3 Easy Steps To A Professional Swing Plane
Page 137 of 139
Then bring up your left foot and then position your right foot. After doing this you then need to waggle the set amount of times you’ve decided upon and while you’re doing this you need to look at the spot where you want your ball to finish. Again, you need to be counting all the while you’re doing this. Once you’re ready to start your swing you then need to say “record”.

3 Easy Steps To A Professional Swing Plane
Page 138 of 139
And remember, what you’re doing is observing everything you’re doing and you want to see the ball being struck by the clubhead. But remember, to start your swing you need a physical trigger. And I recommend bumping in your right knee towards your target. So after doing your physical trigger, start your swing. And then at the end of your swing say “stop record”.
Stop Record
Record
3 Easy Steps To A Professional Swing Plane
Page 139 of 139
Once you’ve completed your shot you then need to say “finish” and take a deep breathe in and then breathe out. That shot is now over. It’s finished. It’s time to experience your surroundings. Talk to your playing partners. Then the next shot you go through the same process. If you truly want to become a confident, consistent golfer then you must complete creating a consistent physical and mental pre-shot routine. Then you must do that routine over and over again so it becomes second nature. And I’ve given you the tools to do this. You may want to change what I’ve shown you. That’s ok, but you must have a process like I’ve shown you that you use every shot. This is critical if you want a great, consistent, golf swing.


![Vol 39 - [Swing, Swing, Swing].pdf](https://static.fdocuments.net/doc/165x107/55cf8f6f550346703b9c5141/vol-39-swing-swing-swingpdf.jpg)


![Vol 39 - [Swing, Swing, Swing]](https://static.fdocuments.net/doc/165x107/55cf8f5a550346703b9b7709/vol-39-swing-swing-swing-5699adb3c742c.jpg)
