2Megapixel HD-SDI Speed Dome Camera User manual · PDF fileDo not disassemble the unit and put...
52
2Megapixel HD-SDI Speed Dome Camera User manual Version F0806
-
Upload
duongquynh -
Category
Documents
-
view
220 -
download
2
Transcript of 2Megapixel HD-SDI Speed Dome Camera User manual · PDF fileDo not disassemble the unit and put...

2Megapixel HD-SDI Speed Dome Camera User manual
Version F0806

2Mega HD-SDI Speed Dome Camera User manual
2
Content
1. Caution.................................................................................................................................................................................................. 3
2. Product Introduction ........................................................................................................................................................................ 5
2.1. Description and features ............................................................................................................................................ 5
2.2. Product package ........................................................................................................................................................... 6
2.3. Name and function of each part ............................................................................................................................. 7
2.4. Installation ......................................................................................................................................................................10
3. DIP switch setting ...........................................................................................................................................................................16
3.1. DIP Switch setting ......................................................................................................................................................16
3.2. Protocol setting ............................................................................................................................................................17
3.3. Address DIP Switch Setting ...................................................................................................................................18
3.4. OSD Menu setting ......................................................................................................................................................19
3.4.1. OSD Menu control ............................................................................................................................................19
3.4.2. Menu function .....................................................................................................................................................20
3.4.3. Set-up menu, Execute and delete by keyboard ...................................................................................40
3.4.4. OSD Message Description ...........................................................................................................................44
4. TROUBLE SHOOTING ................................................................................................................................................................46
5. Dimension ..........................................................................................................................................................................................47
6. Configuration diagram ..................................................................................................................................................................48
7. Specification .....................................................................................................................................................................................50

2Mega HD-SDI Speed Dome Camera User manual
3
1. Caution
Thank you for purchasing our product. Please operate the product after being fully aware of the
manual. Pease contact us if you have any query.
Precaution Note the following matters before the installation of the product.
Avoid the following places for the installation.
A high/low temperature: Using indoor-cameras
in the places of +50°C~ -10°C can cause
troubles and lower its capacity.
Snow, rain and wet: Humidity or water and
any liquid inside-camera can cause troubles.
Vibration, shock: They bring on problems or
errors of the camera.
Oil, gas: Oil and gas can damage the camera
as they go through the cameras.
Closing to High frequency and electric power
lines: Setting the camera up around
electromagnetic units or power supplier can
cause problems.
Direct light, exposure to the air: In the case of
that sets indoor- cameras outside where the
weather is changeable, it can cause problems.

2Mega HD-SDI Speed Dome Camera User manual
4
Caution in Use
Do not disassemble the unit and put alien substances in the unit.
Disassembling the unit or putting alien substances such as a metal can make the
camera defective.
- Make sure of power switch-off before the installation.
: Ensure power switch-off and check the voltage the camera before the installation.
- Do not give the unit a shock and an operation.
: Giving a strong shock or an excessive power on the button, terminal can cause problem.
This product has been designed and manufactured in accordance with the harmonized European standards,
following the provisions of the below stated directives. Electromagnetic Compatibility Directive 89/336/EEC(EN61000-3-2:1995, EN61000-3-3:1995, EN50081-
1:1992, EN50082-1:1997)
This devise complies with part 15 of the fcc rules operation is subject to the following two conditions: (1) This device may not cause harmful interference and (2) This device must accept any interference received including interference that may cause undesired operation
Caution :
① Must use AC24V power source, current intensity must be less than 2A and must use
a double winding transformer
② Never extend the power line from adaptor to camera.
③ Please use more thick cable than 18AWG(1.0mm), if you want to extend the power
line.
④ You must use one adaptor per one camera that is being provided.
⑤ Use extra power supplier, If you want to supply many piece of cameras.
2Mega HD-SDI Speed Dome Camera User manual
5
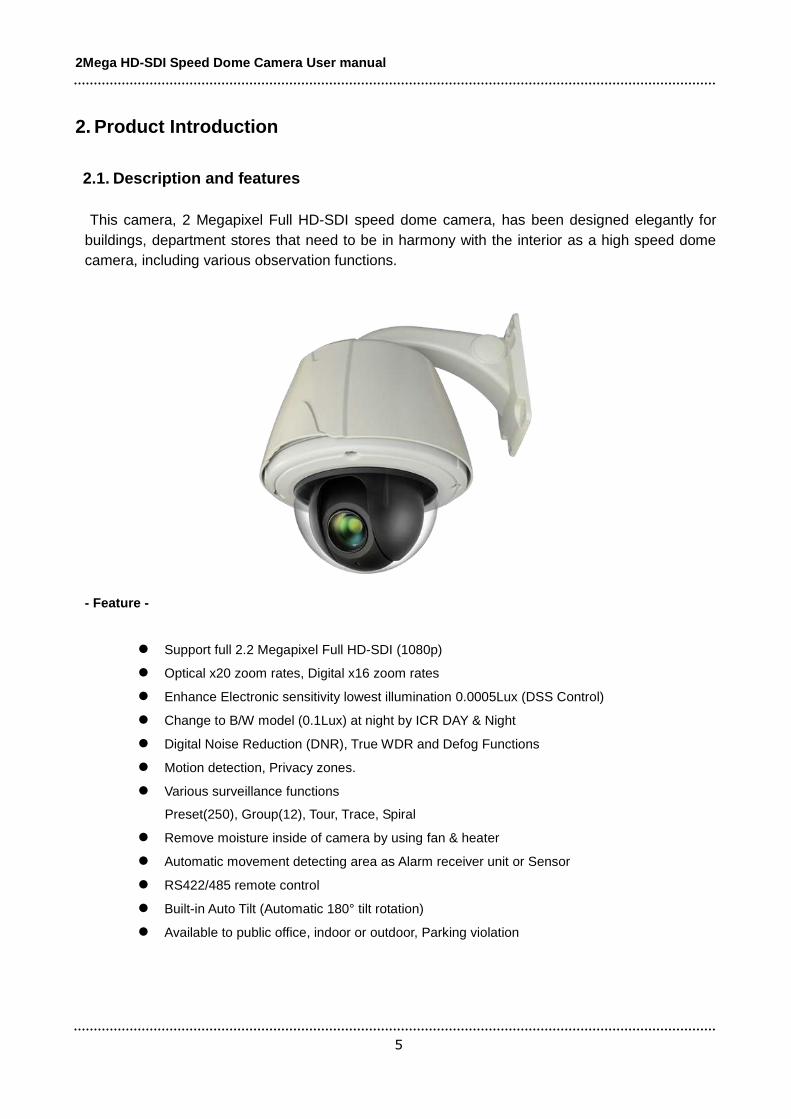
2. Product Introduction
2.1. Description and features
This camera, 2 Megapixel Full HD-SDI speed dome camera, has been designed elegantly for
buildings, department stores that need to be in harmony with the interior as a high speed dome
camera, including various observation functions.
- Feature -
Support full 2.2 Megapixel Full HD-SDI (1080p)
Optical x20 zoom rates, Digital x16 zoom rates
Enhance Electronic sensitivity lowest illumination 0.0005Lux (DSS Control)
Change to B/W model (0.1Lux) at night by ICR DAY & Night
Digital Noise Reduction (DNR), True WDR and Defog Functions
Motion detection, Privacy zones.
Various surveillance functions
Preset(250), Group(12), Tour, Trace, Spiral
Remove moisture inside of camera by using fan & heater
Automatic movement detecting area as Alarm receiver unit or Sensor
RS422/485 remote control
Built-in Auto Tilt (Automatic 180° tilt rotation)
Available to public office, indoor or outdoor, Parking violation

2Mega HD-SDI Speed Dome Camera User manual
6
2.2. Product package
The following items are included in the product package.
MEGA Speed Dome Camera 1 pcs
Wall Mount Bracket 1 pcs
Power Supply (Power Cable & Linear AC24V/2.5A adapter)
1 pcs
Bracket Blank Rubber 2 pcs

2Mega HD-SDI Speed Dome Camera User manual
7
2.3. Name and function of each part
- Exterior -
No Name Function
① Wall Mount Bracket Attached wall bracket on the wall
② Camera Housing
Outdoor PTZ housing. - when the product is released, outdoor housing and indoor housing are united, when the user installs the camera in indoor and in-ceiling, only use indoor housing taking apart from outdoor housing.
③ PTZ Camera PTZ dome drive (Pan/Tilt/Zoom)
④ Dome Clear Bubble Protect Lens and PTZ dome drive

2Mega HD-SDI Speed Dome Camera User manual
8
- Interior -
System base
No Name Function
① 26-Pin D-SUB Port (Male) Terminal board connect port
② DIP Switch (1~8) DIP Switch (1~4)
: Address Setting switch : Set-up Setting switch
②
①

2Mega HD-SDI Speed Dome Camera User manual
9
Connect Cover Inside
No Name Function
① Power Port AC 24V / 2.5A Power input
② Power LED Turn on the light when its power on
③ HD-SDI Port HD-SDI video output (1080P 25/30 FPS output)
④ 26 Pin D-SUB Port (Female)
PTZ camera connector
⑤ Communication,
ALARM In/output port
RS-485 PTZ control communication or ALARM in/output port
⑥ External video output port
CVBS Video output, Camera Control’s Power Frequency is set automatically installation country’s video output Hertz, 50Hz – PAL / 60Hz – NTSC. It doesn’t display Camera OSD and icon
⑥
④
⑤
①
②
③

2Mega HD-SDI Speed Dome Camera User manual
10
2.4. Installation
1. Installing wall mount bracket
① Loosen 4 bolts of cover and 3 bolts of
camera body from camera housing (Not
loosen the bolts completely)
② Put cables (Power, Video, data) in the
bracket and fasten bracket on the wall by 4
bolts then close both holes provided 34mm
Blank rubber
Cause Please use Grip when housing and camera dome drive’s D-sub port are connected or disconnected from housing
- Not using Grip is caused by disorder when connect or disconnect camera dome drive in the camera housing.

2Mega HD-SDI Speed Dome Camera User manual
11
⑥ Connect D-sub part and camera dome
drive with triangle mark of housing as
picture.
⑤ Open housing connecting cover and
connect Power, data, video cables
⑦ Connect to Clear bubble
③ When the camera is installed retaining wall
or Concrete building, put the cables in the
bracket as picture and close hole by
TAB/P1/11" flexible connector(28")
④ Connect Cover housing to wall bracket as
above.

2Mega HD-SDI Speed Dome Camera User manual
12
2. Installing Ceiling Mount Bracket
① Loosen 4 bolts of cover and 3 bolts of
camera body from camera housing (Not
loosen the bubble cover bolts completely)
② Attach Pole box on the ceiling
③ Tighten
Ceiling pole
to pole box
④ Tighten Joint
couple
⑤ Tighten Cover
housing

2Mega HD-SDI Speed Dome Camera User manual
13
⑥ Connect to Data, Video and Power
⑦ Recombine housing and dome drive.
Housing, Connect D-sub part and camera
dome drive with triangle mark of housing
as picture.
⑧ Connect to the clear bubble

2Mega HD-SDI Speed Dome Camera User manual
14
3. Using Speed Dome Junction Box (DSC-30EWB)
- Speed dome junction box installation - Fasten screw up 4 screws of the junction box in order of Camera housing → Wall mount bracket →
Water-proof cover → Speed dome junction box → Wall
Junction box connection Camera connection

2Mega HD-SDI Speed Dome Camera User manual
15
For connecting cables in the junction box, Please refer to wall mount bracket installation part The PTZ
junction box inside part is as below.
※ Please refer to the speed dome junction box user manual.
AC 24V Power Supply AC 24V Input Port AC 24V Output Port
Power LED
AC OUT AC IN
Input port
Output port
LAN (Input)
LAN (output)

2Mega HD-SDI Speed Dome Camera User manual
16
3. DIP switch setting
3.1. DIP Switch setting
-Termination Resistor (DIP S2/SW1):
Turn the last camera on the data line as a switch
to turn on/off the terminal resistor on.
Turn the DIP SW of some of the farthest cameras
on in the case of the data lines distributed to
several directions.
(** The default is off. **)
-Address / Initial Select (DIP S2/SW2):
Set ADDRESS DIP SW in the status of
ADDRESS
(*Reference to next page*)
Set the communication speed (baud rates) and
Protocol (Demand for the technical inquiry) up in
the state of the INITAIL.
(.*** The first default is ADDRESS.**)
-Select PAL / NTSC system (DIP S2/SW 3):
-NC(DIP S2/SW 4):
Not used.
2Mega HD-SDI Speed Dome Camera User manual
17
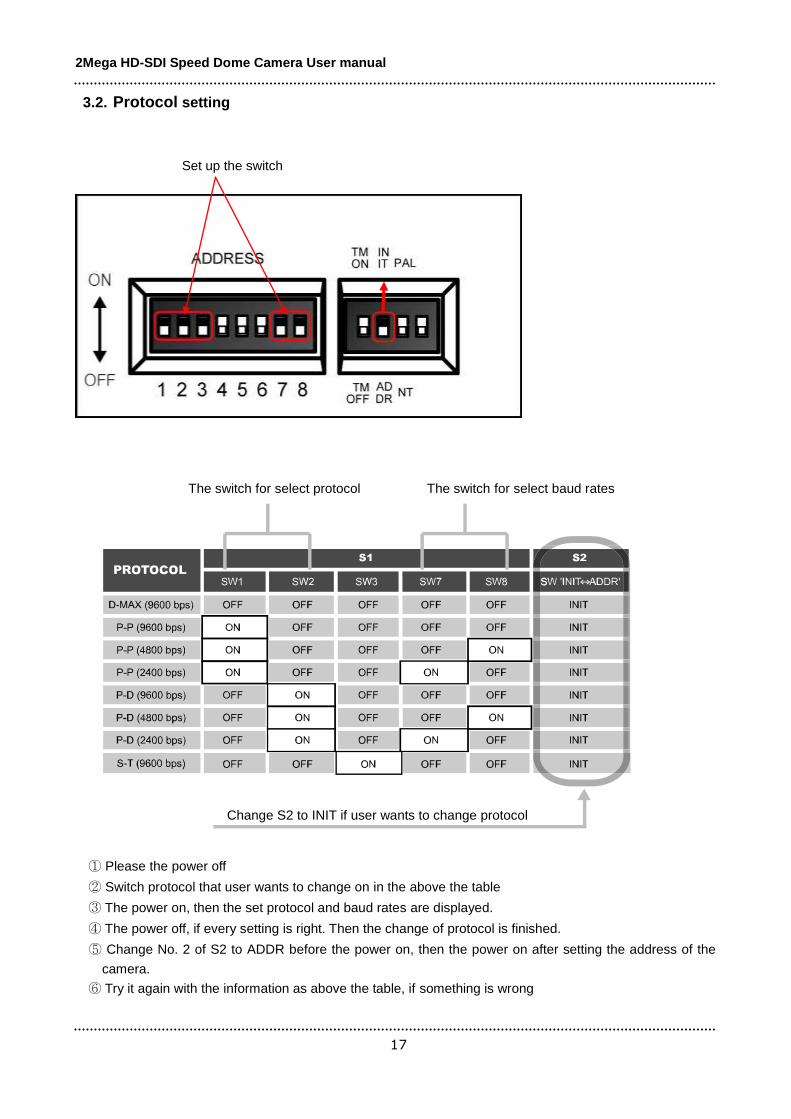
3.2. Protocol setting
Set up the switch
The switch for select protocol The switch for select baud rates
Change S2 to INIT if user wants to change protocol
① Please the power off
② Switch protocol that user wants to change on in the above the table
③ The power on, then the set protocol and baud rates are displayed.
④ The power off, if every setting is right. Then the change of protocol is finished.
⑤ Change No. 2 of S2 to ADDR before the power on, then the power on after setting the address of the
camera.
⑥ Try it again with the information as above the table, if something is wrong

2Mega HD-SDI Speed Dome Camera User manual
18
3.3. Address DIP Switch Setting
ADDRESS is set No 1 ~ 255 by DIP switch 1~8.
RX NO
DIP SWITCH (HEX) RX NO
DIP SWITCH (HEX)
1 2 3 4 5 6 7 1 2 3 4 5 6 7
1 ON OFF OFF OFF OFF OFF OFF 33 ON OFF OFF OFF OFF ON OFF
2 OFF ON OFF OFF OFF OFF OFF 34 OFF ON OFF OFF OFF ON OFF
3 ON ON OFF OFF OFF OFF OFF 35 ON ON OFF OFF OFF ON OFF
4 OFF OFF ON OFF OFF OFF OFF 36 OFF OFF ON OFF OFF ON OFF
5 ON OFF ON OFF OFF OFF OFF 37 ON OFF ON OFF OFF ON OFF
6 OFF ON ON OFF OFF OFF OFF 38 OFF ON ON OFF OFF ON OFF
7 ON ON ON OFF OFF OFF OFF 39 ON ON ON OFF OFF ON OFF
8 OFF OFF OFF ON OFF OFF OFF 40 OFF OFF OFF ON OFF ON OFF
9 ON OFF OFF ON OFF OFF OFF 41 ON OFF OFF ON OFF ON OFF
10 OFF ON OFF ON OFF OFF OFF 42 OFF ON OFF ON OFF ON OFF
11 ON ON OFF ON OFF OFF OFF 43 ON ON OFF ON OFF ON OFF
12 OFF OFF ON ON OFF OFF OFF 44 OFF OFF ON ON OFF ON OFF
13 ON OFF ON ON OFF OFF OFF 45 ON OFF ON ON OFF ON OFF
14 OFF ON ON ON OFF OFF OFF 46 OFF ON ON ON OFF ON OFF
15 ON ON ON ON OFF OFF OFF 47 ON ON ON ON OFF ON OFF
16 OFF OFF OFF OFF ON OFF OFF 48 OFF OFF OFF OFF ON ON OFF
17 ON OFF OFF OFF ON OFF OFF 49 ON OFF OFF OFF ON ON OFF
18 OFF ON OFF OFF ON OFF OFF 50 OFF ON OFF OFF ON ON OFF
19 ON ON OFF OFF ON OFF OFF 51 ON ON OFF OFF ON ON OFF
20 OFF OFF ON OFF ON OFF OFF 52 OFF OFF ON OFF ON ON OFF
21 ON OFF ON OFF ON OFF OFF 53 ON OFF ON OFF ON ON OFF
22 OFF ON ON OFF ON OFF OFF 54 OFF ON ON OFF ON ON OFF
23 ON ON ON OFF ON OFF OFF 55 ON ON ON OFF ON ON OFF
24 OFF OFF OFF ON ON OFF OFF 56 OFF OFF OFF ON ON ON OFF
25 ON OFF OFF ON ON OFF OFF 57 ON OFF OFF ON ON ON OFF
26 OFF ON OFF ON ON OFF OFF 58 OFF ON OFF ON ON ON OFF
27 ON ON OFF ON ON OFF OFF 59 ON ON OFF ON ON ON OFF
28 OFF OFF ON ON ON OFF OFF 60 OFF OFF ON ON ON ON OFF
29 ON OFF ON ON ON OFF OFF 61 ON OFF ON ON ON ON OFF
30 OFF ON ON ON ON OFF OFF 62 OFF ON ON ON ON ON OFF
31 ON ON ON ON ON OFF OFF 63 ON ON ON ON ON ON OFF
32 OFF OFF OFF OFF OFF ON OFF 64 OFF OFF OFF OFF OFF OFF ON
- ADDRESS Table -
- 7 DIP switched on, it can be set 65 ~ 128 as above.
- 8 DIP switched on, it can be set 129~192 as above.
- 7&8 DIP switched on, it can be set 129~255 as above.

2Mega HD-SDI Speed Dome Camera User manual
19
3.4. OSD Menu setting
3.4.1. OSD Menu control
■ OSD (ON SCREEN DISPLAY) menu control
It is the function to call up the Menu of the camera.
◈ User can not only set Preset, Group, Tour, Swing, Trace functions of the camera up by the menu,
but also set them up by shortening keys.
■ OSD MENU Enter
The menu is displayed on the screen with the key tone when user presses No.1 and menu key.
■ OSD Menu Control
- Move cursor by moving joystick up and down.
- Select Menu or change to setting and move to Joystick left
or right.
■ Cancellation of OSD menu
- Press No. 1 + Menu button.
<< DOME CAMERA SETUP >>
- DOME DRIVER SET.
- CAMERA SET. - SPECIAL SET. - TIME SCHEDULE SET.
- EXIT.
JOYSTICK U/D/L/R TO SELECT.
②
①

2Mega HD-SDI Speed Dome Camera User manual
20
3.4.2. Menu function
■ OSD Menu tree
Main menu Sub menu 1 Sub menu 2
DOME DRIVER SET
SET PTZ FUNCTION
SELECT PRESET
PRESET ID SET
PRESET PTZ SET
SWING SET
GROUP SET CH:01~12
TOUR SET
TRACE SET
PREVIOUS MENU PAGE
RUN FUNCTION
n/a
SET PRIVACY
MANUAL P/T SPEED
AUTO TILT MOVE
SMART PAN/TILT
RETURN TO MAIN PAGE
CAMERA SET
ID SET
n/a
H-V REVERSE
AGC CONTROL
SHUTTER SPEED
SHARPNESS LEVEL
BRIGHTNESS LEVEL
COLOR LEVEL
NEXT MENU PAGE
└ DNR LEVEL
└ STABILIZER
└ FOCUS MODE
└ MAX ZOOM LIMIT
└ DSS CONTROL
└ BACK LIGHT MODE WDR SET / HLC SET / BLC SET
└ WHITE BALANCE
n/a
└ NEXT MENU PAGE
└ DAY&NIGHT
└ DEFOG ON/OFF
└ DEFOG LEVEL
└ PREVIOUS MENU PAGE
RETURN TO MAIN PAGE
SPECIAL SET
OSD DISPLAY
n/a
SELECT ALARM
MOTION DETECTION
ALARM CHANNEL ON/OFF
ALARM PRESET SET
AUTO REFRESH TIME
NEXT MENU PAGE
└ USE SHORTCUT KEY
└ RUN DEHUMIDIFICATION
└ LANGUAGE
└ USE PASSWORD
└ CHANGE PASSWORD
└ FACTORY RESET !
└ PREVIOUS PAGE
RETURN TO MAIN PAGE
TIME SCHEDULE SET
SCHEDULE FUNCTION SET
n/a
SCHEDULE BACKLIGHT SET
RESUME TIME SET
HOME POSITION SET
TIME SET

2Mega HD-SDI Speed Dome Camera User manual
21
RETURN TO MAIN PAGE
EXIT n/a n/a
- DOME DRIVER SET. : Set Pan, Tilt or various surveillance functions.
- CAMERA SET. : Set Video, screen display functions.
- SPECIAL SET. : Set motion detection, alarm, multi-language, Password, Factory default
- TIME SCHEDULE SET. : you can set time schedule for various function in this menu.
- EXIT. : Out of OSD menu
■ DOME DRIVER SET
1. SET PTZ FUNCTION
Set up or execute Preset, Swing, Group, Tour, Trace.
Select “DOME DRIVER SET" in main menu, then move joystick left / right and display sub menu list.
Select "1. SET PTZ FUNCTION" then move joystick left/right and display various surveillance function
list.
1). SELECT PRESET CH
- Set up preset Number.
- Set up preset No by moving Joystick left / right.
: Number up / : Number down
◈ Set up Max. 250 programmable Preset No.
2). PRESET ID SET
- User can set ID of each preset No.
- Select "2. PRESET ID SET" then moves joystick left or
right and displays input of preset ID options.
- DOME DRIVE SET.
1. SET PTZ FUNCTION.
2. RUN PTZ FUNCTION:UNDEF
3. SET PRIVACY.
4. MANUAL P/T SPEED:MIDDLE
5. AUTO TILT MOVE:OFF
6. SMART PAN/TILT:ON
7. RETURN TO MAIN PAGE.
JOYSTICK U/D/L/R TO SELECT.
<< DOME CAMERA SETUP >>
- DOME DRIVER SET.
- CAMERA SET. - SPECIAL SET. - TIME SCHEDULE SET. - EXIT.
JOYSTICK U/D/L/R TO SELECT.
- SET PRESET & RUN.
1. SELECT PRESET CH:001
2. PRESET ID SET
3. PRESET PTZ SET
4. SWING SET
5. GROUP SET CH:01~12
6. TOUR SET 7. TRACE SET
8. PREVIOUS MENU PAGE.
JOYSTICK U/D/L/R TO SELECT.

2Mega HD-SDI Speed Dome Camera User manual
22
User can select ID letter or icon by using joystick
Up/Down/Right/Left. Shift letter digit by "ZOOM
To save designated ID, Please pressing "F/F" key,
No to save ID, Please press "F/N" key, it doesn’t save
ID and back to previous setting..
3). PRESET PTZ SET
- PRESET setting menu.
"Save “1.SELECT PRESET CH" No and "2. PRESET ID"
Move to menu as desire by moving joystick up/down/left/right.
Press F/N [SAVE] → [DELETE] → [RETURN], Move cursor and select menu by pressing F/F.
• [SAVE] : Save and go to previous screen
• [DELETE] : Delete PRESET
• [RETURN] : Go to previous screen (Cancellation)
4). SWING SET
- The SWING commands the camera to move between 2 selected positions, monitoring the route .
Change letter After select and
back
After select and
forward
PRESET CH:001[PRESET:001]
! " $ % & ' ( ) * + , - . / 0 1 2 3 4 5 6 7
89 : ;< => ?@ AB C DE F G HIJ KL M NO
P Q R S T U V W X Y Z [ \ ] ^ _ , a b c d e f g
h i j k l m n o p q r s t u v w x y z {ㅣ } ~℃
ZOOM(IN/OUT), ID SHIFT.
F/F SAVE, F/N NOT SAVE.
- SET PRESET & RUN.
1. SELECT PRESET CH:001
2. PRESET ID SET
3. PRESET PTZ SET
4. SWING SET
5. GROUP SET CH:01~12 6. TOUR SET
7. TRACE SET
8. PREVIOUS MENU PAGE.
JOYSTICK U/D/L/R TO SELECT.
[SAVE] [DELETE] [RETURN]
F/F SELECT, F/N SHIFT MENU.
PRESET:001

2Mega HD-SDI Speed Dome Camera User manual
23
: Moves menu : Changes Setting
1. PAN/TILT SWING TILT – Move Up and Down. PAN – Move Left and Right.
2. START PRESET Set start preset point in Swing.
3. END PRESET Set end preset point in Swing.
4. SWING TIME Set duration time between Swing movement .(1~127)
5. SWING SPEED Set movement speed.(1~64)
5). GROUP SET CH: 1~12
User can set up Max. 12 groups and it is included 12 preset points each group. .
- SWING SET.
1. PAN/TILT SWING : UNDEF
2. START PRESET : 000
3. END PRESET : 000
4. SWING TIME : 000
5. SWING SPEED : 000
F/F SAVE, F/N NOT SAVE.
- SET PRESET & RUN.
1. SELECT PRESET CH:001
2. PRESET ID SET 3. PRESET PTZ SET
4. SWING SET
5. GROUP SET CH:01~12
6. TOUR SET
7. TRACE SET
8. PREVIOUS MENU PAGE.
JOYSTICK U/D/L/R TO SELECT.
- SET PRESET & RUN.
1. SELECT PRESET CH:001
2. PRESET ID SET
3. PRESET PTZ SET
4. SWING SET
5. GROUP SET CH:01~12
6. TOUR SET
7. TRACE SET
8. PREVIOUS MENU PAGE.
SELECT (F/F), CHANGE (L/R)
- GROUP SET CH:001
[P] [S] [T] [P] [S] [T]
000 000 000 000 000 000
000 000 000 000 000 000
000 000 000 000 000 000
000 000 000 000 000 000
000 000 000 000 000 000
000 000 000 000 000 000
F/F SAVE, F/N NOT SAVE.

2Mega HD-SDI Speed Dome Camera User manual
24
[P] PESET : Enter PRESET No (Save PRESET No)
[S] SPEED : Set movement speed (1~64) 1<64
[T] TIME : Set duration time (1~127 sec)
Move next menu Move previous menu Change setting
6). TOUR SET
Tour is included 12 groups.
7). TRACE SET
Save joystick pattern movement for Max. 180 seconds and execute save joystick movement. .
- SET PRESET & RUN.
1. SELECT PRESET CH:001
2. PRESET ID SET
3. PRESET PTZ SET
4. SWING SET
5. GROUP SET
6. TOUR SET
7. TRACE SET 8. PREVIOUS MENU PAGE.
JOYSTICK U/D/L/R TO SELECT.
- TOUR SET.
T01:00 T02:00 T03:00 T04:00
T05:00 T06:00 T07:00 T08:00
T09:00 T10:00 T11:00 T12:00
F/F SAVE, F/N NOT SAVE.
- SET PRESET & RUN.
1. SELECT PRESET CH:001
2. PRESET ID SET
3. PRESET PTZ SET
4. SWING SET
5. GROUP SET 6. TOUR SET
7. TRACE SET
8. PREVIOUS MENU PAGE.
JOYSTICK U/D/L/R TO SELECT.
- TRACE SET.
[SET] [SAVE] [DELETE] [RETURN]
F/F SELECT, F/N SHIFT MENU.

2Mega HD-SDI Speed Dome Camera User manual
25
■ TRACE Set
① "7. TOUR SET"
② Press F/N button to select “SET” mode → move camera by using joystick toward position you
want up to for 180/sec
③ After finishing all work, move cursor to save mode → press F/N button to save joystick movement
• [SET] : Start TRACE set up
• [SAVE] : Save and previous OSD screen
• [DELETE] : Delete TRACE
• [RETURN] : Go to previous OSD screen (Cancellation)
8). "PREVIOUS MENU PAGE" - It is back to previous menu screen by moving joystick right.
2. RUN PTZ FUNCTION
It is executed various surveillance function by DVR
without keyboard.
"2. RUN PTZ FUNCTION"
Select desired function,
SWING - GROUP - TOUR -
TRACE by moving joystick
right / left.
Select desired function and out of OSD menu, it is
executed selected function automatically.
Display selected function icon in the screen.
: SWING
: GROUP
: TOUR
: TRACE
3. SET PRIVACY
Max 8 programmable privacy zones can be configured for the protection of privacy.
- DOME DRIVE SET.
1. SET PTZ FUNCTION.
2. RUN PTZ FUNCTION:UNDEF
3. SET PRIVACY.
4. MANUAL P/T SPEED:MIDDLE
5. AUTO TILT MOVE:OFF
6. SMART PAN/TILT:ON
7. RETURN TO MAIN PAGE.
JOYSTICK U/D/L/R TO SELECT.

2Mega HD-SDI Speed Dome Camera User manual
26
■ Setting
- DOME DRIVE SET → SET PRIVACY → Enter PRIVACY ZONE SET Mode
Move Joystick up / down at desired channel then display black box In the middle of
screen by pressing “F/F” key.
- Move camera position where you want to hide - Select privacy zone size by using zoom IN/OUT.
- Set up Privacy zone – adjust box size – Save Privacy setting by “F/F” key then back to previous menu If press “F/N” key, it doesn’t save privacy zone setting and
back to previous screen..
- It is changed SET - ON - OFF – DEL in order each privacy setting channel by moving joystick left / right.
- Select desired mode and execute selected menu by pressing F/F.
Move screen Reduce size Enlarge size
SET ON OFF DEL
Set new privacy area
Display privacy area
Hide privacy area
Remove privacy area
Caution) Not enable to set under 45 degree for PRIVACY ZONE accuracy
- PRIVACY ZONE SET.
CH 01: SET CH 02: BLANK
CH 03: BLANK CH 04: BLANK
CH 05: BLANK CH 06: BLANK
CH 07: BLANK CH 08: BLANK
PREVIOUS MENU PAGE.
SELECT (F/F), CHANGE (L/R)
- DOME DRIVE SET.
1. SET PTZ FUNCTION.
2. RUN PTZ FUNCTION:UNDEF
3. SET PRIVACY.
4. MANUAL P/T SPEED:MIDDLE
5. AUTO TILT MOVE:OFF
6. SMART PAN/TILT:ON
7. RETURN TO MAIN PAGE.
JOYSTICK U/D/L/R TO SELECT.
┌ ┑
└ ┘
SET PRIVACY:01
SAVE(F/F), ESC(F/N), MASK(ZOOM)
- PRIVACY ZONE SET.
CH 01: OFF CH 02: BLANK
CH 03: BLANK CH 04: BLANK
CH 05: BLANK CH 06: BLANK
CH 07: BLANK CH 08: BLANK

2Mega HD-SDI Speed Dome Camera User manual
27
4. MANUAL P/T SPEED
User can control the maximum speed in controlling of
up and down; The mode is Low, Medium, Max
5. AUTO TILT MOVE
The PAN is turned in a 180° degree arc automatically
when the angle of the camera moves down to the
maximum degree, therefore, it is possible to track
objects continuously
6. SMART PAN/TILT
This function makes the Pan/Tilt speed automatically as zoom magnification.
. ■ CAMERA SET
1. ID SET
It is set camera ID up to 16 English letters it is enable to
select desired letter by joystick zoom and save camera
ID by F/F key and out of menu.
- DOME DRIVE SET.
1. SET PTZ FUNCTION.
2. RUN PTZ FUNCTION:UNDEF
3. SET PRIVACY.
4. MANUAL P/T SPEED:MIDDLE
5. AUTO TILT MOVE:OFF
6. SMART PAN/TILT:ON
7. RETURN TO MAIN PAGE.
JOYSTICK U/D/L/R TO SELECT.
- CAMERA SET.
1. ID SET(PRESS F/F KEY).
2. H-V REVERSE : NORMAL
3. AGC CONTROL : MAX
4. SHUTTER SPEED : AUTO
5. SHARPNESS LEVEL : 12
6. BRIGHTNESS LEVEL : 50
7. DNR LEVEL : MIDDLE
8. NEXT MENU PAGE.
9. RETURN TO MAIN PAGE. JOYSTICK U/D/L/R TO SELECT.
<< DOME CAMERA SETUP >>
- DOME DRIVER SET. - CAMERA SET. - SPECIAL SET. - TIME SCHEDULE SET. - EXIT.
JOYSTICK U/D/L/R TO SELECT.
SET ID[_ CAM-000]
! " $ % & ' ( ) * + , - . / 0 1 2 3 4 5 6 7
89 : ;< => ?@ AB C DE FG HIJ KL M NO P Q R S T U V W X Y Z [ \ ] ^ _ , a b c d e f g
h i j k l m n o p q r s t u v w x y z {ㅣ } ~℃
ZOOM(IN/OUT), ID SHIFT.
F/F SAVE, F/N NOT SAVE.

2Mega HD-SDI Speed Dome Camera User manual
28
2. H-V REVERSE
Set up H-V reverse mode.
. ● Normal
● H-REV : Flip the picture horizontally on the
screen.
● V-REV : Flip the picture vertically on the screen.
● HV-REV : Flip the picture horizontally and
vertically on the screen.
3. AGC CONTROL
AGC(Automatic Gain Control)- It adjusts the
amount of video amplification to maintain a full 1-
volt peak-to-peak video signal output automatically.
▶ OFF, LOW, MIDDLE, MAX
4. SHUTTER SPEED
Adjust camera electronic Shutter speed.
Factory default: Auto.
▶ Range : AUTO, A.FLICKER, 1/30 ~ 1/33000
5. SHARPNESS LEVEL
Compensation of the shape of a subject.
▶ Range : 1 ~ 31
6. BRIGHTNESS LEVEL
Control brightness of a screen.
The screen gets dark because an iris is closed as
the numerical value is low, whereas the screen
gets bright because an iris is opened as the
numerical value is high.
. ▶ Range : 1~99, Default : 50
- CAMERA SET.
1. ID SET(PRESS F/F KEY).
2. H-V REVERSE : NORMAL
3. AGC CONTROL : MAX
4. SHUTTER SPEED : AUTO
↓
- CAMERA SET.
1. ID SET(PRESS F/F KEY).
2. H-V REVERSE : NORMAL
3. AGC CONTROL : MAX
4. SHUTTER SPEED : AUTO
↓
- CAMERA SET.
1. ID SET(PRESS F/F KEY).
2. H-V REVERSE : NORMAL
3. AGC CONTROL : MAX
4. SHUTTER SPEED : AUTO
↓
1. ID SET(PRESS F/F KEY). 2. H-V REVERSE : NORMAL
3. AGC CONTROL : MAX
4. SHUTTER SPEED : AUTO
5. SHARPNESS LEVEL : 12
↓
↑
2. H-V REVERSE
3. AGC CONTROL : MAX
4. SHUTTER SPEED : AUTO
5. SHARPNESS LEVEL : 12
6. BRIGHTNESS LEVEL : 50
↓

2Mega HD-SDI Speed Dome Camera User manual
29
7. COLOR LEVEL
Adjust the color saturation of the image. The
higher number denotes a high saturation and low
and close to the black-and-white color becomes
darker.
▶ Range: 1~99, Default: 50
8. NEXT MENU PAGE.
▶ Go to next menu page.
9. RETURN TO MAIN PAGE.
▶ Go to previous menu.
10. DNR LEVEL
Reduce noise of minimum illumination and also file
size becomes smaller while DVR is being recorded
by the effective reduction of noise.
▶ OFF, LOW, MIDDLE, MAX
◈ cf. Not available under AGC off
11. STABILIZER
There is some tremble as zoom magnification is
high, the function can compensate the tremble.
▶ ON / OFF
Select “ON”, it is fixed x20 optical zoom
magnification in 12.MAX ZOOM LIMIT.(Not
available in Digital zoom)
12. FOCUS MODE
Change Focus Mode to hand-worked or auto.
▶ MANUAL : User can set focus manually.
▶ AUTO : Execute Auto focus as subject
movement
▶ ONE SHOT : Auto Focusing mode works while
zoom is worked
- CAMERA SET.
10. DNR LEVEL : MIDDLE
11. STABILIZER : OFF
12. FOCUS MODE : ONE SHOT
13. MAX ZOOM LIMIT : x20
14. DSS CONTROL : 10FIELDS
↓
- CAMERA SET.
1. ID SET(PRESS F/F KEY).
2. H-V REVERSE : NORMAL
3. AGC CONTROL : MAX
4. SHUTTER SPEED : AUTO
5. SHARPNESS LEVEL : 12
6. BRIGHTNESS LEVEL : 50
7. COLOR LEVEL : 50
8. NEXT MENU PAGE.
9. RETURN TO MAIN PAGE. JOYSTICK U/D/L/R TO SELECT.
- CAMERA SET.
10. DNR LEVEL : MIDDLE
11. STABILIZER : OFF
12. FOCUS MODE : ONE SHOT
13. MAX ZOOM LIMIT : x20
14. DSS CONTROL : 10FIELDS
15. BACK LIGHT MODE : OFF 16. WHITE BALANCE : AUTO
↓
- CAMERA SET.
10. DNR LEVEL : MIDDLE
11. STABILIZER : OFF 12. FOCUS MODE : ONE SHOT
13. MAX ZOOM LIMIT : x20
14. DSS CONTROL : 10FIELDS
↓

2Mega HD-SDI Speed Dome Camera User manual
30
13. MAX ZOOM LIMIT
It is used when user corrects and limits the extensional range of the focus as a function to set the
maximum value of zoom. (Available to set DIGITAL ZOOM range)
▶ x20(Optical zoom): MAX ZOOM LIMIT OFF status
▶ x40~x320(Digital zoom)
14. DSS CONTROL
An object becomes clear as the field value gets higher in Illumination, Max. 60 field, whereas a moving
object becomes dim.
▶ Range : Off, 2 ~ 60 fields
15. BACK LIGHT MODE
It provides clear images of object and back
ground against a severe back light.
▶ OFF : Disables the BACKLIGHT
▶ WDR : Activates back light. Compensate
▶HLC(High Light Compensation) : Activates
High Light back light Compensate
▶ BLC : Activates a Use defined back light
compensation.
Select desired Back light mode by “F/F" key.
WDR SET - WDR LEVEL: Set up WDR sensitivity, Off or Low, Middle,
Max. .
HLC (High Light Compensation) SET
- HLC LEVEL: Set-up HLC level LOW, MIDDLE, MAX.
- HLC COLOR : Adjust HLC marking color level
1 (White) ~ 16(Black), 8 level is Gray color.
BLC SET
- Set up BLC mode or BLC area set by joystick,
BLC sensitivity level : LOW, MIDDLE, MAX.
- CAMERA SET.
10. DNR LEVEL : MIDDLE
11. STABILIZER : OFF
12. FOCUS MODE : ONE SHOT
13. MAX ZOOM LIMIT : x20
14. DSS CONTROL : 10FIELDS
15. BACK LIGHT MODE : OFF/WDR/HLC/BLC
16. WHITE BALANCE : AUTO 17. NEXT MENU PAGE.
18. PREVIOUS PAGE
PRESS F/F SET BACKLIGHT
- WDR SET.
1. WDR LEVEL : LOW
RETURN TO MENU.
- HLC SET.
1. HLC LEVEL : MIDDLE
2. HLC COLOR : 07
RETURN TO MENU.
- BLC SET.
1. BLC LEVEL : MIDDLE
2. BLC AREA SET.
RETURN TO MENU.

2Mega HD-SDI Speed Dome Camera User manual
31
- BLC AREA SET
① "2. BLC AREA SET.", enter BLC AREA SET menu by moving joystick left / right.
② It is enables to move BLC area, reduce BLC area and enlarge BLC area by Joystick ZOOM IN/OUT
16. WHITE BALANCE
The white balance menus adjusts the balance of
the screen colors under differnet lighting condition.
▶ AUTO, INDOOR, OUTDOOR
17. NEXT MENU PAGE.
▶ Go to next menu page.
18. PREVIOUS MENU PAGE
Back to previous screen.
19. DAY&NIGHT
The Day & Night function allows the camera to
switch between color and B/W mode. it is set
optimal condition by DSS control function.
▶ NIGHT MODE : B/W Mode most times.
▶ AUTO SLOW : Operates in DAY&NIGHT mode
under low illumination.
▶ AUTO FAST : Operates in DAY&NIGHT mode
high illumination.
▶ DAY MODE : COLOR mode most times.
Default is AUTO SLOW, It keeps color mode most
times under AUTO SLOW.
Move BLC area Reduce BLC
area
Enlarge BLC
area
- BLC AREA SET.
F/F SAVE, F/N NOT SAVE.
- CAMERA SET.
10. DNR LEVEL : MIDDLE
11. STABILIZER : OFF
12. FOCUS MODE : ONE SHOT
13. MAX ZOOM LIMIT : x20
14. DSS CONTROL : 10FIELDS
15. BACK LIGHT MODE : OFF
16. WHITE BALANCE : AUTO
↓
- CAMERA SET.
19. DAY&NIGHT : AUTO SLOW
20. DEFOG ON/OFF : OFF
21. DEFOG LEVEL :06
22. PREVIOUS MENU PAGE. JOYSTICK U/D/L/R TO SELECT.
2Mega HD-SDI Speed Dome Camera User manual
32
20. DEFOG ON/OFF
DEFOG is the ability to clearly restore the image when the monitor degradation by fog, smog, etc.
▶ OFF: Disable this function.
▶ MANUAL: user can set defog level.
▶ AUTO: DEFOG function will be executed automatically.
21. DEFOG LEVEL
You can adjust sensitivity, when setting defog mode to manual.
▶ 1~10: the higher the number , the sensitivity rises.
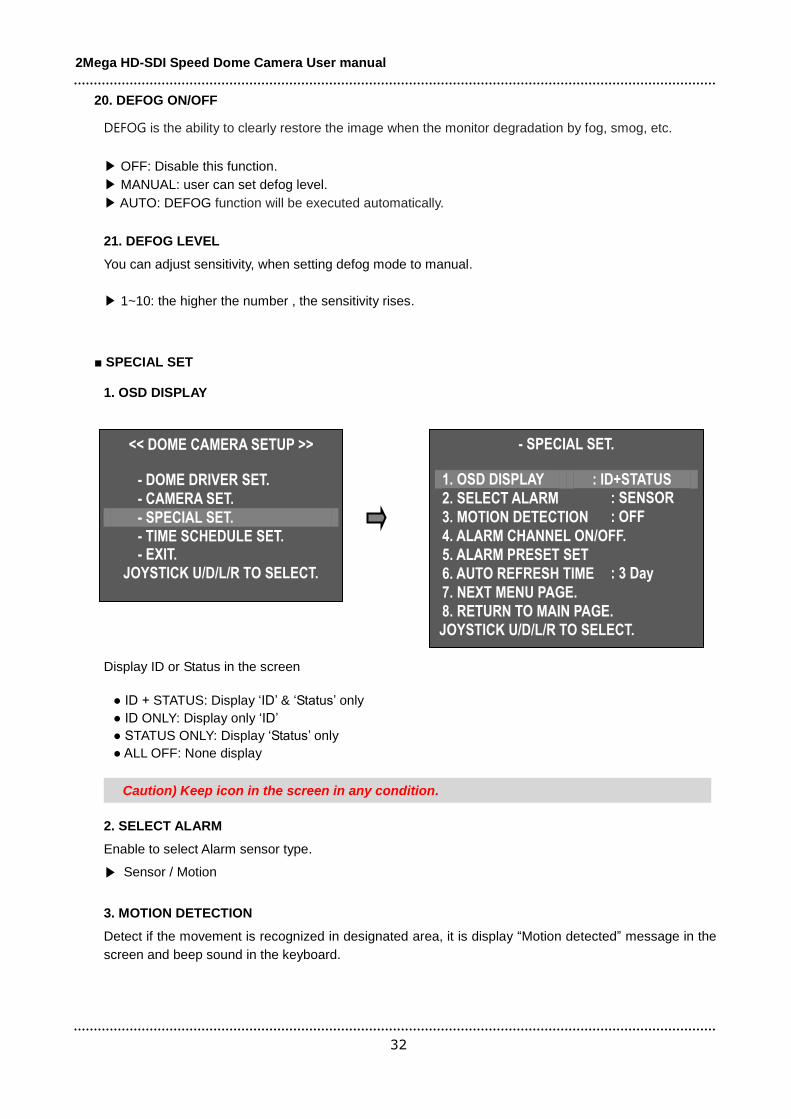
■ SPECIAL SET
1. OSD DISPLAY
Display ID or Status in the screen
● ID + STATUS: Display ‘ID’ & ‘Status’ only
● ID ONLY: Display only ‘ID’
● STATUS ONLY: Display ‘Status’ only
● ALL OFF: None display
2. SELECT ALARM
Enable to select Alarm sensor type.
▶ Sensor / Motion
3. MOTION DETECTION
Detect if the movement is recognized in designated area, it is display “Motion detected” message in the
screen and beep sound in the keyboard.
Caution) Keep icon in the screen in any condition.
- SPECIAL SET.
1. OSD DISPLAY : ID+STATUS
2. SELECT ALARM : SENSOR
3. MOTION DETECTION : OFF
4. ALARM CHANNEL ON/OFF.
5. ALARM PRESET SET
6. AUTO REFRESH TIME : 3 Day
7. NEXT MENU PAGE.
8. RETURN TO MAIN PAGE. JOYSTICK U/D/L/R TO SELECT.
<< DOME CAMERA SETUP >>
- DOME DRIVER SET.
- CAMERA SET.
- SPECIAL SET. - TIME SCHEDULE SET. - EXIT.
JOYSTICK U/D/L/R TO SELECT.

2Mega HD-SDI Speed Dome Camera User manual
33
PTZ function doesn’t perform when motion detection is “On”, Motion detection is detected specific
area’s movement, if the cameras moves Pan, Tilt and zoom, it doesn’t recognize the motion detection
correctly.
■ Set up motion detection
① "2. SELECT ALARM". Select “motion”.
② "3. MOTION DETECTION" select "ON" Change to screen for motion detection area set mode by
pressing F/F key.
③ Set motion detection area by joystick
and adjust motion detection area size
by joystick Zoom IN/OUT.
④ Save motion detection setting and
back to previous menu by pressing
“F/F".
Select MOTION DETECTION : “On” it is displayed “Motion Detected’ message in the screen if motion
is detected in designated motion detection area.
4. ALARM CHANNEL ON/OFF
- Set Alarm input On/Off each channel.
Move motion detection area
Reduction motion
detection area
Enlarge motion
detection area
- SPECIAL SET.
1. OSD DISPLAY : ID+STATUS
2. SELECT ALARM : MOTION
3. MOTION DETECTION : ON
4. ALARM CHANNEL ON/OFF.
5. ALARM PRESET SET
6. AUTO REFRESH TIME : 3 Day
7. NEXT MENU PAGE.
8. RETURN TO MAIN PAGE.
PRESS F/F, AREA OR LINE SET.
- MOTION DETECTION AREA SET.
F/F SAVE, F/N NOT SAVE.
- SPECIAL SET.
1. OSD DISPLAY : ID+STATUS
2. SELECT ALARM : SENSOR
3. MOTION DETECTION : OFF
4. ALARM CHANNEL ON/OFF.
5. ALARM PRESET SET
6. AUTO REFRESH TIME : 3 Day
7. NEXT MENU PAGE. 8. RETURN TO MAIN PAGE.
JOYSTICK U/D/L/R TO SELECT.
- ALARM CHANNEL ON/OFF.
CH 01: OFF CH 02: OFF
CH 03: OFF CH 04: OFF
ALARM RELAY : OFF
ACTIVE ALARM : OPEN
PREVIOUS MENU PAGE.

2Mega HD-SDI Speed Dome Camera User manual
34
- ALARM CH On/Off : Alarm Input – Each channel can be ON/OFF.
- According to signal connection, user can select ACTIVE OPEN(N/C) or ACTIVE CLOSE(N/O).
- If the user selects ACTIVE OPEN, it is activated when Alarm input is open, if the user selects ACTIVE
Close, it is activated when Alarm input is Close
5. ALARM PRESET SET
- The camera can move to a preset point automatically when the wrong signal is sensed in each ALRAM
CHANNEL.
- Set a preset point firstly to move, if wrong signal is sensed, then use that sets the preset number into
each ALARM CHANNEL.
- Select ALARM Channel “OFF” and doesn’t move relevant preset point
- User can select PRESET Point number 1 to 250 and set it.
- It is checked exist Alarm status in the keyboard, if it is sensed wrong signal, the keyboard makes beep
sound and the security manager can check Alarm position status.
When many cameras’ alarm are checked, it might
take time to transmit signal to Control keyboard when alarm is detected but the camera moves specific
preset position automatically.
Please refer to CONTROL KEYBOARD user manual
6. AUTO REFRESH TIME
- Initialize automatically for focus normal movement.
▶ OFF, 6hours~18hours, 1day~7days.
◈ Focus initialize pressing F/F key
7. NEXT MENU PAGE.
▶ Go to the next page.
8. RETURN TO MAIN PAGE.
▶ Go to previous page.
- SPECIAL SET.
1. OSD DISPLAY : ID+STATUS
2. SELECT ALARM : SENSOR
3. MOTION DETECTION : OFF
4. ALARM CHANNEL ON/OFF.
5. ALARM PRESET SET
6. AUTO REFRESH TIME : 3 Day
7. NEXT MENU PAGE.
8. RETURN TO MAIN PAGE.
JOYSTICK U/D/L/R TO SELECT.
- ALARM PRESET SET.
CH 01: 001 CH 02: 002 CH 03: 003 CH 04: 004
PREVIOUS MENU PAGE.
2Mega HD-SDI Speed Dome Camera User manual
35
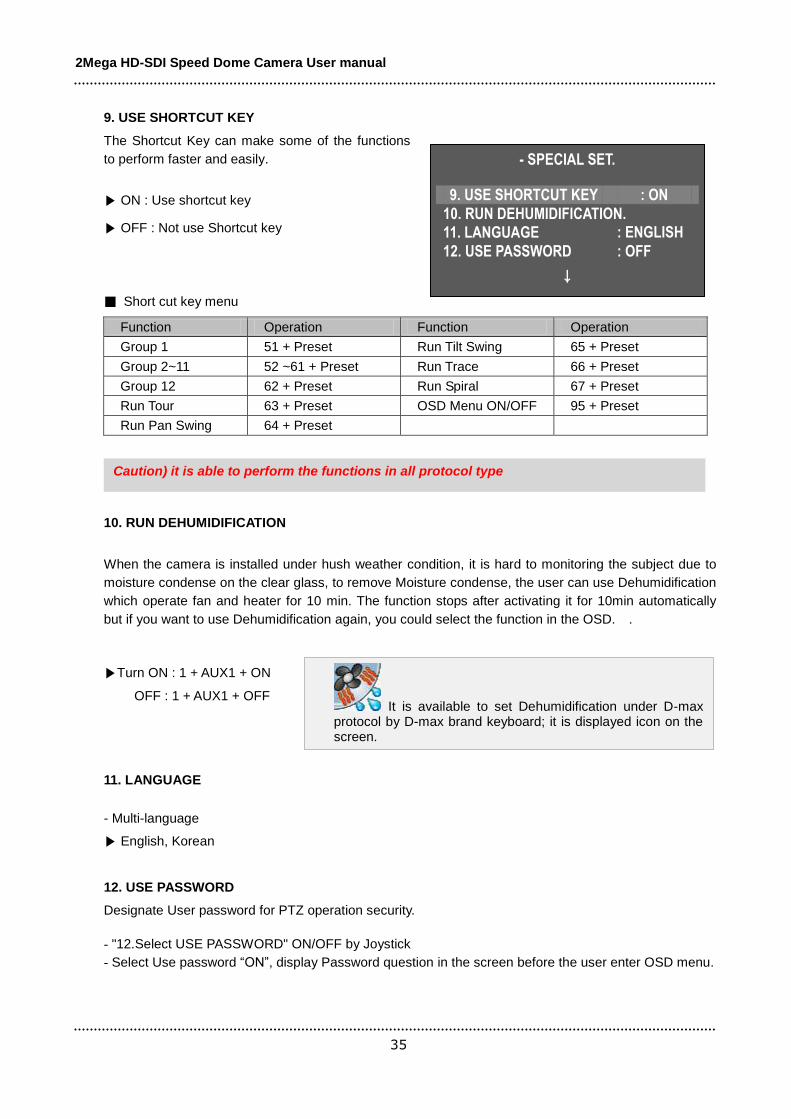
9. USE SHORTCUT KEY
The Shortcut Key can make some of the functions
to perform faster and easily.
▶ ON : Use shortcut key
▶ OFF : Not use Shortcut key
■ Short cut key menu
Function Operation Function Operation
Group 1 51 + Preset Run Tilt Swing 65 + Preset
Group 2~11 52 ~61 + Preset Run Trace 66 + Preset
Group 12 62 + Preset Run Spiral 67 + Preset
Run Tour 63 + Preset OSD Menu ON/OFF 95 + Preset
Run Pan Swing 64 + Preset
10. RUN DEHUMIDIFICATION
When the camera is installed under hush weather condition, it is hard to monitoring the subject due to
moisture condense on the clear glass, to remove Moisture condense, the user can use Dehumidification
which operate fan and heater for 10 min. The function stops after activating it for 10min automatically
but if you want to use Dehumidification again, you could select the function in the OSD. .
▶Turn ON : 1 + AUX1 + ON
OFF : 1 + AUX1 + OFF
11. LANGUAGE
- Multi-language
▶ English, Korean
12. USE PASSWORD
Designate User password for PTZ operation security.
- "12.Select USE PASSWORD" ON/OFF by Joystick
- Select Use password “ON”, display Password question in the screen before the user enter OSD menu.
Caution) it is able to perform the functions in all protocol type
- SPECIAL SET.
9. USE SHORTCUT KEY : ON
10. RUN DEHUMIDIFICATION. 11. LANGUAGE : ENGLISH
12. USE PASSWORD : OFF
↓
It is available to set Dehumidification under D-max protocol by D-max brand keyboard; it is displayed icon on the screen.

2Mega HD-SDI Speed Dome Camera User manual
36
13. CHANGE PASSWORD
- "13. CHANGE PASSWORD" the user can select password by Joystick Left / Right.
- Initial Password is “0000”, New Password is designated by Joystick UP/Down/Left/Right
- F/F key : it saves the password and back to previous menu
- F/N key : it doesn’t save Password and back to previous menu
14. FACTORY RESET
Set factory default same as initialization setting.
Caution) Remove exist setting in the menu.
Caution) if user forget password, it would use Hidden password Hidden password: 7233, Please change to Password for security.
- SPECIAL SET.
9. USE SHORTCUT KEY : ON
10. RUN DEHUMIDIFICATION.
11. LANGUAGE : ENGLISH
12. USE PASSWORD : OFF
13. CHANGE PASSWORD. 14. FACTORY RESET ! WARNING!
15. PREVIOUS PAGE.
JOYSTICK U/D/L/R TO SELECT.
- CHANGE PASSWORD.
OLD PASSWORD : 0000 NEW PASSWORD: 0000
JOYSTICK U/D/L/R TO SELECT.
F/F SAVE, F/N NOT SAVE.
- SPECIAL SET.
9. USE SHORTCUT KEY : ON
10. RUN DEHUMIDIFICATION.
11. LANGUAGE : ENGLISH
12. USE PASSWORD : ON
13. CHANGE PASSWORD.
14. FACTORY RESET ! WARNING!
15. PREVIOUS PAGE.
JOYSTICK U/D/L/R TO SELECT.
- PASSWORD:0000
JOYSTICK U/D/L/R TO SELECT. PRESS F/F ENTER, F/N EXIT.

2Mega HD-SDI Speed Dome Camera User manual
37
■ TIME SCHEDULE SET
1. SCHEDULE FUNCTION SET
Set to operate the functions for various surveillance,
dehumidification, etc., in the designated time.
Select TIME SCHEDULE SET > SCHEDULE FUNCTION SET in order.
1. Setting PRESET, GROUP & SCHEDULE: Select
PRESET or GROUP by moving the Joystick up &
down in [FUNCTION]. Select the saved PRESET No.
or GROUP No. in [NO] and then set the operating
start time and the stop time for PRESET or GROUP
in [START~END].
2. Setting SWING SCHEDULE: Select SWING in [FUNCTION]. Select PAN or TILT in [NO] and then set
the operating start time and the stop time for SWING in [START~END].
3. Setting TOU and TRACE SCHEDULE: Select TOUR or TRACE in [FUNCTION]. Select ON or OFF in
[NO] and then set the operating start time and the stop time for TOUR or TRACE in [START~END].
4. Setting DEFOG SCHEDULE: Select DEFOG in [FUNCTION]. Select MANUAL or AUTO in [NO] and
then set the operating start time and the stop time for DEFOG in [START~END].
Move Menu:
Change Setting
Value:
※ Either PAN or TILT can be set for SWING.
※ [START~END] indicates the hour/minute and the time is set within 24 hours.
※ PRESET, GROUP, SWING, TOUR, TRACE, DEFOG can be overlapped in [FUNCTION]1~6.
Beware of malfunction when time is overlapped.
- TIME SCHEDULE SET.
1. SCHEDULE FUNCTION SET.
2. SCHEDULE BACKLIGHT SET.
3. RESUME TIME SET : OFF
4. HOME POSITION SET : OFF
5. TIME SET.
6. RETURN TO MAIN PAGE.
-TIME: 00:00:00 JOYSTICK U/D/L/R TO SELECT.
<< DOME CAMERA SETUP >>
- DOME DRIVER SET.
- CAMERA SET.
- SPECIAL SET. - TIME SCHEDULE SET.
- EXIT.
JOYSTICK U/D/L/R TO SELECT.
- SCHEDULE FUNCTION SET.
[FUNCTION] [NO] [STSRT~END]
1.PRESET OFF 00/00~00/00
2.GROUP OFF 00/00~00/00
3.SWING OFF 00/00~00/00
4.TOUR OFF 00/00~00/00
5.TRACE OFF 00/00~00/00
6.DEHUMIDITY OFF 00/00
7.LENS INIT OFF 00/00 8.PREVIOUS MENU PAGE.
JOYSTICK U/D/L/R TO SELECT.

2Mega HD-SDI Speed Dome Camera User manual
38
5. Setting DEHUMIDITY(=DEHUMIDIFICATION) SCHEDULE: When the operating start time is set with
DEHUMIDITY function 'ON', the fan & heater will work for 10 minutes on time.
6. Setting LENS INITIAL SCHEDULE: The zoom and the focus of LENS are initialized in the setting time.
- Set LENS INIT to 'ON' and then the operating time.
2. SCHEDULE BACKLIGHT SET
This function makes the set Back Light Compensation worked in the designated time.
- After adjusting to ‘ON’ one function to operate for a fixed time among WDR/HLC/BLC and then set the
operating start time & the stop time. When operating on SCHEDULE function and stopping, it operates
as set in the BACKLIGHT function of CAMERA SET.
3. RESUME TIME SET
It can select the delay time that the camera move to
the place alarming to observe where wrong signal is
sensed.
User can set it for 1sec to 180sec and operate GROUP,
TOUR, SWING again in a preset time. SWING,
GROUP, TOUR are operated in a preset time when
user stops the operating joystick in the case of not
connecting with the ALARM.
※ LENS INIT is for maintaining the lens in the constantly optimized condition when operating the
autofocus function under the optimization of the lens motor.
※ Use this function in the specific time when the dehumidification is needed.
※ Beware of malfunction in case the time setting of BACKLIGHT 1,2,3 is overlapped.
- TIME SCHEDULE SET.
1. SCHEDULE FUNCTION SET.
2. SCHEDULE BACKLIGHT SET.
3. RESUME TIME SET : OFF
4. HOME POSITION SET : OFF
5. TIME SET.
6. RETURN TO MAIN PAGE.
-TIME: 00:00:00 JOYSTICK U/D/L/R TO SELECT.
- SCHEDULE BACKLIGHT SET.
[BACKLIGHT] [NO] [STSRT~END]
1.WDR OFF 00/00~00/00
2.HLC OFF 00/00~00/00
3.BLC OFF 00/00~00/00
4.PREVIOUS MENU PAGE.
JOYSTICK U/D/L/R TO SELECT.
- TIME SCHEDULE SET.
1. SCHEDULE FUNCTION SET.
2. SCHEDULE BACKLIGHT SET.
3. RESUME TIME SET : OFF
4. HOME POSITION SET : OFF
5. TIME SET.
6. RETURN TO MAIN PAGE.
-TIME: 00:00:00 JOYSTICK U/D/L/R TO SELECT.

2Mega HD-SDI Speed Dome Camera User manual
39
4. HOME POSITION SET
This function shows that when the abnormal sign
happens in the execution of PRESET in SCHEDULE
FUNCTION SET, the camera can move to and surveil
Alarm position, and select the staying time. In
addition, even after it works manually or the PRESET
is run, the executed SCHEDULE PRESET operates
again after this setting time. The user can designate
the time from 3 to 180 seconds. When the setting
time passes, the PRESET of SCHEDULE
FUNCTION is run again.
5. TIME SET
This function can set the operating time and the time compensation.
- When moving the joystick right and left in '5.TIME SET', 'TIME SET' appears on the screen .
Move Menu
Change Setting Value
1). CHANGE TIME: Set the time in order of hour/minute/second.
This Icon is displayed in the screen when it is set Resume Time. When Resume time is set, it is not enable to set PRESET, GROUP, TOUR or SWING, If the user want to set the function, Resume time function have to be “OFF” then the user can set the desired function.
EX). When the PRESET of SCHEDULE FUNCTION SET is set to 00:00~23:59, the camera always
moves back to home position after the setting time in alarming or manual operation.
- TIME SCHEDULE SET.
1. SCHEDULE FUNCTION SET.
2. SCHEDULE BACKLIGHT SET.
3. RESUME TIME SET : OFF
4. HOME POSITION SET : OFF
5. TIME SET.
6. RETURN TO MAIN PAGE.
-TIME: 00:00:00 JOYSTICK U/D/L/R TO SELECT.
- TIME SCHEDULE SET.
1. SCHEDULE FUNCTION SET.
2. SCHEDULE BACKLIGHT SET.
3. RESUME TIME SET : OFF
4. HOME POSITION SET : OFF
5. TIME SET.
6. RETURN TO MAIN PAGE.
-TIME: 00:00:00 JOYSTICK U/D/L/R TO SELECT.
- TIME SET.
1.CHANGE TIME : 00/00/00
2. TIME COMPENSATION : 000S/24H JOYSTICK U/D/L/R TO SELECT. F/F SAVE, F/N NOT SAVE.

2Mega HD-SDI Speed Dome Camera User manual
40
2). TIME COMPENSATION: Compensate the time error when operating for a long time. You can set it in
seconds, even in positive numbers and negative numbers. (Based on 24 hours)
ex). 001S/24H → Compensate time one second faster a day(Max. -59 seconds)
-02S/24H → Compensate time two seconds later a day(Max. -60 seconds)
3.4.3. Set-up menu, Execute and delete by keyboard
1. Preset Setting
Save Max. 250 Preset points
① Preset set up
② Preset movement
Move designated preset position after press Preset No and P-SET button.
③ Each Preset movement
Press button for 3 sec then beep sound, it follows the steps as below.
④ All Preset Movement
Press button for 3 sec then beep sound, it follows the steps as below
※ As it’s not a network product, time can be changed a little when using it for a long time. After the
blackout or one to three-hour power-off, time can be compensated, but when operating again and using it in the long-time power-off, please be sure to check time.
- After completing the setting, please press F/F key for saving.
Ex) Delete No 5 Preset
(Holding 3 seconds)
(holding 3 seconds)

2Mega HD-SDI Speed Dome Camera User manual
41
2. Swing Setting
① Swing set
② Swing execute ③ Swing stop
(Pan execute) (Tilt execute)
3. Group setting
① Start Group setting mode
To set more preset, enter preset No and set same process.
Set a GROUP again from the first after ending with , if user wants to finish Preset input in one Group to input
another Group.
Set up duration time (1~127 sec) after movement
Set up movement speed (1~64sec)

2Mega HD-SDI Speed Dome Camera User manual
42
② Group execute ③ Group stop
4. Tour setting
① Tour set mode
② Tour execute/Stop ③ Tour remove
(Holding 3 seconds ~)

2Mega HD-SDI Speed Dome Camera User manual
43
5. Spiral Function
It is a function to observe objects automatically in the spiral direction.
Spiral On ② Spiral Off
* 26. “67+PRESET key” is also available in Shortcut key ‘On’ mode
6. PTZ Trace
It memorizes P/T/Z motions for 200sec then operates them at the same Trace.
① ▪ Trace execute/Stop ▪ Cancellation:
② Trace setting ③ Trace Cancellation
* 26. “66+PRESET key” is also available in Shortcut key ‘On’ mode

2Mega HD-SDI Speed Dome Camera User manual
44
3.4.4. OSD Message Description
1. PRESET Message
2. SWING Message
3. GROUP Message
CAM-001
SAVE PRESET:001
CAM-001
PRESET:001
CAM-001
CLEAR PRESET:001
Display SWING execute in
the screen.
CAM-001
SET GP:01 P001,T001,S64, CNT01
As the message in the time of
operation of GROUP SET,
“GP:01” means group No.1,
"P001" means Preset No1,
"T001"means duration time 1 sec
"S64" means movement speed 64,
"CNT01" means set-up preset points
(1 group is consist of 12 preset
points)
CAM-001
SAVE GROUP:01
As the message in the time of
completion of GROUP SET
CAM-001
[SWING] PRESET:001
It is displayed in the time of
operation of Group and preset
No.
CAM-001
[GROUP:01] PRESET:001
User can check that Preset
No.1 is saved as an appeared
message in Preset set.
It appears when moving to the
preset No.1.
It appears when user deletes
PRESET No.1. The message
‘All clear PRESET’ is displayed
when user delete PRESER data
all at once.

2Mega HD-SDI Speed Dome Camera User manual
45
4. TOUR Message
5. SPIRAL Message
CAM-001
Set Tour GP:01
CAM-001
CLEAR TOUR&GROUP.
It shows the data in GROUP and
TOUR saved was deleted.
As the message in the time of
operation of Tour set, “GP:01”
means GROUP No.1 and it shows
that GROUP No.1 was saved.
CAM-001
[TOUR&GP:01] PRESET:001
CAM-001
[RUN SPIRAL]
As the message in the time of
operation of Tour RUN, it will show
that moving to
PRESET No.1 in GRIOUP No.1.
-RUN SPIRAL : It is the Message in the time of operation
of SPIRAL SEQUENCE.
It observe all area of an object in three
dimensions that SPIRAL SEQUENCE
CAMERA moves to upper then down
slowly in a spiral direction.

2Mega HD-SDI Speed Dome Camera User manual
46
4. TROUBLE SHOOTING
CAUTION IN USE
• Make sure that turn the power switch off before installation.
• Avoid the places where is the high/low temperature and humid.
• Power supply must be min AC24V/1A for indoor (DMS-200) and min AC24V/1.5A for oudoor (DMS-200Se)
• Please be careful of that you connect respective wires without mismatching in installation.
• Supply to power sources after checking the state of insulation of cables which is connected to the exterior
• Please keep the product from a strong shock or vibration which is the cause of troubles.
Checking in under using
Check the product as following, if something is wrong in installation or using.
STATUS CHECK POINT TROUBLE SHOOTING
Power is not turned on. Does the electric power supply into
the product well? Check the POWER LED is “ON” at the BOTTOM COVER.
Does not work in Power On.
In operating, does the LED beside
POWER SW light on red?
Check the status of DATA CABLE, if it is not lit.
Check ADDRESS and DIP SW of communication speed
setting, if it is not lit.
Have you selected to RS485 or
RS422 right? Check the status of OPTION DIP SW No.2
Poor condition of PAN/TILT Have you turned the ending terminal
register ‘ON’?
Turn ‘ON’ the ending terminal register of the camera
which is set in farthest away.
A image is not clear or black
lines are displayed on the
screen.
Is the power adapter AC24V, 1.5A
over?
Exchange the adapter to for an adapter which has higher
current.
The message ‘P/T POSITION
ERROR’ is displayed
continuously.
Is the camera pressed by something
heavy or put it between others?
Check that a rotation of the camera’s body works
smoothly and remove a object that hinders the operation
of the camera.
The message ‘SORRY NOT
MEMORY’ is displayed
continuously.
Have you set the related functions? Please refer to the manual book and setting the function
you want.
ALARM RELAY is not
changed to ‘ON’ in the state
of being alarmed.
Have you set the ALARM RELAY ‘ON’
in the SET MODE? Make sure ALARM RELAY ‘ON’ in the SET MODE.
In abnormal condition, even if
the sensor is well.
Is it correct ALARM ACTIVE setting
status and the sensor is either opened
or closed?
Fit ALARM ACTIVE MODE setting with the connection of
the SENDOR in the SET MODE.(It means either sensor is
opened or closed)
PRESET point is different or
out of moving when the
ALARM occurs. The warning
does not work from the
keyboard when the ARLAM
occurs.
Have you set ALARM PRESET in
the SET MODE?
Check the status of the ALARM PRESET
setting in the SET MODE.
Have you used the exclusive control
keyboard?
The warning is only reacted to the
exclusive control keyboard.
YES. Make sure ALARM “ON” of the camera.

2Mega HD-SDI Speed Dome Camera User manual
47
5. Dimension
Unit : mm

2Mega HD-SDI Speed Dome Camera User manual
48
6. Configuration diagram
■ Usage
• CAMERA + MONITOR + CONTROLLER
• CAMERA + DVR + MONITOR
• Camera + DVR + Monitor + Controller
(Control camera OSD by DVR)
2Mega HD-SDI Speed Dome Camera User manual
49
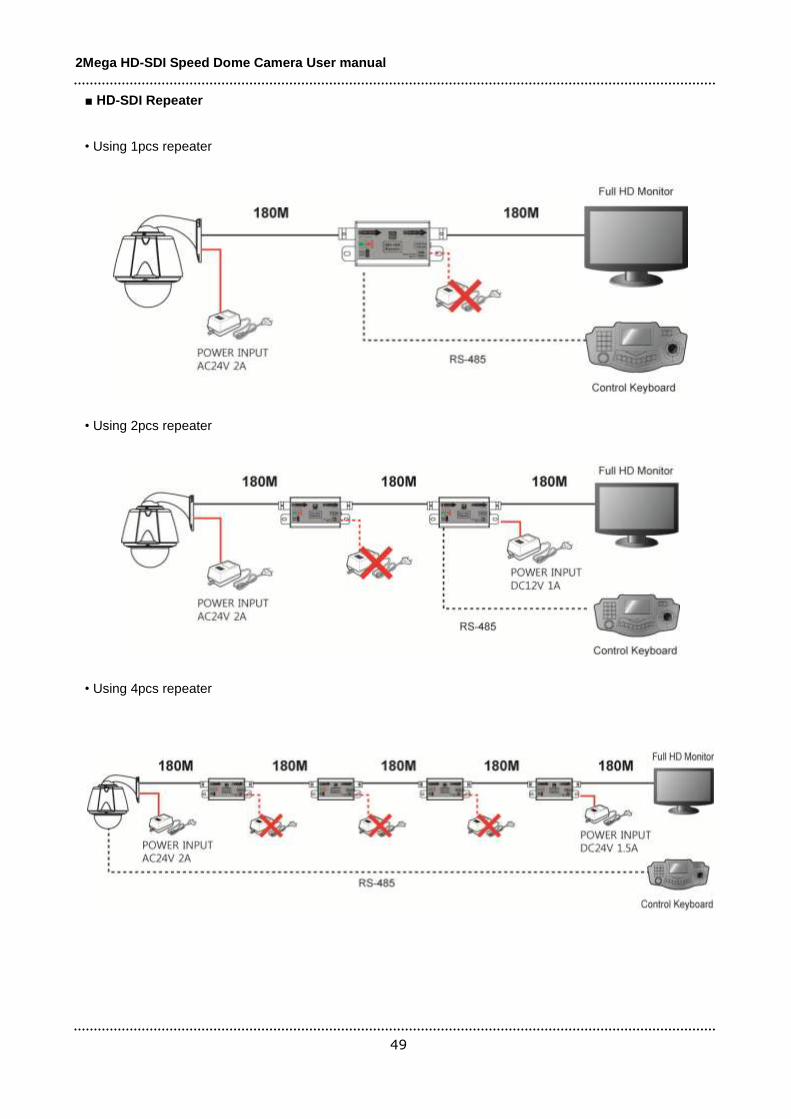
■ HD-SDI Repeater
• Using 1pcs repeater
• Using 2pcs repeater
• Using 4pcs repeater

2Mega HD-SDI Speed Dome Camera User manual
50
7. Specification
MODEL HD-SDI Speed Dome Camera
Video
Image Sensor 1/2.8” 2Mega Sony CMOS
Scan mode Progressive Scan
Total number of pixels 1952(H) x 1236(V), 2M Pixels
Number of active pixels 1944(H) x 1224(V), 2M Pixels
Resolution 1080p
Minimum illumination Min 0.0005Lux @ F1.6(50IRE)
with Max 60X Sens-up)
Video Output HD-SDI
S/N Ratio More than 52dB
Lens
Lens 4.45~89mm(20x), F1.6(Wide)/2.9(Tele)
Optical(20x), Digital Zoom(16x), Total Zoom (320x)
Focus mode Auto / Manual / Oneshot
Angle of view H:62.9°(Wide)~3.1°(Tele), V:43.32°(Wide)~2.34°(Tele)
Pan/ Tilt
Pan/Tilt angle 360° Endless / 92°
Pan Speed 0.1° ~ 240°/sec (64 Levels), Preset: 360°/sec
Preset Accuracy ±0.1°
Preset point 250 Presets
Alarm in/out 4 Inputs / 1 Relay Output
Function
Day & Night Day / Auto / Night
Back Light HLC / BLC / WDR
White Balance AUTO / Indoor/ Outdoor
AGC Low/Middle/Max/Off
DNR Low/Middle/Max/Off
Defog Off/Auto/Manual
Privacy / Motion 8 Zones / 1 Zones
Brightness Level Setting
Color Level Level Setting
Stibilize On/Off
Dehumidification Available
Environment
Operating Humidity 30 % ~ 90 % RH
Operating Temp. - 40°C to 50°
Electrical
Power Consumption Max 22W
Power Supply AC24V, 50/60Hz
Mechanical
Construction Aluminum body , Clear vandal bubble (PC)
Dimension 261.8(W)X324.6(H)mm
Weight About 5Kg (Camera Only)

2Mega HD-SDI Speed Dome Camera User manual
51

DISTRIBUTED BY


![HD-SDI 9 ãDVR · v3113a 2Ï ë hd-sdi 9 ãdvr ]> s*ü ` ` ?u £eÄ zinfinova v3113a 2Ï ëhd-sdi 9 ãdvr ,x ]> ¡ 0e /ß Ä v3113a 2Ï ëhd-sdi 9 ãdvr eîe hd-sdi p¬eó?](https://static.fdocuments.net/doc/165x107/6084aea7ef57d71cdc6b2742/hd-sdi-9-v3113a-2-hd-sdi-9-dvr-s-u-e-zinfinova-v3113a.jpg)