
Kasperryopenaccess.uoc.edu/webapps/o2/bitstream/10609/116967/8... · 2021. 6. 1. · DataDog memory...
60
Kasperry π Albert Sabaté Martínez Grau en Enginyeria de Tecnologies i Serveis de Telecomunicació (Sistemes Telemàtics) Félix Freitag 08 / 06 / 2020
Transcript of Kasperryopenaccess.uoc.edu/webapps/o2/bitstream/10609/116967/8... · 2021. 6. 1. · DataDog memory...

Kasperry π
Albert Sabaté Martínez
Grau en Enginyeria de Tecnologies i Serveis de Telecomunicació (Sistemes Telemàtics)
Félix Freitag
08 / 06 / 2020

1
This work is licensed under a Creative Commons
Attribution-ShareAlike 4.0 International License.

2
FINAL WORKSHEET
Work title: Kasperry π
Author name: Albert Sabaté Martínez
Consultant name: Félix Freitag
Deadline (mm/aaaa): 06/2020
Final Work Area: Aplicacions i sistemes distribuïts
University title: Grau en Enginyeria de Tecnologies i Serveis de
Telecomunicació (Sistemes Telemàtics)
Abstract (max 250 words):
The project Kasperry PI consists of deploying a Kubernetes cluster, which has four
Raspberry PI 4 (4Gb) and a development Raspberry PI to build the Docker images,
also it will be accessible world-wide.
Kasperry PI required research and development to be able to build the cluster and
make it work with public internet. The cluster contains monitoring, security and routing
using ingress route. In order to achieve this, DataDog was implemented for monitoring
and Traefik for doing the DNS routing. Security was a major concern and it has been
implemented in every part of the cluster.
Furthermore, Kasperry PI project covers how to implement a CI/CD environment
using Github and Github Actions, which is the new schema to work with distributed
applications in microservices.
Finally, as a working proof, a web page was developed with Gatsby containing
homemade “how to build a home production-ready Kubernetes cluster” tutorials.
All of these tutorials are available at https://kasperry.io/.
Keywords (between 4 and 8):
Kubernetes, Raspberry, Cluster, Kasperry, PI, Home Cluster

3
Table of contents
1. Introduction 7
1.1 Context and Justification of the Project 7
1.2 Work objectives 7
1.3 Approach and method followed 7
1.4 Work Planning 8
1.5 Brief summary of products obtained 8
2. Kasperry π 10
2.1 Big Picture 10
2.1.1 Raspberry PI 10
2.1.2 Docker 10
Containerd 11
2.1.3 Mesosphere 12
2.1.3.1 Apache Mesos 12
2.1.3.2 Marathon 13
2.1.4 Kubernetes 13
2.1.4.1 Rancher K3s 17
2.1.4.2 MicroK8s 17
2.1.4.3 Minikube 18
2.1.5 Helm 18
2.1.6 CNCF - Cloud Native Computing Foundation 18
2.2 Architecture 20
2.2.1 Planning & Schemas 20
2.2.2 Material and economic valuation 22
2.2.3 Network 23
2.2.4 Deployments 24
2.2.4.1 Tracing & Monitoring 24
2.2.4.2 Load Balancing & Routing 24
2.2.4.3 App 25
2.2.4.4 Database 25
2.3 Building process 26
2.3.1 Setup Raspberry PI 26
2.3.2 Setup Network and local domains 27
2.3.3 Deploying Kubernetes with the CNI (Flannel) 28
2.3.4 Deploy DataDog 29
2.3.5 Deploy Traefik 31

4
2.3.6 Deploy Private Docker Registry 34
2.3.7 Deploy Kasperry PI app 36
2.3.8 CI / CD 40
2.4 Results 43
3. Conclusions 47
4. Glossary 48
5. Bibliography 50
6. Annexes 51
5
Table of figures
■ Figure 1. Gantt timeline. It defines deadlines to ensure a time-quality work.
■ Figure 2. Docker Containers [4]
■ Figure 3. Containerd [17]
■ Figure 4. Mesos Architecture [14]
■ Figure 5. Kubernetes Diagram [5]
■ Figure 6. Rancher k3s Architecture Diagram [20]
■ Figure 7. CNCF Software Landscape [10]
■ Figure 8. Kasperry PI cluster Architecture
■ Figure 9. CNI table comparison [1]
■ Figure 10. My production-ready home cluster!
■ Figure 11. Devices Map Ubiquiti Control Panel
■ Figure 12. Devices List Ubiquiti Control Panel
■ Figure 13. Kubectl get nodes
■ Figure 14. Kubectl -n default get po
■ Figure 15. DataDog Logs Dashboard
■ Figure 16. DataDog Host metrics Dashboard
■ Figure 17. DataDog Kubernetes Dashboard
■ Figure 18. Checking if traefik is running properly
■ Figure 19. nodeSelector and toleration example
■ Figure 20. Traefik Dashboard
■ Figure 21. Ubiquiti Port Forwarding manager
■ Figure 22. Docker Registry IngressRoute
■ Figure 23. Docker Registry Middleware IPWhiteList
■ Figure 24. Persistent Volume & Persistent Volume Claim
■ Figure 25. Docker registry & registry UI running successfully
■ Figure 26. Screenshot of the UI made by Joxit
■ Figure 27. Kasperry PI Web Deployment
■ Figure 28. Kasperry PI Web Service
■ Figure 29. Middleware Traefik
■ Figure 30. Traefik IngressRoute notls
■ Figure 31. Traefik IngressRoute tls
■ Figure 32. Valid Let’s Encrypt Certificate
■ Figure 33. Kasperry PI (Under development) webpage
■ Figure 34. Github Actions Self-hosted runners
■ Figure 35. Github actions Secrets
■ Figure 36. Github actions pipeline
■ Figure 37. Github Action Passed Pipelines
■ Figure 38. Final cluster result (Hardware)
■ Figure 39. Github Actions workflows
■ Figure 40. DataDog memory usage by Kasperry PI pods

6
■ Figure 41. DataDog Kasperry PI running pods
■ Figure 42. Index of figure 41
■ Figure 43 & 44. Kasperry PI vs Splyt benchmark comparison

7
1. Introduction
1.1 Context and Justification of the Project
The idea of this project is to provide knowledge on building a home cluster. Once
built, the home cluster can be used to establish web pages or IoT projects. It is an
important topic because in this way, one can get a production-ready small cluster
with a low budget, which can be used to host services.
This is possible with low cost hardware thanks to the last revision of Raspberry PI
increasing memory RAM to 4Gb.
Previous models of the Raspberry PI did not have enough resources to build a
production-ready cluster. The solution to this is either to have a proper server and
spend a significant amount of money, or to just run a server without any kind of
deployment or scaling system.
With the new technologies, it seems feasible to build a home cluster with Raspberry
PI, and this project is going to prove it.
1.2 Work objectives
● Build a production-ready home cluster using Raspberry PI
● Enable monitoring using DataDog.
● Enable reverse routing and domain resolver for Kubernetes using Traefik.
● Deploy a web page using CI / CD solution provided by Github Actions.
● Publish the tutorials under the domain kasperry.io for the purpose of knowledge
sharing.
1.3 Approach and method followed
For the purpose of the research, content on the internet has been referred to in
order to obtain all the relevant information and knowledge regarding the project,

8
and therefore, to apply and execute accordingly. In particular, third party software
and popular opinions are referred to herein.
The important consideration is how to choose between various Open Source
Software and demonstrate how to build a cluster at home. This project aims to
ensure that everyone can build an affordable cluster without having to use the
costly cloud services provided by the big companies.
1.4 Work Planning
Figure 1. Gantt timeline. It defines deadlines to ensure a time-quality work.
1.5 Brief summary of products obtained
The project will be divided into 4 sections.
● Big Picture
All of the software used to build Kasperry PI will be explained. In addition, other
possible alternatives will be considered and set out briefly.
● Architecture
The architecture of Kasperry PI will be explained. As well as the reason for
choosing this approach.
● Building process
How Kasperry PI is built step by step, including the details and problems
encountered during the process, will be set out.

9
● Results
Validations, “why’s” of Kasperry PI.

10
2. Kasperry π
2.1 Big Picture
Before starting, it would be helpful to be aware of what is available on the market
in the year of 2020. Every year, or even every month, there is new software / tool
/ methodology ready to use. As a result, this big puzzle has to be described piece
by piece.
2.1.1 Raspberry PI
Raspberry PI 4 (4Gb) is the selected board to be used. With the latest release of
this board, the minimum requirements to deploy a cluster of Kubernetes have been
met. More importantly, this board is the most accepted and commonly used on the
market. The popularity and probable continuous development of the board makes
the project more meaningful in the long term. Last but not the least, it is very
affordable.
Despite the aforesaid, Kasperry PI is not limited to this board. In fact, in order to
build a home cluster, one can apply the knowledge shared in the tutorials to
whichever ARM board he deems appropriate, as long as the board chosen meets
the minimum requirements to deploy a cluster of Kubernetes.
2.1.2 Docker
“Docker is a set of platform as a service (PaaS) products that uses OS-level
virtualization to deliver software in packages called containers. Containers are
isolated from one another and bundle their own software, libraries and
configuration files; they can communicate with each other through well-defined
channels. All containers are run by a single operating system kernel and therefore
use fewer resources than virtual machines.” [11].
Figure 2 illustrates how Docker makes use of the architecture of the OS to deploy
containers by reusing it, shown as App A, App B… It is like creating OS layers.

11
Figure 2. Docker Containers [4]
Docker is compatible with ARM infrastructure.
● Containerd
“Containerd was designed to be used by Docker and Kubernetes as well as any
other container platform that wants to abstract away syscalls or OS specific
functionality to run containers on linux, windows, solaris, or other OSes.” [17].
Figure 3 illustrates the tasks of Containerd. It shows how the engine can run
syscalls to containers and vice versa.
Figure 3. Containerd [17]
12
2.1.3 Mesosphere
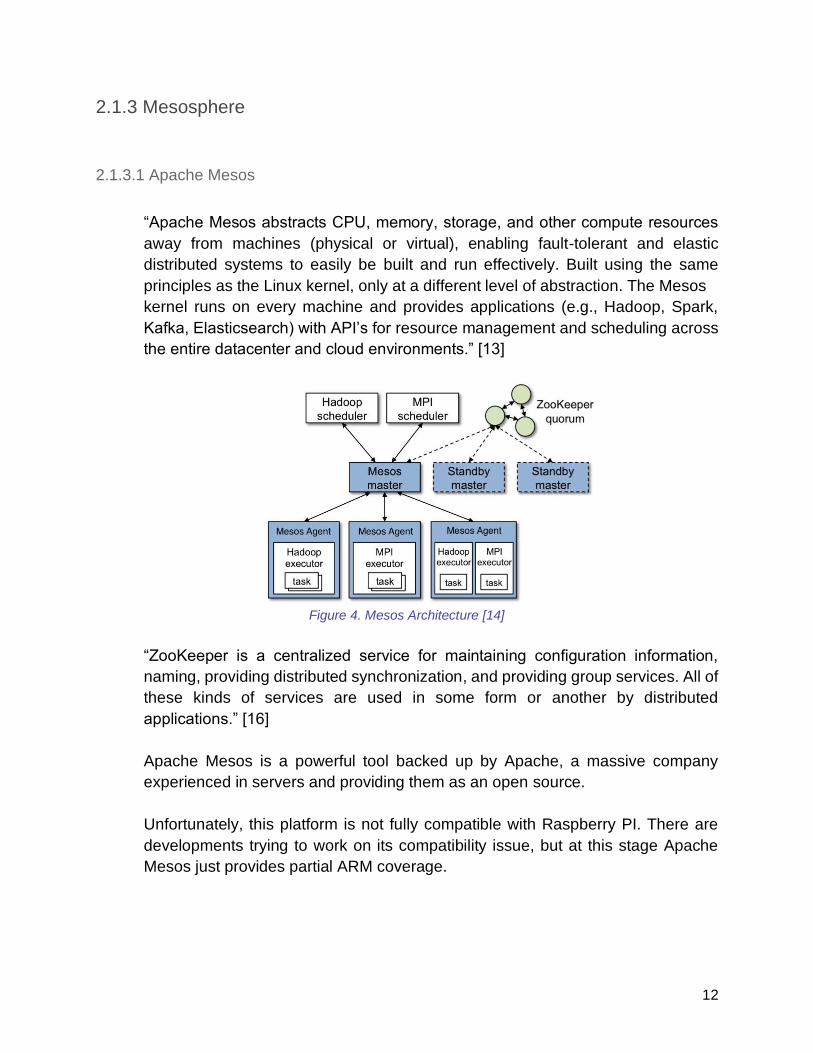
2.1.3.1 Apache Mesos
“Apache Mesos abstracts CPU, memory, storage, and other compute resources
away from machines (physical or virtual), enabling fault-tolerant and elastic
distributed systems to easily be built and run effectively. Built using the same
principles as the Linux kernel, only at a different level of abstraction. The Mesos
kernel runs on every machine and provides applications (e.g., Hadoop, Spark,
Kafka, Elasticsearch) with API’s for resource management and scheduling across
the entire datacenter and cloud environments.” [13]
Figure 4. Mesos Architecture [14]
“ZooKeeper is a centralized service for maintaining configuration information,
naming, providing distributed synchronization, and providing group services. All of
these kinds of services are used in some form or another by distributed
applications.” [16]
Apache Mesos is a powerful tool backed up by Apache, a massive company
experienced in servers and providing them as an open source.
Unfortunately, this platform is not fully compatible with Raspberry PI. There are
developments trying to work on its compatibility issue, but at this stage Apache
Mesos just provides partial ARM coverage.
13
2.1.3.2 Marathon
“Marathon is a framework (or meta framework) that can launch applications and
other frameworks. Marathon can also serve as a container orchestration platform
which can provide scaling and self-healing for containerized workloads. The figure
below shows the architecture of Mesos + Marathon.” [12]
“A container orchestration platform for Mesos and DC/OS” [15]
In other words, the combination of Apache Mesos + Marathon can be compared
with Kubernetes.
Unfortunately, Marathon is dependent on Apache Mesos which does not fully
support ARM.
2.1.4 Kubernetes
“Kubernetes is a portable, extensible, open-source platform for managing
containerized workloads and services, that facilitates both declarative
configuration and automation. It has a large, rapidly growing ecosystem.
Kubernetes services, support, and tools are widely available.
The name Kubernetes originates from Greek, meaning helmsman or pilot. Google
open-sourced the Kubernetes project in 2014. Kubernetes combines over 15 years
of Google’s experience running production workloads at scale with best-of-breed
ideas and practices from the community.” [5]
Figure 5 shows the diagram of a Kubernetes cluster with some of the components
and their relation. Important concepts and components of Kubernetes are as
follows:

14
Figure 5. Kubernetes Diagram [5]
● Api Server
This component is the management hub for the Kubernetes master node. It
facilitates communication between the various components, thereby maintaining
cluster health.
● Scheduler
This component places the workload on the appropriate node – in this case all
workload will be distributed accordingly to the feasible nodes.
● Controller Manager
This component ensures that the cluster’s desired state matches the current state
by scaling workload up and down.
● Proxy
The Kubernetes network proxy runs on each node. This reflects services as
defined in the Kubernetes API on each node and it can do simple TCP, UDP, and
SCTP stream forwarding or round robin TCP, UDP and SCTP forwarding across a
set of backends.
● Kubelet
This component receives pod specifications from the API Server and manages
pods running in the host.
● Etcd
This component stores configuration data which can be accessed by the
Kubernetes master’s API Server by simple HTTP or JSON API.

15
● Container Network Interface (CNI)
Kubernetes has adopted the Container Network Interface(CNI) specification for
managing network resources on a cluster.
● Deployments
These building blocks can be used to create and manage a group of pods.
Deployments can be used with a service tier for scaling horizontally or ensuring
availability.
● ReplicaSet
A ReplicaSet’s purpose is to maintain a stable set of replica Pods running at any
given time. As such, it is often used to guarantee the availability of a specified
number of identical Pods.
● DaemonSet
A DaemonSet ensures that all (or some) nodes run a copy of a Pod. As nodes are
added to the cluster, Pods are added to them. As nodes are removed from the
cluster, those Pods are garbage collected. Deleting a DaemonSet will clean up the
Pods it created.
● StatefulSet
Like a Deployment, a StatefulSet manages Pods that are based on an identical
container spec. Unlike a Deployment, a StatefulSet maintains a sticky identity for
each of their Pods. These pods are created from the same spec, but are not
interchangeable: each has a persistent identifier that it maintains across any
rescheduling.
● Pods
Kubernetes deploys and schedules containers in groups called pods. Containers
in a pod run on the same node and share resources such as filesystems, kernel
namespaces, and an IP address.
● Services
These are endpoints that can be addressed by name and can be connected to
pods using label selectors. The service will automatically round-robin requests
between pods. Kubernetes will set up a DNS server for the cluster that watches
for new services and allows them to be addressed by name. Services are the
“external face” of your container workload.

16
● Ingress
An API object that manages external access to the services in a cluster, typically
HTTP. Ingress may provide load balancing, SSL termination and name-based
virtual hosting.
● Namespaces
Namespaces are intended for use in environments with many users spreading
across multiple teams, or projects. It is recommended to start using namespaces
when the features they provide are needed.
● Labels
These are key-value pairs attached to objects. They can be used to search and
update multiple objects as a single set.
● Persistent Volume
A PersistentVolume (PV) is a piece of storage in the cluster that has been
provisioned by an administrator or dynamically provisioned using Storage Classes.
● Storage Classes
A StorageClass provides a way for administrators to describe the “classes” of
storage they offer. Different classes might map to quality-of-service levels, or to
backup policies, or to arbitrary policies determined by the cluster administrators.
Kubernetes itself is unopinionated about what classes represent. This concept is
sometimes called “profiles” in other storage systems.
● Secrets
Kubernetes Secrets allows storing and managing sensitive information, such as
passwords, OAuth tokens, and ssh keys. Storing confidential information in a
Secret is safer and more flexible than putting it verbatim in a Pod definition or in a
container image.
● ConfigMaps
A ConfigMap is an API object used to store non-confidential data in key-value
pairs. Pods can consume ConfigMaps as environment variables, command-line
arguments, or as configuration files in a volume.
A ConfigMap allows decoupling environment-specific configuration from your
container images so that your applications are easily portable.
Information obtained from sources [5 & 12 & 18]

17
2.1.4.1 Rancher K3s
“Certified Kubernetes distribution designed for production workloads in
unattended, resource-constrained, remote locations or inside IoT appliances.” [19]
Figure 6. Rancher k3s Architecture Diagram [20]
Rancher k3s is probably the most common way to deploy a Kubernetes cluster
using Raspberry PI. Previously it was the only way, given that Raspberry PI 1,2,3
do not have enough resources to run Kubernetes, nor does Raspberry PI 4 with
1Gb of RAM. Rancher k3s is a very good solution for a cluster with low capacity
nodes.
Another important point to consider is if the project needs to use k3s HA, an
external database is needed.
2.1.4.2 MicroK8s
“MicroK8s is a CNCF certified upstream Kubernetes deployment that runs entirely
on your workstation or edge device. Being a snap it runs all Kubernetes services
natively (i.e. no virtual machines) while packing the entire set of libraries and
binaries needed. Installation is limited by how fast you can download a couple of
hundred megabytes and the removal of MicroK8s leaves nothing behind.” [25]

18
MicroK8s is similar to k3s. In this case, it is backed by canonical instead of
Rancher, which means the community is who decides on the changes rather than
a private company.
2.1.4.3 Minikube
“Minikube is a tool that makes it easy to run Kubernetes locally. Minikube runs a
single-node Kubernetes cluster inside a Virtual Machine (VM) on your laptop for
users looking to try out Kubernetes or develop with it day-to-day.” [5]
Minikube is mainly used for development purposes.
2.1.5 Helm
“Helm helps you manage Kubernetes applications — Helm Charts help you define,
install, and upgrade even the most complex Kubernetes application.” [6]
In short, it can be said that Helm can be compared with apt, brew, snap, but it
applies to Kubernetes.
Helm became a graduated project in CNCF in April 2020.
2.1.6 CNCF - Cloud Native Computing Foundation
“Sustaining and integrating open source technologies to orchestrate containers as
part of a microservices architecture” [21]
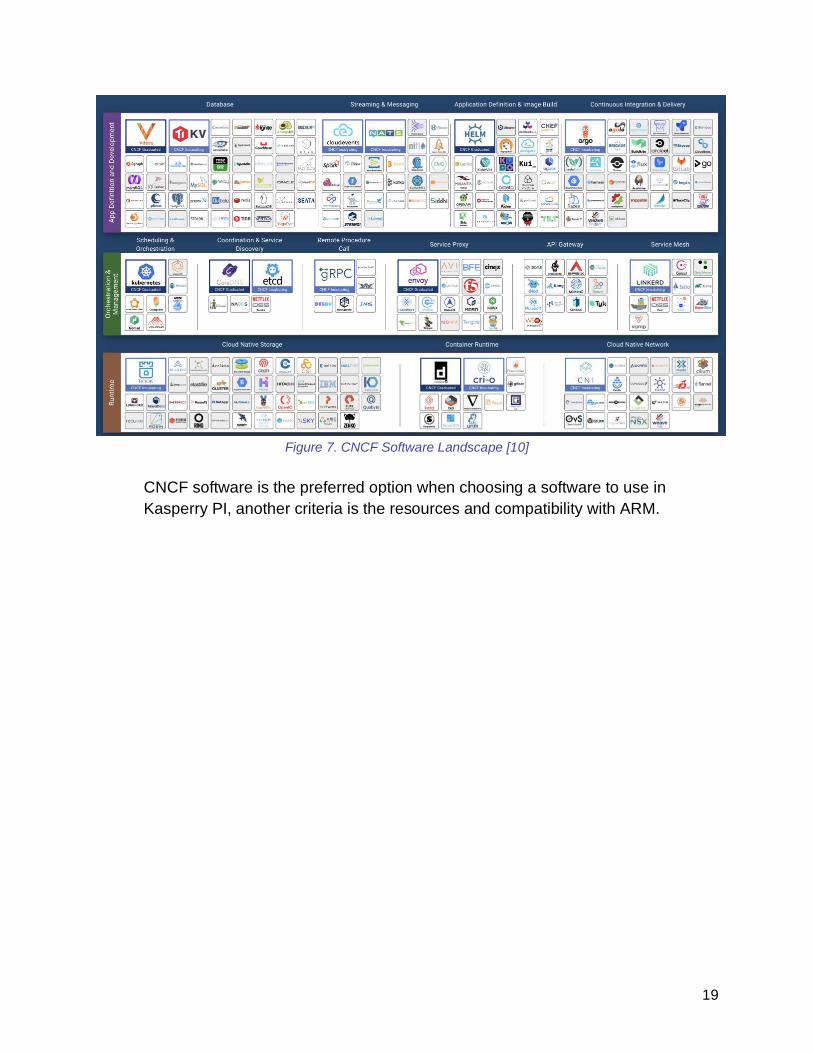
19
Figure 7. CNCF Software Landscape [10]
CNCF software is the preferred option when choosing a software to use in
Kasperry PI, another criteria is the resources and compatibility with ARM.

20
2.2 Architecture
2.2.1 Planning & Schemas
Before starting to plan anything, the requisites to run a Kubernetes cluster are set
out below.
● Ubuntu 16.04+
● Debian 9+
● CentOS 7
● Red Hat Enterprise Linux (RHEL) 7
● Fedora 25+
● HypriotOS v1.0.1+
● Container Linux (tested with 1800.6.0)
● 2 GB or more of RAM per machine (any less will leave little room for the apps)
● 2 CPUs or more
● Full network connectivity between all machines in the cluster (public or private
network is fine)
● Unique hostname, MAC address, and product_uuid for every node.
● Certain ports are open on the machines.
● Swap disabled. Swap MUST be disabled in order to make the kubelet work
properly.
This is everything one needs to know according to the official Kubernetes
documents. Raspberry PI 4 has enough resources to run Kubernetes according to
the above.
In addition, using a good router, firewall, etc. has to be considered. A breach in
one of the apps, or a bad port opened unintentionally can expose the network to
the world.
21
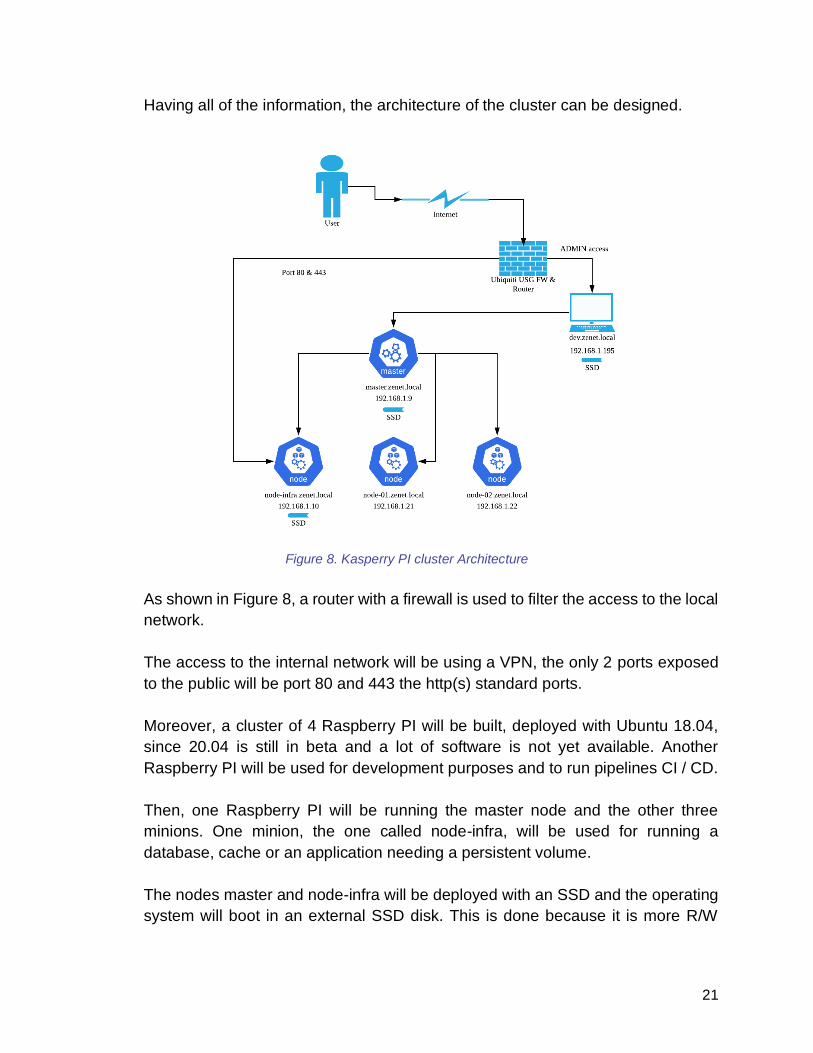
Having all of the information, the architecture of the cluster can be designed.
Figure 8. Kasperry PI cluster Architecture
As shown in Figure 8, a router with a firewall is used to filter the access to the local
network.
The access to the internal network will be using a VPN, the only 2 ports exposed
to the public will be port 80 and 443 the http(s) standard ports.
Moreover, a cluster of 4 Raspberry PI will be built, deployed with Ubuntu 18.04,
since 20.04 is still in beta and a lot of software is not yet available. Another
Raspberry PI will be used for development purposes and to run pipelines CI / CD.
Then, one Raspberry PI will be running the master node and the other three
minions. One minion, the one called node-infra, will be used for running a
database, cache or an application needing a persistent volume.
The nodes master and node-infra will be deployed with an SSD and the operating
system will boot in an external SSD disk. This is done because it is more R/W

22
efficient, and also, the SD cards are not designed for storing intensive R/W Data
and doing so can increase the probability of failure. [26]
Finally, the cluster has to be strongly secured by using TLS certificates.
2.2.2 Material and economic valuation
The material I will be using to build the cluster
Product Qty Price (S$)
Ubiquiti USG 1 206
Switch 8 Ports 1 189
Raspberry PI 4 (4Gb) with SD & power supply & heat sink
5 116
Ethernet Cable 6 6.90
Raspberry PI case with fan 5 12.50
External SSD Disk (500Gb) 2 159
Prices based in Singapore.
Total 1,396.90
* Price in euros it will be around ~900 EUR.
This is the price to have a basic production-ready Kubernetes cluster at home.
Kasperry PI hardware can be upgraded in the future, but it is a good starting point.
In the schema a SSD disk is also added to the dev Raspberry PI, which is
supposed to increase the CI / CD speed.
Another key factor is to have a good internet connection and asking your ISP for a
public IP address.

23
2.2.3 Network
For networking Calico has been chosen since judging from the reviews, it provides
a lot of good functionalities and security.
There are more options to consider for building the cluster network. Figure 9 shows
the information that was analyzed and explains the reason for discarding certain
options.
Figure 9. CNI table comparison [1]
As shown in the comparison chart, the best options are Calico or WeaveNet Crypt
if security is a concern.
Calico: The selected one. According to all comparisons, it is the most balanced
option which gives support to all Kubernetes functionalities.
WeaveNet Crypt: Using Raspberry PI, it cannot afford to encrypt all connections.
This part can be managed on the app side when necessary.
Canal: Similar to WeaveNet Crypt, it consumes too much resources. It also has
less community support.
Cilium: It consumes too much resources, it would not be a good fit for Raspberry
PI.

24
Flannel: Kubernetes recently stopped to support this CNI.
Kube-router & Romana: Discarded as there are better options to choose from.
2.2.4 Deployments
2.2.4.1 Tracing & Monitoring
Once the important aspect of the resource limitations running locally has been
discussed, a full monitoring and tracing solution does not seem to be possible as
there is a lot of data in the network. For example: deploying elasticsearch is known
to be really expensive in terms of resource consumption, so EFK (elastic, fluentd
and kibana) and ELK (elastic, logstash and kibana) which also does not give
support to ARM have to be discarded. Loki with grafana and prometheus was
evaluated as well. At first sight, it looked like a good fit for the Raspberry PI 4 since
it is more lightweight, but it does not provide tracing, so Jaeger will be an option.
As at the moment of this project, considering the resources available, the best
option is to use DataDog. DataDog offers monitoring, logging and tracing all in one
place. It does not need to run a heavy search engine like elasticsearch. Only an
agent has to be running giving a resources release for the cluster. Also, it is easier
to set up.
However, there are some disadvantages of DataDog: Code is partially public and
property of a private company. DataDog is really expensive. The logs are in a third
party database, which can be considered insecure.
2.2.4.2 Load Balancing & Routing
After evaluating envoy, istio and nginx, ARM support is not in the roadmap.
For this reason, Traefik has been chosen as a load balancing and routing app, a
CNCF project.
Furthermore, it provides support for ARM and has full Kubernetes compatibility.

25
Finally, an interesting feature of Traefik is auto SSL (https) using Let’s Encrypt.
2.2.4.3 App
Gatsby has been selected to develop the app. In this case, the decision is a matter
of personal preference. It is a ReactJS based framework which transpiles in html
and makes the web really efficient.
The code will be published with the Dockerfile, Kubernetes yaml and the
information to build the CI / CD.
2.2.4.4 Database
For this project, a database is not required although a deployment of PostgreSQL,
MariaDB & MongoDB was successful.
If these databases are to be deployed, official Docker images have to be used
instead of Bitnami images who are the ones supporting Helm installation. The
deployment has to be created manually.

26
2.3 Building process
2.3.1 Setup Raspberry PI
Figure 10. My production-ready home cluster!
Figure 10 is a presentation of how the project was built initially, including four
Raspberry PI for the cluster and the dev Raspberry PI. Kindly note there is one
extra Raspberry PI to manage the control panel of Ubiquiti and the WiFi AP which
is used for home environment. Thanks to Ubiquiti, creating a safe environment is
possible even if WiFi is shared with guests.
Also, three external SSD Disks (Samsung T5) are attached to the master node,
being the top Raspberry PI in the rack (red SSD), below of which is the node-infra
(blue SSD), and there is another blue SSD attached to the dev node.
Moreover, all the connections are over ethernet so as to provide the cluster with
more stability.
An important detail during the process was to add a heat sink to all the Raspberry
PI and a fan to the ones in the rack. It is a fairly cheap action yet an essential detail.

27
The CPU performance without adding these elements is considerably lower. The
small step makes the difference.
Finally tidying up the cables and the set-up is completed! (Just hardware).
2.3.2 Setup Network and local domains
Now it is time to set up networking, which is an interesting point. A DHCP server
provided by Ubiquiti will be used. For better support, a hostname resolver and
static IP addresses will be set to the Raspberry PI.
At first sight this part seems straightforward and simple, but linking everything with
the IP you want and making the hostname resolve the local domains properly
without any conflict has been fun time!
Figure 11. Devices Map Ubiquiti Control Panel

28
Figure 12. Devices List Ubiquiti Control Panel
Thankfully at the end it works well as shown in figures 11 and 12 above.
In the previous figures it can be seen the domain is zenet.local. The reason for
choosing this domain is that my nickname is AlberTenez, inverting Tenez is Zenet.
2.3.3 Deploying Kubernetes with the CNI (Flannel)
Now the hard part is done. Next step is to run some group of commands which can
be found in the tutorials:
1. https://www.kasperry.io/install-k8s-pkg
2. https://www.kasperry.io/setup-k8s-calico
Following the install and setup tutorials we get the following result.
Figure 13. Kubectl get nodes
Now services can be run in the cluster.

29
The cluster has node-infra. In this node only specific containers need to be
deployed. Therefore, this node will be labeled and tainted.
> kubectl label nodes node-infra.zenet.local worker=infra-master
> kubectl taint node node-infra.zenet.local workers=infra-master:NoSchedule
Tainting a node is the way to have control of what is deploying and where. Once
done, the containers are not going to be scheduled in the node-infra by default.
2.3.4 Deploy DataDog
To deploy DataDog, Helm will be used to simplify the deployment management.
So, the documentation of DataDog [24] will be referred to for the purpose of setting
the “values.yaml” according to the cluster architecture, basically specifying IP,
ports and API secrets.
> wget -O datadog-values.yaml
https://raw.githubusercontent.com/helm/charts/master/stable/datadog/values.yam
l
> # Edit the file adding the no_verify and api_key, also enabled kube metrics.
> helm install -f datadog-values.yaml datadog stable/datadog
There are still a lot of problems with the API certificates x.509, mainly SSL
identification problems. That is because Kubernetes is using self-signed
certificates and custom domains “.local”. As a possible solution, Datadog team
recommends setting the insecure flag to the api requests [23].
Following the recommendation, after setting this flag to “no_verify” the cluster
shows healthy status:
Figure 14. Kubectl -n default get po

30
Figures 15, 16 and 17 are images of the control panel of DataDog. The log
management page, system status and Kubernetes information are shown.
Figure 15. DataDog Logs Dashboard
Figure 16. DataDog Host metrics Dashboard

31
Figure 17. DataDog Kubernetes Dashboard
The above figures 15-17 provide a lot of information. However, there are still some
blank pieces. That is because DataDog provides a lot of solutions which has to be
checked one by one in order to make everything work smoothly.
Using DataDog relieves a lot of resources from the not-so-powerful Raspberry PI.
2.3.5 Deploy Traefik
To deploy Traefik, same as before, Helm will be used, since it is the recommended
way and the easiest one. [22]
> wget -O traefik-values.yaml
https://raw.githubusercontent.com/containous/traefik-helm-
chart/master/traefik/values.yaml
> helm repo add traefik https://containous.github.io/traefik-helm-chart
> helm repo update
> helm install --namespace=traefik -f traefik-values.yaml traefik traefik/traefik

32
In this case it is a bit different. Traefik does not use the official Helm repository.
That is because the “helm stable/traefik” is the version 1.7 of Traefik using Helm
v2 and the version that will be deployed has to be the newest one, v2.2 with Helm
v3. The reason is that the cluster is using the v3 of Helm.
Once everything is deployed:
Figure 18. Checking if traefik is running properly
The next step is to deploy Traefik to node-infra, which has a taint to disable
Kubernetes scheduling pods to the node.
To get the pod scheduled to node-infra, the config tolerations has to be set as
shown in Figure 19.
Figure 19. nodeSelector and toleration example
Now, node-infra is running Traefik and the ports have been exposed to the host.
Figure 20 shows the control panel of Traefik, proving that the service is working.

33
Figure 20. Traefik Dashboard
Access from outside the cluster is banned, since there is a firewall in the Ubiquiti
which filters all new incoming traffic.
On the other hand, the public access to the pod, Traefik which will be managing
the load balancer and routing, will be allowed.
Figure 21. Ubiquiti Port Forwarding manager

34
Figure 21 shows the ports of which the access has been granted to the public. For
security reasons no other ports will be exposed to the public.
Now everything is ready to deploy an app!
2.3.6 Deploy Private Docker Registry
This is the most straight forward service to deploy.
Helm package: https://github.com/Joxit/docker-registry-ui
> git clone https://github.com/Joxit/docker-registry-ui.git
> cd docker-registry-ui/examples/helm/docker-registry-ui
> # Edit values accordingly our needs
> helm install --namespace=registry registry .
Traefik IngressRoute has to be created to make the Docker registry exposed.
Figure 22 shows the IngressRoute yaml with all configurations needed.
Figure 22. Docker Registry IngressRoute

35
Also, a middleware has been created to make sure nobody has access to the
Docker registry without authorization. Figure 23 shows the yaml of this middleware
used to whitelist the IPs of the cluster.
Figure 23. Docker Registry Middleware IPWhiteList
Now the Docker registry is well protected.
Finally, to make the data more consistent the pod will be deployed to node-infra
using persistent Volume as shown in Figure 24. Also, tolerations in Helm
configuration is updated.
Figure 24. Persistent Volume & Persistent Volume Claim
And that’s it! Now Docker registry is already running.

36
Figure 25. Docker registry & registry UI running successfully
In addition, this repository provides a small UI which is shown in Figure 26.
Figure 26. Screenshot of the UI made by Joxit
2.3.7 Deploy Kasperry PI app
Deploying Gatsby will require making a custom Kubernetes yaml.
The code of the webpage is completely public and accessible at:
https://github.com/AlbertSabate/kasperry
To make it work using ARM, the Docker container needs to be built using the same
architecture.
The dev Raspberry PI will be used for all building processes.
The following commands are for creating the Docker image using the dev
Raspberry PI.
> git clone https://github.com/AlbertSabate/kasperry.git
> cd kasperry
> docker build -t registry.zenet.io/kasperry .
> docker push registry.zenet.io/kasperry
Now the new Docker image with the Gatsby website is available to the Docker
registry.

37
Figure 27 shows the deployment yaml needed to deploy Kasperry PI.
Figure 27. Kasperry PI Web Deployment
The deployment is responsible for deploying the new Docker image previously
created to the kubernetes cluster.
Figure 28. Kasperry PI Web Service
Figure 28 shows the Kubernetes service. It is the responsible to expose the
container to the cluster, and then Traefik will be the one exposing it to the public.

38
Figure 29. Middleware Traefik
This Middleware shown in figure 29 is an asset of Traefik. It is the way we have to
create a 301 permanent redirect from http to https.
Figure 30. Traefik IngressRoute notls
Figure 30 shows another asset of Traefik, IngressRoute. It is the way to link the
domain and the service and expose it to the public. This figure is the non-tls
version.
It can be seen that the middleware shown in figure 29 linked in figure 30 is doing
a force redirect to https.

39
Figure 31. Traefik IngressRoute tls
Related with figure 30, figure 31 is the TLS version. The TLS version contains the
data “certResolver”. certResolver is the credentials of the DNS provider, and then,
Traefik will use let’s encrypt to create automatically a valid SSL Certificate.
Figure 32. Valid Let’s Encrypt Certificate

40
Figure 33. Kasperry PI (Under development) webpage
Figure 32 and 33 shows the webpage properly certificated and successfully
running.
Finally, a Helm chart is created to be able to do automatic deployment easily.
> git clone https://github.com/AlbertSabate/kasperry.git
> # Configure helm/values.yaml
> helm install kasperry-web ./helm
2.3.8 CI / CD
The new Github Actions will be used to build the CI / CD. Since the webpage does
not have tests the pipeline will be defined to build the Docker image, push it to the
Docker registry and deploy Kubernetes using Helm.
Github Actions does not provide ARM compatibility, but it provides a self-hosting
option which can be executed in the dev Raspberry PI.
41
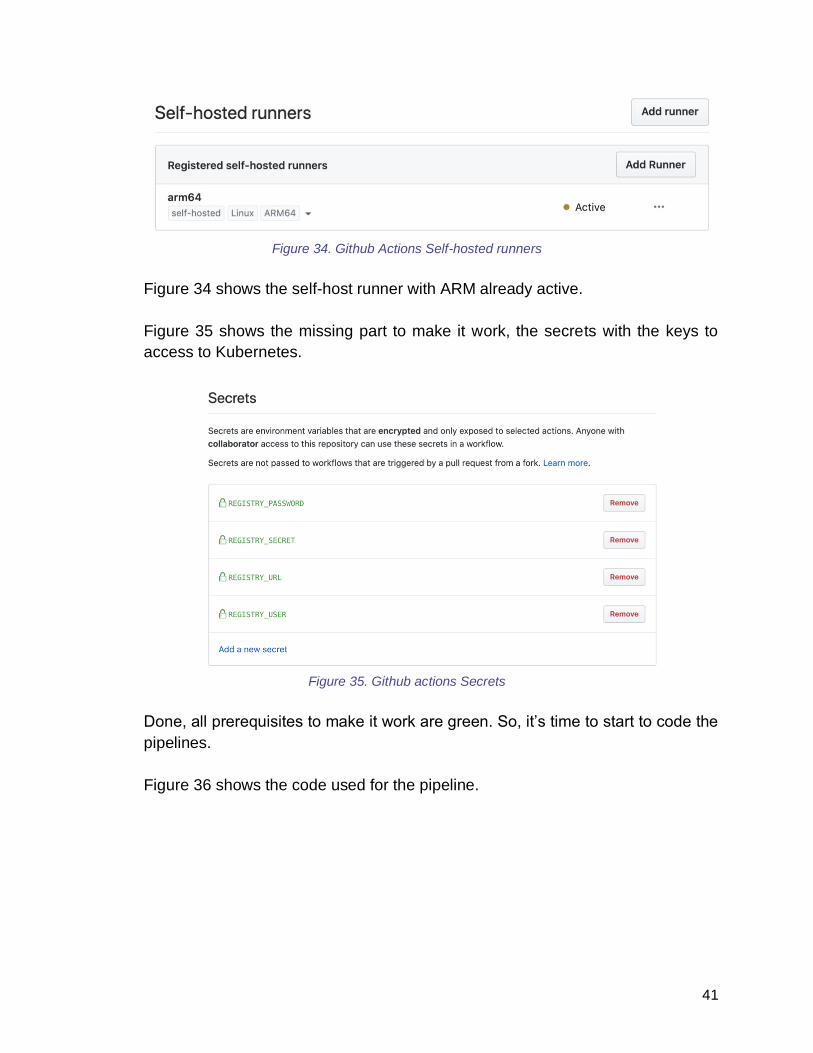
Figure 34. Github Actions Self-hosted runners
Figure 34 shows the self-host runner with ARM already active.
Figure 35 shows the missing part to make it work, the secrets with the keys to
access to Kubernetes.
Figure 35. Github actions Secrets
Done, all prerequisites to make it work are green. So, it’s time to start to code the
pipelines.
Figure 36 shows the code used for the pipeline.

42
Figure 36. Github actions pipeline
It is a really simple approach, running everything inside of the Raspberry PI. What
the pipeline is doing is checking out master, versioning, executing Docker build
and Helm upgrade.
Figure 37 shows how the pipeline is successfully executed.
Figure 37. Github Action Passed Pipelines
This CI / CD is really simple, but it proves a working solution on how to build a
pipeline with whatever resources we have.
43
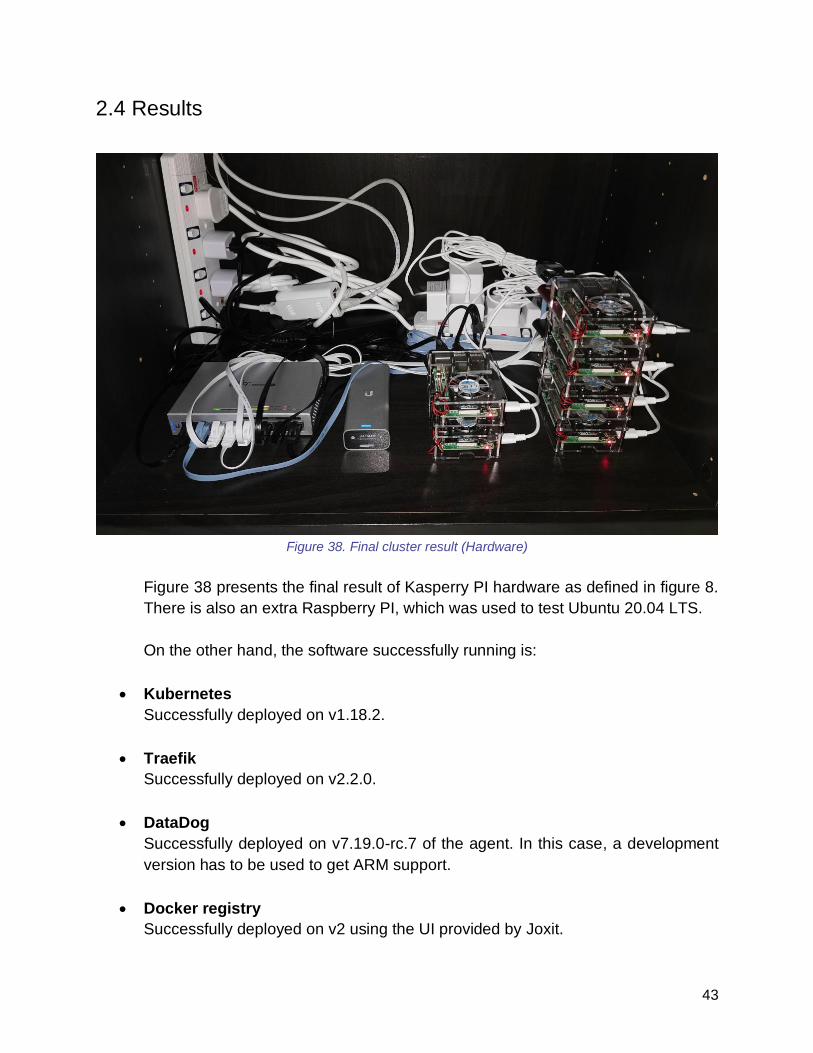
2.4 Results
Figure 38. Final cluster result (Hardware)
Figure 38 presents the final result of Kasperry PI hardware as defined in figure 8.
There is also an extra Raspberry PI, which was used to test Ubuntu 20.04 LTS.
On the other hand, the software successfully running is:
• Kubernetes
Successfully deployed on v1.18.2.
• Traefik
Successfully deployed on v2.2.0.
• DataDog
Successfully deployed on v7.19.0-rc.7 of the agent. In this case, a development
version has to be used to get ARM support.
• Docker registry
Successfully deployed on v2 using the UI provided by Joxit.

44
• Github Actions
Running the self-runner successfully in dev node. The workflow is:
- git push to master
- Triggers the Github Actions
- Executes the workflow shown in figure 37 which is running in the dev node with
access to Kubernetes cluster to apply the new deployment
Once hardware and software are settled, the CI / CD part has to be explained.
Figure 39. Github Actions workflows
Figure 39 shows how the pipeline runs successfully for each push to branch
master. When the pipeline fails, the workflow is stopped and the webpage does
not get deployed, in prevention of having an error on production.

45
Figure 40. DataDog memory usage by Kasperry PI pods
Figure 41. DataDog Kasperry PI running pods
Figure 42. Index of figure 41
Figures 40-42 shows DataDog graphs, aiming to prove the deployments happen
automatically and without downtime to the webpage. Figure 41 shows specifically
there are never less than 2 containers deployed.

46
Figure 43 & 44. Kasperry PI vs Splyt benchmark comparison
Figure 43 and 44 show a benchmark comparing Kasperry PI website with another
landing page deployed on GCloud. In both cases, the availability is 100%, and
concurrency is even better on Kasperry PI website. Kasperry PI is a very optimized
website where the data transferred is 0.99MB in comparison to the 17.46MB from
Splyt.
The only downside is that home internet is not as stable as the corporate one. And
most likely only one IP address will be assigned to the home internet.
Taking all into consideration, the final result I can give after building all of this
project is that Kasperry PI is a really good server candidate, small but ready for
production.

47
3. Conclusions
Building Kasperry PI needed a lot of knowledge on Kubernetes, networking and
webpage design. To obtain the knowledge a lot of reading and analyzing of
documents, articles, news, etc. are required. It develops into a deep learning
process on the most recent DevOps technology.
Furthermore, Kasperry PI web page contains a lot of tutorials to reproduce the
project and it is available worldwide. The webpage is publicly accessible, and it is
hosted on the cluster built following these tutorials.
Finally, Kasperry PI was successfully built. It has been running for more than
30days as of now, which proves that the objectives of this project have been
achieved.
Kasperry PI has been completed and it could demonstrate that building a
production-ready cluster is possible even at home, which is a meaningful
discovery.

48
4. Glossary
K8s or Kube: Short for Kubernetes.
DC/OS: Distributed Cloud Operating System, ie how mesos defines its OS.
CI/CD: In software engineering, CI/CD or CICD generally refers to the combined
practices of continuous integration and either continuous delivery or continuous
deployment.
ARM: A family of reduced instruction set computing architectures for computer
processors.
PaaS: Platform as a service.
OS: Operating system, eg windows, linux, mac, etc.
Cloud: Storing and accessing data and programs over the Internet instead of the
computer's hard drive.
Minion: Refers to a worker node.
Worker: Worker machines. It runs run containerized applications.
Master: A master node is a node which controls and manages a set of worker
nodes.
ISP: Internet Service Provider
SSD: Solid-state drive
YAML: A recursive acronym for "YAML Ain't Markup Language". A human-
readable data-serialization language. It is commonly used for configuration files
and in applications where data is being stored or transmitted.
Cluster: It is a set of loosely or tightly connected computers that work together so
that, in many respects, they can be viewed as a single system.
GCloud: It is referring Google Cloud.
IP address: An Internet Protocol address is a numerical label assigned to each
device connected to a computer network that uses the Internet Protocol for
communication.
TLS: Transport Layer Security, and its now-deprecated predecessor, Secure
Sockets Layer (SSL), are cryptographic protocols designed to provide
communications security over a computer network.
SSL: Secure Sockets Layer is a security technology that is commonly used to
secure server to browser transactions.
x.509: In cryptography, X.509 is a standard defining the format of public key
certificates.
DNS: The Domain Name System is a hierarchical and decentralized naming
system for computers, services, or other resources connected to the Internet or a
private network.
HTTP: The Hypertext Transfer Protocol is an application protocol for distributed,
collaborative, hypermedia information systems.

49
HTTPS: Hypertext Transfer Protocol Secure is an extension of the Hypertext
Transfer Protocol.
DevOps: DevOps is a set of practices that combines software development and
IT operations. It aims to shorten the systems development life cycle and provide
continuous delivery with high software quality.
RC: Release Candidate
Pipeline: In computing, a pipeline, also known as a data pipeline, is a set of data
processing elements connected in series, where the output of one element is the
input of the next one.
DHCP: The Dynamic Host Configuration Protocol is a network management
protocol used on Internet Protocol networks whereby a DHCP server dynamically
assigns an IP address and other network configuration parameters to each device
on a network so they can communicate with other IP networks.
VPN: A virtual private network extends a private network across a public network
and enables users to send and receive data across shared or public networks as
if their computing devices were directly connected to the private network.
MAC address: A media access control address is a unique identifier assigned to
a network interface controller for use as a network address in communications
within a network segment.
CPU: A central processing unit, also called a central processor or main processor,
is the electronic circuitry within a computer that executes instructions that make up
a computer program.
SWAP: SWAP memory is basically parts/pages of memory from the RAM which is
switching to use a file (or partition) dedicated on the hard-drive as memory space
instead.
RAM: Random-access memory is a form of computer memory that can be read
and changed in any order, typically used to store working data and machine code.
GB: The gigabyte is a multiple of the unit byte for digital information. The prefix
giga means 10⁹ in the International System of Units.
MB: The megabyte is a multiple of the unit byte for digital information. Its
recommended unit symbol is MB. The unit prefix mega is a multiplier of 1000000
in the International System of Units.
UUID: A universally unique identifier is a 128-bit number used to identify
information in computer systems.
Bit: The bit is a basic unit of information in information theory, computing, and
digital communications.
Byte: It is a unit of digital information that most commonly consists of eight bits.
IT: Information technology is the use of computers to store, retrieve, transmit, and
manipulate data or information.

50
5. Bibliography
1. https://itnext.io/benchmark-results-of-kubernetes-network-plugins-cni-over-
10gbit-s-network-36475925a560
2. https://docs.traefik.io/
3. https://docs.docker.com/
4. https://www.docker.com/resources/what-container
5. https://kubernetes.io/docs/home/
6. https://helm.sh/docs/
7. https://help.github.com/en/actions
8. https://docs.docker.com/registry/
9. https://joxit.dev/docker-registry-ui/
10. https://landscape.cncf.io/
11. https://en.wikipedia.org/wiki/Docker_(software)
12. https://platform9.com/blog/kubernetes-vs-mesos-marathon/
13. https://mesos.apache.org/
14. https://mesos.apache.org/documentation/latest/architecture/
15. https://mesosphere.github.io/marathon/
16. https://zookeeper.apache.org/
17. https://www.docker.com/blog/what-is-containerd-runtime/
18. https://ubuntu.com/kubernetes/docs/cni-overview
19. https://stackshare.io/stackups/k3s-vs-kubernetes
20. https://rancher.com/docs/k3s/latest/en/architecture/
21. https://github.com/cncf
22. https://github.com/helm/charts/tree/master/stable/traefik
23. https://github.com/DataDog/integrations-core/issues/2582
24. https://github.com/helm/charts/tree/master/stable/datadog
25. https://ubuntu.com/tutorials/install-a-local-kubernetes-with-microk8s#1-overview
26. https://fstoppers.com/poll/how-often-do-sd-cards-really-fail-289251

51
6. Annexes
● https://kasperry.io
● https://github.com/AlbertSabate/kasperry
Kasperry PI Project README

52
Kasperry PI Web page

53

54

55

56

57

58

59


![[Jaws tokyo] last minutes update- datadog](https://static.fdocuments.net/doc/165x107/587148ef1a28ab55588b60d5/jaws-tokyo-last-minutes-update-datadog.jpg)